e beadsmi presents: mini-duo bangle tu rial - red door...
TRANSCRIPT
Copyright 2015 NEDbeads All Rights Reserved Mini Duo Bangle Tutorial
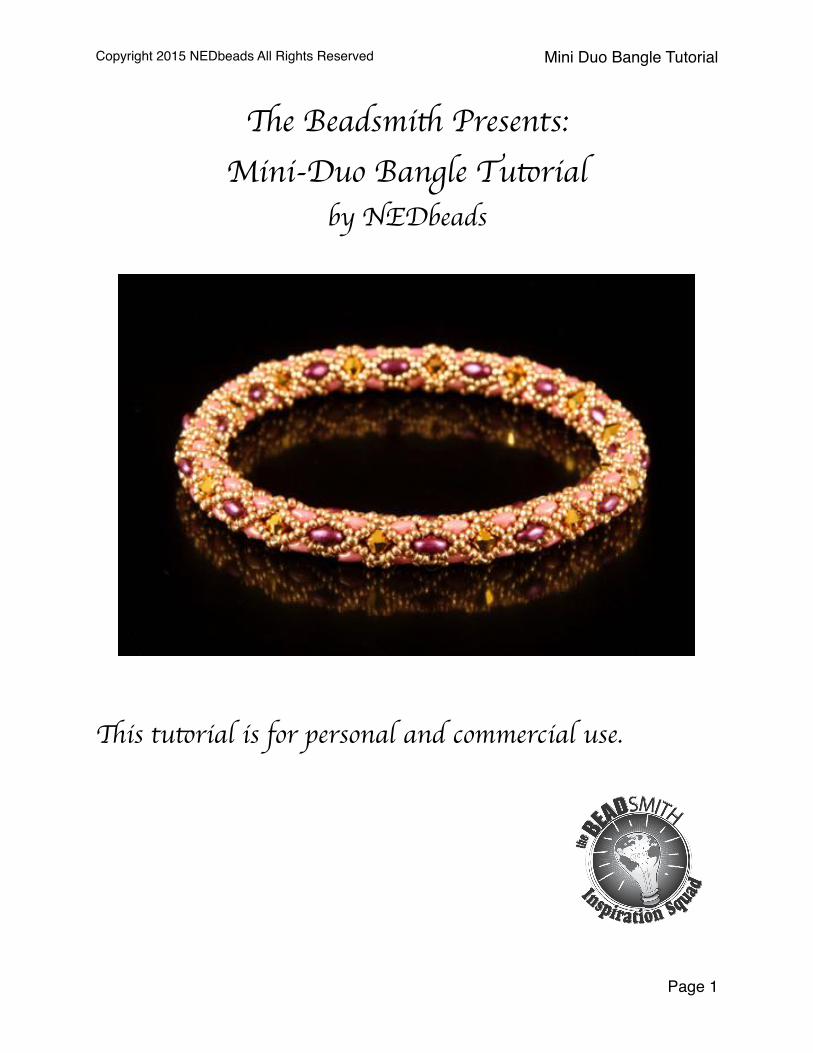
The Beadsmith Presents:Mini-Duo Bangle Tutorial
by NEDbeads
This tutorial is for personal and commercial use.
Page �1

Copyright 2015 NEDbeads All Rights Reserved Mini Duo Bangle Tutorial
LEGALESENEDbeads reserves all rights to this tutorial, written, photographic and/or illustrated. Distributed by the Beadsmith with permission from NEDbeads: this project may be distributed, and taught by customers of the Beadsmith. This document may not be altered in any way or form without the explicit written approval of Nancy Dale. Items made from this tutorial may be sold in limited quantities, but mass production is not allowed.
Page �2

Copyright 2015 NEDbeads All Rights Reserved Mini Duo Bangle Tutorial
Notes For the best curve, stitch this netted bangle with a medium tension rather than a very tight one; pull snugly but not so tightly that your work won’t wiggle. In order to keep a good tension on netting, it helps to remember that instead of pulling your thread up and away from the work, it will hold its shape better if you pull slightly down and around the work to the side. You may see thread showing on some of the steps despite a good tension, but the next step will align the beads and hide the threads. If your Superduos tend to pop out or fall in a little while weaving, simply roll the work between your fingers to even them out again. To measure your hand for your bangle size, wrap a tape measure around the very widest part of your cupped hand and lowest thumb joint. The amounts of materials in the materials list result in a 8.5” inside diameter bangle using my tension. Everyone’s tension is slightly different, so yours may be a bit larger or smaller. To size the bangle, you will need to add or subtract one full section, which consists of one row of crystals, a row of Mini Duos, a row of SuperDuos and another row of Mini Duos.
Happy Beading! Nancy
Page �3
Copyright 2015 NEDbeads All Rights Reserved Mini Duo Bangle Tutorial
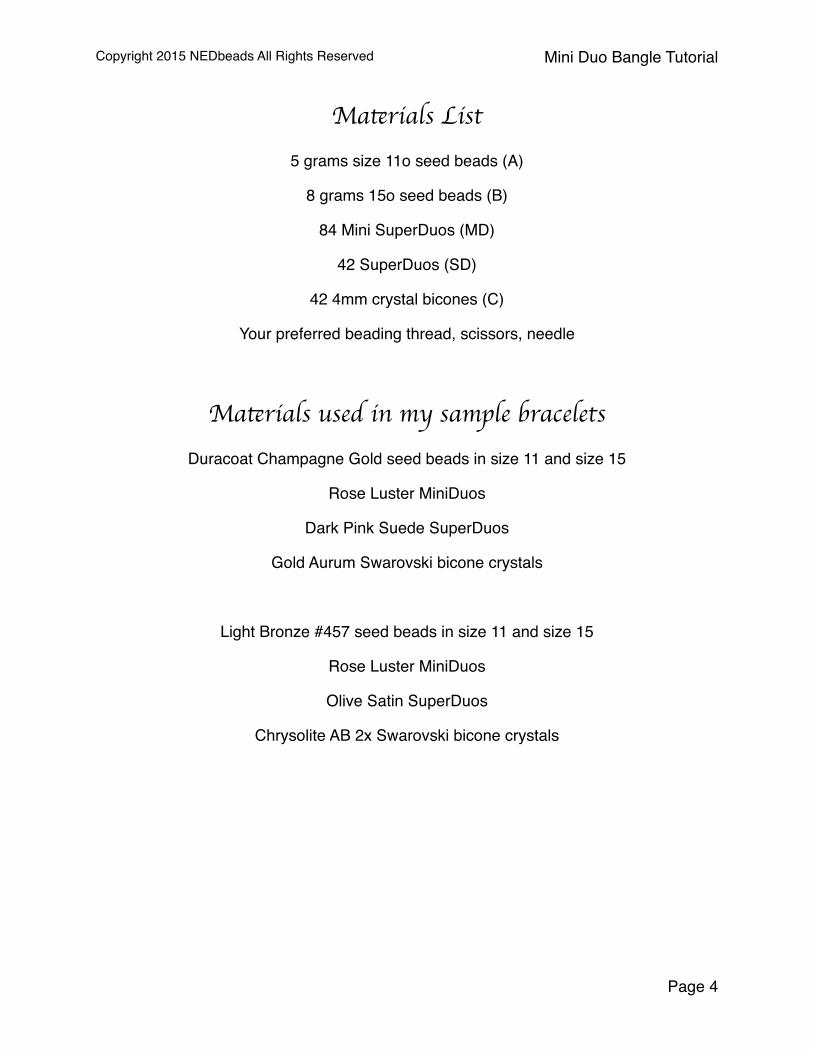
Materials List5 grams size 11o seed beads (A)
8 grams 15o seed beads (B)
84 Mini SuperDuos (MD)
42 SuperDuos (SD)
42 4mm crystal bicones (C)
Your preferred beading thread, scissors, needle
Materials used in my sample braceletsDuracoat Champagne Gold seed beads in size 11 and size 15
Rose Luster MiniDuos
Dark Pink Suede SuperDuos
Gold Aurum Swarovski bicone crystals
Light Bronze #457 seed beads in size 11 and size 15
Rose Luster MiniDuos
Olive Satin SuperDuos
Chrysolite AB 2x Swarovski bicone crystals
Page �4

Copyright 2015 NEDbeads All Rights Reserved Mini Duo Bangle Tutorial
Making the bangle1) Thread a needle with the longest thread you’re
comfortable using. Pick up C and A three times and go through all beads again to form a circle and tie the threads in a surgeon’s knot. Go through the first C and A again.
2) Pick up three B, A, three B. Skip over the next C in the circle and pass through the next A.
3) Repeat twice to add a seven bead net over each C.
4) Step up by passing through the first five beads of your first net (you will exit the B right after the A).
Page �5

Copyright 2015 NEDbeads All Rights Reserved Mini Duo Bangle Tutorial
5) Pick up one MD and pass through the middle B, A, B of the next net. Pull snug to cup your work. Repeat to add two more MD between your nets; on the last stitch, pass ONLY through the B and A - this is your step up to the next round.
6) Pick up one B and pass through the TOP hole of the next MD.
7) Pick up one B and pass through the middle A of your next net.
Page �6

Copyright 2015 NEDbeads All Rights Reserved Mini Duo Bangle Tutorial
8) Repeat Steps 6 - 7 around your rope. Step up by passing through the first B added in this round.
9) Pick up two B, A, two B. Skip over the top of the MD and pass through the next B from the previous round, the middle A, and the next B from the previous round.
10) Repeat around the rope to add a five bead net over each MD. Step up by passing through the first four beads added in your round (you will exit the B right after the A).
Page �7

Copyright 2015 NEDbeads All Rights Reserved Mini Duo Bangle Tutorial
11) Pick up one SD, and pass through the middle B, A, B of the next net. Repeat to add two more SD between your nets; on the last stitch, pass ONLY through the B and A to step up for the next round.
12) Pick up one B and pass through the TOP hole of the next SD.
13) Pick up one B and pass through the middle A of the next net.
Page �8

Copyright 2015 NEDbeads All Rights Reserved Mini Duo Bangle Tutorial
14) Repeat Steps 12 - 13 around your rope. Step up by passing through the first B added in this round.
15) Pick up two B, A, two B. Skip over the top of the SD and pass through the next B from the previous round, the middle A, and the next B from the previous round.
16) Repeat around the rope to add a five bead net over each SD. Step up by passing through the first four beads added in your round (you will exit the B right after the A). Your nets may fall down toward the outside of the rope, as in the first photo, and look a little too small, as the netting is tighter over the SD than it is over the MDs. This is normal and you can nudge them up to the top with your fingers as you stitch the next round.
Page �9

Copyright 2015 NEDbeads All Rights Reserved Mini Duo Bangle Tutorial
17) Repeat Steps 5 - 9 to add another row of MDs, one row of Bs between each MD and A, and 5 bead netting over the MDs. When you step up, only pass through the first three beads added, to exit the A.
18) Pick up one C and pass through the A of the next net. Repeat twice. Reinforce this by passing through all the beads again. Exit from an A.
19) Repeat Steps 2 - 18 for the desired length of your bracelet. Make sure that you end your length at the second row of MDs of a section - stop weaving this round
Page �10

Copyright 2015 NEDbeads All Rights Reserved Mini Duo Bangle Tutorial
when you’ve completed Step 8 (adding a row of B’s between the top hole of the MDs and the As). My bracelet, which measures 8.5” inner diameter, had a total of 14 rows of crystals/SuperDuos and 28 rows of MiniDuos.
20) To connect the ends together, arrange your bracelet on your bead mat so that the Cs on the tail end of your rope fall between the MDs of the working end of the rope. Make sure that your bracelet isn’t twisted and you can see an unbroken line of MDs along the side.
21) Your thread is exiting a B. Pick up two B and pass through the corresponding A on the tail end of your rope.
22) Rotate your work one third of a turn. Pick up two B and pass through the next B and middle A of the last round on the working end. Pass through the next B on the working end.
23) Repeat Steps 21 - 22 twice more to complete the nets around your rope. Tie off and end your threads. Enjoy your bracelet!
Page �11