dynamic forms user manual - pellissippi state · home page navigation ... captured on your forms...
TRANSCRIPT
Page 1
Forms Administrators Dynamic Forms User Manual Last Updated: 9/8/2015

Page 2
Table of Contents Table of Contents ......................................................................................................... 2
Overview .................................................................................................................... .. 3
System Requirements ................................................................................................ . 3
Changing a Profile ....................................................................................................... 4
Home Page Navigation .............................................................................................. . 5
My Forms .................................................................................................................... 6
Forms Search ............................................................................................................ . 7
Retrieving Your Data .................................................................................................. 9
Multi-Signature Queue ............................................................................................... 9
Pending Queue .......................................................................................................... 9
Processed Queue ...................................................................................................... 9
Archived Queue ......................................................................................................... 9
Archiving Forms ......................................................................................................... 11 Exporting to Excel ...................................................................................................... 12

Page 3
Overview Dynamic Forms (https://dynamicforms.ngwebsolutions.com) is a fully hosted, powerful web application which also allows non-technical users to take any paper-based form and quickly build a sophisticated interactive form that can be published to the internet. Dynamic Forms provides single and multiple electronic signature functionality along with a basic workflow feature to enable document processing. Its data/image exchange feature allows users to transfer the data captured on your forms into our local imaging system, such as BDMS in an automated fashion. Dynamic Forms is an affordable way to realize tremendous savings at your institution by decreasing print, postage, processing and reprocessing costs. Its feature-rich process also allows clients to portray a more sophisticated, technology focused presence on the web for their institution.
System Requirements To use Dynamic Forms, users need only use one of the four main web browsers, including Microsoft Internet Explorer, Firefox, Safari and Chrome. Next Gen will support versions of these browsers until they are two or three versions old. Also, Next Gen will do a prudent job of keeping track of the latest Beta and New releases of these browsers; however, we will have a specific schedule as to when certain browsers are supported. Also, for users to view their Dynamic Forms in a PDF format, they will need Adobe Acrobat Reader 6.0 or higher.

Page 4
Changing a Profile Once the user is logged in, there is an Update Profile link located in the top right corner of the screen.
For all Pellissippi State Form users there is only one type of information that can be changed: The Default Institution. This is for users assigned to multiple department forms. To modify your profile information, select the tab that corresponds to the information you wish to change. Add or change the information then click the “Save Changes” button.
Page 5
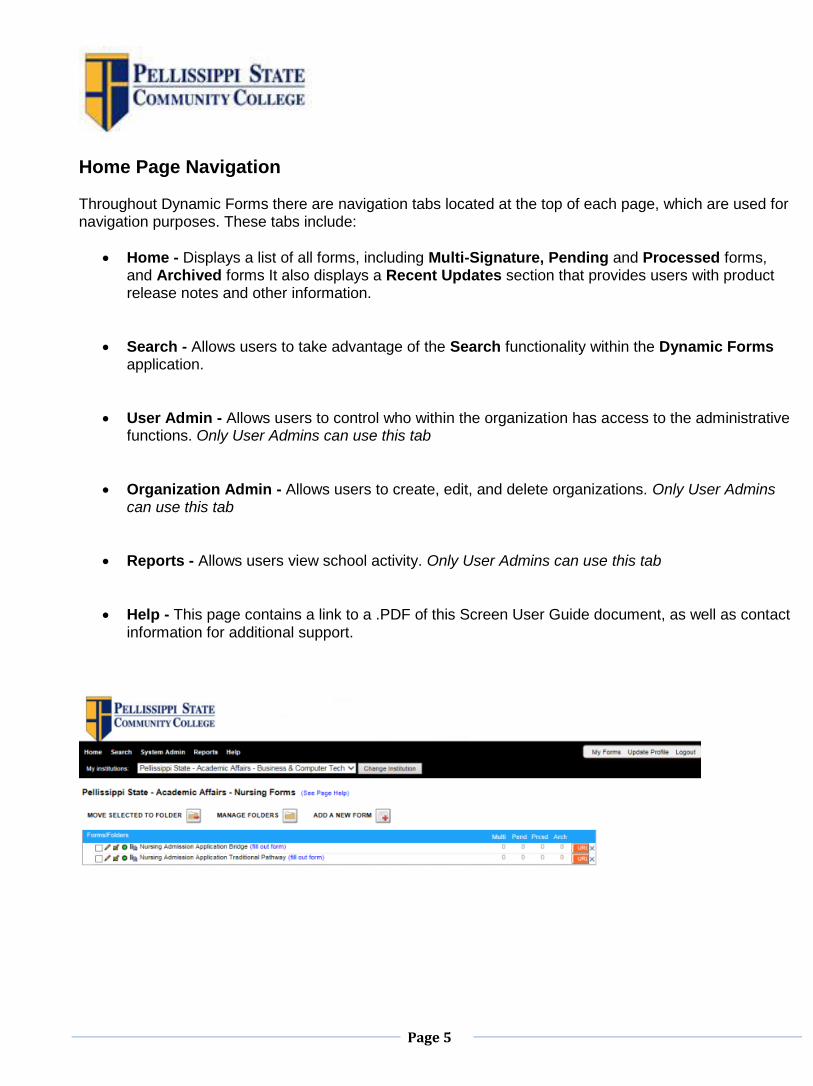
Home Page Navigation Throughout Dynamic Forms there are navigation tabs located at the top of each page, which are used for navigation purposes. These tabs include:
Home - Displays a list of all forms, including Multi-Signature, Pending and Processed forms, and Archived forms It also displays a Recent Updates section that provides users with product release notes and other information.
Search - Allows users to take advantage of the Search functionality within the Dynamic Forms application.
User Admin - Allows users to control who within the organization has access to the administrative functions. Only User Admins can use this tab
Organization Admin - Allows users to create, edit, and delete organizations. Only User Admins can use this tab
Reports - Allows users view school activity. Only User Admins can use this tab
Help - This page contains a link to a .PDF of this Screen User Guide document, as well as contact information for additional support.

Page 6
My Forms
There are additional options in the top right of your screen. Update Profile discussed in Page 4 above and Logout will do just that. If you click on My Forms, you will then be taken to the following screen.
This is very handy should you also be submitting forms as part of your role. Pending Forms will allow you to see a list of forms that are awaiting your signature, for example. Perhaps you have been listed as a co-signer by a student, you will see that form listed. In addition, Forms History will show you all forms that you have previously submitted. To return to the admin pages, simply click on:

Page 7
Forms Search The Form Search tab is used to search for specific records. This allows users to choose one or more forms to search, a field within the form(s) to search, and a specific value on which to search. To search your forms database, simply select from the drop down list any form(s) you want to include in
your search and click You can select more than one form by using your ctrl key and your mouse. You can also select all forms by simply clicking on Select All
Then, select the field you would like to search and click . You may notice that the list of available fields is limited to only those fields associated with the form(s) you selected in the previous step. Field names from list of available fields to choose from might be confusing, this is due to naming conventions used during the Form Design process.
Next, simply select the field you wish to search by. Finally, enter the value, (use * for any value) for which you wish to
search and click . Dynamic Forms will return the search results in the bottom half of the window.
Page 8
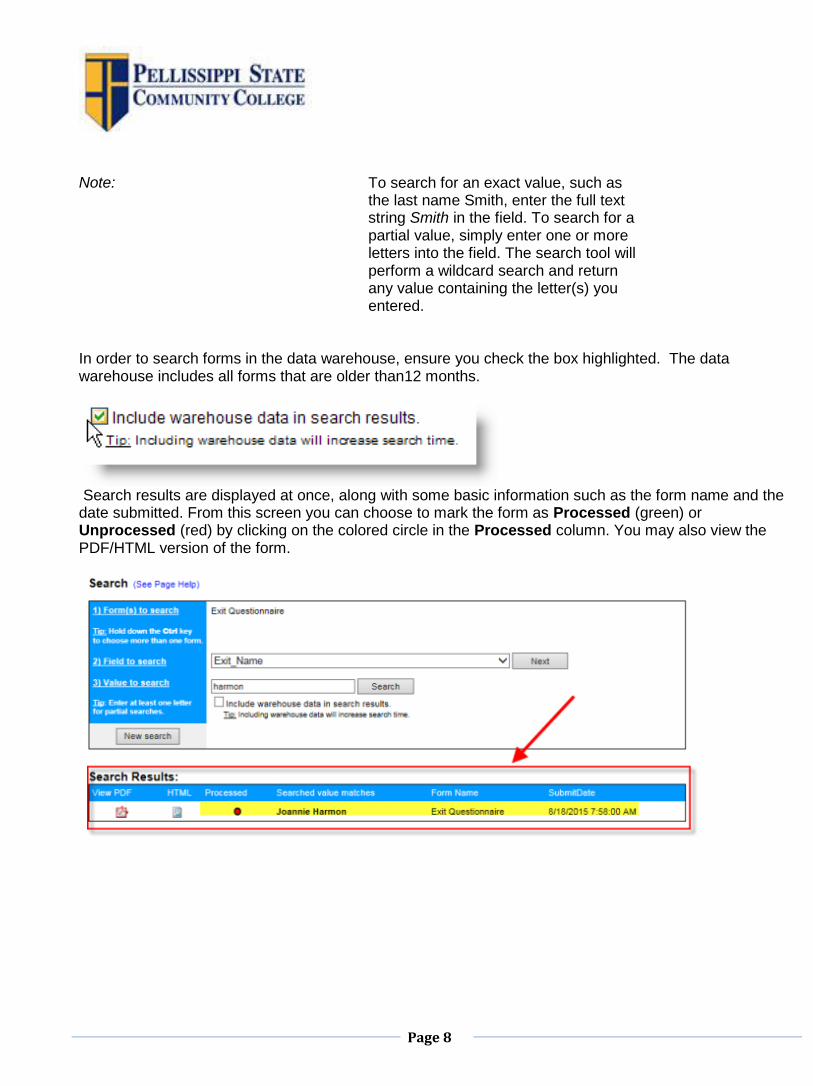
In order to search forms in the data warehouse, ensure you check the box highlighted. The data warehouse includes all forms that are older than12 months.
Search results are displayed at once, along with some basic information such as the form name and the date submitted. From this screen you can choose to mark the form as Processed (green) or Unprocessed (red) by clicking on the colored circle in the Processed column. You may also view the PDF/HTML version of the form.
Note: To search for an exact value, such as the last name Smith, enter the full text string Smith in the field. To search for a partial value, simply enter one or more letters into the field. The search tool will perform a wildcard search and return any value containing the letter(s) you entered.

Page 9
Retrieving Your Data The Home tab displays a list of all of the forms. Each form contains three columns, Multi-Signature, Pending, Processed, and Archived.
Multi-Signature Queue Forms with multiple-signatures but no school section If a student has submitted their section of the form but the parent has not, that form will appear in the Multi-Signature queue. Once the parent completes and signs the form, the form will go to the pending queue. Forms with multiple-signatures and a school section If a student has submitted their section of the form but the parent has not, that form will appear in the Multi-Signature queue. If both student and parent have completed their sections of the form, but the form is still waiting for the school section to be completed, that form will appear in the Multi-Signature queue. Once the school section has been completed, the form will move to the processed queue.
Pending Queue Forms with a single electronic signature will appear in this queue once they have been submitted. Multiple signature forms without a school section will also appear in this queue once all signatures have been completed on the form
Processed Queue Forms with a School use only section will automatically move to this queue once the school use only section has been completed. Forms without a School use only section must be moved manually to this queue.
Archived Queue Forms are manually moved to the Archived Queue. Click here for more details

Page 10
To view the data for pending forms, click on the number link located in the Pending column.
Page 11
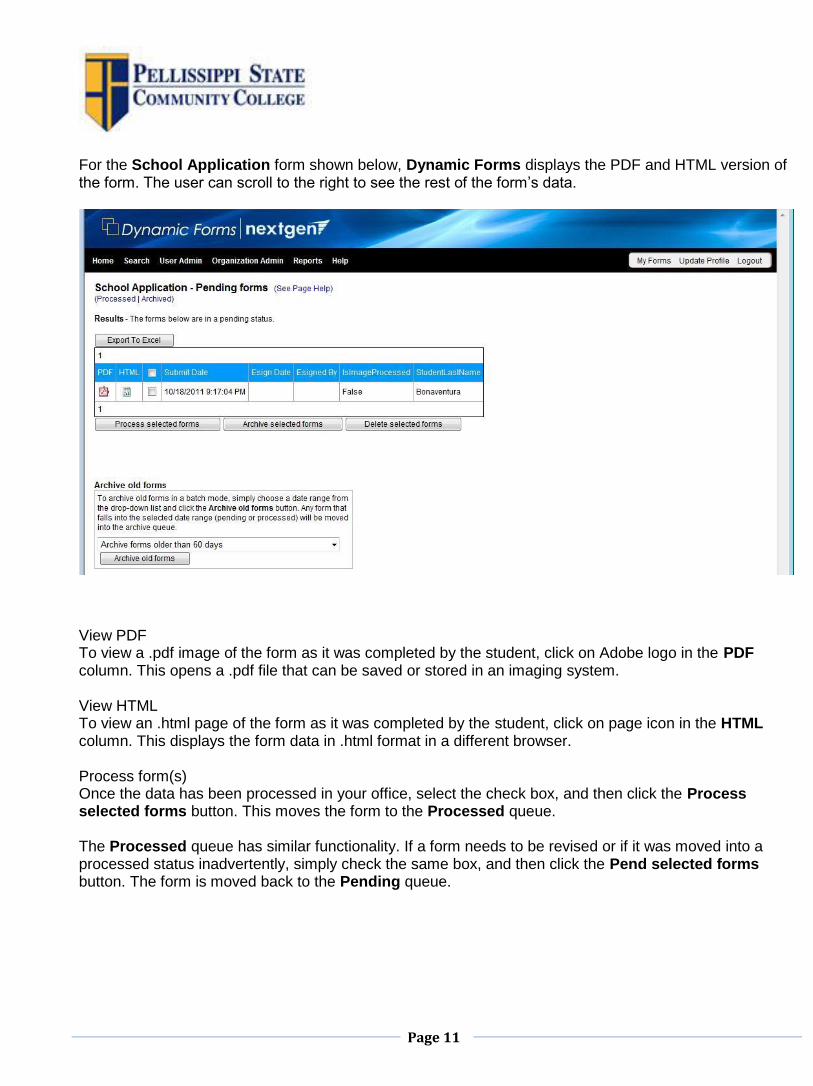
For the School Application form shown below, Dynamic Forms displays the PDF and HTML version of the form. The user can scroll to the right to see the rest of the form’s data.
View PDF To view a .pdf image of the form as it was completed by the student, click on Adobe logo in the PDF column. This opens a .pdf file that can be saved or stored in an imaging system. View HTML To view an .html page of the form as it was completed by the student, click on page icon in the HTML column. This displays the form data in .html format in a different browser. Process form(s) Once the data has been processed in your office, select the check box, and then click the Process selected forms button. This moves the form to the Processed queue. The Processed queue has similar functionality. If a form needs to be revised or if it was moved into a processed status inadvertently, simply check the same box, and then click the Pend selected forms button. The form is moved back to the Pending queue.
Page 12
Delete form(s) It may be necessary to delete a form. The most common reason for deleting a form is so that a user can re-submit an e-sign form that has been set up for duplicate e-signature prevention (for more information about this, refer to Updating a Form’s Characteristics). To delete a form, simply select the checkbox beside the form in question, and click the Delete selected forms button.
Archiving Forms Processed and Pending forms can be moved into an Archive queue at any time. The system can also be used to archive all forms that are older than 60 days, 90 days, or 120 days. To archive a form, select the check box for the form you want to archive, and then click the Archived selected items button. To archive all forms that are greater than 60 days, 90 days, or 120 days, simply select the day range from the drop-down list, and then click the Archive old forms button. When forms are archived, the number of Archived forms displays with the number of Multi-Signature, Pending and Processed forms on the Home tab.

Page 13
Export to Excel
You can click on the Export to Excel button to create an excel file with all the form data. Follow the onscreen instructions and Microsoft Excel should load with all your data in one file. This feature is not document specific; meaning all files in your que will be imported into Excel.