dvdremake pro 3 user manual
TRANSCRIPT

Welcome to DvdReMake Pro 3
Copyright © 2005, DimadSoft Manual version 3.1.3 DvdReMake Pro Features
This manual is best viewed maximized.
DvdReMake Pro is a powerful, yet easy to use DVD editor that will let you change content, appearance and navigation of a DVD disk without the need for complete disk re-authoring. Using unique editing features of DvdReMake Pro you can completely customize your DVD backups, fix authoring errors, merge DVD's, remove audio and subtitle streams, and much more. You can even compile a new DVD from bits and pieces of other DVD disks. See the Features page for DvdReMake's extensive list of features. Whether you have already purchased, or are contemplating purchase, this manual should prove useful. You can browse through the Table of Contents to the left, or look up something specific in the index. There is also a full-text search tab, where you can do simple word searches or complex Boolean searches. If you find a particular section of the manual that you think that you may want to return to at a later date, you can add it to your favorites list on the "Favorites" tab.
Here is a list of some of DvdReMake Pro's features.
Features shown in bold are new to version 3.
Hide warnings, trailers, studio logos, and other unwanted material Delete Titlesets, Titles, Program Chains, Programs, Chapters Add new Titlesets, Titles, Program Chains, Programs, Chapters Remove unwanted angles Remove unwanted audio and subtitle streams Disable menu buttons for material that you remove Remove Parental Management
Página 1 de 8Welcome to DvdReMake Pro 3
28/08/2014file://C:\Users\Usuario\AppData\Local\Temp\~hh9742.htm
Copyright © 2005, DimadSoft
DimadSoft DvdReMake Pro end user license agreement
Important, please read this first. This is a legal license agreement. Before purchasing and using this product you must accept all the terms and conditions contained in this license agreement. By purchasing a license to use dvdremake pro program, you are consenting to be bound by all these terms and conditions. Your use of the software also indicates your assent to be bound by the license terms set forth herein.
If you are not willing to be bound by this agreement and you do not agree to all its terms and conditions, then do not make a purchase.
Ownership
This DimadSoft product and all its components and related documentation ("Software") is owned by DimadSoft or its
successors, who hereafter shall be referred to as the "Licensor". The person or entity in whose name the software is registered, who
hereafter shall be referred to as the "Licensee", does not own a copy of the software. The Software is licensed not sold.
Grant of license
Remove or set Prohibited User Operations Edit VM commands (all possible command combination are supported) Delete menus in a selected language Remove menu transitions Automatically replace motion menus with still menus Select a frame of a motion menu to convert to a still menu Replace a cell with a still of your choice Preview DVD with audio and subtitles Undo/Redo Merge 2-4 DVD's into one, preserving menus Split a DVD into two disks Insert new chapters into a DVD Copy material from one DVD to another Find DVD navigation errors Reorder menu buttons Easily follow DVD navigation using "Goto Destination" and History paneChange properties of the video, audio and subpicture tracks Modify buttons and color schemes in either still or motion menus Easily change button highlight colors Export a test DVD quickly Easily view adjacent button links Edit PGC attributes Customize the User Interface to your liking And much more...
Página 2 de 8Welcome to DvdReMake Pro 3
28/08/2014file://C:\Users\Usuario\AppData\Local\Temp\~hh9742.htm
You are granted a License to use a full-function copy of this software provided that you have lawfully received such copy from the Licensor or one of its designated representatives in return for payment or other consideration, and provided that you agree to,
and abide by the terms of this License agreement.
You will receive an access to download area of Licensor site and
will be able to download Software when you need to. Each downloaded copy of Software is unique, and can be traced back to
you. It is your responsibility to guard these downloads. All reasonable measures must be taken to prevent unauthorized
parties from copying the Software, otherwise it shall be considered a violation of this license agreement, and shall be considered to
cause automatic, immediate revocation of this license.
Number of installations and users per license
The Software may be installed on multiple machines, provided that only a single person per license uses this Software at any given
time.
Computers with Software installed should never be made available to another party for the purpose of operating this software, even if
such operation is for the benefit of the Licensee.
Any assistants, employees or contractors who operate the program
for Licensee shall be considered additional users who must be properly licensed to lawfully use the software.
The Licensor reserves the right to require the Licensee to declare the number of installations and the names of the users for each
license granted.
Página 3 de 8Welcome to DvdReMake Pro 3
28/08/2014file://C:\Users\Usuario\AppData\Local\Temp\~hh9742.htm

License revocation
The Licensor or the representative from whom you received your license grant may revoke your license to use this software for
failure to abide by the terms of this license agreement. In this case your DimadSoft account will be closed and you will be denied
access to the download area.
Upgrades
You will be entitled to free minor upgrades, when and if they become available. A minor upgrade is where the version number
changes only after the first point ("."). An example of a minor upgrade is from version 1.0 to 1.1. There may be an additional fee for a major upgrade. A major upgrade is where the version number changes before the first point ("."). An example of a major upgrade
is from version 1.1 to 2.0.
You furthermore understand and agree that the Licensor is not
obligated to retain every current feature in future versions, and may add, remove, restrict or replace features in such versions at its own
discretion.
Transfer of license
This license is non-transferable, except with the express consent of the Licensor.
Technical support
The Licensor's original grant of license to use this software shall not be construed as obliging the Licensor to provide any level of
technical support other than to provide the ordinary documentation
Página 4 de 8Welcome to DvdReMake Pro 3
28/08/2014file://C:\Users\Usuario\AppData\Local\Temp\~hh9742.htm

that usually accompanies this software. The Licensor's provision of such support shall be considered totally at the discretion of the
Licensor, excepting where Licensor and Licensee have entered into a separate "pay-for-support" agreement.
Where the Licensor chooses to provide support, support will be
provided only to one designated support contact person per license, unless otherwise specified in a pay-for-support agreement.
Refunds
Due to the nature of software products no refund can be offered once Software has been downloaded.
Before purchasing a license to use the Software, it is recommended that you download and evaluate the free/demo version. Testing the
free/demo version ensures that the program works to your satisfaction on all machines on which you intend to use the
Software.
Restrictions
You may NOT:
Copy the Software except as permitted by this license.
Reverse-engineer, decompile or disassemble the Software.
Distribute, rent, loan, lease, sell, sublicense or otherwise transfer all or part of the Software, or any rights granted hereunder to any other person without the prior written
consent of the Licensor.
Remove, alter or obscure any proprietary notices, labels or marks from the Software.
Página 5 de 8Welcome to DvdReMake Pro 3
28/08/2014file://C:\Users\Usuario\AppData\Local\Temp\~hh9742.htm
Modify, translate, adapt, arrange or create derivative works based on the Software for any purpose.
Any such action done without the express agreement of the
Licensor shall be considered a violation of this license agreement, and shall be considered to cause automatic, immediate revocation
of this license.
Copyright
This software is protected by U.S. and international copyright laws. Unlicensed use of this software or use of this software by more than the licensed number of users is a copyright violation and is
subject to legal remedy which shall include, where not prohibited by statute, legal costs plus compensatory and/or punitive damage
charges assessed based on the work done using unlicensed copies of the software.
All copies of this software made by the Licensee shall retain the
copyright notice of the original.
General
If any provision of these license conditions is found to be invalid or otherwise unenforceable, the further conditions of this license will remain fully effective and the parties will be bound by obligations
which approximate, as closely as possible, the effect of the provision found invalid or unenforceable, without being themselves
invalid or unenforceable.
Limited Warranty
Página 6 de 8Welcome to DvdReMake Pro 3
28/08/2014file://C:\Users\Usuario\AppData\Local\Temp\~hh9742.htm

No warranties
No representation in any documentation, web site, and help files shall be taken to mean that this software is suitable for any particular purpose or any purpose whatsoever.
It is agreed that the software is not perfect, that there may be various bugs, omissions and discrepancies from the software's actual functionality compared to that implied by its documentation that prevents the software from performing some particular tasks. The Licensee agrees to accept such discrepancies and limitations.
The Licensor agrees to make a good faith effort to correct such "bugs" as they are detected, but is not obliged to report these to you, nor follow a specific time line to make such corrections.
DimadSoft expressly disclaims any warranty for the Software. The Software and any related documentation is provided "as is" without warranty of any kind, either express or implied, including, without limitation, the implied warranties or merchantability, fitness for a particular purpose, or noninfringement. The entire risk arising out of use or performance of the Software remains with you.
No liability for damages
In no event shall DimadSoft or its suppliers be liable for any damages whatsoever (including, without limitation, damages for loss of business profits, business interruption, loss of business information, or any other pecuniary loss) arising out of the use of or inability to use this DimadSoft product, even if DimadSoft has been advised of the possibility of such damages. Because some jurisdictions do not allow the exclusion or limitation of liability for consequential or incidental damages, the above limitation may not apply to you.
Página 7 de 8Welcome to DvdReMake Pro 3
28/08/2014file://C:\Users\Usuario\AppData\Local\Temp\~hh9742.htm
Copyright © 2005, DimadSoft
Página 8 de 8Welcome to DvdReMake Pro 3
28/08/2014file://C:\Users\Usuario\AppData\Local\Temp\~hh9742.htm
Quick Start Guide
Copyright © 2005, DimadSoft
DVD Structure and Navigation Basics
Copyright © 2005, DimadSoft
Ripping a DVD
Copyright © 2005, DimadSoft
Getting to Know the User Interface
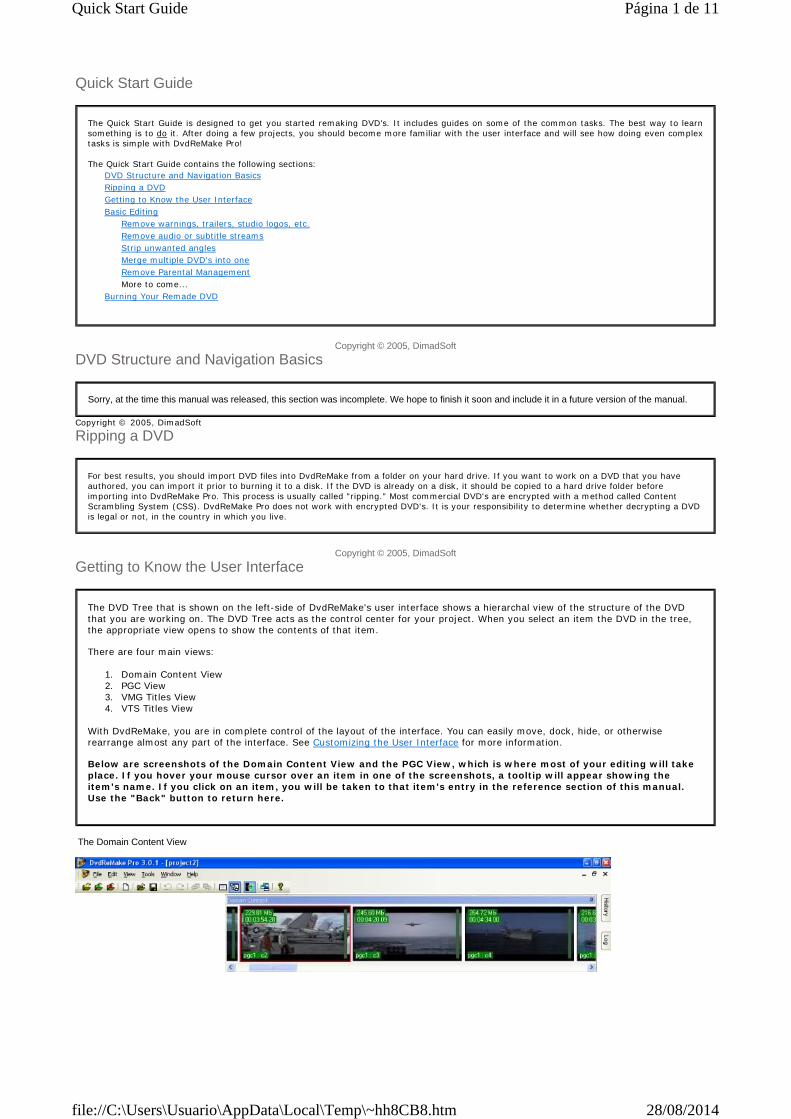
The Domain Content View
The Quick Start Guide is designed to get you started remaking DVD's. It includes guides on some of the common tasks. The best way to learn something is to do it. After doing a few projects, you should become more familiar with the user interface and will see how doing even complex tasks is simple with DvdReMake Pro! The Quick Start Guide contains the following sections:
DVD Structure and Navigation Basics Ripping a DVD Getting to Know the User Interface Basic Editing
Remove warnings, trailers, studio logos, etc. Remove audio or subtitle streams Strip unwanted angles Merge multiple DVD's into one Remove Parental Management More to come...
Burning Your Remade DVD
Sorry, at the time this manual was released, this section was incomplete. We hope to finish it soon and include it in a future version of the manual.
For best results, you should import DVD files into DvdReMake from a folder on your hard drive. If you want to work on a DVD that you have authored, you can import it prior to burning it to a disk. If the DVD is already on a disk, it should be copied to a hard drive folder before importing into DvdReMake Pro. This process is usually called "ripping." Most commercial DVD's are encrypted with a method called Content Scrambling System (CSS). DvdReMake Pro does not work with encrypted DVD's. It is your responsibility to determine whether decrypting a DVD is legal or not, in the country in which you live.
The DVD Tree that is shown on the left-side of DvdReMake's user interface shows a hierarchal view of the structure of the DVD that you are working on. The DVD Tree acts as the control center for your project. When you select an item the DVD in the tree, the appropriate view opens to show the contents of that item. There are four main views:
1. Domain Content View 2. PGC View 3. VMG Titles View 4. VTS Titles View
With DvdReMake, you are in complete control of the layout of the interface. You can easily move, dock, hide, or otherwise rearrange almost any part of the interface. See Customizing the User Interface for more information. Below are screenshots of the Domain Content View and the PGC View, which is where most of your editing will take place. If you hover your mouse cursor over an item in one of the screenshots, a tooltip will appear showing the item's name. If you click on an item, you will be taken to that item's entry in the reference section of this manual. Use the "Back" button to return here.
Página 1 de 11Quick Start Guide
28/08/2014file://C:\Users\Usuario\AppData\Local\Temp\~hh8CB8.htm

Copyright © 2005, DimadSoft
Basic Editing
PGC View
Welcome to the Basic Editing portion of the manual. In the subsections, you will find the most common tasks when using DvdReMake Pro. If you are new to the DVD Authoring world, you are highly recommended to go through each section so you can be familiar with the program, as well as learn some of the terminologies used in this program. New features are discussed as well. Currently, these are the guides. More will be added as the need arises.
Remove audio or subtitle streams
Strip unwanted angles
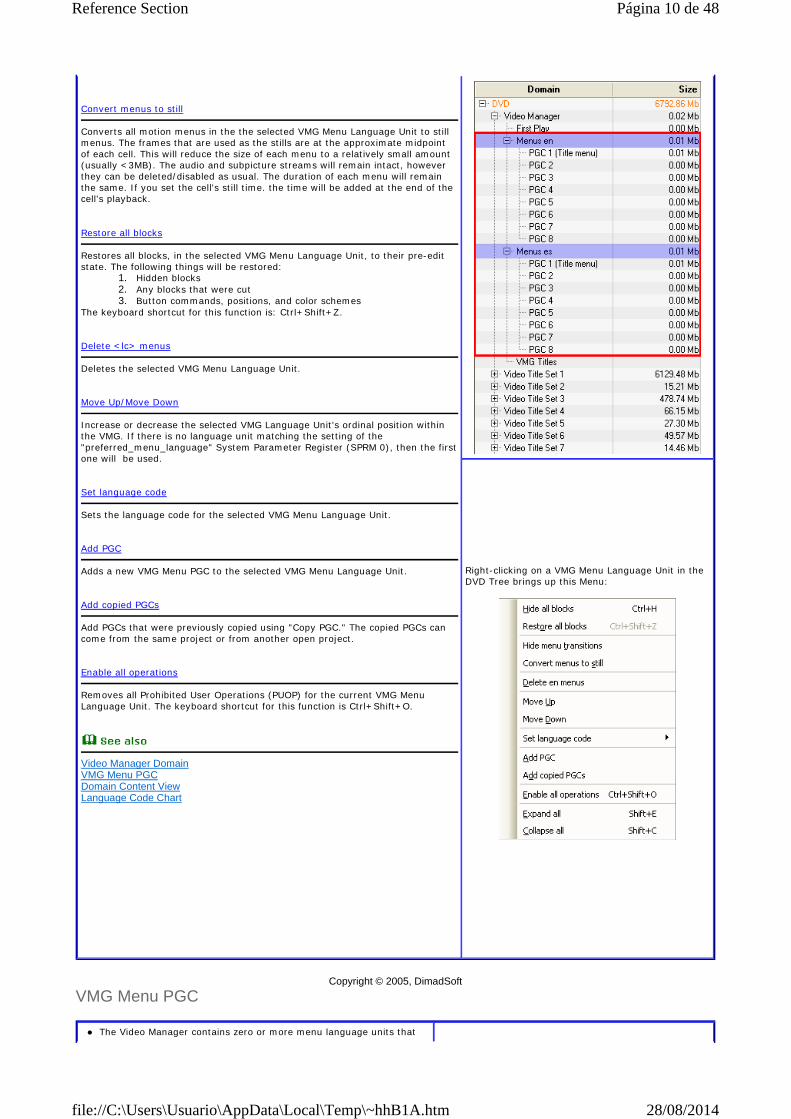
Merge multiple DVDs into one
Página 2 de 11Quick Start Guide
28/08/2014file://C:\Users\Usuario\AppData\Local\Temp\~hh8CB8.htm
Copyright © 2005, DimadSoft
Remove warnings, trailers, studio logos, etc.
Remove Parental Management
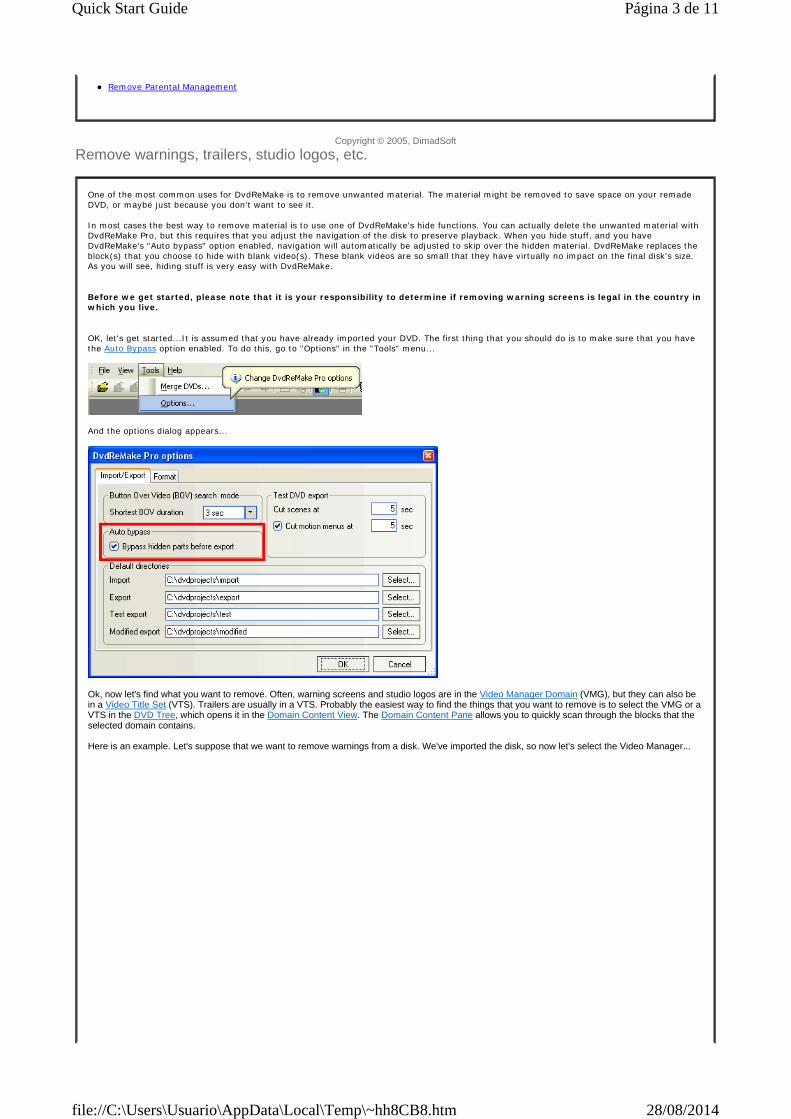
One of the most common uses for DvdReMake is to remove unwanted material. The material might be removed to save space on your remade DVD, or maybe just because you don't want to see it. In most cases the best way to remove material is to use one of DvdReMake's hide functions. You can actually delete the unwanted material with DvdReMake Pro, but this requires that you adjust the navigation of the disk to preserve playback. When you hide stuff, and you have DvdReMake's "Auto bypass" option enabled, navigation will automatically be adjusted to skip over the hidden material. DvdReMake replaces the block(s) that you choose to hide with blank video(s). These blank videos are so small that they have virtually no impact on the final disk's size. As you will see, hiding stuff is very easy with DvdReMake. Before we get started, please note that it is your responsibility to determine if removing warning screens is legal in the country in which you live. OK, let's get started...It is assumed that you have already imported your DVD. The first thing that you should do is to make sure that you have the Auto Bypass option enabled. To do this, go to "Options" in the "Tools" menu...
And the options dialog appears...
Ok, now let's find what you want to remove. Often, warning screens and studio logos are in the Video Manager Domain (VMG), but they can also be in a Video Title Set (VTS). Trailers are usually in a VTS. Probably the easiest way to find the things that you want to remove is to select the VMG or a VTS in the DVD Tree, which opens it in the Domain Content View. The Domain Content Pane allows you to quickly scan through the blocks that the selected domain contains. Here is an example. Let's suppose that we want to remove warnings from a disk. We've imported the disk, so now let's select the Video Manager...
Página 3 de 11Quick Start Guide
28/08/2014file://C:\Users\Usuario\AppData\Local\Temp\~hh8CB8.htm
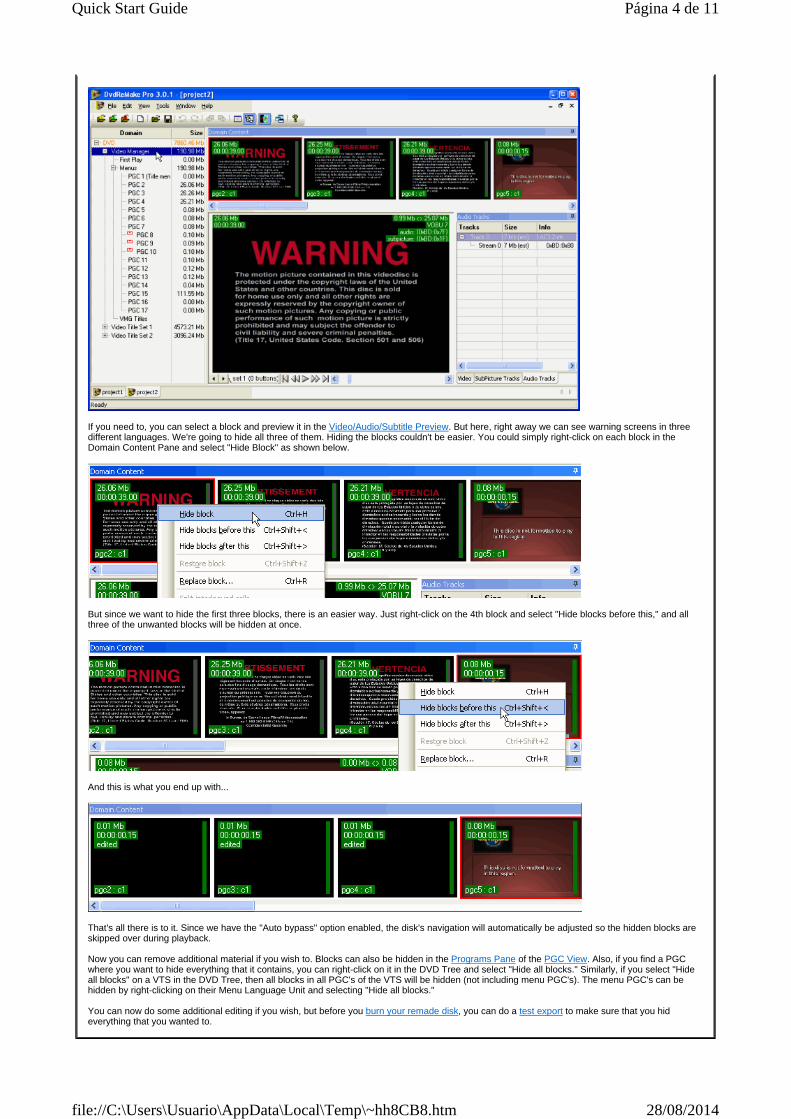
If you need to, you can select a block and preview it in the Video/Audio/Subtitle Preview. But here, right away we can see warning screens in three different languages. We're going to hide all three of them. Hiding the blocks couldn't be easier. You could simply right-click on each block in the Domain Content Pane and select "Hide Block" as shown below.
But since we want to hide the first three blocks, there is an easier way. Just right-click on the 4th block and select "Hide blocks before this," and all three of the unwanted blocks will be hidden at once.
And this is what you end up with...
That's all there is to it. Since we have the "Auto bypass" option enabled, the disk's navigation will automatically be adjusted so the hidden blocks are skipped over during playback. Now you can remove additional material if you wish to. Blocks can also be hidden in the Programs Pane of the PGC View. Also, if you find a PGC where you want to hide everything that it contains, you can right-click on it in the DVD Tree and select "Hide all blocks." Similarly, if you select "Hide all blocks" on a VTS in the DVD Tree, then all blocks in all PGC's of the VTS will be hidden (not including menu PGC's). The menu PGC's can be hidden by right-clicking on their Menu Language Unit and selecting "Hide all blocks." You can now do some additional editing if you wish, but before you burn your remade disk, you can do a test export to make sure that you hid everything that you wanted to.
Página 4 de 11Quick Start Guide
28/08/2014file://C:\Users\Usuario\AppData\Local\Temp\~hh8CB8.htm

Copyright © 2005, DimadSoft
Remove audio or subtitle streams
One of the new features of DvdReMake Pro v3 is the ability to remove/disable audio and subtitle streams. This basic guide will demonstrate how to do just that. The purpose is to remove streams that you don't need, and to reduce the size of the DVD so it can fit on a DVD-5 (Single layer disc). If it does not fit, then use another program to shrink or re-encode to fit on a DVD-5. At least this way, the quality will be better than if unwanted streams had not removed. See: Burning Your Remade DVD. Usually, when performing this procedure, you will also want to hide or delete the corresponding button in the Audio / Subtitle menu of the DVD. But it is safest just to hide the button, so you can retain navigational structure. If you delete, you might have to modify the navigational structure. This method is only for advanced users, who know what they are doing. The details of hiding the buttons won't be discussed here, as it is not the focus. To the task at hand, there are 2 ways to remove streams:
1. Disable track in all PGC's 2. Delete Track
These 2 options are available via context menu (by right-clicking) in the Audio Tracks Pane or the Subpicture Tracks Pane, which are displayed when clicking on a VTS, "Program Chains," or a PGC in the DVD Tree. To show how these 2 options work, and when it is safe to do so, two scenarios are given. One is for a single PGC in the VTS, the other is for multi-PGC's in the VTS.
Scenario 1 (single PGC)
Disable Track
Figure 1
This is the original VTS (single PGC). Looking at the size, this is most likely the movie. Notice the Track number in Figure 1 matches that of Figure 1a in both Audio and Subpicture Tracks pane. The same can be said for the Stream number. The Info column reveals the stream info as well as the stream ID, e.g. 0x80. In the Subpicture Tracks pane, there are 2 stream IDs in 1 track. What does this mean? If you double-click one of the tracks in Figure 1a, you'll notice that each stream corresponds to the Wide, Pan/Scan, or Letterbox view. Usually, this applies to wide-screen movies. Only 1 stream number can be displayed, depending on the setting of the dvd player, and the type of TV (wide - 16x9, or full - 4x3). If it is a full-screen movie, then the stream corresponds to Normal view.
Figure 1a
Figure 2
"Disable track in all PGC" functionality is different from the Domain Content View than it is in the PGC View. If you disable a track in the Domain Content View, you are actually disabling that track from all PGC's. But if you disable a track from the PGC View, you only disable that track in the selected PGC.
Página 5 de 11Quick Start Guide
28/08/2014file://C:\Users\Usuario\AppData\Local\Temp\~hh8CB8.htm
Delete Track
Scenario 2 (multi-PGC)
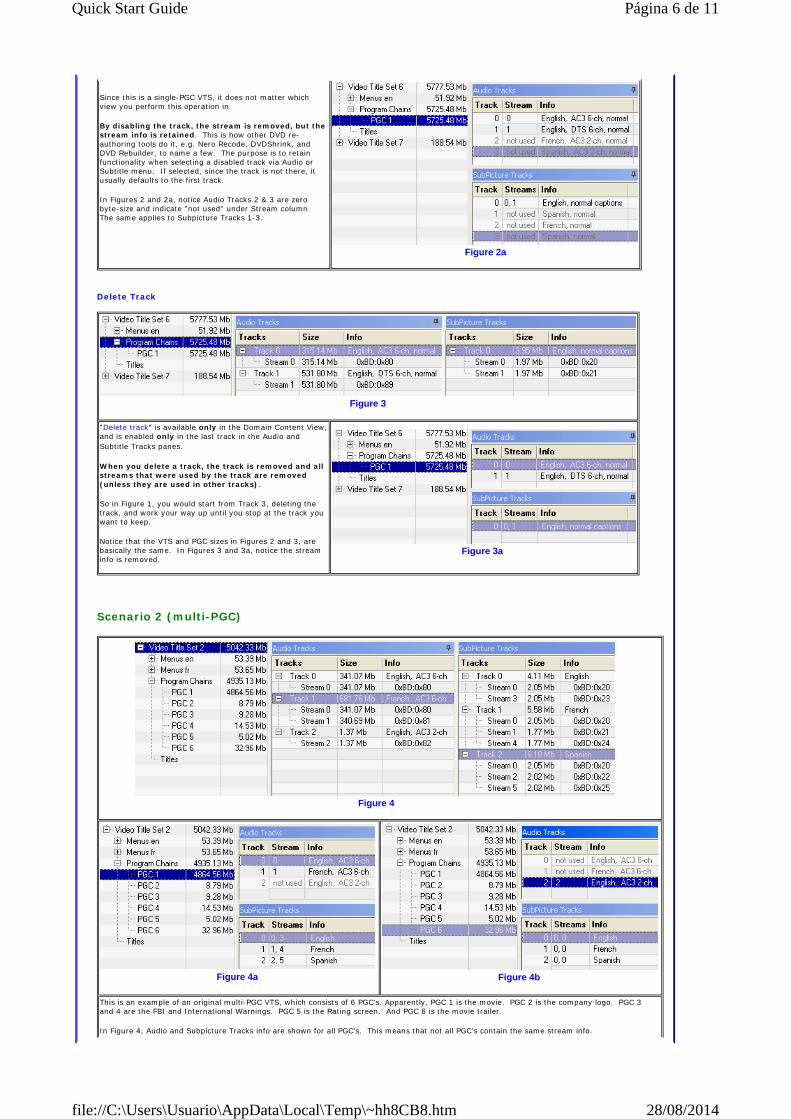
Since this is a single-PGC VTS, it does not matter which view you perform this operation in. By disabling the track, the stream is removed, but the stream info is retained. This is how other DVD re-authoring tools do it, e.g. Nero Recode, DVDShrink, and DVD Rebuilder, to name a few. The purpose is to retain functionality when selecting a disabled track via Audio or Subtitle menu. If selected, since the track is not there, it usually defaults to the first track. In Figures 2 and 2a, notice Audio Tracks 2 & 3 are zero byte-size and indicate "not used" under Stream column. The same applies to Subpicture Tracks 1-3.
Figure 2a
Figure 3
"Delete track" is available only in the Domain Content View, and is enabled only in the last track in the Audio and Subtitle Tracks panes. When you delete a track, the track is removed and all streams that were used by the track are removed (unless they are used in other tracks). So in Figure 1, you would start from Track 3, deleting the track, and work your way up until you stop at the track you want to keep. Notice that the VTS and PGC sizes in Figures 2 and 3, are basically the same. In Figures 3 and 3a, notice the stream info is removed.
Figure 3a
Figure 4
Figure 4a
Figure 4b
This is an example of an original multi-PGC VTS, which consists of 6 PGC's. Apparently, PGC 1 is the movie. PGC 2 is the company logo. PGC 3 and 4 are the FBI and International Warnings. PGC 5 is the Rating screen. And PGC 6 is the movie trailer. In Figure 4, Audio and Subpicture Tracks info are shown for all PGC's. This means that not all PGC's contain the same stream info.
Página 6 de 11Quick Start Guide
28/08/2014file://C:\Users\Usuario\AppData\Local\Temp\~hh8CB8.htm

Copyright © 2005, DimadSoft
Strip unwanted angles
Disable Track
Delete Track
Hopefully, this guide will help you get started in making use of these 2 new features in DvdReMake Pro. Have fun in re-authoring your custom DVD the way you like it.
So, in PGC 1, Figure 4a, the movie contains only 2 audio tracks, Track 0 & 1, and 3 subtitle tracks. PGC 6 contains only Audio track 2 as shown in Figure 4b. Furthermore, PGC's 2-5 consist of the same Audio track info as shown in Figure 4a, and the same Subpicture track info as shown in Figure 4b. Note that even though track info is present in a PGC, it does not mean that there is really an audio or subtitle stream in that PGC. In this example, PGC's 3-5 have no audio stream, and PGC's 2-6 have no subtitle stream. In a multi-PGC VTS, disabling and deleting a track is a little tricky. There are two methods discussed below.
Figure 5
As already mentioned in Disable Track of Scenario 1, there is a difference in whether you disable a track in The Domain Content View or the PGC View, so take note of that. In Figure 4, you cannot simply disable Audio track 2, as PGC 6 (shown in Figure 4b) contains that track. But you can disable other tracks. As shown in Figures 5 and 5a, Audio track 1 and Subpicture tracks 1 & 2 are disabled at the VTS level. This will affect all PGC's. To practice disabling at the PGC level, you could go each PGC to preview if there's really any audio or subtitle stream. Just select the stream in the Audio or SubPicture Tracks Pane, and press play in the Video/Audio/Subtitle Preview. In this example, audio track 0 can be disabled in PGC 3-5 as they are just Warning and Rating screens, and subpicture track 0 can be disabled in PGC 2-6 as there aren't really any subtitles.
Figure 5a
Figure 6
As for when Delete Track option is appropriate for multi-PGC scenario, you must preview each PGC to see if there's really any audio and subtitle streams. As a reminder, this option is enabled only in the last track and only at the VTS level. In Figure 4, Audio track 2 cannot be deleted as PGC 6 needs it. Audio track 1 cannot be deleted either, as the option is disabled. But Subpicture tracks 1 & 2 can. As shown in Figure 6 and 6a, combinations of "Disable Track" and "Delete Track" methods are used at the VTS level. You can also disable track at the PGC level as well, as described in the previous table above.
Figure 6a
There are some DVD's that have multi-angles involved. When viewing, only one angle will be used based on the language selection. Angle selection
Página 7 de 11Quick Start Guide
28/08/2014file://C:\Users\Usuario\AppData\Local\Temp\~hh8CB8.htm
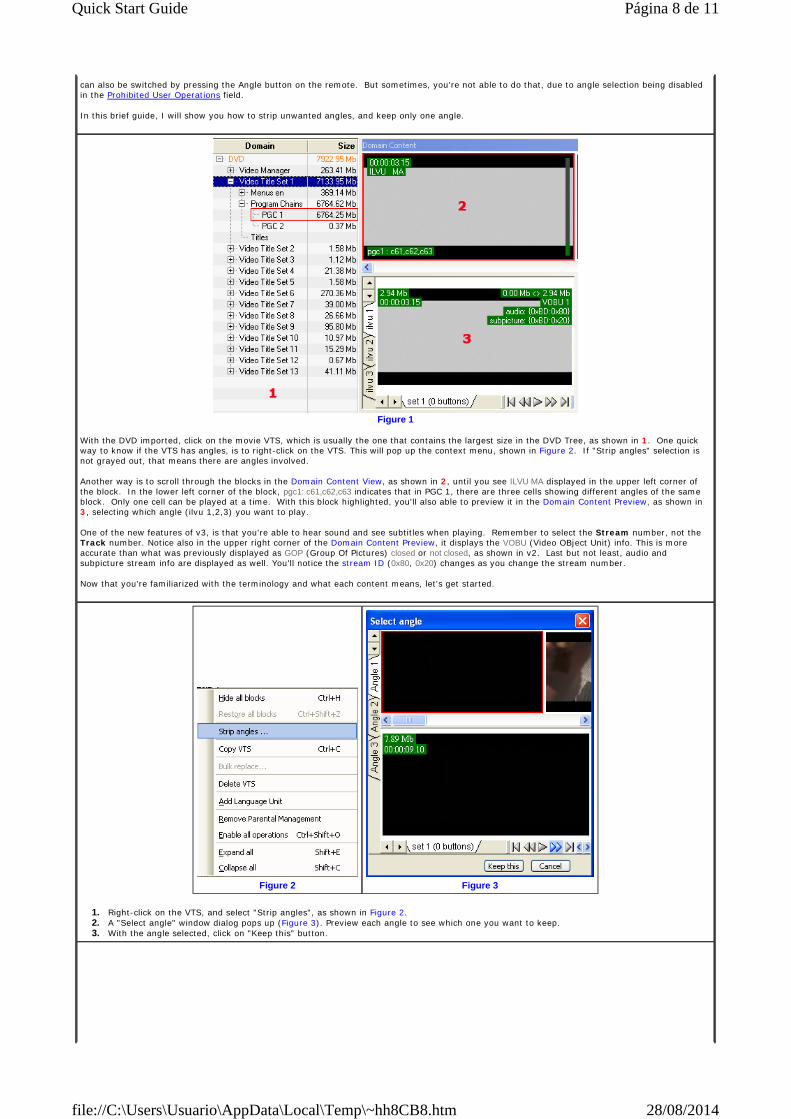
can also be switched by pressing the Angle button on the remote. But sometimes, you're not able to do that, due to angle selection being disabled in the Prohibited User Operations field. In this brief guide, I will show you how to strip unwanted angles, and keep only one angle.
Figure 1
With the DVD imported, click on the movie VTS, which is usually the one that contains the largest size in the DVD Tree, as shown in 1. One quick way to know if the VTS has angles, is to right-click on the VTS. This will pop up the context menu, shown in Figure 2. If "Strip angles" selection is not grayed out, that means there are angles involved. Another way is to scroll through the blocks in the Domain Content View, as shown in 2, until you see ILVU MA displayed in the upper left corner of the block. In the lower left corner of the block, pgc1: c61,c62,c63 indicates that in PGC 1, there are three cells showing different angles of the same block. Only one cell can be played at a time. With this block highlighted, you'll also able to preview it in the Domain Content Preview, as shown in 3, selecting which angle (ilvu 1,2,3) you want to play. One of the new features of v3, is that you're able to hear sound and see subtitles when playing. Remember to select the Stream number, not the Track number. Notice also in the upper right corner of the Domain Content Preview, it displays the VOBU (Video OBject Unit) info. This is more accurate than what was previously displayed as GOP (Group Of Pictures) closed or not closed, as shown in v2. Last but not least, audio and subpicture stream info are displayed as well. You'll notice the stream ID (0x80, 0x20) changes as you change the stream number. Now that you're familiarized with the terminology and what each content means, let's get started.
1. Right-click on the VTS, and select "Strip angles", as shown in Figure 2. 2. A "Select angle" window dialog pops up (Figure 3). Preview each angle to see which one you want to keep. 3. With the angle selected, click on "Keep this" button.
Figure 2
Figure 3
Página 8 de 11Quick Start Guide
28/08/2014file://C:\Users\Usuario\AppData\Local\Temp\~hh8CB8.htm
Copyright © 2005, DimadSoft
Merge Multiple DVDs Into One
Copyright © 2005, DimadSoft
Remove Parental Management
Figure 4
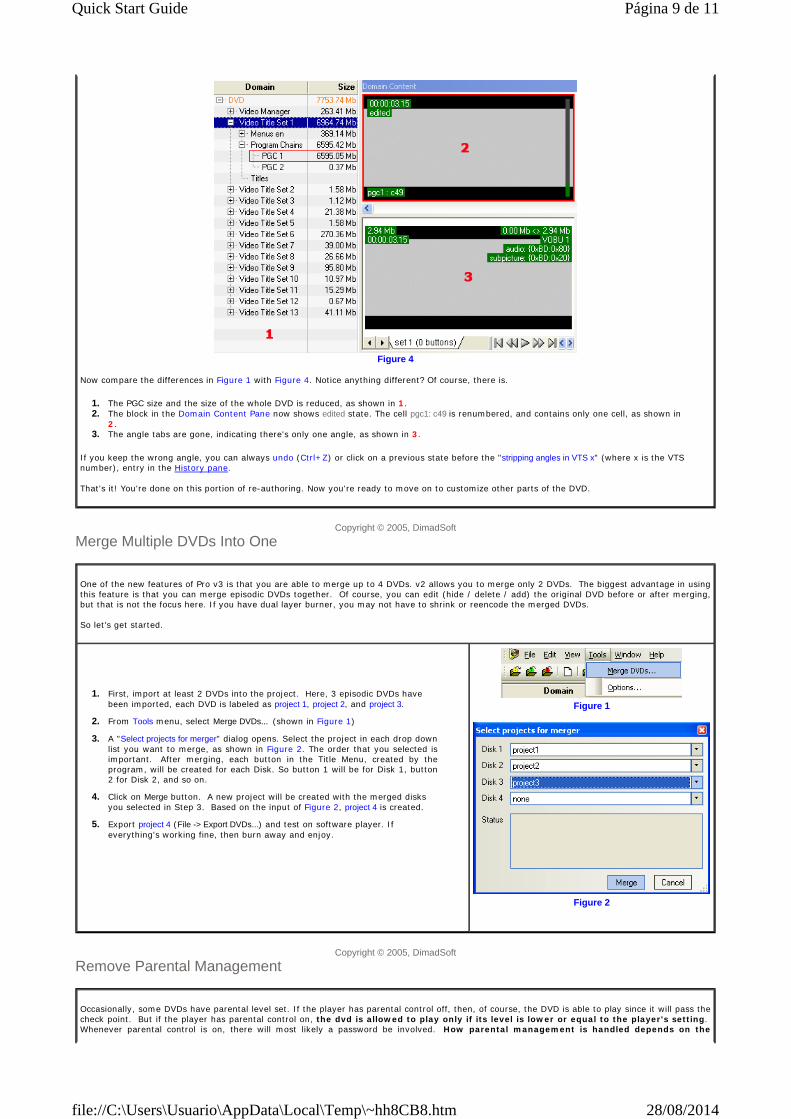
Now compare the differences in Figure 1 with Figure 4. Notice anything different? Of course, there is.
1. The PGC size and the size of the whole DVD is reduced, as shown in 1. 2. The block in the Domain Content Pane now shows edited state. The cell pgc1: c49 is renumbered, and contains only one cell, as shown in
2. 3. The angle tabs are gone, indicating there's only one angle, as shown in 3.
If you keep the wrong angle, you can always undo (Ctrl+Z) or click on a previous state before the "stripping angles in VTS x" (where x is the VTS number), entry in the History pane. That's it! You're done on this portion of re-authoring. Now you're ready to move on to customize other parts of the DVD.
One of the new features of Pro v3 is that you are able to merge up to 4 DVDs. v2 allows you to merge only 2 DVDs. The biggest advantage in using this feature is that you can merge episodic DVDs together. Of course, you can edit (hide / delete / add) the original DVD before or after merging, but that is not the focus here. If you have dual layer burner, you may not have to shrink or reencode the merged DVDs. So let's get started.
1. First, import at least 2 DVDs into the project. Here, 3 episodic DVDs have been imported, each DVD is labeled as project 1, project 2, and project 3.
2. From Tools menu, select Merge DVDs... (shown in Figure 1)
3. A "Select projects for merger" dialog opens. Select the project in each drop down list you want to merge, as shown in Figure 2. The order that you selected is important. After merging, each button in the Title Menu, created by the program, will be created for each Disk. So button 1 will be for Disk 1, button 2 for Disk 2, and so on.
4. Click on Merge button. A new project will be created with the merged disks you selected in Step 3. Based on the input of Figure 2, project 4 is created.
5. Export project 4 (File -> Export DVDs...) and test on software player. If everything's working fine, then burn away and enjoy.
Figure 1
Figure 2
Occasionally, some DVDs have parental level set. If the player has parental control off, then, of course, the DVD is able to play since it will pass the check point. But if the player has parental control on, the dvd is allowed to play only if its level is lower or equal to the player's setting. Whenever parental control is on, there will most likely a password be involved. How parental management is handled depends on the
Página 9 de 11Quick Start Guide
28/08/2014file://C:\Users\Usuario\AppData\Local\Temp\~hh8CB8.htm
behavior of each standalone and software player, but the standalone's behavior is more trustworthy in this matter. This guide will show you how to remove parental management - a new feature of DRMPro v3. In v2, parental management, if any, is automatically removed upon export. However, in v3, you have the option whether to remove it or not. More details are discussed below.
There are three ways where you can access the "Remove Parental Management" option:
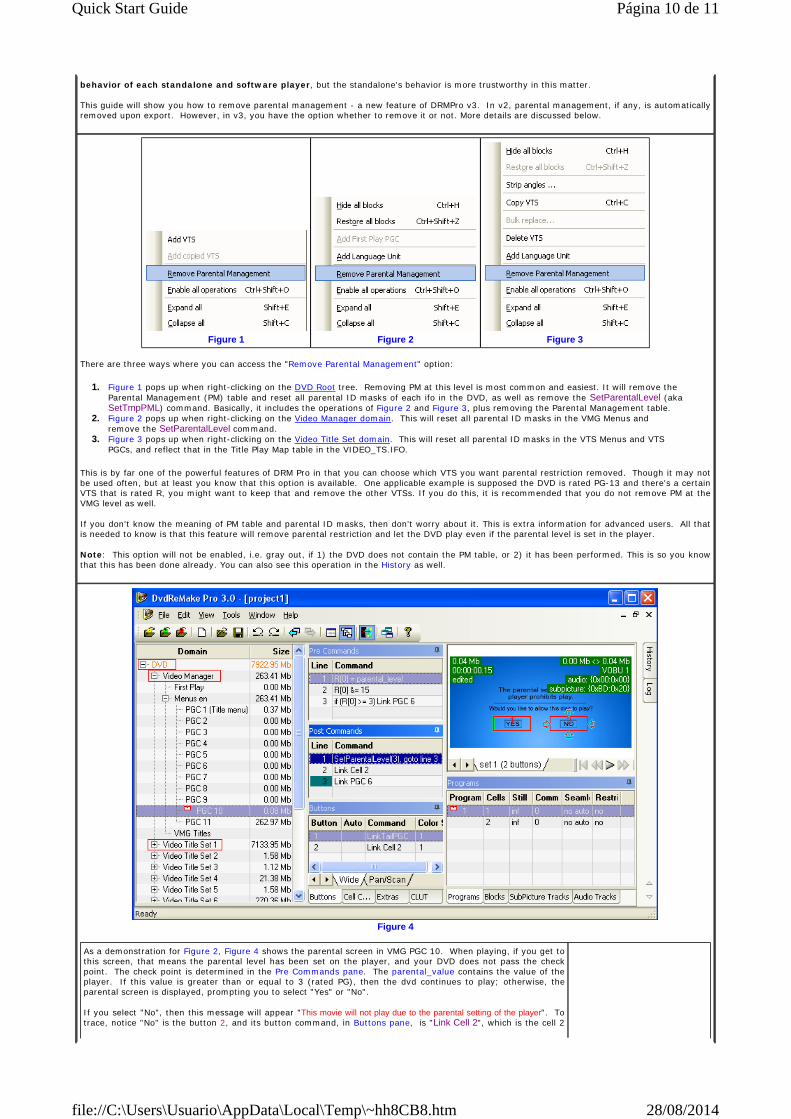
1. Figure 1 pops up when right-clicking on the DVD Root tree. Removing PM at this level is most common and easiest. It will remove the Parental Management (PM) table and reset all parental ID masks of each ifo in the DVD, as well as remove the SetParentalLevel (aka SetTmpPML) command. Basically, it includes the operations of Figure 2 and Figure 3, plus removing the Parental Management table.
2. Figure 2 pops up when right-clicking on the Video Manager domain. This will reset all parental ID masks in the VMG Menus and remove the SetParentalLevel command.
3. Figure 3 pops up when right-clicking on the Video Title Set domain. This will reset all parental ID masks in the VTS Menus and VTS PGCs, and reflect that in the Title Play Map table in the VIDEO_TS.IFO.
This is by far one of the powerful features of DRM Pro in that you can choose which VTS you want parental restriction removed. Though it may not be used often, but at least you know that this option is available. One applicable example is supposed the DVD is rated PG-13 and there's a certain VTS that is rated R, you might want to keep that and remove the other VTSs. If you do this, it is recommended that you do not remove PM at the VMG level as well. If you don't know the meaning of PM table and parental ID masks, then don't worry about it. This is extra information for advanced users. All that is needed to know is that this feature will remove parental restriction and let the DVD play even if the parental level is set in the player. Note: This option will not be enabled, i.e. gray out, if 1) the DVD does not contain the PM table, or 2) it has been performed. This is so you know that this has been done already. You can also see this operation in the History as well.
Figure 1
Figure 2
Figure 3
Figure 4
As a demonstration for Figure 2, Figure 4 shows the parental screen in VMG PGC 10. When playing, if you get to this screen, that means the parental level has been set on the player, and your DVD does not pass the check point. The check point is determined in the Pre Commands pane. The parental_value contains the value of the player. If this value is greater than or equal to 3 (rated PG), then the dvd continues to play; otherwise, the parental screen is displayed, prompting you to select "Yes" or "No". If you select "No", then this message will appear "This movie will not play due to the parental setting of the player". To trace, notice "No" is the button 2, and its button command, in Buttons pane, is "Link Cell 2", which is the cell 2
Página 10 de 11Quick Start Guide
28/08/2014file://C:\Users\Usuario\AppData\Local\Temp\~hh8CB8.htm

Copyright © 2005, DimadSoft
Burning Your Remade DVD
Copyright © 2005, DimadSoft
That's it, you're done on this portion of reauthoring. Now you're ready to move on to customize other parts of the DVD.
in the Programs pane that contains the message screen. If you select "Yes", then the button 1 command says "LinkTailPGC", which will go to the Post Commands pane and executes the commands. Line 1 says "SetParentalLevel(3)", which will prompt you for a password to set the temporary parental level to 3. If you enter correctly, then line 3 executes, moving on to PGC 6. If you enter it wrong, then line 2 executes, which is the same as if you select "No". Now back to the topic. Once you remove PM as shown in Figure 2, SetParentalLevel command is removed in the Post Commands pane. The result is shown in Figure 5.
Figure 5
Once you have finished editing your DVD, it's probably a good idea to use Export Test DVD, and view it with a software player before burning it. There are plenty of software players available, including WinDVD, PowerDVD, and Nero Showtime. Most software players will play a DVD-video from a hard drive folder. Please note however, software players are notorious for being non-compliant when it comes to DVD standards. It is possible for a DVD-video to play with a software player but not in a stand-alone or set top player. OK, you're satisfied with your remade DVD and are ready to burn it. The first thing that you need to decide is whether it will fit on your DVD recordable. Hopefully, after removing unwanted material and audio tracks, it will be small enough to fit. If you are going to burn to a single-layer disc (DVD-5) and the final size of your remade disc is greater than about 4486Mb, you will have to re-encode or transcode it to reduce its size prior to burning it. There are several programs that will reduce the size of your disc. A few of them that are popular are DVD Rebuilder, DVD Shrink, and Nero Recode. Once you have your disc down to a size that will fit, you can use any DVD burning application to burn it. A few of the more popular commercial burning programs are Nero Express or Burning ROM, or VSO's CopyToDVD. Or if you are looking for a free alternative, there's ImageTool Classic, which makes an ISO image of your disk and then burns it using DVD Decrypter. Here are some links to some of the software mentioned:
DVD Shrink DVD Rebuilder CopyToDVD Nero ImageTool Classic
Página 11 de 11Quick Start Guide
28/08/2014file://C:\Users\Usuario\AppData\Local\Temp\~hh8CB8.htm

Reference Section
Copyright © 2005, DimadSoft
Menus and Toolbar
The Reference Section provides detailed information on all of DvdReMake Pro's functions. It is organized in the Table of Contents to closely match the structure of the program's user interface. These are the Reference sections:
Menus and Toolbar File Menu Edit Menu View Menu Tools Menu
DVD Tree Root Video Manager Domain (VMG)
First Play PGC VMG Menu Language Unit
VMG Menu PGC VMG Title Map
Video Title Sets (VTS) VTS Menu Language Unit
VTS Menu PGC Program Chains
Program Chain (PGC) VTS Title Map
Domain Content View Domain Content Pane Audio Tracks Pane SubPicture Tracks Pane Video Information Pane
PGC View Blocks Preview Pane Programs Pane Pre/Post/Cell Command Panes Buttons Pane Button Edit Dialog Audio Tracks Pane SubPicture Tracks Pane Extras Pane CLUT Pane
Video/Audio/Subtitle Preview Menu Preview/Editor Color Scheme Dialog
Miscellaneous Dialogs Select Angle Dialog Select Block Dialog Select Block Dialog (for Substitute Block) Select Pool Dialog Prohibited User Operations Dialog
History Log
Menus The menus provide access to the programs top-level functions and settings. Click on one of the menu titles on the menu bar below to see a description of that menu.
Toolbar The toolbar provides a quick means of using some of the more common functions that are in the menus. Below are brief descriptions of the toolbar buttons. For a more detailed description, refer to the menu descriptions for the same functions.
Página 1 de 48Reference Section
28/08/2014file://C:\Users\Usuario\AppData\Local\Temp\~hhB1A.htm

Copyright © 2005, DimadSoft
File Menu
Import DVD Start a new project by importing a DVD.
Export DVD Export the current project to a hard drive folder.
Export Test DVD Export a test DVD of the current project. Scenes will be cut to the duration specified in Options.
New Project Start a new empty project.
Open Project Open a previously saved project.
Save Project Save the current project to a file (.drp)
Undo Undo the last operation. Multiple operations can be undone from the History Pane
Redo Redo a previously undone operation.
Undo "Open Destination" Step back to the location where the last "Open Destination" function was performed.
Redo "Open Destination" Re-step forward after using Undo Open Destination.
Easy Mode Select the "Easy Mode" where only major domains are shown in the DVD Tree.
Advanced Mode Select the "Advanced Mode" where all domains are shown in the DVD Tree.
Skip Blank Frames Toggle the Skip Blank Frames option.
New Window Duplicates the current project as anew project.
About About DvdReMake Pro 3
Available Functions in the File Menu:
Import DVD ...
Start a new project by importing a DVD. The dialog shown in Figure 1 will open, allowing you to select a folder to import from. You should see files with extensions of IFO, VOB, and BUP, as shown. There is no need to select any files, just hit the "Select" button. It is preferred to import DVD files that were previously ripped to your hard drive. See Ripping a DVD for more information. The keyboard shortcut for this function is Ctrl+I. Export DVD ...
Export the current project as a DVD-video, to a hard drive folder. A dialog similar to the one shown in Figure 1 will appear, allowing you to choose the folder to export to. The keyboard shortcut for this function is Ctrl+E. Update export
Updates the files that have changed in a previously exported project. The existing files that have changed will be overwritten. The keyboard shortcut for this function is Ctrl+U. Export test DVD ...
Exports the current project, but all scenes and motion menus will be cut to a duration specified in Import/Export Options. A dialog similar to the one shown in Figure 1 (below) will appear, allowing you to choose the folder to export to. This is useful in testing the navigation of the disc to see if changes that you made were correct, without having to wait for a lengthy export. The keyboard shortcut for this function is Ctrl+T. Export modified files ...
Exports only files that have changed. This is different than the "Update export" function because you don't have to do a full export first. The exported files will not make a complete DVD (unless all of the files have changed). This function can be useful for advanced users who only make a few changes and wish to avoid a lengthy export of unchanged files. After using this function, the files that were exported will have to be copied to the source folder, replacing the original ones. As a safety feature, DvdReMake will not modify your source files. The keyboard shortcut for this function is Ctrl+M. Export All ...
Exports all open projects. A dialog similar to the one shown in Figure 1 (below) will appear, allowing you to choose a base folder for the exported projects. Each project will be exported to its own subfolder of the base folder. The keyboard shortcut for this function is Ctrl+Shift+E. New project
Página 2 de 48Reference Section
28/08/2014file://C:\Users\Usuario\AppData\Local\Temp\~hhB1A.htm

Copyright © 2005, DimadSoft
Edit Menu
Copyright © 2005, DimadSoft
View Menu
Start a new empty project. The keyboard shortcut for this function is Ctrl+N. Open project
Opens a previously saved project. The keyboard shortcut for this function is Ctrl+O. Close project
Closes the currently selected project. Save project ...
Save the currently selected project to a file. The file extension is "drp". The keyboard shortcut for this function is Ctrl+S. Save project As ...
Saves the currently selected project to a new file name. The old project file remains intact. Exit
Exit DvdReMake Pro. You will be prompted to save changes to open projects.
Figure 1
Available Functions in the Edit Menu:
Undo
Undo the last operation. Multiple operations can be undone from the History Pane. The keyboard shortcut for this operation is Ctrl+Z. Redo
Redo a previously undone operation. The keyboard shortcut for this function is Ctrl+Y.
Available Functions in the View Menu:
Layout
The Layout menu has the following submenus: Save ... Save your current screen layout to a layout (.lay) file. Load ... Load a previously saved screen layout file. Reset Reset your screen layout to the default. When you get to "playing around" with different layouts, it is easy to sometimes get things so messed up that you can't figure out how to get it back to normal. When you select this function, it will seem like the program closed, but don't worry, the program will reappear with the default layout and all of your opened projects.
Página 3 de 48Reference Section
28/08/2014file://C:\Users\Usuario\AppData\Local\Temp\~hhB1A.htm

Copyright © 2005, DimadSoft
Tools Menu
Toolbar
Toggles the toolbar on or off. Status Bar
Toggles the status bar on or off. History
Toggles the display of the History Pane. The History Pane can also be auto-hidden to a tab when it is docked. When it is hidden with this toggle, it is completely invisible. Log
Toggles the display of the Log Pane. The Log Pane can also be auto-hidden to a tab when it is docked. When it is hidden with this toggle, it is completely invisible. Projects Bar
Specifies where to display the project tabs. The possible options are: "Hide", "Bottom", "Right side", "Top", and "Left Side". The Project Bar provides a quick way to switch between open projects.
UI theme
Specifies what theme to use for the program's user interface. Possible choices are: "Visual Studio 2005", "MS Office 2003", "MS Office XP", and "MS Office 2000". Docking Type
Specifies the docking style to be used for movable panes. The possible choices are: "Select by UI theme", "Studio 2003", "Studio 2005". For more information see: Customizing the User Interface. Menus Animation
Specifies what type of animated effect to use when opening the program's menus. Possible choices are: "Random", "Roll", "Slide", "Fade", "Roll & Stretch", "Slide & Stretch", "Noise", "Boxes", "Circles", and "Holes".
Available Functions in the Tools Menu:
Merge DVDs ...
Combine 2-4 projects into one project. A Title menu is created that allows the user to choose which "disk" to play. For more information see: Merge multiple DVDs into one. Options ...
Opens up the Options Dialog allowing you to configure various program options. See below.
Import/Export Options
Página 4 de 48Reference Section
28/08/2014file://C:\Users\Usuario\AppData\Local\Temp\~hhB1A.htm

Available Import/Export options
Shortest BOV duration
In addition to buttons on menus, DVD titles can also have buttons (BOV=Button Over Video). DvdReMake searches for these BOV's when you import a DVD. The only way that DvdReMake can determine if there are BOV's within a title, is to search through the entire title for them. This can take a considerable amount of time due to the size of a title. To reduce the amount of time this takes, DvdReMake can scan through the titles at certain intervals instead of looking at the entire title. The "Shortest BOV duration" setting, sets this interval. The shorter the interval, the longer the search will take. Possible values for this setting are: "0.5 seconds", "1.5 seconds", "3 seconds", "9 seconds", "15 seconds", or "no BOV". Setting this to a high value or "no BOV" will speed-up imports, but will increase the chance that a button will be missed. The default value of 3 seconds is usually a reasonable setting since it is unlikely that a button will be displayed for less than 3 seconds. Bypass hidden parts before export (Auto bypass)
If this option is enabled, the disc's navigation will be adjusted to bypass any material that you've hidden. When the player reaches hidden material, there can be a pause. The auto bypass feature significantly reduces this pause. If there is a large amount of hidden material or the player is particularly slow, there can still be a slight pause. Test DVD export - "Cut scenes at" & "Cut motion menus at"
These settings specify the duration of scenes and motion menus for the Export test DVD function. Default directories
These setting allow you to specify the default directories (folders) used for Imports, Exports, Test exports, and Modified exports.
Format Options
Available Format options
Font
Allows you to change the font used for the user interface. Press the "Reset" button to reset to the default font. Domain Content Preview Options
Certain discs that have a large number of PGC's or cells can degrade system performance when DvdReMake attempts to build its display items. To alleviate this problem, these options allow you to disable some of the more time-intensive display routines. Skip blank frames at start
This setting affects the way the Blocks Preview in the Domain Content View and the PGC View work. When this option is enabled, each block will skip to a position where there is visible content. For more information see: Domain Content Pane Blocks Preview
Show "Goto PGC" in pop-up menu If this option is disabled, the "Goto PGC" function will be unavailable in the Domain Content Pane. On DVD's with a large number of PGC's, the "Goto PGC" function can degrade system performance since the program must dynamically create the pop-up menus that display the PGC and cell numbers.
Show pgc/cell
Página 5 de 48Reference Section
28/08/2014file://C:\Users\Usuario\AppData\Local\Temp\~hhB1A.htm

Copyright © 2005, DimadSoft
DVD Tree
Copyright © 2005, DimadSoft
DVD Tree Root
If this option is disabled, the PGC and cell numbers will not be shown on the preview blocks in the Domain Content Pane. On DVD's with a large number of PGC's and cells, system performance can be degraded since the program must dynamically render the PGC and cell numbers onto the preview blocks.
Undo/Redo - Old revisions amount
This option sets the number of operations that will be kept in the history list. This will be the number of times that you can undo. The higher the number is, the more memory that the operation history uses and therefore can reduce system performance, especially on computers with a modest amount of RAM. The possible choices are: "don't keep", 1, 5, 10, 25, 50, and 100. The "don't keep" setting disables history, undo, and redo. Block Preview
Button link pointers This option sets the position for the adjacent button link pointers shown for menu buttons. The possible choices are: "don't show", "center", "inside", and "outside". For more information on the adjacent button link pointers see, Menu Preview/Editor.
Show info This option turns on or off, the indicators for total size, total time, Mb elapsed, Mb remaining, current VOBU, current audio stream, and current subtitle stream.
DVD Tree options
Show sizes If this option is disabled, the sizes will not be shown in the "Size" column of the DVD Tree.
Highlight DVD navigation errors Enables or disables DvdReMake's navigation error highlighting feature.
Target size Sets the desired target size for remade discs. The total project size that is shown at the DVD Tree Root, will be orange if the current project's size exceeds this setting. If the total project size does exceed the target, and you hover the mouse cursor over the total size, a tooltip will appear, showing how much in excess of the target size the total is. Note that this setting only gives the program the information that it needs to be able to show whether or not you have exceeded your desired size, and does not actually affect the size of your exported disk.
The DVD Tree provides access to the disk's hierarchy. The tree is used
to select which item of the disk that you would like to work on. Which items shown in the DVD Tree depends on whether the current
view mode is set for Easy or Advanced. In the Easy mode, only the major domains are shown, which includes, the Video Manager (VMG) and Video Title Sets (VTS) and their menus. In the Advanced mode, details of all domains are shown. The Easy or Advanced view mode can be selected on the Toolbar.
Root Video Manager (VMG) First Play PGC VMG Menu Language Unit VMG Menu PGC VMG Titles Video Title Sets (VTS) VTS Menu Language Unit VTS Menu PGC VTS Program Chains (PGC) VTS Titles
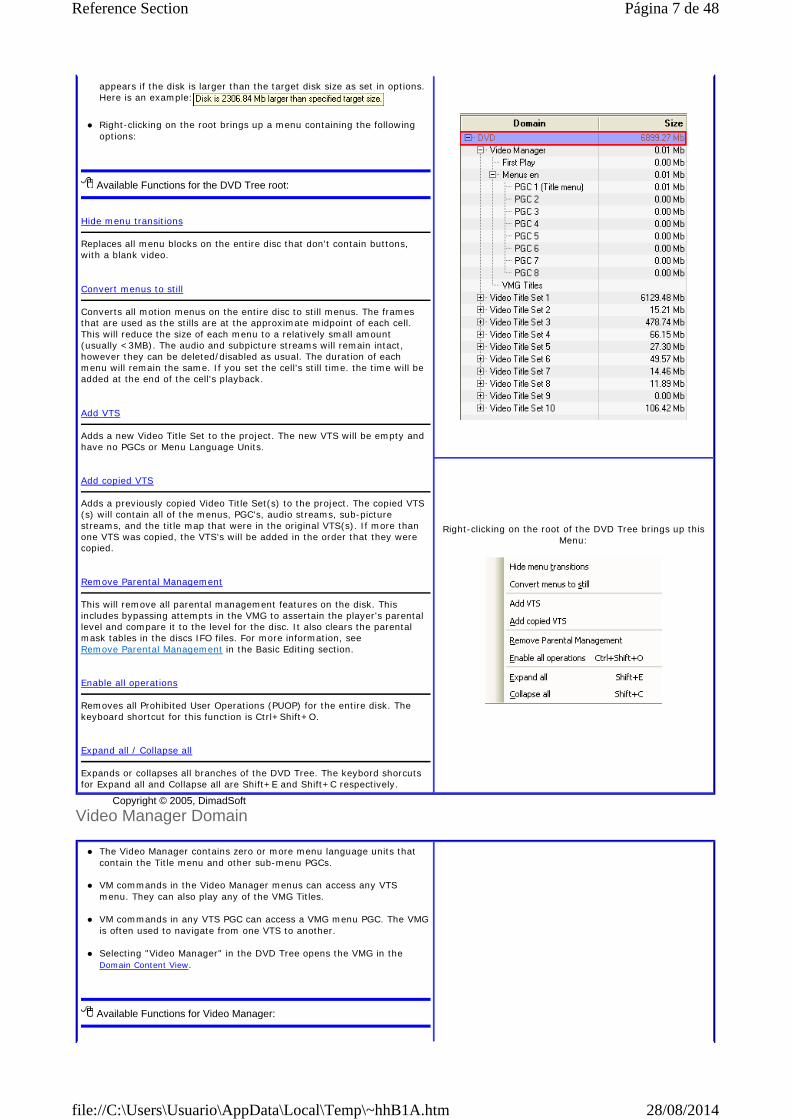
The root of the DVD tree shows the size of the current disk in Megabytes (1MB = 1024x1024 = 1,048,576 bytes).
If you hover the mouse cursor over the root of the DVD, a tool-tip
Página 6 de 48Reference Section
28/08/2014file://C:\Users\Usuario\AppData\Local\Temp\~hhB1A.htm
Copyright © 2005, DimadSoft
Video Manager Domain
appears if the disk is larger than the target disk size as set in options. Here is an example:
Right-clicking on the root brings up a menu containing the following
options:
Available Functions for the DVD Tree root:
Hide menu transitions
Replaces all menu blocks on the entire disc that don't contain buttons, with a blank video. Convert menus to still
Converts all motion menus on the entire disc to still menus. The frames that are used as the stills are at the approximate midpoint of each cell. This will reduce the size of each menu to a relatively small amount (usually <3MB). The audio and subpicture streams will remain intact, however they can be deleted/disabled as usual. The duration of each menu will remain the same. If you set the cell's still time. the time will be added at the end of the cell's playback. Add VTS
Adds a new Video Title Set to the project. The new VTS will be empty and have no PGCs or Menu Language Units. Add copied VTS
Adds a previously copied Video Title Set(s) to the project. The copied VTS(s) will contain all of the menus, PGC's, audio streams, sub-picture streams, and the title map that were in the original VTS(s). If more than one VTS was copied, the VTS's will be added in the order that they were copied. Remove Parental Management
This will remove all parental management features on the disk. This includes bypassing attempts in the VMG to assertain the player's parental level and compare it to the level for the disc. It also clears the parental mask tables in the discs IFO files. For more information, see Remove Parental Management in the Basic Editing section. Enable all operations
Removes all Prohibited User Operations (PUOP) for the entire disk. The keyboard shortcut for this function is Ctrl+Shift+O. Expand all / Collapse all
Expands or collapses all branches of the DVD Tree. The keybord shorcuts for Expand all and Collapse all are Shift+E and Shift+C respectively.
Right-clicking on the root of the DVD Tree brings up this
Menu:
The Video Manager contains zero or more menu language units that contain the Title menu and other sub-menu PGCs.
VM commands in the Video Manager menus can access any VTS
menu. They can also play any of the VMG Titles. VM commands in any VTS PGC can access a VMG menu PGC. The VMG
is often used to navigate from one VTS to another. Selecting "Video Manager" in the DVD Tree opens the VMG in the
Domain Content View.
Available Functions for Video Manager:
Página 7 de 48Reference Section
28/08/2014file://C:\Users\Usuario\AppData\Local\Temp\~hhB1A.htm
Copyright © 2005, DimadSoft
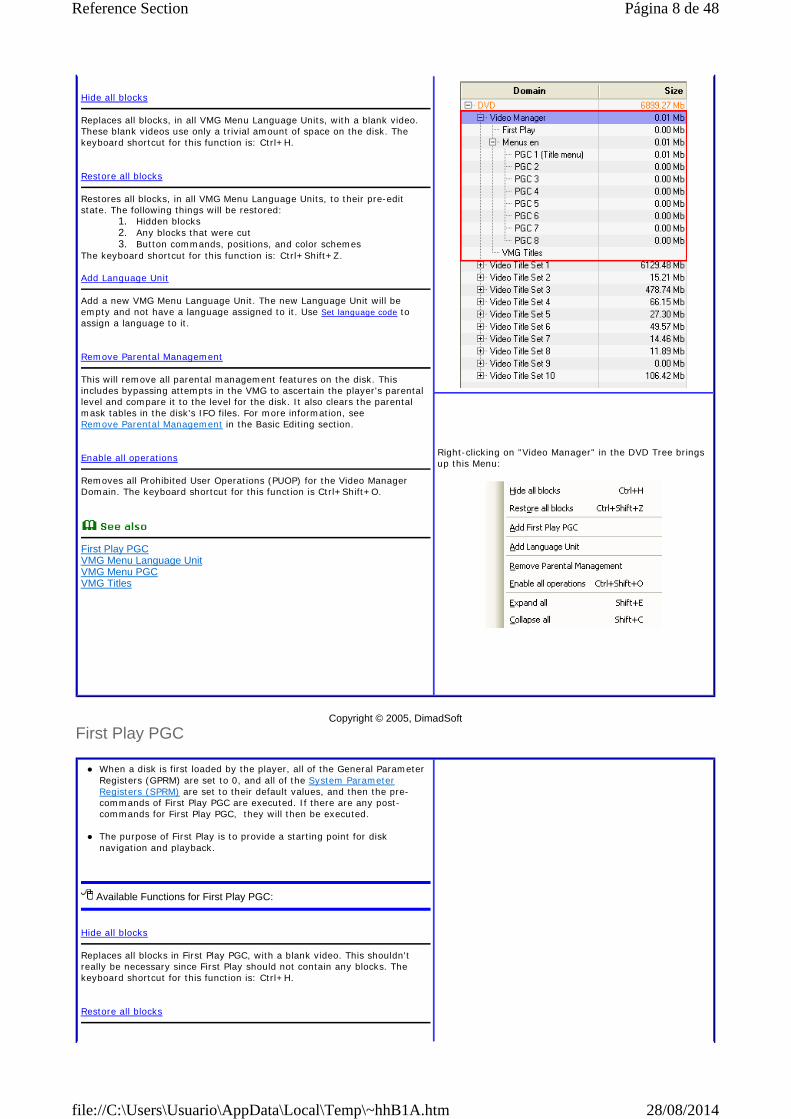
First Play PGC
Hide all blocks
Replaces all blocks, in all VMG Menu Language Units, with a blank video. These blank videos use only a trivial amount of space on the disk. The keyboard shortcut for this function is: Ctrl+H. Restore all blocks
Restores all blocks, in all VMG Menu Language Units, to their pre-edit state. The following things will be restored:
1. Hidden blocks 2. Any blocks that were cut 3. Button commands, positions, and color schemes
The keyboard shortcut for this function is: Ctrl+Shift+Z. Add Language Unit
Add a new VMG Menu Language Unit. The new Language Unit will be empty and not have a language assigned to it. Use Set language code to assign a language to it. Remove Parental Management
This will remove all parental management features on the disk. This includes bypassing attempts in the VMG to ascertain the player's parental level and compare it to the level for the disk. It also clears the parental mask tables in the disk's IFO files. For more information, see Remove Parental Management in the Basic Editing section. Enable all operations
Removes all Prohibited User Operations (PUOP) for the Video Manager Domain. The keyboard shortcut for this function is Ctrl+Shift+O.
First Play PGC VMG Menu Language Unit VMG Menu PGC VMG Titles
Right-clicking on "Video Manager" in the DVD Tree brings up this Menu:
When a disk is first loaded by the player, all of the General Parameter Registers (GPRM) are set to 0, and all of the System Parameter Registers (SPRM) are set to their default values, and then the pre-commands of First Play PGC are executed. If there are any post-commands for First Play PGC, they will then be executed.
The purpose of First Play is to provide a starting point for disk
navigation and playback.
Available Functions for First Play PGC:
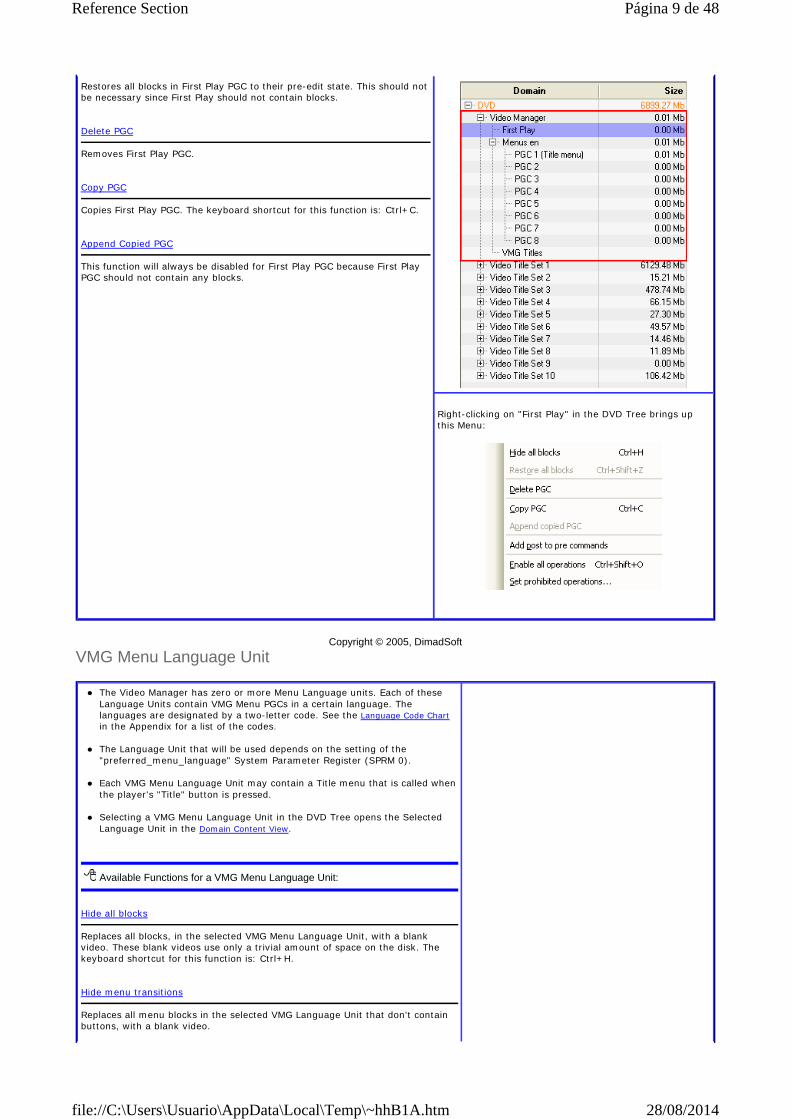
Hide all blocks
Replaces all blocks in First Play PGC, with a blank video. This shouldn't really be necessary since First Play should not contain any blocks. The keyboard shortcut for this function is: Ctrl+H. Restore all blocks
Página 8 de 48Reference Section
28/08/2014file://C:\Users\Usuario\AppData\Local\Temp\~hhB1A.htm
Copyright © 2005, DimadSoft
VMG Menu Language Unit
Restores all blocks in First Play PGC to their pre-edit state. This should not be necessary since First Play should not contain blocks. Delete PGC
Removes First Play PGC. Copy PGC
Copies First Play PGC. The keyboard shortcut for this function is: Ctrl+C. Append Copied PGC
This function will always be disabled for First Play PGC because First Play PGC should not contain any blocks.
Right-clicking on "First Play" in the DVD Tree brings up this Menu:
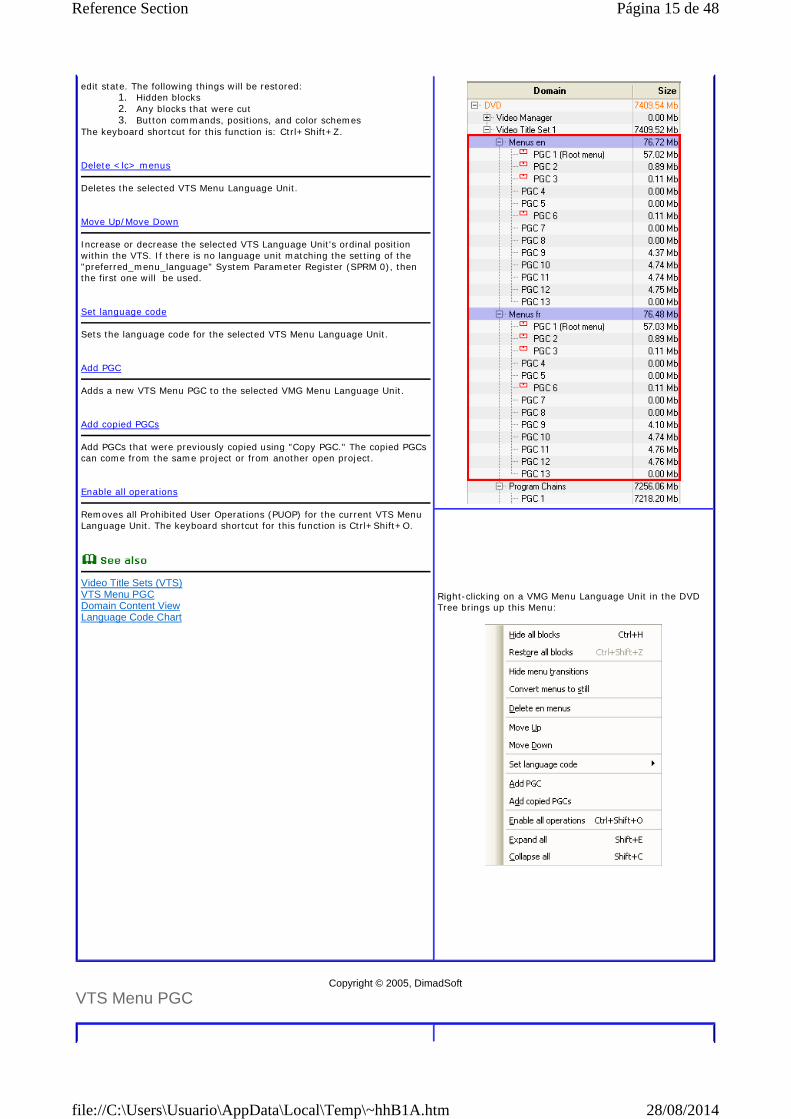
The Video Manager has zero or more Menu Language units. Each of these Language Units contain VMG Menu PGCs in a certain language. The languages are designated by a two-letter code. See the Language Code Chart in the Appendix for a list of the codes.
The Language Unit that will be used depends on the setting of the
"preferred_menu_language" System Parameter Register (SPRM 0). Each VMG Menu Language Unit may contain a Title menu that is called when
the player's "Title" button is pressed. Selecting a VMG Menu Language Unit in the DVD Tree opens the Selected
Language Unit in the Domain Content View.
Available Functions for a VMG Menu Language Unit:
Hide all blocks
Replaces all blocks, in the selected VMG Menu Language Unit, with a blank video. These blank videos use only a trivial amount of space on the disk. The keyboard shortcut for this function is: Ctrl+H. Hide menu transitions
Replaces all menu blocks in the selected VMG Language Unit that don't contain buttons, with a blank video.
Página 9 de 48Reference Section
28/08/2014file://C:\Users\Usuario\AppData\Local\Temp\~hhB1A.htm
Copyright © 2005, DimadSoft
VMG Menu PGC
Convert menus to still
Converts all motion menus in the the selected VMG Menu Language Unit to still menus. The frames that are used as the stills are at the approximate midpoint of each cell. This will reduce the size of each menu to a relatively small amount (usually <3MB). The audio and subpicture streams will remain intact, however they can be deleted/disabled as usual. The duration of each menu will remain the same. If you set the cell's still time. the time will be added at the end of the cell's playback. Restore all blocks
Restores all blocks, in the selected VMG Menu Language Unit, to their pre-edit state. The following things will be restored:
1. Hidden blocks 2. Any blocks that were cut 3. Button commands, positions, and color schemes
The keyboard shortcut for this function is: Ctrl+Shift+Z. Delete <lc> menus
Deletes the selected VMG Menu Language Unit. Move Up/Move Down
Increase or decrease the selected VMG Language Unit's ordinal position within the VMG. If there is no language unit matching the setting of the "preferred_menu_language" System Parameter Register (SPRM 0), then the first one will be used. Set language code
Sets the language code for the selected VMG Menu Language Unit. Add PGC
Adds a new VMG Menu PGC to the selected VMG Menu Language Unit. Add copied PGCs
Add PGCs that were previously copied using "Copy PGC." The copied PGCs can come from the same project or from another open project. Enable all operations
Removes all Prohibited User Operations (PUOP) for the current VMG Menu Language Unit. The keyboard shortcut for this function is Ctrl+Shift+O.
Video Manager Domain VMG Menu PGC Domain Content View Language Code Chart
Right-clicking on a VMG Menu Language Unit in the DVD Tree brings up this Menu:
The Video Manager contains zero or more menu language units that
Página 10 de 48Reference Section
28/08/2014file://C:\Users\Usuario\AppData\Local\Temp\~hhB1A.htm

contain the Title menu and other sub-menu PGC's. VM commands in the VMG Menu PGC's can access any VTS menu.
They can also play any of the VMG Titles. VM commands in any VTS PGC can access a VMG menu PGC. The VMG
is often used to navigate from one VTS to another. A symbol next to a PGC in the DVD Tree, indicates that it contains
buttons. Selecting a VMG Menu PGC in the DVD Tree opens it in the PGC View.
Available Functions for a VMG Menu PGC:
Hide all blocks
Replaces all blocks, in the selected VMG Menu PGC, with a blank video. These blank videos use only a trivial amount of space on the disk. The keyboard shortcut for this function is: Ctrl+H. Restore all blocks
Restores all blocks, in the selected VMG Menu PGC, to their pre-edit state. The following things will be restored:
1. Hidden blocks 2. Any blocks that were cut 3. Button commands, positions, and color schemes
The keyboard shortcut for this function is: Ctrl+Shift+Z. Delete PGC
Deletes the selected VMG Menu PGC. Copy PGC
Copies the selected VMG Menu PGC. This PGC can then be added to another Language unit in the current project or another open project, by using "Add copied PGC." The blocks of the copied PGC can also be appended to another PGC by using "Append copied PGC." If you hold the Shift key down while executing this function, the selected VMG Menu PGC will be added to any previously copied PGC(s). The keyboard shortcut for this function is Ctrl+C or Ctrl+Shift+C to add to previously copied PGC(s). Append copied PGC
Appends the blocks of a previously copied PGC(s) to the end of the blocks of the selected VMG Menu PGC. The copied PGC can come from the current project or another open project. If more than one PGC was copied, the PGC's will be appended in the order that they were copied. Add post to pre commands
Adds all of the post commands for the selected PGC to the end of its pre commands. This is often used as a method to bypass a PGC. This may not be necessary if you have the Auto-bypass option enabled, because it will do this automatically if it is indicated. Set menu category
Sets the menu category for the selected VMG Menu PGC. Since this is in the VMG, the only possible category is the "Title" menu. This menu is called if the player's "Title" button is pressed. Enable all operations
Removes all Prohibited User Operations (PUOP) for the current VMG Menu PGC. The keyboard shortcut for this function is Ctrl+Shift+O. Set prohibited operations
Sets the Prohibited User Operations (PUOP) for the current VMG Menu PGC. See Prohibited User Operations Dialog for more information.
Right-clicking on a VMG Menu PGC in the DVD Tree brings up this Menu:
Página 11 de 48Reference Section
28/08/2014file://C:\Users\Usuario\AppData\Local\Temp\~hhB1A.htm
Copyright © 2005, DimadSoft
VMG Title Map
Video Manager Domain VMG Titles Auto-bypass option Prohibited User Operations Dialog
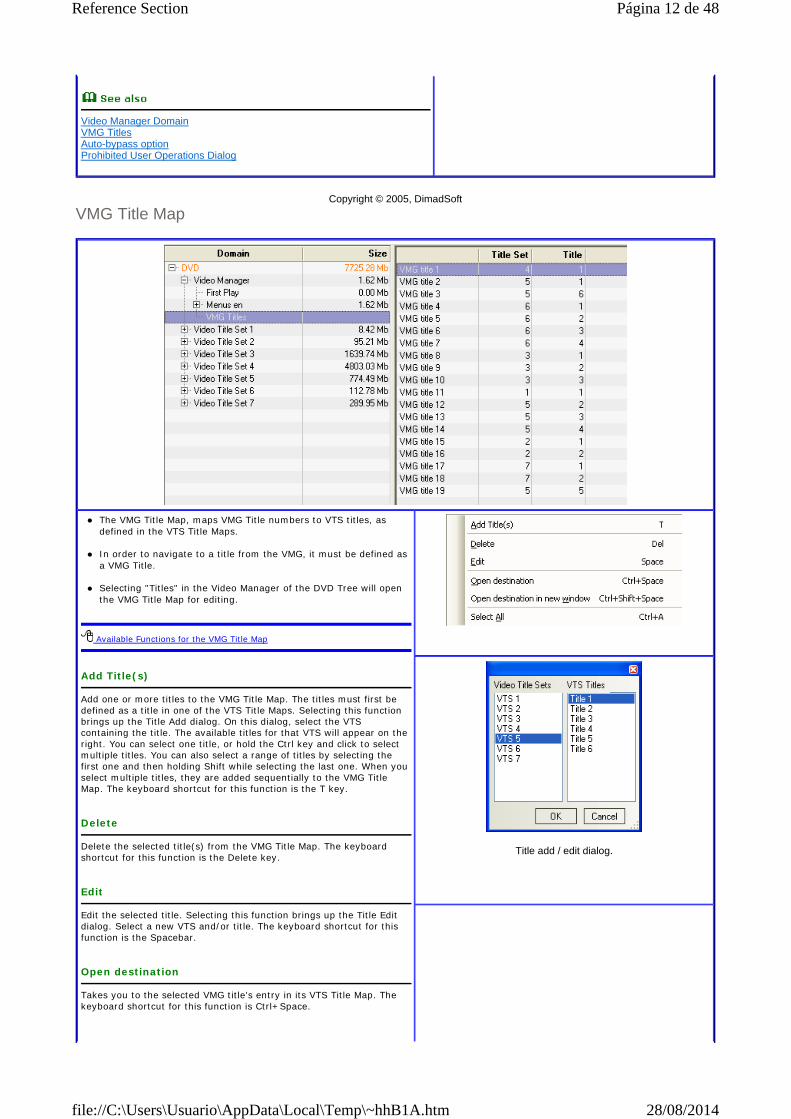
The VMG Title Map, maps VMG Title numbers to VTS titles, as defined in the VTS Title Maps.
In order to navigate to a title from the VMG, it must be defined as
a VMG Title. Selecting "Titles" in the Video Manager of the DVD Tree will open
the VMG Title Map for editing.
Available Functions for the VMG Title Map
Add Title(s)
Add one or more titles to the VMG Title Map. The titles must first be defined as a title in one of the VTS Title Maps. Selecting this function brings up the Title Add dialog. On this dialog, select the VTS containing the title. The available titles for that VTS will appear on the right. You can select one title, or hold the Ctrl key and click to select multiple titles. You can also select a range of titles by selecting the first one and then holding Shift while selecting the last one. When you select multiple titles, they are added sequentially to the VMG Title Map. The keyboard shortcut for this function is the T key. Delete
Delete the selected title(s) from the VMG Title Map. The keyboard shortcut for this function is the Delete key. Edit
Edit the selected title. Selecting this function brings up the Title Edit dialog. Select a new VTS and/or title. The keyboard shortcut for this function is the Spacebar. Open destination
Takes you to the selected VMG title's entry in its VTS Title Map. The keyboard shortcut for this function is Ctrl+Space.
Title add / edit dialog.
Página 12 de 48Reference Section
28/08/2014file://C:\Users\Usuario\AppData\Local\Temp\~hhB1A.htm

Copyright © 2005, DimadSoft
Video Title Sets (VTS)
Open destination in new window
Opens a duplicate project with focus being on the selected VMG title's entry in its VTS Title Map. The keyboard shortcut for this function is Ctrl+Shift+Space. Select All
Selects all titles. The keyboard shortcut for this function is Ctrl+A.
Title add dialog with four titles selected.
The Video Title Sets (VTS) contain Program Chains which contain all of the disk's titles.
Each VTS can have any number of VTS Menu Language Units. These
Menu Language Units can contain The Root menu for the VTS. It can also optionally contain Audio, Sub-picture, Angle, or Chapters menus as well as other VTS Menu PGC's with no special classification.
Each VTS has a VTS Title Map that defines its VTS Titles and also the
chapters for each title. A chapter is also known as a Part of Title or PTT.
Selecting a VTS in the DVD Tree opens it in the Domain Content View.
Available Functions for a Video Title Set:
Hide all blocks
Replaces all blocks, in all VTS PGCs, with a blank video. These blank videos use only a trivial amount of space on the disk. The keyboard shortcut for this function is: Ctrl+H. Using this function from a VTS, does not hide menu blocks. If you would like to hide all menu blocks, you must run this function from a VTS Menu Language Unit. Restore all blocks
Restores all blocks, in all VTS PGCs, to their pre-edit state. The following things will be restored:
1. Hidden blocks 2. Any blocks that were cut 3. Button commands, positions, and color schemes
The keyboard shortcut for this function is: Ctrl+Shift+Z. Strip angles ...
For a multi-angle VTS, this function allows you to remove all but one angle from the VTS. After selecting "Strip angles" the Select angle dialog appears. For more information, see Strip unwanted angles in the Basic Editing section. Copy VTS
Copies the entire selected VTS. This VTS can then be added to another project using "Add copied VTS" on its DVD Tree root. If you hold the Shift key down while executing this function, the selected VTS will be added to any previously copied VTS(s). Bulk replace...
Replace multiple blocks with blocks from another VTS. Selecting "Bulk Replace" will bring up the Select Pool Dialog, allowing you to choose the source of the replacement blocks. The replacement blocks can come from the same project or a different project.
Página 13 de 48Reference Section
28/08/2014file://C:\Users\Usuario\AppData\Local\Temp\~hhB1A.htm

Copyright © 2005, DimadSoft
VTS Menu Language Unit
Delete VTS
Delete the selected VTS. Add Language Unit
Add a new VTS Menu Language Unit. The new Language Unit will be empty and not have a language assigned to it. Use Set language code to assign a language to it. Remove Parental Management
Removes the Parental Management masks for the selected VTS. For more information, see Remove Parental Management in the Basic Editing section. Enable all operations
Removes all Prohibited User Operations (PUOP) for the Selected Video Title Set. The keyboard shortcut for this function is Ctrl+Shift+O.
VTS Menu Language Unit VTS Menu PGC VTS Titles Select Angle Dialog Select Pool Dialog Language Codes Chart
Right-clicking on "Video Title Set x" in the DVD Tree brings up this Menu:
Each Video Title Set contains zero or more menu language units that contain the Root menu for the VTS. The menu language units may also optionally contain Audio, Sub-picture, Angle, and Chapters menus, and other sub-menu PGCs.
The Language Unit that will be used depends on the setting of the
"preferred_menu_language" System Parameter Register (SPRM 0). Selecting a VTS Menu Language Unit in the DVD Tree opens the
Selected Language Unit in the Domain Content View.
Available Functions for a VTS Menu Language Unit:
Hide all blocks
Replaces all blocks, in the selected VTS Menu Language Unit, with a blank video. These blank videos use only a trivial amount of space on the disk. The keyboard shortcut for this function is: Ctrl+H. Hide menu transitions
Replaces all menu blocks in the selected VTS Language Unit that don't contain buttons, with a blank video. Convert menus to still
Converts all motion menus in the the selected VTS Menu Language Unit to still menus. The frames that are used as the stills are at the approximate midpoint of each cell. This will reduce the size of each menu to a relatively small amount (usually <3MB). The audio and subpicture streams will remain intact, however they can be deleted/disabled as usual. The duration of each menu will remain the same. If you set the cell's still time. the time will be added at the end of the cell's playback. Restore all blocks
Restores all blocks, in the selected VTS Menu Language Unit, to their pre-
Página 14 de 48Reference Section
28/08/2014file://C:\Users\Usuario\AppData\Local\Temp\~hhB1A.htm
Copyright © 2005, DimadSoft
VTS Menu PGC
edit state. The following things will be restored: 1. Hidden blocks 2. Any blocks that were cut 3. Button commands, positions, and color schemes
The keyboard shortcut for this function is: Ctrl+Shift+Z. Delete <lc> menus
Deletes the selected VTS Menu Language Unit. Move Up/Move Down
Increase or decrease the selected VTS Language Unit's ordinal position within the VTS. If there is no language unit matching the setting of the "preferred_menu_language" System Parameter Register (SPRM 0), then the first one will be used. Set language code
Sets the language code for the selected VTS Menu Language Unit. Add PGC
Adds a new VTS Menu PGC to the selected VMG Menu Language Unit. Add copied PGCs
Add PGCs that were previously copied using "Copy PGC." The copied PGCs can come from the same project or from another open project. Enable all operations
Removes all Prohibited User Operations (PUOP) for the current VTS Menu Language Unit. The keyboard shortcut for this function is Ctrl+Shift+O.
Video Title Sets (VTS) VTS Menu PGC Domain Content View Language Code Chart
Right-clicking on a VMG Menu Language Unit in the DVD Tree brings up this Menu:
Página 15 de 48Reference Section
28/08/2014file://C:\Users\Usuario\AppData\Local\Temp\~hhB1A.htm

Each Video Title Set contains zero or more menu language units that contain the Root menu for the VTS. The menu language units may also optionally contain Audio, Sub-picture, Angle, and Chapters menus, and other sub-menu PGCs.
VM commands in the VTS Menu PGCs can access any menu within the
same PGC. They can also play any of the VTS's titles. They cannot access any other VTS except from a named menu to a another named menu.
VM commands in any VTS Menu PGC can access a VMG menu PGC.
The VMG is often used to navigate from one VTS to another. A next to a PGC in the DVD Tree, indicates that it contains buttons.
Selecting a VTS Menu PGC in the DVD Tree opens it in the PGC View.
Available Functions for a VTS Menu PGC:
Hide all blocks
Replaces all blocks, in the selected VTS Menu PGC, with a blank video. These blank videos use only a trivial amount of space on the disk. The keyboard shortcut for this function is Ctrl+H. Restore all blocks
Restores all blocks, in the selected VTS Menu PGC, to their pre-edit state. The following things will be restored:
1. Hidden blocks 2. Any blocks that were cut 3. Button commands, positions, and color schemes
The keyboard shortcut for this function is: Ctrl+Shift+Z. Delete PGC
Deletes the selected VTS Menu PGC. Any navigation commands on the disk or titles map to the deleted PGC will be flagged as invalid by DvdReMake's navigation error highlighting feature. Copy PGC
Copies the selected VTS Menu PGC. This PGC can then be added to another Language unit in the current project or another open project, by using "Add copied PGC." The blocks of the copied PGC can also be appended to another PGC by using "Append copied PGC." If you hold the Shift key down while executing this function, the selected VTS Menu PGC will be added to any previously copied PGC(s). The keyboard shortcut for this function is Ctrl+C or Ctrl+Shift+C to add to previously copied PGC's. Append copied PGC
Appends the blocks of a previously copied PGC to the end of the blocks of the selected VTS Menu PGC. The copied PGC can come from the current project or another open project. If more than one PGC was copied, the PGC's will be appended in the order that they were copied. Add post to pre commands
Adds all of the post commands for the selected PGC to the end of its pre commands. This is often used as a method to bypass a PGC. This may not be necessary if you have the Auto-bypass option enabled, because it will do this automatically if it is indicated. Set menu category
Sets the menu category for the selected VTS Menu PGC. Possible categories are, "Root", "SubPicture", "Audio", "Angle", or "Chapters". Enable all operations
Removes all Prohibited User Operations (PUOP) for the current VTS Menu PGC. The keyboard shortcut for this function is Ctrl+Shift+O.
Right-clicking on a VMG Menu PGC in the DVD Tree brings up this Menu:
Página 16 de 48Reference Section
28/08/2014file://C:\Users\Usuario\AppData\Local\Temp\~hhB1A.htm
Copyright © 2005, DimadSoft
Program Chains
Copyright © 2005, DimadSoft
Program Chain (PGC)
Set prohibited operations
Sets the Prohibited User Operations (PUOP) for the current VTS Menu PGC. See Prohibited User Operations Dialog for more information.
Video Title Sets VTS Titles Auto-bypass option Prohibited User Operations Dialog
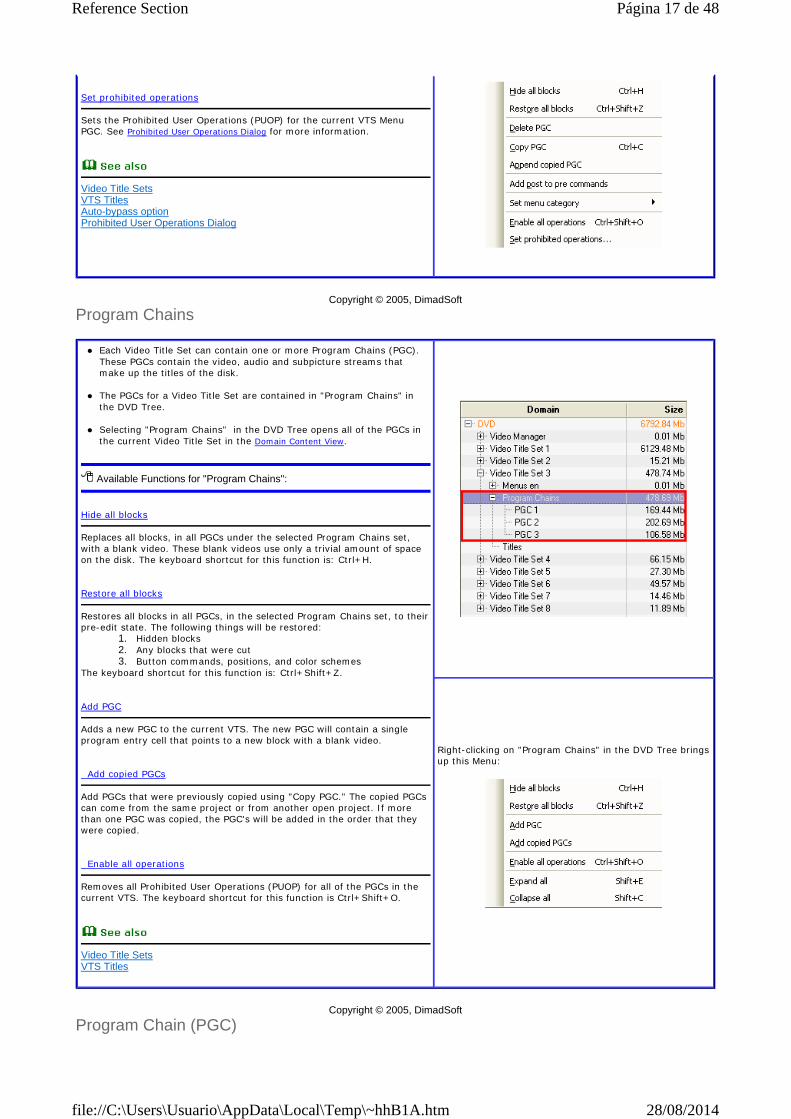
Each Video Title Set can contain one or more Program Chains (PGC). These PGCs contain the video, audio and subpicture streams that make up the titles of the disk.
The PGCs for a Video Title Set are contained in "Program Chains" in
the DVD Tree. Selecting "Program Chains" in the DVD Tree opens all of the PGCs in
the current Video Title Set in the Domain Content View.
Available Functions for "Program Chains":
Hide all blocks
Replaces all blocks, in all PGCs under the selected Program Chains set, with a blank video. These blank videos use only a trivial amount of space on the disk. The keyboard shortcut for this function is: Ctrl+H. Restore all blocks
Restores all blocks in all PGCs, in the selected Program Chains set, to their pre-edit state. The following things will be restored:
1. Hidden blocks 2. Any blocks that were cut 3. Button commands, positions, and color schemes
The keyboard shortcut for this function is: Ctrl+Shift+Z. Add PGC
Adds a new PGC to the current VTS. The new PGC will contain a single program entry cell that points to a new block with a blank video. Add copied PGCs
Add PGCs that were previously copied using "Copy PGC." The copied PGCs can come from the same project or from another open project. If more than one PGC was copied, the PGC's will be added in the order that they were copied. Enable all operations
Removes all Prohibited User Operations (PUOP) for all of the PGCs in the current VTS. The keyboard shortcut for this function is Ctrl+Shift+O.
Video Title Sets VTS Titles
Right-clicking on "Program Chains" in the DVD Tree brings up this Menu:
Página 17 de 48Reference Section
28/08/2014file://C:\Users\Usuario\AppData\Local\Temp\~hhB1A.htm

Each Video Title Set can contain one or more Program Chains (PGC). These PGCs contain the video, audio and subpicture streams that make up the titles of the disk.
VM commands in a PGC can access any other PGC in the same VTS. It
can also access the named menus in its VTS. VM commands in any VTS PGC can access a VMG menu PGC. The VMG
is often used to navigate from one VTS to another. Selecting a PGC in the DVD Tree opens it in the PGC View.
Available Functions for a PGC:
Hide all blocks
Replaces all blocks, in the selected PGC, with a blank video. These blank videos use only a trivial amount of space on the disk. The keyboard shortcut for this function is: Ctrl+H. Restore all blocks
Restores all blocks, in the selected PGC, to their pre-edit state. The following things will be restored:
1. Hidden blocks 2. Any blocks that were cut 3. Button commands, positions, and color schemes
The keyboard shortcut for this function is: Ctrl+Shift+Z. Delete PGC
Deletes the selected PGC. Copy PGC
Copies the selected PGC. This PGC can then be added to another VTS in the current project or another open project, by using "Add copied PGC." The blocks of the copied PGC can also be appended to another PGC by using "Append copied PGC." If you hold the Shift key down while executing this function, the selected PGC will be added to any previously copied PGC(s). The keyboard shortcut for this function is Ctrl+C or Ctrl+Shift+C to add to previously copied PGC's. Append copied PGC
Appends the blocks of a previously copied PGC to the end of the blocks of the selected PGC. The copied PGC can come from the current project or another open project. If more than one PGC was copied, the PGC's will be appended in the order that they were copied. Add post to pre commands
Adds all of the post commands for the selected PGC to the end of its pre commands. This is often used as a method to bypass a PGC. This may not be necessary if you have the Auto-bypass option enabled, because it will do this automatically if it is indicated. Enable all operations
Removes all Prohibited User Operations (PUOP) for the current PGC. The keyboard shortcut for this function is Ctrl+Shift+O. Set prohibited operations
Sets the Prohibited User Operations (PUOP) for the current PGC. See Prohibited User Operations Dialog for more information.
Video Title Sets VTS Titles Auto-bypass option Prohibited User Operations Dialog
Right-clicking on a PGC in the DVD Tree brings up this Menu:
Página 18 de 48Reference Section
28/08/2014file://C:\Users\Usuario\AppData\Local\Temp\~hhB1A.htm
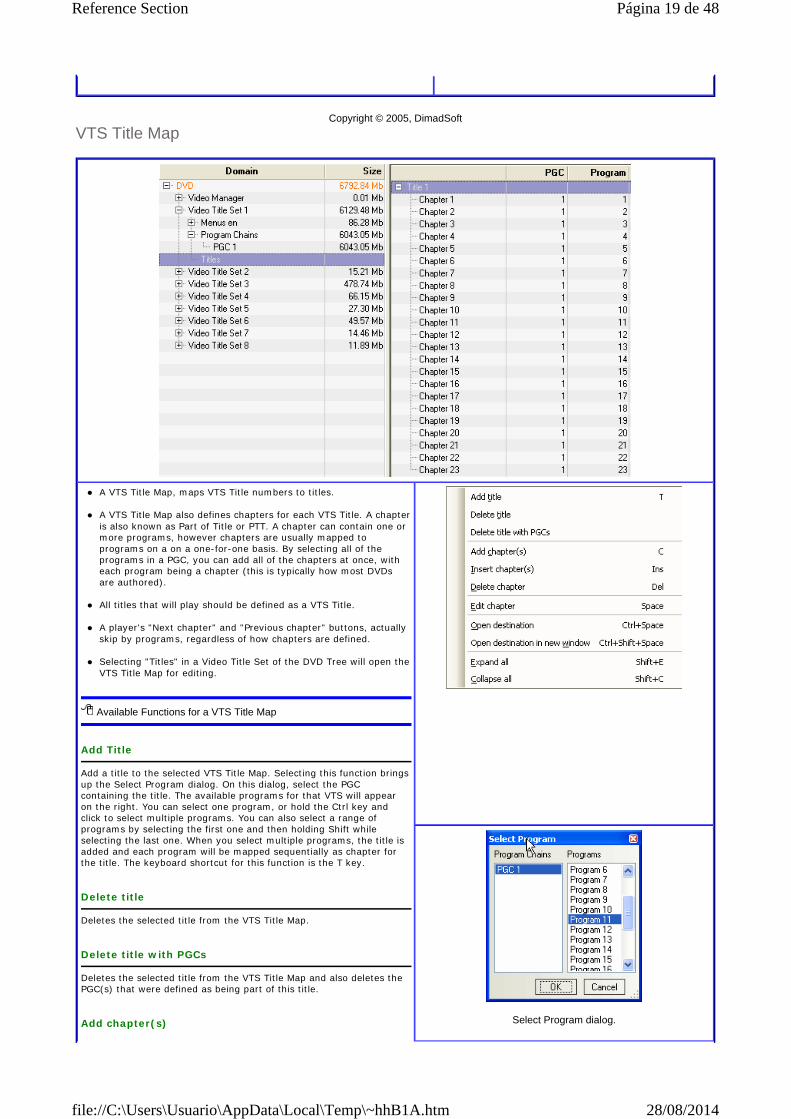
Copyright © 2005, DimadSoft
VTS Title Map
A VTS Title Map, maps VTS Title numbers to titles. A VTS Title Map also defines chapters for each VTS Title. A chapter
is also known as Part of Title or PTT. A chapter can contain one or more programs, however chapters are usually mapped to programs on a on a one-for-one basis. By selecting all of the programs in a PGC, you can add all of the chapters at once, with each program being a chapter (this is typically how most DVDs are authored).
All titles that will play should be defined as a VTS Title.
A player's "Next chapter" and "Previous chapter" buttons, actually
skip by programs, regardless of how chapters are defined. Selecting "Titles" in a Video Title Set of the DVD Tree will open the
VTS Title Map for editing.
Available Functions for a VTS Title Map
Add Title
Add a title to the selected VTS Title Map. Selecting this function brings up the Select Program dialog. On this dialog, select the PGC containing the title. The available programs for that VTS will appear on the right. You can select one program, or hold the Ctrl key and click to select multiple programs. You can also select a range of programs by selecting the first one and then holding Shift while selecting the last one. When you select multiple programs, the title is added and each program will be mapped sequentially as chapter for the title. The keyboard shortcut for this function is the T key. Delete title
Deletes the selected title from the VTS Title Map. Delete title with PGCs
Deletes the selected title from the VTS Title Map and also deletes the PGC(s) that were defined as being part of this title. Add chapter(s)
Select Program dialog.
Página 19 de 48Reference Section
28/08/2014file://C:\Users\Usuario\AppData\Local\Temp\~hhB1A.htm
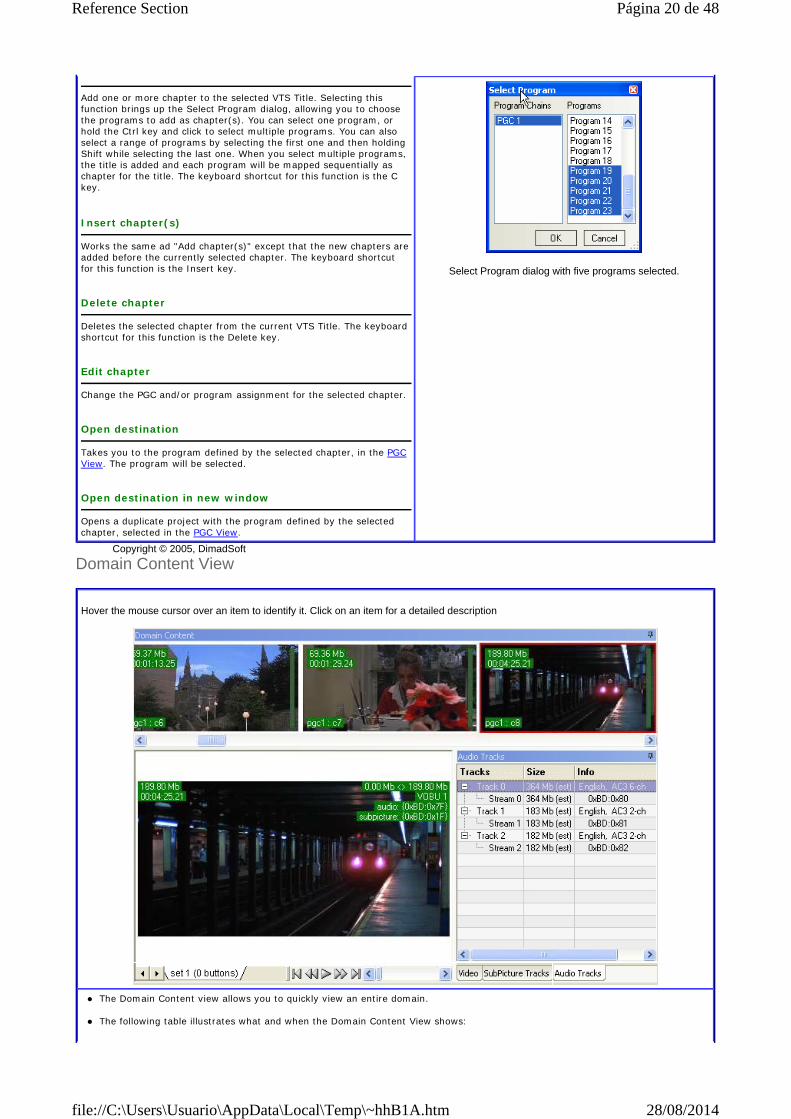
Copyright © 2005, DimadSoft
Domain Content View
Add one or more chapter to the selected VTS Title. Selecting this function brings up the Select Program dialog, allowing you to choose the programs to add as chapter(s). You can select one program, or hold the Ctrl key and click to select multiple programs. You can also select a range of programs by selecting the first one and then holding Shift while selecting the last one. When you select multiple programs, the title is added and each program will be mapped sequentially as chapter for the title. The keyboard shortcut for this function is the C key. Insert chapter(s)
Works the same ad "Add chapter(s)" except that the new chapters are added before the currently selected chapter. The keyboard shortcut for this function is the Insert key. Delete chapter
Deletes the selected chapter from the current VTS Title. The keyboard shortcut for this function is the Delete key. Edit chapter
Change the PGC and/or program assignment for the selected chapter. Open destination
Takes you to the program defined by the selected chapter, in the PGC View. The program will be selected. Open destination in new window
Opens a duplicate project with the program defined by the selected chapter, selected in the PGC View.
Select Program dialog with five programs selected.
Hover the mouse cursor over an item to identify it. Click on an item for a detailed description
The Domain Content view allows you to quickly view an entire domain. The following table illustrates what and when the Domain Content View shows:
Página 20 de 48Reference Section
28/08/2014file://C:\Users\Usuario\AppData\Local\Temp\~hhB1A.htm

Copyright © 2005, DimadSoft
Domain Content Pane
.
When you select this in the DVD Tree... This is shown in the Domain Content View
"Video Manager" All blocks in all VMG Menu Language Units.
A VMG Menu Language Unit All blocks in the selected VMG Menu Language Unit.
A Video Title Set All blocks in all VTS PGCs in the selected VTS (no menus).
A VTS Menu Language Unit All blocks in the selected VTS Menu Language Unit.
"Program Chains" All PGC blocks in the selected VTS.
Domain Content Pane Audio Tracks Pane Sub-Picture Tracks Pane Video Information Pane
Video/Audio/Subtitle Preview
The Domain Content Pane shows a frame for each block in the selected domain.
Clicking on one of the blocks selects that block for the Video/Audio/Subtitle Preview.
An indicator like this: in the upper-left corner of each block shows the size of the block.
An indicator like this: below the size indicator of each block shows the total time for the block.
An indicator like this: in the lower-left corner of each block shows which PGC(s) and cell(s) use the block. If more than
one cell in the same PGC use the block, it will look like this: . In this example cells 2, 3, and 4, in PGC 1 all use the block. If cells in more than one PGC use the block, the indicator will look like this: . These indicators can be turned off by
deselecting the "Show pgc/cell" option in Format options. If the block is interleaved, an indicator will appear below the time indicator that looks like this: . If it is a multi-angle
interleaved block, it will look like this: . When you select an interleaved block, a selectable tab will appear on the Video/Audio/Subtitle Preview, for each interleave unit.
If you make changes to a block an indicator will be shown below the time indicator. All of the indicators can be temporarily hidden by pressing and holding the F6 key. The indicators will return when the F6 key is
released. If the "Skip blank frames at start" option is enabled in Format Options, each block will skip to a position in the block where there is
visible content. The bar graph on the right side of each block shows how far the block has been advanced to skip the blank frames.
Available Functions for Domain Content Pane
Hide block
Replace the selected block(s) with a blank video. This blank video uses only a trivial amount of space on the disk. Multiple blocks can be selected by holding the Ctrl key while selecting them. A range of blocks can be selected by clicking the first one and then holding the Shift key while clicking the last one. All blocks can be selected at once by using the "Select All" function. The keyboard shortcut for this function is Ctrl+H. Hide blocks before this
Replace all blocks before the selected block with a blank video. These blank videos use only a
Página 21 de 48Reference Section
28/08/2014file://C:\Users\Usuario\AppData\Local\Temp\~hhB1A.htm
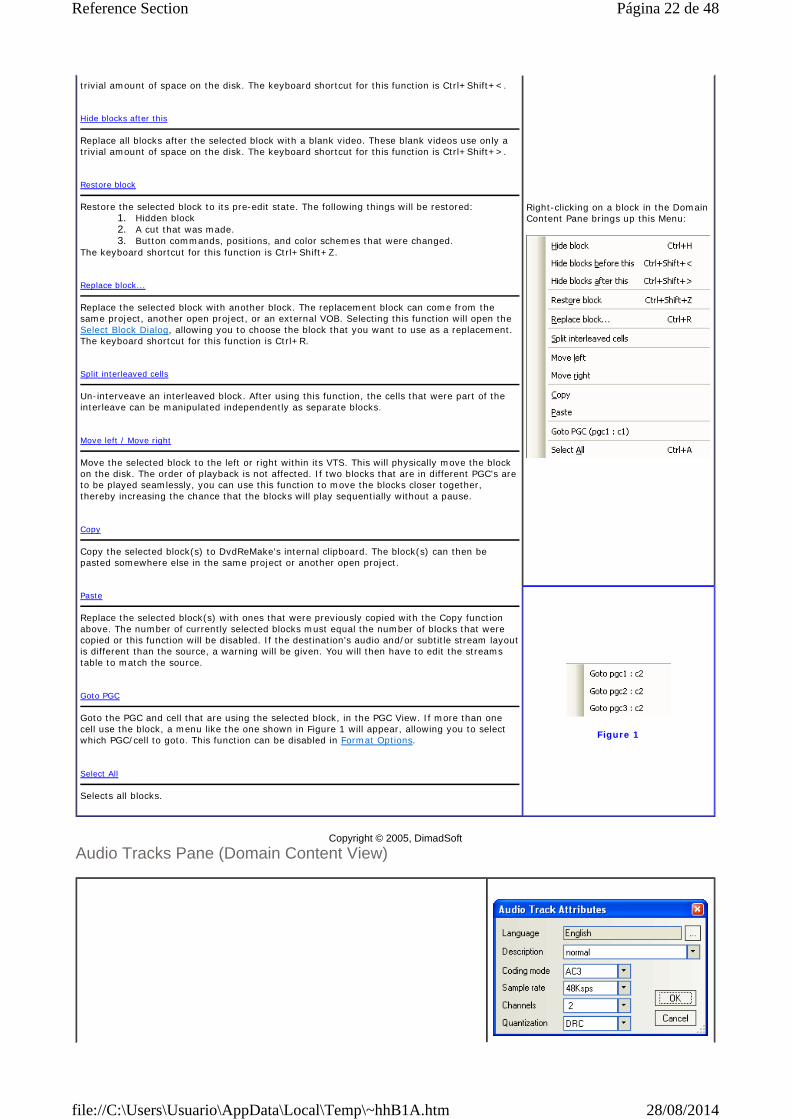
Copyright © 2005, DimadSoft
Audio Tracks Pane (Domain Content View)
trivial amount of space on the disk. The keyboard shortcut for this function is Ctrl+Shift+<. Hide blocks after this
Replace all blocks after the selected block with a blank video. These blank videos use only a trivial amount of space on the disk. The keyboard shortcut for this function is Ctrl+Shift+>. Restore block
Restore the selected block to its pre-edit state. The following things will be restored: 1. Hidden block 2. A cut that was made. 3. Button commands, positions, and color schemes that were changed.
The keyboard shortcut for this function is Ctrl+Shift+Z. Replace block...
Replace the selected block with another block. The replacement block can come from the same project, another open project, or an external VOB. Selecting this function will open the Select Block Dialog, allowing you to choose the block that you want to use as a replacement. The keyboard shortcut for this function is Ctrl+R. Split interleaved cells
Un-interveave an interleaved block. After using this function, the cells that were part of the interleave can be manipulated independently as separate blocks. Move left / Move right
Move the selected block to the left or right within its VTS. This will physically move the block on the disk. The order of playback is not affected. If two blocks that are in different PGC's are to be played seamlessly, you can use this function to move the blocks closer together, thereby increasing the chance that the blocks will play sequentially without a pause. Copy
Copy the selected block(s) to DvdReMake's internal clipboard. The block(s) can then be pasted somewhere else in the same project or another open project. Paste
Replace the selected block(s) with ones that were previously copied with the Copy function above. The number of currently selected blocks must equal the number of blocks that were copied or this function will be disabled. If the destination's audio and/or subtitle stream layout is different than the source, a warning will be given. You will then have to edit the streams table to match the source. Goto PGC
Goto the PGC and cell that are using the selected block, in the PGC View. If more than one cell use the block, a menu like the one shown in Figure 1 will appear, allowing you to select which PGC/cell to goto. This function can be disabled in Format Options. Select All
Selects all blocks.
Right-clicking on a block in the Domain Content Pane brings up this Menu:
Figure 1
Página 22 de 48Reference Section
28/08/2014file://C:\Users\Usuario\AppData\Local\Temp\~hhB1A.htm

Figure 1
The Audio Tracks Pane shows the audio tracks for the selected domain, and allows you to manipulate them in various ways.
The "Size" column shows the size in megabytes of each stream. When the DVD is first imported, the stream sizes are
estimated. When the size shown is an estimate, "(est)" is displayed after each stream's size. You can use "Find exact stream sizes" to determine a more accurate size for each stream. When the streams are being sized, a "searchlight" icon is shown next to each stream's entry to indicate that the sizing routine is running (as shown above).
The "Info" column shows the language and type of each audio track, as well as each stream ID. Each track's info is
shown in this format: language, coding mode, description. The language can be any one of the languages listed in the Language Code Chart in the Appendix. The coding mode can be "Dolby AC3", "MPEG-1", "MPEG-2", "Linear PCM", "DTS", or "SDDS". The description can be "unspecified", "normal", "for the visually impaired", "director's comments", or "alternate director's comment".
Selecting a stream in the Audio Tracks Pane selects that stream as the one to use for audio preview. During a preview,
you can switch streams on-the-fly by selecting a different stream. There may be a slight delay in switching while the audio stream buffer empties. See Video/Audio/Subtitle Preview.
Available Functions for the Audio Tracks Pane:
Disable track in all PGC
Disable the selected audio track in all PGC's. Disabling a track will recover the space that it occupied.
Delete Track
Delete the selected audio track. Only the last track can be deleted. If any track other than the last track is selected, this function will be disabled.
Add track
Add a new audio track. You can assign an existing stream ID to the new track, on the Audio Tracks Pane in the PGC View.
Edit track...
Edit the attributes for the selected audio track. Selecting this function brings up the "Audio Track Attributes Dialog" (Figure 1). The keyboard shortcut for this function is the Spacebar. Double-clicking on a track is also a shortcut for this function.
Copy tracks info
Copies the audio tracks info for the currently selected domain. This info can subsequently be pasted to a different domain elsewhere in the same project or another project. This can be useful after copying blocks from one domain to another, when the audio stream layout is different between them. The keyboard shortcut for this function is Ctrl-C.
Paste tracks info
Paste audio tracks info that was previously copied using the "Paste Tracks Info" function. The keyboard shortcut for this function is Ctrl-V.
Find exact stream sizes
Find the exact size for all audio and subpicture streams in the current domain. Determining the exact stream sizes requires searching through all of the title's VOB files, and therefore can take several minutes to complete. The "searchlight" icon will appear next to each track while the streams are being sized, as shown above. The fact that the search can be time-consuming is the reason that the sizes are only estimated when the DVD is imported. It is not always necessary to know the exact size. You can abort the stream sizing by right-clicking again and selecting "Stop search."
Refresh
Right-clicking on a track in the Audio Tracks Pane brings up this menu:
Página 23 de 48Reference Section
28/08/2014file://C:\Users\Usuario\AppData\Local\Temp\~hhB1A.htm

Copyright © 2005, DimadSoft
Subpicture Tracks Pane (Domain Content View)
Refresh the Audio Tracks Pane. The keyboard shortcut is F5.
Figure 1
The Subpicture Tracks Pane shows the subpicture tracks for the selected domain, and allows you to manipulate them in various ways.
The "Size" column shows the size in megabytes of each stream. When the DVD is first imported, the stream sizes are
estimated. When the size shown is an estimate, "(est)" is displayed after each stream's size. You can use "Find exact stream sizes" to determine a more accurate size for each stream. When the streams are being sized, a "searchlight" icon is shown next to each stream's entry to indicate that the sizing routine is running (as shown above).
The "Info" column shows the language and description (caption type) of each subpicture track, as well as each stream ID.
Each track's info is shown in this format: language, description. The language can be any one of the languages listed in the Language Code Chart in the Appendix. The description can be "normal", "large", "children", "normal CC", "large CC", "children's CC", "forced", "director's comment", "large director's comment", or "director's comment for children".
Selecting a stream in the SubPicture Tracks Pane selects that stream as the one to use for subpicture preview. During a
preview, you can switch streams on-the-fly by selecting a different stream. There may be a slight delay in switching while the subpicture stream buffer empties. See Video/Audio/Subtitle Preview.
Available Functions for the Subpicture Tracks Pane:
Disable track in all PGC
Disable the selected subpicture track in all PGC's. Delete Track
Delete the selected subpicture track. Only the last track can be deleted. If any track other than the last track is selected, this function will be disabled.
Add track
Add a new subpicture track. You can assign an existing stream ID to the new track, on the Subpicture Tracks Pane in the PGC View.
Edit track...
Edit the attributes for the selected subpicture track. Selecting this function brings up the "Subpicture Track Attributes Dialog" (Figure 1). The keyboard shortcut for this function is the Spacebar. Double-clicking on the track is also a shortcut for this function.
Copy tracks info
Copies the subpicture tracks info for the currently selected domain. This info can subsequently be pasted to a different domain elsewhere in the same project or another project. This can be useful after copying blocks from one domain to another, when the subpicture stream layout is different between them. The keyboard shortcut for this function is Ctrl-C.
Paste tracks info
Paste subpicture tracks info that was previously copied using the "Paste Tracks Info" function. The keyboard shortcut for this function is Ctrl-V.
Find exact stream sizes
Find the exact size for all audio and subpicture streams in the current domain. Determining the exact stream sizes requires searching through all of the title's VOB files, and therefore can take several minutes to complete. The "searchlight" icon will appear next to each track while the streams are being sized, as shown above. The fact that the search can be time-consuming is the reason that the sizes are only estimated when the DVD is imported. It is not always necessary to know the exact size. You can abort the stream sizing by right-clicking again and selecting "Stop search."
Right-clicking on a track in the Audio Tracks Pane brings up this menu:
Página 24 de 48Reference Section
28/08/2014file://C:\Users\Usuario\AppData\Local\Temp\~hhB1A.htm

Copyright © 2005, DimadSoft
Video Information Pane
Copyright © 2005, DimadSoft
Program Chains View
Refresh
Refresh the Subpicture Tracks Pane. The keyboard shortcut is F5.
The Video Information Pane shows the format, resolution, and aspect ratio for the selected domain. You can also edit these and a few other attributes.
Please note that most of these settings do not actually
change the content of the DVD, but merely change the attributes that the player uses to know how to display the content. For example, changing the coding mode from MPEG-2 to MPEG-1, will not actually re-encode the video. The ability to change these settings in DvdReMake allows you to fix authoring problems or adjust for custom content that you add or replace existing content with.
Available Functions for a VTS Menu PGC:
Edit ...
Opens the "Video Track Attributes" Dialog (Figure 1) allowing you to edit the attributes for the selected domain. The keyboard shortcut for this function is the Spacebar. Double-clicking anywhere within the Video Information Pane is also a shortcut for this function.
Video Track Attributes Dialog settings:
Aspect Ratio
Normal (4:3): Otherwise known as full screen. Wide (16:9): Widescreen format. Includes options to allow pan/scan and/or letterbox conversion to 4:3 aspect. Video Info
Coding Mode: The type of MPEG encoding used. Possible values are: "MPEG-1" and "MPEG-2." Most DVD's use MPEG-2. Bit Rate: Sets whether a constant bit rate (CBR) or variable bit rate (VBR) is used. Most DVD's use a VBR. Resolution: Sets the video resolution. Possible values for PAL are: 352x288, 352x576, 704x576, 720x576. Possible values for NTSC are: 352x240, 352x480, 704x480, 720x480. Most commercial DVD's use 720x576 for PAL and 720x480 for NTSC. Format
Allows you to set options specific to the video format used on the disk. PAL: PAL format. Includes an option set for Camera or Film mode. NTSC: NTSC format. Includes an option to set Closed Captioning to field 1 and/or field 2. CC1 and CC2 use field 1, and CC3 and CC4 use field 2. TV's manufactured prior to 1990 only support field 1.
Right clicking anywhere in the Video Information pane brings up this menu:
Figure 1
Página 25 de 48Reference Section
28/08/2014file://C:\Users\Usuario\AppData\Local\Temp\~hhB1A.htm

Copyright © 2005, DimadSoft
Blocks Preview
Hover the mouse cursor over an item to identify it (via tooltip). Click on an item for a detailed description
The PGC (Program Chain) View allows you to view and edit an individual Program Chain. With the PGC View you can edit the Virtual Machine (VM) commands for the PGC.
Button commands can also be edited. Buttons can be hidden, or removed.
Blocks Preview Pane Programs Pane Pre/Post/Cell Command Panes Buttons Pane Button Edit Dialog Audio Tracks Pane Subpicture Pane Extras Pane CLUT Pane
Video/Audio/Subtitle Preview
The Blocks Preview for the PGC View shows a frame for each block in the selected PGC.
Clicking on one of the blocks selects that block for the Video/Audio/Subtitle Preview,
and makes it the currently selected block. An indicator like this: in the upper-left corner of each block shows the size of
the block. An indicator like this: under the size indicator shows the total time for the
block. An indicator like this: in the lower-left corner of each block shows which PGC
(s) and cell(s) use the block. If more than one cell in the same PGC use the block, it will look like this: . In this example cells 2, 3, and 4, in PGC 1 all use the block. If cells in more than one PGC use the block, the indicator will look like this:
Página 26 de 48Reference Section
28/08/2014file://C:\Users\Usuario\AppData\Local\Temp\~hhB1A.htm
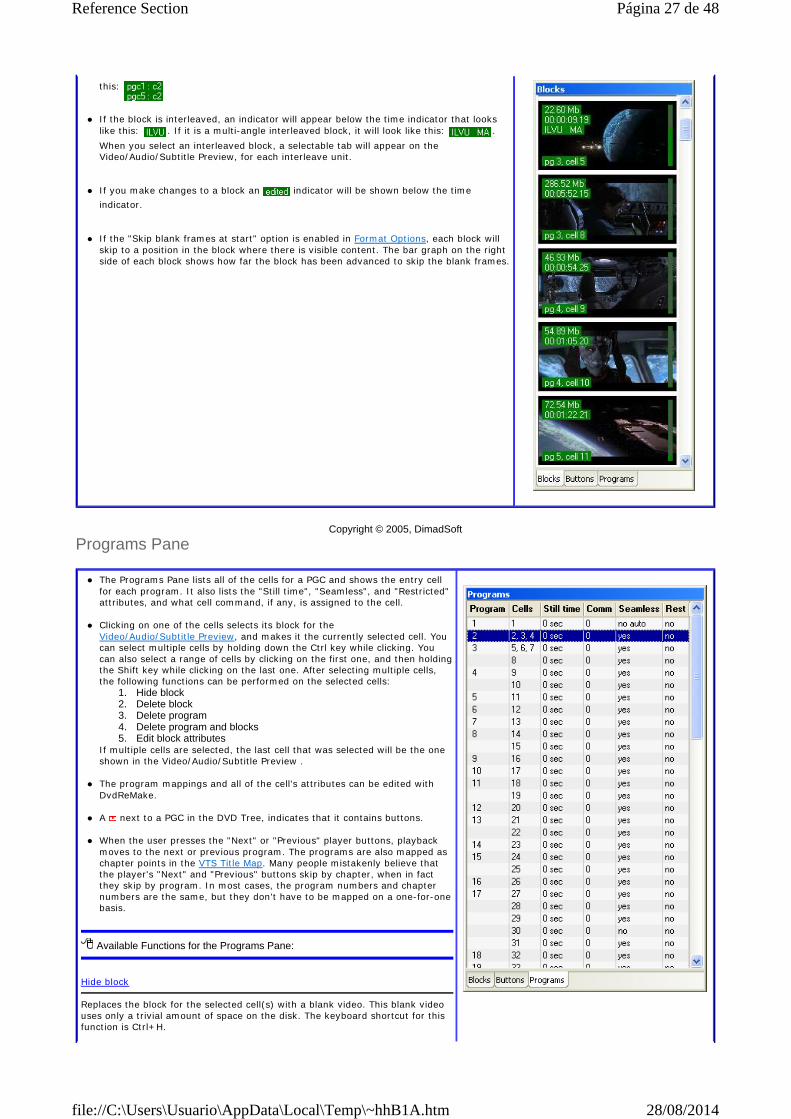
Copyright © 2005, DimadSoft
Programs Pane
this:
If the block is interleaved, an indicator will appear below the time indicator that looks
like this: . If it is a multi-angle interleaved block, it will look like this: . When you select an interleaved block, a selectable tab will appear on the Video/Audio/Subtitle Preview, for each interleave unit.
If you make changes to a block an indicator will be shown below the time indicator.
If the "Skip blank frames at start" option is enabled in Format Options, each block will skip to a position in the block where there is visible content. The bar graph on the right side of each block shows how far the block has been advanced to skip the blank frames.
The Programs Pane lists all of the cells for a PGC and shows the entry cell for each program. It also lists the "Still time", "Seamless", and "Restricted" attributes, and what cell command, if any, is assigned to the cell.
Clicking on one of the cells selects its block for the
Video/Audio/Subtitle Preview, and makes it the currently selected cell. You can select multiple cells by holding down the Ctrl key while clicking. You can also select a range of cells by clicking on the first one, and then holding the Shift key while clicking on the last one. After selecting multiple cells, the following functions can be performed on the selected cells:
1. Hide block 2. Delete block 3. Delete program 4. Delete program and blocks 5. Edit block attributes
If multiple cells are selected, the last cell that was selected will be the one shown in the Video/Audio/Subtitle Preview .
The program mappings and all of the cell's attributes can be edited with
DvdReMake. A next to a PGC in the DVD Tree, indicates that it contains buttons.
When the user presses the "Next" or "Previous" player buttons, playback
moves to the next or previous program. The programs are also mapped as chapter points in the VTS Title Map. Many people mistakenly believe that the player's "Next" and "Previous" buttons skip by chapter, when in fact they skip by program. In most cases, the program numbers and chapter numbers are the same, but they don't have to be mapped on a one-for-one basis.
Available Functions for the Programs Pane:
Hide block
Replaces the block for the selected cell(s) with a blank video. This blank video uses only a trivial amount of space on the disk. The keyboard shortcut for this function is Ctrl+H.
Página 27 de 48Reference Section
28/08/2014file://C:\Users\Usuario\AppData\Local\Temp\~hhB1A.htm
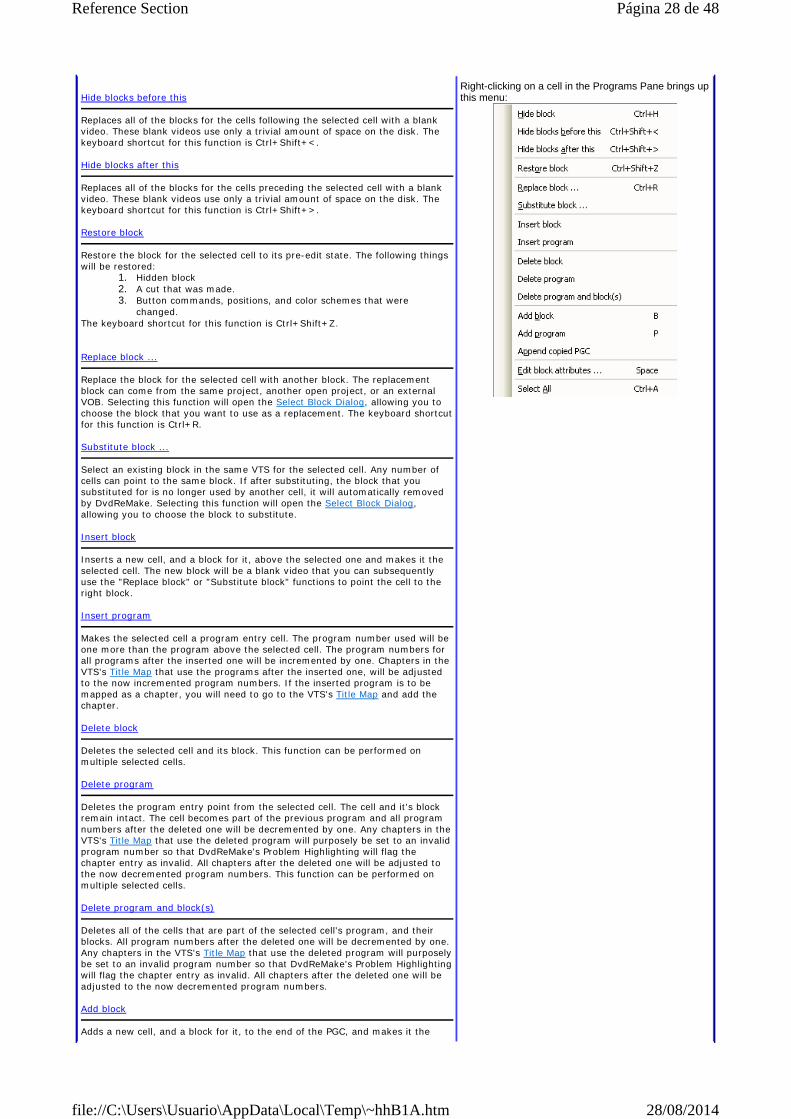
Hide blocks before this
Replaces all of the blocks for the cells following the selected cell with a blank video. These blank videos use only a trivial amount of space on the disk. The keyboard shortcut for this function is Ctrl+Shift+<. Hide blocks after this
Replaces all of the blocks for the cells preceding the selected cell with a blank video. These blank videos use only a trivial amount of space on the disk. The keyboard shortcut for this function is Ctrl+Shift+>. Restore block
Restore the block for the selected cell to its pre-edit state. The following things will be restored:
1. Hidden block 2. A cut that was made. 3. Button commands, positions, and color schemes that were
changed. The keyboard shortcut for this function is Ctrl+Shift+Z. Replace block ...
Replace the block for the selected cell with another block. The replacement block can come from the same project, another open project, or an external VOB. Selecting this function will open the Select Block Dialog, allowing you to choose the block that you want to use as a replacement. The keyboard shortcut for this function is Ctrl+R. Substitute block ...
Select an existing block in the same VTS for the selected cell. Any number of cells can point to the same block. If after substituting, the block that you substituted for is no longer used by another cell, it will automatically removed by DvdReMake. Selecting this function will open the Select Block Dialog, allowing you to choose the block to substitute. Insert block
Inserts a new cell, and a block for it, above the selected one and makes it the selected cell. The new block will be a blank video that you can subsequently use the "Replace block" or "Substitute block" functions to point the cell to the right block. Insert program
Makes the selected cell a program entry cell. The program number used will be one more than the program above the selected cell. The program numbers for all programs after the inserted one will be incremented by one. Chapters in the VTS's Title Map that use the programs after the inserted one, will be adjusted to the now incremented program numbers. If the inserted program is to be mapped as a chapter, you will need to go to the VTS's Title Map and add the chapter. Delete block
Deletes the selected cell and its block. This function can be performed on multiple selected cells. Delete program
Deletes the program entry point from the selected cell. The cell and it's block remain intact. The cell becomes part of the previous program and all program numbers after the deleted one will be decremented by one. Any chapters in the VTS's Title Map that use the deleted program will purposely be set to an invalid program number so that DvdReMake's Problem Highlighting will flag the chapter entry as invalid. All chapters after the deleted one will be adjusted to the now decremented program numbers. This function can be performed on multiple selected cells. Delete program and block(s)
Deletes all of the cells that are part of the selected cell's program, and their blocks. All program numbers after the deleted one will be decremented by one. Any chapters in the VTS's Title Map that use the deleted program will purposely be set to an invalid program number so that DvdReMake's Problem Highlighting will flag the chapter entry as invalid. All chapters after the deleted one will be adjusted to the now decremented program numbers. Add block
Adds a new cell, and a block for it, to the end of the PGC, and makes it the
Right-clicking on a cell in the Programs Pane brings up this menu:
Página 28 de 48Reference Section
28/08/2014file://C:\Users\Usuario\AppData\Local\Temp\~hhB1A.htm

Copyright © 2005, DimadSoft
Pre/Post/Cell Command Panes
selected cell. The new block will be a blank video that you can subsequently use the "Replace block" or "Substitute block" functions to point the cell to the right block. The keyboard shortcut for this function is the B key. Add program
Adds a new cell, and a block for it, to the end of the PGC, and makes it a program entry cell. The new block will be a blank video that you can subsequently use the "Replace block" or "Substitute block" functions to point the cell to the right block. The keyboard shortcut for this function is the P key. Append copied PGC
Appends the blocks of a previously copied PGC to the end of the blocks of the selected PGC. The copied PGC can come from the current project or another open project. Edit block attributes ...
Opens the "PGC Block Attributes Dialog" (Figure 1), which allows you to set the following attributes for the selected cell(s): Command #: This sets the cell command number for the selected cell. The cell commands are shown on the Cell Commands Pane. The corresponding cell command will be executed after the cell is played. Still time: This sets the still time for the cell. Possible values are "no still", 1-254 seconds, and infinity. This is usually used for setting the display duration of a single-frame video such as a menu background. If it is used on a multi-frame video, all of the frames will be played and then the last frame will be shown for the still time duration. Seamless playback: This is a flag that tells the player to make the transition from the previous cell seamless or without a pause. In most cases cells within a PGC will play seamlessly without this flag being set, but when it is set, it tells the player that the VOB's were prepared in such a way to guarantee that the cells will play seamlessly. Merely setting this flag does not guarantee seamless playback, especially if the blocks that the cells point to are physically located far apart. If this flag is set, no cell command will be executed for the previous cell. For this reason, if a cell command is set for a cell, DvdReMake will automatically clear the seamless flag for the next cell. Restricted: When playback reaches a cell with the "Restricted" flag set, any "trick play" will be cancelled and play will revert to standard (1x forward) play. "Trick play" is fast or slow forward play, or any reverse play. The keyboard shortcut for this function is the Spacebar. Double-clicking on a cell is also a shortcut for "Edit block attributes." Select All
Selects all cells.
Figure 1
The Pre, Post, and Cell command Panes list the VM Commands for the selected PGC, and provides a means to edit them.
Pre commands are executed when the PGC is started, before any cells are
shown. If a cell has a cell command associated with it, the command will be
executed after the cell has been played. Post commands are executed after the end of the PGC is reached during
playback or after LinkTailPGC command is executed. Post commands will not be executed when the end of the PGC is reached if the PGC's Next PGC attribute is set to another PGC, in which case playback will transfer to that PGC.
If you select a command that has a goto statement, the goto destination's line number is highlighted in green, as shown in the example on the right. In this example, line 4 is selected, and since it has a "goto line 19," line 19's line number is highlighted in green.
Multiple commands may be selected by holding down the Ctrl key while
Página 29 de 48Reference Section
28/08/2014file://C:\Users\Usuario\AppData\Local\Temp\~hhB1A.htm
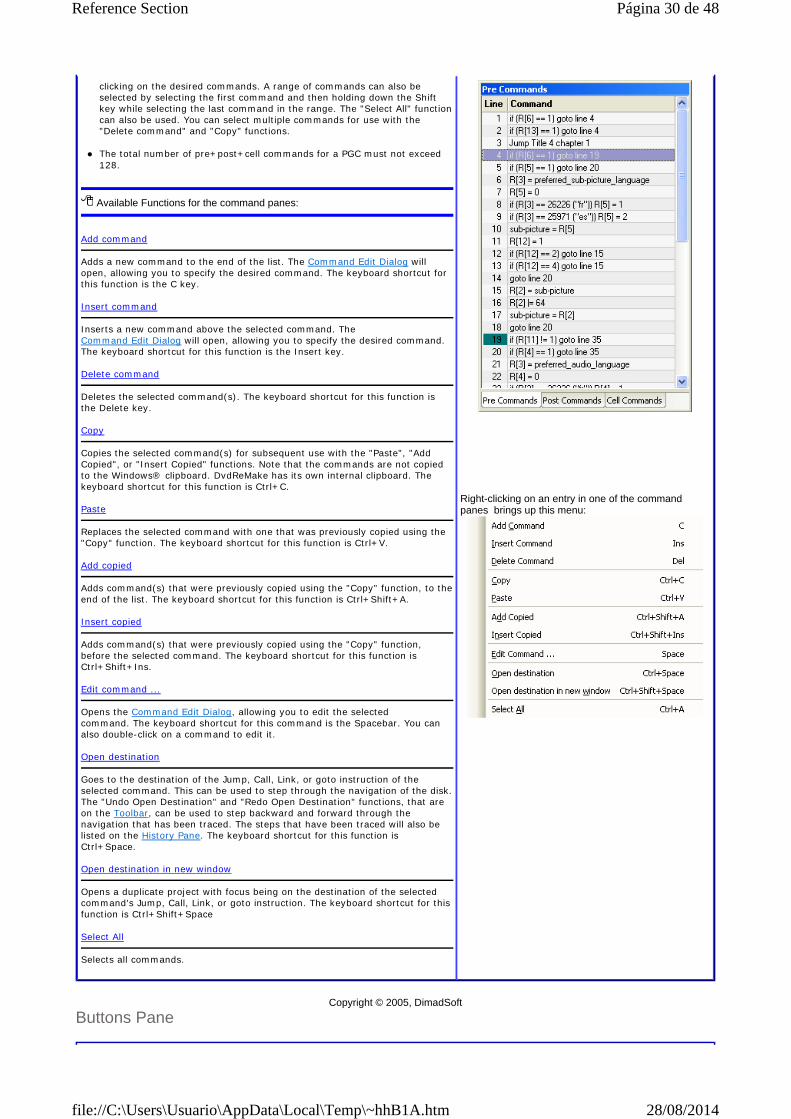
Copyright © 2005, DimadSoft
Buttons Pane
clicking on the desired commands. A range of commands can also be selected by selecting the first command and then holding down the Shift key while selecting the last command in the range. The "Select All" function can also be used. You can select multiple commands for use with the "Delete command" and "Copy" functions.
The total number of pre+post+cell commands for a PGC must not exceed 128.
Available Functions for the command panes:
Add command
Adds a new command to the end of the list. The Command Edit Dialog will open, allowing you to specify the desired command. The keyboard shortcut for this function is the C key. Insert command
Inserts a new command above the selected command. The Command Edit Dialog will open, allowing you to specify the desired command. The keyboard shortcut for this function is the Insert key. Delete command
Deletes the selected command(s). The keyboard shortcut for this function is the Delete key. Copy
Copies the selected command(s) for subsequent use with the "Paste", "Add Copied", or "Insert Copied" functions. Note that the commands are not copied to the Windows® clipboard. DvdReMake has its own internal clipboard. The keyboard shortcut for this function is Ctrl+C. Paste
Replaces the selected command with one that was previously copied using the "Copy" function. The keyboard shortcut for this function is Ctrl+V. Add copied
Adds command(s) that were previously copied using the "Copy" function, to the end of the list. The keyboard shortcut for this function is Ctrl+Shift+A. Insert copied
Adds command(s) that were previously copied using the "Copy" function, before the selected command. The keyboard shortcut for this function is Ctrl+Shift+Ins. Edit command ...
Opens the Command Edit Dialog, allowing you to edit the selected command. The keyboard shortcut for this command is the Spacebar. You can also double-click on a command to edit it. Open destination
Goes to the destination of the Jump, Call, Link, or goto instruction of the selected command. This can be used to step through the navigation of the disk. The "Undo Open Destination" and "Redo Open Destination" functions, that are on the Toolbar, can be used to step backward and forward through the navigation that has been traced. The steps that have been traced will also be listed on the History Pane. The keyboard shortcut for this function is Ctrl+Space. Open destination in new window
Opens a duplicate project with focus being on the destination of the selected command's Jump, Call, Link, or goto instruction. The keyboard shortcut for this function is Ctrl+Shift+Space Select All
Selects all commands.
Right-clicking on an entry in one of the command panes brings up this menu:
Página 30 de 48Reference Section
28/08/2014file://C:\Users\Usuario\AppData\Local\Temp\~hhB1A.htm
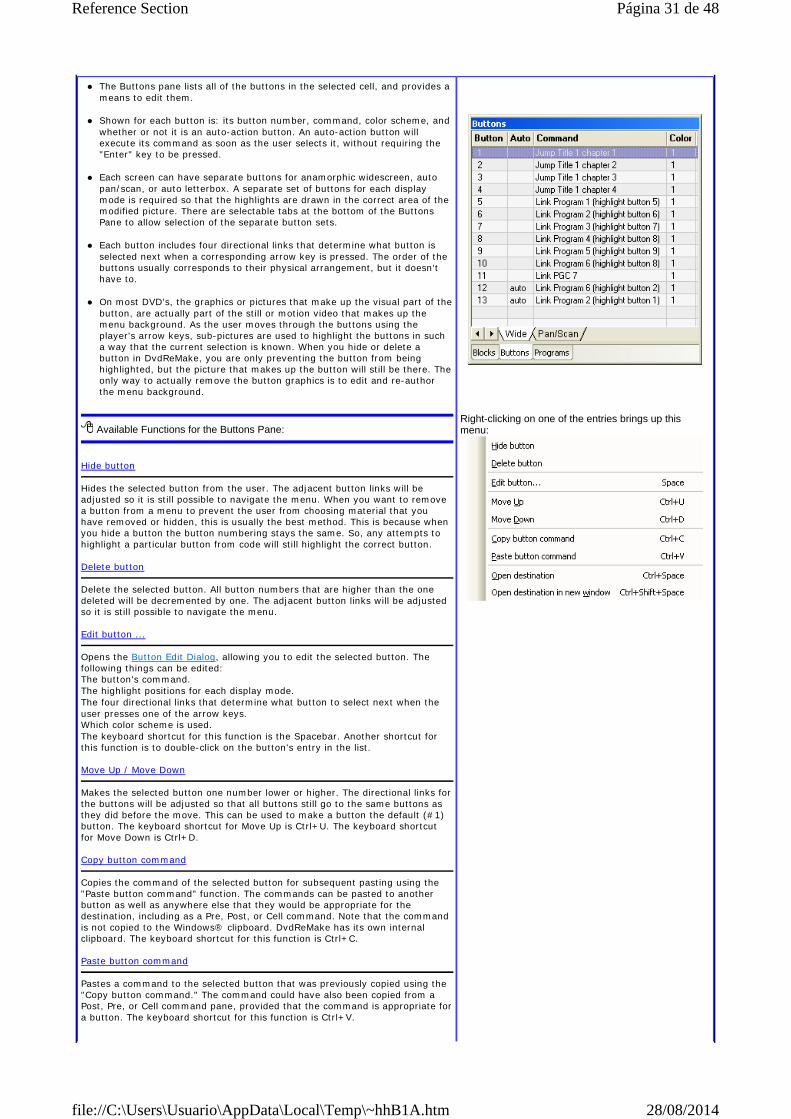
The Buttons pane lists all of the buttons in the selected cell, and provides a means to edit them.
Shown for each button is: its button number, command, color scheme, and
whether or not it is an auto-action button. An auto-action button will execute its command as soon as the user selects it, without requiring the "Enter" key to be pressed.
Each screen can have separate buttons for anamorphic widescreen, auto
pan/scan, or auto letterbox. A separate set of buttons for each display mode is required so that the highlights are drawn in the correct area of the modified picture. There are selectable tabs at the bottom of the Buttons Pane to allow selection of the separate button sets.
Each button includes four directional links that determine what button is
selected next when a corresponding arrow key is pressed. The order of the buttons usually corresponds to their physical arrangement, but it doesn't have to.
On most DVD's, the graphics or pictures that make up the visual part of the
button, are actually part of the still or motion video that makes up the menu background. As the user moves through the buttons using the player's arrow keys, sub-pictures are used to highlight the buttons in such a way that the current selection is known. When you hide or delete a button in DvdReMake, you are only preventing the button from being highlighted, but the picture that makes up the button will still be there. The only way to actually remove the button graphics is to edit and re-author the menu background.
Available Functions for the Buttons Pane:
Hide button
Hides the selected button from the user. The adjacent button links will be adjusted so it is still possible to navigate the menu. When you want to remove a button from a menu to prevent the user from choosing material that you have removed or hidden, this is usually the best method. This is because when you hide a button the button numbering stays the same. So, any attempts to highlight a particular button from code will still highlight the correct button. Delete button
Delete the selected button. All button numbers that are higher than the one deleted will be decremented by one. The adjacent button links will be adjusted so it is still possible to navigate the menu. Edit button ...
Opens the Button Edit Dialog, allowing you to edit the selected button. The following things can be edited: The button's command. The highlight positions for each display mode. The four directional links that determine what button to select next when the user presses one of the arrow keys. Which color scheme is used. The keyboard shortcut for this function is the Spacebar. Another shortcut for this function is to double-click on the button's entry in the list. Move Up / Move Down
Makes the selected button one number lower or higher. The directional links for the buttons will be adjusted so that all buttons still go to the same buttons as they did before the move. This can be used to make a button the default (#1) button. The keyboard shortcut for Move Up is Ctrl+U. The keyboard shortcut for Move Down is Ctrl+D. Copy button command
Copies the command of the selected button for subsequent pasting using the "Paste button command" function. The commands can be pasted to another button as well as anywhere else that they would be appropriate for the destination, including as a Pre, Post, or Cell command. Note that the command is not copied to the Windows® clipboard. DvdReMake has its own internal clipboard. The keyboard shortcut for this function is Ctrl+C. Paste button command
Pastes a command to the selected button that was previously copied using the "Copy button command." The command could have also been copied from a Post, Pre, or Cell command pane, provided that the command is appropriate for a button. The keyboard shortcut for this function is Ctrl+V.
Right-clicking on one of the entries brings up this menu:
Página 31 de 48Reference Section
28/08/2014file://C:\Users\Usuario\AppData\Local\Temp\~hhB1A.htm

Copyright © 2005, DimadSoft
Button Edit Dialog
Copyright © 2005, DimadSoft
Audio Tracks Pane (PGC View)
Open destination
Goes to the destination of the Jump or Link instruction of the selected button's command. This can be used to step through the navigation of the disk. The "Undo Open Destination" and "Redo Open Destination functions", that are on the Toolbar, can be used to step backward and forward through the navigation that has been traced. The steps that have been trace will also be listed on the History Pane. The keyboard shortcut for this function is Ctrl+Space. Open destination in new window
Opens a duplicate project with focus being on the destination of the selected command's Jump or Link instruction. The keyboard shortcut for this function is Ctrl+Shift+Space
The Button Edit Dialog allows you to edit various attributes of Buttons Over Video (BOV). BOV's are usually used in menus but they can occur in titles also.
The "Position" section of the dialog allows you to change the button's highlight
position by changing the values in the four coordinate boxes. The coordinate system used numbers the screen pixels from an origin at the upper-left side of the screen (0,0). The coordinate boxes on the left and the right specify the distance in pixels from the left-side of the screen to the left and right side of the button. The coordinate boxes on the top and bottom specify the distance from the top of the screen to the top and bottom of the button. Separate button positions may be entered for anamorphic widescreen, auto pan/scan, and auto letterbox by selecting one of the tabs at the top of the dialog.
The "Adjacent buttons" section of the dialog allows you to change the
directional links corresponding to the arrow keys on the player's remote. The value shown in the middle input box is the current button number that is being edited. The values in the other four boxes indicate what, from the button currently being edited, should be the next button to be highlighted, when the user presses one of the arrow keys on the player's remote control.
The "Command" section of the dialog shows the current command for the
button being edited. If the "auto" checkbox is checked the button is an auto-action button that will be activated automatically, as soon as it is selected by the user, before the "Enter" key is pressed on the remote control. To edit the command for a button, click the button that is to the right of the command
box. This will open the Command Edit Dialog, allowing you to edit the command.
The "Color scheme" box allows you to select one of the three color schemes
used for button highlighting. The color schemes can be edited by right-clicking on the menu's background in the Menu Preview/Editor, and selecting "Edit Color Schemes". The colors used by the color schemes can be changed on the CLUT Pane.
The Audio Tracks Pane shows the audio streams for the currently selected PGC, and provides a means to disable them or change their stream numbers within their track.
The "Info" column shows the language and type of each audio track. Each
track's info is shown in this format: language, coding mode, description. The language can be any one of the languages listed in the Language Code Chart in the Appendix. The coding mode can be "Dolby AC3", "MPEG-1", "MPEG-2", "Linear PCM", "DTS", or "SDDS". The description can be "unspecified", "normal", "for the visually impaired", "director's comments", or "alternate director's comment". This info can be edited on the Audio Tracks Pane in the Domain Content View.
Selecting a stream in the Audio Tracks Pane selects that stream as the one
to use for audio preview. During a preview, you can switch streams on-the-fly by selecting a different stream. There may be a slight delay in switching while the audio stream buffer empties. See Video/Audio/Subtitle Preview.
Available Functions for the Audio Tracks Pane:
Disable Track
Right-clicking on one of the entries brings up this menu:
Página 32 de 48Reference Section
28/08/2014file://C:\Users\Usuario\AppData\Local\Temp\~hhB1A.htm

Copyright © 2005, DimadSoft
SubPicture Tracks Pane (PGC View)
Copyright © 2005, DimadSoft
Extras Pane
Disable the selected audio stream's track. Disabling a track will recover the space that it occupied. Edit Track
Opens the dialog shown in Figure 1, which allows you to select the stream number for the selected audio stream. You can also enable or disable the selected stream using the "enabled" checkbox. The keyboard shortcut for this function is the Spacebar. Another shortcut is to double-click on the audio stream to edit it. Select All
Selects all tracks.
Figure 1
The Audio Tracks Pane shows the audio streams for the currently selected PGC, and provides a means to disable them or configure which stream is used for the widescreen, pan/scan and letterbox views.
The "Info" column shows the language and description (caption type) of
each subpicture track, as well as each stream ID. Each track's info is shown in this format: language, description. The language can be any one of the languages listed in the Language Code Chart in the Appendix. The description can be "normal", "large", "children", "normal CC", "large CC", "children's CC", "forced", "director's comment", "large director's comment", or "director's comment for children". This info can be edited on the SubPicture Tracks Pane in the Domain Content View.
Selecting a stream in the SubPicture Tracks Pane selects that stream as the
one to use for subpicture preview. During a preview, you can switch streams on-the-fly by selecting a different stream. There may be a slight delay in switching while the subpicture stream buffer empties. See Video/Audio/Subtitle Preview.
Available Functions for the SubPicture Tracks Pane:
Disable Track
Disable the selected subpicture stream's track. Disabling a track will recover the space that it occupied. Edit Track
Opens the dialog shown in Figure 1, which allows you to select the stream numbers that correspond to the widescreen, pan/scan and letterbox views. You can also enable or disable the selected stream using the "enabled" checkbox. The keyboard shortcut for this function is the Spacebar. Another shortcut is to double-click on the subpicture stream to edit it. Select All
Selects all tracks.
Right-clicking on one of the entries brings up this menu:
Figure 1
The Extras Pane shows various attributes for the selected PGC, and provides a means for changing them.
The Next PGC and Prev PGC attributes provides a means to make a
virtual connection between two PGC's in the same VTS. A value of zero means disabled. The current PGC's Next PGC link will be followed when any of the following occurs:
Playback reaches the end of the current PGC. The user presses the "Next Chapter" button while the current PGC's last program is playing. A LinkNextProgram, button or cell command is executed from the current PGC's last program. A LinkNextCell, button or cell command is executed from the current PGC's last
Página 33 de 48Reference Section
28/08/2014file://C:\Users\Usuario\AppData\Local\Temp\~hhB1A.htm
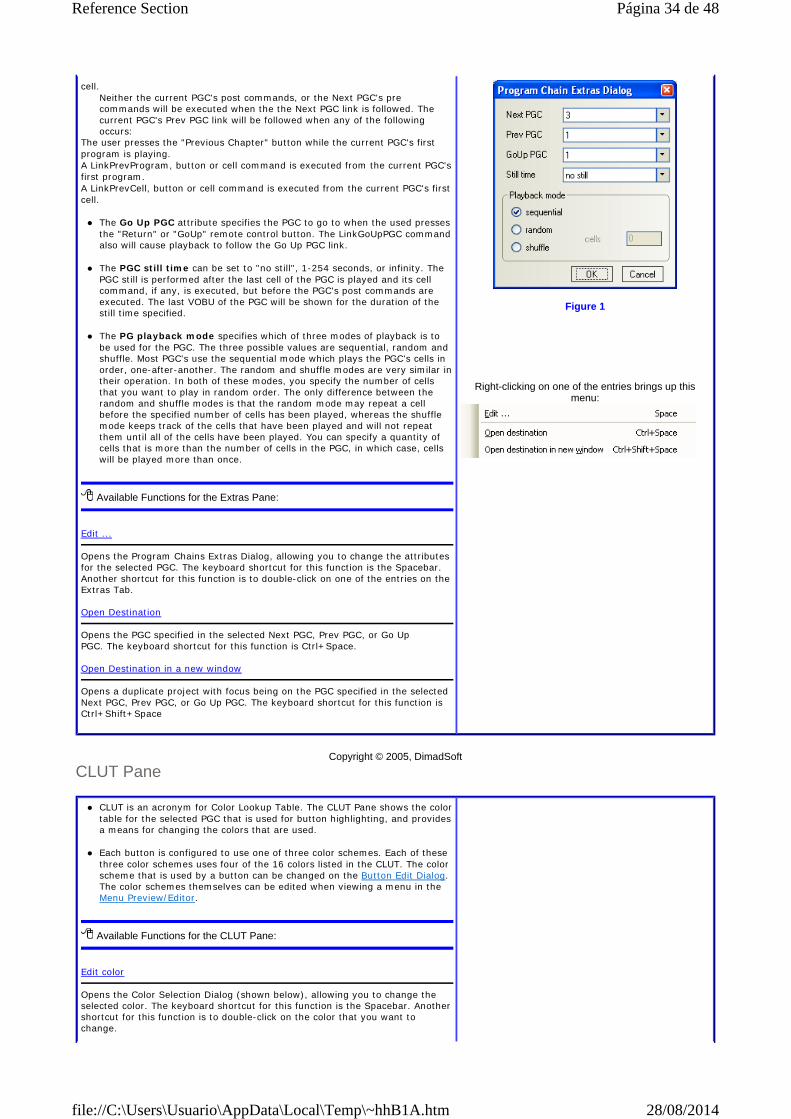
Copyright © 2005, DimadSoft
CLUT Pane
cell. Neither the current PGC's post commands, or the Next PGC's pre commands will be executed when the the Next PGC link is followed. The current PGC's Prev PGC link will be followed when any of the following occurs:
The user presses the "Previous Chapter" button while the current PGC's first program is playing. A LinkPrevProgram, button or cell command is executed from the current PGC's first program. A LinkPrevCell, button or cell command is executed from the current PGC's first cell. The Go Up PGC attribute specifies the PGC to go to when the used presses
the "Return" or "GoUp" remote control button. The LinkGoUpPGC command also will cause playback to follow the Go Up PGC link.
The PGC still time can be set to "no still", 1-254 seconds, or infinity. The
PGC still is performed after the last cell of the PGC is played and its cell command, if any, is executed, but before the PGC's post commands are executed. The last VOBU of the PGC will be shown for the duration of the still time specified.
The PG playback mode specifies which of three modes of playback is to
be used for the PGC. The three possible values are sequential, random and shuffle. Most PGC's use the sequential mode which plays the PGC's cells in order, one-after-another. The random and shuffle modes are very similar in their operation. In both of these modes, you specify the number of cells that you want to play in random order. The only difference between the random and shuffle modes is that the random mode may repeat a cell before the specified number of cells has been played, whereas the shuffle mode keeps track of the cells that have been played and will not repeat them until all of the cells have been played. You can specify a quantity of cells that is more than the number of cells in the PGC, in which case, cells will be played more than once.
Available Functions for the Extras Pane:
Edit ...
Opens the Program Chains Extras Dialog, allowing you to change the attributes for the selected PGC. The keyboard shortcut for this function is the Spacebar. Another shortcut for this function is to double-click on one of the entries on the Extras Tab. Open Destination
Opens the PGC specified in the selected Next PGC, Prev PGC, or Go Up PGC. The keyboard shortcut for this function is Ctrl+Space. Open Destination in a new window
Opens a duplicate project with focus being on the PGC specified in the selected Next PGC, Prev PGC, or Go Up PGC. The keyboard shortcut for this function is Ctrl+Shift+Space
Figure 1
Right-clicking on one of the entries brings up this menu:
CLUT is an acronym for Color Lookup Table. The CLUT Pane shows the color table for the selected PGC that is used for button highlighting, and provides a means for changing the colors that are used.
Each button is configured to use one of three color schemes. Each of these
three color schemes uses four of the 16 colors listed in the CLUT. The color scheme that is used by a button can be changed on the Button Edit Dialog. The color schemes themselves can be edited when viewing a menu in the Menu Preview/Editor.
Available Functions for the CLUT Pane:
Edit color
Opens the Color Selection Dialog (shown below), allowing you to change the selected color. The keyboard shortcut for this function is the Spacebar. Another shortcut for this function is to double-click on the color that you want to change.
Página 34 de 48Reference Section
28/08/2014file://C:\Users\Usuario\AppData\Local\Temp\~hhB1A.htm
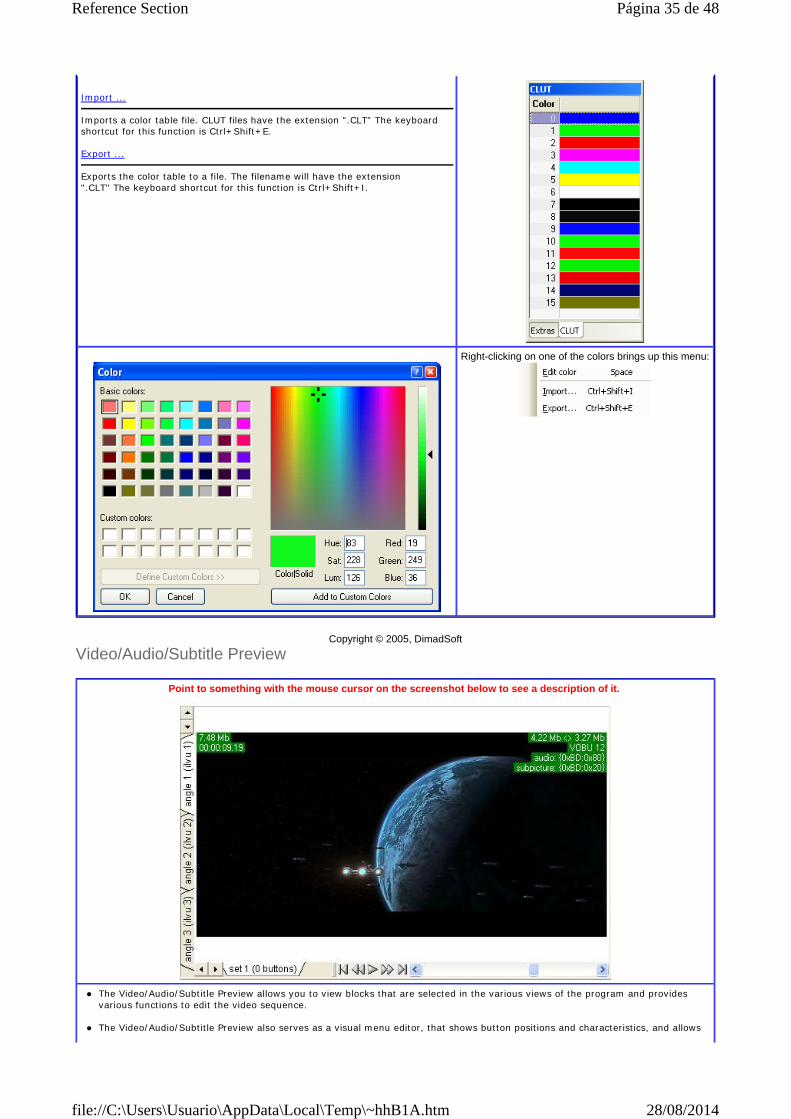
Copyright © 2005, DimadSoft
Video/Audio/Subtitle Preview
Import ...
Imports a color table file. CLUT files have the extension ".CLT" The keyboard shortcut for this function is Ctrl+Shift+E. Export ...
Exports the color table to a file. The filename will have the extension ".CLT" The keyboard shortcut for this function is Ctrl+Shift+I.
Right-clicking on one of the colors brings up this menu:
Point to something with the mouse cursor on the screenshot below to see a description of it.
The Video/Audio/Subtitle Preview allows you to view blocks that are selected in the various views of the program and provides various functions to edit the video sequence.
The Video/Audio/Subtitle Preview also serves as a visual menu editor, that shows button positions and characteristics, and allows
Página 35 de 48Reference Section
28/08/2014file://C:\Users\Usuario\AppData\Local\Temp\~hhB1A.htm

you to edit the buttons and other menu attributes. See Menu Preview/Editor. If the selected block is a multi-angle, or otherwise interleaved, block, the different angles or Interleave Units (ILUV) can be
selected using the tabs along the left side of the preview window. If there are more tabs than will fit within the preview, you can use the up and down arrow buttons located above the tabs to scroll through the different tabs.
The scrollbar at the lower-right of the preview window, allows you to move through the video. Clicking on the left or right arrows,
or in between them and the slider, moves the playback position one VOBU at a time. You can also drag the slider to quickly move to a specific location.
In the upper-left corner of the preview window, there are indicators for total size , and total time . In the upper-
right corner, there are indicators for Mb elapsed/Mb remaining , current VOBU , currently selected audio stream , and currently selected subtitle stream . These indicators can be turned on or off in Format Options. You can also temporarily hide the indicators by pressing and holding the F6 key. The indicators will return when the F6 key is released.
The preview also allows you to play the block with audio and subtitles. Playback is controlled with the control buttons at the
bottom of the preview. The playback controls function as follows: Go To Start
Fast Reverse
Play
Fast Forward
Go To End
When you are previewing, the audio and subtitle stream that is used for playback can be selected on the Audio Tracks Pane, and the SubPicture Tracks Pane. For more information see: Audio Tracks Pane (Domain Content View) Audio Tracks Pane (PGC View) SubPicture Tracks Pane (Domain Content View) SubPicture Tracks Pane (PGC View)
Available Functions for Video/Audio/Subtitle preview:
Hide block
Replaces the block currently being previewed with a blank video. This blank video uses only a trivial amount of space on the disk. Cut to here
Removes a section of the current block, from the beginning to the VOBU preceding the one currently shown. Cut from here
Removes a section of the current block, from the VOBU following the one currently shown, to the end of the block. Split here
Moves the current VOBU and all that follow it to its own newly inserted block. A cell for the inserted block will be inserted after the one pointing to the block that was split. Splitting of blocks that are interleaved for multiple angles or seamless branching is not supported. Restore block
Restore the block that is currently being previewed to its pre-edit state. The following things will be restored:
1. Hidden blocks 2. A cut that was made. 3. Button commands, positions, and color schemes that were
changed. The keyboard shortcut for this function is Ctrl+Shift+Z. Show original ...
Opens a preview window that shows the block before it was edited. Convert to still
Convert the selected block to a still of the frame currently shown in the preview window. This will reduce the size of the block to a relatively small amount (usually <3MB). This function can be especially useful in reducing the size of motion menus, by making them a still menu. The audio and subpicture streams will remain intact, however they can be deleted/disabled as usual. The duration of the block will remain the same. If you set the cell's still time. the time will be added at the end of the cell's playback. Replace with still
Página 36 de 48Reference Section
28/08/2014file://C:\Users\Usuario\AppData\Local\Temp\~hhB1A.htm

Copyright © 2005, DimadSoft
Menu Preview/Editor
Replace the selected block with a frame from the same project or another project. The Select Frame Dialog will open, allowing you to choose the frame that you want to use as a replacement. The audio and subpicture streams will not change, however they can be deleted/disabled as usual. The duration of the block will remain the same. If you set the cell's still time. the time will be added to the end of the cell's playback. Export frame ...
Exports the frame currently shown in the preview window to a Windows® bitmap file (.bmp). Import buttons ...
Import buttons to the block currently being previewed, from a button layout file (.mbl) that was created using the "Export buttons" function. Export buttons ...
Export buttons from the block currently being previewed to a button layout file (.mbl). The buttons can be later imported into a menu using the "Import buttons" function. Add button
Adds a button to the block currently being previewed. Note that this button only creates the navigational and color scheme info and does not create the required subpicture for the button. Edit color schemes ...
Opens the Color Scheme Dialog allowing you to change the color schemes used for button highlighting, for the block currently being previewed. Buttons are usually only used in menu PGC's but can also be in titles. For more information on this function see: Menu Preview/Editor. Set Prohibited operations ...
Sets the Prohibited User Operations (PUOP) for the block currently being previewed. For more information see: Prohibited User Operations Dialog
Menu Preview/Editor
When you are working on a menu block, the preview works the same, but there is added functionality to allow you to see the menu buttons, and edit various aspects of them.
While buttons are usually only used in menus, titles can also have them. Everything mentioned here applies to BOV's in titles also.
The preview window shows the button positions with red rectangles. The buttons can be selected by clicking on them. The selected
button is highlighted with a green double-lined rectangle.
Página 37 de 48Reference Section
28/08/2014file://C:\Users\Usuario\AppData\Local\Temp\~hhB1A.htm
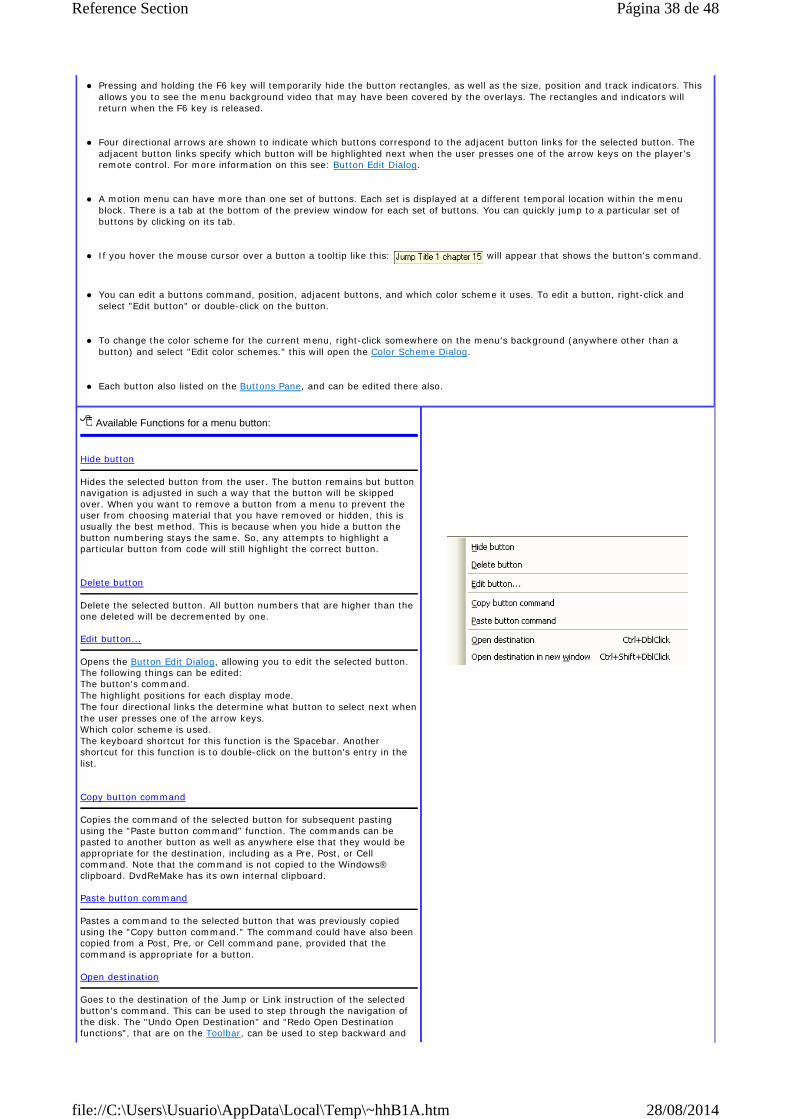
Pressing and holding the F6 key will temporarily hide the button rectangles, as well as the size, position and track indicators. This allows you to see the menu background video that may have been covered by the overlays. The rectangles and indicators will return when the F6 key is released.
Four directional arrows are shown to indicate which buttons correspond to the adjacent button links for the selected button. The
adjacent button links specify which button will be highlighted next when the user presses one of the arrow keys on the player's remote control. For more information on this see: Button Edit Dialog.
A motion menu can have more than one set of buttons. Each set is displayed at a different temporal location within the menu
block. There is a tab at the bottom of the preview window for each set of buttons. You can quickly jump to a particular set of buttons by clicking on its tab.
If you hover the mouse cursor over a button a tooltip like this: will appear that shows the button's command.
You can edit a buttons command, position, adjacent buttons, and which color scheme it uses. To edit a button, right-click and
select "Edit button" or double-click on the button. To change the color scheme for the current menu, right-click somewhere on the menu's background (anywhere other than a
button) and select "Edit color schemes." this will open the Color Scheme Dialog. Each button also listed on the Buttons Pane, and can be edited there also.
Available Functions for a menu button:
Hide button
Hides the selected button from the user. The button remains but button navigation is adjusted in such a way that the button will be skipped over. When you want to remove a button from a menu to prevent the user from choosing material that you have removed or hidden, this is usually the best method. This is because when you hide a button the button numbering stays the same. So, any attempts to highlight a particular button from code will still highlight the correct button. Delete button
Delete the selected button. All button numbers that are higher than the one deleted will be decremented by one. Edit button...
Opens the Button Edit Dialog, allowing you to edit the selected button. The following things can be edited: The button's command. The highlight positions for each display mode. The four directional links the determine what button to select next when the user presses one of the arrow keys. Which color scheme is used. The keyboard shortcut for this function is the Spacebar. Another shortcut for this function is to double-click on the button's entry in the list. Copy button command
Copies the command of the selected button for subsequent pasting using the "Paste button command" function. The commands can be pasted to another button as well as anywhere else that they would be appropriate for the destination, including as a Pre, Post, or Cell command. Note that the command is not copied to the Windows® clipboard. DvdReMake has its own internal clipboard. Paste button command
Pastes a command to the selected button that was previously copied using the "Copy button command." The command could have also been copied from a Post, Pre, or Cell command pane, provided that the command is appropriate for a button. Open destination
Goes to the destination of the Jump or Link instruction of the selected button's command. This can be used to step through the navigation of the disk. The "Undo Open Destination" and "Redo Open Destination functions", that are on the Toolbar, can be used to step backward and
Página 38 de 48Reference Section
28/08/2014file://C:\Users\Usuario\AppData\Local\Temp\~hhB1A.htm

Copyright © 2005, DimadSoft
Color Scheme Dialog
forward through the navigation that has been traced. The steps that have been trace will also be listed on the History Pane. The keyboard shortcut for this function is Ctrl+Space. Open destination in new window
Opens a duplicate project with focus being on the destination of the selected command's Jump or Link instruction. The keyboard shortcut for this function is Ctrl+Shift+Space
Video/Audio/Subtitle Preview Buttons Pane
There are three layers that make up a DVD menu with buttons. The
first layer is the background still or motion video. The second layer is the sub-picture or mask layer, that contains the graphics that make up the buttons. The third layer is the highlight layer, that defines the rectangular coordinates for the portion of the subpicture to show, and configures the colors used to highlight the button that the user has selected.
Each button has three different button states. The first state is the
Display or Normal state, which is the state that all of the buttons are in, except for the highlighted one that was chosen by the user. The second state is the Selection state, which occurs when the user selects the button with the arrow or number keys on the player's remote control. The third state is the Action state, which occurs when the user presses the "Enter" key (aka the "Select" key) for the selected button.
The sub-picture mask is comprised of up to four colors. The four colors
are usually black, white, red, and blue. Each one of the colors represent the background, the pattern, emphasis 1, or emphasis 2. Typically the pattern is for the foreground, the background is for the background, emphasis 1 is the inner edge and emphasis 2 is the outer edge. Many DVD authoring programs don't follow this though, and will use emphasis 1 and emphasis 2 as foreground colors.
For each of the button states, a color and a transparency level can be
mapped to each of the colors in the sub-picture mask. The mappings for the Normal state are actually in the sub-picture stream itself, and cannot be changed on the Color Scheme Dialog. Actually, on most menus, the transparency levels for the Normal state are usually set to 0, thereby making them completely transparent. This is because the graphics for the buttons are usually on the background video, where millions of colors can be used instead of the four that the sub-picture layer is limited to. These menus use sub-pictures only for highlighting the selected button.
Each cell of a menu PGC has three color schemes that are used to configure which of the colors in the PGC's CLUT are used to highlight the buttons in the Selected and Action states. Each button is assigned to one of the color schemes. See the Button Edit Dialog for more information on how to change which color scheme is used by a particular button.
For each color scheme, color and a transparency levels are mapped to
the four subpicture colors, for both the Selection and the Action states.
The color index corresponds to one of the colors in the Color Lookup
Table (CLUT) for the PGC. You can view the CLUT, and change the colors for each index on the CLUT Pane.
The transparency level is a number between 0 and 15. 0 is completely transparent or invisible. 15 is completely opaque.
Página 39 de 48Reference Section
28/08/2014file://C:\Users\Usuario\AppData\Local\Temp\~hhB1A.htm

Copyright © 2005, DimadSoft
Miscellaneous Dialogs
Copyright © 2005, DimadSoft
Command Edit Dialog
The "Export" button allows you to save a color scheme to a file, which can later be loaded using the "Import" button. You can use this to copy color schemes from one menu to another or from scheme to scheme in the same menu. The filename extension for color scheme files is "mct".
Command Edit Dialog
Select Angle Dialog
Select Block Dialog
Select Block Dialog (for Substitute block) Select Pool Dialog
Prohibited User Operations Dialog
The Command edit dialog is opened when you choose to edit a command from the: Pre/Post/Cell Command Panes, or the Button Edit Dialog.
There are 8 categories of commands available in a DVD-video. They are: Special Instructions Link Instructions Jump/Call Instructions System Set Instructions Set Instructions Set, Compare->Link Sub-Instruction Compare->(Set, Link Sub-Instruction) Compare->Set, always Link Sub-Instruction
All of the command categories can be conditionally executed, although there are a few restrictions with some (see descriptions). There is a list of conditional and assignment operators in the Appendix.
As you are configuring a command, an example of what the command will look like is shown in the box at the top of the dialog.
Special Instructions Special Instructions include miscellaneous commands. A condition is optional. If a condition is used, it is evaluated first. If the condition evaluates as true, the command is executed.
Commands
NOP Break
goto line # Set Parental Level
Link Instructions Link Instructions are used for moving within the same domain. With all Link instructions except Link PGC, the highlight button can optionally be specified. If you do not want to set the highlight button, use zero. A condition is optional. If a condition is used, it is evaluated first. If the condition evaluates as true, the command is executed.
Página 40 de 48Reference Section
28/08/2014file://C:\Users\Usuario\AppData\Local\Temp\~hhB1A.htm

Commands
LinkNoLink LinkNextPGC
LinkTopCell LinkPrevPGC
LinkNextCell LinkGoUpPGC
LinkPrevCell LinkTailPGC
LinkTopProgram Resume
LinkNextProgram Link PGC
LinkPrevProgram Link Chapter
LinkTopPGC Link Program
Jump/Call Instructions Jump and Call instructions are used for moving out of a domain. Jump instructions are used in menu PGC's. Call instructions are used in title PGC's and can save a play position that can be later returned to, using the Resume command. A condition is optional. If a condition is used, it is evaluated first. If the condition evaluates as true, the command is executed.
Commands
From a title PGC From a menu PGC
Exit Exit
Jump VTS Title Jump VTS Title
Jump VTS Title Chapter
Jump VTS Title Chapter
Call First Play Jump First Play
Call VMG "title" menu Jump VMG "title" menu
Call VTS Menu Jump VTS Menu
Call VMG PGC Jump VMG PGC
System Set Instructions System Set instructions are for setting various System Parameter Registers (SPRM). In a direct Set, the SPRM is set to a value that you select from a list. In an indirect Set, the SPRM is set to the value of a General Program Register (GPRM) that you specify. A condition or a Link sub-command may be used, but not both. If a condition is used, it is evaluated first. If the condition evaluates as true, the command is executed. If a link is used, it is executed after the Set command.
Commands
Set audio/sub-picture/angle
Set karaoke audio mixing mode
Set register mode and value
Set highlighted button
Optional Link Sub-Commands
LinkNoLink LinkNextPGC
LinkTopCell LinkPrevPGC
LinkNextCell LinkGoUpPGC
LinkPrevCell LinkTailPGC
LinkTopProgram Resume
LinkNextProgram Link PGC
LinkPrevProgram Link Chapter
LinkTopPGC Link Program
Set Instructions Set instructions assign a value to one of the 16 General Parameter Registers (GPRM). It can be a simple assignment, using the "=" operator to assign a value that you specify, or the value of another GPRM. Using other operators, the assignment can also be the result of a mathematical or bitwise calculation between the GPRM that you are setting, and another GPRM or value that you specify. The "=" and bitwise operators can also use a SPRM as a source value. A condition or a Link sub-command may be used, but not both. The three Set/Compare/Link categories listed below can use both a condition and a link, but there are restrictions and you are limited to a smaller set of link sub-commands. If a condition is used, it is evaluated first. If the condition evaluates as true,
Página 41 de 48Reference Section
28/08/2014file://C:\Users\Usuario\AppData\Local\Temp\~hhB1A.htm

the command is executed. If a link is used, it is executed after the Set command.
Optional Link Sub-Commands
LinkNoLink LinkNextPGC
LinkTopCell LinkPrevPGC
LinkNextCell LinkGoUpPGC
LinkPrevCell LinkTailPGC
LinkTopProgram Resume
LinkNextProgram Link PGC
LinkPrevProgram Link Chapter
LinkTopPGC Link Program
Set, Compare->Link Sub-Instruction This command category unconditionally executes a Set command, then evaluates a condition. If the condition is true, a Link command is executed. Unlike the standard Set command described above, you can use both a condition and a Link command with this command type. There is a tradeoff though. While you can have both a condition and a link, the register being set and the compare register must be the same, and you are limited to a smaller subset of Link commands. This command can be used without a condition or a link, but a standard Set command would be more suited for this because it doesn't have the limitations.
Optional Link Sub-Commands
LinkNoLink LinkTopPGC
LinkTopCell LinkNextPGC
LinkNextCell LinkPrevPGC
LinkPrevCell LinkGoUpPGC
LinkTopProgram LinkTailPGC
LinkNextProgram Resume
LinkPrevProgram
Compare->(Set, Link Sub-Instruction) This command category first evaluates a condition. If the condition is true a Set command followed by a Link command are executed. Both the set and the link are subject to the condition. Unlike the standard Set command described above, you can use both a condition and a Link command with this command type. There is a tradeoff though. While you can have both a condition and a link, either the right side of the condition or the Set command must be a value and not a GPRM or SPRM, and you are limited to a smaller subset of Link commands. This command can be used without a condition or a link, but a standard Set command would be more suited for this because it doesn't have the limitations.
Optional Link Sub-Commands
LinkNoLink LinkTopPGC
LinkTopCell LinkNextPGC
LinkNextCell LinkPrevPGC
LinkPrevCell LinkGoUpPGC
LinkTopProgram LinkTailPGC
LinkNextProgram Resume
LinkPrevProgram
Compare->Set, always Link Sub-Instruction This command category first evaluates a condition. If the condition is true a Set command is executed. Then a Link command is executed, regardless what the result of the condition was. Unlike the standard Set command described above, you can use both a condition and a Link command with this command type. There is a tradeoff though. While you can have both a condition and a link, either the right side of the condition or the Set command must be a value and not a GPRM or SPRM, and you are limited to a smaller subset of Link commands. This command can be used without a condition or a link, but a standard Set command would be more suited
Página 42 de 48Reference Section
28/08/2014file://C:\Users\Usuario\AppData\Local\Temp\~hhB1A.htm
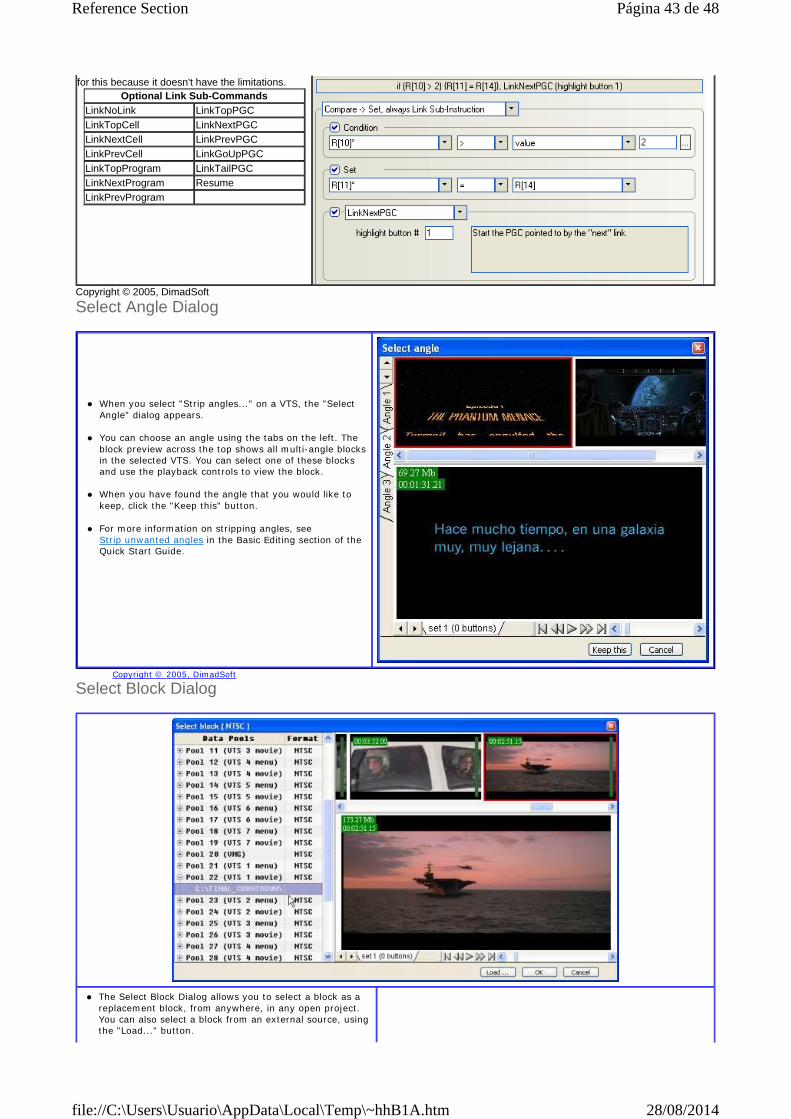
Copyright © 2005, DimadSoft
Select Angle Dialog
Copyright © 2005, DimadSoft
Select Block Dialog
for this because it doesn't have the limitations.
Optional Link Sub-Commands
LinkNoLink LinkTopPGC
LinkTopCell LinkNextPGC
LinkNextCell LinkPrevPGC
LinkPrevCell LinkGoUpPGC
LinkTopProgram LinkTailPGC
LinkNextProgram Resume
LinkPrevProgram
When you select "Strip angles..." on a VTS, the "Select Angle" dialog appears.
You can choose an angle using the tabs on the left. The
block preview across the top shows all multi-angle blocks in the selected VTS. You can select one of these blocks and use the playback controls to view the block.
When you have found the angle that you would like to
keep, click the "Keep this" button. For more information on stripping angles, see
Strip unwanted angles in the Basic Editing section of the Quick Start Guide.
The Select Block Dialog allows you to select a block as a replacement block, from anywhere, in any open project. You can also select a block from an external source, using the "Load..." button.
Página 43 de 48Reference Section
28/08/2014file://C:\Users\Usuario\AppData\Local\Temp\~hhB1A.htm

Copyright © 2005, DimadSoft
Select Block Dialog (for Substitute block)
Copyright © 2005, DimadSoft
Select Pool Dialog
Each VTS, from each open project, has a pool entry in the
"Data Pools" list, for its menus and its movie. Selecting a pool loads its blocks into the scrollable block
selection pane. After selecting the desired block, it will be loaded into the preview window where you can view the block to make sure it is the correct one.
If the source of your replacement block is not in an open
project, you can load an external source by clicking the "Load..." button. After clicking "Load...", the dialog shown on the right is shown. You can select any single VOB file or by changing "Files of type" to "DVD titleset (*.ifo)" you can load an entire VTS by selecting its IFO file.
When you are satisfied with the selected block, click the
"OK" button.
The Select Block Dialog for substitution allows you to select an existing block from any PGC in the same VTS for substitution. The selected cell will then point to the block that you select. Any number of cells can point to the same block.
The scrollable block selection pane across the top shows all of the blocks in the current VTS. After selecting the desired block, it
will be loaded into the preview window where you can view the block to make sure it is the correct one. When you are satisfied with the selected block, click the "OK" button.
Página 44 de 48Reference Section
28/08/2014file://C:\Users\Usuario\AppData\Local\Temp\~hhB1A.htm
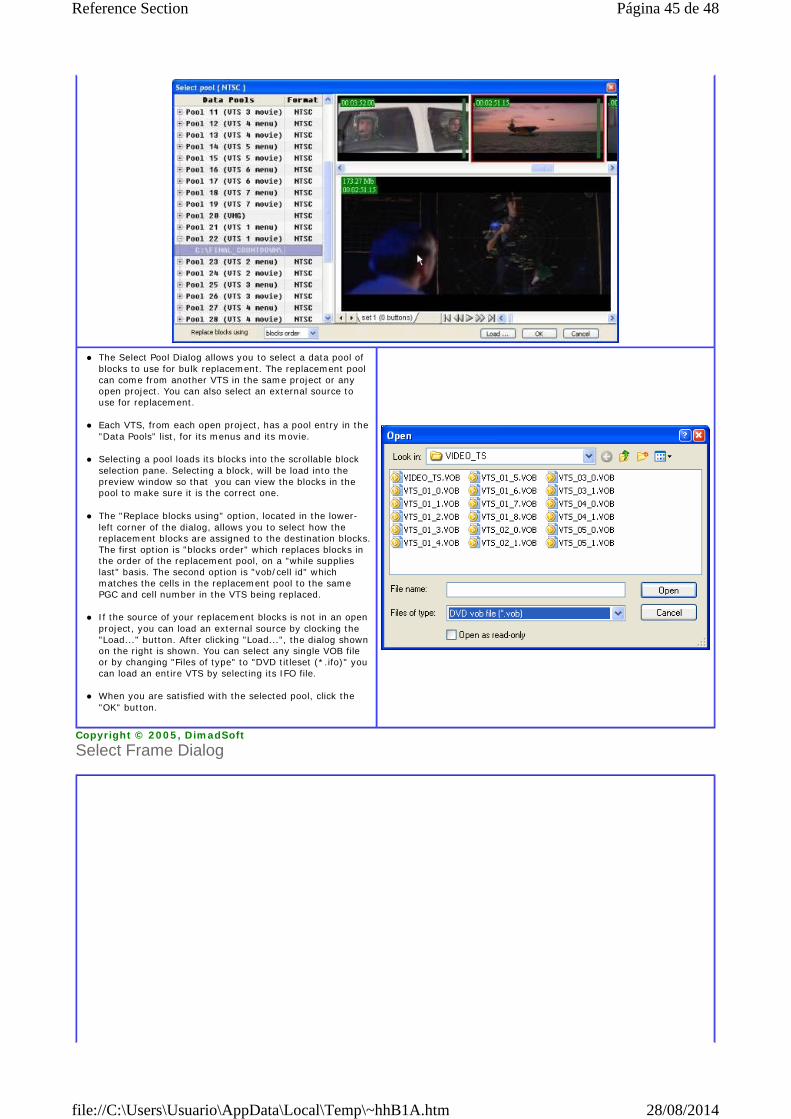
Copyright © 2005, DimadSoft
Select Frame Dialog
The Select Pool Dialog allows you to select a data pool of blocks to use for bulk replacement. The replacement pool can come from another VTS in the same project or any open project. You can also select an external source to use for replacement.
Each VTS, from each open project, has a pool entry in the
"Data Pools" list, for its menus and its movie. Selecting a pool loads its blocks into the scrollable block
selection pane. Selecting a block, will be load into the preview window so that you can view the blocks in the pool to make sure it is the correct one.
The "Replace blocks using" option, located in the lower-
left corner of the dialog, allows you to select how the replacement blocks are assigned to the destination blocks. The first option is "blocks order" which replaces blocks in the order of the replacement pool, on a "while supplies last" basis. The second option is "vob/cell id" which matches the cells in the replacement pool to the same PGC and cell number in the VTS being replaced.
If the source of your replacement blocks is not in an open
project, you can load an external source by clocking the "Load..." button. After clicking "Load...", the dialog shown on the right is shown. You can select any single VOB file or by changing "Files of type" to "DVD titleset (*.ifo)" you can load an entire VTS by selecting its IFO file.
When you are satisfied with the selected pool, click the
"OK" button.
Página 45 de 48Reference Section
28/08/2014file://C:\Users\Usuario\AppData\Local\Temp\~hhB1A.htm
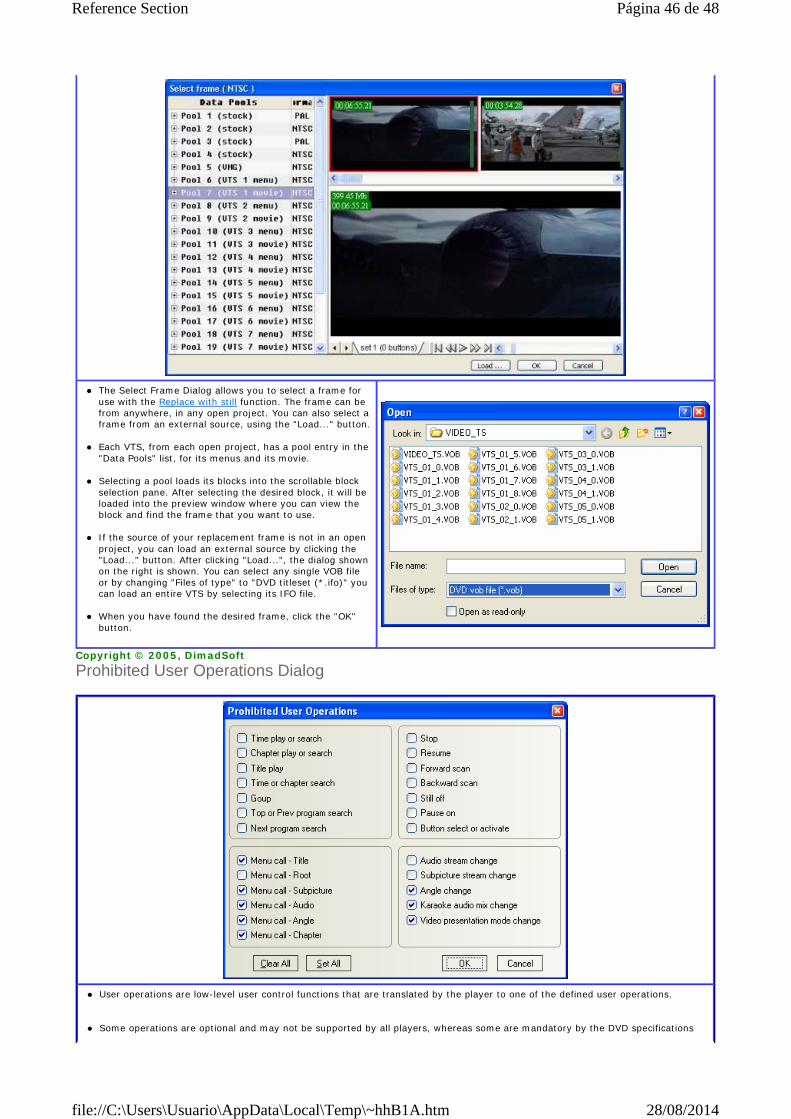
Copyright © 2005, DimadSoft
Prohibited User Operations Dialog
The Select Frame Dialog allows you to select a frame for use with the Replace with still function. The frame can be from anywhere, in any open project. You can also select a frame from an external source, using the "Load..." button.
Each VTS, from each open project, has a pool entry in the
"Data Pools" list, for its menus and its movie. Selecting a pool loads its blocks into the scrollable block
selection pane. After selecting the desired block, it will be loaded into the preview window where you can view the block and find the frame that you want to use.
If the source of your replacement frame is not in an open
project, you can load an external source by clicking the "Load..." button. After clicking "Load...", the dialog shown on the right is shown. You can select any single VOB file or by changing "Files of type" to "DVD titleset (*.ifo)" you can load an entire VTS by selecting its IFO file.
When you have found the desired frame, click the "OK"
button.
User operations are low-level user control functions that are translated by the player to one of the defined user operations. Some operations are optional and may not be supported by all players, whereas some are mandatory by the DVD specifications
Página 46 de 48Reference Section
28/08/2014file://C:\Users\Usuario\AppData\Local\Temp\~hhB1A.htm
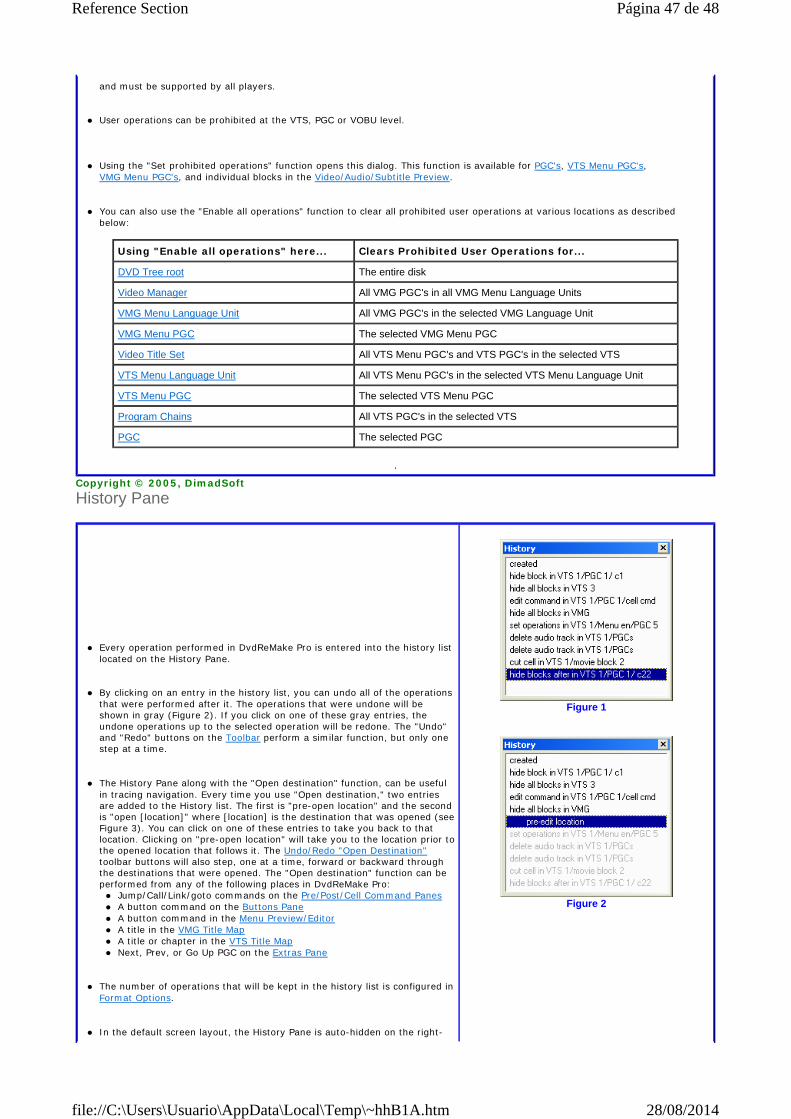
Copyright © 2005, DimadSoft
History Pane
and must be supported by all players. User operations can be prohibited at the VTS, PGC or VOBU level.
Using the "Set prohibited operations" function opens this dialog. This function is available for PGC's, VTS Menu PGC's,
VMG Menu PGC's, and individual blocks in the Video/Audio/Subtitle Preview. You can also use the "Enable all operations" function to clear all prohibited user operations at various locations as described
below:
.
Using "Enable all operations" here... Clears Prohibited User Operations for...
DVD Tree root The entire disk
Video Manager All VMG PGC's in all VMG Menu Language Units
VMG Menu Language Unit All VMG PGC's in the selected VMG Language Unit
VMG Menu PGC The selected VMG Menu PGC
Video Title Set All VTS Menu PGC's and VTS PGC's in the selected VTS
VTS Menu Language Unit All VTS Menu PGC's in the selected VTS Menu Language Unit
VTS Menu PGC The selected VTS Menu PGC
Program Chains All VTS PGC's in the selected VTS
PGC The selected PGC
Every operation performed in DvdReMake Pro is entered into the history list
located on the History Pane. By clicking on an entry in the history list, you can undo all of the operations
that were performed after it. The operations that were undone will be shown in gray (Figure 2). If you click on one of these gray entries, the undone operations up to the selected operation will be redone. The "Undo" and "Redo" buttons on the Toolbar perform a similar function, but only one step at a time.
The History Pane along with the "Open destination" function, can be useful
in tracing navigation. Every time you use "Open destination," two entries are added to the History list. The first is "pre-open location" and the second is "open [location]" where [location] is the destination that was opened (see Figure 3). You can click on one of these entries to take you back to that location. Clicking on "pre-open location" will take you to the location prior to the opened location that follows it. The Undo/Redo "Open Destination" toolbar buttons will also step, one at a time, forward or backward through the destinations that were opened. The "Open destination" function can be performed from any of the following places in DvdReMake Pro: Jump/Call/Link/goto commands on the Pre/Post/Cell Command Panes A button command on the Buttons Pane A button command in the Menu Preview/Editor A title in the VMG Title Map A title or chapter in the VTS Title Map Next, Prev, or Go Up PGC on the Extras Pane
The number of operations that will be kept in the history list is configured in
Format Options. In the default screen layout, the History Pane is auto-hidden on the right-
Figure 1
Figure 2
Página 47 de 48Reference Section
28/08/2014file://C:\Users\Usuario\AppData\Local\Temp\~hhB1A.htm

Copyright © 2005, DimadSoft
Log Pane
Copyright © 2005, DimadSoft
side of the screen. The History pane can be removed from view in the View menu.
Figure 3
Whenever you import or export a DVD, or load or save a project, entries are made in the log to track the operations progress and record and errors that are encountered.
When you start one of the aforementioned operations, the operation's name
is entered into the log in bold. Subsequent entries will show the operations progress, such as when specific parts of a DVD that is read. Errors will be shown in red.
In the default screen layout, the Log Pane is auto-hidden on the right-side
of the screen. The Log pane can be removed from view in the View menu. The log is also written to a file named DvdReMake.log in the program's
installation folder.
Available Functions for the Log Pane:
Copy Log to Clipboard
Copies the log to the Windows® clipboard. If you are having problems, this makes it easy to post your log to the Official DimadSoft User Forums. Clear Log
Clears the log (Duh).
Right-clicking anywhere on the Log Pane brings up this menu:
Página 48 de 48Reference Section
28/08/2014file://C:\Users\Usuario\AppData\Local\Temp\~hhB1A.htm

Advanced Editing
Copyright © 2005, DimadSoft
Making merged disks play consecutively
The Advanced Editing section contains guides for some relatively complex tasks. As you will see, even complex tasks are easy with DvdReMake Pro! Currently the Advanced Editing section contains the following guides:
Making merged disks play consecutively Sorry, that's all there is so far...More to come...
This guide shows you how to implement a "Play All" feature to a DVD created using DvdReMake's Merge DVDs function.
Now, let's go to the VMG Title menu. This is where it decides which disks to play. So after you play Disk 1, it will go here, not displaying the Title menu, of course, and jumps to Disk 2. Remember, if Disk 2, like every other Disks, starts with its main menu or some logo or preview, then that is normal. Don't assume that this procedure let you start playing the movie right away on Disk 2, 3, and 4. However, it can be done, but it's rather complicated depending on the complexity of the DVD. There's no certain way to do it so this method is generally for advanced users who want to further customize their DVDs. ok, Let's look at Figure 2 for reference during this procedure.
1. Go to the Cell Commands pane. Add LinkTailPGC command. For more details, right-click anywhere in that pane, and select Add Command. A NOP command is created. Double-click on it to open the Command Edit dialog. Select Link Instructions from drop-down list. Check the second box, and select LinkTailPGC from drop-down list, and click OK.
2. Go to the Programs pane. Right-click anywhere in that pane, and select Add block. A new blank cell is created, which is cell 2.
3. Double-click or hit <Space> bar on the new cell to open the PGC Block Attributes dialog. Select Command #1 and click OK.
4. Go to the Pre Commands pane. Add the following 3 commands at the end.
Break (Special Instructions). Will be line 18.
highlighted_button = 2048 (button 2), Link Cell 2 (System Set Instructions). At highlighted_button entry, enter the value as 2048. Will be line 19.
highlighted_button = 3072 (button 3), Link Cell 2 (System Set Instructions). Will be line 20.
5. From the top of Pre Commands pane (refer to Figure 3 for now), select Line 1 and hit Insert key. Double-click on NOP, and enter this command:
if (R[0] == 2) goto line 20 (Special Instructions). Is line 1.
6. Select Line 2, and insert this command:
if (R[0] == 3) goto line 22 (Special Instructions). Is line 2.
First, let's get started on Disk 1. In Figure 1, Disk 1 is VTS 1, Disk 2 is VTS 2, and Disk 3 is VTS 3. Yes, there's only one VTS per disk. You may have more VTSs per disk. This is used for illustration and simplicity.
1. Go to the Post Commands pane of the movie PGC, as shown in Figure 1.
2. Insert the commands in the red rectangle box for Lines 1 and 2. If you don't know how to insert, here's how: Select Line 1, and press the Insert key. A NOP command is created. Double-click on it to open the Command Edit dialog. Select Set Instructions from drop-down list. Check the Set button. Enter "R[0] = 2" and click OK.
Repeat this procedure for Line 2. "Call VMG title menu" command is in Jump/Call Instructions category from drop-down list.
3. Repeat Steps 1 and 2 for Disk 2 (if only there's a Disk 3 involved), except on Line 1, increment R[0] value by 1. So, you should have R[0] = 3.
4. Repeat Step 3 for Disk 3 (R[0] = 4) if only there's a Disk 4 involved.
The whole purpose of assigning value to R[0] is to tell the DVD to go to the next disk automatically after the current disk finishes playing.
Figure 1
Página 1 de 2Advanced Editing
28/08/2014file://C:\Users\Usuario\AppData\Local\Temp\~hhD230.htm

Copyright © 2005, DimadSoft
The result should be the same as in Figure 2. If it's not the same, then fix it to make it look like that.
Figure 2
That's it, you're done. Just export and test. If you're satisfied, then shrink or reencode, if need to, then burn. Note: By now, you should have noticed how the panes are ordered. It is customized this way specifically for this illustration so you can see everything without having to make several screenshots. History and Log panes are removed. Other panes are hidden as shown on right side of program. So in the future, if you are asking for help in the support forum, a customized screenshot, showing relevant information of the problem, would greatly help us. Thanks for making use of this program, and we look forward to assist you further.
Página 2 de 2Advanced Editing
28/08/2014file://C:\Users\Usuario\AppData\Local\Temp\~hhD230.htm

Customize User Interface
This section will show you how to customize user interface to your liking.
When the program is first used, the default layout is shown (Figure 4). If at any time, your customized layout is all messed up, just reset the layout and start over, as shown in Figure 1. Figure 2 provides the different UI themes by changing the layout color of the UI. Figure 3 provides different docking types as illustrated below.
Figure 1
Figure 2
Figure 3
Figure 4
Página 1 de 3Customize User Interface
28/08/2014mk:@MSITStore:C:\Users\Usuario\Desktop\DvdReMakePro3.chm::/customizing_the...

The UI theme of Figure 4 is Visual Studio 2005. Like all UI, you can move panes around by selecting the pane, hold the left mouse button down at the pane title bar or at the label tab, drag it to wherever you want it, and release the mouse button. You can also reorder the panes, and resize the window any way you like. Docking type for Figure 5 is Like Studio 2003. Notice the gray outline when the Pre Commands pane is dragged. Figure 6 is the result. Gray outline is shown for Like Studio 2003 and MS Office themes.
Figure 5
Figure 6
Figure 7
Docking type for Figure 7 is Like Studio 2005 or select by UI Theme Visual Studio 2005. For this illustration, starting at Figure 4, drag the Post Commands pane to the right arrow as shown. Figure 8 is the result.
Página 2 de 3Customize User Interface
28/08/2014mk:@MSITStore:C:\Users\Usuario\Desktop\DvdReMakePro3.chm::/customizing_the...
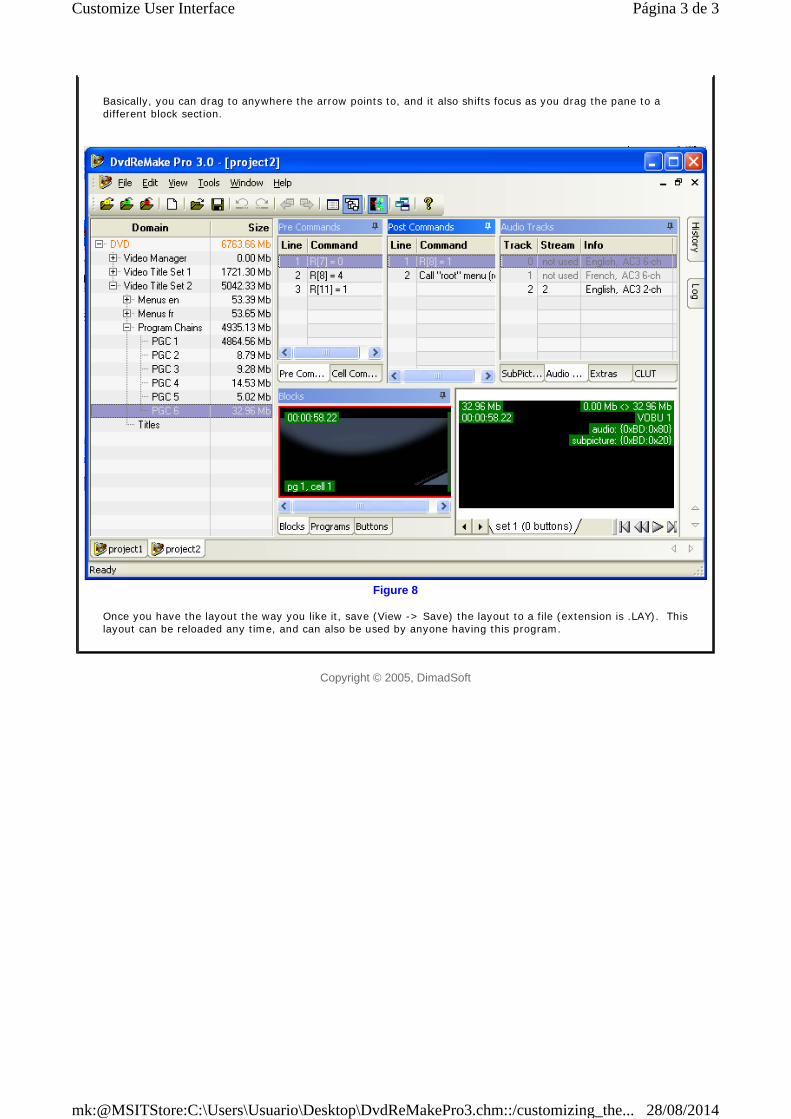
Copyright © 2005, DimadSoft
Basically, you can drag to anywhere the arrow points to, and it also shifts focus as you drag the pane to a different block section.
Figure 8
Once you have the layout the way you like it, save (View -> Save) the layout to a file (extension is .LAY). This layout can be reloaded any time, and can also be used by anyone having this program.
Página 3 de 3Customize User Interface
28/08/2014mk:@MSITStore:C:\Users\Usuario\Desktop\DvdReMakePro3.chm::/customizing_the...

Support
Copyright © 2005, DimadSoft
Obtaining the Latest Version
Copyright © 2005, DimadSoft
Official DimadSoft User Forums
Copyright © 2005, DimadSoft
Obtaining the latest version
Official DimadSoft User Forums
DvdReMake is an actively developed program. Bug fixes and improvements come often. It is always best to make sure that you have the latest version of the program. Registered users can download unlimited minor upgrades for free. A minor upgrade is when the the version number only changes to the right of the first decimal point. For example, version 3.0.2 to version 3.1.0 would be a minor upgrade, but from 2.6.7 to 3.1.0 would be a major upgrade. Registered users can download the latest version anytime by logging on to their account at DimadSoft.com. Be sure to have your computer's ID handy, because you will be asked for it prior to downloading. You can get your computer's ID by selecting "About DvdReMake Pro" in the "Help" menu. Log on to your account here: http://www.dimadsoft.com/login.php On your account page, there is also an option to receive e-mail notifications when a new version is made available. Make sure that your e-mail address is correct on the account page as well, in order to receive these notifications.
The Official DimadSoft User Forums are a great place to visit to ask questions or report problems that you may be having with DvdReMake Pro. There are many users that frequent the forums as well as several experts, including the program's author. There is also a forum to make suggestions for improvements to the program. Many of the current features of the program were the result of user suggestions. The following forums are available: DvdReMake - News & Information DvdReMake - General DvdReMake - Feedback DvdReMake - Suggestions In order for us to assist you better, when reporting problems on the forum, please provide at least the following information:
1. What version of DvdReMake Pro that you are using. It is always a good idea to try the latest version before reporting problems.
2. A detailed description of the problem. 3. If the problem may be system related, please include information about your system, including
your operating system, processor type and speed, amount of RAM, video card, etc.
Página 1 de 1Support
28/08/2014file://C:\Users\Usuario\AppData\Local\Temp\~hhF97E.htm

Appendix
Copyright © 2005, DimadSoft
Glossary
Copyright © 2005, DimadSoft
Virtual Machine Commands
Glossary
Virtual Machine Commands
System Parameter Registers (SPRM) Set Command and Conditional Operators
Language Codes
Sorry, at the time this manual was released, this section was incomplete. We hope to finish it soon and include it in a future version of the manual.
VM Command Description Parameters [ ]=optional Notes
Special InstructionsNOP Do nothing. none
goto lineTransfer control to the command on given line within this group of commands of the PGC.
line # Can only be used in Pre or Post commands.
BreakTerminate execution of the current group of commands and continue playback.
none Can only be used in Pre or Post commands.
Set Parental Level
Ask for confirmation to set a new Parental Level. On success, goto given line in this group of commands. If successful, the new level will be set until the disk is ejected, then it will go back to the level was before executing this command.
PML, line #Can only be used in the Pre or Post commands of a VMG Menu PGC.
Link Instructions
LinkNoLinkDo nothing (except optionally set the highlighted button).
[ highlight button # ]
LinkTopCell Restart the current cell. [ highlight button # ] button or cell commands
LinkNextCell Start the next cell in the current PGC. [ highlight button # ] button or cell commands
LinkPrevCell Start the cell previous to the current cell. [ highlight button # ] button or cell commands
LinkTopProgram Restart the current program. [ highlight button # ] button or cell commands
LinkNextProgramStart the next program in the current PGC.
[ highlight button # ] button or cell commands
LinkPrevProgramStart the program previous to the current program.
[ highlight button # ] button or cell commands
LinkTopPGC Restart the current PGC. [ highlight button # ] button or cell commands
LinkNextPGCStart the PGC specified by the current PGC's NextPGC attribute.
[ highlight button # ]
LinkPrevPGCStart the PGC specified by the current PGC's PrevPGC attribute.
[ highlight button # ]
LinkGoUpPGCStart the PGC specified by the current PGC's GoUpPGC attribute.
[ highlight button # ]
LinkTailPGCSkip to the end of the current PGC and execute its post commands.
[ highlight button # ]
ResumeResume playback at the location saved by a Call or MenuCall operation.
[ highlight button # ] Destination can be any domain.
LinkPGC Start a PGC in the same domain. PGC # Destination must be in the same domain.
Link Chapter Start given chapter (part of title) in the current title.
chapter #, [ highlight button # ] Must be in the same title. Not to be used in menu PGC's.
Link Program Start given program in the current PGC. program #, [ highlight button #]
Jump/Call InstructionsExit Stop playback. none
Página 1 de 5Appendix
28/08/2014file://C:\Users\Usuario\AppData\Local\Temp\~hh935C.htm
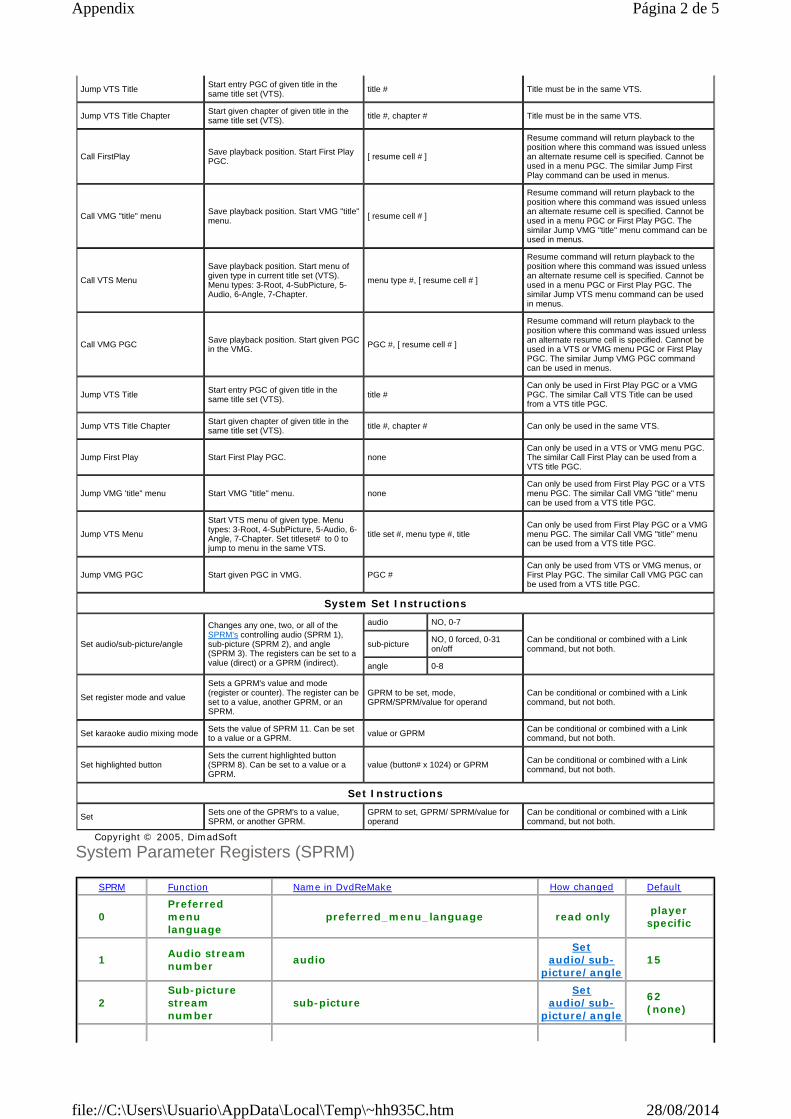
Copyright © 2005, DimadSoft
System Parameter Registers (SPRM)
Jump VTS TitleStart entry PGC of given title in the same title set (VTS).
title # Title must be in the same VTS.
Jump VTS Title ChapterStart given chapter of given title in the same title set (VTS).
title #, chapter # Title must be in the same VTS.
Call FirstPlaySave playback position. Start First Play PGC.
[ resume cell # ]
Resume command will return playback to the position where this command was issued unless an alternate resume cell is specified. Cannot be used in a menu PGC. The similar Jump First Play command can be used in menus.
Call VMG "title" menuSave playback position. Start VMG "title" menu.
[ resume cell # ]
Resume command will return playback to the position where this command was issued unless an alternate resume cell is specified. Cannot be used in a menu PGC or First Play PGC. The similar Jump VMG "title" menu command can be used in menus.
Call VTS Menu
Save playback position. Start menu of given type in current title set (VTS). Menu types: 3-Root, 4-SubPicture, 5-Audio, 6-Angle, 7-Chapter.
menu type #, [ resume cell # ]
Resume command will return playback to the position where this command was issued unless an alternate resume cell is specified. Cannot be used in a menu PGC or First Play PGC. The similar Jump VTS menu command can be used in menus.
Call VMG PGCSave playback position. Start given PGC in the VMG. PGC #, [ resume cell # ]
Resume command will return playback to the position where this command was issued unless an alternate resume cell is specified. Cannot be used in a VTS or VMG menu PGC or First Play PGC. The similar Jump VMG PGC command can be used in menus.
Jump VTS TitleStart entry PGC of given title in the same title set (VTS).
title #Can only be used in First Play PGC or a VMG PGC. The similar Call VTS Title can be used from a VTS title PGC.
Jump VTS Title ChapterStart given chapter of given title in the same title set (VTS). title #, chapter # Can only be used in the same VTS.
Jump First Play Start First Play PGC. noneCan only be used in a VTS or VMG menu PGC. The similar Call First Play can be used from a VTS title PGC.
Jump VMG 'title" menu Start VMG "title" menu. noneCan only be used from First Play PGC or a VTS menu PGC. The similar Call VMG "title" menu can be used from a VTS title PGC.
Jump VTS Menu
Start VTS menu of given type. Menu types: 3-Root, 4-SubPicture, 5-Audio, 6-Angle, 7-Chapter. Set titleset# to 0 to jump to menu in the same VTS.
title set #, menu type #, title Can only be used from First Play PGC or a VMG menu PGC. The similar Call VMG "title" menu can be used from a VTS title PGC.
Jump VMG PGC Start given PGC in VMG. PGC #Can only be used from VTS or VMG menus, or First Play PGC. The similar Call VMG PGC can be used from a VTS title PGC.
System Set Instructions
Set audio/sub-picture/angle
Changes any one, two, or all of the SPRM's controlling audio (SPRM 1), sub-picture (SPRM 2), and angle (SPRM 3). The registers can be set to a value (direct) or a GPRM (indirect).
audio NO, 0-7
Can be conditional or combined with a Link command, but not both.
sub-pictureNO, 0 forced, 0-31 on/off
angle 0-8
Set register mode and value
Sets a GPRM's value and mode (register or counter). The register can be set to a value, another GPRM, or an SPRM.
GPRM to be set, mode, GPRM/SPRM/value for operand
Can be conditional or combined with a Link command, but not both.
Set karaoke audio mixing mode Sets the value of SPRM 11. Can be set to a value or a GPRM.
value or GPRM Can be conditional or combined with a Link command, but not both.
Set highlighted buttonSets the current highlighted button (SPRM 8). Can be set to a value or a GPRM.
value (button# x 1024) or GPRMCan be conditional or combined with a Link command, but not both.
Set Instructions
SetSets one of the GPRM's to a value, SPRM, or another GPRM.
GPRM to set, GPRM/ SPRM/value for operand
Can be conditional or combined with a Link command, but not both.
SPRM Function Name in DvdReMake How changed Default
0 Preferred menu language
preferred_menu_language read only player specific
1 Audio stream number
audio Set
audio/sub-picture/angle
15
2 Sub-picture stream number
sub-picture Set
audio/sub-picture/angle
62 (none)
Página 2 de 5Appendix
28/08/2014file://C:\Users\Usuario\AppData\Local\Temp\~hh935C.htm

Copyright © 2005, DimadSoft
Set Command and Conditional Operators
3 Angle number
angle Set
audio/sub-picture/angle
1
4 Title number volume_title during
playback 1
5 VTS title number
vts_title during
playback From SPRM 4
6 Title PGC number
PGC during
playback
7 Part of Title number
chapter during
playback 1
8 Highlighted button number
highlighted_button Set
highlighted button
1
9 Navigation timer
navigation_timer Set
navigation timer
0
10
PGC to play when Navigation Timer expires
navigation_timer_jump_PGC Set
navigation timer
11 Player audio mixing mode for karaoke
karaoke_audio_mixing_mode Set karaoke audio mixing
mode 0
12 Country code parental_management_contry_code read only
13 Parental level parental_level Set Parental
Level (temporary)
14 Player configuration for video
player_video_configurations read only
15 Player configuration for audio
player_audio_configurations read only
16 Initial language code
preferred_audio_language read only 65535
17
Initial language code extension
preferred_audio_language_extension read only 0
18
Initial Language Code for Sub-picture
preferred_sub-picture_language read only 65535
19
Initial Language Extension Code for Sub-picture
preferred_sub-picture_language_extension
read only 0
20 Player region code
player_regional_code read only
21 Reserved reserved_21
22
Reserved for extended playback mode
reserved_22
23 Reserved
Set command operators Source (V) may be:
Operator Name Description (R=GPRM to set) GPRM SPRM constant
Página 3 de 5Appendix
28/08/2014file://C:\Users\Usuario\AppData\Local\Temp\~hh935C.htm
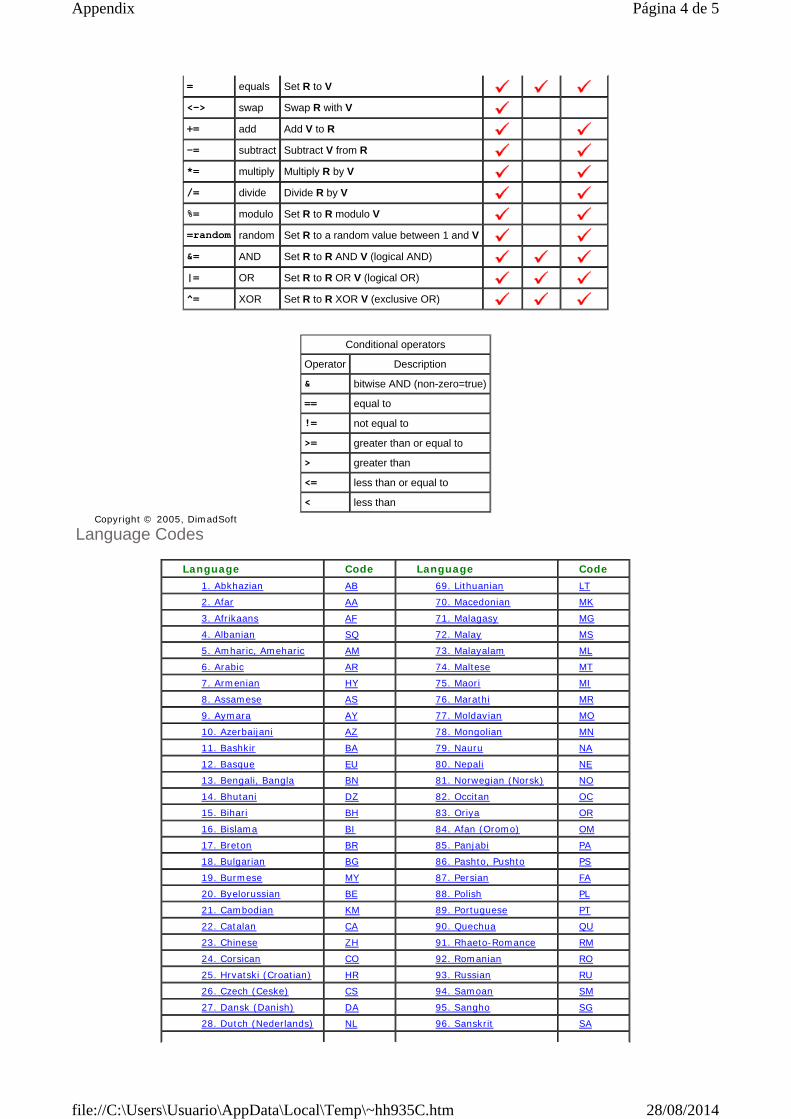
Copyright © 2005, DimadSoft
Language Codes
= equals Set R to V
<-> swap Swap R with V
+= add Add V to R
-= subtract Subtract V from R
*= multiply Multiply R by V
/= divide Divide R by V
%= modulo Set R to R modulo V
=random random Set R to a random value between 1 and V
&= AND Set R to R AND V (logical AND)
|= OR Set R to R OR V (logical OR)
^= XOR Set R to R XOR V (exclusive OR)
Conditional operators
Operator Description
& bitwise AND (non-zero=true)
== equal to
!= not equal to
>= greater than or equal to
> greater than
<= less than or equal to
< less than
Language Code Language Code
1. Abkhazian AB 69. Lithuanian LT
2. Afar AA 70. Macedonian MK
3. Afrikaans AF 71. Malagasy MG
4. Albanian SQ 72. Malay MS
5. Amharic, Ameharic AM 73. Malayalam ML
6. Arabic AR 74. Maltese MT
7. Armenian HY 75. Maori MI
8. Assamese AS 76. Marathi MR
9. Aymara AY 77. Moldavian MO
10. Azerbaijani AZ 78. Mongolian MN
11. Bashkir BA 79. Nauru NA
12. Basque EU 80. Nepali NE
13. Bengali, Bangla BN 81. Norwegian (Norsk) NO
14. Bhutani DZ 82. Occitan OC
15. Bihari BH 83. Oriya OR
16. Bislama BI 84. Afan (Oromo) OM
17. Breton BR 85. Panjabi PA
18. Bulgarian BG 86. Pashto, Pushto PS
19. Burmese MY 87. Persian FA
20. Byelorussian BE 88. Polish PL
21. Cambodian KM 89. Portuguese PT
22. Catalan CA 90. Quechua QU
23. Chinese ZH 91. Rhaeto-Romance RM
24. Corsican CO 92. Romanian RO
25. Hrvatski (Croatian) HR 93. Russian RU
26. Czech (Ceske) CS 94. Samoan SM
27. Dansk (Danish) DA 95. Sangho SG
28. Dutch (Nederlands) NL 96. Sanskrit SA
Página 4 de 5Appendix
28/08/2014file://C:\Users\Usuario\AppData\Local\Temp\~hh935C.htm
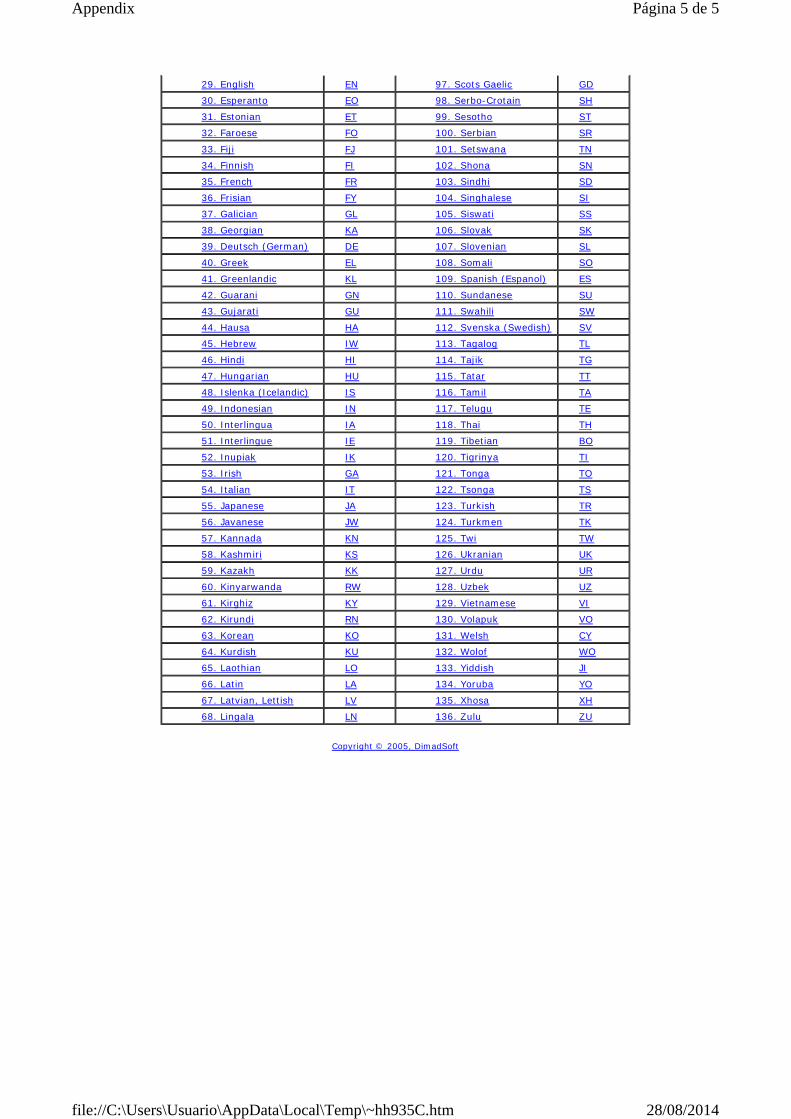
Copyright © 2005, DimadSoft
29. English EN 97. Scots Gaelic GD
30. Esperanto EO 98. Serbo-Crotain SH
31. Estonian ET 99. Sesotho ST
32. Faroese FO 100. Serbian SR
33. Fiji FJ 101. Setswana TN
34. Finnish FI 102. Shona SN
35. French FR 103. Sindhi SD
36. Frisian FY 104. Singhalese SI
37. Galician GL 105. Siswati SS
38. Georgian KA 106. Slovak SK
39. Deutsch (German) DE 107. Slovenian SL
40. Greek EL 108. Somali SO
41. Greenlandic KL 109. Spanish (Espanol) ES
42. Guarani GN 110. Sundanese SU
43. Gujarati GU 111. Swahili SW
44. Hausa HA 112. Svenska (Swedish) SV
45. Hebrew IW 113. Tagalog TL
46. Hindi HI 114. Tajik TG
47. Hungarian HU 115. Tatar TT
48. Islenka (Icelandic) IS 116. Tamil TA
49. Indonesian IN 117. Telugu TE
50. Interlingua IA 118. Thai TH
51. Interlingue IE 119. Tibetian BO
52. Inupiak IK 120. Tigrinya TI
53. Irish GA 121. Tonga TO
54. Italian IT 122. Tsonga TS
55. Japanese JA 123. Turkish TR
56. Javanese JW 124. Turkmen TK
57. Kannada KN 125. Twi TW
58. Kashmiri KS 126. Ukranian UK
59. Kazakh KK 127. Urdu UR
60. Kinyarwanda RW 128. Uzbek UZ
61. Kirghiz KY 129. Vietnamese VI
62. Kirundi RN 130. Volapuk VO
63. Korean KO 131. Welsh CY
64. Kurdish KU 132. Wolof WO
65. Laothian LO 133. Yiddish JI
66. Latin LA 134. Yoruba YO
67. Latvian, Lettish LV 135. Xhosa XH
68. Lingala LN 136. Zulu ZU
Página 5 de 5Appendix
28/08/2014file://C:\Users\Usuario\AppData\Local\Temp\~hh935C.htm