dvdfab movie server a1 user guidedownload.dvdfab.cn/doc/dvdfab-movie-server-user-manual.pdf ·...
TRANSCRIPT
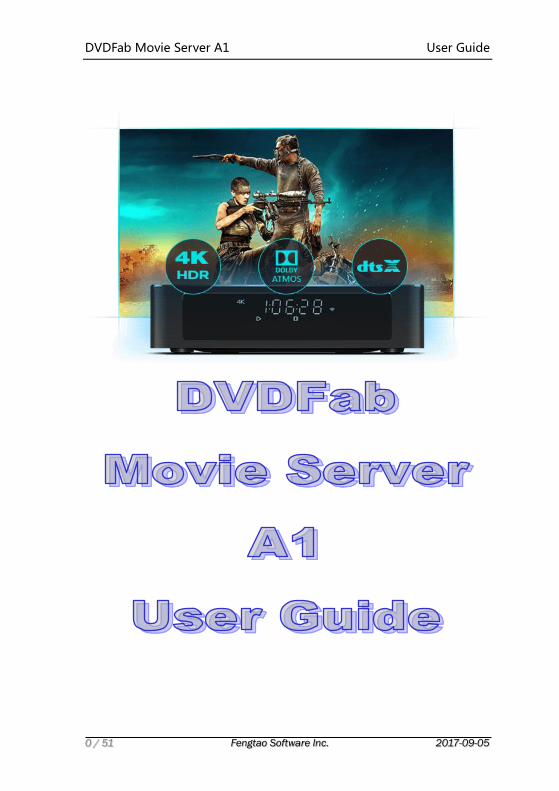
DVDFab Movie Server A1 User Guide
0 / 51 Fengtao Software Inc. 2017-09-05

DVDFab Movie Server A1 User Guide
1 / 51 Fengtao Software Inc. 2017-09-05
Table of Contents
1 Main Features ....................................................................................................... 3
2 Hardware .............................................................................................................. 4
2.1 CONNECTION INTERFACE ............................................................................................... 4 2.1.1 Front ........................................................................................................................ 4 2.1.2 Back ......................................................................................................................... 4
2.2 REMOTE ............................................................................................................................ 6
3 Setup and Installation ...................................................................................... 7
3.1 QUICK SETUP.................................................................................................................... 7 3.2 RECEIVER SETUP ............................................................................................................. 7 3.3 HOME THEATRE SETUP .................................................................................................. 7
4 Initial Settings ..................................................................................................... 7
4.1 FIRST-TIME CONFIGURATION ........................................................................................ 8 4.1.1 Choose UI Language ......................................................................................... 8 4.1.2 Set up Internet Connection ............................................................................ 8 4.1.3 Confirm Setup Method ..................................................................................... 9
4.2 ACTIVATE MOVIE SERVER ........................................................................................... 10 4.2.1 Activate Manually ........................................................................................... 10 4.2.2 Activate via DVDFab 10 ............................................................................... 11 4.2.3 Home Page ......................................................................................................... 13
5 Build Your Movie Library ............................................................................. 16
5.1 IMPORT MOVIES FROM DVDFAB 10 ......................................................................... 16 5.2 IMPORT EXISTING MOVIE COLLECTIONS .................................................................. 17 5.3 IMPORT MEDIA FROM NAS ......................................................................................... 18
5.3.1 Add Network in Local Movies Section .................................................... 18 5.3.2 Add NAS Media via MS Manager .............................................................. 18
6 Media Playback ................................................................................................ 21
6.1 PLAY BACK DVDS & BLU-RAYS ................................................................................. 21 6.1.1 Menu Mode ........................................................................................................ 21 6.1.2 Main Movie Playback .................................................................................... 23
6.2 PLAY BACK OTHER VIDEOS ......................................................................................... 23 6.3 PLAY BACK AUDIOS ...................................................................................................... 24 6.4 BROWSE IMAGE FILES.................................................................................................. 24 6.5 PLAYBACK CONTROL .................................................................................................... 25 6.6 MEDIA MANAGEMENT ................................................................................................. 26
6.6.1 Poster Wall ........................................................................................................ 27 6.6.2 Function Menu ................................................................................................. 28

User Guide
2 / 51
6.6.3 Folder/File List ................................................................................................. 29
7 Apps ...................................................................................................................... 34
8 Settings ................................................................................................................ 36
8.1 GENERAL ....................................................................................................................... 36 8.1.1 Language ............................................................................................................ 36 8.1.2 Time Zone ........................................................................................................... 36 8.1.3 Wi-Fi ..................................................................................................................... 36 8.1.4 Ethernet ............................................................................................................... 37 8.1.5 Bluetooth............................................................................................................. 37 8.1.6 Screensaver ........................................................................................................ 37 8.1.7 Key Tone .............................................................................................................. 37 8.1.8 On-Screen Keyboard ....................................................................................... 37 8.1.9 Cooling Fan ........................................................................................................ 37 8.1.10 Device Name ................................................................................................... 37 8.1.11 Show the Number of Movies ..................................................................... 38 8.1.12 Enter Movies Section upon System Startup ....................................... 38 8.1.13 System Maintenance .................................................................................... 38 8.1.14 Advanced Settings ........................................................................................ 39 8.1.15 Reset above Settings to Default .............................................................. 39
8.2 DISPLAY ......................................................................................................................... 39 8.2.1 Screen Resolution ............................................................................................ 40 8.2.2. Screen Size ......................................................................................................... 40 8.2.3 HDR Mode ........................................................................................................... 40 8.2.4 Video Color Space and HDMI Color Depth Model .............................. 40 8.2.5 Adjust Display Refresh Rate ........................................................................ 40 8.2.6 4K 30Hz TV Compatible Mode ................................................................... 40
8.3 PLAYBACK ...................................................................................................................... 40 8.3.1 Default Way to Browse Extended Device ............................................... 41 8.3.2 Playback Mode .................................................................................................. 41 8.3.3 Playback of 3D Media .................................................................................... 41 8.3.4 LED Screen ......................................................................................................... 41 8.3.5 LED Screen Brightness .................................................................................. 41
8.4 AUDIO ............................................................................................................................. 41 8.4.1 Audio Output Mode ......................................................................................... 42 8.4.2 Passthrough ....................................................................................................... 42 8.4.3 Preferred Audio Language .......................................................................... 42
8.5 SUBTITLE ....................................................................................................................... 42 8.5.1 Preferred Subtitle Language ...................................................................... 43 8.5.2 Character ............................................................................................................ 43 8.5.3 Size ......................................................................................................................... 43 8.5.4 Style ....................................................................................................................... 43 8.5.5 Color ...................................................................................................................... 43 8.5.6 Position ................................................................................................................ 43
8.6 MEMBER CENTER ........................................................................................................ 43 8.7 ABOUT ............................................................................................................................ 44
9 FAQs & Answers ................................................................................................ 45

DVDFab Movie Server A1 User Guide
3 / 51 Fengtao Software Inc. 2017-09-05
1 Main Features
DVDFab Movie Server is an ultimate 4K multimedia managing and
playback facility featuring tons of cutting-edge technologies. Here below are its
main features:
Quad-Core 2.0GHz ARM Cortex-A53 Processor
16GB On-Board Storage Allows More Applications
10/100/1000 Megabit Adaptive Ethernet Port
Two Wi-Fi Antennas with 2.4G/5G Dual-Band Frequency
Different Ports Allows a Great Variety of Peripherals
Black Gold Technique plus Military Grade Materials
Built-in NSS Patented Metal Disk Extraction Cabinet
Closable Front LED Display plus Smart Cooling System
Full-Featured DVD & Blu-ray Navigation Menu Support
Top-Notch TV Show Menu Support and Management
Automatic Media Managing plus Well-Sorted Poster Wall
Smart Filtering Makes Instant Movie Locating Possible
Support 3D, H.265, 4K UHD and More Video Formats
Splendid Audio Support including Dolby Atmos & DTS:X
Add Movie Library from Network Attached Storage (NAS)
Automatically Scrap Metadata Information from Internet
Manually Modify the Inaccurate Metadata Information
Support to Format the HDD into EXT4 File System
Preinstalled Google Play and Google Search Application
Android 5.1 OS Means a Sea of 3rd Party Apps and Games

User Guide
4 / 51
2 Hardware
2.1 Connection Interface
As a top-level 4K Blu-ray media player, DVDFab Movie Server integrates
diversified connection interfaces, via which, you can attach or plug in a variety
of peripherals to bring the watching experience up to a higher level.
2.1.1 Front
2.1.2 Back
1. Front LED Display
2. Video Resolution Indicator
3. Time Indicator
4. Playback Status Indicator
5. Wi-Fi Indicator

DVDFab Movie Server A1 User Guide
5 / 51 Fengtao Software Inc. 2017-09-05
1. Video Output
2. Right Channel Audio Output
3. Power Switch
4. Optical Audio Output
5. Coaxial Audio Output
6. Left Channel Audio Output
7. HDMI Output
8. USB3.0 Interface
9. USB2.0 Interface
10. Ethernet Interface
11. Reset Button
12. DC Power Input
User Guide
6 / 51
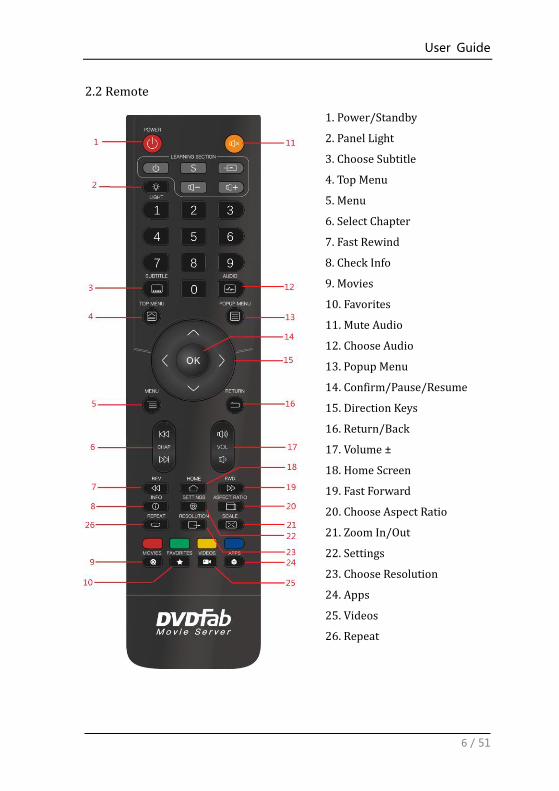
2.2 Remote
1. Power/Standby
2. Panel Light
3. Choose Subtitle
4. Top Menu
5. Menu
6. Select Chapter
7. Fast Rewind
8. Check Info
9. Movies
10. Favorites
11. Mute Audio
12. Choose Audio
13. Popup Menu
14. Confirm/Pause/Resume
15. Direction Keys
16. Return/Back
17. Volume ±
18. Home Screen
19. Fast Forward
20. Choose Aspect Ratio
21. Zoom In/Out
22. Settings
23. Choose Resolution
24. Apps
25. Videos
26. Repeat

DVDFab Movie Server A1 User Guide
7 / 51 Fengtao Software Inc. 2017-09-05
3 Setup and Installation
3.1 Quick Setup
Power off all your devices;
Connect the Movie Server to the TV with an HDMI cable;
Plug in the power adaptor and the Ethernet cable;
Insert your HDD into the HDD cabinet;
Power on the Movie Server and then the TV to start enjoying.
3.2 Receiver Setup
Power off all your devices;
Connect the Movie Server to the TV with an HDMI cable;
Connect the Movie Server to the receiver with an S/PDIF optical
cable;
Plug in the power adaptor and the Ethernet cable;
Insert your HDD to the HDD cabinet;
Power on the Movie Server, then the receiver, and finally the TV to
start enjoying.
3.3 Home Theatre Setup
Power off all your devices;
Connect the receiver to the TV with an HDMI cable;
Connect the Movie Server to the receiver with an HDMI cable;
Plug in the power adaptor and the Ethernet cable;
Insert your HDD to the HDD cabinet;
Power on the Movie Server, then the receiver, and finally the TV to
start enjoying.
4 Initial Settings
For a better experience, you need to configure DVDFab Movie Server to
work with certain home media devices they have, a receiver, smart TV,
User Guide
8 / 51
projector, or the home theatre system, and then set the appropriate audio and
video output modes accordingly. Note that in order to find out the best audio
and video configuration, you may need to refer to the user manuals of their
receiver, TV, projector, or home theatre system as well.
4.1 First-Time Configuration
When power on the Movie Server for the first time, it will guide you
through some very basic configurations, after which, you will be brought to the
Launcher page. Follow the steps below to get started.
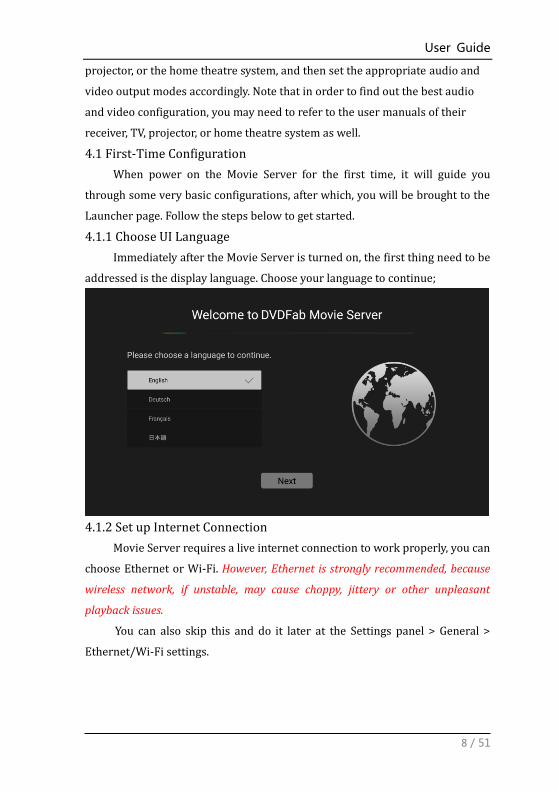
4.1.1 Choose UI Language
Immediately after the Movie Server is turned on, the first thing need to be
addressed is the display language. Choose your language to continue;
4.1.2 Set up Internet Connection
Movie Server requires a live internet connection to work properly, you can
choose Ethernet or Wi-Fi. However, Ethernet is strongly recommended, because
wireless network, if unstable, may cause choppy, jittery or other unpleasant
playback issues.
You can also skip this and do it later at the Settings panel > General >
Ethernet/Wi-Fi settings.
DVDFab Movie Server A1 User Guide
9 / 51 Fengtao Software Inc. 2017-09-05
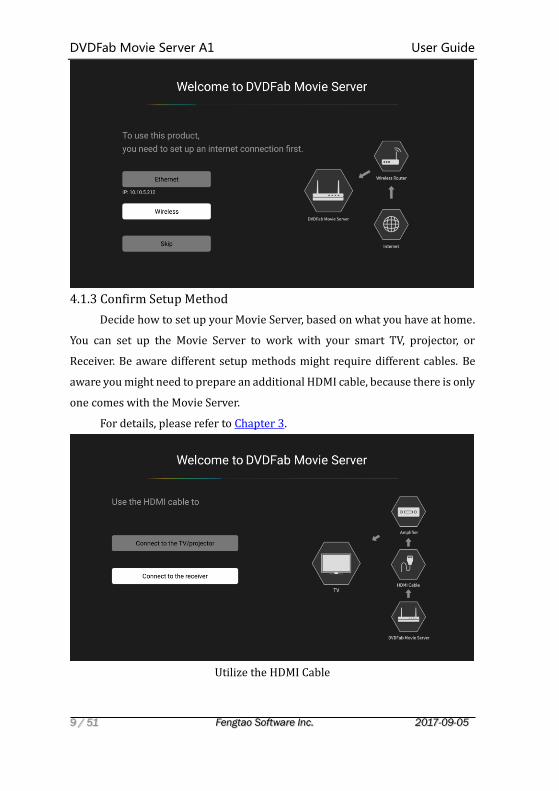
4.1.3 Confirm Setup Method
Decide how to set up your Movie Server, based on what you have at home.
You can set up the Movie Server to work with your smart TV, projector, or
Receiver. Be aware different setup methods might require different cables. Be
aware you might need to prepare an additional HDMI cable, because there is only
one comes with the Movie Server.
For details, please refer to Chapter 3.
Utilize the HDMI Cable

User Guide
10 / 51
Configure the Audio Output
4.2 Activate Movie Server
DVDFab Movie Server requires your DVDFab account to work. To activate
the machine, you can either manually enter the login credentials from DVDFab
Member Center (the one that registered with the E-mail address while placing
the order), or activate the machine by access the account information of DVDFab
10 on your computer.
4.2.1 Activate Manually
Click the Activate Manually button, enter your account information of
DVDFab Member Center at the next page, and then click the Activate button to
activate the machine.

DVDFab Movie Server A1 User Guide
11 / 51 Fengtao Software Inc. 2017-09-05
In case typing with the Remote and the on-screen keyboard feels clumsy
to you, just plug in your computer keyboard to make the typing process easier.
4.2.2 Activate via DVDFab 10
To make the activation process much easier, you can also choose to activate
via DVDFab 10. To do that, please make sure your DVDFab 10 is already running
on your PC, and your PC is connected to the same local area network as your
Movie Server, then click the Activate via DVDFab 10 button to activate the
machine.

User Guide
12 / 51
By either way, if successfully activated, you can see the information, such
as your account, the serial number of your machine, warranty information. If
everything goes right, then you can click the Enjoy button, and the Movie Server
shall start to scan the movie library of the SATA hard drive, and when that
completes, you are ready to rock.
Be aware, in some very rare cases, the activation might fail. If that
happens, please make sure:
1) Your internet connection is good;
2) You have entered your DVDFab account correctly, pay extra attention

DVDFab Movie Server A1 User Guide
13 / 51 Fengtao Software Inc. 2017-09-05
to the password part; or
3) If you activate via DVDFab 10, make sure your DVDFab itself has been
activated, and is currently running.
4.2.3 Home Page
Once the Movie Server is successfully, your will be brought to the Home Page,
where you can see five major sections at the bottom part of the screen, namely
(from left to right), Movies, Favorites, Local Movies, Apps and Settings.
At the bottom part of the Home Screen, there 5 feature icons, namely
(from left to right), Movies, Favorites, Local Videos, Apps and Settings.
Movies: Browse and play back the movies, TV Shows and other videos
stored in the attached 3.5 inch SATA hard drive. You can browse by
Recently Updated, or by different Genres.

User Guide
14 / 51
If you want to locate a specific movie fast and accurately from a sea of
videos, then the smart search feature may help a lot. For that end, go to the
Function Menu, and apply the Search or Filter function accordingly.
Favorites: This section stores the favorite movies, TV Shows or other
videos you manually added to the Favorites list for next-time quick access,
and you can at any time de-favorite, to remove any movie from this list.

DVDFab Movie Server A1 User Guide
15 / 51 Fengtao Software Inc. 2017-09-05
Local Videos: Click this icon, you can browse file-by-file the movies, TV
Shows, and all the other files on the 3.5 inch SATA hard drive, the onboard
storage and also the networked device.
Apps: at this section, you can quickly access and manage the installed
applications.
Settings: Enter the Settings panel to reset any parameters when
necessary.

User Guide
16 / 51
5 Build Your Movie Library
DVDFab Movie Server is intentionally designated to work with DVDFab
software in the first place. The seamless connection between the two can provide
an ultimate user experience. You can directly output the DVD/Blu-ray ISO and
folders created by DVDFab to the attached 3.5 inch SATA hard disk drive inside
the Movie Server. In this way, your personal media library with easy management
is created and you can enjoy your favorite movies, TV Shows anytime convenient.
However, that does not mean Movie Server only accept the ISO files made
by DVDFab 10. Actually, it is an open system, meaning, you can also import their
existing movie collections into the machine, either they are stored on a home
NAS device, or on their PC hard drives, and regardless of what formats they are.
5.1 Import Movies from DVDFab 10
When copying DVDs and Blu-rays with DVDFab 10, you can directly save the
resulting files (ISO image files) to the Movie Server to build up their movie library
there.
Step 1 — Power on the Movie Server and make sure it is connected to the same

DVDFab Movie Server A1 User Guide
17 / 51 Fengtao Software Inc. 2017-09-05
network your computer is connected to;
Step 2 — Start DVDFab 10 on your computer and choose the Copy module;
Step 3 — Insert your DVD/Blu-ray into the computer optical drive;
Step 4 — Choose the Full Disc, Main Movie or Clone mode (more modules and
modes will be supported in the future);
Step 5 — At the “Save to” section, choose DVDFab Movie Server from the
dropdown menu;
Step 6 — Start the backup process;
Step 7 — Power on the receiver or home theatre, depending on what you have,
and the TV to start enjoying your favorite movies.
Besides the Copy module, the MKV Passthrough conversion profile under
the Ripper module also supports to save the resulting MKV videos directly to the
Movie Server. With future versions of DVDFab, there will be more modules and
modes supporting to save the output directly to the Movie Server.
5.2 Import Existing Movie Collections
DVDFab Movie Server also accepts your existing movie collections, either
they are ISO files, movie folders made by earlier generations of DVDFab, or other
backup tools, or the digital formats, such as MP4, MKV, AVI, M2TS, etc. You have
to spend a lot of your time to redo the backup, just use the traditional copy &
paste method to transfer the copied files to the SATA hard drive inside the Movie
Server.
Step 1 — In the address bar of Windows explorer, enter \\YourMovie Server’s IP
Address\share\sata\sata1\DVDFab (Check the IP address of the Movie Server, if
you are not sure, at Settings >General > Wi-Fi/Ethernet);
Step 2 — Press the Enter key on your keyboard;
Step 3 — Copy your old media files and then paste them into the DVDFab folder;
Step 4 — At the Movies section of Movie Server, go to the Function Menu, and
then press the Refresh button there to refresh the movie library.
Note, literally, you can copy anything directly to this path, including the
firmware, application APK files, even the DVDFab 10 copied ISO files, in case,
sometimes due to network reason, it fails to directly transfer the resulting files
User Guide
18 / 51
to the Movie Server. In that case, go to C:\You\User
Name\Documents\DVDFab10\Temp\MediaServer, find and make sure you copy
both the .meta and .iso files to the Movie Server.
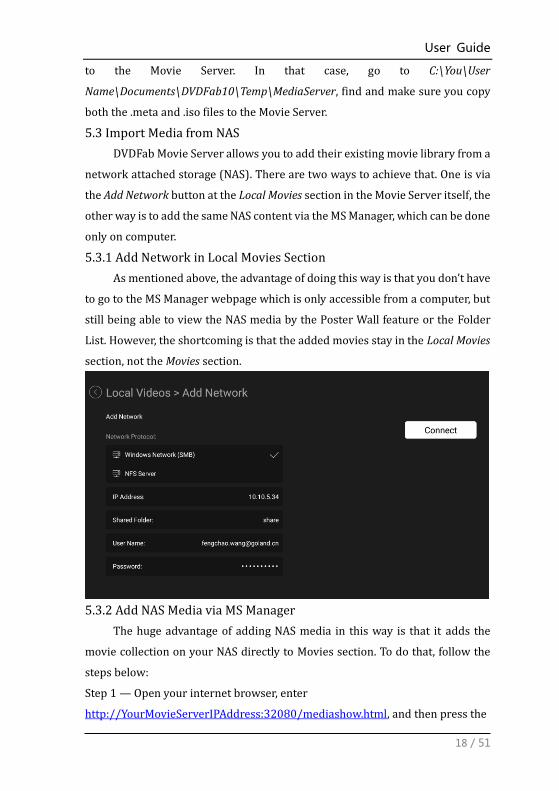
5.3 Import Media from NAS
DVDFab Movie Server allows you to add their existing movie library from a
network attached storage (NAS). There are two ways to achieve that. One is via
the Add Network button at the Local Movies section in the Movie Server itself, the
other way is to add the same NAS content via the MS Manager, which can be done
only on computer.
5.3.1 Add Network in Local Movies Section
As mentioned above, the advantage of doing this way is that you don’t have
to go to the MS Manager webpage which is only accessible from a computer, but
still being able to view the NAS media by the Poster Wall feature or the Folder
List. However, the shortcoming is that the added movies stay in the Local Movies
section, not the Movies section.
5.3.2 Add NAS Media via MS Manager
The huge advantage of adding NAS media in this way is that it adds the
movie collection on your NAS directly to Movies section. To do that, follow the
steps below:
Step 1 — Open your internet browser, enter
http://YourMovieServerIPAddress:32080/mediashow.html, and then press the

DVDFab Movie Server A1 User Guide
19 / 51 Fengtao Software Inc. 2017-09-05
Enter button on the keyboard to enter the MS Manager webpage;
Note: To open this page, you can also launch DVDFab 10 > choose Main
Movie/Full Disc/Clone mode under the Copy module > load a source > select the
Movie Server at the Save to part > Click the MS Manager button.
Step 2 — At the MS Manager webpage, click Edit library;
Step 3 — At the popup page, click Add New Path;

User Guide
20 / 51
Step 4 — Click Add a Network Location;
Step 5 — Select the wanted NAS directory and click OK;

DVDFab Movie Server A1 User Guide
21 / 51 Fengtao Software Inc. 2017-09-05
Step 6 — Once the movie directory is added, wait a while until the Movie Server
refreshes the movie library.
6 Media Playback
You can play back a movie from the Movies section, the Favorites section,
the Local Movies section, or any other devices temporarily connected to the
Movie Server via USB, Bluetooth, or Wi-Fi.
6.1 Play Back DVDs & Blu-rays
When playing back a DVD/Blu-ray ISO file or folder made by DVDFab
from the attached 3.5 inch SATA hard drive, NAS or other temporarily
connected devices, you have two options, one is to play back the selected movie
with navigation menus, the other is to directly play back the feature movie title,
the main title as we call it.
Choose a Playback Mode
6.1.1 Menu Mode
Menu Navigation is another killer feature that this Movie Server inherits
from the DVDFab software package. Bear in mind that this feature only applies
to DVD/Blu-ray ISO and movie folders that contain the standard DVD/Blu-ray
file structure as found on the original discs. In this way, you can get a native

User Guide
22 / 51
DVD/Blu-ray watching experience no second to the one they experience on a
home Blu-ray player machine. You can use the Menu, TOP MENU, POP MENU,
SUBTITLE and AUDIO keys to interact with the movie server during the
playback process, to choose chapters, audio tracks and subtitles they want.
Top Menu
Popup Menu
Top Menu: Opens the top menu, available only under the Navigation Menu
mode.
Pop-up Menu: Opens the popup menu, available only under the Navigation
Menu mode.

DVDFab Movie Server A1 User Guide
23 / 51 Fengtao Software Inc. 2017-09-05
Chapter: Select the different chapters, or jump from one to another.
Audio Track: Select the wanted audio track to go with the playback.
Subtitle: Select the wanted subtitle to go with the playback, either the native
subtitles, or the external subtitles.
Playback Mode: Switch the movie between the 2D and 3D mode.
Aspect Ratio: Adjust the display ratio of the movie.
Info: View the format information of the movie being played.
6.1.2 Main Movie Playback
Compared with the navigation menu mode, you also have another simpler
way to watch their movies, if they don’t necessarily need to wade through all
the menus. Selecting the Main Movie mode, they can directly jump into the
feature length movie to start enjoying the leisure time. Be noted that some keys,
such as Top Menu and Popup Menu, on the Remote shall not work under main
movie mode.
6.2 Play Back Other Videos
When playing other videos of different formats, such as MKV, MP4, AVI,
M2TS, etc., pressing the play button shall directly start to play the video
immediately. Be noted that DVDFab 10 also allows to save the converted video
files directly to the Movie Server in the Ripper module. If you want to save your
free space on the SATA hard drive, you can just convert your DVDs and Blu-rays

User Guide
24 / 51
into your preferred video formats to watch on the Movie Server.
6.3 Play Back Audios
Music playback on the Movie Server probably is not your first choice,
because you can easily enjoy them on your portable devices, like iPod, iPhone, or
iPad, etc., but DVDFab Movie Server does support to play back the audio files,
such as M4A, MP1/2/3, MPA, WAV, OGG, FLAC, APE, CUE etc.
Be aware that the audio files will not be displayed by default in the Movies
section, which means, you will have to manually browse the files in the Local
Videos section, and play back them from there, using the native music player,
which has all the basic features of a music player, like repeat a single song, repeat
all, play in order, play only the selected, shuffle, etc.
If you’re not satisfied with the built-in music player, you can also download
your preferred one from Google Play store.
6.4 Browse Image Files
Similar to playing back songs on the Movie Server, viewing pictures and
photos is not a highly required feature for the movie server, however, DVDFab
Movie Server still is capable of viewing images. All you have to do is to copy and
paste the images to SATA hard drive, or a USB flash drive, and start to view
them from there.

DVDFab Movie Server A1 User Guide
25 / 51 Fengtao Software Inc. 2017-09-05
Press the OK button on the Remote will open the selected image, while
press the OK button again if the image is already opened shall enter the payback
mode, meaning all the images in that folder will be played like a slide. Press the
OK button for the 3rd time shall exit the “Slide Mode”.
6.5 Playback Control
The way how you interact with the playback process is part of a better
watching experience. DVDFab Movie Server comes with a full-functional remote,
which presents you a very smooth playback control experience. For the detailed

User Guide
26 / 51
functions of each keys on the Remote, please refer to Chapter 2.2
In the future firmware updates, there is also going to be a Remote app
designed to work with the Movie Server, meaning, you will be able to control the
Movie Server on your iPhone, Android smart phones, or tablets.
6.6 Media Management
To present you the best media managing experience, DVDFab Movie Server
manages all your media library in a smart and intelligent way. The media
contents in the Movies and Favorites sections are displayed with the Poster Wall
feature by default; while in the Local Movies section, you have the option to
display the movies by the Poster Wall, or the Folder/File List.
Poster Wall

DVDFab Movie Server A1 User Guide
27 / 51 Fengtao Software Inc. 2017-09-05
Folder/File List
6.6.1 Poster Wall
For a maximized user experience, DVDFab Movie Server manages and
organizes the media library stored in the 3.5 inch SATA hard drive by Poster
Wall, which is, as we think and agreed by most of our customers, the best way
to present you all the movies, TV Shows and other videos they have, because
with the help of Poster Wall, you can easily and quickly locate a specific title
from a myriad of collections, and they can get to know the detailed metadata
information of each movie, thanks to the amazing feature of automatically
download all the metadata information from online.

User Guide
28 / 51
6.6.2 Function Menu
Via the Function Menu, you can easily search a wanted title from your
huge movie collections, set up a filter to narrow down your searching scope,
clear your playback history, or refresh the movie library (this is extremely
helpful if you add new titles to your Movie Server).
Search the Media Library

DVDFab Movie Server A1 User Guide
29 / 51 Fengtao Software Inc. 2017-09-05
Set up a Filter
6.6.3 Folder/File List
In the Local Movies section, you can browse all the media contents in the
SATA hard drive by the folder/file list; while if you add the Windows Network,
or a NAS device, you have the free options to view the media contents by the
Poster Wall, or by the Folder/File List. Besides, the media contents in the built-
in 16GB storage can only be accessed by the Folder/File List method.
6.6.4 Modify Metadata Information
Each ISO/video file made by DVDFab 10 copy modules, when transferred to the
Movie Server, is accompanied by its distinctive .meta file, which is why the
Movie Server, with the Poster Wall feature, can show all the detailed
information on the poster. However, if you transfer your old media files onto the
Movie Server, there might be no poster information, or the metadata
information on the poster might be inaccurate. When this happens, DVDFab
offers another way for you to manually correct the metadata on your PC.
Step 1 — Open the browse on your PC, type “10.10.5.251:32080” in the address
bar, and press Enter button on your keyboard;

User Guide
30 / 51
Note: Replace 10.10.5.251 with the IP address of your Movie Server. If not sure,
find it on your Movie Server at Settings > General > Wi-Fi/Ethernet.
Or, you can launch DVDFab 10 > Choose Full Disc/Clone mode > Load a
source > Choose the Movie Server from the drop-down menu of the Save to
section > click MS Manager;
Step 2 — Hover the mouse pointer over the movie whose metadata needs to be
corrected, you will see a three-dot icon show up at the bottom right corner of

DVDFab Movie Server A1 User Guide
31 / 51 Fengtao Software Inc. 2017-09-05
the poster, click on that icon;
Step 3 — At the popup menu, click on the Matching button;
Step 4 — Enter the correct media title, select a category, and then click on the
Search button;

User Guide
32 / 51
Step 5 — Usually, there will be a couple of posters show up at the next window,
you can then select the correct one and click the OK button to apply the poster.

DVDFab Movie Server A1 User Guide
33 / 51 Fengtao Software Inc. 2017-09-05
Step 6 — It shall take a few seconds to download and apply the poster, and
when it finishes, you can then go back to your Movie Server, and then metadata
information should also be updated there.

User Guide
34 / 51
Step 7 > Move to the Movies section and checked the updated metadata
information of the movie you’ve just modified.
7 Apps
Deep inside the DVDFab Movie Server runs the Android 5.0 operating
system, which means you can install all kinds of Android apps either from
major App Markets, such as the Google Play that is preinstalled; other
preinstalled apps include Google Search and YouTube.
You can also install apps by executing the APK files of your favorite apps
from the attached 3.5 inch SATA hard drive, or any USB devices. To install the
app, just locate the APK file from your hard drive under the Local Videos
section, and then press the OK button on the Remote to follow the installation
wizards until the app is successfully installed.

DVDFab Movie Server A1 User Guide
35 / 51 Fengtao Software Inc. 2017-09-05
Install an App
Apps Installed
User Guide
36 / 51
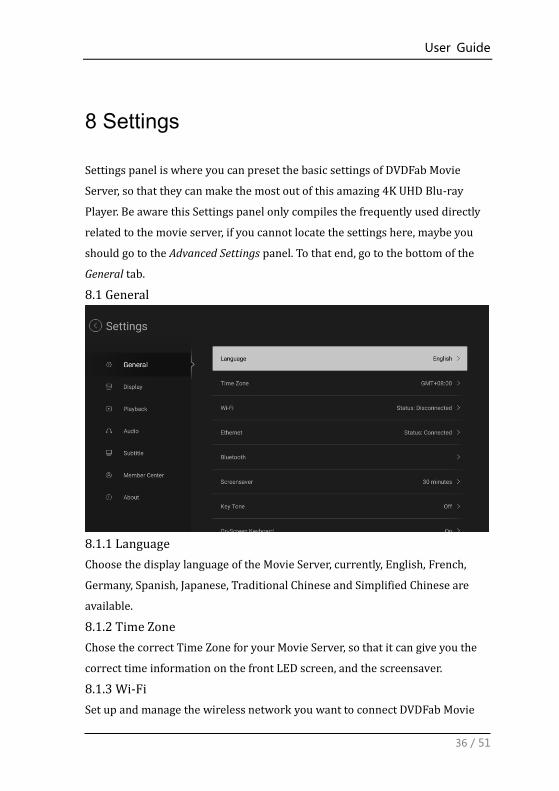
8 Settings
Settings panel is where you can preset the basic settings of DVDFab Movie
Server, so that they can make the most out of this amazing 4K UHD Blu-ray
Player. Be aware this Settings panel only compiles the frequently used directly
related to the movie server, if you cannot locate the settings here, maybe you
should go to the Advanced Settings panel. To that end, go to the bottom of the
General tab.
8.1 General
8.1.1 Language
Choose the display language of the Movie Server, currently, English, French,
Germany, Spanish, Japanese, Traditional Chinese and Simplified Chinese are
available.
8.1.2 Time Zone
Chose the correct Time Zone for your Movie Server, so that it can give you the
correct time information on the front LED screen, and the screensaver.
8.1.3 Wi-Fi
Set up and manage the wireless network you want to connect DVDFab Movie

DVDFab Movie Server A1 User Guide
37 / 51 Fengtao Software Inc. 2017-09-05
Server to.
8.1.4 Ethernet
Set up and manage the wired network you want to connect DVDFab Movie
Server to.
8.1.5 Bluetooth
Turn on/off the Bluetooth function, and manage the nearby Bluetooth devices.
8.1.6 Screensaver
Turn on/off the screensaver feature, and determine after how long the
screensaver should activate if the no actions are detected with the movie server.
8.1.7 Key Tone
Turn on/off the sound effect when you press the keys on the Remote.
8.1.8 On-Screen Keyboard
Turn on/off the built-in on-screen keyboard so that you can use the Remote for
typing when necessary.
8.1.9 Cooling Fan
Turn on/off, or customize the spinning speed of the cooling fan, to control the
temperature of the SATA hard disk drive. You can set the cooling fan to spin
faster/slower if the temperature reaches a certain level.
8.1.10 Device Name
Select or customize what you would like to call the movie server, according its

User Guide
38 / 51
location in the house.
8.1.11 Show the Number of Movies
If this option is enabled, you can see how many movies are in the Movies
section.
8.1.12 Enter Movies Section upon System Startup
Turn this option on if you want to automatically enter to the Movies section
whenever you start up the Movie Server.
8.1.13 System Maintenance
There are a couple of settings here under this option.
Disk Manager — you can check the detailed information and status of your
HDD, including the disk model, heath level, temperature, used & available
space; you can also scan and attempt the recovery of the possible bad sectors,
format the HDD into EXT4 file system, or unmount the HDD when necessary. Be
aware that formatting the HDD shall wipe out all the data on it. So, think twice
before you do it.
HDD Information
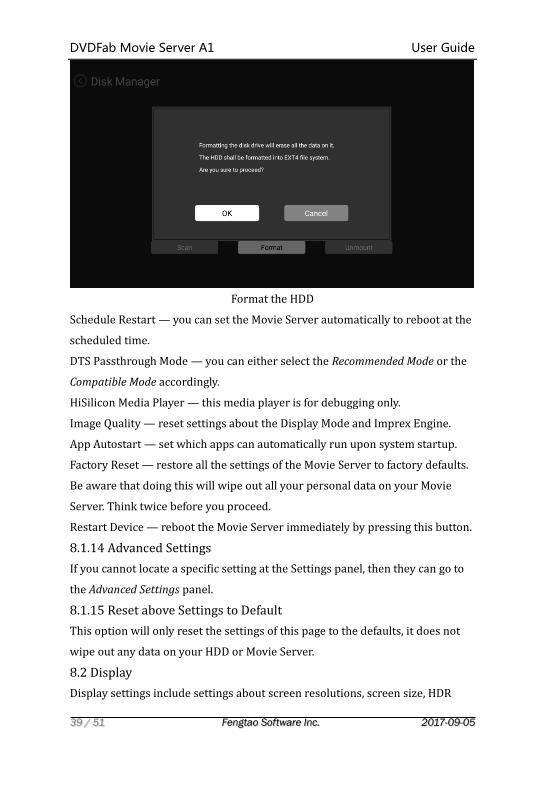
DVDFab Movie Server A1 User Guide
39 / 51 Fengtao Software Inc. 2017-09-05
Format the HDD
Schedule Restart — you can set the Movie Server automatically to reboot at the
scheduled time.
DTS Passthrough Mode — you can either select the Recommended Mode or the
Compatible Mode accordingly.
HiSilicon Media Player — this media player is for debugging only.
Image Quality — reset settings about the Display Mode and Imprex Engine.
App Autostart — set which apps can automatically run upon system startup.
Factory Reset — restore all the settings of the Movie Server to factory defaults.
Be aware that doing this will wipe out all your personal data on your Movie
Server. Think twice before you proceed.
Restart Device — reboot the Movie Server immediately by pressing this button.
8.1.14 Advanced Settings
If you cannot locate a specific setting at the Settings panel, then they can go to
the Advanced Settings panel.
8.1.15 Reset above Settings to Default
This option will only reset the settings of this page to the defaults, it does not
wipe out any data on your HDD or Movie Server.
8.2 Display
Display settings include settings about screen resolutions, screen size, HDR

User Guide
40 / 51
mode, and the video color space and HDMI color depth model.
8.2.1 Screen Resolution
Set the screen resolution for the current display to get the best visual effect.
8.2.2. Screen Size
Adjust the screen display size according to the onscreen tips.
8.2.3 HDR Mode
Select the image enhancement technology supported by the current display
device.
8.2.4 Video Color Space and HDMI Color Depth Model
Choose the best one that fits your situation.
8.2.5 Adjust Display Refresh Rate
Enable or disable the feature to all the Movie Server to automatically adjust the
dislpay refresh rate.
8.2.6 4K 30Hz TV Compatible Mode
Turn this option on to allow the Moive Server automatically switch to the 4K
30/24Hz during the playback process and switch back to 1080p 60Hz when the
playback finishes, so that you can experice smooth UI display and at the same
time, enjoy the stuning 4K videos.
8.3 Playback
Settings at this page are all playback relevant.

DVDFab Movie Server A1 User Guide
41 / 51 Fengtao Software Inc. 2017-09-05
8.3.1 Default Way to Browse Extended Device
Decide how to launch a connected USB device, three choices are available,
Browse by Folder, Poster Wall, and Ask Each Time.
8.3.2 Playback Mode
Decide how to play back the DVD & Blu-ray ISO files and folders, the Menu
Mode, or the Main Movie Mode.
8.3.3 Playback of 3D Media
Choose the default way to play back 3D movies, in 2d Mode, 3D Mode, or Ask
Each Time.
8.3.4 LED Screen
Choose what information to be displayed on the front LED screen, time elapsed,
time remaining, clock, or close during playback.
8.3.5 LED Screen Brightness
Adjust the brightness of the front LED screen.
8.4 Audio
Settings under this page are all audio relevant.

User Guide
42 / 51
8.4.1 Audio Output Mode
Select the output mode of the audio signal, depending on your audio device’s
capability, there are Analog, HDMI, and S/PDIF options to choose from.
8.4.2 Passthrough
When selecting HDMI or S/PDIF as the audio output mode, you can decide
whether or not to use Passthrough method to transmit the audio signals.
If the option is turned on, Movie Server shall use the passthrough method to
transmit the RAW audio signals, which is the best choice for you whose setup
includes an receiver that supports Dolby True-HD, Dolby Atmos and DTS-HD
Master/DTS:X decoding. In this case, you can get up to 7.1 channels or Dolby
Atmos with the highest sound effect via an HDMI cable.
If the option is turned off, the Movie Server will use the LPCM decoding method
to transmit the audio signals. In this case, you will be able get the left and right
two-channel stereo audio even with a regular TV.
8.4.3 Preferred Audio Language
Choose the default option to play the audio in your preferred language.
8.5 Subtitle
Settings under this page are all subtitle relevant.

DVDFab Movie Server A1 User Guide
43 / 51 Fengtao Software Inc. 2017-09-05
8.5.1 Preferred Subtitle Language
Choose the default option to display the subtitle in your preferred language.
8.5.2 Character
Choose the proper character so that the Movie Server can use the correct
encoding format to display subtitles. Normally, Universal (UTF-8) would be OK.
8.5.3 Size
Determine the subtitle size: XXS, XS, S, M, L, XL and XXL options are available.
8.5.4 Style
Determine the subtitle style: bold, normal, or italic.
8.5.5 Color
Determine the subtitle color: white, yellow, blue, gray, or green.
8.5.6 Position
Determine the position on the screen to display the subtitle, lower, low,
medium, high, or higher.
8.6 Member Center
This section list the detailed information about your account info, the serial
number of your Movie Server, and your warranty expiration date.

User Guide
44 / 51
8.7 About
This section shows the detailed information about Movie Server’s firmware
version, SDK version, and you can at any time check if there is a new firmware
version over the air, or you can also use a USE device to install the firmware
APKs you downloaded in advance. Should you encounter any problem during
the process, you can send us a feedback, and our professional service staff shall
respond as soon as possible.

DVDFab Movie Server A1 User Guide
45 / 51 Fengtao Software Inc. 2017-09-05
9 FAQs & Answers
Here below are some commonly asked questions about DVDFab Movie Server,
and we have compiled all the answers into a list, so that you can easily find the
information you are looking for.
Q: What is the purpose of the Movie Server?
A: DVDFab Movie Server is designed to make it easy and enjoyable to enjoy your
movie collection of Blu-ray and DVDs anywhere that can be reached on your local
network.
Q: What kind of content does it accept?
A: The Server is designed to be used with DVDFab v10.x using ISO output format.
It offers full menu functions as found on the original disc. It will also play other
movie files made with DVDFab or from other sources (h264/265 and 4K UHD
formats, etc).
Q: What about Cinavia?
A: DVDFab Movie Server does not respond to the Cinavia watermark.
Q: How is the media library managed and does the location of the files matter?
A: Your movies, regardless of location, are managed two ways by Movie Server:
either using the Poster Wall or browsing by file list by movie name.
Q: Is the internal memory expandable?
A: No, the installed 16GB memory size cannot be expanded.
Q: Does it require a license or key file?
A: No, but it must be activated using your email and password from the DVDFab
Member Center.
User Guide
46 / 51
Q: Does it come with a copy of DVDFab or if not, is there a discount if I buy both?
A: Sorry, DVDFab is not included and there is currently no "combo" discount.
Q: What about the metadata, where does it come from?
A: If your files are created by DVDFab, it will supply the metadata. If not, Movie
Server will attempt to download it from the internet but the accuracy may be
compromised depending on the quality of the source
Q: How does it update? Will there be frequent updates?
A: The Movie Server updates its firmware online and will show you a prompt
screen with a changelog when an update is available. It takes about 3-4 minutes
to download, install and reboot itself, but this can vary a little based on the total
content and your internet speed. The first update has already been released, with
more to come. Updates can also be downloaded to a USB flash drive for updating
later.
Q: Does the coupon code applicable on the software products also apply to the
Movie Server?
A: No, all the coupon codes applicable on the software products, unless
specifically stated otherwise, do not apply to DVDFab Movie Server.
Q: Does the Movie Server include free shipping?
A: Yes, the price listed on our website includes free shipping from our warehouse
in Shenzhen, China to your doorstep.
Q: Should I pay for the import tax if I buy this Movie Server?
A: That depends on where you live. But in any case, the free shipping does not
cover the import tax. If you do have to pay for the import tax, the declared value
on the Pro-forma Invoice is $40.
Q: When will the server be delivered after the sales confirmation?
A: Normally, it will take 3 to 5 business days to ship your movie server once your

DVDFab Movie Server A1 User Guide
47 / 51 Fengtao Software Inc. 2017-09-05
order has been confirmed. We will e-mail you the logistics information when it
is dispatched. It usually shall take 7~10 days to reach your doorstep.
Q: Is the power adaptor American standard or European standard?
A: We have 4 switchable plug converters to go with the 110~220V AC Charger
and they are of American, European, UK and Australian standards, meaning, they
can work in more than 150 countries in the world.
Q: Does this Movie Server play back the contents that are not produced or
handled by DVDFab?
A: Of course, this Movie Server plays back all the video formats, including H.265
and 4K UHD videos.
Q: Does this Movie Server play back networked contents?
A: Sure, it will play back any contents from any networked storage.
Q: Does this Movie Server play back the DVD and Blu-ray menus if they are from
NAS? What about the metadata information?
A: Sure, the navigation menu support also applies to the DVDs and Blu-rays from
the NAS. As to the metadata information, if your files are not handled by DVDFab,
the Movie Server shall still scrap the metadata information from online, but the
accuracy might be compromised.
Q: Does this Movie Server allow streaming the ISO files over my gigabit Ethernet
network?
A: Sure, it allows you to watch your media contents from networked devices
directly.
Q: Does this Movie Server stream to other devices, or act as a PLEX server?
A: Nope, it does not stream to other devices, not serve as a PLEX either.

User Guide
48 / 51
Q: Will I be able to transfer the existing folders to the Movie Server?
A: Sure, you can directly copy and paste them to the following path:
\\YourServerIPAddress\share\sata\sata1\DVDFab, and then you can access
these media in the Movies section.
Q: Does the Mac version DVDFab 10 work with this Movie Server?
A: Sure, the Movie Server works with the Full Disc, Main Movie and Clone modes
of the Copy module in the Mac version of DVDFab 10. More modes and modules
are supported soon.
Q: Is there a storage limitation to the 3.5 inch SATA hard disk drive?
A: Yes, up to 8TB of storage. But you can have many such hard drives, and you
can switch between them anytime.
Q: Does this Movie Server also support Apple’s hard drive system?
A: Sorry, it doesn’t.
Q: Why can't the Movie Server find my SATA hard drive?
A: If the Movie Server is having problems detecting your 3.5 inch SATA hard drive,
please make sure your hard drive is inserted into the HDD cabinet, and also
formatted to be compatible with the Movie Server. If not, especially when it is a
brand-new one, you can format it following the steps below:
1. Connect the SATA hard drive to your PC via a USB to SATA converter;
2. Right-click My Computer > Manage > Disk Management, find the connected
hard drive, which should be marked as Not Initialized;
3. Initialize the HDD using the GPT method.
4. Right-click the hard disk and select to create a new volume, format the disk is
necessary.
Q: How to manage the media files of the Movie Server via Windows explorer?
A: Aside from managing the media files directly from the Movie Server, you can
also manage them from their PC. Here is how:

DVDFab Movie Server A1 User Guide
49 / 51 Fengtao Software Inc. 2017-09-05
1. In the address bar of Windows explorer, enter \\Your Movie Server’s IP
Address\share;
2. Among the six folders there, the one named sata is actually where all your
media files copied by DVDFab 10 are stored, if you want to manage your previous
ISO files made by DVDFab 10 with the Poster Wall feature, you need to copy them
to sata\sata1\DVDFab ; and the one named sdcard is the built-in memory of the
Movie Server, where all the system data are stored.
Q: How to manually transfer the media files to Movie Server?
A: Sometimes due to the network problem, DVDFab might fail to send the
resulting files directly to Movie Server. When this happens, don’t panic, you can
still use the traditional copy & paste method to transfer the copied files to the
SATA hard drive inside the Movie Server. Here is how:
1. Go to C:\You\User Name\Documents\DVDFab10\Temp\MediaServer, find
the .meta and .iso files of the copied movie;
2. In the address bar of Windows explorer, enter \\YourMovie Server’s IP
Address\share\sata\sata1\DVDFab;
3. Copy the two files from path 1 and paste them to path 2.
Q: How to modify the incorrect metadata information?
A: There is a chance that the metadata information of the copied movie in the
Movie Server might not be accurate. When this happens, you can manually edit
(open the .meta file with Windows notepad) the .meta file of the specified movie
to correct it. Here is how:
1. For TV Show: fill in the correct information in the title (e.g.
DOWNTON_ABBEY_SEASON_5_DISC_3), year (e.g. 2014), season (e.g. 5) and
episode (e.g. 8-9) strings, and make sure the string above <title></title> stay
exactly as <tvshow>, and the string below <disc></disc> as </tvshow>;
2. For Movie: fill in the correct information in the title (e.g.
ABSOLUTELY_FABULOUS_THE_MOVIE) and year (e.g. 2016) strings, and make
sure the string above <title></title> stay exactly as <movie>, and the string

User Guide
50 / 51
below <year></year> as </movie>;
When done with the edits, go to Movie Server > Movies > Function Menu >
Refresh, to refresh your movie library so that the metadata information can be
updated, or you also restart the Movie Server to achieve the same goal.
Q: Why the Movie Server in the output drop-down menu is shown as Not Found?
A: To make it easier for you to transfer the copied ISO files from DVDFab 10 to
the Movie Server, we’ve added the option at the output drop-down menu the
DVDFab Movie Server option. If in your DVDFab 10, the Movie Server is shown
as Offline, it means your Movie Server is not turned on. If it is shown as Not Found,
the possible reasons can be anyone listed below:
1. You haven’t purchased the Movie Server yet, which is available at
http://www.dvdfab.cn/movie-server.htm;
2. Your Movie Server is not turned on, then you can simply turn it on;
3. Your Movie Server is not connected to the same network as your DVDFab 10,
then you need to switch to the same network;
4. Your Movie Server is blocked by the firewall of your Windows or Anti-virus
software. In either case, you need to unblock it.
Sometimes, it may also be listed as Not Accessible. In this case, the reason might
be:
1. Your Movie Server is not turned on, then just turn it on;
2. Your Movie Server is turned on, however its DHCP IP address might have been
changed. In this case, restarting DVDFab 10 shall fix the problem.