dvd player with video cassette recorder ssd800 - funai · – 3 – en 1l25 important safeguards 1....
TRANSCRIPT

OWNER’SMANUAL
If you need additional assistance for set-up or operating after reading owner’s manual, please callTOLL FREE : 1-800-968-3429
Please read before using this equipment.
INSTRUCCIONES EN ESPAÑOL INCLUIDAS.
DVD PLAYER with VIDEO CASSETTE RECORDER
SSD800
H9229UD.qxp 02.7.31 2:24 PM Page 1

– 2 – EN1L25
WARNING:TO REDUCE THE RISK OF FIRE OR ELECTRIC SHOCK, DO NOT EXPOSE THIS APPLIANCE TORAIN OR MOISTURE.
LASER SAFETYThis unit employs a laser. Only a qualified service person should remove the cover or attempt to service this device, due topossible eye injury.
CAUTION: USE OF CONTROLS OR ADJUSTMENTS OR PERFORMANCE OF PROCEDURES OTHER THANTHOSE SPECIFIED HEREIN MAY RESULT IN HAZARDOUS RADIATION EXPOSURE.
CAUTION: VISIBLE AND INVISIBLE LASER RADIATION WHEN OPEN AND INTERLOCK DEFEATED. DONOT STARE INTO BEAM.
LOCATION: INSIDE, NEAR THE DECK MECHANISM.
The lightning flash with arrowhead symbol,within an equilateral triangle, is intended toalert the user to the presence of uninsulated“dangerous voltage” within the product’senclosure that may be of sufficient magnitudeto constitute a risk of electric shock to persons.
The exclamation point within an equilateraltriangle is intended to alert the user to the pres-ence of important operating and maintenance(servicing) instructions in the literature accom-panying the appliance.
CAUTION:TO REDUCE THE RISK OF ELECTRIC SHOCK, DONOT REMOVE COVER (OR BACK). NO USER SER-VICEABLE PARTS INSIDE. REFER SERVICING TOQUALIFIED SERVICE PERSONNEL.
CAUTIONRISK OF ELECTRIC SHOCK
DO NOT OPEN
FCC WARNING- This equipment may generate or use radio frequency energy. Changes or modifications to thisequipment may cause harmful interference unless the modifications are expressly approved in the instruction manual.The user could lose the authority to operate this equipment if an unauthorized change or modification is made.
CAUTION: TO PREVENT ELECTRIC SHOCK, MATCH WIDE BLADE OF PLUG TO WIDE SLOT, FULLYINSERT.
ATTENTION: POUR ÉVITER LES CHOC ÉLECTRIQUES, INTRODUIRE LA LAME LA PLUS LARGE DE LAFICHE DANS LA BORNE CORRESPONDANTE DE LA PRISE ET POUSSER JUSQU’AU FOND.
H9229UD.qxp 02.7.31 2:24 PM Page 2

– 3 – EN1L25
IMPORTANT SAFEGUARDS1. Read Instructions - All the safety and operating instruc-
tions should be read before the appliance is operated.2. Retain Instructions- The safety and operating instructions
should be retained for future reference.3. Heed Warnings - All warnings on the appliance and in the
operating instructions should be adhered to.4. Follow Instructions - All operating and use instructions
should be followed.5. Cleaning - Unplug this video product from the wall outlet
before cleaning. Do not use liquid cleaners or aerosolcleaners. Use a damp cloth for cleaning.EXCEPTION: A product that is meant for uninterruptedservice and, that for some specific reason, such as the pos-sibility of the loss of an authorization code for a CATVconverter, is not intended to be unplugged by the user forcleaning or any other purpose, may exclude the referenceto unplugging the appliance in the cleaning descriptionotherwise required in item 5.
6. Attachments - Do not use attachments not recommended bythe video product manufacturer as they may cause hazards.
7. Water and Moisture- Do not use this video product nearwater, for example, near a bath tub, wash bowl, kitchensink, or laundry tub, in a wet basement, or near a swim-ming pool, and the like.
8. Accessories - Do not place this video product onan unstable cart, stand, tripod, bracket, or table.The video product may fall, causing seriousinjury to a child or adult, and serious damage tothe appliance. Use only with a cart, stand, tripod,bracket, or table recommended by the manufacturer, or soldwith the video product. Any mounting of the applianceshould follow the manufacturer's instructions and should usea mounting accessory recommended by the manufacturer.An appliance and cart combination should be moved withcare. Quick stops, excessive force, and uneven surfaces maycause the appliance and cart combination to overturn.
9. Ventilation - Slots and openings in the cabinet are provid-ed for ventilation and to ensure reliable operation of thevideo product and to protect it from overheating, and theseopenings must not be blocked or covered. The openingsshould never be blocked by placing the video product on abed, sofa, rug, or other similar surface. This video productshould not be placed in a built-in installation such as abookcase or rack unless proper ventilation is provided orthe manufacturer's instructions have been adhered to.
10. Power Sources - This video product should be operatedonly from the type of power source indicated on the mark-ing label. If you are not sure of the type of power supplyto your home, consult your appliance dealer or local powercompany. For products intended to operate from batterypower, or other sources, refer to the operating instructions.
11. Grounding or Polarization - This video product isequipped with a polarized alternating-current line plug (aplug having one blade wider than the other). This plug willfit into the power outlet only one way. This is a safety fea-ture. If you are unable to insert the plug fully into the out-let, try reversing the plug. If the plug should still fail to fit,contact your electrician to replace your obsolete outlet. Donot defeat the safety purpose of the polarized plug.
12. Power Cord Protection - Power supply cords should berouted so that they are not likely to be walked on orpinched by items placed upon or against them, paying par-ticular attention to cords at plugs, convenience receptacles,and the point where they exit from the appliance.
13. Outdoor Antenna Grounding - If an outside antenna orcable system is connected to the video product, be sure theantenna or cable system is grounded so as to provide someprotection against voltage surges and built-up staticcharges. Article 810 of the National Electrical Code,ANSI/NFPA No. 70, provides information with regard to
proper grounding of the mast and supporting structure,grounding of the lead-in wire to an antenna discharge unit,size of grounding conductors, location of antenna-dis-charge unit, connection to grounding electrodes, andrequirements for the grounding electrode. (Fig. A)
14. Lightning - For added protection for this video productduring a lightning storm, or when it is left unattended andunused for long periods of time, unplug it from the walloutlet and disconnect the antenna or cable system. Thiswill prevent damage to the video product due to lightningand power-line surges.
15. Power Lines - An outside antenna system should not belocated in the vicinity of overhead power lines or otherelectric light or power circuits, or where it can fall intosuch power lines or circuits. When installing an outsideantenna system, extreme care should be taken to keep fromtouching such power lines or circuits as contact with themmight be fatal.
16. Overloading - Do not overload wall outlets and extensioncords as this can result in a risk of fire or electric shock.
17. Object and Liquid Entry - Never push objects of any kindinto this video product through any openings as they maytouch dangerous voltage points or short-out parts thatcould result in a fire or electric shock. Never spill liquid ofany kind on the video product.
18. Servicing - Do not attempt to service this video productyourself as opening or removing covers may expose you todangerous voltage or other hazards. Refer all servicing toqualified service personnel.
19. Damage Requiring Service - Unplug this video productfrom the wall outlet and refer servicing to qualified servicepersonnel under the following conditions:
a. When the power-supply cord or plug is damaged.b. If liquid has been spilled, or objects have fallen into the
video product.c. If the video product has been exposed to rain or water.d. If the video product does not operate normally by follow-
ing the operating instructions. Adjust only those controlsthat are covered by the operating instructions as an improp-er adjustment of other controls may result in damage andwill often require extensive work by a qualified technicianto restore the video product to its normal operation.
e. If the video product has been dropped or damaged in any way.f. When the video product exhibits a distinct change in per-
formance this indicates a need for service. 20. Replacement Parts - When replacement parts are required,
be sure the service technician has used replacement partsspecified by the manufacturer or have the same character-istics as the original part. Unauthorized substitutions mayresult in fire, electric shock or other hazards.
21. Safety Check - Upon completion of any service or repairsto this video product, ask the service technician to performsafety checks to determine that the video product is inproper operating condition.
22. Heat - This video product should be situated away fromheat sources such as radiators, heat registers, stoves, orother products (including amplifiers) that produce heat.
FIGURE A
EXAMPLE OF ANTENNA GROUNDINGAS PER NATIONAL ELECTRICAL CODE
ANTENNALEADWIRE
ANTENNADISCHARGE UNIT(NEC SECTION 810-20)
GROUNDING CONDUCTORS(NEC SECTION 810-21)
GROUNDCLAMP
GROUND CLAMP
ELECTRICSERVICEEQUIPMENT
POWER SERVICE GROUNDINGELECTRODE SYSTEM(NEC ART 250, PART H)
NEC – NATIONAL ELECTRICAL CODES2898A
H9229UD.qxp 02.7.31 2:24 PM Page 3

– 4 – EN1L25
A NOTE ABOUT RECYCLINGThis product’s packaging materials are recyclable and can be reused. Please dispose of all materials inaccordance with your local recycling regulations.
Batteries should never be thrown away or incinerated but disposed of in accordance with your localregulations concerning chemical wastes.
The serial number of this product may be found on the back of the DVD/VCR COMBINATION UNITS. Thisserial number is unique to your machine. You should record the number and other vital information here andretain this book as a permanent record of your purchase to aid identification in case of theft. Serial numbers arenot kept on file.
Date of Purchase
Dealer Purchase from
Dealer Address
Dealer Phone No.
Model No.
Serial No.
ABOUT COPYRIGHTUnauthorized copying, broadcasting, public performance and lending of discs are prohibited.
This product incorporates copyright protection technology that is protected by claims of certain U.S. patents andother intellectual property rights owned by Macrovision Corporation and other rights owners. Use of this copy-right protection technology must be authorized by Macrovision Corporation, and is intended for home and otherlimited viewing uses only unless otherwise authorized by Macrovision Corporation. Reverseengineering or disassembly is prohibited.
SYMBOLS USED IN THIS MANUALThe following symbols below appear in some headings and notes in this manual, with the following meanings
: refers to playback of video cassette tapes.
: refers to playback of DVD video discs.
: refers to playback of audio CDs.
: refers to playback of MP3 discs.MP3
CD
DVD
VCR
SUPPLIED ACCESSORIES
Remote control
(NA202CD)
Two AA batteries A/V cables
(approx. 3 feet (100 cm)long) (WPZ0102TM015) WPZ0901TM002
RF cable
H9229UD.qxp 02.7.31 2:24 PM Page 4

– 5 – EN1L25
TABLE OF CONTENTS� LASER SAFETY . . . . . . . . . . . . . . . . . . . . . . . . . . . . . . . . . . 2� IMPORTANT SAFEGUARDS . . . . . . . . . . . . . . . . . . . . . . . . 3
ABOUT COPYRIGHT . . . . . . . . . . . . . . . . . . . . . . . . . . . . . . 4SUPPLIED ACCESSORIES . . . . . . . . . . . . . . . . . . . . . . . . . . 4SYMBOLS USED IN THIS MANUAL. . . . . . . . . . . . . . . . . . 4
� FEATURES . . . . . . . . . . . . . . . . . . . . . . . . . . . . . . . . . . . . . . 6� PRECAUTIONS . . . . . . . . . . . . . . . . . . . . . . . . . . . . . . . . . . . 7� ABOUT THE DISCS . . . . . . . . . . . . . . . . . . . . . . . . . . . . . . . 8
PLAYABLE DISCS. . . . . . . . . . . . . . . . . . . . . . . . . . . . . . . . . 8DISC TYPES. . . . . . . . . . . . . . . . . . . . . . . . . . . . . . . . . . . . . . 8
� OPERATING CONTROLS AND FUNCTIONS. . . . . . . . . . . 9DISPLAY . . . . . . . . . . . . . . . . . . . . . . . . . . . . . . . . . . . . . . . 12DISPLAYS DURING OPERATION . . . . . . . . . . . . . . . . . . . 12LOADING THE BATTERIES . . . . . . . . . . . . . . . . . . . . . . . . 12
� VIDEO/DVD SWITCHING . . . . . . . . . . . . . . . . . . . . . . . . . 13� HOOKUPS . . . . . . . . . . . . . . . . . . . . . . . . . . . . . . . . . . . . . . 14
DVD/VCR TO TV CONNECTION . . . . . . . . . . . . . . . . . . . . 14SETTING THE CH3/CH4 SWITCH . . . . . . . . . . . . . . . . . . . 14CONNECTING TO A TV . . . . . . . . . . . . . . . . . . . . . . . . . . . 14CONNECTING TO A TV THAT HAS AN S-VIDEO INPUTJACK OR COMPONENT VIDEO IN JACKS. . . . . . . . . . . . 14CONNECTING TO AN AMPLIFIER EQUIPPED WITH DIGITAL INPUT JACKS SUCH AS MD DECK OR DATDECK . . . . . . . . . . . . . . . . . . . . . . . . . . . . . . . . . . . . . . . . . . 15CONNECTING TO A DOLBY DIGITAL DECODER OR DTS DECODER . . . . . . . . . . . . . . . . . . . . . . . . . . . . . . . . . . 16CONNECTING TO AN ANALOG AUDIO. . . . . . . . . . . . . . 16
� SETUP . . . . . . . . . . . . . . . . . . . . . . . . . . . . . . . . . . . . . . . . . 17AUTOMATIC CHANNEL SET UP. . . . . . . . . . . . . . . . . . . . 17TO CHANGE THE ON-SCREEN LANGUAGE. . . . . . . . . . 18CLOCK SET UP . . . . . . . . . . . . . . . . . . . . . . . . . . . . . . . . . . 18
� PLAYBACK FUNCTION . . . . . . . . . . . . . . . . . . . . . . . . . . . 19NORMAL PLAYBACK . . . . . . . . . . . . . . . . . . . . . . . . . . . . 19AUTO REPEAT PLAYBACK . . . . . . . . . . . . . . . . . . . . . . . . 19SEARCH FUNCTIONS . . . . . . . . . . . . . . . . . . . . . . . . . . . . 19
� RECORDING FUNCTION . . . . . . . . . . . . . . . . . . . . . . . . . 20VIEWING AND RECORDING THE SAME PROGRAM. . . 20OTR (One Touch Recording) . . . . . . . . . . . . . . . . . . . . . . . . . 20TIMER RECORDING. . . . . . . . . . . . . . . . . . . . . . . . . . . . . . 20HINTS FOR TIMER RECORDING . . . . . . . . . . . . . . . . . . . 21
� SPECIAL FEATURES . . . . . . . . . . . . . . . . . . . . . . . . . . . . . 22COPYING A VIDEO TAPE. . . . . . . . . . . . . . . . . . . . . . . . . . 22MTS (Multi-Channel Television Sound) SYSTEM . . . . . . . . 22AUTO REWIND . . . . . . . . . . . . . . . . . . . . . . . . . . . . . . . . . . 23REAL TIME TAPE COUNTER. . . . . . . . . . . . . . . . . . . . . . . 23
INDICE� CONTROLES DEL FUNCIONAMIENETO Y SUS FUNCIONES. . . . . . . . . . . . . . . . . . . . . . . . . . . . . . . . . . . . . . . . . . . . . . . . . . 42� CAMBIO DE VCR/DVD . . . . . . . . . . . . . . . . . . . . . . . . . . . . . . . . . . . . . . . . . . . . . . . . . . . . . . . . . . . . . . . . . . . . . . . . . . . . . . . . . . 45� CONEXIONES . . . . . . . . . . . . . . . . . . . . . . . . . . . . . . . . . . . . . . . . . . . . . . . . . . . . . . . . . . . . . . . . . . . . . . . . . . . . . . . . . . . . . . . . . 46
DVD/VCR A CONEXIÓN DE TV . . . . . . . . . . . . . . . . . . . . . . . . . . . . . . . . . . . . . . . . . . . . . . . . . . . . . . . . . . . . . . . . . . . . . . . . . . . 46AJUSTANDO EL CONMUTADOR CH3/CH4 . . . . . . . . . . . . . . . . . . . . . . . . . . . . . . . . . . . . . . . . . . . . . . . . . . . . . . . . . . . . . . . . . . 46CONECTANDO A UN TV . . . . . . . . . . . . . . . . . . . . . . . . . . . . . . . . . . . . . . . . . . . . . . . . . . . . . . . . . . . . . . . . . . . . . . . . . . . . . . . . . 46CONECTADO A UN TV QUE TIENE TOMA DE ENTRADA DE S-VÍDEO o TOMAS DE ENTRADA DE VÍDEO COMPONENTE . . . 46CONECTANDO A UN AMPLIFICADOR EQUIPADO CON TOMAS DE ENTRADA DIGITAL, TALES COMO PLATINA MD O PLATINA DAT . 46CONECTANDO A UN DESCODIFICADOR DIGITAL DOLBY O DESCODIFICADOR DTS. . . . . . . . . . . . . . . . . . . . . . . . . . . . . . . . 46
CONECTANDO A UN AUDIO ANALÓGICO . . . . . . . . . . . . . . . . . . . . . . . . . . . . . . . . . . . . . . . . . . . . . . . . . . . . . . . . . . . . . . . . . . . . . 46� PREPARACIÓN. . . . . . . . . . . . . . . . . . . . . . . . . . . . . . . . . . . . . . . . . . . . . . . . . . . . . . . . . . . . . . . . . . . . . . . . . . . . . . . . . . . . . . . . . 46
PREPARACIÓN DE CANAL AUTOMÁTICA. . . . . . . . . . . . . . . . . . . . . . . . . . . . . . . . . . . . . . . . . . . . . . . . . . . . . . . . . . . . . . . . . . 46PREPARACIÓN DE RELOJ. . . . . . . . . . . . . . . . . . . . . . . . . . . . . . . . . . . . . . . . . . . . . . . . . . . . . . . . . . . . . . . . . . . . . . . . . . . . . . . . 47
� REPRODUCCIÓN DE UN DISCO . . . . . . . . . . . . . . . . . . . . . . . . . . . . . . . . . . . . . . . . . . . . . . . . . . . . . . . . . . . . . . . . . . . . . . . . . . 47REPRODUCIENDO UN DVD, VIDEO O UN CD AUDIO . . . . . . . . . . . . . . . . . . . . . . . . . . . . . . . . . . . . . . . . . . . . . . . . . . . . . . . . 47
� PLAYING A DISC . . . . . . . . . . . . . . . . . . . . . . . . . . . . . . . . 23PLAYING A DVD VIDEO OR AN AUDIO CD . . . . . . . . . . 23USING THE DVD MENUS . . . . . . . . . . . . . . . . . . . . . . . . . 23USING THE TITLE MENU . . . . . . . . . . . . . . . . . . . . . . . . . 24PAUSING PLAYBACK OR DISPLAYING A STILLPICTURE . . . . . . . . . . . . . . . . . . . . . . . . . . . . . . . . . . . . . . . 24RESUMING PLAYBACK FROM THE POINT WHERE PLAYBACK STOPPED . . . . . . . . . . . . . . . . . . . . . . . . . . . . 24STEPPING THROUGH FRAMES . . . . . . . . . . . . . . . . . . . . 24FAST FORWARD/REVERSE . . . . . . . . . . . . . . . . . . . . . . . . 25SLOW MOTION. . . . . . . . . . . . . . . . . . . . . . . . . . . . . . . . . . 25STARTING FROM A DESIRED TRACK . . . . . . . . . . . . . . . 25PLAYING FROM A DESIRED TITLE OR A CHAPTER . . . 25STARTING FROM A DESIRED TIME COUNT. . . . . . . . . . 26MARKER . . . . . . . . . . . . . . . . . . . . . . . . . . . . . . . . . . . . . . . 26RANDOM (Audio CD) . . . . . . . . . . . . . . . . . . . . . . . . . . . . . 26REPEAT . . . . . . . . . . . . . . . . . . . . . . . . . . . . . . . . . . . . . . . . 27A-B REPEAT . . . . . . . . . . . . . . . . . . . . . . . . . . . . . . . . . . . . 27PROGRAM (Audio CD) . . . . . . . . . . . . . . . . . . . . . . . . . . . . 28ZOOM PLAYBACK (enlargement on-screen) . . . . . . . . . . . . 28PLAYING AN MP3 DISC . . . . . . . . . . . . . . . . . . . . . . . . . . . 29CHANGING THE ON-SCREEN DISPLAY DURING MP3 DISC PLAY . . . . . . . . . . . . . . . . . . . . . . . . . . . . . . . . . 29PLAYING A DESIRED TRACK FROM AN MP3 DISC . . . 30PLAYING AN MP3 DISC RANDOMLY . . . . . . . . . . . . . . . 30PLAYING AN MP3 DISC IN A PROGRAM. . . . . . . . . . . . . 30
� SETTINGS . . . . . . . . . . . . . . . . . . . . . . . . . . . . . . . . . . . . . . 31CHANGING THE AUDIO LANGUAGE OR SOUND MODE. . . . . . . . . . . . . . . . . . . . . . . . . . . . . . . . . . . . . . . . . . 31CHANGING THE SUBTITLE LANGUAGE . . . . . . . . . . . . 32CHANGING THE CAMERA ANGLE (Multi-Angle Pictures) . . . . . . . . . . . . . . . . . . . . . . . . . . . . . . 32CHANGING THE ON-SCREEN DISPLAY . . . . . . . . . . . . . 33BLACK LEVEL SETTINGS . . . . . . . . . . . . . . . . . . . . . . . . . 33TruSurround SETTINGS . . . . . . . . . . . . . . . . . . . . . . . . . . . . 33
� CHANGING THE SETUP ITEMS. . . . . . . . . . . . . . . . . . . . 34LANGUAGE SETTINGS . . . . . . . . . . . . . . . . . . . . . . . . . . . 34DISPLAY SETTINGS . . . . . . . . . . . . . . . . . . . . . . . . . . . . . . 35AUDIO SETTINGS. . . . . . . . . . . . . . . . . . . . . . . . . . . . . . . . 36PARENTAL LOCK . . . . . . . . . . . . . . . . . . . . . . . . . . . . . . . . 37
� LANGUAGE CODE LIST . . . . . . . . . . . . . . . . . . . . . . . . . . 38� TROUBLESHOOTING GUIDE. . . . . . . . . . . . . . . . . . . . . . 39� HANDLING PRECAUTIONS . . . . . . . . . . . . . . . . . . . . . . . 40
DISC HANDLING . . . . . . . . . . . . . . . . . . . . . . . . . . . . . . . . 40� SPECIFICATIONS. . . . . . . . . . . . . . . . . . . . . . . . . . . . . . . . 41
H9229UD.qxp 02.7.31 2:24 PM Page 5

– 6 – EN1L25
FEATURES
Mode
¡Dolby Digital sound This player can handle Dolby Digital surround soundwith 5.1 channels when connected to a Dolby Digitaldecoder.
¡Still/fast/slow/step playback Various playback modes are available including still pic-tures, fast forward/reverse, slow motion and step frames.
¡Random playback for audio CD and MP3This player can shuffle the order of tracks to play them inrandom order.
¡Program playback for audio CD and MP3You can program the order of tracks to play them in anydesired order.
¡DVD menus in a desired language You can display DVD menus in the desired language, ifavailable on the DVD.
¡Screen saver/Auto power-off functionsThe screen saver program starts when there is no inputfrom the player for five minutes in the stop mode. Whenthe screen saver program has been activated for 30 min-utes, the screen saver is automatically turned off.
¡Subtitles in a desired language You can select the desired language for the subtitle dis-play, if that language is available on the disc.
¡Selecting a camera angle You can select the desired camera angle, if the disc con-tains sequences recorded from different angles.
¡Choices for audio language and sound mode You can select the desired audio language and soundmode, if different languages and modes are available onthe disc.
¡Parental lock You can set the control level to limit playback of discswhich may not be suitable for children.
¡Automatic detection of discs This player automatically detects if the loaded disc isDVD, audio CD or MP3 on disc.
¡Playing an MP3 discYou can enjoy MP3 files which are recorded on CD-R/RW.
¡Direct SearchYou can search for the desired title, chapter, and track withthe Number buttons during playback or in stop mode.
DVD¡On-screen display
Information about the current operation can be displayedon the TV screen, allowing you to confirm the currentlyactive functions (such as program playback), on the TVscreen using the remote control.
¡DTS (Digital Theater System)You can enjoy 5.1 channel surround system developed bythe Digital Theater System co. which reproduces the orig-inal sound as truthfully as possible.
¡SearchChapter search: Search for a chapter designated by user is
possible.Title search: Search for a title designated by user is pos-
sible.Track search: Search for a track designated by user is
possible.Time search: Search for a time designated by user is
possible.
¡RepeatChapter: Repeated playback of the chapter of the
disc being played is possible.Title: Repeated playback of the title of the disc
being played is possible.Track: Repeated playback of the track of the disc
being played is possible.Disc (audio CD): Repeated playback of the entire disc being
(MP3) played is possible.A-B: Playback of the section between A and B
(designated by user) is possible.Album: Repeated playback of the album of the
MP3 disc being played is possible.
¡ZoomA ×2 and ×4 magnified screen can be displayed.
¡MarkerA part designated by user can be called back.
¡Resume PlayUser can resume playback from the part at which the playwas stopped even if the power is turned off.
¡SRS TruSurroundYou can enjoy a stereophonic virtual space on your exist-ing stereo system.
¡Component Video Out JacksJacks located on the back of the DVD/VCR COMBINA-TION UNITS are used to send high-quality video to a TVvia Component Video In Jacks.
¡DimmerBrightness of the display can be varied.
¡Bit rate indication
¡DRC (Dynamic range control)You can control the range of sound volume.
This unit employs TruSurround system
of SRS Labs, Inc. as virtual
technology.
TruSurround and the symbol are trademarks of SRS Labs, Inc.TruSurround technology is incorporated under license from SRS Labs, Inc.
H9229UD.qxp 02.7.31 2:24 PM Page 6

– 7 – EN1L25
Mode
Hardware specifications¡Auto Head Cleaner
¡4 Head HiFi Stereo
¡Bilingual on-screen menu display selectable inEnglish, French, or Spanish
¡181 channel capability PLL frequency synthesiz-er tuner with direct station call(A cable converter box may be necessary to view scram-bled cable channels.)
Automatic functions¡Auto power on system
Automatically turns the VCR on when you insert the cas-sette.
¡Digital Auto Tracking (DTR)
VCR
INSTALLATION LOCATIONFor safety and optimum performance of your DVD/VCRCOMBINATION UNITS:• Install the DVD/VCR COMBINATION UNITS in a hori-
zontal and stable position. Do not place anythingdirectly on top of the DVD/VCR COMBINATIONUNITS. Do not place the DVD/VCR COMBINATIONUNITS directly on top of the TV.
• Shield it from direct sunlight and keep it away fromsources of intense heat. Avoid dusty or humid places.Avoid places with insufficient ventilation for proper heat dissipation. Do not block the ventilation holes on the sides of the DVD/VCR COMBINATION UNITS.Avoid locations subject to strong vibration or strongmagnetic fields.
Playback¡S-VHS Quasi Playback (SQPB)
(Allows you to view a tape recorded in S-VHS format.)
¡Auto Repeat
¡2 Step Picture Search Operation
¡Index Search
¡Time Search
Recording¡1 Year, 7 events (including Daily and Weekly Timer
Recording)
¡OTR (One Touch Recording)
PRECAUTIONSAVOID THE HAZARDS OFELECTRICAL SHOCK AND FIRE• Do not handle the power cord with wet hands.• Do not pull on the power cord when disconnecting it
from AC wall outlet. Grasp it by the plug.• If, by accident, water is spilled on your DVD/VCR COM-
BINATION UNITS, unplug the power cord immediatelyand take the unit to our Authorized Service Center forservicing.
• Do not put your fingers or objects into the DVD/VCRCOMBINATION UNITS cassette holder.
MOISTURE CONDENSATION WARNINGMoisture condensation may occur inside the unit when it ismoved from a cold place to a warm place, or after heating acold room or under conditions of high humidity. Do not usethe DVD/VCR COMBINATION UNITS at least for 2 hoursuntil its inside is dry.
H9229UD.qxp 02.7.31 2:24 PM Page 7

– 8 – EN1L25
ABOUT THE DISCS
The following discs can be played back on thisDVD/VCR COMBINATION UNITS.
This player conforms to the NTSC color system. You can-not play discs recorded in other color systems such asPAL or SECAM.¡Some discs include region codes as shown below.
¡The number inside the symbol refers to a region of theworld, and a disc encoded in a specific region formatcan only be played back on DVD/VCR COMBINA-TION UNITS with the same region code.
The following discs cannot be played back on thisDVD/VCR COMBINATION UNITS.
¡DVD with region codes other than 1 or ALL.¡DVD-ROM¡DVD-RAM (Never attempt to play back,
otherwise a malfunction may result.)¡CD-ROM¡VSD¡CDV (Only plays back the audio part.)¡CD-G (Only plays back the sound.)¡CD-R/CD-RW
(Only plays back discs on which audio CD orMP3 are recorded.)
¡CD-I(Never attempt to play back, otherwise a mal-function may result.)
¡SACD
¡Photo CD(Never attempt to play back, otherwise a mal-function may result.)
¡Video CD(Never attempt to play back, otherwise a mal-function may result.)Any other discs without compatibility indications
PLAYABLE DISCS
DVDVideo
12 cm
Approx. 4 h (single-sided)
Approx. 80 min (single-sided)
8 cm
LogoMaximum
Playback TimeContentsDisc Type
Sound and
Pictures
Disc Size
74 min
Approx. 8 h (double-sided)
Approx. 160 min (double-sided)
12 cm
20 min8 cm (singles)
AudioCD
Sound
[DVD]Data on a DVD is divided into sections called "titles", andthen into subsections called "chapters", each of which isgiven a title or chapter number. Playback conditions arepreset on some DVD video discs, and these playback con-ditions take priority over user operations on this player. Ifa function you selected does not run as desired, refer tothe manual accompanying the disc.
DISC TYPES
Example
Title 1 Title 2
Chapter 1 Chapter 2 Chapter 1 Chapter 2Chapter 3 Chapter 4
[AUDIO CD] Data on an audio CD is divided into sections called“tracks”, each of which is given a track number.
ExampleTrack 1 Track 2 Track 3 Track 4 Track 5 Track 6
[MP3]Data on an MP3 is divided into sections called "albums",and then into subsections called "tracks", each of which isgiven an album or track number.
Example
Album 1 Album 2
Track 1 Track 2 Track 1 Track 2Track 3 Track 4
H9229UD.qxp 02.7.31 2:24 PM Page 8

– 9 – EN1L25
OPERATING CONTROLS AND FUNCTIONS
OPEN/CLOSE STOP SKIP/REV PLAY FWD/SKIP
DVD OPERATION VCR OPERATION
STOP/EJECT REW PLAY F.FWD REC/OTR
OUTPUT
POWER
VIDEO
AUDIO
TIMERSET
VCR/TV
CST.IN
CHANNEL
L
R
1 2 3 64 87 9
2625
2423
2221
2019
1817
1615
141113
12
5
10
FRONT PANEL
REMOTE CONTROL
+
1 2 3
4 5 6
7 8 9
0 10
SPEED AUDIOPOWER
SKIP/CH.
SLOW
VCR/TV
+100
DISPLAY PAUSE
PLAY
STOP
RECORD
ENTER
RETURNTITLE
MENU
SETUP
CLEAR/C.RESETZOOMMODE
A-BANGLE
SEARCHMODE
REPEATSUBTITLE
DVD VCR
2827
29
3031
3233
3435
36
3839
4140
37
56
5253
54
51
55
5049
4746
48
4344
45
42
1. Disc loading tray2. DVD OUTPUT Light (Green) [page 13]
This light appears when the DVD output mode isselected. You can only watch DVDs when the greenDVD OUTPUT Light is on. To make the green DVDOUTPUT light come on, press the DVD button onthe remote control or the OUTPUT button on thefront panel.
3. VCR OUTPUT Light (Green) [page 13]This light appears when the VCR output mode is select-ed. You can only watch tapes when the green VCROUTPUT light is on. To make the green VCR OUTPUTlight come on, press the VCR button on the remote con-trol or the OUTPUT button on the front panel.
4. CASSETTE COMPARTMENT 5. REC/OTR Light [page 20]
Lights up during recording. 6. TIMER SET Light [page 20]
The Timer light on current VCR does not glow dur-ing One Touch Timer Recording(OTR). It flashes ifthe TIMER SET button is pressed for a timer record-ing, but there is no tape in the VCR. It flashes whenall timer recordings or One-Touch Recordings are
finished.7. POWER Button [page 17]
Press to turn the power on and off.8. POWER Light
Lights up when the power is on.9. VIDEO In Jack
Connect a video cable coming from the video outjack of a camcorder, another VCR, or a video source(laser disc player, camcorder, etc.) here.
10. AUDIO In JacksConnect audio cables coming from the audio out jacksof a camcorder, another VCR, or an audio source here.
11. TIMER SET Button [page 21]Press to put the VCR into standby mode for a timerrecording.
12. CST IN Light [page 19]Lights up when a cassette is in the VCR.
13. VCR/TV Light [page 17]Lights up when the VCR is in the VCR position, andgoes off when it is in the TV position.
14. CHANNEL Buttons [page 17]In VCR mode, press to change TV channels on theVCR; press to adjust the tracking during normal orslow motion playback; press to remove vertical jitterin a Still picture.
15. REC/OTR Button (VCR) [page 20]Press once to start a recording. Press 2 times or moreand the unit will record in 1/2 hour increments.
16. F.FWD Button (VCR) [page 17]Press to rapidly advance the tape, or view the picturerapidly in forward during playback. (ForwardSearch). When setting program (For example:settingclock or timer program), press to determine yourselection and proceed to the next step you want toinput. Press to determine the setting modes from theon screen menu. Press to add or delete channel num-bers during channel preset.
17. PLAY Button (VCR) [page 17]Press to begin playback. Press to enter digits whensetting program (For example: setting clock or timerprogram). Press to advance settings during “onscreen menu”.
18. REW Button (VCR) [page 18]Press to rewind the tape, or to view the picture rapid-ly in reverse during the playback mode (RewindSearch). Press to cancel a setting of timer programwhen in “on screen menu”. Press to correct digitswhen setting program (For example: setting clock ortimer program). Press to add or delete channel num-bers during channel preset.
H9229UD.qxp 02.7.31 2:24 PM Page 9

– 10 – EN1L25
19. STOP/EJECT Button (VCR) [page 21]�EJECT Button
Press to remove the tape from the VCR.�STOP Button
Press to stop the tape motion. Press to enter digitswhen setting program (For example:setting clockor timer program). Press to select the settingmodes from the on screen menu.
20. OUTPUT Button [page 13]Press to select DVD mode or VCR mode.�You can switch the output mode either by pressing
the OUTPUT button on the front panel, or bypressing the DVD or the VCR button on the remotecontrol. However, if you press the OUTPUT but-ton on the front panel first, you need to re-selectthe corresponding mode by pressing the DVDor the VCR button on the remote control.
21. FWD/SKIP Button (DVD) [page 25]Plays back from the beginning of the next chapter ortrack. Hold down to fast forward playback.
22. PLAY Button (DVD) [page 23]Press to begin playback.
23. SKIP/REV Button (DVD) [page 25]Plays back from the beginning of the current chapteror track. Hold down to fast reverse playback.
24. STOP Button (DVD) [page 23]Stops operation of the disc.
25. OPEN/CLOSE Button [page 23]Press to insert discs into or remove them from the tray.
26. Display, Remote Sensor Window27. SPEED Button [page 20]
Press to select the VCR’s recording speed (SP or SLP)28. POWER Button
Press to turn the power on and off.29. Number Buttons
�DVD mode [page 25]Press to directly select a Track (Audio CD) forplayback. Press to program Tracks (Audio CD) for playback.
�VCR mode [page 17]Press to select TV channels on the VCR. To select channels, enter channel numbers as atwo-digit number for the quickest results. Forexample, to select channel 6, press 0 then 6.+100 Button:If you want to select channels 100 and above, pressthis button first, then press the last two digits. Forexample, to select channel 125, press +100 buttonfirst, then press 2 and 5.
30. DISPLAY Button�DVD mode [page 29]
Press to access or remove the display screen duringDVD or Audio CD playback.
�VCR mode [page 22]Press to access or remove the VCR’s on-screen sta-tus display.
31. DVD Button [page 13]Press to select DVD mode for the remote control. �You can switch the output mode either by pressing
the OUTPUT button on the front panel, or bypressing the DVD or the VCR button on the remotecontrol. However, if you press the OUTPUT but-ton on the front panel first, you need to re-selectthe corresponding mode by pressing the DVDor the VCR button on the remote control..
32. h (REV) Button�DVD mode
Press to view the DVD picture in fast reversemotion or to reverse playback of an Audio CD.
�VCR modePress to rewind the tape, or to view the picturerapidly in reverse during the playback mode(Rewind Search). Press to cancel a setting oftimer program. Press to correct digits when settingprogram (For example: setting clock or timer pro-gram). Press to add or delete channel numbersduring channel preset.
33. STOP Button�DVD mode
Press to stop the disc motion.�VCR mode
Press to stop the tape motion. Press to enter digitswhen setting program (For example: setting clockor timer program). Press to select the settingmodes from the on screen menu.
34. RECORD ButtonPress once to start a recording.
35. MENU Button�DVD mode [page 23]
Press to display the menu of the Disc.�VCR mode [page 17]
Press to access the VCR menu.36. TITLE Button[page 24]37. SETUP Button [page 34]
Press to enter the setup mode.38. ZOOM Button [page 28]
Enlarges part of a DVD-reproduced image.39. MODE Button [pages 26]
Activates program playback or random playbackmode when playing CDs or MP3. Sets Black level orSRS TruSurround.
40. SUBTITLE Button [page 32]Press to select the desired subtitle language.
41. ANGLE Button [page 32]Press to change the camera angle to see the sequencebeing played back from a different angle.
42. REPEAT Button [page 27]Repeats playback of the current disc, title, chapter ortrack.
43. A-B REPEAT Button [page 27]Repeats playback of a selected section.
44. SEARCH MODE Button�DVD mode [page 25]
Press to access or remove the Search display, which allows you to go directly to a specificTitle/Chapter/Track/Time.
�VCR mode [page 19]Press to perform a Time Search or an Index Search.
45. CLEAR/C.RESET Button �DVD mode [page 26]
Press to reset the setting.�VCR mode [page 18]
Press to reset the counter. Press to exit from theMENU screen.
46. RETURN ButtonReturns to the previous operation in the DVDMODE.
47. Arrow ButtonsUse when making settings while watching thedisplay on a TV screen.
H9229UD.qxp 02.7.31 2:24 PM Page 10

– 11 – EN1L25
48. ENTER ButtonPress to accept a setting.
49. g (FWD) Button�DVD mode
Press to fast forward the Disc. Press the PAUSEbutton, then press this button to begin slow motionplayback. Press this button repeatedly to changethe forward speed of slow motion.
�VCR modePress to rapidly advance the tape, or view the pic-ture rapidly in forward during playback (ForwardSearch). When setting program (For example: set-ting clock or timer program), press to determineyour selection and proceed to the next step youwant to input. Press to determine the settingmodes from the on screen menu. Press to add ordelete channel numbers during channel preset.
50. PLAY Button�DVD mode
Press to begin playback. �VCR mode
Press to begin playback. Press to enter digits when setting program (For example: setting clock ortimer program). Press to select the setting modesfrom the on screen menu.
51. VCR Button [page 13]Press to select VCR mode for the remote control. �You can switch the OUTPUT mode either bypressing the OUTPUT button on the front panel, orby pressing the DVD or the VCR button on theremote control. However, if you press the OUTPUTbutton on the front panel first, you need to re-select the corresponding mode by pressing theDVD or the VCR button on the remote control.
52. PAUSE Button�DVD mode [page 24]
Press to pause Disc playback. Press repeatedly toadvance the DVD picture step by step (or oneframe at a time).
�VCR mode [page 19]While recording, press to temporarily stop therecording (pause). Press a second time to resumenormal recording. You can not pause a One-TouchRecording. Or, press during tape playback tofreeze the picture. Press to advance the picture oneframe at a time during still mode.
53. SLOW Button [page 19]During tape playback, press to view the video tape inslow motion. Press again to resume normal playback.This button does not affect DVD playback.
54. VCR/TV Button [page 21]Use to select VCR or TV position. If the VCR/TVlight appears on the front of the VCR, it is in VCRposition (in either VCR or DVD mode). If theVCR/TV light doesn’t appear on the front of theVCR, it is in TV position.�VCR Position
When the green VCR OUTPUT light appears on thefront of the VCR, use the VCR to watch a tape, watcha TV program while recording it, or watch a TVbroadcast using the CHANNEL or the Number but-tons to change channels at the VCR. When the green DVD OUTPUT light appears onthe front of the DVD, use the DVD to view Discplayback or menus.
�TV PositionUse to watch TV (changing channels at the TV) orwatch one program while recording another.
55. SKIP/CH. Buttons�DVD mode
Press to skip Chapters or Tracks.�VCR mode
Press to change TV channels on the VCR.56. AUDIO Button [page 31]
Press to select a desired audio language or sound mode.
ANT - IN
DVD/VCROUT
DVD/VCRAUDIO OUT
COMPONENTVIDEO OUT
L
L
Y
Cr
COAXIAL
S-VIDEOOUT
DIGITAL AUDIO OUTPCM / BITSTREAMCbR
R
AUDO
VIDEOCH3 CH4
ANT - OUT
IN
6766 65 64 63 62 61
5857 59 60
57. AC Power CordConnect to a standard AC outlet to supply powerto the DVD/VCR COMBINATION UNITS.
58. AUDIO IN JacksConnect audio cables coming from the audio outjacks of a camcorder, another VCR, or an audiosource here.
REAR VIEW
Notes¡To use the remote control to operate the DVD/VCR
COMBINATION UNITS and its features, press theDVD button on the remote control before pressingother DVD buttons. Verify that the green DVDOUTPUT Light is on.
¡To use the remote control to operate the VCR and itsfeatures, press the VCR button on the remote controlbefore pressing other VCR buttons. Verify that thegreen VCR OUTPUT Light is on.
H9229UD.qxp 02.7.31 2:24 PM Page 11

– 12 – EN1L25
DISPLAY DISPLAYS DURINGOPERATION
LOADING THE BATTERIES
Lit when the inserteddisc is being played back.
Lights up when a CD is inserted on the tray.
Lights up when a DVDis inserted into the tray.
Lights up when the inserted disc comes to a pause.
Lit when the A-B repeat function is on.
Lit when the repeat function is on.
Displays how long the current title or track has been playing. When a chapter or track is switched, the number of the new title, chapter or track is displayed.
Power on
No disc inserted
Tray open
Tray closed
Loading the Disc
Power off
1. Open the battery compartmentcover.
2. Insert two AA batteries, with eachone oriented correctly.
3. Close the cover.
Notes¡Do not mix alkaline and manganese batteries.¡Do not mix old and new batteries.
59. DVD/VCR AUDIO OUT JacksConnect the supplied audio cables here and to theAudio In jacks of a television or other audioequipment.
60. COMPONENT VIDEO OUT JacksConnect optional component video cables hereand to the component Video In jacks of a televi-sion.
61. COAXIAL JackConnect an optional coaxial digital audio cablehere and to the Coaxial Digital Audio In jack of adecoder or audio receiver.
62. S-VIDEO OUT JackConnect an optional S-Video cable here and tothe S-Video In jack of a television.
63. DVD/VCR VIDEO OUT JackConnect the yellow video cable (supplied) hereand to the TV’s Video In jack.
64. VIDEO IN JackConnect a cable coming from the video out jackof a camcorder, another VCR, or an audio-visualsource (laser disc player, video disc player, etc.)here.
65. CH3/CH4 SwitchSet to channel 3 or 4 to use your TV with yourVCR.
66. ANT-IN (Antenna In) JackConnect your antenna, Cable Box, or DirectBroadcast System.
67. ANT-OUT (Antenna Out) JackUse the supplied RF cable to connect this jack tothe ANTENNA IN Jack on your TV.
Notes¡The S-VIDEO OUT jack, COAXIAL jack, OPTI-
CAL jack, and COMPONENT VIDEO OUT jacksare only useful in DVD mode.
H9229UD.qxp 02.7.31 2:24 PM Page 12

– 13 – EN1L25
VCR/DVD SWITCHING
Since this product comprises VCR and DVD players, it is necessary to select the correctoutput mode.
OPEN/CLOSE STOP SKIP/REV PLAY FWD/SKIP
DVD OPERATION VCR OPERATION
STOP/EJECT REW PLAY F.FWD REC/OTR
OUTPUT
POWER
VIDEO
AUDIO
TIMERSET
VCR/TV
CST.IN
CHANNEL
L
R
LAY FWD/SKIP
VD OPERATION VCR OPERATIO
STOP/EJECT REW
OUTPUT
+
1 2 3
4 5 6
7 8 9
0 10
SPEED AUDIOPOWER
SKIP/CH.
SLOW
VCR/TV
+100
DISPLAY PAUSE
PLAY
STOP
RECORD
ENTER
RETURNTITLE
MENU
SETUP
CLEAR/C.RESETZOOMMODE
A-BANGLE
SEARCHMODE
REPEATSUBTITLE
DVD VCRDVD button
VCR button
OUTPUT button
DVD OUTPUT Light
VCR OUTPUT Light
Press the VCR button on the remote control. (Verify that the VCR OUTPUT Light is lit.)
SWITCHING TO VCR MODE
Notes¡Pressing only the OUTPUT button on the front panel does not switch the mode of the remote control. You
always need to select the correct mode on the remote control too.
Press the DVD button on the remote control. (Verify that the DVD OUTPUT Light is lit.)
SWITCHING TO DVD MODE
H9229UD.qxp 02.7.31 2:24 PM Page 13

– 14 – EN1L25
FOR TVs WITH S-VIDEO INPUT JACKUse an S-Video cable (commercially available) in place of the yellow video cable to enjoy higher quality pic-tures.The S-Video connection only supplies video (picture) in the DVD mode of the DVD/VCR COMBINATIONUNITS. Therefore, in order to use the VCR features or view TV channels on the DVD/VCR COMBINATIONUNITS, you still need to either connect the RF cable to the ANT-OUT jack of the DVD/VCR COMBINATIONUNITS and the TV’s Antenna In jack, or connect the yellow video cable as described earlier (Fig.1). To connectthe supplied RF cable, see “DVD/VCR TO TV CONNECTION” above.
ANT - IN
IN
DVD/VCROUT
DVD/VCRAUDIO OUT
COMPONENTVIDEO OUT
L
L
Y
Cb
COAXIAL
S-VIDEOOUT
DIGITAL AUDIO OUTPCM / BITSTREAM
Cr
R
R
AUDO
VIDEOCH3 CH4
ANT - OUT
To S-VIDEO OUT jackTo S-VIDEO INPUT jack
To Right (red) and Left (white)To AUDIO OUT jacksTo AUDIO INPUT jacks
A/V-compatible or wide screen TV
[Fig. 2]
CONNECTING TO A TV THAT HAS ANS-VIDEO INPUT JACK OR COMPONENT VIDEO IN JACKS
CONNECTING TO A TV
ANT - IN
DVD/VCROUT
DVD/VCRAUDIO OUT
COMPONENTVIDEO OUT
L
L
Y
Cb
COAXIAL
S-VIDEOOUT
DIGITAL AUDIO OUTPCM / BITSTREAM
Cr
R
R
AUDO
VIDEOCH3 CH4
ANT - OUT
IN
A/V-compatible or wide screen TV
To VIDEO OUT jackTo VIDEO INPUT jack
To Right (red) and Left (white)
Antenna/Cable signal
To ANT. IN of TV
To AUDIO INPUT jacks To AUDIO OUT jacks
[Fig. 1]
Notes¡Connect the DVD/VCR COMBINATION UNITS directly to a TV. If the A/V cables are connected to a
VCR, pictures may be distorted due to the copy protection system.
DVD/VCR TO TV CONNECTION
1. Disconnect the AC power cord of the TV from theAC outlet.
2. Disconnect the antenna or cable from the TV.3. Connect the antenna or cable to the ANT-IN jack of
the DVD/VCR COMBINATION UNITS.4. Connect the DVD/VCR COMBINATION UNITS to
the TV using the RF cable.5. Plug the AC power cords of the DVD/VCR COM-
BINATION UNITS and TV into the AC outlets.
ANT - IN
CH3 CH4
ANT - OUT
[VHF/UHF combination antenna]
[Back of the DVD/VCR]
INOUT
[Cable box or satellite box] OR
[Indoor antenna][Back of the
UHF/VHF combination TV]
UHF/VHF
RF cable (supplied)
From Cable or Satellite Company
OR
If your TV does not have A/V terminals: When the DVD/VCR COMBINATION UNITS is inthe VCR Playback mode or when the DVD/VCRCOMBINATION UNITS is in the VCR mode, your TVwill receive signals from the DVD/VCR COMBINA-TION UNITS on either channel 3 or channel 4. To usethe DVD/VCR COMBINATION UNITS with your TV,set the selector switch to CH3 or CH4 (which is locat-ed in the back of yourDVD/VCR COMBINATIONUNITS), whichever is notused for normal broadcasts inyour area. Then set your TVto the same channel.
Note to CATV system installerThis reminder is provided to call the CATV system installer’s attention to Article 820-40 of the NEC that pro-vides guidelines for proper grounding and, in particular, specifies that the cable ground should be connectedto the grounding system of the building, as close to the point of cable entry as practical.
ANT - IN
CH3 CH4
ANT - OUT
[Back of the DVD/VCR]
CH3 CH4
SETTING THE CH3/CH4SWITCH
HOOKUPS
H9229UD.qxp 02.7.31 2:24 PM Page 14

– 15 – EN1L25
ANT - IN
IN
DVD/VCROUT
DVD/VCRAUDIO OUT
COMPONENTVIDEO OUT
L
L
Y
Cb
COAXIAL
S-VIDEOOUT
DIGITAL AUDIO OUTPCM / BITSTREAM
Cr
R
R
AUDO
VIDEOCH3 CH4
ANT - OUT
A/V-compatible or
wide screen TV
To COMPONENT VIDEOINPUT jacks
To COMPONENT VIDEOOUT jacksTo Right (red) and Left (white)
AUDIO INPUT jacks
To Right (red) and Left (white)AUDIO OUTPUT jacks
[Fig. 3]
FOR TVs WITH COMPONENT VIDEO IN JACKSUse a component video cable (commercially available) in place of the yellow video cable to enjoy higher qual-ity pictures.The component video connection only supplies video (picture) in the DVD mode of the DVD/VCR COMBINA-TION UNITS. Therefore, in order to use the VCR features or view TV channels at the DVD/VCR COMBINA-TION UNITS, you still need to either connect the RF cable to the ANT-OUT jack of the DVD/VCR COMBINA-TION UNITS and the TV’s Antenna In jack, or connect the yellow video cable as described earlier (Fig. 1). Toconnect the supplied RF cable, see “DVD/VCR TO TV CONNECTION” on page 14.
CONNECTING TO AN AMPLIFIER EQUIPPED WITH DIGITALINPUT JACKS SUCH AS MD DECK OR DAT DECK
Use an audio coaxial digital cables (not included) for the audio connections.Connecting to an amplifier equipped with digital input jacks such as MD Deck or DAT Deck.
Amplifier equipped with digital input jacks, MD deck,
DAT deck, etc.
ANT - IN
IN
DVD/VCROUT
DVD/VCRAUDIO OUT
COMPONENTVIDEO OUT
L
L
Y
Cb
COAXIAL
S-VIDEOOUT
DIGITAL AUDIO OUTPCM / BITSTREAM
Cr
R
R
AUDO
VIDEOCH3 CH4
ANT - OUT
To COAXIAL DIGITAL AUDIO INPUT jack
To COAXIAL DIGITAL AUDIO OUT jack
Notes¡The audio source on a disc in the 5.1 channel Dolby Digital surround format cannot be recorded as digital
sound by an MD or DAT deck.¡Be sure to turn off the power to all components in the system before connecting another component.¡Refer to the Owner’s Manuals for the components to be connected to the DVD/VCR COMBINATION
UNITS.¡Set Dolby Digital and DTS to off for audio output in the setup mode. Playing a DVD disc using incorrect set-
tings may generate noise distortion, and may also damage the speakers. (See page 36 to set Dolby Digital and
[Fig. 4]
H9229UD.qxp 02.7.31 2:24 PM Page 15

– 16 – EN1L25
CONNECTING TO A DOLBY DIGITAL DECODER OR DTS DECODERIf using this DVD/VCR COMBINATION UNITS to play a DVD disc in 5.1 channel Dolby Digital surround, orDTS surround formats, the DVD/VCR COMBINATION UNITS outputs a Dolby Digital, or DTS data streamfrom its COAXIAL DIGITAL AUDIO OUT jack. By hooking the DVD/VCR COMBINATION UNITS up to aDolby Digital or DTS decoder, you can enjoy a more convincing, realistic ambience with powerful and high-quality surround sound of a professional standard such as can be heard in movie theaters.Use an audio coaxial digital cables (not included) for the audio connections.
Front speaker (left)
Center speakerFront speaker
(right)
Surround speaker
(left)
Surround speaker (right)
Subwoofer
Dolby Digital, DTS decoder
ANT - IN
IN
DVD/VCROUT
DVD/VCRAUDIO OUT
COMPONENTVIDEO OUT
L
L
Y
Cb
COAXIAL
S-VIDEOOUT
DIGITAL AUDIO OUTPCM / BITSTREAM
Cr
R
R
AUDO
VIDEO
ANT - OUT
To COAXIAL DIGITAL AUDIO OUT jack
To COAXIAL DIGITAL AUDIO INPUT jack
CH3 CH4
[Fig. 5]
Manufactured under license from DolbyLaboratories. “Dolby” and the double-D symbol aretrademarks of Dolby Laboratories.
Notes¡Be sure to turn off the power to all components in the system before connecting another component.¡Refer to the Owner’s Manuals for the components to be connected to the DVD/VCR COMBINATIONUNITS.¡If the output is Dolby Digital audio, connect to a Dolby Digital decoder, and set Dolby Digital to on for audio
output in the setup mode.¡If the output is DTS audio, connect to a DTS decoder, and set DTS to ON for audio output in the setup mode.¡Unless connected to a Dolby Digital decoder, or a DTS decoder, set Dolby Digital or DTS to off for audio out-
put in the setup mode. Playing a DVD using incorrect settings may generate noise distortion, and may also
“DTS” and “DTS Digital Out” are trademarks ofDigital Theater Systems Inc.
Notes¡Be sure to turn off the power to all components in the system before connecting another component.¡Refer to the Owner's Manuals for stereo systems and any other components to be connected to the DVD/VCR
COMBINATION UNITS.
ANT - IN
IN
DVD/VCROUT
DVD/VCRAUDIO OUT
COMPONENTVIDEO OUT
L
L
Y
Cb
COAXIAL
S-VIDEOOUT
DIGITAL AUDIO OUTPCM / BITSTREAM
Cr
R
R
AUDO
VIDEOCH3 CH4
ANT - OUT
To Right (red) and Left (white) AUDIO OUT jacks
Stereo system
To ANALOG AUDIO INPUT jacks
CONNECTING TO AN ANALOG AUDIO
[Fig. 6]
H9229UD.qxp 02.7.31 2:24 PM Page 16

5 Begin channel preset by pressing the F.FWDbutton once. The tuner scans and memorizesall active channels in your area.
¡The VCR distinguishes betweenstandard TV channels and cablechannels.
6 After scanning, the tuner stops on the lowestmemorized channel.The TV screen returns toTV mode.
¡If “AUTO SET UP” appears on the TV screen again,check the cable connections. Press the F.FWD but-ton once again and the VCR will begin preset again.
– 17 – EN1L25
AUTOMATIC CHANNEL SET UP
SETUP
The VCR can automatically program the tuner to scanonly the channels which are available in your area.¡Channel memory programming is NOT needed
when the VCR is connected to a cable box or a satel-lite box as in "DVD/VCR TO TV CONNECTION"on page 14. In this case, set the CH3/CH4 Switch(which is located on the back of your VCR) to eitherCH3 or CH4, whichever is not used for normalbroadcasts in your area. Then set your TV to thesame channel. The channel you want to record orview will be selected from the cable or the satellitebox.
¡Follow the steps below once. Repeat only if there isa power failure or if the VCR is unplugged for morethan 30 seconds. (In these cases, the programmedchannels are erased.)
¡You must follow the steps below before attempting toplay or record a video tape.
1 You need to connect the antenna or cable tothe VCR first. Then, connect the DVD /VCRpower plug to a standard AC outlet.
2 Turn on the TV and set the TV to channel 3 or4.
¡Now set the CH3/CH4 switch on the back of theVCR to match the channel selected on the TV.
3 Turn on the VCR by pressing the POWER but-ton. Both the POWER and the VCR/TV lightwill come on.
4 Select the On Screen Language (“ENGLISH”,“FRANCAIS” or “ESPAÑOL”) by pressing thePLAY or the STOP button.Then, press the F.FWD but-ton.
VCR
TO SELECT A DESIRED CHANNELYou can select the desired channel by using theCHANNEL buttons (o/p) or by directly pressing theNumber buttons on the remote control.Note for using the Number buttons:¡When selecting cable channels which are higher than
99, press the +100 button first, then press the last twodigits.
¡You must precede single-digit channel numbers witha zero (For example: 02, 03, 04 and so on).
TO PRESET THE CHANNELS AGAIN
1 Press the MENU button until the main menuappears. (If you have already set the clock,you only have to press it once. If not, youhave to press it twice).
2 Select “CHANNEL SET UP” by pressing thePLAY or the STOP button. Then, press theF.FWD button.
3 Select “AUTO SET UP” by pressing the PLAYor the STOP button. Then, press the F.FWDbutton.
¡After scanning, the tuner stops on the lowest memo-rized channel.
AUTO SET UP
CH 01
H9229UD.qxp 02.7.31 2:24 PM Page 17

– 18 – EN1L25
CLOCK SET UP
Set the clock accurately for proper automatic timerrecording. We suggest that you use a TV or radio sta-tion as your time source.
1 Press the MENU button twice to call up themain menu. (If you have already set theclock, you only have to press it once).
¡If the clock is not set, the CLOCK SET menuappears first. In this case, follow step [3].
2 Select "CLOCK SET" by pressing the PLAYor the STOP button. Then, press the F.FWDbutton
3 Set the clock.
¡To go back one step, press the REW button.
4 Start the clock by pressing theCLEAR/C.RESET or the F.FWD button.
VCR
CLOCK SET
MONTH DAY YEAR 03 / 18 MON 2002
HOUR MINUTE AM/PM 05 : 40 PM AM PM
1) Set the month
Press the PLAY button or the STOP button repeatedly.Then, press the F.FWD button.
2) Set the day
Press the PLAY button or STOP repeatedly.Then, press the F.FWD button.
3) Set the year
Press the PLAY button or the STOP button repeatedly.Then, press the F.FWD button.The day of the week will appear automatically.
4) Set the hour
Press the PLAY button or the STOP button repeatedly.Then, press the F.FWD button.
5) Set the minute
Press the PLAY button or the STOP button repeatedly.Then, press the F.FWD button.
6) Set AM or PM
Press the PLAY button or the STOP button repeatedly.
TO CHANGE THE ON-SCREENLANGUAGE
1 Press the MENU button twice to call up themain menu. (If you have already set theclock, you only have to press it once).
2 Select "LANGUAGE SELECT" by pressingthe PLAY or the STOP button.Then, press theF.FWD button.
3 Select "ENGLISH", "FRANCAIS" or"ESPAÑOL" by pressing the PLAY or theSTOP button. Then, press theCLEAR/C.RESET button.
VCR
TO ADD/DELETE CHANNELSWhen scanning, some channels may be skipped due toa weak signal. In such cases, you can add the channelsto the VCR memory manually.
1 Press the MENU button until the main menuappears. (If you have already set the clock,you only have to press it once. If not youhave to press it twice).
2 Select "CHANNEL SET UP" by pressing thePLAY or the STOP button. Then, press theF.FWD button.
3 Select "MANUAL SET UP" by pressing thePLAY or the STOP button. Then, press theF.FWD button.
4 Enter the desired channel number by press-ing the PLAY or the STOP button.
5 Add or Delete it from memory by pressing theF.FWD or the REW button so that "ADD" or"DELETE" flashes on the TV screen accord-ingly.
6 Exit the Preset mode by pressing theCLEAR/C.RESET button.
- MENU -TIMER PROGRAMMINGAUTO REPEATCHANNEL SET UPCLOCK SETLANGUAGE SELECTAUDIO OUTTV STEREOSAP
[OFF]
[ON]
H9229UD.qxp 02.7.31 2:24 PM Page 18

PICTURE SEARCHIf you want to skip or repeat a scene during playback,press the F.FWD or the REW button.¡Press it again and the VCR will now search at super
high speed. (in the LP/SLP modes only).
INDEX SEARCHThe index signal is recorded on the tape automaticallywhen the recording is started. If you want to view arecording at a specific start point, this can be done easily.
1 Press the SEARCH MODE button so that theIndex Search menu appears.
2 Enter your desired number by pressing thePLAY or the STOP buttonwithin 30 seconds.
3 Press the F.FWD or the REW button to startindex search.
¡If you want to go in the forward direction, press theF.FWD button. If you want to go in the reversedirection, press the REW button.
¡After index search, the VCR will play the tape auto-matically.
TIME SEARCHThis feature allows you to fast forward or rewind thetape for the desired length of time.
1 Press the SEARCH MODE button twice sothat the Time Search menu appears.
2 Enter your desired time toskip by pressing the PLAYor the STOP button within30 seconds.
3 Press the F.FWD or the REW button to starttime search.
¡If you want to go in the forward direction, press theF.FWD button.
¡If you want to go in the reverse direction, press theREW button.
¡After time search, the VCR will play the tape auto-matically.
VCR
– 19 – EN1L25
PLAYBACK FUNCTION
NORMAL PLAYBACK
1 Insert a prerecorded tape. The VCR will turnon, and the VCR/TV Light andthe CST IN Light comes on.
¡If the safety tab has been removed,the VCR will start playback automatically.
2 Turn on the TV and set the TV to channel 3 or 4.
¡Now set the CH3/CH4 switch on the back of theVCR to match the channel selected on the TV.
3 Begin playback by pressing the PLAY button.
¡Tracking adjustment will be done automatically(Digital Tracking function) when you start playback.To adjust the tracking manually, press the CHAN-NEL buttons (o/p) on the VCR.
¡When a tape has reached the end, the VCR will auto-matically rewind the tape to the beginning, and ejectthe tape.
¡S-VHS Quasi Playback (SQPB): This unit allowsyou to view a tape recorded in S-VHS format.(Noise lines may appear on the picture.)
4 To stop playback, press the STOP button.
VCR
PAUSE/STILL/SLOWYou can freeze the picture on TV screen by pressingthe PAUSE button during playback.¡You can advance the picture one frame at a time by
pressing the PAUSE button during the Still mode.¡If the picture begins to vibrate vertically during the
still mode, stabilize the picture by pressing theCHANNEL buttons (o/p).
¡If the picture is distorted or rolling vertically, adjustthe vertical hold control on your TV, if so equipped.
You can watch in the slow motion by pressing theSLOW button during playback or the still mode.¡If a noise bar appears on the TV screen, you can
reduce it by pressing the CHANNEL buttons(o/p).
¡After the VCR has been in Still/Slow mode for 5minutes, it will stop automatically to protect the tapeand the video head from damage.
¡To return to playback, press the PLAY button.
AUTO REPEAT PLAYBACK
This feature allows you to play a tape over and over.
1 Select main menu by pressing the MENUbutton.
VCR
SEARCH FUNCTIONS
2 Select "AUTO REPEAT" by pressing thePLAY or the STOP button.
3 Begin auto repeat playback by pressing theF.FWD button so that [ON] appears next to"AUTO REPEAT".
¡If the on-screen menu still remains, press theCLEAR/C.RESET button to exit the menu.
¡To cancel the Auto repeat mode, press the F.FWD button atstep [3] so that [OFF] appears next to "AUTO REPEAT".
TIME SEARCH2 : 50
INDEX SEARCH03
H9229UD.qxp 02.7.31 2:24 PM Page 19

– 20 – EN1L25
RECORDING FUNCTION
It may be UNLAWFUL to record copyrighted materi-al without the consent of the copyright owner.Accidental Erasure PreventionTo prevent accidental recording on arecorded cassette, remove its recordsafety tab. To record on it later, cover thehole with cellophane tape.Before recording, make sure:¡The desired channel is selected by pressing the
Number buttons on the remote control or theCHANNEL buttons (o/p). (If you connected theVCR to a cable box or satellite box as in"DVD/VCR TO TV CONNECTION" on page 14,set the VCR to channel 3 or 4 i.e. the same channelas the CH3 or CH4 switch on the back of the VCR.Then, select the channel you want to record withthe cable box or satellite box. In this case, you canONLY record and view the SAME channel.)
¡There is a tape with a safety tab in the VCR.¡The desired recording speed is selected in SP (stan-
dard play) or SLP (super long play) mode by press-ing the SPEED button on the remote control.
¡TV STEREO or SAP is selected.
VCR
Type of tape T60 T120 T160SP mode 1 hour 2 hours 2-2/3 hours
SLP mode 3 hours 6 hours 8 hours
Tape Speed Recording/Playback Time
VIEWING AND RECORDINGTHE SAME PROGRAM
1 Begin the recording by pressing the RECORDbutton. The REC/OTR Light comes on.
¡To temporarily stop recording or to resume it, press thePAUSE button. After the VCR has been in Pause modefor 5 minutes, it will stop automatically to protect thetape and the video head from damage.
2 Press the STOP button when the recording iscompleted.
¡If a tape ends during recording, the VCR will automati-cally stop, rewind, and eject the tape.
VCR
OTR (One Touch Recording)
This feature allows you to set the recording length simply bypressing the REC/OTR button on the VCR.
3 Press the REC/OTR button to begin OTR. TheREC/OTR Light comes on. Change the recordinglength by pressing the REC/OTR button repeatedly.
VCR
REC OTR(0:30) OTR(1:00).....(Normal recording)
OTR(8:00) OTR(7:30)
TIMER RECORDING
You may set the VCR to start recording while you areaway. You can set seven programs to record on specif-ic days, daily or weekly within a 1 year period.
If you have not yet set the clock, "CLOCK SET"appears. If so, follow the steps [3] and [4] in"CLOCK SET" section on page 18. Then, set thetimer recording.
1 Insert a tape with its safety tab intact.
2 Press the MENU button.
3 Select "TIMER PROGRAMMING" by pressing thePLAY or the STOP button. Then,press the F.FWD button. The setup screen is displayed.
4 Set the timer.¡If you make mistakes, press the REW button repeat-
edly to go back to the item you want to correct. ¡If you press the REW button after step 7), all the
information you’ve just entered for that programnumber will be cleared.
VCR
PROGRAM NUMBER 4 ONCE DAILY WEEKLY
1) Set the program number (1-7)
A program number which is not allocated flashes. Press the PLAY button or the STOP button repeatedly for the desired program number. Then, press the F.FWD button.
PROGRAM NUMBER 4DATE - - / - -START TIME - - : - - - -END TIME - - : - - - -CHANNEL - -REC SPEED - -
2) Set the frequency of the recording
Press the PLAY button or the STOP button to select the desired frequency from ONCE, DAILY, or WEEKLY recording. Then, press the F.FWD button.
3) Set the date
First, press the PLAY button or the STOP button for the month. Then, press the F.FWD button. Next, press the PLAY button or the STOP button for the day. Then, press the F.FWD button.
PROGRAM NUMBER 4DATE START TIME END TIME CHANNEL REC SPEED
- - / - - - -- - : - - - -- - : - - - -- -- -
ONE TIME PROGRAM
Record safety tab
PROG. 1234567DATE START TIMEEND TIMECHANNELREC SPEED
TIMER PROGRAMMING
¡If a tape ends during OTR, the VCR will stop, eject thetape, and switch to the DVD mode automatically as theTIMER SET light blinks. (If the DVD power is off, theVCR will become STANDBY status).
¡When OTR is finished , the VCR turns off automatically.To use the VCR again, press the TIMER SET button onthe VCR.
H9229UD.qxp 02.7.31 2:24 PM Page 20

– 21 – EN1L25
HINTS FOR TIMERRECORDING
¡If there is a power failure or the VCR is unpluggedfor more than 30 seconds, the clock setting and alltimer settings will be lost.
¡If a tape ends during TIMER RECORDING, theVCR will stop, eject the tape, and switch to the DVDmode automatically as the TIMER SET light blinks.(If the DVD power is off, the VCR will becomeSTANDBY status).
VCR
¡If a tape is not in the VCR or does not have a safety tab,the TIMER SET light flashes and timer recording willnot operate. Please insert a recordable tape.
¡When all timer recordings are finished, the TIMERSET light will flash. To use the VCR again as usual,press the TIMER SET button to disable the flashingTIMER SET light, then press the VCR/TV button toselect the VCR position. The VCR/TV light willappear. Press the VCR button to choose VCR or DVDmode, then continue with the other features asdescribed in this manual.
¡When timer recordings are set, the TIMER SET lightwill come on. To use the VCR as usual until the timefor the recording, press the TIMER SET button so thatthe TIMER SET light disappears. Press the VCR/TVbutton to choose the VCR position. The VCR/TV lightwill come on. Press the VCR button to choose VCR orDVD modes, then continue with the other features asdescribed in this manual.
If you want to use the DVD player duringa VCR timer recording or while the TIMERSET light is on or flashes.¡You can use the DVD player while the TIMER SET
light is on or flashes, or during a timer recording. Pressthe POWER button to turn on the VCR. Press theVCR/TV button to choose VCR position. Press theDVD button on the remote control to choose DVDmode, then continue with the other DVD features asdescribed in this manual. You don’t have to set theTIMER off to use the DVD.
TO STOP AN AUTOMATIC TIMER PRO-GRAM ALREADY STARTEDPress the STOP/EJECT or the TIMER SET button onthe DVD /VCR.
TO CHECK, CORRECT, OR CANCEL ANAUTOMATIC TIMER PROGRAM
1 Turn the power on by pressing the POWERbutton. (If the VCR is in TIMER STANDBYstatus, press the TIMER SET button insteadof the POWER button.)
2 Select main menu by pressing the MENUbutton.
3 Select "TIMER PROGRAMMING" by press-ing the PLAY or the STOP button. Then, theF.FWD button.
4 Select the program number which you wantto check by pressing the PLAY or the STOPbutton.
¡The details of the selected program appears on theTV screen.
¡Go to the digit you want to change by pressing theF.FWD or the REW button. Then, enter correct num-bers by pressing the PLAY or the STOP button.
¡You may cancel the entire program by pressing theREW button while the program number flashes.
5 Press the CLEAR/C.RESET button to exit.
6 Press the TIMER SET button to return totimer stand-by mode.
Press the PLAY button or the STOP button repeatedly for the desired channel number. Then, press the F.FWD button.
PROGRAM NUMBER 4DATE START TIME END TIME CHANNEL REC SPEED
05 /13 MON- - : - - - -- - : - - - -- -- -
ONE TIME PROGRAM
PROGRAM NUMBER 4DATE START TIME END TIME CHANNEL REC SPEED
05 /13 MON07: 30 PM- - : - - - -- -- -
ONE TIME PROGRAM
PROGRAM NUMBER 4DATE START TIME END TIME CHANNEL REC SPEED
05 /13 MON07: 30 PM08: 30 PM- -- -
ONE TIME PROGRAM
PROGRAM NUMBER 4DATE START TIME END TIME CHANNEL REC SPEED
05 /13 MON07: 30 PM08: 30 PM16SPSPSLP
ONE TIME PROGRAM
4) Set the start time
First, press the PLAY button or the STOP button for the hour. Then, press the F.FWD button. Next, press the PLAY button or the STOP button for the minute. Then, press the F.FWD button. And then, press the PLAY button or the STOP button for AM or PM. Then, press the F.FWD button.
5) Set the end time
Follow the same instructions as "Set the start time" to set the end time.
7) Set the tape speed
Press the PLAY button or the STOP button repeatedly for the desired tape speed. Then, press the F.FWD button.
6) Set the channel number
If you connected the DVD/VCR to a cable box or satellite box as in "DVD/VCR TO TV CONNECTION" on page 14, set the DVD/VCR to channel 3 or 4 i.e. the same channel as the CH3 or CH4 switch on the back of the DVD/VCR. Then, select the channel you want to record with the cable box or satellite box. Leave the cable box or satellite box on for timer recording.
5 To set another program, repeat step [4]. To exitfrom the set up screen, press theCLEAR/C.RESET button (You only exit from theset up screen. the information you entered forthe timer recording will not be cleared).
6 When you finish programming, press theTIMER SET button to activate the timer.
¡As the TIMER SET light comes on the VCRbecomes STANDBY status, and switches to DVDOUTPUT mode automatically.
¡When DVD sits idle for more than thirty-five min-utes, the DVD power will be turned off automatical-ly. If you press the TIMER SET button under suchcondition, the VCR power will be turned off andbecome STANDBY status.
TO CLEAR A PROGRAMFollow the steps from 2 to 3. Select the program num-ber you want to clear, and then press the REW button.
H9229UD.qxp 02.7.31 2:24 PM Page 21

– 22 – EN1L25
COPYING A VIDEO TAPE
SPECIAL FEATURES
You can make copies of video tapes made by friends orrelatives for your enjoyment.Warning:Unauthorized recordings of copyrighted video tapesmay be an infringement of copyright laws.Connect the recording VCR (this unit), the playingVCR (another source) and your TV using the follow-ing diagram.¡You can use the AUDIO/VIDEO input jacks on the
front panel of the VCR instead of using the jacks onthe back.
1 Insert a pre-recorded tape into the playingVCR.
2 Insert a tape with a safety tab into therecording VCR.
3 Press the SPEED button on the recordingVCR to select the desired recording speed(SP/SLP).
¡When you use the A/V input jacks on the back of the VCR,select "L1" position by pressing [0], [0], [1] on the remotecontrol or the CHANNEL buttons (o/p).
¡When you use the A/V input jacks on the front of the VCR,select "L2" position by pressing [0], [0], [2] on the remotecontrol or the CHANNEL buttons (o/p).
Note“L1” and “L2” are found before the lowest memo-rized channel. (Example: CH2)
4 Press the REC/OTR button on the recording VCR.
5 Begin playback of the tape in the playingVCR.
¡For best results during dubbing, use the VCR’s frontpanel controls whenever possible. The remote con-trol might affect the playing VCR’s operation.
¡Always use video-quality shielded cables with
VCR
ANT - IN
IN
DVD/VCROUT
DVD/VCRAUDIO OUT
COMPONENTVIDEO OUT
L
L
Y
Cr
COAXIAL
S-VIDEOOUT
DIGITAL AUDIO OUTPCM / BITSTREAM
Cb
R
R
AUDO
VIDEO3CH 4CH
ANT - OUT
ANT in
[TV set](Use for monitoring)
Coaxial cable (supplied)
[Playing VCR](another source)
Audio/Video cables(not supplied)
IN
OUT
AUDIO VIDEO
LEFT RIGHT
[Recording VCR](this unit) MTS (Multi-Channel Television
Sound) SYSTEM
When you play a VHS tape, or receive a broadcast on theVCR tuner channel you are watching, the current statuswill appear when you press theDISPLAY button on the remotecontrol. When you record a MTSbroadcast signal, you need to set itto MTS mode.
1)* When a program is broadcast in stereo,STEREO appears. When a program isbroadcast in second audio, SAP appears.
¡Although a program may be broadcast in both stereoand sub audio, you must select the Recording mode toTV STEREO or SAP before you record a broadcast.
2)* While the VCR is set in HiFi stereo mode,HiFi appears on the TV screen. While theVCR is set in monaural (MONO) mode,HiFi disappears from the TV screen.
¡If you play non-HiFi tapes while the VCR is set inHiFi, HiFi will disappear from the TV screen and theVCR will automatically play in monaural.
VCR
RCA-type connectors. Standard audio cables are notrecommended.
¡You can use a video disc player, satellite receiver, orother audio/video component with A/V outputs inplace of the playing VCR.
TO MONITOR THE RECORDING
1 Turn on the TV and set the TV to channel 3 or 4.¡Now set the CH3/CH4 switch on the back of the
DVD /VCR to match the channel selected on the TV.
2 Press the VCR/TV button on the recordingVCR so that the VCR/TV Light comes on.
MTS RECORDING/MONITOR MODEType of
broadcastHi-Fi audio track
(2-channel)Normal audio
track
Regular(monaural audio) -None-
Mono
Stereobroadcast
STEREO L+R
Bilingualbroadcast
SAP Main audioprogram
Sub audioprogram
Stereo & Bilingualbroadcast
STEREOSAP
L+R
I
STEREO/SAPSelection
-Invalid-
- nvalid-
TV STEREO*
SAP*
TV STEREO*
SAP*
L-channel
Mono
L
Main audioprogram
Sub audioprogram
LSub audioprogram
R-channel
Mono
R
Main audioprogram
Sub audioprogram
RSub audioprogram
Sub audioprogram
*
Display on theTV screen
STOP 12:00AM CH 32 STEREO SAP
SP 0:00:00 HIFI
1)*
2)*
H9229UD.qxp 02.7.31 2:24 PM Page 22

– 23 – EN1L25
PLAYING A DVD VIDEOOR AN AUDIO CD
Getting startedTurn on the power of the TV, amplifier and any othercomponents which are connected to the DVD.(Change the input system to suite the DVD, and checkthat the sound volume is correct).
1 Press the POWER button.¡The power will turn on.
Check that the DVD OUTPUT Light is lit. If notpress the DVD button on the remote control toswitch to DVD mode.
2 Press the OPEN/CLOSE button.
¡The disc loading tray will open.
3 Place a disc into the tray.
¡Make sure the disc is sitting properly in the correctrecess, with the label side up.
4 Press the PLAY button.
¡The tray will close automatically, and playback willthen start from the first chapter or track of the disc.You need to press the PLAY button only when thetray has been closed by pressing the OPEN/CLOSEbutton.
¡If your DVD has a title menu, it may appear on thescreen. In this case, refer to “USING THE DVDMENUS” in the next section, or “USING THETITLE MENU” on page 24.
5 Press the STOP button to stop play.
CDDVD
Notes
¡A “prohibited icon” may appear atthe top-right on the TV screenduring operation, warning that aprohibited operation has beenencountered by the DVD or thedisc.
¡If a disc is dirty or has scratches, the pictures mayappear distorted and the playback operation maystop. In such cases, clean the disc and unplug thepower cord and then plug it again before resumingplayback.
¡With DVDs that use titles for playback programsignals, playback may start from the second title, orit may skip these titles.
¡During the playback of a two layered disc, picturesmay stop for a moment. This happens when the 1stlayer switches to the 2nd layer. This is not a mal-function.
PLAYING A DISC
USING THE DVD MENUS
Some DVDs contain their own menus, such as a guid-ance menu which describes the contents of the disc ora selection menu for sound, language and other cus-tomized settings.
1 Press the MENU button.
¡The DVD menu will appear.
2 Select the desired title.
¡Press the Arrow buttons (L/K/B/s) to change thesetting, and then press the ENTER button.
3 Playback will start from the selected title.
DVD
AUTO REWINDWhen a tape reaches the end during recording, play-back, or fast-forward, the tape will automaticallyrewind to the beginning. After rewinding finishes, theVCR will eject the tape.¡The VCR will not rewind the tape automatically dur-
ing timer recording or One Touch Recording.
REAL TIME TAPE COUNTER¡This shows the elapsed recording or playback time
in hours, minutes, and seconds. (The displayed timewill not change during blank portions of the tape.)
¡The indication will appear when the tape is rewoundfurther than “0:00:00” on the tape counter.
H9229UD.qxp 02.7.31 2:24 PM Page 23

– 24 – EN1L25
USING THE TITLE MENU
With a DVD containing a title menu, you can select thedesired titles from the menu.
1 Press the TITLE button.
¡The title menu will appear.
¡With some discs, a title menu may appear automati-cally. In this case, skip to step 2.
2 Select the desired title.
¡Press the Arrow buttons (L/K/B/s) to select adesired title, and then press the ENTER button.
CALLING UP A MENU SCREENDURING PLAYBACKFor DVDs¡Press the MENU button to call up the DVD menu.
¡Press the TITLE button to call up the title menu.
Note
¡The contents of menus and corresponding menu operations may vary between discs. Refer to themanual accompanying the disc for details.
DVD
PAUSING PLAYBACK OR DISPLAYING A STILL PICTURE
1 Press the PAUSE button during playback.
¡Playback will pause, with soundmuted.
2 Press the PLAY button to resume playback.
CDDVD
F
B
STEPPING THROUGH FRAMES
1 Press the PAUSE button while playback ispaused.
¡The next picture frame is dis-played with sound muted eachtime the button is pressed.
2 Press the PLAY button to resume playback.
DVD
F
B
RESUMING PLAYBACK FROMTHE POINT WHERE
PLAYBACK STOPPED
Press 'PLAY' to play from here.To play the beginning, press 'STOP' firstand then 'PLAY'.
B
1 Press the STOP button during playback.
¡Playback will stop, and then appear the resumingmessage at the center.
2 Press the PLAY button. Playback will startfrom the point where the previous playbacksession was stopped.
Note
¡The resume function can be reset by pressing theSTOP button twice or by opening the disc loadingtray.
CDDVD
H9229UD.qxp 02.7.31 2:24 PM Page 24

1 Press the g (FWD) or the h (REV) but-ton during playback.
¡For DVDs, pressing the g (FWD) or h (REV)button cycles the playback speed in four steps. In thecase of DVDs, the sound will mute.
¡For audio CDs, the playback speed is fixed at ×16.
2 Press the PLAY button to return to normalplayback speed.
CDDVD
– 25 – EN1L25
FAST FORWARD/REVERSE
You can also press the SEARCHMODE button and use the Numberbuttons to enter the track number.
When the track number is entered in the entry box,playback of the desired track will start automatically.
x2
x8
x30
x60
x8
x30
x60
x2
REV Button ButtonFWD
SLOW MOTION
1 Press the g (FWD) button while playbackis paused. (Sound remains muted.)
¡Slow motion mode will be activated.¡Pressing the g (FWD) button cycles the playback
speed in three steps. Select the appropriate speedwhile referring to the speed indication on the screen.
2 Press the PLAY button to return to normalplayback speed.
Notes¡Slow playback is not available with audio CDs.¡Reverse slow motion is not available.¡Slow playback from a TITLE to other TITLE is not
possible.
DVD
×1/16
×1/8
×1/2
ButtonFWD
STARTING FROM A DESIREDTRACK
1 Press the Number buttons to enter thedesired track number.
¡The selected track will be located, and playback will start.
CD
TR : 5
PLAYING FROM A DESIREDTITLE OR A CHAPTER
TRICKS WITH THE SKIP BUTTONS (H, G)
If the SKIP button G is pressed during playbackor while playback is paused, the current track willbe skipped and the next track will start. If the SKIPbutton H is pressed once, the beginning of thecurrent track will be located for replay. If the SKIPbutton H is pressed again within 2 seconds after playback begins, the previous track will belocated.
There are two ways you can jump to a desired title ora chapter.
By using the ‘SEARCH MODE’ button.
1 Press the ‘SEARCH MODE’ button.
¡The title/chapter search display will be displayed.
2 If you wish to perform a title search, select‘TT’. If you wish to perform a chapter search,select ‘CH’ with the Arrow buttons (K/ L) .
3 Enter the desired title or chapter numberwith the Number buttons (If you are enteringa single digit number press “0” first).
¡When you finish entering the number, the selectedtitle or chapter will start automatically.
Notes¡If you didn’t press “0” before entering the single
digit number, you have to press ENTER to go to thedesired title or the chapter.
DVD
TT : 1/ 2 CH __ / 49
TT : _/ 12 CH : 12/ 49
H9229UD.qxp 02.7.31 2:24 PM Page 25

– 26 – EN1L25
STARTING FROM A DESIREDTIME COUNT
1 Press the SEARCH MODE button twice dur-ing playback or while paused.
2 Press the Number buttons to set the desiredtime count.
¡Example: 1 hour, 23 minutes and30 seconds
1 → 2 → 3 → 3 → 0
CDDVD
By using only the Number buttons.TITLE SEARCH:
1 Directly enter the desired title number with theNumber buttons with playback stopped.
CHAPTER SEARCH:1 Directly enter the desired chapter number
with the Number buttons when the disc isbeing played or paused.
¡When you finish entering the number, the selectedtitle or chapter will start automatically.
Notes¡Play back from a desired title or chapter is not avail-
able with some DVDs.¡If the title being played does not display the chapter
number, that means the chapter search function isnot available with that title.
TIME 1:23:30TOTAL 1:29:00
Notes¡For a DVD, Time Search in Title is effective. (But
Time Search in Chapter is ineffective.)¡For a CD, Time Search in Track is effective. (But
Time Search in the entire disc is ineffective.)¡Playback from a desired time count is not available
with some discs or if the unit is in stop mode.¡If the wrong numbers are entered, press the
CLEAR/C.RESET button and re-enter the correctnumbers.
MARKER
RANDOM (Audio CD)
1 Press the MODE button in stop mode.
¡The program setting menu screen will appear.
2 Press the MODE button again.
CD
You can define the part to be called back.
1 Press the SEARCH MODE button threetimes during playback.
Set the marker¡Using the Arrow buttons (s / B),
position the cursor on to themarker number shown as “NOT SET”. Press theENTER button when the screen to be reviewedappears. The marked time will be displayed. Up to5 points can be marked.
Call back the marker¡Using the Arrow buttons (s / B), position the cursor
on to the marker number to be called back and pressthe ENTER button.
Clear the marker¡Using the Arrow buttons (s / B), position the cursor
on to the marker number to be cleared and press theCLEAR/C.RESET button.To clear all markers, place the cursor on “AC” (Allclear markers) and press the ENTER button.
2 Press the SEARCH MODE button or theRETURN button to exit the display.
CDDVD
RANDOM
EXIT : MODESTART : PLAY
3 Press the PLAY button. Random playbackwill then start.
Note
¡Program playback is not available during randomplayback.
TRICKS WITH THE SKIP BUTTONS (H, G)
If the SKIP button G is pressed during playback orwhile playback is paused, the current chapter will beskipped and the next chapter will start. If the SKIPbutton H is pressed once, the beginning of the cur-rent chapter will be located for replay. If the SKIPbutton H is pressed again within 2 seconds afterplayback begins, the previous chapter will be locat-ed.
1 2 3 4 5 ACNOT SET
H9229UD.qxp 02.7.31 2:24 PM Page 26

– 27 – EN1L25
REPEAT
1 Press the REPEAT button during playback.
For DVDs¡A single title or chapter can be played back repeat-
edly.
¡Pressing the REPEAT button cycles the display onthe screen as follows.
For audio CDs¡The whole disc or a single track can be played back
repeatedly.
¡Pressing the REPEAT button cycles the display onthe screen through Off, Track and All.
CDDVD
The current title is played back repeatedly.
REPEAT[OFF]
REPEAT[CHAPTER]
REPEAT [TITLE]
The current chapter is played back repeatedly.
No repeat playback.
The whole disc is played back repeatedly.
REPEAT[ALL]
REPEAT[TRACK]
The current track is played back repeatedly.
No repeat playback.REPEAT [OFF]
If the REPEAT button is pressed once dur-ing program/random playback, the currenttrack will be played back repeatedly.If the REPEAT button is pressed again, theprogram/random playback will be per-formed repeatedly.
Notes¡Repeat playback is not available with some discs.¡The REPEAT setting will be cleared when moving
to an other title, chapter or track.¡Repeat playback does not function during A-B
repeat playback.
You can define a section to be played back repeatedly.
1 Press the A-B REPEAT button during playback.
¡The starting point (A) will then beselected.
2 Press the A-B REPEAT button again at theend point (B) of the desired section.
¡The selected section will beplayed back repeatedly.
3 To exit A-B repeat playback, press the A-BREPEAT button and set it to OFF.
Notes
¡With DVDs, the A-B repeat section can be set onlywithin the current title.
¡With audio CDs, the A-B repeat section can be setwithin the current track.
¡A-B repeat is not available with some scenes inDVD.
¡To cancel the A point which was set, press theCLEAR/C.RESET button.
¡A-B repeat playback does not function when title,chapter, or repeat (all) playback has been set.
CDDVD
A-B REPEAT
REPEAT[ A - ]
REPEAT[ A - B ]
REPEAT[ OFF ]
H9229UD.qxp 02.7.31 2:24 PM Page 27

– 28 – EN1L25
PROGRAM (Audio CD)
1 Press the MODE button in stop mode.
¡The program screen will appear.
CD
PROGRAM TIME 0:00:00 1/1
RANDOM: MODE EXIT: RETURNSTART: PLAY DELETE: CLEAR
--
2 Press the Number buttons to enter thedesired track numbers.
¡50 programs can be displayedat once on the screen. Press“L” to go to the next page.
3 Press the PLAY button.
¡Playback will start in the programmed order.
¡While the program is being played back, the STOPbutton works as follows.
¡Press the STOP button once and then press thePLAY button again. Playback will restart from thepoint where the STOP button was pressed. (Program continued)
TO CLEAR THE PROGRAM
1 Press the STOP button twice, and the pro-gram will be cleared.
Notes
¡Adding programs is not possible during programplayback. You must stop the current playback beforesuch operations can be carried out.
¡Press the CLEAR/C.RESET button to cancel a pro-gram. The most recently entered program will thenbe deleted.
¡Up to 99 programs can be entered.
¡Playback from a desired track and random playbackare not available during program playback.
¡Program settings will be cleared when the power isturned off or the disc loading tray is opened.
¡Press the MODE button to check the programmedsetting.
¡The programs will be cleared when you turn thepower off.
02 05 07 04 10 14 06 15 21 0820 28 10 25 35 12 30 42 11 3449 16 40 58 18 45 63 01 03 _
PROGRAM TIME 2:07:43 1/1
RANDOM: MODE EXIT: RETURNSTART: PLAY DELETE: CLEAR
ZOOM PLAYBACK(enlargement on-screen)
Images can be enlarged on the screen to your taste.
1 Press the ZOOM button during playback.
¡The image will be enlarged at the center of thescreen.
¡Pressing the ZOOM button cycles the zoomingimages in two steps.
DVD
ZOOM [x4]ZOOM [x2] ZOOM [OFF]
2 When the Arrow button (K/ L/ s / B) ispressed during zoom play, the part to bezoomed moves.
¡The zooming frame can be moved from the center 4steps to the right, 4 steps to the left, 4 steps to thetop, and 4 steps to the bottom when times 2 zoom-ing. The frames will move 6 steps when times 4zooming.
¡The current position will be displayed on the right-bottom of the screen. Press the ENTER button, andthe display will disappear.
Note
¡Zooming function does not work while the discmenu is being shown.
H9229UD.qxp 02.7.31 2:24 PM Page 28
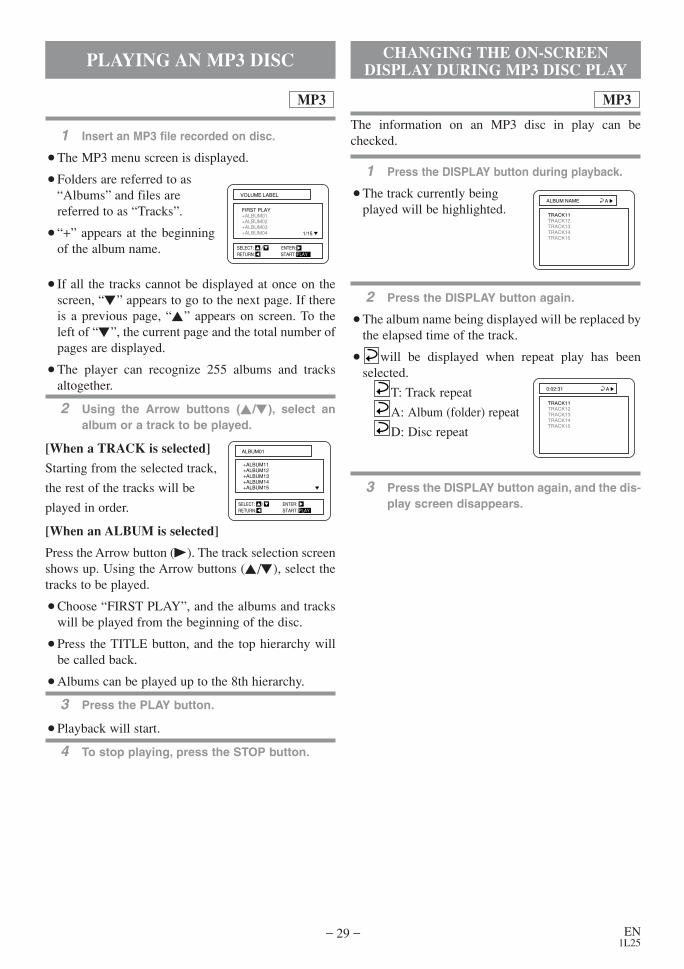
1 Insert an MP3 file recorded on disc.
¡The MP3 menu screen is displayed.
¡Folders are referred to as“Albums” and files arereferred to as “Tracks”.
¡“+” appears at the beginningof the album name.
MP3
– 29 – EN1L25
PLAYING AN MP3 DISC
¡If all the tracks cannot be displayed at once on thescreen, “L” appears to go to the next page. If thereis a previous page, “K” appears on screen. To theleft of “L”, the current page and the total number ofpages are displayed.
¡The player can recognize 255 albums and tracksaltogether.
2 Using the Arrow buttons (K/L), select analbum or a track to be played.
[When a TRACK is selected]
Starting from the selected track,
the rest of the tracks will be
played in order.
[When an ALBUM is selected]
Press the Arrow button (B). The track selection screenshows up. Using the Arrow buttons (K/L), select thetracks to be played.
¡Choose “FIRST PLAY”, and the albums and trackswill be played from the beginning of the disc.
¡Press the TITLE button, and the top hierarchy willbe called back.
¡Albums can be played up to the 8th hierarchy.
3 Press the PLAY button.
¡Playback will start.
4 To stop playing, press the STOP button.
FIRST PLAY+ALBUM01+ALBUM02+ALBUM03+ALBUM04 1/15
VOLUME LABEL
START: PLAYSELECT: / ENTER:RETURN:
+ALBUM11+ALBUM12+ALBUM13+ALBUM14+ALBUM15
ALBUM01
START: PLAYSELECT: / ENTER:RETURN:
CHANGING THE ON-SCREEN DISPLAY DURING MP3 DISC PLAY
The information on an MP3 disc in play can bechecked.
1 Press the DISPLAY button during playback.
¡The track currently being played will be highlighted.
2 Press the DISPLAY button again.
¡The album name being displayed will be replaced bythe elapsed time of the track.
¡ will be displayed when repeat play has beenselected.
T: Track repeat
A: Album (folder) repeat
D: Disc repeat
MP3
TRACK11TRACK12TRACK13TRACK14TRACK15
ALBUM NAME A
3 Press the DISPLAY button again, and the dis-play screen disappears.
TRACK11TRACK12TRACK13TRACK14TRACK15
0:02:31 A
H9229UD.qxp 02.7.31 2:24 PM Page 29

1 Press the MODE button in STOP mode.
¡The program screen is displayed.
MP3
– 30 – EN1L25
PLAYING AN MP3 DISCRANDOMLY
1 Press the MODE button twice in STOP mode.
¡The random setting menu screen will appear.
2 Press the PLAY button.
¡Random play will begin.
MP3
RANDOMRANDOM
EXIT: MODESTART: PLAY
1 Press the SEARCH MODE button during play-back.
¡The SEARCH menu is displayed.¡The track currently being played or in RESUME ON
will be highlighted. In the case of RESUME OFF,the first track of the disc will be highlighted.
¡Press the RETURN button, and the SEARCH menudisappears.
2 Using the Arrow buttons (K/L), select thetrack to be played. Then press the PLAY but-ton to start playing.
Notes
¡During play, a desired track can be searched fordirectly. Just enter the track number with theNumber buttons.
¡If the track number entered is not available, the “dis-able” symbol appears and the direct search mode iscancelled.
¡Playback cannot be started from a desired timecount.
MP3
PLAYING A DESIRED TRACKFROM AN MP3 DISC
PLAYING AN MP3 DISC IN APROGRAM
2 Use the Arrow buttons (L/K) to select atrack. Then press the ENTER button to saveit in a program.
¡When an album name is highlighted, press theArrow button (L ), and the next hierarchy is dis-played.
¡Press the Arrow button (K) to go back to the previ-ous hierarchy.
¡If the entire program cannot be displayed at once onthe screen, “L” appears to go to the next page.
3 When the program has been selected, pressthe PLAY button.
¡The program will begin.
Notes
¡Press the CLEAR/C.RESET button, and the last-programmed entry will be deleted.
¡Press the RETURN button, and the program screenwill be displayed and the program stored in memo-ry.
¡The program setting will be cancelled when thepower is turned off or the disc tray is opened.
RANDOM: MODE EXIT: RETURNSTART: PLAY DELETE: CLEAR
+ALBUM01+ALBUM02+ALBUM03TRACK01TRACK02
PROGRAM-FOLDER NAME
1/11 1/1
RANDOM: MODE EXIT: RETURNSTART: PLAY DELETE: CLEAR
+ALBUM11+ALBUM12TRACK11TRACK12TRACK13
TRACK11
PROGRAM - ALBUM01
1/11 1/1
+ALBUM01TRACK11TRACK12TRACK13TRACK14
ALBUM NAME
1/15
START: PLAYSELECT: / ENTER:RETURN:
RANDOM: MODE EXIT: RETURNSTART: PLAY DELETE: CLEAR
+ALBUM51+ALBUM52TRACK51TRACK52TRACK63
TRACK11TRACK52TRACK31TRACK22TRACK03
PROGRAM - ALBUM05
1/11 2/3
H9229UD.qxp 02.7.31 2:24 PM Page 30

– 31 – EN1L25
SETTINGS
CHANGING THE AUDIOLANGUAGE OR SOUND MODE
The DVD has a function which allows you to select thedesired audio language and sound mode.
For DVDs1 Press the AUDIO button during playback.
¡The current audio status will appear at the top.
2 Press the AUDIO button repeatedly until yousee the language of your choice.
¡The audio language mode can be changed only if thedisc is recorded with a multiple language setting.
CDDVD
Notes¡Pressing the Audio button may not work on some
DVDs with multiple audio languages (e.g. DVDswhich allow audio language setting on the discmenu). Operation varies between discs, so refer tothe manual accompanying the disc.
¡The current audio language and sound mode will bedisplayed when you first press the AUDIO button.
¡If the desired language is not shown after pressingthe Audio button several times, the disc does nothave an audio source in that language.
¡The audio language resets to the one which wasselected in the setup mode every time the power isturned on or discs are replaced. If that language isnot available on a disc, a language defined by thedisc will be selected.
¡The screen display will disappear after about 5 seconds.
¡If you use DIGITAL AUDIO OUT jack, the soundmode of audio CDs can not be changed.
AUDIO 1.ENG DolbyD 5.1CH 48k/3
AUDIO 2.FRE DolbyD 5.1CH 48k/3
AUDIO 3.JPN DolbyD 5.1CH 48k/3
HELLO Bon jour
For audio CDsPress the AUDIO button during playback.¡Pressing the AUDIO button cycles the sound mode
through STEREO, L-CH and R-CH.
Both right and left channelsare active (stereo).
AUDIO STEREO
Only the left channel is active.AUDIO L-CH
AUDIO R-CHOnly the right channel is active.
H9229UD.qxp 02.7.31 2:24 PM Page 31

– 32 – EN1L25
CHANGING THE CAMERAANGLE (Multi-Angle Pictures)
The DVD has a function which allows you to select thedesired camera angle.
1 Press the ANGLE button during playback.
¡If the disc contains sequences recorded from differ-ent camera angles, the angle icon ( ) will appearat the top-right of the screen. You can change thecamera angle when the icon appears on the screen.
¡The camera angle cannot be changed if the disc doesnot contain sequences recorded from different camera angles.
2 Press the ANGLE button while the angle number is shown on the screen.
Notes
¡The screen display will disappear after about 5 seconds.
¡The current camera angle will be displayed whenyou first press the ANGLE button.
DVD
Angle 1
Angle 2
Angle 8
ANGLE 1 / 8
ANGLE 2 / 8
ANGLE 8 / 8
The DVD has a function which allows you to select thedesired language for subtitles.
1 Press the SUBTITLE button during playback,and then press the SUBTITLE button toselect the desired subtitle language.
¡The subtitle language can be changed if the subtitlesare recorded in multiple languages on the DVDbeing played.
¡The subtitle language cannot be changed if the subtitles are recorded in a single language on theDVD being played.
¡Pressing the SUBTITLE button cycles the subtitlelanguage from SUBTITLE 1, SUBTITLE 2 and allthe languages recorded.
¡The current subtitle mode will be displayed whenyou first press the SUBTITLE button.
¡Press the SUBTITLE button, and then press theArrow button (s / B) to set it to on or off.
DVD
Subtitle 1
Subtitle 2
OFF
SUBTITLE 1.ENG/6
SUBTITLE 2.FRE/6
SUBTITLE OFF
HELLO Bon jour
CHANGING THE SUBTITLELANGUAGE
¡It may take time to display the subtitles in the selected language.
¡The screen display will disappear after about 5 seconds.
¡When “SUBTITLE NOT AVAILABLE” appears onscreen, it means that no subtitle has been recorded.
Notes¡Some discs allow subtitle language setting on the
disc menu. (Operation varies between discs, so referto the manual accompanying the disc.)
¡If the desired language is not shown after pressingthe SUBTITLE button several times, the disc doesnot have subtitles in that language.
¡The subtitle language resets to the one which wasselected in the setup mode, every time the power isturned on or discs are replaced. If that language is not available on a disc, a languagedefined by the disc is selected.
H9229UD.qxp 02.7.31 2:24 PM Page 32

– 33 – EN1L25
CHANGING THE ON-SCREENDISPLAY
TT 1/2 0:00:00 -1:23:45
TT(Title):Current title number / the total number of titles.
TIME:Elapsed time of the current title and remaining time of the current title.
You can check the information regarding the disc by pressing the DISPLAY button on the remote control.
For DVDs1 Press the DISPLAY button during playback.
CDDVD
2 Press the DISPLAY button again.
¡Use the Number button to start from the desiredchapter.
3 Press the DISPLAY button again.
4 Press the DISPLAY button or the RETURN but-ton to exit the display.
CH 7/49 0:01:46 -0:03:27
CH (Chapter):Current chapter number / the total number of chapters.
TIME:Elapsed time of the current chapter andremaining time of the current chapter.
BIT RATE
BIT RATE indicator will appear.BIT RATE shows the quantity of information which is recorded on the DVD.C L0
Layer number (*) L0: Layer 0 is playing L1: Layer 1 is playingCurrent Repeat setting C: Chapter repeat T: Title repeat A B: A-B repeat
* appears when a layered disc is playing.
For audio CDs1 Press the DISPLAY button during playback.
TR 4/12 0:03:21 -0:02:15 B
TR (Track):Current track number / the total number of tracks.
TIME:Elapsed time of the current track and remaining time of the current track.
2 Press the DISPLAY button again.
ALL 4/12 0:13:45 -0:45:40 B
ALL:Current track number / the total number of tracks.
TIME:Elapsed time of the current disk and remaining time of the current disc.
3 Press the DISPLAY button or the RETURN but-ton to exit the display.
You can select the BLACK LEVEL ON to make theblack areas of the picture brighter.
1 Press the MODE button during playback.
¡The setup screen is displayed.
2 Press the ENTER button to turn it on or off.
¡ON: This makes the dark parts brighter. (Default:ON)OFF: The original picture which is recorded on the
disc will be shown.¡Press the RETURN button to exit the display.
BLACK LEVEL SETTINGS
BLACK LEVEL : ON
You can enjoy stereophonic sound system when youplayback Dolby Digital and PCM 48 kHz sound.
1 Press the MODE button twice during playback.
¡The setup screen will appear.
2 Press the ENTER button to set it on or off.
ON: TruSurround ON.(Default : OFF)OFF: TruSurround OFF.
¡Press the DISPLAY button ( you may have to pressit more than once), or press the RETURN button toexit the display.
¡SRS TruSurround is available only when the DVD isconnected to a TV or a stereo using the red and whiteAUDIO OUT jacks on the DVD.
TruSurround SETTINGS
SRS TruSurround ON
¡Use the Number buttons to start from a desired track.
DVD
H9229UD.qxp 02.7.31 2:24 PM Page 33

– 34 – EN1L25
1 Press the SETUP button in STOP mode.
¡The setup screen is displayed.
2 Press the Arrow buttons (K/L) to selectLanguage, and then press the ENTER but-ton.
3 Press the Arrow buttons (K/L) to select anitem, and then press the ENTER button.
AUDIO:(Voice is played in selected language.)
SUBTITLE:(Subtitles are shown in selected language.)
DISC MENU:(The disc menu appears in selected language.)
DVD
PLAYER MENU:(The on-screen display appears in selected language.)
4 Press the Arrow buttons (K/L) to select adesired item, and then press the ENTER but-ton.
¡If “OTHER” is selected on the AUDIO, SUBTITLEor DISC MENU setting screen, the Language Codesetting screen will appear. Press the Number buttonsto enter the desired language code while referring tothe list on page 38.
5 Press the SETUP button.
¡The setup mode will be canceled and the ordinaryscreen is displayed.
Notes¡Language Setting for Audio and Subtitle is not avail-
able with some discs, so use the Audio and theSubtitle button. Details are on pages 31 and 32.
¡You can also select an item by entering the numberbesides it using the Number buttons.
¡When you change the setup items, press the STOPbutton if you are in playback mode.
¡While the setup menu is shown, you can not open orclose the tray.
CHANGING THE SETUP ITEMS
LANGUAGE SETTINGS
1.LANGUAGE2.DISPLAY3.AUDIO4.PARENTAL
SET-UP
EXIT: SETUP CANCEL: RETURNSELECT: / SET: ENTER
Please enter a 4-digit Language code.- - - -
SET-UP
EXIT: SETUP CANCEL: RETURN
LANGUAGE CONTROLSDISC MENU
LANGUAGE CODE
1.LANGUAGE2.DISPLAY3.AUDIO4.PARENTAL
SET-UP
EXIT: SETUP CANCEL: RETURNSELECT: / SET: ENTER
1.AUDIO ORIGINAL2.SUBTITLE OFF3.DISC MENU ORIGNAL4.PLAYER MENU ENGLISH
SET-UP
EXIT: SETUP CANCEL: RETURNSELECT: / SET: ENTER
LANGUAGE CONTROLS
1.AUDIO ORIGINAL2.SUBTITLE OFF3.DISC MENU ORIGNAL4.PLAYER MENU ENGLISH
SET-UP
EXIT: SETUP CANCEL: RETURNSELECT: / SET: ENTER
LANGUAGE CONTROLS
1.AUDIO ORIGINAL2.SUBTITLE OFF3.DISC MENU ORIGINAL4.PLAYER MENU ENGLISH
SET-UP
EXIT: SETUP CANCEL: RETURNSELECT: / SET: ENTER
LANGUAGE CONTROLS
1.AUDIO ORIGINAL2.SUBTITLE OFF3.DISC MENU ORIGNAL4.PLAYER MENU ENGLISH
SET-UP
EXIT: SETUP CANCEL: RETURNSELECT: / SET: ENTER
LANGUAGE CONTROLS
H9229UD.qxp 02.7.31 2:24 PM Page 34

ANGLE ICON (Default: ON)Display or not display the Angle icon on the screen.
AUTO POWER OFF (Default: ON)Set or not set to turn off after the screen saver is started andno keys are pressed for 35 minutes.
BACKGROUND COLOR (Default: BLUE)Select blue or gray.
4 Press the Arrow buttons (K/L) to select adesired item, and then press the ENTER buttonto change the setting.
5 Press the SETUP button.
¡The setup mode will be canceled and the ordinaryscreen will appear.
Notes
¡You can also select an item by entering the numberbesides it using the Number buttons.
– 35 – EN1L25
1 Press the SETUP button in STOP mode.
¡The setup screen will appear.
2 Press the Arrow buttons (K/L) buttons toselect DISPLAY and then press the ENTERbutton.
3 Press the Arrow buttons (K/L) to select anitem, and then press the ENTER button.
TV ASPECT (Default: 4:3 LETTER BOX)4:3 LETTER BOX: Wide screen with black bars on top andbottom4:3 PAN & SCAN: Full height picture, trimmed both sides16:9 WIDE: If wide screen TV is connected
PANEL DISPLAY (Default : BRIGHT)Adjust the brightness of the display of the unit.Auto: Stays dim only during playback.
DVD
DISPLAY SETTINGS
1.LANGUAGE2.DISPLAY3.AUDIO4.PARENTAL
SET-UP
EXIT: SETUP CANCEL: RETURNSELECT: / SET: ENTER
1.LANGUAGE2.DISPLAY3.AUDIO4.PARENTAL
SET-UP
EXIT: SETUP CANCEL: RETURNSELECT: / SET: ENTER
1.TV ASPECT 4:3 LETTER BOX2.PANEL DISPLAY BRIGHT3.ANGLE ICON ON4.AUTO POWER OFF ON5.BACKGROUND BLUE
SET-UP
EXIT: SETUP CANCEL: RETURNSELECT: / SET: ENTER
DISPLAY CONTROLS
1.TV ASPECT 4:3 LETTER BOX2.PANEL DISPLAY BRIGHT3.ANGLE ICON ON4.AUTO POWER OFF ON5.BACKGROUND BLUE
SET-UP
EXIT: SETUP CANCEL: RETURNSELECT: / SET: ENTER
DISPLAY CONTROLS
1.BRIGHT2.DIMMER3.AUTO
SET-UP
EXIT: SETUP CANCEL: RETURNSELECT: / SET: ENTER
DISPLAY CONTROLS
PANEL DISPLAY
1.TV ASPECT 4:3 LETTER BOX2.PANEL DISPLAY BRIGHT3.ANGLE ICON ON4.AUTO POWER OFF ON5.BACKGROUND BLUE
SET-UP
EXIT: SETUP CANCEL: RETURNSELECT: / SET: ENTER
DISPLAY CONTROLS
SET-UP
EXIT: SETUP CANCEL: RETURNSELECT: / SET: ENTER
DISPLAY CONTROLS
1.TV ASPECT 4:3 LETTERBOX2.PANEL DISPLAY BRIGHT3.ANGLE ICON ON4.AUTO POWER OFF ON5.BACKGROUND BLUE
1.4:3 LETTER BOX2.4:3 PAN & SCAN3.16:9 WIDE
SET-UP
EXIT: SETUP CANCEL: RETURNSELECT: / SET: ENTER
DISPLAY CONTROLS
TV ASPECT
1.TV ASPECT 4:3 LETTER BOX2.PANEL DISPLAY BRIGHT3.ANGLE ICON ON4.AUTO POWER OFF ON5.BACKGROUND BLUE
SET-UP
EXIT: SETUP CANCEL: RETURNSELECT: / SET: ENTER
DISPLAY CONTROLS
H9229UD.qxp 02.7.31 2:24 PM Page 35

1 Press the SETUP button in STOP mode.
¡The setup screen will appear.
2 Press the Arrow buttons (K/L) to selectAudio and then press the ENTER button.
3 Press the Arrow buttons (K/L) to select anitem, and then press the ENTER button.
DRC (Default: OFF)
On: DRC(Dynamic Range Control)
¡This function is for controlling the range of soundvolume. By compressing the range of sound volume,it is possible not only to suppress the output of loudsound at night and but also to raise the volume oflow sound.
¡This function is effective only for the sound record-ed by Dolby Digital recording.
Dolby Digital (default: ON)On : Output by Dolby DigitalSet to On when the unit is connected to a DolbyDigital Decoder.
DVD
– 36 – EN1L25
DTS (Default: OFF)On : Output DTS soundSet to On when the unit is connected to DTSDecoder.
Down Sampling (Default: AUTO)Set the output for the DVD recorded in PCM 96 kHz (96 kHz or 48 kHz)
¡Press the Arrow buttons (K/L) to select an item,and then press the ENTER button.
When playing a disc with copyright protection
¡If you select 96 kHz, copyright protection will beactivated and no sound will come out. If you selectAUTO, sound will be down sampled at 48 kHz.
4 Press the SETUP button.
¡The setup mode will be canceled and the ordinaryscreen will appear.
AUDIO SETTINGS
1.LANGUAGE2.DISPLAY3.AUDIO4.PARENTAL
SET-UP
EXIT: SETUP CANCEL: RETURNSELECT: / SET: ENTER
1.LANGUAGE2.DISPLAY3.AUDIO4.PARENTAL
SET-UP
EXIT: SETUP CANCEL: RETURNSELECT: / SET: ENTER
1.DRC OFF2.DOLBY DIGITAL ON3.DTS OFF4.DOWN SAMPLING AUTO
SET-UP
EXIT: SETUP CANCEL: RETURNSELECT: / SET: ENTER
AUDIO CONTROLS
1.DRC OFF2.DOLBY DIGITAL ON3.DTS OFF4.DOWN SAMPLING AUTO
SET-UP
EXIT: SETUP CANCEL: RETURNSELECT: / SET: ENTER
AUDIO CONTROLS
SET-UP
AUDIO OPTIONS
1.DRC OFF2.DOLBY DIGITAL ON3.DTS OFF4.DOWN SAMPLING AUTO
EXIT: SETUP CANCEL: RETURNSELECT: / SET: ENTER
1.DRC OFF2.DOLBY DIGITAL ON3.DTS OFF4.DOWN SAMPLING AUTO
SET-UP
EXIT: SETUP CANCEL: RETURNSELECT: / SET: ENTER
AUDIO CONTROLS
SET-UP
AUDIO CONTROLS
DOWN SAMPLING
1.AUTO2.48kHz3.96kHz
EXIT: SETUP CANCEL: RETURNSELECT: / SET: ENTER
H9229UD.qxp 02.7.31 2:24 PM Page 36

When Parental Level is selected¡Press the Arrow buttons (K/L) to
select an item from “ALL” or 8 to1 and then press the ENTER but-ton.
5 Press the SETUP button.
¡The setup mode will be canceled and the ordinaryscreen will appear.
– 37 – EN1L25
CONTROL LEVELS¡ALL
All parental lock is cancelled.
¡Level 8DVD software of any grade (adult/general/children)can be played back.
¡Levels 7 to 2Only DVD software intended for general use andchildren can be played back.
¡Level 1Only DVD software intended for children can beplayed back, with those intended for adult and general use prohibited.
Notes
¡With some DVDs, it may be difficult to find if theyare compatible with parental lock. Be sure to checkif the parental lock function operates in the way thatyou have set.
¡Record the password in case you forget it.
IF YOU FORGET THE PASSWORD1) Press 4, 7, 3, and 7 at Step 3.
¡Password will be cleared and parental level will beset to ALL.
2) Proceed the above Steps 3-5 again.
1 Press the SETUP button in STOP mode.
¡The setup screen will appear.
2 Press the Arrow buttons (K/L) to selectPARENTAL, and then press the ENTER but-ton.
3 Press the Number buttons to enter a 4-digitpassword (you can use any 4-digits exceptfor 4737), and then press the ENTER button.
¡This number will be used as the password from thesecond time onward.
¡By entering the password, you can then change thecontrol level and password settings.
¡If you want to change the password, select“CHANGE” and enter a new password. Then pressthe ENTER button.
4 Press the Arrow buttons (K/L) to select anitem, and then press the ENTER button.
DVD
PARENTAL LOCK
1.LANGUAGE2.DISPLAY3.AUDIO4.PARENTAL
SET-UP
EXIT: SETUP CANCEL: RETURNSELECT: / SET: ENTER
Please enter a 4-digit password.- - - -
SET-UP
EXIT: SETUP CANCEL: RETURN
PARENTAL CONTROLS
PASSWORD
1.PARENTAL LEVEL ALL2.CHANGE
SET-UP
EXIT: SETUP CANCEL: RETURNSELECT: / SET: ENTER
PARENTAL CONTROLS
ALL87 [NC-17]6 [R]5
SET-UP
EXIT: SETUP CANCEL: RETURNSELECT: / SET: ENTER
PARENTAL CONTROLSPARENTAL LEVEL
1.LANGUAGE2.DISPLAY3.AUDIO4.PARENTAL
SET-UP
EXIT: SETUP CANCEL: RETURNSELECT: / SET: ENTER
H9229UD.qxp 02.7.31 2:24 PM Page 37

– 38 – EN1L25
LANGUAGE CODE LIST
123456789
1011121314151617181920212223242526272829303132333435363738394041424344454647484950515253545556575859606162636465666768
No. Language Country code
AfarAbkhazianAfrikaansAmharicArabicAssameseAymaraAzerbaijaniBashkirByelorussianBulgarianBihariBislamaBengali; BanglaTibetanBretonCatalanCorsicanCzechWelshDanish [DAN]German [GER]BhutaniGreek [GRE]English [ENG]EsperantoSpanish [SPA]EstonianBasquePersianFinnish [FIN]FijiFaroeseFrench [FRE]FrisianIrish [IRI]Scots GaelicGalicianGuaraniGujaratiHausaHindiCroatianHungarian [HUN]ArmenianInterlinguaInterlingueInupiakIndonesianIcelandic [ICE]Italian [ITA]HebrewJapaneseYiddishJapanese [JPN]GeorgianKazakhGreenlandicCambodianKannadaKorean [KOR]KashmiriKurdishKirghizLatinLingalaLaothianLithuanian
4 7 4 74 7 4 84 7 5 24 7 5 94 7 6 44 7 6 54 7 7 14 7 7 24 8 4 74 8 5 14 8 5 34 8 5 44 8 5 54 8 6 04 8 6 14 8 6 44 9 4 74 9 6 14 9 6 54 9 7 15 0 4 75 0 5 15 0 7 25 1 5 85 1 6 05 1 6 15 1 6 55 1 6 65 1 6 75 2 4 75 2 5 55 2 5 65 2 6 15 2 6 45 2 7 15 3 4 75 3 5 05 3 5 85 3 6 05 3 6 75 4 4 75 4 5 55 4 6 45 4 6 75 4 7 15 5 4 75 5 5 15 5 5 75 5 6 05 5 6 55 5 6 65 5 6 95 6 4 75 6 5 55 6 6 95 7 4 75 7 5 75 7 5 85 7 5 95 7 6 05 7 6 15 7 6 55 7 6 75 7 7 15 8 4 75 8 6 05 8 6 15 8 6 6
69707172737475767778798081828384858687888990919293949596979899
100101102103104105106107108109110111112113114115116117118119120121122123124125126127128129130131132133134135136
No. Language Country code
Latvian; LettishMalagasyMaoriMacedonianMalayalamMongolianMoldavianMarathiMalayMalteseBurmeseNauruNepaliDutch [DUT]Norwegian [NOR]Occitan(Afan) OromoOriyaPanjabiPolishPashto; PushtoPortuguese [POR]QuechuaRhaeto-RomanceKirundiRomanian [RUM]Russian [RUS]KinyarwandaSanskritSindhiSanghoSerbo-CroatianSinghaleseSlovakSlovenianSamoanShonaSomaliAlbanianSerbianSiswatSesothoSundaneseSwedish [SWE]SwahiliTamilTeluguTajikThaiTigrinyaTurkmenTagalogSetswanaTongaTurkish [TUR]TsongaTatarTwiUkrainianUrduUzbekVietnameseVolapukWolofXhosaYorubaChinese [CHI]Zulu
5 8 6 85 9 5 35 9 5 55 9 5 75 9 5 85 9 6 05 9 6 15 9 6 45 9 6 55 9 6 65 9 7 16 0 4 76 0 5 16 0 5 86 0 6 16 1 4 96 1 5 96 1 6 46 2 4 76 2 5 86 2 6 56 2 6 66 3 6 76 4 5 96 4 6 06 4 6 16 4 6 76 4 6 96 5 4 76 5 5 06 5 5 36 5 5 46 5 5 56 5 5 76 5 5 86 5 5 96 5 6 06 5 6 16 5 6 36 5 6 46 5 6 56 5 6 66 5 6 76 5 6 86 5 6 96 6 4 76 6 5 16 6 5 36 6 5 46 6 5 56 6 5 76 6 5 86 6 6 06 6 6 16 6 6 46 6 6 56 6 6 66 6 6 96 7 5 76 7 6 46 7 7 26 8 5 56 8 6 16 9 6 17 0 5 47 1 6 17 2 5 47 2 6 7
If you choose a Language that has a 3 letter language code, the code will be displayed every time you changethe Audio or Subtitle language setting on pages 31 and 32. If you choose any other languages, ‘---’ will be dis-played instead. (3 letter language codes are written in square brackets.)
H9229UD.qxp 02.7.31 2:24 PM Page 38

– 39 – EN1L25
TROUBLESHOOTING GUIDEIf the DVD/VCR COMBINATION UNITS does not perform properly when operated as instructed in thisOwner's Manual, check the player consulting the following checklist.
VCR
DVD
VCR
DVD
PROBLEM CORRECTIVE ACTION
No power. • Make sure the power plug is connected to an AC outlet.• Make sure the power is turned on.
The player does not respond to. • Check if the power plug is connected to an AC outlet.the remote control. • Check the batteries in the remote control.. • Aim the remote control directly at the remote sensor. If necessary, remove all the
obstacles between the sensor and the remote.• You have to be within 7 m of the player.• Check if the correct mode is selected. If not switch the mode by pressing the DVD or
the VCR button, whichever you need, on the remote control.Timer recording is impossible. • Make sure the timer recording is set correctly.
• Make sure the power is off.• Make sure the VCR clock is set correctly.
Cannot go into Record mode. • Make sure the tape has a safety tab. If needed, cover the hole with cellophane tape.• Put he player in VCR mode. Press the VCR button on the remote control so that the green
VCR OUTPUT light is lit.Playback picture is partially noisy. • Adjust tracking control for a better picture by pressing the CHANNEL button on the
VCR.Cannot view a tape but the • Head cleaning may be necessary. Refer to “AUTO HEAD CLEANING” .audio is OK. • Make sure the VCR is not in the Menu mode.No, or poor, playback picture. • Select channel 3 or 4 on your TV, then press the VCR/TV button so that the VCR/TV
indicator on the VCR comes on.• Fine tune your TV.
TV programs cannot be seen • Re-check the ANT. IN and ANT. OUT connections. See page 14.normally. • Press the VCR/TV button so that the VCR/TV indicator on the VCR disappears.
• Press the VCR button on the remote control to put it in the VCR mode. Check if the greenVCR OUTPUT light is lit. Then, set it to the TV position by pressing the VCR/TV button.The VCR/TV light goes off.
Video or color fades in and out • You cannot copy a copyrighted video tape. You are experiencing copy guard protection.when making a copy of a video tape.Cannot remove the tape. • Check if the player is in the VCR mode. If not, press the VCR button on the remote control
to switch the mode.No picture. • Connect the video cables firmly.
• Insert a correct video disc that plays on this player.• Press the DVD button on the remote control. Check if the DVD OUTPUT Light is lit. Then
try other DVD feature buttons.Disc cannot be played. • Insert the disc.
• Clean the disc.• Place the disc correctly, with the label side up.• Cancel the parental lock or change the control level.
No sound. • Connect the audio cables firmly.• Turn the power of the audio component on.• Correct the audio output settings.• Correct the input settings on the audio component.
No DTS sound. • Make sure to use a DIGITAL AUDIO OUT jack when outputting the DTS audio.Distorted picture. • Connect the player directly to the TV.
• There are some cases where pictures may be slightly distorted, which are not a sign of a mal-function.
• Although pictures may stop for a moment, this is not a malfunction.Audio or subtitle language • The selected language is not available for audio or subtitles on the DVD.does not match the set up This is not a malfunctionThe camera angle cannot be • The DVD does not contain sequences recorded from different camera angles.changed. This is not a malfunction.Audio or subtitle language can • The DVD does not contain audio source or subtitles in the selected language.not be changed. This is not a malfunction.“Prohibited icon” appears on the • That operation is prohibited by the player or the disc.screen, prohibiting an operation. This is not a malfunction.
( )
NotesSome functions are not available in specific modes, but this is not a malfunction. Read the description in thisOwner’s Manual for details on correct operations.¡Playback from a desired track and random playback are not available during program playback.
H9229UD.qxp 02.7.31 2:24 PM Page 39

– 40 – EN1L25
HANDLING PRECAUTIONS
SERVICINGShould your DVD/VCR COMBINATION UNITSbecome inoperative, do not try to correct the problemby yourself. There are no user-serviceable parts inside.Turn off, unplug the power cord, and please call ourhelp line at 1-800-968-3429 to locate an AuthorizedService Center.
CABINET CLEANING¡Wipe the front panel and other exterior surfaces of
the DVD/VCR COMBINATION UNITS with asoft cloth immersed in lukewarm water and wrung dry.
¡Never use a solvent or alcohol. Do not spray insecticide liquid near the DVD/VCR COMBINA-TION UNITS. Such chemicals may cause damage and discoloration tothe exposed surfaces.
AUTO HEAD CLEANING• Automatically cleans video heads as you insert or remove a cas-
sette, so you can see a clear picture.• Playback picture may become blurred or interrupted while the TV
program reception is clear. Dirt accumulated on the video headsafter long periods of use, or the usage of rental or worn tapes cancause this problem. If a streaky or snowy picture appears duringplayback, the video heads in your DVD/VCR COMBINATIONUNITS may need to be cleaned.
1. Please visit your local Audio/Video store and purchase a goodquality VHS Video Head Cleaner.
2. If a Video Head Cleaner does not solve the problem, please callour help line at 1-800-968-3429 to locate an Authorized ServiceCenter.
NOTES:• Remember to read the instructions included with the video head
cleaner before use. • Clean video heads only when problems occur.
IF THE LASER OPTICAL PICKUP UNIT IS DIRTY¡If the player still does not perform properly when it is operated while referring to the relevant sections and to the
TROUBLESHOOTING GUIDE in this Owner’s Manual, the laser optical pickup unit may be dirty. Consult yourdealer or an Authorized Service Center for inspection and cleaning of the laser optical pickup unit.
¡Use discs which have the following logos on them.(Optical audio digital discs.)
¡Handle the discs so that fingerprints and dust do notadhere to the surfaces of the discs.
¡Always store the disc in its protective case when it isnot used.
¡To clean-off, use a soft cloth.
¡Do not use a hard cloth since this will mar the disc.
¡Wipe the disc in a straight line from center to edge.
¡Never wipe with a circular motion.
¡Do not use detergent or abrasive cleaning agents.
DISC HANDLING
H9229UD.qxp 02.7.31 2:24 PM Page 40

– 41 – EN1L25
SPECIFICATIONSProduct type: DVD player with Video Cassette Recorder
Discs: DVD videoAudio CDVideo Cassette tape
Converter output: VHF Channel 3 or 4.
Power source: 120 V AC +/- 10%, 60 Hz +/- 0.5%
Power consumption: 25 W (standby: 7.2 W)
Operating temperature: 5°C to 40°C
Dimensions: W 17-1/8” (435 mm)
H 4” (99 mm)
D 10-1/2” (266 mm)
Weight: 8.8 lbs (4 kg)
¡Designs and specifications are subject to change without notice.
¡If there is a discrepancy between languages, the default language will be English.
H9229UD.qxp 02.7.31 2:24 PM Page 41

– 42 – SP1L25
CONTROLES DEL FUNCIONAMIENTO Y SUS FUNCIONES
OPEN/CLOSE STOP SKIP/REV PLAY FWD/SKIP
DVD OPERATION VCR OPERATION
STOP/EJECT REW PLAY F.FWD REC/OTR
OUTPUT
POWER
VIDEO
AUDIO
TIMERSET
VCR/TV
CST.IN
CHANNEL
L
R
1 2 3 64 87 9
2625
2423
2221
2019
1817
1615
141113
12
5
10
PANEL DELANTERO
PANEL REMOTO
+
1 2 3
4 5 6
7 8 9
0 10
SPEED AUDIOPOWER
SKIP/CH.
SLOW
VCR/TV
+100
DISPLAY PAUSE
PLAY
STOP
RECORD
ENTER
RETURNTITLE
MENU
SETUP
CLEAR/C.RESETZOOMMODE
A-BANGLE
SEARCHMODE
REPEATSUBTITLE
DVD VCR
2827
29
3031
3233
3435
36
3839
4140
37
56
5253
54
51
55
5049
4746
48
4344
45
42
1. Bandeja de carga del disco2. Luz DVD OUTPUT (verde)
Esta luz aparece cuando el DVD/VCR está en modo DVD.Usted sólo puede mirar DVDs cuando la Luz DVD OUT-PUT verde está encendida. Para hacer que la Luz DVDOUTPUT verde se encienda, presione el Botón DVD en elcontrol remote o el Botón OUTPUT en el panel delantero.
3. Luz VCR OUTPUT (Verde)Esta luz aparece cuando el DVD/VCR está en el modoVCR. Usted puede sólo mirar cintas cuando la Luz VCROUTPUT verde está encendida. Para hacer que la Luz VCROUTPUT verde se encienda, presione el Botón VCR en elcontrol remote o el Botón OUTPUT en el panel delantero.
4. CASSETTE COMPARTMENT5. Luz REC/OTR
Se enciende durante la grabación. 6. Luz TIMER SET
La luz de temporizador en la VCR no se enciende durantelas grabaciones con temporizador o grabación con tempo-rizador de un toque (OTR). Destella cuando se presiona elbotón TIMER SET para una grabación con temporizadorpero no hay cinta en la VCR. Destella cuando se terminantodas las grabaciones con temporizador o grabaciones deun toque.
7. Botón POWERPresione para conectar y desconectar la alimentación.
8. Luz POWERSe enciende cuando la alimentación está conectada.
9. Toma VIDEO INConecte aquí un cable de videó procedente de la toma desalida de videó de un camcorder, otro VCR o una fuente devideó (reproductor de discos láser, camcorder, etc.).
10. Tomas AUDIO INConecte aquí cables de audio procedentes de las tomas de sali-da de audio de un camcorder, otro VCR o una fuente de audio.
11. Botón TIMER SETPresione para poner el VCR en modo de espera para unagrabación con temporizador.
12. Luz CASSETTE INSe enciende cuando un cassette está en el VCR.
13. Luz VCR/TVSe enciende cuando el VCR está en la posición VCR, y seapaga cuando está en la posición TV.
14. Botones CHANNELEn el modo VCR, presione para cambiar canales TV en elVCR; presione para ajustar el seguimiento durante repro-ducción de movimiento normal o lento; presione pararemover fluctuaciones verticales en una imagen fija.
15. Botón REC/OTR (VCR)Presione una vez para empezar una grabación.Presione 2 veces o más y la unidad grabará en incre-mentos de 1/2 hora.
16. Botón F.FWD (VCR)Presione para avanzar rápidamente la cinta o ver laimagen rápidamente en avance durante reproduc-ción. (Búsqueda en Avance). Cuando ajuste progra-ma. (Por ejemplo: ajuste reloj o programa con tem-porizador), presione para determinar su selección yproceder al siguiente paso que usted desea entrar.Presione para determinar los modos de ajuste delmenú en pantalla. Presione para añadir o cancelarnúmeros de canal durante preajuste de canal.
17. Botón PLAY (VCR)Presione para empezar la reproducción. Presione paraentrar cifras cuando se ajusta un programa (Por ejemplo:ajuste del reloj o programa con temporizador). Presionepara avanzar los ajustes durante los "menú en la pantalla".
18. Botón REW (VCR)Presione para rebobinar la cinta o para ver la imagen rápi-damente hacia atrás durante el modo de reproducción(Búsqueda en rebobinado). Presione para cancelar unajuste del programa con temporizador cuando está en los"menú en la pantalla". Presione para corregir las cifrascuando se ajusta el programa (Por ejemplo: ajuste el relojo el programa con temporizador). Presione para agregar oborrar números de canal durante el prefijado de canales.
19. Botón STOP/EJECT (VCR)�Botón de expulsión
Púlselo para sacar el videocasete de la VCR.
H9229UD.qxp 02.7.31 2:24 PM Page 42

– 43 – SP1L25
�Botón StopPresione detener el movimiento de la cinta.Presione para entrar dígitos cuando ajuste progra-ma. (Por ejemplo: ajuste reloj o programa con tem-porizador). Presione para seleccionar los modos deajuste del menú en pantalla.
20. Botón OUTPUTPresione para seleccionar el modo DVD o el modo VCR.� Usted puede cambiar el modo de salida ya presionando
el Botón OUTPUT en el panel delantero o ya presionan-do el Botón DVD o VCR en el control remote. Sinembargo, si usted presiona el Botón OUTPUT en elpanel delantero primero, usted necesita volver aseleccionar el modo correspondiente presionando elBotón DVD o el Botón VCR en el control remote.
21. Botón FWD/SKIP (DVD)Reproduce desde el inicio del siguiente capítulo o pista.Retenga abajo para avanzar rápidamente la reproducción.
22. Botón PLAY (DVD)Comienza la reproducción del contenido del disco.
23. Botón SKIP/REV (DVD)Reproduce desde el inicio del capítulo o pista actual.Retenga abajo para reproducción inversa rápida.
24. Botón STOP (DVD)Detiene la operación del disco.
25. Botón OPEN/CLOSEPresione para insertar discos en o removerlos de la bandejade disco.
26. Ventanilla de Sensor Remoto, Visualización27. Botón SPEED
Presiona para seleccionar la velocidad de grabación deVCR (SP o SLP)
28. Botón POWERPresione para conectar y desconectar la alimentación.
29. Botones numéricos�Modo DVD
Presione para seleccionar directamente una Pista(CD de Audio) para reproducción.Presione para programar Pistas (Dcde Audio) parareproducir.
�Modo VCRPresione para seleccionar canales de TV en el VCR. Paraseleccionar canales, entre números de canal como unnúmero de dos dígitos para los resultados más rápidos.Por ejemplo, para seleccionar canal 6, presione 0.6.Botón +100:Si usted desea seleccionar canales 100 y arriba, presioneeste Botón primero, luego presione los dos dígitos últi-mos. Por ejemplo, para seleccionar canal 125, presioneBotón “+100” primero, luego presione “2” y “5”.
30. Botón DISPLAY�Modo DVD
Presione para tener acceso o remover la pantalla de visu-alización durante reproducción DVD o CD de audio.
�Modo VCRPresione para tener acceso o remover visualización deestado en pantalla de VCR.
31. Botón DVDPresione antes de utilizar el control remote para funcionesDVD.
32. Botón h
�Modo DVDPresione para ver la imagen DVD en movimiento deinversión rápida o para invertir la reproducción de unDC de Audio.
�Modo VCRPresione para rebobinar la cinta o para ver la imagenrápidamente en inversión durante el modo de repro-ducción.(Búsqueda en Rebobinado). Presione paracancelar un ajuste de programa con temporizador.
Presione para corregir dígitos cuando ajuste progra-ma. (Por ejemplo: ajuste de reloj o programa contemporizador). Presione para añadir o cancelarnúmeros de canal durante preajuste de canal.
33. Botón StopPresione detener el movimiento de la cinta.Presione para entrar dígitos cuando ajuste progra-ma. (Por ejemplo: ajuste reloj o programa con tem-porizador). Presione para seleccionar los modos deajuste del menú en pantalla.
34. Botón RECORDPresione para iniciar una grabación. O, presione repetida-mente para iniciar una grabación de Un-Toque.
35. Botón MENU�Modo DVD
Presione para visualizar el menú del Disco.�Modo VCR
Presione para tener acceso al menú VCR.36. Botón TITLE37. Botón SETUP
Presione para entrar el modo de preparación.38. Botón ZOOM
Amplía parte de una imagen reproducida-DVD.39. Botón MODE
Activa modo de reproducción de programa o reproducciónaleatoria cuando se reproducen CDs o MP3. Ajusta Nivelde negro o TruSurround SRS.
40. Botón SUBTITLEPresione para seleccionar un idioma de subtítulo deseado.
41. Botón ANGLEPresione para cambiar el ángulo de cámara para verla secuencia que se está reproduciendo desde unángulo diferente.
42. Botón REPEATRepite la reproducción del disco, título, capítulo o pistaactual.
43. Botón A-B REPEATRepite la reproducción de una sección seleccionada.
44. Botón SEARCH MODE�Modo DVD
Presione para tener acceso o remover la indicación debúsqueda, que le permite ir directamente a unTítulo/Capítulo/Pista/Tiempo especificado.
�Modo VCRPresione para avanzar o rebobinar rápidamente la cinta auna longitud específica de tiempo.
45. Botón CLEAR/C.RESET�Modo DVD
Presione para reponen el ajuste.�Modo VCR
Presione para reponer el contador. Presione para salir dela pantalla MEMU.
46. Botón RETURNVuelve a la operación previa.
47. Botones de flechaUtilice cuando haga ajustes mientras mira la indicación enuna pantalla de TV.
48. Botón ENTERPresione para aceptar un ajuste.
49. Botón g
�Modo DVDPresione para avanzar rápidamente el Disco. Presione elBotón PAUSE, luego presione el Botón FWD iniciar areproducción en movimiento lento. Presione el BotónFWD repetidamente para cambiar la velocidad deavance del movimiento lento.
�Modo VCRPresione para avanzar rápidamente la cinta o ver laimagen rápidamente en avance durante reproduc-ción. (Búsqueda en Avance). Cuando ajuste progra-
H9229UD.qxp 02.7.31 2:24 PM Page 43

– 44 – SP1L25
ma. (Por ejemplo: ajuste reloj o programa con tem-porizador), presione para determinar su selección yproceder al siguiente paso que usted desea entrar.Presione para determinar los modos de ajuste delmenú en pantalla. Presione para añadir o cancelarnúmeros de canal durante preajuste de canal.
50. Botón PLAYPresione para comenzar reproducción. Presione paraentrar dígitos cuando ajuste programa. (Por ejemplo:ajuste reloj o programa con temporizador). Presione paraseleccionar los modos de ajuste del menú en pantalla.
51. Botón VCRPresione antes de utilizar el control remote para fun-ciones de VCR.
52. Botón PAUSE�Modo DVD
Presione para pausar la reproducción de Disco. Presionerepetidamente para avanzar la imagen DVD paso a paso(o un fotograma cada vez).
�Modo VCRMientras graba, presione para detener provisionalmentela grabación (pausa). Presione por segunda vez parareanudar la grabación normal. Usted no puede pausarGrabación de Un-Toque. O, presione durante la repro-ducción de cinta para congelar la imagen.
53. Botón SLOWDurante la reproducción de cinta, presione mirar lacinta de videó a movimiento lento. Presione de nuevopara reanudar la reproducción normal. Este Botón noafecta la reproducción DVD.
54. Botón VCR/TVUtilice para seleccionar la posición VCR o TV. Si la LuzVCR/TV aparece en la parte delantera del VCR, está en laposición VCR (en cualquier modo VCR o DVD). Si la LuzVCR/TV no aparece en la parte delantera del VCR, está enla posición TV.�Posición VCR
Cuando la Luz VCR OUTPUT verde aparece en la partedelantera del VCR, utilice la VCR para mirar una cinta, paramirar un programa de TV mientras lo graba o para mirar unaradiodifusión de TV utilizando los botones CHANNEL oNuméricos para cambiar canales en la VCR. Cuando la Luz DVD aparece en la parte delantera de la DVD,utilice el DVD para mirar la reproducción de Disco o menús.
�Posición de TVUtilice para mirar TV (cambiando canales en el TV) opara mirar un programa mientras graba otro.
55. Botones SKIP/CH�Modo DVD
Presione para saltar Capítulos o Pistas.�Modo VCR
Presione para cambiar canales de TV en la VCR.
ANT - IN
DVD/VCROUT
DVD/VCRAUDIO OUT
COMPONENTVIDEO OUT
L
L
Y
Cr
COAXIAL
S-VIDEOOUT
DIGITAL AUDIO OUTPCM / BITSTREAMCbR
R
AUDO
VIDEOCH3 CH4
ANT - OUT
IN
6766 65 64 63 62 61
5857 59 60
56. Botón AUDIOPresione para seleccionar un idioma de audio deseado omodo de sonido.
57. Cordón de Alimentación ACConecte a una toma de corriente AC estándar para sum-inistrar corriente al UNIDADES COMBINADAS DEDVD/VCR.
58. Tomas AUDIO INConecte aquí los cables de audio procedentes de lastomas de salida de audio de un camcorder, otra VCR ouna fuente de audio.
59. Tomas DVD/VCR AUDIO OUTConecte aquí los cables de audio provistos y a las tomasde entrada de audio de un televisor u otro equipo deaudio.
60. Tomas COMPONENT VIDEO OUTConecte aquí los cables de videó componenteopcionales y a las tomas de entrada de Videó compo-nente de un televisor.
61. Toma COAXIALConecte aquí un cable de audio digital coaxial opcionaly a la toma de entrada Audio Digital Coaxial de undescodificador o receptor de audio.
62. Toma S-VIDEO OUTConecte aquí un cable de S-Videó opcional y a la tomade entrada de S-Videó de un televisor.
63. Toma DVD/VCR VIDEO OUTConecte aquí el cable de videó amarillo (provisto) y a latoma de entrada de Videó de TV.
64. Toma VIDEO INConecte un cable procedente de la toma de salida devideó de un camcorder, otra VCR o una fuente de audio-visual (reproductor de disco láser, reproductor de discode videó, etc.) aquí.
65. Cambio CH3/CH4Ajuste a canal 3 ó 4 para utilizar su TV con su VCR.
66. Toma ANT-IN (Entrada de Antena)Conecte su antena o cable aquí.
67. Toma ANT-OUT (Salida de Antena)Utilice el cable coaxial RF provisto para conectar estatoma a la Toma ANTENNA IN en su TV.Caja de cables o Sistema de Radiodifusión Directa.
VISIÓN TRASERA
Notas¡Para utilizar el control remote para operar el UNIDADES
COMBINADAS DE DVD/VCR y sus funciones, presioneel Botón DVD en el control remote antes de presionarotros botones DVD. Verifique que la Luz DVD OUTPUTverde está encendida.
¡Para utilizar el control remote para operar la VCR y susfunciones, presione el Botón VCR en el control remoteantes de presionar otros botones VCR. Verifique que laLuz VCR OUTPUT verde está encendida.
Notas¡La toma S-VIDEO OUT, toma COAXIAL, toma
OPTICAL y tomas COMPONENT VIDEO OUTson sólo útiles en el modo DVD.
H9229UD.qxp 02.7.31 2:24 PM Page 44

– 45 – SP1L25
CAMBIO DE VCR/DVD
Como este producto se utiliza del reproductor VCR y DVD, es necesario cambiar uno del otro.
OPEN/CLOSE STOP SKIP/REV PLAY FWD/SKIP
DVD OPERATION VCR OPERATION
STOP/EJECT REW PLAY F.FWD REC/OTR
OUTPUT
POWER
VIDEO
AUDIO
TIMERSET
VCR/TV
CST.IN
CHANNEL
L
R
LAY FWD/SKIP
VD OPERATION VCR OPERATIO
STOP/EJECT REW
OUTPUT
+
1 2 3
4 5 6
7 8 9
0 10
SPEED AUDIOPOWER
SKIP/CH.
SLOW
VCR/TV
+100
DISPLAY PAUSE
PLAY
STOP
RECORD
ENTER
RETURNTITLE
MENU
SETUP
CLEAR/C.RESETZOOMMODE
A-BANGLE
SEARCHMODE
REPEATSUBTITLE
DVD VCRDVD button
VCR button
OUTPUT button
DVD OUTPUT Light
VCR OUTPUT Light
Presione el Botón VCR en el control remote.(Verifique que la Luz VCR OUTPUT está encendida.)
CAMBIO AL MODO VCR
Notas¡Presionando sólo el Botón OUTPUT en el panel delantero no cambia el modo del control remoto. Usted siem-
pre necesita seleccionar el modo correcto en el control remoto, también.
Presione el Botón DVD en el control remote.(Verifique que la Luz DVD OUTPUT está encendida)
CAMBIO AL MODO DVD
H9229UD.qxp 02.7.31 2:24 PM Page 45

– 46 – SP1L25
CONECTADO A UN TV QUE TIENE TOMA DE ENTRADA DE S-VÍDEO o TOMAS DE ENTRADA DE VÍDEO COMPONENTE
CONECTANDO A UN TV
DVD/VCR A CONEXIÓN DE TV
1. Desconecte el cordón de alimentación AC del tomade corriente AC.
2. Desconecte la antena o cable del TV.3. Conecte la antena o cable a la toma ANT.IN del
UNIDADES COMBINADAS DE DVD/VCR.4. Conecte el UNIDADES COMBINADAS DE
DVD/VCR al TV utilizando el cable RF.5. Enchufe los cordones de alimentación CA del
UNIDADES COMBINADAS DE DVD/VCR y TVdentro de las tomas de corriente AC.
Si su TV no tiene terminales A/V: Cuando el UNIDADES COMBINADAS DEDVD/VCR está en modo de Reproducción VCR ocuando el UNIDADES COMBINADAS DEDVD/VCR está en el modo VCR. su TV recibiráseñales del UNIDADES COMBINADAS DEDVD/VCR en cualquiera de los canales 3 ó 4. Para uti-lizar el UNIDADES COMBINADAS DE DVD/VCRcon su TV, ponga el conmutador selector en CH3 oCH4 (que está ubicado en la parte trasera de suUNIDADES COMBINADAS DE DVD/VCR),cualquiera no se utilice para radiodifusiones normalesen su área. Luego, ajuste su TV al mismo canal.
AJUSTANDO EL CONMUTADORCH3/CH4
CONEXIONES
CONECTANDO A UN AMPLIFICADOR EQUIPADO CON TOMAS DEENTRADA DIGITAL, TALES COMO PLATINA MD O PLATINA DAT
Por favor, vea la [Fig. 4] en la página 15 para detalles.
Por favor, vea la [Fig.1] en la página 14 para detalles.
Por favor, vea la [Fig. 2] en la página 14 para detalles.
CONECTANDO A UN DESCODIFICADOR DIGITAL DOLBY ODESCODIFICADOR DTS
Por favor, vea la [Fig. 5] en la página 16 para detalles.
CONECTANDO A UN AUDIO ANALÓGICOPor favor vea la [Fig. 6] en la página 16 para detalles.
PREPARACIÓN DE CANAL AUTOMÁTICA
PREPARACIÓN
1 Conecte el TV y ponga el TV en el canal 3 ó 4.
2 Conecte el VCR presionando [POWER].Ambas Luces POWER y VCR/TV se encen-derán.
3 Seleccione el Idioma en la pantalla (“INGLÉS”,“FRANCÉS” o “ESPAÑOL”) presionando [PLAY] o[STOP]. Luego, presione [F.FWD].
4 Inicie canal preajustado presionando [F.FWD]una vez. El sintonizador explora y memorizatodos los canales activos de su área.
5 Después de explorar, el sintonizador dedetiene en el canal memorizado más bajo. Lapantalla de TV retorna al modo TV.
VCR
H9229UD.qxp 02.7.31 2:24 PM Page 46

– 47 – SP1L25
PREPARACIÓN DE RELOJ
Ajuste el reloj con precisión para grabación con tempo-rizador automática adecuada. Le sugerimos que usted utiliceun TV o estación de radio como su fuente de tiempos.
1 Presione [MENU] dos veces para llamar el menúprincipal. (Si usted ha ajustado ya el reloj, ustedsólo tiene que presionarlo una vez).
¡Si el reloj no está ajustado, aparece primero el menúCLOCK SET. En este caso, siga el paso [3].
2 Seleccione “CLOCK SET” presionando [PLAY]o[STOP]. Luego, presione [F.FWD]
3 Ajuste el reloj.
¡Para retroceder un paso, presione [REW]
4 Ponga en marcha el reloj presionando[CLEAR/C.RESET] o [F.FWD].
VCR
AJUSTE DE RELOJ
MES DIA AÑO 03 / 18 LUN 2002
HORA MINUTO AM/PM 05 : 40 PM AM PM
1) Ajuste el mes
Presione [PLAY] o [STOP] repetidamenteLuego, presione [F.FWD].
2) Ajuste el día
Presione [PLAY] o [STOP] repetidamenteLuego, presione [F.FWD].
3) Ajuste el año
Presione [PLAY] o [STOP] repetidamenteLuego, presione [F.FWD].El día de la semana aparecerá automáticamente.
4) Ajuste la hora
Presione [PLAY] o [STOP] repetidamenteLuego, presione [F.FWD].
5) Ajuste el minuto
Presione [PLAY] o [STOP] repetidamenteLuego, presione [F.FWD].
6) Ajuste el AM o PM
Presione [PLAY] o [STOP]repetidamente.
REPRODUCIENDO UN DVD,VIDEO O UN CD AUDIO
Para empezarConecte la alimentación del TV, amplificador ycualquier otro componente que se encuentre conectadoal DVD. (Cambie el sistema de entrada para que seadapte DVD y compruebe que el volumen de sonidosea correcto).
1 Presione el Botón POWER.¡La alimentación se conectará.
Compruebe que la Luz DVD OUTPUT está encen-dida. Si no, presione el Botón DVD en el controlremote para cambiar el modo DVD.
2 Presione el Botón OPEN/CLOSE.
¡La bandeja de carga del disco se abrirá.
3 Ponga un disco en la bandeja.
¡Asegúrese de que el disco está asentado correcta-mente, con el lado de la etiqueta arriba.
4 Presione el Botón PLAY.
¡La bandeja se cerrará automáticamente, y la repro-ducción empezará luego desde el primer capítulo opista del disco. Usted necesita presionar el BotónPLAY sólo cuando la bandeja se ha cerrado presion-ando el Botón OPEN/CLOSE.
5 Presione el Botón STOP para detener lareproducción.
CDDVD
REPRODUCCIÓN DE UN DISCO
H9229UD.qxp 02.7.31 2:24 PM Page 47

0VMN03254H9229UD �����
Printed in China
LIMITED WARRANTYFUNAI CORP. will repair this SYLVANIA product, free of charge in the USA in the event of defect in materials orworkmanship as follows:DURATION:
PARTS: FUNAI CORP. will provide parts to replace defective parts without charge for one (1) year from thedate of original retail purchase. Two (2) years for Picture Tube. Certain parts are excluded from thiswarranty.
LABOR: FUNAI CORP. will provide the labor without charge for a period of ninety (90) days from the dateof original retail purchase.
LIMITS AND EXCLUSIONS:
This warranty is extended only to the original retail purchaser. A purchase receipt or other proof of original retailpurchase will be required together with the product to obtain service under this warranty.
This warranty shall not be extended to any other person or transferee.
This warranty is void and of no effect if any serial numbers on the product are altered, replaced, defaced, missingor if service was attempted by an unauthorized service center. This SYLVANIA Limited warranty does not apply toany product not purchased and used in the United States.
This warranty only covers failures due to defects in material or workmanship which occurs during normal use. Itdoes not cover damage which occurs in shipment, or failures which are caused by repairs, alterations or product notsupplied by FUNAI CORP., or damage which results from accident, misuse, abuse, mishandling, misapplication,alteration, faulty installation, improper maintenance, commercial use such as hotel, rental or office use of this product or damage which results from fire, flood, lightning or other acts of God.
THIS WARRANTY DOES NOT COVER PACKING MATERIALS, ANY ACCESSORIES (EXCEPT REMOTECONTROL), ANY COSMETIC PARTS, COMPLETE ASSEMBLY PARTS, DEMO OR FLOOR MODELS.
FUNAI CORP. AND ITS REPRESENTATIVES OR AGENTS SHALL IN NO EVENT BE LIABLE FOR ANYGENERAL, INDIRECT OR CONSEQUENTIAL DAMAGES ARISING OUT OF OR OCCASIONED BY THEUSE OF OR THE INABILITY TO USE THIS PRODUCT. THIS WARRANTY IS MADE IN LIEU OF ALLOTHER WARRANTIES, EXPRESS OR IMPLIED, AND OF ALL OTHER LIABILITIES ON THE PART OFFUNAI, ALL OTHER WARRANTIES INCLUDING THE WARRANTY OF MERCHANTABILITY, AND FITNESS FOR A PARTICULAR PURPOSE, ARE HEREBY DISCLAIMED BY FUNAI AND ITS REPRESENTATIVES IN THE UNITED STATES. ALL WARRANTY INSPECTIONS AND REPAIRS MUST BEPERFORMED BY A FUNAI AUTHORIZED SERVICE CENTER. THIS WARRANTY IS VALID WHEN THEUNIT IS CARRIED-IN TO FUNAI AUTHORIZED SERVICE FACILITY.
IMPORTANT:THIS LIMITED WARRANTY GIVES YOU SPECIFIC LEGAL RIGHTS, YOU MAY HAVE OTHER RIGHTSTHAT VARY FROM STATE TO STATE, IF, AT ANY TIME DURING THE WARRANTY PERIOD, YOU AREUNABLE TO OBTAIN SATISFACTION WITH THE REPAIR OF THIS PRODUCT, PLEASE CONTACT FUNAICORP.
ATTENTION:FUNAI CORP. RESERVES THE RIGHT TO MODIFY ANY DESIGN OF THIS PRODUCTWITHOUT PRIOR NOTICE.
To locate your nearest SYLVANIA Authorized Service Center or for general service procedure,please call 1-800-968-3429 or write to the following:
FUNAI CORPORATION, INC.Customer Service
100 North Street; Teterboro, NJ 07608Tel :1-800-968-3429
PLEASE DO NOT SHIP YOUR UNIT TO THE TETERBORO ADDRESS.
H9229UD.qxp 02.7.31 2:24 PM Page 48