dvd player meridian 596 introduction by careful design meridian have achieved a sound quality with...
TRANSCRIPT

Meridian 596 DVD Playeru
se
r
gu
id
e

i
Pre
fac
e
Meridian 596 DVDPlayer User Guide

Pre
fac
e
ii
Sales and service in the UK
Meridian Audio Ltd
Stonehill
Stukeley Meadows
Cambs
PE29 6EX
England
Tel (01480) 52144
Fax (01480) 459934
World Wide Web
http://www.meridian-audio.com
Part no: 596
Sales and service in the USA
Meridian America Inc
3800 Camp Creek Parkway
Building 2400
Suite 122
Atlanta
GA 30331
Tel (404) 344 7111
Fax (404) 346 7111
Designed andmanufactured in the UK by
Meridian Audio Ltd
Stonehill
Stukeley Meadows
Cambs
PE29 6EX
England
Copyright © 2000 Meridian Audio Ltd
Dolby, Dolby Digital, Pro Logic, AC-3, and the double-D symbol
are trademarks of Dolby Laboratories Licensing Corporation.
Boothroyd|Stuart Meridian, Meridian, and Meridian Digital Theatre
are registered trademarks of Meridian Audio Ltd.
This product incorporates copyright protection technology that
is protected by method claims of certain U.S. patents and other
intellectual property rights owned by Macrovision Corporation
and other rights owners. Use of this copyright protection
technology must be authorized by Macrovision Corporation, and
is intended for home and other limited viewing uses only unless
otherwise authorized by Macrovision Corporation. Reverse
engineering or disassembly is prohibited.
This guide was produced by Human-Computer Interface Ltd,
http://www.interface.co.uk

iii
Pre
fac
e
Contents
Introduction 1
Introduces the 596 DVD player, and gives
examples of two suggested configurations
using it in conjunction with other Meridian
products.
The Meridian 500 Series ...................... 2
Sample configurations ......................... 3
Specification and accessories ............. 5
Using the DVD player 7
Provide step-by-step instructions on
operating the DVD player, using either the
front panel or the Meridian System
Remote.
Front panel ........................................... 8
Meridian System Remote .................... 9
Playing a disc ..................................... 10
Locating a specific title, chapter,
or track ............................................... 12
Stopping, pausing, and resuming play14
Disc information ................................. 15
Advanced features 17
Describes the more advanced features of
the DVD player.
Selecting options from a menu .......... 18
Fast and slow-motion play ................ 19
Playing repeatedly ............................. 20
Selecting a playback audio setting .... 21
Displaying subtitles ............................ 22
Selecting the camera angle ............... 23
Setting the parental lock .................... 24

Pre
fac
e
iv
Setting default options 27
Explains how to set up the default options
using the DVD player’s Setup menu.
Setting default options ....................... 28
Selecting the default languages ......... 30
Selecting the display settings ............ 32
Selecting the audio settings .............. 38
Setting up the DVDplayer 41
Describes how to unpack and install the
DVD player.
Unpacking .......................................... 42
Positioning the DVD player ................ 43
Back panel ......................................... 44
Connecting video ............................... 47
Connecting audio ............................... 48
Connecting to other Meridian
equipment .......................................... 50
Configuring the DVDplayer 51
Explains how to configure the DVD player
to suit the other equipment in your system.
Choosing standard settings ............... 52
Configuring the 596 DVD Player ........ 53

v
Pre
fac
e
Troubleshooting 55
Provides suggested solutions to typical
problems.
Troubleshooting ................................. 56
Maintenance ...................................... 59
Service and guarantee ....................... 60
Index .................................................. 61

Pre
fac
e
vi

Introduction
The 596 DVD video player combines Meridian’s extensive experience of
producing audiophile CD players with their close involvement in the
development of DVD formats, resulting in an outstanding DVD player that
takes full advantage of the capabilities of DVD.
The 596 uses a precision DVD-ROM drive, with the audio and video data
read asynchronously and then triple buffered to isolate output timing from
the mechanics of the drive. The audio is also dejittered using very precise
master oscillators to give a clear, open, authoritative sound.
The 596 provides a range of component and composite video output
options, and switches automatically between NTSC and PAL. It uses
advanced video circuitry and a studio-grade video encoder to produce an
extremely clear picture with low noise and remarkable clarity.
For instructions on setting up the unit turn to Setting up the DVD player,
page 41. Once the DVD player has been set up refer to the next chapter,
Using the DVD player, for information about playing discs.

2
Intr
od
uc
tio
n
The Meridian 500 Series
The Meridian 500 Series is a unique system of digital, analogue,
and video components designed to meet the demand for
absolute quality, ease of use, and lasting value.
The flexibility of the Meridian 500 Series is such that you can
assemble a system as simple or as complex as you need,
perfectly suited to your musical and environmental
requirements, and which can be added to or changed at a later
date should your requirements change.
Each Meridian 500 Series component is housed in a matching
slim line case. Front panel controls provide access to the most
important functions, and the full range of functions is available
from the appropriate remote control using a simple and intuitive
control interface.
500 Series communications
The Meridian 500 Series includes a sophisticated
communications link, to ensure that any configuration of units
will work together as a fully integrated system.
The 500 Series communications system allows you to control
any combination of units using a single remote, and ensures that
your commands from the remote are interpreted unambiguously.
The communications system also allows you to extend your hi-fi
system into two or three rooms, with the ability to control the
sources in one room from the controller in another room.
Professional features
The 500 Series also includes features for professional users,
including RS232 computer control and balanced connections.
The following pages give examples of two suggested
configurations incorporating the 596 DVD Player, to illustrate the
flexibility of the Meridian 500 Series.

Intro
du
ctio
n
3
Sample configurations
596
DSP5500HC
504
Meridian Surround Processor
DSP6000 DSP6000DSP6000DSP6000
The Meridian Surround Processor can decode Dolby Digital
(AC-3), MPEG Surround, DTS Audio, and Dolby Surround
soundtracks.
Meridian Digital Theatre™
The Meridian 596 DVD Player is ideal for use with a Meridian
Surround Processor as the heart of a Meridian Digital Theatre
system.

4
Intr
od
uc
tio
n
By careful design Meridian have achieved a sound quality with
audio CDs which approaches that of their dedicated CD players.
596
DSP5000 DSP5000
The 596 DVD Player can be connected directly to Meridian DSP
loudspeakers, as these include DSP volume and tone controls.
In addition to playing DVD discs, the 596 can play audio CDs,
VCD, CVCD, and MP3 files on CD-ROM.
Meridian Digital Music System

Intro
du
ctio
n
5
Specification and accessories
Specification
THD Less than -93dBFS.
Noise Less than -93dBFS.
Mechanism Dual-lens pickup with red laser.
Formats DVD-Video, CD Audio (CD-DA), CD-R,
Video CD (VCD), CVCD, and MP3.
Processing DSP software provides error correction
and on-board decoding for Dolby
Digital and MPEG Audio.
Conversion 24-bit Delta Sigma.
Display 12-character dot-matrix display.
Indicators for CD, DVD, MP3, and
Repeat. Switchable custom on-screen
display allows instant review of disc
status.
Finish Black textured enamel and glass.
Dimensions 88mm x 321mm x 332mm
(3.46" x 12.64" x 13.07").
Weight 6.4kg (14lbs).
Audio outputs 1 x digital coax SPDIF/IEC1937/MHR
for transferring PCM up to 96kHz
24-bit Dolby Digital (AC-3) or DTS
bitstreams.
1 x stereo analogue direct-coupled
design featuring 192kHz
24-bit conversion. All audio outputs
use FIFO and relocking to give
extremely low jitter.
Video outputs PAL or NTSC encoded as Composite
or S-Video. Component or RGB.
Black-level setup adjustable as 0 or
7.5IRE (Extended Black function).
16:9 and 4:3 displays supported.
Screen saver programmable by user.
Communications Two 5 pin 240° DIN sockets.
Full RS232 control and status for
custom integration or automation.
Power Universal supply 100-240V, 50-60Hz,
25W. Normally off automatic low-noise
fan cooling.
6
Intr
od
uc
tio
n
Available accessories
The following accessories are available from your dealer:
Power cord Europe.
Power cord Canada and USA.
If you have problems purchasing these items, you can order
them direct from Meridian Audio Limited, who can also supply a
range of cables suitable for connecting the 596 DVD Player to
other equipment.
Using the DVD player
This chapter provides a summary of the functions of the DVD player in
order to identify the controls which you use to operate the unit.
It also describes the basic aspects of using the DVD player to play DVD
video discs and audio CDs.
Unless otherwise specified, each function is available from the front panel
or the Meridian System Remote.

Usin
g t
he
DV
D p
laye
r
8
Front panel
1 Open
Opens and closes the disc
tray.
2 > (Play)
Plays a selected chapter/
track.
3 * (Stop)
Stops the disc.
4 = (Pause)
Pauses the disc.
5 Display
Selects the information
displayed.
6 [ (Previous)
Selects the previous
chapter/track.
7 ] (Next)
Selects the next chapter/
track.
8 Off
Switches to standby.
Open > Display
DVD
[* = ] Off
1-017BOOTHROYD STUART
596DVD Player
1 2 3 4 5 6 7 8
Display
Tray

Usin
g th
e D
VD
pla
ye
r
9
Meridian System Remote
Subtitle
Off
EnterReturn
Function 0 Top Menu
#
Record
Slow/Page ]
OSD
[ Page
Angle Audio A-B Phase
Setup
Band
7 8 9
4 5 6
1 2 3
Menu Volume
Display MuteDSP
Clear
Store
Repeat
CD RADIO LP TV TAPE 1 TAPE 2 CDR CABLE DVD VCR 1 VCR 2 LD
16 17 18 19 20 21 22
1
9
10
2 3 4 5 6 7 8
11
12
13
14
15
1 ¯ (Fast reverse)Scans in reverse.[ PagePrevious DVD-A page.
2 [ (Previous)Selects the previouschapter/track.AngleChanges the cameraangle.
3 * (Stop)Stops the disc.+FunctionOpens/closes thedisc tray.
4 > (Play)Plays the disc.AudioChanges the audiotrack.
5 ˘ (Scan forward)Scans forward.Slow/Page ]Plays in slow motion,or next DVD-A page.
6 ] (Next)Selects the nextchapter/track.OSDOn-screen display.
7 = (Pause)Pauses the disc.
8 SubtitleTurns subtitles on/off.+FunctionSubtitle language.
9 Source keysSelect a source.
10 Number keysSelect a title,chapter, or track bynumber.
11 Repeat/A-BRepeats a chapter/track or section.
12 OffSwitches tostandby.
13 Volume keysChange the volume.
14 MuteMutes or restoresthe sound.
15 ClearClears an entry.
16 FunctionSelects a specialfunction.
17 Top MenuDisplays the topmenu.#Title/timecode entry.
18 ReturnReturns from amenu.
19 Menu keysSelect or changeparameters.
20 EnterConfirms a menuselection.
21 MenuDisplays the discmenu.SetupDisplays the Setupmenu.
22 DisplayChanges the front-panel display.
Hold down Function to access the functions shown in blue on the remote.

Usin
g t
he
DV
D p
laye
r
10
Playing a disc
During normal use the DVD player should be left in the standby
state. This uses a negligible amount of electricity, but ensures
that the components of the DVD player operate at maximum
efficiency from the moment you start playing a disc.
If you are not going to use the DVD player for a period of several
days you should switch the unit completely off, at the back
panel, and disconnect it from the AC power supply.
To switch on from standby
Press Open, *, or > (front panel), or select a source on the
remote.
Switch on any other equipment connected to the CD player
which is not part of the Meridian 500 Series.
The display will flash for a few seconds. The DVD player is then
ready for use.
To insert a disc
Press Open (front panel) or Function * (remote) to open the
tray.
Place your disc, label side up, in the tray as shown below.
Press Open (front panel), Function * (remote) or > to close
the tray.
Most DVD videos start playing automatically when you close the
tray.
Some DVD videos are double-sided, and need to be turned over
during play.

Usin
g th
e D
VD
pla
ye
r
11
To play the disc
Press > (front panel or remote).
The on-screen display shows and the front-panel display
shows the title and chapter, or track number:
For example, on chapter 1 of title 2: 2-01
To move to the next or previouschapter or track
Press ] or [ (front panel or remote).
The on-screen display shows or .
Note: These functions are normally disabled while the disc's
copyright notice is being displayed.
To step between the pages of text orgraphics on a DVD-A disc
Press [ Page (Function on the remote) or Page ]
(Function on the remote).
To move to the next or previousalbum (MP3 discs only)
Press V or A (remote).
The on-screen display shows or .
Note: Pause and fast forward/back are not available for MP3
discs.
To switch to standby
Press Off (front panel or remote).
The display will show: .
If you have other Meridian 500 Series equipment connected to
the DVD player, these units will also switch to standby.
If a disc is currently playing, switching to standby will stop the
disc, and the disc can safely be left in the unit.

Usin
g t
he
DV
D p
laye
r
12
Normally, DVD video discs are divided into one or more titles,
and the titles are subdivided into chapters. Audio CDs are
divided into tracks.
The DVD player allows you to play an entire disc, or start playing
from any chapter or track number. While a disc is playing you
can go back to the start of the chapter or track or skip to the
start of the next chapter or track.
You can also enter a specific title, chapter, or track number to
locate the appropriate title or chapter/track directly.
To play starting from a particularchapter or track
Press ] or [ (front panel or remote) to step through the track
numbers until the display shows the track you want to play:
For example, to play chapter 23: 1-23
The on-screen display shows or .
After a short delay the chapter or track you have selected will
start to play.
To locate a chapter or track bynumber
Press # (Function Top Menu on the remote) twice.
The on-screen display prompts for you to enter the chapter or
track number:
Enter the number of the chapter (DVD) or track (audio CD)
using the number keys (remote).
The number is displayed as you enter it:
Press > or Enter (remote).
The DVD player starts playing from the chapter or track number
you specified.
Locating a specific title, chapter, or track

Usin
g th
e D
VD
pla
ye
r
13
To locate a title by number
Press # (Function Top Menu on the remote).
The on-screen display prompts you to enter the title number:
Enter the title number using the number keys (remote).
Press > or Enter (remote) to play from the title number you
have specified.
To play from a specified timecode
Press # (Function Top Menu on the remote) three times until
the on-screen display prompts for a timecode:
Enter the timecode using the number keys (remote).
Press > or Enter (remote) to play from the timecode you have
specified.

Usin
g t
he
DV
D p
laye
r
14
To step forward frame by frame
If you are playing a DVD video disc you can step forward, frame
by frame, while it is paused:
Press = (front panel or remote).
The on-screen display shows .
To continue after pausing
Press > (front panel or remote).
To return to the start of the disc
Press * (front panel or remote) while the disc is stopped.
The on-screen display shows and the disc is reset to the
start.
You can stop or pause a disc, and then resume play at the same
position.
To stop play
Press * (front panel or remote).
The on-screen display shows .
To resume after stopping
Press >>>>> (front panel or remote).
The disc will resume playing from the position where you
stopped playback, and the on-screen display shows .
To pause play
Press = (front panel or remote).
The on-screen display shows .
Stopping, pausing, and resuming play

Usin
g th
e D
VD
pla
ye
r
15
You can display information about a disc on the front panel or
on-screen display.
To change the front panel display
Press Display (front panel, or remote if the 596 is controller *).
The display will step between the following options:
Display Example
Title and chapter numbers (DVD video
disc) or track number (audio CD). 1-37
Chapter number and elapsed disc time.37 1:17:54
Chapter number and elapsed track time.37 0:02:54
Chapter number and remaining disc
time.37 2:31:19
Blank. Blanks all Meridian displays if the
596 is controller *.
* To set up the 596 as controller see To set configuration
options, page 53.
To display disc information on screen
Press OSD (remote).
For a DVD video disc this shows the following information:
Titlenumber
Chapternumber
Elapsedtitle time
Cameraangle
Playmode
For an audio CD this shows the following information:
Tracknumber
Elapsedtrack time
Repeatmode
Playmode
For an MP3 audio CD this shows the following information:
Albumnumber
Tracknumber
Elapsedtrack time
Repeatmode
Playmode
The album number is not displayed if there is only one album.
Disc information

Usin
g t
he
DV
D p
laye
r
16
To display information about DVDvideo disc features
Press OSD (remote) twice while a DVD disc is playing.
This shows the following information about DVD features:
Subtitlelanguage
Audiotrack
Audioformat
Repeatmode
Playmode
To turn off the on-screen display
Press OSD (remote) again.

Advanced features
This chapter describes the more advanced features of the 596 DVD
Player. These features are not essential if you simply want to enjoy DVD
video discs or audio CDs, but they allow you to take full advantage of the
range of options available with the DVD format.
Note: Many of the advanced features depend on the content of the
particular DVD disc you are playing.
The advanced features described in this chapter are only available using
the Meridian System Remote.

18
Ad
va
nc
ed
fe
atu
res
Many DVD video discs provide additional sections of video or
special options, which you can select from an on-screen menu.
Some DVD video discs which contain several titles also provide
a title menu, from which you can select one of the titles.
To select an option from the disc menu
Press Menu to display the disc menu on the screen.
A typical disc menu looks like this:
Press A, V, <, or > to highlight an option, and press Enter to
select it.
To select a title using the title menu
Press Top Menu to display the title menu on the screen.
Press A, V, <, or > to highlight a title, and press Enter to
select it.
The DVD player starts playback from chapter 1 of the title you
selected.
Selecting options from a menu

Ad
va
nc
ed
fea
ture
s
19
You can play back DVD video discs faster than normal, at
between twice and eight times normal speed, or in slow motion,
at between one-half and one-sixteenth of normal speed.
You can also play back audio CDs faster than normal.
Note: The sound is muted when playing back DVD video discs
faster or slower than normal.
To play DVD video discs or audio CDsfaster than normal
Press ˘ or ¯ during playback.
Each time you press the key the speed switches between twice
and eight times normal speed, as shown by the on-screen
display: .
To play DVD video discs in slowmotion
Press Slow (Function ˘) during playback.
The speed switches between one-half, one-quarter, one-eighth,
and one-sixteenth normal speed, as shown by the on-screen
display:
To resume normal speed
Press >.
Fast and slow-motion play

20
Ad
va
nc
ed
fe
atu
res
The on-screen display shows A–B:
The DVD player automatically returns to the start of the section
and plays it back repeatedly.
To cancel the repeat press A-B a third time.
Playing repeatedly
You can play back a specified title, chapter, track, or section of
a disc repeatedly.
To repeat a title, chapter, or track
Select the title, chapter, or track you want to repeat.
Press Repeat to switch between Ch. (chapter repeat), Title
(title repeat), and Off (no repeat).
The current repeat mode is displayed on the on-screen display:
To repeat a specific section of a disc
Press A-B (Function Repeat) at the beginning of the section
you want to play back repeatedly.
The on-screen display shows A–:
Press A-B again at the end of the section.
Ad
va
nc
ed
fea
ture
s
21
Selecting a playback audio setting
To select the audio setting
Press Audio (Function >).
Each time you press Audio the next available soundtrack is
selected.
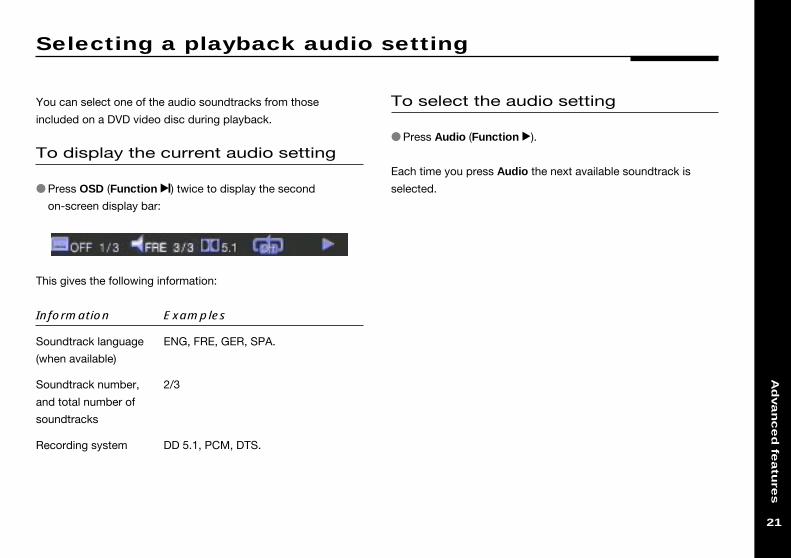
You can select one of the audio soundtracks from those
included on a DVD video disc during playback.
To display the current audio setting
Press OSD (Function ]) twice to display the second
on-screen display bar:
This gives the following information:
Information Examples
Soundtrack language ENG, FRE, GER, SPA.
(when available)
Soundtrack number, 2/3
and total number of
soundtracks
Recording system DD 5.1, PCM, DTS.

22
Ad
va
nc
ed
fe
atu
res
Many DVD video discs include subtitles in up to 32 different
languages. While you are playing a disc you can turn the
subtitles on or off, and select the subtitle language from those
provided on the DVD video disc.
To display the current subtitle setting
Press OSD (Function ]) twice to display the second
on-screen display bar:
This gives the following information:
Information Examples
Subtitle language ENG, FRE, GER, SPA, OFF.
when available
Subtitle number, 2/3
and total number of
languages
To select the subtitle language
Press Function Subtitle.
Each time you press Function Subtitle the next subtitle
language is selected.
To turn subtitles on or off
Press Subtitle.
The on-screen displays shows the current subtitle setting:
Displaying subtitles

Ad
va
nc
ed
fea
ture
s
23
Selecting the camera angle
Some DVD video discs include scenes recorded from up to nine
different camera angles, and you can select the camera angle
while you are playing the disc.
To display the camera angle
Press OSD (Function ]) to display the first on-screen display
bar.
The camera angle icon shows the current camera angle and the
total number of angles:
To select or change the camera angle
Press Angle (Function [), while viewing a scene with multiple
camera angles.
Each time you press Angle the next camera angle is selected.

24
Ad
va
nc
ed
fe
atu
res
Setting the parental lock
Some DVD video discs are provided with a parental lock
function to allow you to lock out playback of scenes whose
content exceeds a specified rating.
To set the parental lock
Press Setup (Function Menu) while the disc is stopped.
The Setup menu is displayed on the on-screen display:
Press Enter to select Playback options.
The Playback options menu appears.
Press V to highlight Rating and press Enter to select it:
The following screen prompts you to enter the password:
Enter your four-digit password and press Enter.

Ad
va
nc
ed
fea
ture
s
25
Initially the password is set to 7890, but you can change it to
any password you choose as described in To change the
password, opposite.
The following screen then allows you to set the rating level:
Press A or V to highlight the rating level you want to set, or
highlight Off to turn the parental lock off, and press Enter to
select it.
Level 1 corresponds to general viewing, level 3 is equivalent to the
USA movie rating PG, and level 8 corresponds to adult viewing.
The rating level you have set will be displayed in the Playback
options menu.
To change the password
Highlight Change password on the Set rating level screen
and press Enter to select it.
The following screen allows you to specify the new password:
Enter the four-digit password you want to use and press
Enter to select it.
Note: The password cannot start with a zero.
Take care not to forget your password, or you will need to
contact your Meridian dealer to reset it for you.

26
Ad
va
nc
ed
fe
atu
res

Setting default options
The DVD format allows disc manufacturers to provide a wide range of
options on DVD video discs, and the 596 DVD Player allows you to choose
between these options.
Which of these features is available depends on the DVD video disc you
are playing. For information about changing these options refer to the
chapter Advanced features, page 17.
For convenience the 596 DVD Player allows you to set a default choice for
most of these options, so that when you first insert a disc it starts playing
with your preferred settings. This chapter explains how to set up the
default options using the DVD player’s Setup menu.
The options described in this chapter are only available using the Meridian
System Remote.

28
Se
ttin
g d
efa
ult
op
tio
ns
The default options are divided into the following five menus of
settings:
Menu Description
Playback options The audio, subtitle, and menu
languages.
Video setup The display settings.
Audio setup The sound format.
Meridian setup Product configuration options.
Information The region code and engineering
information.
You choose the menu of settings you want from the main Setup
menu.
To display the Setup menu
If necessary switch on the DVD player and press * if a disc is
currently playing.
Press Setup.
The main Setup menu will be displayed:
Setting default options

Se
tting
de
fau
lt op
tion
s
29
To select an option from a menu
Press A or V to highlight the option you want:
Press Enter to select the option.
To return to the previous menu
Press Return.
To exit from the setup menus
Press Setup.

30
Se
ttin
g d
efa
ult
op
tio
ns
The Playback options menu lets you change the default
language for the audio soundtrack, subtitles, and on-screen
menus, and the parental rating:
To select the default soundtracklanguage
Most DVD video discs include a selection of soundtrack
languages. English is usually the default soundtrack language,
but you can use the Audio language menu to set a different
default language if you prefer.
Highlight Audio in the Playback options menu, and press
Enter.
Selecting the default languages
The Audio language menu is displayed:
Press <, >, A, or V to highlight the default soundtrack
language you want to use, or select Original to choose the
original soundtrack language, and press Enter.
To set the default subtitle language
DVD video discs can include subtitles in up to 32 different
languages.
The 596 DVD Player allows you to select whether subtitles are
displayed by default, and specify the preferred language if it is
available on the disc.

Se
tting
de
fau
lt op
tion
s
31
Highlight Subtitles in the Playback options menu, and press
Enter.
The Subtitle language menu is displayed:
Press <, >, A, or V to highlight the language you want to
use, and press Enter.
Alternatively, select Auto to automatically display subtitles in the
specified audio language if no soundtrack is available for that
language.
To select the disc menu language
The 596 DVD Player allows you to choose the language for the
disc menus.
Highlight Menu in the Playback options menu and press
Enter.
The Menu language menu is displayed:
Use A or V to highlight the language you want to use, and
press Enter.

32
Se
ttin
g d
efa
ult
op
tio
ns
The Video setup menu lets you change the video and
operational settings of the 596 DVD Player:
Note: The SCART switch option only appears with the SCART
version of the 596.
To set the default picture format
Some DVD video discs allow you to choose between the 4:3
(normal television) or 16:9 (widescreen) picture formats.
If you have a standard 4:3 television you also have the choice of
displaying widescreen pictures cropped to fill your television
screen (pan-scan), or with black bars above and below the
picture (letterbox).
Highlight Display aspect in the Video setup menu, and press
Enter.
The Display aspect ratio menu is displayed:
Press V or A to select the format of your TV, and press
Enter.
Note: The pan-scan feature is not available on some discs, in
which case letterbox format will be used.
To select the video output format
This option should be set according to which of the S-video or
COMPONENT video outputs you are using.
Selecting the display settings

Se
tting
de
fau
lt op
tion
s
33
Highlight Video output in the Video setup menu, and press
Enter.
The Video output menu is displayed. The options depend on
which version of the 596 you have; see below.
Press V or A to highlight the appropriate option, and press
Enter.
Note: The option you select will not affect the composite output,
which is always available.
Component version
Choose S, Y, RGB, or RGBs to use the corresponding output.
SCART version
Choose CVBS or S to provide a composite video or S-video
signal to the SCART socket. S-video is also available on the
S-VIDEO OUT socket.
Choose RGB, Y, or EURO to provide the corresponding
component video, and composite video on the SCART socket.
S-video is not available with these options.
Note: The composite output is monochrome when EURO is
selected.
NoSC is equivalent to S without the function select line, for two-
room operation.

34
Se
ttin
g d
efa
ult
op
tio
ns
To select the black level
Highlight Black level in the Video output menu, and press
Enter.
The Black level menu is displayed:
Press V or A to highlight the appropriate option, and press
Enter.
If you are using the Composite or S-video outputs of the DVD
player select the 7.5 IRE option.
If you are using the Y, RGB, or SCART video outputs select the
option that matches your display.
To select closed caption subtitles
Some DVD videos include closed caption subtitles, which
provide a description of sound effects for the hard of hearing; for
example “door creaks”.
Highlight Closed caption in the Video setup menu, and
press Enter.
The Closed captions menu is displayed:
Press V or A to highlight On or Off, and press Enter.

Se
tting
de
fau
lt op
tion
s
35
To select the TV standard
DVD movies are produced in both PAL and NTSC television
formats. The 596 DVD Player is capable of converting between
formats, to allow you to view DVD movies in either format even if
your television is not capable of displaying that format. However
the conversion process introduces some picture degradation,
and may disable disc menu operation on some discs.
Highlight TV standard in the Video setup menu, and press
Enter.
The TV standard menu is displayed:
Press V or A to highlight the option you want, and press
Enter.
Choose Auto if your television can display both PAL and NTSC
video, or choose NTSC or PAL to match the format supported
by your television.
If your television is capable of displaying both formats the
recommended setting is Auto, which supplies the unconverted
video signal to the television.
A separate Powerup std option lets you specify the standard to
be selected when you bring the 596 out of standby:
Press V or A to highlight the option you want, and press
Enter.

36
Se
ttin
g d
efa
ult
op
tio
ns
To select the screensaver timeouts
Highlight Stop timeout or Pause timeout in the Video setup
menu, and press Enter.
The appropriate menu is displayed:
Press V or A to select the timeout delay, and press Enter.
The pause timeout automatically switches the 596 from pause
into stop mode if no key is pressed for the specified time.
The stop timeout automatically fades the screen to black if the
596 is left in stop mode and no key is pressed for the specified
time.
To set up SCART switching
This option determines how the 596 controls the SCART switch
output (pin 8), which usually switches a television or monitor to
display the SCART output.
Highlight SCART switch in the Video setup menu, and press
Enter.
The SCART switch menu is displayed:
Press V or A to highlight the appropriate option, and press
Enter.

Se
tting
de
fau
lt op
tion
s
37
When playing activates the output when the 596 plays a video
disc or is put into setup, and it remains active until the 596 is put
into standby.
By Source activates the output for sources which have the
SCART switch option set to On in the Source configuration
menu. This allows you to set up a separate CD source which
does not affect the television or monitor. For more information
see To set configuration options, page 53.

38
Se
ttin
g d
efa
ult
op
tio
ns
The Audio setup menu lets you select the 596 audio settings:
To select the digital audio format
Highlight Digital format in the Audio setup menu, and press
Enter.
The Digital audio format menu is displayed:
Press V or A to highlight the format you want, and press
Enter.
Choose Bitstream if you are connecting the 596 DVD Player to
an external digital surround processor.
Choose PCM to use the 596 on-board decoder to provide two
channel PCM audio on the digital output, suitable for feeding to
a digital preamplifier or DSP loudspeakers.
Note: The analogue outputs are not affected by this setting.
Selecting the audio settings

Se
tting
de
fau
lt op
tion
s
39
To select the audio output rate
Highlight 96kHz enable in the Audio setup menu, and press
Enter.
The following menu is displayed:
Press V or A to highlight the option you want, and press
Enter.
Only choose Yes if your digital surround processor is capable of
decoding a 96kHz input.
To select Meridian High Resolution
Highlight MHR in the Audio setup menu, and press Enter.
The following menu is displayed:
Press V or A to highlight the option you want, and press
Enter.
If you are using the 596 with other Meridian equipment that
supports MHR, the recommended setting is On, which uses
MHR for all sources. Otherwise you should select Off.

40
Se
ttin
g d
efa
ult
op
tio
ns

Setting up the DVDplayer
This chapter explains how to install the DVD player. It describes what you
should find when you unpack the DVD player, how you should connect it to
your other audio equipment, and the siting constraints.
You should not make any connections to the DVD player or to any other
component in your system whilst the AC power supply is connected and
switched on.

Se
ttin
g u
p t
he
DV
D p
laye
r
42
Unpacking
The 596 DVD Player comes in a box containing the following
components:
Meridian 596 DVD Player.
Meridian System Remote.
Meridian comms lead.
Power cord.
This manual.
If any of these items are missing please contact your dealer. We
suggest that you retain the packing in case you need to
transport the unit.
Radio interference
FCC Warning: This equipment generates and can radiate radio
frequency energy and if not installed and used correctly in
accordance with our instructions may cause interference to
radio communications or radio and television reception. It has
been type-tested and complies with the limits set out in Subpart
J, Part 15 of FCC rules for a Class B computing device. These
limits are intended to provide reasonable protection against
such interference in home installations.
EEC: This product has been designed to comply with the limits
set out in EN55013 and EN55020C.

Se
tting
up
the
DV
D p
laye
r
43
Positioning the DVD player
Safety warnings
Do not expose the unit to dripping or splashing.
Do not place any object filled with liquid, such as a vase, on
the unit.
Do not place naked flame sources, such as lighted candles,
on the unit.
To avoid overheating
Do not position the DVD player:
In direct sunlight.
Near heat sources, such as a radiator.
Directly on top of heat producing equipment, such as a power
amplifier.
Ensure that air can flow through the cooling slots on the base
and top cover.
To avoid interference
Do not position the DVD player:
Near strong magnetic radiation, such as near a power
amplifier.
Near to a television, or where connecting cables may be
subject to or cause interference.
Se
ttin
g u
p t
he
DV
D p
laye
r
44
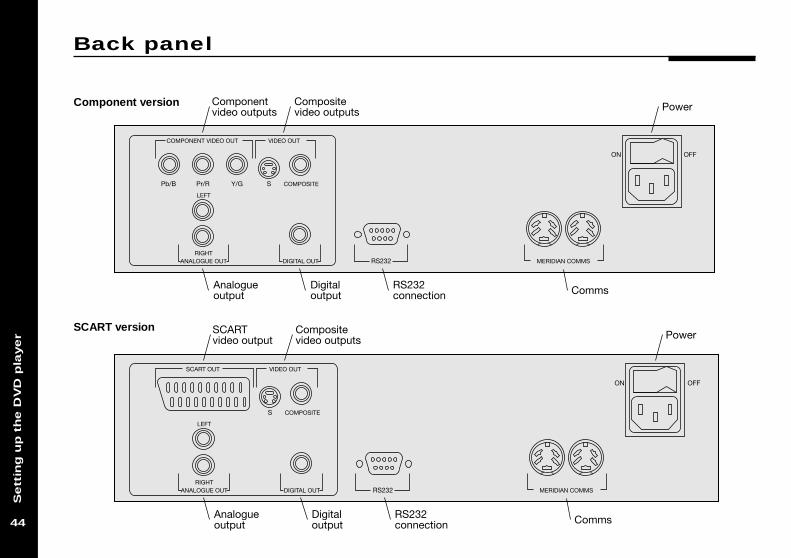
Back panel
Component version
MERIDIAN COMMSRS232
Y/G S COMPOSITE
LEFT
RIGHT
COMPONENT VIDEO OUT VIDEO OUT
Pr/RPb/B
ANALOGUE OUT DIGITAL OUT
OFFON
RS232connection
Componentvideo outputs
Compositevideo outputs
Digitaloutput
Analogueoutput
Power
Comms
SCART version
MERIDIAN COMMSRS232
S COMPOSITE
LEFT
RIGHT
SCART OUT VIDEO OUT
ANALOGUE OUT DIGITAL OUT
OFFON
RS232connection
SCARTvideo output
Compositevideo outputs
Digitaloutput
Analogueoutput
Power
Comms

Se
tting
up
the
DV
D p
laye
r
45
Use this output To connect to this
COMPONENT Component version only: A monitor or
projection television with component
video inputs.
SCART SCART version only: Component,
S-video, or composite video inputs,
depending on the option selected in
the Video output menu.
S-VIDEO OUT A monitor or television with an S-video
input, or a Meridian 562V.2 Multimedia
Controller.
COMPOSITE A television or monitor with a
composite video input, or the
composite video input on a Meridian
562V or 562V.2.
Video connections
The DVD player provides three alternative video outputs to
provide flexibility in connecting it to other equipment.
If your other equipment provides component video inputs, use
these to produce the highest possible video quality.
The video connections should be made using suitable video
cables, which are available from your dealer.

Se
ttin
g u
p t
he
DV
D p
laye
r
46
Audio connections
The following table gives details of the two alternative audio
outputs:
Use this output To connect to this
DIGITAL OUT A surround processor such as the
Meridian 561 Digital Surround
Processor, a digital preamplifier such
as the Meridian 562V, or Meridian DSP
loudspeakers.
ANALOGUE OUT A television, analogue preamplifier
such as the Meridian 502, or an
analogue surround processor such as
the Meridian 541 Surround Controller.
The digital connections should be made with high quality 75Ωscreened cable. Suitable cables are available from Meridian. We
do not recommend using audio cables which do not have
adequate shielding or the correct impedance, or cables intended
for UHF applications, as these do not provide adequate
shielding in the 1–30MHz region.
The analogue connections should be made using high-quality
screened cable, taking care to connect the left and right
channels correctly.
Communications connections
The following table gives details of the communications
connections:
Use this connection To connect to this
COMMS Other Meridian 500 series
equipment, or Meridian DSP
loudspeakers.
RS232 connection For future expansion, to allow
the 596 to be interfaced to a
computer. Contact your dealer
for more information.

Se
tting
up
the
DV
D p
laye
r
47
Connecting using component video
Video lead
596 DVD Player
COMPONENTVIDEO COMPONENT
VIDEO IN
Television
If your television, monitor, or projection system includes
component video inputs, these will give the highest possible
quality from DVD videos.
Connect the appropriate component outputs from the 596
DVD Player to the component video inputs, using suitable
video cables.
Set the Video output menu option to the appropriate option;
see To select the video output format, page 32.
Connecting video
Connecting using S-video
Connect the S-video output to a corresponding input on a
television, monitor, or video control unit, using a suitable
S-video cable.
The S-video output is recommended if your other equipment
provides a choice of both S-video and composite inputs.
Leave the Video output menu option set to S; see To select
the video output format, page 32.
Connecting using composite video
Connect the composite video output to a corresponding input
on a television, monitor, or video control unit using a suitable
cable.
The composite video output is always active, irrespective of the
Video output setting.

Se
ttin
g u
p t
he
DV
D p
laye
r
48
To connect to a Meridian 561 DigitalSurround Processor
561 Digital Surround Processor
DIGITALOUT
596 DVD Player
Digital lead
DIGITALIN
Connect the DIGITAL OUT on the 596 to the DIGITAL IN on
the 561.
Set the Digital format menu option to Bitstream; see To
select the digital audio format, page 38.
To connect to a preamplifier (egMeridian 502 Analogue Controller)
502 Analogue Controller596 DVD Player
ANALOGUEOUTPUT
LD
Phono lead
Connect the ANALOGUE OUT connections from the 596 DVD
Player to a suitable pair of audio inputs on the preamplifier,
such as the CD or LD inputs.
Connecting audio

Se
tting
up
the
DV
D p
laye
r
49
To connect to Meridian DSPloudspeakers
DIGITALOUT
COMMSOUTPUT INPUT
DIGITALOUTPUT
DIGITAL INPUTS2 1
COMMSOUTPUT INPUT
DIGITALOUTPUT
DIGITAL INPUTS2 1
M5 lead
S5 lead
DSP5000 – Main R (slave) DSP5000 – Main L (master)
596 DVD Player
COMMS
Connect the DIGITAL OUT from the 596 DVD Player to
DIGITAL INPUT 1 on the master DSP loudspeaker.
Connect the DIGITAL and COMMS output from the left DSP
loudspeaker to the DIGITAL and COMMS INPUTS on the
slave DSP loudspeaker, using an S5 lead.
Leave the Digital format menu option set to PCM; see To
select the digital audio format, page 38.

Se
ttin
g u
p t
he
DV
D p
laye
r
50
To connect to other Meridian 500Series equipment
Connect one of the COMMS sockets on the back panel of the
DVD player to one of the COMMS sockets on another 500
Series unit, using the 500 comms lead provided with the 596
DVD Player.
The sequence in which you connect the units is not important.
596 DVD Player 500 Series unit
COMMS COMMS
Then configure the units with the following automatic setup
procedure:
Switch all the units to standby.
Press Clear (remote).
Each unit will display:Auto
Connecting to other Meridian equipment
One unit will then be designated
as the controller, and display:Controller
This is the unit that will respond to the remote.
All the other units will be configured
as non-controllers, and display:Not Con.
Your system is now set up and ready for use.
If for any reason the automatic setup does not give the
configuration you want, restore the default operation by
selecting one of the standard types; see Choosing standard
settings, page 52.
Note: Do not, under any circumstances, connect any equipment
other than Meridian 500, 600, or 200 Series to the socket
marked COMMS on the back of the DVD player.

Configuring the DVDplayer
Many advanced aspects of the 596 DVD Player can be configured to alter
the way it operates with the other Meridian equipment in your system.
These settings are initially set to standard values, which are suitable for
most situations, and this chapter describes how to restore the standard
settings.
It then gives details of the more advanced settings and explains how to
change them.

Co
nfi
gu
rin
g t
he
DV
D p
laye
r
52
Choosing standard settings
The DVD player provides three standard settings, called Types,
which configure the 596 into the most commonly needed
configurations.
Choosing one of the three Types overrides any other
configuration you may have performed, and so can be used to
reset the configuration of the unit.
The types are summarised in the following table:
Type Video Audio MHR
0 S-video PCM 96kHz Auto
1 S-video Bitstream 96kHz Auto
2 S-video Bitstream 96kHz On
To restore the standard settings
Switch the 596 to standby.
Hold down Off (front panel).
After a short delay the display
will show:Type,wait...
Press [ or ] on the front panel to change the Type
number.
For example, if you select Type 1
the display shows:Type 1
Wait until the display shows:Typing, wait
The display then shows:Type 1
Press Off to switch back to standby.
Switch on again to use the 596 with the standard setting you
have selected.

Co
nfig
urin
g th
e D
VD
pla
ye
r
53
Configuring the 596 DVD Player
To configure specific options
Highlight Meridian setup in the Setup menu, and press
Enter.
The Meridian setup menu will be displayed:
To set configuration options
The configuration options are generally set to an appropriate
value when you reset the 596 to the standard settings, and you
should not normally need to alter them; see Choosing standard
settings, page 52.
The options are summarised in the following table for advanced
use:
Option Default Description
Diagnostics No Set to Yes for a diagnostic
display on the front-panel
display.
System address 1 Set to a value from 1 to 8.
Product address 1 Set to a value from 1 to 8.
Controller Auto Specifies whether the DVD
player is controller, not
controller, or set automatically.
Start source DVD Specifies which source is
selected when switching on from
standby.
Vol display No Specifies whether the DVD
player displays the volume for
the system.
Fan As Set to Always to keep the fan
required permanently on, or As required
to use it when necessary.
Source config Allows you to configure the
sources; see below.

Co
nfi
gu
rin
g t
he
DV
D p
laye
r
54
To configure the sources
If you are using the 596 DVD Player as the controller in your
Meridian system, you can use the Source config option on the
Meridian Setup menu to configure each of the sources in your
system.
Highlight Source config in the Meridian Setup menu, and
press Enter.
The Source configuration menu is displayed:
For each source you want to configure:
Press the source key on the remote corresponding to the
source you want to configure.
The Category, Address, and SCART switch options show the
current values defined for that source. The SCART switch
option only appears with the SCART version of the 596.
To change any option:
Highlight the corresponding option in the Source
configuration menu and press Enter, select the value you
want to use, and press Enter to select it.
The Category identifies the type of Meridian product selected
by the corresponding source. Specify -C for the current product,
1C for a Meridian CD player, 2C for a Meridian tuner, 3C for
another Meridian DVD player, or NC for a non Meridian product
such as a TV.
Normally the Address should be set to 1A. However if you have
more than one Meridian product of the same type in your
system you can use different source keys to select between
them by assigning them different addresses. For example if you
have two Meridian DVD players, assign one of them address 1A
and the other address 2A.
For information about using the SCART switch option see To
set up SCART switching, page 36.

Tro
ub
lesh
oo
ting
55
Troubleshooting
This chapter provides suggested solutions to typical problems that may
occur when setting up or using the DVD player.
If you are still not able to resolve a difficulty with the help of this guide and
the suggestions in the following pages, please contact your Meridian
dealer or Meridian Audio Ltd.
Tro
ub
lesh
oo
tin
g
56
Troubleshooting
No lights are displayed whenswitching on
Check that your AC power supply is connected correctly.
Check that the ON/OFF switch on the back panel is in the ON
position.
There is no sound when playing a disc
Check that your preamplifier is switched on, and the volume is
at an appropriate level.
Check that the DVD player is connected correctly to the other
components of your system; see Setting up the DVD player,
page 41.
Check that the correct source has been selected on your
preamplifier.
Try playing another disc. If this disc works, check the problem
disc for signs of dirt or damage.
If you are using the DVD player with a preamplifier or active
loudspeakers check that the Digital audio format menu
option is set to PCM; see To select the digital audio output
format, page 38.
There is interference on the radio and/or television when the DVD player isswitched on
Before following the steps below, ensure all units are switched
off.
If this equipment does cause or suffer from interference to/from
radio or television reception then the following measures should
be tried:
Reorient the receiving aerial (or antenna) or route the antenna
cable of the receiver as far as possible from the 596 DVD
Player and its cabling.
Ensure that the receiver uses well-screened antenna cable.
Relocate the receiver with respect to the DVD player.
Connect the receiver and this product to different AC outlets.
The video picture is monochrome
If you are using the S-Video output, make sure that S is selected
in the Video output menu
Otherwise, check your video cabling.

Tro
ub
lesh
oo
ting
57
The video picture is bright blue or pink
If you are using the Component outputs, check that the Y option
is selected in the Video output menu; see To select the video
output format, page 32.
Otherwise, check your video cabling.
Picture whites appear green
Check that RGB is selected in the Video output menu; see To
select the video output format, page 32.
The on-screen display shows PLEASECHECK DISC when attempting to playa disc
Check that the disc is positioned correctly in the drawer; see
To insert a disc, page 10.
If it is a single-sided disc check that the label is uppermost.
Try playing another disc. If this disc works, check the problem
disc for signs of dirt or damage.
The on-screen display shows WRONGREGION CODE
This screen is displayed if you attempt to play a DVD video disc
encoded for a region that is not supported by your DVD player:

Tro
ub
lesh
oo
tin
g
58
A question-mark symbol is displayedon the on-screen display
This indicates that the function you have selected is not
available on the disc you are playing.
The pause timeout automatically switches the 596 from pause
into stop mode if no key has been pressed for the specified
time.
The stop timeout automatically fades the screen to black if the
596 is left in stop mode and no key has been pressed for the
specified time.
Creating MP3 discs
MP3 discs can be created from a computer using appropriate
MP3 encoding software and a CD-ROM writer.
Generate the MP3 files with a date rate of at least 128 Kbits per
second. Group the tracks into folders to create separate albums
on the disc. Do not create folders within the folders.
Tracks and albums are played in the order in which they are
recorded onto the CD-ROM. Usually this will be in alphabetical
order of filename.

Tro
ub
lesh
oo
ting
59
used. Otherwise, it is recommended that you unplug and
reconnect the plugs at least once a year. A proprietary contact
cleaner can be used to some advantage.
The electrical digital output should be treated in a similar way.
To change the mains fuse
FuseSpare
Remove the mains connector, and pull out the drawer next to
the power input to access the fuses.
Before replacing a blown fuse, it is best to ascertain the cause of
the failure.
The fuse drawer includes a spare fuse. This should be replaced
by a fuse of the same rating.
Cleaning
When cleaning the DVD player bear in mind that the front of the
DVD player is plastic, and the display panel and lid are glass.
Disconnect the power cord before cleaning the unit.
Note: Do not use abrasive cleaners on any part of the DVD
player.
To clean the case, display panel, andkeypad
Use a slightly damp cloth.
Ensure that no water is allowed to get inside the case, and do
not reconnect the power until you are certain that the DVD
player is completely dry.
To clean the audio and videoconnections
The audio and video sockets on the back of the DVD player are
gold-plated and need no cleaning if gold-plated phono plugs are
Maintenance

Tro
ub
lesh
oo
tin
g
60
Service
The Meridian 500 Series of hi-fi components have been carefully
designed to give years of untroubled service. There are no user-
serviceable parts inside the case, nor do the units require any
form of maintenance.
In the unlikely event that your DVD player fails to function
correctly, it should be returned, in its original packaging, to your
Meridian dealer.
In case of difficulty within the UK or USA please contact the
appropriate sales and service address shown on page ii.
In case of difficulty outside the UK or USA, contact the importing
agent for the territory. A list of Meridian agents outside the UK is
available from Meridian Audio.
No responsibility can be accepted for the DVD player whilst in
transit to the factory or an agent, and customers are therefore
advised to insure the unit. When seeking service under
guarantee, proof of the date of purchase will be required.
Guarantee
The 596 DVD Player is guaranteed against defects in material
and workmanship for 2 years from the date of purchase.
The guarantee is void if the 596 DVD Player has been subject to
misuse, accident, or negligence, or has been tampered with or
modified in any way without the written authorisation of Meridian
Audio Limited. Note that connecting anything other than the
correct network lead to the COMMS sockets may cause
damage to the 596 DVD Player which will not be covered by this
guarantee. Attempted servicing by unauthorised people may
also invalidate this guarantee. Labour and carriage charges are
not covered unless by local agreement.
Outside the UK, local warranty liability is restricted to equipment
purchased within the territory. Our agents outside the UK are
only under contractual obligation to service under-guarantee
equipment sold through them. They are entitled to make a non-
refundable charge for any service carried out on other
equipment.
This guarantee does not limit your statutory rights within the
United Kingdom.
Service and guarantee

61
Ind
ex
Index
A A-B (remote) 20
accessories 6
advanced features 17
ANALOGUE OUT 46
audio CDs 12
on-screen display 15
audio connections 46, 48
Audio language menu 30
audio output rate, selecting 39
audio settings 21
Audio setup menu 38
automatic setup 50
B back panel 44
Bitstream option 38
Black level menu 34
C camera angle, selecting 23
changing the display 15
chapters 12
moving to next/previous 12
selecting by number 12
choosing standard settings 52
cleaning 59
closing the tray 10
COMMS connection 46
communications connections 46
COMPONENT outputs 45
component video, connecting 47
components 42
composite output 45
composite video, connecting 47
configuring the DVD player 53
connecting
audio 48
to Meridian 500 Series
equipment 50
video 47
connections
audio 46
communications 46
video 45
continuing after pausing 14
controller mode config option 53
Controller, setting 50
D default options, setting 27
digital audio formats 38
Digital audio format menu 38
DIGITAL OUT 46
disc information 15
Disc menu 18
display
flashing 10
front panel 15
on-screen 16
Display aspect ratio menu 32
displaying disc information 15
DVD information, displaying 16
DVD video discs 12, 18
camera angle 23
on-screen display 15
F fast play 19
flashing display 10
front panel controls 8
front panel display 15
fuse, replacing 59
G guarantee 60
I Information menu 28
inserting a disc 10
introduction 1

Ind
ex
62
L language
screen displays 31
subtitles 30
letterbox format 32
locating a specific title, chapter, or
track 12
M maintenance 59
Menu language menu 31
menu, on-screen 18
Meridian 500 Series 2
562V Multimedia Controller 4
communications 2
Meridian 500 Series operation,
setting 50
Meridian 565 Digital Surround
Processor, connecting 48
Meridian Digital Music System 4
Meridian Digital Theatre™ 3
Meridian DSP loudspeakers,
connecting to 49
Meridian setup menu 28
Meridian System Remote 7
MHR option 39
MP3 discs 11
moving between albums 11
creating 58
O on-screen display 15, 16
disc information 15
DVD information 16
opening the tray 10
outputs 44
audio 46
SCART 44, 45
video 45
P pan-scan 32
parental lock, setting 24
pausing play 14
PCM option 38
picture format 32
Playback options menu 30
playing 11
a specific chapter or track 12
a specific title 13
faster than normal 19
from a specified timecode 13
in slow motion 19
preamplifier, connecting to 48
R radio interference 42
repeating
a specific section of a disc 20
a title, chapter, or track 20
RS232 connection 46
S S-video
connecting 47
output 45
safety warnings 43
sample configurations
Meridian Digital Music System 4
Meridian Digital Theatre™ 3
SCART
output 44, 45
switching 36, 54
screensaver timeouts 36
service 60
setting up the DVD player 41
Setup menu 28
slow-motion play 19
soundtracks
language 30

63
Ind
ex
soundtracks (continued)
selecting 21
specification 5
standard settings 52
choosing 52
standby 10
switching on from 10
switching to 11
stepping forward frame by
frame 14
stopping play 14
Subtitle language menu 31
subtitles
closed caption 34
default language 30
displaying 22
turning on or off 22
switching on from standby 10
switching to standby 11
T timecode, playing from 13
titles 12
locating by number 13
selecting from the Title Menu 18
Top menu 18
tracks 12
locating by number 12
moving to next/previous 12
tray, opening and closing 10
troubleshooting 55
TV standard, selecting 35
U unpacking 42
V ventilation 43
video connections 45, 47
Video setup menu 28, 32
W WRONG REGION CODE 57

Ind
ex
64