duplicator controller functions user’s manual -...
TRANSCRIPT

Duplicator Controller Functions
User’s Manual─Version: 1.1─
Attention:Wait over 5 seconds to
power on after shutdownto prevent the abnormaloperation of the system.
Copyright©2011
Copyright and Trademarks
The information of the products in this manual is subject to change without prior notice and does not represent a commitment on the part of the vendor, who assumes no liability or responsibility for any errors that appear in this manual.
This manual contains materials protected under International Copyright Laws. All rights reserved. No part of this manual may be reproduced, transmitted or transcribed without the expressed written permission of the manufacturer and author of this manual.
This Duplicator Controller is used for copying and editing personal audio and video data. Violating Copy Right is a criminal act. This Duplicator Controller only supports legal backup operation.
1
2
Table of Contents
Chapter 1 The Panel .....................................................................Chapter 2 Functions .....................................................................
2.1 Copy ................................................................................................ 2.2 Test .................................................................................................. 2.3 Test&Copy ..................................................................................... 2.4 Verify .............................................................................................. 2.5 Compare ......................................................................................... 2.6 Prescan ........................................................................................... 2.7 Disc Info ......................................................................................... 2.8 Select Source ................................................................................. 2.9 Image .............................................................................................. 2.9.1 Load ........................................................................................ 2.9.2 Delete Image ......................................................................... 2.9.3 Image Info ............................................................................. 2.9.4 Compare Image .................................................................... 2.9.5 Select Image ......................................................................... 2.9.6 Image Src Drive ................................................................... 2.9.7 ImageFormat Info ................................................................ 2.9.8 Edit .......................................................................................... 2.9.9 Format HDD ......................................................................... 2.9.10 LoadImage Method ........................................................... 2.10 Edit Track (for CD only) .......................................................... 2.10.1 CD to CD Edit .................................................................... 2.10.2 CD to HDD Edit ................................................................ 2.10.3 Close Session ...................................................................... 2.11 LightScribe (Optional) .............................................................. 2.11.1 Print ......................................................................................
567 7 8 8 8 8 8 9 9 9
10 10 10 11 11 12 12 13 13 14 14 16 17 17 18
3
2.11.2 Load LSI to HDD .............................................................. 2.11.3 Select LSI File .................................................................... 2.11.4 Delete LSI File ................................................................... 2.11.5 Load LSI Drive .................................................................. 2.11.6 Coypright Info .................................................................... 2.12 Setup ............................................................................................... 2.12.1 Language ............................................................................. 2.12.2 Burn Speed ......................................................................... 2.12.3 Read Speed ........................................................................ 2.12.4 Auto Start Drive ................................................................ 2.12.5 Startup Menu ..................................................................... 2.12.6 Auto Verify ........................................................................ 2.12.7 Auto Compare .................................................................... 2.12.8 Auto Prescan ...................................................................... 2.12.9 Eject Disc ............................................................................ 2.12.10 Burn On The Fly ............................................................. 2.12.11 Burn Mode ....................................................................... 2.12.12 Display Time .................................................................... 2.12.13 Button Sound ................................................................... 2.12.14 Device Info ....................................................................... 2.12.15 System Info ...................................................................... 2.12.16 Quick Erase ...................................................................... 2.12.17 Full Erase .......................................................................... 2.12.18 Auto Close Tray ............................................................... 2.12.19 Quick Compare ............................................................... 2.12.20 Tray-In/Out ...................................................................... 2.12.21 BootTime Delay .............................................................. 2.12.22 Start Tray Eject ............................................................... 2.12.23 Disc Redetect ..................................................................
18 18 18 19 19 20 20 20 21 21 22 22 22 23 23 23 24 24 24 25 25 25 25 25 25 26 26 26 26

4
2.12.24 Show Burn Speed .................................................................
Chapter 3 Troubleshooting .......................................................... 3.1 About LCD .................................................................................... 3.2 About Error Messages ................................................................. 3.3 About DVD-ROM/DVD Writers .............................................. 3.4 About Buttons ............................................................................... 3.5 About DVD Writer Not Readable ............................................ 3.6 About High Failure Rate ............................................................. 3.7 About Firmware Update .............................................................
Appendix A LCD Messages ..........................................................
Appendix B LightScribe Utility Installation ..............................
Appendix C LightScribe Utility Quick Guide ............................
26
27 27 27 27 28 28 28 28
29 34
37
5
Chapter 1 Basic Instructions
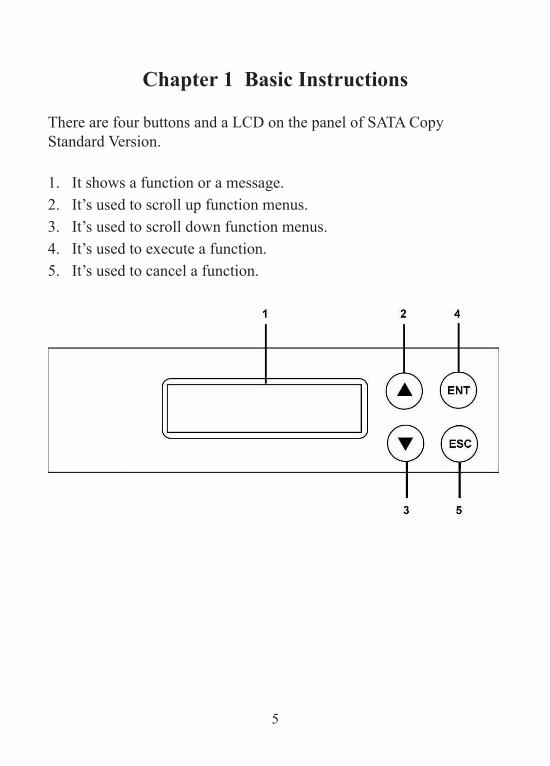
There are four buttons and a LCD on the panel of SATA Copy Standard Version.
1. It shows a function or a message.2. It’s used to scroll up function menus.3. It’s used to scroll down function menus.4. It’s used to execute a function.5. It’s used to cancel a function.

6
Chapter 2 Functions
There are 11 major functions in the copy controller as the following figure shows, and there are sub-functions in Function 7, 9, 10, 11, and 12 as the following figures show.
Among the 12 functions, Function 10 Edit Track is designed exclusively for editing a collection of favorite songs from CDs. During operation if you don’t understand an LCD message, see Appendix A
7
2.1 CopyFunction #1 Copy, instant copy source (disc/image) to the target drives (optical writes). Use Function#8 to select source drive before copying. Select function#1. place a source disc into source drive and blank disc into the target drives. A rewriteable disc can be used as target media, however all data will be erased before copying.Press ENT to start copy function when all discs are ready .
After complete, system will show spent time and the amount of OK disc on the screen, the OK disc will be ejected.
2.2 TestFunction #2, copy simulation, no data will be written to the write once media (DVD+R is not supported for this function).Press ENT to start simulation. If rewriteable disc is used, all contained data will be erased before simulation.
1. Copy
OK: 01Time: 00:05:01

8
2.3 Test & CopyFunction #3, will do copy simulation before copy function.Press ENT to start simulation and copy.Note: only passed test disc will do the copy.
2.4 VerifyFunction #4, to check readability of the burned disc.
2.5 CompareFunction #5, to check if target disc is identical to source disc.
Compare result : OK : Source and target disc are identicalFail : TOC not match, compare skipped due to contains do not match.Diff : Shows how many bytes are different.
2.6 PrescanFunction #6, to check if source disc is readable and without read error.
2.7 Disc InfoFunction #7, to report disc information, disc type and capacity.

9
2.8 Select SourceFunction #8, to set which drive as source device.The drive on CH01 will be chosen as source device. Press ENT, and then press ▲ ▼ to select the source.Assume that HDD is selected as the source device and selected partition contains no data, an error message “Source Drive Not Ready” will show on LCD while trying copy function. In that case, go to Function#9 Image to load the data into the chosen partition first.
2.9 ImageFunction #9 Image is valid only when a hard disk is installed. Disc is loaded to hard disk as an image file. Refer to the menu.
2.9.1 LoadLoad function loads whole disc data from any writers into the current partition of the hard disk. “P:A” means current partition is A.
9. Image
9-01. Image P:ALoad

10
2.9.2 Delete ImageIf you want to delete an image file stored in a particular partition, you can use this function to delete image.
Press ENT, the system will confirm with you for the action, use ▲ ▼ to select Yes or No, then press ENT for confirmation.
2.9.3 Image InfoTo check selected image information. First, enter into the function and press ▼ for more information.
2.9.4 Compare ImageThis function is used to check if created image is identical to source disc.
9-02. Image P:ADelete Image
9-03. Image P:AImage Info
9-04. Image P:ACompare Image
Delete Image? YesA: Audio 537MB

11
When result shows on LCD, press ENT for more detail information.Compare result : OK : Source and target disc are identicalFail : TOC not match, compare skipped due to contains not match.Diff : Shows how many bytes are different.
2.9.5 Select ImageThis function is to select a partition as source image from the hard disk.
Pressing ▲ ▼ to select a partition, LCD will show image name and capacity.
2.9.6 Image Src DriveThis function is used to set the image source drive for loading disc data into a particular partition.
CompareOK: 1
9-05. Image P:ASelect Image
Select PartitionA: DATA

12
Enter into the function and use ▲ ▼ to select image source drive.
2.9.7 Image Format InfoThis function shows which format is used for current hard disk. It is related to function#12.4 Format HDD. There are 5 formats for choice: F_S,CD, DVD, DL (Double Layer) and AUTO.
Press ENT to see the following figure. This figure shows that the hard disk has been formatted as AUTO.
2.9.8 EditThis function is to edit selected image’s title, sub1 title and sub2 title. Only valid when the current partition contains an image file can title.
9-06. Image P:AImage Src Drive
Select Img Src01 CH01 XXXXX
9-07. Image P:AImageFormat Info
ImageFormat InfoAUTO

13
A title should be composed of 1 to 13 characters. The character can be alphabet, number or the combination of both. Use ▲ ▼ to select the number or alphabet. After selecting a desired one, press ENT for next character, the end of key in, press and hold ENT for 2 sec and release for next title.
2.9.9 Format HDDHard disk must be formatted by the system for the very first time. Hard disk will be partitioned into the chosen partition format.
If no hard disk is installed, LCD will show the message as No Valid HDD!The default is F_S.All data on the hard drive will be erased after the hard disk format.After the hard drive is formatted correctly, LCD will show “Format HDD ok!”, Press ENT to verify HDD or press ▼ and choose No return back to menu.
2.9.10 LoadImage MethodThis function is to change the way to save Image. There are 2 formats for choice: Auto and Manual. Auto means system auto assign partition
9-08. Image P:AEdit
9-09. Image P:AFormat HDD
14
for loaded image. Manual let you to choose which partition to load image to.
The default is Auto.Press ENT, and use ▲ ▼ to confirm Auto or Manual. Then press ENT to save the configuration.
2.10 Edit Track (for CD only)Function#10 Edit Track is exclusively designed for editing a collection of favorite songs from CDs. In other words, you can collect songs on a number of CDs and merge them into a single CD. There are 3 sub-functions: CD to CD, CD to HDD and Close Session.
2.10.1 CD to CD EditTo select songs from source CD, and then burn into a blank CD-R/RWs.
Enter into 10.-01 function, 1/10 means the number one of the 10 tracks, and 03:55 means the length of track.
9-10. Image P:ALoadImage Method
10. Edit Track
15
You can press ▼ to see the rest of tracks. If you want to select the track, press ENT then a “+” will shows up, press ENT again will cancel the selection.
After selection, use ▲▼ move to the “End” which is between 1st track and last track.Press ENT to end of selection, and use ▲ ▼ to confirm Yes or No.Press ENT after burning, system will ask if you want to continue edit, use ▲ ▼ to confirm Yes or No.If you want to continue edit, the current source CD will be ejected and ask you to insert next disc.Repeat the above process for editing.
After editing, system will show “Close all disc’s session ? Yes”, use ▲ ▼ to confirm Yes or No.
10-01. Edit TrackCD to CD Edit
Select TrackEnd 5Trk15:55
Insert next disc
Select Track1/10 03:55

16
Once session is closed, no more tracks can be added.
Attention: Commercial audio player might not able to play open session disc, close session is suggested for max. compatibility.
2.10.2 CD to HDD EditTo select tracks from single or multi-audio CD and create image to specific partition of HDD.
The basic operation method is same as CD to CD Edit, system still ask you to insert empty disc even the target drive is HDD. If burning successful, system will show “Image load OK’’, which means the selected tracks are written to temporary partition.Press ENT after burning, system will ask if you want to continue edit, use ▲ ▼ to confirm Yes or No.If you want to continue edit, the current source CD will be ejected and ask you to insert next disc.Repeat the above process for editing.If “No’’ is selected, system will show “Burn or Move to partition?’’, use ▲ ▼ to confirm Burn or Move. Burn : Burn the selected tracks to CD
Close all disc’sSession? Yes
10-02. Edit TrackCD to HDD Edit
17
Move to partition : Create an image for selected tracks.
2.10.3 Close SessionSingle session format is used for Audio CD, and commercial audio player is not able to play open session audio CD, therefor session must be closed to max. playback compatibility. However, no more tracks can be added once session is closed
2.11 LightScribe (Optional Function)LightScribe is an optical disc recording technology that uses specially coated recordable CD and DVD media to produce laser-etched labels with text or graphics, as opposed to stick-on labels and printable discs. This function includes 6 sub-functions: Print, Load LSI to HDD, Select LSI File, Delete LSI File, Load LSI Drive and Coypright Info. Refer to page 11 for the menu. See Appendix B and Appendix C for LightScribe utility installation & user guide.
Moving to P:B
10-03. Edit TrackClose Session
11. LightScribe

18
2.11.1 PrintUse optical drive’s laser to print loaded LSI file. Disc should be placed upside down (label side facing down).
2.11.2 Load LSI to HDDLoad LSI to hard disk.
2.11.3 Select LSI FileSelect LSI file from hard disk for laser printing.
2.11.4 Delete LSI FileDelete a LSI File stored in a particular partition.
11-01. LightScribePrint
11-02. LightScribeLoad LSI to HDD
11-03. LightScribeSelect LSI File
11-04. LightScribeDelete LSI File

19
Press ENT, and LCD will show the information of the image file.
Use ▲ ▼ to confirm Yes or No.
2.11.5 Load LSI DriveThis function is to select source drive in order to load LSI File into a particular partition.
Use ▲ ▼ to select source drive.
2.11.6 Coypright InfoThis function is to see the LightScribe copyright information.
All daa will belost delete? Yes
11-05. LightScribeLoad LSI Drive
Select Load Src:01 CH01 XXXX
11-06. LightScribeCopyright Info

20
2.12 SetupTo change the default setting. However, it is suggested to use the default for the optimal operation. There are 24 sub-functions: Language, Burn Speed, Read Speed, Auto Start Drive, Startup Menu, Auto Verify, Auto Compare, Auto Prescan, Eject Disc, Burn On The Fly, Burn Mode, Display Time, Button Sound, Device Info, System Info, Quick Erase, Full Erase, Auto Close Tray, Quick Compare, Tray-In/Out, BootTime Delay, Start Tray Eject, Disc Redetect and Show Burn Speed.
2.12.1 LanguageNow press ENT, and you will enter the following figure. The function Language lets you select a language in which messages can be shown on LCD.
Press ENT. The default is English. Spanish, Japanese, Traditional Chinese and Simplified Chinese are made to order.
2.12.2 Burn SpeedNow press ESC and ▼ to enter the following figure. This function lets you control the burning speed of CD writers.
12. Setup
12-01. SetupLanguage
21
Press ENT. The DVD Burn Speed will be shown and the default is 8X. Press▼ for change the selection. The next one is BD Burn Speed and the default setting is 2X. Press ▼ to change the selection to CD Burn speed and the default setting is 24X. Press▼ for change to Audio Burn Speed the selection and the default is 24X.
2.12.3 Read SpeedTo change default reading speed of source disc.
The default is 8X, the speed would depend on the reader drive’s read speed and media type and format.
2.12.4 Auto Start DriveSystem will Auto Start to Copy or Test once a blank disc is ready. You have the option to choose 1 or 2 target blank disc(s) that will enable the Auto Start feature.The default is Off. Press ▼ to select 1 or 2 (blank disc(s)).
12-02. SetupBurn Speed
12-03. SetupRead Speed
12-04. SetupAuto Start Drive

22
2.12.5 Startup MenuTo select any function from #1 to # 13 as the first item appears on the screen whenever system is turned on.
The default is “1. Copy”.
2.12.6 Auto VerifyTo set if auto verify target disc’s readability after copy function.
Press ENT. The default is Off. Press ▼ to select On.
2.12.7 Auto CompareTo set if auto do comparison after copy function to check if source and target disc are identical.
The default is Off. Press ▼ to select On.
12-05. SetupStartup Menu
12-06. SetupAuto Vertify
12-07. SetupAuto Compare

23
2.12.8 Auto PrescanTo set auto scan source disc before copy function.
The default is Off. Press ▼ to select On.
2.12.9 Eject DiscThere are 3 kinds of tray behavior when copy process is completed.Eject Good Only: Only good disc will be ejected after burning. Eject All Disc: All discs will be ejected after burning.Do Not Eject: All discs stay in after burning.The default is “Eject Good Only”.
2.12.10 Burn On The Fly“Burn On The Fly” means data will be copied directly from the source disc to the target disc. When the setting is Off, the data will be loaded into temporary partition of HDD first, then copy from HDD to disc.
12-08. SetupAuto Prescan
12-09. SetupEject Disc

24
The default is On. Press ▼ to select Off.
2.12.11 Burn ModeThere are two modes: DAO (Disc At Once) and TAO (Track At Once).
The default is DAO. Press ▼ to select TAO.
2.12.12 Display TimeTo set if display a timer while copying.
The default is Off. Press ▼ to select On.
2.12.13 Button SoundTo enable or disable beep sound while press a key.The default is On. Press ▼ to select Off.
12-10. SetupBurn On The Fly
12-11. SetupBurn Mode
12-12. SetupDisplay Time

25
2.12.14 Device InfoTo show all device information (required during the process of LightScribe installation)(Press ▼ to select Burner, then press ENT. Your writer model information will appear on a screen.)
2.12.15 System InfoTo show system Information.
2.12.16 Quick EraseTo erase data on the DVD rewriteable discs quickly.
2.12.17 Full EraseTo erase data on the DVD rewriteable discs completely. Compared with Quick Erase, Full Erase takes longer time to do the job.
2.12.18 Auto Close TrayAll tray will be closed in selected time and if disc is ready, system will auto start copy, test or both functions, depends on which function is stay on the LCD screen.
2.12.19 Quick CompareQuick Compare is related to function#5 Compare. Once compare error byte reach to the setting figures, compare process will stop.The default is Off, press ▼ to select 1 Byte, 1 KB, 10 KB, 100KB, 1 MB, 10MB, 100MB etc.
26
2.12.20 Tray-In/OutLets you control the drive tray ejecting.Press ENT. The default is All Once and there have Divide 2 Times for selection.
2.12.21 BootTime DelayTo set the device scanning time during the system booting.The default is 5 second, more option is up to 99 seconds.
2.12.22 Start Tray EjectTo set if do eject all tray after system boot up.The default is On. Press ▼ to select Off.
2.12.23 Disc RedetectThe function is designed specially for bad quality disc, the system will detect the disc one more time if disc recognition error occurred. The default is Off. Press ▼ to select On.
2.12.24 Show Burn SpeedNow press ESC and ▼ to enter the following figure. This function lets LCD shows the burning speed of CD/DVD/BD writers.The default is On. Press ▼ to select Off.

27
Chapter 3 Troubleshooting
3.1 About LCDAfter you power up, if there is no display on the LCD, check if the connection of power cord is firm and the environment of power outlet is normal.
3.2 About Error MessagesDuring Copy, Test, Compare and Verify, etc. if you press ESC to abort, an error message will appear on LCD. Abortion may cause the copy controller to hang up, therefore you have to power on again.If reading fails, an error message will appear on LCD. Get a new source DVD to try again.If the copy controller hasn’t detected any device after powering on, an error message will appear on LCD.
3.3 About DVD-ROM/DVD WritersIf a DVD-ROM or a DVD writer cannot read, confirm the format of the source DVD and check if it is damaged.Use any DVD writer to read the source DVD. If it works, the DVD-ROM is probably defective or not compatible with the source DVD.

28
3.4 About ButtonsIf you press any one of the four buttons on the panel, but there is no response, it is perhaps that the button cannot function well. Inspect the jumper setting.
3.5 About DVD Writer Not ReadableAfter copying if the DVD writer is not readable, use Compare to ex-amine, or get another DVD-ROM to test.
3.6 About High Failure RateIf the failure rate of data copying is pretty high, please following the following procedures to improve it.1. Lower the speed of DVD writer.2. Inspect if the blank disc’s quality is good.3. Update the firmware.4. Inspect the DVD writer’s maximum writing speed. If the speed
is over 8X, copy the data to a hard disk first, and then transmit to DVD.
3.7 About Firmware UpdateIf you cannot update the firmware, please inspect the firmware. Per-haps you have downloaded a wrong file.Failure in firmware update may cause the copy controller to fail in booting. Under the circumstances, return the control board to distribu-tor for repair.
29
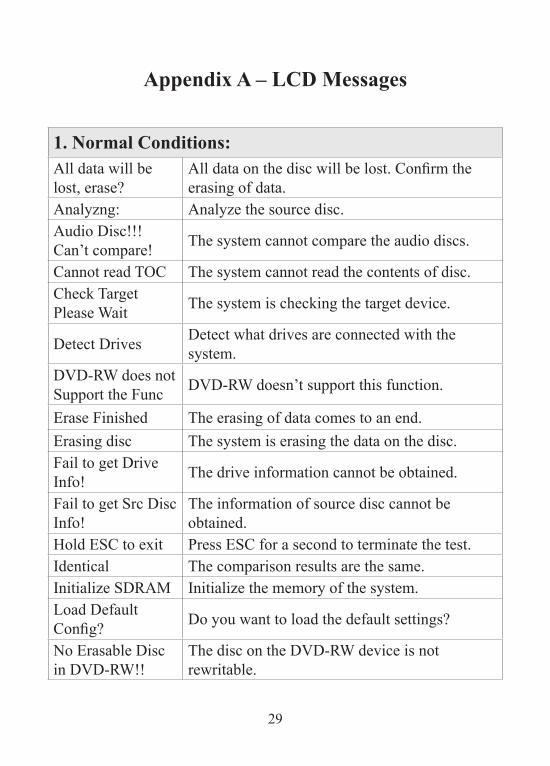
Appendix A – LCD Messages
1. Normal Conditions:All data will be lost, erase?
All data on the disc will be lost. Confirm the erasing of data.
Analyzng: Analyze the source disc.Audio Disc!!! Can’t compare! The system cannot compare the audio discs.
Cannot read TOC The system cannot read the contents of disc.Check Target Please Wait The system is checking the target device.
Detect Drives Detect what drives are connected with the system.
DVD-RW does not Support the Func DVD-RW doesn’t support this function.
Erase Finished The erasing of data comes to an end.Erasing disc The system is erasing the data on the disc.Fail to get Drive Info! The drive information cannot be obtained.
Fail to get Src Disc Info!
The information of source disc cannot be obtained.
Hold ESC to exit Press ESC for a second to terminate the test.Identical The comparison results are the same.Initialize SDRAM Initialize the memory of the system.Load Default Config? Do you want to load the default settings?
No Erasable Disc in DVD-RW!!
The disc on the DVD-RW device is not rewritable.

30
Preparing The system is preparing to record.Press a Key to Eject Fail Disc
Press any key to eject the failed disc after copying.
Press a Key to Eject Good Disc
Press any ket to eject the good disc after copying.
Read disc error During comparison the disc cannot be read.Save new config Fail!
The new setting of configuration cannot be saved.
Source Disc Empty!!! The source disc doesn’t contain any data.
Source Disc Not Ready Source disc is not ready to be read.
Source Drive Not Ready.
Source drive is not ready to read.
Src&Tgt can’t in the same channel
During comparison the source and target discs cannot be in the same channel.
Target Disc Not Empty!!!
The target disc still has data.
Target Disc Not Ready
Target disc is not ready to be written into.
Target Drive Not Ready
Target drive is not ready to write.
Target overflow The target disc hasn’t enough capacity to store new data.
TOC not match The comparison results are not the same.User Abort! Cancel the job during operation.
2. Connecting with a HDD:All data will be lost, format?
All data on the hard disk will be lost. Confirm the formatting of hard disk.

31
Delete Image in Partition xx?
Confirm the deleting of data image in partition xx.
Format HDD? Ask if you want to format the hard disk.Format HDD OK The Formatting of hard disk has been
completed.HDD not Format! The hard disk hasn’t been formatted yet.HDD too small The capacity of hard disk is too small.HDD too small to handle image!
The hard disk hasn’t enough capacity to store the data image (at least 5Gbytes).
Image Exists Overwrite?
There is a data image in the current partition. Confirm the overwriting of data.
Image load Fail The image isn’t successfully loaded from DVD to the hard disk.
Image load OK The image is successfully loaded from DVD to the hard disk.
No Image in Partition xx
There is no data image in partition xx.
No Valid HDD! The system cannot find a hard disk.Partition Damage The partition is damaged.Select HD First! Select a formatted hard disk at first.Verify Disk or Partition?
Do you want to verify the hard disk or just a partition?
Verify Hard Disk Fail!
The hard disk is not verified successfully.
3. Audio Editing:Burn or Move to partition?
Do you want to directly copy the data into disc or move them to the partition.
Can’t edit HDD The hard disk cannot be edited as a source audio disc.

32
Burn or Move to partition?
Do you want to directly copy the data into disc or move them to the partition.
Can’t edit HDD The hard disk cannot be edited as a source audio disc.
Close all disc’s session?
Confirm the closing of disc sessions.
Continue edit next Disc?
Ask if you want to continue the music disc editing.
End edit disc and burn?
Finish the music disc editing and start to copy.
Erase selected Tracks?
Abort the selected tracks and delete them.
Ins empty disc Continue?
Do you want to insert a blank disc and continue copying?
Insert next disc Insert the next audio disc.NO AUDIO track in this dis
The source disc has no audio track.
Sessions were closed already!
The disc sessions have already been closed.
Target Overflow Re-Select
The disc capacity is not enough to store the selected tracks. Please select again.
Tgt overflow, del last trk?
The disc capacity is not enough to store the selected tracks. So, do you want to delete the last track?
4. Firmware Update:Check Sum Error! The udpated firmware has errors.Flash ROM fail! Data cannot be written into Flash ROM.Invalid firmware The disc doesn’t contain a valid firmware.

33
Last update F/W Fail!.
The firmware is not updated successfully.
Last update F/W OK!
The firmware is updated successfully.
Searching F/W The system is searching for a valid firmware.Source can’t be Hard Disk!
During comparison the source cannot be hard disk.

34
Appendix B - LightScribe Utility Installation (Optional)
1. Minimum System RequirementsCPU: Pentium 3 Class or equivalentDrive: CD/RW RecorderRAM: 32MBHard Drive Space: 10Mbytes OS: Windows 2000, XP, Vista or Win 7
2. Software Installation1. Insert the LightScribe utility Installation Disc into the CD driver of
your computer.2. Using the “My Computer” icon or Windows Explorer, click on the
CD drive.3. From the CD Drive, double-click the “LightScribe_Install_Utility.
exe” icon to run the setup program.4. Follow the Installation Wizard to start the installation process, see
screen below:
35
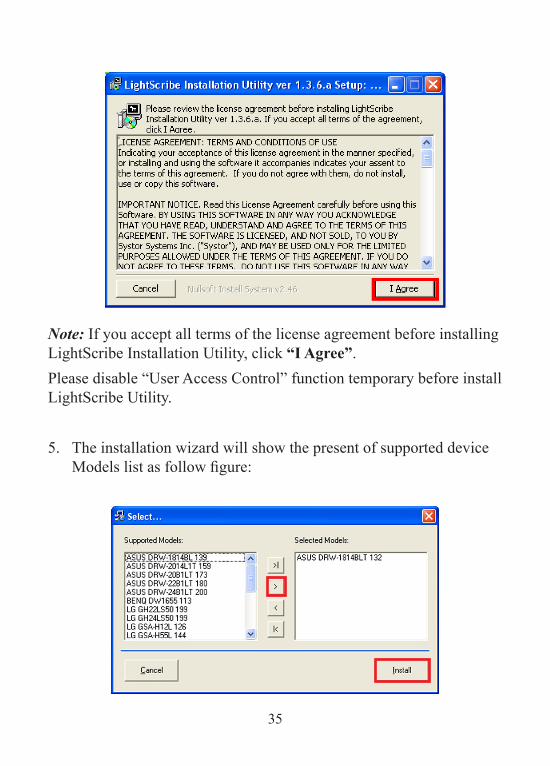
Note: If you accept all terms of the license agreement before installing LightScribe Installation Utility, click “I Agree”. Please disable “User Access Control” function temporary before install LightScribe Utility. 5. The installation wizard will show the present of supported device
Models list as follow figure:

36
6. We advised that all devices in the Supported Models list choose your device and move it to Selected Models list and then click “Install” to continue the installation process. (It will keep you a few minutes to finish Installation).
**See 2.12.14 Device Info to find out your Model Information**
Note: During the installation, there are two different programs will be installed. According the prompting windows to finish installation.
7. Last, click “Close” button to finish install process as follow figure.
37
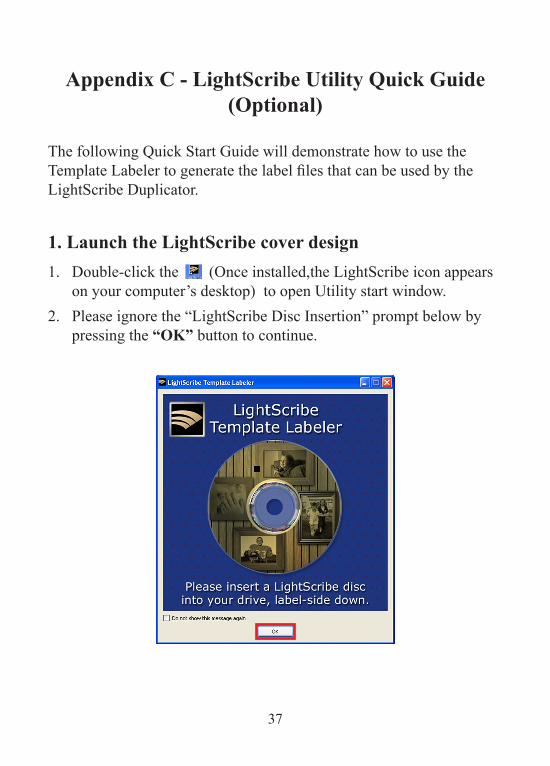
Appendix C - LightScribe Utility Quick Guide (Optional)
The following Quick Start Guide will demonstrate how to use the Template Labeler to generate the label files that can be used by the LightScribe Duplicator.
1. Launch the LightScribe cover design1. Double-click the (Once installed,the LightScribe icon appears
on your computer’s desktop) to open Utility start window. 2. Please ignore the “LightScribe Disc Insertion” prompt below by
pressing the “OK” button to continue.
38
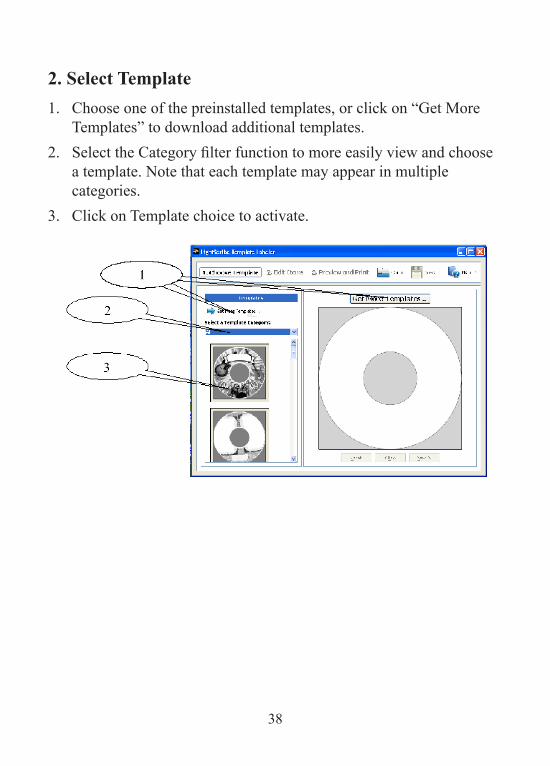
2. Select Template1. Choose one of the preinstalled templates, or click on “Get More
Templates” to download additional templates.2. Select the Category filter function to more easily view and choose
a template. Note that each template may appear in multiple categories.
3. Click on Template choice to activate.

39
3. Edit Items (Text and Pictures)1. Depending on the template chosen, you may have options to
modify text box (es) or picture(s). For inserting pictures, just click on the dedicated area to select the picture you’d like to use.
a. You can select the picture you want, use the Open button.b. Use the Zoom button or the scroll wheel of your mouse to size the
picture, then drag it to position it within the selection window.c. You can move an image by Simply dragging it in the label design
area.

40
2. For text, just click on the text field then, type the text you’d like to appear within the text field. Note you can enter multiple lines of text depending on the template chosen.
4. Preview and Print Label1. Click on “Preview and Print” to bring up the print window.

41
2. The LightScribe Print Options window opens, as follow figure.
a. This should appear as “LightScribe Duplicator Label Writer” as shown above.
b. Select print options, which you can use to adjust the print quality and define the number of copies you require.
c. Select disc color, which you can use to select what disc background color you’ll use to print.

42
3. If you have already made the right choice, you can click “Print” button to save this configuration in .lsi format. (You can custom file name and file path)
4. Click the save button, the saving process begins. You can monitor the process status with the progress bar as follow figure:
Note: As soon as the saving is finished, please wait!

43
5. Create a Data CD with the generated label file(s)If .lsi file have successfully created, LightScribe print window will displays a message about the result of the saving process. You must copy .lsi file into a blank CD via a CD Creating Software; like Nero Burning-ROM.Note: DO NOT place label file(s) under any directory/folder of the Label CD. Failure to do so will result in the label file(s) not being rec-ognized by your system.
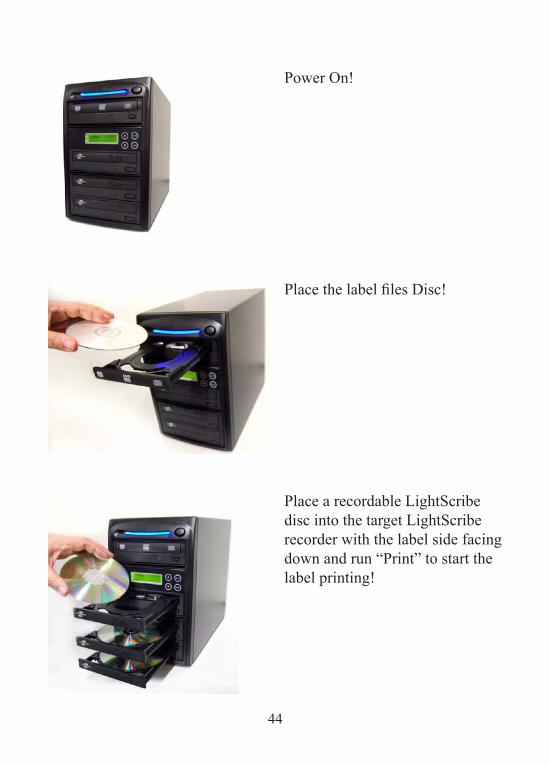
6. Using LightScribe Duplicator to print copies of your disc label.1. Power On the LightScribe Duplicator.2. Place the Data CD that contains the label files you wish to copy
into the source device Tray.3. Place a recordable LightScribe disc into the target LightScribe
recorder with the label side facing down.4. Go to menu “11.LightScribe” by pressing UP or DOWN buttons.
Then press “ENT” key into menu “Print” and press “ENT” key to start the label printing process last.
5. Upon completion, the printed discs will be ejected.
44
Power On!
Place the label files Disc!
Place a recordable LightScribe disc into the target LightScribe recorder with the label side facing down and run “Print” to start the label printing!