duplicating and replacing the floating pinblock 3 · belly work / duplicating and replacing the...
TRANSCRIPT

Schaff Piano Supply Company Presents:
Duplicating and Replacing
the Floating Pinblock
Part 3 - Drilling and Reinstallation
By Chuck Behm
Belly Work

Belly Work
Belly Work / Duplicating and Replacing the Floating Pinblock - 3
Article courtesy Schaff Piano Supply Company Page 2
Duplicating and Replacing
the Floating Pinblock* Part 3 - Drilling and Reinstallation
-Rationale-
The final step in a pinblock installation of this nature (where the pinblock
merely attaches to the plate and is not mortised into the rim of the piano) is to drill
the pinblock for the tuning pins. Although there is more than one approach to this
procedure, it is imperative that whatever method is used the pinholes be drilled
precisely. Sloppy workmanship at this stage of the job will effectively negate all
the care that has been taken in duplicating the pinblock and fitting it to the plate.
As has been stated earlier in this series, owning the correct tools (and knowing
how to use them) makes a world of difference. For drilling the pinblock, a simple
hand-held electric drill is not up to the task. A good quality, heavy-duty drill press,
either a stationary floor model or one that has been modified to roll over the pin-
block once it is in place in the piano, is necessary. The good news is that a quality
tool should pay off for years to come in the form of higher quality workmanship.
* Note: A version of this article first appeared in the November, 2009 issue of the
Piano Technicians Journal.

Belly Work
Belly Work / Duplicating and Replacing the Floating Pinblock - 3
Article courtesy Schaff Piano Supply Company Page 3
-Basic Procedures-
In replacing a pinblock, precise drilling is essential. If the pinblock is to be
drilled on a drill press, accurately centering the holes is a must. The method used
in our shop, although not the simplest (or only) approach, does ensure a perfectly
duplicated pinblock if done correctly.
Photo #1: Pinblock clamped firmly in place.
Assuming that the pinblock of your project piano has been successfully fit-
ted to the plate, the first task in drilling the pinblock is to mark the pilot holes for
the plate screws. To make sure the holes are marked precisely, clamp the pinblock
in place using the configuration of clamps shown in Photo 1 on either side of the
plate. Notice that the c-clamp goes underneath the sawhorse, thus avoiding put-
ting direct pressure on the webbing of the plate.
Next, use a creeper and roll yourself under the plate to mark the visible
holes for the plate screws - a few will be concealed by the saw horse but you can
get those a bit later. Use a sharp #2 pencil to mark the entire circle of each hole as
shown in Photo 2 on the next page. The plate screw holes will be along the pe-
rimeter of the webbing and should be recognizable by their bevel.

Belly Work
Belly Work / Duplicating and Replacing the Floating Pinblock - 3
Article courtesy Schaff Piano Supply Company Page 4
Do not mark the pin holes at this point. (I apologize, by the way, for the fact
that the Photo 2 is slightly out of focus. I was lying on my back on my creeper
looking up, marking a plate screw hole with my right hand while trying to take a
picture with the camera in my left hand – an awkward job at best!).
Photo #2: Things are looking up!
Once all the visible screw holes are marked, roll out from under the plate,
unclamp the pinblock, and move on to the drill press.
The issue at this point is to select the right size bit to drill the pilot holes
with. The drill needs to be larger than you would ordinarily select if you were
turning your screws into pine, or even oak. The hardrock maple (or similar wood)
of the pinblock doesn’t have much give to it, so you need a hole that the threads
of the screws can bite into, without being so hard to turn that you twist the heads
of the screws off altogether. Use a piece of scrap pinblock material to conduct a
trial run. Drill several sizes of holes in descending order, then put the test piece in
your wood vise, and actually try one of the screws to determine a reasonable
torque. I use a square-shanked screwdriver with a crescent wrench to help turn it.
(The head of the screwdriver should ideally be as wide as the slot in the screw,
otherwise you risk having the screwdriver damage the slot.) With the correct size
bit selected, drill the pilot holes in the pinblock.

Belly Work
Belly Work / Duplicating and Replacing the Floating Pinblock - 3
Article courtesy Schaff Piano Supply Company Page 5
Photo #3: Drilling the pilot holes for the plate screws.
When drilling both the pilot holes (Photo 3), and later the pin holes, adjust
the drill press table so that the tip of the bit is a mere fraction of an inch above the
block. That way, you can align it under the bit more accurately.
Photo #4: Pinblock back in place with plate screw holes drilled.
With the pinblock back in place on the plate (Photo 4), reposition it,
reclamp it, and scoot back underneath on your creeper. From this position, insert

Belly Work
Belly Work / Duplicating and Replacing the Floating Pinblock - 3
Article courtesy Schaff Piano Supply Company Page 6
and tighten down two screws on either end to insure correct placement. At that
point remove the clamps, and with the help of a co-worker, turn the plate with at-
tached pinblock back over again. (As you are turning the plate, go easy on your
back by keeping the weight of the plate on the top of your sawhorses.)
Photo #5: Pinblock ready to punch.
At this point, turn in the rest of the screws (Photo 5) to insure that when
you use the punch to tap the centering points for the tuning pins, there will be no
mistakes in positioning caused by a loose fit.
Use a punch (Schaff's tuning pin bushing punch [Cat. No. 174C] adapts
well to the job) and a ball peen hammer (Cat. No. MF-1916) to tap the center
points for the tuning pin holes (Photo 6, next page). If the punch is loose in the
hole in the webbing of the plate, try wrapping the end with just enough electrical
tape to eliminate any wobble. Make sure that as you are using the punch, you are
holding it perpendicular to the face of the plate. If there’s any tilt to the punch, the
point will not be centered correctly.
Caution: Under no circumstances should one attempt a major repositioning of a
cast iron plate without the assistance of a helper. The plate, besides being heavy,
is just too big and awkward to try to move by oneself. Attempting to do so is
tempting fate and putting the future of the piano (plus one's own well-being) in
jeopardy.

Belly Work
Belly Work / Duplicating and Replacing the Floating Pinblock - 3
Article courtesy Schaff Piano Supply Company Page 7
Photo #6: Punching the center points.
With all the tuning holes centered (be sure to double check), remove the
plate screws and store them in the holder, and remove the pinblock from under the
plate. Before doing anything else, mark each end of the block with a slanted arrow
(Photo 7) to indicate the direction that the slant of the pins will take, away from
the fitted, curved edge of the pinblock. Better safe than sorry.
Photo #7: Making sure of the slant.
Belly Work
Belly Work / Duplicating and Replacing the Floating Pinblock - 3
Article courtesy Schaff Piano Supply Company Page 8
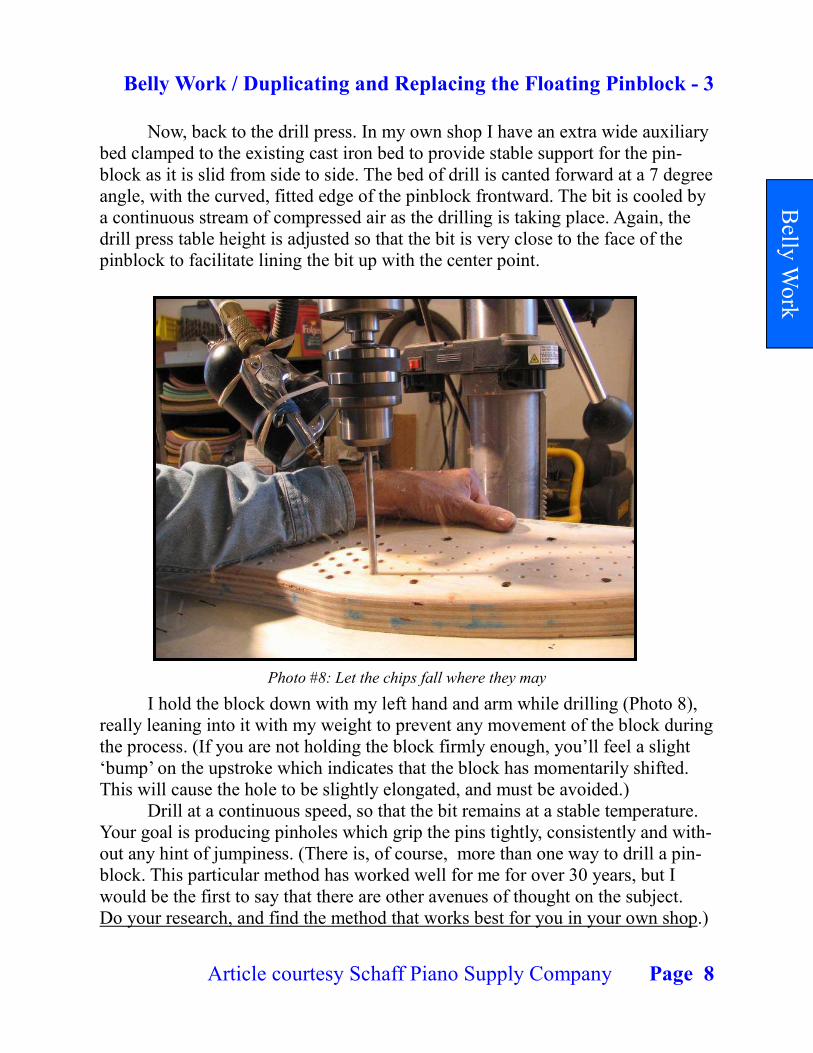
Now, back to the drill press. In my own shop I have an extra wide auxiliary
bed clamped to the existing cast iron bed to provide stable support for the pin-
block as it is slid from side to side. The bed of drill is canted forward at a 7 degree
angle, with the curved, fitted edge of the pinblock frontward. The bit is cooled by
a continuous stream of compressed air as the drilling is taking place. Again, the
drill press table height is adjusted so that the bit is very close to the face of the
pinblock to facilitate lining the bit up with the center point.
Photo #8: Let the chips fall where they may
I hold the block down with my left hand and arm while drilling (Photo 8),
really leaning into it with my weight to prevent any movement of the block during
the process. (If you are not holding the block firmly enough, you’ll feel a slight
‘bump’ on the upstroke which indicates that the block has momentarily shifted.
This will cause the hole to be slightly elongated, and must be avoided.)
Drill at a continuous speed, so that the bit remains at a stable temperature.
Your goal is producing pinholes which grip the pins tightly, consistently and with-
out any hint of jumpiness. (There is, of course, more than one way to drill a pin-
block. This particular method has worked well for me for over 30 years, but I
would be the first to say that there are other avenues of thought on the subject.
Do your research, and find the method that works best for you in your own shop.)

Belly Work
Belly Work / Duplicating and Replacing the Floating Pinblock - 3
Article courtesy Schaff Piano Supply Company Page 9
With the pinblock drilled, reinstall the block in the plate. (If the plate has
not been cleaned or refinished, of course, do that first. Likewise, if the plate
screws have not been polished at this point, do that also before replacing them in
the plate.) When installing the screws, tighten them down using a square shank
screwdriver and wrench. Take your time with this step to avoid having the screw-
driver slip from the slot and mar the finish of the plate. For years, I’ve tightened
the screws snug without the use of a torque wrench – going by feel instead. Using
a calibrated torque wrench, however, to eliminate any guesswork in attaining a
consistent tightness of each of the screws would be what I would recommend for
someone starting out.
Photo #9: Screws polished and ready to be turned down
With the plate screws reinserted (Photo 9), tightened them down. The plate
with attached pinblock is now ready for installation in the piano.
Caution: A reminder again that it is important to use the correct screwdriver for
the job to avoid damaging the screws. Also, avoid over-tightening the screws.
Once they are solidly turned into place, stop applying torque. Breaking the top
half of the screw off in the screw hole will result in a lot more work to remove the
threaded portion left in the hole.

Belly Work
Belly Work / Duplicating and Replacing the Floating Pinblock - 3
Article courtesy Schaff Piano Supply Company Page 10
Photo #10: Plate ready to reinsert in piano.
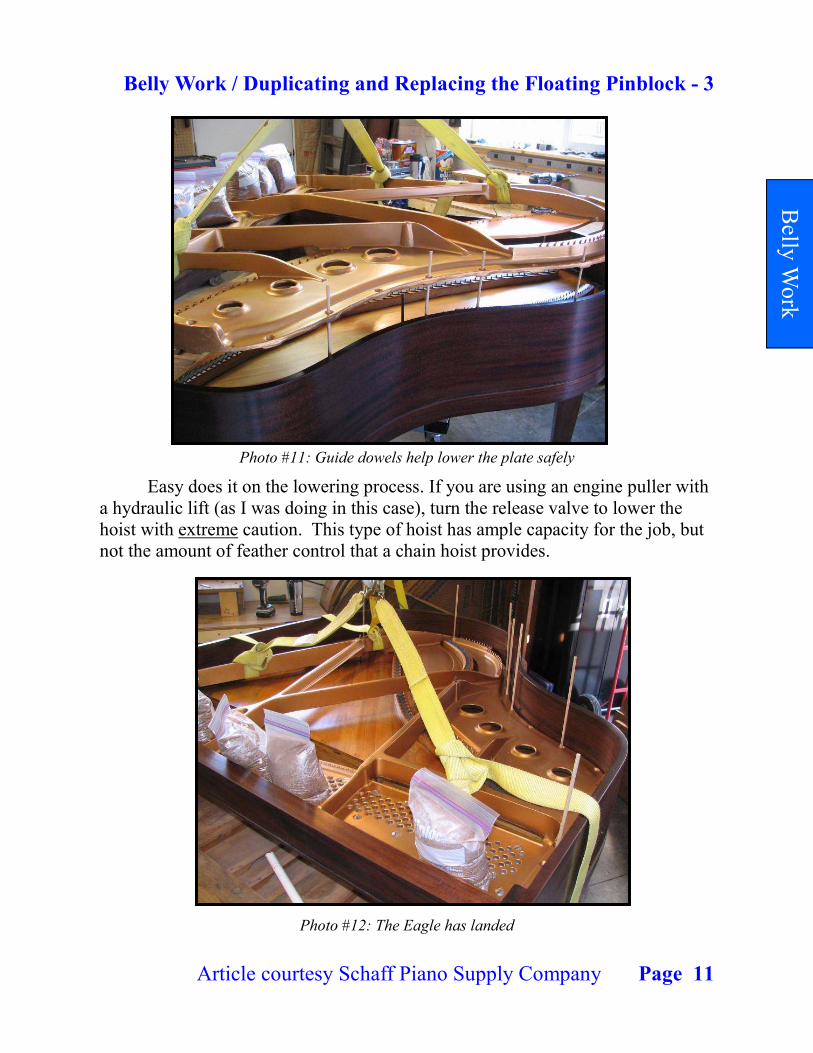
With your hoist over the plate, double knot the straps around the struts of
the plate. Although I always attempt to locate the hook directly over the center of
gravity of the plate and tie the straps with an even amount of tightness, usually
when I start lifting the plate, one side comes up before the other, resulting in the
plate being tilted at an odd angle (which you don’t want). If this is the case, don’t
lower the plate and retie the straps. Instead, place weights on the high end to bring
it down. What I use are freezer bags filled with sand (Photo 10) – they won’t mar
the finish of the plate, and are easy to procure – just buy sandbox sand from any
home improvement store, and fill your bags.
To avoid marring the finish of the inside of the rim – the last thing you want
to have happen at this point – use dowels to help guide the plate down safely. The
clearance can be very tight, but with dowels running down through the bolt holes
of the plate and into the holes around the edge of the sounding board. (Photo 11,
next page), it’s much easier to lower the plate without touching the rim at all.
Caution: It's a good idea to double bag your sand, in that after a couple of years
of use, leaks can spring at an inopportune time.
Belly Work
Belly Work / Duplicating and Replacing the Floating Pinblock - 3
Article courtesy Schaff Piano Supply Company Page 11
Photo #11: Guide dowels help lower the plate safely
Easy does it on the lowering process. If you are using an engine puller with
a hydraulic lift (as I was doing in this case), turn the release valve to lower the
hoist with extreme caution. This type of hoist has ample capacity for the job, but
not the amount of feather control that a chain hoist provides.
Photo #12: The Eagle has landed

Belly Work
Belly Work / Duplicating and Replacing the Floating Pinblock - 3
Article courtesy Schaff Piano Supply Company Page 12
With the plate safely back in the piano remove straps and dowels and double
check its positioning. Tighten down plate screws as you would tighten the lug nuts
on a car tire – going back and forth from one to the other several times to tighten
down the entire plate evenly.
Photos # 13, 14: Before and after
Enjoy the transformation you've accomplished.
Belly Work
Belly Work / Duplicating and Replacing the Floating Pinblock - 3
Article courtesy Schaff Piano Supply Company Page 13
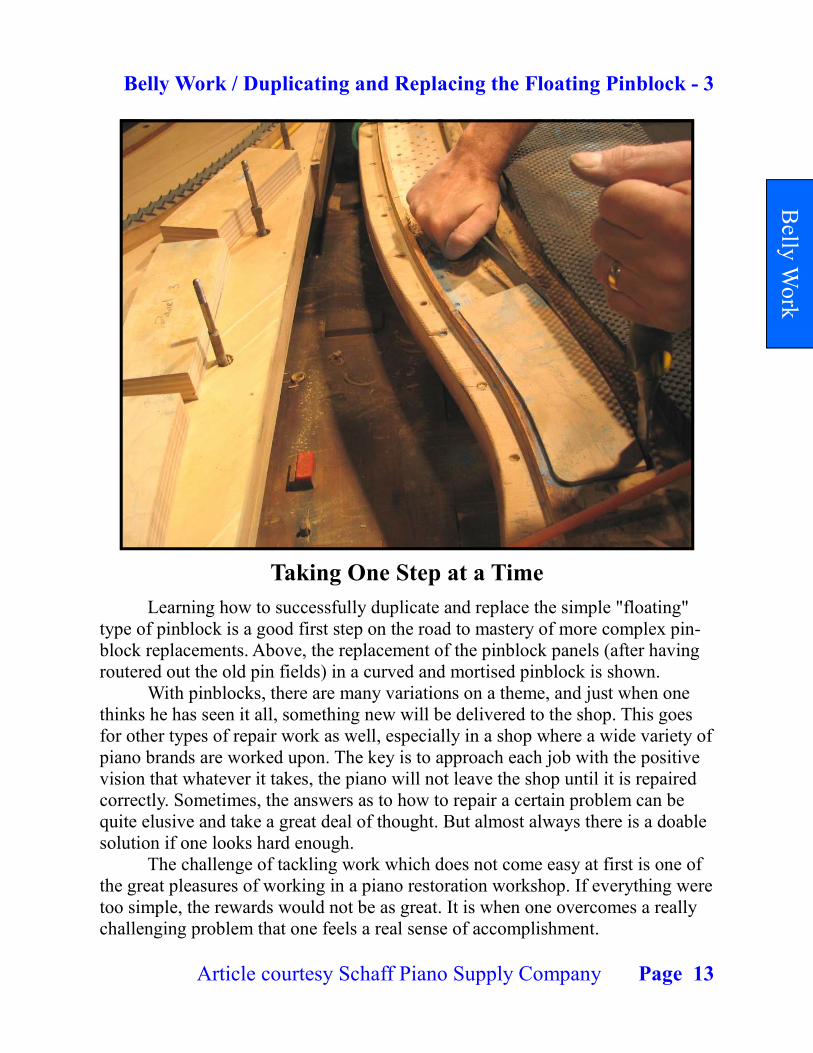
Taking One Step at a Time
Learning how to successfully duplicate and replace the simple "floating"
type of pinblock is a good first step on the road to mastery of more complex pin-
block replacements. Above, the replacement of the pinblock panels (after having
routered out the old pin fields) in a curved and mortised pinblock is shown.
With pinblocks, there are many variations on a theme, and just when one
thinks he has seen it all, something new will be delivered to the shop. This goes
for other types of repair work as well, especially in a shop where a wide variety of
piano brands are worked upon. The key is to approach each job with the positive
vision that whatever it takes, the piano will not leave the shop until it is repaired
correctly. Sometimes, the answers as to how to repair a certain problem can be
quite elusive and take a great deal of thought. But almost always there is a doable
solution if one looks hard enough.
The challenge of tackling work which does not come easy at first is one of
the great pleasures of working in a piano restoration workshop. If everything were
too simple, the rewards would not be as great. It is when one overcomes a really
challenging problem that one feels a real sense of accomplishment.
Belly Work
Belly Work / Duplicating and Replacing the Floating Pinblock - 3
Article courtesy Schaff Piano Supply Company Page 14
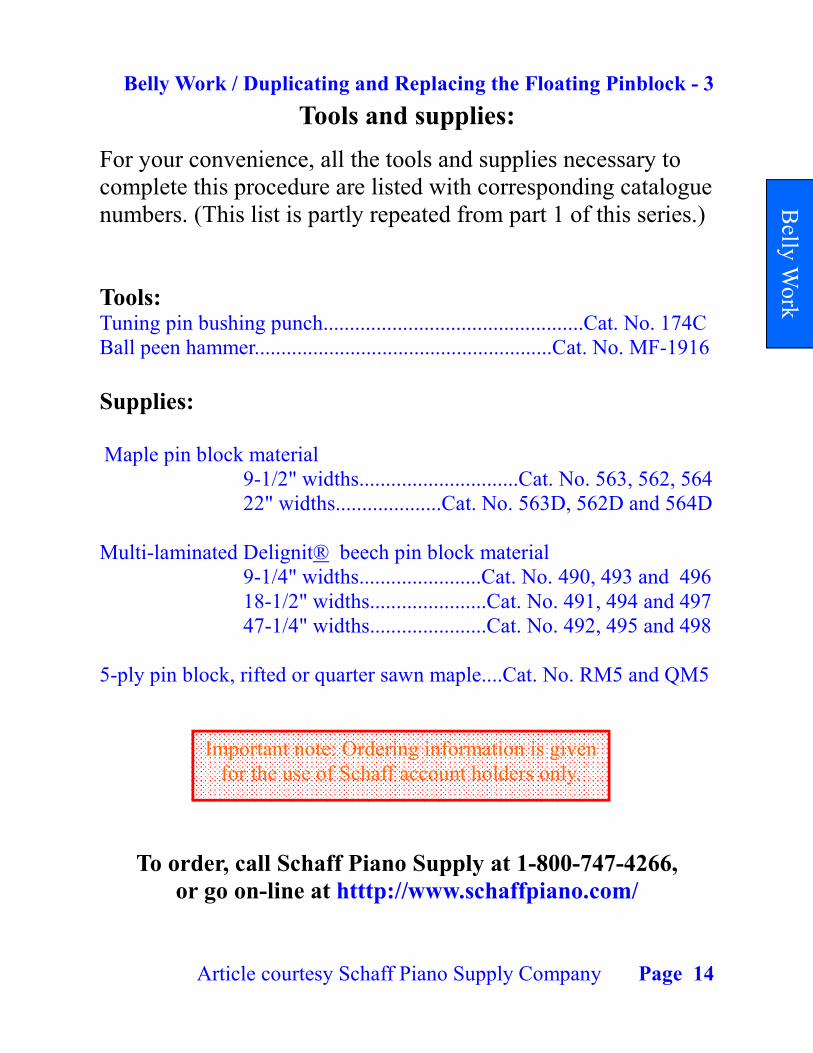
Tools and supplies:
For your convenience, all the tools and supplies necessary to
complete this procedure are listed with corresponding catalogue
numbers. (This list is partly repeated from part 1 of this series.)
Tools: Tuning pin bushing punch.................................................Cat. No. 174C
Ball peen hammer........................................................Cat. No. MF-1916
Supplies:
Maple pin block material
9-1/2" widths..............................Cat. No. 563, 562, 564
22" widths....................Cat. No. 563D, 562D and 564D
Multi-laminated Delignit® beech pin block material
9-1/4" widths.......................Cat. No. 490, 493 and 496
18-1/2" widths......................Cat. No. 491, 494 and 497
47-1/4" widths......................Cat. No. 492, 495 and 498
5-ply pin block, rifted or quarter sawn maple....Cat. No. RM5 and QM5
To order, call Schaff Piano Supply at 1-800-747-4266,
or go on-line at htttp://www.schaffpiano.com/
Important note: Ordering information is given
for the use of Schaff account holders only.

Belly Work
Belly Work / Duplicating and Replacing the Floating Pinblock - 3
Article courtesy Schaff Piano Supply Company Page 15
Notes on Procedures