dual power air compressor - canadian tire · instruction manual model no. 009-5097-2 dual power air...
TRANSCRIPT

INSTRUCTIONMANUAL
model no. 009-5097-2
DUAL POWER
AIR COMPRESSOR
IMPORTANT:Please read this manual carefully before using this tool and keep it for future reference.
model no. 009-5097-2 | contact us 1-888-942-6686
2W
ARRA
NTY
INFO
RMAT
ION
IF ANY PARTS ARE MISSING OR DAMAGED, OR IF YOU HAVE ANY QUESTIONS, PLEASE CALL OUR TOLL-FREE HELPLINE AT 1-888-942-6686
Read and understand this instruction manual thoroughly before using the product. It contains important information for your safety as well as operating and maintenance advice.
Keep this instruction manual for future use. Should this product be passed on to a third party, this instruction manual must be included.
This MotoMaster® product carries a three-year warranty against defects in workmanship and materials.
At its discretion, MotoMaster Canada agrees to have any defective part(s) repaired or replaced free of
charge, within the stated warranty period, when returned by the original purchaser with proof of purchase.
This product is not guaranteed against wear or breakage due to misuse and/or abuse.

3
TABL
E OF
CON
TENT
S
SAVE THESE INSTRUCTIONSThis manual contains important safety and operating instructions. Read all instructions and followthem while using this product.
TABLE OF CONTENTS Specifications 4
Safety 5
Introduction 5
Safety 6
Danger 6
Warning 7
Caution 8
Know Your Air Compressor 9
Preparation 9
Key Parts Diagram 11
Parts List 12
Operation 13
Operation - 12 V DC Mode 13
Operation - 120 V AC Mode 16
Cleaning and Storage 19
Maintenance 19
Troubleshooting 20
SPEC
IFIC
ATIO
NS4
model no. 009-5097-2 / contact us 1-888-942-6686
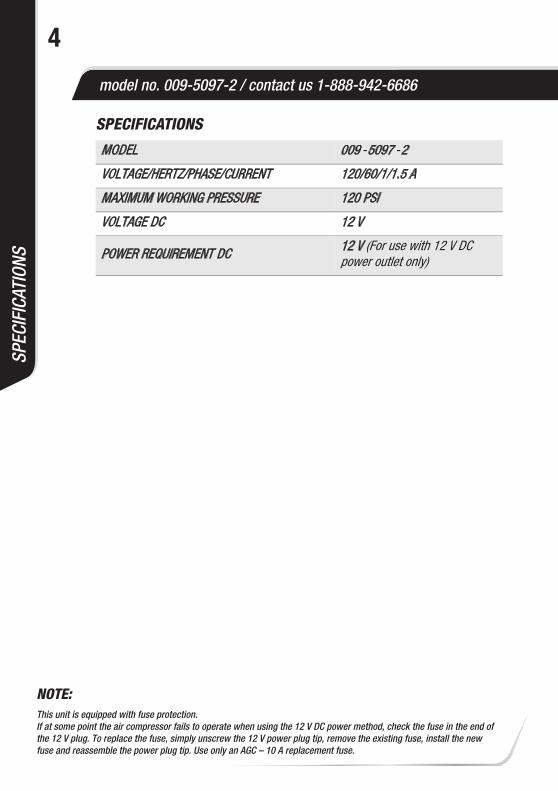
SPECIFICATIONS
MODEL 009 -5097 -2
VOLTAGE/HERTZ/PHASE/CURRENT 120/60/1/1.5 A
MAXIMUM WORKING PRESSURE 120 PSI
VOLTAGE DC 12 V
POWER REQUIREMENT DC 12 V (For use with 12 V DC power outlet only)
NOTE:This unit is equipped with fuse protection. If at some point the air compressor fails to operate when using the 12 V DC power method, check the fuse in the end of the 12 V plug. To replace the fuse, simply unscrew the 12 V power plug tip, remove the existing fuse, install the newfuse and reassemble the power plug tip. Use only an AGC – 10 A replacement fuse.
SAFE
TY
5
INTRODUCTION
This air compressor is designed to inflate the tires of cars, bikes, ATVs, sports equipment and other small inflatable items. Carefully read and understand all of the safety, operation, maintenance and troubleshooting information contained within this Instruction Manual for safe, efficient and trouble-free operation.
This manual contains information that relates to PROTECTING PERSONAL SAFETY and PREVENTING EQUIPMENT PROBLEMS. It is very important to read this manual carefully and understand it thoroughly before using the product.
The symbols listed below are used to indicate this information.
CAUTION!! Potential hazard that may result in moderate injury or damage to equipment.
DANGER!! Potential hazard that will result in serious injury or loss of life.
WARNING!! Potential hazard that could result in serious injury or loss of life.
NOTE:The word “Note” is used to inform the reader of something that he/she needs to know about the tool.

SAFE
TY6
model no. 009-5097-2 / contact us 1-888-942-6686
SAFETY• The warnings, cautions and
instructions discussed in this instruction manual may not cover all possible conditions and situations that may occur during operation. Always use common sense and pay attention while using/operating the product.
• Use the air compressor for the purpose for which it is intended. DO NOT use it for any purpose it is not designed to perform.
• Read and understand all instructions before using this product. Keep this manual for the safety warnings and precautions, operating, inspection and maintenance instructions. When using the product, basic precautions should always be followed to reduce the risk of personal injury and/or damage to the equipment. Note that when this manual refers to a part number, it refers to the parts list included. Before allowing others to use this product,make sure they are aware of allsafety information.
DANGER
• Keep children away from the work area. Do not allow bystanders and visitors to handle the product. Distractions may cause you to lose control.
• DO NOT use the power tool in an explosive atmosphere or in the presence of flammable liquids, gases or dust. Sparks that are created during use may ignite gases.
• For best results and more efficient power, it is recommended that you operate the air compressor with your vehicle’s eng gine runnin .
• Always operate the air compressor in an open, well-ventilated area and not inside a confined area such as a garage, as doing so may lead to bodily injury or asphyxiation resulting in death.
• Always allow for proper ventilation. Most vehicles’ 12 V power outlets will operate withthe vehicle ignition off; however,some vehicles require that theignition be turned on.

SAFE
TY
7
WARNING• DO NOT allow unskilled or
untrained individuals to operate the power tool.
• This air compressor operates on DC 12 V and AC 120 V. DO NOT attempt to operate this air compressor with any other source or voltage. DO NOT rewire or reconfigure the air compressor from its original design, as doing so may lead to personal injury or bodily harm.
• Wear suitable protective equipment like gloves, hard hat, ANSI-approved earplugs, electrically non-conductive clothes and non-skid footwear when working.
• Ensure that your vehicle’s 12 V power outlet is free of any ash residue or debris. A dirty 12 V power outlet can cause the air compressor and power cord to overheat. Overheating can cause damage to your air compressor/vehicle and could cause bodily harm or injury. Disconnect power when not in use.
• Risk of eye injury: Wear safety glasses with side shields when operating the tool and verify that others in the work area are also wearing safety glasses. Safety glasses must conform to American National Standards Institute (ANSI Z87.1) requirements and must provide protection from flying particles from the front and the sides.
• Inhalation risk: Wear a full face shield if your work creates metal filings or wood chips. Wear an ANSI-approved dust mask or respirator when working around metal, wood, and chemical dusts and mists.

SAFE
TY8
model no. 009-5097-2 / contact us 1-888-942-6686
CAUTION• Do not wear watches, rings,
bracelets or loose clothing when using the tool. These can get caught in the moving parts, resulting in damage to the tool and/or serious injury.
• Maintain proper footing at all times in order to ensure correct balance.
• Do not overload the tool. Allow the tool to operate at its optimum speed for maximum efficiency.
• Do not use a tool that is leaking, with missing or damaged parts, or that requires repairs. Verify that all screws are securely tightened.
• Keep your work area clean and ventilated. Cluttered benches and dark areas increase the possibility of personal injury or property damage.
• Allow air compressor to cool down for 10 minutes, after each 10 minutes of continuous operation.
• After using the air compressor, turn off the power supply.
• The air compressor is not a toy. Handle it with caution.
• DO NOT carry the air compressor by the air hose or power cord, as doing so may lead to damage.
• DO NOT leave the air compressor unattended while in operation.
• DO NOT overinflate. Please follow the manufacturer’s instructions for the item you are inflating.
• DO NOT operate the air compressor in wet or damp areas.
• Operate the air compressor only with the attachments and accessories that are included.
• This air compressor is not designed to fill air tanks or air shocks.
KNOW
YOU
R AI
R CO
MPR
ESSO
R
9
PREPARATION• The vehicle’s 12 V battery
should be fully charged to get the best performance from your air compressor. If your vehicle’s battery is weak, the air compressor will not work at its maximum output level.
• This appliance has a polarized plug (one blade is wider than the other), which fits in a polarized outlet only one way. If the plug does not fit fully in the outlet, reverse the plug. If it still does not fit, contact a qualified electrician to install the proper outlet. Do not change the plug in any way.
• Operate in a safe work environment. Keep your work area clean and well lit. DO NOT expose the air compressor to rain or any other kind of bad weather. DO NOT use in damp or wet locations and DO NOT expose this tool to rain. Water entering a power tool will increase the risk of electric shock. DO NOT use in the presence of flammable gases or liquids.
• Use only a two-wire extension cord that has a two-blade plug and a two-slot receptacle that will accept the plug on the product. Make sure your extension cord is in good condition. When using an extension cord, be sure to use one heavy enough to carry the current your product will draw. For lengths less than 6' (1.8 m) 18 AWG extension cords should be used. An undersized cord will cause a drop in line voltage resulting in loss of power and overheating.
• In a double-insulated product, two systems of insulation are provided instead of grounding. No grounding means is provided on a double-insulated product, nor should a means for grounding be added to the product. Servicing of a double-insulated product requires extreme care and knowledge of the system and should be done only by a qualified electrician. Replacement parts for a double-insulated product must be identical to those parts in the product.
KNOW
YOU
R AI
R CO
MPR
ESSO
R10
model no. 009-5097-2 / contact us 1-888-942-6686
A double-insulated product is marked with the words “Double insulation” or “Double insulated.” The double-insulation symbol may also be marked on the product.
• Store unused equipment. When not in use, tools must be stored in a dry location to prevent rust. ALWAYS keep the tools out of the reach of children.
KEY
PART
S DI
AGRA
M
11
32.0
ACCESSORYCOMPARTMENT
1
2 3 4 5 6
7
8
9
10
11
1213
14
15
16
17

PART
S LI
ST12
model no. 009-5097-2 / contact us 1-888-942-6686
PARTS LIST
If any parts are missing or damaged, or if you have any questions, please call 1-888-942-6686.
No. Description Qty No. Description Qty
1 Power selector switch 1 10 Quick-connect valve adaptor 1
2 Increase/decrease preset PSI level button 1 11 Presta valve adaptor 1
3 Digital pressure gauge 1 12 Sports needle 1
4 Run/pause power switch 1 13 Mattress nozzle 1
5 Carrying handle 1 14 120 V AC power cord 1
6 Tire valve cap storage 4 15 12 V DC power cord 1
7 12 V DC power cord storage 1 16 Accessory
compartment 1
8 Air hose storage 1 17 120 V AC power cord storage 1
9 Air hose 1

OPE
RATION
Inside Spread Display
13
OPERATION - 12 V DC MODE• Place the air compressor on a
flat and stable surface.
• Insert the 12 V DC power cord (1) into 12 V DC power outlet (2) for automatic continuous supply of 12 V current to the air compressor (fig. A)
• Connect the quick-connect valve adaptor (1) to the item that you are inflating, and push the valve lock lever down to secure the connection (fig. B).
.
• Push the power selector switch (1) in the top left corner of the air compressor to the 12 V position (fig. C).
MOM-95097-01
fig. A
1
2
fig. B
MOM-95097-02
1
MOM-95097-03
fig. C1
1
2
3
4
CAUTION!! Do not overinflate the item being inflated. Failure to comply could lead to moderate injury or damage to the equipment.

OPER
ATIO
N14
model no. 009-5097-2 / contact us 1-888-942-6686
NOTE:If the currthe inflato
• The digital pressure gauge displays the current pressure of the item you are inflating. The LCD reading (1) will be static when the LCD readout screen is displaying the current PSI (fig. D).
• Press the button (1) on the digital pressure gauge to set the desired PSI. The preset range of the digital pressure gauge is between 3 and 120 PSI. When the LCD readout screen is displaying the target PSI, the LCD readout will blink three times at the desired preset level, and it will then change back to the current PSI level of the item that you are inflating (fig. E).
fig. D
MOM-95097-04
1
MOM-95097-05
fig. E
1
5
6
ent pressure of the item you are inflating is greater than the preset level,r will not turn on.

OPER
ATIO
N
15
• Press the run/pause button (1) to turn on the air compressor. The preset PSI level can be changed during inflation, by pressing the buttons to the new desired PSI level. The air compressor will shut off automatically at the desired preset PSI level that you have programmed into the digital pressure gauge (fig. F).
• To stop the air compressor before it reaches the preset PSI level, push the run/pause button (1). To resume inflation, simply press the run/pause button again (fig. G).
MOM-95097-06
fig. F
1
MOM-95097-07
fig. G
1
NOTE:Disconnecting the inflator from the 12 V DC power outlet will clear the previous preset PSI setting.
7
8
NOTE:The inflator has a tolerance of + or – 2 PSI and will automatically shut off accordingly.
OPER
ATIO
N16
model no. 009-5097-2 / contact us 1-888-942-6686
OPERATION - 120 V AC MODE• Place the air compressor on a
flat and stable surface.
• Insert the 120 V AC power cord (1) into a grounded 120 V AC outlet (2) for automatic continuous power supply of 120 V current to the air compressor (fig. H).
• Connect the quick-connect valve adaptor (1) to the item that you are inflating, and push the valve lock lever down to secure the connection (fig. I) .
• Push the power selector switch (1) in the top left corner of the air compressor to the 120 V position (fig. J) .
MOM-95097-08
fig. H
1
2
fig. I
MOM-95097-14
1
MOM-95097-09
fig. J
1
1
2
3
4

OPER
ATIO
N
17
• The digital pressure gauge will display the current pressure of the item you are inflating. The LCD reading (1) will be static when the LCD readout screen is displaying the current PSI (fig. K).
• Press the button (1) on the digital pressure gauge to set the desired PSI. The preset range of the digital pressure gauge is between 3 and 120 PSI. When the LCD readout screen is displaying the target PSI, the LCD readout will blink three times at the desired preset level, and it will then change back to the current PSI level of the item that you are inflating (fig. L).
fig. K
MOM-95097-10
1
MOM-95097-11
fig. L
1
5
6
NOTE:If the current pressure of the item you are inflating is greater than the preset level,the inflator will not turn on.

OPER
ATIO
N18
model no. 009-5097-2 / contact us 1-888-942-6686
NOTE:The air com
NOTE:Disconnecti
• To turn the air compressor on, push the run/pause button (1). The preset PSI level can be changed during inflation by pressing the buttons to the new desired PSI level. The air compressor will shut off automatically at the desired preset PSI level that you have programmed into the digital pressure gauge (fig. M).
• To stop the air compressor before it reaches the preset PSI level, push the run/pause button (1). To resume inflation, simply press the run/pause button again (fig. N).
MOM-95097-12
fig. M
1
MOM-95097-13
fig. N
1
pressor has a tolerance of + or – 2 PSI and will automatically shut off accordingly.
7
8
ng the air compressor from the 120 V AC outlet will clear the previous preset PSI setting.
19
MAI
NTEN
ANCE
CLEANING AND STORAGE• Turn the power selector switch
to “Off” position and unplug the cord.
• Wipe the plastic parts clean using mild soap and warm water. DO NOT allow moisture or water to get into the interior moving parts.
• Unplug the cord and disconnect from the power supply when the tool is not in use and store the unused tool to prevent rust.
• The tool should be stored in a clean and dry environment.
• ALWAYS keep the tool out of the reach of children.
CAUTION!! ALWAYS keep the tool out of the reach of children.

TROU
BLES
HOOT
ING
20
model no. 009-5097-2 / contact us 1-888-942-6686
The following chart lists common operating issues and solutions. Please read it carefully and follow all instructions closely.
DISPOSING OF THE TOOL
If the tool is damaged beyond repair, do not throw it out. Bring it to the appropriate recycling facility.
Problem Possible Causes Solutions
Unit does not start.
1. Preset pressure setting is below the actual pressure of the item that you are inflating.
2. Cord is not plugged in.
3. Circuit breaker is tripped.
4. Fuse in 12 V DC power cord is blown.
1. Adjust the preset pressure setting to higher pressure.
2. Plug into a working 120 V AC or 12 V DC power outlet.
3. Reset circuit breaker.
4. Replace the 10 A fuse in 12 V DC power cord.
WARNING!!
NOTE:
If any of the above symptoms appear while the tool is in use, turn it off and disconnect it from the power supply immediately. Failure to heed this warning will result in serious personal injury.
For further information, please call 1-888-942-6686.