dtc1000/4000/4500 cups driver user...
TRANSCRIPT

15370 Barranca Parkway Irvine, CA 92618-2215 USA
DTC1000/4000/4500
CUPS Driver User Guide-LINUX
L001452 Rev 1.0

© 2010 HID Global Corporation All rights reserved
Document Number L001452 Rev.1.0, © 2010 HID Global Corporation. All rights reserved.
Exclusive permission is granted to authorized resellers of HID Global products to reproduce and distribute this copyrighted document to authorized HID Global customers, who have signed a “no disclosure agreement” regarding the restricted, proprietary use of said document.
The revision number for this document will be updated to reflect changes, corrections, updates and enhancements to this document.
Revision Control Number Date Document Title
Revision 1.0 July 2010 DTC1000/4000/4500 Linux User Guide
These reference documents were thoroughly reviewed to provide HID Global with professional and international standards, requirements, guidelines and models for our technical, training and user documentation. At all times, the Copyright Protection Notice for each document was adhered to within our HID Global documentation process. This reference to other documents does not imply that HID Global is an ISO-certified company at this time.
• ANSI/ISO/ASQ Q9001-2000 American National Standard, (sub-title) Quality Management Systems - Requirements (published by the American Society of Quality, Quality Press, P.O. Box 3005, Milwaukee, Wisconsin 53201-3005)
• The ASQ ISO 9000:2000 Handbook (editors, Charles A. Cianfrani, Joseph J. Tsiakals and John E. West; Second Edition; published by the American Society of Quality, Quality Press, 600 N. Plankinton Avenue, Milwaukee, Wisconsin 53203)
• Juran's Quality Handbook (editors, Joseph M. Juran and A. Blanton Godfrey; Fifth Edition, McGraw-Hill)
Any questions regarding changes, corrections, updates or enhancements to this document should be forwarded to:
HID Global Support Services 6533 Flying Cloud Drive Eden Prairie, MN 55344 (USA) (866)607-7339 Ext #6 FAX: (952) 946-8492 www.hidglobal.com
DTC1000/DTC4000/DTC4500 CUPS Driver User Guide - LINUX (L001452, Rev 1.0) 2

© 2010 HID Global Corporation All rights reserved
Table of Contents
Section 1: Supported Distributions CUPS ..................................................................................... 5 32-bit Linux versions:................................................................................................................................5 64-bit Linux versions:................................................................................................................................5
Section 2: Installation Procedures .................................................................................................. 6 Installing the CUPS Driver.............................................................................................................................6 Adding a USB Printer.....................................................................................................................................7 Adding a Network Printer ..............................................................................................................................8
Determining the Printer IP Address...........................................................................................................9 Reviewing the File Listing ...........................................................................................................................10
Section 3: Printer Maintenance..................................................................................................... 11 Performing a Ribbon Sensor Calibration......................................................................................................11 Performing a Lamination Sensor Calibration ...............................................................................................11 Cleaning the Printer......................................................................................................................................12
Section 4: Managing the Printer ................................................................................................... 13 Printing on the Command Line: ...................................................................................................................13
Printing a Test Card.................................................................................................................................13 Simply Print Commands:.........................................................................................................................14 Printing with Magnetic Stripe Encoding: ................................................................................................14 Printing with F-Panel:..............................................................................................................................14 Print to File: .............................................................................................................................................14
Managing from the Cups Web Interface ......................................................................................................15 Setting Options with Cups using Command-Line ........................................................................................15
Printer-Specific Options: .........................................................................................................................15 Setting Printer Options: ...........................................................................................................................15
Section 5: Driver Options .............................................................................................................. 16 Reviewing the Card Options ........................................................................................................................16 Reviewing the Print Options ........................................................................................................................17
Reviewing the Print Options....................................................................................................................18 Reviewing the Print Options....................................................................................................................19
Reviewing the Image Color Options ............................................................................................................20 Reviewing the Image Position Options ........................................................................................................22 Reviewing the Overlay and Print Area Options ...........................................................................................24
Reviewing the Front Area........................................................................................................................25 Reviewing the Back Area ........................................................................................................................27 Reviewing the Print Area Examples........................................................................................................30 Reviewing the Print Area Examples........................................................................................................31 Defining Overlay/Print Area Options ......................................................................................................32
Reviewing the K-Panel Options ...................................................................................................................33 Reviewing the F-Panel Options....................................................................................................................36 Reviewing the Lamination Options..............................................................................................................36
Reviewing the Lamination Position and Speed .......................................................................................37 Reviewing the Lamination Side...............................................................................................................37 Reviewing the Lamination Film Types Per Cartridge .............................................................................38 Reviewing the Lamination Transfer Temperatures per Cartridge ...........................................................39
Reviewing the Global Magnetic Encoding Options .....................................................................................40 Sending ISO Magnetic Encoding Information ........................................................................................41 Sending JIS II Magnetic Encoding Information ......................................................................................42 Sending RAW Magnetic Encoding Information......................................................................................42 Reviewing the URL Encoding Reference................................................................................................42
DTC1000/DTC4000/DTC4500 CUPS Driver User Guide - LINUX (L001452, Rev 1.0) 3

© 2010 HID Global Corporation All rights reserved
Reviewing the ASCII Code and Character Table ....................................................................................43 Reviewing the Magnetic Track Encoding Options.......................................................................................44
DTC1000/DTC4000/DTC4500 CUPS Driver User Guide - LINUX (L001452, Rev 1.0) 4

© 2010 HID Global Corporation All rights reserved
Section 1: Supported Distributions CUPS The Common Unix Printing System (CUPS), a modular printing system for Unix-like computer operating systems, allows a computer to act as a print server. A computer running CUPS is a host that can accept print jobs from client computers, process them, and send them to the appropriate printer. The minimum required CUPS version for this driver is 1.2.0, if a previous version of the CUPS interface is being used please contact the support team at HID Global.
The driver has been tested on the following Linux distributions:
32-bit Linux versions:
• Ubuntu 8.04 & 9.04
• Debian 5.04
• Fedora 7, 8, 9 & 10
• Mandriva One 2009
• Red Hat Enterprise 5
• openSuse 10.3
64-bit Linux versions:
• Ubuntu 9.04
• Debian 5.03
• Fedora 11
• Mandriva One 2009
• openSuse 11.1
DTC1000/DTC4000/DTC4500 CUPS Driver User Guide - LINUX (L001452, Rev 1.0) 5

© 2010 HID Global Corporation All rights reserved
Section 2: Installation Procedures Please follow these same procedures for the DTC1000, DTC4000, and DTC4500. The DTC4500 will refer to Lamination Options not used with the DTC1000 and DTC4000 Card Printers.
Please see Lamination Options for the DTC4500 specifics.
Installing the CUPS Driver On some Linux Distributions, it may be necessary to disable SELinux capabilities in order to install or use the CUPS Driver. Refer to the SELinux web site at:
http://www.nsa.gov/research/selinux/index.shtml
or the documentation for your specific distribution for more information.
Once the CUPS driver is installed, the Printer’s Options are accessible by following the instructions (provided in this section under Installing the CUPS Driver).
Step Procedure
1 Unpack the driver tar-ball by running the following command as root from the directory the file was downloaded to:
tar -xzvPf fargoDTC4000-1.0.0.x.tar.gz
(Note: If an existing driver was already present on the system, it may be necessary to restart CUPS to allow the file changes to take effect.)
DTC1000/DTC4000/DTC4500 CUPS Driver User Guide - LINUX (L001452, Rev 1.0) 6

© 2010 HID Global Corporation All rights reserved
Adding a USB Printer Most distribution of Linux support USB plug and play. With the driver installed, let your Operating System search for a driver. Select Fargo for the make and DTC4000 for the model. Printer will be listed in the CUPS with function options. If you prefer follow the instructions below.
Step Procedure
1 Attach Power and USB to the printer.
2 Address the primary CUPS interface on the local computer using a web browser. The address for the CUPS interface is: http://localhost:631/
3 Choose Add Printer. (Note: If you are asked for a username and password, enter your login username and password or the “root” username and password.)
4 Enter a Name, Location and Description for the Printer.
Click Continue.
5 Select the printer in the device list. (E.g.: "Fargo DTC4000 USB #1")
Click Continue.
6 Select the Manufacturer (Fargo) from the list. (Skip this step if CUPS detected the manufacturer for you.)
Click Continue.
7 Select DTC4000 (en) from the Model list.
Click Add Printer.
DTC1000/DTC4000/DTC4500 CUPS Driver User Guide - LINUX (L001452, Rev 1.0) 7
© 2010 HID Global Corporation All rights reserved
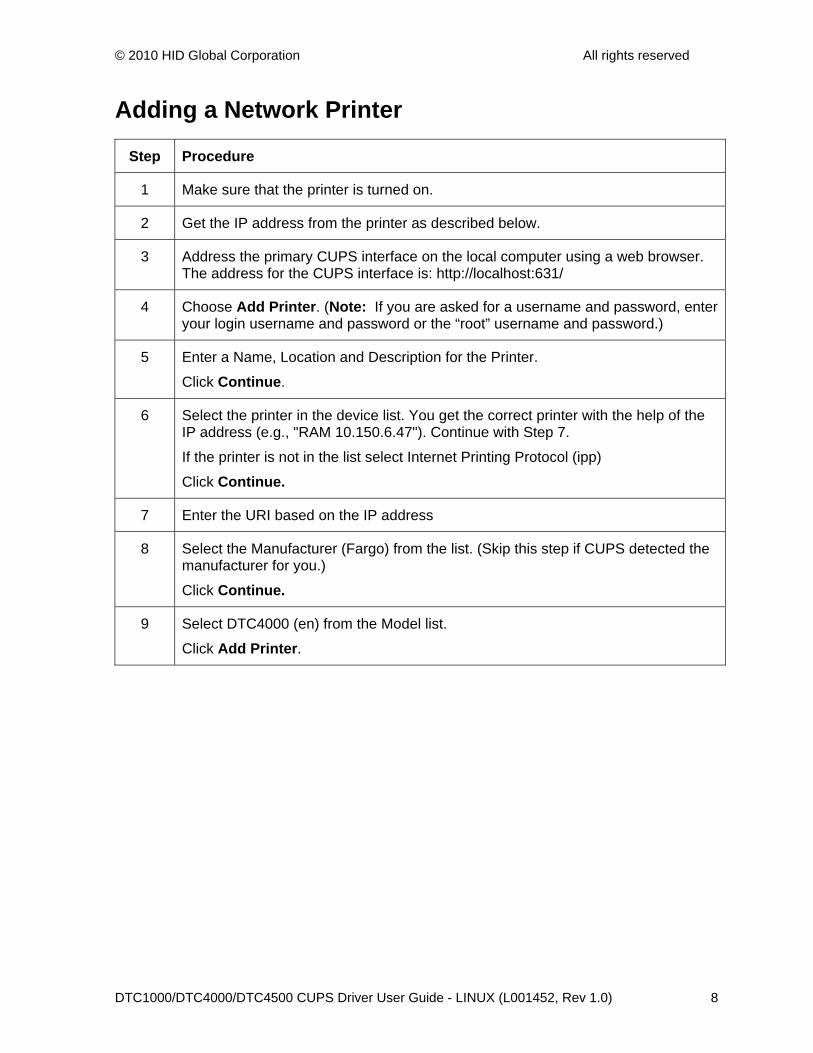
Adding a Network Printer
Step Procedure
1 Make sure that the printer is turned on.
2 Get the IP address from the printer as described below.
3 Address the primary CUPS interface on the local computer using a web browser. The address for the CUPS interface is: http://localhost:631/
4 Choose Add Printer. (Note: If you are asked for a username and password, enter your login username and password or the “root” username and password.)
5 Enter a Name, Location and Description for the Printer.
Click Continue.
6 Select the printer in the device list. You get the correct printer with the help of the IP address (e.g., "RAM 10.150.6.47"). Continue with Step 7.
If the printer is not in the list select Internet Printing Protocol (ipp)
Click Continue.
7 Enter the URI based on the IP address
8 Select the Manufacturer (Fargo) from the list. (Skip this step if CUPS detected the manufacturer for you.)
Click Continue.
9 Select DTC4000 (en) from the Model list.
Click Add Printer.
DTC1000/DTC4000/DTC4500 CUPS Driver User Guide - LINUX (L001452, Rev 1.0) 8
© 2010 HID Global Corporation All rights reserved
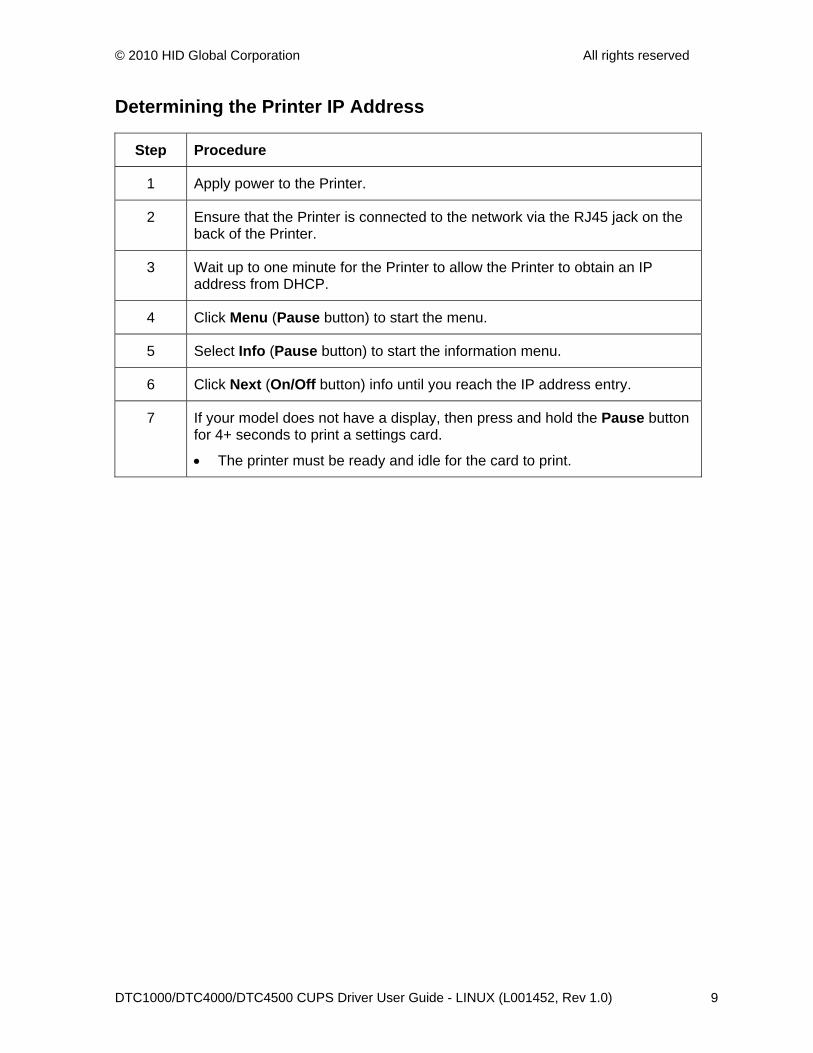
Determining the Printer IP Address
Step Procedure
1 Apply power to the Printer.
2 Ensure that the Printer is connected to the network via the RJ45 jack on the back of the Printer.
3 Wait up to one minute for the Printer to allow the Printer to obtain an IP address from DHCP.
4 Click Menu (Pause button) to start the menu.
5 Select Info (Pause button) to start the information menu.
6 Click Next (On/Off button) info until you reach the IP address entry.
7 If your model does not have a display, then press and hold the Pause button for 4+ seconds to print a settings card.
• The printer must be ready and idle for the card to print.
DTC1000/DTC4000/DTC4500 CUPS Driver User Guide - LINUX (L001452, Rev 1.0) 9

© 2010 HID Global Corporation All rights reserved
Reviewing the File Listing These files should have been installed to your computer. (Note: Replace DTC4000 by DTC1000 or DTC4500 for the file listings of the other printer models.)
/usr/share/cups/profiles/sRGB.icm Reference Color Profile
/usr/share/cups/profiles/DTC4000CLR.icm Printer Specific Color Profile
/usr/share/cups/model/ DTC4000.ppd PPD File for the DTC4000 Card Printer
/usr/lib/cups/filter/rastertofargo-x.y Raster Filter for Fargo Card Printers. X.y is major and minor version of the filter
/usr/share/fargo/DTC4000/DTC4000.xml Configuration File for the DTC4000 Card Printer.
/usr/share/fargo/DTC4000/*.prn Test prn files.
DTC1000/DTC4000/DTC4500 CUPS Driver User Guide - LINUX (L001452, Rev 1.0) 10

© 2010 HID Global Corporation All rights reserved
Section 3: Printer Maintenance Performing a Ribbon Sensor Calibration
Step Procedure
1 Remove all cards from the Card Hopper and close the Hopper door.
2 Open the Front Cover, remove the Ribbon Cartridge and close the Printer’s front cover.
3 From a terminal window enter:
lpr -P DTC4000 “/usr/share/fargo/DTC4000/CalibrateRibbon.prn”
4 When completed, the Printer will beep twice.
Performing a Lamination Sensor Calibration This procedure applies to strictly to the DTC4500 Printer.
Step Description
1 Ensure that the Cartridges are out of the Laminator.
2 Ensure the Laminator cover is closed.
3 From a terminal window enter:
lpr -P DTC4500 “/usr/share/fargo/DTC4500/CalibrateLamination.prn”
4 When completed, the Printer will beep twice.
DTC1000/DTC4000/DTC4500 CUPS Driver User Guide - LINUX (L001452, Rev 1.0) 11

© 2010 HID Global Corporation All rights reserved
Cleaning the Printer
Step Description
1 Remove all cards from the Card Hopper and close the Hopper door.
2 Open the Front Cover and remove the Ribbon Cartridge.
3 Remove the paper backing from both sides of the Cleaning Card.
4 Place the Cleaning card into the Single Feed Slot.
5 From a terminal window, enter:
lpr -P DTC4000 “/usr/share/fargo/DTC4000/CleanPrinter.prn”
DTC1000/DTC4000/DTC4500 CUPS Driver User Guide - LINUX (L001452, Rev 1.0) 12

© 2010 HID Global Corporation All rights reserved
Section 4: Managing the Printer Printing on the Command Line: Printing a Test Card
Step Description
1 Ensure that cards are in the Input Hopper.
2 Ensure that the YMCKO Ribbon is installed in the Printer.
3 From a terminal window, enter:
• lpr -P DTC4000 /usr/share/fargo/DTC4000/DTC4000_YMCKO_Tst.prn
OR
• lp -d DTC4000 /usr/share/fargo/DTC4000/DTC4000_YMCKO_Tst.prn
4 When completed, a test card should be printed.
Example test card:
DTC1000/DTC4000/DTC4500 CUPS Driver User Guide - LINUX (L001452, Rev 1.0) 13

© 2010 HID Global Corporation All rights reserved
Simply Print Commands:
• lpr -P [printer] [filename]
OR
• lp -d [printer] [filename]
Printing with Magnetic Stripe Encoding:
Run the following command:
lp -d [printer] -o “MagTrack1=%25MAGTEST1%3F MagTrack2=%3B1234567890%3F MagTrack3=%3B1234567890%3F” [filename]
Printing with F-Panel:
Run the following command:
lp –d [printer] -o "FPanelFrontFilename=[Fpanel-filename]" [filename]
Print to File:
Run the following command:
lp -d DTC4500_LPT -o PrintToFile=/home/fargo/output.prn /home/fargo/Desktop/TestCardGirl.pdf
With this command line, the printer data stream is written to the specified file.
DTC1000/DTC4000/DTC4500 CUPS Driver User Guide - LINUX (L001452, Rev 1.0) 14

© 2010 HID Global Corporation All rights reserved
DTC1000/DTC4000/DTC4500 CUPS Driver User Guide - LINUX (L001452, Rev 1.0) 15
Managing from the Cups Web Interface The Web printer management interface is located at:
http://localhost:631/printers From there you can perform all printer management tasks with a few simple mouse clicks.
Setting Options with Cups using Command-Line Printer-Specific Options:
Each printer has its own options that are based on the options in the PPD (driver) file. The lpoptions command provides a way to see a list of the available options:
lpoptions -p DTC4000 -1 Each option starts with the option name, a slash, the human readable text for that option, and a colon. This is followed by a list of values for that option. The asterisk (*) in from of the value indicates that this is the default setting. The options themselves follow the colon:
Setting Printer Options:
For many types of files, the default printer options may be sufficient for your needs. However, at times you may need to change the options for a particular file you are printing. Cups provides both System V (lp) and Berkeley (lpr) printing commands.
The lp and lpr commands allow you to pass printer options using the –o options:
• lp -d [printer] -o landscape -o scaling=75 -o media=A4 [filename] OR
• lpr -P [printer] -o landscape -o scaling=75 -o media=A4 [filename]

© 2010 HID Global Corporation All rights reserved
Section 5: Driver Options Reviewing the Card Options
Command Line Usage CUPS option Description
Copies = X n/a Sets the number of Copies
PageSize = CR80 Media Size = CR80
Sets the Page Size for the print job to CR-80 (3.366"L x 2.110"W / 85.5mmL x 53.6mmW).
PageSize = CR79 Media Size = CR79
Sets the Page Size for the print job to CR-79 (3.295"L x 2.043"W / 83.7mmL x 51.9mmW).
CardThickness = <10, 20, 30, 40>
CardThickness = <10, 20, 30, 40>
Sets the Card Thickness to 10, 20, 30 or 40.
This option applies to the DTC4500 only:
Command Line Usage CUPS option Description
CardHopper = FirstAvailable Card Hopper = First Available
Sets the card hopper to first available.
CardHopper = Hopper1 Card Hopper = Top
Sets the card hopper to 1.
CardHopper = Hopper2 Card Hopper = Bottom
Sets the card hopper to 2.
Fargo DTC1000/DTC4000/DTC4500 CUPS Driver User Guide - LINUX (L001452, Rev 1.0) 16

© 2010 HID Global Corporation All rights reserved
Reviewing the Print Options
Command Line Usage CUPS option Description
Ribbon = YMCKO Ribbon Type = YMCKO Full
Sets the Ribbon type for the print job to YMCKO – Full Color/ Resin Black/Overlay.
Ribbon = YMCKO_Half Ribbon Type = YMCKO Half Panel
Sets the Ribbon type for the print job to YMCKO_HP – Full Color/ Resin Black/ Overlay/ Half Panel
Ribbon=YMCKK Ribbon Type= YMCKK Sets the Ribbon type for the print job to YMCKK – Full Color/Two Resin Black. Only available for the DTC4500.
Ribbon = YMCKOK Ribbon Type = YMCKOK
Sets the Ribbon type for the print job to YMCKOK – Full Color/Two Resin Black/Overlay.
Ribbon = YMCFKO Ribbon Type = YMCFKO
Sets the Ribbon type for the print job to YMCFKO – Full Color/ Fluorescing/ Resin Black/Overlay. Only available for the DTC4500 and DTC4000.
Fargo DTC1000/DTC4000/DTC4500 CUPS Driver User Guide - LINUX (L001452, Rev 1.0) 17

© 2010 HID Global Corporation All rights reserved
Reviewing the Print Options
Command Line Usage CUPS option Description
Ribbon = YMCFKOK Ribbon Type = YMCFKOK
Sets the Ribbon type for the print job to YMCFKOK – Full Color/ Fluorescing/ Two Black/Overlay. Only available for the DTC4500 and DTC4000.
Ribbon = KStandard Ribbon Type = Standard Resin
Sets the Ribbon type for the print job to Standard Resin.
Ribbon = KPremium Ribbon Type = Premium Resin
Sets the Ribbon type for the print job to Premium Resin.
Ribbon = MonoColor Ribbon Type = Colored Resin
Sets the Ribbon type for the print job to mono color Resin. This option should be used for any of the colored resin Ribbons (Red, Blue, Green, or White)
Ribbon = KO Ribbon Type = KO - Premium Resin/Overlay
Sets the Ribbon type for the print job to KO – Premium Resin/Overlay.
Ribbon = BO Ribbon Type = BO - Dye-Sub Black/Overlay
Sets the Ribbon type for the print job to BO – Dye Sub Black with Overlay
Ribbon = None Ribbon Type = None - Re-Writable
Sets the Ribbon type for the print job to none. Used for rewriteable cards.
Fargo DTC1000/DTC4000/DTC4500 CUPS Driver User Guide - LINUX (L001452, Rev 1.0) 18

© 2010 HID Global Corporation All rights reserved
Reviewing the Print Options
Command Line Usage CUPS option Description
PrintBothSides = true/false Print Both Sides = True/ False
Allows dual printing capabilities if the printer is equipped with a flipper module.
SplitRibbon = true/false Split 1 Set of Ribbon Panels = True/ False
By selecting true this option will print full color on the front of the card and resin black on the back of the card. If using the YMCKO ribbon type, the front will print with YMC and the back with the K panel, and the O panel printed on the front.
PrintBackonFront = true/false Print Back Image on Front of Card = True/ False
Allows printing back on front and front on back.
PrintBackOnly = true/false Print Back Side Only = True/ False
Allows printing back side only.
RotateImageFront = true/false Rotate Front 180 Degrees = True/ False
Allows rotating the front print.
RotateImageBack = true/false Rotate Back 180 Degrees = True/ False
Allows rotating the back print.
DisablePrinting = true/false Disable Printing (Feed Card Only) = True/ False
Allows disabling Printing, useful to encode cards.
WriteOnly= true/false Write Only (No erase pass) = True/ False
Allows write only. (For rewriteable cards)
Fargo DTC1000/DTC4000/DTC4500 CUPS Driver User Guide - LINUX (L001452, Rev 1.0) 19

© 2010 HID Global Corporation All rights reserved
Reviewing the Image Color Options
Command Line Usage
CUPS Option Description
ColorMatching = None Color Matching = None
Select None for print speed versus print color or for use of third party color matching software.
ColorMatching = System
Color Matching = System Color Management
This provides a closer match to the sRGB color specifications. (Note: This option shifts colors to a different color model so the colors in the image will more closely match how they appear on the monitor.)
Fargo DTC1000/DTC4000/DTC4500 CUPS Driver User Guide - LINUX (L001452, Rev 1.0) 20

© 2010 HID Global Corporation All rights reserved
Reviewing the Image Color Options
Command Line Usage
CUPS Option Description
ResinDither = Graphics Resin Dither = Optimize for Graphics
Select Optimize for Graphics when printing barcodes and graphics with resin.
ResinDither = Photos Resin Dither = Optimize for Photos
Select Optimize for Photo when printing photo quality images with resin.
DyeSubIntensity = <-50 to 50>
Dye-Sub Intensity = <-50 to 50>
Dye-Sub intensity – defaults to zero and has a range from -50 to 50. This is valid for YMC panels.
ResinHeatFront = <-50 to 50>
Resin Heat Front = <-50 to 50>
Resin heat for the front of the card – defaults to zero and has a range from -50 to 50. Deals with K material only
ResinHeatBack = <-50 to 50>
Resin Heat Back = <-50 to 50>
Resin heat for the back of the card – defaults to zero and has a range from -50 to 50. Deals with K material only.
OverlayHeat = <-50 to 50>
Overlay Heat = <-50 to 50>
Overlay heat – defaults to zero and has a range from -50 to 50. Deals with O panel only.
EraseIntensity = <-50 to 50>
Erase Intensity = <-50 to 50>
Erase Intensity - defaults to zero and has a range from -50 to 50.
SharpnessOffset = <-50 to 50>
Sharpness = <-50 to 50>
Image Quality: Sharpness – defaults to zero with a range of -50 to 50.
ContrastOffset = <-50 to 50>
Contrast = <-50 to 50>
Image Quality: Contrast – defaults to zero with a range of -50 to 50.
GammaOffset = <-50 to 50>
Gamma = <-50 to 50>
Image Quality: Gamma – defaults to zero with a range of -50 to 50.
YellowBalance = <-50 to 50>
Yellow Balance = <-50 to 50>
Yellow Balance – defaults to zero with a range of -50 to 50.
MagentaBalance = <-50 to 50>
Magenta Balance = <-50 to 50>
Magenta Balance – defaults to zero with a range of -50 to 50.
CyanBalance = <-50 to 50>
Cyan Balance = <-50 to 50>
Cyan Balance – defaults to zero with a range of -50 to 50.
Fargo DTC1000/DTC4000/DTC4500 CUPS Driver User Guide - LINUX (L001452, Rev 1.0) 21
© 2010 HID Global Corporation All rights reserved
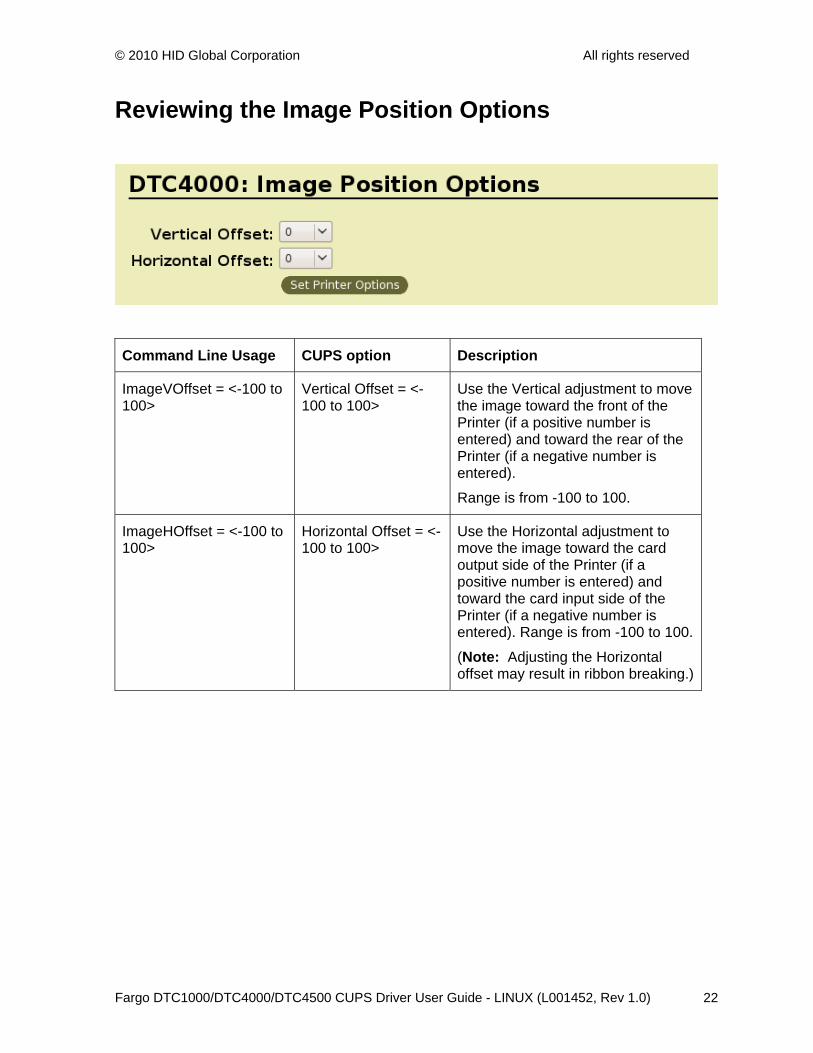
Reviewing the Image Position Options
Command Line Usage CUPS option Description
ImageVOffset = <-100 to 100>
Vertical Offset = <-100 to 100>
Use the Vertical adjustment to move the image toward the front of the Printer (if a positive number is entered) and toward the rear of the Printer (if a negative number is entered).
Range is from -100 to 100.
ImageHOffset = <-100 to 100>
Horizontal Offset = <-100 to 100>
Use the Horizontal adjustment to move the image toward the card output side of the Printer (if a positive number is entered) and toward the card input side of the Printer (if a negative number is entered). Range is from -100 to 100.
(Note: Adjusting the Horizontal offset may result in ribbon breaking.)
Fargo DTC1000/DTC4000/DTC4500 CUPS Driver User Guide - LINUX (L001452, Rev 1.0) 22

© 2010 HID Global Corporation All rights reserved
Reviewing the Image Position Options
Here is an overview of image position options.
Fargo DTC1000/DTC4000/DTC4500 CUPS Driver User Guide - LINUX (L001452, Rev 1.0) 23

© 2010 HID Global Corporation All rights reserved
Reviewing the Overlay and Print Area Options
Fargo DTC1000/DTC4000/DTC4500 CUPS Driver User Guide - LINUX (L001452, Rev 1.0) 24

© 2010 HID Global Corporation All rights reserved
Reviewing the Front Area
Command Line Usage CUPS Options Description
PrintAreaFrontOption = fullcard
Front Overlay/Print Area = Full Card
The full card will be printed, and overlay will be applied.
PrintAreaFrontOption = omitSmartChip
Front Overlay/Print Area = Omit Smart Chip Area
An area (corresponding to the ISO location for a smart chip) will be omitted from print and overlay.
PrintAreaFrontOption = omitMagStripe
Front Overlay/Print Area = Omit Mag Stripe Area
An area (corresponding to the ISO location for a Magnetic stripe) will be omitted from print and overlay.
PrintAreaFrontOption = omitSignature
Front Overlay/Print Area = Omit Signature Area
An area (corresponding to the ISO location for a Signature Stripe) will be omitted from print and overlay.
PrintAreaFrontOption = defined
NA All defined areas will be omitted from print and overlay. The only way to use defined areas is through the command line. See Defining Overlay/Print area options: for more information.
PrintAreaFrontOption = undefined
NA All undefined areas will be omitted from print and overlay. The only way to use defined areas is through the command line. See Defining Overlay/Print area options: for more information.
Fargo DTC1000/DTC4000/DTC4500 CUPS Driver User Guide - LINUX (L001452, Rev 1.0) 25

© 2010 HID Global Corporation All rights reserved
Reviewing the Front Area
Command Line Usage CUPS option Description
PrintAreaFrontApply = PrintAndOverlay
Front Apply Area(s) = Print and Overlay
Print area options are applied to print and overlay as described in the table above.
PrintAreaFrontApply = OverlayOnly
Front Apply Area(s) = Overlay Only
Print area options from the table above are applied to overlay only.
PrintAreaFrontApply = PrintOnly
Front Apply Area(s) = Print Only (No Overlay)
Print area options from the table above are applied to print only. Use this option for ribbons without overlay.
Fargo DTC1000/DTC4000/DTC4500 CUPS Driver User Guide - LINUX (L001452, Rev 1.0) 26

© 2010 HID Global Corporation All rights reserved
Reviewing the Back Area
Command Line Usage CUPS Options Description
PrintAreaBackOption = fullcard
Back Overlay/Print Area = Full Card
The full card will be printed, and overlay will be applied.
PrintAreaBackOption = omitSmartChip
Back Overlay/Print Area = Omit Smart Chip Area
An area (corresponding to the ISO location for a smart chip) will be omitted from print and overlay.
PrintAreaBackOption = omitMagStripe
Back Overlay/Print Area = Omit Mag Stripe Area
An area (corresponding to the ISO location for a Magnetic stripe) will be omitted from print and overlay.
PrintAreaBackOption = omitSignature
Back Overlay/Print Area = Omit Signature Area
An area (corresponding to the ISO location for a Signature Stripe) will be omitted from print and overlay.
PrintAreaBackOption = defined
n/a All defined areas will be omitted from print and overlay. The only way to use defined areas is through the command line. See Defining Overlay/Print area options: for more information.
PrintAreaBackOption = undefined
n/a All undefined areas will be omitted from print and overlay. The only way to use defined areas is through the command line. See Defining Overlay/Print area options: for more information.
Fargo DTC1000/DTC4000/DTC4500 CUPS Driver User Guide - LINUX (L001452, Rev 1.0) 27

© 2010 HID Global Corporation All rights reserved
Reviewing the Back Area (continued)
Command Line Usage CUPS option Description
PrintAreaBackapply = PrintAndOverlay
Back Apply Area(s) = Print and Overlay
Print area options are applied to print and overlay as described in the table above.
PrintAreaBackapply = OverlayOnly
Back Apply Area(s) = Overlay Only
Print area options from the table above are applied to overlay only.
PrintAreaBackapply = PrintOnly
Back Apply Area(s) = Print Only (No Overlay)
Print area options from the table above are applied to print only. Use this option for ribbons without overlay.
(Note: If you are using Split Ribbon Print, this option must be set to Print Only.)
VisualSecurityArea = None Visual Security Solution = No Visual Security
Sets the Visual Security Area to no visual Security.
VisualSecurityArea = UpperLeft
Visual Security Solution = Upper Left
Sets the Visual Security Area to upper left.
VisualSecurityArea = UpperRight
Visual Security Solution = Upper Right
Sets the Visual Security Area to upper right.
VisualSecurityArea = LowerLeft
Visual Security Solution = Lower Left
Sets the Visual Security Area to lower left.
VisualSecurityArea = LowerRight
Visual Security Solution = Lower Right
Sets the Visual Security Area to lower right.
Fargo DTC1000/DTC4000/DTC4500 CUPS Driver User Guide - LINUX (L001452, Rev 1.0) 28

© 2010 HID Global Corporation All rights reserved
Reviewing the Back Area
Command Line Usage CUPS option Description
VisualSecurityType = VeriMark
Visual Security Type = VeriMark
Sets the Visual Security Type to VeriMark.
VisualSecurityType = HoloMark
Visual Security Type = HoloMark
Sets the Visual Security Type to HoloMark.
VisualSecurityOrientation = Landscape
Visual Security Orientation = Landscape
Sets the Visual Security Orientation to Landscape.
VisualSecurityOrientation = Portrait
Visual Security Orientation = Portrait
Sets the Visual Security Orientation to Portrait.
Fargo DTC1000/DTC4000/DTC4500 CUPS Driver User Guide - LINUX (L001452, Rev 1.0) 29

© 2010 HID Global Corporation All rights reserved
Reviewing the Print Area Examples
Display: Omit Smart Chip Example
Display: Omit Magnetic Stripe Example
Fargo DTC1000/DTC4000/DTC4500 CUPS Driver User Guide - LINUX (L001452, Rev 1.0) 30
© 2010 HID Global Corporation All rights reserved
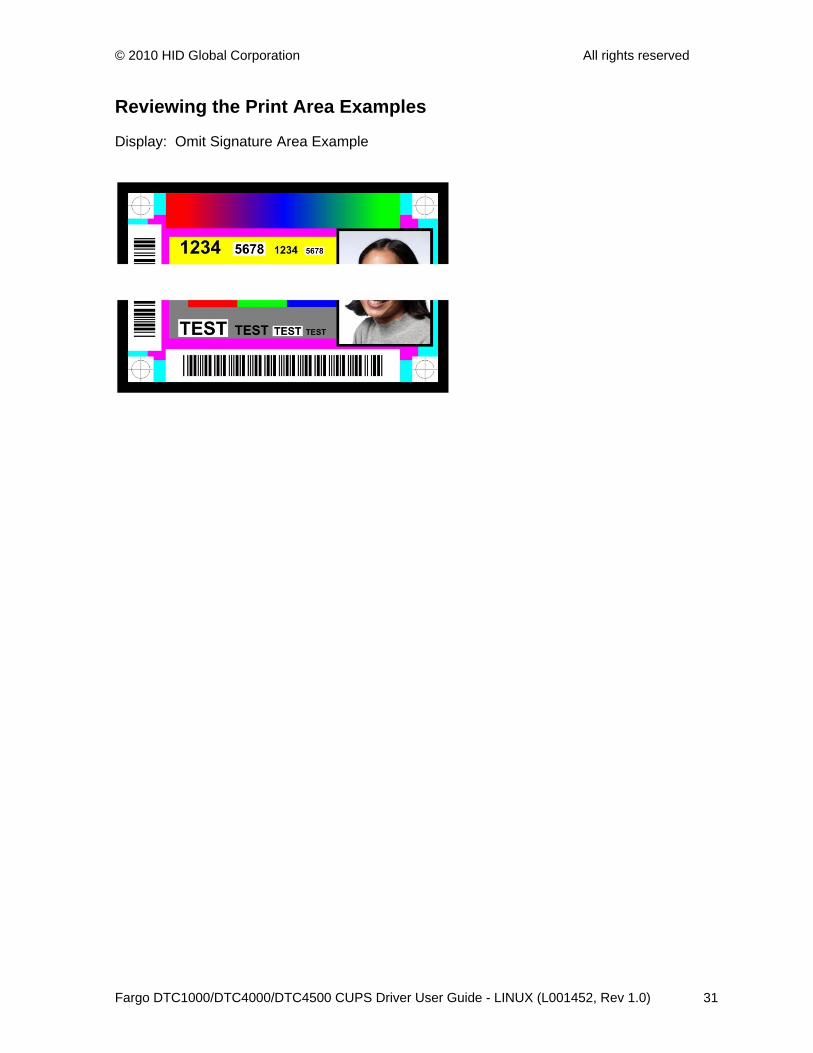
Reviewing the Print Area Examples
Display: Omit Signature Area Example
Fargo DTC1000/DTC4000/DTC4500 CUPS Driver User Guide - LINUX (L001452, Rev 1.0) 31

© 2010 HID Global Corporation All rights reserved
Defining Overlay/Print Area Options
If custom print areas should be excluded from the print, this can be done with defined areas. To use these custom areas, PrintAreaFrontOption or PrintAreaBackOption must be set to defined or undefined areas.
• Select defined to exclude all defined areas from the print. Select undefined to exclude all undefined areas from the print.
• Five (5) areas can be defined. The only way to define these areas is via the command line interface. (Note: This is because these parameters are too complex for the cups interface. Use 2,3,4 or 5 instead of 1 to address the other print areas.)
• To define a print area set Origin X and Y and Length X and Y. Remember that Origin, Length and Origin + Length must be in the printable area.
The printable area is from 0/0 to 152/242 for CR80 and from 0/0 to 148/238 for CR79.
Command Line Usage CUPS option Description
PrintAreaFrontEnable1 = true/ false
n/a Select if print area front 1 should be enabled.
PrintAreaFrontXOrigin1 = X n/a Sets the X origin for print area front 1.
PrintAreaFrontYOrigin1 = X n/a Sets the Y origin for print area front 1.
PrintAreaFrontXLength1 = X n/a Sets the X length for print area front 1.
PrintAreaFrontYLength1 = X n/a Sets the Y length for print area front 1.
PrintAreaBackEnable1 = true/ false
n/a Select if print area back 1 should be enabled.
PrintAreaBackXOrigin1 = X n/a Sets the X origin for print area back 1.
PrintAreaBackYOrigin1 = X n/a Sets the Y origin for print area back 1.
PrintAreaBackXLength1 = X n/a Sets the X length for print area back 1.
PrintAreaBackYLength1 = X n/a Sets the Y length for print area back 1.
Fargo DTC1000/DTC4000/DTC4500 CUPS Driver User Guide - LINUX (L001452, Rev 1.0) 32

© 2010 HID Global Corporation All rights reserved
Reviewing the K-Panel Options
Command Line Usage CUPS Options Description
YMCunderKFront = true/ false
Front YMC Under K = True/ False
Sets if YMC colors are printed under the K print areas.
YMCunderKBack = true/ false
Back YMC Under K = True/ False
Sets if YMC colors are printed under the K print areas.
KpanelFrontApply = none
Front K-Panel Area = None Select None to have any graphics objects that are black in color to be printed using composite colors (YMC).
KpanelFrontApply = fullcard
Front K-Panel Area = Full Card
Select Full Card to print any black graphic objects on the card in resin.
KpanelFrontApply = defined
n/a Select Defined Areas to print graphic object in the defined areas in resin.
KpanelFrontApply = undefined
n/a Select Undefined Areas to print graphic object outside the defined areas in resin.
Fargo DTC1000/DTC4000/DTC4500 CUPS Driver User Guide - LINUX (L001452, Rev 1.0) 33

© 2010 HID Global Corporation All rights reserved
Reviewing the K-Panel Options
Command Line Usage CUPS option Description
KPanelBackApply= none Back K-Panel Area = None
Select None to have any graphics objects that are black in color to be printed using composite colors (YMC).
KPanelBackApply= fullcard Back K-Panel Area = Full Card
Select Full Card to print any black graphic objects on the card in resin.
KPanelBackApply= defined n/a Select Defined Areas to print graphic object in the defined areas in resin.
KPanelBackApply= undefined
n/a Select Undefined Areas to print graphic object outside the defined areas in resin.
Fargo DTC1000/DTC4000/DTC4500 CUPS Driver User Guide - LINUX (L001452, Rev 1.0) 34

© 2010 HID Global Corporation All rights reserved
Reviewing the K-Panel Options
5 K-Panel areas can be defined. The only way to define these areas is via the command line interface. (Note: This is because these parameters are too complex for the cups interface. Use 2,3,4 or 5 instead of 1 to address the other k-panel areas.)
• To define a k-panel area, set Origin X and Y and Length X and Y. Remember that Origin, Length and Origin + Length must be in the printable area.
• The printable area is from 0/0 to 152/242 for CR80 and from 0/0 to 148/238 for CR79.
Command Line Usage CUPS option Description
KPanelFrontEnable1 = true/ false
n/a Select if k-panel front 1 should be enabled.
KPanelFrontXOrigin1 = X n/a Sets the X origin for k-panel front 1.
KPanelFrontYOrigin1 = X n/a Sets the Y origin for k-panel front 1.
KPanelFrontXLength1 = X
n/a Sets the X length for k-panel front 1.
KPanelFrontYLength1= X
n/a Sets the Y length for k-panel front 1.
KPanelBackEnable1= true/ false
n/a Select if k-panel back 1 should be enabled.
KPanelBackXOrigin1= X n/a Sets the X origin for k-panel back 1.
KPanelBackYOrigin1= X n/a Sets the Y origin for k-panel back 1.
KPanelBackXLength1= X n/a Sets the X length for k-panel back 1.
KPanelBackYLength1= X n/a Sets the Y length for k-panel back 1.
Fargo DTC1000/DTC4000/DTC4500 CUPS Driver User Guide - LINUX (L001452, Rev 1.0) 35

© 2010 HID Global Corporation All rights reserved
Reviewing the F-Panel Options F-Panel cards must be printed on the command line.
Command Line Usage CUPS Options Description
FpanelFrontFilename = X
n/a Sets the filename for the F-panelfront. The F-panelfront will only be printed if an explicit file name is specified.
FpanelBackFilename = X
n/a Sets the filename for the F-panelback. The F-panelback will only be printed if an explicit file name is specified.
Reviewing the Lamination Options To increase lamination adhesion, overlay should not be applied. Ribbon with an overlay panel (i.e. YMCKO, YMCKO_HP, YMCKOK, YMCFKO, YMCFKOK, KO, BO), by default will apply the overlay, to change this, select Print Only (No Overlay) from Overlay and Print options. (Note: These options apply to the DTC4500 only.)
Fargo DTC1000/DTC4000/DTC4500 CUPS Driver User Guide - LINUX (L001452, Rev 1.0) 36

© 2010 HID Global Corporation All rights reserved
Reviewing the Lamination Position and Speed
Command Line Usage CUPS Options Description
LamPosition = <-100 to +100> Horizontal Offset = < -100 to +100>
Horizontal Offset: To move the overlaminate more toward the card output side of the Printer, enter a negative number
LamSpeed= < 8 to 55> Dwell Time (sec/in)= <0.8 to 5.5>
Dwell Time: Controls the throughput speed of the cards. The range of this parameter is from 0.8s to 5.5s. The command line parameter is Multiplied by 10.
Reviewing the Lamination Side
Command Line Usage CUPS Options Description
LamSide = None Lamination Side = None No Lamination will be done.
LamSide = FrontSide Lamination Side = Front Only front of card will be laminated.
LamSide = BackSide Lamination Side = Back Only back of card will be laminated.
LamSide = BothSides Lamination Side = Both Both sides of card will be laminated.
LamSide = OppositeSides Lamination Side = Opposite
Will flip the card again before laminating.
Fargo DTC1000/DTC4000/DTC4500 CUPS Driver User Guide - LINUX (L001452, Rev 1.0) 37

© 2010 HID Global Corporation All rights reserved
Reviewing the Lamination Film Types Per Cartridge
Command Line Usage CUPS Options Description
LamType1 = None Cartridge 1 = None Indicates that no film is being used in Cartridge 1.
LamType1 = ClearFilm Cartridge 1 = Clear Film Indicates that Clear film is being used in Cartridge 1.
LamType1 = RegisteredFilm Cartridge 1 = Registered Film
Indicates that Registered Film is being used in Cartridge 1.
LamType1 = PolyGuard_06 Cartridge 1 = 0.6 Polyguard
Indicates that 0.6 Polyguard is being used in Cartridge 1.
LamType1 = PolyGuard_10 Cartridge 1 = 1.0 Polyguard
Indicates that 1.0 Polyguard is being used in Cartridge 1.
LamType1 = PolyGuardAltPatch
Cartridge 1 = Polyguard Alternating Patch
Indicates that Polyguard Alternating Patch is being used in Cartridge 1.
LamType1 = HolographicFilm
Cartridge 1 = Holographic Film
Indicates that Holographic Film is being used in Cartridge 1.
LamType2 = None Cartridge 2 = None Indicates that no film is being used in Cartridge 2.
LamType2 = ClearFilm Cartridge 2 = Clear Film Indicates that Clear film is being used in Cartridge 2.
LamType2 = RegisteredFilm Cartridge 2 = Registered Film
Indicates that Registered Film is being used in Cartridge 2.
Fargo DTC1000/DTC4000/DTC4500 CUPS Driver User Guide - LINUX (L001452, Rev 1.0) 38

© 2010 HID Global Corporation All rights reserved
Reviewing the Lamination Film Types Per Cartridge
Command Line Usage CUPS Options Description
LamType2 = PolyGuard_06 Cartridge 2 = 0.6 Polyguard
Indicates that 0.6 Polyguard is being used in Cartridge 2.
LamType2 = PolyGuard_10 Cartridge 2 = 1.0 Polyguard
Indicates that 1.0 Polyguard is being used in Cartridge 2.
LamType2 = PolyGuardAltPatch
Cartridge 2 = Polyguard Alternating Patch
Indicates that Polyguard Alternating Patch is being used in Cartridge 2.
LamType2 = HolographicFilm
Cartridge 2 = Holographic Film
Indicates that Holographic Film is being used in Cartridge 2.
Reviewing the Lamination Transfer Temperatures per Cartridge
Command Line Usage CUPS Options Description
LamTransferTemp1 = <500 to 1700> Transfer Temp (Celsius) = <50 to 170 C>
Sets the transfer temperature in Celsius for Cartridge number 1. The command line parameter is multiplied by 10.
LamTransferTemp2 = <500 to 1700> Transfer Temp (Celsius) = <50 to 170 C>
Sets the transfer temperature in Celsius for Cartridge number 2. The command line parameter is multiplied by 10.
Fargo DTC1000/DTC4000/DTC4500 CUPS Driver User Guide - LINUX (L001452, Rev 1.0) 39

© 2010 HID Global Corporation All rights reserved
Reviewing the Global Magnetic Encoding Options
Command Line Usage CUPS option Description
Coercivity = 4000 Coercivity = Super (4000 Oe)
Sets the coercivity for magnetic encoding to 4000Oersted
Coercivity = 2750 Coercivity = High (2750 Oe)
Sets the coercivity for magnetic encoding to 2750 Oersted
Coercivity = 600 Coercivity = Medium (600 Oe)
Sets the coercivity for magnetic encoding to 600 Oersted
Coercivity = 300 Coercivity = Low (300 Oe)
Sets the coercivity for magnetic encoding to 300 Oersted
Command Line Usage CUPS option Description
ShiftDataLeft = true/ false
Data Shift Left = Yes/No
Allows shifting the data left.
Fargo DTC1000/DTC4000/DTC4500 CUPS Driver User Guide - LINUX (L001452, Rev 1.0) 40

© 2010 HID Global Corporation All rights reserved
Sending ISO Magnetic Encoding Information
The CUPS Driver uses URL Encoding when defining data to be encoding to the Magnetic Stripe. Any special characters (such as start and end sentinels) must be described with URL encoding to be recognized. See the Reviewing the URL Encoding Reference for additional information.
• The first character of this data string must be the track's specific Start Sentinel (SS) and the last character must be the specific End Sentinel (ES).
• The characters or data in between the SS and ES can include all of the valid characters specific to each track.
• The number of these characters, however, is limited by each track's maximum character capacity.
When segmenting track data, the appropriate Field Separator (FS) must be used. The table below shows the SS, ES, FS and the valid characters defined for each track.
Track Start Sentinel
End Sentinel
Field Separator
Valid Characters Maximum Number of Characters
Track 1 % ? ^ ASCII 32-95 78
Track 2 ; ? = ASCII 48-63 39
Track 3 ; ? = ASCII 48-63 109
Fargo DTC1000/DTC4000/DTC4500 CUPS Driver User Guide - LINUX (L001452, Rev 1.0) 41

© 2010 HID Global Corporation All rights reserved
Sending JIS II Magnetic Encoding Information
JIS II uses only track 2. All other track data is ignored.
The CUPS Driver uses URL Encoding when defining data to be encoding to the Magnetic Stripe. Any special characters (such as start and end sentinels) must be described with URL encoding to be recognized.
See the Reviewing the URL Encoding Reference for additional information.
Sending RAW Magnetic Encoding Information
The CUPS Driver uses URL Encoding when defining data to be encoding to the Magnetic Stripe. Any special characters (such as start and end sentinels) must be described with URL encoding to be recognized.
See the Reviewing the URL Encoding Reference for additional information.
Reviewing the URL Encoding Reference
! * ' ( ) ; : @ &
%21 %2A %27 %28 %29 %3B %3A %40 %26
= + $ , / ? % #
%3D %2B %24 %2C %2F %3F %25 %23
Fargo DTC1000/DTC4000/DTC4500 CUPS Driver User Guide - LINUX (L001452, Rev 1.0) 42

© 2010 HID Global Corporation All rights reserved
Reviewing the ASCII Code and Character Table
ASCII Code Character ASCII Code Character ASCII Code
Character
32 space 56 8 80 P
33 ! 57 9 81 Q
34 “ 58 : 82 R
35 # 59 ; 83 S
36 $ 60 < 84 T
37 % 61 = 85 U
38 & 62 > 86 V
39 ' 63 ? 87 W
40 ( 64 @ 88 X
41 ) 65 A 89 Y
42 * 66 B 90 Z
43 + 67 C 91 [
44 ' 68 D 92 \
45 - 69 E 93 ]
46 . 70 F 94 ^
47 / 71 G 95 _
48 0 72 H
49 1 73 I
50 2 74 J
51 3 75 K
52 4 76 L
53 5 77 M
54 6 78 N
55 7 79 O
Fargo DTC1000/DTC4000/DTC4500 CUPS Driver User Guide - LINUX (L001452, Rev 1.0) 43
© 2010 HID Global Corporation All rights reserved
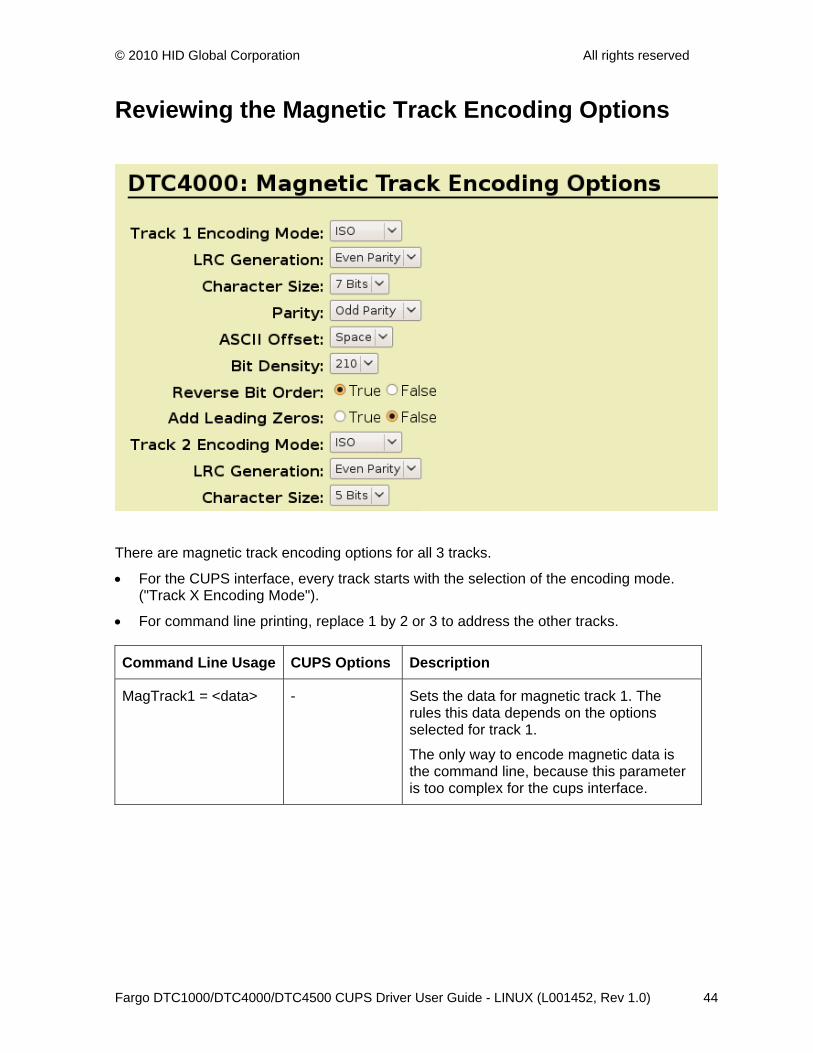
Reviewing the Magnetic Track Encoding Options
There are magnetic track encoding options for all 3 tracks.
• For the CUPS interface, every track starts with the selection of the encoding mode. ("Track X Encoding Mode").
• For command line printing, replace 1 by 2 or 3 to address the other tracks.
Command Line Usage CUPS Options Description
MagTrack1 = <data> - Sets the data for magnetic track 1. The rules this data depends on the options selected for track 1.
The only way to encode magnetic data is the command line, because this parameter is too complex for the cups interface.
Fargo DTC1000/DTC4000/DTC4500 CUPS Driver User Guide - LINUX (L001452, Rev 1.0) 44

© 2010 HID Global Corporation All rights reserved
Fargo DTC1000/DTC4000/DTC4500 CUPS Driver User Guide - LINUX (L001452, Rev 1.0) 45
Reviewing the Magnetic Track Encoding Options
Command Line Usage
CUPS option Description
Mag1TrackMode = ISO Track 1 Encoding Mode = ISO
Sets the Encoding Mode for the Print job to ISO. See Sending ISO Magnetic Encoding Information for additional information.
Mag1TrackMode = Custom
Track 1 Encoding Mode = Custom
Sets the Encoding Mode for the Print job to Custom.
Mag1TrackMode = JIS Track 1 Encoding Mode = JIS II
Sets the Encoding Mode for the Print job to JIS II. Remember that only track 2 is used for JIS2. See Sending JIS II Magnetic Encoding Information for additional information.
Mag1TrackMode = RAW
Track 1 Encoding Mode = RAW
Sets the Encoding Mode for the Print job to RAW. See Sending RAW Magnetic Encoding Information for additional information
Mag1LRCGeneration = None/ Even/ Odd
LRC Generation = None/ Even Parity/ Odd Parity
Sets the LRC generation to none, even or odd.
Mag1Charsize = <4-8> Character Size = <4–8>
Sets the character size to 4,5,6 or 7.
Mag1Parity = None/ Even/ Odd
Parity = None/ Even Parity/ Odd Parity
Sets the character parity to none, even or odd.
Mag1ASCIIOffset = Null/ Space/ Zero
ASCII Offset = Null/ Space/ Zero
Sets the ASCII offset to null, space or zero.
Mag1BitDensity = 75/ 128/ 210
Bit Density = 75/ 128/ 210
Sets the bit density to 75, 128 or 210
Mag1ReverseCharBits = True/ False
Reverse Bit Order = Yes/ No
Allows reversing the binary data.
Mag1AddLeadingZeros = True/ False
Add Leading Zeros = Yes/ no
Allows adding leading zeros to the data string based on bit density.