dreamweaver cs5 - charles sturt...
TRANSCRIPT

Dreamweaver CS5
Written by: Education and Training Team Customer Services Management Division of Information Technology
May 2011 Version 1.5
Copyright 2011 Charles Sturt University No part of this document may be reproduced, altered or sold without prior written permission of the
Executive Director, Division of Information Technology, Charles Sturt University

Dreamweaver CS5
Aim of this module The aim of this module is to provide you with skills and knowledge required for updating data on public web sites at Charles Sturt University (CSU), using Dreamweaver CS5 software. On completion of this module, you should be able to:
• Ensure that you have a copy of the public website on a local drive you are responsible for
looking after;
• Set up a Dreamweaver site corresponding to the local copy of the public website;
• Identify the web page(s) that you are responsible for updating;
• Be able to make basic editing changes, make links etc. in your web page
• Test the changes in a web browser;
• Select all the files you altered/created and upload the data back to the remote site;
• Remove any duplicated copies
The Elements of Competency and Performance Criteria specific to this competency are contained under the heading WHAT YOU SHOULD ACHIEVE. Elements of Competency are the building blocks which make up a competency. Use the elements to:
• Identify what you have to achieve; • Identify what you have already achieved; • Check your progress – that is, how you are going.
WHAT YOU NEED TO COMPLETE THIS MODULE
• Good written and spoken English • Basic keyboard / typing skills • A desire to learn new skills • Your own copy of this Learner Guide
Before starting this module, ensure you have completed any prerequisite modules and are ready for assessment. If not, you may have difficulty with some of the prerequisite knowledge and skills required for this module.
Prerequisites:
• CSU IT Induction module
• Public web page access – you can request this by filling in the form that you can find at the following URL: https://online.csu.edu.au/division/dit/forms/webpub.htm
• Good word processing skills and electronic file management experience.
Page 1 of 37
Dreamweaver CS5
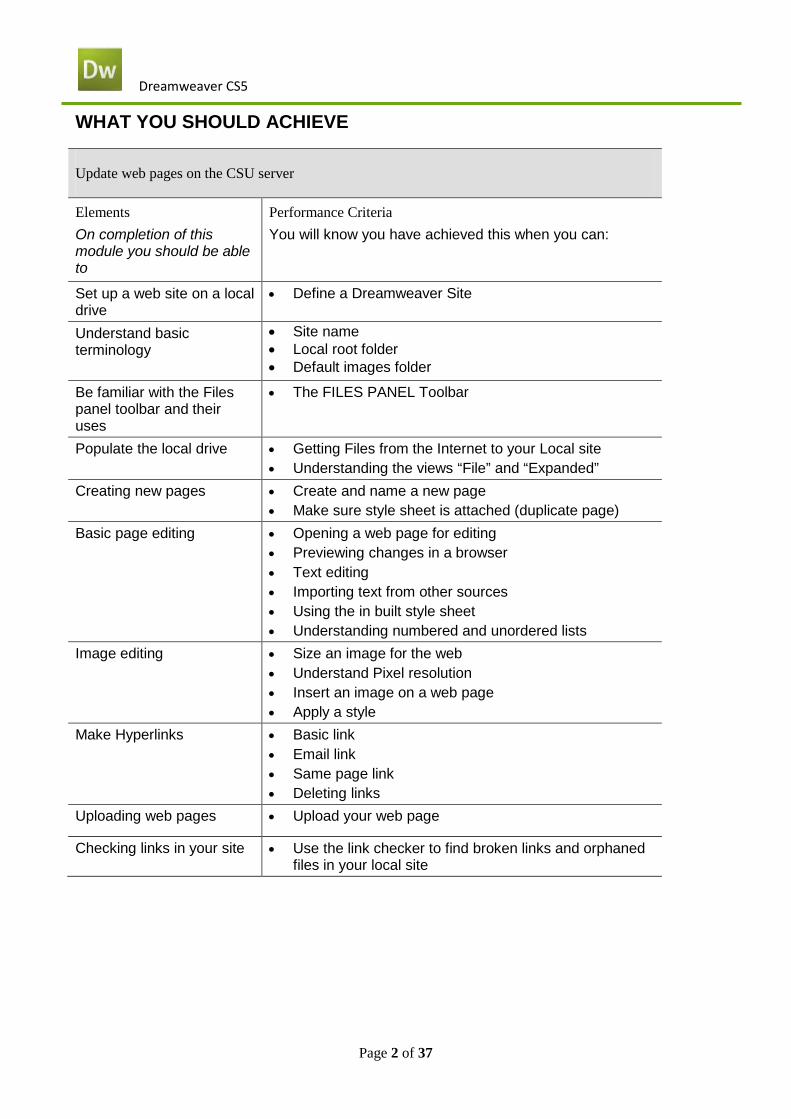
WHAT YOU SHOULD ACHIEVE
Update web pages on the CSU server
Elements On completion of this module you should be able to
Performance Criteria You will know you have achieved this when you can:
Set up a web site on a local drive
• Define a Dreamweaver Site
Understand basic terminology
• Site name • Local root folder • Default images folder
Be familiar with the Files panel toolbar and their uses
• The FILES PANEL Toolbar
Populate the local drive
• Getting Files from the Internet to your Local site • Understanding the views “File” and “Expanded”
Creating new pages • Create and name a new page • Make sure style sheet is attached (duplicate page)
Basic page editing • Opening a web page for editing • Previewing changes in a browser • Text editing • Importing text from other sources • Using the in built style sheet • Understanding numbered and unordered lists
Image editing • Size an image for the web • Understand Pixel resolution • Insert an image on a web page • Apply a style
Make Hyperlinks • Basic link • Email link • Same page link • Deleting links
Uploading web pages • Upload your web page
Checking links in your site • Use the link checker to find broken links and orphaned files in your local site
Page 2 of 37
Dreamweaver CS5
UPDATING YOUR CSU PUBLIC WEB SITE USING DREAMWEAVER CS5
INTRODUCTION
This document is designed to show you the basics of updating data on public web sites at Charles Sturt University (CSU), using Dreamweaver CS5 software. Please note that there are appendices at the end of this document.
The CSU web site is designed as an official web publishing site for the University. It accommodates materials that have the official approval of the University and is subject to the University’s quality assurance procedures and practices.
Each part of the official CSU web site is “owned” by an organisational unit and the responsibility for that area of the site rests with the Head of School, Section or Division. Publishing access rights are often assigned to designated members of staff. By publishing public pages to the CSU web site you are subject to the Web Publishing at Charles Sturt University policy which can be found under the quick links section at the LHS of the Web Publishing page at the following URL:
http://www.csu.edu.au/webpublishing
Links to other recommended reading can also be found in the Web Publishing page. Either type in the above URL in your web browser or:
1. Go to my.csu
2. Click on the IT SERVICES quick link on the left side of my.csu
3. Click on the WEB PUBLISHING link
In particular, you should make yourself aware of:
• CSU Web Policy http://www.csu.edu.au/webpublishing/6_policy.htm
• CSU Web Disability Access Action Plan (found under the CSU web policy link) http://www.csu.edu.au/webpublishing/styleguide/13_access.htm
• Web Style Guide http://www.csu.edu.au/webpublishing/styleguide/index.htm
Page 3 of 37

Dreamweaver CS5
REQUESTING ACCESS TO THE CSU official PUBLISHING PUBLIC SERVER
You must have access to the CSU official publishing public server to be able to upload any web pages. This server is known to the world as www.csu.edu.au. If you don’t have access, the quickest way to get access is to fill in the form found at:
https://online.csu.edu.au/division/dit/forms/webpub.htm
There is also a web publishing form link on the left hand side of the Web Publishing page.
DREAMWEAVER LOCAL SITE
Dreamweaver allows you create a site (Local Site) which will enable you to see your files kept on a local or network site without leaving the program.
If you know where the local files for your web site are on your local or network drive, write this down as you will need this information to set up your site in Dreamweaver. See Getting Files from the Internet” on page 11 for actual instructions on downloading a backup from the Internet.
If you do not have a backup of the files, the first step is to determine which files need backing up. You will do this by going to the home page of your website in your browser (Internet Explorer is the browser used at CSU) and writing down the information from the Address Bar.
Public Web Publishing
The following two screenshots give examples of the information you need to be able to edit your web pages. The first is a web page that the general public as well as staff and students can see. The second is a divisional public web page. The information needed is the text that comes after www.csu.edu.au.
Figure 1: Write down /faculty/science/
Figure 2: Write down: /division/dit/
Page 4 of 37

Dreamweaver CS5
CREATING A DREAMWEAVER SITE
In Dreamweaver, the word SITE is used as shorthand to refer to any of the following things:
• A WEBSITE: a set of pages on a server, to be viewed by a visitor to the site using a web browser.
• A REMOTE SITE: the files on the server that make up a website, from your (the author’s) point of view rather than a visitor’s point of view. This is sometimes called the ‘Live’ site.
• A LOCAL SITE: the files on your local disk that correspond to the files in the remote site. In the most common Dreamweaver workflow, you edit the files on your local disk, then upload them to the remote site. This is sometimes called the ‘Development site’
• A DREAMWEAVER SITE DEFINITION: a set of instructions to define the path needed to connect to both the remote and local sites
Excerpt from the Dreamweaver Help menu
The following instructions will:
1. Set up a DREAMWEAVER SITE DEFINITION for your CSU website
2. Get a copy of the REMOTE SITE files to use as a Local Site if a copy does not already exist.
Defining a Dreamweaver Site
If you already have a local copy of your website, make sure you know where the files are located before following these steps. If you do not have a local copy, these notes include instructions on creating a folder on your local or network drive in which to keep the copy, (the LOCAL SITE). The next section then gives instructions on how to download a copy of your WEBSITE from the REMOTE SITE.
1. Create a folder on your “S” drive and name it website (or whatever your site is called). Then inside that folder, create another folder called ‘images’
2. Open Dreamweaver and click on the ‘manage sites’ text.
3. Click on the SITE menu, select the MANAGE SITES option.
Page 5 of 37
Dreamweaver CS5
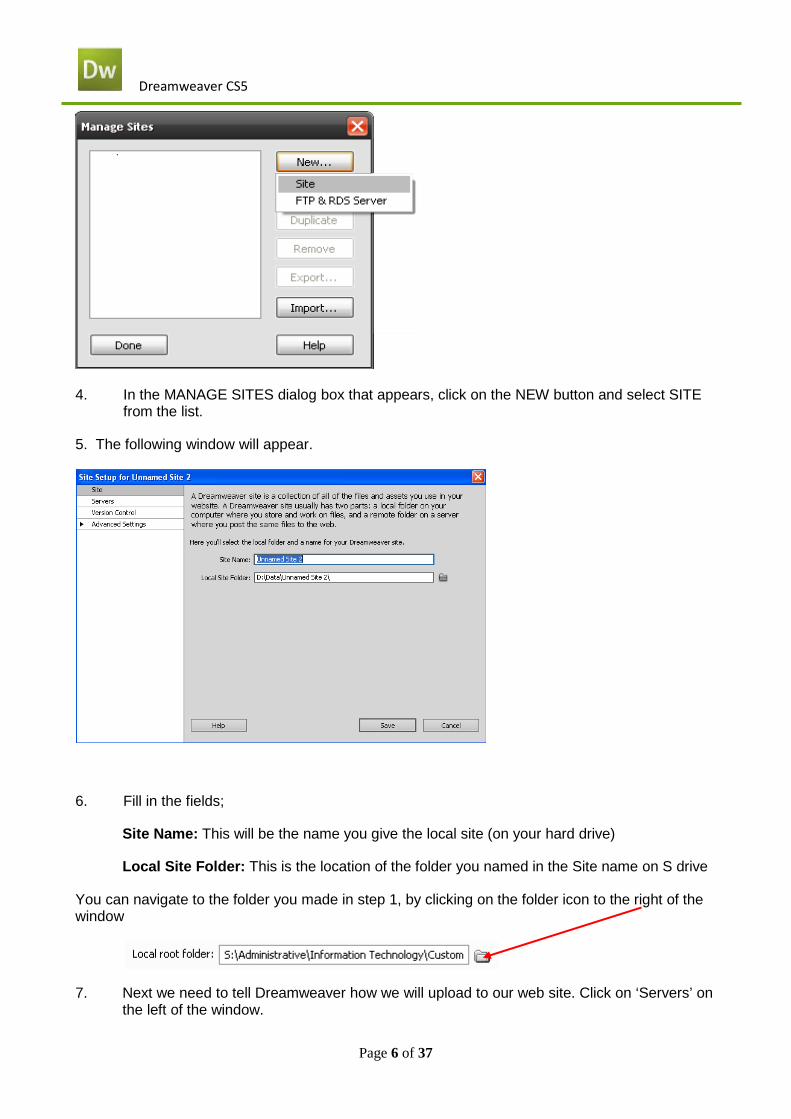
4. In the MANAGE SITES dialog box that appears, click on the NEW button and select SITE from the list.
5. The following window will appear.
6. Fill in the fields;
Site Name: This will be the name you give the local site (on your hard drive)
Local Site Folder: This is the location of the folder you named in the Site name on S drive
You can navigate to the folder you made in step 1, by clicking on the folder icon to the right of the window
7. Next we need to tell Dreamweaver how we will upload to our web site. Click on ‘Servers’ on the left of the window.
Page 6 of 37
Dreamweaver CS5
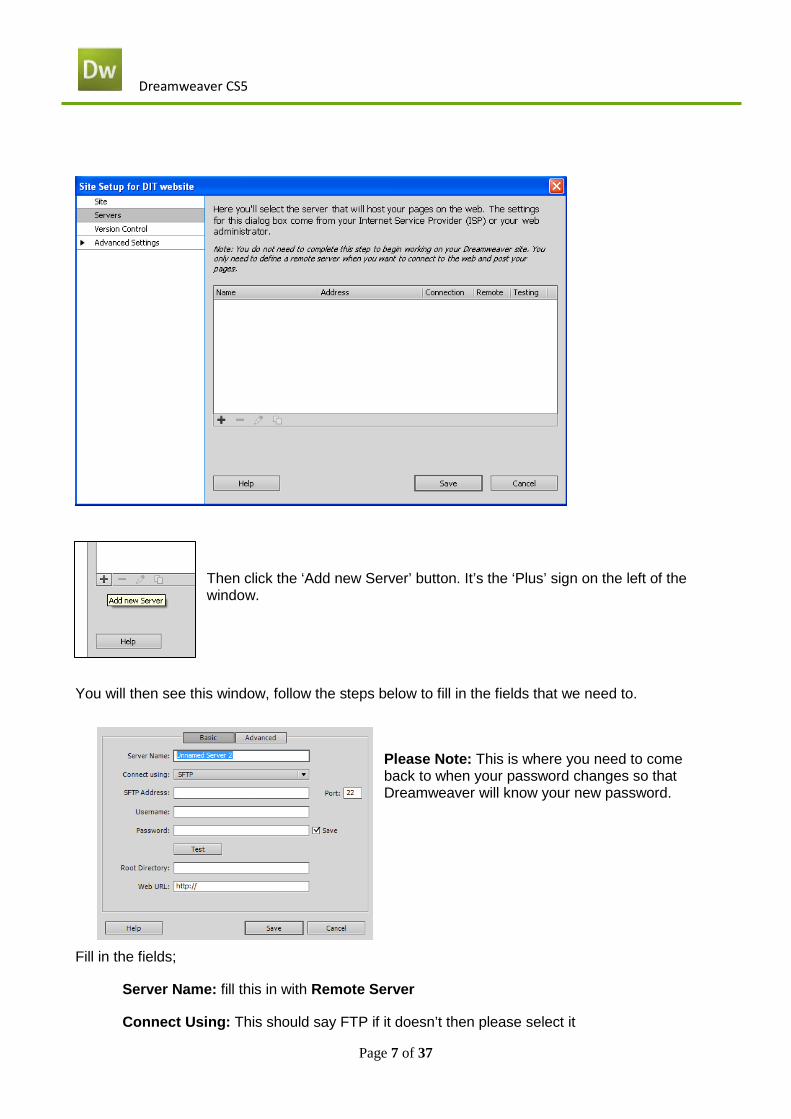
Then click the ‘Add new Server’ button. It’s the ‘Plus’ sign on the left of the window.
You will then see this window, follow the steps below to fill in the fields that we need to.
Please Note: This is where you need to come back to when your password changes so that Dreamweaver will know your new password.
Fill in the fields;
Server Name: fill this in with Remote Server
Connect Using: This should say FTP if it doesn’t then please select it
Page 7 of 37

Dreamweaver CS5
FTP Address: fill this in with the following information. louise.mit.csu.edu.au
Login: your CSU login name.
Password: your current password. Please note, do not click the save box, as you will need to change this as your password changes.
Root Directory: This should say /local/WWW/ then add your website
Here is a screen shot of the required fields filled in using /division/dit/ as the example.
10. Once this is done, click on OK, then click Done in the second window.
11. The FILES panel will now show the name of your site in a drop down list. Make sure that the second drop down list next to it has LOCAL VIEW selected, so you can see your local site in this window, with all the files and folders. Note: you will not see the folders just yet, as at this stage we have not downloaded them from the Remote site
.
• If you have more than one Dreamweaver Site definition, use the first drop down list in the screenshot above to switch to other sites;
• If you need to create another Dreamweaver Site definition, you will find the MANAGE SITES link at the bottom of the first drop down list in the screenshot above. Alternatively click on the SITE menu, MANAGE SITES option.
The name of the site currently in view
Make sure this ALWAYS says LOCAL VIEW
Page 8 of 37

Dreamweaver CS5
To reinforce what you have just learned, do the following
1. Copy the folder S:\Common\Special Projects\Training\page-curator-template08 from there to your desktop (right click copy, right click paste)
2. Define the “Local Site”
3. Show your trainer that you are able to fill in the “Remote Site” details (but don’t do it fill in the blanks on page 7)
4. Explain the difference between “Local” and “Remote”
Page 9 of 37
Dreamweaver CS5
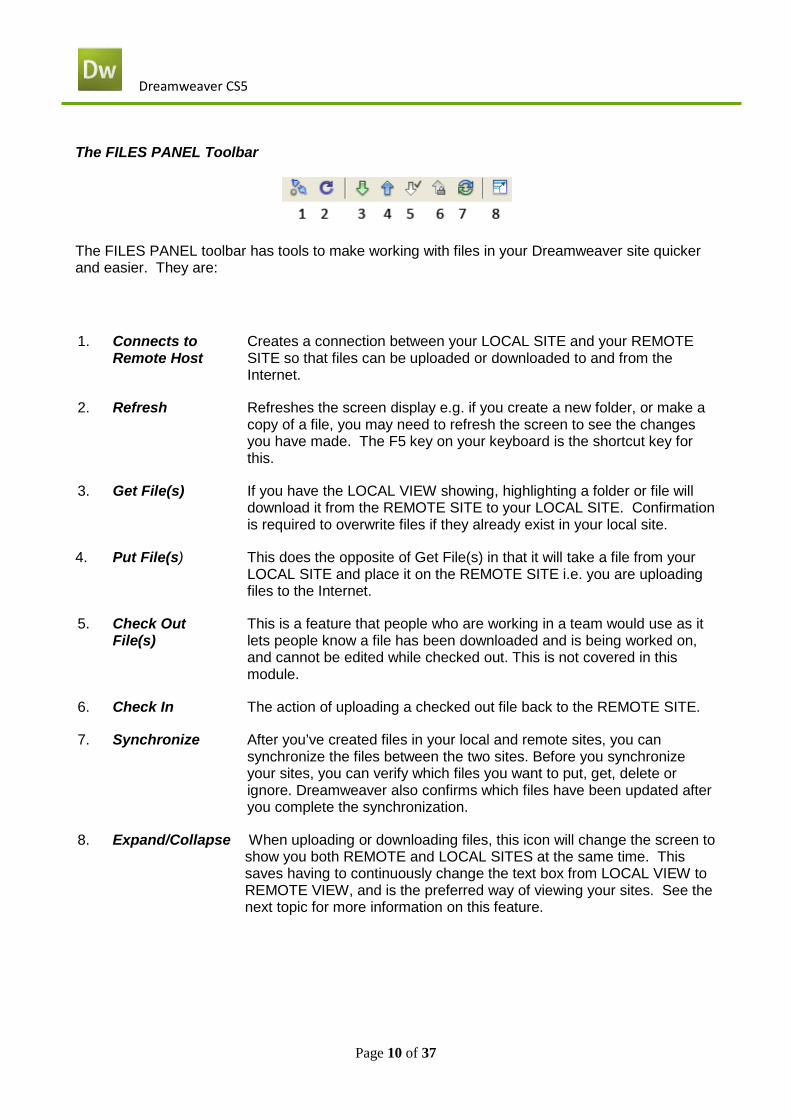
The FILES PANEL Toolbar
The FILES PANEL toolbar has tools to make working with files in your Dreamweaver site quicker and easier. They are:
1. Connects to Remote Host
Creates a connection between your LOCAL SITE and your REMOTE SITE so that files can be uploaded or downloaded to and from the Internet.
2. Refresh Refreshes the screen display e.g. if you create a new folder, or make a copy of a file, you may need to refresh the screen to see the changes you have made. The F5 key on your keyboard is the shortcut key for this.
3. Get File(s) If you have the LOCAL VIEW showing, highlighting a folder or file will download it from the REMOTE SITE to your LOCAL SITE. Confirmation is required to overwrite files if they already exist in your local site.
4. Put File(s) This does the opposite of Get File(s) in that it will take a file from your LOCAL SITE and place it on the REMOTE SITE i.e. you are uploading files to the Internet.
5. Check Out File(s)
This is a feature that people who are working in a team would use as it lets people know a file has been downloaded and is being worked on, and cannot be edited while checked out. This is not covered in this module.
6. Check In The action of uploading a checked out file back to the REMOTE SITE.
7. Synchronize After you’ve created files in your local and remote sites, you can synchronize the files between the two sites. Before you synchronize your sites, you can verify which files you want to put, get, delete or ignore. Dreamweaver also confirms which files have been updated after you complete the synchronization.
8. Expand/Collapse When uploading or downloading files, this icon will change the screen to show you both REMOTE and LOCAL SITES at the same time. This saves having to continuously change the text box from LOCAL VIEW to REMOTE VIEW, and is the preferred way of viewing your sites. See the next topic for more information on this feature.
Page 10 of 37
Dreamweaver CS5
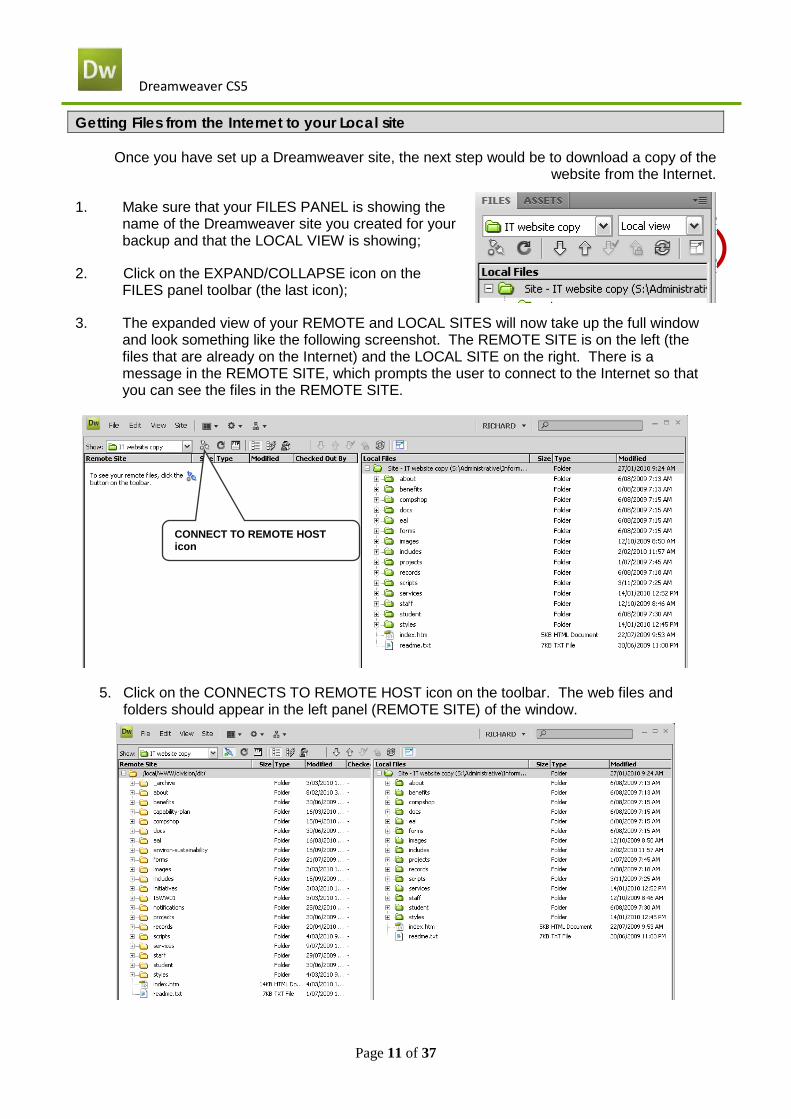
Getting Files from the Internet to your Local site
Once you have set up a Dreamweaver site, the next step would be to download a copy of the website from the Internet.
1. Make sure that your FILES PANEL is showing the name of the Dreamweaver site you created for your backup and that the LOCAL VIEW is showing;
2. Click on the EXPAND/COLLAPSE icon on the FILES panel toolbar (the last icon);
3. The expanded view of your REMOTE and LOCAL SITES will now take up the full window and look something like the following screenshot. The REMOTE SITE is on the left (the files that are already on the Internet) and the LOCAL SITE on the right. There is a message in the REMOTE SITE, which prompts the user to connect to the Internet so that you can see the files in the REMOTE SITE.
5. Click on the CONNECTS TO REMOTE HOST icon on the toolbar. The web files and folders should appear in the left panel (REMOTE SITE) of the window.
CONNECT TO REMOTE HOST icon
Click on this icon to start the download (Downward pointing arrow)
Click on this icon to connect to the REMOTE SITE
Page 11 of 37

Dreamweaver CS5
Select the files in the REMOTE SITE that are to be copied to the LOCAL SITE. If you select the folder (as in the screenshot above) you are asking to download the whole website.
6. Click on the GET FILE(S) icon on the toolbar (the icon with the downwards pointing arrow). If you selected the whole site you will be asked to confirm that this is what you require. If you selected only certain files and folders you will not be asked to confirm the action. If asked to include dependant files say NO.
7. Click OK to start the download.
After the download, a mirror of the website will appear in the Local Files panel.
Click on the EXPAND/COLLAPSE icon to return to the main Dreamweaver page.
NOTE: never use the remote site for editing. This is the “Live” site. You should only ever view the remote site with the expand button. Make sure that you are always looking at the green folders and not the yellow ones.
EXPAND / COLLAPSE icon
Page 12 of 37
Dreamweaver CS5
To reinforce what you have just learned, do the following
1. What does this icon mean
2. In a few words explain what Put File(s) means
3. Which icon would you click to show both the remote and local sites?
Page 13 of 37

Dreamweaver CS5
CREATING A NEW CSU WEB PAGE
To ensure you have access to style sheets and other items required to make a CSU web page, it is suggested you:
1. Create a duplicate of an existing web page in your website;
2. Rename it to the new name;
3. Open the page, select all text content and/or images and press DELETE on the keyboard;
4. Insert the new content
5. Insert the new title of the page in the title box
EDITING WEB PAGES
Opening a Web Page for Editing
Locate and select the file in the FILES PANEL and then do one of the following:
• Double click on the file;
• Use the keyboard shortcut to open the file – CTRL+O;
• Click on the FILE menu, and select OPEN; or
• Right mouse click on the file and select OPEN from the shortcut menu.
The file will open up in the DOCUMENT WINDOW, ready for editing.
Previewing Changes in a Browser
It is Best Practice to preview any additions/changes you make to a web page, to ensure that your work will look professional when viewed in a browser. As you work, you can preview your page without leaving Dreamweaver by using the PREVIEW/DEBUG IN BROWSER icon which is located on the DOCUMENT WINDOW toolbar. Or simply press F12.
1. Click on the PREVIEW IN BROWSER icon;
2. Select PREVIEW IN IEXPLORE from the drop down menu;
3. The page has to be saved and if you haven’t done so, a dialog box will appear prompting you to save the page – click on YES;
Page 14 of 37
Dreamweaver CS5
4. The page will now open in INTERNET EXPLORER and should appear just as it will on the internet. (School and Faculty sites will render the style but no include files – no header or navigation. See glossary)
HINT: Try resizing your browser window to different sizes to see if your work still looks OK, that text wraps as the browser window is made smaller or larger, images still appear where they should etc.
When the page is completely finished and you have previewed it in your browser and the page has been uploaded to the internet, you should try and use another computer’s browser or ask a colleague or friend to preview the page for you to ensure there are no difficulties with viewing the page or that there are no errors etc.
Saving Web Pages
Saving your work is extremely important, you should save often.
Choose one of the following:
• Click on FILE, SAVE; or
• Use the keyboard shortcut – CTRL+S
Text Editing
Text is edited very much the same way as word processing in that:
• To delete text – select it and then use the DELETE key on the keyboard to delete it;
• To add text – place the cursor in the desired position and type in the new text – old text is pushed aside to make room for the new text
• To replace text – select the old text then type new text over the top.
• To start a new paragraph – use the ENTER key on the keyboard – a blank space between paragraphs will be included.
• To start a new line without a space – use SHIFT + ENTER.
The PROPERTY INSPECTOR, at the bottom of the Dreamweaver window, (below the DOCUMENT WINDOW) has many options for editing text including the traditional Bold and Italics. You can also add bullets or numbering to text. Remember to select the text before applying any of these options. Wherever possible however, please use the built in styles that have been provided so as to create a professional, consistent look about your CSU web pages (see the next topic, “Using CSU Styles”).
Page 15 of 37

Dreamweaver CS5
Using CSU Styles
In order to keep a consistent look about CSU web pages, the web team has created built in styles which should, wherever possible, be used to format text. For example, if you want to add a heading, you should use a heading style. A normal paragraph should have the Paragraph style applied to it.
You will find these built in styles in the FORMAT drop down list of the PROPERTY INSPECTOR (see the screenshot above).
To find out what style an existing heading on the page has (so that you can apply the same style to another heading), place the cursor in the heading and look at the PROPERTY INSPECTOR text box or the Status Bar of the DOCUMENT WINDOW. Both will tell you what the existing heading is using.
To apply the style, simply click in the heading or paragraph, then choose the style from the FORMAT drop down list in the PROPERTY INSPECTOR.
If you require a new or specialized style, please log a job with the IT Service Desk and one of the Web Team will contact you to discuss your requirements.
Applying styles to tables/tags
List of built in Styles (see this Page about using CSU Styles) BOLD & ITALIC icons
Bullets and Numbering icons
Page 16 of 37

Dreamweaver CS5
Tags
In the HTML syntax, most elements are written with a start tag and an end tag, with the content in between. Tags are composed of the name of the element, surrounded by angle brackets. An end tag also has a slash after the opening angle bracket, to distinguish it from the start tag. For example, a paragraph, which is represented by the p element, would be written as
<p>Lorem ipsum dolor sit amet, consectetur adipisicing elit, …</p>
You can select elements on your page by using the tags at the bottom of the page
Current position of cursor
Looking in these locations will tell you what style has been applied to the heading
Page 17 of 37

Dreamweaver CS5
This is a very good method to make sure that you select the whole element and not just a portion of it, before applying a style.
Example: To select a pargraph you would place your cursor anywhere in the paragrph, then select the <p> tag at the bottom of the page.
Selecting Text to edit, and the Difference between selecting text and selecting tags.
You can select text to edit your site in one of two ways, by selecting or double clicking the portion of text you wish to edit in the Design View (View > Design View), or selecting the whole tag of the element you wish to edit by clicking on its tag from the list on the bottom of the design Screen.
Tags can be identified as the angle brackets (< and >) that wrap around page elements and are only viewable in the Code & Code and Design View options. Tags tell the html document what type of element that content is, and applies the format class styles, and hyperlink information.
Example:<div> <a href="link.htm" class=”redlink”>This is a link told to be a class style of a red link inside a div element</a></div>
The difference between selecting the page’s text over selecting the elements tags is that when you double-click text in the Design view, you are only selecting the content characters specifically to edit, and not the whole element your content is wrapped in.
This Example is the screen Split into Code View on top, Design View on bottom, and shows that when only the text is selected in the Design view, the entire <p> paragraph tag it sits in is not selected and will not take on your chosen style.
This can cause problems when selecting text and image styling classes from the properties bar, adding messy new <span> tags around your text. Use the Tag Selector Bar that appears at the very bottom of your webpage above the Properties Inspector bar, to select the actual tag your content sits in.
Page 18 of 37

Dreamweaver CS5
Example of selecting the whole paragraph tag from the Tag Selector Bar, this will ensure you haven’t missed any of your contents format information when applying your styles.
Importing Text
There is no need to retype text into a web page if it already exists. A simple copy and paste often works from programs such as MS Excel and Notepad.
You can also import files using the FILE, IMPORT command. If the file is too large you will receive a warning and sometimes a suggestion that the copy and paste method would be easier.
When you paste text into a Dreamweaver document, you can use either the Paste or the Paste Special command. The Paste Special command lets you specify the format of pasted text in different ways. For example, if you wanted to paste text from a formatted Microsoft Word document in to your Dreamweaver document, but wanted to strip out all the formatting so that you could apply your own CSS style sheet to the pasted text, you could select the text in Word, copy it to your Clipboard, and use the Paste Special command to select the option that lets you paste text only.
You should use one of the two methods below to get text from a Word document into a Dreamweaver document.
• Open the MS Word document and select and copy the text you want to transfer • In Dreamweaver, place the cursor where you want the text in the document • Select Edit > Paste Special then in the dialog box, select option 2 “Text with structure
(paragraphs, lists,tables, etc)
Method two:
1. Open the MS Word document, click on FILE, SAVE AS and select RICH TEXT FORMAT (*.RTF) from the SAVE AS TYPE drop down list (located at the bottom of the SAVE AS dialog box);
2. Open the .RTF file, select the text and use normal copy and paste commands.
Page 19 of 37

Dreamweaver CS5
NOTE: If you have a large MS Word document you should think about creating several smaller HTML pages or providing a link for people to open the actual Word document rather than have a long web page. Experience has shown that most people will not read large amounts of text on a web page
Sizing Images You need to make sure that when you put images into Dreamweaver they are the correct size and resolution for the web.
We can use a small program called ‘Microsoft Photo Editor’ for this purpose, if you can’t get access to Photoshop or similar.
Microsoft Photo Editor can be found under Start > Programs > Microsoft Office Tools > Photo Editor. Also ask your instructor about watching the short video tutorial.
After Photo Editor has opened, go to view > measurement units, and make sure that inches are selected.
Next, open the image that you want to resize or alter.
We are now going to check the resolution of the image, go to file > properties. When the new window opens, look at the resolution setting and check that it is 72 pixels /inch and not 300 pixels / inch. Then click on ok to accept the resolution settings.
Resizing the image, if you look at the bottom right of Photo Editor it will show you the width and the height of the image currently loaded. You may want to change the size of this image. To do this go to Image > resize, and a new window will open with the dimensions for the image. Make sure that the Units are in pixels not inches and look at the size. It is not recommended that you make the picture larger than 200 pixels. You will have to use your own discretion on this. Try a size and see what it looks like on the page. You can always come back and redo the size.
Save it to the images folder in your website so that you can access it from Dreamweaver.
Inserting images
Images on most web pages use a style class to right align them to text and place a grey border around each image for consistency of display. These style classes are made by the web team and cannot be altered by the end user.
Inserting an image into a paragraph of text
1. Place your cursor at the beginning of the paragraph of text and left-click 2. Use the insert picture icon to locate the image
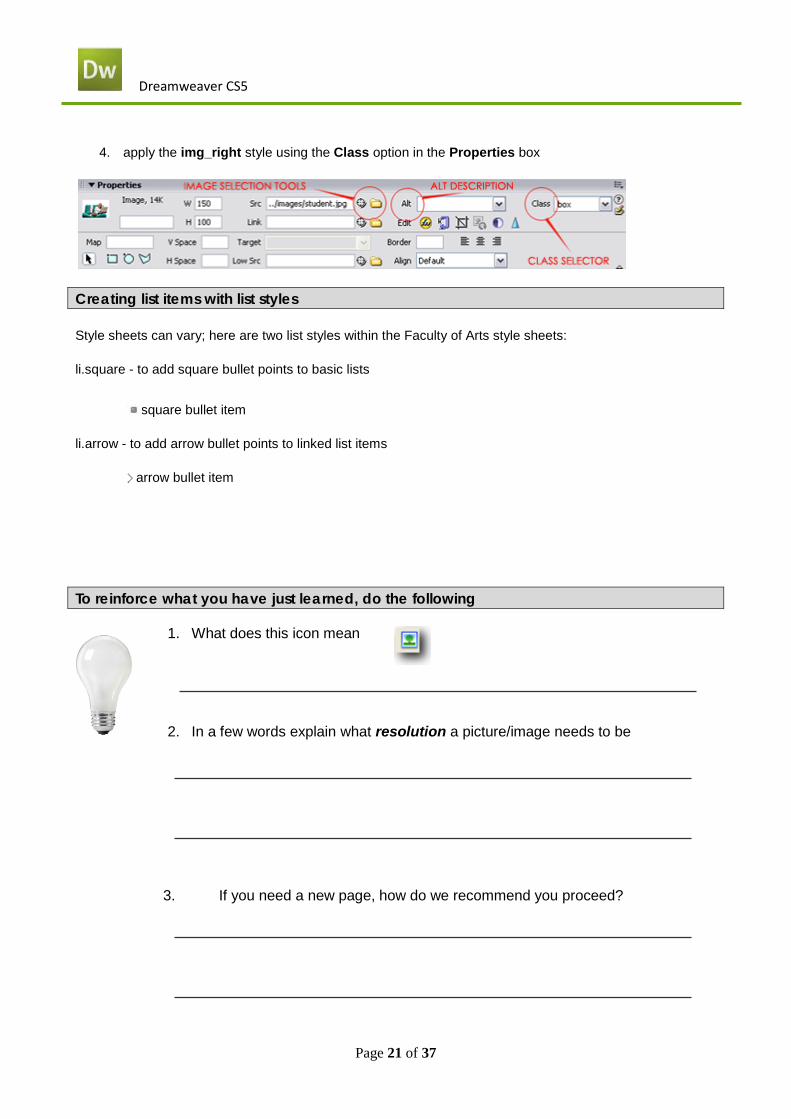
3. Ensure you give the image an Alt description using the Alt option in the Properties box
Page 20 of 37
Dreamweaver CS5
4. apply the img_right style using the Class option in the Properties box
Creating list items with list styles
Style sheets can vary; here are two list styles within the Faculty of Arts style sheets:
li.square - to add square bullet points to basic lists
square bullet item
li.arrow - to add arrow bullet points to linked list items
arrow bullet item
To reinforce what you have just learned, do the following
1. What does this icon mean
2. In a few words explain what resolution a picture/image needs to be
3. If you need a new page, how do we recommend you proceed?
Page 21 of 37

Dreamweaver CS5
LINKING (HYPERLINKS)
The use of links (or hyperlinks) is the main way of navigating through the internet, be it from one web page to another web page, to part of the same page or even to an email address.
Inserting links
Links to another webpage within CSU should open in the same browser window. Links to another website external to CSU should open in a blank browser window. Other links such as links to Word documents should also be linked to open in a blank browser window. Creating an email link (i.e. [email protected]) will also be necessary when editing staff contact details.
Insert a basic link
1. Select the text you would like to link up
2. Use the Link selection tools in the Properties box to select a file or document within your website's folders
3. Alternatively, to link to an existing webpage or website - type the URL of the website into the Link
input box 4. For an external link or a link to any form of document other than a web page - select the Target
option in the Properties box and left-click _blank
Insert an email link
1. Select the text you would like to link up or place your cursor where you would like to create the email link and left-click
2. left-click the Email Link icon and fill in the required email information
3. left-click OK
Page 22 of 37
Dreamweaver CS5
Creating a ‘Same Page’ Link
A way of navigating around the same web page is to use anchors. An anchor is placed in every location that you want to link to and then a link is created referring to that anchor. For example, you often see “Top of Page” or “Home” at the bottom of a web page. When clicked on the user is taken to the top or home page rather than having to scroll. An anchor, in this example, would have been put at the top of the page and the text “Top of Page” is made into a link that will take you to that anchor.
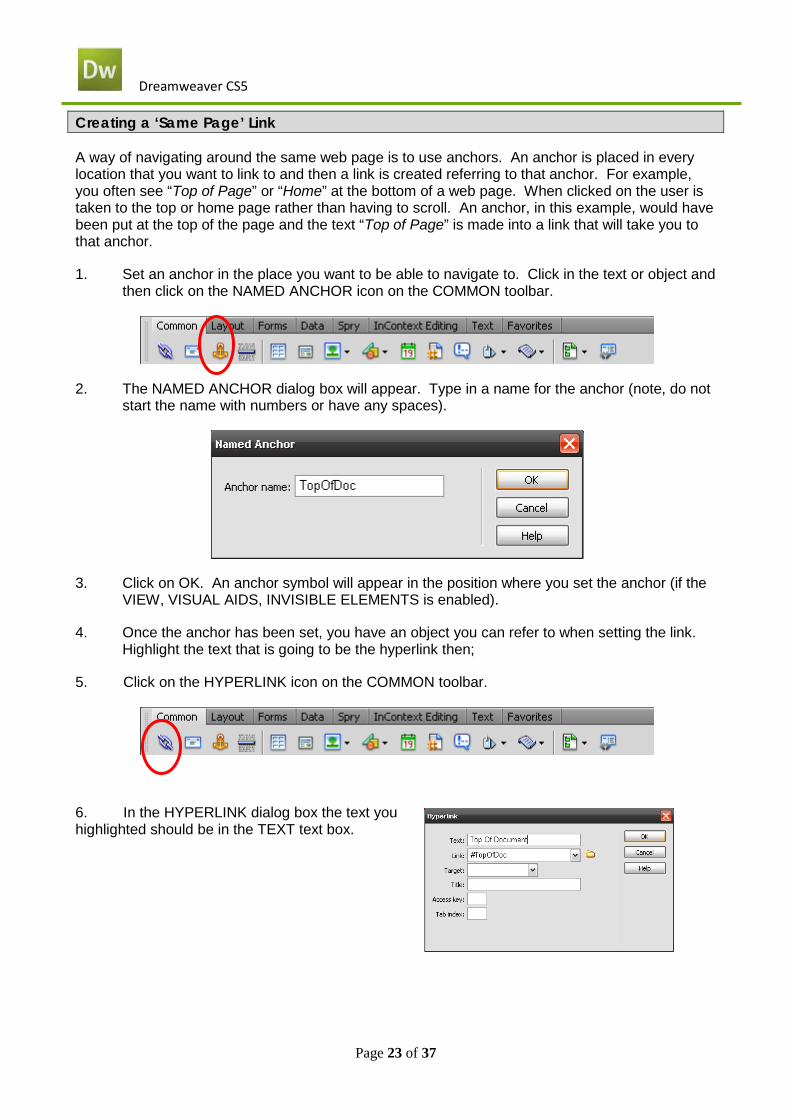
1. Set an anchor in the place you want to be able to navigate to. Click in the text or object and then click on the NAMED ANCHOR icon on the COMMON toolbar.
2. The NAMED ANCHOR dialog box will appear. Type in a name for the anchor (note, do not start the name with numbers or have any spaces).
3. Click on OK. An anchor symbol will appear in the position where you set the anchor (if the VIEW, VISUAL AIDS, INVISIBLE ELEMENTS is enabled).
4. Once the anchor has been set, you have an object you can refer to when setting the link. Highlight the text that is going to be the hyperlink then;
5. Click on the HYPERLINK icon on the COMMON toolbar.
6. In the HYPERLINK dialog box the text you highlighted should be in the TEXT text box.
Page 23 of 37

Dreamweaver CS5
6. Click on the drop down arrow of the LINK text box. The anchor(s) you created should be in the drop down list. Select the one you require.
8. Click on OK.
Another method of referring to the anchor you created is to type #Name_of_the_anchor in the LINK text box of the PROPERTY INSPECTOR e.g. using the anchor in the example above your LINK text box would look like the screenshot to the right.
Deleting a Link
1. Click in the underlined text that is a link, or on the image that is a link;
2. Select the link information in the LINK text box in the PROPERTY INSPECTOR and delete it with the DELETE key on the keyboard; or
3. Right mouse click on the link and select REMOVE LINK from the shortcut menu.
Deleting Files or Folders
When you are sure the upload of your files or folders to the website is correct and you are happy with all changes made, duplicated copies (or any file or folder) can be deleted by first selecting the file or folder, then:
• using the DELETE key on the keyboard; or
• by right mouse clicking on the file or folder, going to the EDIT menu and selecting DELETE.
Restoring a File from a Duplicated Copy
In the event that you need to restore a copy of a file because something has gone wrong with the original file you are working on:
1. Delete the file that has been edited but cannot be used;
2. Rename the file you duplicated as a safety backup by deleting the words “Copy of”. When you are in RENAME mode you can select words and delete them, or type over the whole file name. Go into RENAME mode by either:
a) Right mouse clicking on the file and selecting the EDIT, RENAME option;
b) Use the keyboard shortcut F2. This will put you into rename mode (a rectangle appears around the name of the file or folder);
Page 24 of 37
Dreamweaver CS5
c) Click on the name of the file, wait about 1-2 seconds then click on the filename again; or
d) Use the drop down menu on the title bar of the FILE panel, select the FILE menu and then click on the RENAME option.
Make sure you keep the file extension of .htm or .html if you elect to retype the whole filename.
FIND BROKEN, EXTERNAL, AND ORPHANED LINKS
Use the Check Links feature to search for broken links and orphaned files (files that still exist in the site but that aren’t linked to by any other files in the site). You can search an open file, a portion of a local site, or an entire local site.
Dreamweaver verifies links only to documents within the site; Dreamweaver compiles a list of external links in the selected document but does not verify them.
You can also identify and delete files that are no longer used by other files in your site.
If you ever change the name of a file or a name of a directory, you will be prompted to update links. If you say no - your links will not update - hence the link checker process begins
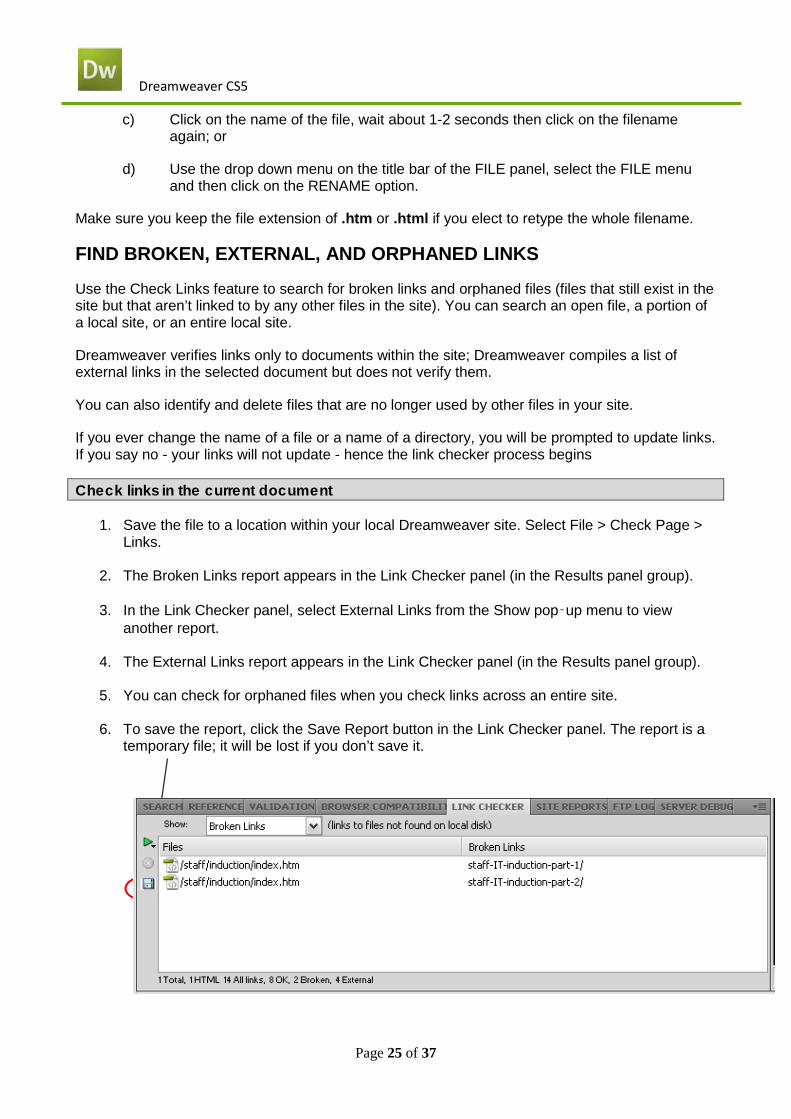
Check links in the current document
1. Save the file to a location within your local Dreamweaver site. Select File > Check Page > Links.
2. The Broken Links report appears in the Link Checker panel (in the Results panel group).
3. In the Link Checker panel, select External Links from the Show pop‑up menu to view another report.
4. The External Links report appears in the Link Checker panel (in the Results panel group).
5. You can check for orphaned files when you check links across an entire site.
6. To save the report, click the Save Report button in the Link Checker panel. The report is a temporary file; it will be lost if you don’t save it.
Page 25 of 37
Dreamweaver CS5
Check links in part of a local site
1. In the Files panel, select a site from the Current Sites pop-up menu.
2. In Local view, select the files or folders to check.
3. Initiate the check by doing one of the following: a. Right-click one of the selected files, and then select Check Links > Selected
Files/Folders from the context menu. b. Select File > Check Page > Links.
4. The Broken Links report appears in the Link Checker panel (in the Results panel group).
5. In the Link Checker panel, select External Links from the Show pop-up menu to view
another report. 6. The External Links report appears in the Link Checker panel (in the Results panel group).
7. You can check for orphaned files when you check links across an entire site.
8. To save a report, click the Save Report button in the Link Checker panel.
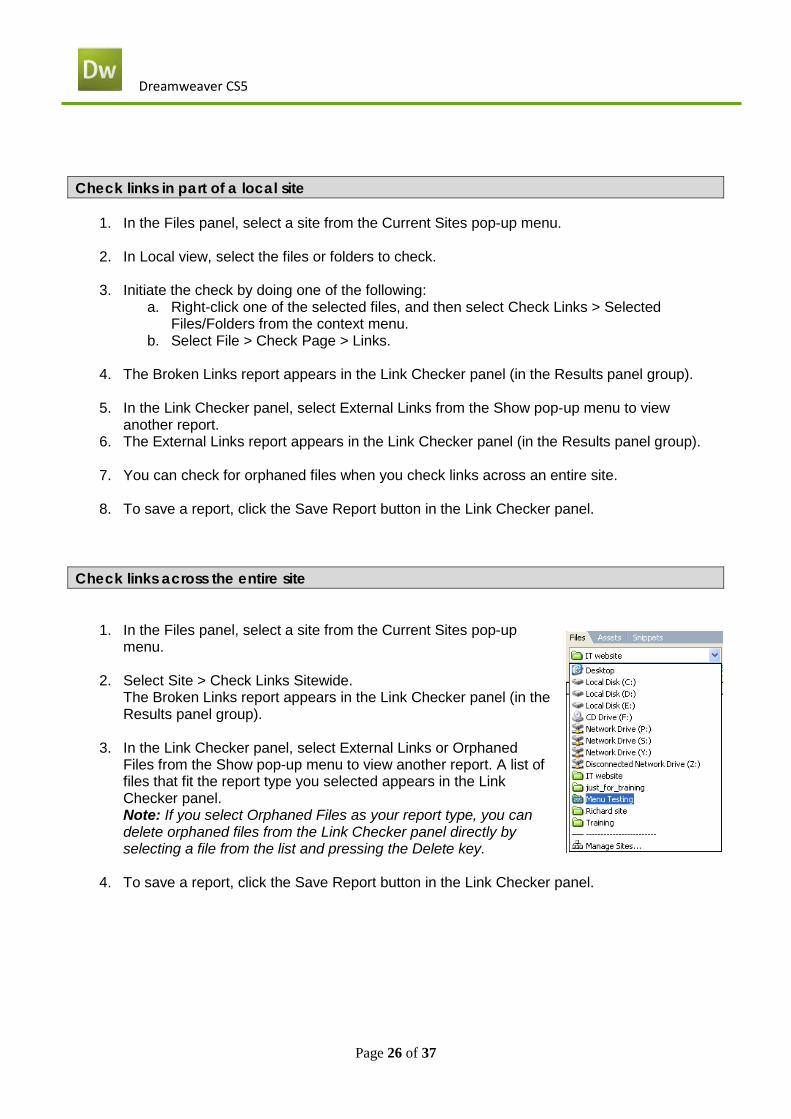
Check links across the entire site
1. In the Files panel, select a site from the Current Sites pop-up
menu.
2. Select Site > Check Links Sitewide. The Broken Links report appears in the Link Checker panel (in the Results panel group).
3. In the Link Checker panel, select External Links or Orphaned Files from the Show pop-up menu to view another report. A list of files that fit the report type you selected appears in the Link Checker panel. Note: If you select Orphaned Files as your report type, you can delete orphaned files from the Link Checker panel directly by selecting a file from the list and pressing the Delete key.
4. To save a report, click the Save Report button in the Link Checker panel.
Page 26 of 37

Dreamweaver CS5
UPLOADING WEB PAGES AND OTHER OBJECTS
When your web page is finished, and you have checked it in the browser (F12), you are ready to upload it back to the Internet. Make sure that all new files have been named correctly, with no spaces or capitals used. If you need a space use an underscore.
If you have created a web page with new images, these images will also have to be uploaded. These images are known as dependent files and if you select a page to be uploaded that contains dependent files, you will be asked if you want to upload those as well. This is quite a time saving device as you do not have to go searching for where you kept the files. This is why document relative paths are so important, so Dreamweaver knows where to find the objects you have put into a web page.
1. Save your web page(s).
2. Make sure that your FILES PANEL is showing the name of the Dreamweaver site you created for your backup and that the LOCAL VIEW is showing;
3. Click on the file(s) name you want to upload to the public web site.
4. Click on the PUT FILE(S) icon (the upwards pointing arrow on the FILES PANEL toolbar;
4. You will be asked whether you want to include dependent files. (see glossary) If you have inserted new images or changed objects you should answer NO, but remember to upload them to your website. You should check to see that everything has uploaded.
6. Your file(s) will be uploaded to the Internet.
You should now check the web page in your browser, and to be safe get a colleague to check from their workstation, to ensure that the changes look professional, that links work etc.
Also remember to delete any duplicated copies of files you created that are no longer needed.
Page 27 of 37
Dreamweaver CS5
To reinforce what you have just learned, do the following
1. What does this icon mean
2. In a few words explain what blank target means
3. In a few words explain what Dependant files are
Page 28 of 37

Dreamweaver CS5
GLOSSARY Anchor
Synonymous with hyperlinks, anchor refers to non-linear links among documents. Or more simply put, it's the word or phrase that can be selected to connect to another page or resource.
Anchor Color
You guessed it--the color on screen that represents the anchors. The reason so many are blue is that is often the default color. This color can be changed to any combination of red, green and blue.
Agent
Agents are search tools that automatically seek out relevant online information based on your specifications. Agents are also called intelligent agents, personal agents, knowbots or droids.
Annotations
Personal notes you can attach to the documents you have saved in your Web browser. The notes are available to you whenever the document is viewed.
Archie
Derived from the word archive, Archie is a Net-based service that allows you to locate files that can be downloaded via FTP.
ASCII
(pronounced "Ask-ee") An acronym for American Standard Code for Information Interchange, ASCII is an international standard in which numbers, letters, punctuation marks, symbols and control codes are assigned numbers from 0 to 127. Easily transferred over networks, ASCII is a plain, unadorned text without style or font specifications.
Asychronous Connection
The type of connection a modem makes over a phone line, this connection is not synchronized by a mutual timing signal or clock.
AU Sounds
This is an audio format developed for Sun workstations and often used to distribute sound clips via the Web.
Authoring Software
This term refers to software that enables the creation of multimedia or hypertext documents and presentations.
Avatar
This term refers to an interactive representation of a human in a virtual reality environment; term was popularized by Neal Stephenson's novel "Snow Crash."
Bandwidth
The range of transmission frequencies a network can use. The greater the bandwidth the more information that can be transferred over that network at one time. The term bandwidth also broadly includes throughput, meaning the amount of data sent.
Baud
Page 29 of 37
Dreamweaver CS5
A unit of speed in data transmission, or the maximum speed at which data can be sent down a channel. Baud is often equivalent to bits per second. Named after J. M. E. Baudot (died 1903).
BBS
This is an acronym for Bulletin Board System, a computer equipped with software and telecommunications links that allow it to act as an information host for remote computer systems.
BinHex
A file conversion format that converts binary files to ASCII text files.
Bit
A contraction of binary digit, a bit is the smallest unit of information that a computer can hold. Eight bits is equivalent to a byte. The speed at which bits are transmitted or bit rate is usually expressed as bits per second or bps.
Blog
A blog is basically a journal that is available on the web. The activity of updating a blog is "blogging" and someone who keeps a blog is a "blogger." Blogs are typically updated daily using software that allows people with little or no technical background to update and maintain the blog. Postings on a blog are almost always arranged in cronological order with the most recent additions featured most prominantly.
Broadband
A general term for different types of high-speed, high-bandwidth connections to the Internet, including DSL and cable.
Browser
A type of software that allows you to navigate information databases; examples are Netscape Navigator and Microsoft Internet Explorer.
Byte
The number of bits used to represent a character.
CD-ROM
Compact Disk-Read Only Memory; an optical disk from which information may be read but not written.
CD-R or Compact Disk-Recordable
Refers to computer peripheral disk drives that allow the user to record content on to a blank compact disk.
Client
A computer that has access to services over a computer network. The computer providing the services is a server. Note: in an X-11 environment, the meanings of client and server are reversed.
Client-Server Architecture
An information-passing scheme that works as follows: a client program, such as Mosaic, sends a request to a server. The server takes the request, disconnects from the client and processes the request. When the request is processed, the server reconnects to the client program and the information is transferred to the client. This architecture differs from traditional Internet databases where the client connects to the server and runs the program from the remote site. Note: in an X-11 environment, the meanings of client and server seemingly are reversed.
Configuration Page 30 of 37

Dreamweaver CS5
This is a general-purpose computer term that can refer to the way you have your computer set up. It is also used to describe the total combination of hardware components that make up a computer system and the software settings that allow various hardware components of a computer system to communicate with one another.
Configure
The act of changing software or hardware actions by changing the settings.
CyberMall
A term commonly used to describe an electronic site shared by a number of commercial interests.
Cyberspace
A term coined by William Gibson in his novel "Neuromancer" to refer to a near-future computer network where users mentally travel through matrices of data. The term is now used to describe the Internet and the other computer networks.
Dependant File
A dependant file is any associated file linked to, from within a webpage. Examples of dependant files include: images, Word, Powerpoint or .pdf documents, include files and Cascading Style Sheets. Dependant files should only be included on webpage upload if editing has required the inclusion of a new link to a dependant file.
DHCP
Abbreviation for Dynamic Host Configuration Protocol, an Internet standard protocol that allows IP addresses to be pooled and assigned as needed to clients.
Dial-up Connection
The most popular form of Net connection for the home user, this is a connection from your computer to a host computer over standard telephone lines.
Direct Connection
A permanent connection between your computer system and the Internet. This is sometimes referred to as a leased-line connection because the line is leased from the telephone company.
DNS
An acronym for Domain Name Server, DNS refers to a database of Internet names and addresses which translates the names to the official Internet Protocol numbers and vice versa.
Document
When used in reference to the World Wide Web, a document is any file containing text, media or hyperlinks that can be transferred from an HTTP server to a client program.
Document Window
This is the Web browser's scrollable window in which HTML documents can be viewed.
Download
To transfer to your computer a copy of a file that resides on another computer.
DSU
Page 31 of 37

Dreamweaver CS5
The abbreviation for Digital Services Unit, DSU replaces the modem in synchronous connections to the Internet.
Dynamic IP
In which the IP address may change (typically via DHCP) each time you log on to the Internet. See Static IP.
EDI
The abbreviation for Electronic Data Interchange, EDI system allows linked computers to conduct business transactions such as ordering and invoicing over telecommunications networks.
External Viewer
A program used for presenting graphics, audio and video files. Programs that allow the viewing of GIF and JPEG files and the hearing of AU files fall into this category.
FAQ
This is the acronym for Frequently Asked Questions. A common feature on the Internet, FAQs are files of answers to commonly asked questions. Read FAQs before wasting electrons asking obvious questions. Saves you from receiving flames.
Firewall
This term refers to security measures designed to protect a networked system from unauthorized or unwelcome access.
FTP
File Transfer Protocol is a protocol that allows the transfer of files from one computer to another. FTP is also the verb used to describe the act of transferring files from one computer to another.
GIF
This acronym stands for Graphic Interchange Format, a commonly used file compression format developed by CompuServe for transferring graphics files to and from online services.
Gopher
A menu-oriented tool used to locate online resources developed at the University of Minnesota.
Gopherspace
A term used to describe the entire gopher network.
Groupware
This term refers to software applications that facilitate shared work on documents and information.
GUI
An acronym for Graphical User Interface, this term refers to a software front-end meant to provide an attractive and easy to use interface between a computer user and application. The Macintosh operating system has a GUI, DOS does not.
Home Page
The document displayed when you first open your Web browser. Home Page can also refer to the first document you come to at a Web site.
Page 32 of 37

Dreamweaver CS5
Hotlists
Lists of frequently used Web locations and URLs (Uniform Resource Locators).
Host
A computer acting as an information or communications server.
HTML
An acronym for HyperText Markup Language, HTML is the language used to tag various parts of a Web document so browsing software will know how to display that document's links, text, graphics and attached media.
HTML Document
A document written in HyperText Markup Language.
HTTP
The abbreviation for Hypertext Transfer Protocol, HTTP is used to link and transfer hypertext documents.
Hypermedia
The hypertext concept extended to include linked multiple media.
Hypertext
This term describes the system that allows documents to be cross- linked in such a way that the reader can explore related documents by clicking on a highlighted word or symbol.
IAB
The abbreviation for Internet Architecture Board, the IAB is the council that makes decisions about Internet standards.
IETF
The abbreviation for Internet Engineering Task Force, IETF refers to a subgroup of the Internet Architecture Board that focuses on solving technical problems on the Internet.
Include Files
Include files are single files that store repeated elements of information. These files are inserted into a webpage via a virtual include link that allows for the include file information to be displayed upon the webpage in a browser. Examples of include file information are: website headers, navigation and footers. Include files for CSU websites are maintained by the DIT Web Team and any changes to these files should be requested by logging a job with the DIT Service Desk.
Inline Images
These are the graphics contained within a Web document.
IP
The abbreviation for Internet Protocol, IP refers to the set of communication standards that control communications activity on the Internet. An IP address is the number assigned to any Internet-connected computer.
Page 33 of 37
Dreamweaver CS5
ISDN
The abbreviation for Integrated Services Digital Network, ISDN is a telecommunications standard that uses digital transmission technology to support voice, video and data communications applications over regular telephone lines.
ISOC
This is the abbreviation for Internet Society, an organization formed to support a worldwide information network. ISOC is the sponsoring body of the Internet Architecture Board.
JPEG
The acronym for Joint Photographic Experts Group, JPEG is an image compression format used to transfer color photographs and images over computer networks. Along with GIF, it's one of the most common ways photos are moved over the Web.
Links
These are the hypertext connections between Web pages. This is a synonym for hotlinks or hyperlinks.
Live
When used in reference to a World Wide Web file, this term designates an object linked to another layer of information.
Metaverse
From the novel "Snow Crash" by Neal Stephenson, this term describes a virtual online representation of reality.
MIME
An acronym for Multipurpose Internet Mail Extensions, MIME is a messaging standard that allows Internet users to exchange e-mail messages enhanced with graphics, video and voice. MIME file types are also used in Mosaic.
Mosaic
This is the common name of a World Wide Web multimedia browser program developed at the National Center for Supercomputing Applications in Urbana-Champaign, Ill. The official, copyrighted name of the program is NCSA Mosaic(tm).
MPEG
The acronym for Moving Pictures Expert Group, MPEG is an international standard for video compression and desktop movie presentation. A special viewing application is needed to run MPEG files on your computer.
NCSA
This is the abbreviation for National Center for Supercomputing Applications at the University of Illinois in Urbana-Champaign.
NFS
The abbreviation for Network File System, NFS is a protocol suite developed and licensed by Sun Microsystems that allows different makes of computers running different operating systems to share files and disk storage.
NIC
The abbreviation for Network Information Center, NIC is an organization responsible for supplying information for component networks that comprise the Internet.
Page 34 of 37
Dreamweaver CS5
NOC
The abbreviation for Network Operations Center, NOC is the organization responsible for the day-to-day operations of the Internet's component networks.
Node
A device attached to a network. A node uses the network as a means of communication and has an address on the network.
NREN
The abbreviation for National Research and Education Network, NREN is an effort to combine the networks operated by the U.S. government into a single high-speed network.
OSI Model
The Open Systems Interconnection (OSI) reference model for describing network protocols was devised by the Internet Standards Organization. It divides protocols in to seven layers to standardize and simplify definitions.
POP
An acronym for Point of Presence, POP is a service provider's location for connecting to users. Generally, POPs refer to the location where people can dial into the provider's host computer. Most providers have several POPs to allow low-cost access via telephone lines.
POTS
This is an acronym for Plain Old Telephone Service.
PPP
The abbreviation for Point-to-Point Protocol, PPP is an Internet connection where phone lines and a modem can be used to connect a computer to the Internet.
Protocol
A set of standards that define how traffic and communications are handled by a computer or network routers.
QuickTime
This is a digital video standard developed for Apple Macintosh computers. Special viewing applications are needed to run QuickTime movies.
Router
A communications device designed to transmit signals via the most efficient route possible.
Search Engine
This term refers to a program that helps users find information in text-oriented databases.
Server
A computer system that manages and delivers information for client computers. Note: in an X-11 environment, the meanings of client and server are reversed.
SGML
The abbreviation for Standard Generalized Markup Language, SGML is an international standard for the publication and delivery of electronic information.
Page 35 of 37

Dreamweaver CS5
Shareware
This term refers to software that is available on public networks and BBSs. Users are asked to remit a small amount to the software developer, but it's on the honor system.
SLIP
The acronym for Serial Line Internet Protocol, SLIP refers to a method of Internet connection that enables computers to use phone lines and a modem to connect to the Internet without having to connect to a host.
Socket
This is a communication mechanism originally implemented on the BSD version of the UNIX operating system. Sockets are used as endpoints for sending and receiving data between computers.
Static IP
An IP address which is the same every time you log on to the Internet. See Dynamic IP.
Synchronous Connection
An analog to analog or digital to digital connection that is able to perform two or more processes at the same time by means of a mutual timing signal or clock.
T-1
High-speed data line connection. T-1 operates at 1.45 Mbps.
Tags
These are formatting codes used in HTML documents. Tags indicate how parts of a document will appear when displayed by browsing software.
TCP-IP
The basic protocols controlling applications on the Intn the Internet; it stands for "transmission control protocol/Internet protocol."
TIFF
This is the acronym for Tagged Image File Format, a graphic file format developed by Aldus and Microsoft. Mosaic supports the viewing of TIFF images.
URL
This is the abbreviation for Uniform Resource Locator, the addressing system used in the World Wide Web and other Internet resources. The URL contains information about the method of access, the server to be accessed and the path of any file to be accessed.
Veronica
This is a search utility that helps find information on gopher servers. Veronica allows users to enter keywords to locate the gopher site holding the desired information. The name is an acronym for "very easy rodent oriented net-wide index of computerized archives." Honest!
WAIS
Page 36 of 37

Dreamweaver CS5
The abbreviation for Wide Area Information Service, WAIS is a Net-wide system for looking up specific information in Internet databases.
WAIS gateway
This term refers to a computer that is used to translate WAIS data so it can be made available to an otherwise incompatible network or application. Mosaic must use a WAIS gateway.
Web Browser
This is the software that allows a user to access and view HTML documents. Examples of Web browsers include Netscape, Mosaic, Cello and Lynx.
Web Document
An HTML document that is browsable on the Web.
Web Log
See blog.
Webmaster
This term refers to the person in charge of administrating a World Wide Web site.
Web Node
This term is synonymous with Web site or Web server.
Web Page
An HTML document that is accessible on the Web.
Webspace
This term refers to the space created by the World Wide Web.
World Wide Web
Also known as WWW or W3, the World Wide Web is a hypertext-based Internet service used for browsing Internet resources.
XML
eXtensible Mark-up Language, a specification developed by the W3C. XML is a pared-down version of Standard Generalised Mark-Up Language, designed especially for Web documents. It allows designers to create their own customised tags, enabling the definition, transmission, validation, and interpretation of data between applications and between organizations.
Tabor Griffin Communications has released all copyright restrictions for this item. Please feel free to distribute this article to your friends and colleagues.
Page 37 of 37