draft - software operations manual - karnataka … · government of karnataka directorate of...
TRANSCRIPT

GOVERNMENT OF KARNATAKA DIRECTORATE OF MUNICIPAL ADMINISTRATION
e-Gov Financialse-Gov Financials
Draft - Software Operations ManualDraft - Software Operations Manual
Municipal Reform CellMNSMC, 6TH FLOOR , NORTH BLOCK, 1-4 IT PARK
RAJAJINAGAR INDUSTRIAL ESTATE, BANGALORE-10
Version – 2..1.1
1

Document Version HistoryVersion Date Author Comments1.0 12/6/2006 Tara Bevinje (IPE)
Krishna Rupanagunta (eGov)Original Document
1.0.1 13/10/2006 Krishna Rupanagunta (eGov) Create/modify/view detailed codeBank Reconciliation Statement
1.0.2 21/11/2006 Elzan Mathew(eGov) General changes 2.2 25/04/2009 Sheela .S (KMDS) General Changes2.0.3 20/05/2009 Sheela .S (KMDS) Reports and receipts changes2.1.0 20/05/2009 Sheela .S (KMDS) Bank Reconcilation Module and Changes
AMENDMENT HISTORY
Issue Date AffectedPages
Section / Para No. BRIEF DESCRIPTION OF AMENDMENT
Rel 2.2
Rel 2.0.3 20/2/09 P – 43,46 Ch – 6 (4) Display of bill number in MIS report, Cancel work orderP – 56 Ch – 7 (4) Cancellation of voucherP – 63 Ch – 8 (2) Miscellaneous receipts Accept payee information for cheques P – 111 Ch –
15(9,10)Difficult to view in cheque in hand report
Rel 2.1.0 20/5/09 P – 12 Ch – 2 Version number to display in application P – 25,41,46 Ch – 6 (1)(2)
(4)Error in chart of accounts, Error in tax setup (modify setup), Tab index – procurement orders.
P – 57,63 Ch – 8(1)(2) Property Tax receipt –help link, Modify Miscellaneous receiptP – 82, 91 Ch – 10 (2)
(3)Cash payment – view payment search filter not working, Salary payment provide others option.
P - 94 Ch – 11 Journal VoucherP – 100-103 Ch – 13 New Chapter included – Bank Reconciliation ModuleP – 105, 106, 109, 116
Ch – 14 Balance Sheet was not as per KMF No.77, Income and Expenditure Report, Trial balance should show the inactive codes and difference in Dr. and Cr., Opening Balance Report.
P – 117, 119 Ch – 14 Included MIS ReportRel 2.1.1 17/11/2
009P – 57 Ch – 8 Modify property tax receipt
P – 93 Ch – 11 Journel vocher screen displayP – 106 Ch – 14 Income and Expenditure account, Balance sheet not as per KMF No.77P – 68 Ch – 9 Modify bills to have net amount
2

Table of Contents
Chapter 1: Introduction..................................................................................................5 Chapter 2: General software features..........................................................................6 The platform....................................................................................................................6
Navigation ...............................................................................................................................7Short-cut Keys........................................................................................................................7Working on multiple windows...............................................................................................7Selection from drop-down lists ..............................................................................................8Screen help.............................................................................................................................9Voucher Numbering.............................................................................................................10Built-in calendar ..................................................................................................................11
Chapter 3: System Overview.......................................................................................12Logging in ..............................................................................................................................12
Chapter 4 Set-up............................................................................................................16Funds.......................................................................................................................................16Function..................................................................................................................................17 .................................................................................................................................................18Modification of ULB detail can be done by clicking on the modify button on the enquiry screen and fill up the details as required for the fields shown in the above table..........................................................................................................................................19
..........................................................................................................................................20 Chapter 5: Processing ..................................................................................................21
Financial Year.........................................................................................................................21Opening Balance....................................................................................................................22Close Period............................................................................................................................23
...........................................................................................................................................24 Chapter 6 : Masters......................................................................................................25
Chart of Accounts..................................................................................................................26Account Code Creation.........................................................................................................27Create/View/Modify Detailed Code......................................................................................30
ADDBank................................................................................................................................33Masters: Collection Related .................................................................................................36
Code Screen Mapping...........................................................................................................36Tax Set-up............................................................................................................................39Set-up cheque in Hand/Cash-in-Hand.................................................................................42Collection/Payment Points...................................................................................................42
Contractors/suppliers bills related masters ......................................................................43Supplier/Contractor Master.................................................................................................44Procurement Orders.............................................................................................................45
Masters-Others.......................................................................................................................47Accounting Entity................................................................................................................47Financing Source..................................................................................................................51Department..........................................................................................................................52
Chapter 7 : Accounting of Transactions...................................................................53Modify transactions...............................................................................................................54
3

Reverse transactions..............................................................................................................54Voucher confirmation............................................................................................................55Voucher Cancellation............................................................................................................56Property Tax Receipts............................................................................................................58
Property Tax Collection...............................................................................................59Miscellaneous Receipts..........................................................................................................61Reverse Receipts.....................................................................................................................64View Receipts.........................................................................................................................66
Chapter 9: Bill Accounting..........................................................................................69Contractor Bill........................................................................................................................69Supplier Bill............................................................................................................................72Salary Bill................................................................................................................................75
Chapter 10: Payments...................................................................................................80Bank Payments.......................................................................................................................80Cash Payments.......................................................................................................................82Sub – ledger Payments..........................................................................................................85Advance Payments................................................................................................................85Pay Supplier/Contractor:.....................................................................................................87
Chapter 11: Journal Proper..........................................................................................91Create Journal Proper............................................................................................................92
Chapter 12: Contra Entries...........................................................................................95Cash Deposit...........................................................................................................................95Cash Withdrawal...................................................................................................................96Bank to Bank Transfer...........................................................................................................98
Bank statement Entries not in Bank Book.............................................................101 .........................................................................................................................................101 Chapter 14 : Reports....................................................................................................103
Financial Statements............................................................................................................103Accounting Records.............................................................................................................106
Sub-ledger....................................................................................................................1131. Statement of outstanding Liability ..................................................................... 117 Function wise Income/expenditure subsidiary register......................................118 Register of Advance....................................................................................................119 .........................................................................................................................................119 Dishonored Cheques report......................................................................................119 .........................................................................................................................................119 Chapter 15: System Administration........................................................................120
Role Definition......................................................................................................................120Administration Setup..........................................................................................................120
Administrative Boundary Definition.................................................................................121Department Definition.......................................................................................................121User Definition...................................................................................................................122
Role-based Access Control..................................................................................................123Role-Screen mapping..........................................................................................................124Rule Definition...................................................................................................................124
Chapter 16: Deductions Module..............................................................................128 Scope .............................................................................................................................128
Setup/Masters......................................................................................................................128Party Type..........................................................................................................................128
4

Document Type..................................................................................................................129Recovery Masters...............................................................................................................130
Application of Recoveries...................................................................................................134Remit Recovery....................................................................................................................135Generate Party-wise Remittance Report...........................................................................139Cheque Printing- Set up Master.........................................................................................140
Chapter 1: Introduction
eGov Financials is accounting software developed exclusively for urban local bodies. The focus of
this software is to make accounting simple, and make it possible for the staff at ULBs to maintain
the accounts of the ULB without the need to have advanced knowledge of double entry
accounting system. Special screens are provided for repetitive transactions such as Property tax
receipt, other taxes receipt, contractors/suppliers’ bill accounting, contractors/suppliers’
payment etc where the entries passed are similar within the voucher type. The User fills up the
fields provided in the screen from the voucher. On submitting the voucher, double entry is
passed at the back end. The advantage of the system is that the person entering the vouchers
need not have advanced knowledge of debits and credits. There is also a “journal proper” screen
which requires debit and credit entries, for transactions of general nature.
The other advantages of the Application are:
• It is compatible with the KMAM, and uses the chart of accounts prescribed in KMAM. The
ULBs have the option to add detail level account codes wherever a more detailed level reporting
is required.
• Financial Statements and other reports are generated in the formats which are prescribed in
the Accounting Manual, with schedules. It also generates other reports required by ULBs such as
budget variance report, Fixed Assets Register etc, and these reports are available at any point of
time during the year.
• It enables multi-ULB accounting. The Super-user at the State-level can access the accounts of
all the ULBs within the State, and get on-line reports in real-time. Master data which are
common to all ULBs, such as Funds, functions, chart of accounts (up to sub-minor code level),
TDS rates, depreciation rates etc can be set-up at the State-level, to maintain uniformity across
ULBs.
• An extension of multi-ULB accounting may be state-level consolidation of ULB accounts, and
comparison of the financial performance of different ULBs.
• The Bank Reconciliation feature allows on-line bank reconciliation. The “Bank Reconcile”
screen gives the un-cleared entries at any point of time. On giving the “clearing date”, the balance
as per bank statement gets updated, and the cheque goes out of the list of un-cleared cheques.
5

There is also a bank entry screen, from where the user can pass entries from the bank statement,
to update the bank book.
Chapter 2: General software features
The platform
eGov Financials is part of the Integrated Municipal e-governance Application suite developed by
eGovernments Foundation. The figure below shows the full integration of all the modules. All the
modules are developed as web-based applications and can be accessed over the internet using a
web-browser. This has the following advantages:
Ease of Installation: Since the client machine needs to have only the web ubiquitous web
browser, no software installation is required on the client machines.
Multi-user, Integrated Database System: The architecture and application design is built
ground up for usage by multiple users who might be located geographically in different
offices. All the users in the system have a same view of the system in real time.
Integration Platform: eGov Financials is part of an Integrated Architecture that brings
together all the departments within a ULB into a common information platform.
Proactive Information Disclosure: Availability of the data on an internet platform allows for
easy integration into a proactive information disclosure platform (eg city websites),
providing for an easy implementation of the Right To Information (RTI) Act.
6

Navigation
Short-cut KeysThe user can navigate around the Menu Tree by clicking the mouse. The menu tree itself can be
configured for each role and only the relevant screens can be enabled for a user. Once the user is
in a screen, she can either use mouse clicks or tab button to move from one field to another. The
following special keys are enabled for ease of data entry:
Keystroke ActionF2 Add a new row for debit/credit transaction in any of the transaction gridsAlt+X Close a window/For going to previous windowAlt+S Save and close the windowAlt+N Save and opens a new windowAlt+C CancelAlt+G To show the GL EntryAlt+A Add a recordAlt+M Modify a record
Working on multiple windowsThe application works in a web-browser window (Internet Explorer) and allows the user to open
multiple windows at a time. From the main menu screen, the user can open a new window using
the Ctrl+N key (alternatively: File -> New -> Window). This helps the user in accessing
information from other screens or modules while working on a particular screen or module.
7

For example, while making payment to a contractor from the Sub-ledger payment screen, the
user may want to verify the balance due to the contractor. Keeping the Sub-ledger Payment
screen open, he can go to the contractors account in the sub-ledger, verify the balance, and go to
the Sub-ledger payment screen, and make the payment. A screen, once opened, remains open till
the user closes it.
Selection from drop-down lists The Application provides drop-down lists wherever possible, allowing the user to select from the
lists. For example, in the Contractors bill accounting screen, the field for “Contractor” gives a
drop-down list of all contractors from where the user can select the contractor. Once the
Contractor is selected, “work order number” gives a drop-down list of the work orders issued to
that contractor.
Drop-down lists are of two types:
This is used when the list of drop-down options is not very long
(e.g. list of Open Work Orders against a Contractor)This is used when the list of drop-down options is long. This pops
up a smaller search window. Here we have the facility to filter the
data based on the value entered in the Text box. This is been
implemented in the Account Code list in all the screens.
On clicking on , a pop-up screen appears for searching for the relevant values.
Sort Order:
Code: Sorts by code
Description: Sorts by Description (this is the default)
Filter:
Left: Search for the sub-string from the left of the string
Within: Search for the sub-string within the string
Right: Search for the sub-string at the trailing end of the string
Description:
String (full text or sub-string) on which search is to be executed.
Click on for the search to be executed. All the valid results are returned by the system.
The user can select on the desired record and that will be copied on to the transaction screen.
8

The account code field in specific transaction screens displays the account codes relevant for the
screen. This feature provides the user with need-based information, and reduces the chances of
mistakes being committed by the user. This is setup using the Code-Screen Mapping feature.
Screen helpAll transaction screens are provided with a button on the top-right corner (see below) that takes
the user to the screen level help.
On clicking the help button, the help window pops up (see below) which provides the user with
an overview of the screen as well as help with all the fields on the screen.
9

Voucher NumberingThe Application allows for Voucher Numbers to be entered by the user on each voucher. In
addition, the system generates an internal number (CG or Computer Generated Number). These
are the numbers by which the voucher is stored in the system and they can be used by the user to
retrieve the voucher for reference at a later point in time.
The manually assigned voucher numbers are based on the following rules:
The first letter identifies the Fund to which the Voucher belongs. This identifier is assigned on
the Fund as part of Setup.
The second letter identifies the type of voucher. The options are: Receipts, Payments, Contras,
Journal Vouchers.
These two letters are followed by a number (up to 10-digits).
The voucher uniqueness (for both Manual and CG Numbers) is established for each Financial Year
and Voucher Type. The CG Number is re-set to 00001 at the beginning of each Financial Year.
On successful completion of a transaction, the user gets the message: ‘Transaction Successfully
executed’ along with the following information:
Voucher number entered by the user
CG Number generated by the system
In case of a system error, it is recommended that the user record the error message and convey the
same to the support desk for faster resolution.
10

Built-in calendar The system uses a built-in calendar to validate the voucher date on each transaction. The
following conditions are checked by the system:
1. The voucher date CANNOT be in the future. However, dates in the past are allowed.
2. The voucher date must belong to an Open Financial Year. Also the voucher date should
not be under a closed period. Financial Years are setup under the Processing Setup.
11

Chapter 3: System Overview
Logging in eGov Financials is a web-based application accessed from the Internet Explorer. The system can
be accessed either by typing the web-page in the browser or accessing the site from the city
website. On typing the address in the internet explorer, the login page will appear as under :
On entering the user-id/password, the system validates the information and if successful, the
application home-page is brought up. The screen is divided into three major parts:
1. The Header Section which shows the following:
a. The ULB Details
b. ‘Home’ which brings the user back to the main screen from any screen.
c. ‘Logout’ which logs the user out of the system.
2. Menu Tree Section: This lists the menu in a tree form. The actual contents of the tree are
populated based on the Role assigned to the user (see the section on Role Based Access
Control). eGov Financials is a fully menu-driven Application, with a multi-level menu
structure which allows the user to select an option in the menu and go to the next lower
level with each selection.
3. Summary Data about the ULB in the form of pie-charts, generated in real-time. This
snapshot is taken at the time when the user logs into the system and gives a quick
summary of the expenditure/income patterns for the ULB.
a. Summary Expenditure: Actual Expenditure incurred for the current financial
year along-with % share of the total expenditure for the ULB, grouped by minor-
code
b. Summary Income: Actual Income incurred for the current financial year along-
with % share of the total income for the ULB, grouped by the minor-code.
12

The full list of menu options is shown below. The actual list of options is actually driven by the
Role assigned to the User-ID. If a user needs an extra menu option, she needs to request the same
with the System Administrator.
Transactions Receipts Property Tax collectionsMiscellaneous ReceiptView ReceiptsModify ReceiptsReverse Receipts
Bill Accounting Contractors’ BillsSuppliers’ BillsSalary BillsView BillsModify BillsReverse Bills
Payments Bank PaymentsCash PaymentsAdvance PaymentPay Supplier/ContractorSalary PaymentsView PaymentsModify PaymentsReverse Payments
Journal Proper Create Journal ProperView Journal Voucher
13
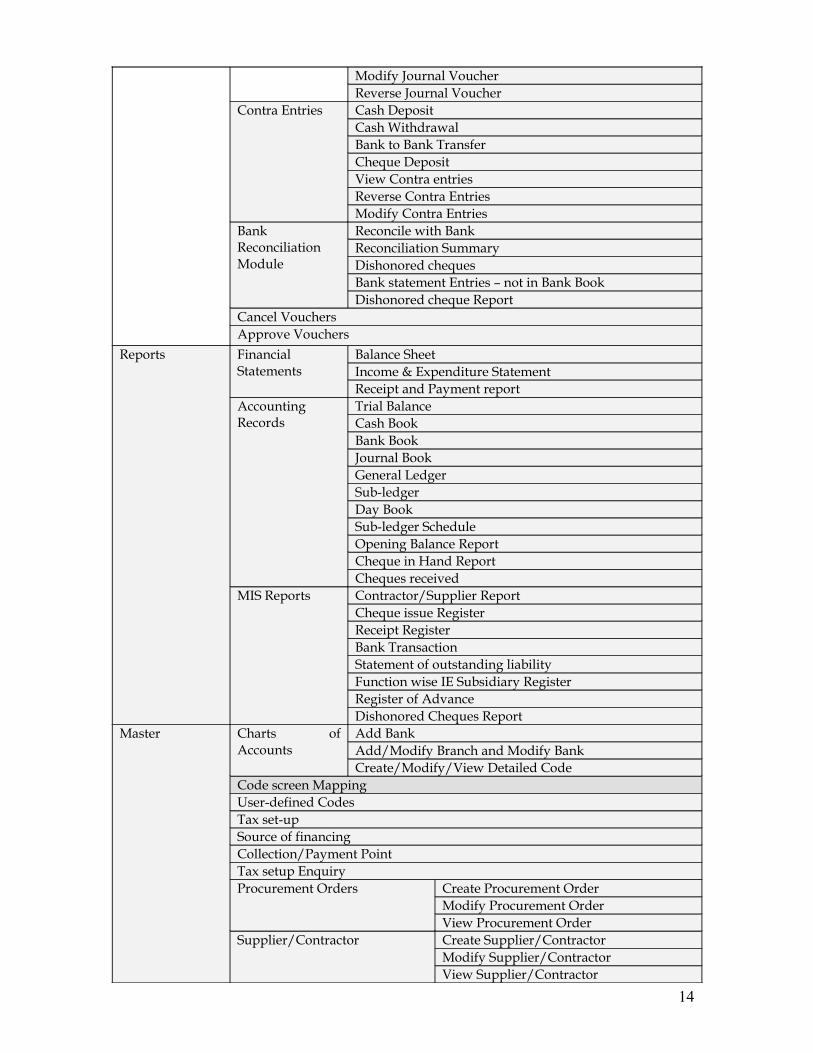
Modify Journal VoucherReverse Journal Voucher
Contra Entries Cash DepositCash WithdrawalBank to Bank TransferCheque DepositView Contra entriesReverse Contra EntriesModify Contra Entries
Bank Reconciliation Module
Reconcile with BankReconciliation SummaryDishonored chequesBank statement Entries – not in Bank BookDishonored cheque Report
Cancel VouchersApprove Vouchers
Reports Financial Statements
Balance SheetIncome & Expenditure StatementReceipt and Payment report
Accounting Records
Trial BalanceCash Book Bank BookJournal BookGeneral LedgerSub-ledgerDay BookSub-ledger ScheduleOpening Balance ReportCheque in Hand ReportCheques received
MIS Reports Contractor/Supplier ReportCheque issue RegisterReceipt RegisterBank TransactionStatement of outstanding liabilityFunction wise IE Subsidiary RegisterRegister of AdvanceDishonored Cheques Report
Master Charts of Accounts
Add BankAdd/Modify Branch and Modify BankCreate/Modify/View Detailed Code
Code screen MappingUser-defined CodesTax set-upSource of financingCollection/Payment PointTax setup EnquiryProcurement Orders Create Procurement Order
Modify Procurement OrderView Procurement Order
Supplier/Contractor Create Supplier/ContractorModify Supplier/ContractorView Supplier/Contractor
14

Set-up Cheques in Hand/cash in HandAccounting Entity
Processing Financial YearOpening BalanceClose Period
Set-up FundsFunctionsULB DetailsReport Schedule Mapping Create Report schedule
View/Modify Report ScheduleAdministration Boundary Settings
Role-based AccessDeductions
Masters
Party Type Create /view/Modify Party Type Contract Type Create/view/Modify Contract
TypeRecovery
Master
Create /view/Modify Recovery
Remittance RecoveryCreate Remittance RecoveryView Remittance RecoveryModify Remittance Recovery
15
Chapter 4 Set-up
Set-up consists of masters that have to be set up at Super User level for all the ULBs. This allows
a common set of attributes for gathering and reporting on data. The following items appear
under Set-up and need to be managed
1. Funds
2. Functions
3. ULB Details
4. Report Schedule Mapping
For creating/modifying an item under Set-up, the following steps have to be followed:
1. Only users with access to this menu setup can create/modify menu options.
2. Go to Menu Tree, and click “Set-up”.
3. Click the required set-up option (any one of the above items). An “Enquiry Screen” opens up,
with “New”, “Modify” and “Close” buttons. Clicking the “New” button opens up the screen
for creation of a new item under the selected option. Clicking the “Modify” button opens up
a screen for modification of the fields of a fund already created. However, once transactions
are accounted under a set-up, no modification is allowed.
FundsThis setup enables maintenance of separate books of account for different funds. For
creating/managing Funds, go to the Fund screen. The Fund Enquiry screen will appear. The
screen is provided with “New” and “Modify” buttons.
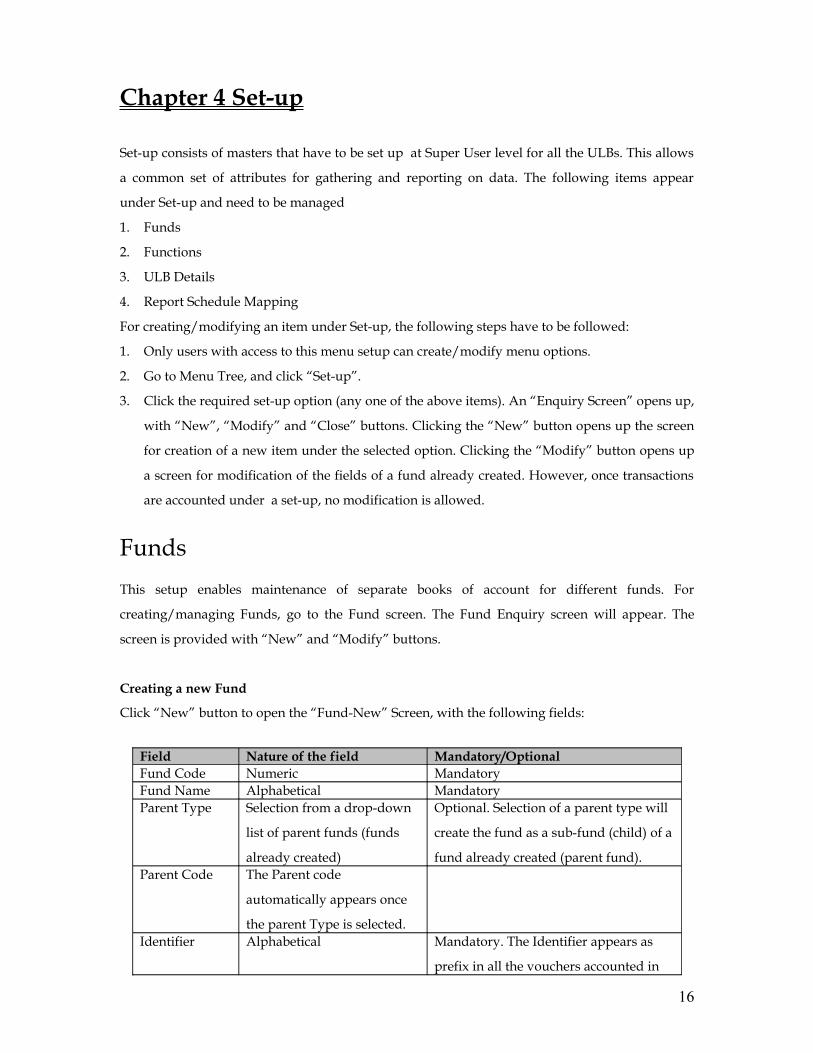
Creating a new Fund
Click “New” button to open the “Fund-New” Screen, with the following fields:
Field Nature of the field Mandatory/OptionalFund Code Numeric MandatoryFund Name Alphabetical MandatoryParent Type Selection from a drop-down
list of parent funds (funds
already created)
Optional. Selection of a parent type will
create the fund as a sub-fund (child) of a
fund already created (parent fund). Parent Code The Parent code
automatically appears once
the parent Type is selected.Identifier Alphabetical Mandatory. The Identifier appears as
prefix in all the vouchers accounted in
16

the books of the Fund. Active By clicking on, the Fund becomes active, and accounting of transactions
under the fund is enabled. By clicking off, the Fund becomes inactive,
and no transactions can be accounted under the Fund. Inter Fund
Transfer Code
This code has to be given from chart of accounts of KMABR -2006
Fill up all the mandatory fields. Fill up the “Parent Type” field if the fund has to be created under
a fund category already created. A child fund (sub-fund) can be created for any fund that is
already created. For example, for creation of “Municipal Services” as a Fund Category (parent
fund) and General Fund as the child, fill the different fields in the “Funds” set up as under:
Field Municipal Service Fund General FundFund Code 1 1-01Fund Name Municipal Service Fund General FundParent Type -- Municipal Service FundParent Code -- 1Identifier GActive √ √Inter Fund Transfer Code As per chart of Accounts As per chart of Accounts
Modification of a Fund
Clicking the “Modify” button in the Fund – Enquiry screen, opens up the “Funds-Modify: screen
with modifiable fields. Clicking the “Submit” button carries out the modifications.
FunctionThe “Function” setup works the same way as the “Funds” Set-up. The “Functions-Enquiry”
screen is provided with “New” and “Modify” buttons, for creating a new function, and for
carrying out modifications.
Creating a new Function
Click “New” button to open the “Function-New” Screen, with the following fields:
17

Field Nature of the field Mandatory/OptionalFunction Code Numeric MandatoryFunction Name Alphabetical MandatoryParent Type Selection from a drop-down
list of parent funds (funds
already created)
Optional. Selection of a parent type will
create the function as a sub-function
(child) of a function already created. Parent Code The Parent code
automatically appears once
the parent Type is selected.Active By clicking on, the Function becomes active, and accounting of
transactions under the function is enabled. By clicking off, the Function
becomes inactive, and no transactions can be accounted under it.
Fill up all the mandatory fields. Fill up the “Parent Type” field if the function has to be created
under a function category already created. A child function (sub-function) can be created for any
function that is already created. For example, for creation of “General Administration” as a
Function Category (parent function) and Municipal Body as the child, fill the different fields as
shown below
Field General Administration Municipal BodyFunction code 0 01Function Name General Administration Municipal BodyParent Type -- General AdministrationParent Code -- 0Active √ √
ULB Details:
The details of the ULB can be modified using the ULB details screen.
Following are the details of the fields:
Field Nature of the field Mandatory/OptionalULB Name Alphabetical MandatoryAddress AlphaNumeric MandatoryCity AlphaNumeric MandatoryPin AlphaNumeric MandatoryPhone Numeric MandatoryFax Numeric Optional
18

Mobile Numeric OptionalE-mail AlphaNumeric OptionalContact Person Alphabetical OptionalNarration AlphaNumeric Optional
Modification of ULB detail can be done by clicking on the modify button on the enquiry screen
and fill up the details as required for the fields shown in the above table.
Report Schedule Mapping:
This menu is meant for mapping account codes to respective schedules of financial
statements. To create a Report Schedule click on the Create Report Schedule button .The fields
displayed are as under:
Field Nature of the field Mandatory/OptionalReport Type Choose the appropriate
report type from the list
Mandatory
Report Line
item
Choose among the list Mandatory
Description DefaultedSchedule No Schedule No shall be given
as mentioned in KMABR
2006 w.r.t report type
Mandatory
Schedule
Name
Schedule name shall be given
by referring to KMABR 2006
w.r.t report type
Mandatory
Account Code To be selected from list MandatoryDescription DefaultedOperation Less/Add to be selected for
adding and removing a
Mandatory
19

particular code
20

Chapter 5: Processing
“Processing” is a feature used for managing opening/closing a financial period, and
transfer balances. It has the following sub-menus under it:
Financial Year - To create a new financial year, or to modify an existing financial year.
Opening – To create opening balances for the first time when the ULB starts using the
Software.
Close period - To close a period within a financial year (Hard close/soft close). This is also
used to re-open a period within a financial year that is soft-closed.
Financial YearThe following are the steps to be followed for creating a financial year, say 2006-07
with half-yearly breaks:
a) Click New. The “Financial Year Add” Screen opens up.
b) Fill in the following fields :
Financial Year 2006-07Starting Date 1-4-2006Ending Date 31-3-2007Opening for
Posting
√
Processing
Financial year // Opening //yeRY
Closing /
21

Fiscal Period
Name
Starting Date
Ending Date
I Half-Year
1-4-06
30-9-06
Fiscal Period
Name
Starting Date
Ending Date
II Half-Year
1-10-06
31-3-07
c) Click “Save & New”, if you want to open another financial year;
d) Click “Save & Close”, if you don’t want to open another financial Year.
Financial Years can be created only in a forward sequence. In other words, 2006-07 cannot be
created once 2005-06 has been created.
The system validates that the following:
1. There must be no overlap between the date ranges of financial years.
2. The must be no overlap between the fiscal periods within a financial year.
A financial year with quarterly or monthly breaks can also be created in the same
way by giving appropriate fiscal period names, starting dates and ending dates. If no
monthly/quarterly/half-yearly breaks are required, fiscal period name can be
“Financial Year”, starting date 1-4-06 and Ending Date 31-3-07.
Opening BalanceOn double-clicking this menu, the “Opening Balance Set-up” screen opens up.
22

The following steps have to be followed to create opening balances:
Step No Field Name Action Required1 Fund Name Select Fund from the drop-down list2 Financial Year Select Financial Year from the drop-down list3 Type Select Asset/Liability from the drop-down
list4 Major Head Select Major Head from the drop-down list5 Minor Head Select Major Head from the filtered drop-
down list under the major code selected
above. 6 Financing Source Select from the drop-down list of financing
Source7 Account Code Select from the filtered list of account code
under the selected major and minor codes8 Account Head On selection of the Account Code, the
Account Head automatically appears in this
field.9 Accounting Entity For an account code without an accounting
entity, the words “No Entity” automatically
appears in this field. For an account code
with accounting entities, the drop-down list
of accounting entities appears, from which
the relevant accounting entity has to be
selected.10 Debit Amount/Credit amount The opening balance has to be entered in the
respective field, depending on whether the
balance is a debit balance or credit balance.11 Submit/Cancel/Close Click “Submit” to save the opening balance,
Click Cancel to cancel the entry. Click
“Close” to close the screens
Close PeriodOn clicking “Close Period” from the Processing Menu, the “Set-up Fiscal Period” Screen opens
up, with the following options:
1. Close financial Year – For Closing a financial Year
2. Re-open Date Range - To re-open a date range that was soft-closed earlier.
3. Close Date Range - To hard/soft-close a date range
4. Transfer closing Balance- To transfer closing balances
23

24
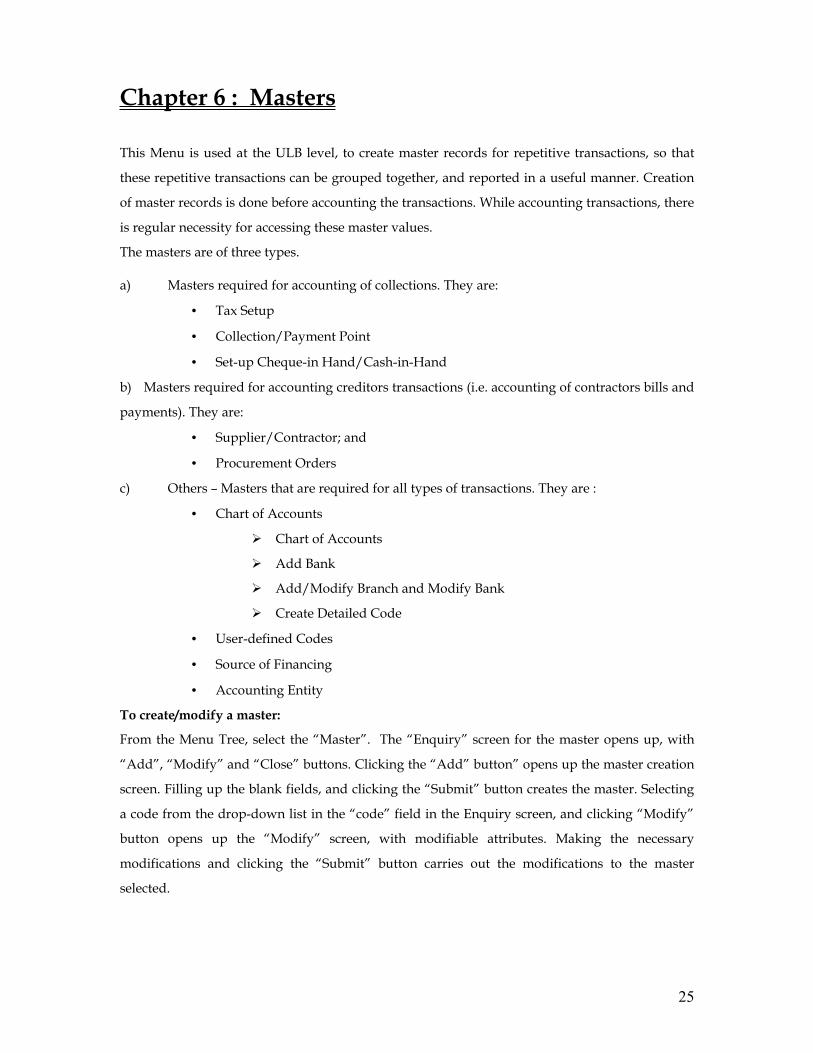
Chapter 6 : Masters
This Menu is used at the ULB level, to create master records for repetitive transactions, so that
these repetitive transactions can be grouped together, and reported in a useful manner. Creation
of master records is done before accounting the transactions. While accounting transactions, there
is regular necessity for accessing these master values.
The masters are of three types.
a) Masters required for accounting of collections. They are:
• Tax Setup
• Collection/Payment Point
• Set-up Cheque-in Hand/Cash-in-Hand
b) Masters required for accounting creditors transactions (i.e. accounting of contractors bills and
payments). They are:
• Supplier/Contractor; and
• Procurement Orders
c) Others – Masters that are required for all types of transactions. They are :
• Chart of Accounts
Chart of Accounts
Add Bank
Add/Modify Branch and Modify Bank
Create Detailed Code
• User-defined Codes
• Source of Financing
• Accounting Entity
To create/modify a master:
From the Menu Tree, select the “Master”. The “Enquiry” screen for the master opens up, with
“Add”, “Modify” and “Close” buttons. Clicking the “Add” button” opens up the master creation
screen. Filling up the blank fields, and clicking the “Submit” button creates the master. Selecting
a code from the drop-down list in the “code” field in the Enquiry screen, and clicking “Modify”
button opens up the “Modify” screen, with modifiable attributes. Making the necessary
modifications and clicking the “Submit” button carries out the modifications to the master
selected.
25

Chart of AccountsIn this Menu, the Chart of accounts is provided in a tree format. The COA structure is compliant
with the Accounting and Budgeting Rules, 2006.
The structure of the COA Tree is as under:
The left hand side of the COA screen is in the form of a tree with “Income”, “Expenses”,
“Liabilities” and “assets” as the branches. The “Major codes”, “Minor codes”, and “Sub-
minor Codes” are the sub-branches, and “Detail Codes” are the leaves.
Type
26
Income Expenseseeepenses
Liabilities Assets
Major Heads Major Heads Major Heads Major Heads
Minor Heads Minor Heads Minor Heads Minor Heads
Sub-minor Heads
Sub-minor Heads
Sub-minor Heads
Sub-minor Heads
Detail Heads Detail Heads Detail Heads Detail Heads

Field Name Field Type Field Description
Group NameParent Account Name VarChar Account Code VarChar Name VarCharDescription VarChar Alternate Name VarChar Purpose Number Account detail Type Number Function Required Number Active for Posting Number Budget Check Required Number
The authorization to create or modify codes at different levels is set by Role Based Access
Control. For instance, at the ULB level, the major/minor/sub-minor codes can be modified – they
can be modified at the state level. On the other hand, the detail code can only be modified at the
ULB level and not at the State level.
Account Code CreationThe various steps to be followed for creating an account code are as under:
a) Log-in as a user with the appropriate role eg: STATEADMIN.
b) Click “Masters”
c) Click “Chart of accounts”. Two options “Chart of accounts”, and “Bank Accounts”
appear.
d) Double-click “Chart of accounts”. The options “Income”, “Expenses”, “Assets” and
“Liabilities” are displayed.
The COA Tree on the left hand side permits the user to go down the tree by a process of selection
from multiple options at each level till he reaches the required level. In other words, by clicking
at “Income”, the list of major heads under “Income” are displayed. On selection of a major head,
all the minor heads under the selected major head are displayed. This process is continued till the
level of “detail code”. The user can add a code at any of these levels, if he is authorized to do so,
by clicking on the add button on the right hand side of the screen.
For example, to add a detail code under “Income-Other Income-Miscellaneous Income-Others”,
log in with the appropriate role. Select “Income”. The major heads under “Income (1)” are
displayed on the LHS.
i.e Income – Tax Revenue (11)
Income – Assigned Revenues & Compensations (12)
27

Income - Rental Income from Municipal Properties (13)
Income- Fees & User charges (14)
Income - Sale & Hire charges (15)
Income - Revenue Grants, Contributions and Subsidies (16)
Income - Income from Investments (17)
Income - Interest Earned (18)
Income - Other Income (19)
Click on “Income-Other Income (19)”. The following minor heads under the major heads “Other
Income” are displayed on the COA Tree :.
Deposits Forfeited (191)
Lapsed Deposits (192)
Insurance claim Recovery (193)
Profit on Disposal of Fixed Assets (194)
Recovery from Employees (195)
Unclaimed Refund/Liabilities (196)
Excess Provisions written back (197)
Miscellaneous Income-Others (198)
Click on “Miscellaneous Income-Others (198)”. The following sub-minor codes under the minor
head “Miscellaneous Income-Other” are displayed on the COA Tree :
Recoveries-Bank charges on dishonor of cheques (1981)
Recoveries-Law charges and court cost (1982)
Recoveries-Miscellaneous (1983)
Recoveries-Income from Educational Institutions 1984)
Recoveries-Income-Others (1985)
Click on “Recoveries-Income-Others (1985). Click the “Add” button on the right hand side.
28

The blank fields in the “Chart of accounts-Add account code” screens have to be filled up in the
following manner:
Field Type Value (Example) Account code Mandatory Field 1854Name Mandatory Field Recoveries from contractors
and suppliersAlternate Name Optional Field --Description Optional Field --Parent account Code The higher-level code (Sub-minor
code) is automatically taken from the
COA Tree.
Recoveries
Active for Posting Click “√ “ in the field to enable
posting to this field
√
Type The letter “I(Income)”, “E
(Expense)”, “L (Liability)” or
“A(Asset)” taken automatically from
the attribute appearing at major code
level.
I
Classification Select from the following options in
the drop-down list
1) Major code
2) Minor Code
3) Sub-minor Code
29

4) Detail codePurpose Optional.
Select from the following options in
the drop-down list:
Contractor Deductions
Fixed Assets
Bank codes
PT Penalty code
Cess Payable
Cess Control
Property Tax Receivable
Cash-in-Hand
Cheque-in-Hand
Payable to Others
Receivable from Others
Municipal fund
Excess IE
Interfund Transfer Account
Contractor Deductions
--
Function required Click “√ “ in the field to display
“Function” field in vouchers when
this account code is selected.
√
Account Detail Type Optional --On clicking “Submit” button, the account code is created.
Purpose: The system uses this mapping for internally mapping a specific account code for specific
purposes. For instance, an account code designated as PT Penalty Code will be used as the
income account to credit the penalty charged during the Property Tax Receipt.
Account Detail Type: If a type is selected for an account code, the system would create a sub-
ledger for the type selected. For instance, if Employee is selected as the Account Detail Type for
Festival Advance to Employees, an Employee is required to be selected from the Employee
master on each voucher that uses that account code. This would then enable the system to create a
sub-ledger for that party within the account code.
Create/View/Modify Detailed CodeIn addition to the screen above, a separate screen is provided for the users to create a detailed code quickly without having to navigate the account code hierarchy as shown above. On clicking the link ‘Create/Modify/View Detailed Code’ from the menu, the user is presented with a screen as shown below:
30

Here, the user can enter the detailed account code, click on Go. This displays the attributes for that detailed code.
Clicking on the button allows the user to modify the detailed code. This can be done ONLY if there are no entries posted against that code. Further, all the attributes EXCEPT the Account Code can be modified.
Clicking on the button allows the user to add a new detailed code. The screen shown below opens up:
The user must select the Parent Account code – the list of minor codes is displayed here and the user needs to select the parent under which the detailed code needs to be setup. The following table shows the values that need to be entered:
Field Type Value (Example) Parent Account code Mandatory Field 1989 Parent Account Name Display Income from HospitalsAccount Code Mandatory Field: the user can
only enter the detailed codes (ie
1989-01
31

digits 5,6). The minor code is
automatically defaulted from
the parent account codeName Mandatory Field Income from hospitals -
city hospitalsDescription Optional Field --Budget Check Required Optional Field --Active for Posting Click “√ “ in the field to enable
posting to this field
√
Purpose Optional.
Select from the following
options in the drop-down list:
Contractor Deductions
Fixed Assets
Bank codes
PT Penalty code
Cess Payable
Cess Control
Property Tax Receivable
Cash-in-Hand
Cheque-in-Hand
Payable to Others
Receivable from Others
Municipal fund
Excess IE
Interfund Transfer account
Contractor Deductions
--
Function required Click “√ “ in the field to
display “Function” field in
vouchers when this account
code is selected.
√
Account Detail Type Optional --
Clicking on the button saves the record. Now the detailed code is available for being used in transactions.
Access to this screen is provided from all the screens in the system by clicking on the link
– this allows for users easy and quick access to create detailed codes. The user can create the detailed code and resume work on the transaction screen.
32

ADDBank
This screen is for creating the Banks. For adding a bank, the “add Bank” button should be clicked, which opens up the “Bank-New”
screen. By giving a bank name and saving, a new bank is created.
In the screen it will show the list of already existing Bank names. From here we can go to
the next option by clicking “ADD BRANCH”. For any bank created in the system we need to
have atleast one branch.
Add/Modify Branch and Modify BankA ULB may have various bank accounts, used for different purposes. It may open two accounts
in the same branch of a bank, and use one account for its day-to-day operations, and the other
account for operating the funds of a specific grant. It may also have a third account in a different
bank for managing its SAS collections. The Chart of accounts have various types of bank
accounts, classified on the type of the bank, and on the purpose for which it is used.
For example, a few bank account heads in the Chart of account are :
“Bank Account-Nationalised Banks-General”
“Bank Account-Nationalised Banks-Collection”
“Bank Account-Nationalised Banks-Specific Grants”
“Bank Account-Scheduled Banks-General”
“Bank Account- Scheduled Banks-Collection”
“Bank Account- Scheduled Banks-Specific Grants”
The ULB may also have one or two treasury accounts. 33

The above account heads are at sub-minor code level. Below these account heads, the ULB may
have different bank accounts, which are identified by account numbers given by the banks (ex –
Canara Bank, Indiranagar Branch, Account No 195243) . To have individual bank books for all
such bank accounts, the ULB will have to create detail codes for all such bank accounts.
eGovernment Financials provides a special screen to create all such bank accounts, and to
automatically create a detail code, and link it to the chart of accounts. Each bank account is linked
to a unique fund, and all transactions done through that bank account will automatically, appear
in the books of account of the fund to which it is linked.
To create/modify a bank account, the Bank Accounts Menu is selected from the Menu Tree, on
clicking which, the Bank-Enquiry screen opens up.
As you can see from the above picture, the Bank Enquiry screen has “Modify”, “Add Branch”
and “Close” buttons in addition to “Bank Name” field.
Adding a Branch (with an account number) to an existing Bank
For adding a branch to an existing bank, the following steps have to be followed :
a) Select Bank from the drop-down list in the “Bank code” in the “Bank-Enquiry” screen.
b) Click “Add Branch” button, to open the “Bank Branch-New” screen
34
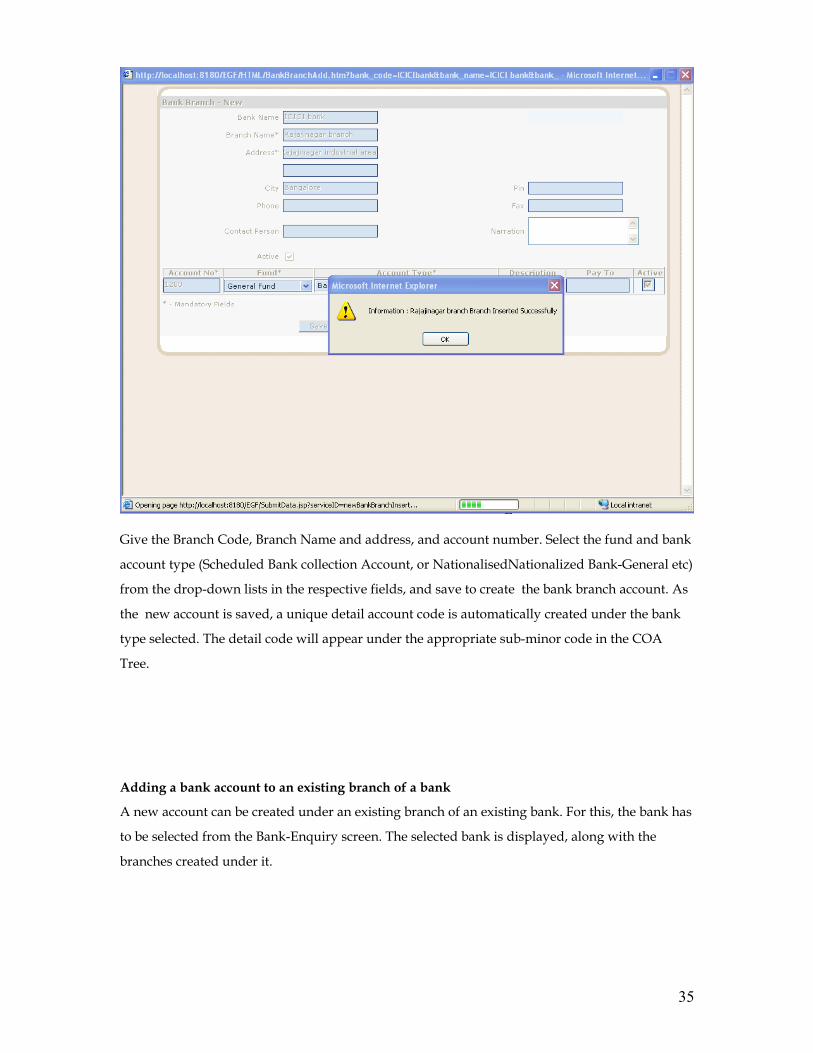
Give the Branch Code, Branch Name and address, and account number. Select the fund and bank
account type (Scheduled Bank collection Account, or NationalisedNationalized Bank-General etc)
from the drop-down lists in the respective fields, and save to create the bank branch account. As
the new account is saved, a unique detail account code is automatically created under the bank
type selected. The detail code will appear under the appropriate sub-minor code in the COA
Tree.
Adding a bank account to an existing branch of a bank
A new account can be created under an existing branch of an existing bank. For this, the bank has
to be selected from the Bank-Enquiry screen. The selected bank is displayed, along with the
branches created under it.
35

On selection of a Branch, the “Branch Enquiry” screen opens up. The “Add Branch” button is
clicked to open the “New Account” screen. A new account can be created, as explained in the
case of adding a branch (with a new account number. The detail account code is auto-generated
in this case also.
Modify a bank account
We should not be modifying the bank account number, fund and the account types if the
bank account is already used for posting. We have to cancel the related vouchers if any changes
need to be done.
Masters: Collection Related The following masters have to be created before accounting collections :
a) Code screen mapping
b) Tax Set-up
c) Collection/payment Point
d) Set-up Cheque in Hand/Cash in Hand
Code Screen MappingThis screen is used to map account codes to specific screens or fields (services). The account codes
that are mapped to a particular screen/field will appear as drop-down lists in those screens or
fields, from which the user can select the account code he wants.
36

The Code-Screen mapping set-up has a field “service which lists out a number of
screen names or field names. On selection of a service and mapping the relevant
account codes to this service through the Code-Screen mapping, the mapped account
codes appear as drop-down lists in the screen/field to which they are mapped.
The services which are listed out in the Code-Screen Mapping Set-up and the screens/fields to
which they are mapped are:
Service Mapped to PurposeAsset Category Under development.
37
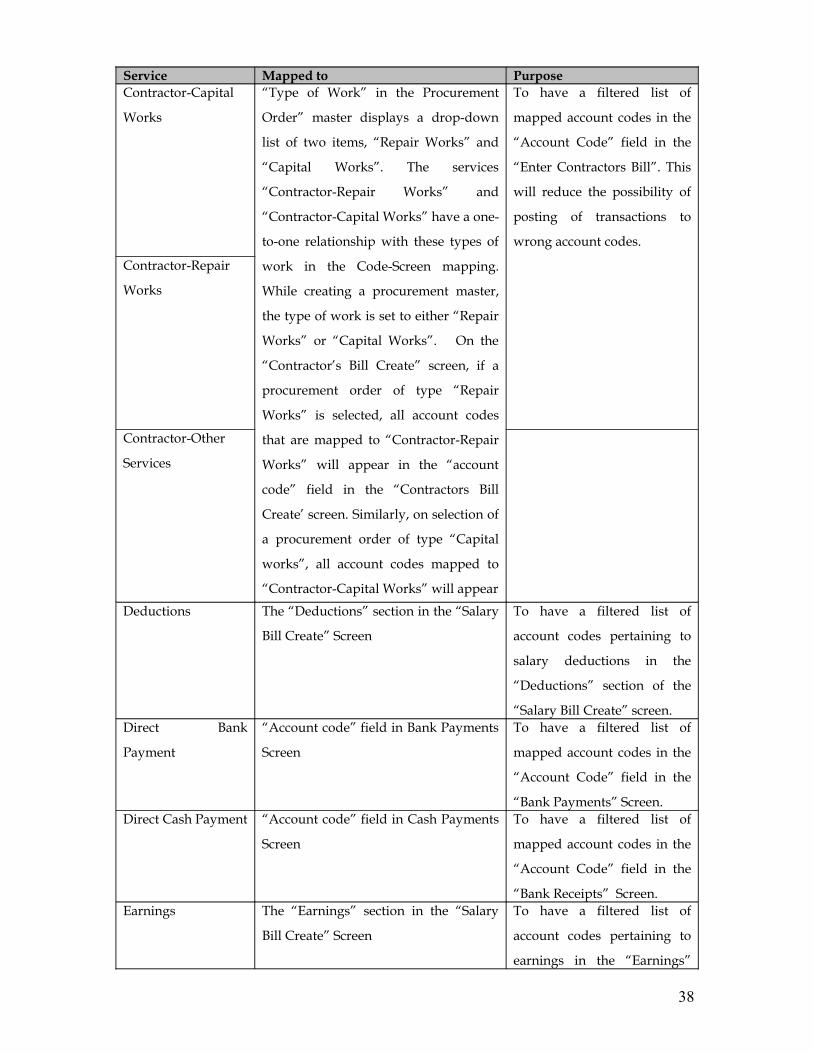
Service Mapped to PurposeContractor-Capital
Works
“Type of Work” in the Procurement
Order” master displays a drop-down
list of two items, “Repair Works” and
“Capital Works”. The services
“Contractor-Repair Works” and
“Contractor-Capital Works” have a one-
to-one relationship with these types of
work in the Code-Screen mapping.
While creating a procurement master,
the type of work is set to either “Repair
Works” or “Capital Works”. On the
“Contractor’s Bill Create” screen, if a
procurement order of type “Repair
Works” is selected, all account codes
that are mapped to “Contractor-Repair
Works” will appear in the “account
code” field in the “Contractors Bill
Create’ screen. Similarly, on selection of
a procurement order of type “Capital
works”, all account codes mapped to
“Contractor-Capital Works” will appear
To have a filtered list of
mapped account codes in the
“Account Code” field in the
“Enter Contractors Bill”. This
will reduce the possibility of
posting of transactions to
wrong account codes.
Contractor-Repair
Works
Contractor-Other
Services
Deductions The “Deductions” section in the “Salary
Bill Create” Screen
To have a filtered list of
account codes pertaining to
salary deductions in the
“Deductions” section of the
“Salary Bill Create” screen.Direct Bank
Payment
“Account code” field in Bank Payments
Screen
To have a filtered list of
mapped account codes in the
“Account Code” field in the
“Bank Payments” Screen.Direct Cash Payment “Account code” field in Cash Payments
Screen
To have a filtered list of
mapped account codes in the
“Account Code” field in the
“Bank Receipts” Screen. Earnings The “Earnings” section in the “Salary
Bill Create” Screen
To have a filtered list of
account codes pertaining to
earnings in the “Earnings”
38
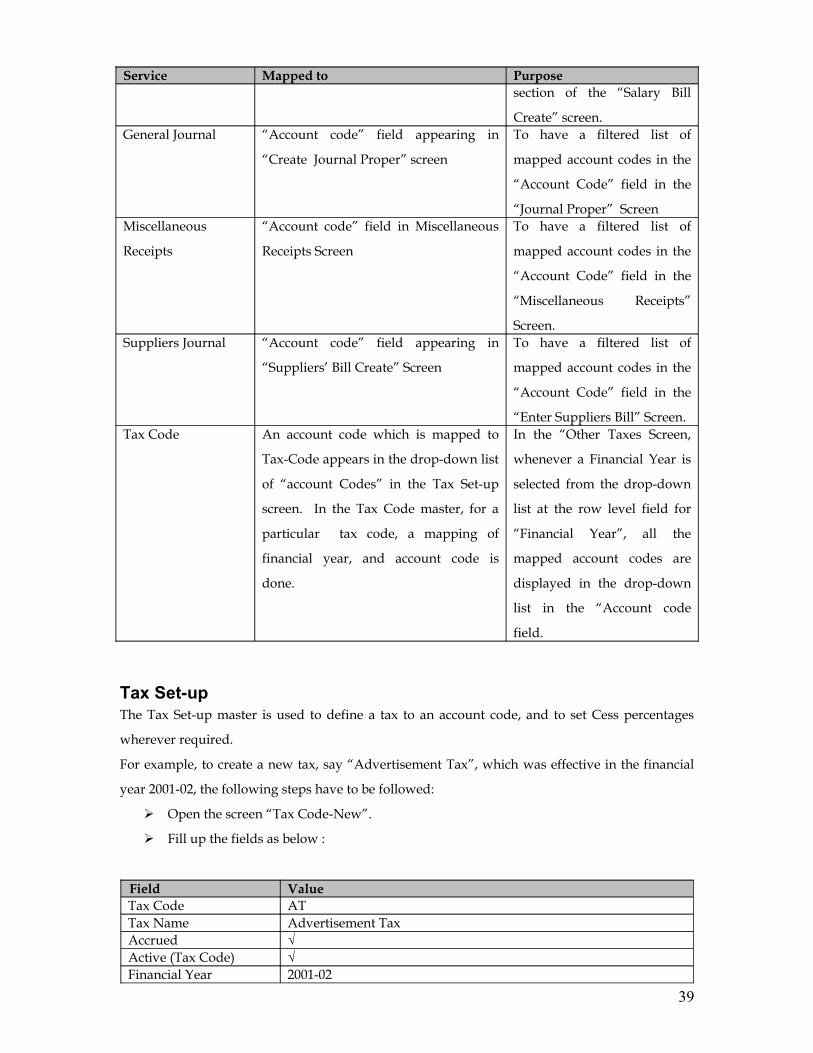
Service Mapped to Purposesection of the “Salary Bill
Create” screen.General Journal “Account code” field appearing in
“Create Journal Proper” screen
To have a filtered list of
mapped account codes in the
“Account Code” field in the
“Journal Proper” ScreenMiscellaneous
Receipts
“Account code” field in Miscellaneous
Receipts Screen
To have a filtered list of
mapped account codes in the
“Account Code” field in the
“Miscellaneous Receipts”
Screen.Suppliers Journal “Account code” field appearing in
“Suppliers’ Bill Create” Screen
To have a filtered list of
mapped account codes in the
“Account Code” field in the
“Enter Suppliers Bill” Screen.Tax Code An account code which is mapped to
Tax-Code appears in the drop-down list
of “account Codes” in the Tax Set-up
screen. In the Tax Code master, for a
particular tax code, a mapping of
financial year, and account code is
done.
In the “Other Taxes Screen,
whenever a Financial Year is
selected from the drop-down
list at the row level field for
“Financial Year”, all the
mapped account codes are
displayed in the drop-down
list in the “Account code
field.
Tax Set-upThe Tax Set-up master is used to define a tax to an account code, and to set Cess percentages
wherever required.
For example, to create a new tax, say “Advertisement Tax”, which was effective in the financial
year 2001-02, the following steps have to be followed:
Open the screen “Tax Code-New”.
Fill up the fields as below :
Field ValueTax Code ATTax Name Advertisement TaxAccrued √Active (Tax Code) √Financial Year 2001-02
39

Field ValueAccount Code 1121-00Account Head Automatically taken from the COA Tree, based on the account code
selectedActive CheckboxIs old Check boxCess --
Action Expected ResultSubmit Modification will be done.Cancel Cancels the entries made and refreshes the screen.Close Closes the screen.
On clicking “Submit”, the new tax code is created.
Cess percentages: On clicking “Cess” the Cess Percentage table is displayed with the Cess
Account heads. This list is determined based on account codes which have the Purpose
Code as ‘Cess Payable’. The Cess percentages are modifiable fields. Cess Percentages can be
created for a new tax, or cess percentages can be modified for an existing code for a particular
year.
As part of setup, tax code with code PT must be setup, with all the corresponding cesses by year,
for automatic calculation of cesses and posting to the relevant Receivables and Cess Payable
Accounts.
How to use a tax code in accounting Tax collection: For accounting property tax receipt for a
financial year, a tax code has to be first created Property tax in the Tax-set-up master. It is also
required to create a financial year, and map the financial year to a particular “Receivables”
Account code. When this is done, the financial year will appear in the “Property Tax” Receipt
screen, enabling the user to account property tax collection of a particular financial year, and post
it to respective receivables account code. In the tax code screen below, the financial years 2004-05
to 2006-07 are set up, and mapped to Receivables-Property tax” accounts of the respective years.
40

Once these tax codes are defined, Property Tax Receipt Screen displays these Financial Years,
against which property tax collections can be accounted. Similarly, tax codes set-up for taxes
other than property tax are mapped to Other Taxes Screen, to enable the user to account taxes
collected for a particular financial year, and to post I to appropriate Receivables” account code.
The Financial Year field used in the Property Tax field does NOT map to the Financial Year
Master. The Financial Year field is an informational field, which tracks the year for which the
collection is being made. By default all the financial years mapped in the Tax set up will appear in
the Property Tax Receipt and Other Taxes screens. The collection itself will be accounted for in the
current Financial Year.
41

Set-up cheque in Hand/Cash-in-HandThis is used to map cheque-in-hand and cash-in-hand accounts within a ULB to administrative
units. The screen provides the option to Create or Modify the Setup. The following steps need to
be followed:
1. Select Admin level: In most ULBs, this would be the city. In some cases, it may be the Zone.
2. Select the Admin Boundary Value (eg city name, Zone name)
3. Assign the Cash-in-hand and Cheque-in-hand account codes.
The drop-down account codes for Cash-in-hand and Cheque-in-hand accounts are based on the
respective Purpose Codes assigned to the Account Codes in the Chart of Accounts setup.
Collection/Payment PointsThis is used to define Collection Points for all the Receipt/Payment Transactions. This can be
used for MIS reporting. The options are:
Collections:
42

1. Bill Collector: For field collections
2. Counter: For office collections
Payments:
1. Cashier: For bank/cash payments
The following example shows how to create a new Bill Collector: The fields in the “Bill collector-
New” screen have to be filled up in the following manner:
Field Particulars ExampleCode Mandatory-alphanumeric B1Name Mandatory-Alphabetical ShyamDepartment Code Select from the drop-down list of departments
already created
REVENUE
Department Name Taken automatically from the Department mAster,
based on the Department code selected
REVENUE
Bill collector/
Counter/ Cashier
Click on one of the options Bill collector
Narration OptionalActive A “√” symbol makes the Bill Collector. The
absence of it makes the bill collector inactive.
√
The Collection/Payment Points are mapped to modes of collection (Field/Counter or
Office/Cash). The different Receipt screens (Property Tax, Other Taxes and Miscellaneous
Receipts) have different modes of collection such as “Field”, “Counter (Office). Depending on the
mode of collection selected in the receipt screen, a drop-down list of collection Agents are
mapped to that mode of collection, are displayed in the “Collection Agent” field. Selecting a bill
collector maps the receipt entry to that bill collector.
Similarly, in payment screens (Salary Payment, Sub-ledger payment, Advance Payment, Bank
Payment and Cash Payment), the cashier field shows the list of Payment Agents setup in this
screen.
Contractors/suppliers bills related masters The masters related to contractors/suppliers Bill accounting are:
a) Supplier/contractor;
b) Procurement Orders
Both these masters are with the options: “create”, “modify” and “View”. The “view” option
enables you to view a selected master, and the “Modify” option enables you to modify a selected
master.
43

Supplier/Contractor MasterPrior to passing a supplier or contractor bill, it is required to create a Supplier/Contractor
Master, and also to create a Procurement Order (Purchase Order/Work Order) for the Supplier/
Contractor. The following are steps to create a new Supplier/Contractor Master.
Open the Create supplier/ contractor screen, and fill the fields in the screen as below:
Field Particulars Example (Supplier) Example (Contractor)Code Mandatory-
alphanumeric field
S1 C1
Name Mandatory Ganesh suppliers Konark EnterprisesAddress Mandatory No 13, 15th Cross,
Basavanagudi, Bangalore
No 898, IA Main,
Jayanagar II Block,
BangaloreCity Optional -- --Pin Optional -- --Phone Optional -- --Fax Optional -- --Mobile Optional -- --E-Mail Optional -- --Contact
Person
Optional -- --
Narration Optional -- --
44

Field Particulars Example (Supplier) Example (Contractor)Bank Name Bank AccountDisbursement
ModePAN NoParty Type Mandatory – To select
between “Contractor”/
”Supplier”
Supplier Contractor
Sub TypeActive A “√” makes the
Contractor/Supplier
active.
√ √
“Save & Close”, button saves the master, and closes the screen, whereas “Save & New” saves the
master, and opens a new screen for creation of further items.
Procurement OrdersProcurement Orders are of two types:
1. Contractor Orders: These can be of two different sub-types:
a. Original Works: which result in the creation/enhancement of an asset
b. Repair Works: which result in the repair of an existing asset.
2. Supplier Orders: These are for Supply Orders (eg raw materials, stationery)
The steps for creating a procurement order are given below with examples:
Field Particulars Example (PO) Example (WO)Type Mandatory – check box Supplier ContractorOrder No Mandatory-
alphanumeric field
SO1 PO1
Name of work Mandatory Stationery Supply Pipe Laying ProjectOrder Date Mandatory - Date field 7-6-2006 7-6-2006Total Value Mandatory-Numeric 20000 1000000Advance Payable Optional-Numeric -- 50000Authorized by Optional - TextLevel of Work To select between
“City”, “Zone” and
“Ward”
City Ward
Work Type To select from the drop-
down listSub Type To select from the drop-
down listOrdered to To select from the drop-
down list of
Suppliers/Contractors
Ganesh suppliers Konark Enterprises
45

Field Particulars Example (PO) Example (WO)already created
Type of Work Drop-down –
Mandatory only if
ordered to Contractors
Capital Works
Repaid Works
Other Service
- Capital Works
Fund Name To select from the drop-
down list of Funds
already created
General fund Water Supply and
Sewerage Fund
Financing source To select from the drop-
down list of Financing
Sources already created
Own source State Govt Loan
Scheme Drop – down listSub – Scheme Drop - down listRetention Optional-Numeric -- 50000Security Deposit Optional-Numeric -- 100000Narration Optional -- --PAN No Optional -- --TIN No Optional -- --Status A “√” makes it active √ √Sanction no Optional-alphanumeric GF/1150/1-6-2006 WS/218/1-6-06Sanction Date Optional-DateNarration Optional-TextRemarks Optional-Text“Save & Close”, button saves the master, and closes the screen, whereas “Save & New” saves the
master, and opens a new screen for creation of further items.
46
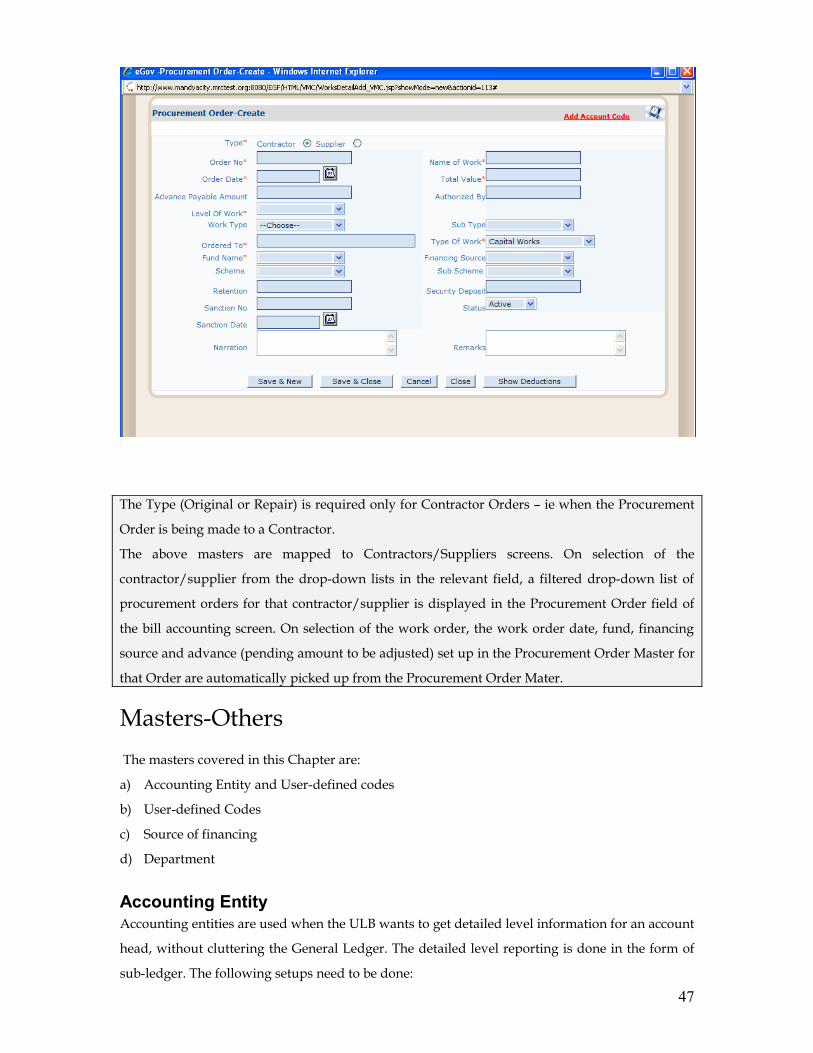
The Type (Original or Repair) is required only for Contractor Orders – ie when the Procurement
Order is being made to a Contractor.
The above masters are mapped to Contractors/Suppliers screens. On selection of the
contractor/supplier from the drop-down lists in the relevant field, a filtered drop-down list of
procurement orders for that contractor/supplier is displayed in the Procurement Order field of
the bill accounting screen. On selection of the work order, the work order date, fund, financing
source and advance (pending amount to be adjusted) set up in the Procurement Order Master for
that Order are automatically picked up from the Procurement Order Mater.
Masters-Others The masters covered in this Chapter are:
a) Accounting Entity and User-defined codes
b) User-defined Codes
c) Source of financing
d) Department
Accounting EntityAccounting entities are used when the ULB wants to get detailed level information for an account
head, without cluttering the General Ledger. The detailed level reporting is done in the form of
sub-ledger. The following setups need to be done:
47

1. Define Accounting Entity – the entity for which the sub-ledger needs to be created. For
instance, for tracking festival advances by employee, create an Accounting Entity called
Employee.
2. Define User-defined codes under the Accounting Entity. Once the Accounting Entity
Employee is defined, define the Employee for whom the sub-ledger needs to be maintained.
3. Assign accounting entity to an Account Code (Detailed Code) in the Chart of Accounts,
which creates a sub-ledger for each user-defined code within the GL code. Assign the
Accounting Entity Employee to the Festival Advances GL Code.
The Accounting entity must be mapped at the Detailed Code level.
Accounting Entity ‘CREDITORS’ is pre-defined in the system and needs to be assigned to all
Account Codes where the sub-ledgers by Creditors are required. The following account codes
MUST have CREDITORS as the Accounting Entity:
Creditors – Contractor Payable (381100)
Creditors – Supplier Payable (381200)
User-defined codes are NOT required for Contractors/Suppliers. The system automatically
manages the mapping from the Contractor/Supplier Master.
For example, the ULB may give loans to beneficiaries under Ashraya Scheme. In the General
Ledger, the loans given, and repayments will be accounted under one account head i.e Loans to
Others – Under Ashraya Scheme (482100). The balance in this account will give the total balance
due from all the beneficiaries. However, it will not give information on amounts due from
individual beneficiaries. To know the loans given to individual beneficiaries, amounts received
from them, and balance due from each beneficiary at any point of time, “accounting entity” is
used.
Creating an accounting entity: For creating the accounting entity “Loans under Ashraya
scheme”, open the “accounting entity” screen. Type the words “Loans under Ashraya scheme”
in the “Name field. Give brief description in the “Description” field (Optional), and click “Add”.
Button. The accounting entity is now created.
Creating user-defined codes under the accounting entity “Loans under Ashraya scheme : Open
the “User-defined Codes” screen, click “New” to open “User-defined Sub-Codes-New” screen.
48
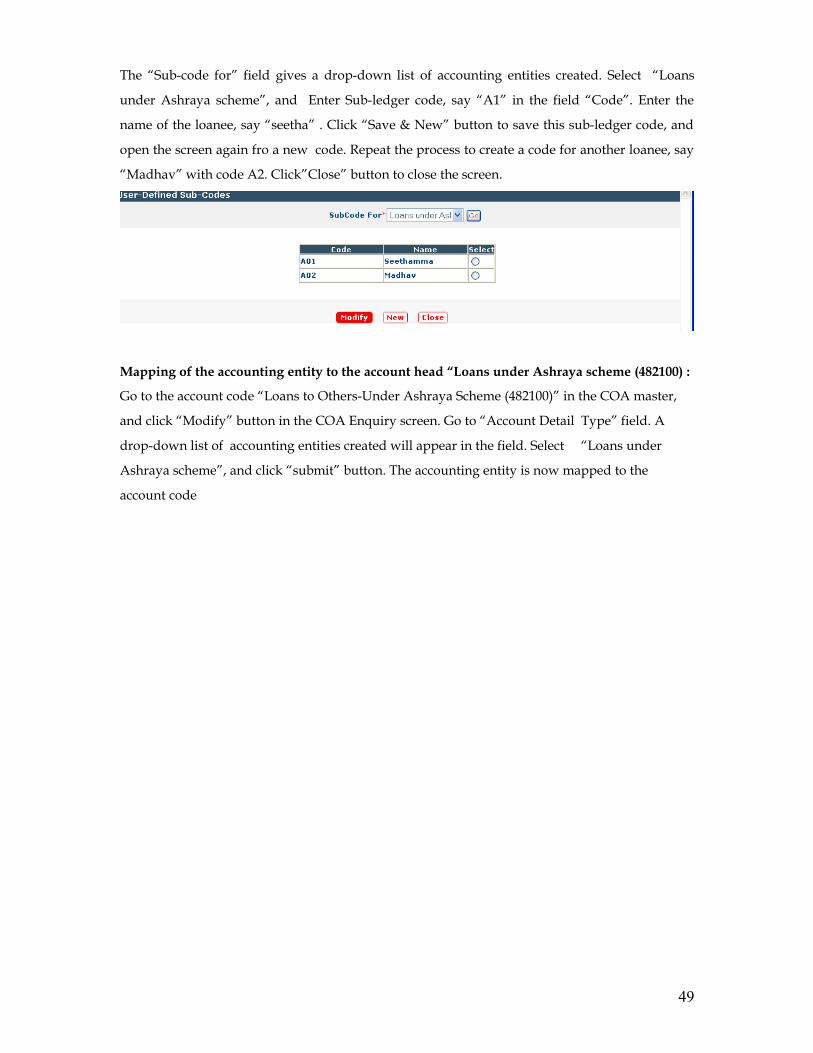
The “Sub-code for” field gives a drop-down list of accounting entities created. Select “Loans
under Ashraya scheme”, and Enter Sub-ledger code, say “A1” in the field “Code”. Enter the
name of the loanee, say “seetha” . Click “Save & New” button to save this sub-ledger code, and
open the screen again fro a new code. Repeat the process to create a code for another loanee, say
“Madhav” with code A2. Click”Close” button to close the screen.
Mapping of the accounting entity to the account head “Loans under Ashraya scheme (482100) :
Go to the account code “Loans to Others-Under Ashraya Scheme (482100)” in the COA master,
and click “Modify” button in the COA Enquiry screen. Go to “Account Detail Type” field. A
drop-down list of accounting entities created will appear in the field. Select “Loans under
Ashraya scheme”, and click “submit” button. The accounting entity is now mapped to the
account code
49

.
At the time of creating a new accounting code also, it can be attached with an accounting entity,
by selecting the accounting entity from the “account detail type” field.
Capturing sub-ledger information against a GL code in transactions: In a transaction, when the
account code with an accounting entity is selected, the user needs to click on the button under
Details. This pops up a new window with the Accounting Entity. The drop-down shows the list
of User-defined codes under that Entity. Select the sub-ledger code here and click on Submit. In
the example, if the ULB plans to give a loan of Rs. 1,00,000 under the Ashraya scheme, it needs to
be recorded as a Bank Payment (Transactions -> Payments -> Bank Payment) and under that,
when the account code 481200 (Loans to Others – under Ashraya Scheme) is used, the user must
assign the sub-ledger code of the party as below:
50
Mapping the Accounting entity to the GL Code

On clicking , the user is taken back to the main transaction screen and on clicking
Save & Close, the transaction is saved. This can then be viewed in the sub-ledger report.
Financing SourceFinancing source indicates the source of financing a particular activity. For example, If a road
construction activity is carried out using ULB’s own source, it can be linked to the Financing
Source “Own source”. A pipe laying project financed out of loan from State government can be
accounted under the financing source “State government Loan”. A grant received under SJSRY
Scheme has to be accounted under the financing source “SJSRY Scheme”.
Creating a financing source: For creating a financing source, select “Financing source” master,
and click “New” to open “Financing source-New” screen. Enter Financing Source Code and
Name, click “Active”, and “Save & Close” to create a financing Source. To create a financing
source under another financing source already created (for example, create “SJSRY Scheme”
under an existing financing source “Specific Grant”), select the “specific Grant” from the “Parent
Type” field. The parent code will automatically appear on selection of parent type.
51

Mapping of transactions to financing sources: The transaction screens have a field for
“Financing Source” which displays the drop-down list of all financing sources created from the
financing source master. Selection of a financing source will map the transaction to it.
DepartmentCollection/Payment Officers are mapped to Departments created from this master Under the
Administration Set-up there is an option to create department. On click of the “Department” link
in the left hand side menu tree, you will get a screen on the right hand side. Fill the “Department
Code” and the “Department Name” and click “Create”. The department so created appears in
the drop-down list in the “Department Code”, and the bill collector will be mapped to the
Department selected from this list.
52

Chapter 7 : Accounting of Transactions
The different types and sub-types of transactions are:
Receipts Bills Accounting Payments Contra Entries Journal Proper
Property Tax Contractor Bill Bank Payments Cash Deposit
Supplier Bill Cash Payments Cash withdrawal
Misc Receipts Salary Bill Sub-ledger Payments Bank to Bank Transfer
Salary Payments Pay-in
The different options available for transactions are:
a) Create transaction
b) Modify transaction
c) Reverse transaction
d) View transaction
e) Confirm transaction
f) Cancel transaction
There are separate screens available for each of these options. An authorized user can carry out
these functions by accessing the screen from the menu tree. Separate screens are available under
each transaction type for viewing, modifying, and reversing transactions. On clicking any of the
above options, a transaction search screen opens up. On giving either voucher number range, or
voucher date range, or the Fund name, the list of confirmed/unconfirmed vouchers in the
voucher no or date range and fund is displayed. By clicking on the required, the voucher is
displayed. The voucher can be viewed/modified/reversed, depending on the option selected.
53

Modify transactionsOnly unconfirmed vouchers may be modified. On selecting the “modify transaction’ option for
the transaction type, the voucher is displayed, with the user given the option to change any of the
attributes. On saving, the voucher is modified.
Reverse transactionsOn selecting the “Reverse transaction’ option for the transaction type, the voucher is displayed,
with additional buttons for “Reverse”, “Voucher Number”, and ”Voucher Date”. On filling up
these values, and, submitting, a reversal voucher is generated, which will reverse the original
transaction. The reversal date cannot be a date prior to the original voucher date. In the General
ledger report, both the original transaction, and the reversal entry will appear, but on different
columns. For example, the reversal of a receipt entry will appear on the payment side of cash
book, and the reversal of a payment transaction will appear as a receipt transaction. The General
Ledger Report also has an option not to show reversed entries. If this option is selected, both the
original entry, and the reversed entry will not be displayed in the ledger account.
54

Voucher confirmationVouchers are created as “Unconfirmed vouchers” at the first instance. This is a setting done as
per the requirement of the ULBs. A voucher can be “Confirmed” on create itself. The menu tree
has an option “Confirm vouchers” under transactions, on selecting which the confirm Voucher
screen opens up. On giving a date range and Fund, all the unconfirmed vouchers within that date
range and Fund are listed out. On clicking the vouchers to be confirmed, and clicking “submit”
button, the voucher gets confirmed.
55

The unconfirmed transactions are posted to General Ledger, but the presence of unconfirmed vouchers is indicated in all reports as unconfirmed”.
Voucher Cancellation The menu tree has an option “Cancel vouchers” under transactions, on selecting which the
Cancel Voucher screen opens up. On giving a date range and fund, all the unconfirmed vouchers
within that date range and fund are listed out. On clicking the vouchers to be canceled, and
clicking “submit” button, the voucher gets canceled. If a voucher is canceled the same voucher
number can be reused. We can cancel only unconfirmed vouchers.
56

57

Chapter 8: Receipts Accounting
Receipts are recorded in eGov Financials in the form of vouchers. The following three types of
screens are provided to enter receipt vouchers:
a) Property Tax Receipts: For recording the receipt of Property Tax receipts.
b) Miscellaneous Receipts
Property Tax ReceiptsThis is the screen provided to record Property Tax Collections. The user is required to input the
amount received and penalty for each collection year along with the relevant MIS data and the
system automatically performs the following actions:
a) Pass the Receipt Voucher to record the receipt of Property Tax crediting the
Receivables accounts for the relevant collection years.
b) Compute the relevant cess amounts for each cess collection head and pass the Journal
Voucher.
The following example shows the accounting impact of transactions from this screen:
The accounts department receives a cash receipt for Rs. 10000/- for 2005-06 of which Rs. 200/- is
against Penalty for late payment of the Tax. The following vouchers will be passed in the system:
Receipt Voucher:
4711-00 Cash in Hand Dr 10,000
4611-06 To Property Tax Receivables: 2005-06 9800
1443-00 To Penalties and Fines – Property Tax 200
Journal Voucher for Cesses Collected on behalf of the state:
4691-00 Cess Control Account Dr 2,400
3851-01 To Cess Payable – Library Cess 540
3852-02 To Cess Payable – Health Cess 1,340
3853-03 To Cess Payable – Beggary Cess 270
1471-00 To Cess Collection Charges 240
The Cess Account codes (Payable accounts and the collection charges) and the corresponding
% must be specified against the Property Tax Receivables Accounts for each year in the Tax
Setup Screen against Tax Code: PT
The Property Tax Receivables Account Codes must be defined for each year in the Chart of
Accounts Setup Screen. These account codes must be Detailed Codes under the Property Tax
58

Receivables Account.
The Collection Mode determines the relevant Account to be debited:
Cash: Cash-in-hand (4711-00)
Cheque: Cheque-in-hand (4712-00)
Bank: Based on the Bank Account selected, the corresponding GL code is selected by the
system from the Bank Master.
Property Tax Collection
Overview
Screen to submit the Property Tax Receipt. The user inputs the amount received and penalty
along with all the required MIS data and the system automatically:
1. Calculates the cess amounts (based on % set up by the user)
2. Passes the necessary accounting transactions ( based on account codes set up by the user)
59

1. Input Header Data
Field Type/Options RemarksJournal Voucher
No.
Numeric Voucher number for the JV for the
Cess transactionsReceipt Voucher
No.
Numeric Voucher number for the Receipt
Voucher Date Date Voucher Date. This date needs to
be in an Open PeriodCollection Mode Field
Counter
BankCollection Agent Drop-down: If the Collection Mode choice is:
Field: the list of Bill Collectors is shown
Counter: the list of Collection Agents is
chosen
Collection Agents are defined on
the Collection Agent Screen
Bank Drop-down: List of Banks
List of Banks where the ULB has an account
under the �General Fund�
Field appears only when the
Collection Mode is BANK
Account
Number
Drop-down: Account Number
Accounts for the Bank (specific to �General
Fund�)
Field appears only when the
Collection Mode is BANK
Financing
Source
Drop-down: List of Financing Sources Defaulted to �Own Source�
Ward Drop-down: List of WardsFunction Drop-down: List of Functions Defaulted to �Property
Taxes�Fund Drop-down: List of Funds Defaulted to �General Fund�Collection Type Cash
Cheque
Others
Select �Others� to record
documents that do NOT need to
be reconciled (eg DD)Cheque/ Ref No Numeric Cheque number if type: Cheque
Document No if type: OthersCheque Date DateNarration Alphanumeric
2. Input Details
60

Field Type/Options RemarksBoundary Level Drop-down: List of Administrative
boundaries at which accounting is managed
Defaulted to the ULB since all
cheque-in-hand/cash accounts
are defined at the ULB levelCheque-in-hand
Account
Defaulted from setup Account defined from the Setup
Cheque-in-hand/Cash-in-hand
ScreenCash Account Defaulted from setup
Period The list of periods defined in the system Periods are defined in the Tax
Setup Screen under Property Tax
(PT). As part of the setup, the
account to be credited is also
defined.Amount
Received
Amount Received Received in the form of Cash,
Cheque or a direct Bank DepositPenalty PenaltyNet Amount Net Amount Calculated as Amount Received
� Penalty. This is the actual
Property Tax Received
3. Save Transaction
Action ResultSubmit Submits the transaction. On successful submit, the system generates the Journal
Voucher and Receipt Voucher NumbersCancel Cancel the transactionClose Close the screenShow Splitup Shows the split up of how the amount paid is split into the following. The sum of
the following is debited against the bank, cash or cheque-in- hand account (as the
case may be).
1. Receivables (Credit)
2. Penalty (Credit)
3. Cess for each cess type (Credit)
Miscellaneous ReceiptsThis is the screen to record all other receipts (examples: Rental fees from properties owned by the
ULB; Earnest money deposit paid by contractors as part of a tender bidding process etc). The user
needs to select the mode of receipt and the account code(s) that need to be credited.
The following example shows the accounting impact of transactions from this screen:
61

The accounts department receives three cheques on 14-6-2006, Rs 10,000 towards licence fees, Rs
15,000 towards Katha transfer fees, and Rs 25,000 towards Development Charges. The
Miscellaneous Receipt Voucher in the system is as follows:
4712-00 Cheque-in-Hand Account Dr 50000
1421-00 To Receivables-Licensing Fees-2006-07… 10000
1412-00 To Fees for Katha Transfer 15000
1438-00 To Development Charges 25000
The Collection Mode determines the relevant Account to be debited:
Cash: Cash-in-hand (4711-00)
Cheque: Cheque-in-hand (4712-00)
Bank: Based on the Bank Account selected, the corresponding GL code is selected by the
system from the Bank Master.
Input Header Data
Field Type/Options RemarksVoucher No. Alpha Numeric Voucher number for the Receipt
List of counters Counters are defined on the
Collection Agent ScreenVoucher Date Date Voucher Date. This date needs to
be in an Open PeriodMode of
Collection
Cash
Cheque
BankBank Drop-down: List of Banks
List of Banks where the ULB has an account
under the ‘General Fund’
Field appears only when the
Collection Mode is BANK
Account
Number
Drop-down: Account Number
Accounts for the Bank (specific to ‘General
Fund’)
Field appears only when the
Collection Mode is BANK
Scheme Drop-down listSub Scheme Drop-down listFinancing
Source
Drop-down: List of Financing Sources
Fund Drop-down: List of FundsRef No Numeric Document No if type: OthersRef Date DateAmount* Numeric Amount ReceivedNarration Alphanumeric
62

Cheque Details
Field Type/Options RemarksCheque Number Numeric If the mode of collection is chequeAmount Numeric Cheque amountCheque Date Date Cheque dateReceived from Name Person name
The system accepts multiple cheques in a single receipt. The total of the cheque amounts must be
same as the header amount.
Input Details
Field Type/Options RemarksBoundary Level Drop-down: List of Administrative
boundaries at which accounting is managed
Defaulted to the ULB since all
cheque-in-hand/cash accounts
are defined at the ULB levelCheque-in-hand
Account
Defaulted from setup Account defined from the Setup
Cheque-in-hand/Cash-in-hand
ScreenCash Account Defaulted from setup
Function Drop-down: List of functions This is mandatory if the function
is set to required for the Account
headAccount Code Drop-down: Chart of AccountsAccount Head Display From the chart of accountsDr Amount Display Debit AmountCr Amount Numeric Credit Amount
Click Additional Details Only if additional details are
required for any account code
63

The picture above shows how the entry will look like in the Transaction Screen, before the save
button is clicked.
Save Transaction
Action ResultSave & New Submits the transaction. On successful submit, the system generates the Receipt
Voucher Number. The same screen is made available for entering a new recordSave & Close Submits the transaction. On successful submit, the system generates the Receipt
Voucher Number. The screen is closed.Cancel Cancels the transactionClose Close the screenShow GL Entry Shows the entry that will passed to the GL on submitting the transaction.
Reverse ReceiptsReversal is a feature that is provided to nullify the effect of a voucher that has been confirmed.
Prior to confirmation, a voucher can be modified or canceled, but once it is confirmed, reversal is
the only possible option. Reversal creates a new voucher and posts to the General Ledger by
reversing the effect of the original voucher.
Once the Cheque is deposited in the bank (via a Cheque deposit), the receipt CANNOT be
reversed.
64

The user selects one or more criteria and the system returns all the Receipts that match the
criteria. The users can then click on a Receipt and see the details of the specific receipt.
This receipt can then be reversed. This process passes a new voucher which reverses the
accounting impact of the original voucher. The system maintains a link between the two
vouchers.
Search for a Specific Voucher
Search Criteria
Field Type/Options RemarksReceipt Type All
Property Tax
Other ReceiptsReceipt Mode All
Field
Office
BankWard List of WardsVoucher
Number From
Alpha numeric
Voucher
Number To
Alpha numeric
Voucher Date
From
Date
Voucher Date To DateFund List of Fund
User Actions
65

Action ResultSearch Returns all the Vouchers in a tabular form which satisfy the search criteria. User
can click on the voucher and the voucher details are displayed.
Select the Voucher to be reversed
1. From the search results, select the Voucher to be Reversed.
2. Click on Reverse to Reverse the Voucher.
Input Reversal Details and submit
Reverse Voucher
Field Type/Options RemarksVoucher
Number
Alpha Numeric Reverse Receipt Voucher
Cess Voucher Alpha Numeric Valid only in case of Property Tax
Receipt ReversalsVoucher Date Date
User Actions
Action ResultSubmit Submit the transaction. On successful submit, the Receipt Voucher number and
Cess Voucher number for Reversals will be displayedClose Close the screen
View ReceiptsA screen is provided to View Receipts entered in the system. The user selects one or more criteria
and the system returns all the Receipts that match the criteria. The users can then click on a
Receipt and see the details of the specific receipt.
On the output screen, the rows are color coded as follows:
• Green: Reversal Voucher. This is executed in the system by Reversing the original
voucher to negate the effect of that voucher.
• Red: Vouchers which have been reversed. This is the original voucher which has been
nullified by the Cancellation Voucher.
66

Search Criteria
Field Type/Options RemarksReceipt Type All
Property Tax
Other ReceiptsReceipt Mode All
Field
Office
BankWard List of WardsVoucher
Number
Alpha numeric
Voucher Date
From
Date
Voucher Date To DateFund List of Funds optional
User Actions
Action Result
67

Search Returns all the Vouchers in a tabular form which satisfy the search criteria. User
can click on the voucher and view the details of each voucher.
68
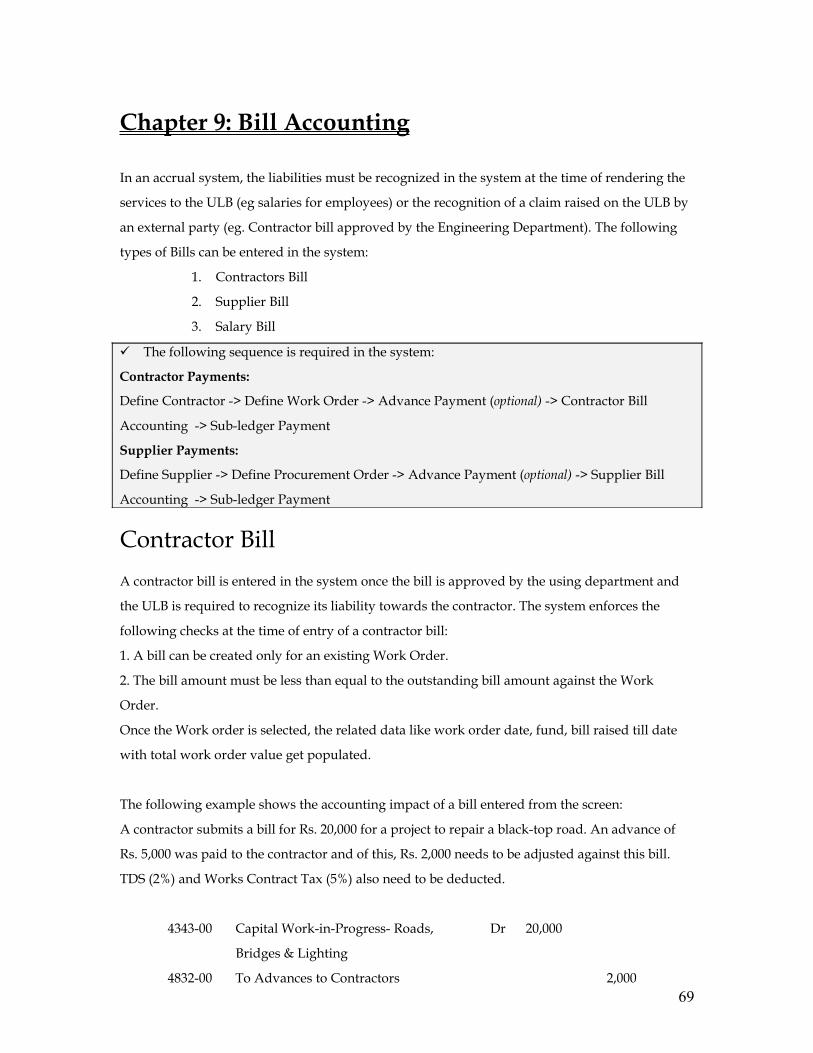
Chapter 9: Bill Accounting
In an accrual system, the liabilities must be recognized in the system at the time of rendering the
services to the ULB (eg salaries for employees) or the recognition of a claim raised on the ULB by
an external party (eg. Contractor bill approved by the Engineering Department). The following
types of Bills can be entered in the system:
1. Contractors Bill
2. Supplier Bill
3. Salary Bill
The following sequence is required in the system:
Contractor Payments:
Define Contractor -> Define Work Order -> Advance Payment (optional) -> Contractor Bill
Accounting -> Sub-ledger Payment
Supplier Payments:
Define Supplier -> Define Procurement Order -> Advance Payment (optional) -> Supplier Bill
Accounting -> Sub-ledger Payment
Contractor BillA contractor bill is entered in the system once the bill is approved by the using department and
the ULB is required to recognize its liability towards the contractor. The system enforces the
following checks at the time of entry of a contractor bill:
1. A bill can be created only for an existing Work Order.
2. The bill amount must be less than equal to the outstanding bill amount against the Work
Order.
Once the Work order is selected, the related data like work order date, fund, bill raised till date
with total work order value get populated.
The following example shows the accounting impact of a bill entered from the screen:
A contractor submits a bill for Rs. 20,000 for a project to repair a black-top road. An advance of
Rs. 5,000 was paid to the contractor and of this, Rs. 2,000 needs to be adjusted against this bill.
TDS (2%) and Works Contract Tax (5%) also need to be deducted.
4343-00 Capital Work-in-Progress- Roads, Dr 20,000
Bridges & Lighting
4832-00 To Advances to Contractors 2,00069

3846-00 To Recoveries Payable- TDS-Contractors 400
3847-00 To Recoveries Payable- Works Contract Tax 1,000
3812-00 To Creditors – Contractors Payable 16,600
The Deductions must be defined in the Deductions Menu. Here the account code and the %
deduction for each Recovery type must be defined. The deduction amount is calculated as a % of
the Passed Amount.
The Contractor Payable Account CANNOT be used on the transaction screen – the amount to
this account is automatically calculated. The following rule is applied to calculate the amount to
be credited to this account: Sum (Debit Accounts) – Sum (Credit for deductions, adjustments etc)
The following validations are performed in addition to the standard check of (Debits=Credits):
Bill amount >= Passed amount + Adjustment amount
Debit Total = Passed amount
Net Payable = Passed Amount – Adjustment Amount – Deductions (calculated)
Input Header Data
70

Field Type/Options RemarksVoucher No. Alpha Numeric Voucher number for the BillContractor Drop-down Contractors defined in the systemVoucher Date Date Voucher Date. This date needs to
be in an Open PeriodWork Order Ref Drop-down: Restricted to all the OPEN
Work Orders against the Contractor
selected above.Work Order Date Defaulted from the Work OrderTotal Value of
Work order
Defaulted from the Work Order
Total Bill amount Defaulted from the Work OrderFund Defaulted from the Work OrderFinancing Source Defaulted from the Work OrderAsset Future extension Not mandatory to useAdvance Amount Advance Amount paid to the Contractor The advance amount not yet
adjusted is shown here (not an
editable field)Bill Number Bill Number – text field OptionalBill Date Bill Date OptionalBill Amount Bill Amount (from the Bill)Passed Amount Amount passed. This defaults to the Bill
Amount and can be less than or equal to the
Bill Amount.Advance Adjusted Amount to be adjusted with this bill Adjustment Amount+ Passed
Amount <= Bill AmountNet Payable Net payable Amount to be credited to the
Contractor Payable Account
This is calculated as Passed
Amount – Advance Adjusted –
sum (all deductions)Narration TextApproved by Drop-down Approval authority has to be a
valid user in the system
Input Details
Field Type/Options RemarksFunction Code Drop-down: List of FunctionsAccount Code Drop-down: Chart of Accounts The list is restricted to the account
codes mapped in Code-Screen
Mapping. Account Head Display From the chart of accountsDr Amount* Numeric Debit Amount
71

Click Additional Details Only if additional details are
required for any account code
Deductions
Field Type/Options RemarksType Drop-down of the Types Types are defined from the
master screen: Creditor
RecoveriesAccount Head Defaulted from the TypeAmount Calculated as a % of the Passed amount. The % rate is defined in the
master screen: Creditor
RecoveriesAccount Code Drop down from the COA Either Account code or Type
needs to be there.* The following constraints are checked by the system:
Passed Amount = ∑(Debit Amount)
Amount Credited to Contractor Payable Account = ∑(Debit Amount) - ∑(Credit Amount)
Save Transaction
Action ResultSave & New Submits the transaction. On successful submit, the system generates the Voucher
Number. The same screen is made available for entering a new recordSave & Close Submits the transaction. On successful submit, the system generates the Voucher
Number. The screen is closed.Cancel Cancels the transactionClose Close the screenShow GL Entry Shows the entry that will passed to the GL on submitting the transaction.
Supplier BillA supplier bill is entered into the system when the material is received and the bill is passed by
the department responsible for placing the order. At this point, the ULB is required to recognize
its liability towards the Supplier. The system enforces the following checks at the time of entry of
a Supplier bill:
1. A bill can be created only for an existing Procurement Order.
2. The bill amount must be less than equal to the cumulative outstanding bill amount against the
Work Order.
The following example shows the accounting impact of a bill entered from the screen:
72

A supplier submits a bill for Rs. 5,000 to the Stores Department following the delivery of an order
of Paper made by the department. The Stores department approves the bill and notes the MRN
number/date as proof of delivery of the supply. An advance of Rs. 100 was paid to the supplier
and this is to be adjusted. No TDS is to be deducted.
2222-00 Printing and Stationery Dr 1,000
4831-00 To Advance to Suppliers 100
3811-00 To Creditors – Suppliers Payable 900
The Supplier Payable Account CANNOT be used on the transaction screen – the amount to
this account is automatically calculated. The following rule is applied to calculate the amount to
be credited to this account: Sum (Debit Accounts) – Sum (Credit for deductions, adjustments etc)
The following validations are performed in addition to the standard check of (Debits=Credits):
Bill amount >= Passed amount + Adjustment amount
Debit Total = Passed amount
Net Payable = Passed Amount – Adjustment Amount – Sum (deductions)
Input Header Data
Field Type/Options RemarksVoucher No. Alpha Numeric Voucher number for the Bill
73

Field Type/Options RemarksSupplier Drop-down Suppliers defined in the systemVoucher Date Date Voucher Date. This date needs to
be in an Open PeriodPO Number Drop-down: Restricted to all the OPEN
Purchase Orders against the Supplier
selected above.PO Date Defaulted from the Work OrderFund Defaulted from the Work OrderFinancing Source Defaulted from the Work OrderBill Number Bill NumberBill Date Bill DateMRN Number Material Receipt Number MRN recording the receipt of the
goodsMRN Date MRN Date MRN DateAdvance Amount Advance Amount Outstanding Pending Advance Amount (not
an editable field)Bill Amount Bill Amount (from the Bill)Passed Amount Amount passed. This defaults to the Bill Amount
and can be less than or equal to
the Bill Amount.Adjustment Amount Amount to be adjusted with this billNet Payable Net Payable amount to be credited to the
Supplier Payable Account
This is calculated as:
Passed Amount – Adjustment
Amount – sum(all deductions)Narration TextApproved by Drop-down Approval authority has to be a
valid user in the system
Input Details
Field Type/Options RemarksAccount Code Drop-down: Chart of Accounts The list is restricted to the account
codes mapped in Code-Screen
Mapping. Account Head Display From the chart of accountsDr Amount* Numeric Debit AmountCr Amount* Numeric Credit AmountNarrationClick Additional Details Only if additional details are
required for any account code* The following constraints are checked by the system:
Passed Amount = ∑(Debit Amount)
Amount Credited to Supplier Payable Account = ∑(Debit Amount) - ∑(Credit Amount)
Save Transaction
Action Result
74

Save & New Submits the transaction. On successful submit, the system generates the Voucher
Number. The same screen is made available for entering a new recordSave & Close Submits the transaction. On successful submit, the system generates the Voucher
Number. The screen is closed.Cancel Cancels the transactionClose Close the screenShow GL Entry Shows the entry that will passed to the GL on submitting the transaction.
Salary BillA salary bill is entered into the system to recognize the ULB’s obligation to pay salaries to its
employees. Typically, a voucher is passed at a summary level for the entire ULB or by
department (as the case maybe). If the ULB has a practice of tracking salaries by Function, a
separate voucher must be passed for each function.
The following example shows the accounting impact of a salary bill entered from the screen:
The total salary bill for the ULB for April 2006 is as follows:
Salaries of Permanent Employees Rs. 2,00,000
House Rent Allowance Rs 16,000
Other Allowances Rs 7,000
Deductions are as follows:
LIC Premium Rs. 24,000
GPF Rs 6,000
KGID Rs 5,000
Festival Advance Rs. 5,000
Income Tax deducted at Source Rs 3,000
Professional Tax Rs 2,000
The Accounting impact of the transaction is as follows:
2111-00 Pay Dr 2,00,000
22122-00 Allowances-House Rent Allowance Dr 16,000
2129-00 Allowances-Others Dr 7,000
3841-00 To Recoveries Payable-General Provident Fund 6,000
3842-01 To Recoveries Payable-Employees’ Insurance-LIC 24,000
3842-02 To Recoveries Payable-Employees’ Insurance-KGID 5,000
3844-00 To Recoveries Payable-TDS-employees 3,000
313843-01 To Recoveries Payable-Others-Professional Tax 2,000
75

4813-00 To Festival Advance 5,000
23821-00 To Employees Liabilities-Salaries, Wages Payable 1,78,000
The Salaries Payable Account CANNOT be used on the transaction screen – the amount
credited to this account is automatically calculated. The following rule is applied to calculate the
amount to be credited to this account: Sum (Earnings) – Sum (Deductions)
Input Header Data
Field Type/Options RemarksVoucher No. Alpha Numeric Voucher number for the BillVoucher Date Date Voucher Date. This date needs to
be in an Open PeriodMonth Drop-down Month for which the salary bill is
being passedFinancial year Drop-down Financial Year – this is for
informational purposes.Fund Drop-downFinancing
Source
Drop-down
Narration Text
76

Input Details
Earnings
Field Type/Options RemarksFunction Name Drop-down List of functionsAccount Code Drop-down: Chart of Accounts The list is restricted to the account
codes mapped in Code-Screen
Mapping. Account Head Display From the chart of accountsAmount Numeric Amount debited from each of the
accounts (earning heads)Click Additional Details Only if additional details are
required for any account code: Eg
if an employee wise sub-ledger is
maintained for the account code,
then the employee name must be
entered here
Deductions
Field Type/Options RemarksFunction Name Drop-down List of functionsAccount Code Drop-down: Chart of Accounts The list is restricted to the account
codes mapped in Code-Screen
Mapping. Account Head Display From the chart of accountsAmount Numeric Amount credited to each of the
accounts (deduction heads)Click Additional Details Only if additional details are
required for any account code: Eg
if an employee wise sub-ledger is
maintained for the account code,
then the employee name must be
entered here* The following constraints are checked by the system:
Amount Credited to Salary Payable Account = ∑(Earnings) - ∑(Deductions)
77

Save Transaction
Action ResultSave & New Submits the transaction. On successful submit, the system generates the Voucher
Number. The same screen is made available for entering a new recordSave & Close Submits the transaction. On successful submit, the system generates the Voucher
Number. The screen is closed.Cancel Cancels the transactionClose Close the screenShow GL Entry Shows the entry that will passed to the GL on submitting the transaction.
78

79

Chapter 10: Payments
The system provides 5 separate screens for payments:
a) Bank Payments
b) Cash Payments
c) Advance Payments
d) Pay Supplier/Contractor
e) Salary Payments
Bank PaymentsThe Bank Payment Screen is used for making payments by cheque. This is typically used for
petty expenses (eg newspaper bills, telephone charges etc) which need not be backed by a
Purchase Order.
The following example shows the accounting impact of a Bank Payment entered from the screen:
The newspaper bill for April-06 added up to Rs. 500/-
The Accounting impact of the transaction is as follows:
2221-00 Books & Periodicals purchased Dr 500
4721-01 To Nationalised Bank-General- 500
CICI Bank Indiranagar A/c No 101
The Bank GL code to be credited is determined from the Bank Account.
The Sum (Debits) – Sum (credits) is the amount deducted from the Bank Account. Balance
sufficiency is done against this amount and the transaction cannot be completed if the balance is
insufficient.
The Document No. field can be used to record the Bill Number or any such document backing the
transaction.
80

Input Header Data
Field Type/Options RemarksVoucher No. Alpha Numeric Voucher number for the BillVoucher Date Date Voucher Date. This date needs to
be in an Open PeriodPaid-by Drop-downCheque No Input field Cheque number uniqueness is
checked
The cheque number must belong
to the range held by the ULB for
that account.Cheque Date DateFund Defaulted Defaulted from the bank accountFinancing
Source
Drop-down
Document No. Bill Number or any other relevant
docDocument DateAmount This will be the amount deducted
from the bank accountNarration Text
81

Input Details
Field Type/Options RemarksFunction Name Drop-down List of functionsAccount Code Drop-down: Chart of Accounts The list is restricted to the account
codes mapped in Code-Screen
Mapping. Account Head Display From the chart of accountsDr Amount Numeric Amount debited to the accountClick Additional Details Only if additional details are
required for any account code: Eg
if an employee wise sub-ledger is
maintained for the account code,
then the employee name must be
entered here
* The following constraint is checked by the system:
Sum (Debit) – Sum (credit) = Amount deducted from the bank account. Balance sufficiency is
done against this amount.
Save Transaction
Action ResultSave & New Submits the transaction. On successful submit, the system generates the Voucher
Number. The same screen is made available for entering a new recordSave & Close Submits the transaction. On successful submit, the system generates the Voucher
Number. The screen is closed.Cancel Cancels the transactionClose Close the screenShow GL Entry Shows the entry that will passed to the GL on submitting the transaction.
Cash PaymentsThe Cash Payment Screen is used for making payments by cash. This is typically used for petty
expenses (eg newspaper bills, telephone charges etc), which need not be backed by a Purchase
Order.
The following example shows the accounting impact of a Cash Payment entered from the screen:
The sweeper expenses for April-06 added up to Rs. 1500/-
82
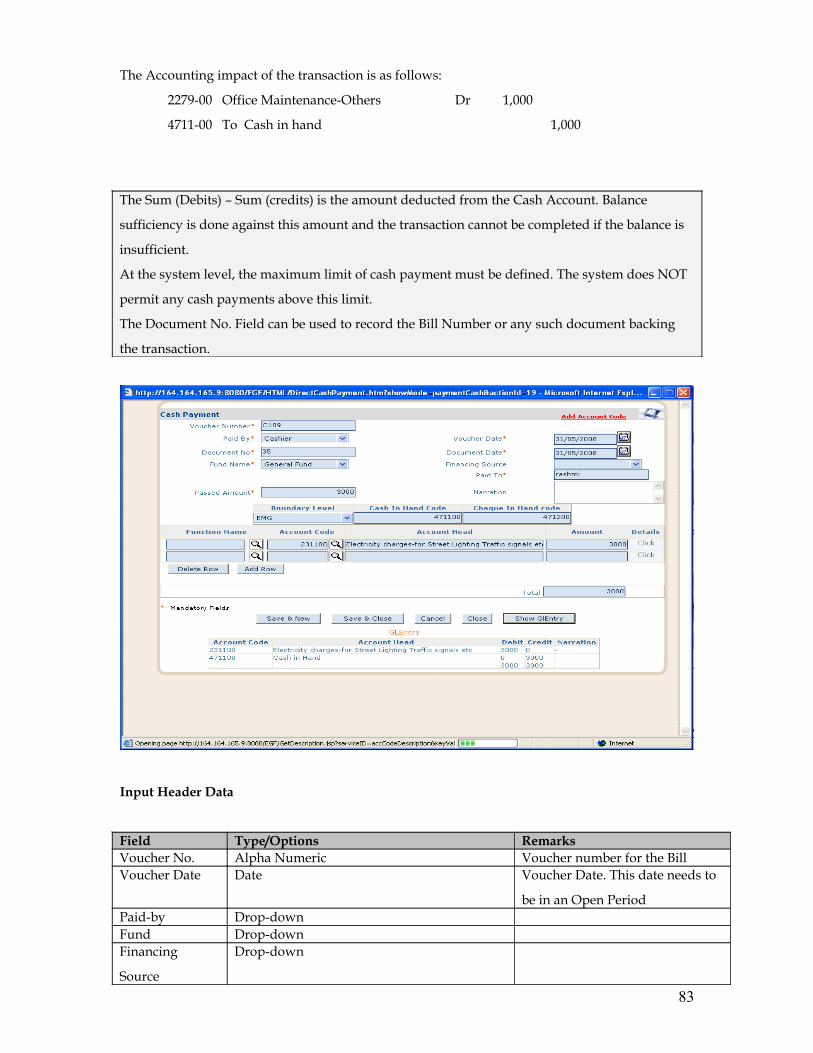
The Accounting impact of the transaction is as follows:
2279-00 Office Maintenance-Others Dr 1,000
4711-00 To Cash in hand 1,000
The Sum (Debits) – Sum (credits) is the amount deducted from the Cash Account. Balance
sufficiency is done against this amount and the transaction cannot be completed if the balance is
insufficient.
At the system level, the maximum limit of cash payment must be defined. The system does NOT
permit any cash payments above this limit.
The Document No. Field can be used to record the Bill Number or any such document backing
the transaction.
Input Header Data
Field Type/Options RemarksVoucher No. Alpha Numeric Voucher number for the BillVoucher Date Date Voucher Date. This date needs to
be in an Open PeriodPaid-by Drop-downFund Drop-downFinancing
Source
Drop-down
83

Document No. Bill Number or any other relevant
docDocument DateAmount This will be the amount deducted
from the cash in hand accountNarration TextBoundary Level Drop-down Boundary level setup for the
transaction (default to city in
most cases)Cash-in-hand From setupCheque-in-hand From setup
Input Details
Field Type/Options RemarksFunction Name Drop-down List of functionsAccount Code Drop-down: Chart of Accounts The list is restricted to the account
codes mapped in Code-Screen
Mapping. Account Head Display From the chart of accountsDr Amount Numeric Amount debited to the accountClick Additional Details Only if additional details are
required for any account code: Eg
if an employee wise sub-ledger is
maintained for the account code,
then the employee name must be
entered here
* The following constraint is checked by the system:
Sum (Debit) – Sum (credit) = Amount deducted from the cash account. Balance sufficiency is
done against this amount.
Save Transaction
Action ResultSave & New Submits the transaction. On successful submit, the system generates the Voucher
Number. The same screen is made available for entering a new recordSave & Close Submits the transaction. On successful submit, the system generates the Voucher
Number. The screen is closed.Cancel Cancels the transactionClose Close the screenShow GL Entry Shows the entry that will passed to the GL on submitting the transaction.
84

Sub – ledger Payments
Advance PaymentsThe Advance Payment Screen is used for making advance payments against Procurement
Orders.
We can make payments across funds, say the work order is of “Enterprise Fund” and we make
payment from a bank of “General Fund”. This will be an Interfund transfer. In this case we have
to pass a Journal voucher also for the Bank Fund. There will be a link between the payment and
the Journal voucher.
The following example shows the accounting impact of an Advance Payment entered from the
screen:
Contractor ABC is paid an advance of Rs1200 by cheque against a Work Order.
To pass an entry for this, the “Advance Payment” screen has to be opened, and filled up as below
Input Header Data
85

Field Type/Options RemarksVoucher No. Alpha Numeric Voucher number for the BillVoucher Date Date Voucher Date. This date needs
to be in an Open PeriodType of Payment Drop-down:
Contractor
SupplierContractor Name Drop -down List is restricted by the type
chosen aboveContractor Code Defaulted Work Order/PO
Ref
Drop-down Drop-down is restricted to the
Procurement Orders which
have a pending advance paidBank Drop-downAccount Drop-down Accounts under that bank
which belong to the same fund
as the Work OrderBank Fund Defaulted Defaulted from the bank
accountFund Name Defaulted Defaulted from the work orderFinancing Source DefaultedCheque No.Cheque dateAdvance Amount This will be the amount
deducted from the bank accountNarration Text
Save Transaction
Action ResultSave & New Submits the transaction. On successful submit, the system generates the Voucher
Number. The same screen is made available for entering a new recordSave & Close Submits the transaction. On successful submit, the system generates the Voucher
Number. The screen is closed.Cancel Cancels the transactionClose Close the screenShow GL Entry Shows the entry that will passed to the GL on submitting the transaction.
The Accounting impact of the transaction is as follows:
1.If the bank fund and Work order fund is same
4832-00 Advance to Contractors Dr 3,000
4721-01 To Nationalised Bank-General-
IDBI Bank Indiranagar A/c No 3454 3,000
86

2.If the Bank Fund and the Work order funds are different
Payment
4863-00 Interfund Transfer Enterpriese Fund Dr 3000
4721-01 To Nationalised Bank-General-
IDBI Bank Indiranagar A/c No 3454 3,000
Journal
4832-00 Advance to Contractors Dr 3,000
4861-00 Interfund Transfer General Fund 3000
Pay Supplier/Contractor:This screen is provided to make payments to Suppliers and Contractors against bills entered into
the system. The user inputs a date range and all the bills due for payment for that date range are
shown and also search can be made by filtering for fund ,Contractor /Supplier. The user can then
select a specific bill and process the payment for that bill.
The search results return bills against which there is a pending payment. There will be a single
record for all the pending bills for a particular work order.
If multiple pending bills are listed, payments can be combined against all these bills. The bills for
which payment needs to be made must be selected from the list.
87

Header Data: Search Criteria
Field Type/Options RemarksType Contractor
SupplierName Contractor /Supplier name Pay-to Party selected in the search screenBill date from DateBill Date to DateFund Defaulted Defaulted from the work order selected
Header Data: Search Results
Field Type/Options RemarksSl No Number Running serial no.Work Order
Code
Alpha numeric Defaulted
Vc No Alpha numeric DefaultedBill Date date DefaultedPassed Amount Amount From the billAdvance
Adjusted
Amount Against this bill
Statutory
Deductions
Amount Defaulted
Other
Deductions
Amount Defaulted
Net Amount Net Amount PayableEarlier Payment Amount If earlier payment was made against this billSelect optionPayment
Amount
Amount (Net – Earlier Payment)
Input Details
Field Type/Options RemarksVoucher No. Alpha numeric Voucher number for the BillVoucher Date Date Voucher Date. This date needs to
be in an Open PeriodPaid-by Drop-downBank Drop-down List of all the banks.Account Drop-down Accounts under that Cheque No. numeric Cheque numberCheque date date Cheque dateJournal Voucher
Number
Alpha numeric Applicable in case of inter fund
paymentsNarration TextBank Fund Defaulted Defaulted from the Bank account
selected
88
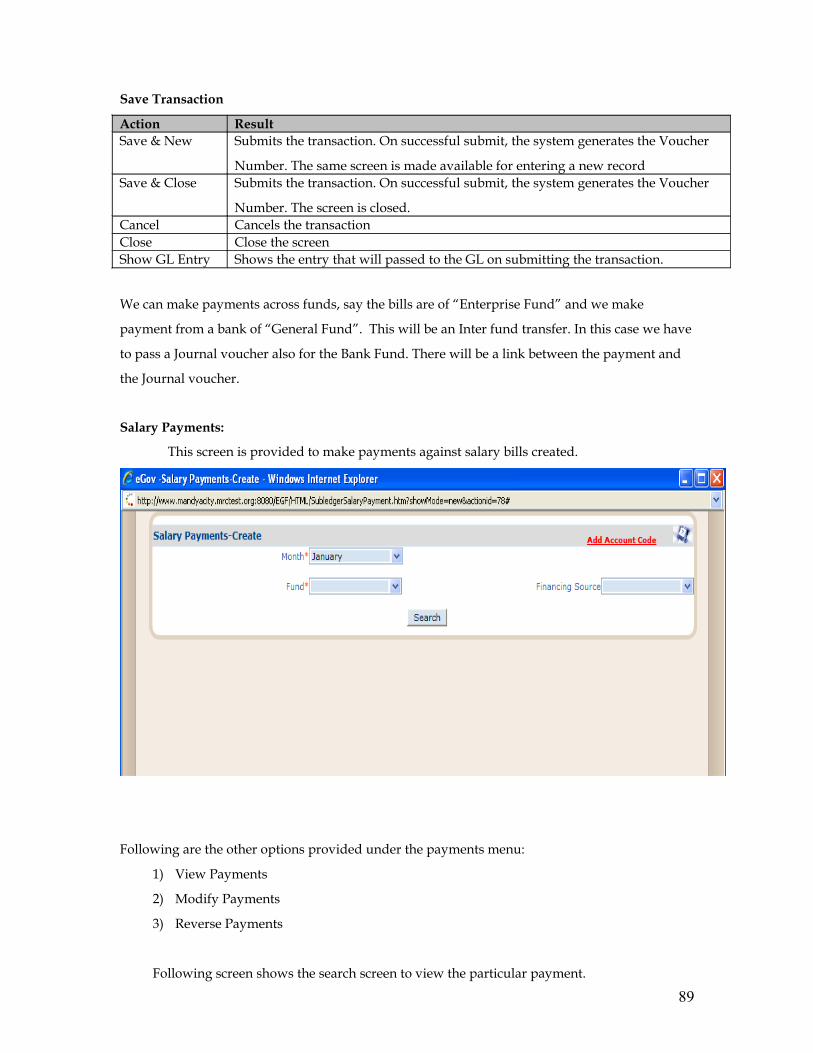
Save Transaction
Action ResultSave & New Submits the transaction. On successful submit, the system generates the Voucher
Number. The same screen is made available for entering a new recordSave & Close Submits the transaction. On successful submit, the system generates the Voucher
Number. The screen is closed.Cancel Cancels the transactionClose Close the screenShow GL Entry Shows the entry that will passed to the GL on submitting the transaction.
We can make payments across funds, say the bills are of “Enterprise Fund” and we make
payment from a bank of “General Fund”. This will be an Inter fund transfer. In this case we have
to pass a Journal voucher also for the Bank Fund. There will be a link between the payment and
the Journal voucher.
Salary Payments:
This screen is provided to make payments against salary bills created.
Following are the other options provided under the payments menu:
1) View Payments
2) Modify Payments
3) Reverse Payments
Following screen shows the search screen to view the particular payment.
89

Following screen shows the modify option provided for the payment details:
90
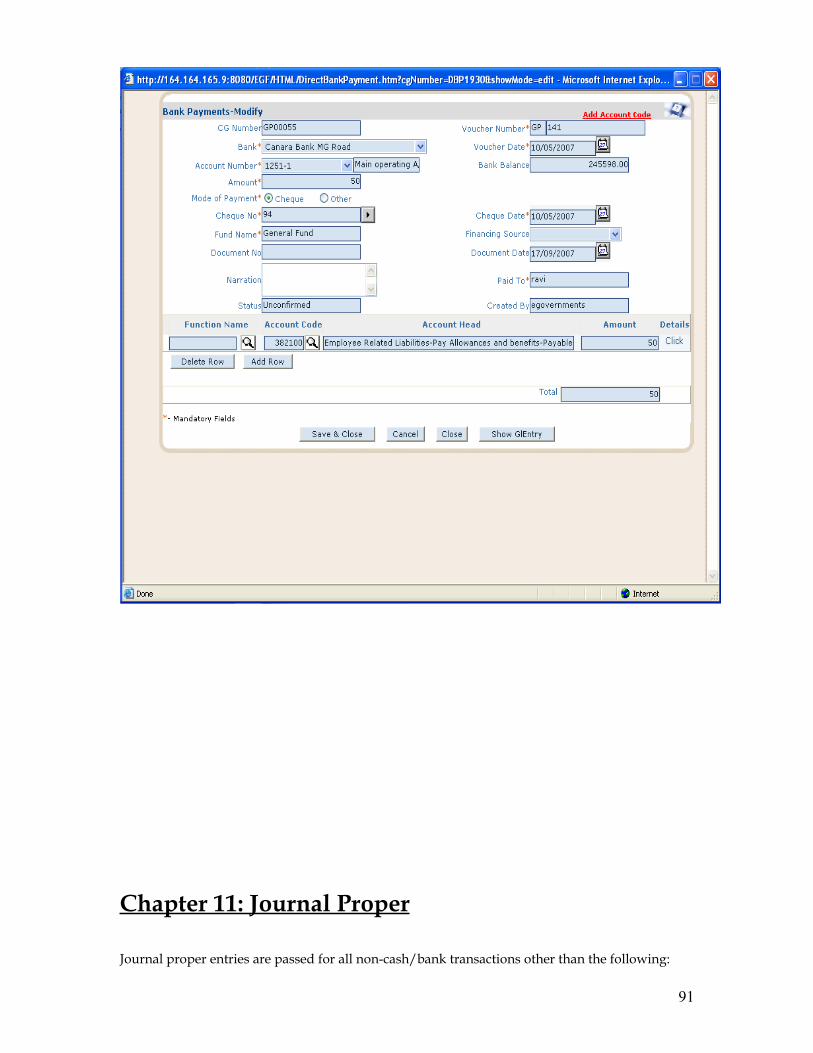
Chapter 11: Journal Proper
Journal proper entries are passed for all non-cash/bank transactions other than the following:
91

a) Entries for accounting of bills for which there are separate screens
b) Cess control entries which are automatically passed from the property tax receipt screen
at the time of collection accounting.
Create Journal Proper
Take the example of an entry for accrual of property tax for the year 2006-07, which needs to be
passed for April 1, 2006. The total property tax accrued for the year is Rs 10,00,000. The cess
percentages are as follows:
Health Cess 15%
Library Cess 6%
Beggary Cess 3%
The following accounting entry will need to be passed from the Journal Proper Screen:
4611-07 Property Tax Receivables 2006-07 Dr 12,40,000
1111-00 To Property Tax Income 10,00,000
4691-00 To Cess Control Account 2,40,000
Input Header Data
Field Type/Options RemarksVoucher No. Alpha numeric Voucher number for the BillVoucher Date Date Voucher Date. This date needs to
be in an Open PeriodFund Drop-downFinancing
Source
Drop-down
Scheme Scheme to enterSub Scheme Sub Scheme to enterNarration TextField Field to enter
Input Details
Field Type/Options RemarksFunction Name Drop-down List of functions
92

Account Code Drop-down: Chart of Accounts The list is restricted to the account
codes mapped in Code-Screen
Mapping. Account Head Display From the chart of accountsDr. Amount Numeric Amount DebitedCr. Amount Numeric Amount CreditedClick Additional Details Only if additional details are
required for any account code: Eg
if an employee wise sub-ledger is
maintained for the account code,
then the employee name must be
entered here
Save Transaction
Action ResultSave & New Submits the transaction. On successful submit, the system generates the Voucher
Number. The same screen is made available for entering a new recordSave & Close Submits the transaction. On successful submit, the system generates the Voucher
Number. The screen is closed.Cancel Cancels the transactionClose Close the screenShow GL Entry Shows the entry that will passed to the GL on submitting the transaction.
93

The options for viewing, modifying and reversing the journal proper are also provided.
View option: This option is provided to view the bills created and the bills displayed can only be
viewed and cannot be modified.
Modify Option: This option is provided to modify the bill already created.
Reverse Option: Vouchers once confirmed cannot be modified, hence this option is provided to
nullify the effect of voucher to be modified and pass a new voucher instead of modifying.
94

Chapter 12: Contra Entries
Contra entries are of five types:
a) Cash Deposit
b) Cash Withdrawal
c) Cheque Deposit
d) Bank to Bank Transfer
The options available are:
a) Modify contra Entry
b) Reverse contra Entry’ and
c) View contra Entry
Cash DepositCash deposit is used for depositing cash (from Cash-in-hand account) to a specific bank account.
The system checks for the cash balance sufficiency before saving the record.
95

Input Details
Field Type/Options RemarksVoucher No. Alpha numeric Voucher number for the BillVoucher Date Date Voucher Date. This date needs to
be in an Open PeriodBoundary Level Drop-down Boundary level setup for the
transaction (default to city in
most cases)Cash-in-hand From setupCheque-in-hand From setupBank Drop-downBank Account Drop-downFund Default Fund to which the bank account
belongsAmount This will be the amount deducted
from the cash in hand accountNarration Text
Cash WithdrawalCash withdrawal is used for withdrawing cash from a specific bank account to the cash-in-hand
account. The system checks for the bank balance sufficiency before saving the record.
4. Input Header Data
Field Type/Options RemarksVoucher No. Numeric Voucher number for the Cash WithdrawalVoucher Date Date Voucher Date. This date needs to be in an Open Period
96

Boundary Level Drop-down Boundary level setup for the transaction (default to city in most cases)
Cash-in-hand From setupCheque-in-hand From setupBank Drop-downBank Account Drop-downFund Default Fund to which the bank account belongsFinancing Source
Drop-down
Cheque no. From the list of cheques available with the ULB for that account
Cheque Date DateAmount This will be the amount deducted from the cash in hand
accountNarration Text
Cheque DepositA cheque received from any person is to be sent to bank along with a challan to be collected and
credited to payees account is called cheque deposit. Unless it is sent to bank for collection the
paying banker cannot make payment of the cheque.
Input Header Data
Field Type/Options Remarks
Pay-in Slip No. Numeric
97

Pay-in slip date DateFund Drop-downFinancing Source
Drop-down
Bank Drop-down Only banks with accounts belonging to the fund selected above will be shown
Account Drop-down Accounts for that fund in the bank
Cheque in hand Display Cheque-in-hand accountNarration Text
On Search the following will be shown
1. Search Results
Field Type/Options RemarksSl no. Numeric Serial numberVoucher Number
Display Voucher which had a cheque deposit
Cheque No. DisplayCheque Date DisplayReceipt Date Display Date of receiptAmount Display Amount from the deposit
(Cheque Amount)Select Check-box Select the cheques that need to be
deposited
2. Save Transaction
Action ResultSave & New Submits the transaction. On successful submit, the system generates the Receipt
Voucher Number. The same screen is made available for entering a new recordSave & Close Submits the transaction. On successful submit, the system generates the Receipt
Voucher Number. The screen is closed.Cancel Cancels the transactionClose Close the screenShow GL Entry Shows the entry that will passed to the GL on submitting the transaction.
Bank to Bank TransferThis is used for transferring funds from one bank account to another account of the same bank,
belonging to the same fund. The system checks for the bank balance sufficiency before saving the
record.
98

5. Input Details
Field Type/Options RemarksVoucher No. Alpha numeric Voucher number for the BillVoucher Date Date Voucher Date. This date needs to be in an
Open PeriodFund Default Fund to which the bank account belongsFinancing Source Drop-downTransfer From: Bank Drop-downTransfer From: Bank Account Drop-downTransfer To: Bank Drop-downTransfer To: Bank Account Drop-downMode of Transfer Cheque
Others
Others can be used for automatic transfers
Cheque/Ref No. Cheque number must be from the list of
cheques available with the ULB for that
accountCheque Date DateAmount This will be the amount deducted from the
cash in hand accountNarration Text
Chapter 13: Bank Reconciliation Module
Bank reconciliation is the process of comparing and matching figures from the accounting
records against those shown on a bank statement. The result is that any transactions in the
99

accounting records not found on the bank statement are said to be outstanding. Taking the
balance on the bank statement adding the total of outstanding receipts less the total of the
outstanding payments this new value should (match) reconcile to the balance of the accounting
records.
Reconcile with bank
The user needs to validate the bank clearance date and amount from the bank statement
Field Name Field Type Field Description
Bank And Branch Drop down list List of active bank.Account Number Drop down list List of account number based on the bank.Bank Statement Balance Numeric The user can enter the amount from the bank statement.
Bank Statement Date Date The user can enter the date from the bank statement.
Reconciliation Date Date The user can enter the date.It cannot be less than the bank statement date.
Cheque Date Date The User enters the cheque clearance date from the bank statement.
100

Bank statement Entries not in Bank Book
Field Name Field Type Field Description
Bank And Branch Drop down list List of active bank.
Account Number Drop down list List of account number based on the bank.
Dishonored cheques
Field Name Field Type Field Description
101

Bank And Branch Drop down list List of active bank.Account Number Drop down list List of account number based on the bank.Cheque Number Numeric The user can enter the cheque numberCheque Date Date The user can enter the date from the cheque
Reconciliation Summary
Once the reconciliation is done, the user uses the summary to view the cheques which are
all in the bank book but not in bank statement.
Field Name Field Type Field DescriptionBank And Branch Drop down list List of active bank.Account Number Drop down list List of account number based on the bank.Bank Statement Balance Numeric The user can enter the amount from the bank
statement.
Bank Statement Date Date The user can enter the date from the bank statement.
102

Chapter 14 : Reports
Reports are summarization of transactions of a ULB over a period of time, in a classified manner,
so that they can be used by different types of stakeholders to know and understand the
performance of the ULB, and to draw conclusions and take decisions. Reports are at two levels:
Financial Statements: They are reports which summarize the transactions at a higher level,
giving reports on the overall performance of the ULB as a whole, its financial position etc as a
result of the transactions during a period. For example, the income & Expenditure account of a
ULB for a period gives the net surplus or deficit of a ULB during a period, and the balance sheet
gives the financial position of the ULB at the end of the given period.
Accounting records: They are the intermediary level reports which classify each individual
transaction into different groups of transactions. Transactions of similar types are grouped
together, so that the ULB Management will know the net result of a particular type of activity, for
example, total property tax collected during a period, total cost of a project.
MIS Reports: They are the reports which provide to the management some exceptional reports
for decision making such as Contractor/Supplier report, Cheque Issue Register details ,Register
of bills detail and Receipt Register details for the specified periods.
To generate a report, the following steps have to be followed:
Select “Reports” from the Menu Tree. The following two options are displayed
Financial Statements
Accounting Records
MIS reports
Select one of the options. The different types of reports under the selected option are
displayed.
Select the required report.
Fund-wise Reports: All the reports in the Menu provide the option to provide fund-wise reports.
Financing Source-wise Reports: Selection of a Financing Source field generates the report for
that Financing Source. If the field is left blank, a consolidated report across all financing sources
can be selected.
Financial StatementsFinancial Statements can be termed as the mirror through which the various stake-holders can
look into and understand how the ULB has managed its affairs during a period. eGov Financials
facilitates generation of financial statements in real-time, and the financial performance of the
ULB at any periodicity can be seen. The Financial Statements consist of two reports:
• Balance sheet
103

• Income & Expenditure Statement
• Receipts/Payment Statement
These Reports are in summarized forms, and have schedules, which give information at the
detailed level.
Balance sheet
Balance sheet is a financial statement which reports the assets, liabilities and net worth at a specific time.
Field Name Field Type Field DescriptionPeriod Drop down Options of yearly /half yearly / date are provided.As at
Rupees Drop down Select the required option for display of amount in Rupees/Thousands/Lakhs
Income & Expenditure Statement
Income & Expenditure Statement is a schedule of all Income received and Payments made during
a past period or for a particular interval of forecasted time period.
104

Field Name Field Type Field DescriptionFrom Date Date Mandatory To Date Date Mandatory
Rupees Drop down Select the required option for display of amount in Rupees/Thousands/Lakhs
Receipts/Payment Statement
Receipts/Payment Statement is a schedule of all Receipts received and Payments made during a
past period or for a particular financial year.
105

Field Name Field Type Field Description
Period Drop down Options of yearly /half yearly / monthly are provided.
Year Drop Down Options of years/months are provided.
Amount Drop down Select the required option for display of amount in Rupees/Thousands/Lakhs
Accounting RecordsAccounting records classify the transactions accounted through various vouchers in a systematic
manner, and generate reports of transactions carried out over a selected period. Accounting
records provided are as follows:
3. Trial Balance
4. Cash Book
5. Bank book
6. Journal Book
7. General Ledger
8. Sub Ledger
9. Day Book
10. Sub Ledger schedule
11. Opening Balance Report
12. Cheque in Hand Report
13. Cheque Received
The table below gives a brief description of each records and lists out the entries that are recorded
in each:
Type What it does Entries recorded
Trial Balance To check the arithmetical accuracy of
accounting records maintained under
Double entry accounting system.
List of all accounts closing
balances from general ledger,
cash book and bank book under
debit and credit headings.Cash book Gives a chronological account of all
cash receipts and payments, during a
selected period, with opening and
closing cash balances.
a) Cash receipts
b) Cash Payments
d) Cash Deposit
f) Cash WithdrawalBank Book Gives a chronological account of all
bank receipts and payments, during a
a) Bank receipts
b) Bank Payments
106

selected period, with opening and
closing bank balances.
c) Transfer from Bank to Bank
d) Inter-fund Transfer
e) Pay-inJournal Book Lists out all journal entries
chronologically, for the selected period.
a) Contractors Bills
b) Suppliers bills
c) Salary Bills
d) Journal ProperGeneral Ledger Posting of all transactions from prime
book of entries and provides summary
of accounts.
a) Receipt Vouchers
b) Payment Vouchers
c) Journal Vouchers
from prime book of entries.Sub-Ledger Transactions pertaining to a ledger
account will be segregated under
various heads.
Vouchers which are posted to a
ledger account simultaneously
will be posted under each
detailed heads in sub ledger
pertaining to that ledger account.Day Book Lists out all transactions
chronologically, during the selected
period, irrespective of the types of
transactions.
Opening Balance
Report
Gives the list of opening balances as on
the beginning of the year.Cheque in hand
Report
Gives the list of Cheque received,
deposited and not yet deposited to
bank.
Receipt Vouchers
Trial BalanceThis is a very important report from an accountant’s point of view, since this is an evidence of
arithmetical accuracy of the accounting records. It also lists out the net balances of all the
accounts in the General Ledger, as at a particular date. A trial balance can be generated at a
particular date and also between dates. For doing that, “Trial Balance” has to be selected from
the “Accounting Records sub-menu. In the Trial Balance screen that opens up, fund and date
have to be selected, and “search” button has to be clicked, to generate the trial balance. The trial
balance has “debit” and “credit” columns, with ”debit” and “Credit” totals which are nothing but
totals of all debit an credit balances, respectively. If both the totals are equal, it indicates a tallied
trial balance. A difference in the trial balance is a definite indication of arithmetical inaccuracy,
either in opening balances, or in one or more of the entries.
107

Field Name Field Type Field DescriptionReport Type Drop down Options of as on date/ range are provided.
Fund Drop DownOptions of types of fund for which the trial balance report need to be generated are provided.
As on date Date Select the date, if date option is selected in report type.
Cash BookThe Cash book for a particular “Fund”, for a particular period can be generated by selecting the
Fund in the Fund field, and giving the “Starting Date” and the “End Date”, and clicking the
“Search” button. The Cash book is displayed as in the picture below:
108

All cash receipts are accounted on the debit side of Cash book from cash receipt vouchers, and all
cash payments are accounted on the credit side from cash payment vouchers. The closing
balance as at the “end date” is also displayed.
Bank BookA Bank book is similar in all respects, to Cash Book, except for the fact that it records the
following:
1. Bank transactions i.e all cheques and cash remitted to bank
2. All cheques issued from the bank account
3. Transfers “to” and “from” the bank account are displayed.
4. The closing balance as at the “end date” is also displayed.
109

The cash book, besides being a prime book of entry, also serves as the general ledger account of
Cash-in-Hand. Similarly, the bank book for a particular bank account serves as the general
ledger account of that bank account. There are as many bank books as the number of bank
accounts.
Journal BookA journal book lists out all journal entries passed for a Fund, during the selected period. The
journal entries include contractors’ bills, suppliers’ bills, and salary bills i.e all the entries which
do not involve either cash account, or a bank account.
110
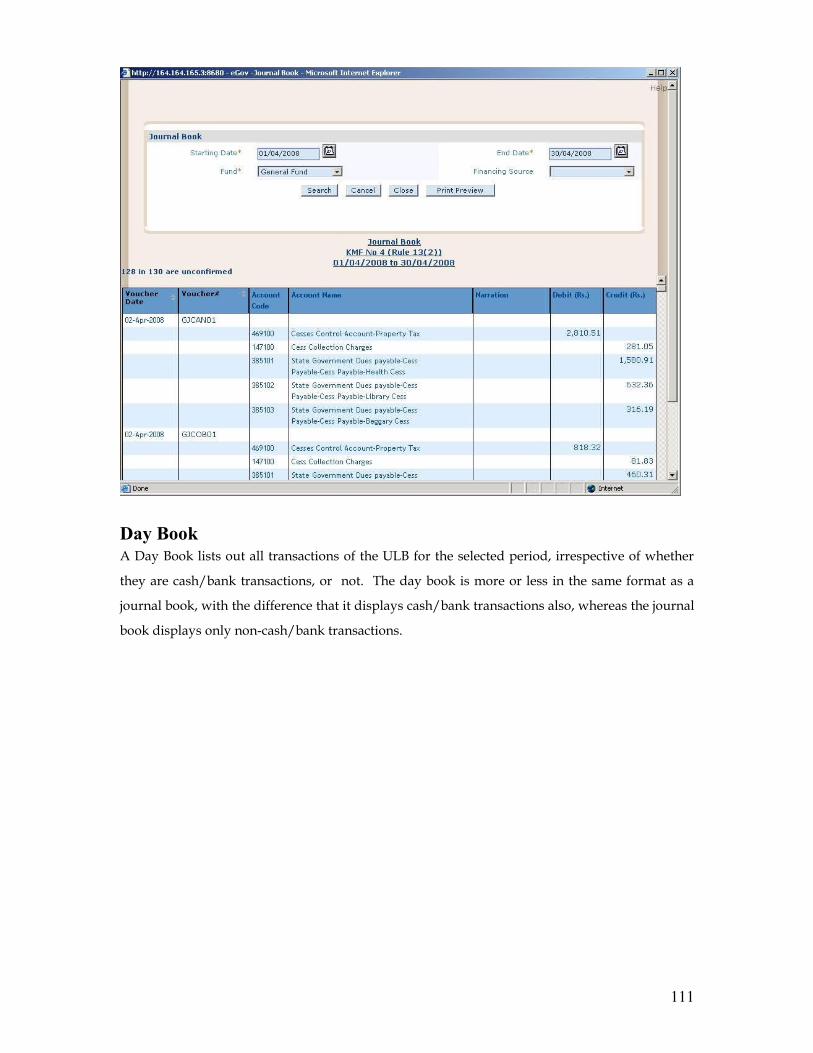
Day BookA Day Book lists out all transactions of the ULB for the selected period, irrespective of whether
they are cash/bank transactions, or not. The day book is more or less in the same format as a
journal book, with the difference that it displays cash/bank transactions also, whereas the journal
book displays only non-cash/bank transactions.
111

General LedgerThe General Ledger classifies the transactions of a ULB for the selected period, under different
detail account codes. It also gives the net balance in the account for the selected period. To
generate General Ledger Report, the following steps have to be followed:
Field Details ExampleAccount code The account code from which
accounts the report is required.
(Select from the COA by clicking the
magnifying glass in the field.)
111200 (Service Tax in lieu of
Property tax)
Fund Select from the drop-down list General FundStarting Date Select the date from the calendar, or
type the date
8/06/2006
End Date Select the date from the calendar, or
type the date
8/06/2006
112

From the general ledger report we can drill down to the respective vouchers on click of voucher#.
Sub-ledgerA sub-ledger is in the same format as the general ledger. However, instead of reporting the
transactions under each detail code from the chart of accounts, it reports the transactions under
an accounting entity/relation, which in turn, is mapped to a detail code. The total of balances of
all the accounting entities under a detail code as on a particular date, matches with the balance in
the account of that detail code in the General Ledger, as on that date.
For example, a ULB has three contractors A, B, C and D. The contractors’ masters are created in
the Contractor/Supplier Master. The details of work orders issued to these contractors are also
113

recorded in the Procurement Order master. The details of the orders, bills that are accounted and
paid are given in the table below:
Particulars Work Order P (Contractor A)
Work Order Q (Contractor B)
Work Order R (Contractor C)
Work Order S (Contractor D)
Fund General General General GeneralProject/Work Road Repair New Road
Construction
Building Repair New building
constructionOrder Value 1,00,000 10,00,000 5,00,000 50,00,000Bill accounted:Bill No P1 (1-4-2006)Bill no P2 (15-5-06)Bill no Q1 (30-5-06)Bill no R1 (1-5-06)Bill no R2 (15-5-06)
50,000 30,000
80,0002,00,0001,00,000
Payments made:15-4-0630-5-0615-6-0615-6-06
50,000
40,00040,000
1,00,000
Now open the sub-ledger Report, and select the following:
Account code 381200
Fund General
Starting date 1-4-2006
End Date 30-6-06
Entity Detail Contractor P/Q/R/S (One at a time)
The sub-ledger accounts for Contractor P, Q, R and S show the following balances respectively :
Contractor P Rs 30,000 (Cr)
Contractor Q Nil
Contractor R Rs 2,00,000 (Cr)
Contractor S Nil
At the same time, the Creditors-contractors’ Payable (381200) account in General Ledger
shows a balance of Rs 2,30,000 (CR) as on the same date.
Opening Balance Report:This report gives the details of opening balances in a financial year. The report can be obtained by
clicking on the opening balance report menu.
114
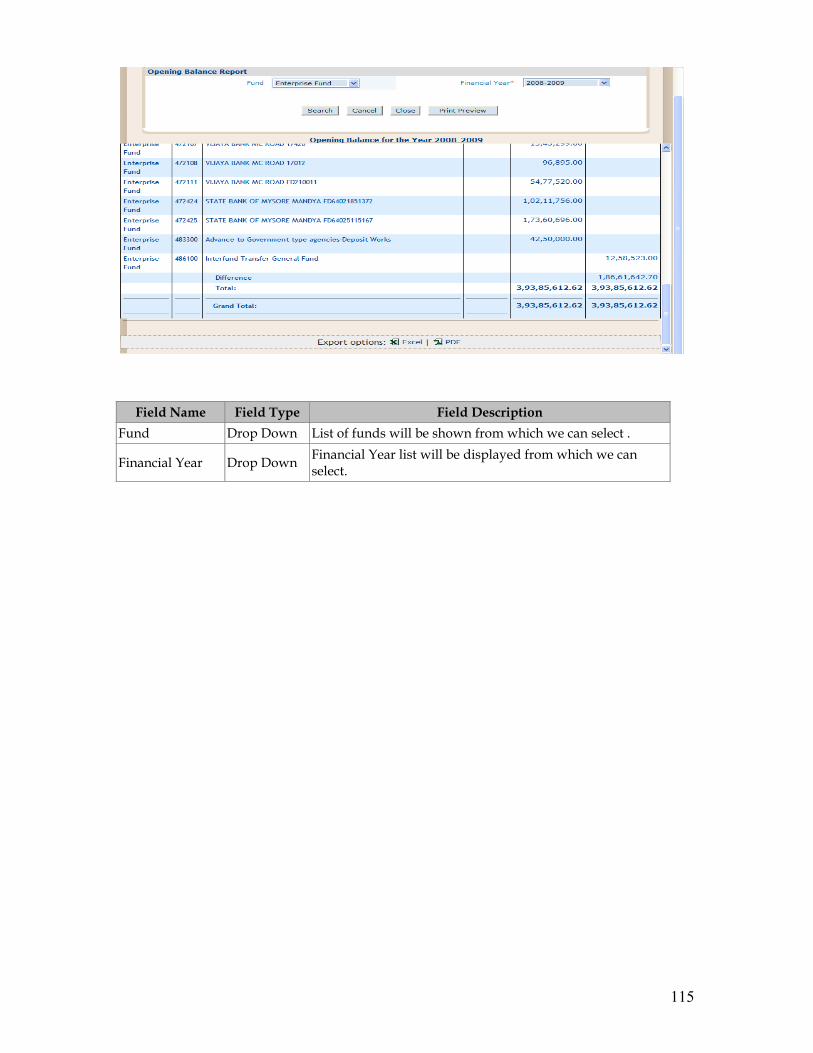
Field Name Field Type Field DescriptionFund Drop Down List of funds will be shown from which we can select .
Financial Year Drop Down Financial Year list will be displayed from which we can select.
115

Cheque in hand Report:This report gives the list of Cheque received and deposited to bank and which are not yet
deposited to bank . This can be obtained by clicking on the Cheque in hand report menu
MIS ReportsContractor/Supplier ReportThis report gives the details of each work taken up by the Contractor or Supplier
Field Name Field Type Field DescriptionType Drop Down Contractor or Supplier option to be selected.Code Search Lens Code of the Contractor/Supplier.Name Alphabetic Name of Contractor or Supplier will be displayed.
Cheque issue register report
116

This report gives the details of all the cheques issued during the period specified.
Field Name Field Type Field DescriptionFrom Date Date From date to be selected.To Date Date To date to be selected.
Receipt Register - Books of Accounts
This report will generate the register of receipts for a fund for a particular period selected. The receipt number can be further drilled down to get the receipt details in depth.
Field Name Field Type Field Description
Fund Drop Down List of funds will be shown from which we can select.
Starting date Date Date of beginning of the report to be generated.End date Date To date till which the report needs to be generated.
Bank transaction
To list out the transaction entries made for the particular bank account.
FieldName FieldType FieldDescription
Bank String Drop-down: List of Banks where the ULB has an account
Account number Number Drop-down: Accounts for the selected Bank Starting date date Starting date of the reportEnding date date ending date of the reportSl. No. Number Runnig serial numberVoucher Number alphanumeric Voucher number of the transaction entryCheque Number alphanumeric Cheque number of the transactionType String Payment or ReceiptVoucher Date Date Voucher date of the tranactionCheque Date Date Cheque date of the transactionPayment Amount Type Payment transaction amount, if the type is PaymentReceipt Amount Type Receipt transaction amount, if the type is Receipt
Payin slip Number Alphanumeric Payin slip number, if the transaction is Cheque Receipt
Payin slip date Date Payin slip date, if the transaction is Cheque Receipt
1. Statement of outstanding Liability To get the Statement of outstanding Liability for Expenses for Suppliers/Contractors.
FieldName FieldType Field Description
117

Date Date As on DateType Text Select Contractor/ Supplier or Both
Code Text Supplier Code, if the type is Supplier or Contractor Code, if the type is Contractor
Name TextSupplier Name, if the Code is Supplier Codeor Contractor Name, if the Code is Contractor Code
Sr. No. Number Running serial numberName of the Supplier/ Contractor Text Supplier Name / Contractor Name
Nature of Payable Text Supplier or Contractor/Work order nameDate of Bill Date Voucher DateBill Number Text BIll NumberCode of Account Text glcodeBill Amount (Rs.) Number Bill.Passed Amount - Paid amountIn respect of Grant/ Special Fund Text Fund Name
Remarks Text -
Function wise Income/expenditure subsidiary register
This report will list out the function-wise Income/Expenses for the major heads wise for the selected fund.
FieldName FieldType FieldDescriptionIncome/Expenditure Text select Income / Expenditure Fund Text select fund from drop down listStart Date Date From date of the reportEnd Date Date To date of the report
118

Register of Advance
Dishonored Cheques report
Field Name Field Type Field Description
Cheque Number Numeric The user can enter the cheque number
Fund Drop down list The user can choose the type of fund
Cheque Date From Date The user can enter the from date
Cheque Date To Date The user can enter the to date
119
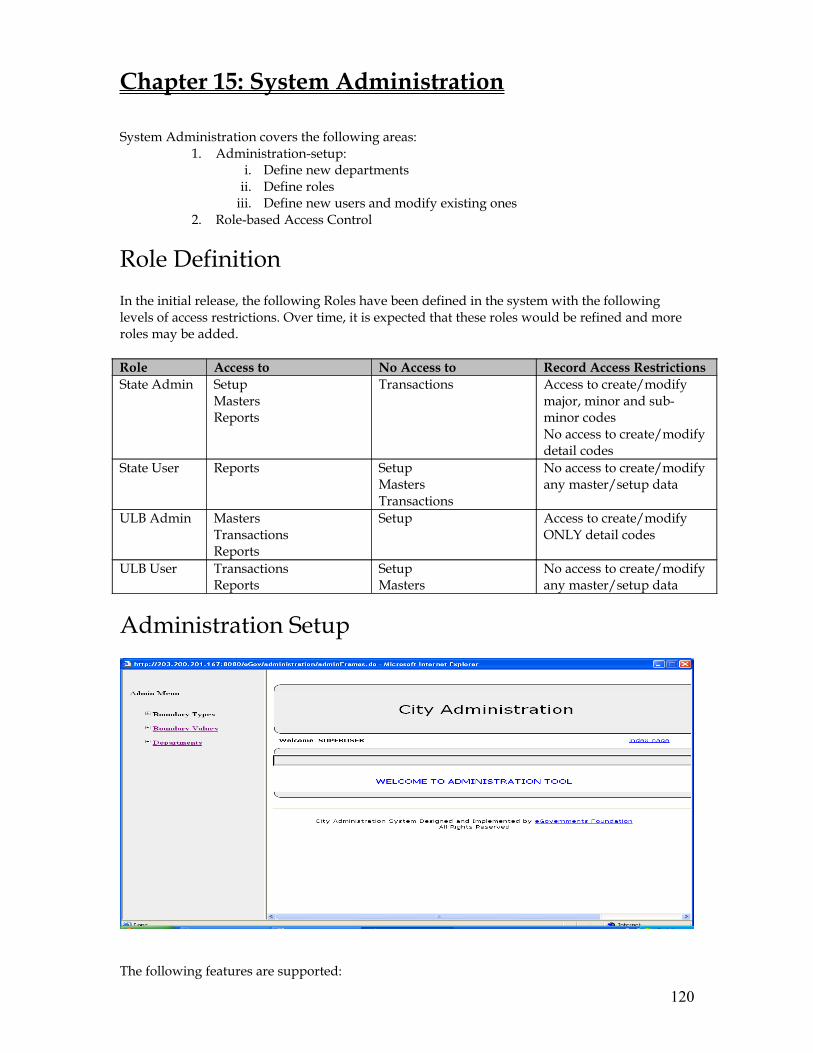
Chapter 15: System Administration
System Administration covers the following areas:1. Administration-setup:
i. Define new departmentsii. Define roles
iii. Define new users and modify existing ones2. Role-based Access Control
Role DefinitionIn the initial release, the following Roles have been defined in the system with the following levels of access restrictions. Over time, it is expected that these roles would be refined and more roles may be added.
Role Access to No Access to Record Access RestrictionsState Admin Setup
MastersReports
Transactions Access to create/modify major, minor and sub-minor codesNo access to create/modify detail codes
State User Reports Setup MastersTransactions
No access to create/modify any master/setup data
ULB Admin MastersTransactionsReports
Setup Access to create/modify ONLY detail codes
ULB User TransactionsReports
SetupMasters
No access to create/modify any master/setup data
Administration Setup
The following features are supported:
120

1. Boundary Types – this is a cross-application setup and will be used by multiple applications.
Typically, this will be City -> Zone -> Ward
2. Boundary Values – this is a cross-application setup and will be used by multiple applications
3. Departments
4. Definition of users
5. User Maintenance: eg. updating user password, changing user roles
Administrative Boundary Definition
Administrative Boundaries are defined in two stages:
1. Definition of Administrative boundary types: This is a one-time setup that builds the
administrative hierarchies in the ULB. The following generic hierarchy is setup in the
system (see below for the screen shot): City -> Zone -> Ward -> Street
2. Definition of Administrative boundary values: Once the types are defined, the individual
values at each level need to be defined. This includes the list of wards, which is again a
one-time setup. The ward is captured as part of the Property Tax transactions,
Procurement Order creation etc and can be used to report transactions by ward.
Department DefinitionA ULB administration is divided into departments and each department would have roles with
each employee being assigned a specific role.
The following screen shows the Department Master screen.
121

Field Type RemarksDepartment Code Alphanumeric RequiredDepartment Name Alphanumeric RequiredDepartment Description Alphanumeric Optional
Press to create a new Department
User DefinitionUsers can be defined in the system using the Boundary Settings Option under Administration.
The following set of rules is assumed:
a) ULB personnel focus on certain well-defined geographic boundaries. In most cases, Accounts
personnel operate at the City level, and in some cases, at the Zone level.
b) ULB personnel are allotted departments
c) Each department has multiple Roles
d) A specific role within a department can have multiple users.
The following pre-requisites must be fulfilled prior to defining users:
1. Boundary types must be defined.
2. Boundary values must be defined.
The following fields are part of User Definition:
Field Type RemarksFirst Name Alphanumeric RequiredMiddle Name Alphanumeric OptionalLast Name Alphanumeric RequiredSalutation Alphanumeric OptionalUserId Alphanumeric RequiredPassword Alphanumeric Required (stored in an encrypted form)Belongs To Drop-down ULBDepartment Drop-down
122

Field Type RemarksUser Role Drop-downChoose Jurisdiction Level Drop-down From the list of boundary types
defined. The current list is: City, Zone,
Ward, StreetChoose Jurisdiction Values Drop-down (with
multiple selections)
From the list of boundary values
defined for the level selected above
Role-based Access ControlThere are various types of users who need to access the Application for different purposes. For
instance, at the ULB level, the accountant uses it for day-to-day accounting of vouchers; while the
Accounts Superintendent needs to check a contractor account, bank balance etc; and the
Commissioner may need to view reports such as the Income & Expenditure account or budget
variance report to assess the performance of the ULB.
The Role-based Access Control (RBAC) is a feature in the system that controls access control to
the screens as well as data based on pre-defined rules. Access Control is managed at two levels:
1. Access to Screens: Based on the Role, a user has access to a set of screens. For instance, a user
at the State level must not have access to the transaction screens (i.e. cannot pass vouchers)
but they may need to have access to reports.
123

2. Access to data: Based on the role, a user has access to update/manage certain masters. For
instance, it has been decided that in the Chart of Accounts, the major/minor/sub-minor
codes can be updated only at the state level. On the other hand, the detailed codes can be
created or updated only at the ULB level. This can be controlled by setting up rules in the
system.
Role-Screen mapping
The system provides a screen for mapping the setup/master/transaction screens for each role.
User access is then controlled based on the role assigned to the user. The list of user transaction
screens is listed as Action. The example below shows the setup for assignment of the ‘Create
Bank Payment’ screen to the State User, Super User, ULB Admin and ULB User roles. The State
Admin role does not have access to this transaction.
The same setup can be done Role-wise. For a given role, the list of screens can be selected as
shown below. Individual screens can be selected and added/removed as required:
Rule Definition
124

The system provides a screen for mapping the setup/master/transaction screens for each role.
User access is then controlled based on the role assigned to the user. The sequence of setups is as
follows:
1. Define a Rule Group (a logical grouping of Rules) for an Action to be performed by a Role.
2. Define Rules for each Rule Group. Multiple Rules can be defined for a Rule Group.
The following Types of Rules are currently supported in the system:
• Account Code Rule: Access to specific ranges of account codes can be restricted for specific
roles. For instance, a ULB level role cannot create/modify major/minor/sub-minor codes in
the Chart of Accounts.
• Amount Rule: Total Value of a transaction can be restricted for specific roles. For instance,
the value of a Contract Order that can be created by a specific Role can be restricted to a pre-
defined limit.
• Fund Rule: The list of Funds accessible to specific roles.
Rule-group definitionThe first step is to define Rule Groups for a specific Action and Role. Access to this screen is as
follows:
Administration -> Role-based Access Control ->Create RuleGroup for Action to a Specific Role
If a specific RuleGroup exists for a Role/Action combination, it is displayed. This can then be
modified or deleted. If there is no RuleGroup defined for the Role/Action combination, a new
RuleGroup name can be defined.
The existing RuleGroup assignments for a specific Action can be displayed from the same screen.
125

Similarly, the existing RulGroup assignments for a specific Role can also be displayed from the
same screen.
Rule DefinitionOnce a RuleGroup is defined, specific Rules need to be defined for that RuleGroup. Each Rule has the following attributes:Field Type RemarksRule Name Alphanumeric Name of the RuleDefault Alphanumeric Default Value assigned to the RuleMin (Range) Alphanumeric Minimum value in the rangeMax (Range) Alphanumeric Maximum value in the rangeType Drop-down:
Account Code RuleFund RuleAmount Rule
Type of Rule
Include Check-box To be checked if the Rule includes access to the range of values
Exclude Check-box To be checked if the Rule excludes access to the range of values
Active Check-box To be checked to activate the Rule
The following table shows some examples of Rules defined in the system:
Rule Type Min Max Include ExcludeAccess to create/modify major/minor/ sub-minor codes
Account Code Rule
0 99999
Access disabled to create/modify Detailed Codes
Account Code Rule
100000 999999
Access disabled to create/modify Bank GL codes from the Chart of Accounts Screen (these are automatically generated by the bank master)
Account CodeRule
47 47
126

Access to this screen is as follows:
Administration -> Role-based Access Control ->Create Rules for RuleGroup.
The list of all RuleGroups assigned by Role/Action combination can be viewed in a single
consolidated window. Access to this screen is as follows:
Administration -> Role-based Access Control ->View Role-Action Mapping.
Click on a RuleGroup to go to the screen with the Rules associated with the RuleGroup
127

Chapter 16: Deductions Module
Scope
The Deductions Module will cover the following major areas:1. Compilation of Deductions by category on a monthly basis for remittance. This should
cover all the deductions (calculated as well as manually deducted).2. Calculation of Deductions for each voucher based on pre-defined rules.3. Generation of statutory documents (e.g. Form-16A - TDS Certificate) on an annual basis.
Setup/Masters:1. TDS Master2. Works/Professional Services Types
Setup/Masters
Party TypeThe following master sets up the Party Types:NAME TYPE COMMENTSCode Numeric Required FieldDescription Text Required Field
128

For each Type, any number of sub-types can be setup:NAME TYPE COMMENTSCode Numeric Required FieldDescription Text Required Field
The following Party Types can be setup:1. Contractor2. Supplier
3. Employee (to be used later with Payroll)The following party sub-types can be setup under Contractor:
1. Individuals2. Domestic company• The drop-down of Contractor Type will be available in the Contractor Master Screen.Tables Used:
1. eg_partytype
Field Field Type Required (Y/N)Id Number Y (PK)code varchar(20) Yparentid Number Ndescription varchar(100) YCreateby Number YCreateddate Date Ylastmodifiedby Number NLastmodifieddate Date Y
Document TypeThe following masters set up the Contract Types and sub-typesNAME TYPE COMMENTSCode Numeric Required FieldDescription Text Required FieldApplied to Drop-down from Party Type Required Field
For each Type, any number of sub-types can be setup:NAME TYPE COMMENTSCode Numeric Required FieldDescription Text Required FieldThe following contract Types can be setup:
1. Worksa. Transportationb. Advertisingc. Labour contracts
129

d. Works contractse. Composite works contracts (incl supply of material)f. Service contracts (other than Professional Services)g. Others
2. Professional Servicesa. Legal b. Medicalc. Engineeringd. Architecturale. Accountingf. IT Professionalsg. Technical Consultancyh. Interior decorationi. Film artists, authorized representativesj. Others
• The drop-down of Contract Type/Sub-Type will be available in the WO/PO creation screen,.
Table Used:1.egw_typeofwork
Field Field Type Required (Y/N)Id number Y (PK)Code varchar(20) YParentid number NDescription varchar(1000) YParttypeid number YCreateby number YCreateddate Date YLastmodifiedby Number NLastmodifieddate Date Y
Recovery MastersThe following TDS Master needs to be setup:
1. Automatic – The deductions are automatically applied to each bill as part of deductions.
2. Manual – The deductions are manually calculated as part of the bill. No deduction details grid.
130

HEADER:NAME TYPE COMMENTSTDS Code Alphanumeric Required fieldTDS Name Alphanumeric Required FieldAccount Code Drop-down from Chart of
Accounts(All Sub-Ledger Codes)
Required Field
Applied To Drop-down:ContractorSupplierEmployee
Required Field
Bank Loan Check box Optional field – If Recovery is manual and Applied To=’Employee’
Bank Drop-down from Bank Master
Required if Recovery is manual, Applied To=’Employee’ and Bank Loan is selected.
Remitted To Text Bank Account to which the TDS needs to be remitted. Required Field
131

BSR Code Text BSR Code of Bank Account to which the TDS needs to be remitted
If Recovery is Automatic:DETAILS:NAME TYPE COMMENTSDocument Type Drop-down from Contract
TypesWorksProfessional Services
Optional field
Document Sub-type Based on the Type selected above, the list of sub-types
Optional Field
Party Type Drop-down from Party types:IndividualDomestic Company
Optional Field
Date From Effective Date from Required FieldDate To Effective Date to Optional field – If left
empty, assume that is active forever
Payment Limit – Low Numeric Optional fieldPayment Limit – High Numeric Optional fieldIT Numeric
0-100%Required
Surcharge Numeric0-100%
Optional
Education Cess Numeric0-100%
Optional
Total Calculated asIT+Surcharge+Education Cess
Validation check: Total must be less than equal to 100
Flat Amount Numeric Optional
Given below are two examples of Recovery Setup (TDS and Works Contract Tax):
132

The following validation needs to be done:1. For any given contract type, contractor type, subtype, date range and payment limit
ranges, only one row must be allowed in the masters screen.2. The total of IT, Surcharge and Education Cess may not exceed 100%.3. If the effective date to is left empty, it is assumed that the rate is effective for ever.4. The WO date (agreement date) is compared with the Date From/Date to fields to identify
the rate to be applied.5. The Account code must be a Sub-Ledger code. The same Account code CANNOT be
used across multiple TDS masters except if Recovery=’manual’ and Applied To=’Employee’ and Bank Loan is selected.
6. Either (IT + surcharge + Education Cess) or Flat Amount should be there. Cannot contain both.
Tables Used:1.TDSField Field Type Required (Y/N)Id Numeric Y (PK)type varchar(20) Ydescription varchar(50) Yglcodeid number Yisactive number Yremitted varchar(100) NCreateby number YCreated Date Ymodifiedby Number NLastmodified Date Ybsrcode varchar(20) NPartytypeid Number NBankid Number N
133
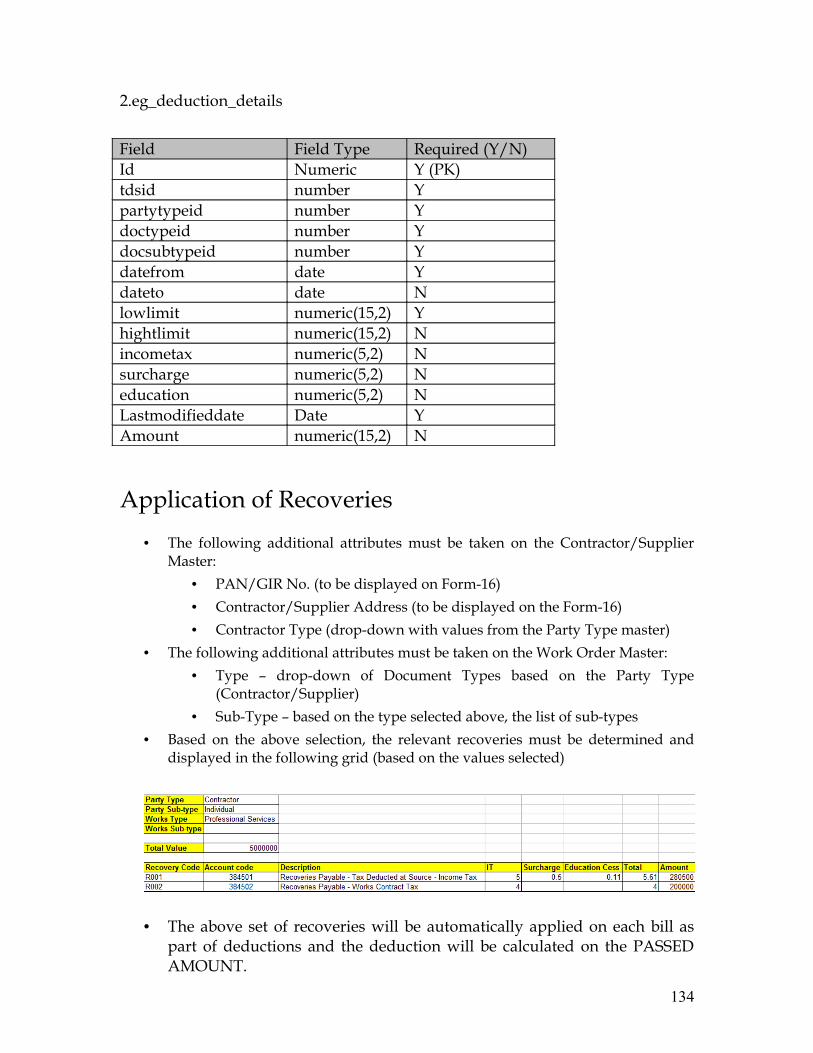
2.eg_deduction_details
Field Field Type Required (Y/N)Id Numeric Y (PK)tdsid number Ypartytypeid number Ydoctypeid number Ydocsubtypeid number Ydatefrom date Ydateto date Nlowlimit numeric(15,2) Yhightlimit numeric(15,2) Nincometax numeric(5,2) Nsurcharge numeric(5,2) Neducation numeric(5,2) NLastmodifieddate Date YAmount numeric(15,2) N
Application of Recoveries• The following additional attributes must be taken on the Contractor/Supplier
Master:• PAN/GIR No. (to be displayed on Form-16)• Contractor/Supplier Address (to be displayed on the Form-16)• Contractor Type (drop-down with values from the Party Type master)
• The following additional attributes must be taken on the Work Order Master:• Type – drop-down of Document Types based on the Party Type
(Contractor/Supplier)• Sub-Type – based on the type selected above, the list of sub-types
• Based on the above selection, the relevant recoveries must be determined and displayed in the following grid (based on the values selected)
• The above set of recoveries will be automatically applied on each bill as part of deductions and the deduction will be calculated on the PASSED AMOUNT.
134

Remit Recovery
• Recoveries may be remitted at any point in time (typically this is done by the 7th
of a month for the previous month).• The user needs to select the following:
• Fund• Recovery Name• Bank (Read only) : If the recovery code has any bank attached to it we
need to default the bank name.• The user is required to input the month/year (default will be the previous
month/year) for which the remittance is being made.• The User then clicks on “Search” button.• The system retrieves all the recoveries which have NOT yet been remitted as
shown below for that Fund till that month end and year.
135

The following details are given:NAME TYPE COMMENTSParty Name Name of the Party
(Contractor etc)Display
Party PAN/GIR# PAN/GIR# From the Contractor Master
Address Address From the contractor Master
Reference Doc No Voucher Reference (JV)Reference Date Voucher Date Amount Amount Amount DeductedRemitted Amount Amount Amount that is going to be
remitted (default the same as amount, user can change to a lesser amount)
136

Remittance details:NAME TYPE COMMENTSRemit To Display From the Recovery Master Voucher Number Payment Voucher
numberVoucher Date Payment voucher
dateBank From drop-downBank account From drop-downCheque Number will be inputted based on the configuration
value. <autogeneratechque>N</autogeneratecheque>If Y, then on save we need to auto populate.
Cheque Date
Logic:
• Read from eg_remittance_gldtl where glamt- remittedamt>0 based on tdsid(Recovery ID). (On creation of voucher records are inserted to eg_remittance_gldtl only if the glcodeid is a recovery code)
• Show one record for each bill . User can enter the remitted amount. Default the remaining amount to be remitted.
• Show the user the available cheque numbers for that bank account.• A bank payment gets created on Save of process.• All the bills that are used for this remittance needs to be back updated with the
appropriate remittance.• Populate the eg_remittance table with all data.• On click of “Save and View” , save all the data in database and then open up a
new screen with all the created data in a print preview format and then give a print option from there.
Table Used:1. Tds2. Eg_remittance
Field Field Type Required (Y/N)Id Numeric Y (PK)Tds id Number YFund id Number Yfyid Number YMonth Number YPayment vhid Number YCreated by Number YCreated date Date YLast modified by Number YLast modified date Date Y
137

3. eg_remittance_gldtl
Field Field Type Required (Y/N)Id Numeric Y (PK)gldtlid Number Ygldtlamt numeric(15,2) YRemitted amt numeric(15,2) NLast modified date Date YTds id Number N
4. Eg_remittance_detail
Field Field Type Required (Y/N)Id Numeric Y (PK)Remittance id Number YRemittance gldtlid Number YLast modified date Date YRemitted amt numeric(15,2) N
Modify RemittanceAny record can be modified either by surrendering the old cheque and creating a
new one or by using the same old cheque.If a cheque is surrendered, in the screen we need to take the new cheque number of autogenerate based on the configuration value. A record needs to be inserted to eg_surrendered_cheques. And a the payment voucher gets modified.If a cheque is not surrendered, the payment voucher gets modified but the cheque number will be same.
Table Used:
5. eg_surrendered_cheques
Field Field Type Required (Y/N)Id Numeric Y (PK)Bank account id number YCheque no varchar(20) YCheque date date Yvhid number YLast modified date Date Y
138

Generate Party-wise Remittance Report• This is in the format of Form-16 and can be generated by Party (across Funds).
The following report criteria are required:o Party Name (Optional)- if left blank, the same report needs to be run for
all partieso For the period (Required): The period for which the report is required
(typically a year).• The following details are taken:
HeaderField Details CommentsName and address of person deducting Tax
ULB Name, Details from ULB Master
TDS circle where Annual Return under Section 206 is to be delivered
From the ULB Master
Name and address of person to whom payment is made or in whose account it is credited
Party NameParty Address
Party selected by the user
Tax Deduction No. of the deductor
From the ULB master
PAN/GIR No. of the deductor
From the ULB master
Nature of Payment TextPAN/GIR of the payee Party selected by the user
(from masters)For the period User selected
Details
Field Details CommentsAmount Paid/Credited In case of contractors,
Passed AmountDate of Payment/Credit Date of remittanceIT Amount deducted for that
recoverySurcharge Surcharge deducted for
that recoveryEducation Cess Education Cess deducted
for that recoveryTotal tax deposited Sum of IT+ Surcharge+
Education CessCheque/DD No. From the Remittance
detailsBSR Code of Bank Branch From the Recovery Master
139

Field Details CommentsDate on which tax deposited
From remittance
Transfer Voucher/Challan identification no.
Voucher number (for the bill)
Cheque Printing- Set up Master
Every Bank will have a cheque format of itself. For printing the data on the cheque leaf (pre printed stationary) we need to to first set up the Set up master
Here will define the X.Y coordinates of the data that are to be printed.
The set up master screen will have the layout like below.
Tables Used:
3. eg_cheque_format
Field Field Type Required (Y/N)Id Numeric Y (PK)bankid number Yheight numeric(5,2) Yfield1 varchar(50) Yfield2 varchar(50) Yfield3 varchar(50) Yfield4 varchar(50) Yfield5 varchar(50) Yfield6 varchar(50) Ycreatedby number Ycreateddate date Ylastmodifiedby number YLastmodifieddate Date Y
4. eg_cheque_format_details
Field Field Type Required (Y/N)Id Numeric Y (PK)headerid number Yfield varchar(50) Yxvalue numeric(5,2) Yyvalue numeric(5,2) Ylength numeric(5,2) YLastmodifieddate Date Y
140

141