
1
QUICKSTART
PC-DISPLAY INSTALLATION &
BLUETOOTH SETUP INSTRUCTIONS
Vmed
2
PC-Display and Bluetooth Instructions
This is the Quick Start manual for PC-Display software. The complete software
user manual for Vmed wireless monitors is included on the software CD and is
accessible from the HELP menu after installing the software. The printable
manuals including manuals for each monitor are available on line at
www.vmedtech.com/customers. The passkey is 2002224. This site also includes a link
to a video tutorial on Bluetooth discovery/pairing for all versions of Windows. This Quick Start setup manual will allow you to install the necessary application software to display monitoring data from Vmed PC-VetGard+, PC-VetChek, BP-AccuGard, VetGard 1 and PC-Vet monitors. The software will automatically detect the remote monitor being used and adjust the display accordingly.
This manual will also guide you in the setup and discovery of the Bluetooth plug-and-play feature using Microsoft Windows XP (Service pack 2 or later), Vista, Windows 7, 8.1 and 10 operating systems. If you are using the Windows XP operating system with built-in Bluetooth, you must follow the Bluetooth installation instructions in an alternate Bluetooth manual which is accessible from the Vmed customer downloads page (www.vmedtech.com/customers password: 2002224).
Important note for Windows tablet users If you purchased a Windows tablet with your new monitor, all software has been pre-installed and Bluetooth
discovery/pairing to your monitor completed. Just open PC-Display and begin monitoring. Newer tablets have internal Bluetooth. The Bluetooth USB dongle included with your monitor is for other computers in your
clinic. Since tablets do not have a CD reader, download and install all software for tablets from the
download site listed above.
Vmed Software
PC-Display Software The Vmed Windows application program installed on your computer for the processing and display of
real time patient information for all Vmed wireless monitors. PC-Display software can be installed on
multiple computers without limit and simultaneous instances of the program can be run subject to
computer capability.
Reviewer Software The Vmed Reviewer software allows the user to open and view the recorded patient episode files created
by the PC-Display software. These files can include ECG and CO2 waveforms, periodic vital signs
recordings, alarm events, notes and patient information. It enables the user to make measurements of the
given waveform and facilitates email transmission of patient files. If you have the Interpreter software
do not bother installing the Reviewer.

3
Interpreter Software The Vmed Interpreter is optional ECG interpretation software compatible with all Vmed wireless
monitors. This program has restricted use and requires registration. All functions available in the
Reviewer program are also available in the Interpreter program.
Bluetooth Software This software is only used if your computer is NOT operating with Windows XP (Service Pack 2 or
higher), Vista or Windows 7, 8 or 10 operating systems. Do not install any Bluetooth software unless you are instructed to do so by a qualified Vmed support representative.
4
Table of Contents
PC-DISPLAY AND BLUETOOTH INSTRUCTIONS ............................................................. 2
Important note for Windows tablet users ................................................................................................................ 2
SECTION 1 PC-DISPLAY INSTALLATION AND SETUP ............................................. 5
Installing the PC-Display Application software ...................................................................................................... 5
SECTION 2 BLUETOOTH INSTALLATION AND DISCOVERY ................................ 10
Windows XP (SP 2 or 3) and Vista ....................................................................................................................... 10
Windows Vista (SP2) and 7 .................................................................................................................................. 14
Windows 8.1 ......................................................................................................................................................... 17
SECTION 3 CONNECTING TO THE VMED WIRELESS REMOTE .......................... 19
TECHNICAL SUPPORT ........................................................................................................... 21

5
Section 1 PC-Display Installation and Setup
DO NOT INSTALL ANY BLUETOOTH SOFTWARE IF USING WINDOWS XP.
FOLLOW THE BLUETOOTH INSTRUCTIONS IN THIS MANUAL. NOTE:
This printed manual covers Bluetooth installation on Windows 10, 8.1, 7, Vista and
Windows XP with Service Pack 2 or 3 (SP2 or SP3) computers only. Refer to the
manual on the Vmed customer downloads page (www.vmedtech.com/customers
password: 2002224) to install and use Bluetooth on older operating systems or with
built-in Bluetooth adapters.
Installing the PC-Display Application software
The PC-Display installation CD contains the following programs:
• PC-display application program
• DEMO programs
• Reviewer program
• Interpreter program
• Monitor manual
• Acrobat Reader
• Primo PDF
• Bluetooth installation videos
Section
1
6
1. Put the Vmed Software Installation CD into the computer’s CD-ROM drive. The
installation program should automatically start and the window below will appear:
You may at first wish to click the “Play suggested installation tutorial video” text in order
to view a tutorial video of how to install Bluetooth and discover your Vmed wireless
device on your computer.
NOTE: If you wish to save printed reports with ECG sweep information to a PDF
(Acrobat) file then you should choose to install Primo PDF from the “Other Software”
link of the main installer screen. You should also install the ECG Reviewer from the
main screen if you already do not have the ECG Interpreter installed.
7
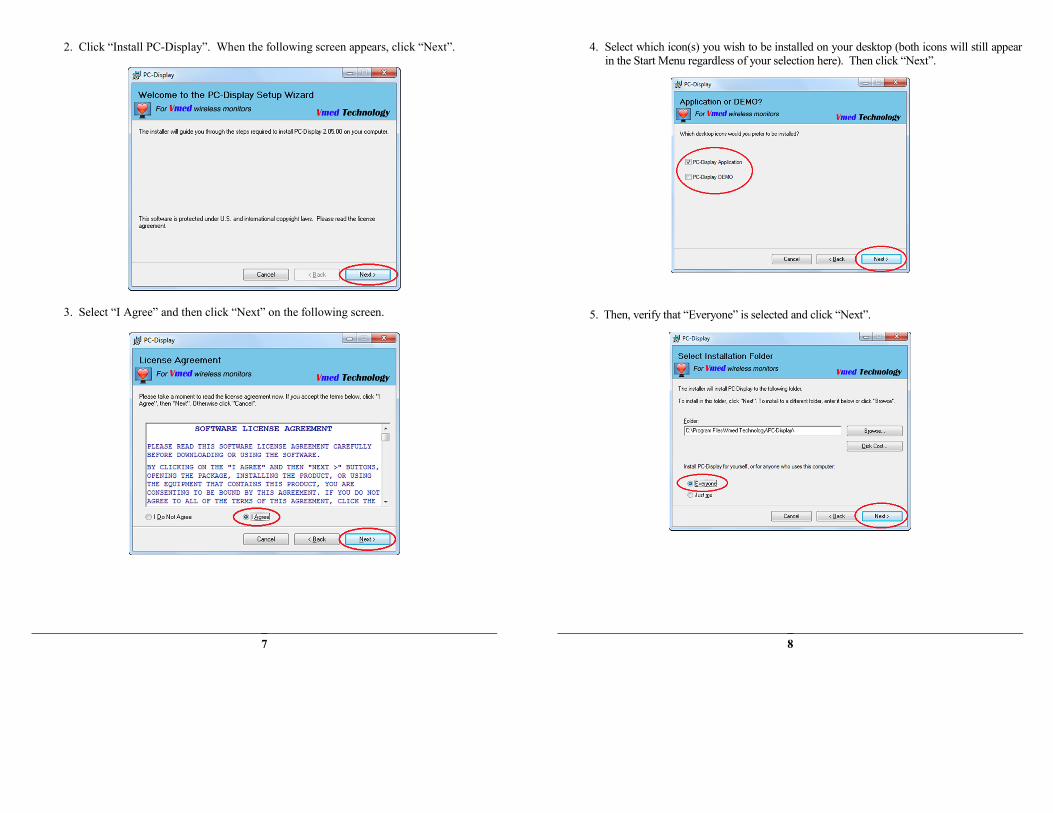
2. Click “Install PC-Display”. When the following screen appears, click “Next”.
3. Select “I Agree” and then click “Next” on the following screen.
8
4. Select which icon(s) you wish to be installed on your desktop (both icons will still appear
in the Start Menu regardless of your selection here). Then click “Next”.
5. Then, verify that “Everyone” is selected and click “Next”.
9
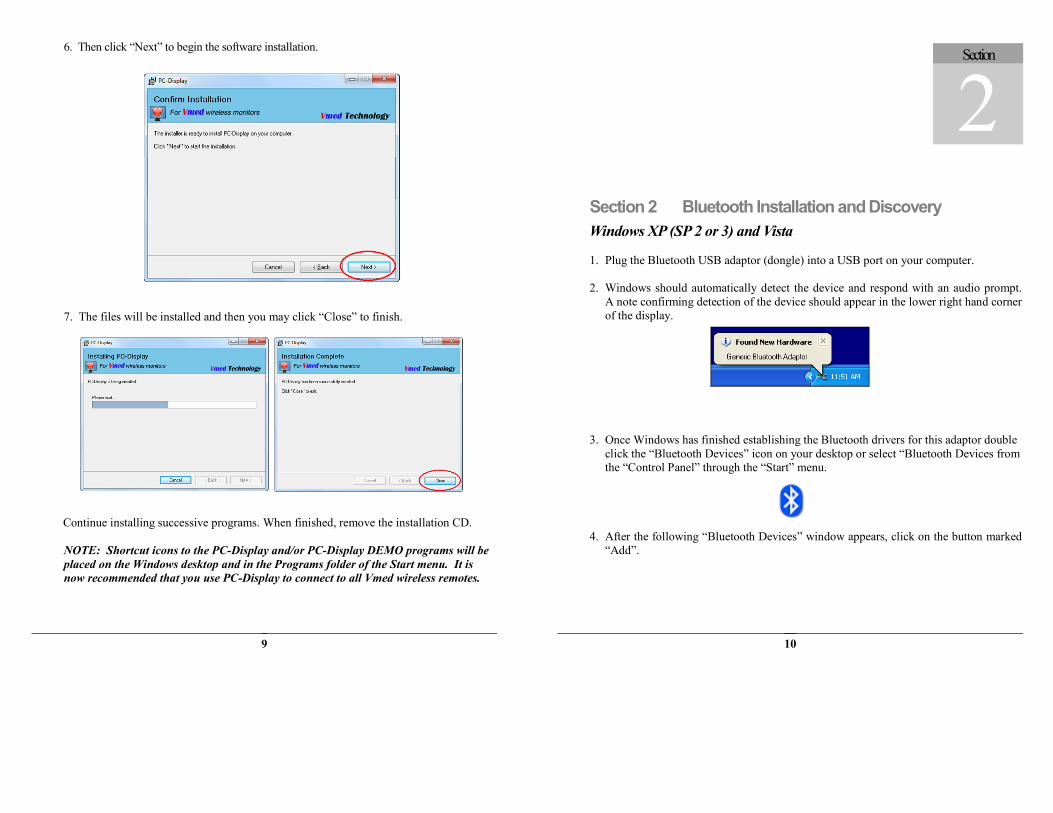
6. Then click “Next” to begin the software installation.
7. The files will be installed and then you may click “Close” to finish.
Continue installing successive programs. When finished, remove the installation CD.
NOTE: Shortcut icons to the PC-Display and/or PC-Display DEMO programs will be
placed on the Windows desktop and in the Programs folder of the Start menu. It is
now recommended that you use PC-Display to connect to all Vmed wireless remotes.
10
Section 2 Bluetooth Installation and Discovery
Windows XP (SP 2 or 3) and Vista
1. Plug the Bluetooth USB adaptor (dongle) into a USB port on your computer.
2. Windows should automatically detect the device and respond with an audio prompt. A note confirming detection of the device should appear in the lower right hand corner
of the display.
3. Once Windows has finished establishing the Bluetooth drivers for this adaptor double click the “Bluetooth Devices” icon on your desktop or select “Bluetooth Devices from
the “Control Panel” through the “Start” menu.
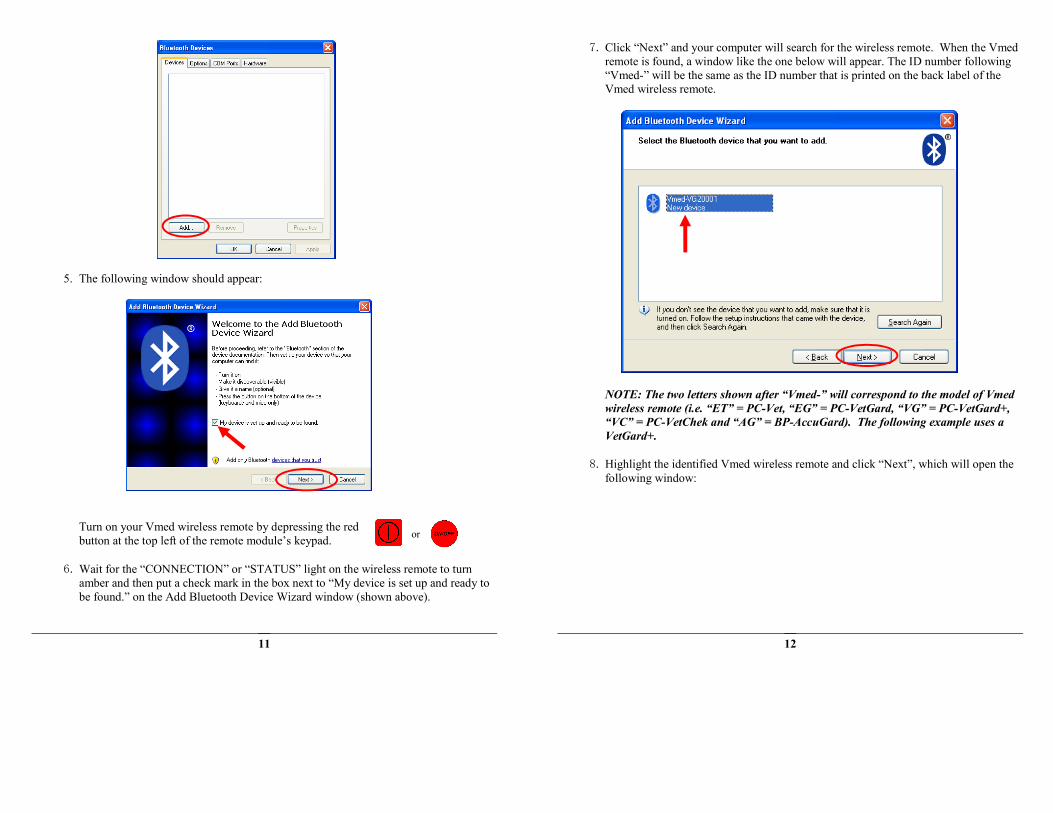
4. After the following “Bluetooth Devices” window appears, click on the button marked “Add”.
Section
2
11
5. The following window should appear:
Turn on your Vmed wireless remote by depressing the red
button at the top left of the remote module’s keypad.
6. Wait for the “CONNECTION” or “STATUS” light on the wireless remote to turn amber and then put a check mark in the box next to “My device is set up and ready to
be found.” on the Add Bluetooth Device Wizard window (shown above).
or
12
7. Click “Next” and your computer will search for the wireless remote. When the Vmed remote is found, a window like the one below will appear. The ID number following
“Vmed-” will be the same as the ID number that is printed on the back label of the
Vmed wireless remote.
NOTE: The two letters shown after “Vmed-” will correspond to the model of Vmed
wireless remote (i.e. “ET” = PC-Vet, “EG” = PC-VetGard, “VG” = PC-VetGard+,
“VC” = PC-VetChek and “AG” = BP-AccuGard). The following example uses a
VetGard+.
8. Highlight the identified Vmed wireless remote and click “Next”, which will open the following window:

13
9. Select the “Let me choose my own passkey” option and enter the passkey of “default” in the text entry box beside it. Then, click “Next”. When the window below opens,
click “Finish”.
NOTE: There should be two COM (communications) ports listed on the screen
below. They may be different for different discoveries and you should not have to
remember them, but you should verify that there are two listed.
14
Windows Vista (SP2) and 7
1. Plug the Bluetooth USB Adaptor (dongle) into an available USB port of your computer.
2. Windows should automatically detect the device and respond with an audio prompt. A note confirming detection of the device should appear in the lower right hand corner of the
display.
3. Once Windows has finished establishing the Bluetooth drivers for this adaptor double-click the “Bluetooth Devices” icon in the bottom right portion of your desktop or select
“Bluetooth Devices from the “Control Panel” through the “Start” menu (or select
“Devices and Printers” from the “Start” menu if you are using Windows 7).
4. Turn on your Vmed wireless remote by depressing the red button at the top left of the remote module’s keypad.
5. In the resulting devices window click the button marked “Add a device”.
or

15
6. The devices window will display new devices as they are found. Select your Vmed remote device (in this example it is a PC-VetGard+ with the ID: VG20123). Once
selected, click the Next button.
7. On the following screen, choose the middle option, “Enter the device’s pairing code”.
16
8. Then, enter the following pairing code: default. Click “Next” to proceed.
9. This will begin the pairing of your Bluetooth device. Once the pairing process is complete then you will see a “Close” button. At this point, you may press this
button to finish the pairing process.
10. You may also see a notification bubble verifying that the pairing process is complete.
17
Windows 8.1 and 10
NOTE: If you know that this computer has internal, or built-in, Bluetooth functionality then skip to step 3.
1. Plug the Bluetooth USB Adaptor (dongle) into an available USB port of your computer.
2. Windows should automatically detect the device and respond with an audio prompt. A note confirming detection of the device should appear in the lower right hand corner of the
display.
3. Turn on your Vmed wireless remote by depressing the red button at the top left of the remote module’s keypad.
4. Double-click the “Bluetooth Devices” icon in the bottom right portion of your desktop.
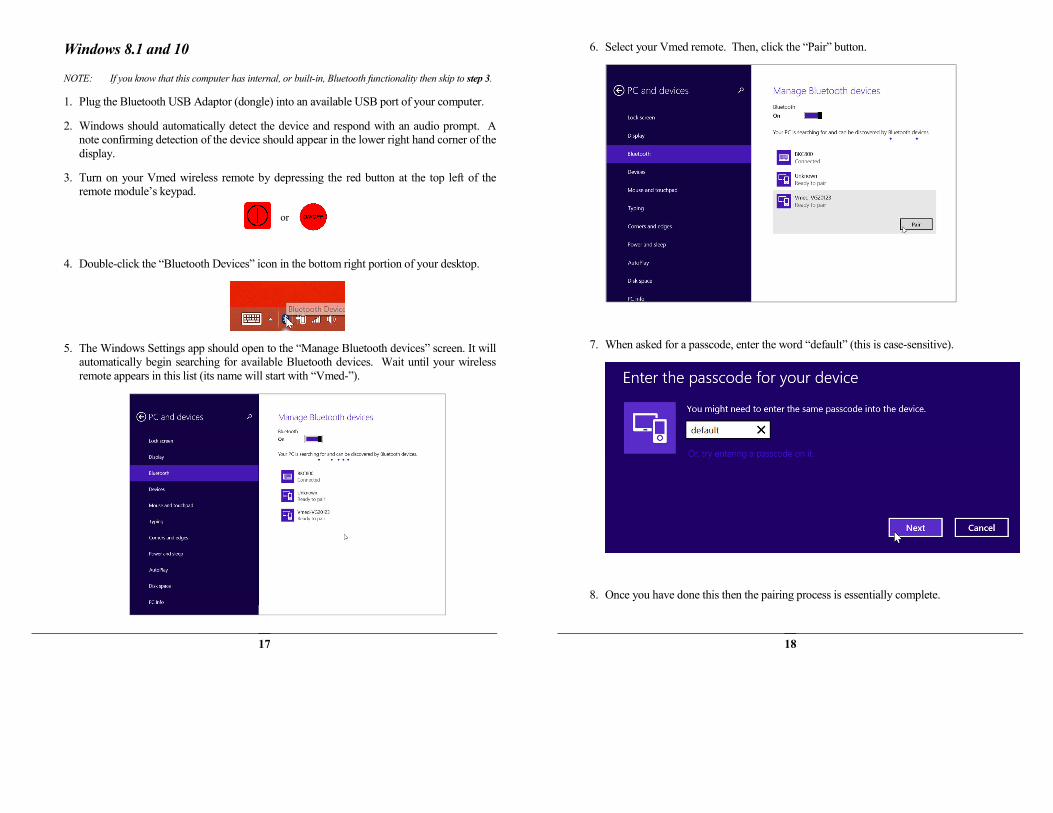
5. The Windows Settings app should open to the “Manage Bluetooth devices” screen. It will automatically begin searching for available Bluetooth devices. Wait until your wireless
remote appears in this list (its name will start with “Vmed-”).
or
18
6. Select your Vmed remote. Then, click the “Pair” button.
7. When asked for a passcode, enter the word “default” (this is case-sensitive).
8. Once you have done this then the pairing process is essentially complete.

19
Section 3 Connecting To the Vmed Wireless Remote
1. Power on the previously discovered Vmed remote. The “CONNECTION” or “STATUS” light on the remote will turn red and then amber.
NOTE: Every device has to be discovered once for each computer. If you have
never been through the discovery procedure with this particular device on this
PC, do so before proceeding (see previous section).
2. Start the PC-Display application by clicking the PC-Display icon on the desktop to open the window below:
3. Select the device you wish to use and press “Connect”.
NOTE: If you have discovered multiple Vmed wireless remotes, the device last
discovered or connected to your computer will appear in the text box in the above
window. Click the “down” arrow to view the other discovered devices and highlight
the one you want to use before connecting. As many as seven Vmed remote devices
can be connected to a computer at one time. The practical limitation, however, is
the size of the display and the processing power/memory of your computer. To use
Section
3
20
multiple devices, go to Section 2 Step #3 and repeat the discovery process for each.
The Vmed software automatically selects the COM Port if the Vmed Bluetooth USB
adapter is being used with that computer.
4. Once the wireless remote has been selected from the list and you press the “Connect” button then you should be presented with the following Patient
Information window.
5. Input the patient’s information in this window and then click the “OK” button to begin the wireless connection process.
NOTE: Vmed advises you to at least replace the default numbers listed in the
“Patient Name” category with a name or ID number that would easily identify
the current patient. This will be used later in order to find the patient episode
file that is recorded from this session.
6. It might take about 7-10 seconds for PC-Display to initially discover the different sensors that are attached to your wireless monitor. Once it has done so it will
repaint the screen with the appropriate measurements displayed.

21
Technical Support
If you purchased your Vmed product directly from Vmed or a distributor
other than DVM Solutions:
Phone: 800-926-9622
FAX: 425-585-0231
Email: [email protected]
WEB: www.vmedtech.com
If you purchased your Vmed product from DVM Solutions:
Phone: 866-373-9627
FAX: 830-438-7041
WEB: www.dvmsolutions.com
Software updates Visit www.vmedtech.com/customers (use this password: 2002224) for periodic software
updates and to download the latest hardware specific user manuals and other information.
Vmed Technology, 2016 914 164th St. SE • Mill Creek, WA 98012 USA
Phone: 800-926-9622
Email [email protected]
Downloads web site: www.vmedtech.com/customers


