Download - USER’S MANUAL - Zoetis

Urine Analyzer
U S E R ’ S M A N U A L
For Veterinary Use Only

Abaxis and VetScan are registered trademarks of Abaxis, Inc. Reproduction in any form, either in print or electronic, is prohibited without written permission of Abaxis, Inc. Copyright ©Abaxis, Inc. 2017.
ABAXIS, INC.
3240 Whipple Road
Union City, CA 94587 USA
+1 800 822 2947 | www.abaxis.com
ABAXIS Europe GmbH,
Bunsenstr. 9-11
64347 Griesheim, Germany
+49 6155 780 210
Part No. 1500-7005 Rev A
TABLE OF CONTENTSTable of Contents ......................................................................................................................................................................... 3
Symbols ........................................................................................................................................................................................... 5
Warranty .......................................................................................................................................................................................... 5
Introduction ................................................................................................................................................................................... 6
Intended Use ................................................................................................................................................................................. 7
System Overview .......................................................................................................................................................................... 8
How the VetScan UA Works ....................................................................................................................................................... 9
Setting Up the VetScan UA ......................................................................................................................................................10
Introduction to the VetScan UA Menu ...........................................................................................................................13
Settings Menu ...................................................................................................................................................................12
Home Screen & Test Menu ............................................................................................................................................14
Running a Sample ......................................................................................................................................................................15
Urine Sample Collection .....................................................................................................................................................15
Urine Sample Handling .......................................................................................................................................................15
Materials needed for Testing: ............................................................................................................................................16
Set up for testing ...................................................................................................................................................................16
Running a Test ........................................................................................................................................................................16
Reviewing Previous Results – Database ..............................................................................................................................20
Reviewing Stored Results ...................................................................................................................................................20
Maintenance ................................................................................................................................................................................21
Cleaning the Strip Tray ........................................................................................................................................................21
Cleaning the UA Analyzer ...................................................................................................................................................23
Running a Check Strip .........................................................................................................................................................23
Running UA Controls ...........................................................................................................................................................26
Appendix A: Troubleshooting ................................................................................................................................................28
Frequently Asked Questions? ............................................................................................................................................28
Abaxis Resources ...................................................................................................................................................................30
Appendix B: UA Results Bins ...................................................................................................................................................31
Appendix C: Error Codes ..........................................................................................................................................................32
Appendix D: Interfering Substances ....................................................................................................................................33
Appendix E: VetScan UA Analyzer and Printer Specifications ......................................................................................34
Analyzer Specifications .......................................................................................................................................................34
Printer Specifications ...........................................................................................................................................................34
Appendix F: Safety and Regulatory Compliance ..............................................................................................................35
Index ...............................................................................................................................................................................................37

4
SYMBOLS
Operator’s manual; operating instructions
User’s manual available. Consult manual for detailed use instructions.
EC REP
European Community representative
Authorized Representative in the European Community
Electrical and electronic products recycling symbol
Recycle only as electronic waste. Do not dispose in normal waste.
Protect from heat, radioactive sources and direct sunlight
Keep away from radiation, heat and direct sunlight.
Environment-Friendly Use Period
Caution Caution to safety hazard
Manufacturer Manufacturer of record
Keep Dry Protect from moisture. Do not allow it to be wet.
This side Up Keep package and analyzer right side up.
Use by date Expiration date of product.
CE MarkDenotes conformity to specific European directives and regulations
TUV MarkIndicates conformity to TUV testing standards. TUV Mark for Canada and USA.
Handle with care Handle with care.
RCM Mark Indicates compliance with RCM standards.
Transit and Storage Temperature
Storage and transit temperatures; does not indicate operating temperatures.
RoHS Compliant Compliance with RoHS environmental standards.
For Veterinary Use Only
For Veterinary Diagnostic Use only. Not for use for humans.
Do not tip/Do not roll
Keep upright. Do not tip on side.
Date of Manufacture Date of manufacture.
Serial number Analyzer or Printer serial number
Fragile, Handle with care Fragile
Potential Biohazardous Risk
Treat as biohazardous. Use standard safety procedures.
Caution
Potential risk of personal injury or damage to the instrument if improperly handled. Consult the manual before proceeding

U S E R ’ S M A N U A L 5
WARR ANT YThe Abaxis VetScan UA Urine Analyzer is covered by a standard Abaxis warranty. Contact your local Abaxis office for the details of the warranty.
6
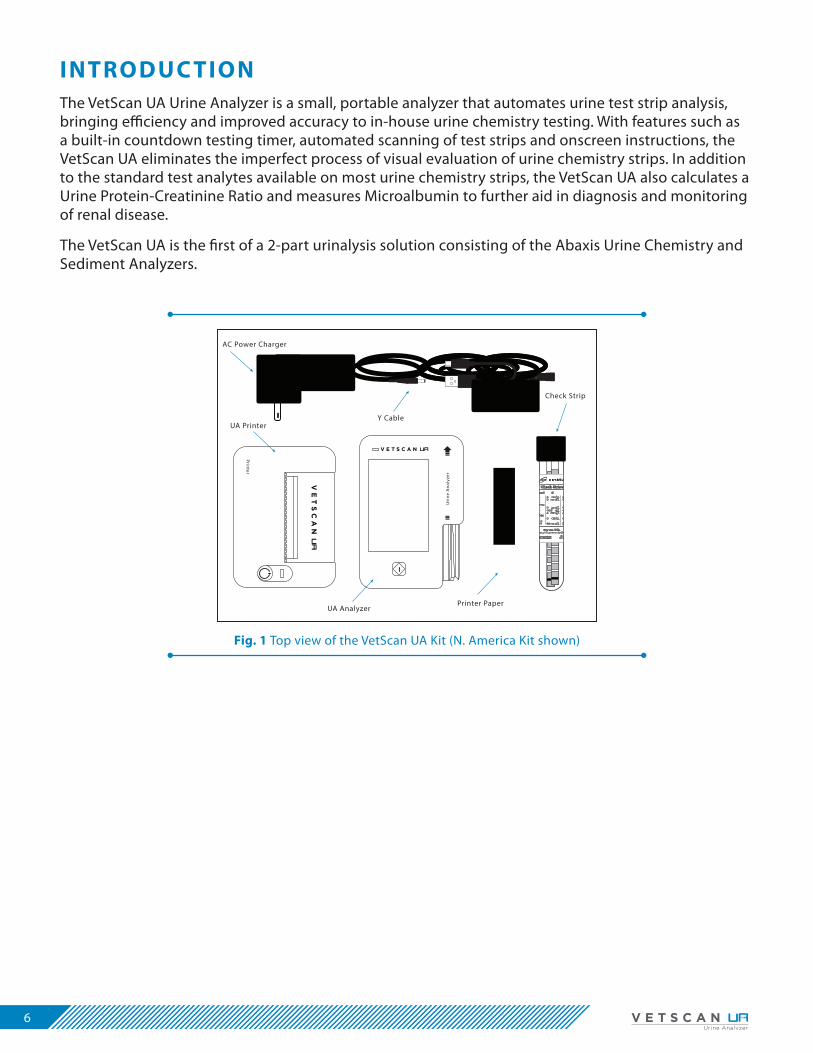
INTRODUC TIONThe VetScan UA Urine Analyzer is a small, portable analyzer that automates urine test strip analysis, bringing efficiency and improved accuracy to in-house urine chemistry testing. With features such as a built-in countdown testing timer, automated scanning of test strips and onscreen instructions, the VetScan UA eliminates the imperfect process of visual evaluation of urine chemistry strips. In addition to the standard test analytes available on most urine chemistry strips, the VetScan UA also calculates a Urine Protein-Creatinine Ratio and measures Microalbumin to further aid in diagnosis and monitoring of renal disease.
The VetScan UA is the first of a 2-part urinalysis solution consisting of the Abaxis Urine Chemistry and Sediment Analyzers.
Printer
Uri
ne
An
alyz
er
Check Strip
AC Power Charger
Y CableUA Printer
UA AnalyzerPrinter Paper
Fig. 1 Top view of the VetScan UA Kit (N. America Kit shown)
U S E R ’ S M A N U A L 7
INTENDED USEThe VetScan UA is intended for veterinary use only for the testing of urine chemistries in mammalian veterinary urine samples, particularly dogs and cats. Urine from other species may be run on the analyzer, but has not been validated. The VetScan UA will measure urine analytes through disposable test strips and provide semi-quantitative results on up to 14 analytes including, leukocytes (LEU), ketones (KET), nitrite (NIT), urobilinogen (URO), bilirubin (BIL), glucose (GLU), protein (PRO), specific gravity (SG), pH, blood (BLD), ascorbic acid (ASC), microalbumin (MA), calcium (Ca), creatinine (CR), and a calculated urine protein creatinine ratio (PRO/CR).
Urine testing on the VetScan UA is intended to help evaluate chemical analytes in urine for the detection of kidney disease, lower urinary tract disease, and specific endocrine disease. It is meant to be utilized as part of the urinalysis in correlation with urine sediment examination, and other clinical diagnostics to obtain a complete evaluation of the disease process affecting the patient.
8
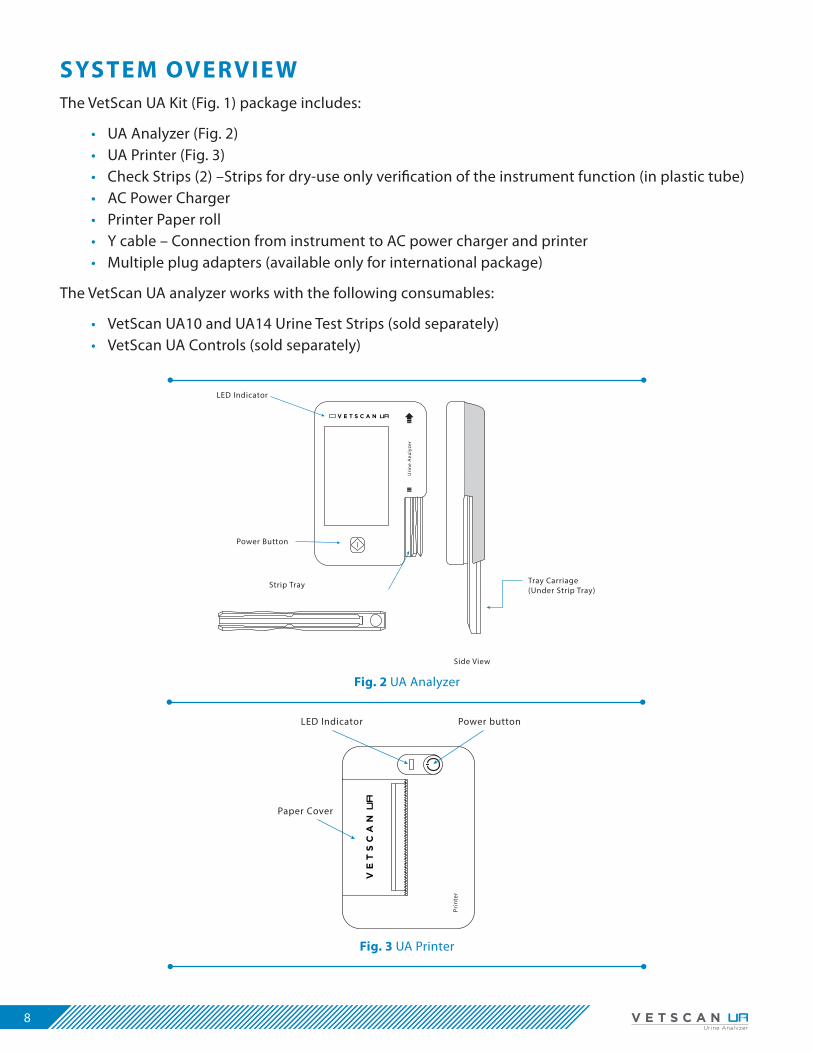
SYSTEM OVERVIE WThe VetScan UA Kit (Fig. 1) package includes:
• UA Analyzer (Fig. 2) • UA Printer (Fig. 3)• Check Strips (2) –Strips for dry-use only verification of the instrument function (in plastic tube)• AC Power Charger• Printer Paper roll• Y cable – Connection from instrument to AC power charger and printer • Multiple plug adapters (available only for international package)
The VetScan UA analyzer works with the following consumables:
• VetScan UA10 and UA14 Urine Test Strips (sold separately)• VetScan UA Controls (sold separately)
Prin
ter
Power buttonLED Indicator
Paper Cover
Fig. 3 UA Printer
Uri
ne
An
alyz
er
Strip Tray
Side View
Tray Carriage(Under Strip Tray)
Power Button
LED Indicator
Fig. 2 UA Analyzer
U S E R ’ S M A N U A L 9
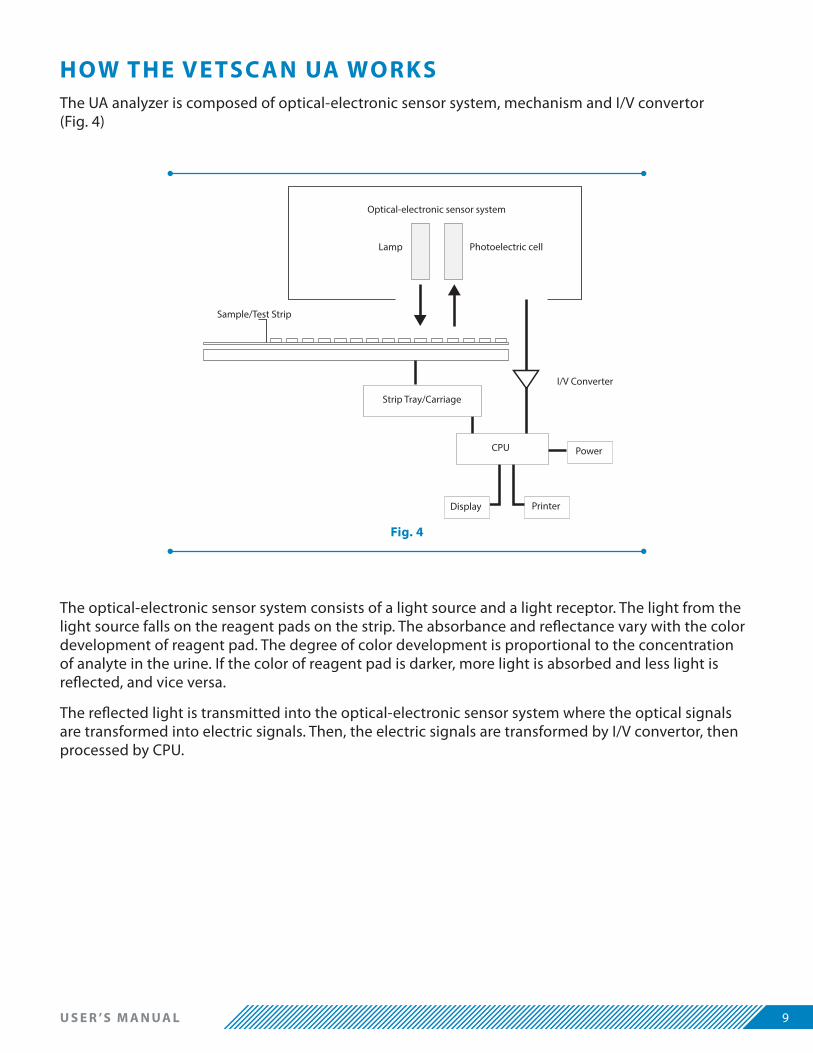
HOW THE VETSC AN UA WORKSThe UA analyzer is composed of optical-electronic sensor system, mechanism and I/V convertor (Fig. 4)
Optical-electronic sensor system
Lamp
Sample/Test Strip
CPU Power
Printer
I/V Converter
Photoelectric cell
Display
Strip Tray/Carriage
The optical-electronic sensor system consists of a light source and a light receptor. The light from the light source falls on the reagent pads on the strip. The absorbance and reflectance vary with the color development of reagent pad. The degree of color development is proportional to the concentration of analyte in the urine. If the color of reagent pad is darker, more light is absorbed and less light is reflected, and vice versa.
The reflected light is transmitted into the optical-electronic sensor system where the optical signals are transformed into electric signals. Then, the electric signals are transformed by I/V convertor, then processed by CPU.
Fig. 4
10
Uri
ne
An
alyz
er
Prin
ter
Y cable
micro USB
VetScan UA analyzer
VetScan UA printer
USB
AC Power Charger
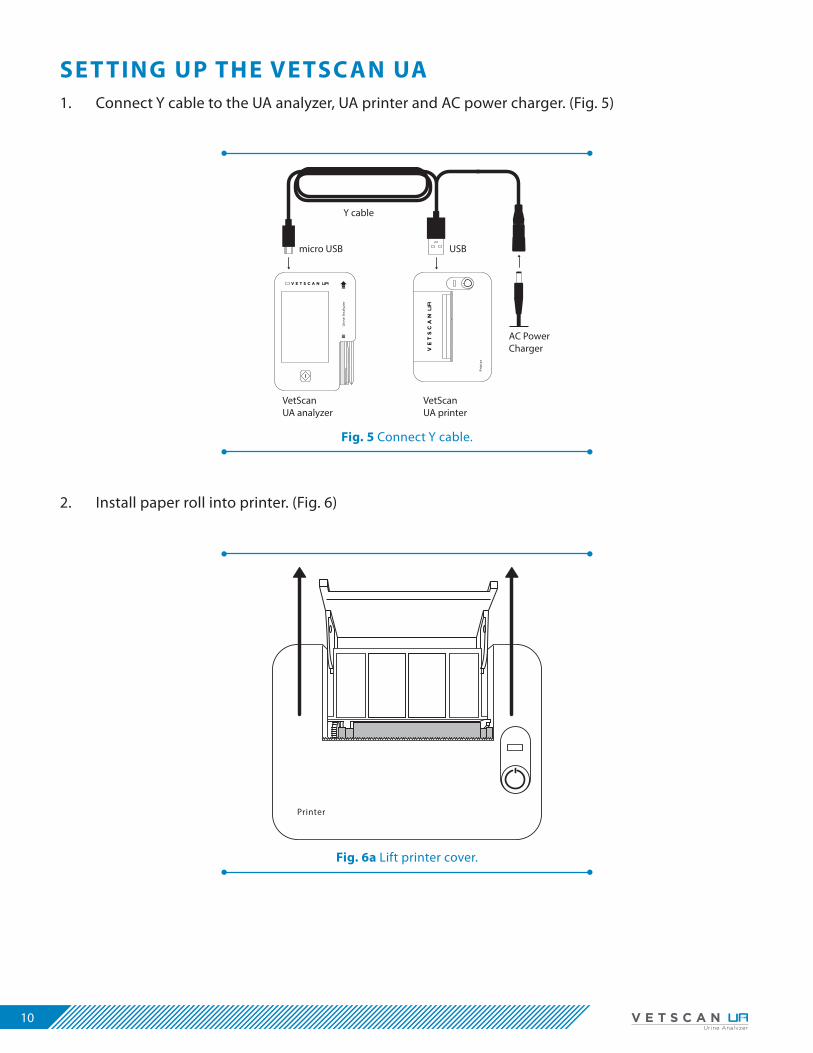
SET TING UP THE VETSC AN UA1. Connect Y cable to the UA analyzer, UA printer and AC power charger. (Fig. 5)
Printer
Fig. 5 Connect Y cable.
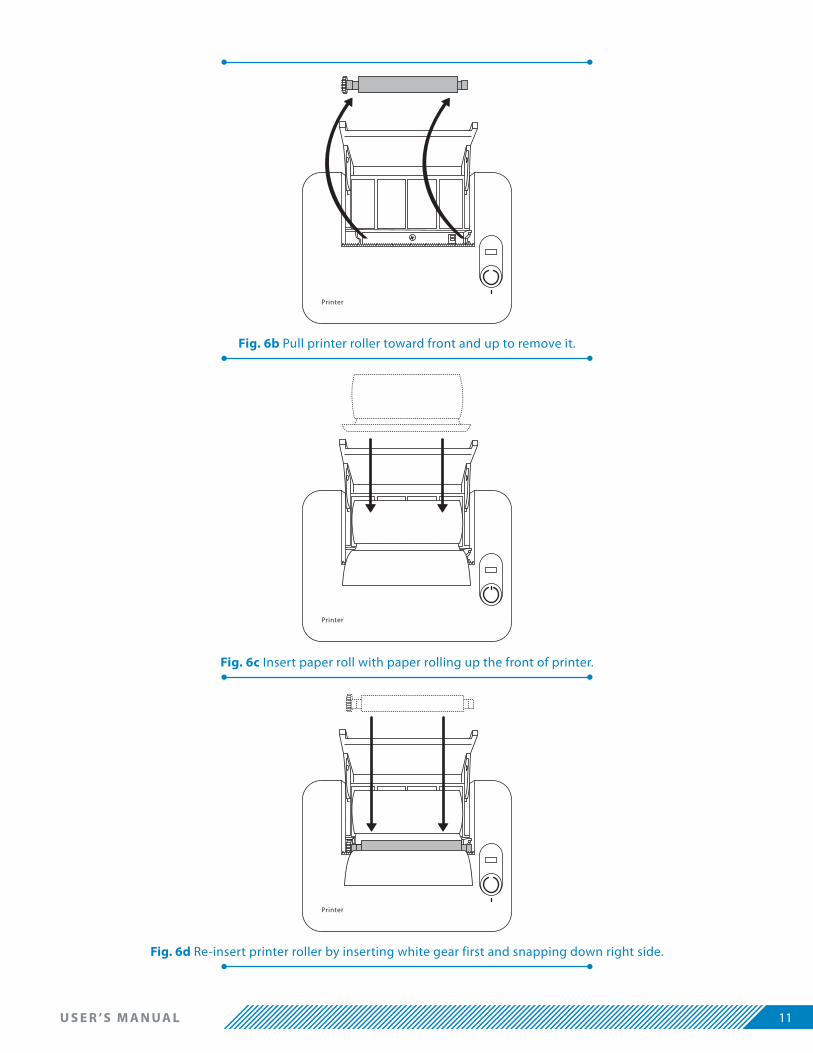
2. Install paper roll into printer. (Fig. 6)
Fig. 6a Lift printer cover.
U S E R ’ S M A N U A L 11
Fig. 6b Pull printer roller toward front and up to remove it.
Printer
Printer
Fig. 6c Insert paper roll with paper rolling up the front of printer.
Fig. 6d Re-insert printer roller by inserting white gear first and snapping down right side.
Printer
12
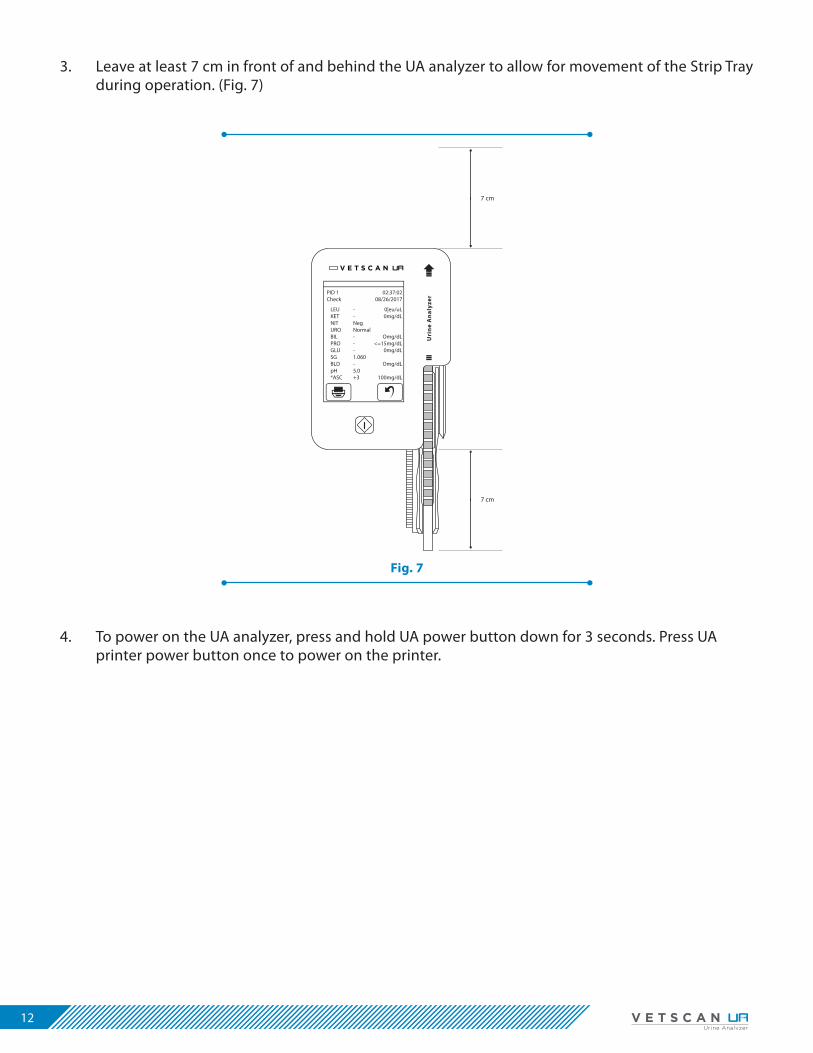
3. Leave at least 7 cm in front of and behind the UA analyzer to allow for movement of the Strip Tray during operation. (Fig. 7)
Uri
ne
An
alyz
er
PID 1Check
LEUKETNITUROBILPROGLUSGBLDpH*ASC
--NegNormal---1.060-5.0+3
0|eu/uL0mg/dL
Omg/dL<=15mg/dL
0mg/dL
Omg/dL
100mg/dL
02:37:0208/26/2017
7 cm
7 cm
Fig. 7
4. To power on the UA analyzer, press and hold UA power button down for 3 seconds. Press UA printer power button once to power on the printer.
U S E R ’ S M A N U A L 13
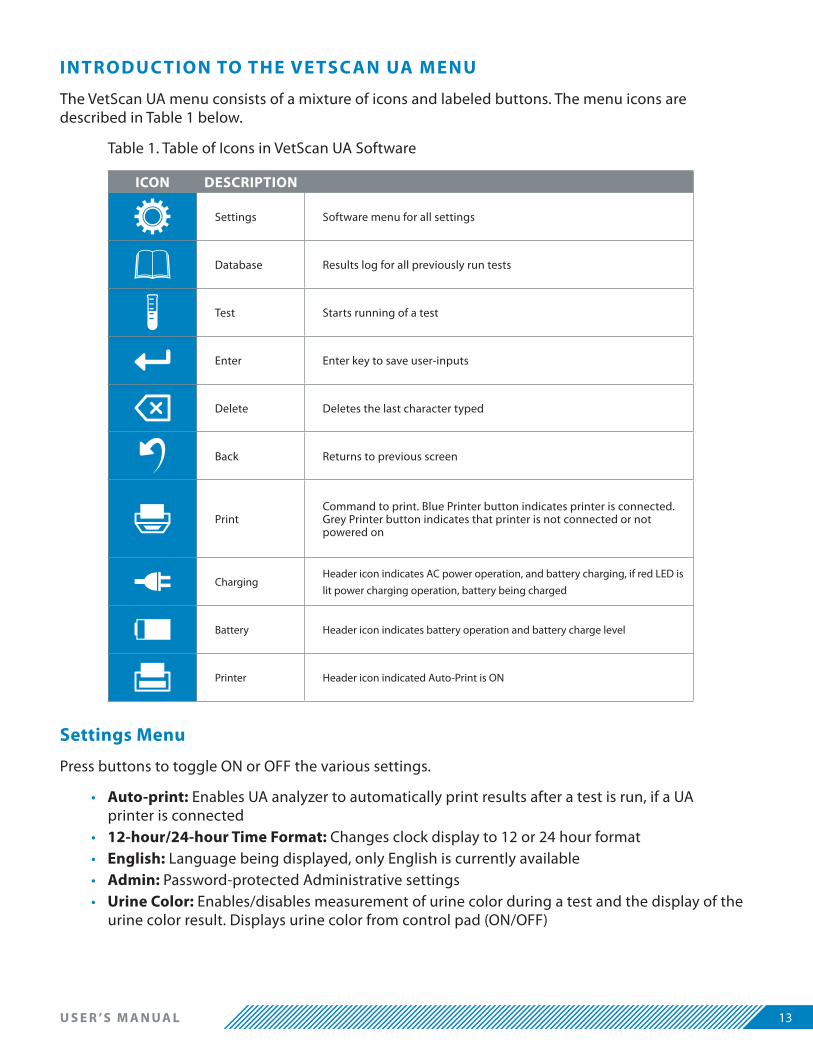
INTRODUC TION TO THE VETSC AN UA MENU
The VetScan UA menu consists of a mixture of icons and labeled buttons. The menu icons are described in Table 1 below.
Table 1. Table of Icons in VetScan UA Software
ICON DESCRIPTION
Settings Software menu for all settings
Database Results log for all previously run tests
Test Starts running of a test
Enter Enter key to save user-inputs
Delete Deletes the last character typed
Back Returns to previous screen
PrintCommand to print. Blue Printer button indicates printer is connected. Grey Printer button indicates that printer is not connected or not powered on
ChargingHeader icon indicates AC power operation, and battery charging, if red LED is lit power charging operation, battery being charged
Battery Header icon indicates battery operation and battery charge level
Printer Header icon indicated Auto-Print is ON
Settings Menu
Press buttons to toggle ON or OFF the various settings.
• Auto-print: Enables UA analyzer to automatically print results after a test is run, if a UA printer is connected
• 12-hour/24-hour Time Format: Changes clock display to 12 or 24 hour format• English: Language being displayed, only English is currently available • Admin: Password-protected Administrative settings• Urine Color: Enables/disables measurement of urine color during a test and the display of the
urine color result. Displays urine color from control pad (ON/OFF)
14
• USB Send: Displays status of setting for an automatic transmission of results from the micro-USB port
• Unit (SI/CON): Changes displayed Units for results between SI and Conventional
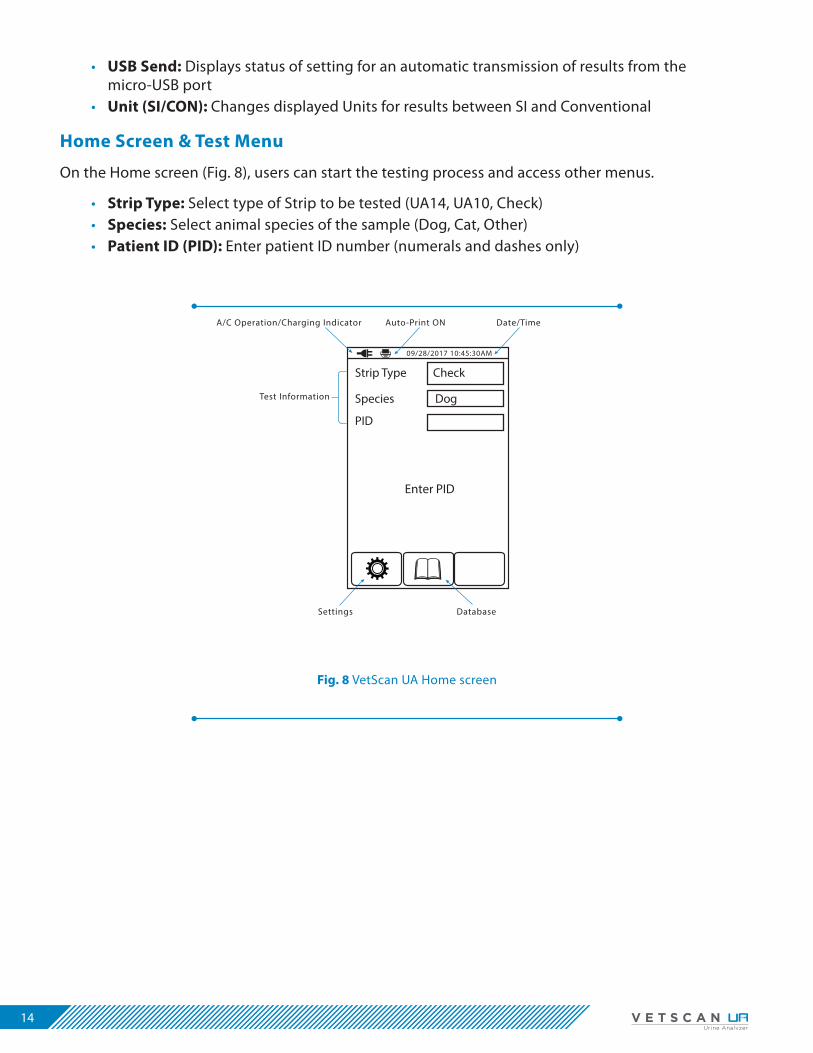
Home Screen & Test Menu
On the Home screen (Fig. 8), users can start the testing process and access other menus.
• Strip Type: Select type of Strip to be tested (UA14, UA10, Check)• Species: Select animal species of the sample (Dog, Cat, Other)• Patient ID (PID): Enter patient ID number (numerals and dashes only)
Strip Type Check
Species Dog
PID
Enter PID
A/C Operation/Charging Indicator Auto-Print ON Date/Time
Settings Database
Test Information
09/28/2017 10:45:30AM
Fig. 8 VetScan UA Home screen
U S E R ’ S M A N U A L 15
RUNNING A SAMPLE
URINE SAMPLE COLLEC TION
Urine samples for use with the VetScan UA may be collected in each of three different ways.
• Cystocentesis: Insert a small needle into the bladder through the skin and draw urine sterilely into the syringe for sampling and culture, if needed.
• Free catch (mid-stream): Using a sterile urine collection jar, collect a mid-stream urine sample. This is not sterile due to contamination from the urethra and sexual organs. Culture is not recommended for this type of sample.
• Catheter: Sterilely place a urinary catheter within the urethra and advance it into the bladder. Collect the sample using a sterile syringe. Sample may be used for testing and culture if needed.
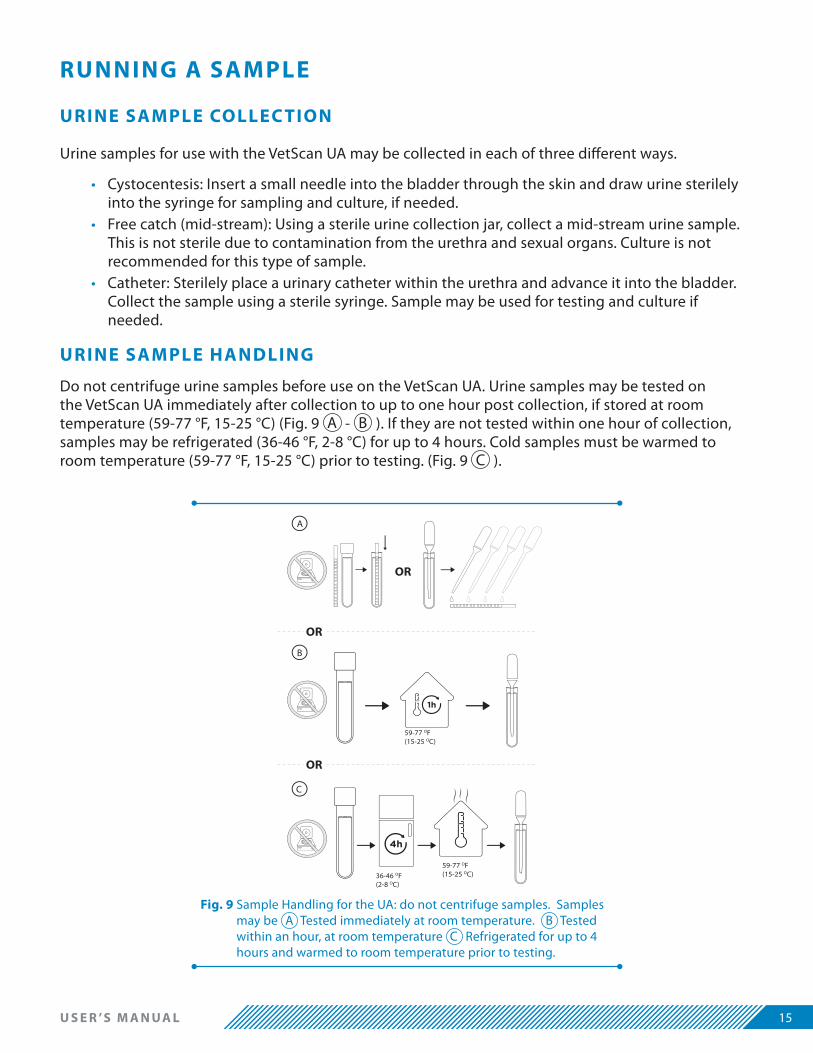
URINE SAMPLE HANDLING
Do not centrifuge urine samples before use on the VetScan UA. Urine samples may be tested on the VetScan UA immediately after collection to up to one hour post collection, if stored at room temperature (59-77 °F, 15-25 °C) (Fig. 9 A - B ). If they are not tested within one hour of collection, samples may be refrigerated (36-46 °F, 2-8 °C) for up to 4 hours. Cold samples must be warmed to room temperature (59-77 °F, 15-25 °C) prior to testing. (Fig. 9 C ).
Fig. 9 Sample Handling for the UA: do not centrifuge samples. Samples may be A Tested immediately at room temperature. B Tested within an hour, at room temperature C Refrigerated for up to 4 hours and warmed to room temperature prior to testing.
A
B
C
OR
59-77 OF (15-25 OC)36-46 OF
(2-8 OC)
59-77 OF (15-25 OC)
OR
OR

16
MATERIALS NEEDED FOR TESTING
• VetScan UA analyzer• Fresh urine sample• Dropper/pipette (optional)• Lint-free absorbent paper• Gloves• VetScan UA Test strips
SET UP FOR TESTING
1. Place the UA analyzer on a stable, flat surface.
2. Power on UA analyzer (and printer, if desired).
3. Be sure to leave space at the ends of the UA to allow for movement of the Strip Tray. (Fig. 7)
4. Check that the Strip Tray is clean and dry before starting a test. Clean Strip Tray if needed (See Maintenance).
RUNNING A TEST
1. Remove a UA test strip from the tube. Tightly recap the tube immediately.
CAUTION: Be sure to leave desiccant packs inside the Strip tube and to keep the tube tightly capped. Exposure to humidity will decrease the usable life of strips and may change results from strips exposed to humidity. Do not run expired Strips (those that were opened more than 90 days ago or have passed the expiration date).
2. Enter test information (Fig. 10)
Select Strip Type (UA14, UA10 or Check). NOTE: selecting the correct Strip Type is important as the analyzer will only scan for the Strip Type selected. Select Species (Dog, Cat, Other). Enter Patient ID (PID) – PID may be up to 13 numerals long and include hyphens.
3. Press Test (Test Tube icon) button to start test.
4. Countdown timer appears. Perform the next three steps before the timer reaches 35. The Test strip must be placed on Strip Tray before timer reaches 35 (Fig. 10).
Strip Type UA14
Species Dog
PID 1234
Prepare to apply urine
Press Test Tube to run
Strip Type UA14
Species Dog
PID
Enter PID
Select Strip Type,Species and enter PID
Touch Test button(test tube)
Countdown timerstarts
Strip Type UA14
Species Dog
PID 1234
When beeping starts:Quickly apply urineBlot edge of stripPlace strip on holder.Testing. . .
Cancel
60
Fig. 10 Enter Patient Information
U S E R ’ S M A N U A L 17
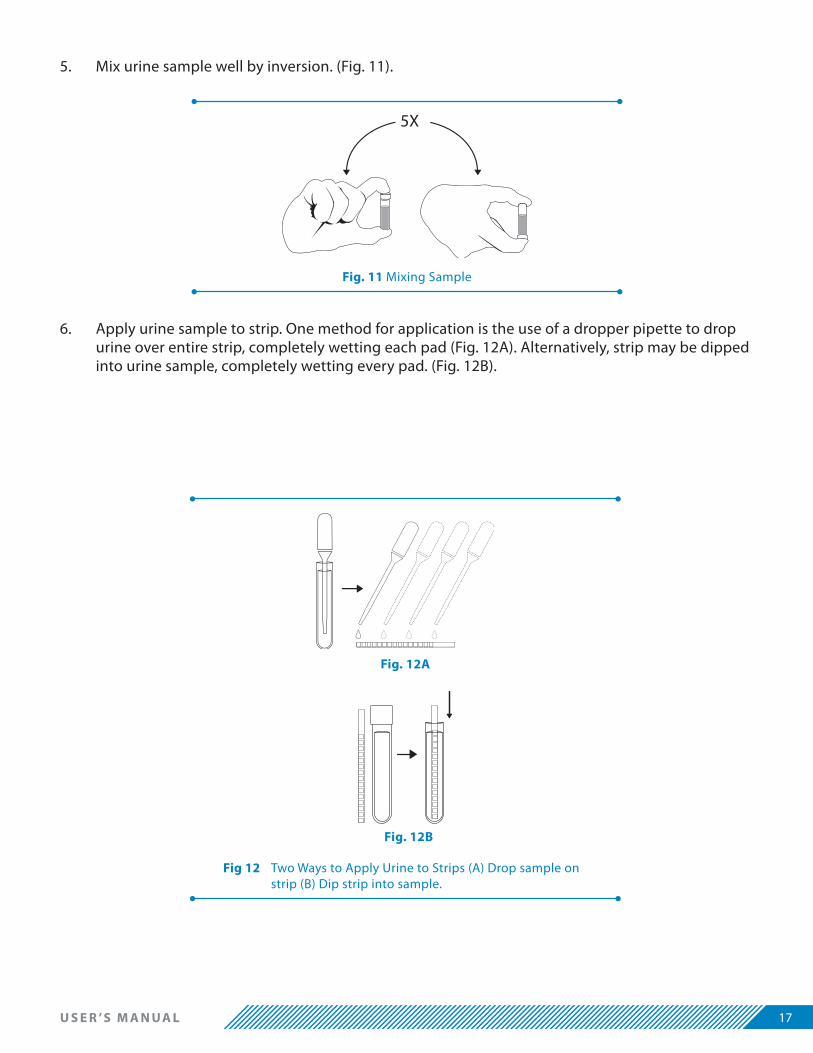
5. Mix urine sample well by inversion. (Fig. 11).
5X
6. Apply urine sample to strip. One method for application is the use of a dropper pipette to drop urine over entire strip, completely wetting each pad (Fig. 12A). Alternatively, strip may be dipped into urine sample, completely wetting every pad. (Fig. 12B).
Fig. 11 Mixing Sample
Fig 12 Two Ways to Apply Urine to Strips (A) Drop sample on strip (B) Dip strip into sample.
Fig. 12A
Fig. 12B

18
7. Blot long edge of strip on absorbent paper to remove excess urine. DO NOT blot the top surface of the pads to avoid contamination (Fig. 13). Work quickly to blot excess urine.
8. Place strip on the UA Strip Tray. The end of the strip should align with the end of the trough in the Strip Tray, approximately where the top cover of the UA analyzer is indented (Fig. 14). This step MUST be completed before the countdown timer reaches 35 as the Strip Tray will begin to slide into the analyzer. The UA analyzer will time the reactions and scan when appropriate.
WARNING! If the Strip Tray has already moved into the analyzer to start scanning before the strip is placed in the tray, the run must be canceled. For best results, a new strip will have to be wetted to restart the testing.
Uri
ne
An
alyz
er
Strip Type UA14
Species Dog
PID 1234
When beeping starts:Quickly apply urineBlot edge of stripPlace strip on holder.Testing. . .
Cancel
35
35s
Fig. 13 Blotting long edge of strip.
Fig. 14 Insert Strip onto Strip Tray.
U S E R ’ S M A N U A L 19
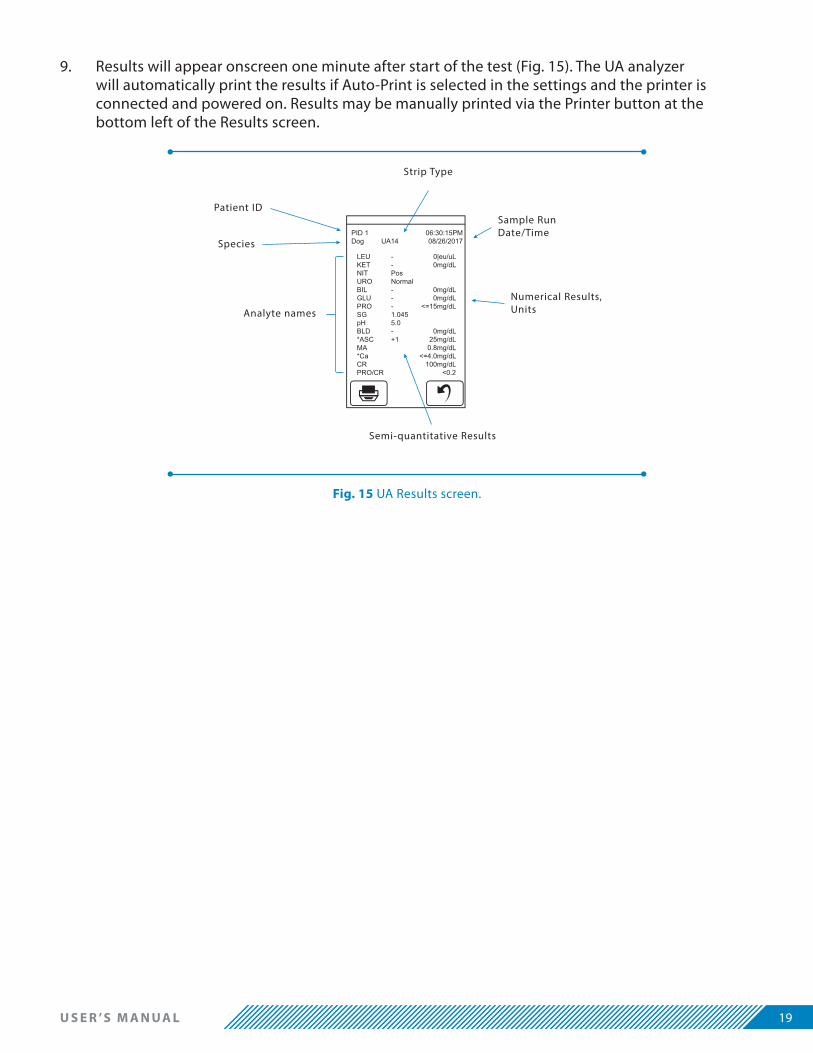
9. Results will appear onscreen one minute after start of the test (Fig. 15). The UA analyzer will automatically print the results if Auto-Print is selected in the settings and the printer is connected and powered on. Results may be manually printed via the Printer button at the bottom left of the Results screen.
PID 1Dog UA14
LEUKETNITUROBILGLUPROSGpHBLD*ASCMA*CaCRPRO/CR
--PosNormal---1.0455.0-+1
0|eu/uL0mg/dL
0mg/dL0mg/dL
<=15mg/dL
0mg/dL25mg/dL0.8mg/dL
<=4.0mg/dL100mg/dL
<0.2
06:30:15PM08/26/2017
Strip Type
Analyte names
Species
Patient IDSample RunDate/Time
Numerical Results,Units
Semi-quantitative Results
Fig. 15 UA Results screen.

20
RE VIE WING PRE VIOUS RESULTS – DATABASEThe VetScan UA analyzer stores up to 500 previously run tests.
RE VIE WING STORED RESULTS
1. From the Home screen, touch the Database button (book icon).
2. Use the two arrows on the right side to scroll through the Database. For faster scrolling, hold an arrow button down to skip through database by increments of ten (10) records at a time.
3. If a printer is connected, the Printer icon in the bottom left will be in blue/white. If it is disconnected, it will be greyed out.
Printer button
4. To print a stored result, scroll to the result in the database and press the printer button.
5. To exit the Database, touch the Back button.
U S E R ’ S M A N U A L 21
MAINTENANCEThe UA analyzer and printer require very little maintenance, but to ensure longevity of the system and accuracy of results, they should be cleaned on a regular basis to remove any contaminating urine residue or debris that might interfere with proper function.
NOTE: For instructions on handling and cleaning biohazardous materials, consult the biosafety guidelines provided by your facility.
WARNING! The VetScan UA does not have any user serviceable parts inside the analyzer. Do not open the analyzer as opening the analyzer will void the warranty. Contact Abaxis Technical Support if you suspect a problem inside the analyzer.
CLEANING THE STRIP TR AY
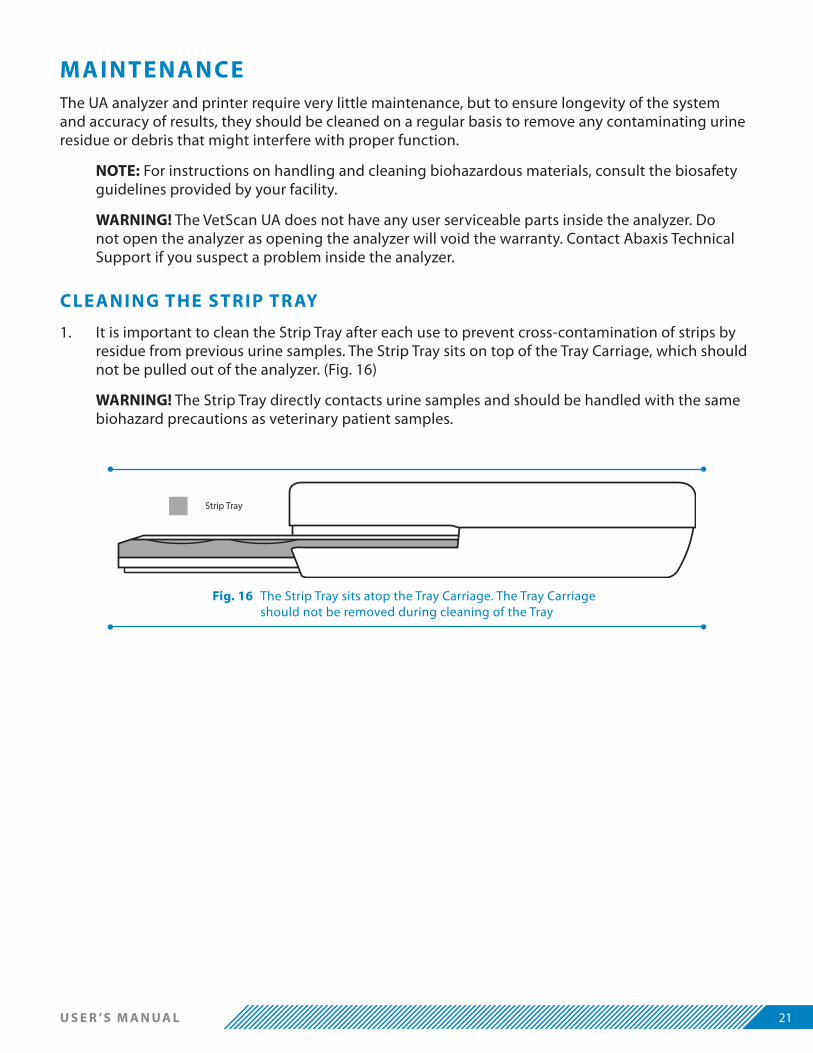
1. It is important to clean the Strip Tray after each use to prevent cross-contamination of strips by residue from previous urine samples. The Strip Tray sits on top of the Tray Carriage, which should not be pulled out of the analyzer. (Fig. 16)
WARNING! The Strip Tray directly contacts urine samples and should be handled with the same biohazard precautions as veterinary patient samples.
Strip Tray
Fig. 16 The Strip Tray sits atop the Tray Carriage. The Tray Carriage should not be removed during cleaning of the Tray
22
2. To clean the Strip Tray, first power on the UA analyzer. Remove the Strip Tray by grasping the upper right side of the tray (Fig. 17A). Lift up and gently pull Strip Tray (but not the Tray Carriage) in the direction shown (Fig. 17B). The Strip Tray should lift off easily.
Urine Analyzer
PID 1
Check
LEUKETN
ITU
ROBILPROG
LUSGBLDpH*A
SC
--Neg
Norm
al---1.060-5.0+3
0|eu/uL0m
g/dL
Om
g/dL<=15m
g/dL0m
g/dL
Om
g/dL
100mg/dL
02:37:0208/26/2017
Fig. 17A
Fig. 17B
3. Clean the Strip Tray using alcohol wipes or a lint-free tissue with mild soap and water to remove all residual urine (Fig. 18). Never use corrosive cleaners, abrasive detergents or rough material that may damage the surface. Cleaning the perimeter of the inner tray will prolong the useful life of the system. Allow Strip Tray to completely dry prior to replacing it into the analyzer.
Fig. 18 Wipe Urine Residue from Strip Tray
Fig. 17 Removing the Strip Tray. A) Grasp corner of Strip Tray B) Lift up and gently pull

U S E R ’ S M A N U A L 23
4. Replace Strip Tray into the analyzer. Insert the end with the white dot first, aligning the guides on the bottom of the Strip Tray with the slots in the Tray Carriage (see arrows, Fig. 19). Tray will gently snap into place.
Fig. 19 Re-insert Strip Tray
5. If the Carriage is soiled and requires cleaning, contact Abaxis Technical Support.
CLEANING THE VETSC AN UA ANALYZER
1. Wipe the analyzer clean with a soft cloth or towel to remove dust and residue. Do not allow moisture to get onto the touch screen.
WARNING! The VetScan UA does not have any user serviceable parts inside the analyzer. Do not open the analyzer as opening the analyzer will void the warranty. Contact Abaxis Technical Support if you suspect a problem inside the analyzer.
WARNING! Do not blow high pressure air into the inside of the analyzer to clean it.
WARNING! To prevent electrical shock, always turn off and unplug the UA analyzer before cleaning it. Unplug the power supply from the wall or disconnect the UA analyzer from the Y cable. Do not obstruct the power supply.
RUNNING A CHECK STRIP
1. A Check Strip is an artificial test strip that is intended to be run DRY, with no sample or liquid, in order to test the UA analyzer for proper operation. Run a Check Strip if the analyzer is being used for the first time, has not been used for more than 1 year, or is providing unexpected results. Two (2) identical Check Strips are provided with the VetScan UA analyzer kit. Only use Check Strips that are undamaged, not discolored and are not broken.
2. Clean the Strip Tray if it is wet or has urine residue to prevent contamination of the Check Strips. (See Cleaning the Strip Tray)
24
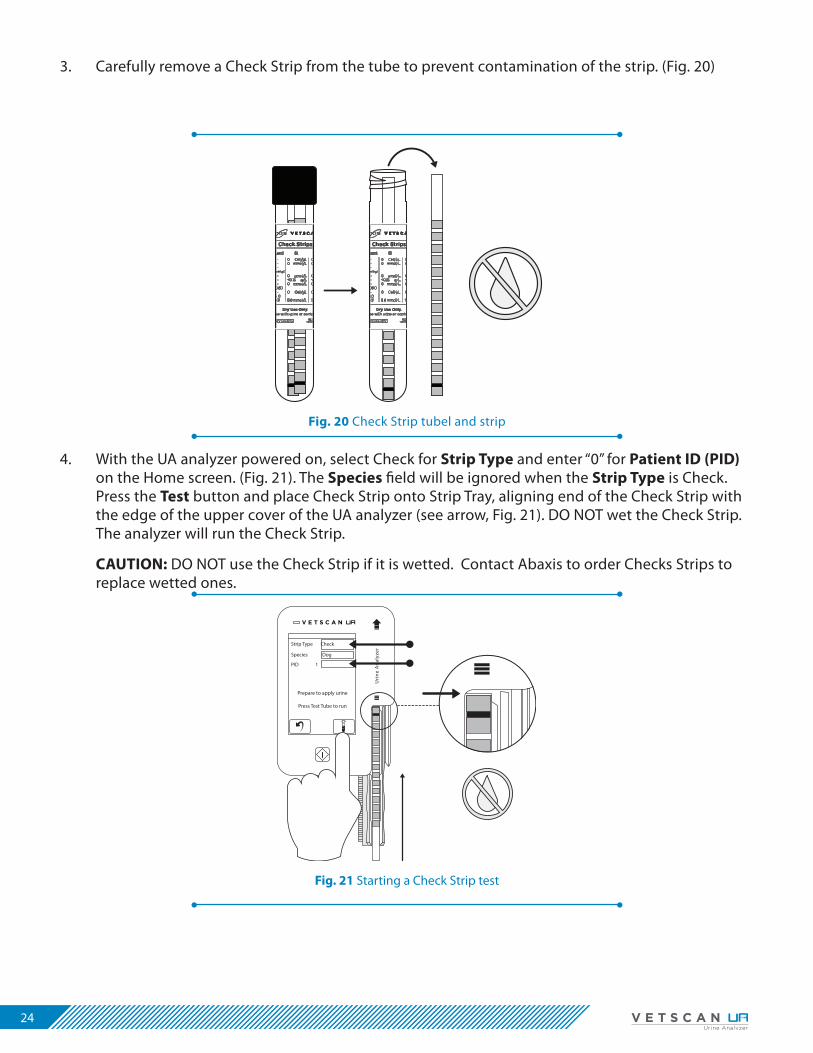
3. Carefully remove a Check Strip from the tube to prevent contamination of the strip. (Fig. 20)
Fig. 20 Check Strip tubel and strip
4. With the UA analyzer powered on, select Check for Strip Type and enter “0” for Patient ID (PID) on the Home screen. (Fig. 21). The Species field will be ignored when the Strip Type is Check. Press the Test button and place Check Strip onto Strip Tray, aligning end of the Check Strip with the edge of the upper cover of the UA analyzer (see arrow, Fig. 21). DO NOT wet the Check Strip. The analyzer will run the Check Strip.
CAUTION: DO NOT use the Check Strip if it is wetted. Contact Abaxis to order Checks Strips to replace wetted ones.
Uri
ne
An
alyz
er
Strip Type Check
Species Dog
PID 1
Prepare to apply urine
Press Test Tube to run
Fig. 21 Starting a Check Strip test
U S E R ’ S M A N U A L 25
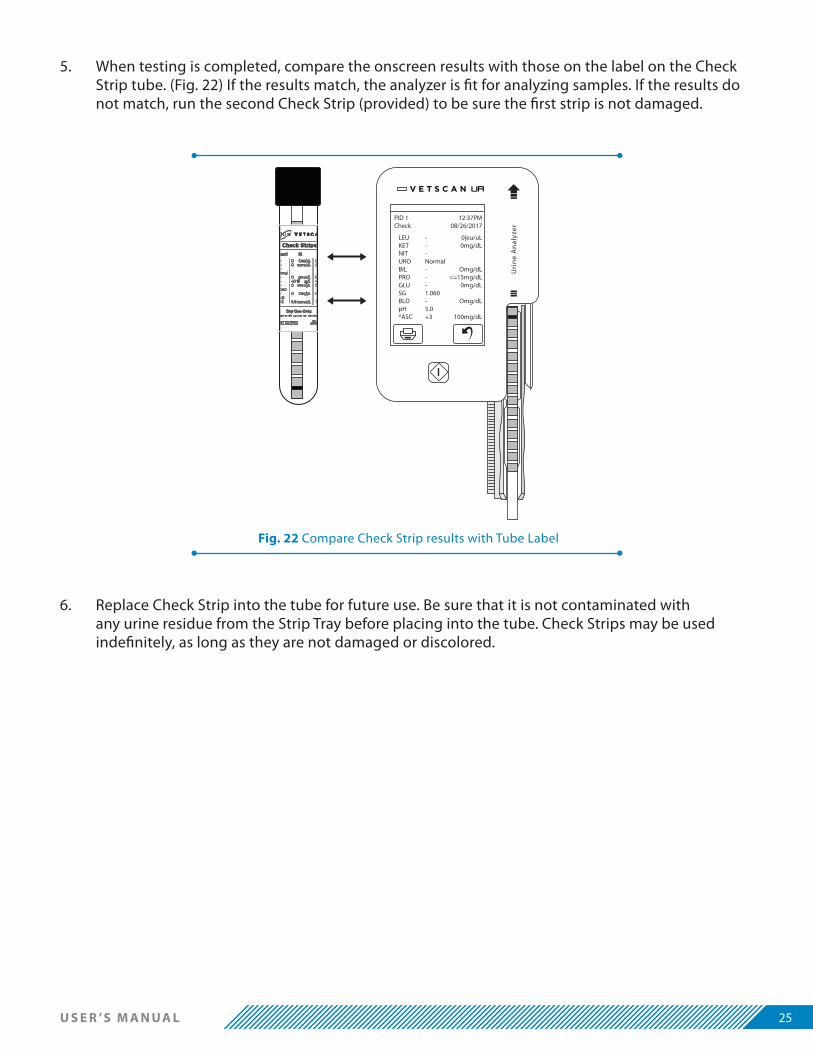
5. When testing is completed, compare the onscreen results with those on the label on the Check Strip tube. (Fig. 22) If the results match, the analyzer is fit for analyzing samples. If the results do not match, run the second Check Strip (provided) to be sure the first strip is not damaged.
Uri
ne
An
alyz
er
PID 1Check
LEUKETNITUROBILPROGLUSGBLDpH*ASC
---Normal---1.060-5.0+3
0|eu/uL0mg/dL
Omg/dL<=15mg/dL
0mg/dL
Omg/dL
100mg/dL
12:37PM08/26/2017
Fig. 22 Compare Check Strip results with Tube Label
6. Replace Check Strip into the tube for future use. Be sure that it is not contaminated with any urine residue from the Strip Tray before placing into the tube. Check Strips may be used indefinitely, as long as they are not damaged or discolored.
26
RUNNING UA CONTROLS
1. UA Controls are liquid control samples used to check the performance of the entire VetScan UA analyzer system (UA analyzer and strips). UA controls kits contain two levels of control solution, Control I (negative control) and Control II (positive control). Run UA test strips with UA control samples (one strip for each of the UA controls) if the analyzer has been inactive for more than one year or if the analyzer is producing unexpected results. NOTE: Running at least the Control II with one strip from each new tube is a good practice when switching to a new lot of strips.
2. Remove UA Controls from the refrigerator prior to use to allow controls to warm to room temperature (59-77 °F, 15-25 °C), typically about 15 minutes. Record the date of opening on the box if this is the first use of the kit.
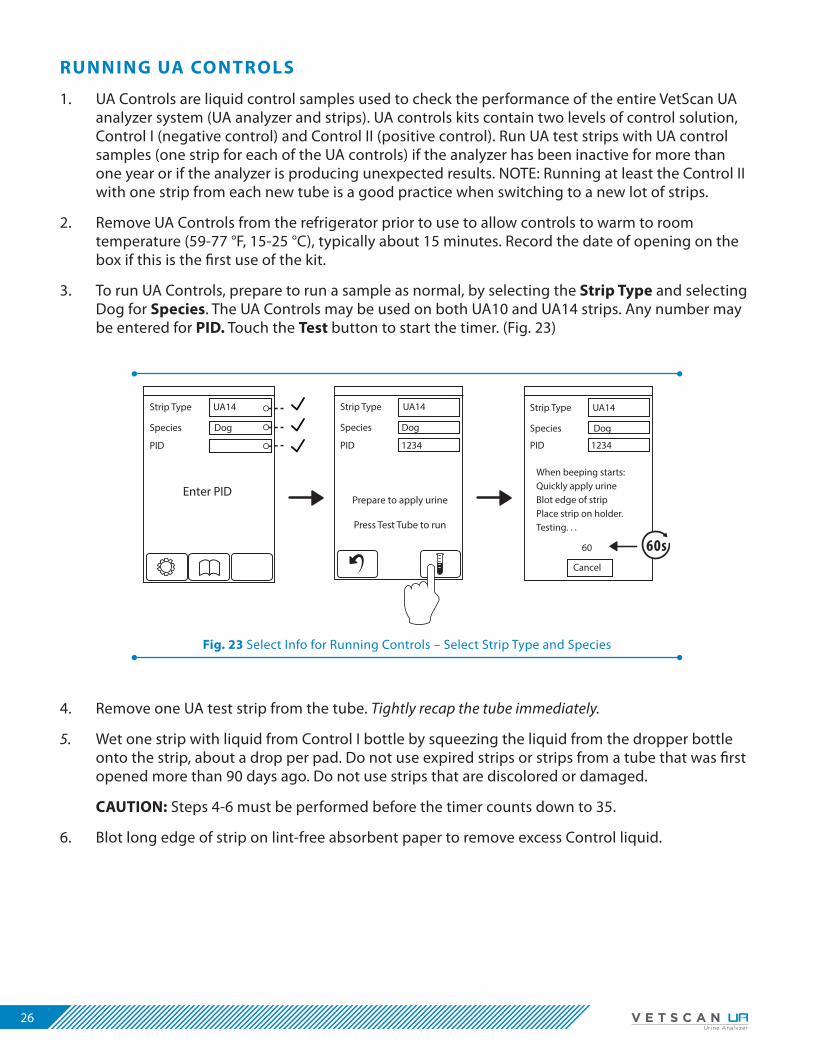
3. To run UA Controls, prepare to run a sample as normal, by selecting the Strip Type and selecting Dog for Species. The UA Controls may be used on both UA10 and UA14 strips. Any number may be entered for PID. Touch the Test button to start the timer. (Fig. 23)
Strip Type UA14
Species Dog
PID
Enter PID
Strip Type UA14
Species Dog
PID 1234
Prepare to apply urine
Press Test Tube to run
Strip Type UA14
Species Dog
PID 1234
When beeping starts:Quickly apply urineBlot edge of stripPlace strip on holder.Testing. . .
Cancel
60 60s
Fig. 23 Select Info for Running Controls – Select Strip Type and Species
4. Remove one UA test strip from the tube. Tightly recap the tube immediately.
5. Wet one strip with liquid from Control I bottle by squeezing the liquid from the dropper bottle onto the strip, about a drop per pad. Do not use expired strips or strips from a tube that was first opened more than 90 days ago. Do not use strips that are discolored or damaged.
CAUTION: Steps 4-6 must be performed before the timer counts down to 35.
6. Blot long edge of strip on lint-free absorbent paper to remove excess Control liquid.
U S E R ’ S M A N U A L 27
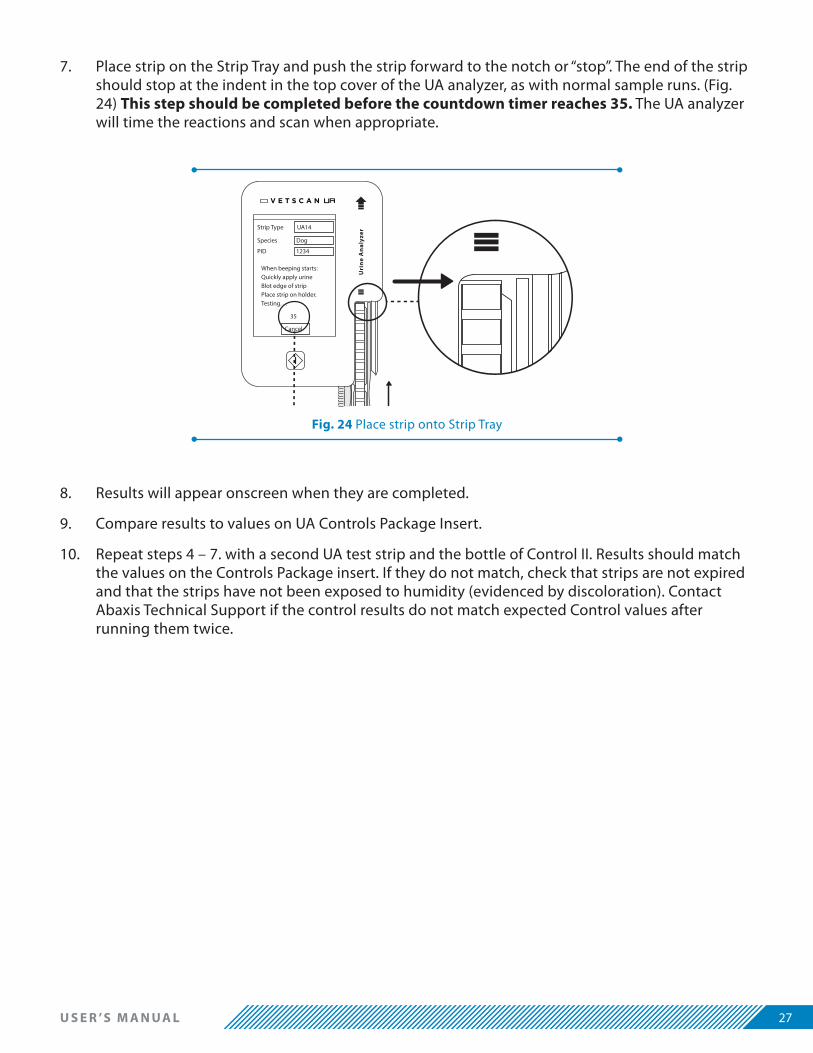
7. Place strip on the Strip Tray and push the strip forward to the notch or “stop”. The end of the strip should stop at the indent in the top cover of the UA analyzer, as with normal sample runs. (Fig. 24) This step should be completed before the countdown timer reaches 35. The UA analyzer will time the reactions and scan when appropriate.
Uri
ne
An
alyz
er
Strip Type UA14
Species Dog
PID 1234
When beeping starts:Quickly apply urineBlot edge of stripPlace strip on holder.Testing. . .
Cancel
35
35s
Fig. 24 Place strip onto Strip Tray
8. Results will appear onscreen when they are completed.
9. Compare results to values on UA Controls Package Insert.
10. Repeat steps 4 – 7. with a second UA test strip and the bottle of Control II. Results should match the values on the Controls Package insert. If they do not match, check that strips are not expired and that the strips have not been exposed to humidity (evidenced by discoloration). Contact Abaxis Technical Support if the control results do not match expected Control values after running them twice.
28
APPENDIX A: TROUBLESHOOTINGThe VetScan UA instrument hardware is not intended to be serviced by operators. Any UA instrument that requires servicing should be returned to Abaxis for repair or replacement. Do not open the analyzer as opening the analyzer will void the warranty. Contact Abaxis Technical Support if you suspect a problem inside the analyzer.
FREQUENTLY ASKED QUESTIONS?
1. What if I get an Error code screen?
• Follow the recovery instructions onscreen (and see Appendix C for additional troubleshooting steps).
2. The Strip Tray moved before I put the wetted strip on it. Can I still run the strip?
• Best practice is to re-run the entire test again by applying sample to a new strip as the timer ensures that reactions are run to the same standard each time a sample is run.
3. How does running a cold strip or a cold sample affect my results?
• In general, results will be falsely lowered. For example, LEU, GLU, CR will all be falsely decreased with cold samples and/or cold strips. BIL and URO will also be decreased with cold samples.
4. If I accidentally pull the Tray Carriage out, how do I replace it?
The Tray Carriage may be mistakenly removed when pulling out the Strip Tray. The analyzer will not function properly when the Tray Carriage is removed.
• If the Tray Carriage is mistakenly pulled out of the analyzer and Error-7 is displayed on the screen and the Carriage is still partially in the analyzer, simply push the Tray Carriage into the analyzer by 1 cm and then power off. The analyzer will pull the Carriage to home position and recover.
• If the Carriage is mistakenly completely removed from the analyzer, power the analyzer off. Remove the Strip Tray from the Carriage (see Cleaning the Strip Tray).
• Position Carriage so that the gears are on the left, with the tab pointing straight up (Fig. 25).

U S E R ’ S M A N U A L 29
Fig. 26A
Fig. 26B
Fig. 26 A) Insert Carriage Tab B) Insert blue notch in Carriage
Fig. 25 Position Strip Tray with gear teeth to Left and tab pointed up.

30
• Insert the Carriage into the analyzer, inserting the tab into the notch in the white case (Fig. 26A). A notch in the blue case should fit into the bottom of the carriage (Fig. 26B).
• Gently push Carriage into the analyzer with increasing force until the Carriage is caught by the gears (push in about one cm).
• Replace Strip Tray.
• Power analyzer ON and OFF and ON again to allow Carriage to move to home position. Analyzer should be ready to run samples. Contact Abaxis Technical Support for more information on this process.
ABAXIS RESOURCES
Abaxis provides many resources for veterinary laboratories and hospitals. The Abaxis website (www.abaxis.com) contains useful information for running the VetScan UA Urine analyzer, VetScan UA printer and the VetScan UA Test Strips. It also contains links to technical notes, manuals, product information, and technical support information as well as technical resources on a variety of applications related to the VetScan UA analyzer and printer.
Table 2 lists Abaxis resources and how to locate what you need.
Table 2. Abaxis resources.RESOURCE HOW TO CONTACT
Local Authorized Abaxis Distributors
Find local Abaxis authorized Distributors on the Abaxis website (www.abaxis.com).
Technical InformationFind technical information, package inserts and manuals on the Reference Center on the Abaxis website (www.abaxis.com).
Technical Support
Find local technical support on the phone, contact your nearest Abaxis office. For technical support in the United States and Canada, call 1-800-822-2947 (toll-free phone), and select option 2 for technical/customer support option or dial +49 6155 780 210 for technical support for Rest of World.

U S E R ’ S M A N U A L 31
APPENDIX B: UA RESULTS BINSANALYTE RESULT TYPE SPECIES SEMI-QUANTITATIVE SYMBOL AND CONCENTRATION
LEUSemi-Quantitative * - +/- +1 +2 +3
Cell/μL (CON) * 0 15 70 125 500
Cell/μL (SI) * 0 15 70 125 500
KETSemi-Quantitative * - +/- +1 +2 +3
mg/dL (CON) * 0 5 15 40 ≥80
mmol/L (SI) * 0 0.5 1.5 4 ≥8.0
NITSemi-Quantitative (CON) * - +
Semi-Quantitative (SI) * - +
UROSemi-Quantitative *
Normal
+1 +2 +3
mg/dL (CON) * 2.0 4.0 ≥8.0
μmol/L (SI) * 33 66 ≥131
BILSemi-Quantitative * - +1 +2 +3
mg/dL (CON) * 0 0.5 2 6
μmol/L (SI) * 0 8.6 33 100
GLUSemi-Quantitative * - +/- +1 +2 +3 +4
mg/dL (CON) * 0 5 100 250 500 ≥1000
mmol/L (SI) * 0 2.8 5.5 14 28 ≥55
PROSemi-Quantitative * - +/- +1 +2 +3
mg/dL (CON) * <15 15 30 100 300
g/L (SI) * <0.15 0.15 0.3 1 3
SG (no units) * 1.000 1.010 1.015 1.020 1.030 1.040 1.045 1.050 1.060
pH (no units) * 5.0 5.5 6.0 6.5 7.0 7.5 8.0 8.5 9.0
BLDSemi-Quantitative * - +/- +1 +2 +3
Cell/μL (CON) * 0 10 25 80 200
Cell/μL (SI) * 0 10 25 80 200
ASCSemi-Quantitative * - +/- +1 +2 +3
mg/dL (CON) * 0 10 25 50 100
mmol/L (SI) * 0 0.6 1.4 2.8 5.6
MAmg/dL (CON)
Dog & Other <2.5 ≥2.5
Cat <2.5 ≥2.5
mg/L (SI)Dog & Other <25 ≥25
Cat <25 ≥25
Camg/dL (CON) * ≤4.0 10 20 30 ≥40
mmol/L (SI) * ≤1.0 2.5 5 7.5 ≥10
CRmg/dL (CON) * ≤10 50 100 200 ≥300
mmol/L (SI) * ≤0.9 4.4 8.8 17.6 ≥26.4
PRO/CR(no units) CON & SI same
Dog & Other <0.2 ≥0.2 to <0.5 ≥0.5 to <2.0 ≥2.0
Cat <0.2 ≥0.2 to <0.4 ≥0.4 to <2.0 ≥2.0
Color (no units) * Transparent Yellow Orange Red Green Other
*Not applicable
32
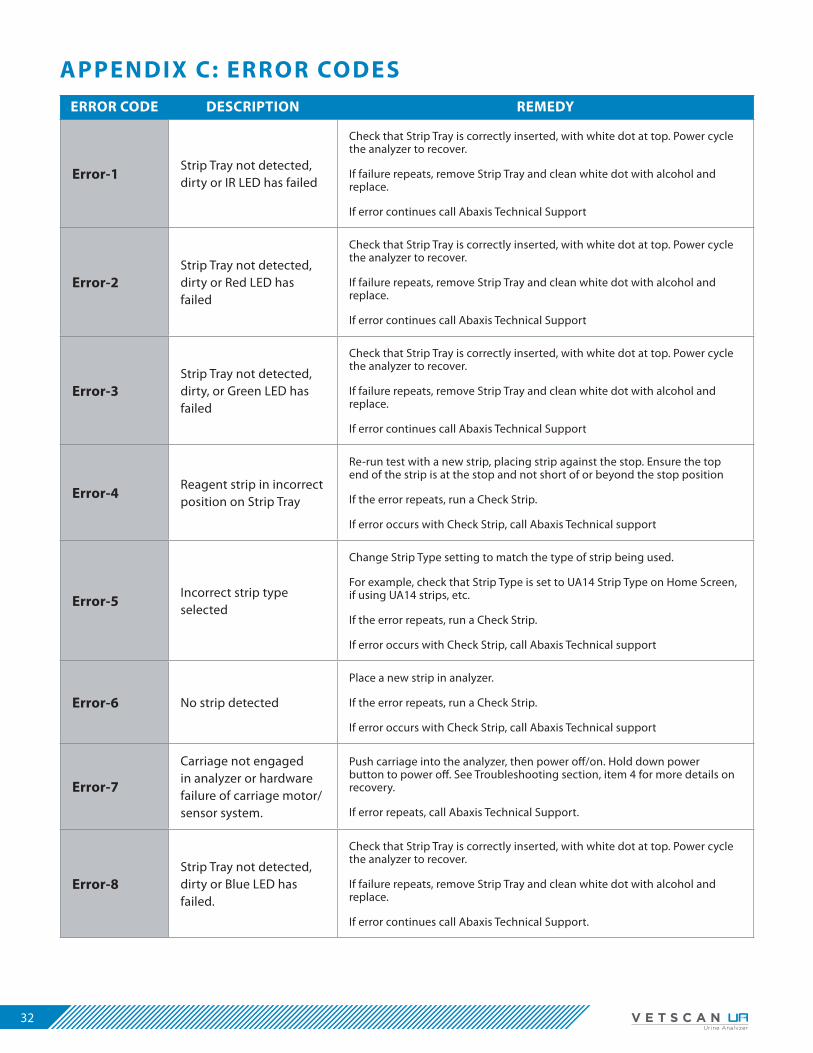
APPENDIX C: ERROR CODESERROR CODE DESCRIPTION REMEDY
Error-1Strip Tray not detected, dirty or IR LED has failed
Check that Strip Tray is correctly inserted, with white dot at top. Power cycle the analyzer to recover.
If failure repeats, remove Strip Tray and clean white dot with alcohol and replace.
If error continues call Abaxis Technical Support
Error-2Strip Tray not detected, dirty or Red LED has failed
Check that Strip Tray is correctly inserted, with white dot at top. Power cycle the analyzer to recover.
If failure repeats, remove Strip Tray and clean white dot with alcohol and replace.
If error continues call Abaxis Technical Support
Error-3Strip Tray not detected, dirty, or Green LED has failed
Check that Strip Tray is correctly inserted, with white dot at top. Power cycle the analyzer to recover.
If failure repeats, remove Strip Tray and clean white dot with alcohol and replace.
If error continues call Abaxis Technical Support
Error-4Reagent strip in incorrect position on Strip Tray
Re-run test with a new strip, placing strip against the stop. Ensure the top end of the strip is at the stop and not short of or beyond the stop position
If the error repeats, run a Check Strip.
If error occurs with Check Strip, call Abaxis Technical support
Error-5Incorrect strip type selected
Change Strip Type setting to match the type of strip being used.
For example, check that Strip Type is set to UA14 Strip Type on Home Screen, if using UA14 strips, etc.
If the error repeats, run a Check Strip.
If error occurs with Check Strip, call Abaxis Technical support
Error-6 No strip detected
Place a new strip in analyzer.
If the error repeats, run a Check Strip.
If error occurs with Check Strip, call Abaxis Technical support
Error-7
Carriage not engaged in analyzer or hardware failure of carriage motor/sensor system.
Push carriage into the analyzer, then power off/on. Hold down power button to power off. See Troubleshooting section, item 4 for more details on recovery.
If error repeats, call Abaxis Technical Support.
Error-8Strip Tray not detected, dirty or Blue LED has failed.
Check that Strip Tray is correctly inserted, with white dot at top. Power cycle the analyzer to recover.
If failure repeats, remove Strip Tray and clean white dot with alcohol and replace.
If error continues call Abaxis Technical Support.
U S E R ’ S M A N U A L 33
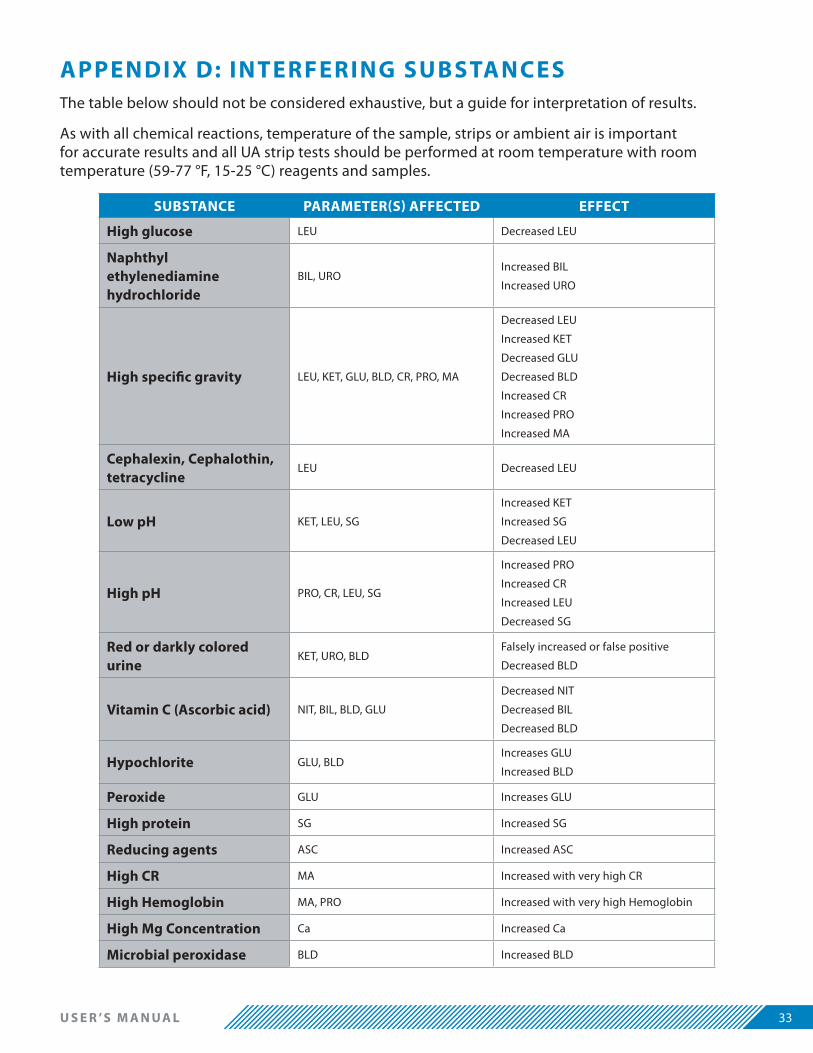
APPENDIX D: INTERFERING SUBSTANCESThe table below should not be considered exhaustive, but a guide for interpretation of results.
As with all chemical reactions, temperature of the sample, strips or ambient air is important for accurate results and all UA strip tests should be performed at room temperature with room temperature (59-77 °F, 15-25 °C) reagents and samples.
SUBSTANCE PARAMETER(S) AFFECTED EFFECT
High glucose LEU Decreased LEU
Naphthyl ethylenediamine hydrochloride
BIL, UROIncreased BIL
Increased URO
High specific gravity LEU, KET, GLU, BLD, CR, PRO, MA
Decreased LEU
Increased KET
Decreased GLU
Decreased BLD
Increased CR
Increased PRO
Increased MA
Cephalexin, Cephalothin, tetracycline
LEU Decreased LEU
Low pH KET, LEU, SG
Increased KET
Increased SG
Decreased LEU
High pH PRO, CR, LEU, SG
Increased PRO
Increased CR
Increased LEU
Decreased SG
Red or darkly colored urine
KET, URO, BLDFalsely increased or false positive
Decreased BLD
Vitamin C (Ascorbic acid) NIT, BIL, BLD, GLU
Decreased NIT
Decreased BIL
Decreased BLD
Hypochlorite GLU, BLDIncreases GLU
Increased BLD
Peroxide GLU Increases GLU
High protein SG Increased SG
Reducing agents ASC Increased ASC
High CR MA Increased with very high CR
High Hemoglobin MA, PRO Increased with very high Hemoglobin
High Mg Concentration Ca Increased Ca
Microbial peroxidase BLD Increased BLD

34
APPENDIX E: VETSC AN UA ANALYZER AND PRINTER SPECIFIC ATIONS
ANALYZER SPECIFIC ATIONS
• Measuring Principle: Reflectance photometry• Measurement Wavelength: 470 nm, 550 nm, 620 nm, 720 nm• Sample Supply Method: Manual dipping or dropper onto the test strip• Throughput: approximately 60 tests / hour• Reaction Time: About 60 seconds/test• Display: Touch screen, which allows entry for Reagent Strips type, Species, and Patient ID for each test,
as well as User Settings and Database review, and displays test results and allows printing.• Database Memory: Stores up 500 samples.• Specific Gravity Correction: Automatically corrected based on pH readings.• Chromaturia Correction: Automatically corrected by color correction test pad.• Data Output: Printing of results or view on screen display only. No data transmission to PC is currently
supported.• Dimension: 120 mm × 83 mm × 31 mm (L × W × H).• Weight: 180 g.• Power Supply: The instrument: 5 V 3 A. The AC adapter: Input: 100 V - 240 V~, 50/60 Hz.• Power Consumption: 5 W instrument
PRINTER SPECIFIC ATIONS
• Printer: Thermal line printer • Printer Paper: Thermal paper• Dimension: 110 mm × 80 mm × 38 mm (L × W × H)• Weight: 180 g (without paper roll)• Operating Voltage Range: 5 V• Power Supply: Printer: 5 V 3 A. The adapter: Input: 100 V - 240 V~, 50/60 Hz• Power Consumption: 6 W• Paper roll capacity – 50 to 55 results per roll
Conditions for Use
ENVIRONMENTAL CONDITION APPROVED USAGE CONDITIONS
Temperature 59 - 86 °F (15-30℃)
Humidity ≤ 80% (Recommended), non-condensing
Location Indoor use only
Rated Input power 100 V - 240 V~, 50/60 Hz
UA Analyzer 5 V, 3 A, input power
UA Printer 5 V, 3 A, input power
U S E R ’ S M A N U A L 35
APPENDIX F: SAFET Y AND REGULATORY COMPLIANCE
Safety Warning Labels
Warning labels posted on the analyzer and in this manual warn you about potential sources of injury or harm. Refer to the Symbols Table to review the meaning of each safety warning label.
Use only the provided power supply and cable when connecting the UA analyzer and printer.
The UA analyzer and the printer have been tested and found to be in compliance with all applicable requirements of the following safety and electromagnetic standards:
Safety Compliance
• IEC 61010-1:2010 Safety Requirements for Electrical Equipment for Measurement, Control and Laboratory Use, Part 1: General Requirements
• IEC 61010-2-081:2015 Safety Requirements for Electrical Equipment for Measurement, Control, and Laboratory use, Part 2-081: Particular Requirements for automatic and semi-automatic laboratory equipment for analysis and other purposes
• CAN/CSA-C22.2 No. 61010-1-12 Safety Requirements for Electrical Equipment for Measurement, Control and Laboratory Use – Part 1: General Requirements
• UL 61010-1:2012 Safety Requirements for Electrical Equipment For Measurement, Control, And Laboratory Use – Part 1: General Requirement
Electromagnetic Compatibility (EMC)
• IEC 61326-1:2012 Electrical Equipment for Measurement Control and Laboratory Use – EMC Requirements – Part 1: General Requirements, Class A
• EN61326-1:2013 Electrical Equipment for Measurement Control and Laboratory Use – EMC Requirements – Part 1: General Requirements, Class A
• EN 61326-2-6:2013 Electrical Equipment for Measurement, Control And Laboratory Use – EMC Requirement- Part 2-6: Particular Requirements – In Vitro Diagnostic (IVD) Medical Equipment
• FCC Part 15 Subpart B:2016

36
FCC Warnings and Notes
• Warning: Changes or modifications to this unit, not expressly approved by Abaxis, could void the user’s authority to operate the equipment.
• Note: This equipment has been tested and found to comply with the limits for a Class A digital device, pursuant to part 15 of the FCC Rules. These limits are designed to provide reasonable production against harmful interference when the equipment is operated in a commercial environment. Operation of this equipment in a residential area is likely to cause harmful interference in which case the user will be required to correct the interference, at his own expense.
• Note regarding FCC compliance. Although this instrument has been tested and found to comply with Part 15, Subpart B of the FCC Rules for a Class A digital device, please note that this compliance is voluntary, in regard to the cited FCC regulations in effect at the time of manufacture.
• Note regarding Canadian EMC compliance: This digital apparatus does not emit radio noise exceeding the limits for class A digital apparatus prescribed in the Radio Interference Regulations made by the Department of Communications of Canada.
Battery
The VetScan UA Analyzer uses a 3.7 V lithium ion rechargeable cell battery to run the system in the event of AC power loss. When not connected to the AC Charger, the UA will automatically operate by battery power, the LED will be off and the battery icon will appear to indicate the charge on the battery. When connected to AC Charger, the Red LED will illuminate while the battery is charging and turn off after the battery is fully charged. The plug icon on the screen header will continue to indicate that the UA is operating off AC power.
The battery should fully charge within 5 hours when it is new. A full battery charge will allow analyzer testing for up to 200 tests. After repeated charging, the battery may lose its ability to hold a charge.
If less than 100 tests are received on a full charge, it may be an indication that the battery is getting weak. If this occurs, the analyzer may be run off AC power. Contact Abaxis Technical Support (See “Abaxis Resource” section) for assistance in replacing the battery.
Warning! Contact Abaxis technical support when attempting to replace the battery. Do not attempt to change the battery on without Abaxis support.
For The State of California, USA ONLY
Perchlorate material – lithium battery contains perchlorate. Special handling may apply, see www.dtsc.ca.gov/hazardouswaste/perchlorate.
U S E R ’ S M A N U A L 37
A
Admin settings ..........................................................13
Auto-print ............................................................13, 19
B
Back button ................................................................20
Battery icon .........................................................13, 36
C
Carriage ............................................. 21-23, 28-29, 32
Replacing carriage ...................................28-29
Charging icon ...............................................13-14, 36
Check Strips ..............................................8, 23-25, 32
Purpose of check strip .................................... 8
Running check strip ......................................23
Clock..............................................................................13
Controls .............................................................8, 26-27
Running controls ............................................26
D
Database ........................................................13, 20, 34
Database capacity ....................................................20
Database searching .................................................20
Delete button ............................................................13
E
Enter button ...............................................................13
Error codes ...........................................................28, 32
H
Home screen .........................................14, 20, 24, 32
I
Interferring substances ..........................................33
L
Language ....................................................................13
M
Maintenance .......................................................16, 21
Cleaning analyzer ...........................................23
Cleaning strip tray .............................21-23, 28
O
Operating temperature ..........................................34
P
Patient ID (PID) ............................................14, 16, 24
Power button .....................................................12, 32
Power supply/charger .....................6, 8, 10, 34-36
Printer icon ......................................................... 13, 20
Printer paper ........................................................ 8, 34
Printing ..........................................................19, 20, 34
Printing from Database .........................................20
R
Results bins ................................................................31
Results screen ...........................................................19
Running test strips ....................................13, 15- 19
Blotting strips ..................................................18
Wetting strips with dropper .........17, 26, 34
S
Settings screen ....................................10, 13, 19, 34
Species ........................................7, 14, 16, 26, 31, 34
Specifications ............................................................34
Strip storage ........................................................16-17
Strip tray ......................12, 16-18, 21-24, 27-29, 32
Cleaning .................................16, 21-23, 28, 32
Removing ...........................................22, 28, 32
Strip Type ................................. 14, 16, 19, 24, 26, 32
T
Test button ......................................13, 16-17, 24, 26
Test timer .............................................6, 17-18, 26-28
Time format ...............................................................13
Tray Carriage ...........................................8, 21-23, 28
U
Units ...............................................................14, 19, 31
Urine collection methods .....................................15
Catheter collection ........................................15
Cystocentesis ...................................................15
Free-catch .........................................................15
Urine color ..................................................................13
Urine sample handling ...........................................15
Urine sample storage ..............................................15
Dipping strip .............................................17, 34
USB Send .....................................................................13
Y
Y cable ..........................................................6, 8, 10, 23
Index

38
Part No. 1500-7005 Rev A


