
PWB Interconnect Solutions Inc. Copyright 2013 (Document Revision 1, Dated 7/13) 1
IntroductiontotheISTStandardCouponFormat
This document is intended to give a basic overview of the IST coupon appearance,
features and attributes, PWB is presently in the process of drafting a user manual for
an application tool that will enable the automatic generation of the described design
files (ODB++).
103-235 Stafford Road West Nepean, Ontario
CANADA K2H 9C1 [email protected]
http://www.pwbcorp.com
Tel (613) 596-4244
Fax (613) 596-2200

PWB Interconnect Solutions Inc. Copyright 2013 (Document Revision 1, Dated 7/13) 2
Introduction The objective for test vehicle standardization was primarily undertaken to permit the automation of
design file generation and maintain commonality of feature locations for automated electrical test
verification. The planned automated application tool will create the complete design file package
including artworks (ODB++ / Gerber), drill files, drawings and testing information. The IST coupon is
designed to duplicate the features, attributes and construction of the product; this permits an effective
measurement and prediction of product reliability.
PWB Interconnect solutions Inc. will continue (in the short term) to create the IST design package until
the automated application tool and associated training have been transitioned over to the customer. A
is still required to complete the existing IST coupon design worksheet to enable the design file
generation for the standardized format
StandardizedISTCoupon
Size Width 0.700” / 17.8mm
Height 4.5” / 114.3mm
Function Via Reliability, Material Integrity, Product Assurance, Process Control
The IST coupon contains a number of key features and attributes as follows:
1. 9 Hole Registration strip, measuring in 0.025mm/.001” increments for all layers
2. Two IST heating options – Surface SuperHeat or internal interconnections
3. Two Sensing Circuits – Combinations of PTH, Buried via, Blind via, or Microvia
4. Capacitance capable for Confirming Construction and material robustness (based on planes)
5. Planarization circuits for non‐destructively confirming foil and/or copper plating thickness
6. Resistance Temperature Detectors (RTD) for measuring X,Y & Z thermal conductivity
7. Mounting holes for simplified loading onto the DELAM fixture
The schematic below cross references the key features and their location within the IST coupon.

PWB Interconnect Solutions Inc. Copyright 2013 (Document Revision 1, Dated 7/13) 3
Note: See figure 3 for definition of zones 1, 2 and 3.
The listed features will remain consistent on all IST coupons; the only variable will be the “via field
containing the products via type, via/pad/anti‐pad diameters and the associated via to via spacing. The
specific geometries will be consistent with the actual product receiving the IST coupon.
Appendix A illustrates a number of IST coupons showing various grid size options. The present grid sizes
availability in the automated design tool ranges from 0.032”/0.8mm up to 0.100”/2.54mm. Customized grid
sizes are available upon request to PWB Interconnect Solutions Inc.
A description of each standardized IST coupons features are as follows:
1) 9HoleRegistrationStripThe Registration Strip is used to quantify the amount of registration (hole to feature movement)
between a drilled hole and an internal feature, from .001”/0.025mm up to .009”/0.225mm of
movement in .001”/0.025mm increments. The amount of registration is determined by checking
electrical continuity between the common (“C”) via and each hole sequentially. The number recorded
represents the movement of the plated through hole relative to the worse case annular clearances
within all internal layers.
Note: The registration module (REG – Available from PWB upon request) quantifies individual inner
layer movement; this capability enables the increased understanding of which specific layers have
moved and in what direction.

PWB Interconnect Solutions Inc. Copyright 2013 (Document Revision 1, Dated 7/13) 4
Figure1
2) HeatingCircuitsThere are two types of heating circuits designed into the IST Coupon. The first type is the SuperHeat
circuit (H); figure 2 illustrates one of six thermal zones. This heating circuit is primarily used for
simulating the assembly cycles (preconditioning cycles) that are completed before IST testing.
Figure2
The SuperHeat Circuits are located on both external layers, they are designed to simulate the elevated
thermal excursions that the PWB experiences when being placed through a SMT reflow oven, or in the
rework process. In figure 3, the traces within the circles form the three zones (on each side) of the
SuperHeat circuit, the traces weave between the arrays of via structures to provide uniform heating.
The via structures, internal copper planes and material properties enable thermal conduction of the
heat to penetrate into the central layers.

PWB Interconnect Solutions Inc. Copyright 2013 (Document Revision 1, Dated 7/13) 5
Figure 3
The second type of heating circuit (P) uses the traditional internal interconnect heating principles.
Figure 4
The P (power) circuit is shown above; this circuit is modeled to achieve a level of resistance within a
specified range to enable effective heating across all test circuits. The traces are encapsulated on at
least two inner layers and are shown in the diagram above in “red” and “blue” to differentiate the
separate layers, shown in figure 4.
Both the traces, via holes and copper planes conduct heat to uniformly elevate the temperature in the
surrounding vicinity. Refer to Appendix B to understand how the Power Circuit interacts with the Sense
Circuits.
3) SenseCircuitsFigure 5

PWB Interconnect Solutions Inc. Copyright 2013 (Document Revision 1, Dated 7/13) 6
The sense circuits represent the critical features and attributes of the via structures designed in the
product, requiring reliability testing. The decision as to which specific set of conditions should be
selected for inclusion into the test coupon can vary dependent on a number of important
considerations. Establishing a “hierarchy of Influence” is the recommended approach to assisting in the
decision process.
Definition of Hierarchy of Influence
Measuring multiple/various structures designed into a PWB product can enable an understanding of the
“weakest link within the PWB processing chain” and assist in understanding whether design is
influencing product failure. There should be a natural expectation that vias with higher aspect ratios
(dielectric thickness divided by drill/ablation diameter) should fail before lower aspect ratio structures.
From a simplistic perspective the order in which failures should occur would initiate with PTH, buried
via, blind via, multi‐level microvia and lastly single level microvia (which should not fail).
PWB interconnected structures can range from simple to very complicated, an example of simple is a
plated through hole (PTH), complicated includes multi‐levelled microvia structures stacked or staggered
to internal structures. As additional structures are required the decision related to what circuits should
be included into the coupon starts to become more complex.
The following tables give examples of how various via structures can be accommodated using either one
or two IST coupon designs. Table 1 describes a test circuit selection strategy that attempts to include up
to a maximum of three critical structures into a single IST coupon. The single coupon approach
understands that certain structures may not be included; table 2 illustrates how a second coupon design
can include additional circuits designed into more complex constructions.
Table 1
StructuresSingle-level
MicroviaMulti-level Microvia
Circuits to test Barrel Interconnect Barrel Interconnect Barrel Interconnect
PTH Only S1 PPTH+Counter-bored via S1+S2 P
PTH+Buried S1 P S2PTH+Buried+Microvia S1 or S2 P S1 or S2 S1 or S2
PTH+Blind S1 P S2PTH+Blind+Microvia S1 or S2 P S1 or S2 S1 or S2
Buried+Microvia S1 P S2Blind+Microvia S1 P S2
Microvia S1 & PMulti-level Microvia S2 & P S1
Single Coupon Test Circuit Selection Strategy
PTH Buried Via Blind Via

PWB Interconnect Solutions Inc. Copyright 2013 (Document Revision 1, Dated 7/13) 7
Table 2
StructuresSingle-level
MicroviaMulti-level Microvia
Circuits to test Barrel Interconnect Barrel Interconnect Barrel Interconnect Via to Pad Via to Via
PTH+Buried+Microvia C1-S1 C1-P C1-C2-S2 C2-P C2-S1PTH+Blind+Microvia C1-S1 C1-P C1-C2-S2 C2-P C2-S1
PTH+Buried+ Multi-level Microvia C1-S1 C1-P C1-S2 C2-P C2-S1+S2
PTH+Microvia+ Multi-level Microvia C1-S1 C1-P C1-S2 C2-S1+S2
Microvia+ Multi-level Microvia C1-C2-P C1-C2-S1+S2
Two Coupon Test Circuit Selection Strategy
PTH Buried Via Blind Via
Note 1: The previously described SuperHeat circuit (on page 4) will automatically be included in all IST
coupon designs. Note 2: The number of test circuits possible is determined by the via to via spacing
requirement.
4) CapacitancePlateFigure 6
The capacitance plates have two primary purposes: 1) Confirming the product construction to determine
that the dielectric materials are consistent panel to panel and lot to lot. 2) Measuring for material
degradation following exposure to assembly + rework thermal excursion and/or the cyclic temperatures
experienced in long term testing. A drilled and plated via is used to independently connect to each
internal copper plane/plate.

PWB Interconnect Solutions Inc. Copyright 2013 (Document Revision 1, Dated 7/13) 8
Confirmation of Construction
The products construction is designed with a number of similar copper filled areas consistent with the
power or ground planes. The near identical copper planes (plates) are created on several
internal/external layers. Figure 6 identifies an individual filled area, which represents a single plate.
Connections to each plate within the coupon are achieved using a drilled and plated through hole, the
holes (based on number of planes used in the construction) are located on a specific via to via spacing
(grid) to enable a manual or automated capacitance measurement. The measured capacitance values
are used to determine specific information related to each dielectric pair (B or C stage). One of the
surface layers (usually layer 1) should contain a numbering scheme (located adjacent to the PTH holes)
that confirms which holes are connected to each of the external and internal layers.
Each internal and external plate is individually designed to be identical in size/area. The plate area will
vary slightly by grid design. For reference the thickness of copper foils and/or any additional inner/outer
layer plating are not factors that affect the plate area. By measuring the bulk capacitance for each hole
pairing (L1 to L2, L2 to L3, Etc.) you are effectively establishing a relative bulk value associated to the
plate area, dielectric thickness and the materials inherent electrical properties (dielectric constant – Dk).
It is recommended that a measurement frequency of 800 KHz be used for ensuring accuracy,
repeatability and reproducibility.
The capacitance to dielectric thickness ratio can be calculated if the geometry of the plate and the
dielectric properties of the material between the plates are known. For example, the capacitance of a
parallel‐plate capacitor constructed of two common plates both of area A separated by a distance d is
approximately equal to the following:
C = εr ε0 (A/D)
Where:
C is the capacitance;
A is the area of overlap of the two plates;
εr is the relative static permittivity (sometimes called the dielectric constant) of the material between
the plates (for a vacuum, εr = 1);
ε0 is the electric constant (ε0 ≈ 8.854×10⁻¹² F m–1); and
d is the separation between the plates.
See Appendix C for additional information related to how capacitance testing is used to identify the
presence and severity of dielectric material degradation.

PWB Interconnect Solutions Inc. Copyright 2013 (Document Revision 1, Dated 7/13) 9
Capacitance is proportional to the area of the common plates and inversely proportional to the
separation between conducting plates. The closer the plates are to each other, the greater the
capacitance. Anticipating that both the B and C stage dielectric materials “should” have a consistent Dk,
the most dominant factor affecting any changes in capacitance value will be related to the dielectric
thickness between the two plates. Based on this principle we are able to correlate the relationship
between the measured capacitance and the expected dielectric thickness.
See Appendix D for additional information related to how capacitance data can be converted into a
prediction of dielectric thickness between individual, or all internal layers.
5) PlanarizationCircuitsFigure 7
When sequentially laminated constructions are processed copper plating is deposited on each outer
layer of each sub‐laminated panel. The additional thickness of copper can creates a problem for the
PWB manufacturer related to holding the tolerance and control for the critical printing and etching
operation. In some production processes the “excess” plated copper is partially removed by machining,
brushing or chemically etching. This process is commonly referred to as planarization, or skiving. The
test circuit shown in the diagram above is designed to measure the volume of copper that remains on
the critical internal and external layers. The circuit is measured to determine the relative bulk
resistance, which is directly related to the copper thickness (foil + plating). Based on the measured
resistance a prediction of plating “wrap” thickness can be established, the data is also useful for
determining the level of control that the PWB manufacture can achieve in this critical area of processing.
The IST coupon is limited to only two planarization circuits; this should be considered the minimum
requirement. Additional PL modules (are available from PWB upon request) are designed to understand
the ability to measure and control copper thickness (plating wrap) on internal vias and layers.

PWB Interconnect Solutions Inc. Copyright 2013 (Document Revision 1, Dated 7/13) 10
6) ResistanceTemperatureDetector(RTD)CircuitsFigure 8
The “resistance temperature detector” (RTD) test circuits are designed to act like similar to a thermo‐
couple. The responsibility of the RTD is for measuring relative temperature distribution across the 3
zones of the superheat circuit in the upper, central and lower layers of the PWB construction. The RTD
location within the construction is based on the first available internal signal layer after the internal
interconnects and a signal layers closest to the centre of the products construction. Lower layer count
constructions (possibly up to 10 layers) may not always permit the placement of RTD circuits.
Measuring the variation in temperatures can assist in the understanding of how the heat is
conducting/penetrating from the surface layers into the central layers of the PWB construction. This is
highly recommended for thicker/higher layer (high thermal mass) PWB constructions that are intended
to receive a lead free assembly and/or rework process.
7) MountingHolesforDELAMFixture
A standardized design feature of the IST coupon is the inclusion of 3 mounting holes that align to the
automated DELAM bed of nails fixture, to enable coupon and module measurements to be completed
accurately and quickly. The DELAM tester will automatically measure the resistance and capacitance of
IST Coupon and Modules, for simplified data collection, establishment of baselines and subsequent
comparison.

PWB Interconnect Solutions Inc. Copyright 2013 (Document Revision 1, Dated 7/13) 11
Appendix A
The following images show examples of the IST coupon illustrating the identical features around the
perimeter, the only changes are in the via field related to the via to via spacing (grid). The products grid
size determines how many test circuits can be incorporated into the available area of the central via
field (3.5” / 88.9mm by .500” / 12.7mm). Grid sizes up to and including .060” / 1.5mm can
accommodate 2 individual test circuits (1 power + 2 senses); grid sizes above .060” / 1.5mm are
restricted to a single test circuit (1 power + 1 sense).
COUPON OUTPUT – in this example grid sizes range from .040” / 1mm to .100” / 2.5mm
.040” / 1mm grid ‐ Two Sense
.040” / 1mm grid ‐ Three Sense
.050” / 1.25mm grid
.060” / 1.5mm grid (2 Sense Option)

PWB Interconnect Solutions Inc. Copyright 2013 (Document Revision 1, Dated 7/13) 12
.060” / 1.5mm grid (1 Sense Option)
.075” / 1.9mm grid
.080” / 2mm grid
.100” / 2.5mm grid

PWB Interconnect Solutions Inc. Copyright 2013 (Document Revision 1, Dated 7/13) 13
Appendix B
Explanation of how the Power and Sense Circuits are tested
The IST test system applies a DC current to a specifically designed heating circuit (in the IST coupon),
through either the external SuperHeat (H) circuit or the internal interconnects (P) circuit. Monitoring
and controlling of the resistance/temperature is completed throughout each thermal cycle. There is a
physical principle, that can be described mathematically, that defines the relationship of the
temperature of the interconnect to the amount of current being passed through the heating circuit. This
is further influenced by the amount of metallization and its resistivity (a value that describes how hard it
is for electrons to flow through the entire interconnect). The test vehicle is generally heated to
temperatures just below the glass transitional (Tg) of the base material (compliant to IPC TM650
Method 2.6.26 which specifies 150C in 3 minutes).
Once the system has automatically established a resistance/temperature profile (ramp in 3 minutes +/‐
3 seconds), the system turns off this current and forced air cooling is started for approximately 2
minutes, returning the coupons back to ambient, this constitutes a single thermal cycle.
Differential thermal expansion is created and continues throughout IST testing until failure inception
initiates as micro‐structure cracking, located in specific regions within individual structures. Thermal
cycling continues until the pre‐determined rejection criteria is achieved, coupon rejection can be based
on a maximum number of cycles, or a percentage increase within each interconnect circuits elevated
resistance (usually a 10% increase from the starting resistance).
The flowchart describes the basic steps in the automated IST testing sequence.
Measure BulkResistance
Determine ResistivityCalculate
Hot Resistance
Select/Apply DCCurrent
Monitor BothInterconnects
Achieve 150°C withinPTH
Cycle Same Conditions Simultaneously Monitor Record/Analyze Data
Note: It is standard protocol to include simulated assembly cycles into the IST testing sequence. The
most common protocol includes starting the IST coupon for 2 cycles, followed by the customer specified
assembly conditions (3x, 5x, 6x reflow temperature), after which IST testing is restarted on the 3rd cycle.

PWB Interconnect Solutions Inc. Copyright 2013 (Document Revision 1, Dated 7/13) 14
The system automatically repeats this temperature cycle over and over, measuring the resistance
continuously until the maximum number of cycles or rejection is achieved; rejection could be at a
predetermined increase in resistance or a pre‐determined number of cycles. All test
conditions/parameters are automated; the operator applies customer specific IST testing conditions on
system setup.
During each thermal excursion, the system continuously monitors the minute resistance changes in each
via structures and/or inner layer to barrel (post or capture pad) interconnects. As the structural
integrity of the interconnect changes, the resistance value of the vias and interconnections
proportionally changes. The IST system is designed to quantify the ability of the total interconnect
structure to withstand these thermo mechanical strains, from the as manufactured or assembled state,
until the products reaches the point of structural failure.
With high quality interconnects, the integrity of the barrels and inner layer connections are not
degraded for several hundreds of cycles, the difference between the resistance values before, during
and after thermal cycling are negligible. If changes between progressive cycles are positive or negative,
then something has potentially degraded within the metalized copper (plating, foils, etc.) structures
processed into the product.
The IST system’s measurements are very sensitive to minute changes in resistance. In other words, if a
failure mode initiates, the measured differences in resistance are usually very subtle (sub‐milliohm).
Subsequently, the ability of the interconnect to withstand further stressing is reduced, which leads to
larger measured increases in resistance. When larger resistance changes are detected, a defect that
ultimately leads to failure, has initiated, this is commonly referred to as inception, leading to failure
propagation and eventually damage accumulation. If the incremental changes are relatively large, a
structural failure has occurred within the structure. IST is designed to monitor these changes and stop
the stressing at a pre‐determined (low) level of failure. This permits timely intervention in order that
root cause analysis be completed at an early stage of damage propagation, or before the damage
accumulation destroys the critical information that relates to the failure inception.
Using the IST methodology allows the user to determine when a defect begins to develop as well as how
rapidly the failure propagates. The changes are monitored in 2 or 3 independent test circuits; the
internal heating circuit (P), which carries the current through the inner layer circuitry, is monitored for
resistance changes associated to inner layer separations and foil cracking. The two other (sense) test
circuits receives no current, they are generally responsible for the plated through hole, buried via, blind
via, and/or microvia interconnections. The IST system compares all individual test circuits to determine
whether barrel cracking, microvia inter‐facial separation to the target pad, or internal interconnect
separation is the more dominant failure mechanism.

PWB Interconnect Solutions Inc. Copyright 2013 (Document Revision 1, Dated 7/13) 15
Appendix C
Measuring for material degradation
The material degradation test protocol also utilizes the IST coupon. The test circuit (in the central via
field) area has two primary responsibilities: a) Reliability testing of the via structures, b) Robustness
testing of the materials, following simulated assembly. The design requirements for the features and
attributes of the via reliability testing also determines the critical hole to hole spacing (Eg. 0.8mm/.032”
and 1mm/.040” grid grid/pitch) within the via field.
The material testing usually includes PTH with a specified via‐to‐via spacing, which should be consistent
with the smallest grid/pitch device designed into the product. The capacitance holes are connected to
each of the internal copper planes. The layer to layer configuration commonly uses a strip‐line
(sig/plane/sig/etc.) configuration. To enable a measurement of material degradation the internal plates
are configured to achieve the following functionality: a) have the electrical sensitivity to measure low‐
level Dk changes within the dielectric materials, b) measure changes in capacitance that are lower due
to small (localized) increases in dielectric thickness, caused by the presence of a material separation. It
is understood that small areas of material damage may not be easily detected until the total area is
sufficiently large enough to effectively quantify with statistical confidence.
Previous studies have confirmed that the via‐to‐via spacing can have a critical effect on the propensity
for internal material damage. The configuration/polarity of the inner layers represents the construction
used in the product, generally a signal line located between two internal planes. The combination of
these features and the associated distance between the vias and planes creates an environment where
vapour pressure has limited ability to dissipate, increasing the shear stress on the glass/resin materials
across the central zone of the construction. The vapour pressure is only partially related to the presence
of available moisture (absorbed/inherent water content); if the moisture content is very low, vapour
pressure would still occur (although to a lesser degree) and will continue to increase relative to the
rising temperature. The resulting superheated steam would follow the equation P = RT/V, the higher
the temperature the higher the pressure for a constant volume of moisture. The reality is that the
increased temperatures now being used in lead free assembly has effectively double the level of vapour
pressure within the PWB substrate
Significant bulk capacitance change (greater than 4% reduction) after simulated assembly is
typically an indication that internal damage (delamination) is present. A change in capacitance of < 4%
considers some allowance for moisture leaving the coupon during assembly. If this level of change
should occur, it is recommended to discontinue any further testing of the material and perform
immediate failure analysis. The results of the microsection analysis will confirm or refute the presence of
material damage.

PWB Interconnect Solutions Inc. Copyright 2013 (Document Revision 1, Dated 7/13) 16
The primary responsibility of the material degradation (robustness) testing philosophy is to
determine whether the B and C stage materials can “survive” assembly without structural damage
(delamination). If the materials are confirmed to be robust it establishes the ability of the product to go
forward into the via reliability testing phase. It must be understood that material damage has proven to
be a confounding factor because it effectively changes the stress loading due to the stress relieving
(dissipating) affect around the via structures. There is a high probability of false positive results when
measuring via reliability in products that have material damage present.
The coupons are designed to be measured before, during and after the assembly cycles on the identical
coupon, comparing the impact of assembly with different sets of coupons will complicate the situation,
but if the coupons follow the same construction in both cases the difficulties can be overcome. . Each
coupons is measured and compared, the mean profiles are calculated and established as the
baseline/reference for subsequent comparison to all assembled cycles (stressed) coupons.
Each FR4/Polyimide material contains different levels of dielectric variability (control) between the B
and C stage materials, measuring a number of coupons can determine the consistency of the products
construction.
Evaluating the relative change in capacitance data is completed by entering all measured profiles from
the as received and stressed coupons into a spreadsheet, followed by the calculation of the relative
change, as a percentage. Figure 9 is a plot of the capacitance changes measured, the results illustrate
minimal changes were measured, confirming a robust material. The small variations between each
coupon are relative to the inherent differences of the dielectric properties (thickness and Dk). The
“shape” of the data is related to the comparison with the reference profiles, a capacitance trend or
divergence from the trend is used to determine if material degradation is expected
Figure 9
Material "A" (58% Resin) / 0.8mm / .032" / Section M2Measured After 6X Reflow - Relative Capacitance Change
-10.00%
-8.00%
-6.00%
-4.00%
-2.00%
0.00%
2.00%
4.00%
6.00%
8.00%
10.00%
2/4
4/6
6/8
8/10
10/1
111
/13
13/1
515
/17
17/1
9
Internal Reference Planes
Cap
acit
ance
in P
ico
Far
ads
M2_2M2_3M2_4M2_5M2_6M2_7M2_8
PWB Interconnect Solutions Inc. Copyright 2013 (Document Revision 1, Dated 7/13) 17
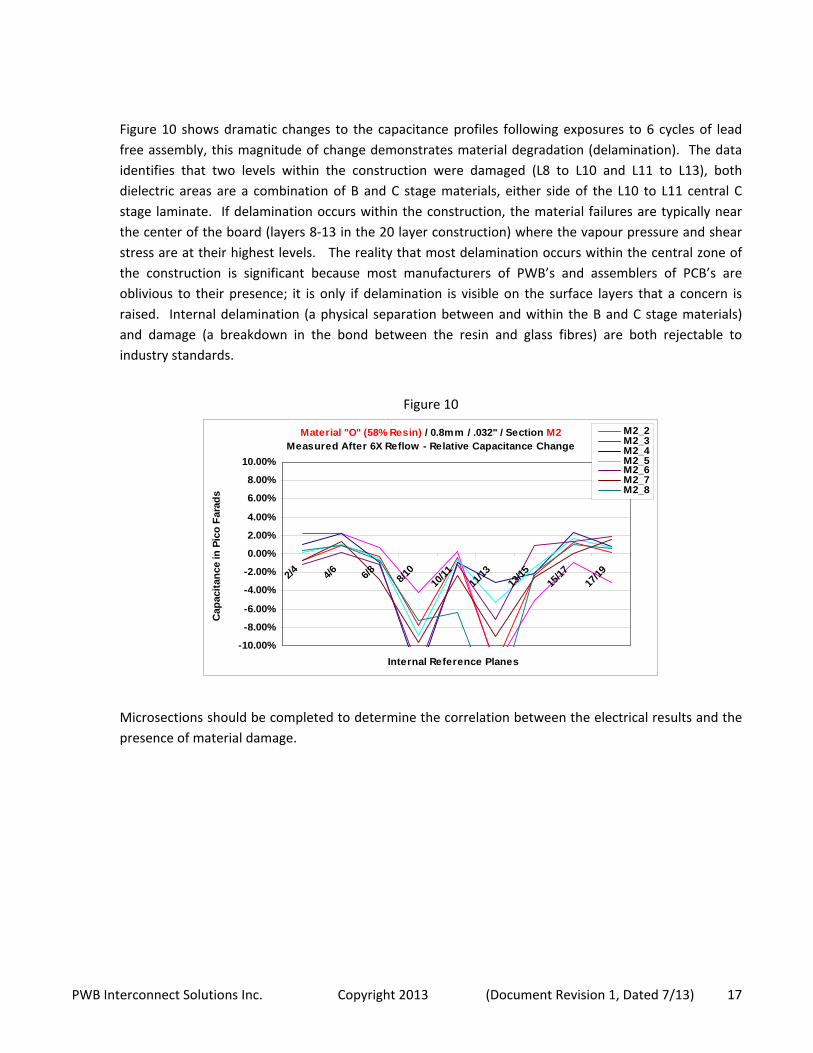
Figure 10 shows dramatic changes to the capacitance profiles following exposures to 6 cycles of lead
free assembly, this magnitude of change demonstrates material degradation (delamination). The data
identifies that two levels within the construction were damaged (L8 to L10 and L11 to L13), both
dielectric areas are a combination of B and C stage materials, either side of the L10 to L11 central C
stage laminate. If delamination occurs within the construction, the material failures are typically near
the center of the board (layers 8‐13 in the 20 layer construction) where the vapour pressure and shear
stress are at their highest levels. The reality that most delamination occurs within the central zone of
the construction is significant because most manufacturers of PWB’s and assemblers of PCB’s are
oblivious to their presence; it is only if delamination is visible on the surface layers that a concern is
raised. Internal delamination (a physical separation between and within the B and C stage materials)
and damage (a breakdown in the bond between the resin and glass fibres) are both rejectable to
industry standards.
Figure 10
Material "O" (58% Resin) / 0.8mm / .032" / Section M2Measured After 6X Reflow - Relative Capacitance Change
-10.00%
-8.00%
-6.00%
-4.00%
-2.00%
0.00%
2.00%
4.00%
6.00%
8.00%
10.00%
2/4
4/6
6/8
8/10
10/1
111
/13
13/1
515
/17
17/1
9
Internal Reference Planes
Cap
acit
ance
in P
ico
Far
ads
M2_2M2_3M2_4M2_5M2_6M2_7M2_8
Microsections should be completed to determine the correlation between the electrical results and the
presence of material damage.

PWB Interconnect Solutions Inc. Copyright 2013 (Document Revision 1, Dated 7/13) 18
Appendix D
Converting the collected capacitance data into predicted thickness measurements can be
achieved by comparing the data to an established baseline. The baseline is determined after
completing initial microsection analysis on previously (the same design configuration)
measured coupons. Statistical comparison of the data can be used to generate algorithms
and/or graphs (see figures 11) to enable thickness predictions with future production lots.
Figure 11
Customer X - Product X ConstructionAs Received - 370HR Materials
300
350
400
450
500
550
600
Laye
r 1-
2
Laye
r 2-
3
Laye
r 3-
4
Laye
r 4-
5
Laye
r 5-
6
Laye
r 6-
7
Laye
r 7-
8
Laye
r 8-
9
Laye
r 9-
10
Laye
r 10
-11
Laye
r 11
-12
Laye
r 12
-13
Laye
r 13
-14
Laye
r 14
-15
Laye
r 15
-16
Laye
r 16
-17
Laye
r 17
-18
Laye
r 18
-19
Laye
r 19
-20
Laye
r 20
-21
Laye
r 21
-22
Laye
r 22
-23
Laye
r 23
-24
Laye
r 24
-25
Laye
r 25
-26
Laye
r 26
-27
Laye
r 27
-28
Cap
acita
nce
(pF
)
The capacitance data can be converted into estimated copper to copper dielectric thickness
measurements, to create a construction profile, see figures 12 and 13.
Figure 12
Customer X - Product X ConstructionAs Received - All Materials Measure Dielectric Vs Capacitance
6
7
8
9
10
11
12
13
290
295
300
315
325
330
340
345
355
360
370
375
380
390
405
420
425
Capacitance
Die
lect
ric
Sp
acin
g in
Mils
(.0
00")
Material A
Material B
Material C

PWB Interconnect Solutions Inc. Copyright 2013 (Document Revision 1, Dated 7/13) 19
Figure 13
Customer X - Product X ConstructionAs Received - 370HR Materials
3
4
5
6
7
8
9
10
Laye
r 1-
2
Laye
r 2-
3
Laye
r 3-
4
Laye
r 4-
5
Laye
r 5-
6
Laye
r 6-
7
Laye
r 7-
8
Laye
r 8-
9
Laye
r 9-
10
Laye
r 10
-11
Laye
r 11
-12
Laye
r 12
-13
Laye
r 13
-14
Laye
r 14
-15
Laye
r 15
-16
Laye
r 16
-17
Laye
r 17
-18
Laye
r 18
-19
Laye
r 19
-20
Laye
r 20
-21
Laye
r 21
-22
Laye
r 22
-23
Laye
r 23
-24
Laye
r 24
-25
Laye
r 25
-26
Laye
r 26
-27
Laye
r 27
-28
Mea
sure
d D
iele
ctric
Thi
ckne
ss in
Mils
(.0
00")
After the relationship/correlation between capacitance and measured thickness measurements has
been established it is the PWB manufacturer’s decision which technique (or combination of techniques)
offers the greatest technical/financial advantage for decision making on confirmation of product
construction.
Important considerations: The capacitance measurements are non‐destructive; the thickness profile can
be established within minutes, rather than hours. Additionally capacitance data collection has a low
cost association, compared with microsection analysis. Using the capacitance profiles creates a
reference for subsequent measurements taken after exposure to elevated assembly and rework
temperatures. Secondly, the capacitance data combines the influences of dielectric thickness and
material Dk; ultimately it is the electrical environment associated with the signal line (not the absolute
dielectric thickness) that is the crucial understanding for producing controlled impedance products.


