Download - SHRS VPN Connection Using Junos Pulse Secure
SHRS VPN Connection Using Junos Pulse Secure
Table of Contents Step 1: Installing Junos Pulse Secure ............................................................................................................ 2
Step 2: Connecting to the VPN...................................................................................................................... 5
Step 3: Mapping the Network Drives ............................................................................................................ 8
Last Modified
November 1, 2016
SHRS VPN Connection Page 2 of 11 November 1, 2016 Using Junos Pulse Secure
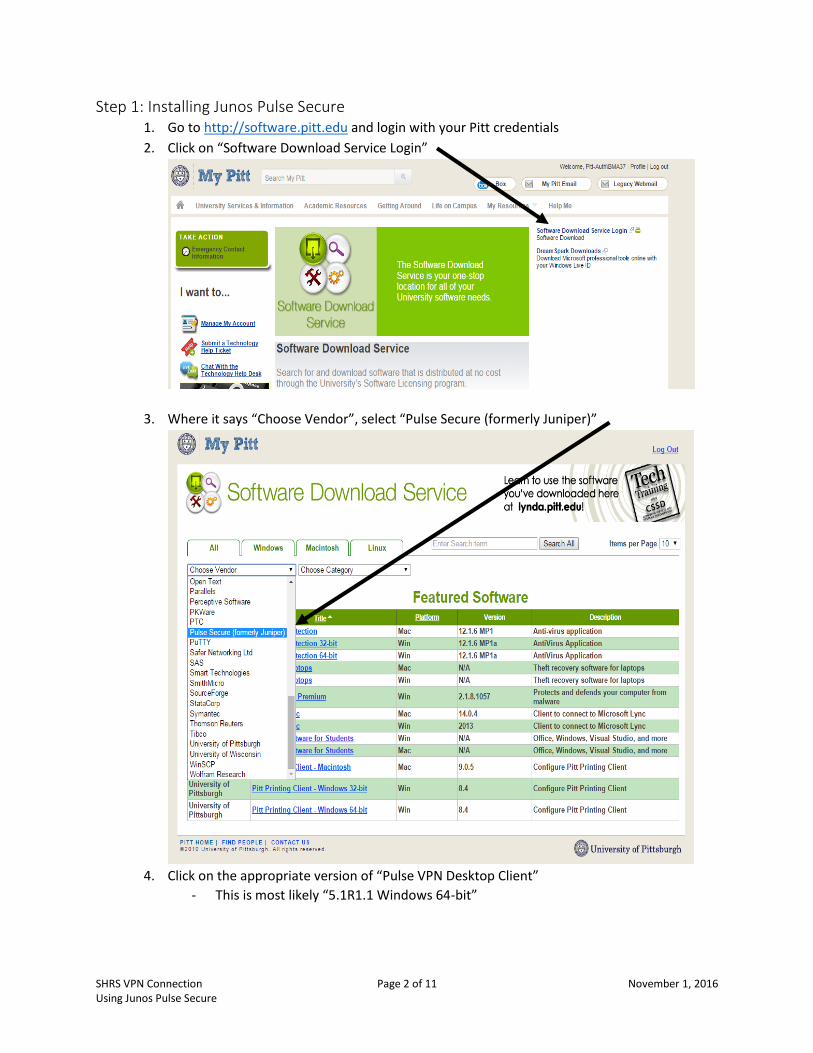
Step 1: Installing Junos Pulse Secure 1. Go to http://software.pitt.edu and login with your Pitt credentials
2. Click on “Software Download Service Login”
3. Where it says “Choose Vendor”, select “Pulse Secure (formerly Juniper)”
4. Click on the appropriate version of “Pulse VPN Desktop Client”
- This is most likely “5.1R1.1 Windows 64-bit”
SHRS VPN Connection Page 3 of 11 November 1, 2016 Using Junos Pulse Secure
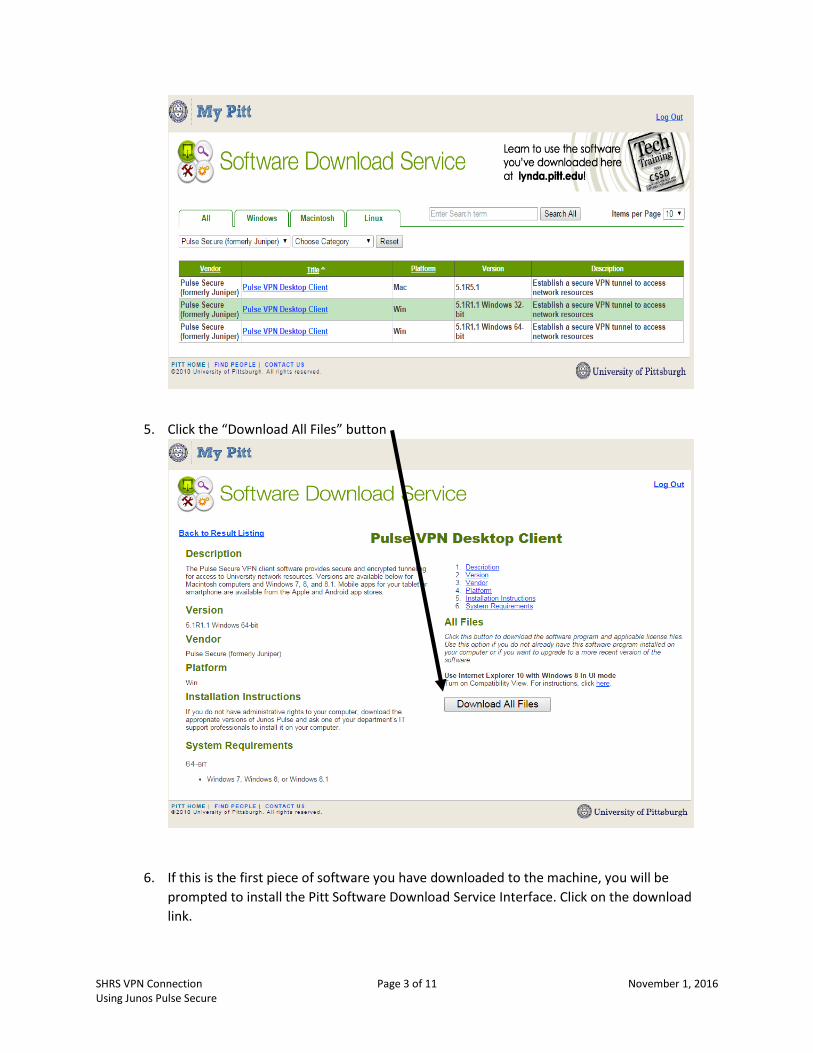
5. Click the “Download All Files” button
6. If this is the first piece of software you have downloaded to the machine, you will be
prompted to install the Pitt Software Download Service Interface. Click on the download
link.
SHRS VPN Connection Page 4 of 11 November 1, 2016 Using Junos Pulse Secure
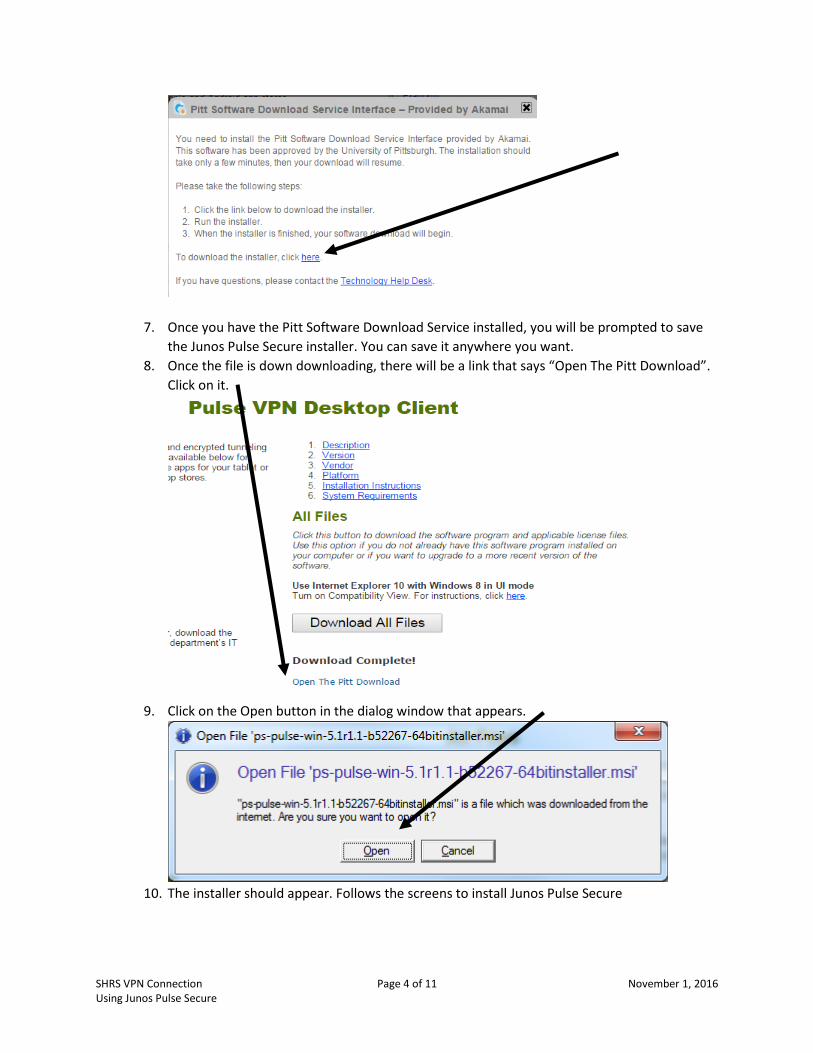
7. Once you have the Pitt Software Download Service installed, you will be prompted to save
the Junos Pulse Secure installer. You can save it anywhere you want.
8. Once the file is down downloading, there will be a link that says “Open The Pitt Download”.
Click on it.
9. Click on the Open button in the dialog window that appears.
10. The installer should appear. Follows the screens to install Junos Pulse Secure
SHRS VPN Connection Page 5 of 11 November 1, 2016 Using Junos Pulse Secure
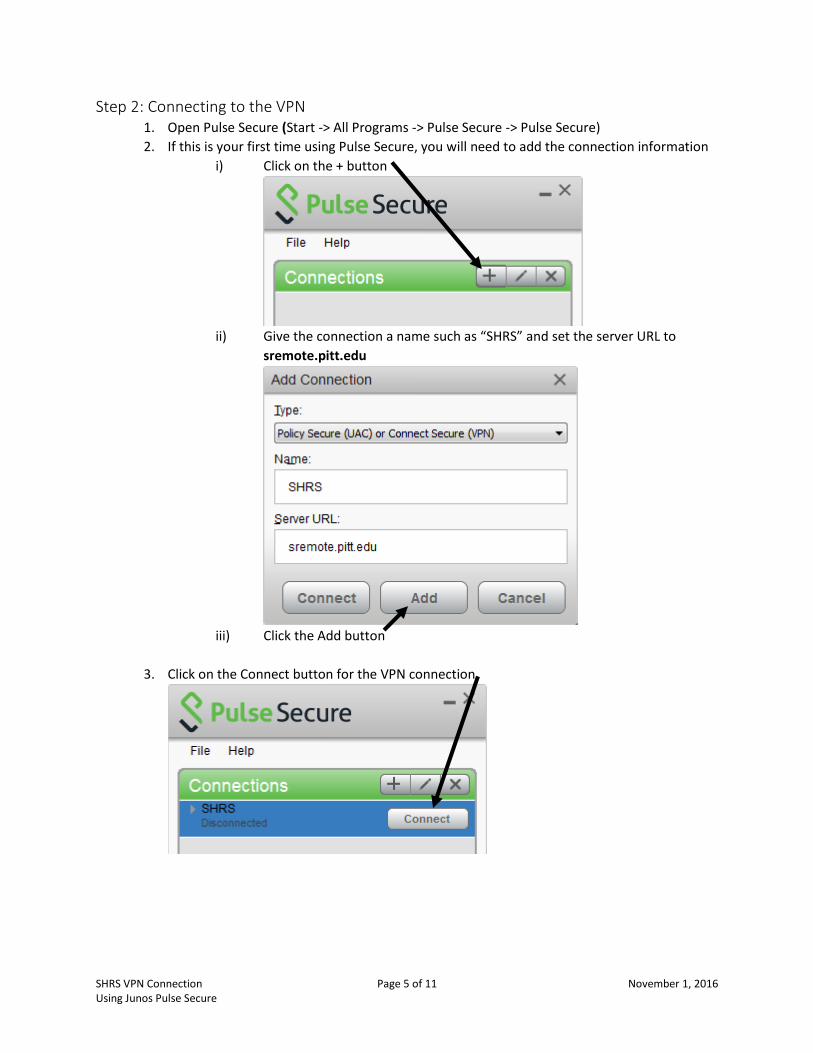
Step 2: Connecting to the VPN 1. Open Pulse Secure (Start -> All Programs -> Pulse Secure -> Pulse Secure)
2. If this is your first time using Pulse Secure, you will need to add the connection information
i) Click on the + button
ii) Give the connection a name such as “SHRS” and set the server URL to
sremote.pitt.edu
iii) Click the Add button
3. Click on the Connect button for the VPN connection
SHRS VPN Connection Page 6 of 11 November 1, 2016 Using Junos Pulse Secure
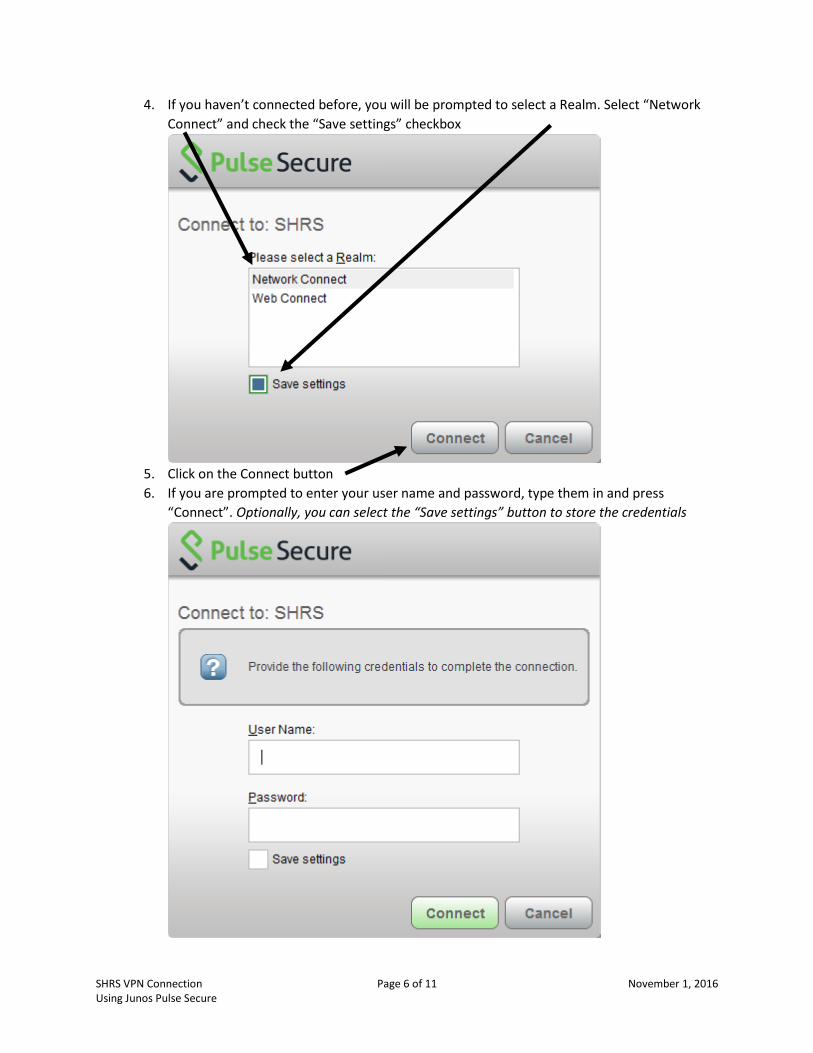
4. If you haven’t connected before, you will be prompted to select a Realm. Select “Network
Connect” and check the “Save settings” checkbox
5. Click on the Connect button
6. If you are prompted to enter your user name and password, type them in and press
“Connect”. Optionally, you can select the “Save settings” button to store the credentials
SHRS VPN Connection Page 7 of 11 November 1, 2016 Using Junos Pulse Secure
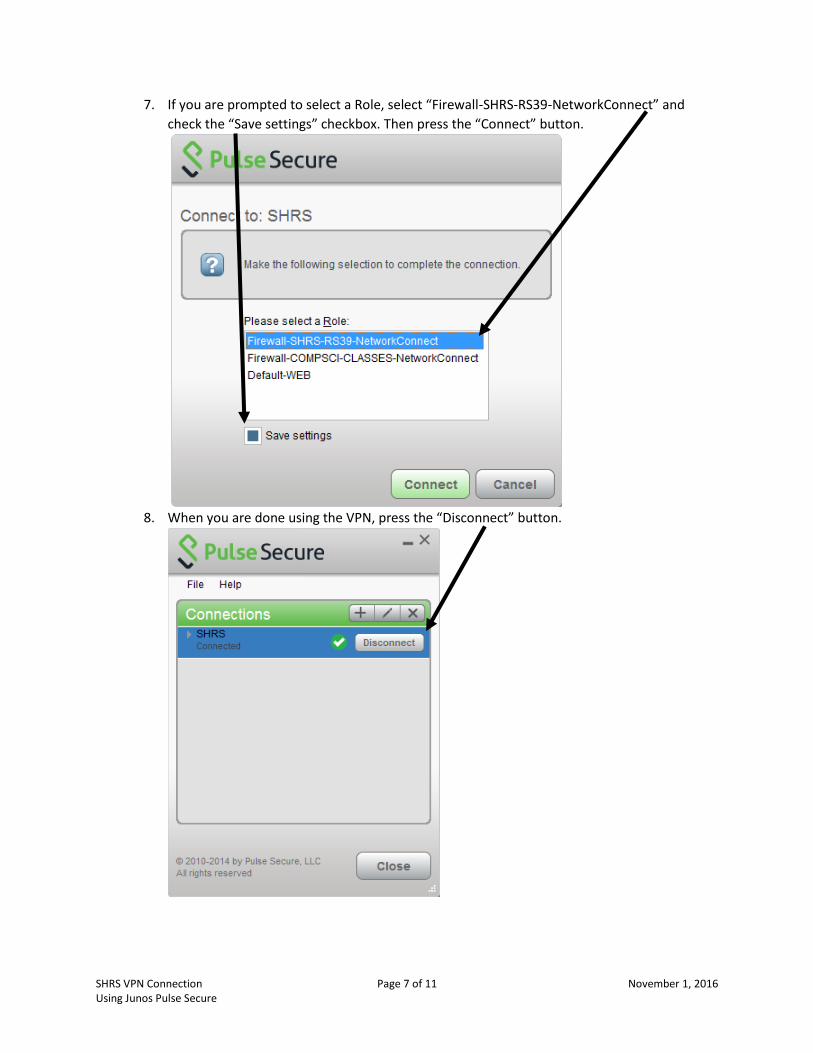
7. If you are prompted to select a Role, select “Firewall-SHRS-RS39-NetworkConnect” and
check the “Save settings” checkbox. Then press the “Connect” button.
8. When you are done using the VPN, press the “Disconnect” button.
SHRS VPN Connection Page 8 of 11 November 1, 2016 Using Junos Pulse Secure
Step 3: Mapping the Network Drives 1. Go to START->CONTROL PANEL->FOLDER OPTIONS->VIEW. Make sure the hide file
extensions for known file types option is unchecked.
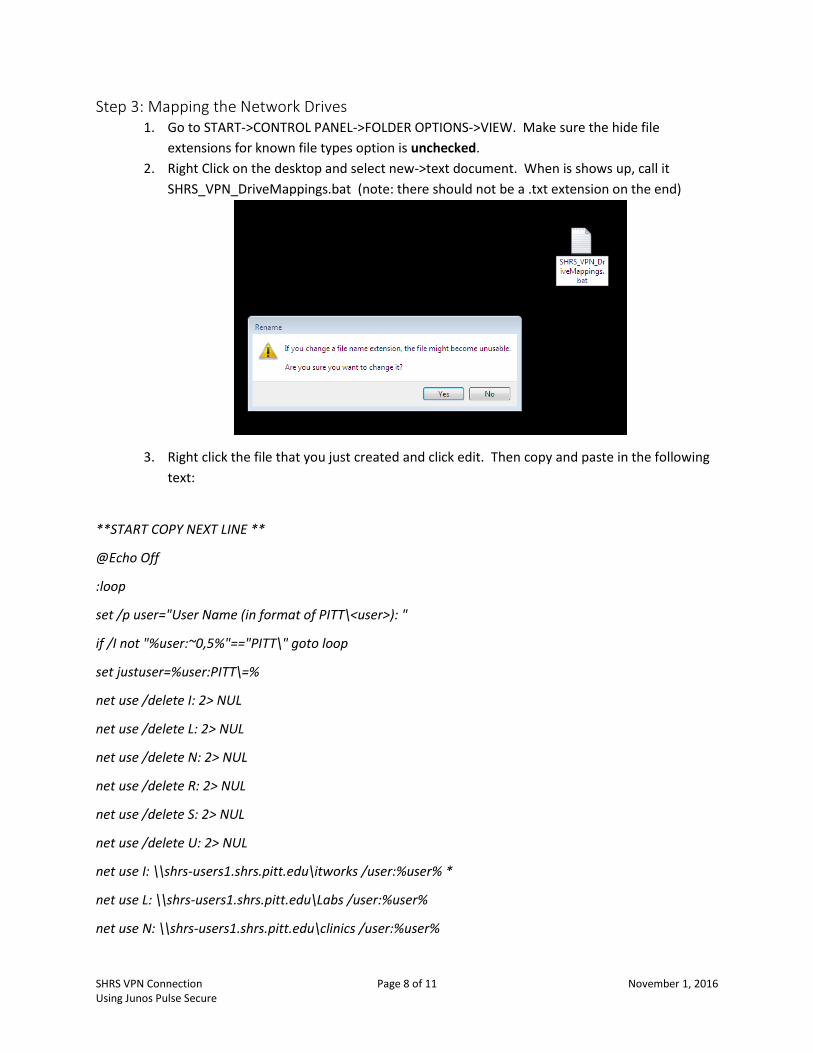
2. Right Click on the desktop and select new->text document. When is shows up, call it
SHRS_VPN_DriveMappings.bat (note: there should not be a .txt extension on the end)
3. Right click the file that you just created and click edit. Then copy and paste in the following
text:
**START COPY NEXT LINE **
@Echo Off
:loop
set /p user="User Name (in format of PITT\<user>): "
if /I not "%user:~0,5%"=="PITT\" goto loop
set justuser=%user:PITT\=%
net use /delete I: 2> NUL
net use /delete L: 2> NUL
net use /delete N: 2> NUL
net use /delete R: 2> NUL
net use /delete S: 2> NUL
net use /delete U: 2> NUL
net use I: \\shrs-users1.shrs.pitt.edu\itworks /user:%user% *
net use L: \\shrs-users1.shrs.pitt.edu\Labs /user:%user%
net use N: \\shrs-users1.shrs.pitt.edu\clinics /user:%user%
SHRS VPN Connection Page 9 of 11 November 1, 2016 Using Junos Pulse Secure
net use R: \\shrs-users1.shrs.pitt.edu\centers /user:%user%
net use S: \\shrs-users1.shrs.pitt.edu\departments /user:%user%
if exist \\shrs-users1.shrs.pitt.edu\Users\%justuser% (
net use U: \\shrs-users1.shrs.pitt.edu\Users\%justuser% /user:%user%
)
**END COPY PREVIOUS LINE **
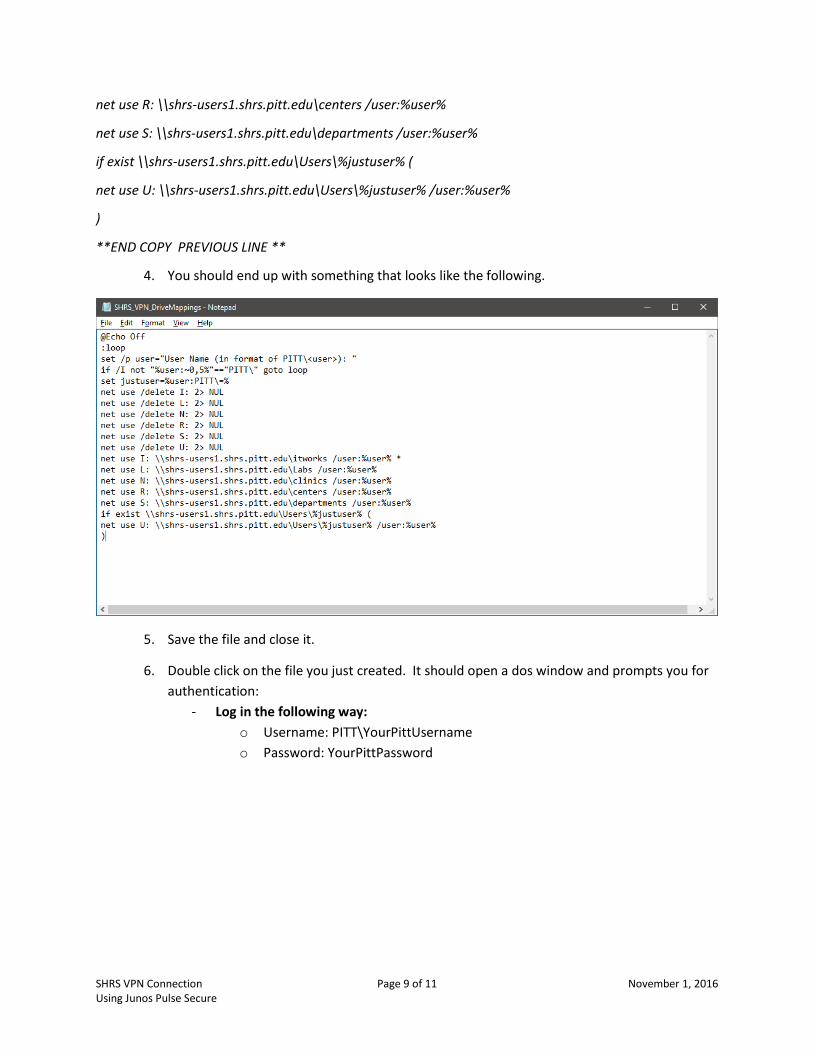
4. You should end up with something that looks like the following.
5. Save the file and close it.
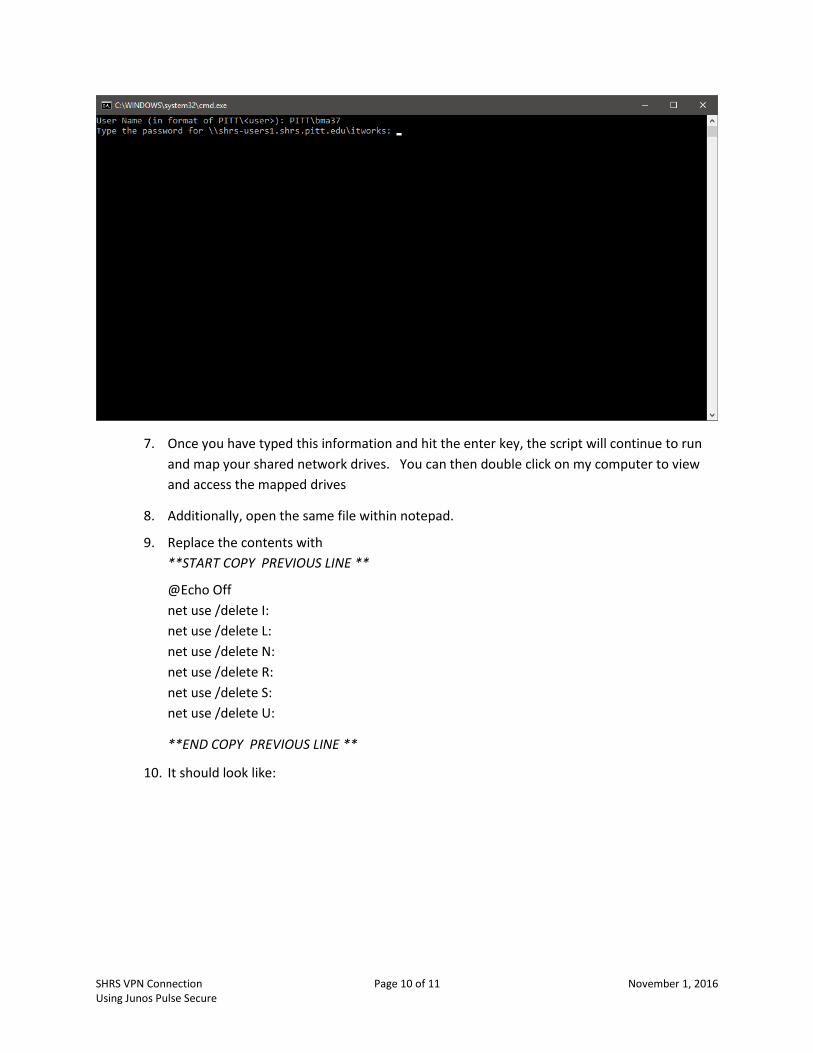
6. Double click on the file you just created. It should open a dos window and prompts you for
authentication:
- Log in the following way:
o Username: PITT\YourPittUsername
o Password: YourPittPassword
SHRS VPN Connection Page 10 of 11 November 1, 2016 Using Junos Pulse Secure
7. Once you have typed this information and hit the enter key, the script will continue to run
and map your shared network drives. You can then double click on my computer to view
and access the mapped drives
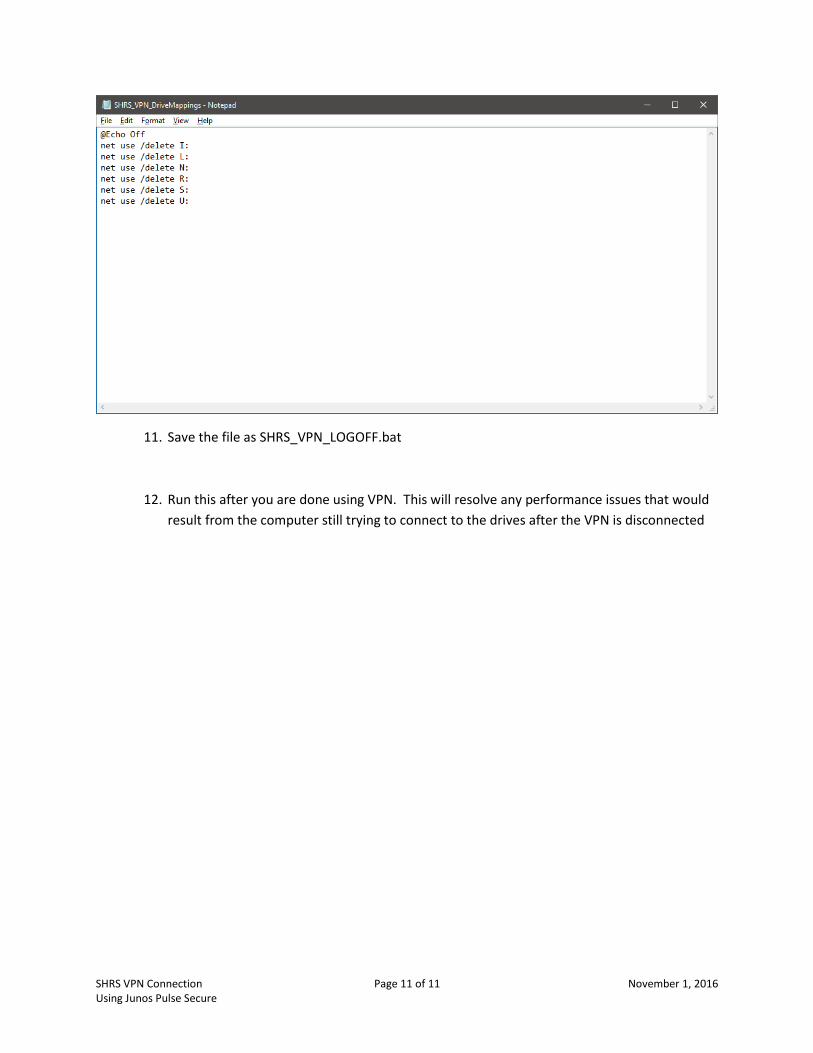
8. Additionally, open the same file within notepad.
9. Replace the contents with
**START COPY PREVIOUS LINE **
@Echo Off
net use /delete I:
net use /delete L:
net use /delete N:
net use /delete R:
net use /delete S:
net use /delete U:
**END COPY PREVIOUS LINE **
10. It should look like:
SHRS VPN Connection Page 11 of 11 November 1, 2016 Using Junos Pulse Secure
11. Save the file as SHRS_VPN_LOGOFF.bat
12. Run this after you are done using VPN. This will resolve any performance issues that would
result from the computer still trying to connect to the drives after the VPN is disconnected


![Junos® OS Dynamic VPN Feature Guide for SRX Series Gateway ... · accounting-session-id[access-request]; accounting-terminate-cause[accounting-off];](https://cdn.vdocuments.site/doc/165x107/5ff30ccdd5a85f24ae08013c/junos-os-dynamic-vpn-feature-guide-for-srx-series-gateway-accounting-session-idaccess-request.jpg)


