Download - Scr0130: Sequence, Selection, and Loop - CNX

OpenStax-CNX module: m46076 1
Scr0130: Sequence, Selection, and
Loop*
R.G. (Dick) Baldwin
This work is produced by OpenStax-CNX and licensed under the
Creative Commons Attribution License 3.0�
Abstract
The purpose of this module is to teach you about structured programming; the sequence structure,
the selection structure, and the loop structure. The module will also teach you how to write a Scratch
program that illustrates the selection structure, mouse events, and Cartesian coordinates.
1 Table of Contents
• Preface (p. 2)
· Viewing tip (p. 3)
* Images (p. 3)
• General background information (p. 3)
· What is structured programming? (p. 3)
* One door in and one door out (p. 4)* Nesting of structures is allowed (p. 4)
· Pseudocode (p. 4)· The sequence structure (p. 4)
* The action elements themselves may be structures (p. 5)
· The selection structure (p. 5)
* Test a condition for true or false (p. 5)* The action elements themselves may be structures (p. 5)* Sometimes no action is required on false (p. 6)
· The loop structure (p. 6)
* Perform the test and exit on false (p. 6)* Perform some actions and repeat the test on true (p. 6)* Each action element may be another structure (p. 6)* Need to avoid in�nite loops (p. 6)
· Other possible structures (p. 7)
• Preview (p. 7)
· Screen output for the program named IfSimple01 (p. 7)
*Version 1.1: Mar 26, 2013 12:41 pm -0500�http://creativecommons.org/licenses/by/3.0/
http://cnx.org/content/m46076/1.1/

OpenStax-CNX module: m46076 2
· Click the green �ag or the basketball (p. 8)
• Discussion and sample code (p. 9)
· Three sprites (p. 9)· Program code for the LeftBeachball (p. 9)
* Adding the blue go to block to the program (p. 10)* Coordinate values (p. 10)* Behavior of the LeftBeachball (p. 11)
· Positioning the other beach ball (p. 11)· The basketball (p. 11)
* Initializing the position of the basketball (p. 11)* Initializing the orientation of the basketball (p. 12)* Handling mouse events on the basketball (p. 13)* Behavior of the bottom script (p. 15)* The selection block (p. 15)* Two independent decisions (p. 15)
· Selection control structures available in Scratch (p. 16)
* How do the two bottom blocks di�er? (p. 16)* Specifying the condition on which the decision will be based (p. 16)* Two groups of programming blocks have the correct shape (p. 17)* Will use the touching block (p. 19)
· Go back and examine the script (p. 19)
* Conditions have been established - need actions (p. 19)
· Programming blocks belonging to the Motion group (p. 19)
* Turn around and face the other way (p. 21)
· An online version of this program is available (p. 21)
• Run the program (p. 21)• Student programming project (p. 21)
· Orthogonal axes in Cartesian coordinates (p. 23)· Draw a straight line to the location of the next mouse click (p. 23)· A sneak peek at the solution (p. 25)
• Summary (p. 25)• What's next? (p. 25)• Resources (p. 25)• Miscellaneous (p. 26)
2 Preface
This module is one in a collection of modules designed to help beginners of all ages (8 and up) learn how tocreate the code for computer programs. Information is provided not only for the beginners themselves butalso for their parents and teachers where appropriate.
The purpose of this module is to teach you about structured programming; the sequence structure, theselection structure, and the loop structure. The module will also teach you how to write a Scratch programthat illustrates the selection structure, mouse events, and Cartesian coordinates.
The module also presents a student project by which you can demonstrate your understanding of theconcepts learned by studying the module.
http://cnx.org/content/m46076/1.1/

OpenStax-CNX module: m46076 3
2.1 Viewing tip
I recommend that you open another copy of this module in a separate browser window and use the followinglinks to easily �nd and view the images while you are reading about them.
2.1.1 Images
• Image 1 (p. 4) . The sequence structure in pseudocode.• Image 2 (p. 5) . The selection structure in pseudocode.• Image 3 (p. 6) . The loop structure in pseudocode.• Image 4 (p. 8) . User interface for the program named IfSimple01.• Image 5 (p. 9) . A paraphrased version of the Scratch code.• Image 6 (p. 10) . Program code for the left beach ball• Image 7 (p. 12) . Initializing the position and orientation of the basketball.• Image 8 (p. 14) . All of the code that applies to the basketball.• Image 9 (p. 15) . Pseudocode for a selection structure.• Image 10 (p. 15) . Two independent decisions.• Image 11 (p. 16) . Selection control structures available in Scratch.• Image 12 (p. 18) . Programming blocks belonging to the Sensing group.• Image 13 (p. 20) . Programming blocks belonging to the Motion group.• Image 14 (p. 22) . Initial output from the program named IfWithVar01.• Image 15 (p. 24) . Program output after having clicked twice in the Stage area.
3 General background information
In this module, I will help you learn about:
• Structured programming.• The sequence structure.• The selection structure.• The loop structure.
In introductory programming courses, you will often hear a lot about something called structured program-ming. In comparison with more modern and complex programming concepts such as runtime polymorphism,structured programming is fairly mundane. However, that's not to say that structured programming isn'timportant. It is very important. But it is just a small bump in the road of learning that leads to a morecomplete understanding of computer programming, especially object-oriented programming.
3.1 What is structured programming ?
Basically, the concept of structured programming says that any programming logic problem can be solvedusing an appropriate combination of only three programming structures, none of which are complicated. Thethree structures are known generally as:
• The sequence structure.• The selection or decision structure .• The loop, repetition, or iteration structure.
http://cnx.org/content/m46076/1.1/

OpenStax-CNX module: m46076 4
3.1.1 One door in and one door out
To understand structured programming, you need to think in terms of a section of program code that hasonly one entry point and one exit point. It is very important that there cannot be multiple entry points ormultiple exit points.
There must be only one way into the section of code and one way out of the section of code.
3.1.2 Nesting of structures is allowed
Another important part of the concept is that structures may be nested inside of other structures providedthat every structure meets the basic rules for a structure.
Thus, by nesting simple structures inside of simple structures, large and complex overall structures canbe constructed.
3.2 Pseudocode
Computer programming source code consists generally (but not in Scratch) of programming instructionswritten in text form with a very speci�c format or syntax that is designed to be understood by a computerprogram. Humans who are not computer programmers might not be expected to understand much of whatthey see in computer programming source code.
According to Wikipedia 1 ,
"The pre�x pseudo - (from Greek... "lying, false") is used to mark something as false,fraudulent, or pretending to be something it is not."
According to Wikipedia 2 ,
"Pseudocode is an informal high-level description of the operating principle of a computerprogram or other algorithm. It uses the structural conventions of a programming language, butis intended for human reading rather than machine reading. Pseudocode typically omits detailsthat are not essential for human understanding of the algorithm...
The purpose of using pseudocode is that it is easier for people to understand than conventionalprogramming language code, and that it is an e�cient and environment-independent descriptionof the key principles of an algorithm."
3.3 The sequence structure
We can describe the sequence structure using the pseudocode shown in Image 1 (p. 4) .
Image 1. The sequence structure in pseudocode.
Enter
Perform one or more actions in sequence
Exit
Figure 1: Image 1. The sequence structure in pseudocode.
1http://en.wikipedia.org/wiki/Pseudo2http://en.wikipedia.org/wiki/Pseudocode
http://cnx.org/content/m46076/1.1/

OpenStax-CNX module: m46076 5
Thus, the general requirement for the sequence structure is that one or more actions may be performedin sequence after entry and before exit.
There may not be any branches or loops between the entry and the exit.All actions must be taken in sequence.
3.3.1 The action elements themselves may be structures
However, it is important to note that one or more of the action elements may themselves be sequence,selection, or loop structures.
If each of the structures that make up the sequence has only one entry point and one exit point, eachsuch structure can be viewed as a single action element in a sequence of actions.
The sequence structure is the simplest of the three, and there's not much more that I can say about it.
3.4 The selection structure
The selection or decision structure can be described as shown in the pseudocode in Image 2 (p. 5) .
Image 2. The selection structure in pseudocode.
Enter
Test a condition for true or false
On true
Take one or more actions in sequence
On false
Take none, one, or more actions in sequence
Exit
Figure 2: Image 2. The selection structure in pseudocode.
3.4.1 Test a condition for true or false
Once again, there is only one entry point and one exit point.The �rst thing that happens following entry is that some condition is tested for true or false .The concept of something being true or false is commonly referred to as a boolean condition in
computer programming (named after George Boole) .If the condition is true, one or more actions are taken in sequence and control exits the structure.If the condition is false, none , one or more di�erent actions are taken in sequence and control exits
the structure. (Note the inclusion of the word none here.)
3.4.2 The action elements themselves may be structures
Once again, each of the action elements in the sequence may be another sequence, selection, or loop structure.Eventually all of the actions for a chosen branch will be completed in sequence and control will exit the
structure.
http://cnx.org/content/m46076/1.1/

OpenStax-CNX module: m46076 6
3.4.3 Sometimes no action is required on false
It is often the case that no action is required when the test returns false. In that case, control simply exitsthe structure without performing any actions.
3.5 The loop structure
The loop or iteration structure can be described as shown in the pseudocode in Image 3 (p. 6) .
Image 3. The loop structure in pseudocode.
Enter
Test a condition for true or false
Exit on false
On true
Perform one or more actions in sequence.
Go back and test the condition again
Figure 3: Image 3. The loop structure in pseudocode.
As before, there is only one entry point and one exit point. Note that in this case, the exit point is notat the end of the pseudocode. Instead, it follows the test.
3.5.1 Perform the test and exit on false
The �rst thing that happens following entry is that a condition is tested for true or false.If the test returns false, control simply exits the structure without taking any action at all.
3.5.2 Perform some actions and repeat the test on true
If the test returns true:
• One or more actions are performed in sequence.• The condition is tested again and the process is repeated.
During each iteration, if the test returns false, control exits the structure. If the test returns true, the entireprocess is repeated.
3.5.3 Each action element may be another structure
Each of the action elements may be implemented by another sequence, selection, or loop structure.Eventually all of the actions will be completed and the condition will be tested again.
3.5.4 Need to avoid in�nite loops
Generally speaking, unless something is done in one of the actions to cause the test to eventually returnfalse, control will never exit the loop.
In this case, the program will be caught in what is commonly referred to as an in�nite loop.
http://cnx.org/content/m46076/1.1/
OpenStax-CNX module: m46076 7
3.6 Other possible structures
In some programming languages, there are structures other than sequence, selection, and loop that structured-programming experts are willing to accept for convenience including:
• The switch-case structure.• The do-until structure.• The for loop• The for-each loop
While sometimes more convenient than the three main structures, these structures are not required for thesolution of programming logic problems.
4 Preview
In this module, I will present and explain the simplest example of a selection structure that I was able towrite in Scratch without using variables and without using relational or logical operators. (I will explainoperators, including relational and logical operators in future modules.)
4.1 Screen output for the program named IfSimple01
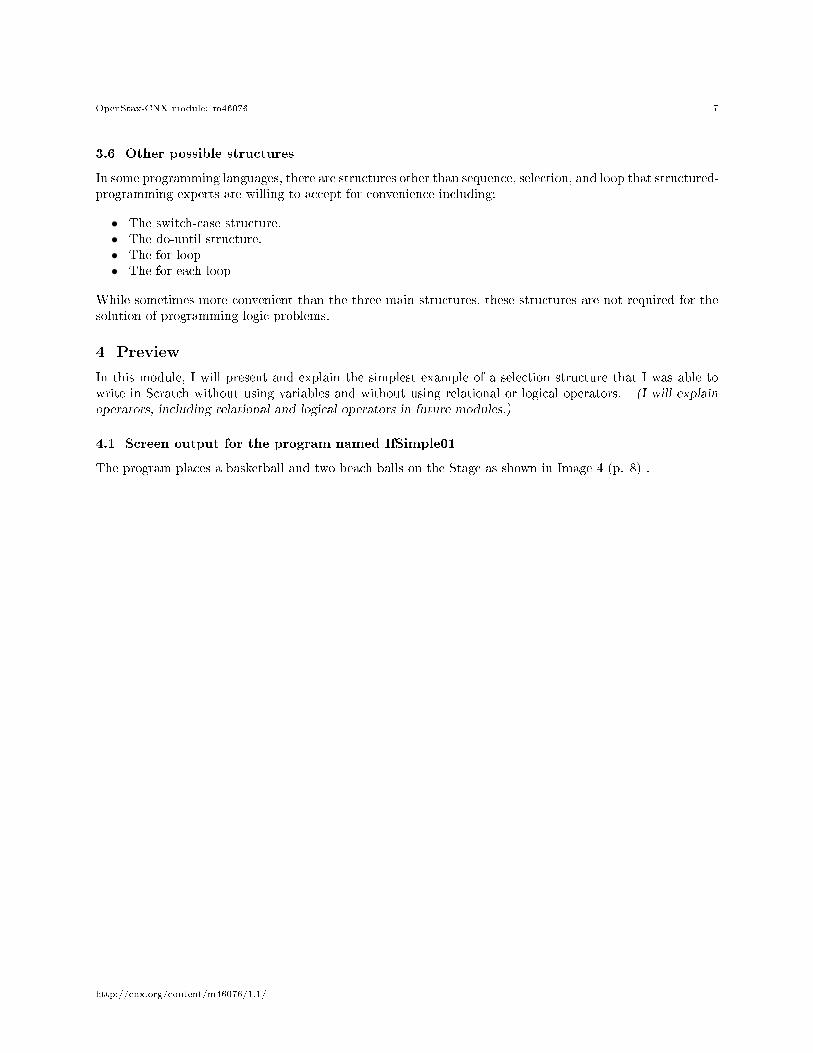
The program places a basketball and two beach balls on the Stage as shown in Image 4 (p. 8) .
http://cnx.org/content/m46076/1.1/
OpenStax-CNX module: m46076 8
Image 4. User interface for the program named IfSimple01.
Figure 4: Image 4. User interface for the program named IfSimple01.
4.1.1 Click the green �ag or the basketball
When the user clicks the green �ag in the upper right corner, the three balls are placed in a horizontal linewith the basketball in the center.
Scratch code, which can be paraphrased as shown in Image 5 (p. 9) , is executed each time the userclicks the basketball with the mouse.
http://cnx.org/content/m46076/1.1/

OpenStax-CNX module: m46076 9
Image 5. A paraphrased version of the Scratch code.
when Basketball is clicked{
move basketball forward by 90 steps
if(Basketball is touching RightBeachball){
turn Basketball by 180 degrees
}//end if
if(Basketball is touching LeftBeachball){
turn Basketball by 180 degrees
}//end if
}
Figure 5: Image 5. A paraphrased version of the Scratch code.
In other words, if you repetitively click the basketball with the mouse, it will move back and forth fromleft to right bouncing o� of the two beach balls. The basketball will keep bouncing back and forth betweenthe two beach balls for as long as you continue clicking on the basketball.
5 Discussion and sample code
Let's walk through the steps required to develop this program. I will deal �rst with the code that de�nesthe behavior of the program when the user clicks the green �ag in the upper right corner of Image 4 (p. 8) .
The Cartesian coordinate system The position of sprites on the Stage in the Scratch userinterface is based on a two-dimensional Cartesian coordinate system 3 with the origin at thecenter of the Stage.
5.1 Three sprites
Note in the lower right corner of Image 4 (p. 8) that this program contains two beach balls and one basketballin addition to the Stage.
You add sprites to your program by clicking on the button with the icon of the �le folder in the grayarea immediately below the white Stage area in Image 4 (p. 8) .
When you click on one of the sprites that you have added to the program, that sprite appears at thetop of the center pane. Having done that, you can then drag programming blocks into the center pane thatde�ne the behavior of that sprite.
5.2 Program code for the LeftBeachball
The code that I wrote (by dragging blocks into the center pane) for the sprite named LeftBeachball isshown in Image 6 (p. 10) .
3http://en.wikipedia.org/wiki/Cartesian_coordinate_system
http://cnx.org/content/m46076/1.1/

OpenStax-CNX module: m46076 10
Image 6. Program code for the left beach ball.
Figure 6: Image 6. Program code for the left beach ball.
You are already familiar with the tan block with the green �ag shown in Image 6 (p. 10) because youlearned about it in a previous module. However, the blue block in Image 6 (p. 10) has not been used priorto this module.
5.2.1 Adding the blue go to block to the program
The blue block shown in Image 6 (p. 10) was added to the program module by:
• Clicking the dark blue button labeled Motion in the upper left of Image 4 (p. 8) . (See Image 13(p. 20) for all of the programming blocks belonging to the Motion group.)
• Dragging the blue block shown in Image 6 (p. 10) from the left panel to the center panel and clickingit into place under the tan block.
• Typing the literal values -200 and 0 into the two white boxes on the blue block.
5.2.2 Coordinate values
If you move the mouse pointer around in the user interface, the coordinates of the mouse pointer are displayedat the right end of the gray area immediately below the Stage as shown in Image 4 (p. 8) . The x coordinates
http://cnx.org/content/m46076/1.1/

OpenStax-CNX module: m46076 11
range from -240 at the left to +240 at the right. The y coordinates range from +180 at the top to -180 atthe bottom.
5.2.3 Behavior of the LeftBeachball
The behavior of the program module shown in Image 6 (p. 10) can be interpreted as follows: When the userclicks the green �ag, cause the sprite named LeftBeachball to move to a location with an x (horizontal)coordinate value of -200 and a y (vertical) coordinate value of 0. Since the origin is at the center of theStage, this causes the beach ball to move to the left of the origin on the horizontal axis.
5.2.3.1 Some experimentation was required
Because I didn't know the diameter of the beach ball, I had to experiment to determine how far to move itto the left of the origin to locate it at the left side of the Stage as shown in Image 4 (p. 8) . I settled on avalue of -200 for the x coordinate and a value of 0 for the y coordinate.
5.3 Positioning the other beach ball
In the interest of brevity, I won't show the code required to position the beach ball on the right side of theStage. I did exactly the same thing for that beach ball except that I speci�ed the value of the x coordinateto be 200 instead of - 200. This causes the beach ball named RightBeachball to move to the right sideof the Stage when the user clicks the green �ag.
5.4 The basketball
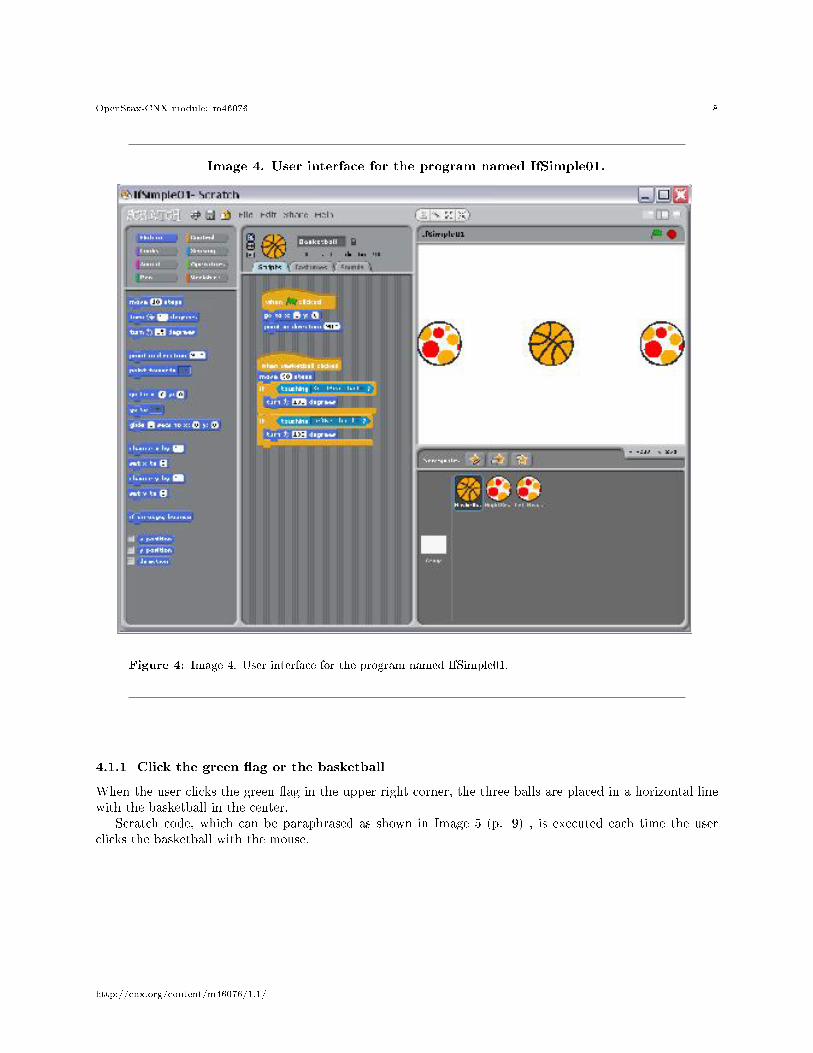
5.4.1 Initializing the position of the basketball
Image 7 (p. 12) shows a portion of the center pane after clicking on the sprite named Basketball .
http://cnx.org/content/m46076/1.1/
OpenStax-CNX module: m46076 12
Image 7. Initializing the position and orientation of the basketball.
Figure 7: Image 7. Initializing the position and orientation of the basketball.
You will note that the tan block and the uppermost blue block in Image 7 (p. 12) are the same as inImage 6 (p. 10) except that the x coordinate value is set to 0. This causes the basketball to move to theorigin when the user clicks the green �ag.
5.4.2 Initializing the orientation of the basketball
However, Image 7 (p. 12) contains a block that is not contained in Image 6 (p. 10) . The bottom blue blockin Image 7 (p. 12) is used to set the orientation of the basketball. (By orientation, I mean the directionthat the basketball is facing.)
It may seem strange to say that a round basketball is facing in one direction or the other. However,every sprite has a front, back, top, and bottom even in those cases where it is not visually obvious. (Theorientation would be visually obvious if I were to use an animal for the sprite in place of the basketball. Youcan tell which direction the basketball is facing by observing the curved diagonal lines on the basketball.)
After you drag the blue block labeled point in direction into the center pane, you can click the arrowin the white box to expose the following four choices:
• (90) right• (-90) left• (0) up• (180) down
http://cnx.org/content/m46076/1.1/

OpenStax-CNX module: m46076 13
As you can see, I selected the choice that causes the basketball to face to the right. As a result, when theuser clicks the green �ag, the basketball will move to the origin and turn to face the right.
5.4.3 Handling mouse events on the basketball
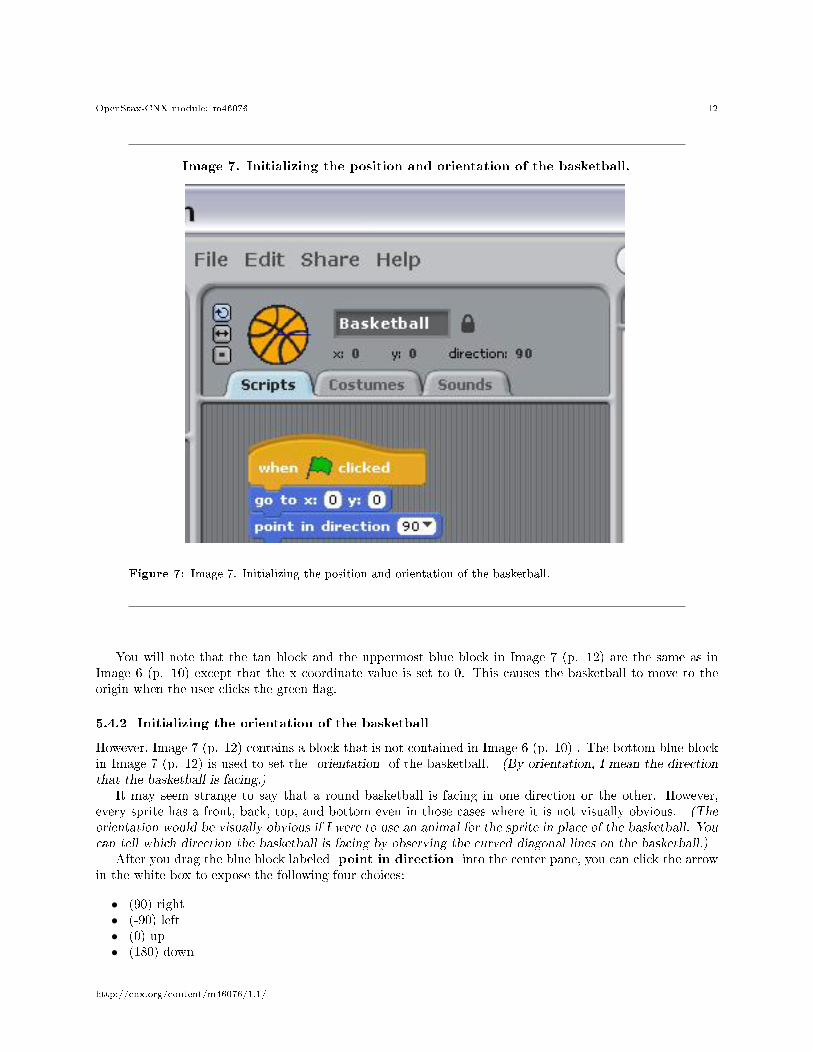
Image 8 (p. 14) shows all of the code in the center pane that applies to the basketball.
http://cnx.org/content/m46076/1.1/
OpenStax-CNX module: m46076 14
Image 8. All of the code that applies to the basketball.
Figure 8: Image 8. All of the code that applies to the basketball.
The top script in Image 8 (p. 14) is another image of the script that was shown in Image 7 (p. 12) . At
http://cnx.org/content/m46076/1.1/

OpenStax-CNX module: m46076 15
this point, we are interested in the behavior of the bottom script in Image 8 (p. 14) .
5.4.4 Behavior of the bottom script
The tan block labeled when Basketball clicked speci�es that all of the actions produced by the blocksbelow that block will occur when the user clicks the basketball with the mouse. Furthermore, those actionswill occur in top to bottom order.
The blue block labeled move 90 steps causes the basketball to move 90 steps forward (in the directionthat it is facing) . Each step constitutes one unit in the Cartesian coordinate system. For example, if youwere to change this value from 90 to 240, that would cause the basketball to move from the origin to theextreme right edge of the Stage.
5.4.5 The selection block
As I indicated earlier (p. 3) , the selection structure is sometimes referred to as a decision structure. Inother words, this structure causes the program to select or make a decision between two alternatives. Thepseudocode in Image 9 (p. 15) describes this process.
Image 9. Pseudocode for a selection structure.
if a specified condition is true
perform a specified action
otherwise (when the specified condition is not true)
perform a different action
Figure 9: Image 9. Pseudocode for a selection structure.
Sometimes the second part of the selection process isn't needed. In other words, in some cases, if thespeci�ed condition is not true, there is no requirement to do anything at all. That is the case in this program.
5.4.6 Two independent decisions
This program makes two independent decisions shown by the pseudocode in Image 10 (p. 15) .
Image 10. Two independent decisions.
if the basketball is touching the beach ball on the right
turn around and face to the left
if the basketball is touching the beach ball on the left
turn around and face to the right
Figure 10: Image 10. Two independent decisions.
http://cnx.org/content/m46076/1.1/
OpenStax-CNX module: m46076 16
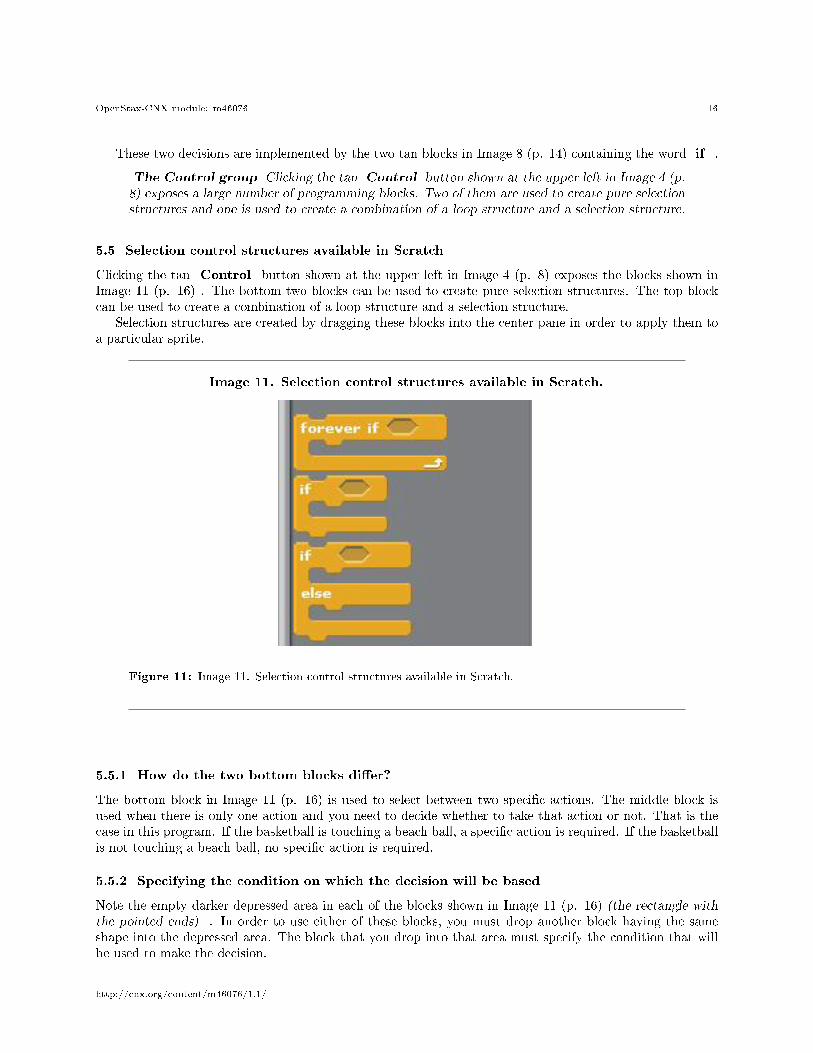
These two decisions are implemented by the two tan blocks in Image 8 (p. 14) containing the word if .
The Control group Clicking the tan Control button shown at the upper left in Image 4 (p.8) exposes a large number of programming blocks. Two of them are used to create pure selectionstructures and one is used to create a combination of a loop structure and a selection structure.
5.5 Selection control structures available in Scratch
Clicking the tan Control button shown at the upper left in Image 4 (p. 8) exposes the blocks shown inImage 11 (p. 16) . The bottom two blocks can be used to create pure selection structures. The top blockcan be used to create a combination of a loop structure and a selection structure.
Selection structures are created by dragging these blocks into the center pane in order to apply them toa particular sprite.
Image 11. Selection control structures available in Scratch.
Figure 11: Image 11. Selection control structures available in Scratch.
5.5.1 How do the two bottom blocks di�er?
The bottom block in Image 11 (p. 16) is used to select between two speci�c actions. The middle block isused when there is only one action and you need to decide whether to take that action or not. That is thecase in this program. If the basketball is touching a beach ball, a speci�c action is required. If the basketballis not touching a beach ball, no speci�c action is required.
5.5.2 Specifying the condition on which the decision will be based
Note the empty darker depressed area in each of the blocks shown in Image 11 (p. 16) (the rectangle withthe pointed ends) . In order to use either of these blocks, you must drop another block having the sameshape into the depressed area. The block that you drop into that area must specify the condition that willbe used to make the decision.
http://cnx.org/content/m46076/1.1/

OpenStax-CNX module: m46076 17
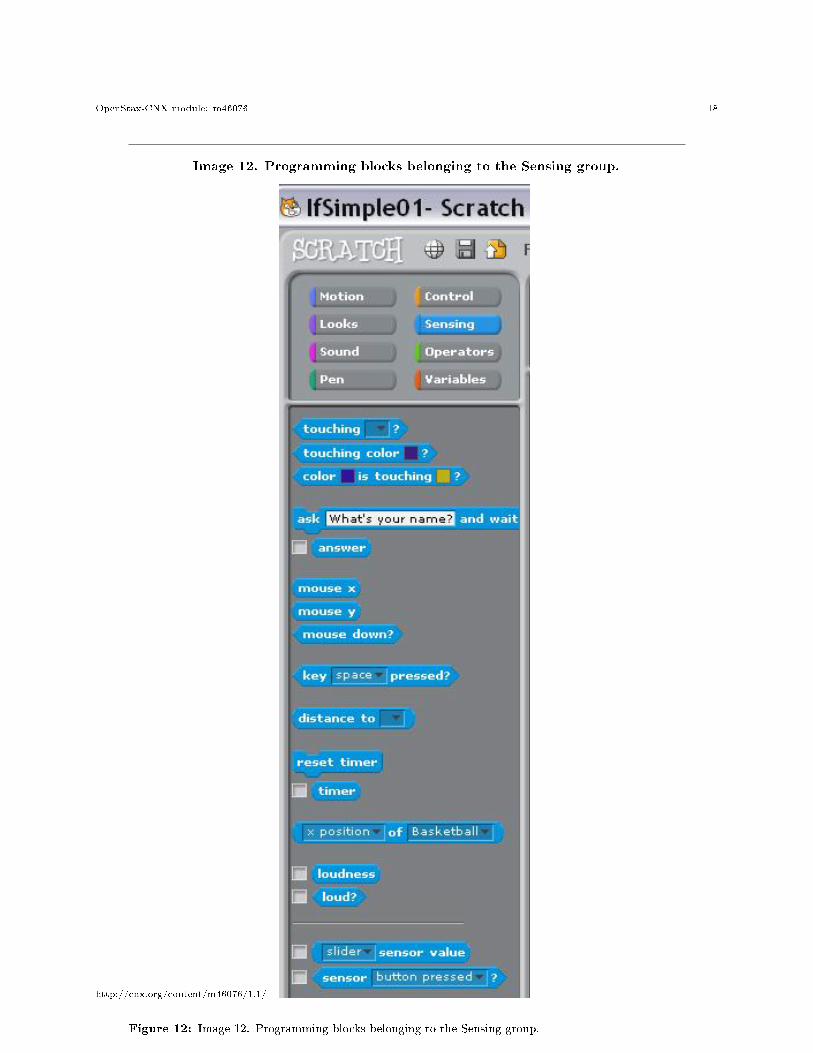
5.5.3 Two groups of programming blocks have the correct shape
Unless I missed seeing some others, there are only two buttons at the top left of Image 4 (p. 8) that exposeblocks having the required shape:
• Sensing (light blue)• Operators (green)
In this case, we will select and use a block from the light blue Sensing group. (We will use programmingblocks from the green Operators group in a future module.) All of the blocks belonging to the Sensing
group are shown in Image 12 (p. 18) .
http://cnx.org/content/m46076/1.1/
OpenStax-CNX module: m46076 18
Image 12. Programming blocks belonging to the Sensing group.
Figure 12: Image 12. Programming blocks belonging to the Sensing group.
http://cnx.org/content/m46076/1.1/

OpenStax-CNX module: m46076 19
5.5.4 Will use the touching block
We will use the block labeled touching followed by a pull-down list and a question mark.The items that appear in the pull-down list depend on the sprites that have been added to the pro-
gram. For this program, that list consists of the following choices when the basketball has been selected forprogramming:
• mouse-pointer• edge• LeftBeachball• RightBeachball
The top two choices are always there. The remaining choices depend on the sprites that have been addedto the program at the point in time when you pull down the list and the sprite that has been selectedfor programming. (Note that the Basketball sprite does not appear in the above list because it wasselected for programming when I examined the list. In other words, you can't determine that the basketballis touching the basketball.)
5.6 Go back and examine the script
Getting back to the bottom script in Image 8 (p. 14) , you can see that I dragged two copies of the if blockshown in Image 11 (p. 16) into the center panel and connected the blocks as shown in Image 8 (p. 14) .Then I dragged two copies of the touching block from the Sensing group shown in Image 12 (p. 18) ,and dropped each of those blocks into the corresponding locations in the if blocks in Image 8 (p. 14) .
Then I selected RightBeachball from the pull-down list for one of the touching blocks and selectedLeftBeachball from the pull-down list for the other touching block.
5.6.1 Conditions have been established - need actions
At this point, I had the conditions for the two selection structures established, but I hadn't yet speci�ed theactions to be taken when one or the other of the conditions is found to be true.
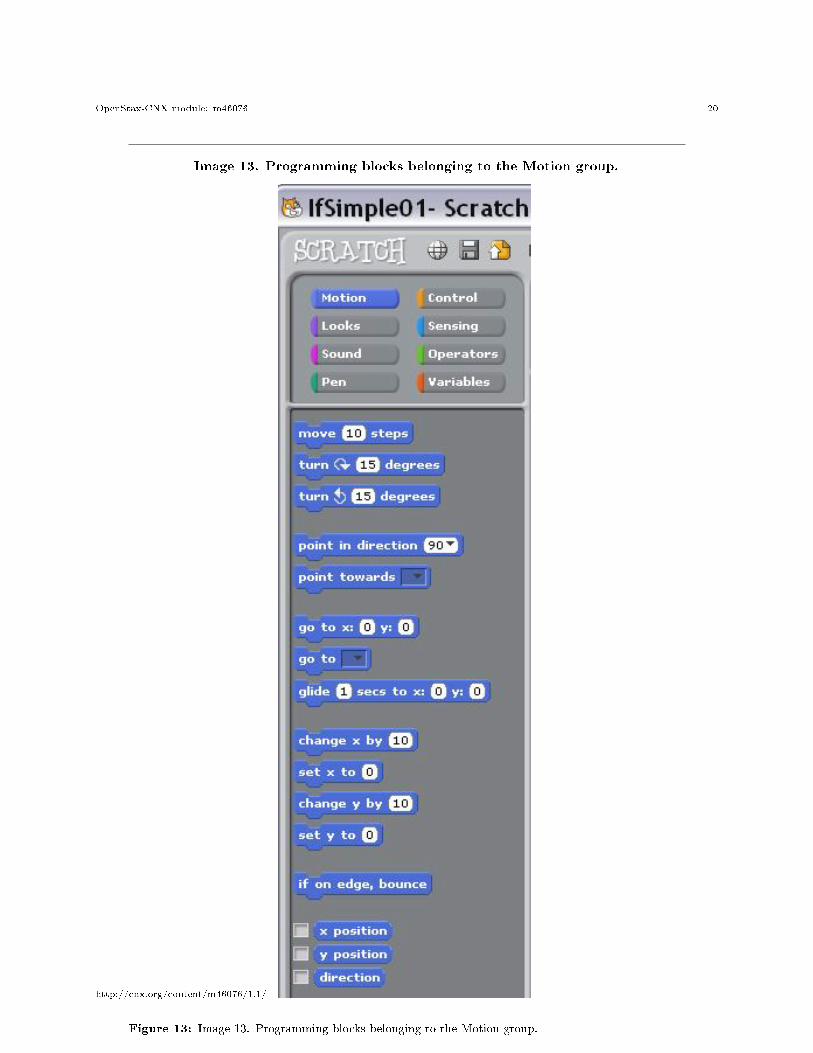
5.7 Programming blocks belonging to the Motion group
Image 13 (p. 20) shows the programming blocks that are exposed by clicking the Motion button at thetop left of Image 4 (p. 8) .
http://cnx.org/content/m46076/1.1/
OpenStax-CNX module: m46076 20
Image 13. Programming blocks belonging to the Motion group.
Figure 13: Image 13. Programming blocks belonging to the Motion group.
http://cnx.org/content/m46076/1.1/
OpenStax-CNX module: m46076 21
You saw three of the blocks from Image 13 (p. 20) being used in Image 6 (p. 10) , Image 7 (p. 12) , andimmediately below the top tan block in the bottom script in Image 8 (p. 14) . Now we need to use anotherof the blocks from Image 13 (p. 20) .
5.7.1 Turn around and face the other way
Recall that the blue point in direction block in the top script in Image 8 (p. 14) causes the basketballto turn to face to the right when the user clicks the green �ag.
The two turn blocks in the bottom script in Image 8 (p. 14) cause the basketball to rotate around itscenter by 180 degrees. This, in turn, causes it to face in the opposite direction from the direction that it waspreviously facing. (It also turns it upside down, but that doesn't matter for a round basketball.)
This is the action that is required whenever either of the touching blocks is true. In other words,whenever the basketball touches either of the beach balls, it must turn to face the opposite direction and beprepared to move 90 steps in that direction the next time the user clicks the basketball.
5.8 An online version of this program is available
A copy of this program has been posted online for your review (see Resources (p. 25) for the URL) . Ifyou don't �nd the program using that URL, search the Scratch site for the user named dbal.
6 Run the program
I encourage you to use the information provided above to write this program. Experiment with the code,making changes, and observing the results of your changes. Make certain that you can explain why yourchanges behave as they do.
Just for fun, use blocks from the purple Sound group and add some sound e�ects to your program.I also encourage you to write the program described below.
7 Student programming project
Write a Scratch program named IfWithVar01 that produces the output shown in Image 14 (p. 22) whenthe user clicks the green �ag.
http://cnx.org/content/m46076/1.1/

OpenStax-CNX module: m46076 22
Image 14. Initial output from the program named IfWithVar01.
Figure 14: Image 14. Initial output from the program named IfWithVar01.
http://cnx.org/content/m46076/1.1/

OpenStax-CNX module: m46076 23
7.1 Orthogonal axes in Cartesian coordinates
When the user clicks the green �ag, a DrawingPencil sprite draws a pair of orthogonal axes that intersectat the origin in the white Stage area. Make the horizontal axis extend from -200 to 200. Make the verticalaxis extend from -100 to 100.
7.2 Draw a straight line to the location of the next mouse click
Each time the user clicks the mouse in the white Stage area (after the user has clicked the green �ag) , astraight line is drawn from the current location of the DrawingPencil to the location where the mouseclick occurred. Image 15 (p. 24) shows an example output after two mouse clicks.
http://cnx.org/content/m46076/1.1/

OpenStax-CNX module: m46076 24
Image 15. Program output after having clicked twice in the Stage area.
Figure 15: Image 15. Program output after having clicked twice in the Stage area.
http://cnx.org/content/m46076/1.1/

OpenStax-CNX module: m46076 25
7.3 A sneak peek at the solution
In case you need to sneak a peek at the solution to this programming project, a copy of this program hasbeen posted online for your review (see Resources (p. 25) for the URL) . (If you don't �nd the programusing that URL, search the Scratch website for the user named dbal .)
Once you locate the project on the Scratch web site, you can execute it online. You can also download theproject and open it in the Scratch Programming Environment on your computer by following the instructionsunder Download this project!
8 Summary
I began by explaining structured programming, the sequence structure, the selection structure, and the loopstructure. Then I presented and explained a Scratch program that illustrates the selection structure. (Thesequence structure is so simple that it doesn't require an explanation. The loop structure will be explainedin a future module.) The program also illustrates the handling of mouse events and Cartesian coordinates.
Finally, I provided the speci�cations for a student-programming project for you to write to demonstrateyour understanding of what you learned from the �rst program.
Copies of both programs have been posted online for your review (see Resources (p. 25) for the URL). If you don't �nd the program using that URL, search the Scratch site for the user named dbal .
9 What's next?
In the next module, I will teach you about arithmetic operators. In the two modules following that one, Iwill teach you about relational and logical operators and how to use those operators to write the conditionalexpressions used in selection and loop structures.
10 Resources
• Scratch home 4
• Scratch download page 5
• Scratch tutorial - Dance Tutorial 6
• Scratch forums 7
• Son of String Art 8
• Scratch explanatory video 9
• Scratch tutorials from MIT 10
• Scratch tutorial - Digital Art for All 11
• Scratch for Budding Computer Scientists 12
• Learn Scratch at learnscratch.org 13
• Scratch Tutorial - Space Shuttle Mission STS-2020 14
• SCRATCH TUTORIALS ICT In Primary Education 2012-2013 15
• Scratch Wiki 16
4http://scratch.mit.edu/5http://scratch.mit.edu/download6http://mit.edu/∼sil/www/scratch/7http://scratch.mit.edu/forums/8http://scratch.mit.edu/projects/Paddle2See/890239http://www.code.org/learn/scratch
10http://info.scratch.mit.edu/Video_Tutorials11http://www.digitalartforall.com/category/scratchtutorials/12http://cs.harvard.edu/malan/scratch/13http://learnscratch.org/14http://scratched.media.mit.edu/resources/scratch-tutorial-space-shuttle-mission-sts-202015http://ictinprimary.webnode.es/scracth-tutorials/16http://wiki.scratch.mit.edu/wiki/Main_Page
http://cnx.org/content/m46076/1.1/
OpenStax-CNX module: m46076 26
• Scratch WikiTable of ContentsWebsite - Scratch Wiki 17
• Scratch WikiTable of ContentsTutorials - Scratch Wiki 18
• Scratch WikiTable of ContentsProgram - Scratch Wiki 19
• Tutorial about Variables - Scratch Wiki 20
• Scratch support MIT web site 21
• Scratch resources at Scratch.ie 22
• ScratchEd Resources 23
• Scratch project Day Dream 24
• Scratch project Son of String Art 25
• Scratch Project Scratch Tutorial 26
• Variable01 27 - Online version of program• Variable02 28 - Online version of student programming project• Variable03 29 - Online version of student programming project• IfSimple01 30 - Online version of program• IfWithVar01 31 - Online version of student programming project
11 Miscellaneous
This section contains a variety of miscellaneous information.
note: Housekeeping material
• Module name: Scr0130: Sequence, Selection, and Loop• File: Scr0130.htm• Published: 03/26/13
note: Disclaimers: Financial : Although the Connexions site makes it possible for you todownload a PDF �le for this module at no charge, and also makes it possible for you to purchase apre-printed version of the PDF �le, you should be aware that some of the HTML elements in thismodule may not translate well into PDF.
I also want you to know that, I receive no �nancial compensation from the Connexions website evenif you purchase the PDF version of the module.
In the past, unknown individuals have copied my modules from cnx.org, converted them to Kindlebooks, and placed them for sale on Amazon.com showing me as the author. I neither receivecompensation for those sales nor do I know who does receive compensation. If you purchase sucha book, please be aware that it is a copy of a module that is freely available on cnx.org and that itwas made and published without my prior knowledge.
17http://wiki.scratch.mit.edu/wiki/Scratch_Wiki:Table_of_Contents/Website18http://wiki.scratch.mit.edu/wiki/Scratch_Wiki:Table_of_Contents/Tutorials19http://wiki.scratch.mit.edu/wiki/Scratch_Wiki:Table_of_Contents/Program20http://wiki.scratch.mit.edu/wiki/Tutorial_about_Variables21http://info.scratch.mit.edu/Support22http://www.scratch.ie/resources23http://scratched.media.mit.edu/resources24http://scratch.mit.edu/projects/cremeglace/4015025http://scratch.mit.edu/projects/Paddle2See/8902326http://scratch.mit.edu/projects/turkey3/257687127http://scratch.mit.edu/projects/dbal/15444628http://scratch.mit.edu/projects/dbal/15445229http://scratch.mit.edu/projects/dbal/15445730http://scratch.mit.edu/projects/dbal/15596631http://scratch.mit.edu/projects/dbal/155971
http://cnx.org/content/m46076/1.1/

OpenStax-CNX module: m46076 27
A�liation : I am a professor of Computer Information Technology at Austin Community Collegein Austin, TX.
-end-
http://cnx.org/content/m46076/1.1/


