Rev. 201611
LIBERTY Dental Plan Online Provider Portal User Guide
Online Provider Portal User Guide
Rev. 201611
LIBERTY Dental Plan Online Provider Portal User Guide
Table of Contents GETTING STARTED
SYSTEM REQUIREMENTS ........................................................................................................................................ 3 OFFICE NUMBER AND ACCESS CODE .................................................................................................................. 3
NEW OFFICE REGISTRATION
REGISTER A NEW OFFICE ..................................................................................................................................... 4 MY PREFERENCES ................................................................................................................................................ 6 ADD A NEW USER ............................................................................................................................................... 8 SET NEW USER ROLES .......................................................................................................................................... 9 ENABLE AND DISABLE USERS ............................................................................................................................... 10 EDIT USER INFORMATION .................................................................................................................................... 11 MY PROFILE ...................................................................................................................................................... 12 MY PROVIDERS ................................................................................................................................................. 12
ACCESSING YOUR USER ACCOUNT
LOG ON ........................................................................................................................................................... 13 PASSWORD RESET .............................................................................................................................................. 15
MEMBER ELIGIBILITY AND BENEFITS
CHECK MEMBER ELIGIBILITY ............................................................................................................................... 17 MEMBER UTILIZATION SCREEN............................................................................................................................. 18 CHECK MULTIPLE MEMBER ELIGIBILITIES ............................................................................................................... 19
MEMBER ROSTERS
CAPITATION PLANS ONLY .................................................................................................................................. 20
CLAIMS, PRE-ESTIMATES AND REFERRALS
SUBMIT A CLAIM, PRE-ESTIMATE OR REFERRAL ..................................................................................................... 21 SUBMISSION WITH ADDITIONAL INFORMATION...................................................................................................... 23 CHECK THE STATUS OF A CLAIM, PRE-ESTIMATE OR REFERRAL .............................................................................. 24 SEARCH A CLAIM BY CLAIM NUMBER ................................................................................................................. 26 SEARCH A CLAIM BY PATIENT ACCOUNT NUMBER ............................................................................................... 27
ATTACHMENTS
AVAILABLE DOCUMENTS .................................................................................................................................... 28
RESOURCES
FORMS AND PROVIDER REFERENCE GUIDES ........................................................................................................ 29 PROVIDER RESOURCE LIBRARY ........................................................................................................................... 30
TALK TO US
SUBMITTING A WRITTEN INQUIRY ......................................................................................................................... 31
LOGOFF
TO LOG OFF OF THE ONLINE PROVIDER PORTAL ................................................................................................. 33

Page 3 of 34
Rev. 201611
Getting Started LIBERTY Dental Plan (LIBERTY) offers 24/7 real-time access to information and tools through our secure Online Provider Portal.
System Requirements • Internet Connection (Internet Explorer 7 or later) • Adobe Acrobat Reader
Office Number and Access Code All contracted network dental offices are issued a unique Office Number and Access Code. These numbers can be found in your LIBERTY Welcome Letter and are required to register your office on LIBERTY’s Online Provider Portal. If you are unable to locate your Office Number and/or Access Code, please contact our Member Services Department at (888) 700-0643 for assistance.

Page 4 of 34
Rev. 201611
New Office Registration Register a New Office A designated Office Administrator should be the user to set up the account on behalf of all providers/staff. The Office Administrator will be responsible for adding, editing and terminating additional users within the office.
1. To register a new office, enter the following website address into your browser: www.libertydentalplan.com
2. Click on Register
Page 5 of 34
Rev. 201611
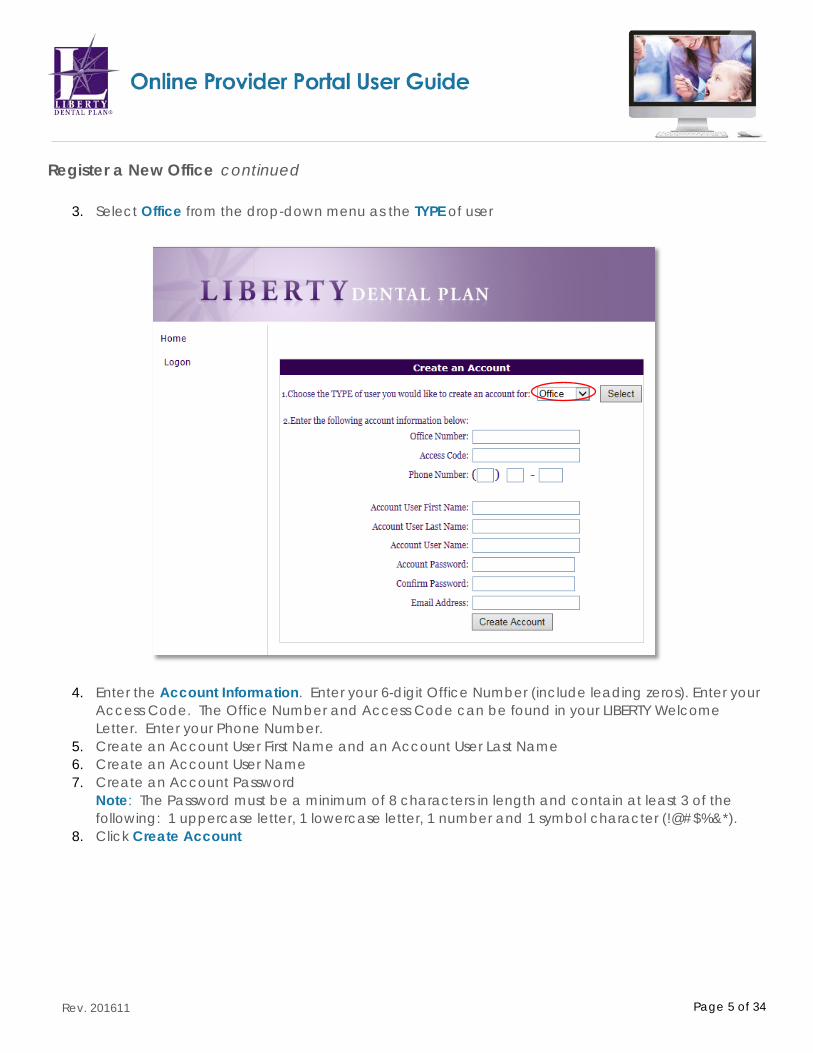
Register a New Office continued 3. Select Office from the drop-down menu as the TYPE of user
4. Enter the Account Information. Enter your 6-digit Office Number (include leading zeros). Enter your Access Code. The Office Number and Access Code can be found in your LIBERTY Welcome Letter. Enter your Phone Number.
5. Create an Account User First Name and an Account User Last Name 6. Create an Account User Name 7. Create an Account Password
Note: The Password must be a minimum of 8 characters in length and contain at least 3 of the following: 1 uppercase letter, 1 lowercase letter, 1 number and 1 symbol character (!@#$%&*).
8. Click Create Account

Page 6 of 34
Rev. 201611
My Preferences After initial set-up, the user will be directed to the My Preferences tab.
1. Make sure that the default for provider type is set to Dental
2. Select your office’s various Preferences
Note: The Evidence of Payment (EOP) is sent to providers and the Evidence of Benefits (EOB) is sent to members.
The Place of Service on Claim Submission page default is set to Office. Another location can be selected as a default from the drop-down menu.
Page 7 of 34
Rev. 201611
My Preferences continued
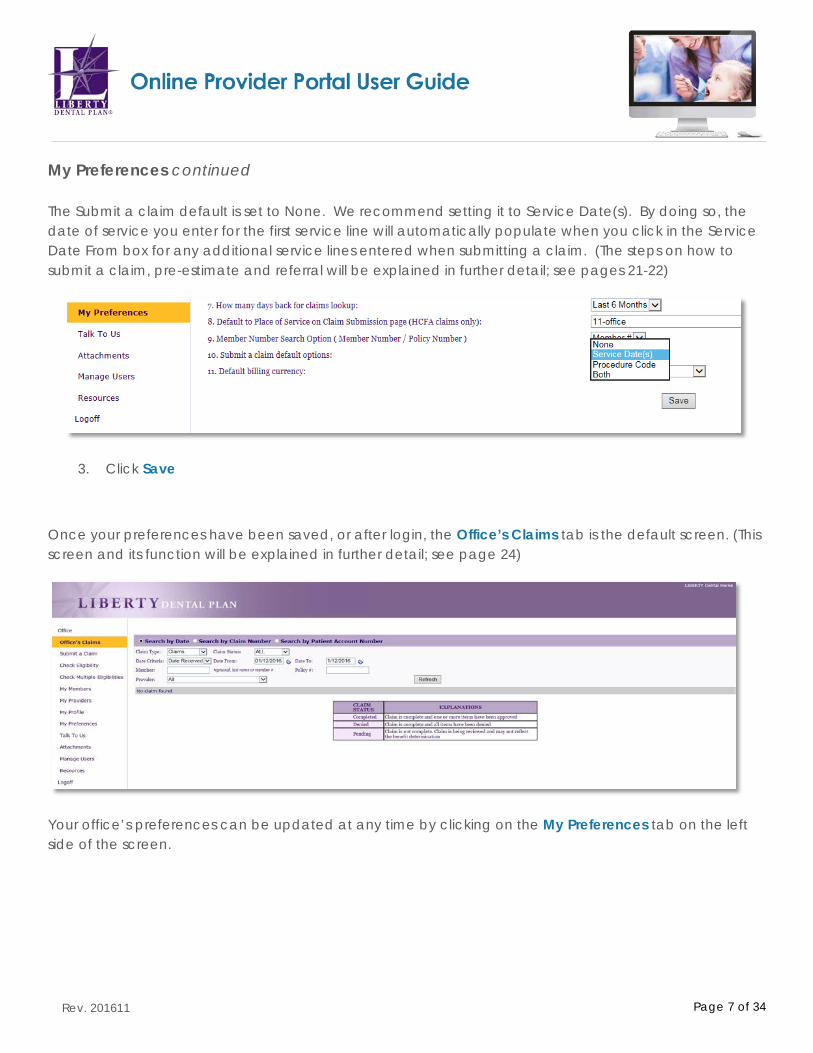
The Submit a claim default is set to None. We recommend setting it to Service Date(s). By doing so, the date of service you enter for the first service line will automatically populate when you click in the Service Date From box for any additional service lines entered when submitting a claim. (The steps on how to submit a claim, pre-estimate and referral will be explained in further detail; see pages 21-22)
3. Click Save
Once your preferences have been saved, or after login, the Office’s Claims tab is the default screen. (This screen and its function will be explained in further detail; see page 24)
Your office’s preferences can be updated at any time by clicking on the My Preferences tab on the left side of the screen.
Page 8 of 34
Rev. 201611
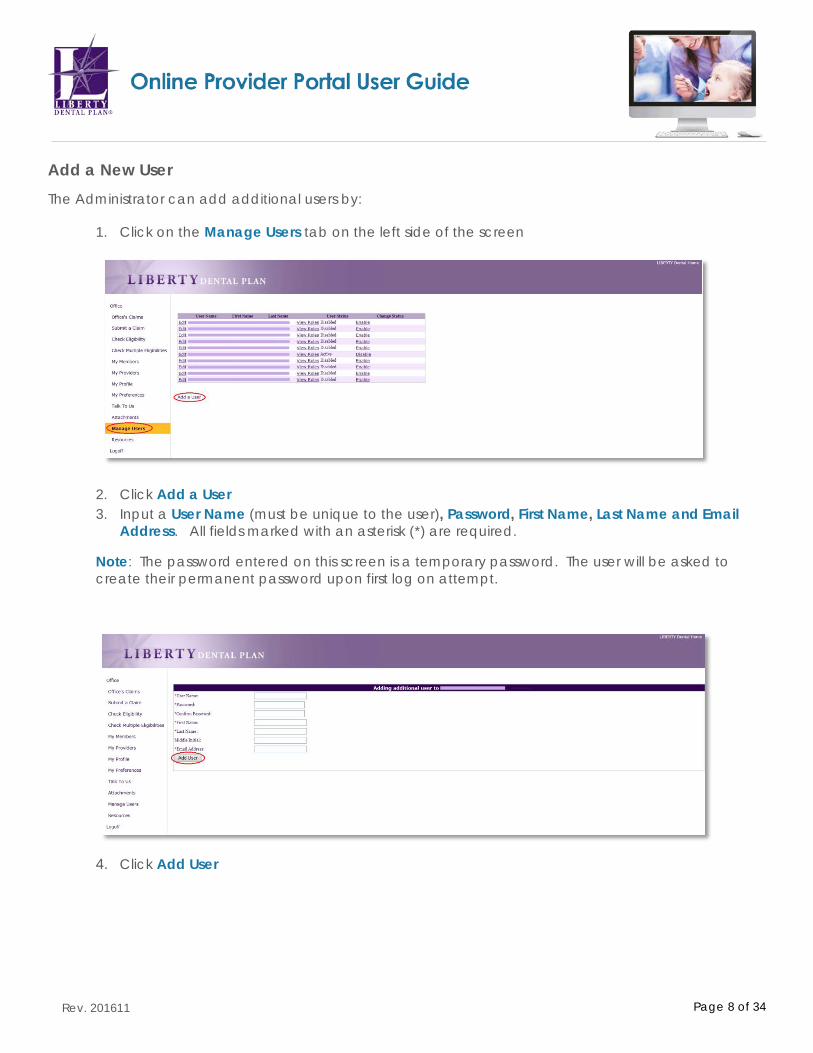
Add a New User The Administrator can add additional users by:
1. Click on the Manage Users tab on the left side of the screen
2. Click Add a User 3. Input a User Name (must be unique to the user), Password, First Name, Last Name and Email
Address. All fields marked with an asterisk (*) are required.
Note: The password entered on this screen is a temporary password. The user will be asked to create their permanent password upon first log on attempt.
4. Click Add User

Page 9 of 34
Rev. 201611
Set New User Roles 1. We recommend that you click on PrimaryWebAccount and WebOffice to grant the user access
to view and update information for the office. Once you click on each role in Current User Role(s) Available, the roles will move up to Current User Role(s).
2. Check PrimaryWebAccount and WebOffice, then click Return
Roles:
• PrimaryWebAccount – Allows the user to manage and add additional user accounts for the entire office. This includes resetting passwords, updating user information (First name, Last Name, Email Address), as well as disabling users in the event they should no longer have access to the account.
• WebOffice – Allows access to all functionality on the portal, except limits access to “Manage Users” tab. The user would only have access to their account and no access to any other user accounts for that office.

Page 10 of 34
Rev. 201611
Enable and Disable Users
Once a new user is set up, the Office Administrator has the ability to enable or disable their account.
1. Click on the Manage Users tab on the left side of the screen • If the User Status is Active, the account is Enabled. To disable the account, click Disable
under Change Status. • If the User Status is Disabled, the account is not active. To reinstate the account, click
Enable under Change Status.

Page 11 of 34
Rev. 201611
Edit User Information The Office Administrator can edit a user’s information:
1. Click on the Manage Users tab on the left side of the screen
2. Click Edit for the user you would like to edit 3. Update user information
Note: All user information with an asterisk (*) can be edited.
4. Click Update User

Page 12 of 34
Rev. 201611
My Profile You can view your office’s current business information by clicking on the My Profile tab on the left side of the screen. This information can only be updated by contacting your Professional Relations Network Manager.
My Providers You can view a list of all the providers linked to your office in our system by clicking on the My Providers tab on the left side of the screen. Please contact your Professional Relations Network Manager to add, terminate or request the status of a provider.

Page 13 of 34
Rev. 201611
Accessing Your User Account Log On
Please visit www.libertydentalplan.com.
1. Click on LOGIN
Page 14 of 34
Rev. 201611
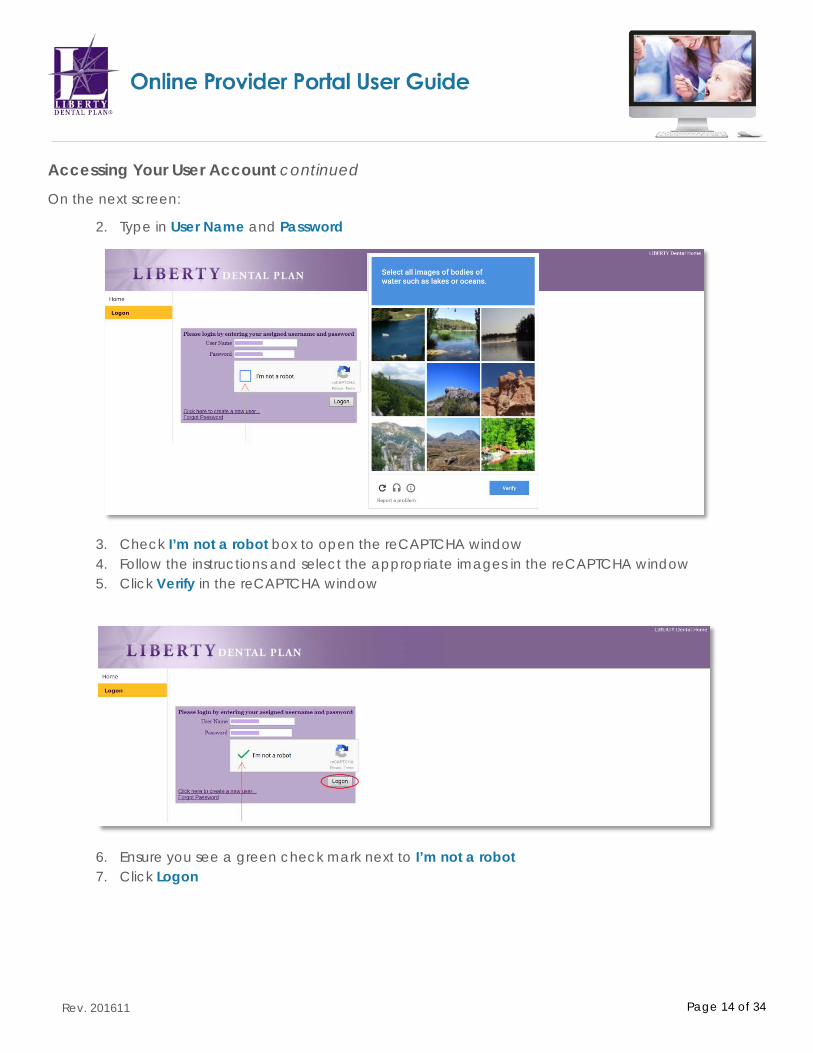
Accessing Your User Account continued
On the next screen:
2. Type in User Name and Password
3. Check I’m not a robot box to open the reCAPTCHA window 4. Follow the instructions and select the appropriate images in the reCAPTCHA window 5. Click Verify in the reCAPTCHA window
6. Ensure you see a green check mark next to I’m not a robot 7. Click Logon

Page 15 of 34
Rev. 201611
Password Reset Please visit www.libertydentalplan.com.
1. Click Forgot my password
On the next screen:
2. Select Office from the drop-down menu as the TYPE of user 3. Enter the Account Information. The Office Number and Access Code can be found in your LIBERTY
Welcome Letter.
4. Click Reset Password

Page 16 of 34
Rev. 201611
Password Reset continued On the next screen:
5. Type in User Name and Password
6. Check I’m not a robot box to open the reCAPTCHA window 7. Follow the instructions and select the appropriate images in the reCAPTCHA window 8. Click Verify in the reCAPTCHA window 9. Ensure you see a green check mark next to I’m not a robot 10. Click Logon
Page 17 of 34
Rev. 201611
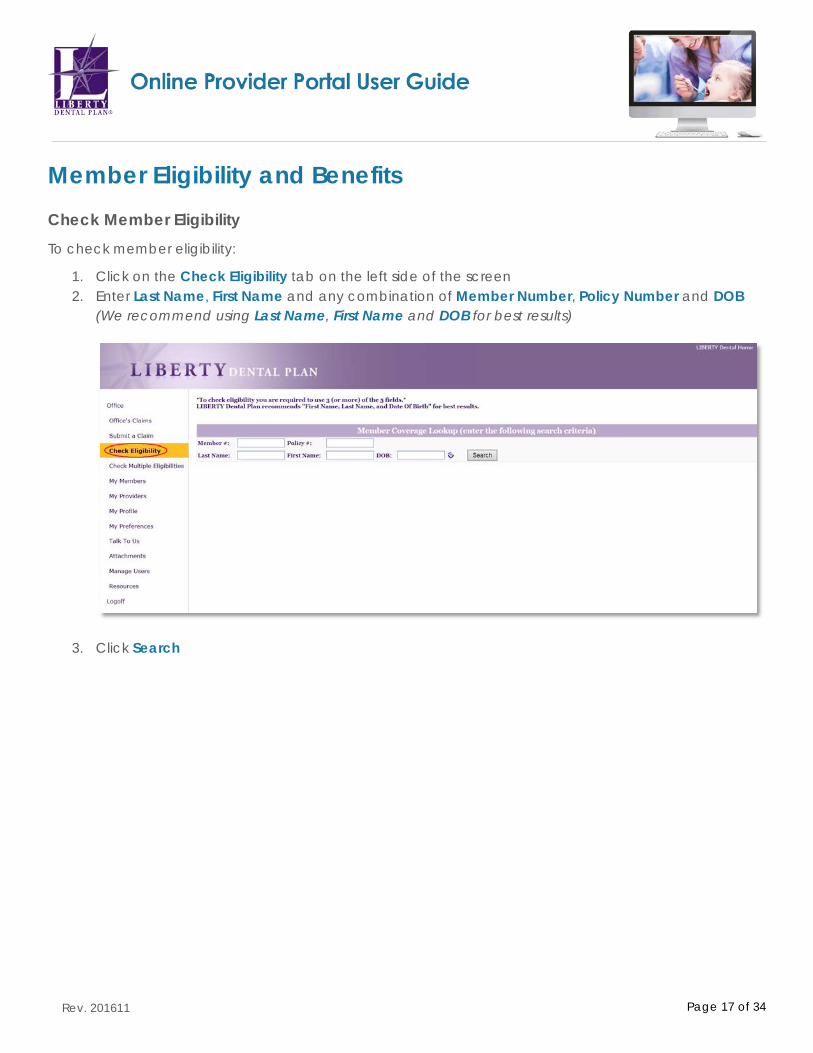
Member Eligibility and Benefits Check Member Eligibility To check member eligibility:
1. Click on the Check Eligibility tab on the left side of the screen 2. Enter Last Name, First Name and any combination of Member Number, Policy Number and DOB
(We recommend using Last Name, First Name and DOB for best results)
3. Click Search
Page 18 of 34
Rev. 201611
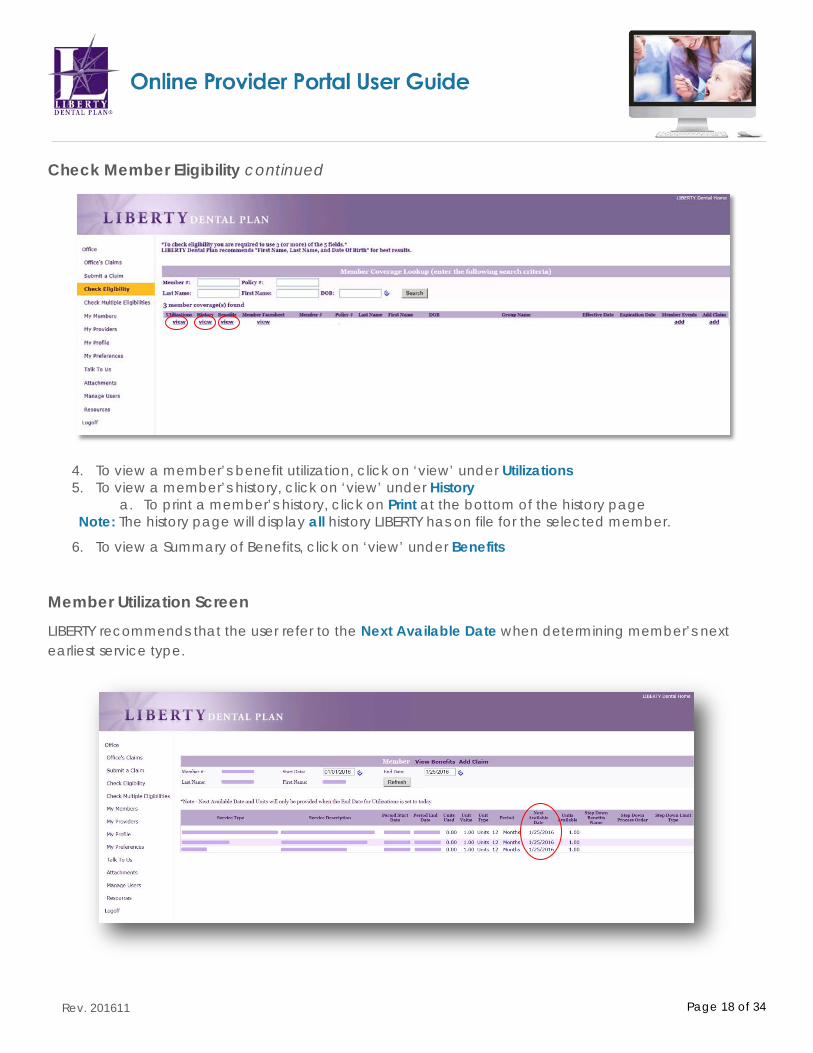
Check Member Eligibility continued
4. To view a member’s benefit utilization, click on ‘view’ under Utilizations 5. To view a member’s history, click on ‘view’ under History
a. To print a member’s history, click on Print at the bottom of the history page Note: The history page will display all history LIBERTY has on file for the selected member.
6. To view a Summary of Benefits, click on ‘view’ under Benefits
Member Utilization Screen LIBERTY recommends that the user refer to the Next Available Date when determining member’s next earliest service type.
Page 19 of 34
Rev. 201611
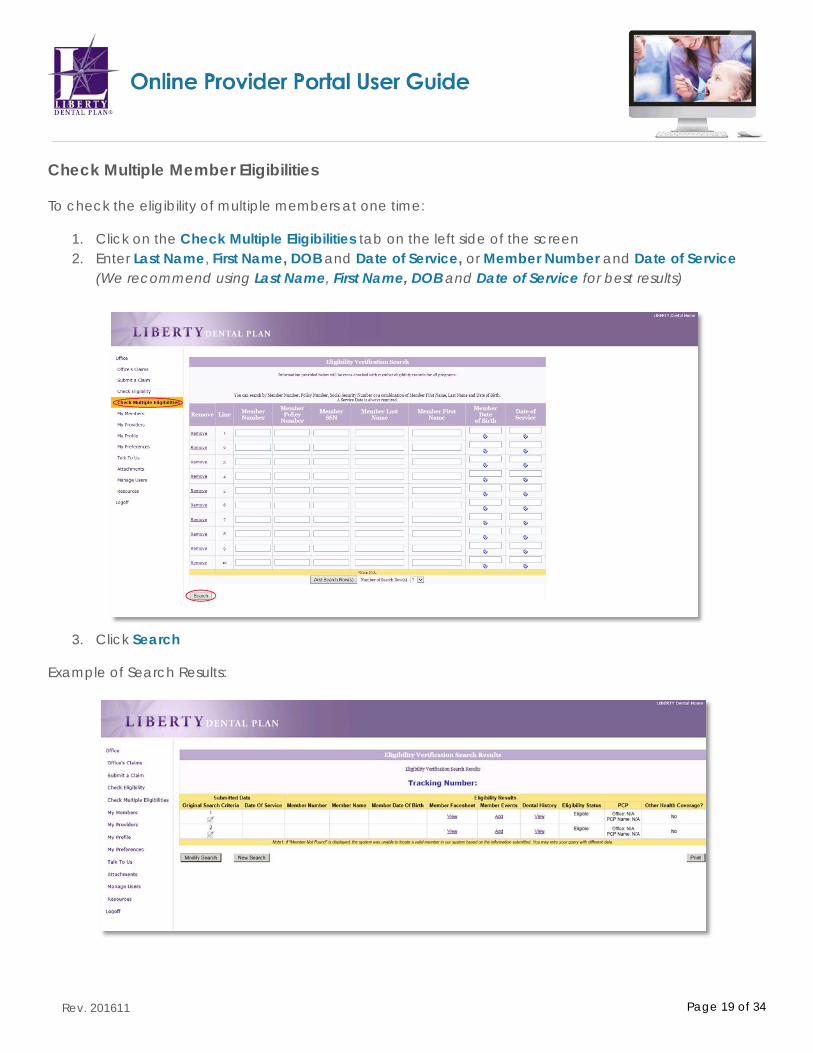
Check Multiple Member Eligibilities
To check the eligibility of multiple members at one time:
1. Click on the Check Multiple Eligibilities tab on the left side of the screen 2. Enter Last Name, First Name, DOB and Date of Service, or Member Number and Date of Service
(We recommend using Last Name, First Name, DOB and Date of Service for best results)
3. Click Search
Example of Search Results:

Page 20 of 34
Rev. 201611
Member Rosters Capitation Plans Only Offices that participate in a capitation program may view their monthly rosters by clicking on the My Members tab located on the left side of the screen. The My Members screen allows the user to view all members assigned to the office.
To sort membership assigned to an office by month, use the drop-down menus to select Month/Year and select All. Click Find.
To sort membership assigned to a specific provider, select Month/Year and use drop-down menu to select individual provider. Click Find.
Once you have sorted the membership, you will be able to print monthly rosters from this page by clicking Print.

Page 21 of 34
Rev. 201611
Claims, Pre-Estimates and Referrals Submit a Claim, Pre-Estimate or Referral
1. Click on the Submit a Claim tab on the left side of the screen
2. Click on Dental Claim (ADA) or Pre-Estimate Claim (EST) radio button (see next page for Referral (RES) submission)
a. Choose treating provider from Provider drop-down menu b. Choose office/location from Vendor drop-down menu for (ADA) or (EST) submission c. Input patient information i.e. Last Name, First Name and any combination of Member #, Policy
# or DOB (We recommend using Last Name, First Name and DOB for best results)
d. Submit up to 30 service lines at a time by completing the fields in each row. To add additional lines, click Add service line(s).

Page 22 of 34
Rev. 201611
Submit a Claim, Pre-Estimate or Referral continued
3. Click on Referral (RES) radio button
a. Select the Provider referring the patient from the drop-down menu b. For emergency referrals, check the Emergency Referral box c. Select the appropriate option from the Specialty Category drop-down menu d. Select the appropriate option from the Specialty Subcategory drop-down menu e. Input patient information i.e. Last Name, First Name and any combination of Member #, Policy
# or DOB (We recommend using Last Name, First Name and DOB for best results)
f. Submit up to 30 service lines at a time by completing the fields in each row. To add additional lines, click Add service line(s).
Page 23 of 34
Rev. 201611
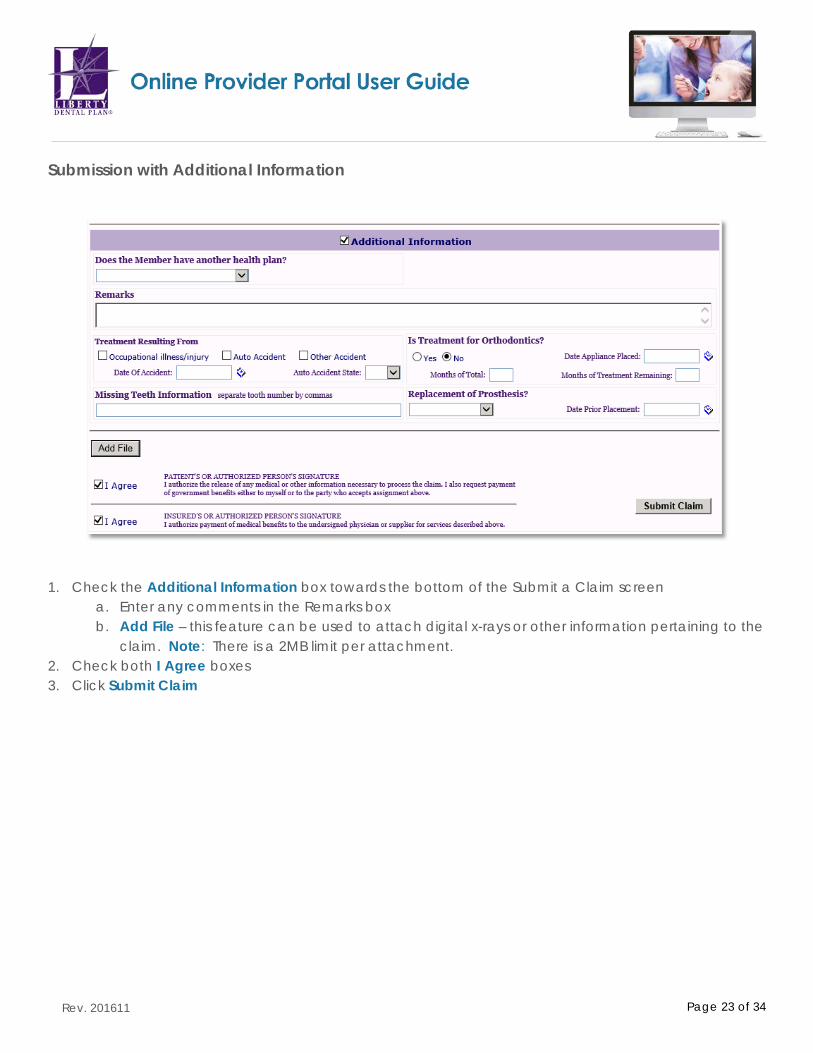
Submission with Additional Information
1. Check the Additional Information box towards the bottom of the Submit a Claim screen
a. Enter any comments in the Remarks box b. Add File – this feature can be used to attach digital x-rays or other information pertaining to the
claim. Note: There is a 2MB limit per attachment. 2. Check both I Agree boxes 3. Click Submit Claim

Page 24 of 34
Rev. 201611
Check the Status of a Claim, Pre-Estimate or Referral
1. To view a Claim, Pre-Estimate or Referral associated with your office, click on the Office’s Claims tab on the left side of the screen
2. Click on Search by Date, Search by Claim Number or Search by Patient Account Number radio buttons
3. When searching by date, use the Claim Type drop-down menu to select Claims, Pre-Estimate or Referral
You can narrow your search results using the Claim Status drop-down menu, Member or Policy # boxes.
4. Click Refresh when searching by date
Page 25 of 34
Rev. 201611
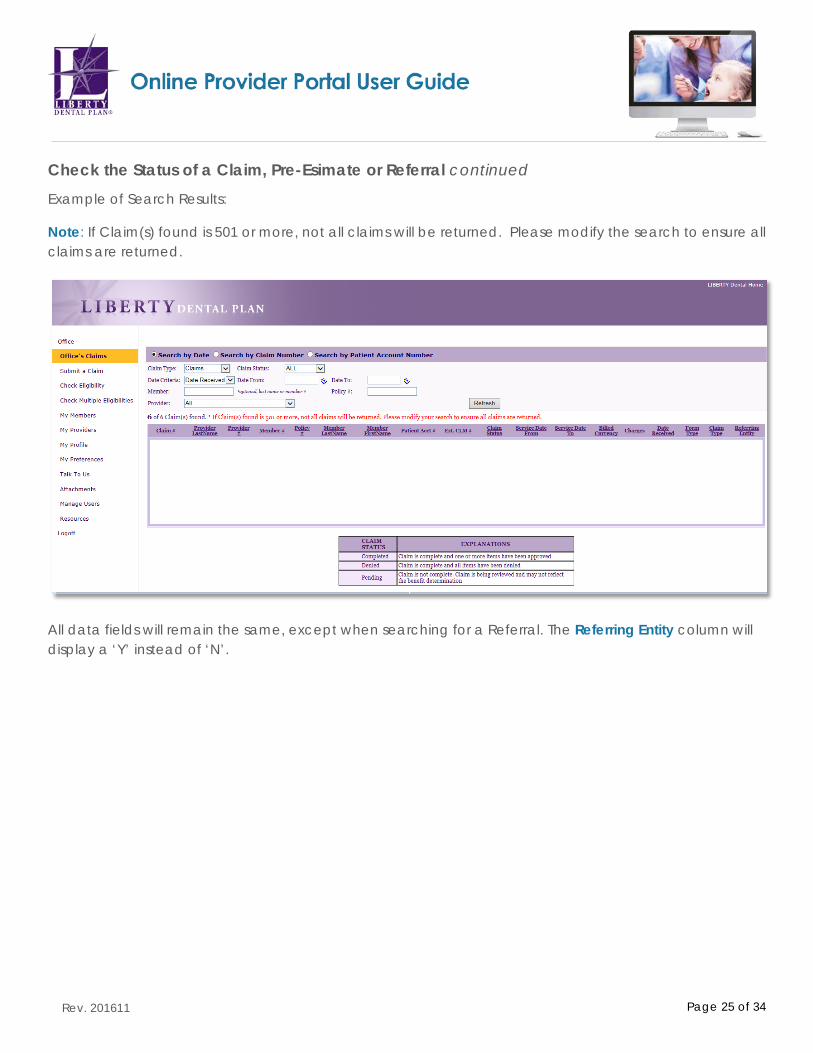
Check the Status of a Claim, Pre-Esimate or Referral continued
Example of Search Results:
Note: If Claim(s) found is 501 or more, not all claims will be returned. Please modify the search to ensure all claims are returned.
All data fields will remain the same, except when searching for a Referral. The Referring Entity column will display a ‘Y’ instead of ‘N’.
Page 26 of 34
Rev. 201611
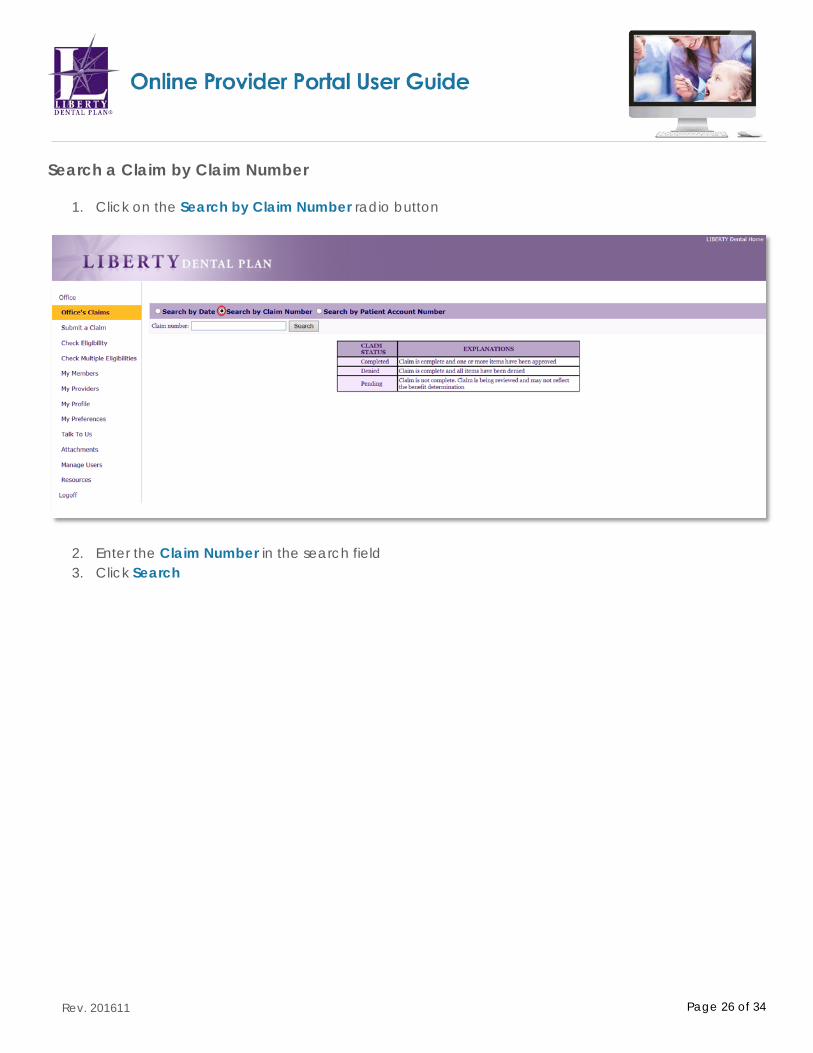
Search a Claim by Claim Number
1. Click on the Search by Claim Number radio button
2. Enter the Claim Number in the search field 3. Click Search
Page 27 of 34
Rev. 201611
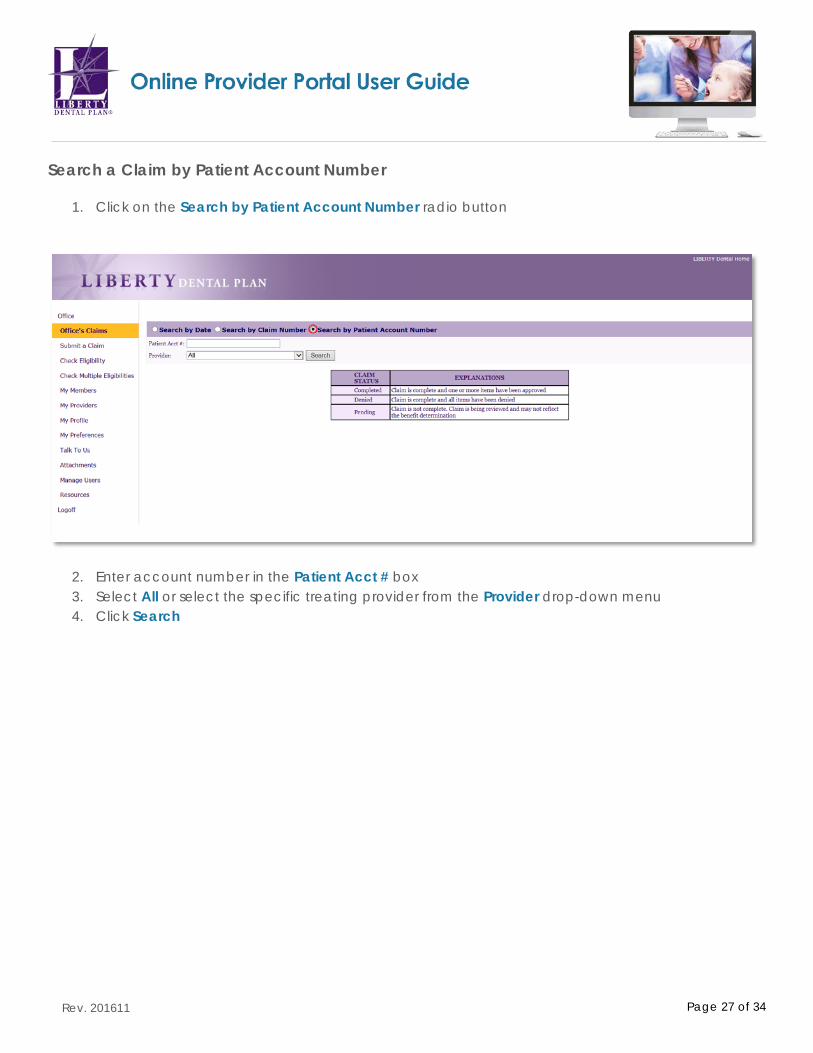
Search a Claim by Patient Account Number
1. Click on the Search by Patient Account Number radio button
2. Enter account number in the Patient Acct # box 3. Select All or select the specific treating provider from the Provider drop-down menu 4. Click Search
Page 28 of 34
Rev. 201611
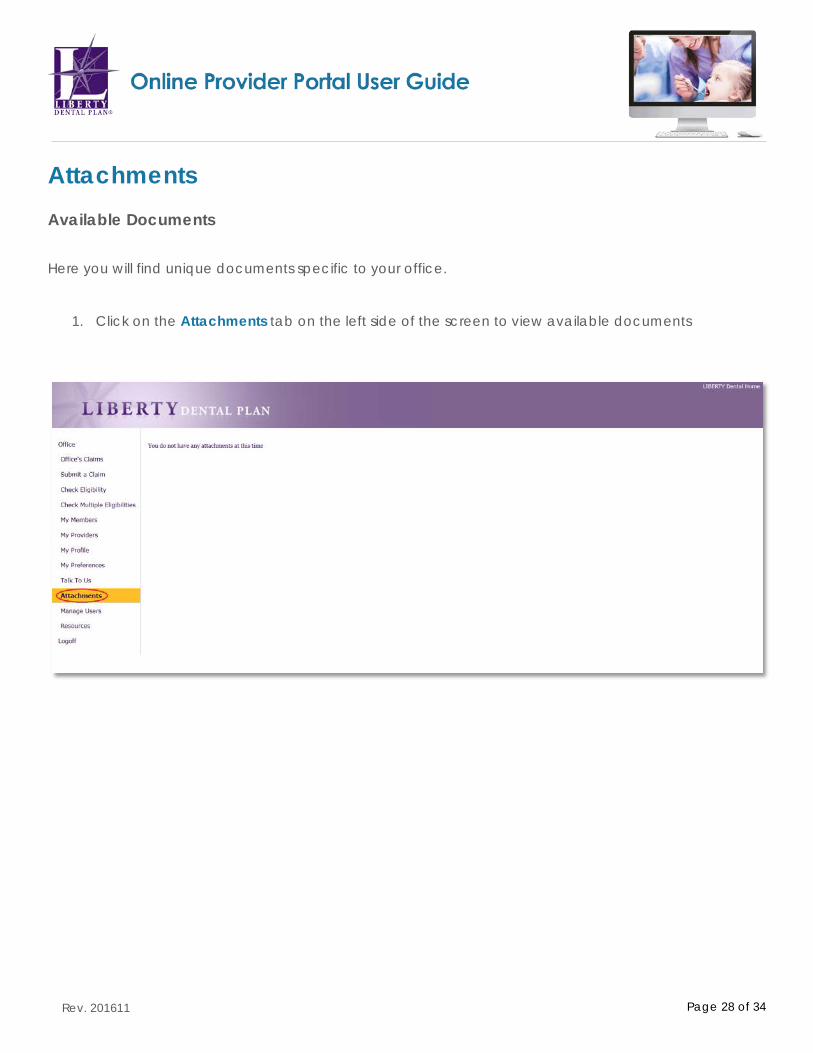
Attachments Available Documents Here you will find unique documents specific to your office.
1. Click on the Attachments tab on the left side of the screen to view available documents
Page 29 of 34
Rev. 201611
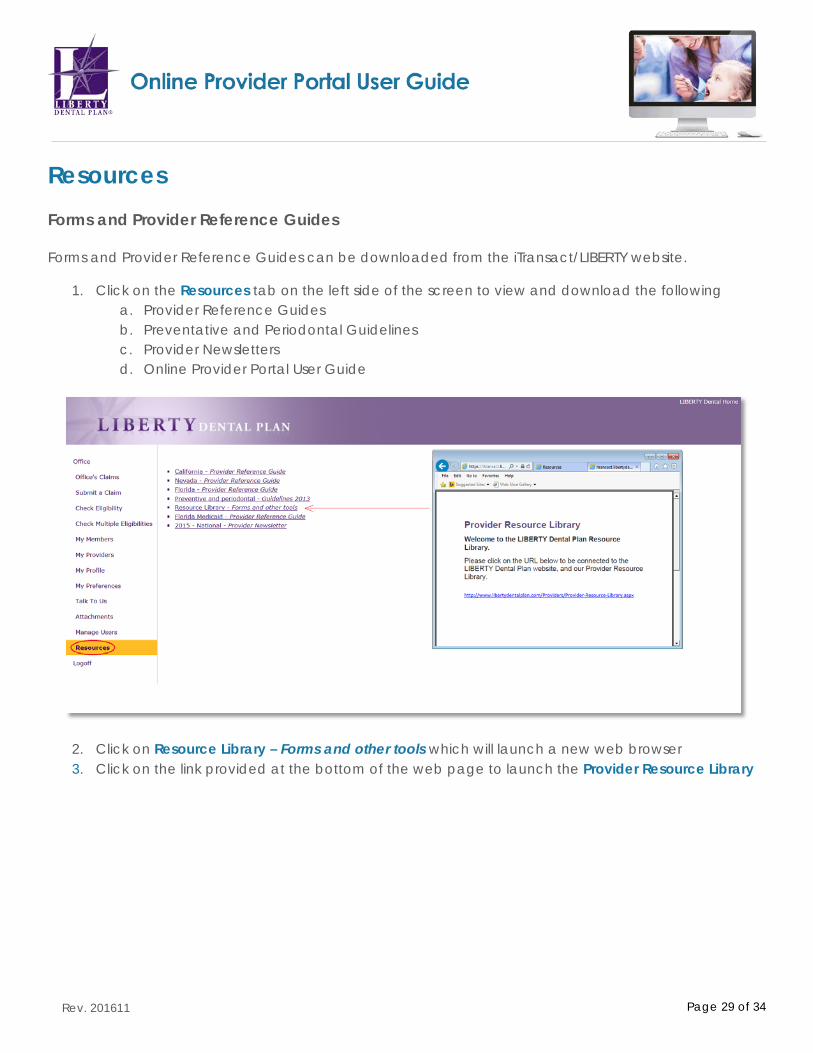
Resources Forms and Provider Reference Guides
Forms and Provider Reference Guides can be downloaded from the iTransact/LIBERTY website.
1. Click on the Resources tab on the left side of the screen to view and download the following a. Provider Reference Guides b. Preventative and Periodontal Guidelines c. Provider Newsletters d. Online Provider Portal User Guide
2. Click on Resource Library – Forms and other tools which will launch a new web browser 3. Click on the link provided at the bottom of the web page to launch the Provider Resource Library
Page 30 of 34
Rev. 201611
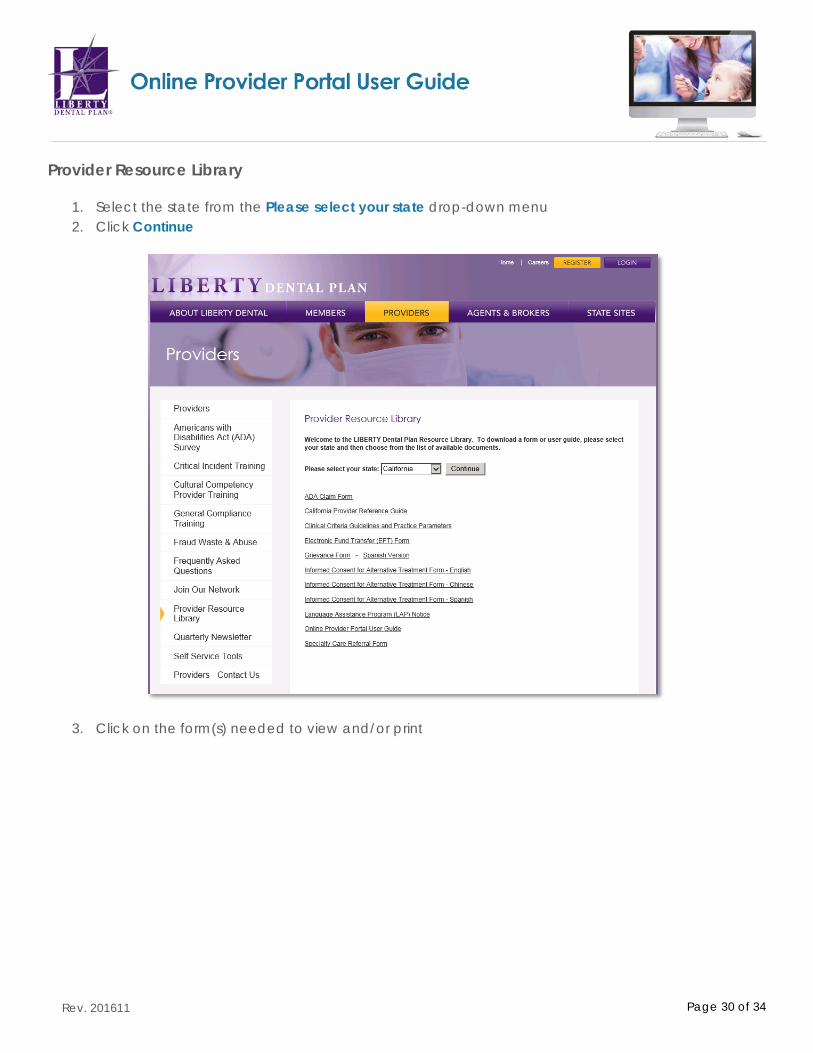
Provider Resource Library
1. Select the state from the Please select your state drop-down menu 2. Click Continue
3. Click on the form(s) needed to view and/or print
Page 31 of 34
Rev. 201611
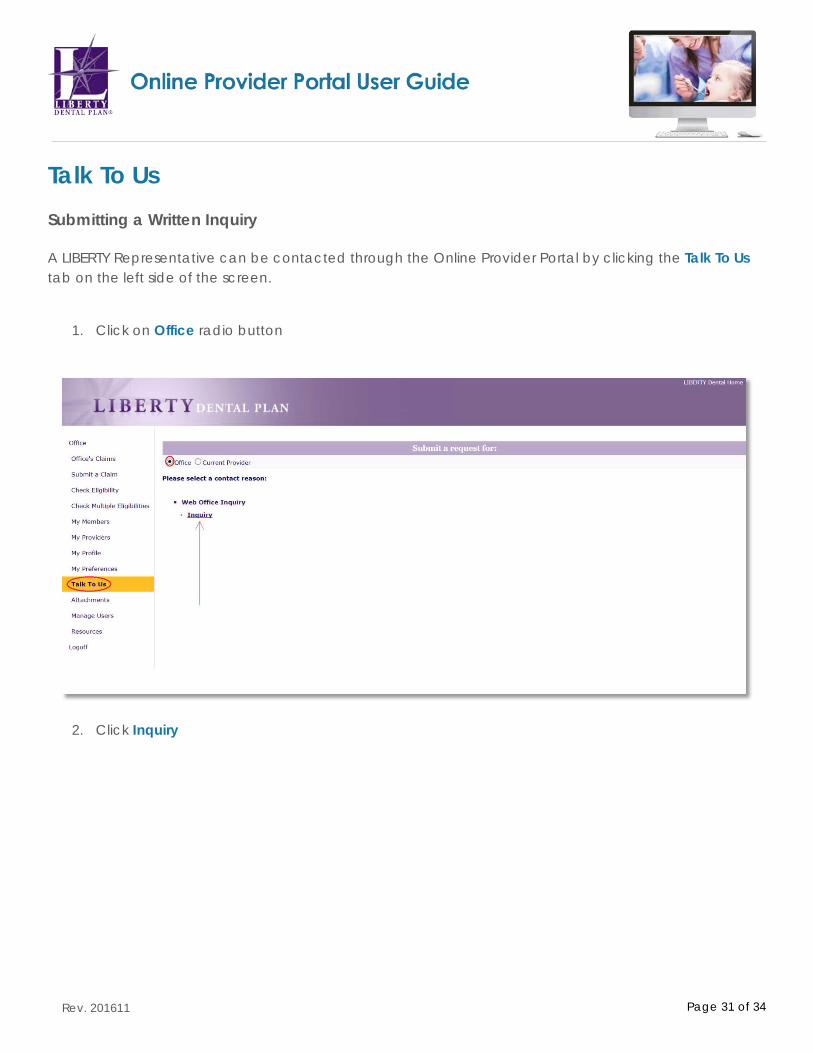
Talk To Us Submitting a Written Inquiry A LIBERTY Representative can be contacted through the Online Provider Portal by clicking the Talk To Us tab on the left side of the screen.
1. Click on Office radio button
2. Click Inquiry
Page 32 of 34
Rev. 201611
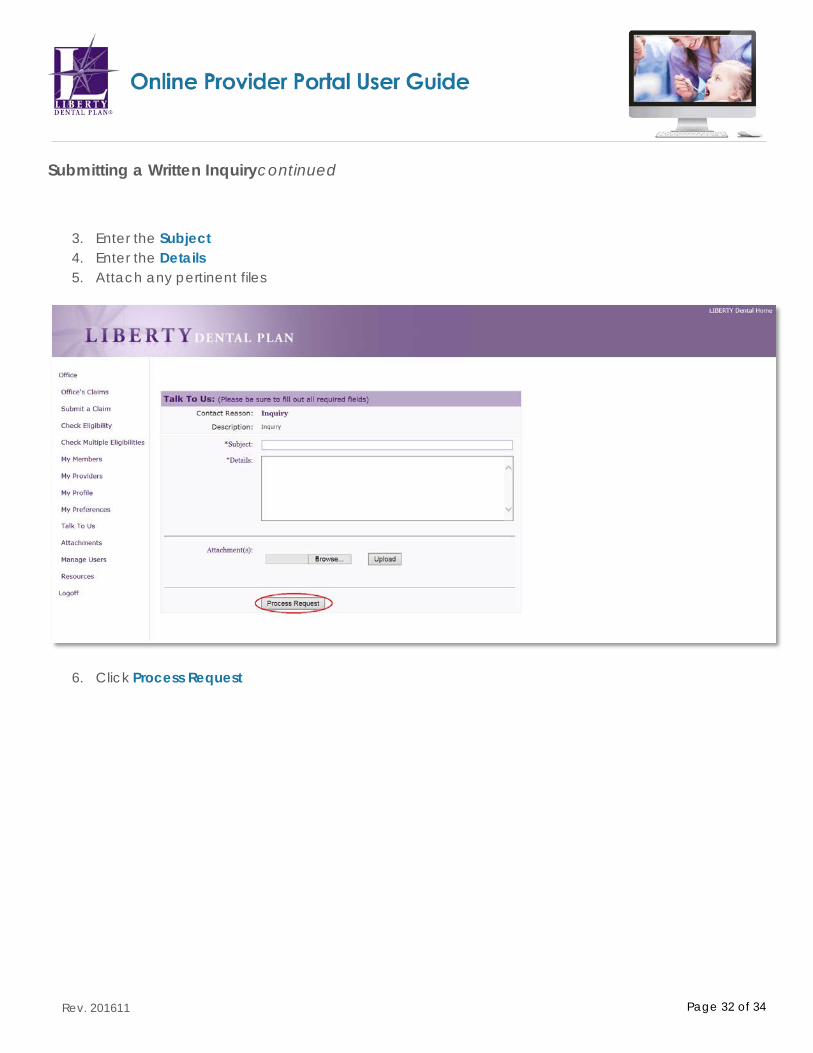
Submitting a Written Inquirycontinued
3. Enter the Subject 4. Enter the Details 5. Attach any pertinent files
6. Click Process Request

Page 33 of 34
Rev. 201611
Logoff To Log Off of the Online Provider Portal
1. Click the Logoff tab on the left side of the screen
Page 34 of 34
Rev. 201611
Making members shine, one smile at a timeTM


