Fourth Edition.
Copyright © 2006-2012 by Dennis R Weaver and The Prepared Pantry. All rights reserved.
Photographs by Debbie Frantzen, Julie Rencher, and The Prepared Pantry. Used by permission.
The material herein is published by The Prepared Pantry for the private use of individuals and may not be used for commercial purposes without the express consent of the publisher. The information contained herein is believed accurate but the publisher makes no warranties, express or implied, and the recipient is using this information at his or her own risk.
For permission to use any material from any part of this book including subsequent chapters for commercial purposes, contact the publisher at:
The Prepared Pantry www.preparedpantry.com 2 N. Landmark Lane Rigby, ID 83442 1-208-745-7892
i
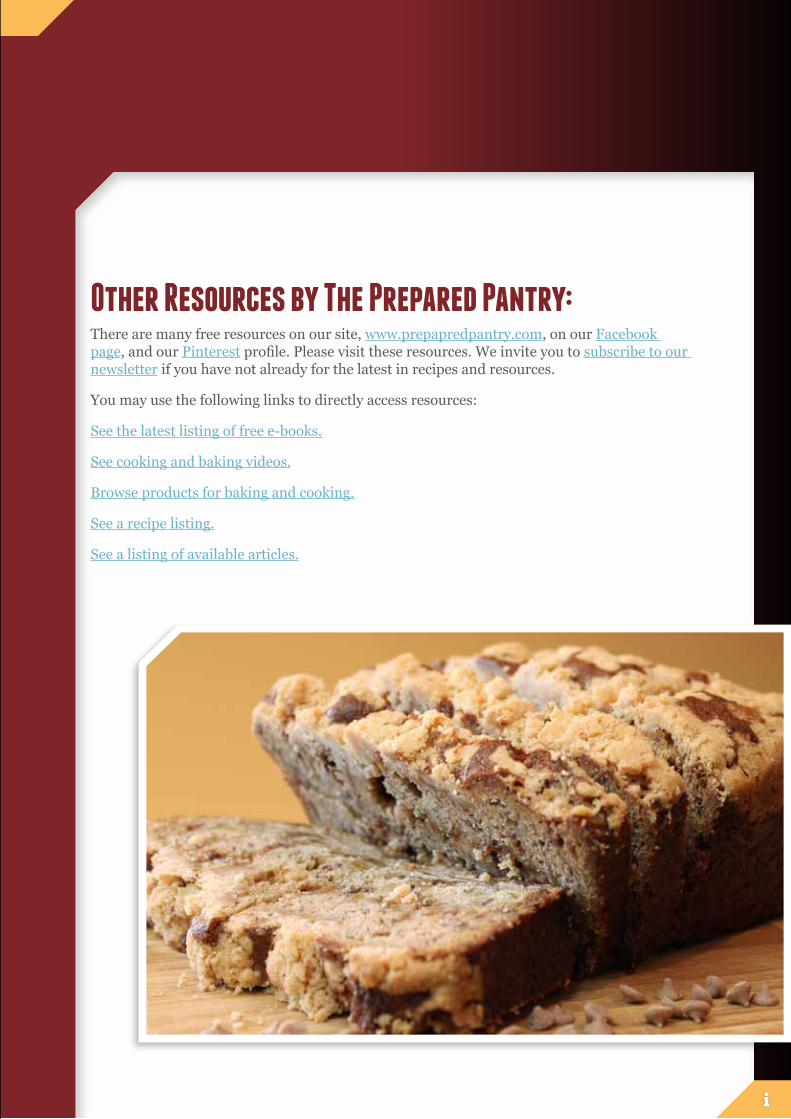
Other Resources by The Prepared Pantry:There are many free resources on our site, www.prepapredpantry.com, on our Facebook page, and our Pinterest profile. Please visit these resources. We invite you to subscribe to our newsletter if you have not already for the latest in recipes and resources.
You may use the following links to directly access resources:
See the latest listing of free e-books.
See cooking and baking videos.
Browse products for baking and cooking.
See a recipe listing.
See a listing of available articles.

Good Food Magazine Month 20XX
ii
PrefaceThis third edition is expanded from the earlier two editions. The information is updated and more recipes and images are included. In addition links have been added to resource materials on our site where you can learn more and in some cases to products. We hope these links make this a more valuable resource.
This book was intended to be printed on your computer at home. With the advent of iPads, Kindle Readers, Nooks, and more we realized that the book needed to be in multiple formats, not just as a PDF document. We realize technologies are rapidly evolving. If you need the book in an additional format, please check our site for the latest formats.
We invite you to use additional resources at www.PreparedPantry.com. Our site has grown to over 50,000 URL’s as of this edition date. Additionally, many videos and e-books have been added. You will find more information like this, recipes, and more free downloads. Keep in touch with us through our free newsletters and online magazines. We really want to help you bake.
We wish you the very best
Dennis and Merri Ann Weaver and Company
Rigby, Idaho
Preface How to Bake

5
Month 20XX Good Food Magazine
iii
Introduction How to Bake
IntroductionMy mother gave me a cook book for my eighth birthday. Maybe it was an unusual gift for a boy that helped his dad in the garage and milked cows. But it started a love affair with cooking.
I spent many an hour in that old country kitchen. Some of it was just talking with my mother. Much of it was learning to cook. Sometimes it was helping her. I suspect that much of my philosophy of life was formed in a big square kitchen with a green vinyl floor.
My mother wasn’t far removed from her pioneer stock. She had an innovative, make-do attitude. She was basic in her cooking. She had a lot to do and a family to feed and wasn’t likely to get too fancy. It carried over into my cooking. We ate foods in season and put food by for winter. On many a summer or fall afternoon, the counters were lined with peaches or pears in Mason jars, cooling, waiting to be stacked in tall brown cabinets on the closed porch that doubled as a pantry. My mother was neat, orderly, and ambitious. I hope some of my habits mirror hers.
I grew up, went to college, and found my way to Alaska. I worked in a kitchen on the North Slope, an assistant baker, feeding construction hands and roughnecks working in the oil field. Food was king there, the major diversion in a bleak landscape. I baked, washed dishes, and fed steaks to the night crew. I learned professional tricks, techniques that I didn’t learn in my mother’s square kitchen.
I drifted away to the corporate world. I was fortunate to meet Merri Ann, we married, and had kids. I drifted again, this time to Minnesota and grad school. In Minnesota I found wonderful restaurants and the bakeries of the big cities. I fell in love with the little ethnic shops off the West Bank where you could get fried bananas and chicken molé, where you didn’t understand the hurried conversations between the owner and his staff. Life was expanding as was my exposure to foods that I would never see in my little home town.
I was cooking for pleasure, often for relief, and slugging out a career in the city. But I was working long hours in corporate America and not spending enough time with my family. It wasn’t the life that we wanted and we revolted to the country, to Idaho and a town of 3,000.
We started The Prepared Pantry—Merri Ann and I with timely advice from a wonderful friend from Minnesota, Cy Laurent. Debbie Frantzen, our married daughter, soon joined us. Her boundless energy, technical abilities, and artistic talents proved invaluable. She’s still our webmaster and systems guru and she seems to be able to do almost anything.
No one should underestimate the time and the toil of a business start-up. But we were where we wanted to be and working with food, baking with passion. We spent the first year developing products—mostly bread mixes—baking the same thing over and over
© 2006-12 The Prepared Pantry iv
and over again until we could do no better. Then we would send them around the country from sea level to 8,700 feet and get others to bake them. Finally we felt like we were ready to sell them.
Sales always come slowly at first. We advertised and that only helped a little. Then we started a newsletter. We discovered a sea of kindred spirits hungry to learn about baking. We loved our newsletters and judging from the tide of subscribers, had found a vein of people that loved to bake and wanted to learn more. We kept working at our newsletters and got better. The business finally gained momentum and grew rapidly.

Good Food Magazine Month 20XX
Chapter 1Flour—the Basic Ingredient and How to Use it for the Best Baked Goods
Chapter 2The Wonderful World of Eggs
Chapter 3How to Make Bread and Pastries with Yeast
Chapter 4The Secrets of Using Chemical Leaveners—Baking Powder and Baking Soda
Chapter 5Fresh from the Dairy—Dairy Products and How to Use Them
Chapter 6Butter, Shortening, and Oil—The Fats We Bake With
Chapter 7How Sweet it is—How to Use the Family of Sweeteners
Chapter 8Chocolate! How to Make the Best Desserts
iv
A strange thing happened along the way; we discovered that we loved to help people bake. We were no longer in the baking business; we were in the people business. We found ourselves passionate about helping people bake. We wrote baking guides and watched thousands download them. It didn’t matter if they bought. If we helped enough people, they would buy, we believed. We weren’t wrong.
Now we get a flood of inquiries and emails. Sometimes someone shares a discovery with us and we get to share their excitement. Sometimes they just say “hi.” We struggle to keep up, but that’s okay. No matter how big we get, we never want to forget—we’re in the people business.
Introduction How to Bake
1
Month 20XX Good Food Magazine
1
Book Contents
How to Bake: The Art and Science of Baking
Chapter 1Flour—the Basic Ingredient and How to Use it for the Best Baked Goods
Chapter 2The Wonderful World of Eggs
Chapter 3How to Make Bread and Pastries with Yeast
Chapter 4The Secrets of Using Chemical Leaveners—Baking Powder and Baking Soda
Chapter 5Fresh from the Dairy—Dairy Products and How to Use Them
Chapter 6Butter, Shortening, and Oil—The Fats We Bake With
Chapter 7How Sweet it is—How to Use the Family of Sweeteners
Chapter 8Chocolate! How to Make the Best Desserts

2
Chapter 1Flour—the Basic Ingredient and How to Use it for the Best Baked Goods
To understand baking, you must understand flour. It helps to know a little about flour, so we’ll begin this chapter with a short discussion about wheat.

3
Table of Contents:
Preface ..............................................................................iiIntroduction ....................................................................iii
How to Bake: ............................................................ 1
Part 1: Types of Wheat .............................................4Components of the Wheat Kernel ....................................4
Part 2: Flour Types ...................................................5The White Flours ..............................................................5Whole Wheat Flour .......................................................... 7Other Flours ..................................................................... 7Chewy or Tender—How do we Control the Texture .......8Flour Blends .....................................................................8Other Flour Additives .......................................................9Storing Your Flour ...........................................................9
Part 3: Recipes—Applying What You Learned ...... 10Sweet Buttermilk Cornbread ......................................... 10Texas Chili Corn Bread .................................................. 12European Soft Peasant Bread ....................................... 14100% Whole Wheat Bread Recipe ................................. 16California Golden Raisin Muffins .................................. 18American Rye Bread Recipe .......................................... 19Deli Rye Bread Recipe ....................................................20Creamy Ricotta and Sausage Calzone Recipe .............. 21How to Make Pitas .........................................................22Teton Valley Multi Grain Bread Recipe ........................23Frosted Cinnamon Raisin Bread Recipe .......................25October Pumpkin Bread Recipe .....................................26Old-Fashioned Caramel Cake Recipe ............................27
Chapter 1 Flour-The Basic Ingredient
Copyright 2006-2012, The Prepared Pantry. All rights reserved.
The material herein is published by The Prepared Pantry for the private use of individuals and may not be used for commercial purposes without the express consent of the publisher. The information contained herein is believed accurate but the publisher makes no warranties, express or implied, and the recipient is using this information at his or her own risk.
Good Food Magazine Month 20XX
4
Part 1 : Types of WheatTo understand baking, you must understand flour. It helps to know a little about flour, so we’ll begin this chapter with a short discussion about wheat.
Wheat has three characteristics by which it is classified: its hardness—hard or soft, its color—red or white, and its growing season—winter or spring. These characteristics determine the properties of the wheat and the flour from which it is derived.
Hardness refers to the protein content of the kernel. A hard wheat has a high protein content and the proteins in wheat are what forms the gluten in bread dough that gives bread its chewiness. A flour made from hard wheat is referred to as a strong wheat. Flours made from hard wheat are ideal for bread making. Soft flours, made from soft wheat, are more suitable for cakes, cookies, and muffins where tenderness, not chewiness, is important.
Red wheat has a red pigment in the hull of the kernels. This red pigment has a slight bitter taste but red wheat usually is high in protein and makes a wonderfully structured bread. White wheat tends to be sweeter, less bitter, but with less protein. White wheat has a higher mineral content (which is noted in the flour specification as the ash content). Though it has a lower protein content, white wheat is used for bread making, especially for artisan and European-type breads.
Wheat is grown either in the winter or spring. Winter wheat is planted in the fall, it sprouts, grows for a short period, and then becomes dormant through the winter months. In the spring, it begins growing again. Spring wheat is planted in the spring. Spring wheat is usually higher in protein than winter wheat.
In the United States, there are five primary types of wheat grown: hard red winter wheat, hard red spring wheat, soft red winter wheat, hard white wheat, and soft white wheat.
Flour mills produce flour to certain specifications with designated tolerances. They are reliant on the availability of wheat types for stock. The
larger producers do a marvelous job of producing flours that meet particular specifications reflecting their access to a variety of wheat stocks. Consistency of specification is essential for the commercial bakery and should be important to the home baker.
I grew up in the rural West where hard red winter wheat was common. My grandmothers and my mother made homemade bread weekly. Whole wheat bread tended to be full, hearty loaves but slightly bitter. We masked that bitterness with lots of butter and honey or jam. It was not until I understood wheat and flour that I understood where that bitterness came from. Today, I temper that with a flour blend made with some white wheat and a higher ash content. Later in this chapter, we’ll tell you how to remove some of that bitterness by soaking the wheat flour.
Components of the Wheat KernelThere are three major components to the wheat kernel: the bran, the endosperm, and the germ. The bran consists of the protective outer covering, the hull of the kernel. Most of the fiber is in the bran. The germ is the embryonic portion of the kernel and is high in protein, minerals, and sugars. The endosperm is the starchy inner portion that provides the food for the growing germ much as an egg white does in an egg.
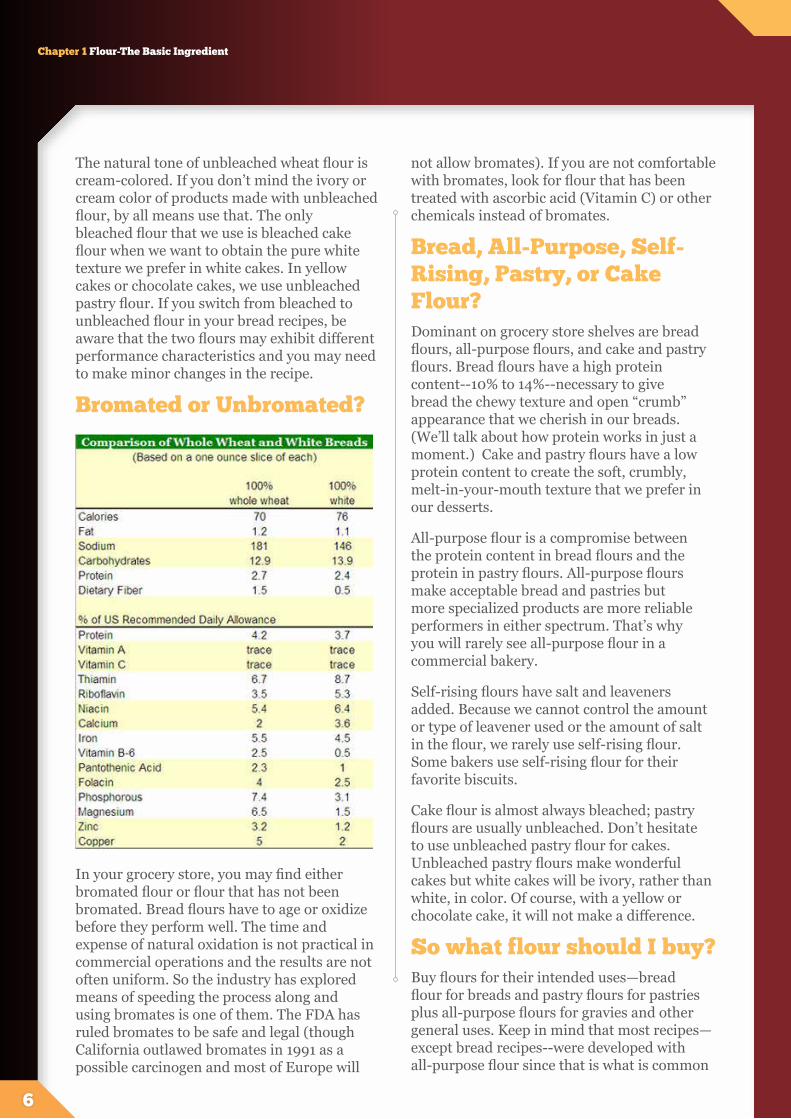
In the milling process, the kernels are ground into powder. To make white flour, the powder is sifted to remove most of the bran particles. Whole wheat flour contains bran. (In many operations, the bran is removed and then added back for whole wheat flour.) With the removal of the bran, some flavor and nutritional content is lost. By law, in the United States, white flours must be enriched with vitamins and minerals to approximate the nutritional value of whole wheat flour.
Chapter 1 Flour-The Basic Ingredient
5
Month 20XX Good Food Magazine
5
Chapter 1 Flour-The Basic Ingredient
Part 2 : Flour TypesHow many different kinds of flour are there? We opened a commercial flour catalog and counted 28. These were flours that were available from one supplier for the western United States. This supplier has a different catalog for customers in the eastern states. At last count, we had 16 on hand for our test kitchen.
Matching the flour to the product that you are baking is one of the keys to successful baking. While the commercial baker has access to dozens of specialized flours, we can do quite well with just a few in our kitchens. With those few, you can match the flour to the product you are baking and create your own blends for the effect that you want.
The Role of GlutenBefore we begin to examine types of flour, let’s understand gluten. Gluten is made of the proteins found in wheat flour and gives bread its structure, strength, and texture. Without these marvelous little proteins, bread would not be bread. It also explains why it is so hard to make bread from rice, potato, rye, or oat flour and why wheat flour has to be added to these to make bread—only wheat has enough protein to make bread. The gluten makes the bread.
Gluten is developed in the dough when two types of proteins absorb water and are pulled and stretched in the kneading process. When water is mixed with flour, the protein in the flour absorbs moisture. When dough is worked by mixing or kneading, these two types of protein come together into strands—tiny ropes of gluten. As the yeast produces gases in the dough, mostly carbon dioxide, these strands trap the gas bubbles and the dough expands.
A high protein content is necessary for great bread and a low protein content is required for the tender crumb we love in cakes. During baking, this protein coagulates just as the proteins in an egg coagulate in the heat of
a frying pan. It’s this coagulated protein that gives bread its chewiness. In a cake, we don’t want chewiness so we use a low protein content flour. Furthermore, we use a shortening (commercial shortening, butter, margarine, or oil) to lubricate and shorten the gluten strands. (Hence the descriptive name “shortening”.)
You can see how much protein is in flour by comparing ingredient labels. Bread flours will have as much as 14% protein. All-purpose flour is usually in the eight to ten percent range and cake flour is less than that.
A typical bread flour (this one happens to be a General Mills flour) has 12% protein, 75% carbohydrates, one percent fat, less than one percent ash, and 14% moisture. (If exposed to air, the moisture content will change and affect the baker’s formulation.)
The White FloursBy far, the western world consumes more white flour than any other. We can buy bleached or unbleached, bread, all-purpose, self-rising, cake, and pastry. We can buy flour made with soft Southern wheat or hard winter wheat. They are all different, each with an intended purpose. The choice of flour will make a profound difference in most baked goods.
Bleached or Unbleached?Should you use bleached or unbleached flour? Chlorine is the common bleaching agent used to whiten flour (though some millers use benzoyl peroxide). Many store breads use bleached flour to obtain the whiteness that we associate with commercial white bread. While the FDA has approved the use of chlorine in flour, you may prefer to avoid the additives and use flour that has not been bleached.
Chlorine tends to damage the proteins in flour and therefore weaken the gluten structure in bread.
Good Food Magazine Month 20XX
6
The natural tone of unbleached wheat flour is cream-colored. If you don’t mind the ivory or cream color of products made with unbleached flour, by all means use that. The only bleached flour that we use is bleached cake flour when we want to obtain the pure white texture we prefer in white cakes. In yellow cakes or chocolate cakes, we use unbleached pastry flour. If you switch from bleached to unbleached flour in your bread recipes, be aware that the two flours may exhibit different performance characteristics and you may need to make minor changes in the recipe.
Bromated or Unbromated?
In your grocery store, you may find either bromated flour or flour that has not been bromated. Bread flours have to age or oxidize before they perform well. The time and expense of natural oxidation is not practical in commercial operations and the results are not often uniform. So the industry has explored means of speeding the process along and using bromates is one of them. The FDA has ruled bromates to be safe and legal (though California outlawed bromates in 1991 as a possible carcinogen and most of Europe will
not allow bromates). If you are not comfortable with bromates, look for flour that has been treated with ascorbic acid (Vitamin C) or other chemicals instead of bromates.
Bread, All-Purpose, Self-Rising, Pastry, or Cake Flour?Dominant on grocery store shelves are bread flours, all-purpose flours, and cake and pastry flours. Bread flours have a high protein content--10% to 14%--necessary to give bread the chewy texture and open “crumb” appearance that we cherish in our breads. (We’ll talk about how protein works in just a moment.) Cake and pastry flours have a low protein content to create the soft, crumbly, melt-in-your-mouth texture that we prefer in our desserts.
All-purpose flour is a compromise between the protein content in bread flours and the protein in pastry flours. All-purpose flours make acceptable bread and pastries but more specialized products are more reliable performers in either spectrum. That’s why you will rarely see all-purpose flour in a commercial bakery.
Self-rising flours have salt and leaveners added. Because we cannot control the amount or type of leavener used or the amount of salt in the flour, we rarely use self-rising flour. Some bakers use self-rising flour for their favorite biscuits.
Cake flour is almost always bleached; pastry flours are usually unbleached. Don’t hesitate to use unbleached pastry flour for cakes. Unbleached pastry flours make wonderful cakes but white cakes will be ivory, rather than white, in color. Of course, with a yellow or chocolate cake, it will not make a difference.
So what flour should I buy? Buy flours for their intended uses—bread flour for breads and pastry flours for pastries plus all-purpose flours for gravies and other general uses. Keep in mind that most recipes—except bread recipes--were developed with all-purpose flour since that is what is common
Chapter 1 Flour-The Basic Ingredient

7
Month 20XX Good Food Magazine
7
in nearly all kitchens. You may wish to use all-purpose flour for a new recipe and then switch to a specialty flour after you become familiar with the recipe.
We recommend that you try different brands—there is a surprising difference in performance between brands--and then stick with what works for you. In our experience, name brands tend to consistently hold to a specification where less expensive brands tend to vary from season to season and sometimes, even lot to lot. If you really want to broaden your selection, make friends with a baker since he or she has available a vast array of flours each with its own specification. Buy a bag or two of flour from your baker and try it. Flour is inexpensive and your baker will be able to supply you with a detailed specification so that you can see what you are getting.
Whole Wheat FlourThe wheat kernel is composed of three parts: the bran which forms the hard outer coating of the kernel, the smaller germ which is the embryonic portion of the kernel as the yolk is to an egg, and the starchy endosperm. In the milling of white flour, the bran is cracked from the kernel and discarded and most of the germ is removed leaving the endosperm.
In whole wheat flour, both the bran and the germ are left with the flour. Since the germ has a high fat content and fat can go rancid, whole wheat flours are much more likely to spoil. Also, since the flour is composed of the entire wheat kernel, whole wheat flour is not enriched with vitamin additives as white flour is. (The federal government specifies the addition of vitamins to white flour. See the nutritional comparison of enriched white flour to whole wheat flour in this chapter.) Whole wheat flour can be purchased in either a fine ground or coarse ground texture.
Most but not all of the “brown” breads produced commercially are made from a blend of white bread flour and fine ground whole wheat with about 40% of the flour being whole wheat. The white flour tempers the whole wheat providing a slightly milder taste without the bitterness that whole wheat sometimes carries. The white flour also creates a stronger gluten structure since bread flour typically has
a higher protein content than whole wheat alone. Additionally, the bran in whole wheat has sharp edges that cut gluten strands as it is kneaded.
Graham flour is whole wheat flour. One day in the office we had an engaged debate as to just what graham flour was—a whole wheat flour with extra bran, whole wheat flour from soft wheat, or a more coarsely ground whole wheat. We contacted Technical Services at General Mills. They quoted chapter and verse: FDA’s Code of Federal Regulations allows any whole wheat flour to be called graham flour. So it depends on the miller. Read the package carefully to see just what you are getting.
Other FloursCornmeal, like wheat flour, can be purchased with or without the germ and in a fine or a coarse ground form. For cornmeal with the germ removed, look for the term “degerminated” on the label. Degerminated cornmeal keeps longer--since the fatty germ is removed--but is not as nutritionally complete as cornmeal with the germ.
The word “meal” refers to products that are not as finely ground as flour. Both cornmeal and corn flour are available. Polenta is usually coarsely ground.
Rye flour is used extensively in pumpernickel and rye breads. It can be purchased in light rye, medium rye, and dark rye flours. White rye is especially prized by the bakers of artisan loaves and creates a mild, uniquely-flavored bread with a taste that is described as being sourdough-like.
Because rye proteins do not form the gluten strands necessary to create structure, bread made with rye flour alone is heavy and dense. Accordingly, when making breads with rye flour, add two to three times as much high protein content bread flour as rye flour. Often extra wheat gluten is added.
The flavor most of us associate with rye bread comes from the caraway seeds in the bread. If your family says they don’t like rye bread, make it without the caraway seeds. They will probably find your bread very good. At the end of this lesson, you will find a recipe calling for rye flour and no caraway seeds.
Chapter 1 Flour-The Basic Ingredient

Good Food Magazine Month 20XX
Oats are used in baking in various forms: rolled, quick, steel cut, and flour (steel cut oats are quick oats that are not rolled). Oat bran can also be purchased. Oat products are most generally used with chemically leavened products like scones, cookies, and muffins. Rolled oats added to yeasted bread make for a wonderful chewy texture and moistness. Steel cut oats add chewy nuggets.
Buckwheat flour is often used in pancakes and sometimes in breads. Buckwheat is not really a grain but a seed. Because there are no proteins to form gluten, buckwheat adds little structure to the baked product. It is most commonly used in pancakes but is sometimes added to breads and muffins. Buckwheat flours is used primarily for its unique taste.
Potato flour is an important component in the baker’s arsenal. Unlike wheat flour, it is hygroscopic—that is, it attracts water instead of drying out. So the staling process in breads is retarded or slowed. One tablespoon of potato flour to two cups of wheat flour will extend the life of your bread and keep it moist. Adding more potato flour will add a nice taste to the bread. We use potato flours extensively in our breads.
Chewy or Tender—How do we Control the TextureHow is it that we can use flour to make both a tender cake and firm chewy French bread? The gluten makes the difference. In a cake, we want little gluten development. In a chewy bread, we want a high percentage of well-developed gluten. We can control this texture in our baked goods by changing four conditions:
1. Selection of flours: Cake flours are “weak” or “soft” and have a low protein content, probably around 8%. Bread flours and high-gluten flours are “strong” and usually have a protein content of 12 to 14%.
2. Amount of shortening: Any fat is referred to as a shortening because it shortens the gluten strands. It does so by lubricating the fibers so they cannot stick together. The more shortening in the dough, the more tender and less chewy the product will be.
3. Amount of liquid: Gluten must have liquid to absorb and expand. If dough does not have enough liquid, the gluten will not fully form and the product will not be tender. That’s why we put a minimal amount of water in pie crusts.
4. Mixing methods: Generally, the more a batter or dough is mixed, the more the gluten develops. Tender muffins use low-protein flour and are mixed only until the moisture is absorbed while breads are kneaded for a relatively long time.
How Much Does That Flour Weigh?
For consistent results, we always weigh flour. It’s very difficult to get consistent weights using a measuring cup. (We’ve tried by measuring series of ten cups and weighing each. As close as we can get is plus or minus ten percent.) So, we convert the flour called for in a recipe to ounces before beginning.
The following table can be used for converting cups of flour to ounces of flour so that you can weigh it with your scale and get the same amount of flour in your recipe each time. Be aware that different flours have different weights for the same volume.
Once you find a flour that works well for you (and a conversion ratio that works), stick with it. While there is some variation in flour from season to season (and from batch to batch), there is less variation than between brands.
Flour BlendsA common way of controlling texture is by blending flours. A baker may wish a little softer flour for a hearth bread or pizza crust and choose to obtain that result by mixing two different flours. Or a baker may choose to
Chapter 1 Flour-The Basic Ingredient
8
9
Month 20XX Good Food Magazine
Use a good, commercial grade conditioner for all of your yeast baking--pastries and breads. It creates an enhanced environment for the growth of yeast helping to make your breads and pastries more uniform and lighter. It also strengthens the gluten structure in the dough to create a better crumb to your loaves. Some dough conditioners also retard staling and help your bread stay fresher longer.
Experiment to find the dough conditioner that works best with your baking. Start with one that is concentrated so that you are adding as little as possible to your recipe. A good dough conditioner will call for as little as one-half teaspoon per loaf. Many inexpensive conditioners found in stores will call for much more than that.
Potato FlourPotato flour is used by professional bakers to improve breads and pastries by making them moister and retarding staling. As mentioned elsewhere, potato flour is hygroscopic, that is, it attracts moisture rather than drying out and keeps your breads moister longer. Add it to your flour when mixing, about one tablespoon per loaf. More can be added for flavor if you prefer. Though you won’t taste it in small amounts, potato flour has a slight, almost sourdough-like flavor in greater concentrations.
Storing Your FlourKeep you flour tightly covered so that it neither dries out nor absorbs moisture and store it in a cool location. Some millers state that if tightly covered and in a cool location, white flours will last indefinitely. We prefer to use all white flours within two years.
Because whole wheat still has the fatty germ included, it will not store as well. As with all fats, storage temperature and oxygen greatly affect shelf life. In an airtight container at a cool temperature, whole wheat flours will last a year. Unfortunately, when buying whole wheat flours at the store, we don’t know how long those flours have been on the shelf or in a warehouse unless we can find a milling date. Buy from a reputable, high-volume grocer. Consider asking the manager how old his or her whole wheat flours are.
make a bread more rustic or with more fiber by adding a whole grain flour to a white flour.
Here are some common blends:
• Whole wheat breads are commonly made with 40% to 60% whole wheat flour with the remaining flour being high protein bread flour. Because whole wheat flour is often lower in protein than high protein bread flours and because the bran in whole wheat flour can damage proteins, many bakers add wheat gluten to the blend to make it more comparable to their favorite bread flours.
• Rye breads are made with a combination of wheat and rye flours and often gluten is added. The rye content should not exceed 40% of the total.
• Hearth breads are often made with a combination of high protein bread flours and all-purpose flour. Though designated with a numerical system not used in the US, most European flours are softer than our high protein bread flours and a flour blend often approximates these European flours.
• Pizzas and calzones are often made with a softer flour to make a more tender crust than those made with bread flour alone. You can create a softer crust by adding all-purpose flour, whole wheat flour, or rye flour. We like 10% to 15% rye flour in our pizza dough. A dark rye makes a more rustic crust while a white rye makes a more refined crust.
• Peasant breads are usually made with blends, blends of high protein bread flour and whole grain flours, either whole grain rye or wheat.
• Cornmeal is commonly added to wheat flour for cornbreads. Occasionally cornmeal is added to flours for peasant breads or Sally Lunn bread.
Other Flour AdditivesConditionersDough conditioner (or dough enhancer) is indispensable to the baking of great breads.
9
Chapter 1 Flour-The Basic Ingredient
10
Part 3 : Recipes: Applying What You Learned
The following recipes were chosen to give you the opportunity to make some very good baked goods while working with different types of flour. You’ll work with different wheat flours, rye flour, blends, and cornmeal. These are some of our favorite recipes and think they will become yours also.
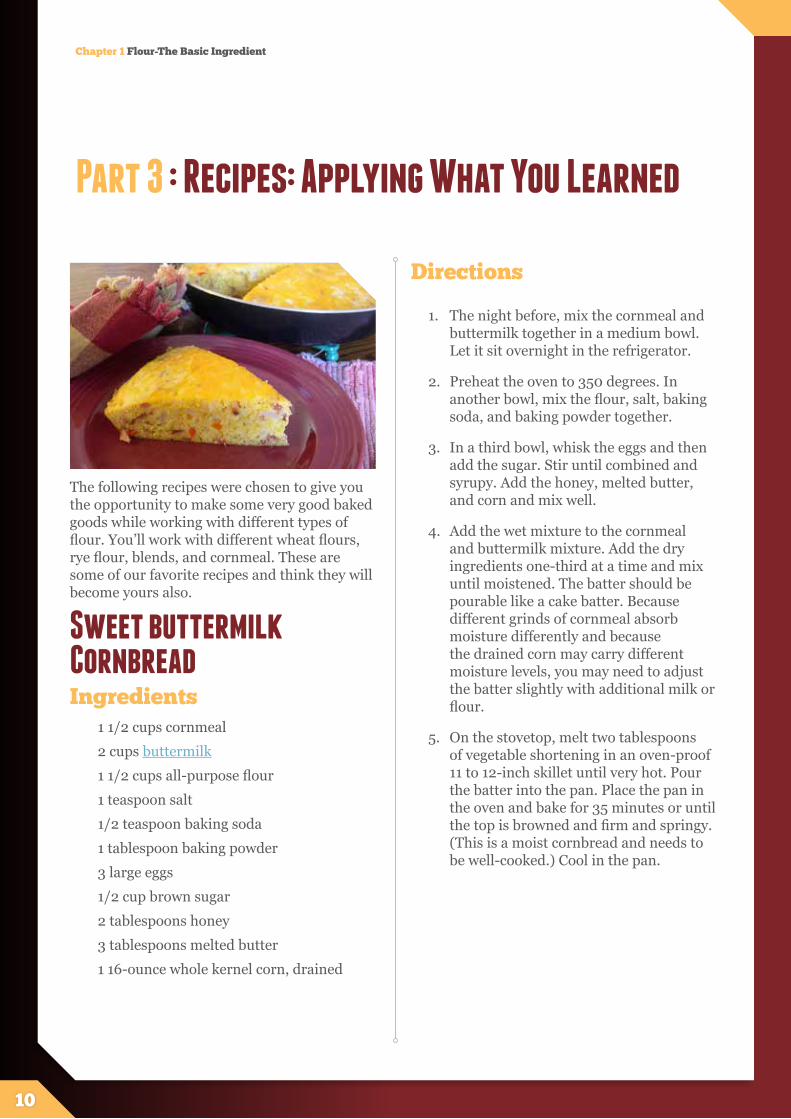
Sweet buttermilk CornbreadIngredients
1 1/2 cups cornmeal
2 cups buttermilk
1 1/2 cups all-purpose flour
1 teaspoon salt
1/2 teaspoon baking soda
1 tablespoon baking powder
3 large eggs
1/2 cup brown sugar
2 tablespoons honey
3 tablespoons melted butter
1 16-ounce whole kernel corn, drained
Directions
1. The night before, mix the cornmeal and buttermilk together in a medium bowl. Let it sit overnight in the refrigerator.
2. Preheat the oven to 350 degrees. In another bowl, mix the flour, salt, baking soda, and baking powder together.
3. In a third bowl, whisk the eggs and then add the sugar. Stir until combined and syrupy. Add the honey, melted butter, and corn and mix well.
4. Add the wet mixture to the cornmeal and buttermilk mixture. Add the dry ingredients one-third at a time and mix until moistened. The batter should be pourable like a cake batter. Because different grinds of cornmeal absorb moisture differently and because the drained corn may carry different moisture levels, you may need to adjust the batter slightly with additional milk or flour.
5. On the stovetop, melt two tablespoons of vegetable shortening in an oven-proof 11 to 12-inch skillet until very hot. Pour the batter into the pan. Place the pan in the oven and bake for 35 minutes or until the top is browned and firm and springy. (This is a moist cornbread and needs to be well-cooked.) Cool in the pan.
Chapter 1 Flour-The Basic Ingredient

11
Quit pouring buttermilk down the drain!Most of the time, I don’t do enough baking at home to justify keeping fresh buttermilk in the refrigerator. Before it gets used, it separates and curdles. Instead I use dry buttermilk in place of fresh. You can’t tell the difference in your recipes, you don’t take up room in the refrigerator, and you save money.
It’s handy to use dry buttermilk. The package will tell you how much water to add to reconstitute the dry buttermilk. I don’t bother reconstituting it. I add the dry buttermilk powder with the other dry ingredients and the amount of water called for with the wet ingredients. It mixes just fine.
Chapter 1 Flour-The Basic Ingredient
12
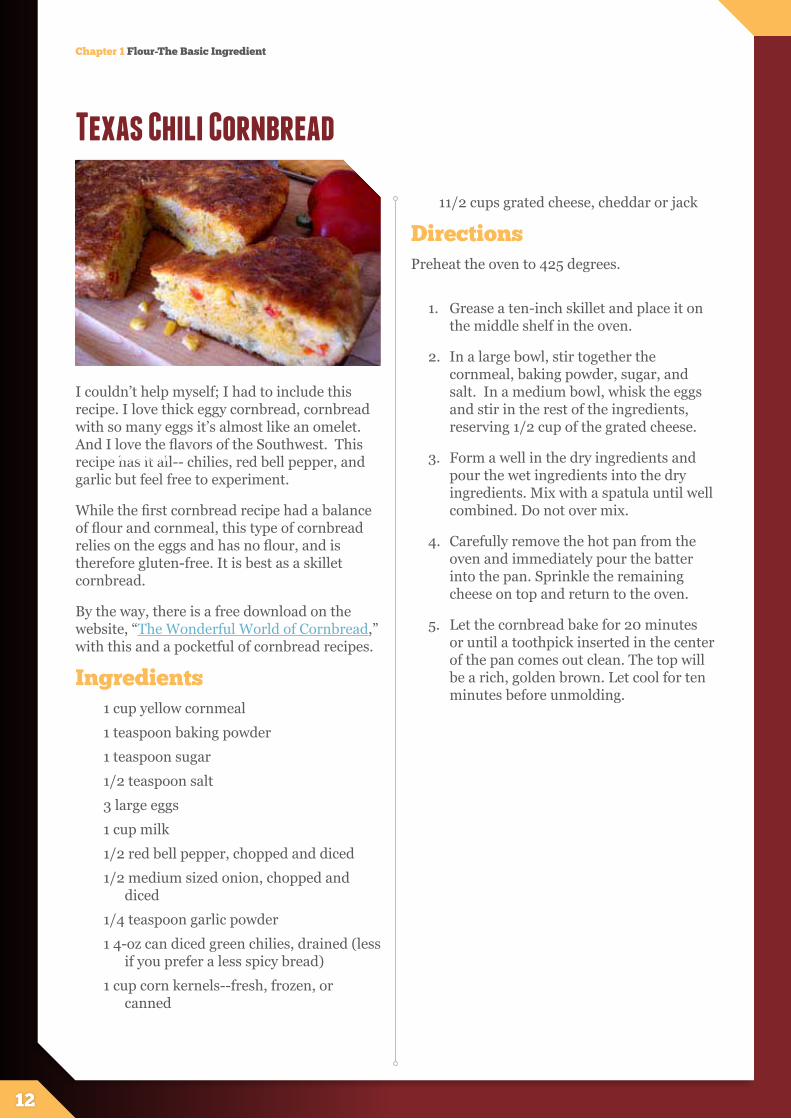
Texas Chili Cornbread
I couldn’t help myself; I had to include this recipe. I love thick eggy cornbread, cornbread with so many eggs it’s almost like an omelet. And I love the flavors of the Southwest. This recipe has it all-- chilies, red bell pepper, and garlic but feel free to experiment.
While the first cornbread recipe had a balance of flour and cornmeal, this type of cornbread relies on the eggs and has no flour, and is therefore gluten-free. It is best as a skillet cornbread.
By the way, there is a free download on the website, “The Wonderful World of Cornbread,” with this and a pocketful of cornbread recipes.
Ingredients 1 cup yellow cornmeal
1 teaspoon baking powder
1 teaspoon sugar
1/2 teaspoon salt
3 large eggs
1 cup milk
1/2 red bell pepper, chopped and diced
1/2 medium sized onion, chopped and diced
1/4 teaspoon garlic powder
1 4-oz can diced green chilies, drained (less if you prefer a less spicy bread)
1 cup corn kernels--fresh, frozen, or canned
11/2 cups grated cheese, cheddar or jack
DirectionsPreheat the oven to 425 degrees.
1. Grease a ten-inch skillet and place it on the middle shelf in the oven.
2. In a large bowl, stir together the cornmeal, baking powder, sugar, and salt. In a medium bowl, whisk the eggs and stir in the rest of the ingredients, reserving 1/2 cup of the grated cheese.
3. Form a well in the dry ingredients and pour the wet ingredients into the dry ingredients. Mix with a spatula until well combined. Do not over mix.
4. Carefully remove the hot pan from the oven and immediately pour the batter into the pan. Sprinkle the remaining cheese on top and return to the oven.
5. Let the cornbread bake for 20 minutes or until a toothpick inserted in the center of the pan comes out clean. The top will be a rich, golden brown. Let cool for ten minutes before unmolding.
Photo by Name SurName
Chapter 1 Flour-The Basic Ingredient

13
What pan should you use for skillet cornbread?You can use a nonstick pan or a stainless pan. A nonstick pan is handy because it releases so easily.
During our cooking classes, we sometimes have the occasion to bake in a skillet. There are always some in the class that are surprised when we stick a nonstick pan with hard black handle in the hot oven. “Is that really ovenproof?” The nonstick frying pans that we sell are and I think most others are as well.
Once you discover that your frying pans are ovenproof and can be used as bakeware, you’ll find occasion to bake in them and you’ll have more choices in your kitchen arsenal. We use frying pans for cornbread, skillet cobblers (see these skillet cobbler recipes or a skillet cobbler mix), and sometimes, coffee cakes.
Chapter 1 Flour-The Basic Ingredient

14
European Soft Peasant Bread Sometimes we take the easy way out. We love hearth breads—the texture, the heft, even how they look. Somewhere along the way, we learned that we can make an easy “mock” hearth bread with a nine-inch pie pan. The pan makes forming the loaf easy and holds the loaf in shape resulting in a taller loaf than if baked on a flat sheet. Because it was easy to do, we even designed our Irish Potato Wheat and White Bread mixes to be baked in pie pans.
European peasant bread is usually made with whole flours, often coarse flours, but they have a goodness and charm about them that make them endearing. The challenge is to work with these flours, to make a bread that is refined enough that it is pleasant to the pallet. This variation gives you a chance to explore whole wheat flours and dark rye flour. In combination, they make a great hearty bread. In this bread, you will soak part of the flour overnight to soften the bran and temper the bread.
This is a whole grain recipe but by soaking some of the flour overnight, the bran is softened and absorbs moisture resulting in a softer bread than many peasant breads. The
recipe makes two large loaves.
Baker’s notes: This recipe calls for a soft crust. This bread can properly be made as an artisan bread with a hard, chewy crust. To do so, follow the baking directions for Easy Sourdough Bread which follows.
This bread can also be made in loaf pans for sandwich breads. Form the loaves and bake the bread at 350 degrees for about 25 minutes or until done.
If you would like to make similar loaves from a mix, you can do so with our Irish Potato Wheat Bread mixes. The Irish Potato Wheat Bread has some white bread flour to temper the whole wheat and give it more structure and is a richer bread with an ample addition of buttermilk.
Ingredients1 cup whole wheat flour
1 1/2 cup dark rye flour
2 1/3 cups water at room temperature
1 7-gram packet of instant yeast (or two teaspoons)
2 cups graham flour
1/2 tablespoon salt
1/4 cup brown sugar
4 tablespoons melted and slightly cooled butter
2 cups more or less whole wheat flour coarsely ground whole wheat flour or graham flour for dusting
Chapter 1 Flour-The Basic Ingredient

Photo by Name SurName
15
Directions
1. The night before, mix the one cup of whole wheat flour, the rye flour, and the water together until combined. Cover and let sit at room temperature until the next day.
2. The next day, move the flour and water mixture to the bowl of your stand-type mixer. Add the yeast and combine using the dough hook. Add the graham flour, salt, and sugar. Add the butter on top of the dry ingredients and then begin mixing with your dough hook attachment. Add portions of the two cups whole wheat flour until the dough forms a ball. Continue kneading with the machine, adding more flour as needed to get the right consistency. The dough should be soft when you poke it with your finger. The dough ball should knead for about five minutes at medium speed or until the wheat gluten is well-developed (the bread will start to look a little stringy when stretched). Remove the dough to a greased bowl, turn once, and cover with plastic wrap. Let rise until doubled.
3. Grease two nine-inch pie pans with shortening and sprinkle them with cornmeal, graham flour, or semolina flour. Set aside. After the dough has risen, divide it in two with a knife. Form a ball by pulling the dough around the center and tucking the seams together on the bottom thus gently stretching the surface of the dough. Pinch the seams together to keep them from opening as the loaf expands. Place the seam side down on the prepared pie pan and repeat with the second loaf. Cover lightly with greased plastic wrap and set aside to rise until doubled. Because these are whole grain loaves with rye flour, it may take longer for them to rise, maybe two hours. Let them rise until they are soft and puffy. While the bread is still rising, preheat the oven to 350 degrees.
4. When the bread has risen, lightly dust the tops of the loaves with graham flour. When the bread has risen and just before placing the loaves in the oven, take a very sharp knife or razor and score the tops by making several quick slashes at a 45 degree angle and not more than 1/4-inch deep. The slashes can be made in a cross or square pattern as shown. (Slashes allow steam to escape without splitting the loaves.) Immediately place the loaves on the center rack of the oven leaving as much room for the air to circulate around the loaves as possible. Bake for 40 minutes or until the bread is done and well browned. If you are using an insta-read thermometer, the bread should register 195 to 200 degrees when done. Remove the loaves from the pans to cool on wire racks. Let the bread cool before slicing.
Chapter 1 Flour-The Basic Ingredient


