Download - Network Setting
NETWORK SETUP INSTRUCTIONS
1
How to Connect AVTECH Product to Internet
To connect AVTECH DVR or network camera to Internet, you need to:
1). Figure out your network environment, and have related IP information in your hand. For details, please refer to “Figure out your network environment” at page 1.
2). Connect your product to a computer via LAN. For details, please refer to “Connect AVTECH product to your PC via LAN” at page 2.
3). Access your product from your computer and change the network setting. For details, please refer to “Set the network configuration of AVTECH product” at page 6.
Figure out your network environment
There are three connection types to connect your AVTECH product to Internet: by Static IP, PPPoE, and DHCP. Each type requires different configurations.
Static IP: Get the information of “Server IP”, “Gateway” and “Net Mask” from your ISP (Internet Service Provider).
Or, if you’re using port forwarding, please get them from the settings of your router. For port forwarding, please see page 10.
PPPOE: a) Get the user name and password for Internet access from your ISP. b) Create a DDNS domain name for easy access to your DVR or network camera.
For DDNS settings, please see page 7.
For other network cameras, it’s not necessary to additionally apply DDNS service.
DHCP:
a) Create a DDNS domain name for easy access to your DVR or network camera. For DDNS settings, please see page 7.
b) If your DVR or network camera is attached to a router, it would be better to assign a private IP address to your DVR or network camera so you can set port forwarding for it. For port forwarding, please see page 10.
2
Connect AVTECH product to your PC via LAN
Step1: Connect your DVR or network camera to your PC via a RJ45 network cable. Make sure your device is powered on
Step2: Set the PC’s IP address as “192.168.1.XXX” (1~255, except 10).
For Windows 2000 users:
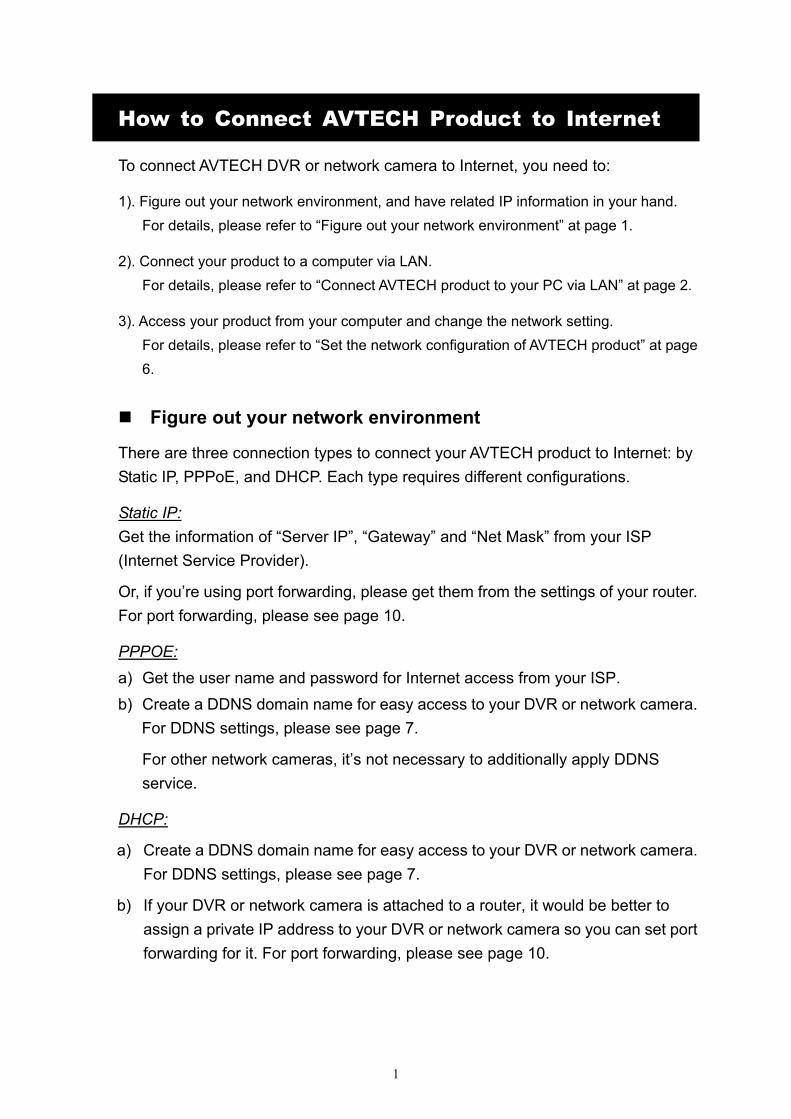
a) Select “Start” “Settings” “Network and Dial-up Connections”.
b) Right-click on “Local Area Connection”, and select “Properties”.
Note: If the LAN connection of your computer is not enabled, enable it now.
c) In the “General” tab, select “Internet Protocol (TCP/IP)”, and select “Properties”.
3
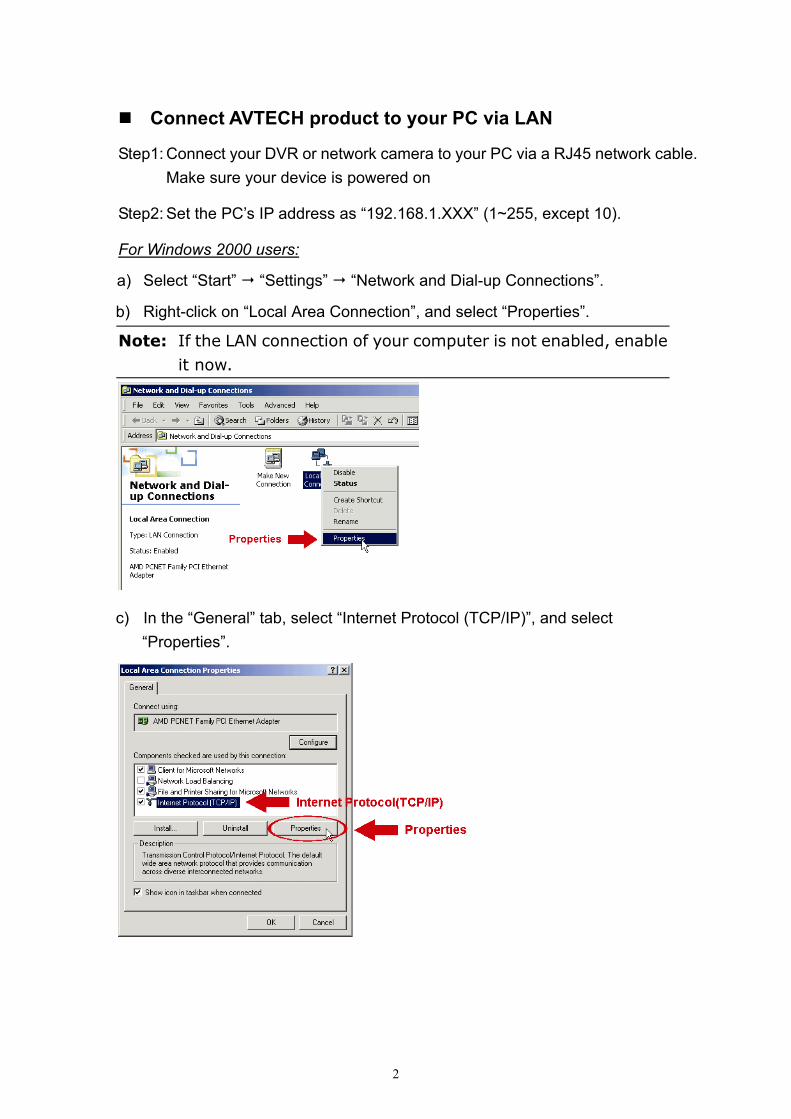
d) In the “General” tab, select “Use the following IP address”, and set the IP address as described above.
e) Click “OK” to close the “Internet Protocol (TCP/IP) Properties” dialog box. Then, click “Close” to close the “Local Area Connection Properties” dialog box.
For Windows XP users: a) Select “start” “All Programs” “Control Panel” “Network and Internet
Connections” “Network Connections” (If you’re in “Category View”).
4
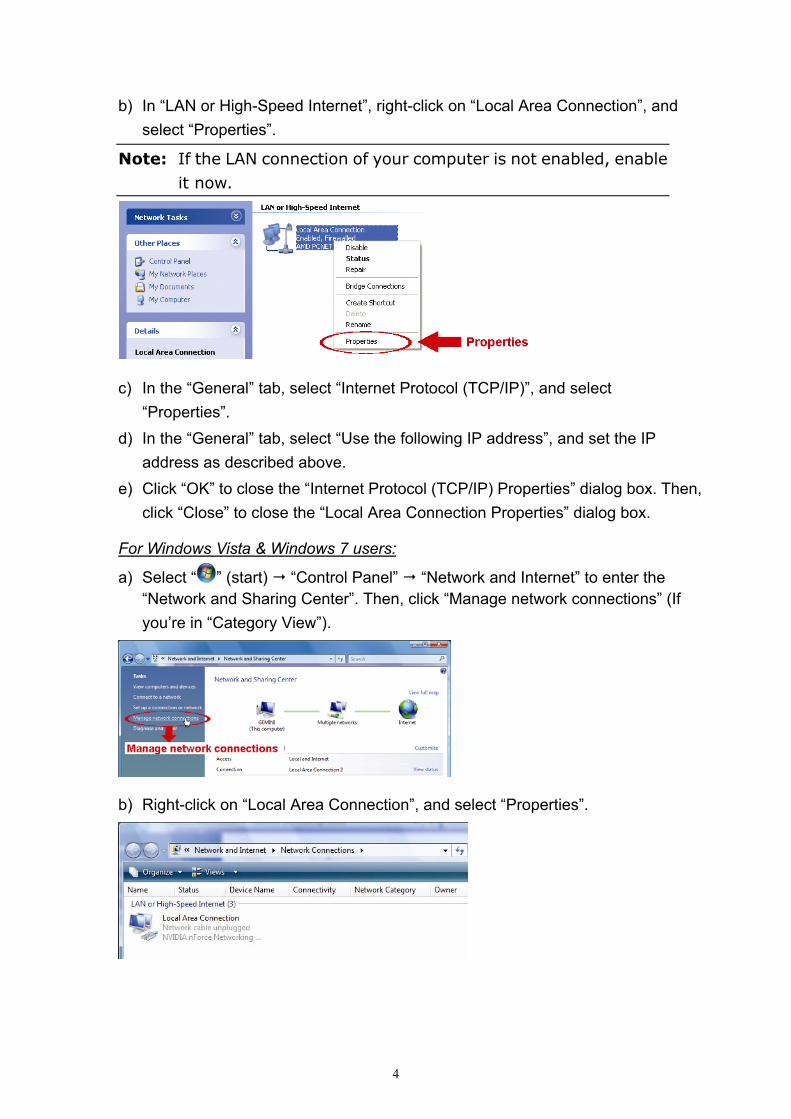
b) In “LAN or High-Speed Internet”, right-click on “Local Area Connection”, and select “Properties”.
Note: If the LAN connection of your computer is not enabled, enable it now.
c) In the “General” tab, select “Internet Protocol (TCP/IP)”, and select “Properties”.
d) In the “General” tab, select “Use the following IP address”, and set the IP address as described above.
e) Click “OK” to close the “Internet Protocol (TCP/IP) Properties” dialog box. Then, click “Close” to close the “Local Area Connection Properties” dialog box.
For Windows Vista & Windows 7 users:
a) Select “ ” (start) “Control Panel” “Network and Internet” to enter the “Network and Sharing Center”. Then, click “Manage network connections” (If you’re in “Category View”).
b) Right-click on “Local Area Connection”, and select “Properties”.
5
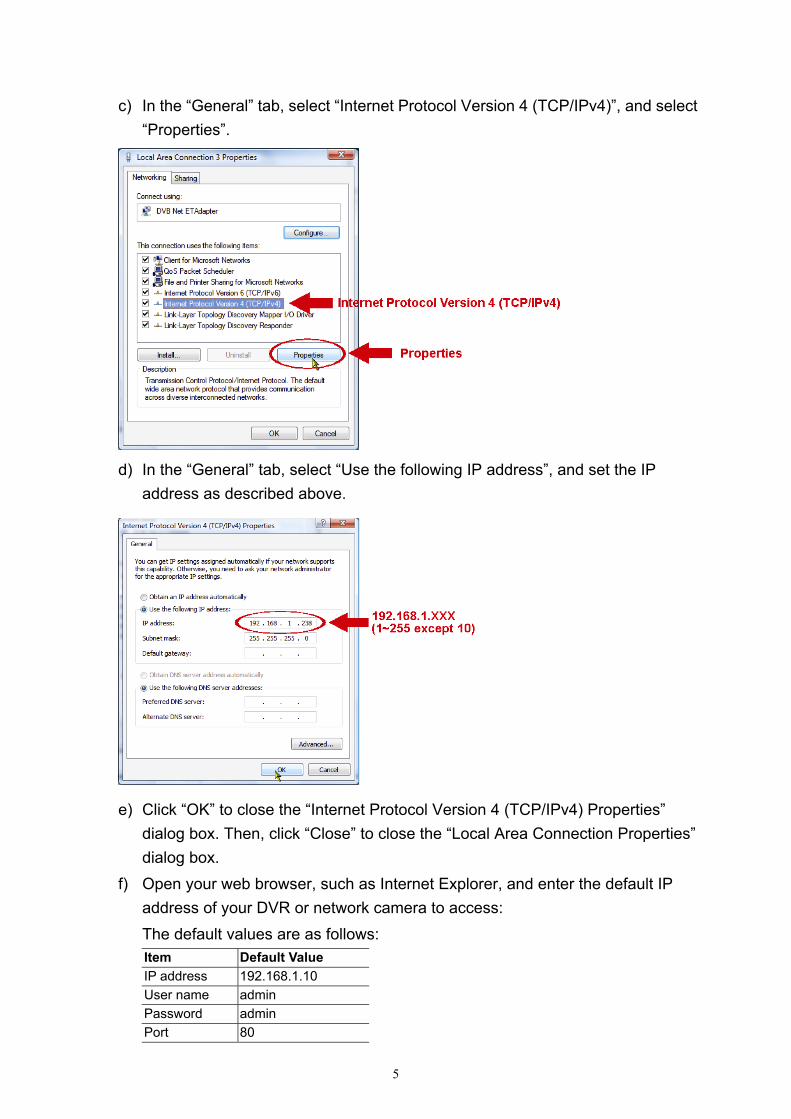
c) In the “General” tab, select “Internet Protocol Version 4 (TCP/IPv4)”, and select “Properties”.
d) In the “General” tab, select “Use the following IP address”, and set the IP
address as described above.
e) Click “OK” to close the “Internet Protocol Version 4 (TCP/IPv4) Properties” dialog box. Then, click “Close” to close the “Local Area Connection Properties” dialog box.
f) Open your web browser, such as Internet Explorer, and enter the default IP address of your DVR or network camera to access: The default values are as follows: Item Default Value IP address 192.168.1.10 User name admin Password admin Port 80
6
Set the network configuration of AVTECH product
Go to the system configuration page, and select “Network”.
Check your network environment, and choose from STATIC IP, PPPOE or DHCP to connect your DVR or network camera to the Internet.
For Static IP:
a) Go to “Network”, and select “Static IP”. Enter the information of “Server IP”, “Gateway” and “Net Mask” obtained from your ISP (Internet Service Provider) or from the settings of your router.
b) Enter the port number. The valid number ranges from 1 to 9999. The default value is 80. Typically, the TCP port used by HTTP is 80.
If your DVR or network camera is attached to a router, it is better to set port forwarding on your router. For port forwarding settings, please see page 10.
For PPPOE:
a) Go to “Network” “DDNS”, and enter the information you used when you subscribe the DDNS service. For DDNS settings, please see page 7.
b) Go to “Network”, and select “PPPOE”. Then, enter the user name and password obtained from your ISP.
For DHCP:
a) Go to “Network” “DDNS”, and enter the information you used when you subscribe the DDNS service. For DDNS settings, please see page 7.
If your DVR or network camera is attached to a router, it would be better to assign a private IP address to your DVR or network camera so you can set port forwarding for it. For port forwarding settings, please see page 10.
b) Go to “Network”, and select “DHCP”. Your DVR or network camera will get an IP address for Internet access automatically.
Complete network configurations
Disconnect your DVR (or network camera) and computer, and connect both of them to Internet respectively.
Open your web browser, and enter the IP address you just configured for your DVR or network camera to see if you can access successfully.
7
DDNS setting
DDNS (Dynamic Domain Name System) is a method of keeping a domain name linked to a changing IP Address. The DDNS feature allows your device using a domain name with your dynamically assigned IP address. It would be more convenient for you to use DDNS when using a floating IP like PPPOE or DHCP. AVTECH products support most DDNS service providers and you can enter your domain name to connect to your server no matter what your IP address is.
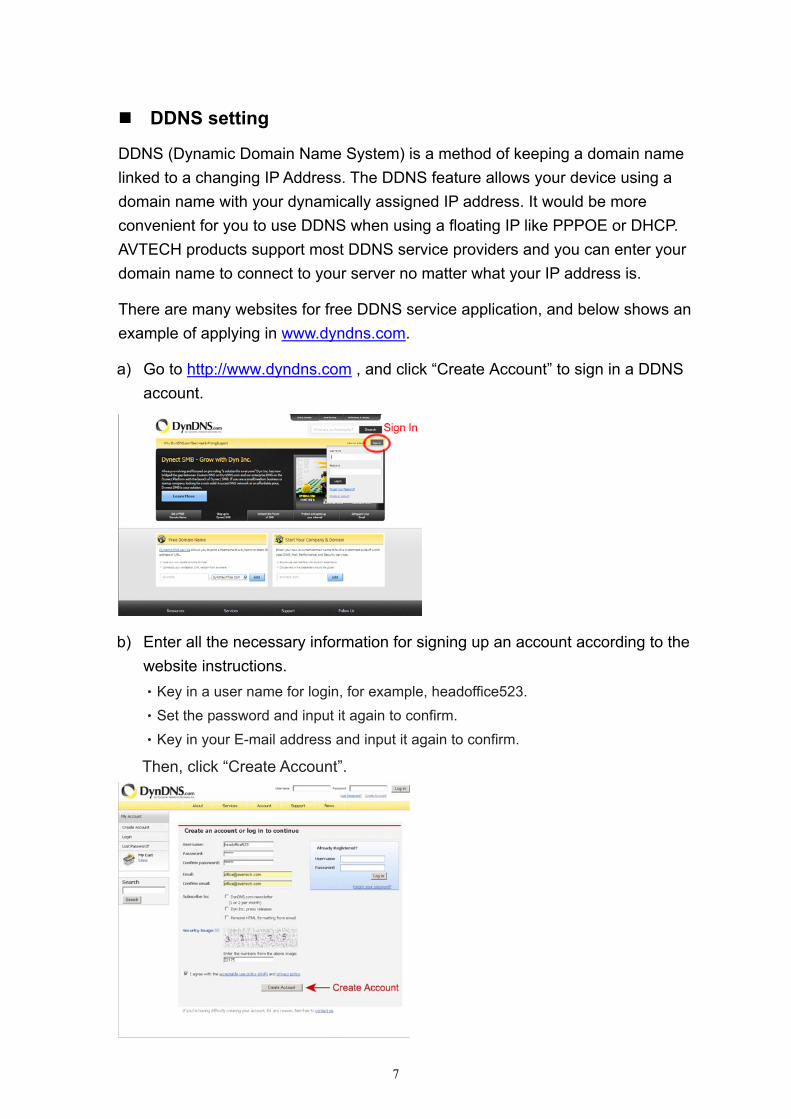
There are many websites for free DDNS service application, and below shows an example of applying in www.dyndns.com.
a) Go to http://www.dyndns.com , and click “Create Account” to sign in a DDNS account.
b) Enter all the necessary information for signing up an account according to the website instructions. ‧Key in a user name for login, for example, headoffice523. ‧Set the password and input it again to confirm. ‧Key in your E-mail address and input it again to confirm.
Then, click “Create Account”.
8
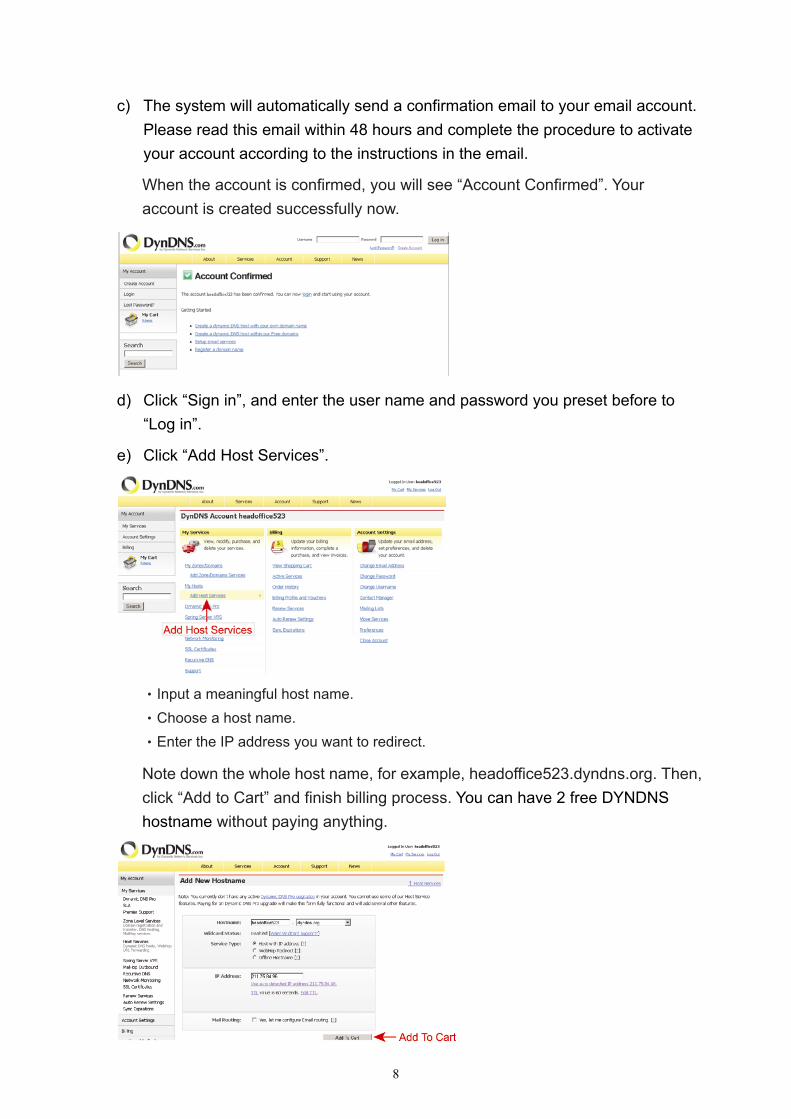
c) The system will automatically send a confirmation email to your email account. Please read this email within 48 hours and complete the procedure to activate your account according to the instructions in the email.
When the account is confirmed, you will see “Account Confirmed”. Your account is created successfully now.
d) Click “Sign in”, and enter the user name and password you preset before to “Log in”.
e) Click “Add Host Services”.
‧Input a meaningful host name. ‧Choose a host name. ‧Enter the IP address you want to redirect.
Note down the whole host name, for example, headoffice523.dyndns.org. Then, click “Add to Cart” and finish billing process. You can have 2 free DYNDNS hostname without paying anything.
9
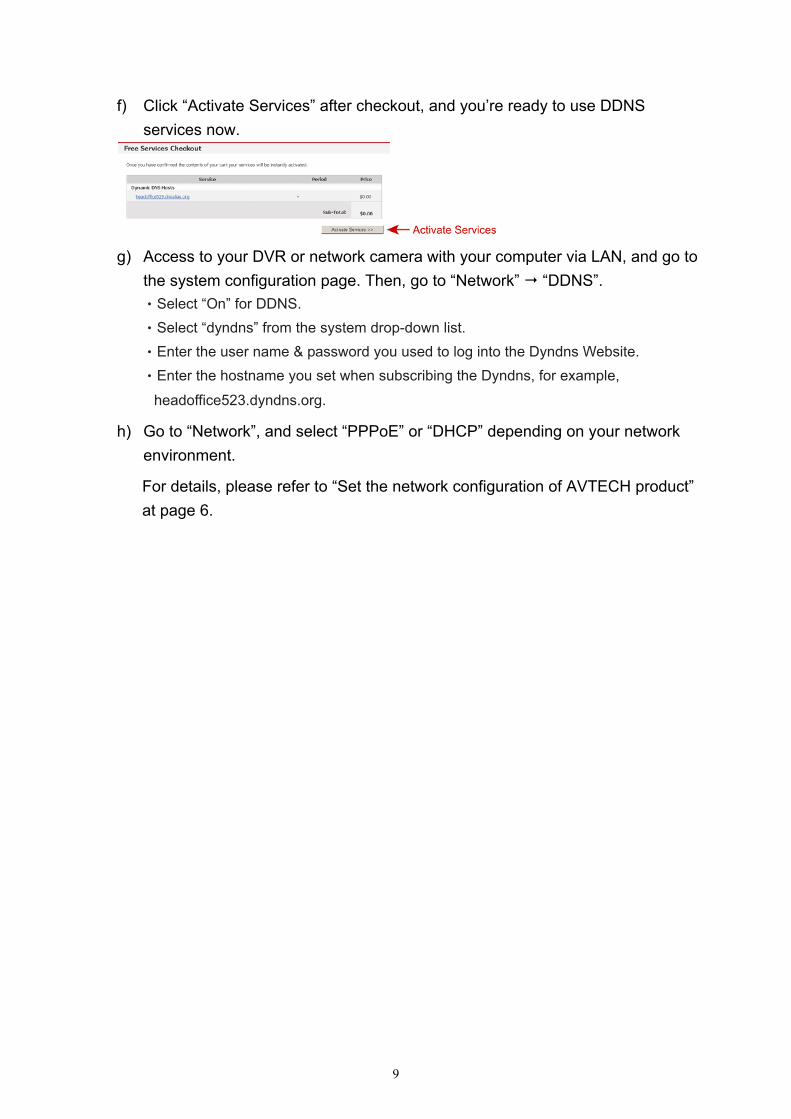
f) Click “Activate Services” after checkout, and you’re ready to use DDNS services now.
g) Access to your DVR or network camera with your computer via LAN, and go to
the system configuration page. Then, go to “Network” “DDNS”. ‧Select “On” for DDNS. ‧Select “dyndns” from the system drop-down list. ‧Enter the user name & password you used to log into the Dyndns Website. ‧Enter the hostname you set when subscribing the Dyndns, for example,
headoffice523.dyndns.org.
h) Go to “Network”, and select “PPPoE” or “DHCP” depending on your network environment.
For details, please refer to “Set the network configuration of AVTECH product” at page 6.
10
Port forwarding
If your DVR or network camera is attached to a router, you would have to set port forwarding in your router so you can log in your device from Internet. There are different setting methods for different routers. Please refer to their respective user manuals.
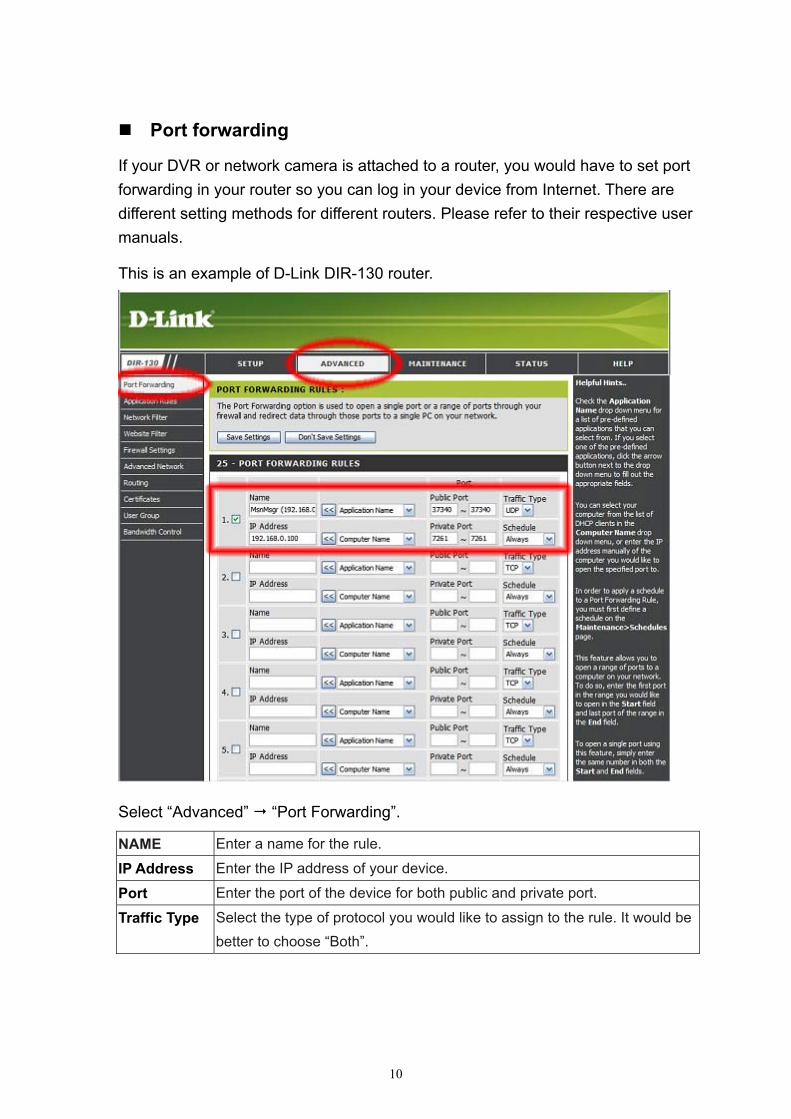
This is an example of D-Link DIR-130 router.
Select “Advanced” “Port Forwarding”.
NAME Enter a name for the rule.
IP Address Enter the IP address of your device.
Port Enter the port of the device for both public and private port.
Traffic Type Select the type of protocol you would like to assign to the rule. It would be better to choose “Both”.


