Microsoft Office
Word 2016 for Windows Mail Merge and Creating Forms
Learning Technologies, Training & Audiovisual Outreach
University Information Technology Services
Copyright © 2016 KSU Division of University Information Technology Services
This document may be downloaded, printed, or copied for educational use without further permission
of the University Information Technology Services Division (UITS), provided the content is not modified
and this statement is not removed. Any use not stated above requires the written consent of the UITS
Division. The distribution of a copy of this document via the Internet or other electronic medium
without the written permission of the KSU - UITS Division is expressly prohibited.
Published by Kennesaw State University – UITS 2016
The publisher makes no warranties as to the accuracy of the material contained in this document and
therefore is not responsible for any damages or liabilities incurred from UITS use.
Microsoft product screenshot(s) reprinted with permission from Microsoft Corporation.
Microsoft, Microsoft Office, and Microsoft Word are trademarks of the Microsoft Corporation.
University Information Technology Services
Microsoft Office: Word 2016 for Windows
Mail Merge and Creating Forms
Table of Contents
Introduction ................................................................................................................................................ 4
Learning Objectives ..................................................................................................................................... 4
Creating Forms ............................................................................................................................................ 5
Enable the Developer Tab ....................................................................................................................... 5
Beginning Your Form ............................................................................................................................... 6
Inserting Content Controls ...................................................................................................................... 7
Replacing Instructional Text ............................................................................................................... 8
Setting Content Control Properties .................................................................................................... 9
Rich Text and Plain Text Properties .................................................................................................. 10
Combo Box and Drop-down List Properties ..................................................................................... 11
Date Picker Properties ...................................................................................................................... 12
Picture Properties ............................................................................................................................. 13
Check Box Properties ........................................................................................................................ 13
Lock and Restrict Your Form ................................................................................................................. 14
Lock Content ..................................................................................................................................... 14
Restrict Editing .................................................................................................................................. 15
Unlocking a Form .............................................................................................................................. 16
Saving Your Fillable Form as a Template .............................................................................................. 17
Mail Merge ................................................................................................................................................ 17
Using the Mail Merge Wizard ............................................................................................................... 18
Using the Mail Merge Wizard to Create Your Own List of Recipients .............................................. 26
Matching Fields ..................................................................................................................................... 27
Additional Help ......................................................................................................................................... 28
Revised: 6/29/2016 Page 4 of 28
Introduction
This booklet is the companion document to the Word 2016: Mail Merge and Creating Forms workshop.
The booklet will show users how to create fillable forms, restrict editing in the forms, and save the
form as a template. This booklet will also show how to use the Mail Merge Wizard to quickly create
personalized letters to multiple people.
Learning Objectives
After completing the instructions in this booklet, you will be able to:
Create fillable forms in Word.
Add the Developer tab to the Ribbon.
Recognize content controls and how to add them to your form.
Lock and restrict your form.
Save your form as a template.
Unlock a form.
Use the Mail Merge Wizard.
Reassign fields using the matching fields tool.

Page 5 of 28
Creating Forms
You can create fillable forms in Word that can be used to collect information, and when building your
form, you can add a variety of tools to assist with data collection.
Recent Photograph:
Name: Scrappy Owl
Sex: Male ☒ Female ☐ Birth Date: 10/9/1963
Address: 1000 Chastain Point Major: Communications
City: Kennesaw Graduated: ☒
State: Georgia Currently Employed: ☒
Zip: 30144 How did you hear about us? Magazine Figure 1 - Example Form
Once your form is complete, you can then save it as a template, so that the user fills in a copy and the
original (template) does not change. This section on Creating Forms will explain how to re-create the
Example Form above.
Enable the Developer Tab
Before you can begin creating your form, you will need to make sure the Developer tab is displayed in
your Ribbon. The Developer Tab contains the tools necessary to create your form. If you do not see the
Developer tab, follow the steps below to activate it:
1. Click the File tab.
2. In the Backstage View, click Options.
Page 6 of 28
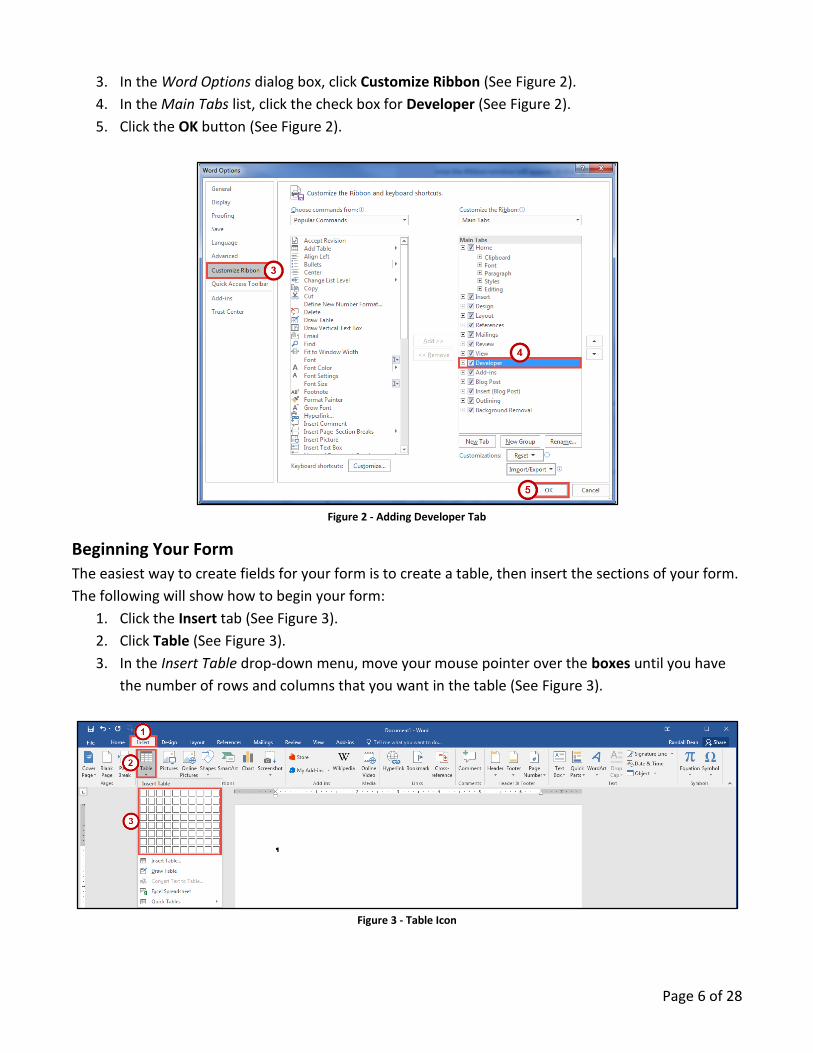
3. In the Word Options dialog box, click Customize Ribbon (See Figure 2).
4. In the Main Tabs list, click the check box for Developer (See Figure 2).
5. Click the OK button (See Figure 2).
Figure 2 - Adding Developer Tab
Beginning Your Form
The easiest way to create fields for your form is to create a table, then insert the sections of your form.
The following will show how to begin your form:
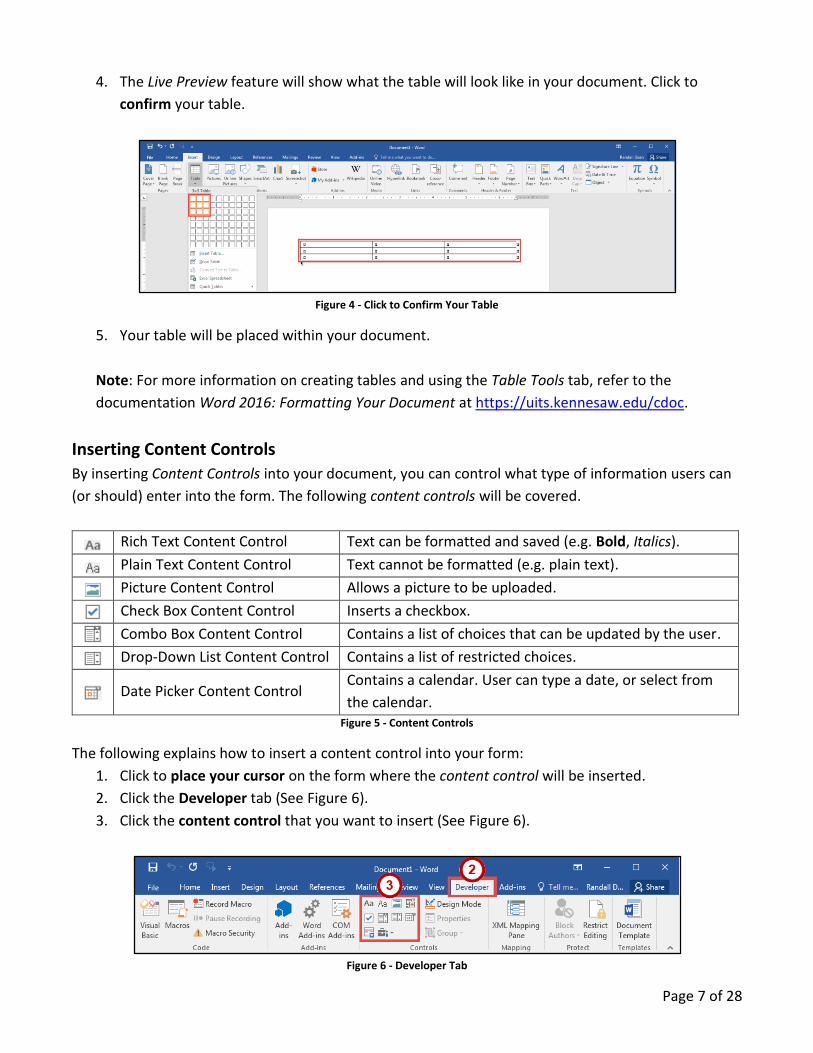
1. Click the Insert tab (See Figure 3).
2. Click Table (See Figure 3).
3. In the Insert Table drop-down menu, move your mouse pointer over the boxes until you have
the number of rows and columns that you want in the table (See Figure 3).
Figure 3 - Table Icon
Page 7 of 28
4. The Live Preview feature will show what the table will look like in your document. Click to
confirm your table.
Figure 4 - Click to Confirm Your Table
5. Your table will be placed within your document.
Note: For more information on creating tables and using the Table Tools tab, refer to the
documentation Word 2016: Formatting Your Document at https://uits.kennesaw.edu/cdoc.
Inserting Content Controls
By inserting Content Controls into your document, you can control what type of information users can
(or should) enter into the form. The following content controls will be covered.
Rich Text Content Control Text can be formatted and saved (e.g. Bold, Italics).
Plain Text Content Control Text cannot be formatted (e.g. plain text).
Picture Content Control Allows a picture to be uploaded.
Check Box Content Control Inserts a checkbox.
Combo Box Content Control Contains a list of choices that can be updated by the user.
Drop-Down List Content Control Contains a list of restricted choices.
Date Picker Content Control Contains a calendar. User can type a date, or select from
the calendar. Figure 5 - Content Controls
The following explains how to insert a content control into your form:
1. Click to place your cursor on the form where the content control will be inserted.
2. Click the Developer tab (See Figure 6).
3. Click the content control that you want to insert (See Figure 6).
Figure 6 - Developer Tab

Page 8 of 28
Replacing Instructional Text
All content controls contain “instructional” text that indicates what the end user is to do with the
control. Whenever the user enters information into a content control, the instructional text is
automatically replaced.
Figure 7 - Example of Instructional Text
The following explains how to change the instructional text that appears in the content control:
1. Click the Developer tab (See Figure 8).
2. Click Design Mode (See Figure 8).
Figure 8 - Developer Tab
3. The content controls in your document will enter design mode.
Figure 9 - Design Mode Active
Page 9 of 28
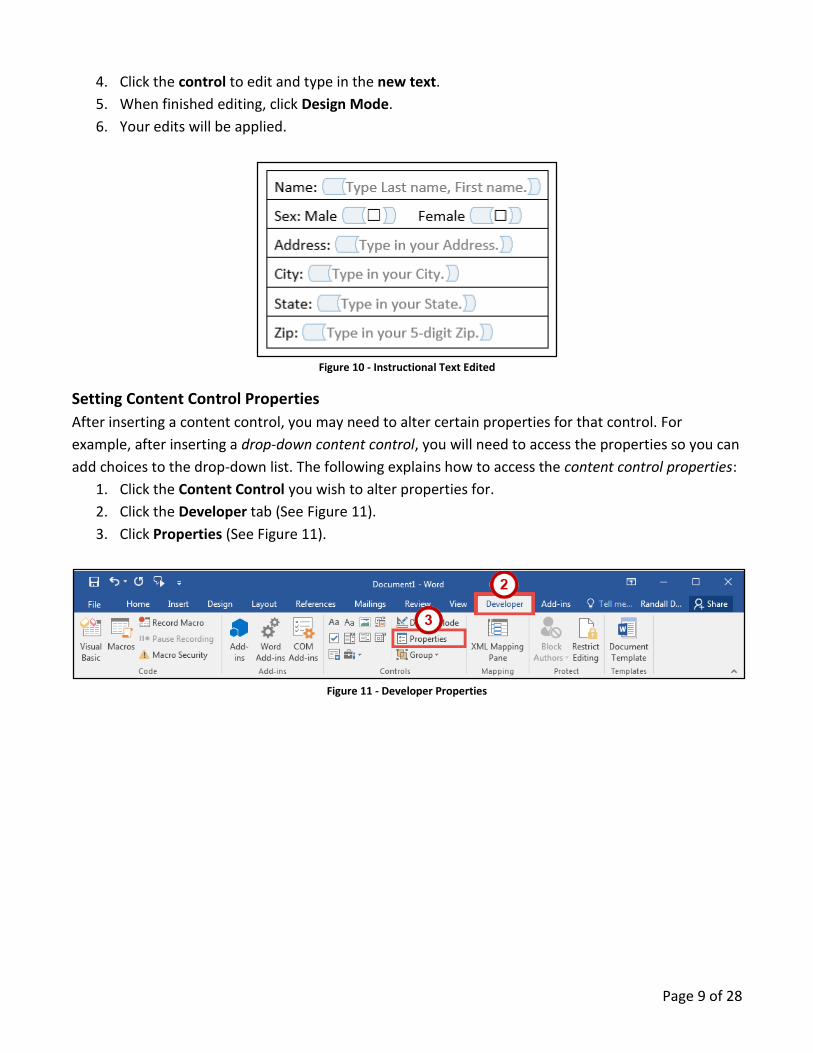
4. Click the control to edit and type in the new text.
5. When finished editing, click Design Mode.
6. Your edits will be applied.
Figure 10 - Instructional Text Edited
Setting Content Control Properties
After inserting a content control, you may need to alter certain properties for that control. For
example, after inserting a drop-down content control, you will need to access the properties so you can
add choices to the drop-down list. The following explains how to access the content control properties:
1. Click the Content Control you wish to alter properties for.
2. Click the Developer tab (See Figure 11).
3. Click Properties (See Figure 11).
Figure 11 - Developer Properties
Page 10 of 28
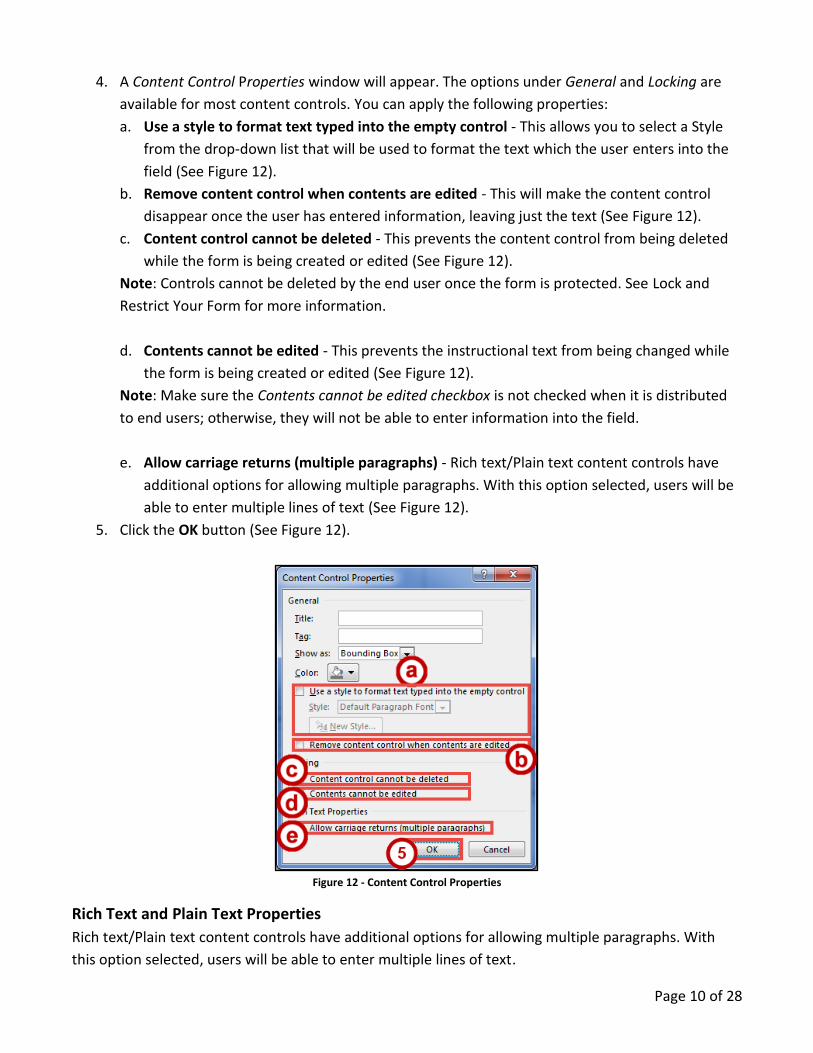
4. A Content Control Properties window will appear. The options under General and Locking are
available for most content controls. You can apply the following properties:
a. Use a style to format text typed into the empty control - This allows you to select a Style
from the drop-down list that will be used to format the text which the user enters into the
field (See Figure 12).
b. Remove content control when contents are edited - This will make the content control
disappear once the user has entered information, leaving just the text (See Figure 12).
c. Content control cannot be deleted - This prevents the content control from being deleted
while the form is being created or edited (See Figure 12).
Note: Controls cannot be deleted by the end user once the form is protected. See Lock and
Restrict Your Form for more information.
d. Contents cannot be edited - This prevents the instructional text from being changed while
the form is being created or edited (See Figure 12).
Note: Make sure the Contents cannot be edited checkbox is not checked when it is distributed
to end users; otherwise, they will not be able to enter information into the field.
e. Allow carriage returns (multiple paragraphs) - Rich text/Plain text content controls have
additional options for allowing multiple paragraphs. With this option selected, users will be
able to enter multiple lines of text (See Figure 12).
5. Click the OK button (See Figure 12).
Figure 12 - Content Control Properties
Rich Text and Plain Text Properties
Rich text/Plain text content controls have additional options for allowing multiple paragraphs. With
this option selected, users will be able to enter multiple lines of text.
Page 11 of 28
Combo Box and Drop-down List Properties
When adding combo box and drop-down lists context controls, you will need to enter the properties
for these controls in order to add the choices users will select from the list. The following explains how
to add entries to the combo box/drop-down list:
1. Click the Combo Box Content Control you wish to alter properties for.
2. Click the Developer tab.
3. Click Properties.
4. In the Content Control Properties dialog box, click the Add button.
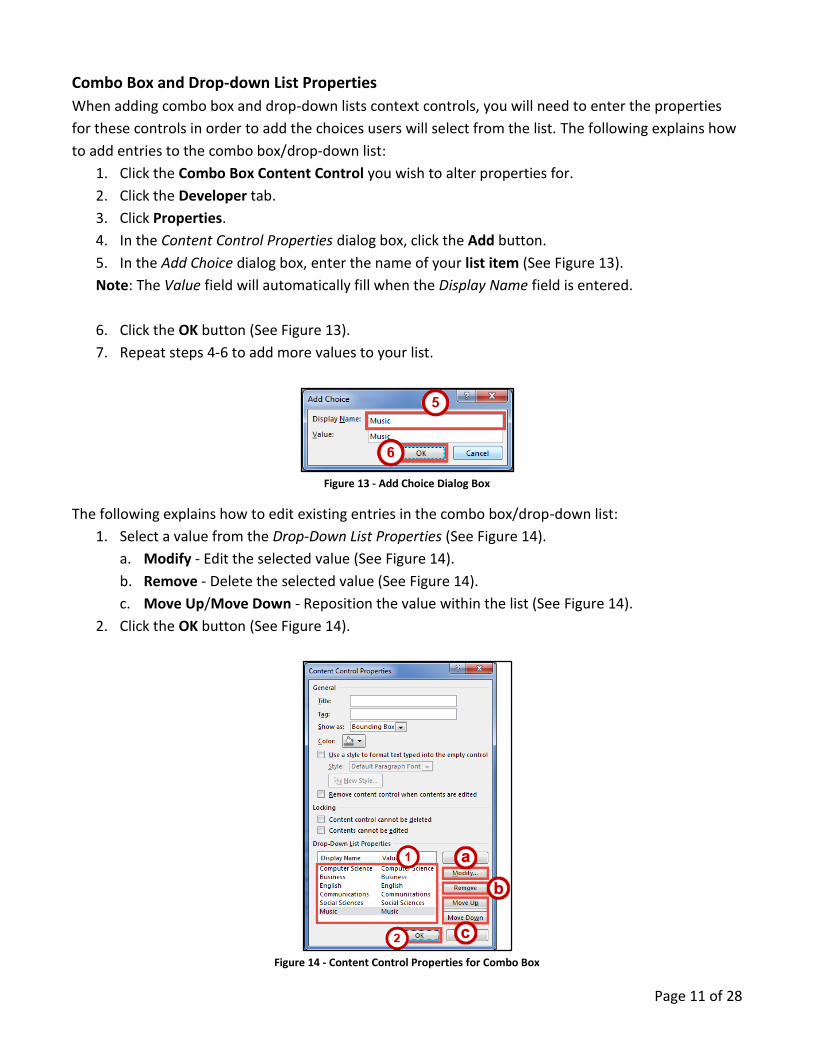
5. In the Add Choice dialog box, enter the name of your list item (See Figure 13).
Note: The Value field will automatically fill when the Display Name field is entered.
6. Click the OK button (See Figure 13).
7. Repeat steps 4-6 to add more values to your list.
Figure 13 - Add Choice Dialog Box
The following explains how to edit existing entries in the combo box/drop-down list:
1. Select a value from the Drop-Down List Properties (See Figure 14).
a. Modify - Edit the selected value (See Figure 14).
b. Remove - Delete the selected value (See Figure 14).
c. Move Up/Move Down - Reposition the value within the list (See Figure 14).
2. Click the OK button (See Figure 14).
Figure 14 - Content Control Properties for Combo Box
Page 12 of 28
Date Picker Properties
The Date Picker Properties provide options how you would like the date to display in the field once
selected by the user (the other options can be left as they are). The follow explains how to change how
your date will be displayed in the field:
1. Click the Date Picker Content Control you wish to alter properties for.
2. Click the Developer tab.
3. Click Properties.
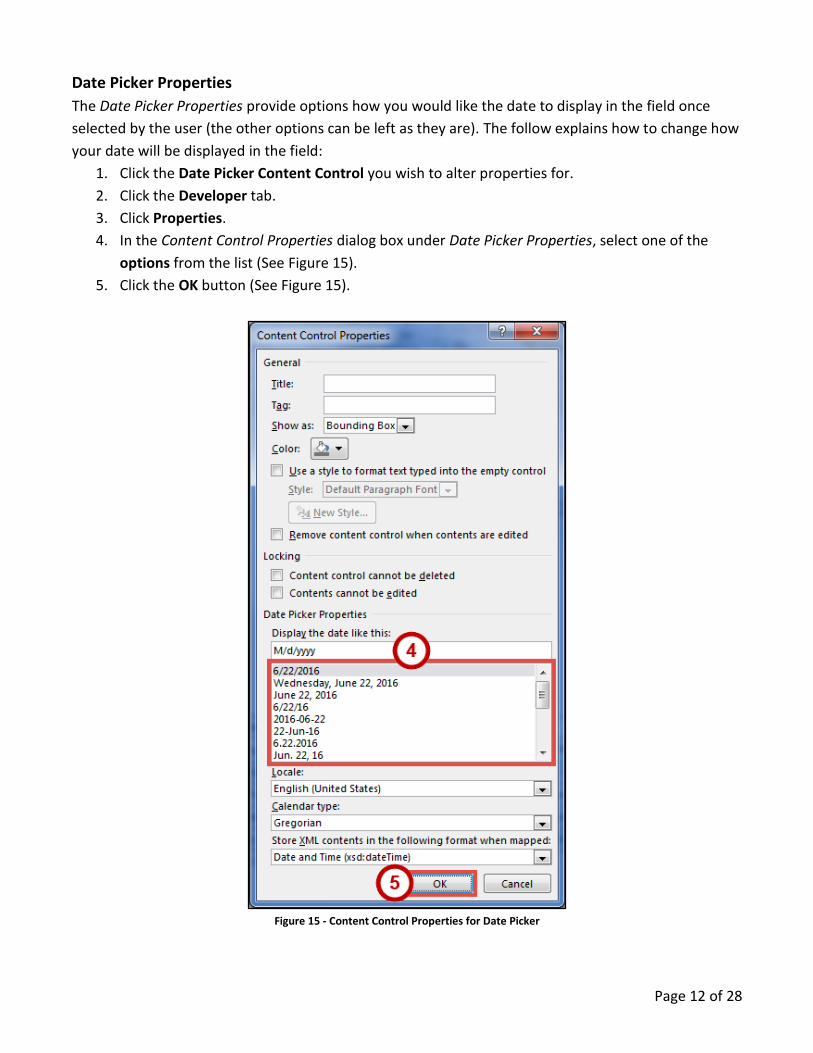
4. In the Content Control Properties dialog box under Date Picker Properties, select one of the
options from the list (See Figure 15).
5. Click the OK button (See Figure 15).
Figure 15 - Content Control Properties for Date Picker
Page 13 of 28
Picture Properties
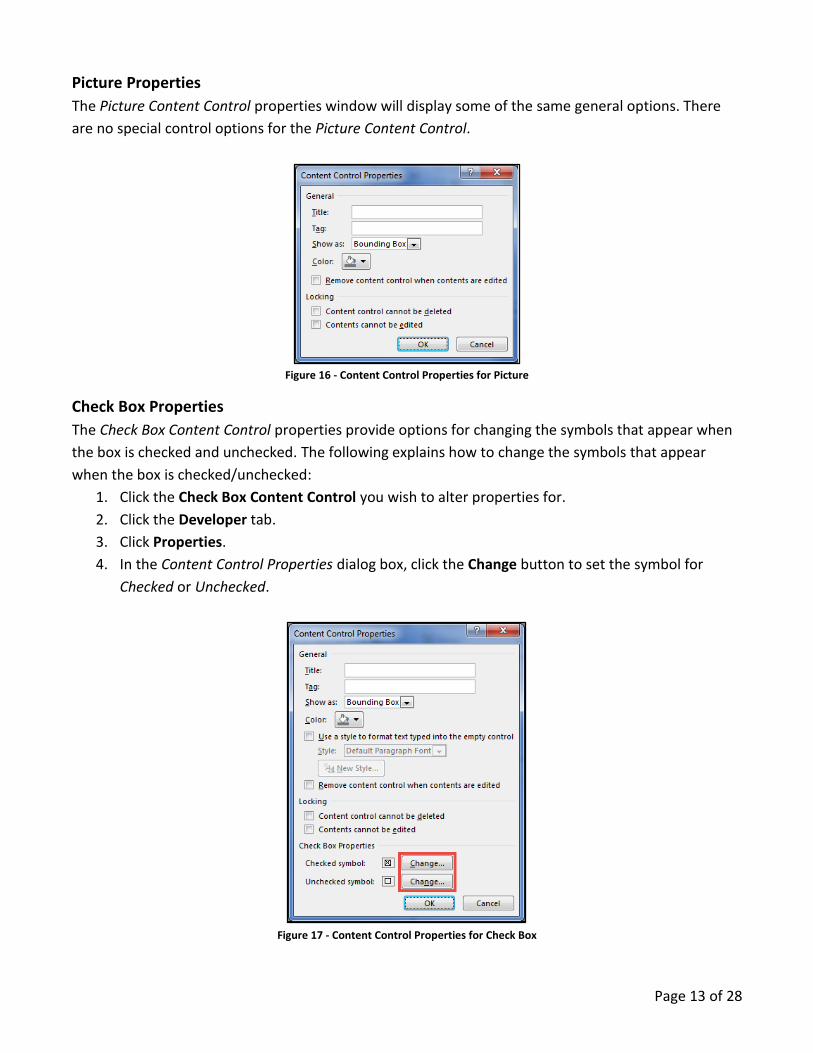
The Picture Content Control properties window will display some of the same general options. There
are no special control options for the Picture Content Control.
Figure 16 - Content Control Properties for Picture
Check Box Properties
The Check Box Content Control properties provide options for changing the symbols that appear when
the box is checked and unchecked. The following explains how to change the symbols that appear
when the box is checked/unchecked:
1. Click the Check Box Content Control you wish to alter properties for.
2. Click the Developer tab.
3. Click Properties.
4. In the Content Control Properties dialog box, click the Change button to set the symbol for
Checked or Unchecked.
Figure 17 - Content Control Properties for Check Box
Page 14 of 28
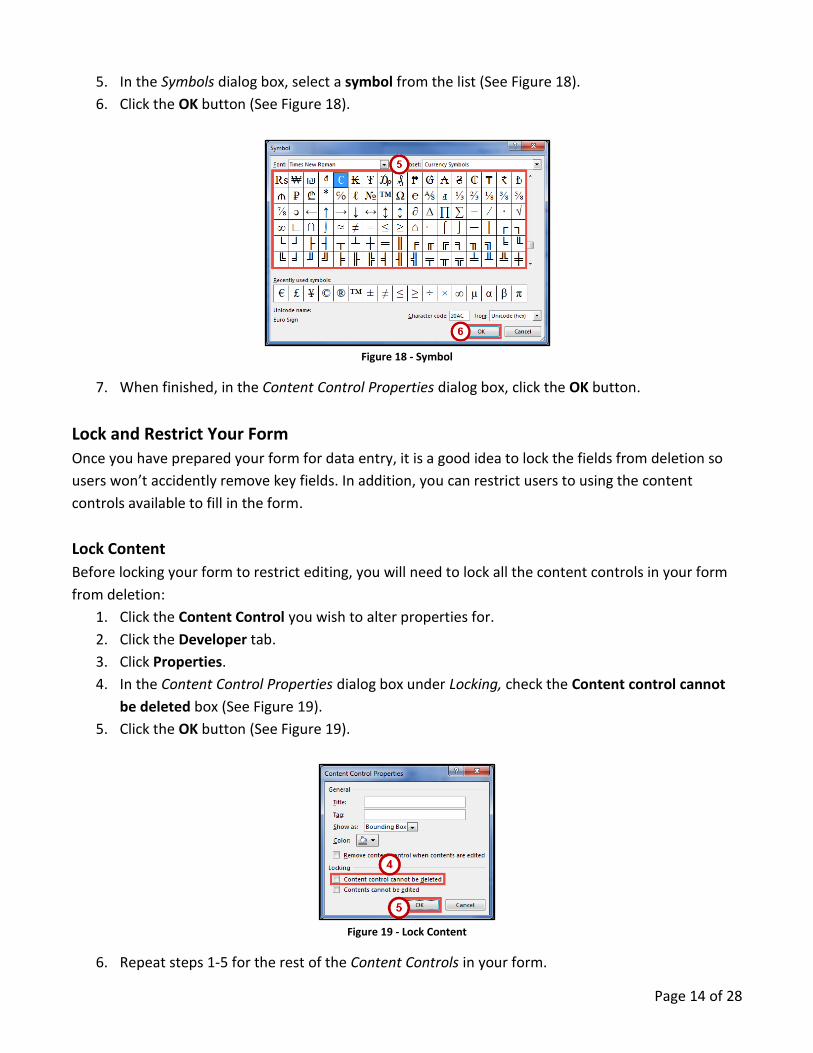
5. In the Symbols dialog box, select a symbol from the list (See Figure 18).
6. Click the OK button (See Figure 18).
Figure 18 - Symbol
7. When finished, in the Content Control Properties dialog box, click the OK button.
Lock and Restrict Your Form
Once you have prepared your form for data entry, it is a good idea to lock the fields from deletion so
users won’t accidently remove key fields. In addition, you can restrict users to using the content
controls available to fill in the form.
Lock Content
Before locking your form to restrict editing, you will need to lock all the content controls in your form
from deletion:
1. Click the Content Control you wish to alter properties for.
2. Click the Developer tab.
3. Click Properties.
4. In the Content Control Properties dialog box under Locking, check the Content control cannot
be deleted box (See Figure 19).
5. Click the OK button (See Figure 19).
Figure 19 - Lock Content
6. Repeat steps 1-5 for the rest of the Content Controls in your form.
Page 15 of 28
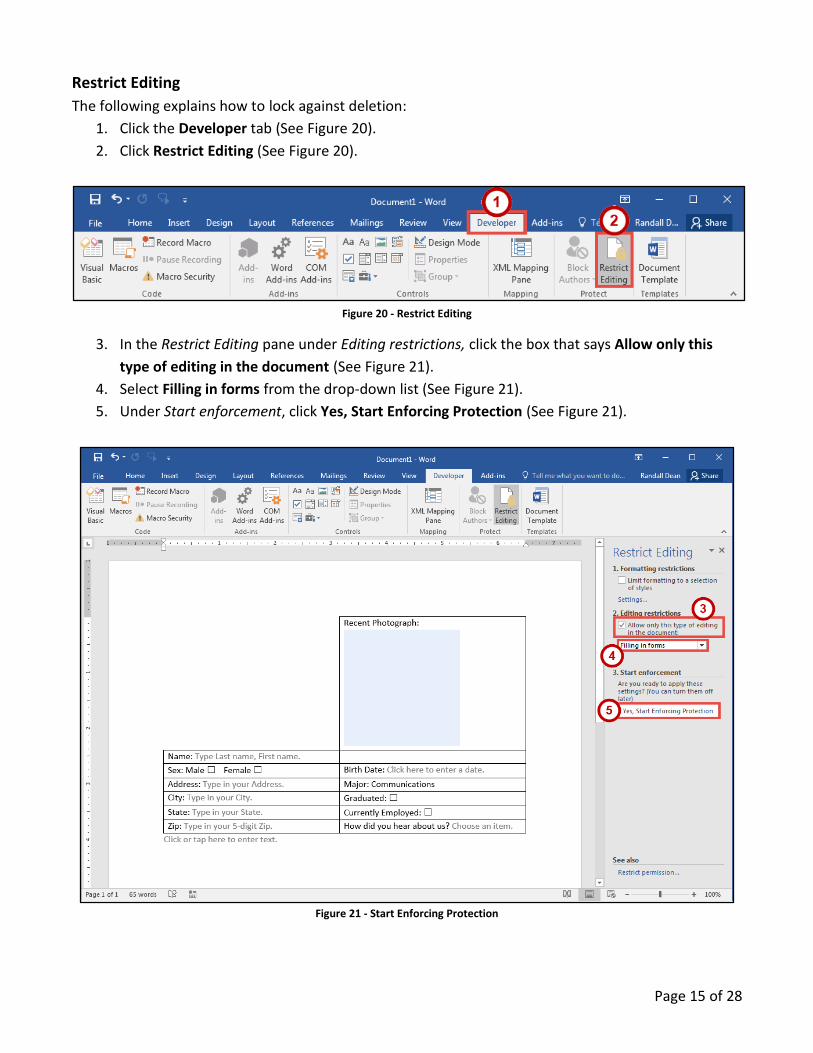
Restrict Editing
The following explains how to lock against deletion:
1. Click the Developer tab (See Figure 20).
2. Click Restrict Editing (See Figure 20).
Figure 20 - Restrict Editing
3. In the Restrict Editing pane under Editing restrictions, click the box that says Allow only this
type of editing in the document (See Figure 21).
4. Select Filling in forms from the drop-down list (See Figure 21).
5. Under Start enforcement, click Yes, Start Enforcing Protection (See Figure 21).
Figure 21 - Start Enforcing Protection
Page 16 of 28
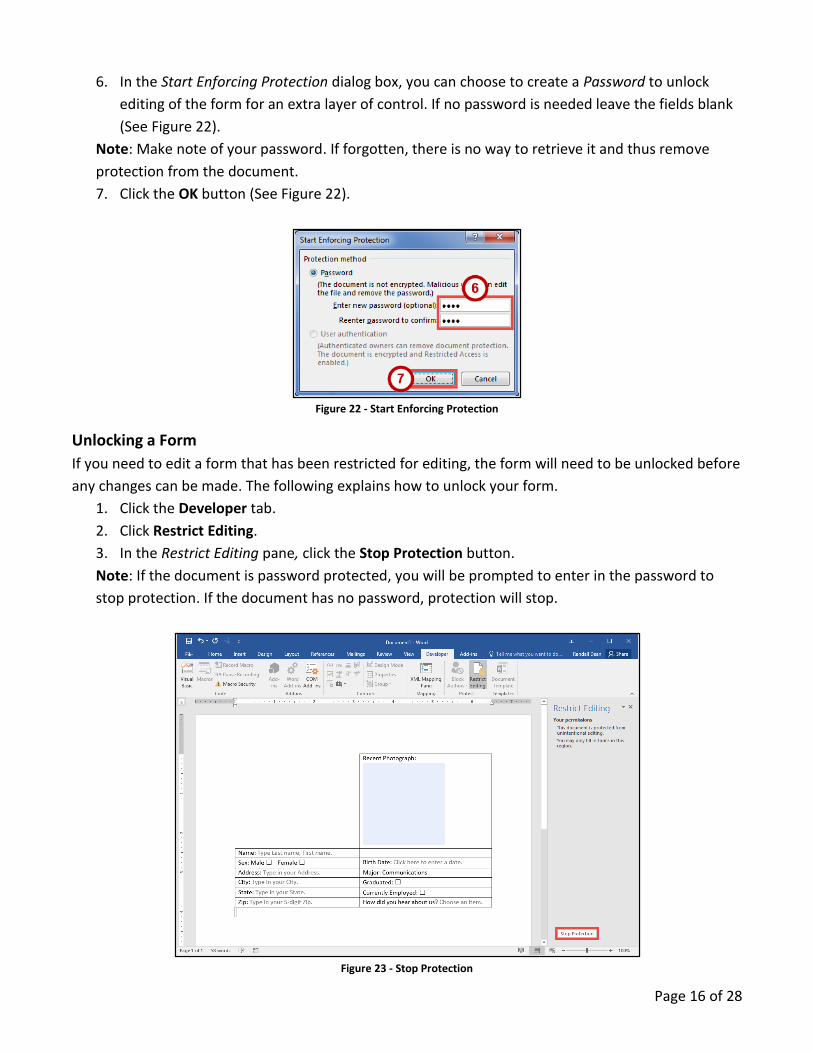
6. In the Start Enforcing Protection dialog box, you can choose to create a Password to unlock
editing of the form for an extra layer of control. If no password is needed leave the fields blank
(See Figure 22).
Note: Make note of your password. If forgotten, there is no way to retrieve it and thus remove
protection from the document.
7. Click the OK button (See Figure 22).
Figure 22 - Start Enforcing Protection
Unlocking a Form
If you need to edit a form that has been restricted for editing, the form will need to be unlocked before
any changes can be made. The following explains how to unlock your form.
1. Click the Developer tab.
2. Click Restrict Editing.
3. In the Restrict Editing pane, click the Stop Protection button.
Note: If the document is password protected, you will be prompted to enter in the password to
stop protection. If the document has no password, protection will stop.
Figure 23 - Stop Protection
Page 17 of 28
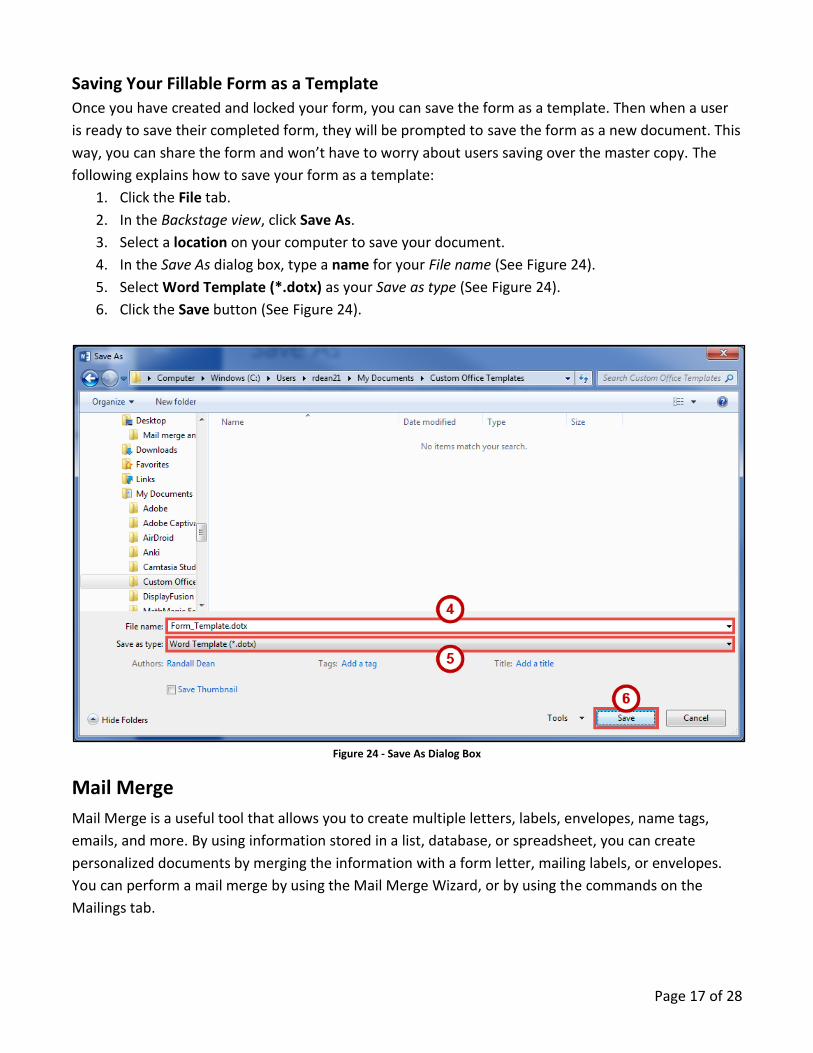
Saving Your Fillable Form as a Template
Once you have created and locked your form, you can save the form as a template. Then when a user
is ready to save their completed form, they will be prompted to save the form as a new document. This
way, you can share the form and won’t have to worry about users saving over the master copy. The
following explains how to save your form as a template:
1. Click the File tab.
2. In the Backstage view, click Save As.
3. Select a location on your computer to save your document.
4. In the Save As dialog box, type a name for your File name (See Figure 24).
5. Select Word Template (*.dotx) as your Save as type (See Figure 24).
6. Click the Save button (See Figure 24).
Figure 24 - Save As Dialog Box
Mail Merge
Mail Merge is a useful tool that allows you to create multiple letters, labels, envelopes, name tags,
emails, and more. By using information stored in a list, database, or spreadsheet, you can create
personalized documents by merging the information with a form letter, mailing labels, or envelopes.
You can perform a mail merge by using the Mail Merge Wizard, or by using the commands on the
Mailings tab.
Page 18 of 28
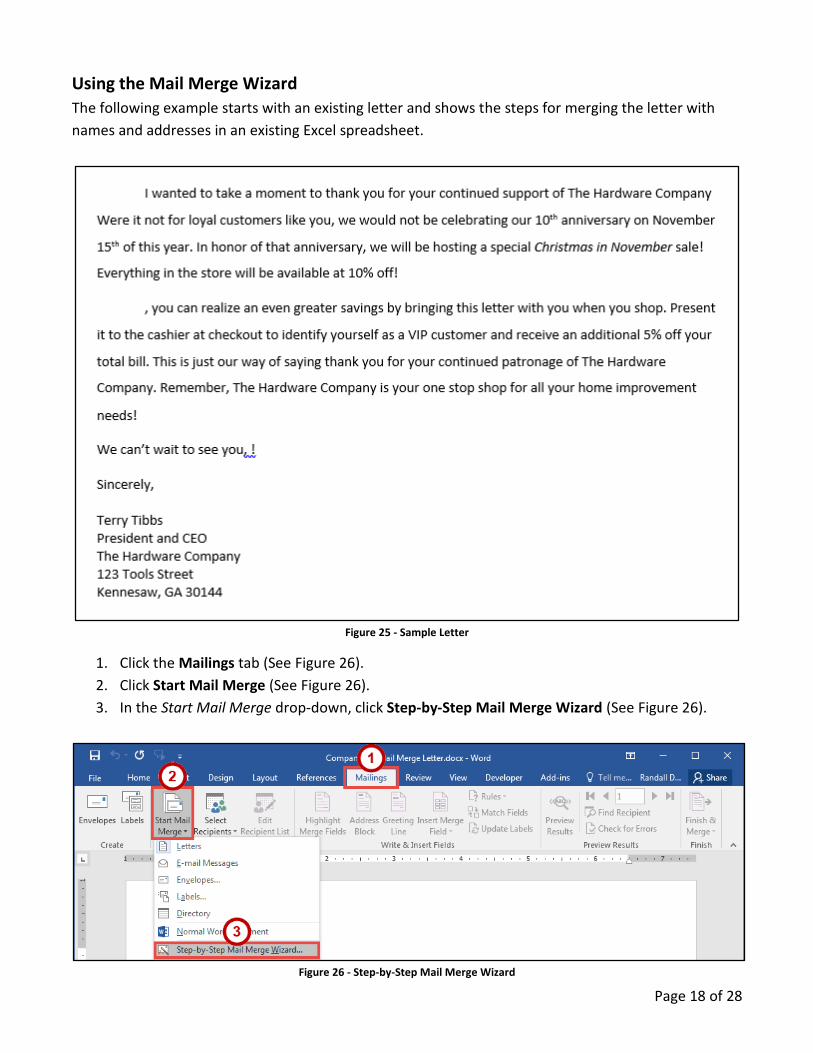
Using the Mail Merge Wizard
The following example starts with an existing letter and shows the steps for merging the letter with
names and addresses in an existing Excel spreadsheet.
Figure 25 - Sample Letter
1. Click the Mailings tab (See Figure 26).
2. Click Start Mail Merge (See Figure 26).
3. In the Start Mail Merge drop-down, click Step-by-Step Mail Merge Wizard (See Figure 26).
Figure 26 - Step-by-Step Mail Merge Wizard
Page 19 of 28
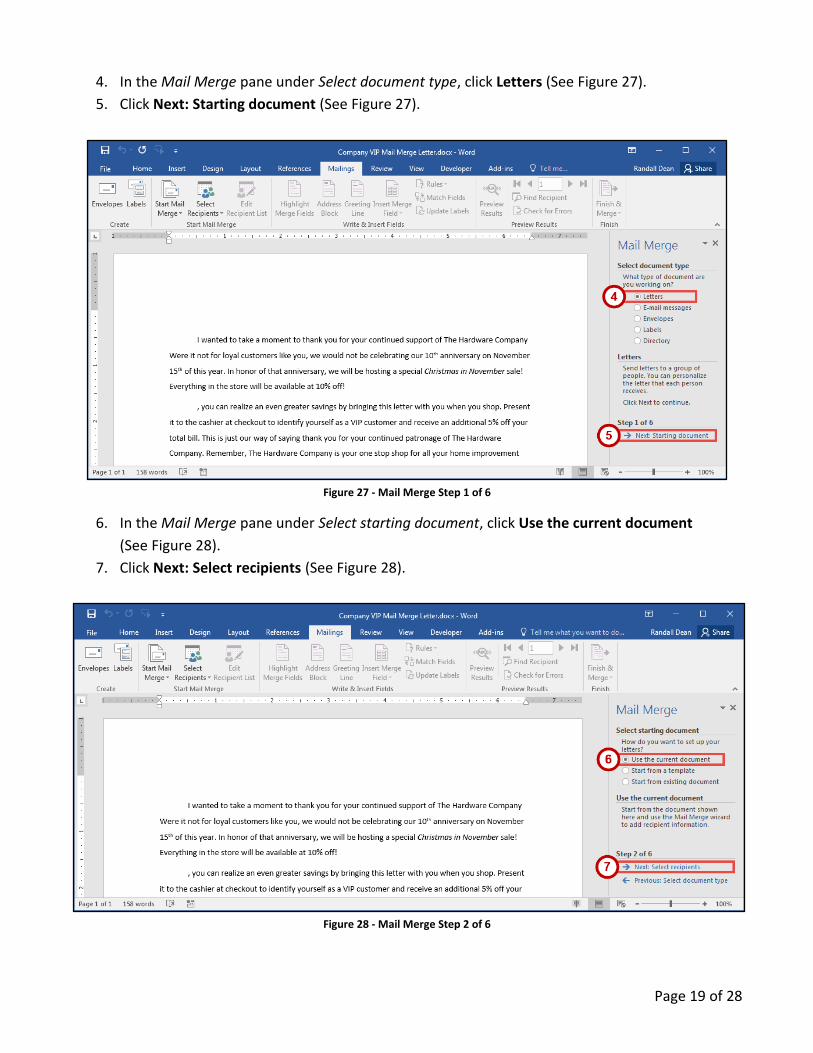
4. In the Mail Merge pane under Select document type, click Letters (See Figure 27).
5. Click Next: Starting document (See Figure 27).
Figure 27 - Mail Merge Step 1 of 6
6. In the Mail Merge pane under Select starting document, click Use the current document
(See Figure 28).
7. Click Next: Select recipients (See Figure 28).
Figure 28 - Mail Merge Step 2 of 6
Page 20 of 28
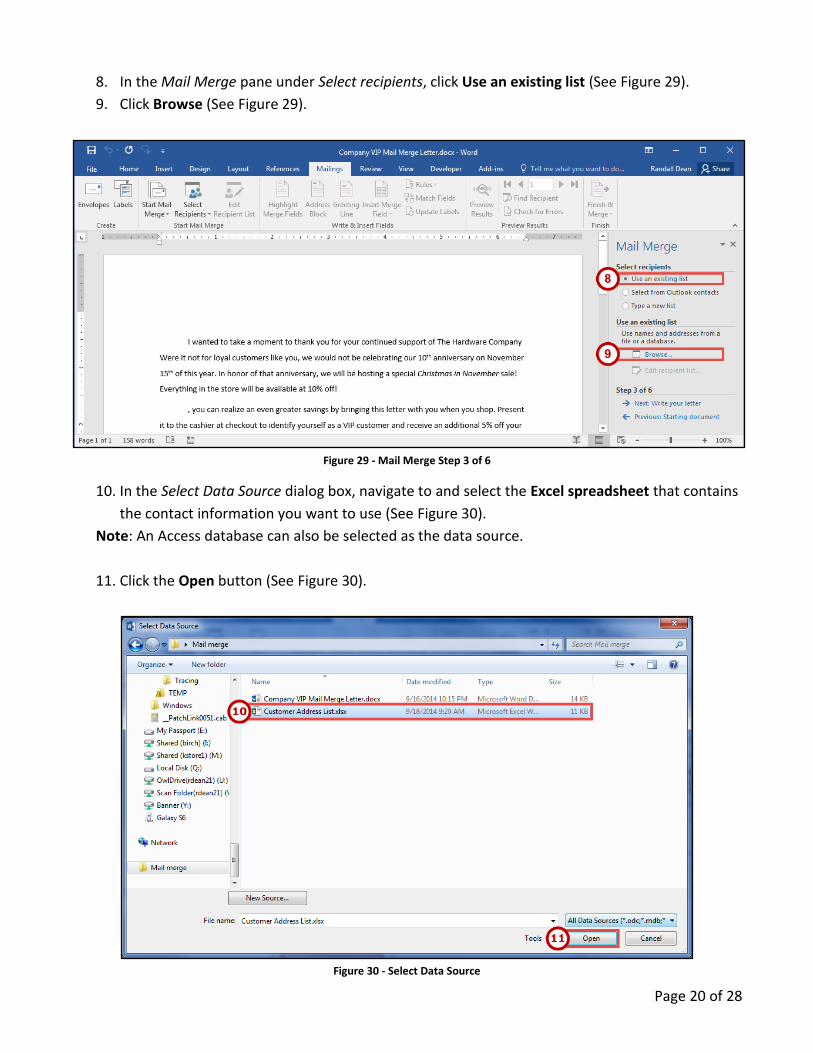
8. In the Mail Merge pane under Select recipients, click Use an existing list (See Figure 29).
9. Click Browse (See Figure 29).
Figure 29 - Mail Merge Step 3 of 6
10. In the Select Data Source dialog box, navigate to and select the Excel spreadsheet that contains
the contact information you want to use (See Figure 30).
Note: An Access database can also be selected as the data source.
11. Click the Open button (See Figure 30).
Figure 30 - Select Data Source
Page 21 of 28
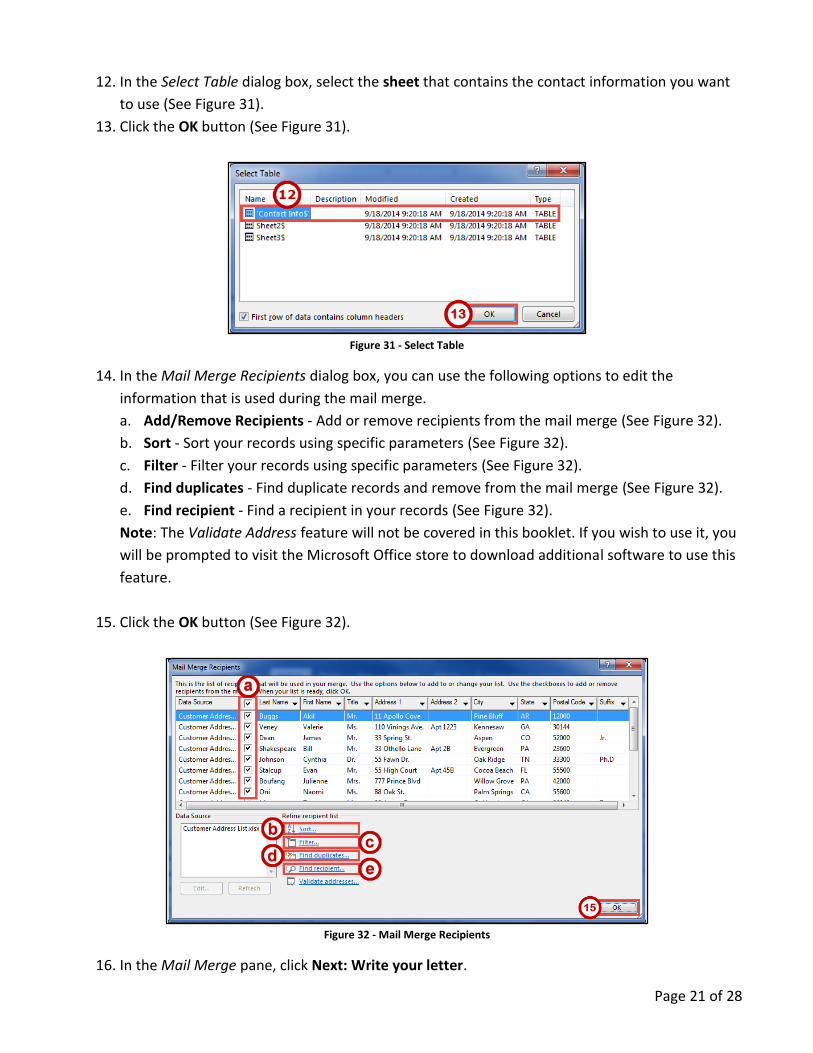
12. In the Select Table dialog box, select the sheet that contains the contact information you want
to use (See Figure 31).
13. Click the OK button (See Figure 31).
Figure 31 - Select Table
14. In the Mail Merge Recipients dialog box, you can use the following options to edit the
information that is used during the mail merge.
a. Add/Remove Recipients - Add or remove recipients from the mail merge (See Figure 32).
b. Sort - Sort your records using specific parameters (See Figure 32).
c. Filter - Filter your records using specific parameters (See Figure 32).
d. Find duplicates - Find duplicate records and remove from the mail merge (See Figure 32).
e. Find recipient - Find a recipient in your records (See Figure 32).
Note: The Validate Address feature will not be covered in this booklet. If you wish to use it, you
will be prompted to visit the Microsoft Office store to download additional software to use this
feature.
15. Click the OK button (See Figure 32).
Figure 32 - Mail Merge Recipients
16. In the Mail Merge pane, click Next: Write your letter.
Page 22 of 28
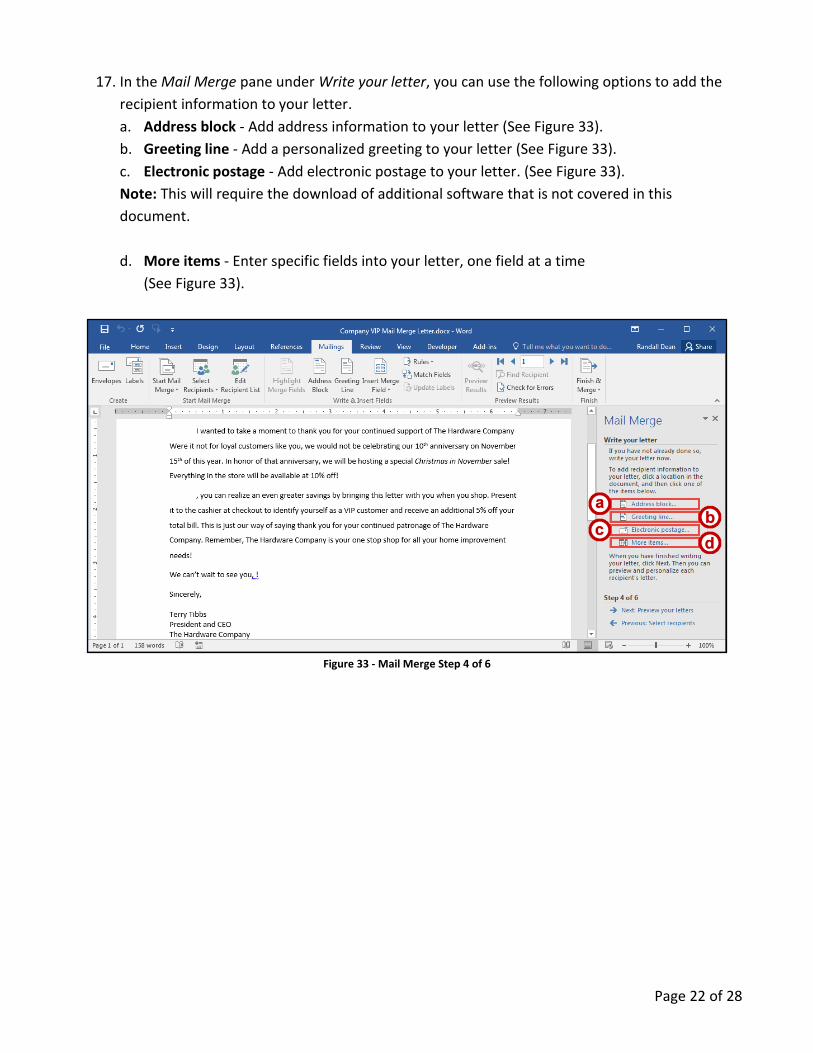
17. In the Mail Merge pane under Write your letter, you can use the following options to add the
recipient information to your letter.
a. Address block - Add address information to your letter (See Figure 33).
b. Greeting line - Add a personalized greeting to your letter (See Figure 33).
c. Electronic postage - Add electronic postage to your letter. (See Figure 33).
Note: This will require the download of additional software that is not covered in this
document.
d. More items - Enter specific fields into your letter, one field at a time
(See Figure 33).
Figure 33 - Mail Merge Step 4 of 6
Page 23 of 28
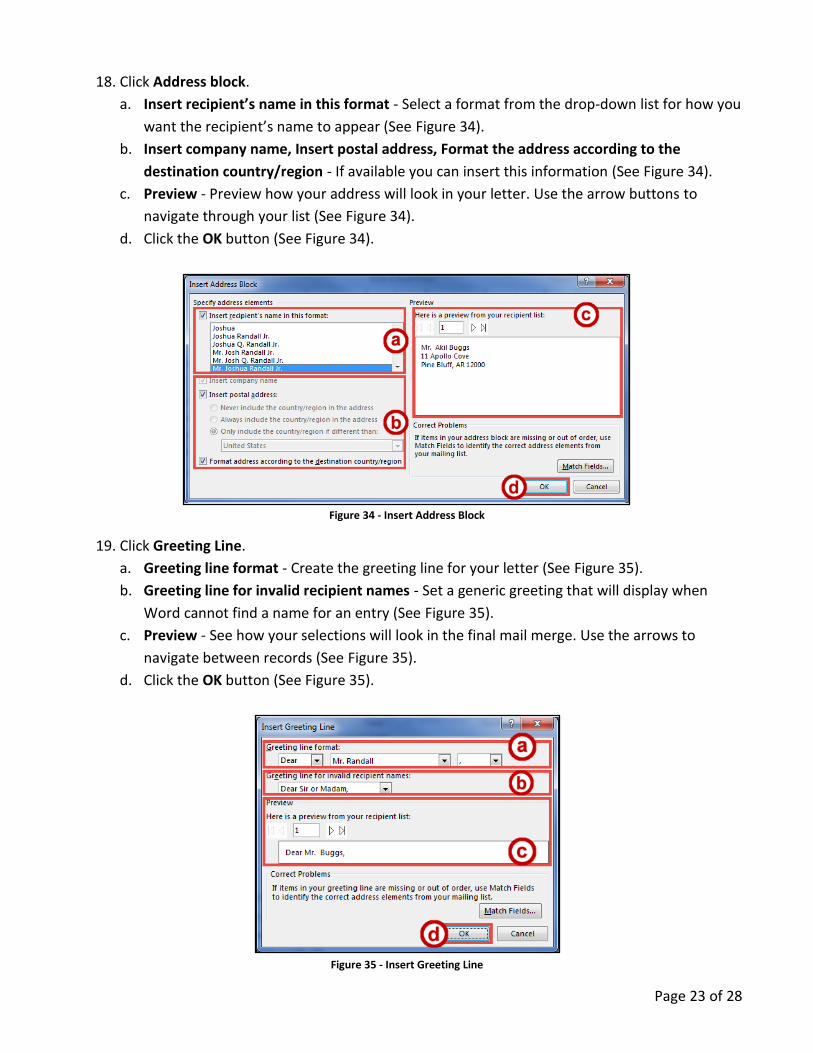
18. Click Address block.
a. Insert recipient’s name in this format - Select a format from the drop-down list for how you
want the recipient’s name to appear (See Figure 34).
b. Insert company name, Insert postal address, Format the address according to the
destination country/region - If available you can insert this information (See Figure 34).
c. Preview - Preview how your address will look in your letter. Use the arrow buttons to
navigate through your list (See Figure 34).
d. Click the OK button (See Figure 34).
Figure 34 - Insert Address Block
19. Click Greeting Line.
a. Greeting line format - Create the greeting line for your letter (See Figure 35).
b. Greeting line for invalid recipient names - Set a generic greeting that will display when
Word cannot find a name for an entry (See Figure 35).
c. Preview - See how your selections will look in the final mail merge. Use the arrows to
navigate between records (See Figure 35).
d. Click the OK button (See Figure 35).
Figure 35 - Insert Greeting Line

Page 24 of 28
20. Click More items.
a. Fields - Insert specific fields into your letter, one field at a time (See Figure 36).
b. Insert - Insert the selected field (See Figure 36).
c. Click the Close button (See Figure 36).
Figure 36 - Insert Merge Field
21. In the Mail Merge pane, click Next: Preview your letters.
22. In the Mail Merge pane under Preview your letters, you can preview all letters before
completing your mail merge (See Figure 37).
23. Click Next: Complete the merge (See Figure 37).
Figure 37 - Mail Merge Step 5 of 6
Page 25 of 28
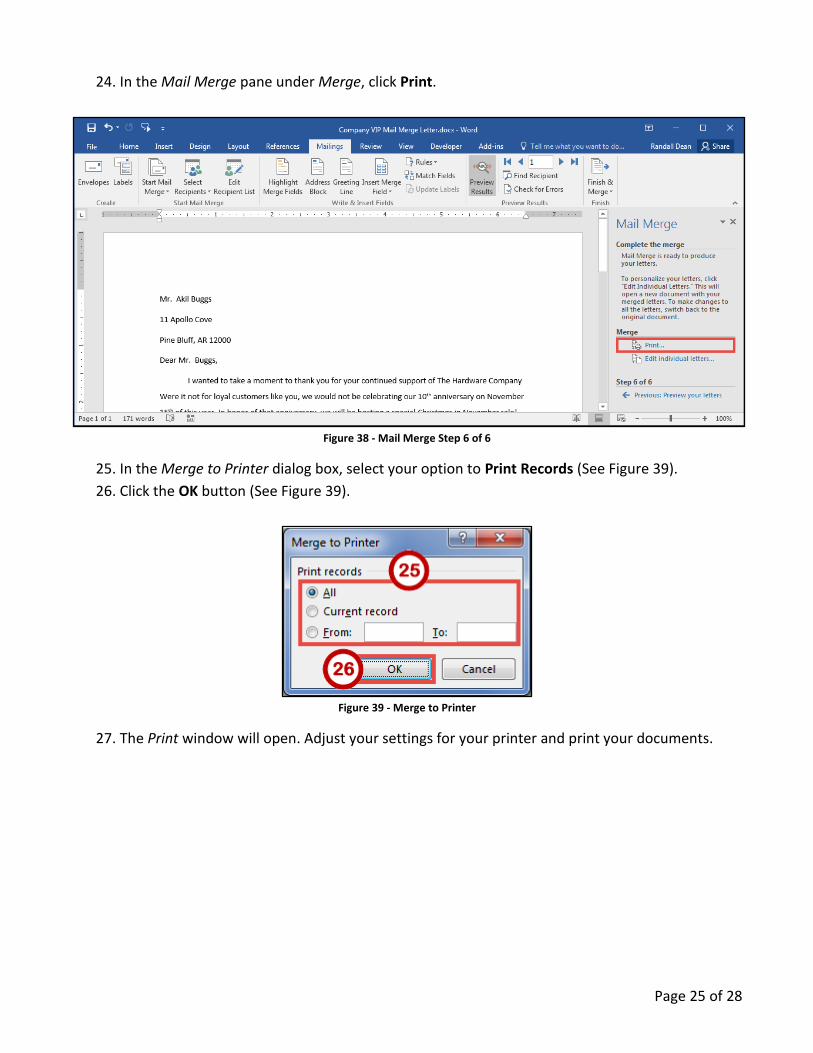
24. In the Mail Merge pane under Merge, click Print.
Figure 38 - Mail Merge Step 6 of 6
25. In the Merge to Printer dialog box, select your option to Print Records (See Figure 39).
26. Click the OK button (See Figure 39).
Figure 39 - Merge to Printer
27. The Print window will open. Adjust your settings for your printer and print your documents.
Page 26 of 28
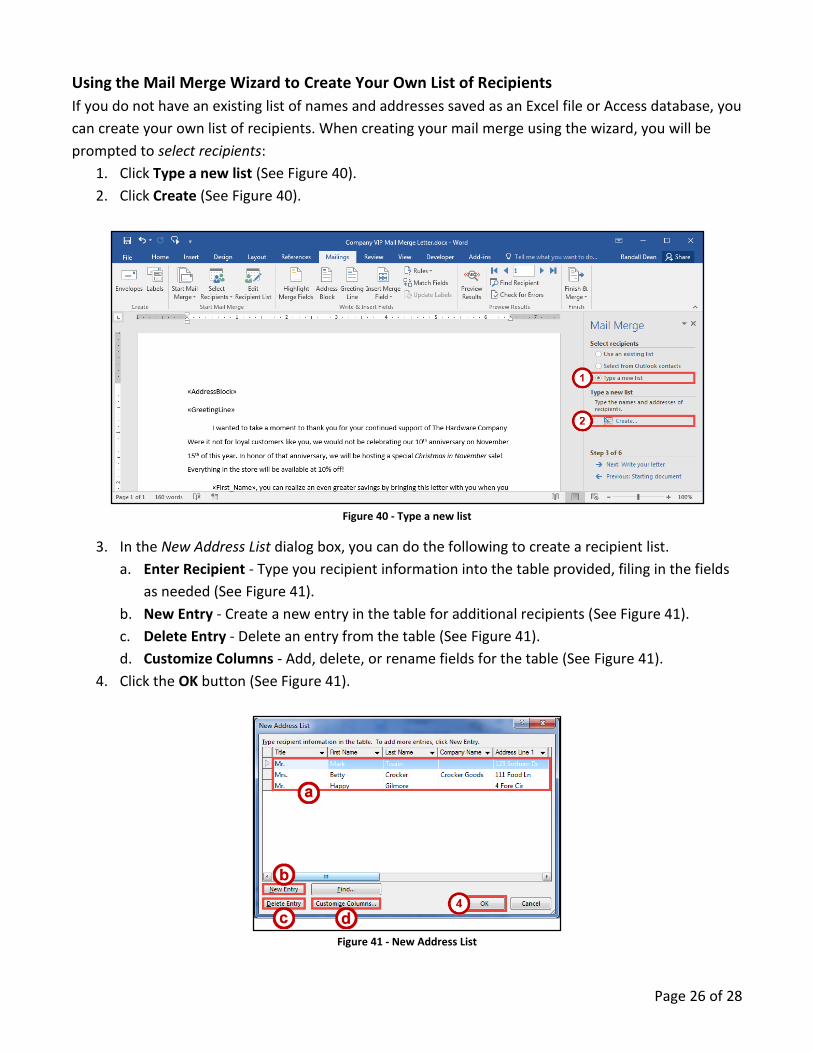
Using the Mail Merge Wizard to Create Your Own List of Recipients
If you do not have an existing list of names and addresses saved as an Excel file or Access database, you
can create your own list of recipients. When creating your mail merge using the wizard, you will be
prompted to select recipients:
1. Click Type a new list (See Figure 40).
2. Click Create (See Figure 40).
Figure 40 - Type a new list
3. In the New Address List dialog box, you can do the following to create a recipient list.
a. Enter Recipient - Type you recipient information into the table provided, filing in the fields
as needed (See Figure 41).
b. New Entry - Create a new entry in the table for additional recipients (See Figure 41).
c. Delete Entry - Delete an entry from the table (See Figure 41).
d. Customize Columns - Add, delete, or rename fields for the table (See Figure 41).
4. Click the OK button (See Figure 41).
Figure 41 - New Address List
Page 27 of 28
5. Click the OK button.
Note: You will be prompted to save your list to your computer. Once saved, the Mail Merge Wizard
will take you the Mail Merge Recipients window to continue the mail merge process.
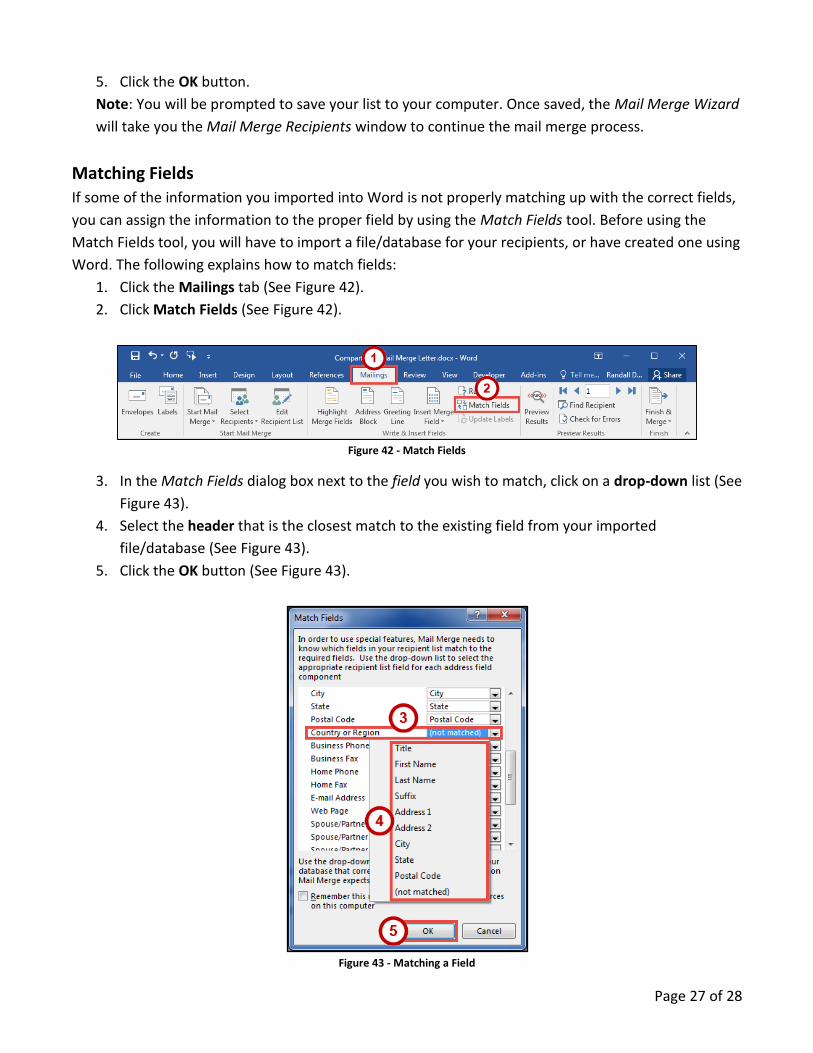
Matching Fields
If some of the information you imported into Word is not properly matching up with the correct fields,
you can assign the information to the proper field by using the Match Fields tool. Before using the
Match Fields tool, you will have to import a file/database for your recipients, or have created one using
Word. The following explains how to match fields:
1. Click the Mailings tab (See Figure 42).
2. Click Match Fields (See Figure 42).
Figure 42 - Match Fields
3. In the Match Fields dialog box next to the field you wish to match, click on a drop-down list (See
Figure 43).
4. Select the header that is the closest match to the existing field from your imported
file/database (See Figure 43).
5. Click the OK button (See Figure 43).
Figure 43 - Matching a Field
Page 28 of 28
Additional Help
For additional support, please contact the KSU Service Desk:
KSU Service Desk for Faculty & Staff
Phone: 470-578-6999
Email: [email protected]
Website: http://uits.kennesaw.edu
KSU Student Helpdesk
Phone: 470-578-3555
Email: [email protected]
Website: http://uits.kennesaw.edu


