
Intelligent 3D PDF
Exporter for
Navisworks®
User Guide Version 16.1
3D PDF Exporter
Easy to UseMultiple Industry
Uses
Combined 3D PDFs
GA Drawing
Convenient Exporting
Clash Reporting

1 | Intratech Intelligent 3D PDF Exporter for Navisworks User Guide © Copyright 1996 – 2016 | 3D Apps by Intratech | All Rights Reserved
Revision History
Release No. Date Revision Description
16.0.0.7 2015/11/12 Initial Revision (draft)
16.0.0.9 2015/12/24 Updated setting values
16.0.2.6 2016/04/08 Updated GA drawings/ISO drawings/Mapping Rules
16.0.3.9 2016/06/17 Updated multiple PDF exporting functions and customized PDF template
16.1.2.12 2016/08/25 Support U3D format for PDF output files2016/08/25

2 | Intratech Intelligent 3D PDF Exporter for Navisworks User Guide © Copyright 1996 – 2016 | 3D Apps by Intratech | All Rights Reserved
Table of Contents Installation Guide ....................................................................................................................... 4
Basic System Requirements ................................................................................................... 4
Setup Guide ........................................................................................................................... 4
Uninstall ................................................................................................................................. 5
Application User Guide .............................................................................................................. 6
Getting started: .......................................................................................................................... 6
Object Exporter: ..................................................................................................................... 6
Export Selected Items: ........................................................................................................ 7
Export PDF: ........................................................................................................................ 8
Customize Export Options: ................................................................................................. 9
PDF Template ....................................................................................................................10
Output settings ...................................................................................................................11
Export Selected clashes .....................................................................................................12
PDF Template ....................................................................................................................12
GA Exporter...........................................................................................................................14
Setting Mapping rules between 2D Tags and 3D Objects in NW ........................................15
Add selected areas: ...........................................................................................................17
Mapping ISO drawing with 3D object: ................................................................................18
Creating ISO drawings in 3D PDF ......................................................................................19
3D PDF output file .....................................................................................................................21
2D-3D Links...........................................................................................................................22
Settings .....................................................................................................................................23
About ........................................................................................................................................24

3 | Intratech Intelligent 3D PDF Exporter for Navisworks User Guide © Copyright 1996 – 2016 | 3D Apps by Intratech | All Rights Reserved
Introduction Intelligent 3D PDF® Exporter for Navisworks is an add-on software that users can use to
convert selected model(s) with neighboring objects or clash reports into a 3D PDF. Combine
your GA drawings with the data that you specifically select, including properties and hierarchy
while exporting everything into a convenient 3D PDF.
Our program enables you to:
- Export selected objects and their neighbors while maintaining a viewpoint to simply the
visualization and limit the need to export an entire model.
- Export items with selected clashes to easily visualize your clashes and export them to
3D PDF files with the relevant neighbors.
- Combine selected 3D spaces in Navisworks with your 2D GA Drawings into a single,
high functionality 3D PDF.
- Simplify the combination of 2D ISO Drawings and 3D Pipe lines together in our powerful
3D PDFs.

4 | Intratech Intelligent 3D PDF Exporter for Navisworks User Guide © Copyright 1996 – 2016 | 3D Apps by Intratech | All Rights Reserved
Installation Guide
Basic System Requirements
For our program to operate correctly, computers that will run our program require these
minimum specifications:
Windows 64bit
A licensed copy of Navisworks (2014, 2015, or 2016)
Net framework of 4.5 or later
Setup Guide
After downloading the file, double click on the installation
file and begin the downloading process. Click “Next” and
continue through the installation process.
While going through the installation
for the first time, it is possible to begin
a 15 day free trial to test the program
in order to make a final decision.
- Click “Try” to continue trial with
the trial version
- Displayed at the bottom is
the remaining days available
on your free trial.
- When you are ready to activate,
click the “Activate” button
and continue to the activation
process.
- Select your “License Type” and
enter your activation key. This
can be found on your License
Certificate.

5 | Intratech Intelligent 3D PDF Exporter for Navisworks User Guide © Copyright 1996 – 2016 | 3D Apps by Intratech | All Rights Reserved
Uninstall
To uninstall 3D Apps Intelligent 3D PDF for Navisworks, please go to Control Panel and open
Programs
You can find 3D Apps Intelligent 3D PDF for Navisworks in the programs list. Select 3D PDF
for Navisworks and then click Uninstall button.
Then dialog box for uninstall confirmation will be displayed. Please click Yes to proceed the
uninstallation.

6 | Intratech Intelligent 3D PDF Exporter for Navisworks User Guide © Copyright 1996 – 2016 | 3D Apps by Intratech | All Rights Reserved
Application User Guide
Getting started:
- Open your version of Autodesk® Revit®.
- From the top menu, select the “PDF Exporter” tab.
- Within the PDF Exporter tab, there are 4 main functions:
● Object Exporter
● Clash Exporter
● GA Exporter
● ISO Exporter
Object Exporter:
When opening the Object
Exporter function, the following
window will be displayed.
For a more detailed explanation
of the “Settings” and “About”
sections, please refer to the
relevant sections (5. Setting 6.
About).

7 | Intratech Intelligent 3D PDF Exporter for Navisworks User Guide © Copyright 1996 – 2016 | 3D Apps by Intratech | All Rights Reserved
Export Selected Items:
To export selected items, please select the required items from the “Selection Tree’ on the left
or from the 3D viewer in the middle section.
Once an item is selected, click “Add selected Items” to add them to the list on the right. All of
the selected items will be added to the export list
- Select Items from “Selection Tree” or from 3D viewer and choose “Add selected Items”
- All selected items will be added in the export list
- There is no limit to the number of items that can be added to the export list.
Select an item from the Export List to zoom into that item in the 3D viewer window.
Clicking on an item from the export
list will allow you to customize the
specific options for that item.
In order to customize settings, click
on to view the
additional settings.
View: Preview Settings Options

8 | Intratech Intelligent 3D PDF Exporter for Navisworks User Guide © Copyright 1996 – 2016 | 3D Apps by Intratech | All Rights Reserved
- Dim others: Dim all other items besides the selected items.
- Hide others: Hide all other items besides the selected items.
- Transparent others: Set all other items besides the selected items to be
transparent.
- Reset all: Remove selected options to rest to default and show all items in the
model.
- Preview: Preview how the selected items will be shown in the output file
Export PDF:
When preparing to export the PDF, there are two main options depending on whether you need
to export as a single PDF file or a PDF file for each individual item:
Users can export all the items in the
Export List into a single PDF file by setting
the slider to “Single” and entering the
PDF file name.
Additionally, the program can export each individual item in the Export List to an Individual PDF.
In order to export multiple PDFs, set the slider to “Multiple” and then enter the file name for
each item’s Individual PDF next to each item on the Left.

9 | Intratech Intelligent 3D PDF Exporter for Navisworks User Guide © Copyright 1996 – 2016 | 3D Apps by Intratech | All Rights Reserved
Customize Export Options:
Select items with neighbors:
Selecting this function allows you to extend the selected items’ box and export all items in that
extended box.
Set an Input value to extend to
according to either length,
percentage or 3D offset.

10 | Intratech Intelligent 3D PDF Exporter for Navisworks User Guide © Copyright 1996 – 2016 | 3D Apps by Intratech | All Rights Reserved
The resulting image will
include the neighbors within
the parameters set above and
will be displayed like this:
Exclude Properties:
To change the exported properties, select
“Exclude Properties”
Selecting “Exclude all Properties” will
result in the exported file to not include any
of the properties of the exported items.
If you want to exclude certain properties,
check the properties you would like to be
excluded. For example, in the displayed
image Type, Lock, and Bore would be
excluded (other unselected items would be
included).
PDF Template
If you would like to use a special
template for your exported file,
please select the desired PDF
Template from the drop-down
menu.
11 | Intratech Intelligent 3D PDF Exporter for Navisworks User Guide © Copyright 1996 – 2016 | 3D Apps by Intratech | All Rights Reserved
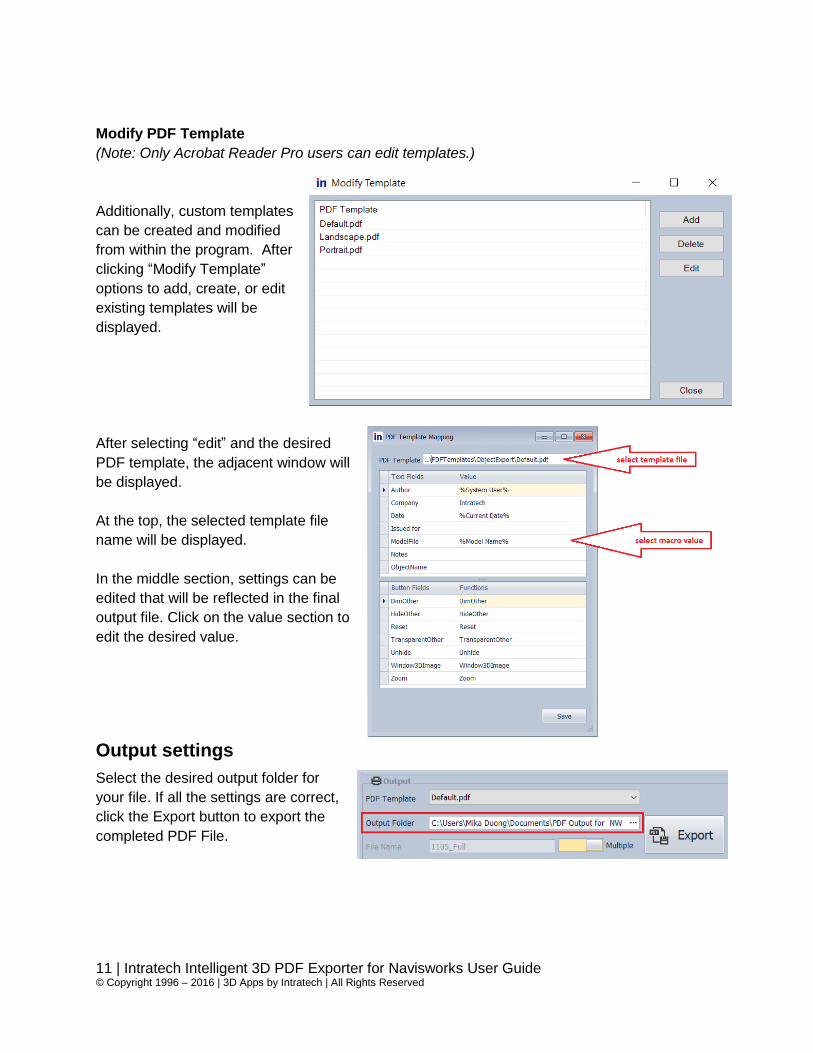
Modify PDF Template
(Note: Only Acrobat Reader Pro users can edit templates.)
Additionally, custom templates
can be created and modified
from within the program. After
clicking “Modify Template”
options to add, create, or edit
existing templates will be
displayed.
After selecting “edit” and the desired
PDF template, the adjacent window will
be displayed.
At the top, the selected template file
name will be displayed.
In the middle section, settings can be
edited that will be reflected in the final
output file. Click on the value section to
edit the desired value.
Output settings
Select the desired output folder for
your file. If all the settings are correct,
click the Export button to export the
completed PDF File.

12 | Intratech Intelligent 3D PDF Exporter for Navisworks User Guide © Copyright 1996 – 2016 | 3D Apps by Intratech | All Rights Reserved
Clash Exporter
Export Selected clashes
After selecting Export
selected clashes, the results
from clash tests and the clash
items will be displayed.
If a new clash test was
performed in Navisworks,
select “Reload clashes” to
update the Clash Report
export list. The right side
menu displays the results of
different clash tests. You can
select the test you would like
to export the clashes from the
list by checking it.
When the desired items are displayed, click export to easily export your Clash Report.
PDF Template
Clash Reports also have
the option to use
customized PDF Templates.
Users can add, delete and edit
Clash Report Templates with the
Modify Template options. These
settings can be changed to
customize what will be reported in
the Clash Report.

13 | Intratech Intelligent 3D PDF Exporter for Navisworks User Guide © Copyright 1996 – 2016 | 3D Apps by Intratech | All Rights Reserved
In Modify Template form, the program will
list up the sample template and all
template was used.
User can select a template to delete or
edit
Besides, a new template can be added
by import PDF template file and enter the
value by manual or select macro value

14 | Intratech Intelligent 3D PDF Exporter for Navisworks User Guide © Copyright 1996 – 2016 | 3D Apps by Intratech | All Rights Reserved
GA Exporter
Each model loaded within Navisworks can
have accompanying General Arrangement
drawings (GA drawings).
These drawings can display the
dimensions of one or multiple objects and
can are viewed as 2D drawings from a top-
down view, side-view, and front-view.
When looking at a zoomed
into a GA drawing, the Tag
numbers of Equipment or
Pipelines can be seen
adjacent to the relevant
equipment.
In the 3D model view, the
equipment would be
displayed like this:

15 | Intratech Intelligent 3D PDF Exporter for Navisworks User Guide © Copyright 1996 – 2016 | 3D Apps by Intratech | All Rights Reserved
Using the 3D PDF Exporter for Navisworks allows you to link one 3D object with the specific
Tag No from a 2D Drawing.
In the resulting 3D PDF, clicking on the Tag in 2D will then zoom in and display the relevant 3D
image.
For example, by clicking
“M-EV-02”, this 3D object
will be displayed.
Setting Mapping rules between 2D Tags and 3D Objects in NW
Using these settings will define the mapping rules for several design models, including Revit,
PDMS and PDS. The current version of the GA export function creates a hyperlink for two item
types (Piping and Equipment).
The default location of the Mapping file is C:\Program Files\Autodesk\Navisworks Manage
2014\Plugins\Intratech.3DAPPs.PDFExporter\MappingRules.xml
The mapping rules will be different depending on the model type.
1
2

16 | Intratech Intelligent 3D PDF Exporter for Navisworks User Guide © Copyright 1996 – 2016 | 3D Apps by Intratech | All Rights Reserved
Using the 1st line <identifier>, the program will search all object that have same EQUI type in
the PDMS attributes.
Using the 2nd line <tagno>, the program will compare the value within the Name properties of
EQUI objects and the tags in 2D drawing.
If the values match, the program will automatically create a link between the two. If they are
same, a link will be created automatically.
Add selected objects:
The functionality here is similar to Object
Exporter.
You can choose Items from the “Selection
Tree” or from 3D viewer itself.
After selecting an object(s), click the “Add
selected Object” to add all the selected items
to your export list.
All selected items will be added in the export
list

17 | Intratech Intelligent 3D PDF Exporter for Navisworks User Guide © Copyright 1996 – 2016 | 3D Apps by Intratech | All Rights Reserved
To select the appropriate GA
drawings to map with these objects,
first select the output folder. Next,
enter the file name and click the
“Export” button to finish.
All of the files will relevant files will be
exported into a single PDF File.
Add selected areas:
This function allows you to select an area of items for Export. You can select this area of items
by creating a rectangular box around the desired items.
First, select the “Add Selected Area”
button.
Next, in the 3D viewer of Naviswork,
draw the box around the desired section
by selecting two points.
Set a min point and a max point and
then the program will create a box
around the two points.
Press “Enter” key to add this box to the
list. The default name setting will be “Box
1” and continue as more areas are
added.

18 | Intratech Intelligent 3D PDF Exporter for Navisworks User Guide © Copyright 1996 – 2016 | 3D Apps by Intratech | All Rights Reserved
Clicking on “Box 1” will display the created
box in the 3D viewer.
Note: You need to select an area which
contains 3D objects for those that you
intend to link with Tags in 2D backing
sheet.
When ready to export, select the GA
drawing for this area. Then enter the file
name of the output PDF file and click
“Export” to finish.
ISO Exporter This function allows you to combines ISO drawings with their corresponding 3D pipeline
sections into a 3D PDF file.
Requirements to use this function:
1. The Backing sheet folder must contain ISO drawings.
2. For automatic ISO drawing 3D PDF, the ISO drawing name needs to match the
properties specified in the mapping rule.
Mapping ISO drawing with 3D object:
The default location for the mapping file for making hyperlinks is located in
C:\ProgramFiles\Autodesk\NavisworksManage2014\Plugins\Intratech.3DAPPs.PDFExporter\Ma
ppingRules.xml
By checking the <ISO> Section, you can define the link between ISO drawing and 3D Pipelines.

19 | Intratech Intelligent 3D PDF Exporter for Navisworks User Guide © Copyright 1996 – 2016 | 3D Apps by Intratech | All Rights Reserved
PDMS models: The ISO
drawing’s file name will
be mapped according to
the LINENO property of
the 3D objects.
If the ISO drawing’s file
name is the same as the
property “LINENO” of an
object within the 3d
model, a link will be
created automatically.
Creating ISO drawings in 3D PDF
Select the folder that contains the relevant ISO Drawings. After selected the folder, the ISO files
will be listed in the ISO files field on the left.
When clicking on the loaded ISO
drawing, the program will
automatically search
corresponding pipelines to
create a direct link.

20 | Intratech Intelligent 3D PDF Exporter for Navisworks User Guide © Copyright 1996 – 2016 | 3D Apps by Intratech | All Rights Reserved
After checking and correctly matching all ISO drawings and 3D Pipelines, click Export.
The resulting files will be displayed as below:
21 | Intratech Intelligent 3D PDF Exporter for Navisworks User Guide © Copyright 1996 – 2016 | 3D Apps by Intratech | All Rights Reserved
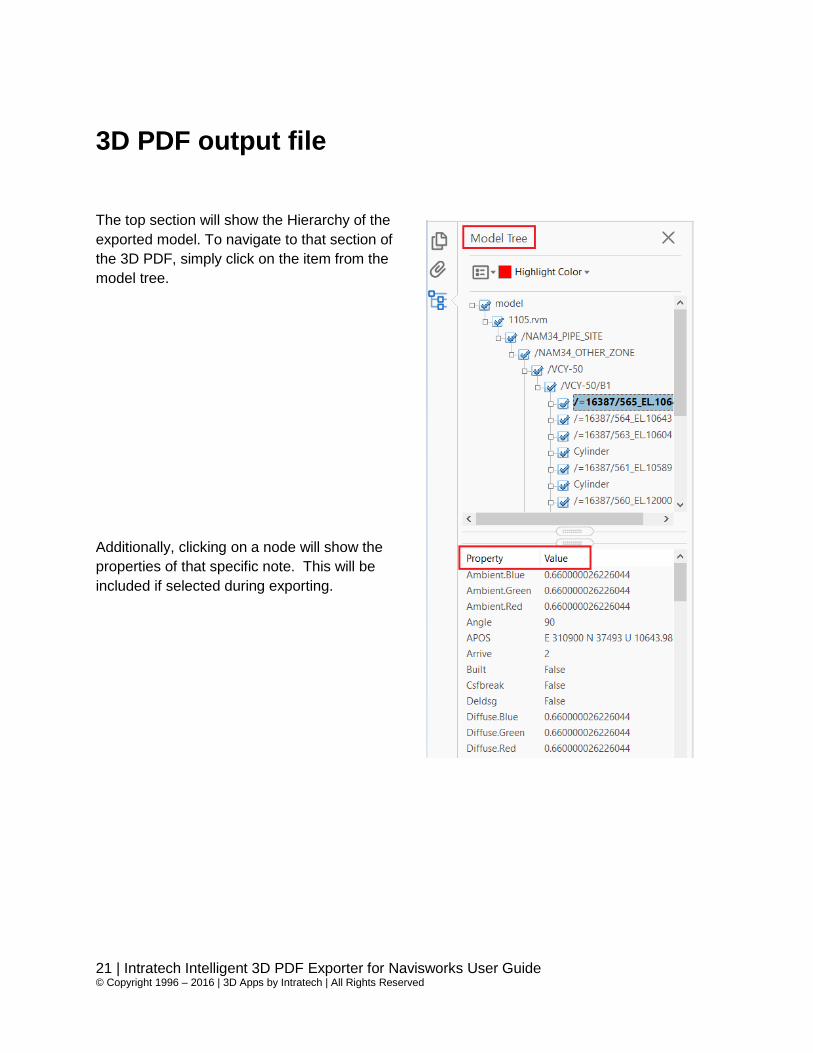
3D PDF output file
The top section will show the Hierarchy of the
exported model. To navigate to that section of
the 3D PDF, simply click on the item from the
model tree.
Additionally, clicking on a node will show the
properties of that specific note. This will be
included if selected during exporting.

22 | Intratech Intelligent 3D PDF Exporter for Navisworks User Guide © Copyright 1996 – 2016 | 3D Apps by Intratech | All Rights Reserved
2D-3D Links
Setting 2D-3D links is currently only supported with GA Exporter.
Select a 2D link in the drawing to zoom into that object in the 3D viewer.
Alternatively, click on the 2D link from the list to display the 3D image.

23 | Intratech Intelligent 3D PDF Exporter for Navisworks User Guide © Copyright 1996 – 2016 | 3D Apps by Intratech | All Rights Reserved
Foreign Language Compatibility
By default, all languages besides English are not supported in Acrobat Reader. If you are using
a language besides English in the model, please download the relevant language pack from the
Acrobat website.
Settings
Exclude Hidden Objects: Set
to “On” to not export objects that
were hidden in 3D view.
3D Content Format: this option
allows you to set the outputted
PDF format.
Note: BlueBeam Vu reader
can open only U3D format
and fixed viewport PDF files.
To read in BlueBeam Vu,
- Convert to U3D
- Export with fixed viewport.
- Do not combine 2D & 3D
Model render mode: Use the
drop-down menu to select the
render style for exported objects
in PDF files.
Light scheme: Select the light
mode for exported objects in
PDF file.
Background color: Set color for the background of the PDF file.
Show toolbar: Set to “On” to set whether the toolbar is shown when opening the output
file.
Open model tree: Check this box to set if the model tree is shown when opening the
output file.
24 | Intratech Intelligent 3D PDF Exporter for Navisworks User Guide © Copyright 1996 – 2016 | 3D Apps by Intratech | All Rights Reserved
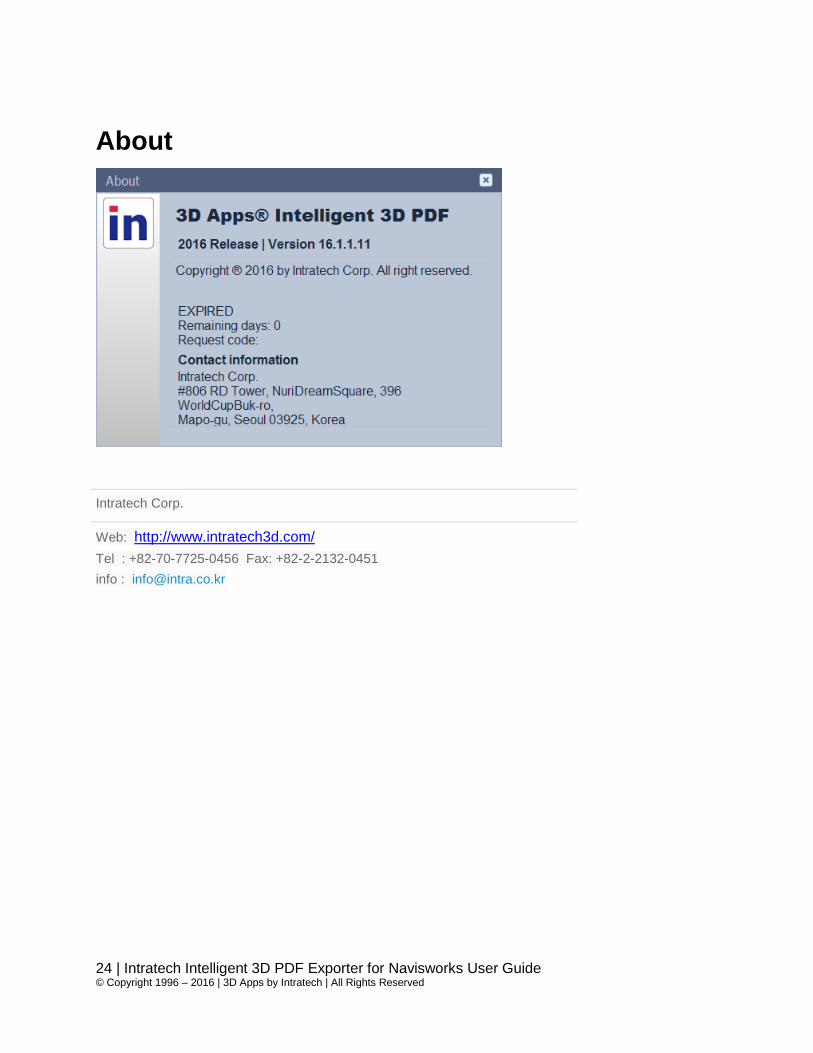
About
Intratech Corp.
Web: http://www.intratech3d.com/
Tel : +82-70-7725-0456 Fax: +82-2-2132-0451
info : [email protected]


