How to use REST support on z/VSE for access to
IBM MQ REST API
Last formatted on: Wednesday, March 27, 2019
Sergey Grimaylo

© Copyright IBM Corp. 2018, 2019 How to use Web Services with z/VSE
- 2 -
Disclaimer
This publication is intended to help in the implementing of z/VSE application programs
for accessing IBM MQ server (version 9.1.0 and later) on supported platforms. The
information contained in this document has not been submitted to any formal IBM test
and is distributed AS IS. The information about non-IBM ("vendor") products in this
manual has been supplied by the vendor and IBM assumes no responsibility for its
accuracy or completeness. The use of this information or the implementation of any of
these techniques is a customer responsibility and depends on the customer's ability to
evaluate and integrate them into the customer's operational environment. While each item
may have been reviewed by IBM for accuracy in a specific situation, there is no
guarantee that the same or similar results will be obtained elsewhere. Customers
attempting to adapt these techniques to their own environments do so at their own risk.
Any pointers in this publication to external Web sites are provided for convenience only
and do not in any manner serve as an endorsement of these Web sites.
Any performance data contained in this document was determined in a controlled
environment, and therefore, the results that may be obtained in other operating
environments may vary significantly. Users of this document should verify the applicable
data for their specific environment. Reference to PTF numbers that have not been
released through the normal distribution process does not imply general availability. The
purpose of including these reference numbers is to alert IBM customers to specific
information relative to the implementation of the PTF when it becomes available to each
customer according to the normal IBM PTF distribution process.
The following terms are trademarks of other companies:
Java and all Java-based trademarks and logos are trademarks or registered trademarks of
Sun Microsystems, Inc. in the United States and/or other countries.
Microsoft, Windows, Windows XP, .Net, .Net logo, and the Windows logo are
trademarks of Microsoft Corporation in the United States and/or other countries.
Contents 1. Introduction ............................................................................................................... 3 2. Using REST API with no authentication ................................................................... 5
2.1. Overview ................................................................................................................ 5 2.2. Disabling a user authentication .............................................................................. 5 2.3. Verification of the MQ Server accessibility .......................................................... 5 2.4. Samples of programs ............................................................................................. 6
3. Using REST API with HTTP basic authentication ................................................... 7 3.1. Overview ................................................................................................................ 7 3.2. Configuration of the MQ user................................................................................ 7 3.3. Verification of the MQ Server accessibility ........................................................ 12 3.4. Samples of programs ........................................................................................... 13
4. Using REST API with token-based authentication ................................................. 13 4.1. Overview .............................................................................................................. 13
© Copyright IBM Corp. 2018, 2019 How to use Web Services with z/VSE
- 3 -
4.2. Verification of the MQ Server accessibility ........................................................ 14 4.3. Samples of programs ........................................................................................... 16
5. Using REST API with client certificate authentication ........................................... 16 5.1. Overview .............................................................................................................. 16 5.2. Extraction of the public part of the z/VSE Certificate ......................................... 17 5.3. Importing the public part of z/VSE Certificate into the MQ Server Trust
KeyStore ....................................................................................................................... 19 5.4. Enabling the client certificate authentication by the MQ Server ......................... 21 5.5. Verification of the MQ Server accessibility ........................................................ 22 5.6. Samples of programs ........................................................................................... 23
6. Appendix A: Debugging facilities ........................................................................... 23 6.1. Socket functions trace .......................................................................................... 23 6.2. REST trace ........................................................................................................... 24
7. Appendix B: Test tools ............................................................................................ 24 7.1. cURL .................................................................................................................... 24 7.2. Postman................................................................................................................ 25
8. Appendix C: Tailoring SSL connection between z/VSE and MQ Server ............... 27 8.1. Generation of a new certificate for MQ Server KeyStore ................................... 27 8.2. Disabling the default SSL configuration on MQ Server ..................................... 32 8.3. Generation of z/VSE certificates ......................................................................... 32 8.4. Enabling SSL on z/VSE....................................................................................... 41
9. Appendix D: Obtaining the programming samples ................................................. 42
1. Introduction
The document describes the basic knowledge for using the z/VSE REST support for
accessing IBM MQ Server on Windows (version 9.1.0). This support gives z/VSE
application program an opportunity to communicate with MQ messaging REST API and
MQ administrative REST API. The publication covers mainly the first of these APIs
(administrative REST API will be involved only for basic testing the MQ server
installation).
With the messaging REST API your application program can:
• Create messages on an existing queue (request PUT);
• Read (destructively get) messages from a queue (request DELETE).
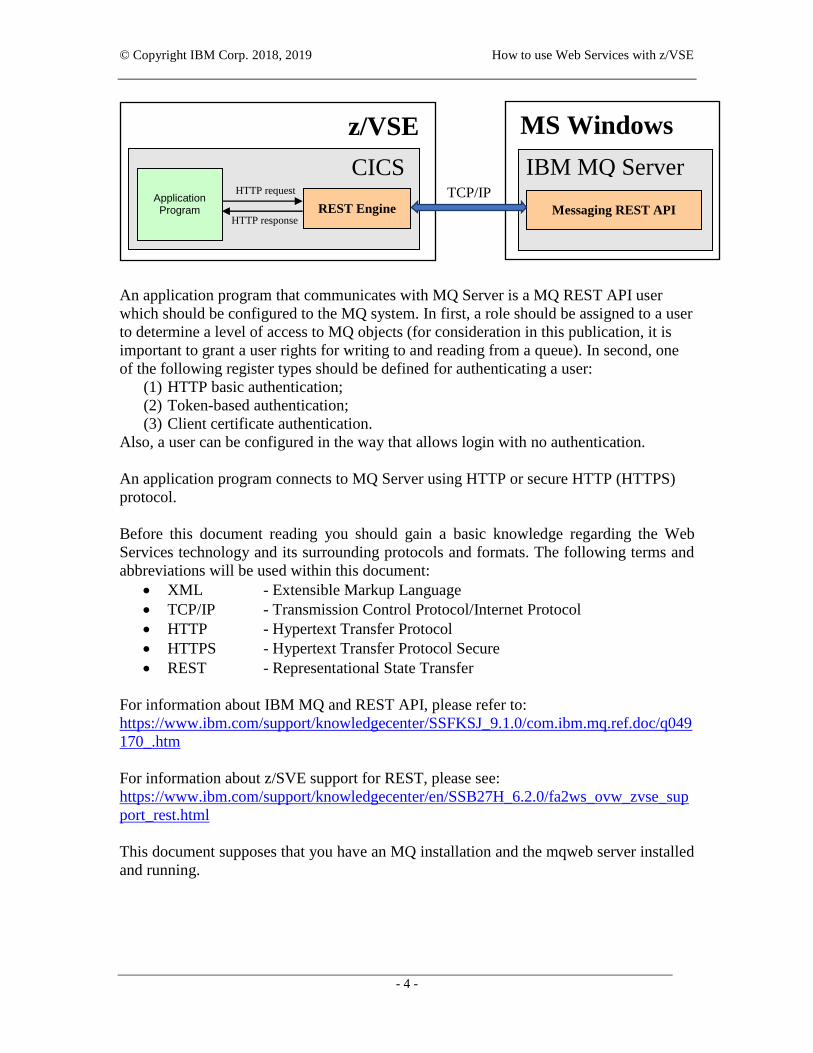
An application program sends a REST request to MQ server and receives a response from
MQ server via REST Engine (that is provided as a part of the z/VSE 6.2). The REST
Engine interacts with MQ, so you don’t need to install additional components on your
z/VSE system. The figure below shows the simplified scheme of interaction between
z/VSE application program and MQ server.
© Copyright IBM Corp. 2018, 2019 How to use Web Services with z/VSE
- 4 -
An application program that communicates with MQ Server is a MQ REST API user
which should be configured to the MQ system. In first, a role should be assigned to a user
to determine a level of access to MQ objects (for consideration in this publication, it is
important to grant a user rights for writing to and reading from a queue). In second, one
of the following register types should be defined for authenticating a user:
(1) HTTP basic authentication;
(2) Token-based authentication;
(3) Client certificate authentication.
Also, a user can be configured in the way that allows login with no authentication.
An application program connects to MQ Server using HTTP or secure HTTP (HTTPS)
protocol.
Before this document reading you should gain a basic knowledge regarding the Web
Services technology and its surrounding protocols and formats. The following terms and
abbreviations will be used within this document:
• XML - Extensible Markup Language
• TCP/IP - Transmission Control Protocol/Internet Protocol
• HTTP - Hypertext Transfer Protocol
• HTTPS - Hypertext Transfer Protocol Secure
• REST - Representational State Transfer
For information about IBM MQ and REST API, please refer to:
https://www.ibm.com/support/knowledgecenter/SSFKSJ_9.1.0/com.ibm.mq.ref.doc/q049
170_.htm
For information about z/SVE support for REST, please see:
https://www.ibm.com/support/knowledgecenter/en/SSB27H_6.2.0/fa2ws_ovw_zvse_sup
port_rest.html
This document supposes that you have an MQ installation and the mqweb server installed
and running.
REST Engine Application Program
HTTP request
HTTP response
CICS
z/VSE MS Windows
IBM MQ Server
Messaging REST API TCP/IP
© Copyright IBM Corp. 2018, 2019 How to use Web Services with z/VSE
- 5 -
2. Using REST API with no authentication
2.1. Overview
Accessing the REST API with no a user authentication can be recommended for
development and investigation purposes only and should be forbidden for production
systems.
For using REST API with no authentication, you just disable it in the security
configuration of the MQ Server.
Also, if you are planning to use secure HTTP (HTTPS) for accessing REST API, you
should configure SSL as described in the Appendix C.
2.2. Disabling a user authentication
To disable a user authentication, you should:
(1) Replace the MQ Server security configuration file (mqwebuser.xml) by the
no_security.xml sample (that provides HTTP with no authentication or role
mapping). The mqwebuser.xml file located in the directory
MQ_DATA_DIRECTORY\web\installations\installationName\servers\mqweb
(please keep its backup copy before replacing); the file no_security.xml can be
found in the directory MQ_INSTALLATION_PATH\web\mq\samp\configuration.
(2) Edit the mqwebuser.xml file as follows:
o Enable the MQ server for listening HTTP/HTTPS requests on all IP addresses
by uncommenting the line:
<variable name="httpHost" value="*"/>
o Enable HTTPS on the port 9443 by adding the line:
<variable name="httpsPort" value="9443"/>
(this is “just in case”: on MQ Server the port 9443 is used for HTPPS requests
by default)
2.3. Verification of the MQ Server accessibility
To make sure that MQ server is accessible for a user with no authentication, send the
request POST to the messaging REST API for creating a new message. For example, the
following cURL command results in creation of the message Hello world! on the
existing queue testQueue:
curl -k -X POST
http://localhost:9080/ibmmq/rest/v1/messaging/qmgr/mq1/queue/test
Queue/message -d "Hello world!" -H "Content-Type:text/plain"
To verify that the new message has been created, send the request DELETE; in normal
case, the requested message body will be displayed on Windows console like to the
following:
© Copyright IBM Corp. 2018, 2019 How to use Web Services with z/VSE
- 6 -
curl -k -X DELETE
http://localhost:9080/ibmmq/rest/v1/messaging/qmgr/mq1/queue/test
Queue/message
Hello world!
For information regarding cURL facility refer to the Appendix B. For the verification,
you can use the Postman tool as well (Appendix B).
2.4. Samples of programs
The samples POST_HTTP(s)_NA and DELETE_HTTP(s)_NA demonstrate the basic
technique of programming (on the COBOL programming language) for using REST API
with no authentication. To obtain the samples refer to the Appendix D.
The sample POST_HTTP(s)_NA implements the procedure of message creation by the
HTTP request POST. The request can be sent either without options or with an option
that provides a created message with specific attribute (you can specify the only option
for a request or several options at once). HTTP request headers are used for options
specification.
The sample covers all available options:
• Create simple text message (no options, no message attributes);
• Create the message with correlation ID (the header “ibm-mq-md-correlationId”);
• Create the message with expiry duration (the header “ibm-mq-md-expiry”);
• Create the message with persistence (the header “ibm-mq-md-persistence”). The
message with “persistence” attribute stays in the queue after MQ server restart;
• Create the message with the “Reply-To” destination (the header “ibm-mq-md-
replyTo”).
For details, please refer to
https://www.ibm.com/support/knowledgecenter/SSFKSJ_9.1.0/com.ibm.mq.ref.dev.doc/
q130750_.htm
The sample DELETE_HTTP(s)_NA shows the messages retrieving (with deletion) by the
HTTP request DELETE. The request without options returns the first available message;
when specify a request option (in a request HTTP header) you are filtering messages for
extraction from the queue (several options can be specified at once).
The sample covers all available options:
• Get first available message (no options);
• Get next available message with specified correlation ID (the header
”correlationId”);
• Get next available message with message ID (the header “messageId”);
• Wait specified number of milliseconds for a new message if there are no available
messages by now (the header “wait”).

© Copyright IBM Corp. 2018, 2019 How to use Web Services with z/VSE
- 7 -
Before these samples running you should update the queue URL (value MQ-SERVER-
URL within samples) with actual IP address, port number, queue manager name and
queue name. Also, you need to comment and uncomment the proper lines (containing the
server URL) for using HTTP or HTTPS protocol.
You can make sample more verbose if running it in the DEBUG mode by uncommenting
and commenting the respective lines: * SOURCE-COMPUTER. IBM-370 WITH DEBUGGING MODE.
SOURCE-COMPUTER. IBM-370.
3. Using REST API with HTTP basic authentication
3.1. Overview
For using REST API with HTTP basic authentication, you need:
• Configure a Windows user to the MQ Server (see Configuration of the MQ user);
• Provide each HTTP request of an application program with the name and
password of the configured user (as described in the Samples of programs).
Also, for accessing REST API with the secure HTTP you should configure SSL as
described in Appendix C.
For details about REST API with HTTP basic authentication, please see here:
https://www.ibm.com/support/knowledgecenter/SSFKSJ_9.1.0/com.ibm.mq.sec.doc/q12
8710_.htm
3.2. Configuration of the MQ user
To configure MQ user, perform the following actions on the Windows system where the
MQ Server had been installed:
(1) Create a new Windows user (or select existing one);
(2) Make created user known to MQ Server (add a user to the MQ manager queue
you are interested in);
(3) Configure a user registry and a user role.
The detailed actions description is below.
For more information about MQ users and roles, please see here:
https://www.ibm.com/support/knowledgecenter/SSFKSJ_9.1.0/com.ibm.mq.sec.doc/q12
7970_.htm
(1) Create a new Windows user:
1.1. Press Start on the Windows Taskbar and right-click on the Computer, then
select Manage in the contextual menu;

© Copyright IBM Corp. 2018, 2019 How to use Web Services with z/VSE
- 8 -
1.2. Expand the list Configuration (on Windows server) or the list System
tools (on Windows 7), thereupon expand the list Local Users and
Groups;
1.3. Right-click on the Users item (the list Local Users and Groups) and
select the New user in the contextual menu;
1.4. Enter user name and user password when prompted (for example, UsrGrm and
PswGrm123), then press Create:
(2) Add a new user to the MQ manager queue:
2.1. Start IBM MQ Explorer (if not started yet).
2.2. At the left of the IBM MQ Explorer window expand the IBM MQ list and
then the Queue Managers list:
© Copyright IBM Corp. 2018, 2019 How to use Web Services with z/VSE
- 9 -
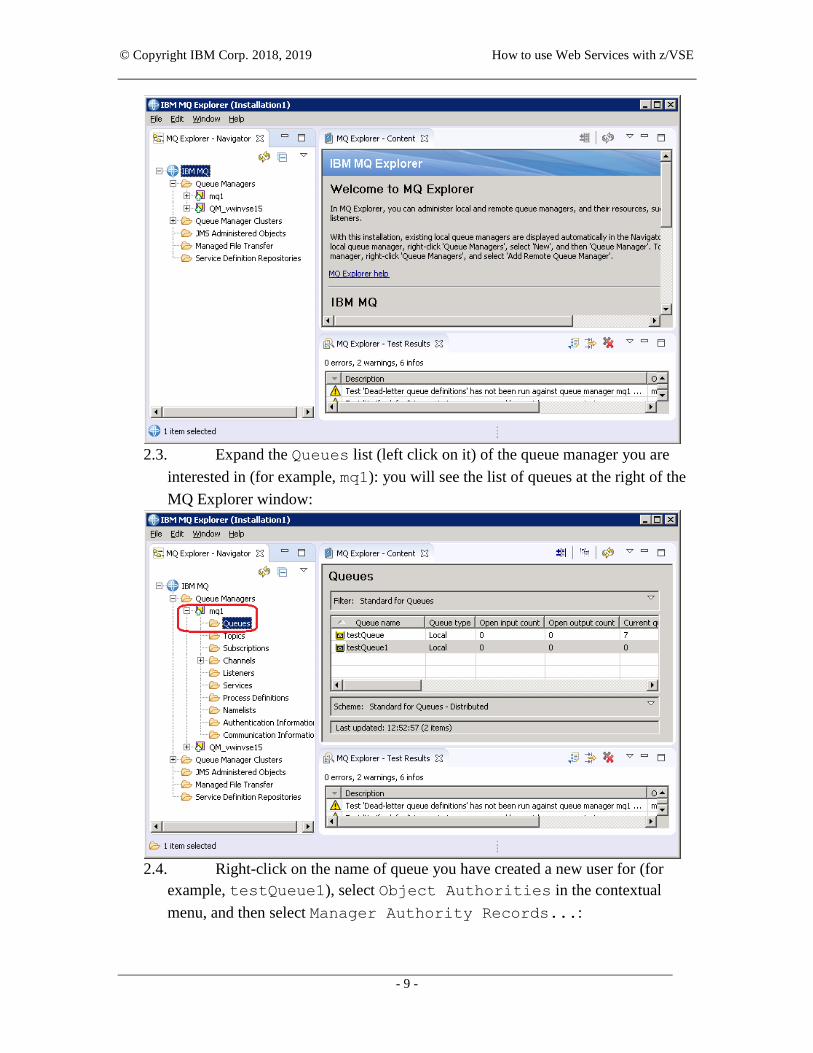
2.3. Expand the Queues list (left click on it) of the queue manager you are
interested in (for example, mq1): you will see the list of queues at the right of the
MQ Explorer window:
2.4. Right-click on the name of queue you have created a new user for (for
example, testQueue1), select Object Authorities in the contextual
menu, and then select Manager Authority Records...:
© Copyright IBM Corp. 2018, 2019 How to use Web Services with z/VSE
- 10 -
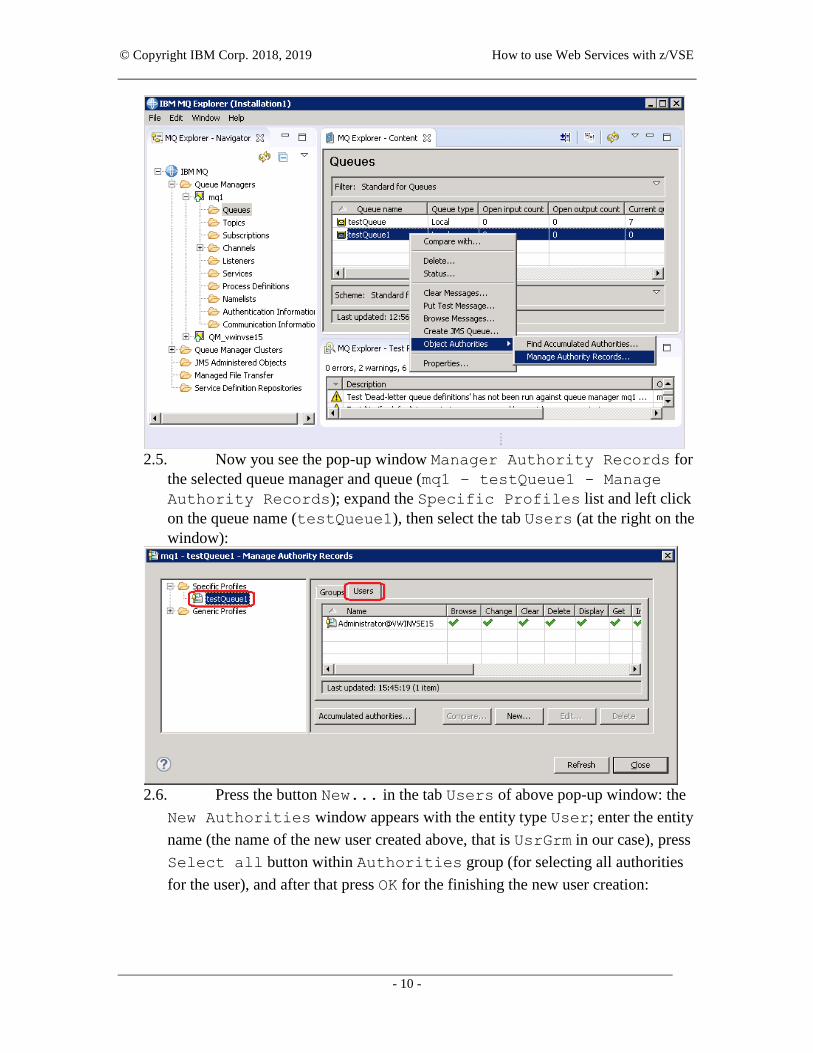
2.5. Now you see the pop-up window Manager Authority Records for
the selected queue manager and queue (mq1 – testQueue1 - Manage
Authority Records); expand the Specific Profiles list and left click
on the queue name (testQueue1), then select the tab Users (at the right on the
window):
2.6. Press the button New... in the tab Users of above pop-up window: the
New Authorities window appears with the entity type User; enter the entity
name (the name of the new user created above, that is UsrGrm in our case), press
Select all button within Authorities group (for selecting all authorities
for the user), and after that press OK for the finishing the new user creation:
© Copyright IBM Corp. 2018, 2019 How to use Web Services with z/VSE
- 11 -
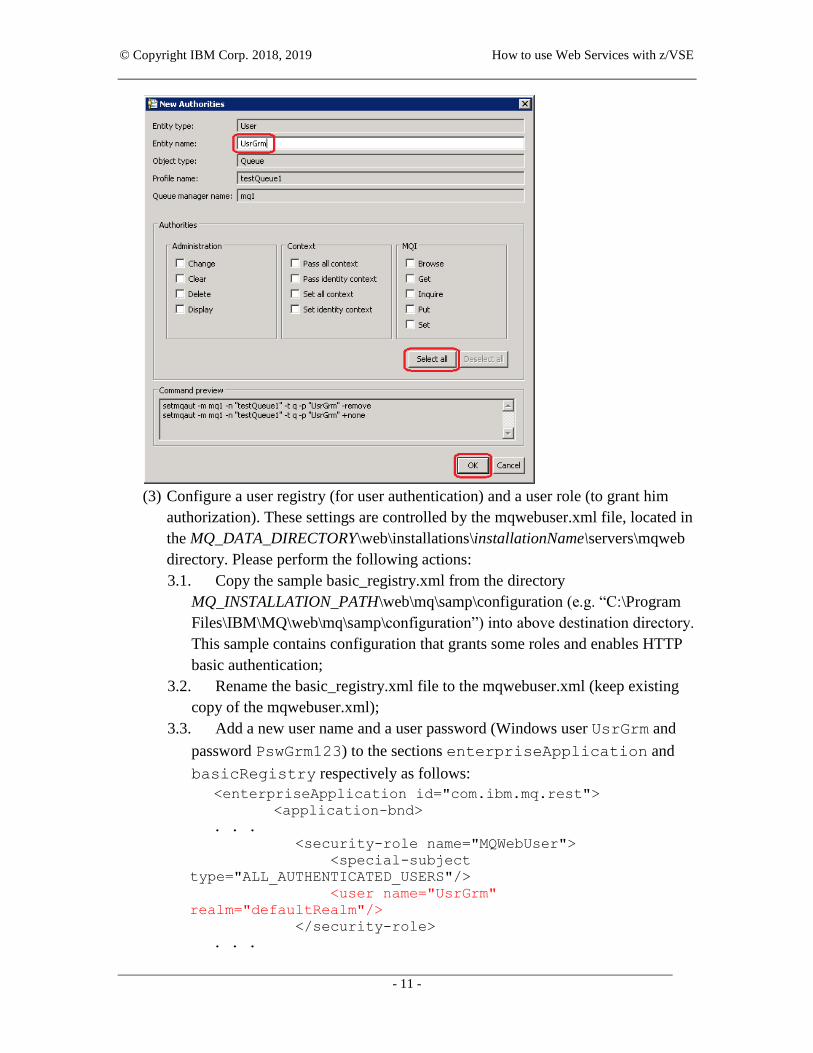
(3) Configure a user registry (for user authentication) and a user role (to grant him
authorization). These settings are controlled by the mqwebuser.xml file, located in
the MQ_DATA_DIRECTORY\web\installations\installationName\servers\mqweb
directory. Please perform the following actions:
3.1. Copy the sample basic_registry.xml from the directory
MQ_INSTALLATION_PATH\web\mq\samp\configuration (e.g. “C:\Program
Files\IBM\MQ\web\mq\samp\configuration”) into above destination directory.
This sample contains configuration that grants some roles and enables HTTP
basic authentication;
3.2. Rename the basic_registry.xml file to the mqwebuser.xml (keep existing
copy of the mqwebuser.xml);
3.3. Add a new user name and a user password (Windows user UsrGrm and
password PswGrm123) to the sections enterpriseApplication and
basicRegistry respectively as follows:
<enterpriseApplication id="com.ibm.mq.rest">
<application-bnd>
. . .
<security-role name="MQWebUser">
<special-subject
type="ALL_AUTHENTICATED_USERS"/>
<user name="UsrGrm"
realm="defaultRealm"/>
</security-role>
. . .
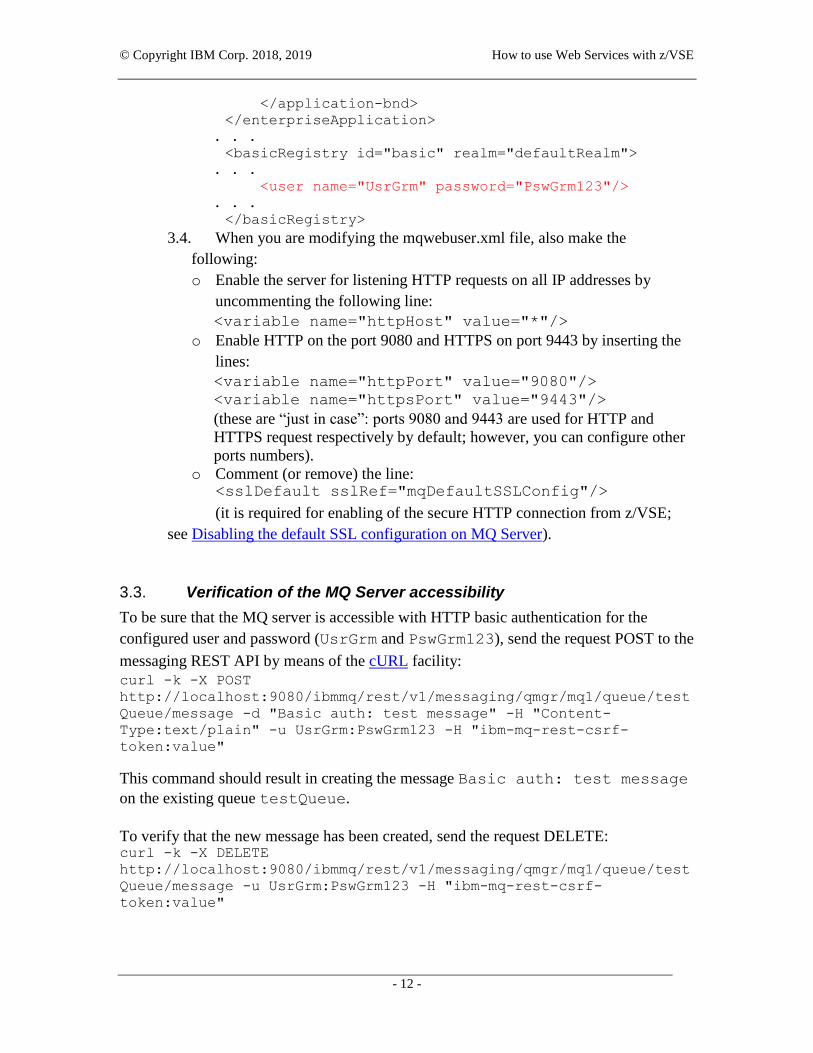
© Copyright IBM Corp. 2018, 2019 How to use Web Services with z/VSE
- 12 -
</application-bnd>
</enterpriseApplication>
. . .
<basicRegistry id="basic" realm="defaultRealm">
. . .
<user name="UsrGrm" password="PswGrm123"/>
. . .
</basicRegistry>
3.4. When you are modifying the mqwebuser.xml file, also make the
following:
o Enable the server for listening HTTP requests on all IP addresses by
uncommenting the following line:
<variable name="httpHost" value="*"/>
o Enable HTTP on the port 9080 and HTTPS on port 9443 by inserting the
lines:
<variable name="httpPort" value="9080"/>
<variable name="httpsPort" value="9443"/>
(these are “just in case”: ports 9080 and 9443 are used for HTTP and
HTTPS request respectively by default; however, you can configure other
ports numbers).
o Comment (or remove) the line: <sslDefault sslRef="mqDefaultSSLConfig"/>
(it is required for enabling of the secure HTTP connection from z/VSE;
see Disabling the default SSL configuration on MQ Server).
3.3. Verification of the MQ Server accessibility
To be sure that the MQ server is accessible with HTTP basic authentication for the
configured user and password (UsrGrm and PswGrm123), send the request POST to the
messaging REST API by means of the cURL facility:
curl -k -X POST
http://localhost:9080/ibmmq/rest/v1/messaging/qmgr/mq1/queue/test
Queue/message -d "Basic auth: test message" -H "Content-
Type:text/plain" -u UsrGrm:PswGrm123 -H "ibm-mq-rest-csrf-
token:value"
This command should result in creating the message Basic auth: test message
on the existing queue testQueue.
To verify that the new message has been created, send the request DELETE: curl -k -X DELETE
http://localhost:9080/ibmmq/rest/v1/messaging/qmgr/mq1/queue/test
Queue/message -u UsrGrm:PswGrm123 -H "ibm-mq-rest-csrf-
token:value"
© Copyright IBM Corp. 2018, 2019 How to use Web Services with z/VSE
- 13 -
In normal case, the DELETE request response will show the retrieved message body as
follows: Basic auth: test message
To verify the HTTP basic authentication, you can use the Postman tool as well.
3.4. Samples of programs
The samples POST_HTTP_BA and DELETE_HTTP_BA show the basic technique of
COBOL programming for REST API with HTTP basic authentication (to obtain samples
see Appendix D).
For such authentication:
• A HTTP request must be provided with “ibm-mq-rest-csrf-token” header (with
any value);
• A user name and a user password must be specified in fields REST-REQ-AUTH-
USER and REST-REQ-AUTH-PASSWORD of the REST COMMAREA
respectively;
• The REST-REQ-AUTH-TYPE field must be set to ‘1’.
These samples repeat the scenarios of messages creating and retrieving implemented in
the samples POST_HTTP(s)_NA and DELETE_HTTP(s)_NA.
Before samples running, please update the server URLs with actual IP addresses, port
number, queue manager name and queue name.
The samples use insecure protocol (HTTP) for accessing MQ server; however, you can
update them easy to HTTPS by changing port number and protocol notation in the
constant MQ-SERVER-URL.
4. Using REST API with token-based authentication
4.1. Overview
With the token-based authentication:
(1) An application program (REST API user) starts the token-based authentication
session (logs in): sends a user name and a user password to the REST API
resource login (https://host:port/ibmmq/rest/v1/login) with the POST request;
(2) The MQ server generates the LTPA token and returns it to an application program
as a cookie;
(3) An application program keeps the LTPA token within its internal storage to
authenticate future requests;
(4) An application program creates message(s) on or retrieves message(s) from the
MQ server by sending the request(s) POST or DELETE to the messaging REST
API
(https://host:port/ibmmq/rest/v1/messaging/qmgr/QueueManagerName/queue/Qu
eueName/message) with the cookie that contains the LTPA token;
© Copyright IBM Corp. 2018, 2019 How to use Web Services with z/VSE
- 14 -
(5) An application program stops the token-based authentication session (logs out):
sends the DELETE request to the REST API resource login.
For details about REST API with token-base authentication, please see here:
https://www.ibm.com/support/knowledgecenter/SSFKSJ_9.1.0/com.ibm.mq.sec.doc/q12
8720_.htm
For using the token-base authentication you need:
• Configure MQ user and enable HTTP basic authentication (refer to Configuration
of the MQ user);
So, for token-base authentication, the same security configuration
(mqwebuser.xml file) is used as for basic authentication.
• Verify token-base authentication.
Also (if you are planning to use secure HTTP protocol), the SSL should be configured as
described in the Appendix C.
4.2. Verification of the MQ Server accessibility
For verifying that MQ Server is accessible with token-based authentication, you can
involve the Postman tool according to the following scenario:
(1) Start the token-based authentication session:
• Select POST request;
• Specify the REST API login resource as URL;
• Select No Auth as the authorization type;
• Specify the request body:
o Select raw for the body;
o Choose Json(application/json) in the drop-down list;
o Enter the user name and the user password (as the request body) in the
JSON format: {
"username" : "User_name",
"password" : "User_password"
}
When the JSON (application/json) has been selected, the header
Content-Type with the value application/json will be
generated (or overwritten) automatically;
• Press Send for sending the request to the MQ server.
(2) Verify the request response, that is be sure:
• The status is 204 No content;
• The returned LtpaToken2 cookie looks like to the following: LtpaToken2 pC00RPBXCcjlBbj
EQFoOcXHPUJrpc
k5TCnQhmIIxkIm
cCA6+h/qr1WouR
3a3QdFeoJrQtA

© Copyright IBM Corp. 2018, 2019 How to use Web Services with z/VSE
- 15 -
D8XepHlFhX7sxZ
GW7uNA0gfqzJGl
rpVhGMohJvp8lK
nJvOCgM9G0fYPT
XIDhhb4MrK2oFn
cxP3Ifq1ScAc+Sx1
QlyZlzZqMjp1Nzl
0Bppb1JCwRkupt
aMwzy61Urw6r9
m5yRSgBqAOb4L
R7sWJZVo5KNP8+
658tDbIyB2E3md
IDUY0JinKMDn9D
kCuxeek531QoDT
179qJJTp2mSq5hJ
NH14txEt9+W+E0
L0+nWqgqmjbhyJ
zwyxdq4BX
(3) Keep the returned cookie LtpaToken2 “as is” (don’t remove it from next sending
requests);
(4) Send some requests POST and DELETE to the messaging REST API for creating
message(s) on and for retrieving message(s) from the MQ server.
When sending a request:
• Be sure that the cookie LtpaToken2 is present in the request (when token-
based authentication session logged in, the cookie should be attached to next
requests by default):
• Specify the header ibm-mq-rest-csrf-token with any value (if not
specified);
• For the request POST select raw for the body and choose Text
(text/plain) in the drop-down list.
When request is done, verify that:
• The status is 201 Created for the request POST and is 200 OK for the
DELETE;
© Copyright IBM Corp. 2018, 2019 How to use Web Services with z/VSE
- 16 -
• The returned message body is as expected (for the request DELETE).
(5) Stop the token-based authentication session by sending the request DELETE to
the REST API resource login.
When sending the request:
• Be sure that the cookie LtpaToken2 is present in the request;
• Specify the header ibm-mq-rest-csrf-token with any value (if not
specified);
When request is done, verify that:
• The status is 204 No Content.
You can use the cURL facility for the verification of the MQ Server accessibility as well.
4.3. Samples of programs
The samples POST_HTTP_TBA and DELETE_HTTP_TBA demonstrate the basic of
COBOL programming for REST API with token-based authentication (here, the REST-
REQ-AUTH-TYPE field of the REST COMMAREA is set to ‘0’, that means “no
authentication” actually). To obtain the samples refer to the Appendix D.
Before these samples running you should update the server URLs with actual IP
addresses, port number, queue manager name and queue name.
The samples reproduce procedures of messages creating and retrieving using all available
options (like to the samples for another authentication types).
The insecure protocol (HTTP) is used in these samples; however, you can update samples
for using HTTPS by changing port number in the MQ server URLs MQ-SERVER-URL
and MQ-SERVER-URL-T and changing protocol notation in these URLs.
5. Using REST API with client certificate authentication
5.1. Overview
With the authentication of this type, the certificate is used in place of a user name and a
user password in a sending request. The certificate must be provided for each REST API
request to the MQ Server.
Only the secure HTTP can be used with the authentication of this type.
For more information about REST API with client certificate authentication, please see
here:
https://www.ibm.com/support/knowledgecenter/SSFKSJ_9.1.0/com.ibm.mq.sec.doc/q12
7940_.htm
For using REST API with a client certification authentication, you need:
© Copyright IBM Corp. 2018, 2019 How to use Web Services with z/VSE
- 17 -
• Configure a new MQ user and role for basic authentication (as described in the
Configuration of the MQ user).
• Setup SSL using configured MQ user (as described in the Appendix C).
• Extract the public part of the z/VSE certificate.
• Import the public part of z/VSE certificate into the MQ server Trust KeyStore.
• Enable client certificate authentication by the MQ Server.
• Verify the client certificate authentication.
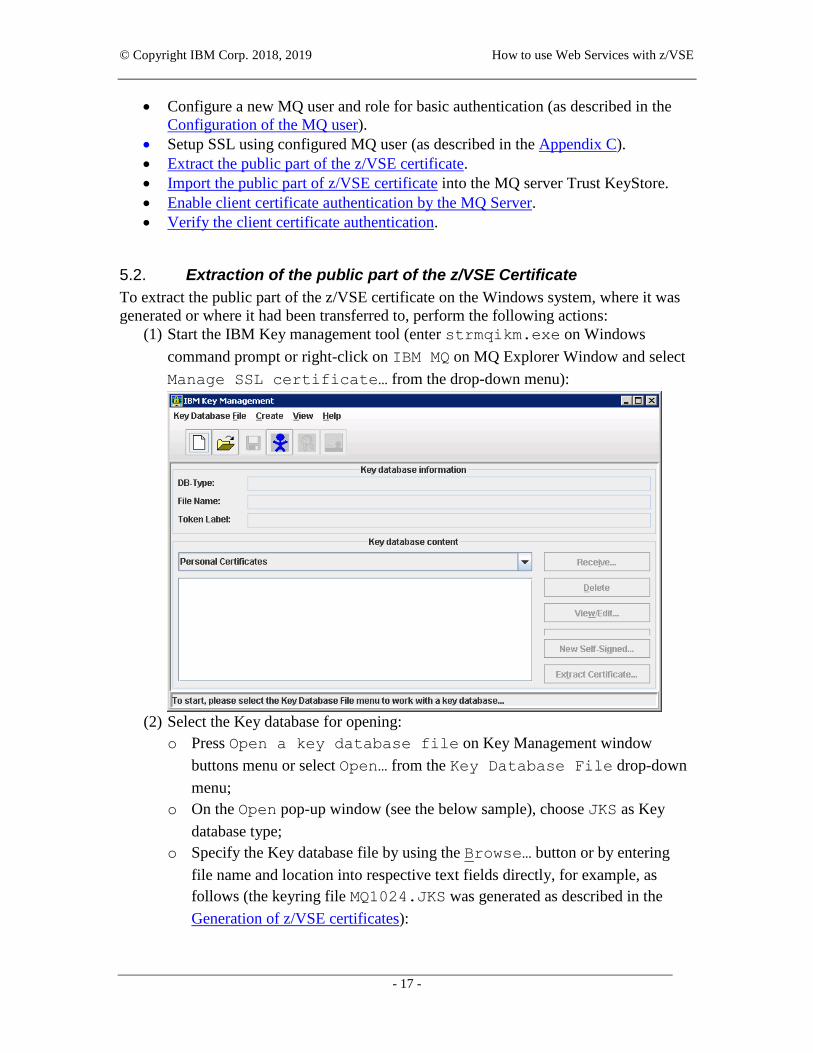
5.2. Extraction of the public part of the z/VSE Certificate
To extract the public part of the z/VSE certificate on the Windows system, where it was
generated or where it had been transferred to, perform the following actions:
(1) Start the IBM Key management tool (enter strmqikm.exe on Windows
command prompt or right-click on IBM MQ on MQ Explorer Window and select
Manage SSL certificate… from the drop-down menu):
(2) Select the Key database for opening:
o Press Open a key database file on Key Management window
buttons menu or select Open… from the Key Database File drop-down
menu;
o On the Open pop-up window (see the below sample), choose JKS as Key
database type;
o Specify the Key database file by using the Browse… button or by entering
file name and location into respective text fields directly, for example, as
follows (the keyring file MQ1024.JKS was generated as described in the
Generation of z/VSE certificates):
© Copyright IBM Corp. 2018, 2019 How to use Web Services with z/VSE
- 18 -
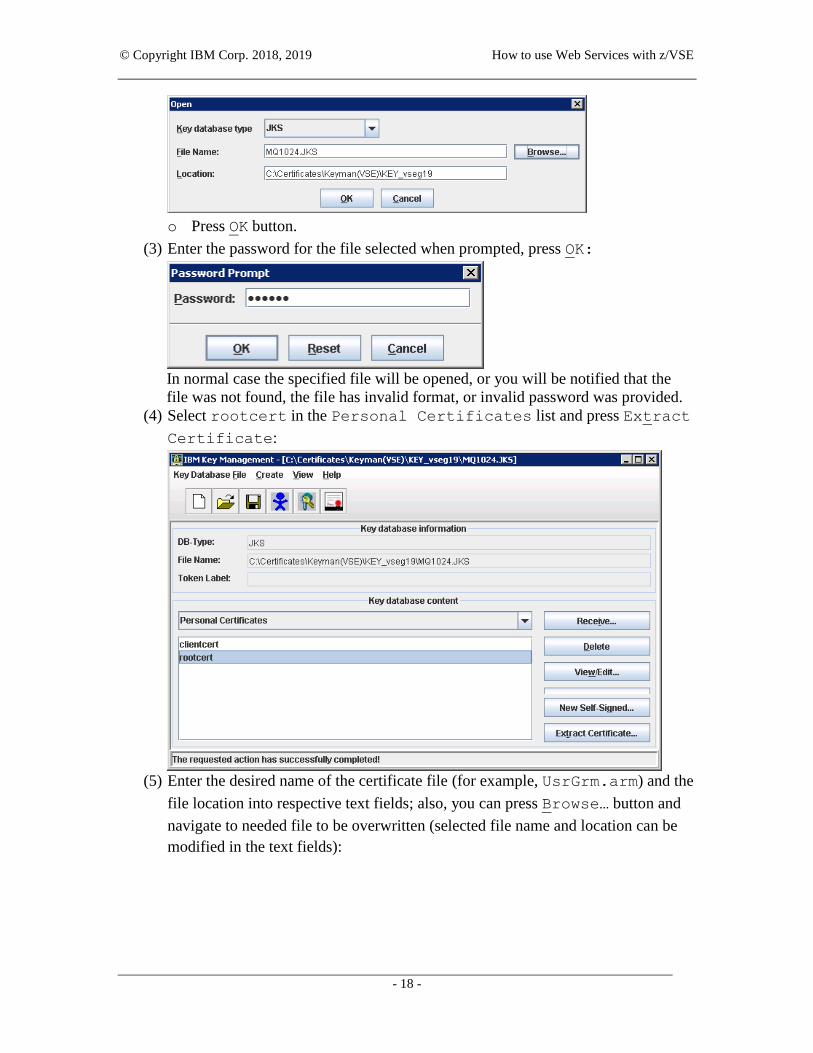
o Press OK button.
(3) Enter the password for the file selected when prompted, press OK:
In normal case the specified file will be opened, or you will be notified that the
file was not found, the file has invalid format, or invalid password was provided.
(4) Select rootcert in the Personal Certificates list and press Extract
Certificate:
(5) Enter the desired name of the certificate file (for example, UsrGrm.arm) and the
file location into respective text fields; also, you can press Browse… button and
navigate to needed file to be overwritten (selected file name and location can be
modified in the text fields):
© Copyright IBM Corp. 2018, 2019 How to use Web Services with z/VSE
- 19 -
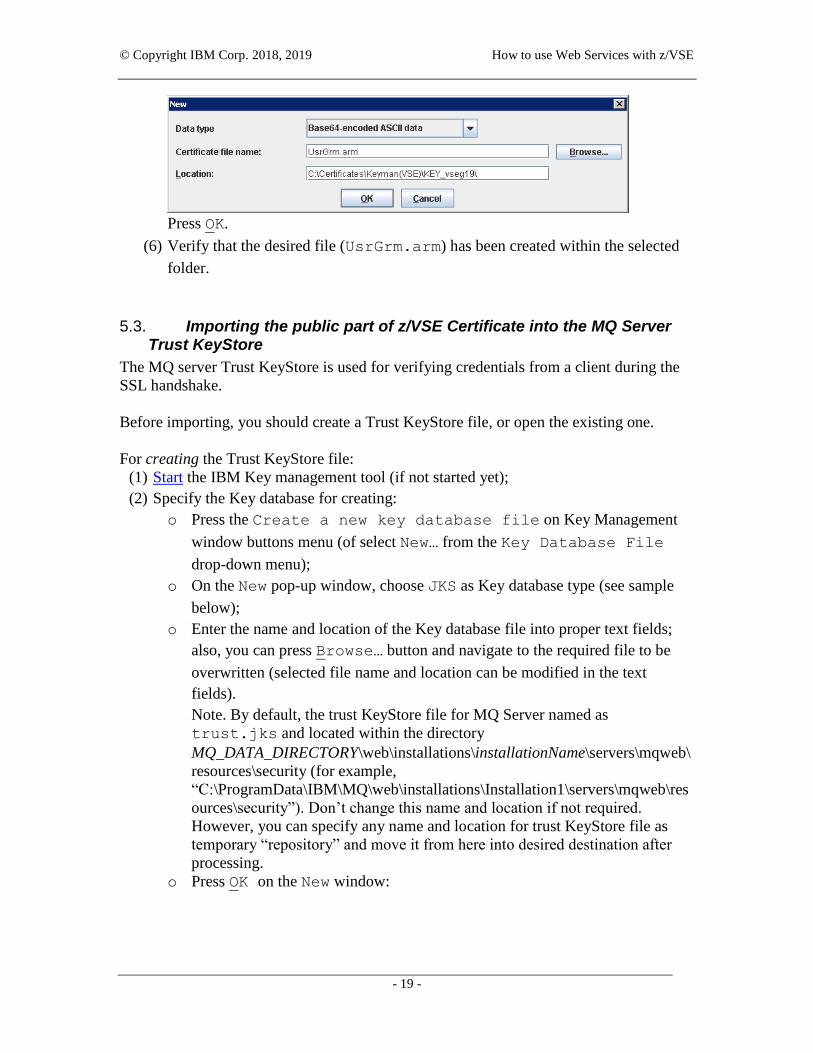
Press OK.
(6) Verify that the desired file (UsrGrm.arm) has been created within the selected
folder.
5.3. Importing the public part of z/VSE Certificate into the MQ Server Trust KeyStore
The MQ server Trust KeyStore is used for verifying credentials from a client during the
SSL handshake.
Before importing, you should create a Trust KeyStore file, or open the existing one.
For creating the Trust KeyStore file:
(1) Start the IBM Key management tool (if not started yet);
(2) Specify the Key database for creating:
o Press the Create a new key database file on Key Management
window buttons menu (of select New… from the Key Database File
drop-down menu);
o On the New pop-up window, choose JKS as Key database type (see sample
below);
o Enter the name and location of the Key database file into proper text fields;
also, you can press Browse… button and navigate to the required file to be
overwritten (selected file name and location can be modified in the text
fields).
Note. By default, the trust KeyStore file for MQ Server named as
trust.jks and located within the directory
MQ_DATA_DIRECTORY\web\installations\installationName\servers\mqweb\
resources\security (for example,
“C:\ProgramData\IBM\MQ\web\installations\Installation1\servers\mqweb\res
ources\security”). Don’t change this name and location if not required.
However, you can specify any name and location for trust KeyStore file as
temporary “repository” and move it from here into desired destination after
processing.
o Press OK on the New window:

© Copyright IBM Corp. 2018, 2019 How to use Web Services with z/VSE
- 20 -
o Supply the password for Database file when prompted in a new pop-up
window (for example, the pswgrm; keep the password in mind):
(3) Verify that the file trust.jks has been created in the selected folder. The created file
is opened in the Key management tool.
For opening the existing Trust KeyStore file perform actions as described in the
Extraction of the public part of the z/VSE Certificate (actions (1)-(3)).
For importing the public part of z/VSE Certificate:
(1) Be sure that the Trust KeyStore file is opened in the IBM Key management tool;
(2) Select Signer Certificates from drop-down menu in the Key
database content group:
(3) Press the button Add and select the file that represents the public part of z/VSE
certificate (for example, the UsrGrm.arm located in the directory

© Copyright IBM Corp. 2018, 2019 How to use Web Services with z/VSE
- 21 -
“C:\Certificates\Keyman(VSE)\KEY_vseg19”; see Extraction of the public part of
the z/VSE Certificate):
(4) Press OK and on new pop-up window enter the certificate label (as the label you
should use the MQ user name the z/VSE certificate has been generated for):
(5) Press OK: in normal case the certificate will appear in the Signer
Certificates list (it is UsrGrm in our case):
(6) Now you can close the Key Management tool window and (if needed) move the
trust KeyStore file from the temporary “repository”
(C:\Certificates\Keyman(VSE)\KEY_vseg19\trust.jks) into the required
destination
(MQ_DATA_DIRECTORY\web\installations\installationName\servers\mqweb\res
ources\security\trust.jks).
(7) To make the new (or updated) file trust.jks active, restart MQ Server.
5.4. Enabling the client certificate authentication by the MQ Server
For enabling the client certificate authentication, you must:
© Copyright IBM Corp. 2018, 2019 How to use Web Services with z/VSE
- 22 -
(1) Make sure that the configuration file mqwebuser.xml had been adapted for HTTP
Basic authentication (as described in the Configuration of the MQ user);
(2) Update the mqwebuser.xml as follows:
• Comment out (or remove) the line (see Disabling the default SSL
configuration on MQ Server):
<sslDefault sslRef="mqDefaultSSLConfig"/>;
• Uncomment and update the element ssl and two elements KeyStore (or
simply add a new elements) as follows:
<ssl id="defaultSSLConfig"
keyStoreRef="defaultKeyStore"
trustStoreRef="defaultTrustStore"
clientAuthenticationSupported="true"
/>
<!-- Psw = 'password' (default) -->
<keyStore id="defaultKeyStore"
location="key.jks"
type="JKS"
password="{xor}Lz4sLCgwLTs="
/>
<!-- Psw = 'pswgrm' -->
<keyStore id="defaultTrustStore"
location="trust.jks"
type="JKS"
password="{xor}LywoOC0y"
serverKeyAlias="UsrGrm"
/>
Notes.
o The value of the serverKeyAlias attribute (within the element
keyStore id="defaultTrustStore") must match the name of the
server certificate (it is UsrGrm in our case).
o The above configuration assumes that the password (attribute password)
for MQ Server KeyStore is password and the password for trust
KeyStore is pswgrm. If you use another password(s), please encode it by
the securityUtility.bat utility (that can be found in the
MQ_INSTALLATION_PATH\web\mq\bin\ directory e.g. “C:\Program
Files\IBM\MQ\web\bin\”).
5.5. Verification of the MQ Server accessibility
For verification of the MQ Server accessibility with the client certification authentication,
you can involve the cURL facility with PEM certificate support.
For verification, enter the following command on the Windows prompt:
© Copyright IBM Corp. 2018, 2019 How to use Web Services with z/VSE
- 23 -
curl -k -X POST
https://localhost:9443/ibmmq/rest/v1/messaging/qmgr/mq1/queue/tes
tQueue/message -d "CE: test message" -H "Content-Type:text/plain"
--cert-type PEM --cert
C:\Certificates\Keyman(VSE)\KEY_vseg19\MQ1024.PEM:pswgrm -H "ibm-
mq-rest-csrf-token: value"
where C:\Certificates\Keyman(VSE)\KEY_vseg19\MQ1024.PEM is full
path to the keyring file generated (as described in the Generation of z/VSE certificates).
As result, the message CE: test message should be created on the existing queue
testQueue. To make sure the message had been created, try to retrieve it by the
request DELETE:
curl -k -X DELETE
https://localhost:9443/ibmmq/rest/v1/messaging/qmgr/mq1/queue/tes
tQueue/message --cert-type PEM --cert
C:\Certificates\Keyman(VSE)\KEY_vseg19\MQ1024.PEM:pswgrm -H "ibm-
mq-rest-csrf-token: value"
In normal case the message body will be shown as the request response.
5.6. Samples of programs
The samples POST_CERT and DELETE_CERT implement COBOL programs using
REST API with client certificate authentication. To obtain the samples refer to the
Appendix D.
Before these samples running you should update the server URL (MQ-SERVER-URL)
with actual IP addresses, port number, queue manager name and queue name.
The samples provide procedures of messages creating and retrieving with all available
options (like to the samples for another authentication types).
6. Appendix A: Debugging facilities
6.1. Socket functions trace
If you are using CSI TCP/IP stack, you can invoke the $SOCKDBG trace. The source of
the $SOCKDBG phase can be found in the PRD2.TCPIPC sub-library (the member
$SOCKDBG.Z). To activate the trace, set options (in the $SOCKDBG.Z member) you
are interested in, assembler and catalog the phase into PRD2.CONFIG sub-library;
thereupon restart CICS (additional diagnostic messages will be written in the CICS LST
output). For the trace deactivating, remove the $SOCKDBG.PHASE from the
PRD2.CONFIG sub-library.
© Copyright IBM Corp. 2018, 2019 How to use Web Services with z/VSE
- 24 -
For getting more information about $SOCKDBG trace, please see the CSI documentation
here: http://www.csi-international.com/support/doc/zVSE/TCP-IP/2.1/TCP-
IP_for_VSE_2.1_Progmrs_Guide_201708.pdf
BSI TCP/IP stack and CSI one with OpenSSL (configured using the Socket API
Multiplexer) allow to produce the OpenSSL and gsk-interface (SSL-related API
functions) trace. To turn the debugging trace on, add the // SETPARM
SSL$DBG='YES' statement to the CICS startup job and after that restart CICS: debug
messages will be sent to the SYSLST (CICS listing).
To disable the trace, replace the above statement by the // SETPARM
SSL$DBG='NO' or remove it at all ('NO' is default option).
Also, you can provide the trace with the system scope by adding the // SETPARM
SYSTEM SSL$DBG='YES' statement to the system startup.
For details, please see here:
https://www.ibm.com/support/knowledgecenter/SSB27H_6.2.0/fa2pr_using_open_ssl_tra
ce.html
6.2. REST trace
To setup the REST trace, you need to generate the optional REST phase IESRESTO
(skeleton SKRESTOP from the library 59). Set the flags TRSYSLOG or/and TRSYSLST
for sending trace messages to the System Log or/ and to the CICS LST output.
7. Appendix B: Test tools
7.1. cURL
The cURL is the free and opensource command line facility for transferring data to URLs
using different protocols (HTTP, HTTPS, FTP, POP3 etc.). For getting more information
and for downloading the software, visit the cURL Web site https://curl.haxx.se/.
When the cURL is installed, you can get the brief information about facility usage by its
invocation with the option -help (cURL -help); the option -M (or —manual) is
intended to display the full manual (the huge help text).
In this document the facility applies for local testing of HTTP requests; in this case you
enter localhost as URL in a HTTP request, for example: curl -k -X POST
http://localhost:9080/ibmmq/rest/v1/messaging/qmgr/mq1/queue/test
Queue/message -d "Message body"
-H "Content-Type:text/plain"
© Copyright IBM Corp. 2018, 2019 How to use Web Services with z/VSE
- 25 -
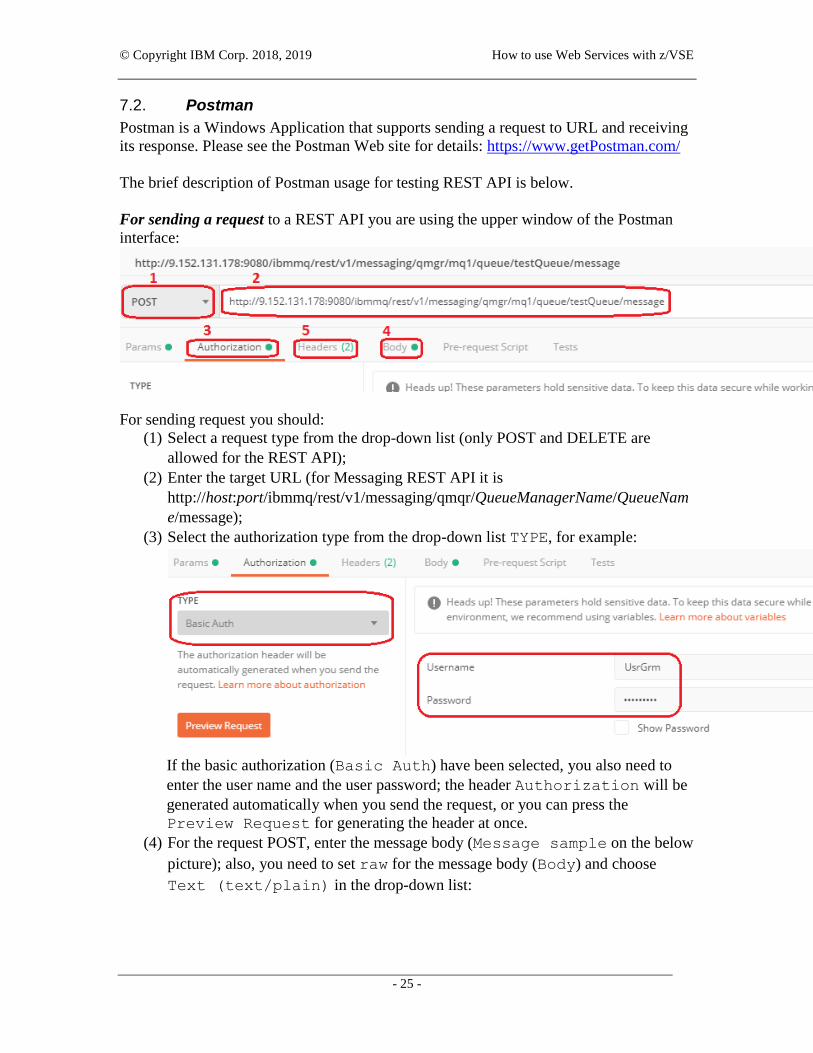
7.2. Postman
Postman is a Windows Application that supports sending a request to URL and receiving
its response. Please see the Postman Web site for details: https://www.getPostman.com/
The brief description of Postman usage for testing REST API is below.
For sending a request to a REST API you are using the upper window of the Postman
interface:
For sending request you should:
(1) Select a request type from the drop-down list (only POST and DELETE are
allowed for the REST API);
(2) Enter the target URL (for Messaging REST API it is
http://host:port/ibmmq/rest/v1/messaging/qmqr/QueueManagerName/QueueNam
e/message);
(3) Select the authorization type from the drop-down list TYPE, for example:
If the basic authorization (Basic Auth) have been selected, you also need to
enter the user name and the user password; the header Authorization will be
generated automatically when you send the request, or you can press the
Preview Request for generating the header at once.
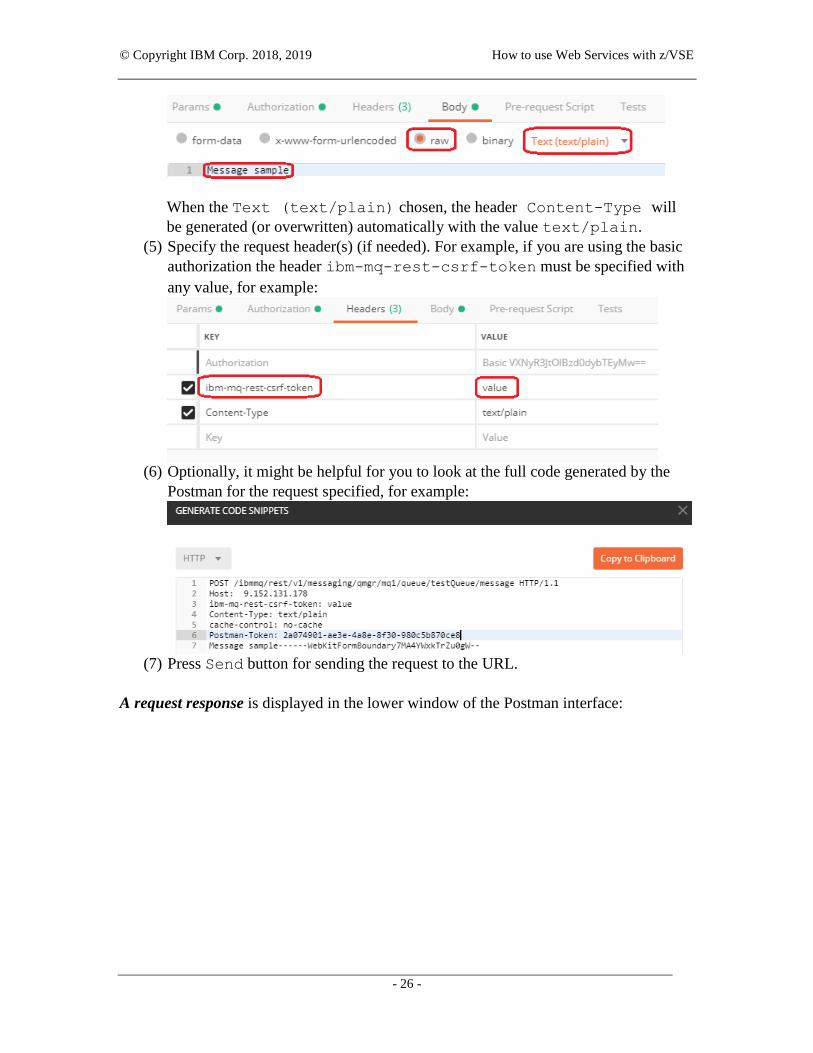
(4) For the request POST, enter the message body (Message sample on the below
picture); also, you need to set raw for the message body (Body) and choose
Text (text/plain) in the drop-down list:
© Copyright IBM Corp. 2018, 2019 How to use Web Services with z/VSE
- 26 -
When the Text (text/plain) chosen, the header Content-Type will
be generated (or overwritten) automatically with the value text/plain.
(5) Specify the request header(s) (if needed). For example, if you are using the basic
authorization the header ibm-mq-rest-csrf-token must be specified with
any value, for example:
(6) Optionally, it might be helpful for you to look at the full code generated by the
Postman for the request specified, for example:
(7) Press Send button for sending the request to the URL.
A request response is displayed in the lower window of the Postman interface:

© Copyright IBM Corp. 2018, 2019 How to use Web Services with z/VSE
- 27 -
Here you can verify the response status (201 Created on above picture), response
body (for the DELETE request), response headers and some other attributes.
8. Appendix C: Tailoring SSL connection between z/VSE and MQ Server
If you are planning to use SSL connection between z/VSE and IBM MQ Server, you
need:
(1) Generate a new certificate for the MQ server KeyStore (this is optional).
(2) Disable the default SSL configuration on MQ Server.
(3) Generate z/VSE certificates.
(4) Enable SSL on z/VSE.
8.1. Generation of a new certificate for MQ Server KeyStore
The MQ Server KeyStore is used to provide credentials in SSL handshake.
During the MQ Server installing (or starting), if a KeyStore certificate could not be
found, the “default” self-signed certificate is generated automatically. If this certificate
doesn’t meet your requirements, you can invoke the IBM Key management tool (shipped
as part of the IBM MQ Server) that allows to generate a new self-signed certificate and to
create a new certificate request for sending to a certification authority.
The below scenario shows the generation of 1024 key length self-signed certificate that
can be used on a test system (and that permits to exclude a crypto card exploiting).
However, for a production system the 2048-bit (or higher) key with a crypto card is
recommended (such self-signed certificate can be generated according to this scenario,
too; for creating a request to a certification authority refer to:
© Copyright IBM Corp. 2018, 2019 How to use Web Services with z/VSE
- 28 -
https://www.ibm.com/support/knowledgecenter/SSFKSJ_9.1.0/com.ibm.mq.sec.doc/q12
7940_.htm).
(1) Keep the backup copy of the existing MQ KeyStore file (key.jks) located in the
directory
MQ_DATA_DIRECTORY\web\installations\installationName\servers\mqweb\reso
urces\security (e.g. in the
“C:\ProgramData\IBM\MQ\web\installations\Installation1\servers\mqweb\resourc
es\security”).
(2) Start MQ WEB Server (enter strmqweb.bat on Windows command line
prompt) – if not started yet.
(3) Start the IBM Key management tool: run the strmqikm.exe executable, or
right-click on IBM MQ in the IBM MQ Explorer Window and select Manage
SSL certificate… from the drop-down menu.
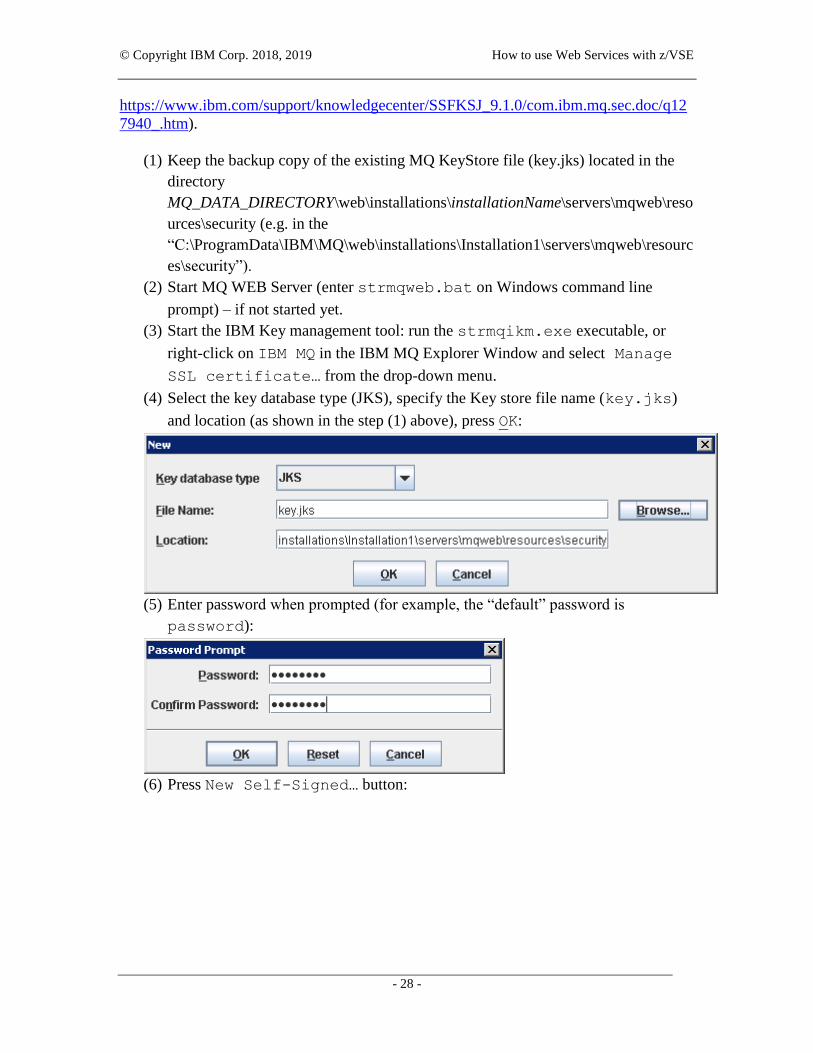
(4) Select the key database type (JKS), specify the Key store file name (key.jks)
and location (as shown in the step (1) above), press OK:
(5) Enter password when prompted (for example, the “default” password is
password):
(6) Press New Self-Signed… button:

© Copyright IBM Corp. 2018, 2019 How to use Web Services with z/VSE
- 29 -
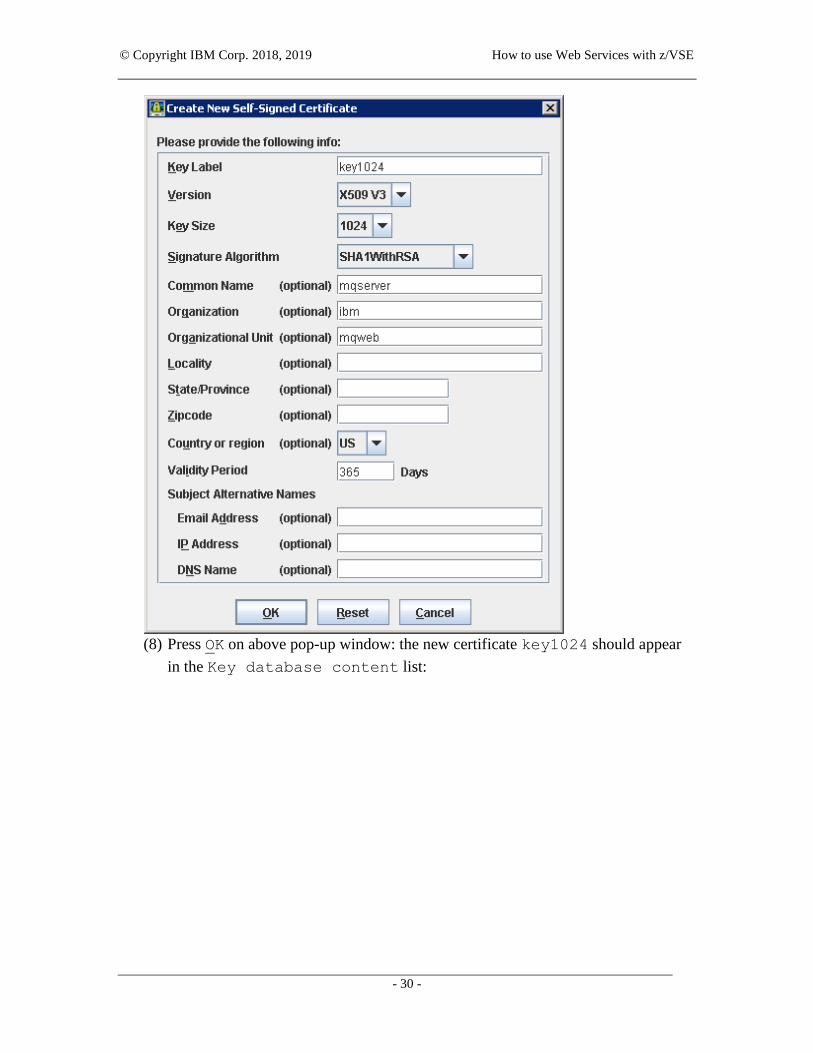
(7) On the pop-up window, select the Key size equal to 1024, enter Key label,
Common Name and other options e.g. as follows:
© Copyright IBM Corp. 2018, 2019 How to use Web Services with z/VSE
- 30 -
(8) Press OK on above pop-up window: the new certificate key1024 should appear
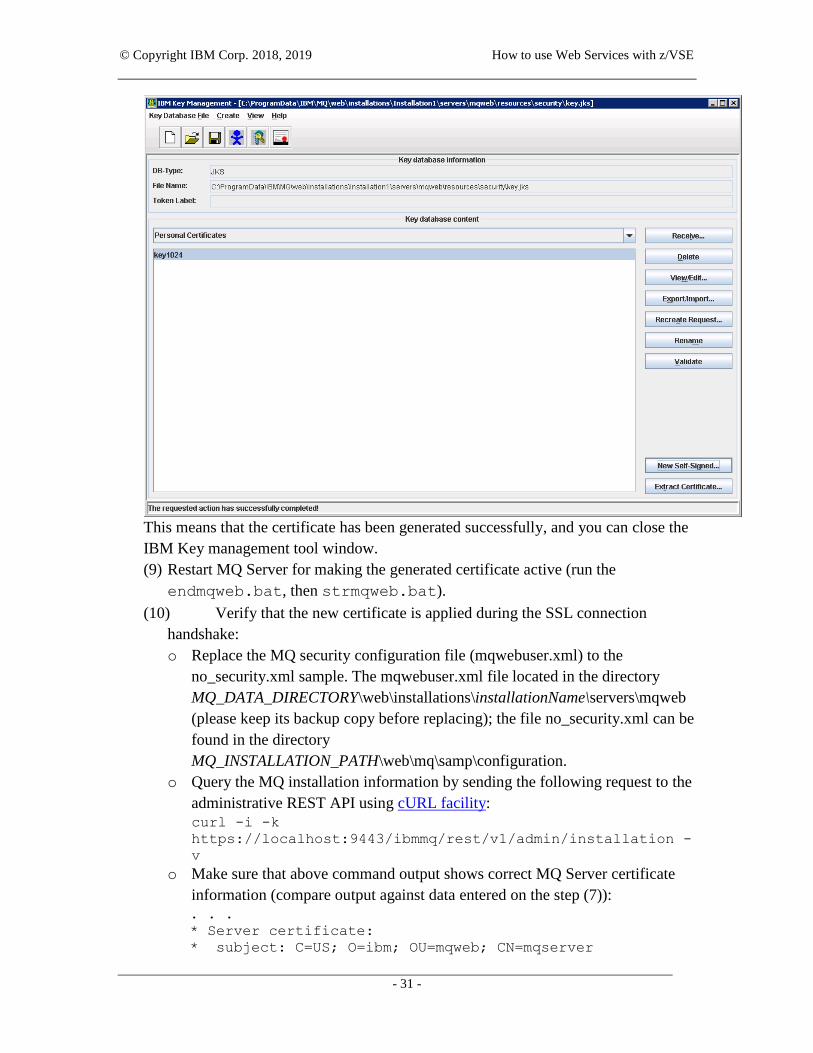
in the Key database content list:
© Copyright IBM Corp. 2018, 2019 How to use Web Services with z/VSE
- 31 -
This means that the certificate has been generated successfully, and you can close the
IBM Key management tool window.
(9) Restart MQ Server for making the generated certificate active (run the
endmqweb.bat, then strmqweb.bat).
(10) Verify that the new certificate is applied during the SSL connection
handshake:
o Replace the MQ security configuration file (mqwebuser.xml) to the
no_security.xml sample. The mqwebuser.xml file located in the directory
MQ_DATA_DIRECTORY\web\installations\installationName\servers\mqweb
(please keep its backup copy before replacing); the file no_security.xml can be
found in the directory
MQ_INSTALLATION_PATH\web\mq\samp\configuration.
o Query the MQ installation information by sending the following request to the
administrative REST API using cURL facility:
curl -i -k
https://localhost:9443/ibmmq/rest/v1/admin/installation -
v
o Make sure that above command output shows correct MQ Server certificate
information (compare output against data entered on the step (7)):
. . .
* Server certificate:
* subject: C=US; O=ibm; OU=mqweb; CN=mqserver
© Copyright IBM Corp. 2018, 2019 How to use Web Services with z/VSE
- 32 -
* start date: Nov 20 10:40:37 2018 GMT
* expire date: Nov 20 10:40:37 2019 GMT
* issuer: C=US; O=ibm; OU=mqweb; CN=mqserver
* SSL certificate verify result: self signed certificate
(18), continuing anyway.
> GET /ibmmq/rest/v1/admin/installation HTTP/1.1
> Host: localhost:9443
> User-Agent: curl/7.61.0
> Accept: */*
. . .
<
{"installation": [{
"name": "Installation1",
"platform": "windows",
"version": "9.1.0.0"
}]}* Connection #0 to host localhost left intact
Note. For a new certificate verification, you can use the Postman tool as well.
8.2. Disabling the default SSL configuration on MQ Server
Here you need to remove, or comment out, the following line (that specifies the default
MQ SSL configuration) in the actual MQ Server security configuration file
mqwebuser.xml (located in the directory
MQ_DATA_DIRECTORY\web\installations\installationName\servers\mqweb): <sslDefault sslRef="mqDefaultSSLConfig"/>
8.3. Generation of z/VSE certificates
For the z/VSE certificates generation, the Keyman/VSE tool should be installed on your
Windows workstation. This tool provides most of facilities concerning TLS/SSL keys
and certificates. The tool installation package can be found here: https://www.ibm.com/it-
infrastructure/z/zvse-downloads. When the tool is installed you can look through the
attached user’s guide.
There is a special feature of generation procedure when you are planning to use
certificate for a client authentication; this feature will be underlined.
To generate the z/VSE certificates, perform the following steps.
(1) Be sure that TCP/IP stack is started in non-SSL (insecure) mode (otherwise the
Keyman/VSE tool can’t be started on the step (3)).
(2) Start the z/VSE Connector Server by entering the command R RDR,STARTVCS
on z/VSE console (the Connector Server should be configured in insecure mode).
(3) Start the Keyman/VSE.
Note. Next steps (4) – (6) represents the procedure of configuration of a new z/VSE
host (the Keyman/VSE should be connected to for uploading RSA key pairs and SSL
© Copyright IBM Corp. 2018, 2019 How to use Web Services with z/VSE
- 33 -
certificates). You can skip these steps (move to the step (7) at once) if needed host
had been configured before.
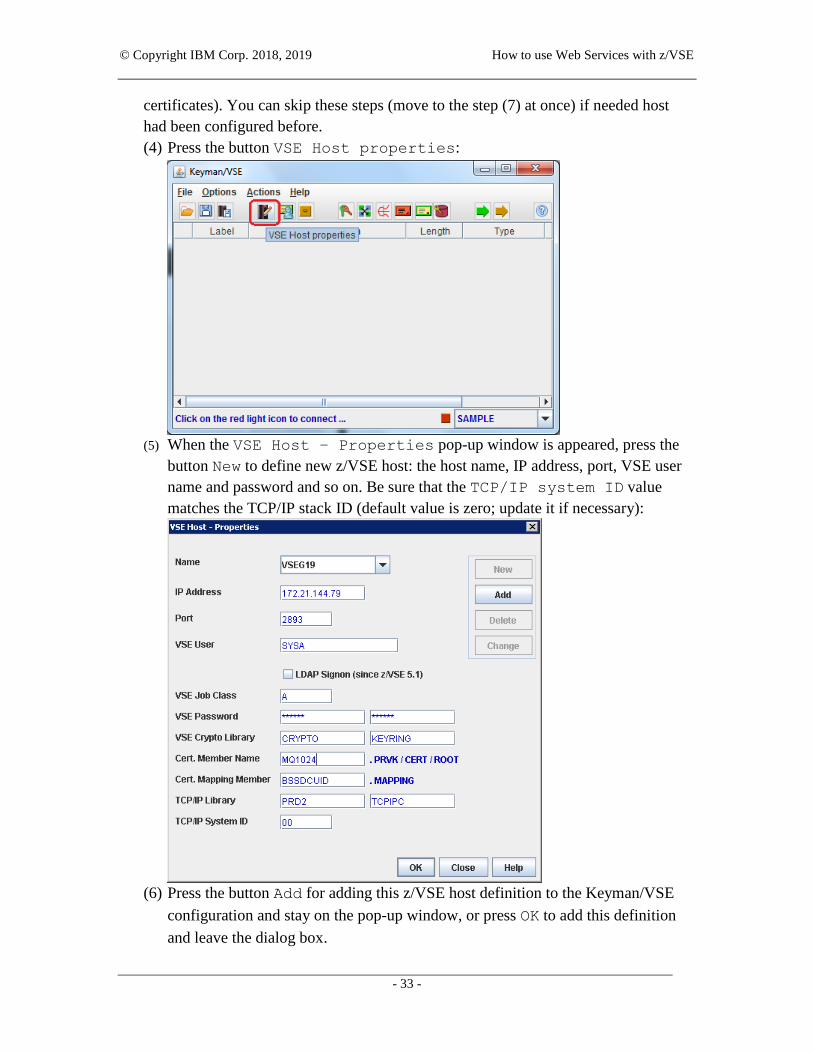
(4) Press the button VSE Host properties:
(5) When the VSE Host – Properties pop-up window is appeared, press the
button New to define new z/VSE host: the host name, IP address, port, VSE user
name and password and so on. Be sure that the TCP/IP system ID value
matches the TCP/IP stack ID (default value is zero; update it if necessary):
(6) Press the button Add for adding this z/VSE host definition to the Keyman/VSE
configuration and stay on the pop-up window, or press OK to add this definition
and leave the dialog box.
© Copyright IBM Corp. 2018, 2019 How to use Web Services with z/VSE
- 34 -
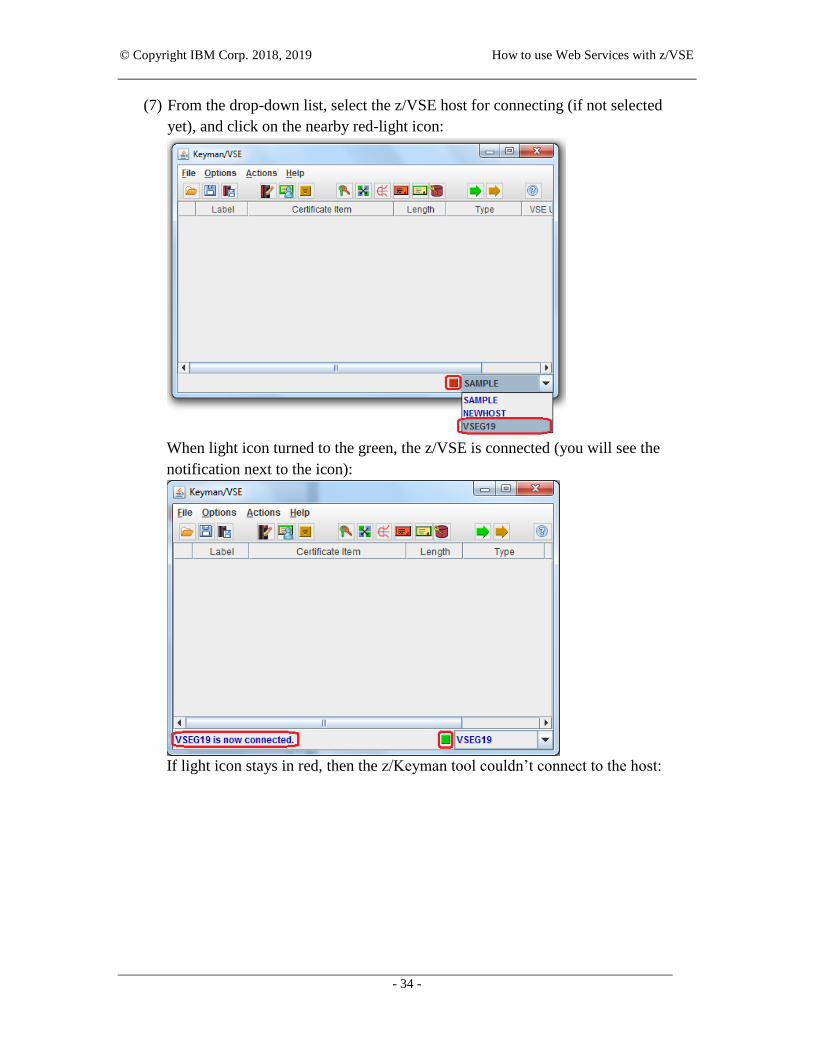
(7) From the drop-down list, select the z/VSE host for connecting (if not selected
yet), and click on the nearby red-light icon:
When light icon turned to the green, the z/VSE is connected (you will see the
notification next to the icon):
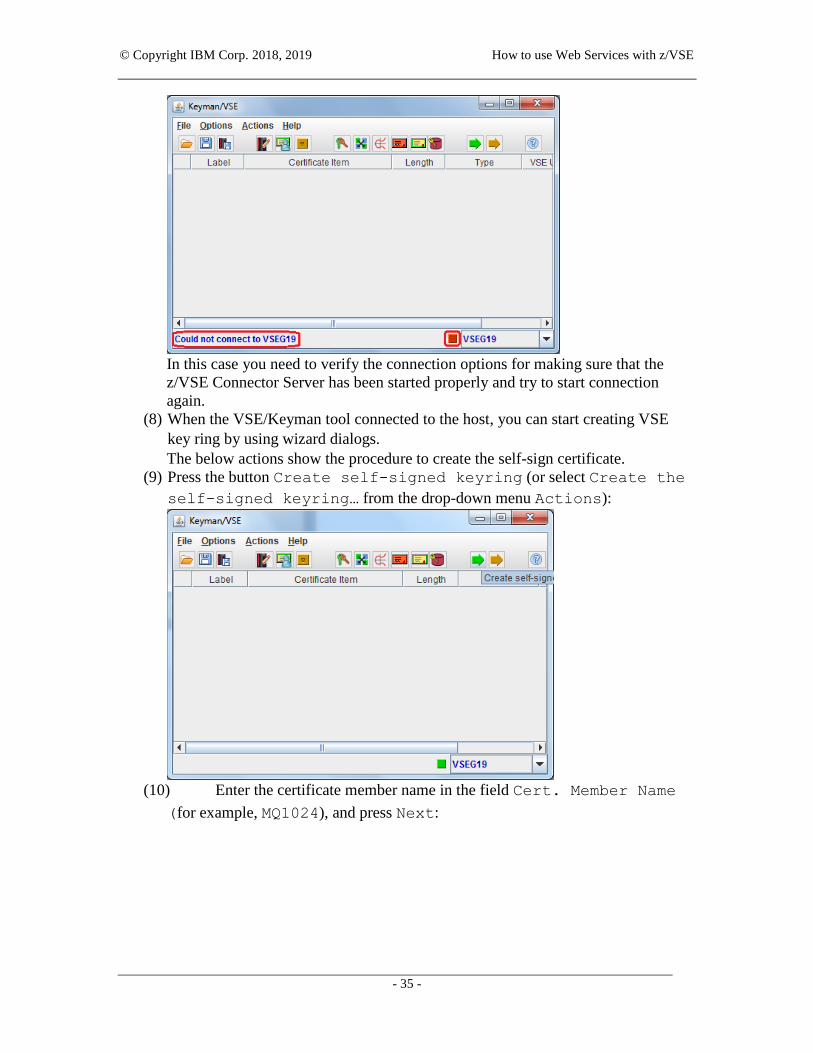
If light icon stays in red, then the z/Keyman tool couldn’t connect to the host:
© Copyright IBM Corp. 2018, 2019 How to use Web Services with z/VSE
- 35 -
In this case you need to verify the connection options for making sure that the
z/VSE Connector Server has been started properly and try to start connection
again.
(8) When the VSE/Keyman tool connected to the host, you can start creating VSE
key ring by using wizard dialogs.
The below actions show the procedure to create the self-sign certificate.
(9) Press the button Create self-signed keyring (or select Create the
self-signed keyring… from the drop-down menu Actions):
(10) Enter the certificate member name in the field Cert. Member Name
(for example, MQ1024), and press Next:
© Copyright IBM Corp. 2018, 2019 How to use Web Services with z/VSE
- 36 -
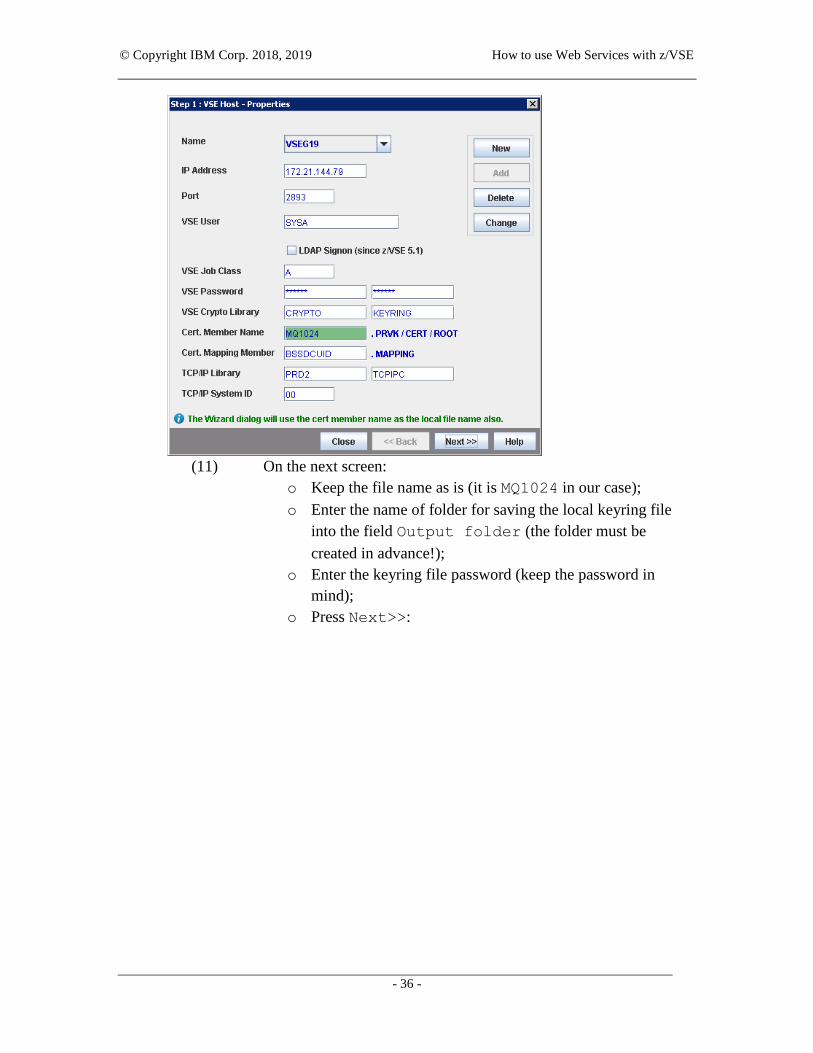
(11) On the next screen:
o Keep the file name as is (it is MQ1024 in our case);
o Enter the name of folder for saving the local keyring file
into the field Output folder (the folder must be
created in advance!);
o Enter the keyring file password (keep the password in
mind);
o Press Next>>:
© Copyright IBM Corp. 2018, 2019 How to use Web Services with z/VSE
- 37 -
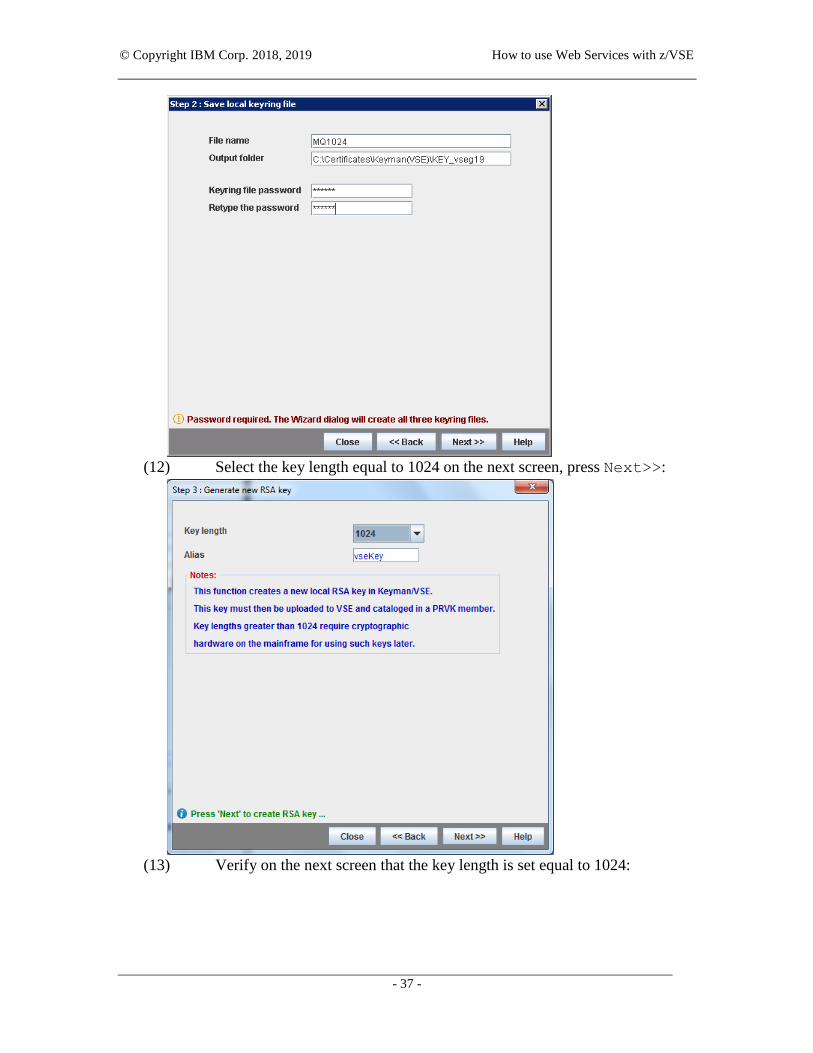
(12) Select the key length equal to 1024 on the next screen, press Next>>:
(13) Verify on the next screen that the key length is set equal to 1024:

© Copyright IBM Corp. 2018, 2019 How to use Web Services with z/VSE
- 38 -
(14) Press Next>> on the next screen:
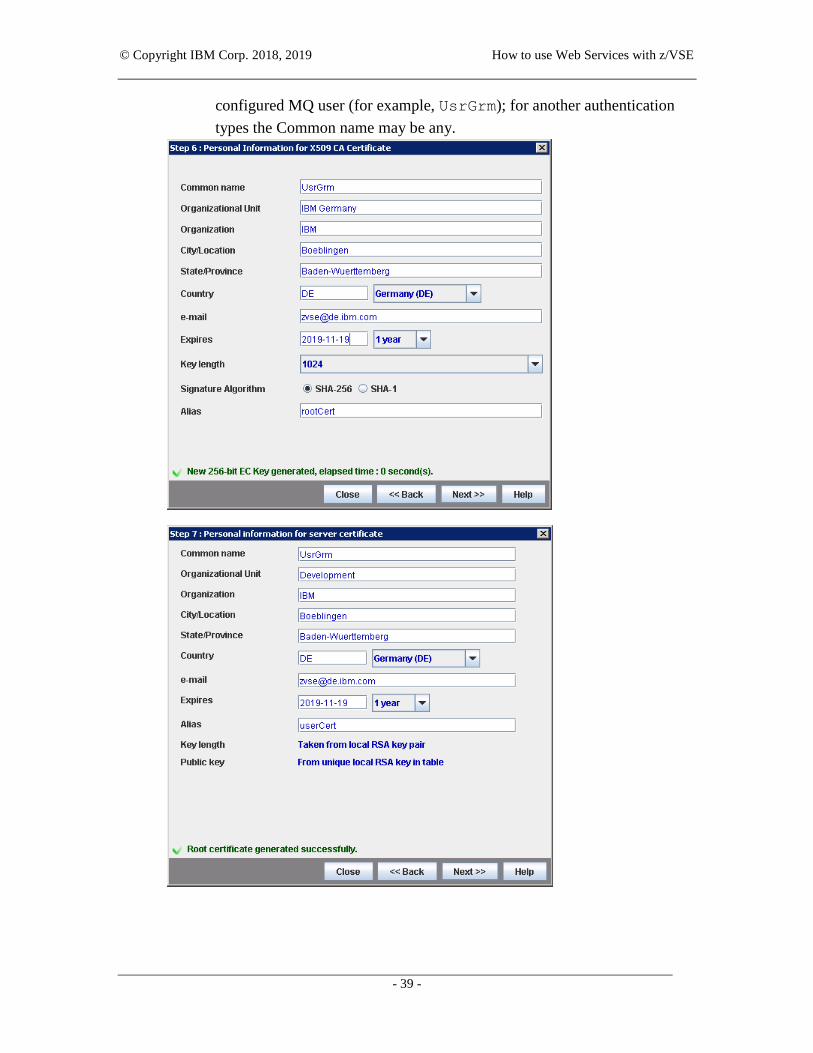
(15) On next three screens enter the MQ user name into the field Common
name and fill other fields (as shown on the below sample).
Important: when the certificate is generating for the Client authentication
in accessing MQ Server, the Common name must match the name of the
© Copyright IBM Corp. 2018, 2019 How to use Web Services with z/VSE
- 39 -
configured MQ user (for example, UsrGrm); for another authentication
types the Common name may be any.
© Copyright IBM Corp. 2018, 2019 How to use Web Services with z/VSE
- 40 -
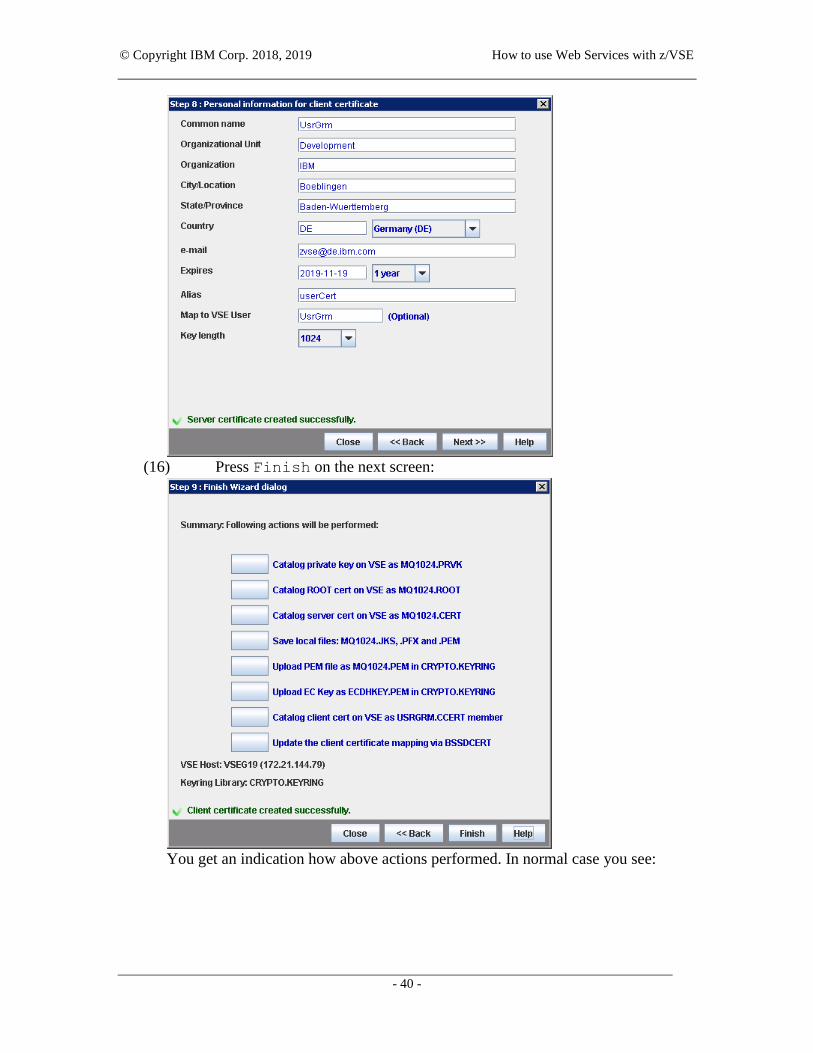
(16) Press Finish on the next screen:
You get an indication how above actions performed. In normal case you see:

© Copyright IBM Corp. 2018, 2019 How to use Web Services with z/VSE
- 41 -
(17) Verify that:
• The local folder C:\Certificates\Keyman(VSE)\KEY_vseg19
contains keyring files:
o MQ1024.JKS
o MQ1024.PEM
o MQ1024.PFX
(MQ1024 is certificate name entered on action (10));
• The z/VSE keyring library CRYPTO.KEYRING contains the following
members:
o USRGRM CCERT
o MQ1024 CERT
o BSSDCUID MAPPING
o ECDHKEY PEM
o MQ1024 PEM
o MQ1024 PRVK
o MQ1024 ROOT
8.4. Enabling SSL on z/VSE
To enable SSL for connection of z/VSE to IBM MQ Server, you should produce the
REST engine option phase IESRESTO:
(1) Copy the skeleton SKRESTOP from the ICCF library 59 into the private library
10;
© Copyright IBM Corp. 2018, 2019 How to use Web Services with z/VSE
- 42 -
(2) Set z/VSE certificate name within the part SSL specific settings of the
skeleton, for example:
*
* Keyname for SSL
*
SSLKEYNM DC CL8'MQ1024'
Note. If you are enabling SSL for accessing MQ Server with Client certificate
authentication, then:
o The specified certificate (it is MQ1024 in the above example) must be
generated for a user configured to MQ Server (see Generation of z/VSE
certificates);
o This setting guarantees that each HTTPS request to MQ Server will be
provided with the specified certificate.
(3) Keep default values for all other options of the phase.
(4) Submit the SKRESTOP skeleton to z/VSE.
(5) Verify that job return code is zero (okay).
(6) Activate the produced phase by setting its new copy (by means of the CICS
transaction CEMT SET PROG(IESRESTO) NEWCOPY).
9. Appendix D: Obtaining the programming samples
You can download the programming samples archive from the FTP server:
ftp://public.dhe.ibm.com/eserver/zseries/zos/vse/download/xmps/MQ_via_REST.zip.
The samples contain JCL and JECL statements to compile, link-edit and catalog the
programs in the PRD2.CONFIG sub-library. When a sample has been cataloged, you
need to define it to the CICS and set its new copy. Also, you should define a CICS
transaction for a sample running.


