
FREE GUIDE TO
Fixing Knitting Mistakes
for all Knitters

©F+W Media, Inc. | All rights reserved | F+W Media grants permission for any or all pages in this issue to be copied for personal use | www.knittingdaily.com 2
FREE GUIDE TO FIXING KNITTING MISTAKES
FOR ALL KNITTERS A Knitting Daily eBook edited by
Kathleen Cubley
E D I T O R I A L S T A F F
EDITOR, KNITTING DAILY Kathleen Cubley
C R E A T I V E S E R V I C E S
PRODUCTION DESIGNER Janice TapiaPHOTOGRAPHY As noted
ILLUSTRATION Gayle Ford
Projects and information are for inspiration and personal use only. Interweave Knits and Knitting Daily do not recommend, approve, or endorse any of the advertisers, products, services, or views advertised in this publication. Nor does Knits or Knitting Daily evaluate the advertisers’ claims in any way. You should, therefore, use your own judgment in evalu ating the advertisers, products, services, and views advertised in Knits or Knitting Daily.
FREE GUIDE TO Fixing Knitting Mistakes for all Knitters
I’VE OFTEN SEEN KNITTERS WHO MAKE A MISTAKE IN THEIR KNITTING and don’t know how to fix it. They inevitably end up putting their project aside and either starting another one, or taking a break from knitting altogether, until they can learn how to fix their mistakes.
I want you to be able to keep on knitting, so I decided to put together an eBook with some common fixes that every knitter should know how to do.
I hope you find this helpful!
Cheers,
Kathleen CubleyEditor, KnittingDaily.com
ContentsTools to Help you Fix Knitting Mistakes. . . . . . . . . . . . . . . . . . .PAGE 3Fixing Basic Mistakes . . . . . . . . . . . . . . . . . . . . . . . . . . . . . . . . . . . . .PAGE 4 Laddering Down to Fix a Stitch PAGE 4
Unknitting PAGE 6
Ripping Out Rows PAGE 8
Picking up a Dropped Edge Stitch PAGE 9
Fixing a Split Stitch PAGE 9
Preventing and Fixing Twisted Stitches PAGE 10
Fixing an Added Yarn Over PAGE 11
Accidentally Working the First Stitch as Two Stitches PAGE 11
Fixing Mistakes in Circular Knitting . . . . . . . . . . . . . . . . . . . . . .PAGE 12 Fixing a Twist After the Fact PAGE 12
Preventing Ladders when Using DPNs PAGE 12
Fixing Mistakes in Colorwork . . . . . . . . . . . . . . . . . . . . . . . . . . . .PAGE 13 Preventing Tangles in Yarn PAGE 13
Preventing Puckers in Stranded Knitting PAGE 13
Preventing Jogs in Striped Knitting PAGE 14
Fixing Mistakes with Duplicate Stitch PAGE 14
Fixing Other Mistakes . . . . . . . . . . . . . . . . . . . . . . . . . . . . . . . . . . .PAGE 15 Placing a Lifeline PAGE 15
Fixing a Mis-Crossed Cable PAGE 15
Swiss Darning PAGE 16

Free Guide To Fixing Knitting Mistakes for all Knitters
©F+W Media, Inc. | All rights reserved | F+W Media grants permission for any or all pages in this issue to be copied for personal use | www.knittingdaily.com 3
• Crochet hooks. Get hooks in various sizes, at least E, F, G, and H. You’ll use crochet hooks to pick up dropped stitches, ladder down to fix a problem stitch, and put stitches back on the needle if they fall off.
• Stitch markers. Have interlocking stitch markers handy. You can use them to hold dropped stitches, hold two or three stitches of a mis-crossed cable, and so forth.
• Tapestry needles. You’ll use this to thread stitches onto waste yarn, string lifelines, tug misshapen stitches into shape, and more.
• Waste yarn. I like mercerized cotton because it’s smooth, which makes it easy to put stitches on and take them off.
• Small Double Pointed Needles. You’ll use these to hold stitches and knit up from mistakes that you ladder down to.
Tools to Help You Fix Knitting Mistakes
You’ll need to have a few tools and notions on hand to fix your mistakes. These are things you probably have in your knitting bag
already, but review the list just to make sure.

Free Guide To Fixing Knitting Mistakes for all Knitters
©F+W Media, Inc. | All rights reserved | F+W Media grants permission for any or all pages in this issue to be copied for personal use | www.knittingdaily.com 4
between tip of the crochet hook and
the hanging stitch (Figure 6).
4Pull the ladder through the stitch,
back to front, and drop the rescued
stitch off the end of the hook. Continue
this maneuver until you’ve scooped
every ladder through the loop below
it, then transfer the stitch to the left
needle (Figure 7).
You’ve saved one knit stitch. When
you pick up a stitch and pull the ladder
through with the crochet hook, you
mimic vertically what your knitting
Vertical Fixes for Stitch Mistakes
While unknitting corrects mistakes
horizontally, sometimes it’s more effi-
cient to drop down vertically through
multiple rows to fix a single dropped
or twisted stitch, or even to change a
knit stitch into a purl and vice versa.
Dropped Stitch
1To begin, trace along the column
from the dropped stitch up to your
needle (Figure 5). Knit or unknit to the
stitch to the right of this stitch.
2To rescue a knit stitch, push the
crochet hook through the front of
the hanging stitch.
3Then pick up the first ladder,
the one farthest down from the
knitting needle. Position the ladder
Figure 7: One knit stitch picked up
Figure 5: Ladder and hanging stitch
Figure 6: Ladder and stitch on hook
Fixing Basic Mistakes
LADDERING DOWN TO FIX A STITCH

Free Guide To Fixing Knitting Mistakes for all Knitters
©F+W Media, Inc. | All rights reserved | F+W Media grants permission for any or all pages in this issue to be copied for personal use | www.knittingdaily.com 5
needles do horizontally when wrap-
ping a stitch.
To rescue a purl stitch, insert the
crochet hook from the back of the
work to the front to pick up the stitch
(Figure 8) and pull the ladder through
to the back (Figure 9).
Sometimes it’s easier to fix a purl
by turning the work to the knit side,
allowing you to pick it up from the
front as a knit stitch.
To save a dropped stitch when
you’re working in garter stitch, alternate
between rescuing knit stitch and a purl
stitch from a row to row as you hook
ladders up to the needle. Remember
Figure 8: Pick up purl stitch
Figure 9: One purl stitch picked up
that, although working garter stitch
back and forth means knitting each
stitch on each row, what you actually
produce is alternating rows of knit
stitches (the valleys) and rows of purl
stitches (the hills), since the reverse of
every knit stitch is a purl stitch.
LADDERING DOWN TO FIX A STITCH
Discover knitwear designs that will capture your imagination. You don’t have to be a designer or a knitting pro to make beautiful knitted garments and accessories, and you don’t have to hunt all over for inspiring designs.From cover to cover, Interweave Knits magazine gives you great projects, from the beginner to the advanced. Every issue is packed full of captivating smart designs, step-by-step instructions, easy-to-understand illustrations, plus well-written, lively articles sure to inspire.
interweaveknits.com
I N T E R W E A V E
KNITS

Free Guide To Fixing Knitting Mistakes for all Knitters
©F+W Media, Inc. | All rights reserved | F+W Media grants permission for any or all pages in this issue to be copied for personal use | www.knittingdaily.com 6
working yarn comes off the back of knit
stitches and off the front for purls.
1The trick to unknitting is to place
the left needle tip into the stitch
lying right underneath the live stitch
next to the tip of your right needle.
To do this, pull on the working yarn;
the opening created in your stitches
points to exactly where to place your
left needle.
2Place your left needle in the open-
ing from front to back (Figures 1
and 2). This captures the stitch from
the previous row without twisting it.
Figure 1: Unknit Step 2
Unknitting
Unknitting—sometimes called
“tinking” (“tink” is “knit” spelled back-
ward)—is like seeing a reverse, slow-
motion film of knitting errors as they
happen. We all tend to repeat the same
mistakes on any project. Unknitting
takes us back to the mistake. Undoing
the mistake shows what went wrong,
giving us the chance to learn.
Here’s How to UnknitUnknitting moves stitches in
reverse, undoing each new stitch from
the right needle and replacing the old
stitch on the left. If you’re at the end
of a row, leave the full right needle in
your right hand, exactly the opposite
of what you’d do normally. If you’re in
the middle of a row, find your working
yarn (see page 8) and hold the needle
it’s attached to in your right hand. The
UNKNITTING
Free Guide To Fixing Knitting Mistakes for all Knitters
©F+W Media, Inc. | All rights reserved | F+W Media grants permission for any or all pages in this issue to be copied for personal use | www.knittingdaily.com 7
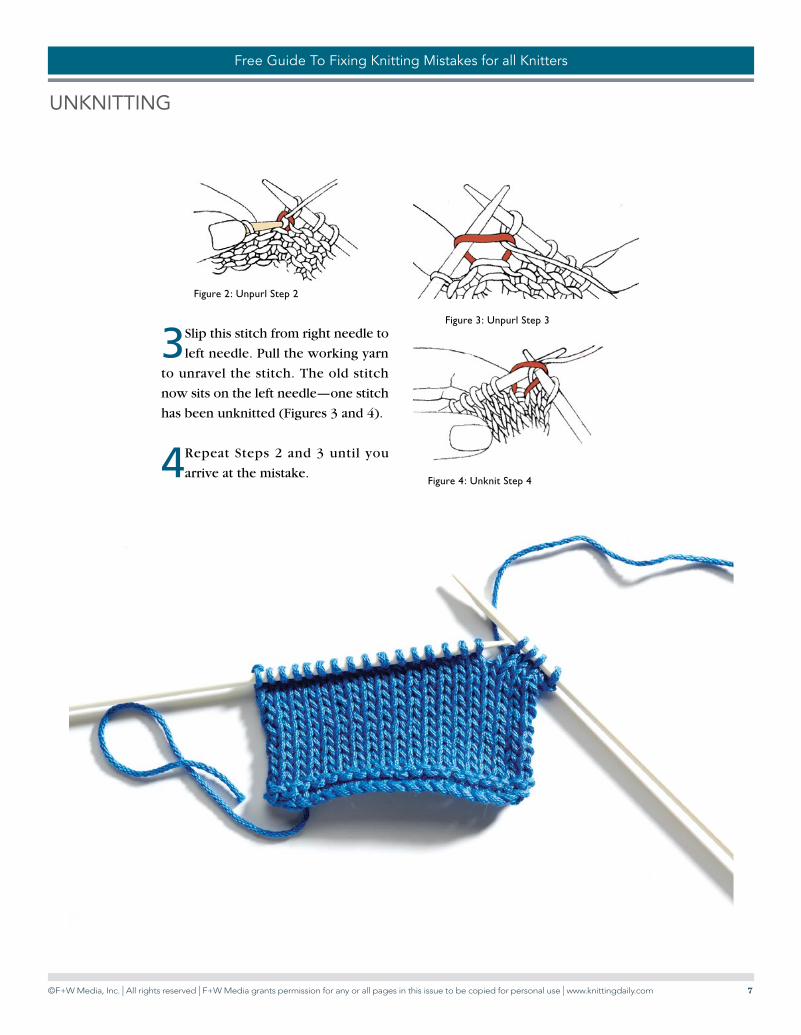
3Slip this stitch from right needle to
left needle. Pull the working yarn
to unravel the stitch. The old stitch
now sits on the left needle—one stitch
has been unknitted (Figures 3 and 4).
4Repeat Steps 2 and 3 until you
arrive at the mistake.
Figure 2: Unpurl Step 2
Figure 4: Unknit Step 4
Figure 3: Unpurl Step 3
UNKNITTING

Free Guide To Fixing Knitting Mistakes for all Knitters
©F+W Media, Inc. | All rights reserved | F+W Media grants permission for any or all pages in this issue to be copied for personal use | www.knittingdaily.com 8
Take the fear out of ripping your knitting without dropping a single stitch.
See a mistake a few rows back? Use a much smaller-gauge needle than the one you’re knitting with and pick up one loop (right leg) of every single stitch straight across the row (Figure 18). Pay attention to the base of the loops as you’re doing so to ensure you’re in the same row all the way across. Be careful not to pick up extra stitches by splitting stitches. Once all the stitches are picked up, pull out the knitting—all the loops are now on your needle and none have been dropped (Figure 19).
Figure 18
Figure 19
Ripping Out Rows
RIPPING OUT ROWS

Free Guide To Fixing Knitting Mistakes for all Knitters
©F+W Media, Inc. | All rights reserved | F+W Media grants permission for any or all pages in this issue to be copied for personal use | www.knittingdaily.com 9
131
Edge Stitch When an edge stitch drops and ravels,
there will be no visible “ladders,” but there will be
a large loop extending from the edge above a small
loop, below which the knitted edge is intact.
1. Insert the crochet hook into the small loop, from
front to back, then hold the large loop with some
tension as you pull the lower part of the large loop
through the loop on the hook to form a stitch.
2. With the hook in the stitch just made, pull the
upper part of the large loop through this loop to
form another stitch.
Repeat Steps 1 and 2 as many times as necessary.
3. With the hook in the last stitch made, pull the
working yarn through this loop.
4. Place the last stitch on the needle, making sure
that the leading leg is in front of the needle.
Dropped edge stitch
Step 1
Step 2 Step 3
PICKING UP A DROPPED EDGE STITCH
D I A G N O S I S : If you’re working
with yarn that’s not tightly plied, you
may have split the yarn in a single
stitch with the needle point when
you placed the needle for the first
step of the knit stitch. It’s easy to knit
the split yarn as two stitches (Figure
15), and the next thing you know, your
stitch count is off.
FIX: If the split stitch is on
the same row you’re working,
unknit back past that stitch, then
knit it again as a single stitch. If the
split stitch is farther down in the
finished fabric, use the vertical fix to
drop down and pick it up as a single
stitch.
Figure 15: Split stitch
FIXING A SPLIT STITCH
D I A G N O S I S : If you’re working
with yarn that’s not tightly plied, you
may have split the yarn in a single
stitch with the needle point when
you placed the needle for the first
step of the knit stitch. It’s easy to knit
the split yarn as two stitches (Figure
15), and the next thing you know, your
stitch count is off.
FIX: If the split stitch is on
the same row you’re working,
unknit back past that stitch, then
knit it again as a single stitch. If the
split stitch is farther down in the
finished fabric, use the vertical fix to
drop down and pick it up as a single
stitch.
Figure 15: Split stitch

Free Guide To Fixing Knitting Mistakes for all Knitters
©F+W Media, Inc. | All rights reserved | F+W Media grants permission for any or all pages in this issue to be copied for personal use | www.knittingdaily.com 10
PREVENTING AND FIXING TWISTED STITCHES
Prevent twisted stitches by paying attention to where and how you insert your needle into a stitch. Every stitch has a front leg and a back leg—the front leg being closest to you (Figure 9). A twisted stitch is caused by knitting through the back leg of a stitch. Sometimes a pattern will call for a twisted stitch but the directions will say so. To make a knit stitch, insert the right-hand needle through the front leg of the stitch on your left-hand needle (Figure 10).
To make sure you’re not twisting a stitch when purl-ing, insert your needle into the front leg from right to left of the leg, and purl the stitch (Figure 11).
Figure 9
Figure 10
Figure 11
Prevent Twisted Stitches
Twisted stitches often happen when stitches are placed back on the needle after you’ve ripped out a few rows, or, Heaven forbid, when the needle falls out of the knitting.
It’s best just to get those stitches back on the needle, whether they’re oriented correctly or not. Start knitting, and when you come to a twisted stitch, simply knit into the back loop and your stitch will be magically corrected! You can do the same thing on the purl side.
Fixing Twisted Stitches

Free Guide To Fixing Knitting Mistakes for all Knitters
©F+W Media, Inc. | All rights reserved | F+W Media grants permission for any or all pages in this issue to be copied for personal use | www.knittingdaily.com 11
ACCIDENTALLY WORKING THE FIRST STITCH AS TWO STITCHESThis common problem is a variation of the accidental yarnover: the working yarn is thrown over the needle at the end of the row, front to back, instead of under the needle. That pulls the first stitch up so that it looks like two stitches (Figure 1). To fix this mistake, simply unknit to the double stitch and reknit it as one stitch.
Figure 1
FIXING AN ADDED YARN OVER
When you’re beginning to knit, it’s a good idea to count your stitches at the end of each row. If you end a row with more stitches than you began with, you’ve probably added some extra stitches. Look for slanted stitches on your needle (See Figure 1). If you see slanted stitches on your needle (See Figure 1), you may have accidentally made yarnover. To fix it, unknit to the unwanted yarnover and pull it off the needle. Finish your row without the extra stitch!
Figure 1

Free Guide To Fixing Knitting Mistakes for all Knitters
©F+W Media, Inc. | All rights reserved | F+W Media grants permission for any or all pages in this issue to be copied for personal use | www.knittingdaily.com 12
Fixing Mistakes in Circular Knitting
FIXING A TWIST AFTER THE FACTWhat if, despite your valiant efforts, you discover that you have a twist in your cast-on? It’s easy to correct this at the end of your first round. Shift the twist around to the tip of the left needle (Figure 1). You’ll see that there is only one strand of yarn going from the right needle to the left (it’s the strand that made the initial join). Work the twist into that strand by putting the point of the left needle down and through the center of the circle that you’re knitting (Figure 2), passing the needle tip either in front of or behind the single strand so that the cast-on no longer twists around the needle (Figure 3). The single strand will be twisted a little more tightly or loosely, depending on which way your cast-on was twisted, but it won’t be noticeable. After you start working your second round there will be two strands in that space. If you tried to work the twist into that area, the two strands would twist around each other, which would be noticeable. So always double-check for a twist at the end of your first round—it’s your last chance to fix it easily!
PREVENTING LADDERS WHEN USING DPNsMany knitters are plagued by columns of loose stitches between the last stitch on one needle and the first stitch on the next. This typically happens when the first or last stitch on each needle is worked a little looser than the rest. To avoid this problem, maintain consistent tension at needle changes. If this doesn’t take care of the problem, shift the boundary between needles every round or two so that the needle boundaries do not fall between the same pair of stitches for more than a couple of rounds. Another solution is to eliminate the boundaries between needles—work the socks on a very short circular needle so that all the stitches are on the same needle. Most knitters find that working with two circular needles or one very long circular needle also eliminates the problem.
Figure 1 Figure 2 Figure 3

Free Guide To Fixing Knitting Mistakes for all Knitters
©F+W Media, Inc. | All rights reserved | F+W Media grants permission for any or all pages in this issue to be copied for personal use | www.knittingdaily.com 13
Fixing Mistakes in Colorwork
PREVENTING TANGLES IN YARN
Prevent tangles You can prevent the two balls of
yarn from tangling around each other as you knit by
always stranding the right-hand yarn over the left-
hand yarn and the left-hand yarn under the right-
hand yarn. Do not twist the strands on the back.
Prevent puckers In multicolor knitting, the stitches
will pucker if the strands are pulled too tightly across
the back. To prevent this, spread the stitches on the
right-hand needle to their approximate gauge each
time you change colors, rather than allowing them
to scrunch up near the tip of the needle.
PREVENTING PUCKERS IN STRANDED KNITTING

Free Guide To Fixing Knitting Mistakes for all Knitters
©F+W Media, Inc. | All rights reserved | F+W Media grants permission for any or all pages in this issue to be copied for personal use | www.knittingdaily.com 14
Jogless JoinSouth American Join—Designer Vicki Square shows how to join colors when striping while working in the round. If you want your stripes to join and not jog, here’s what to do. Work to last stitch of the round before the color change. Slip the last stitch from the round knitwise. Then pick up the first stitch of the round from the row below from the back (the one below the stitch that’s on the needle) (Figure 32) and place it on the left-hand needle, slip it knitwise. Then insert the left needle into the front of those two stitches and knit them together to make one stitch (Figure 33). This makes a continuous round without a color jog.
Figure 33Figure 32
PREVENTING JOGS IN STRIPED KNITTING
FIXING MISTAKES WITH DUPLICATE STITCH
Duplicate StitchWhen knitting stranded colorwork, it’s easy to knit a stitch in the wrong color, but not so easy to fix it when you notice it several rows later! Here’s a simple fix, an embroidery technique called duplicate stitch.
Step 1. Bring the threaded tapestry needle up from the back at the base of the V of the knit stitch to be covered, and then insert it under both loops of the stitch in the row above it, and pull the needle through.
Step 2. Insert the needle into the base of the V again, and pull the needle through to the back of the work.
Step 1 Step 2

Free Guide To Fixing Knitting Mistakes for all Knitters
©F+W Media, Inc. | All rights reserved | F+W Media grants permission for any or all pages in this issue to be copied for personal use | www.knittingdaily.com 15
Fixing Other Mistakes
PLACING A LIFELINEA lifeline is a strand of yarn that is inserted into the work so that if an error is encountered, it is easy to rip back to that point. Lifelines are often used in lace knitting. Leave lifelines in your work until the piece is complete.To insert a lifeline, thread a tapestry needle with smooth, tightly twisted yarn (such as crochet or perle cotton) and insert the tapestry needle purlwise through each stitch on the needle, catching each stitch but going around any markers. Do not remove the stitches from the needle.
When working on a circular needle, it is easier to insert the lifeline if the stitches are pushed onto the cable portion of the needle. If you must rip back, use a smaller needle to pick up the stitches from the lifeline thread, and then resume working with your regular needle.
FIXING A MIS-CROSSED CABLEIf you find a mistake in a cable crossing several rows (or even repeats) down and don’t want to live with it, don’t rip out all your work to that point! Instead, insert a small double-pointed needle or stitch holder into the stitches in the row just below the incorrect cable. Work up to the point of the offending crossing and then drop only the involved stitches from your needle. (If the error involves strands that have since separated, this point may be several stitches away from the original crossing point. The stitches in each strand stay with it throughout the knitting, meaning that you must drop from wherever the original strand’s stitches have ended up.) Ladder the dropped stitches down until you reach the held stitches. Rework the pattern correctly, using the ladders as the working yarn. Use a blunt-tipped needle to even the tension in any wonky stitches afterwards.
Free Guide To Fixing Knitting Mistakes for all Knitters
©F+W Media, Inc. | All rights reserved | F+W Media grants permission for any or all pages in this issue to be copied for personal use | www.knittingdaily.com 16
SWISS DARNING
Swiss Darning
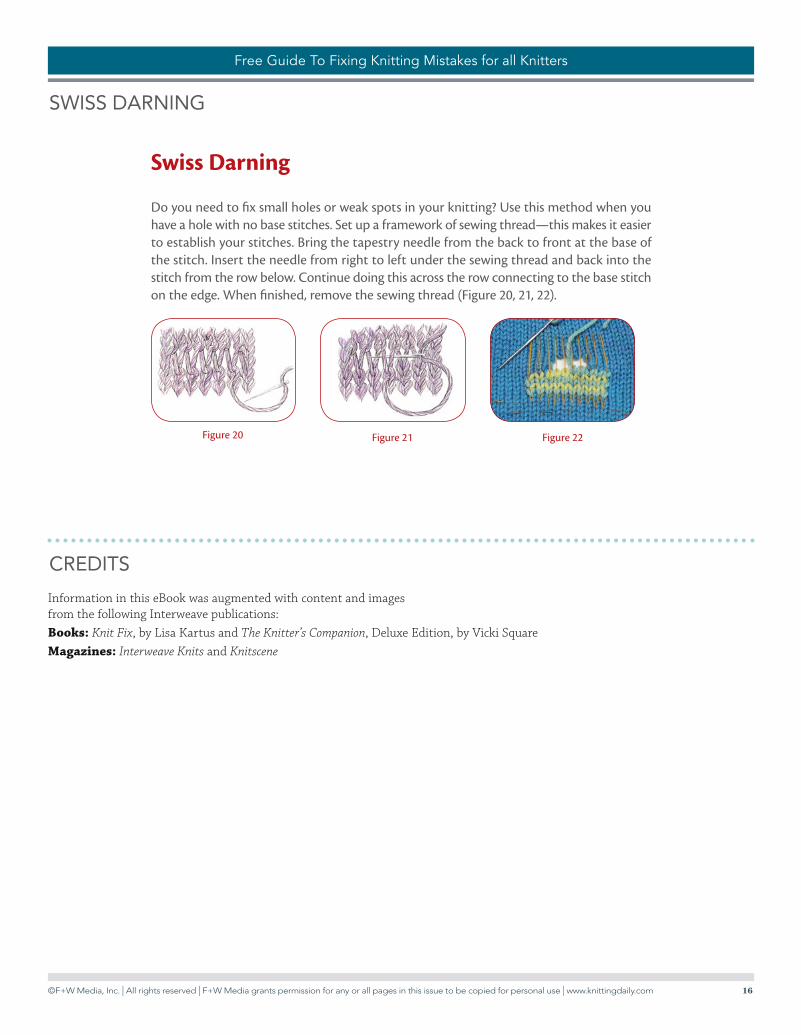
Do you need to fix small holes or weak spots in your knitting? Use this method when you have a hole with no base stitches. Set up a framework of sewing thread—this makes it easier to establish your stitches. Bring the tapestry needle from the back to front at the base of the stitch. Insert the needle from right to left under the sewing thread and back into the stitch from the row below. Continue doing this across the row connecting to the base stitch on the edge. When finished, remove the sewing thread (Figure 20, 21, 22).
Figure 22Figure 21Figure 20
CREDITS
Information in this eBook was augmented with content and images from the following Interweave publications:Books: Knit Fix, by Lisa Kartus and The Knitter’s Companion, Deluxe Edition, by Vicki SquareMagazines: Interweave Knits and Knitscene


