
EZ Pool Biller
Instruction manual
Unlike most software programs EZ Pool Biller is just that,
easy. This manual explains how to use all the powerful
features included in the program, but note that to get started
using the program it is not necessary to use all the features.
Ideally, you should read the “Getting Started” tutorial prior to
using this manual. This way you will already have an idea of
how to do some of the basics.
EZ Pool Biller is controlled by 9 buttons at the top of your
screen. As such, this manual details each button and what it
does.
Here are three important facts you need to successfully
operate EZ Pool Biller. 1. To save your work you must always either click
on a button that says “Update”, “Add” or
“Done”.
2. You can leave almost any screen by clicking on
a button entitled “Leave Customer Detail
Menu”, or simply select any button at the top of
the screen to choose where you wish to go,
however, if you haven’t first clicked update to
save your work your changes will be lost.
3. Do not use your “back” button on your browser
to navigate the program. Always move
through the screens by clicking on “buttons”
within the program.
Note: You may find these instructions more helpful if you
print them so that you can be looking at the program as you
read.
1
Table of Contents
Page
Chapter 1: The Admin Button …………………....………3
Chapter 2: The Customer Button………………..……….17
Chapter 3: The Billing Button………………..………….23
Chapter 4: The Statements Button…………………….....32
Chapter 5: The Phone Notes Button………………..……35
Chapter 6: The Reports Button………………..…………36
Chapter 7: The Vendor Button………………..………….40
Chapter 8: The Expenses Button………………..……….41
2

Chapter 1
The Admin Button
When you click on this button it provides you a variety of
administrative functions. We will now walk you through
each button that appears on the admin screen and what it does
for you.
Employee manager: This section allows you to add/
remove employees who you wish to provide access to your
customer information in EZ Pool Biller.
If you choose “Add employee” and click “ok” a new screen
appears. In the blank name fields type the name of the
employee you are adding. Select either “view/edit” or “view
only”. “View edit” will allow the employee to make changes
to anything such as address, billing items, etc. so be sure if
you grant this access that this is somebody you trust to work
and edit in the program. Having said that, you can always
see what changes an employee made (and correct them if you
wish). These features are discussed later in the billing tab
section and in the reports tab section. Additionally no
employees who have “view/edit” privileges have access to the
“Admin” tab. “view only” allows the employee to only see the
details, but they cannot change or add anything.
After you enter their name and select “view/edit” or “view
only”, click the add button. The screen refreshes. You will
now see your employee’s name on the top with a number to
the right of their name. This number is their account name.
Below it is their password. If you ever need to reset their
password, just check the “reset” box” and click update.
Going back to the admin page brings you back to where we
started, if you had selected “Update employee” instead of
“Add employee” you will see a drop down list box of all your
3
employees. You would then select the relevant employee,
click update, make the relevant changes, and then click update
again to save these changes.
Company Info: There are 2 options in this section.
“Update Company Info” - If you click this button you are
taken to a screen where you can change your company profile
information. If you need to reset your password, select the reset
button and click update and then be sure to write down
CAREFULLY your new password.
Your Company name, full address and phone numbers ONLY
will appear on your statements.
If you would like your customers to be able to login to
their account and pay their bills online you should set up
a PayPal account to be used for your customer bill pay.
You should call EZ Pool Biller tech support so we can
assist you with setting up the correct options in your
PayPal account.
The following fields are required for Customer Bill Pay:
PayPal Merchant ID: This field needs to be completed if you
wish to accept online payments. You can get this
information for this field by logging in to your PayPal account
PayPal EMAIL: This field also needs to be completed if you
wish to accept online payments. You must enter the email
address you provided PayPal in your profile with them.
The following fields are required to email customer
statements:
Business Email: Enter the email address you want to send
your statements from.
4

Email Logon ID: Enter your Email Login ID. (This is
frequently your email address but maybe different)
Email Logon Password: Enter the password to your email
account.
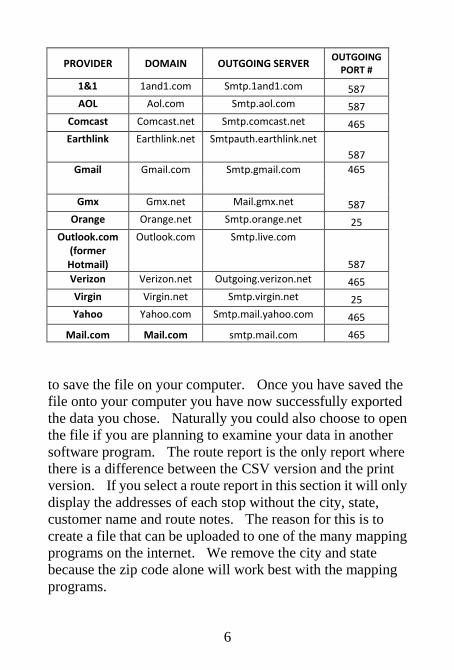
Outgoing Email Server: This information can be found from
your email provider or your website host. On the next page
we have provided a list of some common emails provider’s
server information. It is possible for this information can
change and we cannot guarantee the below list is are up to
date and correct.
Outgoing Email Port: This information can be found from
your email provider or your website host. On the next page
we have provided a list of some common emails provider’s
server information. It is possible for this information can
change and we cannot guarantee the below list is up to date
and correct.
SSL Port: In addition to finding out the correct Outgoing
Email Port you need know if the port is on a secure layer (SSL
Port). If the port is SSL select “Yes” if it is not select “No”.
“Export Company Reports” - If you click this button you
will be taken to a screen with a list of reports which can be
exported to a CSV file. Most of the options of what you can
export are obvious, but after you read the other sections of this
manual the options will be crystal clear. The export
company reports section functions very similar to the reports
section. Just select a report and click on “view report”.
After you do this the report will display on the screen.
However, unlike the reports section there will be an option at
the top of the report that says “Generate CSV File”. Clicking
on “Generate CSV File” and you are offered to save or open a
file. If you select “save” you will be asked where you want
5
PROVIDER DOMAIN OUTGOING SERVER OUTGOING
PORT #
1&1 1and1.com Smtp.1and1.com 587
AOL Aol.com Smtp.aol.com 587
Comcast Comcast.net Smtp.comcast.net 465
Earthlink Earthlink.net Smtpauth.earthlink.net
587
Gmail Gmail.com Smtp.gmail.com 465
Gmx Gmx.net Mail.gmx.net 587
Orange Orange.net Smtp.orange.net 25
Outlook.com (former Hotmail)
Outlook.com Smtp.live.com
587
Verizon Verizon.net Outgoing.verizon.net 465
Virgin Virgin.net Smtp.virgin.net 25
Yahoo Yahoo.com Smtp.mail.yahoo.com 465
Mail.com Mail.com smtp.mail.com 465
to save the file on your computer. Once you have saved the
file onto your computer you have now successfully exported
the data you chose. Naturally you could also choose to open
the file if you are planning to examine your data in another
software program. The route report is the only report where
there is a difference between the CSV version and the print
version. If you select a route report in this section it will only
display the addresses of each stop without the city, state,
customer name and route notes. The reason for this is to
create a file that can be uploaded to one of the many mapping
programs on the internet. We remove the city and state
because the zip code alone will work best with the mapping
programs.
6
Import / Export: This section has 4 options for you to
choose from regarding your customer data.
1. “Backup Customer Info” - To back-up
your customer info, simply click this button.
A pop up box will appear asking you where
to save your backup file on your computer.
Choose where you want to save your backup
file and then click the save button.
2. “Import Backup Customer Info” –
Click on this if you want to restore your
back-up copy. Be careful when using this
tool as it will permanently replace your
current online records. When you click this
button, a new screen will appear asking you
to browse and locate your backup customer
info file. Locate where you previously
saved your backup copy and then click
“Upload data file”.
3. “Import New Customer Info” - This is
very useful if you acquire a large number of
new service accounts. For example, if you
bought a new route of accounts and want to
import the new data (customers). The data
file you are importing should be in a CSV file
which is a standard generic format. Many
programs can export their data in CSV
format.
7
To start click the “Import New
Customer Info” button. A new screen
appears. On the left side you see a box with
the titles of many fields. These titles are a
list of all the fields EZ Pool Biller uses. The
idea here is that you need to match up the
data fields from your import file to the proper
fields in EZ Pool Biller so everything imports
to the correct fields. The first thing you will
need to do is look at the CSV file you are
importing. For each record in the CSV file
there will be data separated by commas. For
example, the first record in your CSV file
may look like this:
Jones, Martha, 754-555-5555, $70.00
Well obviously starting at the left we can see
the customer’s last name, first name, phone
number, and their monthly service price. So
now returning to our field titles on the left of
our screen we would we want to do the
following. First, highlight the field title
“Billing last name” and then “Selected data
fields” below the left column. You can now
see that the field title “Billing last name” is
now on the right column. Next you would
select the “Billing first name” field and then
move it to the right column.
Note: It is important that you move the fields
in the same order as the order of your data in
your import CSV data file, so data
8
ends up where you want it. A few things to
note are if your customer has a past balance
in your CSV file you will want to match this
up with the “balance” field. When the
balance imports it will be reflected in EZ
Pool Biller as “past balance” and will be
dated as the 1st of whatever month it is.
The “Monthly Service Price” is where you
want to import your recurring monthly
service fee. You will still need to manually
set recurring charges. This is explained later
in the “customer info” section.
After you select and arrange your fields in the
proper order you will want to browse to find
the file you are importing and then click on
“Upload data file”.
4. “Remove all Customer Info” – NEVER
USE this button unless you really want
to PERMANENTLY lose ALL your data.
This function is only used in very special
circumstances and you probably will never
have to use it.
Billing Credit Split: This feature can be used when posting
customer payments. You use the drop down list box below
the payment to split up what the customer paid. Note the
customer will not see this breakdown – it is strictly for your
use. By using this feature you can generate useful reports.
For example, if a customer has a $75 “service” charge and a
$90 “part” charge for a cartridge and the customer made a
$165 payment, you can split the payment to cover the
“service” charge and “part” charge.
9
On the drop down box you would select “service” and then
record $75.00, then below that you would select “part” and
record $90.00. Then for example, you can later generate
reports to learn things such as how much money did I receive
in parts this month and so on. This feature is further
explained in the section on the “Billing” tab. So if you want
to use this feature you should click the “on” button and it will
turn on. if you want to hide this feature then click “off”.
Help Feature: This feature is to help use and understand all
the features in EZ Pool Biller. When “help” is “on” you will
get information and instructions when you put your cursor
over most of the buttons throughout the program. You will
also notice many titles or description will be in a bold font
with a different shade of blue. This tells you that putting the
cursor over the words will give you additional information.
Please note different browsers may affect the time that the
help views after placing your cursor over it. Firefox will
display the help for much longer than other browsers do.
We recommend that you keep this on until you are familiar
with the program. You can turn it on and off whenever you
like.
Convenience Pay Fee: Use this feature if you decide to
allow online payments. Since you are providing a service to
the customer you may decide to charge a fee for providing this
online service. You have three options. Charge a flat fee,
charge a percentage fee (this is a % of the amount the
customer would be paying), or charge no fee.
If you want to select a flat fee this is how you enter it. Click
10
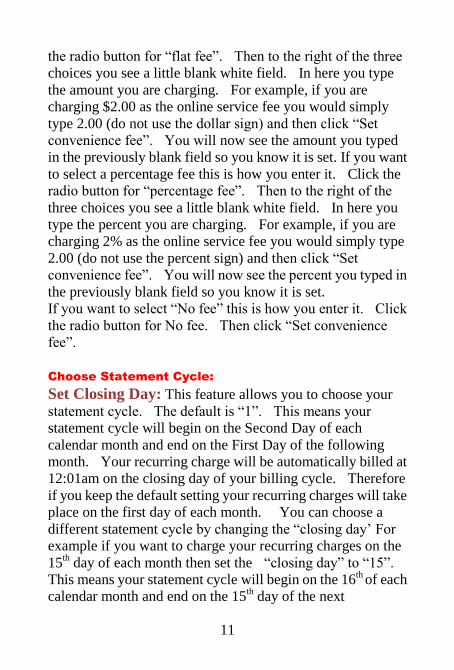
the radio button for “flat fee”. Then to the right of the three
choices you see a little blank white field. In here you type
the amount you are charging. For example, if you are
charging $2.00 as the online service fee you would simply
type 2.00 (do not use the dollar sign) and then click “Set
convenience fee”. You will now see the amount you typed
in the previously blank field so you know it is set. If you want
to select a percentage fee this is how you enter it. Click the
radio button for “percentage fee”. Then to the right of the
three choices you see a little blank white field. In here you
type the percent you are charging. For example, if you are
charging 2% as the online service fee you would simply type
2.00 (do not use the percent sign) and then click “Set
convenience fee”. You will now see the percent you typed in
the previously blank field so you know it is set.
If you want to select “No fee” this is how you enter it. Click
the radio button for No fee. Then click “Set convenience
fee”.
Choose Statement Cycle:
Set Closing Day: This feature allows you to choose your
statement cycle. The default is “1”. This means your
statement cycle will begin on the Second Day of each
calendar month and end on the First Day of the following
month. Your recurring charge will be automatically billed at
12:01am on the closing day of your billing cycle. Therefore
if you keep the default setting your recurring charges will take
place on the first day of each month. You can choose a
different statement cycle by changing the “closing day’ For
example if you want to charge your recurring charges on the
15th day of each month then set the “closing day” to “15”.
This means your statement cycle will begin on the 16th
of each
calendar month and end on the 15th day of the next
11
calendar month. With this setting, your customers who have
recurring charges set will bill at 12:01am on the 15th day of
each month. Note: If you choose a “closing day of 29th,30
th
or 31st day of the month the program will use the last day of
the month on any month that has less days than your chosen
closing day.
Closing Days in Advance: This feature should be used if
you would like to print and prepare your bills before the date
the recurring item takes place.
For example If the “Set Days in Advance” field is set
on the default of “0” and if your statement ends on the first
day of the month your recurring charges are charged on the
first day of the month. If you want to print your bills the
night before, on the last day of the prior month, to prepare and
mail them on the next day (which is the first) the charges will
obviously not be there because the EZ Pool Biller will bill the
charges at 12:01AM on the 1st day of the month. In this
example we could set “Set Days in Advance” to “1”. This
means EZ Pool Biller will charge the recurring charges 1 day
before the charges take place but with the date the charge is
supposed to take place. In other words in this example on the
last day of the prior month, at 12:01AM all your customers’
recurring charges would be billed but the date of the billing
item would be the 1st of the next month (this is when the
charge is supposed to occur). This would now allow you to
print your bills the day before billing day and have them ready
to mail on the billing day. You can set this feature for up to 3
days in advance.
12
Edit drop down lists: This feature has to do with
controlling the selections in your drop down menus in other
sections of EZ Pool Biller. Here we teach you how to add or
remove selections in your drop down list boxes. In other
sections of this manual we teach when or how you might want
to use these selections.
As you can see there are five columns:
Charge, Credit, Route, Account and Recurring.
You will learn about each of these drop downs in their
respective section. In this section we show you how to edit
the drop down list selections. Below each column title there
are some names of selections that come with default in the
program such as “fee” in the charge column. You can keep
or remove the defaults as you like. This is how you add a
selection if you like. Observe that directly above each “Add”
and “Remove” button that is at the bottom of each column
there is a blank white field where you can type. To add a
selection name you type the name in this blank field and then
click the “Add” button. To remove a selection, select the
selection you wish to remove and then click the “Remove”
button. All items in the drop down box must be 1 word. If
you wish to use 2 words use an underscore so there are no
blank spaces. Example “Route_3”. Additionally if you wish
to add multiple items at once you can do this by using a
comma after each item and then click “add”.
Note : If you are planning to print route reports you will
want to add some field names in this column. For example,
“Route_1”, “Route_ 2”, etc.
13
Manage Standard Charges
This section is for creating standard items that you bill for on
a regular basis. For example if you frequently install a C900
cartridge filter you could add the item by typing a description
and the price (use the dollar sign when typing the amount).
In this example you could add this standard item by typing
“Hayward C900 replacement filter cartridge $110.00” in the
field just above the “add” & “remove” buttons. Then click
the “add” button. The item will be added in a list box just
above. You can add as many items as you like. If you want
to remove a standard item, select the item, and then click the
“remove” button. The item will be deleted. We will
explain how to use this feature in the billing section.
Invoice Settings: This is where you can customize your
statements. There are 5 things you can do to your statements.
1. Show Customer Login Info on
Statement/Invoice. If you want all your
customers to be able to login to their account you
can turn this feature on. When this feature
is “on”each customers password and the web
address where to login will be displayed on their
print statements. If you email PDF statements
the information will be on the statement but will
not display on text email statements. You can
turn this feature on and off whenever you like.
14
2. Attach Statement to email as PDF. If you
are set up to send email statrments this feature
allows you to choose what type of email
statements you will send. The default setting is
“off” and emails will be sent as text. If you turn
this feature on a PDF statement will be attached
instead.
3. Upload company logo – This will appear in
the upper right hand corner of your
statements, invoices and estimates. If you
have a company logo that you would like to
appear on your statements you should click the
“Upload Company Logo” button. You are then
asked to browse on your computer to locate your
logo file. After you locate the image, select the
image and then click “Upload image”. Note that
the image must have a ratio of 1.5/1 width/height,
or the image will be distorted. For example,
your image could be 3 inches wide and two
inches tall. If you ever decide that you want to
replace your logo simply upload the new logo
and the old logo will be replaced by the new logo.
15
4. Upload company image/banner – If you
have a company image/banner that you would
like to appear on your statements you should
click the “Upload Company image/banner”
button. You are then asked to browse on your
computer to locate your banner file. After you
locate the image, select the image, then click
“Upload company image/banner”. Note that the
image must be 400 pixels wide by 50 pixels tall
or the image will be distorted.
5. Upload additional text line – If you would
like your statements to have a personalized
statement you can type it in the empty field in
this section and then click “Upload additional
text line”. Note that you cannot exceed 75
characters on this statement.
16
Chapter 2
The Customer Button
When you click on this button you are able to add new
customers as well as manage your customer’s information.
Active vs. Inactive selection: By default you will see a
list of your active customers. If you wish to see a list of your
inactive customers, select the “inactive” radio button and
click “OK”. You should move a customer to inactive status
when you no longer service that customer.
Add Customer: This button allows you to add a new
customer. When you click on this button a screen will
appear with all the fields you need to add a new customer.
Most of the default settings are what you will want. As you
look at this screen you’ll notice that there is a top section that
begins with “active customer” and ends with “Billing address
same as Service Location” When you are adding a new
customer you will want to answer/fill- out the questions/fields
listed below.
1. Active customer – the default is yes, unless you
have stopped service you will want to leave the
answer as yes.
2. Customer password – This is the customer’s
password you will need to provide the customer if
you choose to offer online bill pay. If you ever need
to reset their password you select the “reset” radio
button and click “update” at the bottom of the page.
3. Start date – Write the date when you began the
service (format doesn’t matter, you can skip this entry
if you like)
17

4. Route and Route Day – These two fields will
only be visible if in the admin section you added the
name of at least one route to the drop down list box.
See the section on “Edit drop down lists” in chapter 1
“The Admin Button” to learn how to do this. If you
have this option on you can then select which route
and day you want this customer on.
5. Statement – You have four choices here. You
can choose to only print the monthly statement or to
only email the monthly statement, to do both or to do
none. Select the option you prefer. Keep in mind
that you must have an email address entered into the
company info business email field in order to select
email or both. When email statements are sent they
will show your business email address as the sender.
Also remember that if you have some customers set
to only receive email statements that no statement
will be printed when printing paper statements.
6. Billing Address same as Service Location
– the default setting is for this to be on and the service
location information will be automatically entered
when you click the “add” button if this feature is on.
However, if the bill goes to an address different than
you service (e.g., when you have a renter), uncheck
the box and enter the appropriate information in the
billing and service location fields.
Now you will see the next two sections are called Billing
Information and the other Service Location Information.
18
Add your customer information to the relevant fields. Any
notes you enter into service notes field will print out on your
route reports. Any notes you enter into the office notes field
will NOT show up on route reports.
Any notes you add in phone notes will only display in the
“phone notes” tab. You can add unlimited customer notes by
repeating this process.
*Please Note: The field will clear after you update the
customer record.
Below you will see a series of fields for where you can list the
customer’s pool equipment. Fill in only the fields you want.
These fields are all optional.
Recurring Info - The last section is where you can schedule
the recurring charges. You can schedule up to 6 recurring
items. First we will show you how to set up to automatic
monthly pool service billing and then how you can set up any
other recurring charges.
First you choose the “charge type” from the drop down list
box. The “charge type” is for your use in reports and will not
show on your statements. We have added 5 types,
SERVICE, STABILIZER, REPAIRS, PARTS and FEE,
however this drop down list box can be modified in the
Admin section of EZ Pool Biller. For monthly pool service we
suggest you choose “service”.
Then choose the “recurring type” from the drop down box.
The “recurring item” is the description of the charge that will
show on your statements. We have added 2 types, POOL
SERVICE {MTH} and STABILIZER SEMI-ANNUAL
FEE, however this drop down box can be modified in the
Admin section of EZ Pool Biller. If you use {MTH} at the end
of your description, the program will insert the current month.
For example if your description is “pool service {MTH}”
then the program would insert “pool service April”. You
19
could also use “MONTHLY POOL SERVICE” and no
month would be in your description of the service.
Next fill in the amount you would like to bill monthly.
Now choose how frequently you want the charge to be billed.
If you put a “1”, your customer would be billed every 1
month. If you put a “3”, your customer would be billed
every 3 months. Next check the “ON” box. Lastly select
the month to start billing from the next drop down list box.
For example if the date is November, 10th 2013 and you
would like monthly service to begin in December choose
“DEC 2013”. If you have other recurring charges you can
add them as well. For example if you want to bill stabilizer
every 6 months you can choose the “charge type as
“stabilizer”, choose the “recurring type” as “STABILIZER
SEMI-ANNUAL FEE”, CHOOSE THE AMOUNT YOU
WISH TO CHARGE, Fill in 6 for the “recur” field, check the
on box and choose the month you wish the first charge to take
place. The program will automatically charge this on the
start month you selected and then every 6 months thereafter.
Remember you can add charge types in the “admin” section
and set up to 6 recurring items. You can set multiple items to
bill each month or on the same frequency but you must create
different “recurring items” so that each charge is unique.
Now you can click the “Add” button to save your work and
EZ Pool Biller will automatically take you to the billing
tab/section (we will explain the “add/view pictures” button at
the end of this section). We will explain what to enter in the
billing tab in the next chapter. However, a few quick
comments before we move on to chapter 3.
Return to the main section of customers by clicking the “leave
customer detail menu” at the top of the screen and then click
the “customer” button at the top of the page. We now see a list
of your customers. There are a few things you will want to
20

notice. Customers are automatically alphabetized. Next to
each customer’s name is an account number that EZ Pool
Biller assigned when you added a customer. This account
number serves as the user name if you decide to issue login
information to your customers. Also, at the top of the screen
there is a list of the alphabet. If you click on a letter you will
be taken to that part of the alphabet of your customer list.
You can also push the control button on your keyboard and
letter “f” simultaneously and then type a customer’s name
into the find box to help locate customers quickly. If you
ever want to update any information on a customer simply
click on the individual customer, edit any field or selection
you wish, and then click “update” at the bottom of the page.
If you wish to add pictures to a customer record you can click
the “add/view pictures” which is on the right side of the
“update” button at the bottom of the customer info page.
This feature allows you to upload pictures of the customer’s
pool or equipment. You will see a “choose file” button to
the right of an empty field. Click “browse” and find the
picture on your computer that you want to add (pictures have
to be under 200kb and in JPEG format). Then click “open”.
The file name will now appear in the box to the left of the
“browse” button. Now click “upload image”. You will
now see a thumbnail of the picture you uploaded. You can
add more pictures or view the picture by clicking on the file
name. If you are done with managing your pictures you can
choose the “customer” button at the top of the page. This
will bring you back to the main customer info page. You can
add as many pictures as you like to each customer however
there is a storage limit of 200 pictures total for all your
customers. If you want to remove a picture you can click the
“delete” button below the thumbnail. Please keep in mind
21
pictures cannot be recovered once deleted. You can return to
the picture section of a customer’s record by clicking
“add/view pictures” button at the bottom of the main
customer info page
View or Edit Customer Information: Anytime you want
to look at your customer’s information you should just click
the customer button at the top of the screen. You then see a
list of your customers. If you click on any customers name
you can then see all of their information. If you don’t want to
change anything just click the “Leave customer detail menu”
and you will be returned to your customer list. If you make
any changes you simply click the “Update” button at the
bottom of the page to save your work. You can then click the
“Leave customer detail menu” if you want to leave this
customer. It is important to note that if you are looking at a
customer’s information, you can click the billing, statement or
phone notes tabs and EZ Pool Biller will keep you working
with the same customer until you click the “Leave customer
detail menu”.
22
Chapter 3
The Billing Button
When you click on this button you are able to manage your
customer’s billing entries by posting payments and charging
for anything.
Anytime you want to look at your customers billing
information you should just click the billing button at the top
of the screen. You then see a list of your customers. If you
click on any customers name you can then see all of their
billing information. If you don’t want to change anything
just click the “Leave customer detail menu” and you will be
returned to your customer list. It is important to note that if
you are looking at a customer’s information, you can click the
billing, statement or phone notes tabs and EZ Pool Biller will
keep you working with the same customer until you click the
“Leave customer detail menu”.
We will now walk you through everything that appears on the
billing button’s screen and what it does for you. If you click
on one of your customers you will be taken to a screen where
you will see the customers billing history and be able to add
billing items. Adding items means you are going to charge
for something or post a payment.
As we mentioned in Chapter 2 you are automatically taken to
the billing button section after adding a new customer. Note
if you clicked on a customer’s name that had never had any
billing details added the screen would look exactly the same
as when you just entered a new customer’s information and
were automatically taken to the billing section.
So to begin you can click on a customer’s name you are taken
to a new screen with the customer’s entire billing history.
23
The first thing you see below the tabs is a button that says
“Leave Customer Detail Menu”. You would click this if you
did not wish to make any changes for this customer’s billing.
Now continuing down the screen you see the words “Billing
View Settings” and below that 4 selections. Items Entered By: Invoice items: Payments splits: Deleted Items: These 4 selections have to do with what displays. They are
completely optional. If you want to keep it easy you can just
ignore them. The “Set” button just activates which, if any of
these options you selected. For now uncheck all of the boxes
and click “Set” (A little further down we will explain what
each of these settings are for). This will affect how many
columns you see below. Now continuing down you see the
name of the customer you are working with. You also see a
number to the right of the customer name. This is the
customer’s account number which was created by EZ Pool
Biller. Below the name you see the 7 column titles (Date,
Description, Recurring, Credit, Charge, Balance, Remove).
These columns will begin to look like columns as you bill
your customers, post payments, etc. We will now show you
how to add (i.e., bill or post a payment) an item. An item can
be something you bill for each month or something you just
want to bill for one time. So now click the “Add item”
button and you are taken to a new screen.
Below the “Leave Customer Detail Menu” you can see we
have five choices.
“Charge” – This selection is for creating charges. You will
use this for all charges that you want to be reflected on the
customer’s statement.
24
“Create Invoice” – This selection is in case you want to
create an invoice (which has a unique invoice number).
“Create Estimate” – This selection allows you to create
and estimate (which has a unique estimate number).
“Credit” – This selection is for when you are posting a
payment or a credit.
“Note” – This selection is to add a note to the billing history
and will appear on the customer’s statement.
Select the “Charge” button and click “Ok”. You are now on
a new page and should see 5 columns starting with the date
column that we will fill out.
1. Date: EZ Pool Biller automatically puts
today’s date for you. You can change this if you like
to a future date but you cannot change it to a date in
the past.
2. Charge Type: If you click on the drop down
box below the words “charge Type” you see five
options. The options in this drop down box can be
modified in the Admin section of EZ Pool Biller.
Return to chapter 1 to read the instructions about how
to do this.
3. Manual Statement Description: You can
put whatever you like here to describe the charge (this
will appear on the customer’s statement). If the
customer has a past balance we suggest writing “Past
balance”. If it just a basic item just put a basic
description such as C1200 cartridge or Pump basket.
(If you are adding a standard item leave this empty)
25
4. Amount ($): This is the amount you are
billing. So type in the price of the item you are
billing for. (If you are adding a standard item leave
this empty)
5. Standard Statement Description: You can
use this to add a charge for a standard item (Adding
standard items is done in the admin section). To add
a standard item you will select it from the dropdown
box. Always leave the “manual statement
description” field and the amount field empty when
adding a standard item. The description and dollar
amount in the standard item you chose will be added.
Now click the “Done” button just below and you will be
returned to the ledger screen for this customer.
It is very important to note that if you enter any information
such as a payment or bill, that you will want to click the “OK”
or “Done” button so what you entered is saved. If you leave
this screen by clicking “Leave Customer Detail Menu” what
you entered will not be saved.
Now just repeat the process to bill any other items.
Any recurring charges you have set in the Customer Info
section will show in this section. (as discussed earlier in the
“customer button” they will automatically be inserted at 12:01
am of the last day of your statement cycle)
You will notice the “remove” column on the right has a trash
can. This is how you delete an item. Simply click the trash
can and this item will be deleted. The item can be still
recovered as described at the end of this section.
26
Now that we’ve learned to charge for items, let’s learn how to
post payments.
Once again, click on the billing button and you see your list of
customers. Click on a customer’s name and then select “Add
item”.
As you see we are back to our five choices. This time please
select “Credit” and click the “OK” button.
This time you’ll notice the screen is slightly different. There
are four columns.
1. Date: Like before it is automatically filled in
with today’s date. You can change this if you like to a future
date but you cannot change it to a date in the past.
2. Credit Type: Click on the drop down list box
and select how they are paying you. The options in
this drop down list box can be modified in the Admin
section of EZ Pool Biller. Return to chapter 1 to
read the instructions about how to do this. Please
note if you choose the wrong selection in the drop
down box it is no big deal. The only consequence is
that your reports will not be quite accurate.
Billing Credit Split: (Note: to see this feature you must
have the “Billing Credit Split” in the “Admin” section
set to “ON”). If you have this feature on you will notice that
in column 2 under the drop down box where you selected
“check” there is a another column title called “Credit
Towards”. This is an optional feature and you can ignore it if
you like. If you decide to use it, it is easy to do so. Its
purpose is to help generate better reports. Here is how you
use this feature. If for example your customer paid you with
one check $165.00 – say $75.00 for the monthly service and
$90.00 for a C1200 cartridge you would enter the information
27
as follows. In the “Credit towards” section you would first
select in row 1 the “service” choice in the drop down list box
and then to the right of this in the amount column you would
enter $75.00. Then you would go to the row below this and
choose “part” from the drop down box and then enter $90.00
in the amount column to the right. By doing this EZ Pool
Biller can separate what money was paid for and generates
more meaningful reports for you.
VERY IMPORTANT – You must enter the total amount
they paid at the end of row 1 as described in item 4 below.
3. Statement Description: You can type
whatever you like here, but we recommend you just type the
actual check number here. For credit cards we recommend
the last 4 digits. You should never enter complete credit card
numbers into the program.
4. Amount: Now type the amount of their check
in this field.
Keep in mind that EZ Pool Biller can let customers login and
post their own payments. That means you don’t ever have to
post payments!
Now click the “Done” button.
Now let’s learn how to create a specific invoice. Remember
invoices are when you just want to bill for a specific item once
and create a bill for a customer for just that one item. If you
create an invoice it will appear on the customer’s monthly
statement as well.
Once again, click on the billing button and you see your list of
customers. Click on a customer’s name and then select “Add
item”. As you see we are back to our five choices. This
time please select “create invoice” and click the “OK” button.
A new screen appears with 4 columns.
28

1. Date - Automatically filled out for you.
2. Charge type – You can choose a category to
help generate meaningful reports or you can simply
ignore this field. (The options in this drop down list
box can be modified in the Admin section. Return to
chapter 1 to read the instructions about how to do
this.)
3. Statement Description – Just type a brief
description of what the invoice is for.
4. Amount – Enter the amount to be billed.
Below the 4 columns you have a field where you
can enter a detailed description of the invoice.
Cick” done” when you are finished.
You will now be looking at the billing details page.
Your invoice will be added as a line item at the
bottom of the page. You can print or email the
invoice by clicking on the appropriate icon in the
Invoice / Estimate column. (Note: If you want to
email the invoice you must have the email statements
feature set up in the admin section and you must have
an email address in the customer’s profile).
Now let’s learn how to create an estimate. Once
again, click on the billing button and you see your list
of customers. Click on a customer’s name and then
select “Add item”. As you see we are back to our
29

Five choices. This time please select “Create
Estimate” and click the “OK” button.
At this point you will create the estimate exactly the
same as an invoice (explained on the previous page.).
After you create the estimate you can print or email it
using the appropriate icon on the billing details page.
Each estimate will have a unique estimate number
assigned to the estimate. You can also change your
estimate into an invoice at any time after you have
created this. This is done from the billing page. In
the invoice column next to the print and email icon
their will be a convert icon. This will only appear
next to estimates. Clicking the convert icon will
change the estimate into an invoice. This will
change the top of the estimate to say “Invoice”
instead of “Estimate”, it will also now charge the
customer the amount of the estimate and add it to the
customers balance. (when the estimate is created it
does not affect the customers charges/balance. Now
that it is an invoice it will), lastly the estimate number
will still be the same but is now the invoice number.
Understanding the View Settings Features
When in the billing section of the program whenever you
click on a customer’s name and are viewing the billing details
for that customer you have 4 options on what is to display on
the screen. These four options are: Items Entered By: Invoice items: Payments splits: Delete Items:
The “Set” button activates any of the options you selected.
Depending on which settings you choose you will discover
that you have differing number of columns that will appear
30
when looking at the items posted in your billing ledger.
When you have selected the “Items Entered By”
option a new column displays to the left of the date column.
In this column three pieces of information are provided. The
date and time of when the entry was created and who entered
the information.
When you have selected the “Invoice items” option
two new columns (Inv # and View Inv) are displayed to the
right of the balance column. The Inv # column allows you
to click on the invoice so you can see details about the
particular invoice. The view invoice column allows you to
view the actual invoice and print it.
When you have selected the “Payment splits” option
any payments that were posted and the “Credit towards”
feature was used are then shown on the screen reflecting how
the “split” of the payment was done.
The feature below is very important as it allows you
to recover deleted items. When you have selected the “Deleted items” option a new
column is displayed to the right of the balance column. With
this column showing you are able recover deleted items. If
you have ever deleted any item in the past it will display with
the row showing in a gray color. This helps you to remember
what you have done in the past. Note: If a row is displaying
in the gray color it is not being calculated in the balance of
what a customer owes. You can click “recover” and the item
will be restored.
31

Chapter 4
The Statements Button
Anytime you want to look at your customer’s statements you
should just click the statements button at the top of the screen.
You then see a list of your customers. If you click on any
customers name you can then see their statement. It is
important to note that if you are looking at a customer’s
information, you can click the billing, statement or phone
notes tabs and EZ Pool Biller will keep you working with the
same customer until you click the “Leave customer detail
menu”. You will notice that when you click on a customer’s
name that you see their current statement. On the bottom of
the statement there is a button that says “Detail on”. If you
click this button it will show the entire billing history for this
customer. While you are looking at the customer’s statement
you have the option to click on “Generate PDF statement”.
Click this is if you would like to print their statement at any
given time. You can also click on “Email Statement” which
will then send the customer their statement by email.
Obviously this will only work if the customer has an email
address AND you have a business email set in Company Info
under the Admin tab.
Explanation of Customer Online Login & Bill Pay
When a customer logs in using their account number and
password they will have 2 choices “Statements” or “Logout”.
They are unable to access any other area of the program.
When they choose the Statements tab they will view their
current statement. If the customer would like to see their
entire history they can click the “detail on” button at the
bottom of the page. If you have your PayPal account
32
information completed ,in the admin section just above the
statement they will see “Enter payment amount here” with a
blank field to the left of these words. This is for customers to
pay their bill online. If a customer would like to make an
online payment they enter the amount they want to pay in the
blank field. The customer then clicks on “Make payment”.
At this point they are routed through PayPal where they enter
their credit/debit card details. After payment is completed
the customer is given the option to return to their online
account with you where they can see the payment they just
made reflected in EZ Pool Biller. You will not ever need to
use this field If you do not offer bill pay you can still allow
customers to login and view their statements.
How to print your monthly statements in 1 Click
As you know by now when you click on the statement button
at the top of the screen a list of your customers will be
displayed. Above this there are two options: “Generate PDF
Statement” and “Email Statement”. If you click on
“Generate PDF statement” while you are looking at the
customer list a PDF file will be created and then open up
which will show all of your statements for those customers
who have “Print” or “Both” selected for statements on
the Customer Info page. You then just print this file and
all your bills are ready to mail. The statements are designed
to use a double window envelope so you do not need to
address anything. You can find a link to acquire double
window envelopes on our FAQ page or you can just purchase
the double window envelopes at an office supply store.
You can also click on “Email statement” in which case all
your customers who you set to receive email statements will
be sent their statement by email. After you click “Email
33
Statement” a small box will appear showing how many emails
were sent and they will be listed below. Next you will see a
summary of how many emails were not sent and a list of these
email addresses. Additionally EZ Pool Biller will also send
this email summary to your business email address.
Reasons that a statement was not sent include:
You do not have email set up properly in the admin section,
If this is the case no emails will be sent. Go to the admin
section and then the update company information button to fix
this.
The customer has no billing activity in their history. The
program will not send a statement if the customer has never
had any billing activity.
A connection/internet issues may have happened during the
sending of the mail. You can go to the individual customer
and re-send their statement.
Note: You must have a “Business Email” address for this
feature to work. You can add this in the “admin tab” and
choose “Update Company Information”.
If you want to check whether a customer is set to have their
bill printed, emailed, or both you can easily check by clicking
on the “Customer” button and then clicking on the
Customer’s name and look at their statement setting. You
can also print a billing method report from the reports section.
34
Chapter 5
The Phone Notes Button
Viewing phone Notes: Anytime you want to look at phone
notes you should just click the “phone notes” button at the top
of the screen. You then see a list of your customers. If you
click on any customers name you can then see any phone
notes entered for this customer. You will also see who entered
the phone note and the time and date it was entered. You can
then click the “Leave customer detail menu” if you want to
leave this customer. You can also click on the Customer,
Billing, or Statements tab.
35

Chapter 6
The Reports Button
When you click on the reports button you are taken to a screen
that says “Select a report”.
Income reports:
The default setting is to print an income report. You
can select either “Type” or “Category”. If you select
“Type” the report will be organized by how you
received payment. For example, you may have one
section listing all the checks you received and another
section listing all your online payments received. If
you choose “Category” the income report will break
down your income by category of income such as by
“Service” or “Parts”. If when you enter your
payments you do not do payment splits then an
income report by category will not provide accurate
information. You must enter “To” and “From” dates
for the period you would like to see the income you
received. After you enter the dates you then click on
the “View report’ button and your income report will
display showing all your income and the total
received.
Charge reports: If you select this option a report will be generated for
all the items you billed for over a given date period.
You must enter “To” and “From” dates for the period
you would like to see the charges you billed. After
you enter the dates you then click on the “View
report’ button and your charges report will display
showing all your charges and the total you billed out.
36
Expenses report:
Use this report to get a list and totals of all
your expenses. You may choose any date range.
Changes report:
This is a unique report for which can be used to
recover changed or deleted items if needed. You can
also review changes that employees have made.
Choose a date range and then “View Report”. A list
of all the edits/changes to any fields in the program or
changes to radio button selections (i.e. active or
inactive customer) will be listed. The 1st and 2
nd
column are the account number and customer name in
which information was changed. The 3rd
column has
a description of the type of change. The 4th column
tells you the field in which the change took place. The
5th column has what the new data or selection is. The
6th column has the old data (what was in the field or
selection before the change). Columns7,8 and 9 tell
you the employees account number, the name of the
employee, who made the change and the time and
date of the change. You can use this to fix mistakes,
find old phone numbers etc., or find anything that was
done by an employee. Remember you can choose
the date range so you can go back to look at
information/changes from any time period no matter
how long ago.
Billing method report: This report will list all your customer’s and how each
customer’s statements will be sent. This is based
on your selection in each customers profile for
37
“statement” which offers you Print, Email, Both
Or None.
Aging reports:
If you select this option and then click the “View
report’ button you will see a report display showing
which customers are current, who owes 30 days, 60
days, and 90 days. This report allows you to easily
see if any of your customers are getting behind in
their payments.
Recurring reports:
If you select this option you get a report that shows
you all the customers you have who are automatically
being billed in the current month and how much
revenue this totals up to.
Active customers report:
If you select this option you get a report which lists all
your customers and their information such as address,
phone number etc. This report can be very useful for
locating a customer when you only have partial
information. For example, if you get a phone
message and you only can understand the last four
digits of their phone number and nothing else try
running this report. Then press the control key on
your keyboard and the letter “f” simultaneously.
The find box will appear. Type in whatever
information you have and you can usually locate the
customer you are looking for.
38

Inactive customers report:
This works just like the active customers report
above, but it is for your inactive customers.
Route report:
When you select this report you are taken to a screen
where you have the option to select the day and route
you wish to display. Make your selections and then
click “Ok”. If you like you can choose the order for
the route by numbering each customer in the blank
field on the left side and then click “resequence
customer order”. The route will now be in the order
that you have chosen. You can then print this report
for yourself or to give your service technician.
Note: You have to enter routes when you set your
customers up or no report can be selected. Of
course, you can always go back and set-up the routes
at any time.
39
Chapter 7
The Vendor Button
Add Vendor: This button allows you to add a new vendor.
When you click on this button a screen will appear with all the
fields you need to add a new vendor.
At the top you will see the “active vendor” is checked. If the
vendor becomes inactive, simply uncheck this and click
“update” at the bottom of the page.
You may fill out any information that you like and click
“add”. The only field you must fill in is the vendor name.
Update Vendor: If you wish to update a vendor simply
make any changes you would like to make and click “update
“at the bottom of the page.
Navigation: You may return to the main section of vendors
by clicking the “Leave Vendor Detail Menu” at the top of the
screen. We now see a list of your vendors. You will notice
all the vendors are listed and automatically alphabetized.
40
Chapter 8
The Expenses Button
When you click on this button, you are able to enter and edit
all your expenses.
Below the Edit Expense Box you will see a box with the
following 8 columns. There are 5 INVOICES columns:
DATE, VENDOR, INV #, DESC, INV AMNT and there are
3 PAYMENT columns: DATE, ACCT, PAY DESC. Below
are 5 rows. This allows you to enter up to 5 expenses
quickly. To Add an Expense:
You will fill out all the fields in yellow.
DATE: The default is the current date. Edit it as needed.
VENDOR: Choose the vendor from the drop down list box.
(Add “Vendors” in the “ADMIN” section as described in
chapter 1.)
INV #: Enter the Invoice #
DESC: Enter a description of the expense, such as
“chemicals” or “office supplies”
INV AMNT: Enter the amount of the expense.
You can add the expense by clicking “UPDATE” or you can
continue to add up to 4 more expenses at once.
To complete the Expense, you will want to add the payment
information. You can do this at the time you enter the expense
or add it later.
To enter the payment information, fill out the fields in
Turquoise.
DATE: Enter the date the expense was paid for.
ACCT: Choose the account you paid it with. For
example “Checking Account” or “ABC Bank Credit Card”.
(Add “Accounts” in the “ADMIN” section as described in
41
chapter 1.)
PAY DESC: Enter information such as the check number or
any other description. Then click “UPDATE”.
After you have filled out both the expense and payment
information, the expense will no longer view on this page.
You view your expenses in reports.
If you enter only Expense information without the payment
information, it will display on this page until you have
completed entering the payment information.
Edit an Expense: Choose a date range in the “Edit
Expense” Box. Then click “Edit Expense”. Next, edit any
field that needs to be updated and click “UPDATE”. If you
want to remove the entire expense, check the “REMOVE
EXPENSE” check box to the right of the expense and click
“UPDATE”.
42


