Download - Dynamic Load Analysis


A Thesis
entitled
Dynamic Load Analysis and Optimization of Connecting Rod
by
Pravardhan S. Shenoy
Submitted as partial fulfillment of the requirements for
the Master of Science Degree in
Mechanical Engineering
Adviser: Dr. Ali Fatemi
Graduate School
The University of Toledo
May 2004

The University of Toledo
College of Engineering I HEREBY RECOMMEND THAT THE THESIS PREPARED UNDER MY
SUPERVISION BY Pravardhan S. Shenoy
ENTITLED Dynamic Load Analysis and Optimization of Connecting Rod
BE ACCEPTED IN PARTIAL FULFILLMENT OF THE REQUIREMENTS FOR THE
DEGREE OF Master of Science in Mechanical Engineering
------------------------------------------------------------------------- Thesis Adviser: Dr. Ali Fatemi Recommendation concurred by: ---------------------------------- Committee
Dr. Mehdi Pourazady on ----------------------------------
Dr. Hongyan Zhang Final Examination ----------------------------------------------------------------------------------------------
Dean, College of Engineering
ii
ABSTRACT
OF
Dynamic Load Analysis and Optimization of Connecting Rod
Pravardhan S. Shenoy
Submitted as partial fulfillment of the requirements for
the Master of Science Degree in
Mechanical Engineering
The University of Toledo
May 2004
The main objective of this study was to explore weight and cost reduction
opportunities for a production forged steel connecting rod. This has entailed performing a
detailed load analysis. Therefore, this study has dealt with two subjects, first, dynamic
load and quasi-dynamic stress analysis of the connecting rod, and second, optimization
for weight and cost.
In the first part of the study, the loads acting on the connecting rod as a function
of time were obtained. The relations for obtaining the loads and accelerations for the
connecting rod at a given constant speed of the crankshaft were also determined. Quasi-
dynamic finite element analysis was performed at several crank angles. The stress-time
history for a few locations was obtained. The difference between the static FEA, quasi-
dynamic FEA was studied. Based on the observations of the quasi-dynamic FEA, static

iii
FEA and the load analysis results, the load for the optimization study was selected. The
results were also used to determine the variation of R-ratio, degree of stress multiaxiality,
and the fatigue model to be used for analyzing the fatigue strength. The component was
optimized for weight and cost subject to fatigue life and space constraints and
manufacturability.
It is the conclusion of this study that the connecting rod can be designed and
optimized under a load range comprising tensile load corresponding to 360o crank angle
at the maximum engine speed as one extreme load, and compressive load corresponding
to the peak gas pressure as the other extreme load. Furthermore, the existing connecting
rod can be replaced with a new connecting rod made of C-70 steel that is 10% lighter and
25% less expensive due to the steel’s fracture crackability. The fracture crackability
feature, facilitates separation of cap from rod without additional machining of the mating
surfaces. Yet, the same performance can be expected in terms of component durability.

iv
ACKNOWLEDGEMENTS
I would like to thank my parents (Subhash and Somi), sister (Tejaswini), aunt
(Lata) and uncle (Ranganath) for prodding / supporting / inspiring me to pursue higher
education that eventually led me to fly across the globe for pursuing this Master’s
program.
I sincerely appreciate Dr. Ali Fatemi for accepting me as his student and for
giving me the opportunity to work on this program. I am also grateful for his support and
guidance that have helped me expand my horizons of thought and expression. Dr. Mehdi
Pourazady was very helpful in finding solutions to several problems I had during the
course of this program. I am grateful to him for his time and patience.
I would like to thank Randy Weiland and John Kessler for providing me with the
technical information required for this program. This research program was funded by
AISI (American Iron and Steel Institute) and David Anderson played a leading role in
facilitating this research.
Thanks to Tom Elmer (MAHLE Engine Components) and Berthold Repgen for
helping us find answers to manufacturing and cost issues of the connecting rod related to
this program.
I would also like to thank Dr. Masiulaniec Cyril, Russel Chernenkoff and my lab
mates Mehrdad Zoroufi, Fengjie Yin, Hui Zhang, Li Bing, and Atousa Plaseied for their
helpful discussion relating to various aspects of this work.

v
TABLE OF CONTENTS
ABSTRACT.................................................................................................................. ii
ACKNOWLEDGEMENTS........................................................................................ iv
TABLE OF CONTENTS............................................................................................. v
LIST OF TABLES .................................................................................................... viii
LIST OF FIGURES ..................................................................................................... x
NOMENCLATURE................................................................................................... xx
1. INTRODUCTION .............................................................................................. 1
1.1 BACKGROUND ................................................................................................ 1
1.2 LITERATURE REVIEW ................................................................................... 2
1.3 OBJECTIVES AND OUTLINE ......................................................................... 9
2. DYNAMIC LOAD ANALYSIS OF THE CONNECTING ROD ................ 16
2.1 ANALYTICAL VECTOR APPROACH.......................................................... 17
2.2 VERIFICATION OF ANALYTICAL APPROACH........................................ 19
2.3 DYNAMIC ANALYSIS FOR THE ACTUAL CONNECTING ROD............. 21
2.4 FEA WITH DYNAMIC LOADS...................................................................... 23
3. FE MODELING OF THE CONNECTING ROD......................................... 43
3.1 GEOMETRY OF THE CONNECTING ROD.................................................. 43
3.2 MESH GENERATION..................................................................................... 44
3.3 BOUNDARY CONDITIONS........................................................................... 46

vi
3.3.1 Loading ..................................................................................................... 46
3.3.2 Restraints .................................................................................................. 51
3.4 VALIDATION OF FEA MODELS .................................................................. 53
4. RESULTS OF FINITE ELEMENT STRESS ANALYSIS .......................... 69
4.1 QUASI-DYNAMIC STRESS ANALYSIS ...................................................... 70
4.2 STATIC AXIAL STRESS ANALYSIS............................................................ 78
4.3 COMPARISON OF STATIC AND QUASI-DYNAMIC FEA RESULTS ...... 80
4.4 OPTIMIZATION POTENTIAL ....................................................................... 84
5. OPTIMIZATION ........................................................................................... 103
5.1 OPTIMIZATION STATEMENT ................................................................... 104
5.2 CONSTRAINTS............................................................................................. 105
5.2.1 Applied loads .......................................................................................... 105
5.2.2 Allowable stress ...................................................................................... 106
5.2.3 Allowable stress amplitude ..................................................................... 109
5.2.4 Side constraints....................................................................................... 111
5.2.5 Buckling load .......................................................................................... 112
5.3 OPTIMIZATION UNDER DYNAMIC LOAD ............................................. 112
5.4 VALIDATION OF THE CRANK END DESIGN.......................................... 121
5.5 OBSERVATIONS FROM THE OPTIMIZATION EXERCISE .................... 125
5.6 MANUFACTURING ASPECTS.................................................................... 126
5.7 ECONOMIC COST ASPECTS ...................................................................... 128
6. SUMMARY AND CONCLUSIONS............................................................. 153

vii
REFERENCES......................................................................................................... 156
APPENDIX I ............................................................................................................ 159
APPENDIX II ........................................................................................................... 165

viii
LIST OF TABLES
Table 2.1 Details of 'slider-crank mechanism-1' used in ADAMS/View -11. 27
Table 2.2 Configuration of the engine to which the connecting rod
belongs. 27 Table 2.3 Inputs for FEA of connecting rod using dynamic analysis
results at crankshaft speed of 5700 rev/min. 28 Table 2.4 Inputs for FEA of connecting rod using dynamic analysis
results at crankshaft speed of 4000 rev/min. 29 Table 2.5 Inputs for FEA of connecting rod using dynamic analysis
results at crankshaft speed of 2000 rev/min. 30 Table 3.1 Properties of connecting rod material. 56 Table 3.2 von Mises stresses in the shank region under tensile and
compressive loads. 56 Table 3.3 Measured and predicted strains. Locations of strain gages are
shown in Figure 3.16. Measured strain is the average of four gages. 57
Table 4.1 Comparison of static axial stresses under the four FEA model
boundary conditions. 86 Table 4.2 von Mises stresses at nodes shown in Figure 4.21. 87 Table 5.1 Summary of mechanical properties of existing forged steel
and C-70 steel. 131 Table 5.2 Input for quasi-dynamic FEA of the optimized connecting
rod, using load analysis results at crankshaft speed of 5700 rev/min. 132
Table 5.3 Minimum factor of safety for regions I through V, shown in
Figure 5.9. 133 Table 5.4 Comparison of the optimized connecting rod based on
dynamic load analysis with the existing connecting rod. 134

ix
Table 5.5 Cost split up of forged steel and forged powder metal
connecting rods (Clark et al., 1989). 135

x
LIST OF FIGURES Figure 1.1 Market shares of powder forged, steel forged, and cast
connecting rods in European and North American markets, based on an unpublished market analysis for the year 2000 (Ludenbach, 2002). 13
Figure 1.2 Initial and final designs of a connecting rod wrist pin end
(Sarihan and Song, 1990). 13 Figure 1.3 The optimum design obtained by Yoo et al. (1984). 14 Figure 1.4 Design of a PM connecting rod (Sonsino and Esper, 1994). 14 Figure 1.5 Stresses at the bottom of the connecting rod column
(Ishida et al., 1995). 15 Figure 1.6 Stresses at the center of the connecting rod column (Ishida
et al., 1995). 15 Figure 2.1 Vector representation of slider-crank mechanism. 31 Figure 2.2 Free body diagram and vector representation. (a) Free
body diagram of connecting rod. (b) Free body diagram of piston. 31
Figure 2.3 Typical input required for performing load analysis on the
connecting rod and the expected output. 32 Figure 2.4 Slider-crank mechanism -1. 32 Figure 2.5 Angular velocity of link AB for 'slider-crank mechanism-
1'- A comparison of the results obtained by DAP and ADAMS/View-11 at 3000 rev/min crank speed (clockwise). 33
Figure 2.6 Angular acceleration of link AB for 'slider-crank
mechanism-1'- A comparison of the results obtained by DAP and ADAMS/View-11 at 3000 rev/min crank speed (clockwise). 33
Figure 2.7 Forces at the joint A, for 'slider-crank mechanism-1'- A
comparison of the results obtained by DAP and ADAMS/View-11 at 3000 rev/min crank speed. Fx 34

xi
corresponds to FAX and Fy corresponds to FAY. Figure 2.8 Forces at the joint B for 'slider-crank mechanism-1'- A
comparison of the results obtained by DAP and ADAMS/View-11 at 3000 rev/min crank speed. Fx corresponds to FBX and Fy corresponds to FBY. 34
Figure 2.9 Variation of crank angle with time at 3000 rev/min crank
speed in clockwise direction. 35 Figure 2.10 Pressure crank angle diagram used to calculate the forces
at the connecting rod ends. 35 Figure 2.11 Variation of angular velocity of the connecting rod over
one complete engine cycle at crankshaft speed of 5700 rev/min. 36
Figure 2.12 Variation of angular acceleration of the connecting rod
over one complete engine cycle at crankshaft speed of 5700 rev/min. 36
Figure 2.13 Variations of the components of the force over one
complete cycle at the crank end of the connecting rod at crankshaft speed of 5700 rev/min. Fx corresponds to FAX and Fy corresponds to FAY. 37
Figure 2.14 Variations of the components of the force over one
complete cycle at the piston pin end of the connecting rod at crankshaft speed of 5700 rev/min. Fx corresponds to FBX and Fy corresponds to FBY. 37
Figure 2.15 Axial, normal, and the resultant force at the crank end at
crank speed of 5700 rev/min. 38 Figure 2.16 Axial, normal, and the resultant force at the piston-pin end
at crank speed of 5700 rev/min. 38 Figure 2.17 Variation of the axial, normal (normal to connecting rod
axis), and the resultant force at the crank end at crank speed of 4000 rev/min. 39
Figure 2.18 Variation of the axial, normal (normal to connecting rod
axis), and the resultant force at the crank end at crank speed of 2000 rev/min. 39

xii
Figure 2.19 Effect of speed on P-V diagram at constant delivery ratio.
Curve 5 is for 900 rev/min, curve 6 for 1200 rev/min, curve 7 for 1500 rev/min, and curve 8 for 1800 rev/min (Ferguson, 1986). 40
Figure 2.20 Loads normal to the connecting rod axis. Note that
variations from 0o to 360o repeat from 360o to 720o. 40 Figure 2.21 Variation of the axial load at the crank end and the load
normal to connecting rod length at the C.G. at 5700 rev/min crankshaft speed. The 360o to 720o variation has been superimposed on 0o to 360o variation. Plot has been divided into three regions: i, ii and iii. 41
Figure 2.22 Variation of load at the crank end over the portion of the
cycle that will need FEA at 5700 rev/min crankshaft speed. Markers on the curve represent crank angles at which FEA has been performed. 42
Figure 3.1 Geometry of the connecting rod generated by the
digitizing process. 58 Figure 3.2 Solid model of the connecting rod used for FEA. (a)
Isometric view. (b) View showing the features at the crank end. 59
Figure 3.3 Locations on the connecting rod used for checking
convergence. (a) Locations on the connecting rod. (b) Location at the oil hole. 60
Figure 3.4 von Mises stress at locations 1 through 10 in Figure 3.3.
Note that convergence is achieved at most locations with element length of 1.5 mm. Further local refinement with element length of 1 mm produced convergence at location 9. 61
Figure 3.5 Locations on the connecting rod where the stress variation
has been traced over one complete cycle of the engine. (a) Locations shown on the 3D connecting rod. (b) Other symmetric locations. 62
Figure 3.6 Stress along the connecting rod axis in the shank of the
connecting rod under dynamic loads as a function of mesh 63

xiii
size. Locations 12 and 13 are shown in Figure 3.5. Figure 3.7 Tensile loading of the connecting rod (Webster et al.
1983). 63 Figure 3.8 Polar co-ordinate system R, Θ, Z used. ‘t’ (not shown) is
the thickness of the contact surface normal to the plane of paper. 64
Figure 3.9 Compressive loading of the connecting rod (Webster et al.
1983). 64 Figure 3.10 Pressure crank angle diagram also known as the indicator
diagram (supplied by OEM). 65 Figure 3.11 Illustration of the way in which boundary conditions were
applied when solving the quasi-dynamic FEA model. 65 Figure 3.12 FEA model of the connecting rod with axial tensile load at
the crank end with cosine distribution over 180o and piston pin end restrained over 180o. 66
Figure 3.13 FEA model of the connecting rod with axial compressive
load at the crank end uniformly distributed over 120o (as shown in Figure 3.9) and piston pin end restrained over 120o. 66
Figure 3.14 Solid model of the test assembly and the finite element
model used for the assembly. The FEM includes the axial compressive load applied to the pin at the piston pin end, the restraints applied to the crank pin, the interference simulated by applying pressure, and contact elements between the pins and the connecting rod. 67
Figure 3.15 Location of nodes used for validation of the FEA model. 67 Figure 3.16 Location of two strain gages attached to the connecting
rod. Two other gages are on the opposite side in identical positions. 68
Figure 4.1 Stress variation over the engine cycle at 5700 rev/min at
locations 1 and 2. XX is the σxx component of stress. The stress shown for the static tensile load of 17.7 kN, is the von Mises stress. 88

xiv
Figure 4.2 Stress variation over the engine cycle at 5700 rev/min at
locations 3 and 4. XX is the σxx component of stress, YY is the σyy component of stress and so on. The stress shown for the static tensile load of 9.4 kN is the von Mises stress. 88
Figure 4.3 Stress variation over the engine cycle at 5700 rev/min at
locations 5 and 6. XX is the σxx component of stress, YY is the σyy component and so on. The stress shown for the static tensile load of 17.7 kN is the von Mises stress. 89
Figure 4.4 Stress variation over the engine cycle at 5700 rev/min at
locations 7 and 8. YY is the σyy component, XY is the σxy component of stress, and so on. The stress shown for the static tensile load of 17.7 kN is the von Mises stress. 89
Figure 4.5 Stress variation over the engine cycle at 5700 rev/min at
location 9. YY is the σyy component. The stress shown for the static tensile load of 17.7 kN is the von Mises stress. 90
Figure 4.6 Stress variation over the engine cycle at 5700 rev/min at
locations 10 and 11. YY is the σyy component, ZZ is the σzz component of stress and so on. The stress shown for the static tensile load of 9.4 kN is the von Mises stress. 90
Figure 4.7 Stress variation over the engine cycle at 5700 rev/min at
locations 12 and 13. XX is the σxx component of stress. The stress shown under static tensile load of 9.4 kN is the von Mises stress component. 91
Figure 4.8 Stress variation over the engine cycle at 5700 rev/min at
locations 14 and 15. XX is the σxx component of stress, YY is the σyy component and so on. The stress shown under the static tensile load of 17.7 kN is the von Mises stress. 91
Figure 4.9 Mean stress, stress amplitude, minimum stress and
maximum stress at location 12 (w.r.t. Figure 3.5) on the connecting rod as a function of engine speed. 92
Figure 4.10 Mean stress, stress amplitude, and R ratio of the σxx
component, and the equivalent mean stress and equivalent stress amplitude at R = -1 at engine speed of 5700 rev/min at locations 1 through 15. 92

xv
Figure 4.11 Mean stress, stress amplitude and the R ratio of the σyy
component at engine speed of 5700 rev/min at locations 1 through 15. 93
Figure 4.12 Mean stress, stress amplitude, and the R ratio of the σzz
component at engine speed of 5700 rev/min at locations 1 through 15. 93
Figure 4.13 Mean stress, stress amplitude, and the R ratio of the σxy
component at engine speed of 5700 rev/min at locations 1 through 15. 94
Figure 4.14 Mean stress, stress amplitude, and the R ratio of the σxz
component at engine speed of 5700 rev/min at locations 1 through 15. 94
Figure 4.15 Mean stress, stress amplitude, and the R ratio of the σyz
component at engine speed of 5700 rev/min at locations 1 through 15. 95
Figure 4.16 von Mises stress distribution with static tensile load of
26.7 kN at piston pin end. The crank end was restrained. 95 Figure 4.17 von Mises stress distribution with static tensile load of
26.7 kN at the crank end. The pin end was restrained. 96 Figure 4.18 von Mises stress distribution with static compressive load
of 26.7 kN at piston pin end. The crank end was restrained. 96 Figure 4.19 von Mises stress distribution with static compressive load
of 26.7 kN at the crank end. The piston pin end was restrained. 97
Figure 4.20 von Mises stress at a few discrete locations on the mid
plane labeled on the connecting rod, along the length, for tensile (17.7 kN) and compressive loads (21.8 kN). 97
Figure 4.21 Location of the nodes in the web region near the crank end
and the pin end transitions, the stresses at which have been tabulated in Table 4.2. 98
Figure 4.22 Schematic representation of the four loading cases
considered for analysis. 99

xvi
Figure 4.23 Stress ratios at different locations (shown in Figure 3.5)
and for different FEA models. Case-1 is the test assembly FEA, Case-2 is the connecting rod-only FEA (with load range comprising of static tensile and compressive loads for both Case –1 and Case-2), Case-3 is the FEA with overall operating range under service condition, Case-4 is the FEA with operating range at 5700 rev/min under service operating condition. All cases are shown in Figure 4.22. 100
Figure 4.24 Figure shows a comparison of the equivalent stress
amplitude at R = -1 (MPa) under three cases. Case-2 is the connecting rod-only FEA (with range comprising of static tensile and compressive loads), Case-3 is the FEA with overall operating range under service condition, Case-4 is the FEA with operating range at 5700 rev/min under service operating condition. 100
Figure 4.25 Maximum tensile von Mises stress at different locations on
the connecting rod under the two cases. Case-2 is the connecting rod-only FEA (with range comprising of static tensile and compressive loads), and Case-4 is the FEA with operating range at 5700 rev/min under service operating condition. 101
Figure 4.26 The factor of safety, ratio of yield strength to the
maximum stress, for locations shown in Figure 3.5 and the maximum von Mises stress in the whole operating range. 101
Figure 4.27 The factor of safety, ratio of the endurance limit to the
equivalent stress amplitude at R = -1, at the locations shown in Figure 3.5 and the equivalent stress amplitude at R = -1 considering the whole operating range. 102
Figure 5.1 Failure Index (FI), defined as the ratio of von Mises stress
to the yield strength of 700 MPa, under the dynamic tensile load at 360o crank angle for the existing connecting rod and material. Maximum FI is 0.696. 136
Figure 5.2 Failure Index (FI), defined as the ratio of von Mises stress
to the yield strength of 700 MPa, under peak static compressive load for the existing connecting rod and material. Maximum FI is 0.395. 136

xvii
Figure 5.3 Failure Index (FI), defined as the ratio of equivalent stress amplitude at R = -1 to the endurance limit of 423 MPa, for the existing connecting rod and material. Maximum FI is 0.869. 137
Figure 5.4 Drawing of the connecting rod showing few of the
dimensions that are design variables and dimensions that cannot be changed. Dimensions that cannot be changed are boxed. 138
Figure 5.5 The geometry of the optimized connecting rod. 139 Figure 5.6 Failure Index (FI), defined as the ratio of von Mises stress
to the yield strength of 574 MPa, under the dynamic tensile load occurring at 360o crank angle at 5700 rev/min for the optimized connecting rod. Maximum FI is 0.684. 139
Figure 5.7 Failure Index (FI), defined as the ratio of von Mises stress
to the yield strength of 574 MPa, under the peak compressive gas load for the optimized connecting rod. The maximum FI is 0.457. 140
Figure 5.8 Failure Index (FI), defined as the ratio of equivalent stress
amplitude at R = -1 to the endurance limit of 339 MPa for the optimized connecting rod. Maximum FI is 0.787. 140
Figure 5.9 The various regions of the connecting rod that were
analyzed for Failure Index (FI) or Factor of Safety (FS). 141 Figure 5.10 The existing and the optimized connecting rods
superimposed. 141 Figure 5.11 Isometric view of the optimized and existing connecting
rod. 142 Figure 5.12 Drawing of the optimized connecting rod (bolt holes not
included). 143 Figure 5.13 Modeling of the bolt pretension in the connecting rod
assembly. 144 Figure 5.14 FE model of the connecting rod assembly consisting of the
cap, rod, bolt and bolt pre-tension. The external load corresponds to the load at 360o crank angle at 5700 144
xviii
rev/min and was applied with cosine distribution. The pin end was totally restrained.
Figure 5.15 von Mises stress variation and displacements of the
connecting rod and cap for a FEA model as shown in Figure 5.14 under tensile load described in Section 5.1.The displacement has been magnified 20 times. 145
Figure 5.16 Connecting rod cap on the left shows the edge and the
relocated jig spot. The figure of the cap on the right shows the springs connected between the opposite edges of the cap. 145
Figure 5.17 FE model of the connecting rod assembly consisting of the
cap, rod, bolt and bolt pre-tension. The external load which corresponds to the load at 360o crank angle at 5700 rev/min was applied with cosine distribution. The pin end was totally restrained. Springs were introduced to model stiffness of other components (i.e. crankshaft, bearings, etc.). 146
Figure 5.18 von Mises stress variation for FEM shown in Figure 5.17 146 Figure 5.19 FE model of the connecting rod assembly consisting of the
cap, rod, bolt and bolt pre-tension. The external load corresponds to the compressive load of 21.8 kN and was applied as a uniform distribution. The pin end was totally restrained. 147
Figure 5.20 von Mises stress distribution under compressive load of
21.8 kN for the FEM shown in Figure 5.19. 147 Figure 5.21 A trial connecting rod that was considered for
optimization. Not a feasible solution since punching out of the hole in the shank would cause distortion. 148
Figure 5.22 Steel forged connecting rod manufacturing process flow
chart (correspondence with Mr. Tom Elmer from MAHLE Engine Components, Gananoque, ON, Canada). The number in each box is the cost in $ and the number in the parentheses is the percent of the total cost. 149
Figure 5.23 Powder forged connecting rod manufacturing process flow
chart. The number in each box is the cost in $ and the 150

xix
number in the parentheses is the percent of the total cost. Figure 5.24 C-70 connecting rod manufacturing process flow chart
(correspondence with Mr. Tom Elmer from MAHLE Engine Components, Gananoque, ON, Canada). The number in each box is the cost in $ and the number in the parentheses is the percent of the total cost. 151
Figure 5.25 The fracture splitting process for steel forged connecting
rod (Park et al., 2003). 152

xx
NOMENCLATURE
aA, aP Acceleration of point A, piston a Absolute acceleration of a point on the connecting rod
ac.gX, ac.gY X, Y components of the acceleration of the C.G. of the connecting rod E Modulus of elasticity e
Offset, the distance from the centerline of the slider path to the crank bearing center
FI, FS Failure index, factor of safety
Fa Load amplitude
Fm Mean load
FX Force in X direction on piston
FAX, FAY X, Y components of the reactions at the crank end
FBX, FBY X, Y components of the reactions at the piston pin end
IZZ Moment of Inertia about Z axis and C.G. of the connecting rod m Slope of the modified Goodman line
mp, mc Mass of piston assembly, connecting rod p Normal pressure
po Normal pressure constant
Pt, Pc Tensile, compressive resultant load in the direction of the rod length

xxi
R Transition radius r Radius of crankshaft pin
r1 Radius of crank
r2 Connecting rod length
r3 Distance from crankshaft bearing center to slider (piston pin center)
ro Outer radius of outer member
ri Inner radius of inner member
Sa, Sm Alternating, mean stress
Sax, Say, Saz Alternating x, y, z stress
Smx, Smy, Smz Mean x, y, z stress
Smax, Smin Maximum, minimum stress SNf Equivalent stress amplitude at R = -1 Sqa, Sqm Equivalent stress amplitude, equivalent mean stress
Su Ultimate tensile strength t Thickness of the connecting rod at the loading surface u Distance of C.G. of the connecting rod from crank end center
Vp Slider velocity in X direction δ Total radial interference

xxii
ρ Position vector of any point on connecting rod
τaxy, τayz, τazx xy, yz, zx shear stress amplitude
σxx, σyy, σzz x, y, z components of normal stress
σxy, σyz, σzx xy, yz, zx components of shear stress
ω1 Angular velocity of crankshaft
ω2 Angular velocity of connecting rod
α2 Angular acceleration of connecting rod θ, Θ
Crank angle, angular coordinate of polar coordinate system defined for the contact surface
β Connecting rod angle with positive direction of X axis η (2π-β)

1
1. INTRODUCTION
1.1 BACKGROUND
The automobile engine connecting rod is a high volume production, critical
component. It connects reciprocating piston to rotating crankshaft, transmitting the thrust
of the piston to the crankshaft. Every vehicle that uses an internal combustion engine
requires at least one connecting rod depending upon the number of cylinders in the
engine.
Connecting rods for automotive applications are typically manufactured by
forging from either wrought steel or powdered metal. They could also be cast. However,
castings could have blow-holes which are detrimental from durability and fatigue points
of view. The fact that forgings produce blow-hole-free and better rods gives them an
advantage over cast rods (Gupta, 1993). Between the forging processes, powder forged or
drop forged, each process has its own pros and cons. Powder metal manufactured blanks
have the advantage of being near net shape, reducing material waste. However, the cost
of the blank is high due to the high material cost and sophisticated manufacturing
techniques (Repgen, 1998). With steel forging, the material is inexpensive and the rough
part manufacturing process is cost effective. Bringing the part to final dimensions under
tight tolerance results in high expenditure for machining, as the blank usually contains
more excess material (Repgen, 1998). A sizeable portion of the US market for connecting

2
rods is currently consumed by the powder metal forging industry. A comparison of the
European and North American connecting rod markets indicates that according to an
unpublished market analysis for the year 2000 (Ludenbach, 2002), 78% of the connecting
rods in Europe (total annual production: 80 million approximately) are steel forged as
opposed to 43% in North America (total annual production: 100 million approximately),
as shown in Figure 1.1. In order to recapture the US market, the steel industry has
focused on development of production technology and new steels. AISI (American Iron
and Steel Institute) funded a research program that had two aspects to address. The first
aspect was to investigate and compare fatigue strength of steel forged connecting rods
with that of the powder forged connecting rods. The second aspect was to optimize the
weight and manufacturing cost of the steel forged connecting rod. The first aspect of this
research program has been dealt with in a master’s thesis entitled “Fatigue Behavior and
Life predictions of Forged Steel and PM Connecting Rods” (Afzal A., 2004). This current
thesis deals with the second aspect of the study, the optimization part.
Due to its large volume production, it is only logical that optimization of the
connecting rod for its weight or volume will result in large-scale savings. It can also
achieve the objective of reducing the weight of the engine component, thus reducing
inertia loads, reducing engine weight and improving engine performance and fuel
economy.
1.2 LITERATURE REVIEW
The connecting rod is subjected to a complex state of loading. It undergoes high
cyclic loads of the order of 108 to 109 cycles, which range from high compressive loads

3
due to combustion, to high tensile loads due to inertia. Therefore, durability of this
component is of critical importance. Due to these factors, the connecting rod has been the
topic of research for different aspects such as production technology, materials,
performance simulation, fatigue, etc. For the current study, it was necessary to investigate
finite element modeling techniques, optimization techniques, developments in production
technology, new materials, fatigue modeling, and manufacturing cost analysis. This brief
literature survey reviews some of these aspects.
Webster et al. (1983) performed three dimensional finite element analysis of a
high-speed diesel engine connecting rod. For this analysis they used the maximum
compressive load which was measured experimentally, and the maximum tensile load
which is essentially the inertia load of the piston assembly mass. The load distributions
on the piston pin end and crank end were determined experimentally. They modeled the
connecting rod cap separately, and also modeled the bolt pretension using beam elements
and multi point constraint equations.
In a study reported by Repgen (1998), based on fatigue tests carried out on
identical components made of powder metal and C-70 steel (fracture splitting steel), he
notes that the fatigue strength of the forged steel part is 21% higher than that of the
powder metal component. He also notes that using the fracture splitting technology
results in a 25% cost reduction over the conventional steel forging process. These factors
suggest that a fracture splitting material would be the material of choice for steel forged
connecting rods. He also mentions two other steels that are being tested, a modified
micro-alloyed steel and a modified carbon steel. Other issues discussed by Repgen are the
necessity to avoid jig spots along the parting line of the rod and the cap, need of

4
consistency in the chemical composition and manufacturing process to reduce variance in
microstructure and production of near net shape rough part.
Park et al. (2003) investigated microstructural behavior at various forging
conditions and recommend fast cooling for finer grain size and lower network ferrite
content. From their research they concluded that laser notching exhibited best fracture
splitting results, when compared with broached and wire cut notches. They optimized the
fracture splitting parameters such as, applied hydraulic pressure, jig set up and geometry
of cracking cylinder based on delay time, difference in cracking forces and roundness.
They compared fracture splitting high carbon micro-alloyed steel (0.7% C) with carbon
steel (0.48% C) using rotary bending fatigue test and concluded that the former has the
same or better fatigue strength than the later. From a comparison of the fracture splitting
high carbon micro-alloyed steel and powder metal, based on tension-compression fatigue
test they noticed that fatigue strength of the former is 18% higher than the later.
Sarihan and Song (1990), for the optimization of the wrist pin end, used a fatigue
load cycle consisting of compressive gas load corresponding to maximum torque and
tensile load corresponding to maximum inertia load. Evidently, they used the maximum
loads in the whole operating range of the engine. To design for fatigue, modified
Goodman equation with alternating octahedral shear stress and mean octahedral shear
stress was used. For optimization, they generated an approximate design surface, and
performed optimization of this design surface. The objective and constraint functions
were updated to obtain precise values. This process was repeated till convergence was
achieved. They also included constraints to avoid fretting fatigue. The mean and the
alternating components of the stress were calculated using maximum and minimum

5
values of octahedral shear stress. Their exercise reduced the connecting rod weight by
nearly 27%. The initial and final connecting rod wrist pin end designs are shown in
Figure 1.2.
Yoo et al. (1984) used variational equations of elasticity, material derivative idea
of continuum mechanics and an adjoint variable technique to calculate shape design
sensitivities of stress. The results were used in an iterative optimization algorithm,
steepest descent algorithm, to numerically solve an optimal design problem. The focus
was on shape design sensitivity analysis with application to the example of a connecting
rod. The stress constraints were imposed on principal stresses of inertia and firing loads.
But fatigue strength was not addressed. The other constraint was the one on thickness to
bound it away from zero. They could obtain 20% weight reduction in the neck region of
the connecting rod. The optimum design is shown in Figure 1.3.
Hippoliti (1993) reported design methodology in use at Piaggio for connecting
rod design, which incorporates an optimization session. However, neither the details of
optimization nor the load under which optimization was performed were discussed. Two
parametric FE procedures using 2D plane stress and 3D approach developed by the
author were compared with experimental results and shown to have good agreements.
The optimization procedure they developed was based on the 2D approach.
El-Sayed and Lund (1990) presented a method to consider fatigue life as a
constraint in optimal design of structures. They also demonstrated the concept on a SAE
key hole specimen. In this approach a routine calculates the life and in addition to the
stress limit, limits are imposed on the life of the component as calculated using FEA
results.

6
Pai (1996) presented an approach to optimize shape of connecting rod subjected
to a load cycle, consisting of the inertia load deducted from gas load as one extreme and
peak inertia load exerted by the piston assembly mass as the other extreme, with fatigue
life constraint. Fatigue life defined as the sum of the crack initiation and crack growth
lives, was obtained using fracture mechanics principles. The approach used finite element
routine to first calculate the displacements and stresses in the rod; these were then used in
a separate routine to calculate the total life. The stresses and the life were used in an
optimization routine to evaluate the objective function and constraints. The new search
direction was determined using finite difference approximation with design sensitivity
analysis. The author was able to reduce the weight by 28%, when compared with the
original component.
Sonsino and Esper (1994) have discussed the fatigue design of sintered
connecting rods. They did not perform optimization of the connecting rod. They designed
a connecting rod with a load amplitude Fa = 19.2 kN and with different regions being
designed for different load ratios (R), such as, in the stem Fm = -2.2 kN and R = -1.26, at
the piston pin end Fm = -5.5 kN and R = -1.82, at the crank end Fm = 7.8 kN and R =
-0.42. They performed preliminary FEA followed by production of a prototype. Fatigue
tests and experimental stress analysis were performed on this prototype based on the
results of which they proposed a final shape, shown in Figure 1.4. In order to verify that
the design was sufficient for fatigue, they computed the allowable stress amplitude at
critical locations, taking the R-ratio, the stress concentration, and statistical safety factors
into account, and ensured that maximum stress amplitudes were below the allowable
stress amplitude.

7
For their optimization study, Serag et al. (1989) developed approximate
mathematical formulae to define connecting rod weight and cost as objective functions
and also the constraints. The optimization was achieved using a Geometric Programming
technique. Constraints were imposed on the compression stress, the bearing pressure at
the crank and the piston pin ends. Fatigue was not addressed. The cost function was
expressed in some exponential form with the geometric parameters.
Folgar et al. (1987) developed a fiber FP/Metal matrix composite connecting rod
with the aid of FEA, and loads obtained from kinematic analysis. Fatigue was not
addressed at the design stage. However, prototypes were fatigue tested. The investigators
identified design loads in terms of maximum engine speed, and loads at the crank and
piston pin ends. They performed static tests in which the crank end and the piston pin end
failed at different loads. Clearly, the two ends were designed to withstand different loads.
Balasubramaniam et al. (1991) reported computational strategy used in Mercedes-
Benz using examples of engine components. In their opinion, 2D FE models can be used
to obtain rapid trend statements, and 3D FE models for more accurate investigation. The
various individual loads acting on the connecting rod were used for performing
simulation and actual stress distribution was obtained by superposition. The loads
included inertia load, firing load, the press fit of the bearing shell, and the bolt forces. No
discussions on the optimization or fatigue, in particular, were presented.
Ishida et al. (1995) measured the stress variation at the column center and column
bottom of the connecting rod, as well as the bending stress at the column center. The
plots, shown in Figures 1.5 and 1.6 indicate that at the higher engine speeds, the peak
tensile stress does not occur at 360o crank angle or top dead center. It was also observed

8
that the R ratio varies with location, and at a given location it also varies with the engine
speed. The maximum bending stress magnitude over the entire cycle (0o to 720o crank
angle) at 12000 rev/min, at the column center was found to be about 25% of the peak
tensile stress over the same cycle.
Athavale and Sajanpawar (1991) modeled the inertia load in their finite element
model. An interface software was developed to apply the acceleration load to elements on
the connecting rod depending upon their location, since acceleration varies in magnitude
and direction with location on the connecting rod. They fixed the ends of the connecting
rod, to determine the deflection and stresses. This, however, may not be representative of
the pin joints that exist in the connecting rod. The results of the detailed analysis were not
discussed, rather, only the modeling technique was discussed. The connecting rod was
separately analyzed for the tensile load due to the piston assembly mass (piston inertia),
and for the compressive load due to the gas pressure. The effect of inertia load due to the
connecting rod, mentioned above, was analyzed separately.
While investigating a connecting rod failure that led to a disastrous failure of an
engine, Rabb (1996) performed a detailed FEA of the connecting rod. He modeled the
threads of the connecting rod, the threads of connecting rod screws, the prestress in the
screws, the diametral interference between the bearing sleeve and the crank end of the
connecting rod, the diametral clearance between the crank and the crank bearing, the
inertia load acting on the connecting rod, and the combustion pressure. The analysis
clearly indicated the failure location at the thread root of the connecting rod, caused by
improper screw thread profile. The connecting rod failed at the location indicated by the
FEA. An axisymmetric model was initially used to obtain the stress concentration factors

9
at the thread root. These were used to obtain nominal mean and alternating stresses in the
screw. A detailed FEA including all the factors mentioned above was performed by also
including a plasticity model and strain hardening. Based on the comparison of the mean
stress and stress amplitude at the threads obtained from this analysis with the endurance
limits obtained from specimen fatigue tests, the adequacy of a new design was checked.
Load cycling was also used in inelastic FEA to obtain steady state situation.
In a published SAE case study (1997), a replacement connecting rod with 14%
weight savings was designed by removing material from areas that showed high factor of
safety. Factor of safety with respect to fatigue strength was obtained by performing FEA
with applied loads including bolt tightening load, piston pin interference load,
compressive gas load and tensile inertia load. The study lays down certain guidelines
regarding the use of the fatigue limit of the material and its reduction by a certain factor
to account for the as-forged surface. The study also indicates that buckling and bending
stiffness are important design factors that must be taken into account during the design
process. On the basis of the stress and strain measurements performed on the connecting
rod, close agreement was found with loads predicted by inertia theory. The study also
concludes that stresses due to bending loads are substantial and should always be taken
into account during any design exercise.
1.3 OBJECTIVES AND OUTLINE
The objective of this work was to optimize the forged steel connecting rod for its
weight and cost. The optimized forged steel connecting rod is intended to be a more

10
attractive option for auto manufacturers to consider, as compared with its powder-forged
counterpart.
Optimization begins with identifying the correct load conditions and magnitudes.
Overestimating the loads will simply raise the safety factors. The idea behind optimizing
is to retain just as much strength as is needed. Commercial softwares such as I-DEAS and
ADAMS-View can be used to obtain the variation of quantities such as angular velocity,
angular acceleration, and load. However, usually the worst case load is considered in the
design process. Literature review suggests that investigators use maximum inertia load,
inertia load, or inertia load of the piston assembly mass as one extreme load
corresponding to the tensile load, and firing load or compressive gas load corresponding
to maximum torque as the other extreme design load corresponding to the compressive
load. Inertia load is a time varying quantity and can refer to the inertia load of the piston,
or of the connecting rod. In most cases, in the literature the investigators have not
clarified the definition of inertia load - whether it means only the inertia of the piston, or
whether it includes the inertia of the connecting rod as well. Questions are naturally
raised in light of such complex structural behavior, such as: Does the peak load at the
ends of the connecting rod represent the worst case loading? Under the effect of bending
and axial loads, can one expect higher stresses than that experienced under axial load
alone? Moreover, very little information is available in the literature on the bending
stiffness requirements, or on the magnitude of bending stress. From the study of Ishida et
al. (1995) reviewed in Section 1.2, it is clear that the maximum stress at the connecting
rod column bottom does not occur at the TDC, and the maximum bending stress at the
column center is about 25% of the maximum stress at that location. However, to obtain

11
the bending stress variation over the connecting rod length, or to know the stress at
critical locations such as the transition regions of the connecting rod, a detailed analysis
is needed. As a result, for the forged steel connecting rod investigated, a detailed load
analysis under service operating conditions was performed, followed by a quasi-dynamic
FEA to capture the stress variation over the cycle of operation.
Logically, any optimization should be preceded by stress analysis of the existing
component, which should be performed at the correct operating loads. Consequently, the
load analysis is addressed in Chapter 2, followed by a discussion of the finite element
modeling issues in Chapter 3, and the results of FEA in Chapter 4. Chapter 3 discusses
such issues as mesh convergence, details of how loads and restraints have been applied,
and validation of the FE model for three cases - static FEA, quasi-dynamic FEA, and test
assembly FEA. Chapter 4 discusses the stress-time history, R ratio and multiaxiality of
stresses for various locations on the connecting rod under service operating conditions.
This indicates the extent of weight reduction to expect through optimization, identifies
the regions from which material can be removed, or regions that need to be redesigned.
This chapter also discusses the static FEA results and makes a comparison between the
static FEA, quasi-dynamic FEA, and results from test assembly FEA. Optimization of the
connecting rod is addressed in Chapter 5. Optimization was performed to reduce the mass
and manufacturing cost of the connecting rod, subject to fatigue life and yielding
constraints. The material was changed to C-70 fracture splitable steel to reduce
manufacturing cost by elimination of machining of mating surfaces of the connecting rod
and it’s cap. S-N approach was used for the fatigue model during the optimization, as the
connecting rod operates in the elastic range (i.e. high cycle fatigue life region). A

12
comparison between the various manufacturing processes and their costs is also
presented.

13
Figure 1.1: Market shares of powder forged, steel forged and cast connecting rods in European and North American markets, based on an unpublished market analysis for the year 2000 (Ludenbach, 2002).
Figure 1.2: Initial and final designs of a connecting rod wrist pin end (Sarihan and Song, 1990).
North American Market Share: Split up of 100 million conrods
Powder Forged Steel ForgedCast
European Market Share: Split up of 80 million conrods

14
Figure 1.3: The optimum design obtained by Yoo et al. (1984).
Figure 1.4: Design of a PM connecting rod (Sonsino and Esper, 1994).

15
Figure 1.5: Stresses at the bottom of the connecting rod column (Ishida et al., 1995).
Figure 1.6: Stresses at the center of the connecting rod column (Ishida et al., 1995).

16
2. DYNAMIC LOAD ANALYSIS OF THE CONNECTING ROD
The connecting rod undergoes a complex motion, which is characterized by
inertia loads that induce bending stresses. In view of the objective of this study, which is
optimization of the connecting rod, it is essential to determine the magnitude of the loads
acting on the connecting rod. In addition, significance of bending stresses caused by
inertia loads needs to be determined, so that we know whether it should be taken into
account or neglected during the optimization. Nevertheless, a proper picture of the stress
variation during a loading cycle is essential from fatigue point of view and this will
require FEA over the entire engine cycle.
The objective of this chapter is to determine these loads that act on the connecting
rod in an engine so that they may be used in FEA. The details of the analytical vector
approach to determine the inertia loads and the reactions are presented in Appendix I.
This approach is explained by Wilson and Sadler (1993). The equations are further
simplified so that they can be used in a spreadsheet format. The results of the analytical
vector approach have been enumerated in this chapter.
This work serves two purposes. It can used be for determining the inertia loads
and reactions for any combination of engine speed, crank radius, pressure-crank angle
diagram, piston diameter, piston assembly mass, connecting rod length, connecting rod
mass, connecting rod moment of inertia, and direction of engine rotation. Secondly, it
serves as a means of verifying that the results from ADAMS/View-11 are interpreted in

17
the right manner. However, for reasons of convenience of reading and transferring data
the analytical work was used as the basis and the commercial software was used as a
verification tool.
In summary, this chapter enumerates the results of the analytical vector approach
used for developing a spread sheet in MS EXCEL (hereafter referred to as DAP-Dynamic
Analysis Program), verifies this DAP by using a simple model in ADAMS, uses DAP for
dynamic analysis of the forged steel connecting rod, and discusses how the output from
DAP is used in FEA. It is to be noted that this analysis assumes the crank rotates at a
constant angular velocity. Therefore, angular acceleration of the crank is not included in
this analysis. However, in a comparison of the forces at the ends of the connecting rod
under conditions of acceleration and deceleration (acceleration of 6000 rev/s2 and
deceleration of 714 rev/sec2 based on approximate measurements) with the forces under
constant speed, the difference was observed to be less than 1%. The comparison was
done for an engine configuration similar to the one considered in this study.
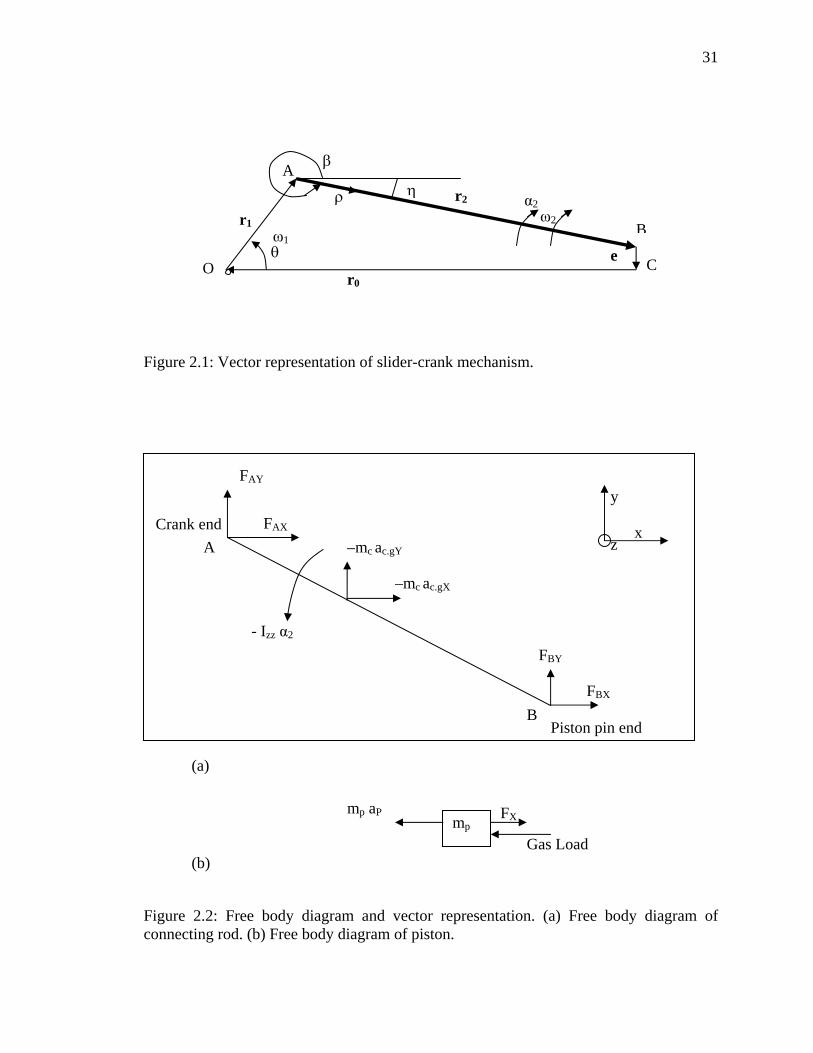
2.1 ANALYTICAL VECTOR APPROACH
The analytical vector approach (Wilson and Sadler, 1993) has been discussed in
detail in Appendix I. With reference to Figure 2.1, for the case of zero offset (e = 0), for
any given crank angle θ, the orientation of the connecting rod is given by:
β = sin-1{-r1 sinθ / r2 } (2.1)
Angular velocity of the connecting rod is given by the expression:
ω2 = ω2 k (2.2)
ω2 = - ω1 cosθ / [ (r2/r1)2 - sin2θ ] 0.5 (2.3)

18
Note that bold letters represent vector quantities. The angular acceleration of the
connecting rod is given by:
α2 = α2 k (2.4)
α2 = (1/ cosβ ) [ ω12 (r1/r2) sinθ - ω2
2 sinβ ] (2.5)
Absolute acceleration of any point on the connecting rod is given by the following
equation:
a = (-r1 ω12 cosθ - ω2
2 u cosβ - α2 u sinβ) i
+ (-r1 ω12 sinθ - ω2
2 u sinβ + α2 u cosβ) j (2.6)
Acceleration of the piston is given by:
ap = (-ω12 r1 cosθ - ω2
2 r2 cosβ - α2 r2 sinβ) i
+ (-ω12
r1 sinθ - ω22 r2 sinβ + α2 r2 cosβ) j (2.7)
Forces acting on the connecting rod and the piston are shown in Figure 2.2.
Neglecting the effect of friction and of gravity, equations to obtain these forces are listed
below. Note that mp is the mass of the piston assembly and mc is the mass of the
connecting rod. Forces at the piston pin and crank ends in X and Y directions are given
by:
FBX = – (mp aP + Gas Load) (2.8)
FAX = mc ac.gX - FBX (2.9)
FBY = [mc ac.gY u cosβ - mc ac.gX u sinβ + Izz α2 + FBX r2 sinβ] / (r2 cosβ) (2.10)
FAY = mc ac.gY - FBY (2.11)
These equations have been used in an EXCEL spreadsheet, referred to earlier in
this chapter as DAP (Dynamic Analysis Program). This program provides values of
angular velocity and angular acceleration of the connecting rod, linear acceleration of the

19
crank end center, and forces at the crank and piston pin ends. These results were used in
the FE model while performing quasi-dynamic FEA. An advantage of this program is that
with the availability of the input as shown in Figure 2.3, the output could be generated in
a matter of minutes. This is a small fraction of the time required when using commercial
softwares. When performing optimization, this is advantageous since the reactions or the
loads at the connecting rod ends changed with the changing mass of the connecting rod.
The loads required to perform FEA were obtained relatively quickly using this program.
A snap shot of the spread sheet is shown in Appendix II.
2.2 VERIFICATION OF ANALYTICAL APPROACH
The analytical approach used in this study was verified with the results obtained
from ADAMS/View -11. A simple slider crank mechanism as shown in Figure 2.4 was
used in ADAMS. This mechanism will be referred to as ‘slider-crank mechanism-1’ and
its details have been tabulated in Table 2.1. The crank OA rotates about point O and the
end B of the (connecting rod) link AB slides along the line OB. The material density used
is 7801.0 kg/m3 (7.801E-006 kg/mm3). Crank OA rotational speed is 3000 rev/min
clockwise.
All these details were input to the DAP. Results were generated for the clockwise
crank rotation of the ‘slider crank mechanism-1’. It is to be noted that the gas load is not
included here since the purpose is just to verify the DAP. However, it is just a matter of
superimposing the gas load with the load at the piston pin end in DAP, when it is used for
the actual connecting rod analysis.

20
For a 2D mechanism such as a slider crank mechanism, we can expect forces only
in the plane of motion. Forces in Z direction will be zero. There will also be no moments
since there are pin joints at both the ends of the connecting rod. The results of the
dynamic analysis for ‘slider-crank mechanism-1’ using DAP have been plotted in Figures
2.5 through 2.8. The results from ADAMS have also been plotted in these Figures. Figure
2.5 shows the variation of the angular velocity of link AB over one complete rotation of
the crank as obtained by both the DAP and ADAMS. At the above-mentioned speed of
3000 rev/min the crank completes one complete rotation in 0.02 sec, which is the time
over which the angular velocity has been plotted. The two curves coincide indicating
agreement of the results from DAP with the results from ADAMS/View-11. Similarly,
Figure 2.6 shows the variation of angular acceleration of link AB, Figure 2.7 shows the
variation of the forces at joint A, and Figure 2.8 shows the variation of forces at joint B.
In all these figures since the curves of DAP and ADAMS/View-11 coincide, it can be
concluded that there is perfect agreement of the results from DAP with the results from
ADAMS/View-11. These results verify correctness of the DAP. For each of the quantities
plotted the variation will repeat itself for subsequent rotations of the crank. The variation
of the crank angle with time is shown in Figure 2.9. It needs to be mentioned here that
ADAMS or I-DEAS provides all of the required parameters or quantities. DAP was,
however, used for this study, essentially due to its simplicity as compared to either I-
DEAS or ADAMS. These softwares require generation of the entire mechanism, which is
relatively time consuming.

21
2.3 DYNAMIC ANALYSIS FOR THE ACTUAL CONNECTING ROD
Now that the DAP has been verified, it can be used to generate the required
quantities for the actual connecting rod which is being analyzed. The engine
configuration considered has been tabulated in Table 2.2. The pressure crank angle
diagram used is shown in Figure 2.10 obtained from a different OEM engine (5.4 liter,
V8 with compression ratio 9, at speed of 4500 rev/min). These data are input to the DAP,
and results consisting of the angular velocity and angular acceleration of the connecting
rod, linear acceleration of the connecting rod crank end center and of the center of
gravity, and forces at the ends are generated for a few engine speeds.
Results for this connecting rod at the maximum engine speed of 5700 rev/min
have been plotted in Figures 2.11 through 2.14. Figure 2.11 shows the variation of the
angular velocity over one complete engine cycle at crankshaft speed of 5700 rev/min.
Figure 2.12 shows the variation of angular acceleration at the same crankshaft speed.
Note that the variation of angular velocity and angular acceleration from 0o to 360o is
identical to its variation from 360o to 720o. Figure 2.13 shows the variation of the force
acting at the crank end. Two components of the force are plotted, one along the direction
of the slider motion, Fx, and the other normal to it, Fy. These two components can be
used to obtain crank end force in any direction. Figure 2.14 shows similar components of
load at the piston pin end. It would be particularly beneficial if components of these
forces were obtained along the length of the connecting rod and normal to it. These
components are shown in Figure 2.15 for the crank end and Figure 2.16 for the piston pin
end.

22
At any point in time the forces calculated at the ends form the external loads,
while the inertia load forms the internal load acting on the connecting rod. These result in
a set of completely equilibrated external and internal loads. A similar analysis was
performed at other engine speeds (i.e. 4000 rev/min and 2000 rev/min). The variation of
the forces at the crank end at the above mentioned speeds are shown in Figures 2.17 and
2.18, respectively. Note from these figures that as the speed increases the tensile load
increases whereas the maximum compressive load at the crank end decreases. Based on
the axial load variation at the crank end, the load ratio changes from –11.83 at 2000
rev/min to –1.65 at 4000 rev/min. The load amplitude increases slightly and the mean
load tends to become tensile. The positive axial load is the compressive load in these
figures due to the co-ordinate system used (shown in the inset in these figures). The
pressure-crank angle diagram changes with speed. The actual change will be unique to an
engine. The pressure-crank angle diagram for different speeds for the engine under
consideration was not available. Therefore, the same diagram was used for different
engine speeds. However, from a plot showing the effect of speed on P-V diagram at
constant delivery ratio, Figure 2.19 (Ferguson, 1986), barely any change in the peak gas
pressure is seen at different speeds, though, a change of nearly 10% is visible at lower
pressures. Delivery ratio is the ratio of entering or delivered air mass to the ideal air mass
at ambient density. However, note that the speeds for which these have been plotted are
much lower than the maximum speed for this engine.

23
2.4 FEA WITH DYNAMIC LOADS
Once the components of forces at the connecting rod ends in the X and Y
directions are obtained, they can be resolved into components along the connecting rod
length and normal to it. The components of the inertia load acting at the center of gravity
can also be resolved into similar components. It is neither efficient nor necessary to
perform FEA of the connecting rod over the entire cycle and for each and every crank
angle. Therefore, a few positions of the crank were selected depending upon the
magnitudes of the forces acting on the connecting rod, at which FEA was performed. The
justification used in selecting these crank positions is as follows:
The stress at a point on the connecting rod as it undergoes a cycle consists of two
components, the bending stress component and the axial stress component. The bending
stress depends on the bending moment, which is a function of the load at the C.G. normal
to the connecting rod axis, as well as angular acceleration and linear acceleration
component normal to the connecting rod axis. The variation of each of these three
quantities over 0o–360o is identical to the variation over 360o-720o. This can be seen from
Figure 2.20 for the normal load at the connecting rod ends and at the center of gravity. In
addition, Figure 2.12 shows identical variation of angular acceleration over 0o–360o and
360o-720o. Therefore, for any given point on the connecting rod the bending moment
varies in an identical fashion from 0o–360o crank angle as it varies from 360o–720o crank
angle.
The axial load variation, however, does not follow this repetitive pattern. (i.e one
cycle of axial load variation consists of the entire 720o). This is due to the variation in the

24
gas load, one cycle of which consists of 720o. However, the variation over 0o–360o can be
superimposed with the variation over 360o–720o and this plot can be used to determine
the worst of the two cycles of 0o–360o and 360o–720o to perform FEA, as shown in
Figure 2.21. In this figure, a point on the “Axial: 360-720” curve, say at 20o crank angle,
actually represents 360o + 20o or 380o crank angle.
The axial load at the crank end and at the piston pin end are not generally
identical at any point in time. They differ due to the inertia load acting on the connecting
rod. The load at either end could be used as a basis for deciding points at which to
perform FEA. The load at the crank end was used in this work.
In order to decide the crank angles at which to perform the FEA and to narrow
down the crank angle range, the axial load at the crank end from 0o–360o was compared
with axial load at the crank end from 360o-720o. Positive load at the crank end in Figure
2.21 indicates compressive load and negative load indicates tensile load on the
connecting rod. This is due to the co-ordinate system which has been shown in the figure
in the inset. The plot in Figure 2.21 can be divided into 3 regions: i, ii & iii, as shown in
this figure.
Region ii shows two curves ‘b’ and ‘e’. Curve ‘b’ is higher than curve ‘e’ for
most of the region. So curve ‘e’ was not analyzed. FEA at one crank angle on the curve
‘e’ was performed to ensure that the stresses are in fact lower on this curve. Region iii
shows curves ‘c’ and ‘f’. Since curve ‘c’ represents a higher load than curve ‘f’, curve ‘f’
was not analyzed.
Eliminating the ‘e’ and ‘f’ portions of the curves leaves curves ‘a’, ‘b’, ‘c’, and
‘d’ to be analyzed in the range 0o–431o. Over this range, FEA had to be performed at

25
adequate crank angles so as to pick up the stress variation as accurately as possible. What
was discussed above was based on the load at the crank end. A similar trend was
observed for the load at the piston pin end. Figure 2.22 shows the variation of load from
0o to 431o crank angle at the crank end. From this diagram, the following crank angles
based on peaks and valleys were picked for FEA: 0o, 24o (crank angle close to the peak
gas pressure), 60o, 126o, 180o, 243o, 288o, 336o, 360o (peak tensile load), 396o, and 432o.
These crank angles are shown in Figure 2.22. In addition, FEA was performed for crank
angles of 486o and 696o to validate the premise on which curves ‘e’ and ‘f’ were
eliminated.
The above discussion was for crank speed of 5700 rev/min. In order to study
effect of engine speed (rev/min) FEA was performed at other crankshaft speeds viz, 4000
rev/min and 2000 rev/min. Figures 2.17 and 2.18 show the variation in the loads at these
engine speeds respectively. FEA was performed at the following crank angles: 24o, 126o,
and 360o at each of the above-mentioned speeds. In addition, FEA was also performed at
the crank angle of 22o, at which compressive load is maximum and at 371o at which
tensile load is maximum at 2000 rev/min. At 4000 rev/min maximum compressive load
occurs at 23o and maximum tensile load occurs at 362o. As the engine is cranked, the
engine speed is very low and the connecting rod experiences axial load of 21838 N,
which constitutes all of the gas load. The stress at any point on the connecting rod at this
axial load can be interpolated from the axial stress analysis results. Results of the FEA
are discussed in Chapter 4. Tables 2.3, 2.4, and 2.5 list the crank angles at which FEA
was performed at 5700 rev/min, 4000 rev/min, and 2000 rev/min, respectively.
Parameters that are needed to perform FEA using I-DEAS are also listed in these tables.

26
These include angular velocity, angular acceleration, linear acceleration of the crank end
center, and directions and magnitudes of the loads acting at the connecting rod ends. The
pressure constants listed in the tables are the constants defined in Chapter 3 in Equation
3.3 for the cosine distribution of the load, and in Equation 3.6 for uniformly distributed
load (UDL). As discussed in Chapter 3, if the axial component of the load at the crank
end or pin end was tensile the load was applied with a cosine distribution, while if the
axial component of the load was compressive the load was applied with uniform
distribution.

27
Table 2.1: Details of ‘slider-crank mechanism-1' used in ADAMS/View –11.
Crank OAConnecting
Rod AB Slider B Calculated Mass (kg) 0.0243 0.0477 0.0156 Calculated Volume (mm3) 3116 6116 2000
IXX (kg-mm2) 0.12 0.24 0.26
IYY (kg-mm2) 21.9 165.4 0.65
IZZ ( kg-mm2) 21.9 165.4 0.65
IXY (kg-mm2) 0 0 0
IZX (kg-mm2) 0 0 0
IYZ (kg-mm2) 0 0 0
Length (mm) 100 200 20 Width (mm) 5 5 10 Depth (mm) 6 6 10
Table 2.2: Configuration of the engine to which the connecting rod belongs.
Crankshaft radius 48.5 mm Connecting rod length 141.014 mm Piston diameter 86 mm Mass of the piston assembly 0.434 kg Mass of the connecting rod 0.439 kg
Izz about the center of gravity 0.00144 kg m2
Distance of C.G. from crank end center 36.44 mm Maximum gas pressure 37.29 Bar

28
Table 2.3: Inputs for FEA of connecting rod using dynamic analysis results at crankshaft speed of 5700 rev/min.
Crank End Load Piston Pin End Load
Crank Angle
Ang. Velocity Ang. Accln FAX FAY Resultant Direc-
tion FBX FBY Resultant Direc-tion
Pressure Constant for UDL -(MPa)
Pressure Constant for Cosine Load-
(MPa)
deg rev/s rev/s2 N N N deg N N N deg Crank End Pin End Crank
End Pin End*
0 -32.7 0 -6832 0 6832 0.0 -1447 0 1447 0.0 3.8 10.6 24 -30.1 7205 5330 -3698 6487 -34.8 -12744 1405 12821 -6.3 9.1 33.6 60 -17.1 17119 2174 -6254 6621 -70.8 -5639 1371 5803 -13.7 9.3 15.2 126 20.0 15699 12736 -7121 14592 -29.2 -8070 2559 8466 -17.6 20.6 22.2 180 32.7 0 13856 0 13856 0.0 -6929 0 6929 0.0 19.5 18.2 243 15.6 -17765 9891 7189 12228 36.0 -6037 -2166 6414 19.7 17.2 16.8 288 -10.7 -19380 -815 5470 5530 -81.5 -964 -107 970 6.3 7.8 2.5 336 -30.1 -7205 -14997 826 15020 -3.2 7584 1467 7724 10.9 23.4 23.2 360 -32.7 0 -17683 0 17683 0.0 9404 0 9404 0.0 27.5 28.3 396 -32.3 2702 -17485 -212 17487 0.7 9330 -670 9354 -4.1 27.2 28.1 432 -10.7 19380 -1585 -5203 5439 73.1 -194 -159 251 39.4 7.7 0.7 486 20.0 15699 10275 -6408 12109 -31.9 -5609 1846 5905 -18.2 17.1 15.5
696 -30.1 -7205 -9625 1585 9755 -9.4 2211 708 2322 17.8 15.2 7.0
Acceleration at the crank end center is 17,280,197 mm/s2.
Pressure constant for UDL as defined by Equation 3.6.
Pressure constant for cosine load as defined by Equation 3.3.
* The pressure constants in this column have been corrected for the oil hole.

29
Table 2.4: Inputs for FEA of connecting rod using dynamic analysis results at crankshaft speed of 4000 rev/min.
Crank End Piston Pin End
Crank Angle
Ang. Velocity
Ang. Accln FAX FAY Resultant Direc-
tion FBX FBY Resultant Direc-tion
Pressure Constant for UDL -(MPa)
Pressure Constant for Cosine Load-
(MPa)
deg rev/s rev/s2 N N N deg N N N deg Crank End Pin End Crank
End Pin
End*
23 -21.3 3401 13579 -3237 13960 -13.4 -17265 2152 17398 -7.1 19.69 45.60 24 -21.2 3548 13477 -3354 13888 -14.0 -17128 2225 17272 -7.4 19.59 45.27
126 14.0 7731 7749 -3934 8691 -26.9 -5451 1688 5707 -17.2 12.26 14.96 360 -22.9 0 -8366 0 8366 0.0 4289 0 4289 0.0 13.01 12.88 362 -22.9 296 -8406 -26 8406 0.2 4332 -71 4333 -0.9 13.07 13.01
Acceleration at the crank end center is 8,509,792 mm/s2.
Pressure constant for UDL as defined by Equation 3.6.
Pressure constant for cosine load as defined by Equation 3.3.
* The pressure constants in this column have been corrected for the oil hole.

30
Table 2.5: Inputs for FEA of connecting rod using dynamic analysis results at crankshaft speed of 2000 rev/min.
Crank End Piston Pin End
Crank Angle
Ang. Velocity Ang. Accln FAX FAY Resultant Direc-
tion FBX FBY Resultant Direc-tion
Pressure Constant for UDL -(MPa)
Pressure Constant for Cosine Load-
(MPa)
deg rev/s rev/s2 N N N deg N N N deg Crank End Pin End Crank
End Pin End*
22 -10.7 813 19636 -2886 19847 -8.4 -20565 2626 20732 -7.3 27.99 54.34 24 -10.6 887 19405 -3104 19652 -9.1 -20318 2822 20513 -7.9 27.72 53.77 126 7.0 1933 4120 -1616 4425 -21.4 -3545 1054 3699 -16.6 6.24 9.69 360 -11.5 0 -1586 0 1586 0.0 566 0 566 0.0 2.47 1.70 371 -11.3 407 -1684 -62 1685 2.1 687 -70 691 -5.8 2.62 2.07
Acceleration at the crank end center is 2,127,448 mm/s2.
Pressure constant for UDL as defined by Equation 3.6.
Pressure constant for cosine load as defined by Equation 3.3.
* The pressure constants in this column have been corrected for the oil hole.
31
Figure 2.1: Vector representation of slider-crank mechanism.
(a)
(b)
Figure 2.2: Free body diagram and vector representation. (a) Free body diagram of connecting rod. (b) Free body diagram of piston.
mp aP
Gas Load
FX mp
B
A
O θ
η
C
r1
r0 e
r2
β
ρ α2 ω2
ω1
FAX
FAY
- Izz α2
–mc ac.gY
–mc ac.gX
FBY
FBX
A
B
x
y
z Crank end
Piston pin end

32
Figure 2.3: Typical input required for performing load analysis on the connecting rod and the expected output.
Figure 2.4: ‘Slider-crank mechanism –1’.
O B
mp mc
u Izz
θ
A r
ω1
l
B
FBY
FBX
FAX
FAY
ω2 α2
aA
A
Dynamic Analysis Program (DAP) in MS Excel
C.G.
C.G.
O
A
B . .

33
-1.0E+04-8.0E+03-6.0E+03-4.0E+03-2.0E+030.0E+002.0E+034.0E+036.0E+038.0E+031.0E+04
0 0.005 0.01 0.015 0.02
Time - s
Ang
Vel
ocity
- de
g/s Ang Vel - DAP
Ang Vel - ADAMS
Figure 2.5: Angular velocity of link AB for ‘slider-crank mechanism-1’- A comparison of the results obtained by DAP and ADAMS/View–11 at 3000 rev/min crank speed (clockwise).
-4.0E+06
-3.0E+06
-2.0E+06
-1.0E+06
0.0E+00
1.0E+06
2.0E+06
3.0E+06
4.0E+06
0 0.005 0.01 0.015 0.02
Time - s
Ang
ular
Ace
lera
tion
- deg
/s2
Ang Accl-DAPAng Accl-ADAMS
Figure 2.6: Angular acceleration of link AB for ‘slider-crank mechanism-1’- A comparison of the results obtained by DAP and ADAMS/View–11 at 3000 rev/min crank speed (clockwise).

34
-1000-800-600-400-200
0200400600
0 0.005 0.01 0.015 0.02
Time - s
Forc
e - N
Fx-DAPFy-DAPFx-ADAMSFy-ADAMS
Figure 2.7: Forces at the joint A, for ‘slider-crank mechanism-1’- A comparison of the results obtained by DAP and ADAMS/View–11 at 3000 rev/min crank speed. Fx corresponds to FAX and Fy corresponds to FAY.
-200-150-100
-500
50100150200250300
0 0.005 0.01 0.015 0.02
Time - s
Forc
e - N
Fx-DAPFy-DAPFx-ADAMSFy- ADAMS
Figure 2.8: Forces at the joint B for ‘slider-crank mechanism-1’- A comparison of the results obtained by DAP and ADAMS/View–11 at 3000 rev/min crank speed. Fx corresponds to FBX and Fy corresponds to FBY.

35
-360
-300
-240
-180
-120
-60
00 0.005 0.01 0.015 0.02
Time - second
Cra
nk A
ngle
- de
gree
Figure 2.9: Variation of crank angle with time at 3000 rev/min crank speed in clockwise direction.
0
5
10
15
20
25
30
35
40
0 200 400 600Crank Angle - degree
Cyl
inde
r Pre
ssur
e - b
ar
Figure 2.10: Pressure crank angle diagram used to calculate the forces at the connecting rod ends.

36
-250-200-150-100
-500
50100150200250
0 90 180 270 360 450 540 630 720
Crank Angle - deg
Ang
Vel
ocity
- ra
d/s
Figure 2.11: Variation of angular velocity of the connecting rod over one complete engine cycle at crankshaft speed of 5700 rev/min.
-1.5E+05
-1.0E+05
-5.0E+04
0.0E+00
5.0E+04
1.0E+05
1.5E+05
0 90 180 270 360 450 540 630 720
Crank Angle - deg
Ang
Acc
eler
atio
n - r
ad/s
2
Figure 2.12: Variation of angular acceleration of the connecting rod over one complete engine cycle at crankshaft speed of 5700 rev/min.

37
-2.0E+04
-1.5E+04
-1.0E+04
-5.0E+03
0.0E+00
5.0E+03
1.0E+04
1.5E+04
2.0E+04
0 200 400 600
Crank Angle - deg
Forc
e - N Fx
Fy
Figure 2.13: Variations of the components of the force over one complete cycle at the crank end of the connecting rod at crankshaft speed of 5700 rev/min. Fx corresponds to FAX and Fy corresponds to FAY.
-1.5E+04
-1.0E+04
-5.0E+03
0.0E+00
5.0E+03
1.0E+04
1.5E+04
0 90 180 270 360 450 540 630 720
Crank Angle - deg
Forc
e - N Fx
Fy
Figure 2.14: Variations of the components of the force over one complete cycle at the piston pin end of the connecting rod at crankshaft speed of 5700 rev/min. Fx corresponds to FBX and Fy corresponds to FBY.

38
-2.0E+04
-1.5E+04
-1.0E+04
-5.0E+03
0.0E+00
5.0E+03
1.0E+04
1.5E+04
2.0E+04
0 200 400 600
Crank Angle - deg
Forc
e - N Axial
NormalResultant
Figure 2.15: Axial, normal, and the resultant force at the crank end at crank speed of 5700 rev/min.
-1.5E+04
-1.0E+04
-5.0E+03
0.0E+00
5.0E+03
1.0E+04
1.5E+04
0 200 400 600
Crank Angle - deg
Forc
e - N Axial
NormalResultant
Figure 2.16: Axial, normal, and the resultant force at the piston-pin end at crank speed of 5700 rev/min.

39
Figure 2.17: Variation of the axial, normal (normal to connecting rod axis), and the resultant force at the crank end at crank speed of 4000 rev/min. Figure 2.18: Variation of the axial, normal (normal to connecting rod axis), and the resultant force at the crank end at crank speed of 2000 rev/min.
-1.E+04
-5.E+03
0.E+00
5.E+03
1.E+04
2.E+04
2.E+04
0 60 120 180 240 300 360 420 480 540 600 660 720
Crank Angle - deg
Forc
e - N
AxialNormal Resultant
Compressive
Tensile
X (Axial)
Y (Normal)
Z
-5.E+03
0.E+00
5.E+03
1.E+04
2.E+04
2.E+04
3.E+04
0 60 120 180 240 300 360 420 480 540 600 660 720
Crank Angle - deg
Forc
e - N
AxialNormalResultant
X (Axial)
Y (Normal)
Z
Tensile
Compressive

40
Figure 2.19: Effect of speed on P-V diagram at constant delivery ratio. Curve 5 is for 900 rev/min, curve 6 for 1200 rev/min, curve 7 for 1500 rev/min, and curve 8 for 1800 rev/min (Ferguson, 1986).
-8000
-6000
-4000
-2000
0
2000
4000
6000
8000
0 200 400 600
Crank Angle - deg
Forc
e - N
Load Normal to Axis at Piston Pin EndLoad Normal to Axis at Crank EndInertia Load Normal to Axis at C.G.
Figure 2.20: Loads normal to the connecting rod axis. Note that variations from 0o to 360o repeat from 360o to 720o.

41
Figure 2.21: Variation of the axial load at the crank end and the load normal to connecting rod length at the C.G. at 5700 rev/min crankshaft speed. The 360o to 720o variation has been superimposed on 0o to 360o variation. Plot has been divided into three regions: i, ii and iii.
X
Y
Z
-2.E+04
-2.E+04
-1.E+04
-5.E+03
0.E+00
5.E+03
1.E+04
2.E+04
2.E+04
0 60 120 180 240 300 360
Crank Angle - deg
Forc
e - N
Axial:0-360Axial:360-720Normal at C.G.
i ii iii
a b
c
d
e
f
Compressive
Tensile

42
-2.E+04
-2.E+04
-1.E+04
-5.E+03
0.E+00
5.E+03
1.E+04
2.E+04
2.E+04
0 60 120 180 240 300 360 420 480 540 600 660 720
Crank Angle - deg
Forc
e - N
Axial
Normal at C.G.
Figure 2.22: Variation of load at the crank end over the portion of the cycle that will need FEA at 5700 rev/min crankshaft speed. Markers on the curve represent crank angles at which FEA has been performed.

43
3. FE MODELING OF THE CONNECTING ROD
This chapter discusses geometry of connecting rod used for FEA, its generation,
simplifications and accuracy. Mesh generation and its convergence is discussed. The load
application, particularly the distribution at the contact area, factors that decide load
distribution, the calculation of the pressure constants depending on the magnitude of the
resultant force, application of the restraints and validation of the FEA model are also
discussed. Three FEM were used to determine structural behavior under three different
conditions, namely, static load condition (static FEA), service operating condition (quasi-
dynamic FEA) and test condition (test assembly FEA). These finite element models are
also discussed in this chapter.
3.1 GEOMETRY OF THE CONNECTING ROD
The connecting rod was digitized using a coordinate measuring machine. A solid
model of the connecting rod, as shown in Figure 3.1, was generated using I-DEAS
Master Modeler. For FEA, the flash along the entire connecting rod length including the
one at the oil hole was eliminated in order to reduce the model size. The flash runs along
the length of the connecting rod and hence does not cause stress concentration under axial
loading. The flash is a maximum of about 0.15 mm thick. Even under bending load the
flash can be eliminated especially when we consider the fact that the solution time will
increase drastically if we do model this feature, and very little increase in strength can be

44
expected. This is due to the fact that the flash being 0.15 mm thick will drastically
increase the model size, if it is modeled. The connecting rod geometry used for FEA can
be seen in Figure 3.2. Note that the flash and the bolt-holes have been eliminated. The
cross section of the connecting rod from failed components reveals that the connecting
rod, as manufactured, is not perfectly symmetric. In the case of one connecting rod, the
degree of non-symmetry in the shank region, when comparing the areas on either side of
the axis of symmetry perpendicular to the connecting rod length and along the web, was
about 5%. This non-symmetry is not the design intent and is produced as a manufacturing
variation. Therefore, the connecting rod has been modeled as a symmetric component.
The connecting rod weight as measured on a weighing scale is 465.9 grams. The
difference in weight between the weight of the solid model used for FEA and the actual
component when corrected for bolt head weight is less than 1%. This is an indication of
the accuracy of the solid model.
3.2 MESH GENERATION
Static FEA
Finite element mesh was generated using parabolic tetrahedral elements with
various element lengths of 2.5 mm (20719 elements), 2 mm (37373 elements), 1.5 mm
(77316 elements), and 1 mm (226409 elements). The von Mises stress was checked for
convergence at ten locations, as shown in Figure 3.3. The results are plotted in Figure 3.4.
For most areas on the connecting rod convergence has been achieved with 1.5 mm
uniform element length. This is evident for all locations, except 9, in Figure 3.4.
Therefore, a finite element mesh was generated with a uniform global element length of

45
1.5 mm, and at locations with chamfers a local element length of 1 mm was used. This
resulted in a mesh with 104471 elements. Further refinement was done locally by using
element length of 0.8 mm (128954 elements). It can be seen that convergence has been
achieved with 1 mm local mesh size. The maximum percentage difference between the
stress values observed between the last two models (the one with 104471 elements and
the one with 128954 elements) is 2.3%, which is small. Hence, the mesh with 104471
elements was used for FEA.
Quasi-Dynamic FEA
The same mesh that was used for static FEA, as presented in the section above,
was also used for quasi-dynamic FEA. Convergence was checked at locations where high
bending stresses are expected. In this case they were checked at locations 12 and 13,
about 87.6 mm from crank end center, as shown in Figure 3.5. As discussed in Chapter 4,
locations 12 and 13 (with reference to Figure 3.5) experience considerably high bending
stresses. Figure 3.6 indicates that convergence of stress σxx was achieved with a mesh
that uses 1.5 mm uniform global element length and 1 mm local element length.
Test Assembly FEA
The mesh used for static FEA used 1.5 mm global element length and 1 mm local
element length at chamfers. The mesh used for assembly FEA was even finer. The mesh
was generated with an element length of 1 mm between the ends of the connecting rod
and 1.5 mm at the cap. Since convergence was checked for the mesh used in static FEA

46
and the mesh used in this case was finer, there was no need to check the convergence
again.
3.3 BOUNDARY CONDITIONS 3.3.1 Loading
Static FEA
The crank and piston pin ends are assumed to have a sinusoidal distributed
loading over the contact surface area, under tensile loading, as shown in the Figure 3.7.
This is based on experimental results (Webster et al. 1983). The normal pressure on the
contact surface is given by:
p = po cos Θ (3.1)
The load is distributed over an angle of 180o. The total resultant load is given by:
Pt = ∫−
2/
2/
π
π po (cos2 Θ) r t dΘ = po r t π / 2 (3.2)
Figure 3.8 describes r, t and Θ. The normal pressure constant po is, therefore, given by:
po = Pt / ( r t π / 2) (3.3)
The tensile load acting on the connecting rod, Pt, can be obtained using the
expression from the force analysis of the slider crank mechanism. This is discussed in
detail in Chapter 2.
For compressive loading of the connecting rod, the crank and the piston pin ends
are assumed to have a uniformly distributed loading through 120o contact surface, as
shown in Figure 3.9 (Webster et al. 1983). The normal pressure is given by:

47
p = po (3.4)
The total resultant load is given by:
Pc = ∫−
3/
3/
π
π po (cos Θ) r t dΘ = po r t √3 (3.5)
The normal pressure constant is then given by:
po = Pc / ( r t √3) (3.6)
Pc can be obtained from the indicator diagram, such as the one shown in Figure 3.10, of
an engine.
In this study four finite element models were analyzed. FEA for both tensile and
compressive loads were conducted. Two cases were analyzed for each case, one with
load applied at the crank end and restrained at the piston pin end, and the other with load
applied at the piston pin end and restrained at the crank end. In the analysis carried out,
the axial load was 26.7 kN (6 kips) in both tension and compression. The pressure
constants for 26.7 kN are as follows:
Compressive Loading:
Crank End: po = 26700/ (24 x 17.056 x √3) = 37.66 MPa
Piston pin End: po = 26700/ (11.97 x 18.402 x √3) = 69.98 MPa
Tensile Loading:
Crank End: po = 26700/ [24 x 17.056 x (π/2)] = 41.5 MPa
Piston pin End: po = 26700/ [11.97 x 18.402 x (π/2)] = 77.17 MPa
Since the analysis is linear elastic, for static analysis the stress, displacement and
strain are proportional to the magnitude of the load. Therefore, the obtained results from
FEA readily apply to other elastic load cases by using proportional scaling factor.

48
Quasi-Dynamic FEA
While performing quasi-dynamic FEA of the connecting rod, the external loads
consisting of reactions or the loads computed at the connecting rod ends in the previous
chapter, were applied to both crank end and the piston pin end of the connecting rod. The
angular velocity, angular acceleration, and linear acceleration were specified in both
magnitude and direction for the connecting rod. All the above-mentioned quantities are
for the crank angle of interest. The center of rotation about which they were calculated
was also specified. The inertia and dynamic loads were calculated and applied internally
by the software (I-DEAS) based on these inputs. This ensures that the loads applied form
a set of completely equilibrated internal and external loads.
While applying the loads, the manner in which loads were applied for axial static
FEA was extended to the case of quasi-dynamic FEA. If the component of the resultant
force along the connecting rod length suggested a tensile load to act on the connecting
rod, the resultant load was applied with cosine distribution. The cosine distribution was
applied 90o on either side of the direction of the resultant load, totally 180o. But if the
component of the resultant force along the connecting rod length suggested a
compressive load to act on the connecting rod, the resultant load was applied with
uniform distribution. The uniformly distributed load was applied 60o on either side of the
direction of the resultant load, totally 120o. The results at the regions near the ends of the
connecting rod are sensitive to the type of load distribution used (uniformly distributed or
cosine distribution). At the crank end transition, however, the stresses differed only by
7% at the crank angle of 432o, when the load distribution was changed from cosine to

49
UDL. Detailed investigation of the actual load distribution was beyond the scope of this
work. Therefore, the method of load distribution suggested by Webster et al. (1983) was
used.
An example will clarify the boundary conditions further. From Table 2.3, consider
crank angle 432o as an example. The application of boundary condition at this crank
angle has been illustrated in Figure 3.11. The computed direction of the resultant load at
the crank end is 73.1o. Therefore, 120o of the surface of the crank end (60o on either side
of this direction) carried a uniformly distributed load with a pressure of 7.7 MPa. Since
the axial components of the load are compressive, loads were applied with uniform
distribution. The resultant of this uniformly distributed compressive load is 5439 N. The
direction of the resultant load at the piston pin end is 39.4o. Therefore, 120o of the surface
of the pin end (60o on either side of this direction) will carry a uniformly distributed load
with a pressure of 0.7 MPa. The resultant of this uniformly distributed compressive load
is 251 N. To account for the dynamic motion of the connecting rod and the resulting
inertia loads, the acceleration boundary conditions are imposed. The translational
acceleration of 17,280,197 mm/s2 in the direction of the crank towards the crank center,
angular velocity of -10.7 rev/s (units used in I-DEAS), and angular acceleration of 19,380
rev/s2 (vector direction normal to the connecting rod plane) are imposed on the
connecting rod. The crank end center is specified as the center of rotation.
As a second example, consider the crank angle 396o from Table 2.3. The axial
components of the loads at both the crank and pin ends are tensile. Therefore, the load
was applied with cosine distribution at both the ends. At the crank end, 90o on either side
of the direction of 0.7o (totally 180o) carried the load with a pressure of 27.2 MPa

50
distributed as a cosine function. The resultant of this load was 17487 N. Similarly, at the
pin end, 90o on either side of the direction of – 4.1o (totally 180o) carried the load with a
pressure of 28.1 MPa distributed as a cosine function. The resultant of the load was 9354
N. In addition, to account for the dynamic motion of the connecting rod and the resulting
inertia loads, the acceleration boundary conditions were imposed. The translational
acceleration of 17,280,197 mm/s2, angular velocity of –32.3 rev/s and angular
acceleration of 2702 rev/s2 are imposed on the connecting rod. The crank end center is
specified as the center of rotation.
Test Assembly FEA
This FEA was carried out to simulate the fatigue test conditions. The testing was
carried out at R = - 1.25 where R = Pmin / Pmax, at three load levels. The tensile load used
in this FEA was 44.5 kN, which was applied in the direction along the length of the
connecting rod. This load was applied directly to the pins attached to the connecting rod
at the piston pin end, as a uniformly distributed load. The compressive load used, 55.6
kN, was also applied in the direction along the length of the connecting rod. Contact
elements were used between the connecting rod and the pins. Friction between the pins
and the connecting rod was also taken into account (coefficient of friction = 0.42). The
pins were press fitted into the connecting rod with no bearings being used, while testing.
The diametral interference between the pins and the connecting rod was 1/1000th of an
inch i.e 0.0254 mm. The interference between the connecting rod and pins was also taken
into account in the finite element model. The interference was approximated by applying
the pressure on the surface of the connecting rod crank end and pin end bores. The

51
pressure is computed using the press fit theory of machine design (Shigley and Mischke,
1989). The pressure was however not applied to the interface region of pins, as the stress
distribution in the pins is not of interest. Assuming the pin to be of the same material as
the connecting rod (i.e. both steel) the contact pressure is given by:
)(2))((
22
22
3
22
io
io
rrRrRRrEp
−−−
=δ (3.7)
At the crank end R = 24 mm, ri = 0, ro = 28.55 mm (approximation), E = 206700
MPa, and δ = 0.0254/2 = 0.0127 mm. Using these values in Equation 3.7, the contact
pressure is 16.04 MPa. At the pin end R = 11.97 mm, ri = 0, ro = 15.32 mm
(approximation), E = 206700 MPa, and δ = 0.0127 mm. Using these values the contact
pressure is 42.69 MPa.
3.3.2 Restraints
Static FEA
As already mentioned, four FEA models were solved. Figure 3.12 shows a FEA
model in which tensile load is applied at the crank end and the piston pin end is
restrained. Note that half of the piston pin inner surface (180o) is completely restrained
(180o of contact surface area is totally restrained, i.e X, Y, Z translations of all the nodes
on this surface are set to zero if the connecting rod is in tension).
Similarly, when the connecting rod is under axial compressive load, 120o of
contact surface area is totally restrained. Figure 3.13 shows FEA model in which
compressive load is applied at the crank end and piston pin end is completely restrained.

52
Quasi-Dynamic FEA
If restraints and forces are both applied to a surface, force will not be transmitted
in the direction in which the restraints are applied. This presents a problem in simulating
a pin joint. A way to simulate the pin joint is to apply all the loads acting on the
connecting rod that keep the connecting rod in dynamic equilibrium at the instant under
consideration (i.e. at a specific crank angle) and then solve the model. Therefore, no
restraints were applied to the model while solving for the case of quasi-dynamic FEA.
The finite element model was solved by eliminating the rigid body motion, achieved by
specifying kinematic degrees of freedom and specifying elimination of rigid body motion
while solving, as opposed to applying restraints. Not applying restraints and using loads
at both ends of the connecting rod permits better representation of the loads transferred
through the pin joints.
Test Assembly FEA
The restraints were applied to the pin at the crank end. All degrees of freedom
were restrained. The FEA model is shown in Figure 3.14. Since the restraints were
applied to the pin rather than the connecting rod, the structural behaviour at even the
crank end of the connecting rod predicted by this FE model can be expected to be
accurate.

53
3.4 VALIDATION OF FEA MODELS
Static FEA
The properties of the material used for linear elastic finite element analysis are
listed in Table 3.1. In order to validate the FEA model, the stresses in the shank region
half way along the length of the connecting rod were compared under two conditions of
compressive load application. First, a 26.7 kN uniformly distributed load was applied at
the piston pin end, while the crank end was restrained. Second, a 26.7 kN uniformly
distributed load was applied at the crank end, while the piston pin end was restrained.
Since the magnitude of the loads are identical under the two conditions, we can expect
the stresses to be same at a location away from the loading and restraints (i.e mid-span)
under the two conditions. A similar comparison was also made for tensile load
application. However, in this case the load distribution on the surface was cosine. The
results are tabulated in Table 3.2. There is very good agreement for the compressive load.
Under tensile load conditions, the stresses differ by a maximum of 2.7% at the same
locations. Two nodes were picked from the flanges and one on the web of the connecting
rod. The locations of the nodes are shown in Figure 3.15. The fact that stresses are
identical at nodes 37478 and 32302, see Table 3.2, also validates the FEA model since
these are nodes symmetric in their position on the flange, with respect to the connecting
rod axis.
Strain gage measurements were also made on a connecting rod under tensile as
well as compressive loads. A comparison of the FEA predictions with the strain gage
measurements is in order. At a distance of 57.8 mm as shown in Figure 3.16, the location

54
of the strain gages, the average strain gage reading from four strain gages was –486
microstrain under a compressive load of 3000 lbs, and 473 microstrain under a tensile
load of 3000 lbs. The results are tabulated in Table 3.3.
Two sets of FEA results are tabulated, FEA-I and FEA-II. FEA-I used a FE model
that included the connecting rod, the pins at the crank and piston pin ends, the
interference fit between pins and the connecting rod, and contact elements. This model is
referred to in this thesis as ‘test assembly FEA’. This model very much simulated the
testing condition. Testing has been described by Afzal (2004). FEA-II used a FE model
that included only the connecting rod. The loads and restraints were applied as described
in Sections 3.3.1 and 3.3.2 for static FEA. The theoretically predicted strain is also
tabulated, calculated as εxx = (F/AE) *106. The cross sectional area at 57.8 mm from
crank end center is 133.7 mm2. Note that the strain gages are located at the fatigue critical
location, near the crank end transition.
From Table 3.3, it is clear that the differences are small and there is very good
agreement between the experimental results and FEA results. This verifies the accuracy
of the modeled geometry, as well as the convergence of the FE mesh. In addition, it
indicates that in the shank region the structural behavior of the connecting rod is
independent of the way the load is applied at the ends. The two FE models differed in the
way the load was applied. FEA-I load was applied through the pins, and FEA-II load was
applied directly on the inner bore of the ends.

55
Quasi-Dynamic FEA
After solving the quasi-dynamic FEA model in I-DEAS, the “.lis” file for this
model lists the loads as follows:
“NET APPLIED LOAD:
FX = -0.33 N, FY = -0.29 N, FZ = 0 N
MX = 0 N-mm, MY = 0 N-mm, MZ = -125.8 N-mm ”
Here, FX, FY and FZ represent net applied loads (sum of all the loads) in X, Y and Z
directions, respectively, and MX, MY, MZ represent moments about X, Y, and Z
directions, respectively. FX and FY are very small as compared to the applied loads and
so is MZ. They are not zero due to round off errors. This indicates that the connecting rod
is in fact in static equilibrium under the effect of the applied loads. This validates the
FEA model. This kind of validation was done for every quasi-dynamic FEA model
solved.
Test Assembly FEA
The section discussing the validation of static FEA model also discussed
validation of test assembly FEA, with reference to the results in Table 3.3. As indicated,
there is very good agreement between the FEA results and the strain gage measurements.
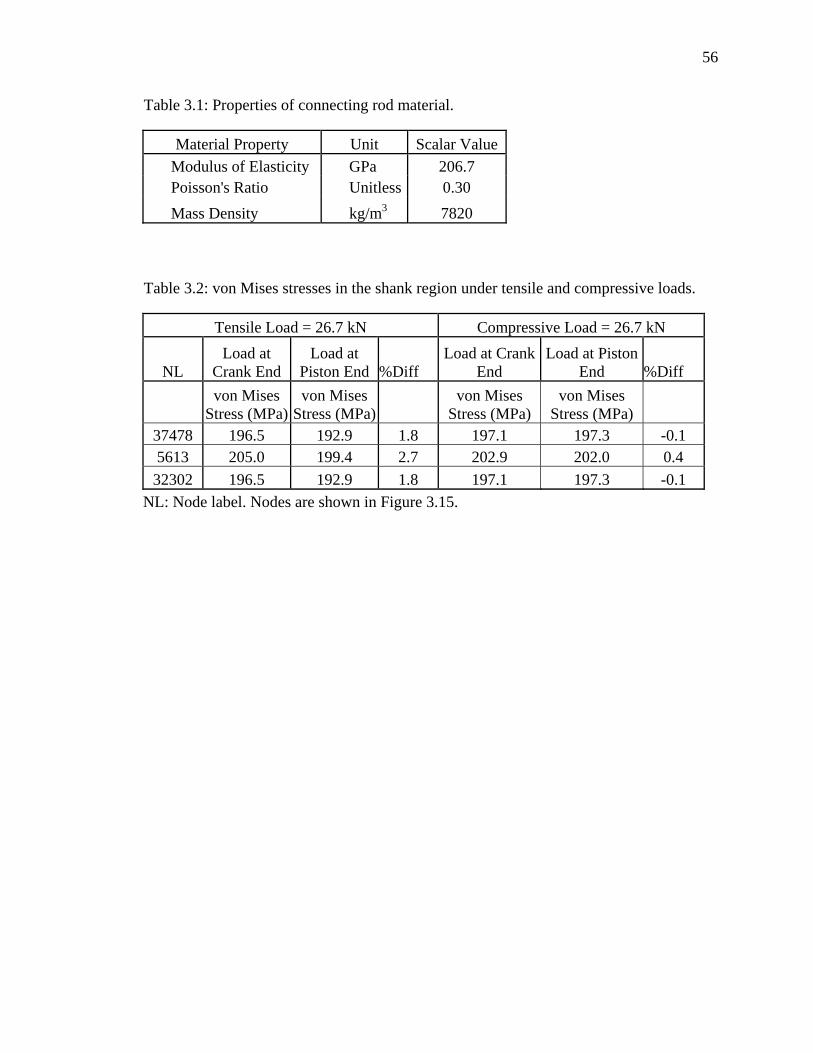
56
Table 3.1: Properties of connecting rod material.
Material Property Unit Scalar Value Modulus of Elasticity GPa 206.7 Poisson's Ratio Unitless 0.30 Mass Density kg/m3 7820
Table 3.2: von Mises stresses in the shank region under tensile and compressive loads.
Tensile Load = 26.7 kN Compressive Load = 26.7 kN
NL Load at
Crank End Load at
Piston End %Diff Load at Crank
End Load at Piston
End %Diff
von Mises
Stress (MPa) von Mises
Stress (MPa) von Mises
Stress (MPa) von Mises
Stress (MPa) 37478 196.5 192.9 1.8 197.1 197.3 -0.1 5613 205.0 199.4 2.7 202.9 202.0 0.4 32302 196.5 192.9 1.8 197.1 197.3 -0.1
NL: Node label. Nodes are shown in Figure 3.15.

57
Table 3.3: Measured and predicted strains. Locations of strain gages are shown in Figure 3.16. Measured strain is the average of four gages.
Load Measured
Strain
FEA-I Prediction-
Test Assembly*
FEA-II prediction-Connecting
Rod Alone** Theoretical Strain***
Diff. Measured vs. FEA-I
Diff. Measured vs. FEA-
II
Diff. Measured
vs. Theoretical
(µstrain) (µstrain) (µstrain) (µstrain) (%) (%) (%)
3000 lbs Tensile load 473 467 477 483 1.2 -0.8 -2.1
3000 lbs
Compressive load -486 -480 -480 -483 1.2 1.2 0.6
* FE model included the connecting rod, the pins at the ends, interference fit, axial load and restraints ** FE model included only the connecting rod with the load, applied as uniformly distributed in compression or a cosine distribution in tension, and restraints *** Theoretical strain calculated from: εxx = *106
AEF

58
Figure 3.1: Geometry of the connecting rod generated by the digitizing process.

59
(a)
(b) Figure 3.2: Solid model of the connecting rod used for FEA. (a) Isometric view. (b) View showing the features at the crank end.

60
(a)
(b) Figure 3.3: Locations on the connecting rod used for checking convergence. (a) Locations on the connecting rod. (b) Location at the oil hole.
1
2
79
8
65
43
10

61
Figure 3.4: von Mises stress at locations 1 through 10 in Figure 3.3. Note that convergence is achieved at most locations with element length of 1.5 mm. Further local refinement with element length of 1 mm produced convergence at location 9.
0.0
50.0
100.0
150.0
200.0
250.0
300.0
350.0
400.0
450.0
500.0
2.5 mm 2 mm 1.5 mm 1.5 mm & 1mm
1.5 mm & 0.8mm
1 mm
Element Length (No. of Elements)
von
Mis
es S
tress
- M
Pa
# 1
# 2
# 3
# 4
# 5
# 6
# 7
# 8
# 9
# 10
(20719) (37373) (77316) (104471) (128954) (226409)

62
(a)
(b) Figure 3.5: Locations on the connecting rod where the stress variation has been traced over one complete cycle of the engine. (a) Locations shown on the 3D connecting rod. (b) Other symmetric locations.
1
2
3
4
5
6
7
8
9 10
11
12
13
14
15
1
3
1214
5
7
10

63
0102030405060708090
100
2 mm uniform 1.5 mm uniform and1 mm local
1 mm uniform
Element Length
Stre
ss σ
xx -
MP
a
Location 12Location 13
Figure 3.6: Stress along the connecting rod axis in the shank of the connecting rod under dynamic loads as a function of mesh size. Locations 12 and 13 are shown in Figure 3.5.
Figure 3.7: Tensile loading of the connecting rod (Webster et al. 1983).

64
Figure 3.8: Polar co-ordinate system R, Θ, Z used. ‘t’ (not shown) is the thickness of the contact surface normal to the plane of paper.
Figure 3.9: Compressive loading of the connecting rod (Webster et al. 1983).
R Θ
r

65
Figure 3.10: Pressure crank angle diagram also known as the indicator diagram (supplied by OEM).
Figure 3.11: Illustration of the way in which boundary conditions were applied when solving the quasi-dynamic FEA model.
0
5
10
15
20
25
30
35
40
0 200 400 600
Crank Angle - degree
Cyl
inde
r Pre
ssur
e - b
ar
Direction of Resultant Force at Crank End Direction of Resultant Force at Pin End
UDL applied over 60o surface on either side of the resultant
73.1o
39.4o Direction (432o) of linear acceleration at the crank end

66
Figure 3.12: FEA model of the connecting rod with axial tensile load at the crank end with cosine distribution over 180o and piston pin end restrained over 180o.
Figure 3.13: FEA model of the connecting rod with axial compressive load at the crank end uniformly distributed over 120o (as shown in Figure 3.9) and piston pin end restrained over 120o.

67
Figure 3.14: Solid model of the test assembly and the finite element model used for the assembly. The FEM includes the axial compressive load applied to the pin at the piston pin end, the restraints applied to the crank pin, the interference simulated by applying pressure, and contact elements between the pins and the connecting rod. Figure 3.15: Location of nodes used for validation of the FEA model.
32302
37478
5613
TEST ASSEMBLY

68
Figure 3.16: Location of two strain gages attached to the connecting rod. Two other gages are on the opposite side in identical positions.
1
2
57.8

69
4. RESULTS OF FINITE ELEMENT STRESS ANALYSIS
The load analysis was carried out to obtain the loads acting on the connecting rod
at any given time in the loading cycle and to perform FEA. Most investigators have used
static axial loads for the design and analysis of connecting rods. However, lately, some
investigators have used inertia loads (axial load varying along the length) during the
design process. A comparison between the two is needed and is discussed in this chapter.
Connecting rods are predominantly tested under axial fatigue loading, as it was
the case for the connecting rod investigated in this project (Afzal, 2004). The maximum
and minimum static loads can simulate the fatigue testing range. As a result, FEA was
carried out under axial static load with no dynamic/inertia loads. In order to capture the
structural behavior of the connecting rod under service operating condition, quasi-
dynamic FEA was also performed. Quasi-dynamic FEA results differ from the static FEA
results due to time varying inertia load of the connecting rod which is responsible for
inducing bending stresses and varying axial load along the length.
The results of the above mentioned analyses are presented and discussed in this
chapter with a view to use them for optimization. This chapter discusses the stress-time
history at critical locations, selection of load or the loads under which the connecting rod
should be optimized, comparison of the quasi-dynamic with static stress analysis results
and obtaining the bending stress magnitude and load ratios.

70
4.1 QUASI-DYNAMIC STRESS ANALYSIS
A few geometric locations were identified on the connecting rod at which the
stresses were traced over the entire load cycle to obtain the stress-time history. These
locations are shown in Figure 3.5.
Static FEA results showed high stresses in the regions of the transitions to the
shank at the crank end and piston pin end, the oil hole, and the cap. From these regions,
representative locations were selected at which stresses could be traced. Locations 1, 3, 9,
10 and 14 in Figure 3.5 are such that a node would be created at these locations and could
be identified for any orientation of the connecting rod. It must be borne in mind that with
auto-mesh used here for meshing, it is difficult to control generation of a node at a
specific location within the interior of a surface or a volume. However, a node is created
and clearly identified at a vertex. Locations 1, 3, 9, 10 and 14 in Figure 3.5 are such
vertices (generated by intersection of surfaces) on the geometry and representative of
those regions. Locations 2, 4, 11 and 15 are symmetrically located, from locations 1, 3,
10, 14, respectively with respect to the centerline of the connecting rod. Locations 12 and
13 were selected to capture the behavior of the shank. Locations 5, 6, 7 and 8 cannot be
termed critical locations, but nevertheless were selected as representative locations for the
crank end region. Location 9 is located on the mid plane. One might argue that the
stresses at the mid plane are usually higher than the stresses at the edge of the component
and that all the chosen locations should be on the mid plane. However, making such a
choice would not have altered the conclusions or observations made in the following
paragraphs. Further references have been made to this effect, where appropriate. Figures
4.1 through 4.8 show the stress-time histories for these locations at a crank speed of 5700

71
rev/min. Also superimposed on these plots is the von Mises stress at these locations under
a static load. The static load used for obtaining the stress is either the maximum load at
the crank end or the maximum load at the pin end, depending on whether the location in
question is closer to the crank end or the pin end. For example, since locations 1 and 2 are
closer to the crank end, the static load used was the maximum load at the crank end (17.7
kN). However, since locations 3 and 4 are closer to the pin end, the static load used was
the maximum load at the pin end (9.4 kN). In addition to the static von Mises stress, von
Mises stress variation under service operating condition is also plotted. The signed von
Mises stress is used in this case. The von Mises stress carries the sign of the principal
stress that has the maximum absolute value.
One of the objectives of performing the quasi-dynamic FEA was to determine the
design loads for optimization. The maximum compressive load that could act on the
connecting rod is the load corresponding to the peak gas pressure. Figure 2.10 indicates
that the peak gas pressure occurs at about 22o crank angle. The axial component of this
load is 21.8 kN, which is the design compressive load for the connecting rod. This is
essentially a static load (where the loads at the crank and pin ends are the same). This
compressive load acts in the region of the connecting rod between the centers of the
crank end and piston pin end. Virtually no load acts on the crank end cap under the
compressive load.
The other extreme load that acts on the connecting rod is the tensile load, which
increases as the engine speed increases, as evident from Figure 4.9. Figure 4.9 shows a
plot of stress variation with engine speed and indicates that tensile stress increases as the
speed increases, due to an increase in the tensile load. This can be anticipated due to the

72
fact that as the engine speed is raised the inertia load due to the piston mass increases,
thus increasing the tensile load on the connecting rod. Maximum tensile load on the
connecting rod is attained at the maximum engine speed. Therefore, the tensile design
load for the connecting rod is a load at the maximum engine speed of 5700 rev/min, as
specified by the OEM. It should be noted that the tensile design load consists of both
structural load and acceleration load. Also notice from Figure 4.9 that the mean stress
increases with increasing engine speed, while the stress amplitude is almost independent
of speed.
Figure 2.15, which shows load variation at 5700 rev/min, indicates that the peak
tensile load (the resultant of the x and y components) at the crank end occurs at 362o.
Figure 2.16, which shows load variation at the pin end, also indicates that the peak tensile
load at the pin end occurs at 362o. This suggests that the load corresponding to 362o crank
angle should be used as the tensile design load. However, before the load at this crank
angle could be used as the design load, it should be verified that this is in fact the worst
case loading. Figure 1.5 shows that the peak stress (not load) at the column bottom occurs
at close to 382o and far from 360o. The stress-time history at location 2 for this
connecting rod (Figure 4.1), indicates a peak at 348o, and far from 360o. Note that
locations 1 and 2 are both right at the transition to the crank end, and therefore, a critical
region. In light of these facts, it is essential to verify that the load corresponding to 362o
crank angle is the worst case loading. Due to symmetry of the load and simplicity of
generating the FEA model, FEA was performed at 360o rather than at 362o. The external
loads (loads at the ends) at 360o crank angle differ from the loads at 362o crank angle by
less than 0.4%.

73
The stress-time histories, Figures 4.1 through 4.8, for all the locations except 5
and 6 indicate peak tensile stress in the neighborhood of 360o crank angle. At locations 2
and 13 (Figures 4.1 and 4.7) the maximum stress occurs at crank angle of 348o (among
the crank angles at which FEA was performed). At locations 3, 4, 7, 8, 9, 10, 11, 14 and
15 the maximum stress does occur at 360o crank angle (among the crank angles at which
FEA has been performed). At locations 5 and 6 the stresses are very low. Clearly, not one
instant of time can be identified as the time at which all the points on the connecting rod
experience the maximum state of stress. However, on the basis of the load analysis and
because most of the critical locations undergo maximum tensile stress at crank angles
near 360o, the load corresponding to this crank angle has been considered as the tensile
design load. The load at 362o is higher than that at 360o by just about 0.2% at the crank
end and 0.4% at the pin end. The benefit of using the load corresponding to 360o crank
angle is simplicity and symmetry of the FE model. The following paragraph further
clarifies the reasons for using the load at 360o crank angle at 5700 rev/min as the tensile
design load.
Under tensile load, the critical regions are at the transitions to the crank end and to
the pin end, such as regions near locations 14, 15, 3 and 4 in Figure 3.5. Under
compressive load the critical region is shifted to right where the transition begins, such as
regions near locations 1 and 2. This is evident by comparing Figures 4.1 and 4.8. The
peak von Mises stress at location 2 is 94 MPa (at 348o crank angle) and that at location 14
is 162 MPa (at 360o crank angle). So in the crank end region, under tensile load the
critical region is near location 14, where the peak stress does in fact occur at crank angle
of 360o. Under compressive load, location 2 (maximum stress of about 100 MPa)

74
becomes more critical, in comparison to location 14 (maximum stress of less than 100
MPa). At the pin end transition (locations 3 and 4), the maximum stress occurs at 360o
crank angle anyway.
The design of the shank region near location 12, for this particular connecting rod,
where peak stress occurs at 348o crank angle is dependent upon the compressive load and
not on the tensile load, since the compressive load is higher in magnitude than the tensile
load. With the requirements of buckling strengths, and the minimum web and rib
dimensions in place, which will keep the stresses low due to higher cross-sectional area,
there is very little likelyhood that this region will violate any stress constraints at crank
angles near 360o.
It should be noted that none of the abovementioned observations would change if
the locations chosen had been on the mid-plane of the connecting rod or a location that
experienced higher stress, but in the vicinity of the location evaluated.
In summary, the design load range for optimization consists of the peak
compressive gas load (static load) of 21.8 kN, and the tensile load at 360o crank angle at
5700 rev/min (dynamic load).
With regards to the load ratio for the connecting rod, at the crank end the load
ratio is -1.23 and at the piston pin end the load ratio is –2.31. The load ratio at the crank
end is based on the peak compressive load of 21.8 kN and peak tensile load of 17.7 kN
(from Figure 2.15). The load ratio at the piston pin end is based on the peak compressive
load of 21.8 kN and peak tensile load of 9.4 kN (from Figure 2.16). The maximum loads
are nearly axial, and for this reason the above ratios are based on axial loads. For this

75
reason, fatigue testing at different load ratios is often conducted in order to test different
regions of the connecting rod (such as in Sonsino and Esper, 1994).
For fatigue design some investigators used the overall operating load range of the
connecting rod (Sarihan and Song, 1990), while some used the load range at the
maximum power output (Pai, 1996). With reference to Figure 4.9, for location 12 the
overall operating stress range is 244 MPa (i.e. -160 MPa to 84 MPa). This stress range is
obtained using the overall load range. The stress range at the maximum speed for this
location is 157 MPa (i.e. –73 MPa to 84 MPa), a 36% decrease (when compared with 244
MPa) in the operating stress range. A 36% change in the stress amplitude can result in
more than an order of magnitude change in the fatigue life. Evidently, using the overall
operating range will lead to a very conservative design of the component. Yet, the overall
operating range of the component has been used for fatigue design (Sarihan and Song,
1990).
An aspect of dynamic loads is the bending stresses they produce and their
significance. All of the locations specified in Figure 3.5 are symmetric with respect to the
centerline of the component. A difference between the stresses of the symmetric locations
in the plots showing stress-time histories indicate presence of bending stress, the
magnitude of which is equal to half the difference. Under static axial load the stress at the
symmetric locations will be the same. One way to evaluate the significance of the
bending stress is to obtain the maximum bending stress that a section will experience and
express it as a percentage of the maximum stress experienced at that section. The
maximum bending stress is 26% of the maximum stress at the section through location 12
(Figure 4.7), 22% of the maximum stress at the section through location 1 (Figure 4.1),

76
6% at the section through location 3 (Figure 4.2), and 7% at the section through location
15 (Figure 4.8). This suggests that bending stiffness needs to be adequate to take care of
these bending loads. Note that the SAE case study (1997), referred to in Chapter 1, also
indicates that bending stiffness is an important design factor. The plot in Figure 4.7 also
highlights the significance of the bending stresses. The resultant loads at either ends of
the connecting rod are lower at 348o, when compared with the loads at 360o crank angle.
Yet, due to the bending stresses, the stress at location 13 in Figure 4.7 is higher at 348o
than at 360o crank angle.
A few observations can be drawn about the state of stress from the stress-time
histories in Figures 4.1 through 4.8. Locations 1, 2, 12, and 13 have a uniaxial state of
stress. Locations 3 and 4 have predominantly uniaxial state of stress. Locations 5, 6, 10,
11, 14 and 15 have a multiaxial, in-phase state of stress (confirmed by using principal
stresses). Locations 7, 8 and 9 have Y components of stress as the significant stresses and
have a predominantly uniaxial state of stress. Since some regions have multiaxial state of
stress, it is essential to determine if the multiaxiality is significant enough to justify using
multiaxial fatigue models. Figure 4.8 indicates that at critical locations 14 and 15 the
stress σyy is as high as 30% of the stress σxx at crank angle of 360o. This is quite
significant. This justifies the need to use multiaxial fatigue models. It is to be noted that
the multiaxiality results from stress concentration, such as at locations 14 and 15.
The equivalent stress approach based on von Mises criterion is commonly used
for multiaxial proportional loading. The equivalent stress amplitude was calculated based
on von Mises criterion, as follows:

77
Sqa = 2
)ττ(τ 6)S(S)S(S)S(S azx2
ayz2
axy22
axaz2
azay2
ayax +++−+−+− (4.1)
The equivalent stress amplitude as calculated using Equation 4.1 and as obtained
from the signed von Mises stress curves in Figures 4.1 through 4.8 were observed to be
equal, as expected.
The equivalent mean stress was calculated as follows:
Sqm = Smx + Smy + Smz (4.2)
Sines had observed that mean shear stress had no effect on cyclic bending or
cyclic torsion fatigue limits (Socie and Marquis, 2000). As a result using Equation 4.2
(which does not take the mean shear stress into account) to compute the mean stress is
justified. Moreover, it captures the beneficial effect of compressive mean stress, which
equivalent mean stress calculated based on von Mises criterion does not.
After obtaining the equivalent mean stress and stress amplitude, the equivalent
stress amplitude at R = -1 (corresponds to SNf) was obtained by using the commonly used
modified Goodman equation:
1SS
SS
u
qm
Nf
qa =+ (4.3)
It was also noticed that the R ratio varies with location on the connecting rod and
engine speed. Figure 4.9 indicates that mean stress varies with engine speed, whereas the
stress amplitude is nearly constant at location 12. The R ratio for location 12 changes
from – 18.8 at 2000 rev/min to – 0.86 at 5700 rev/min. It also varies with the location on
the connecting rod. This is discussed in Section 4.3 while discussing comparison with
other FEA models. The mean stress and stress amplitude at the speed of 5700 rev/min are

78
shown in Figures 4.10 through 4.15 for the locations identified in Figure 3.5. The
combination of mean stress and stress amplitude results in higher fatigue damage at
locations such as 2, 4, and 13, as compared with symmetric locations 1, 3, and 12,
respectively.
4.2 STATIC AXIAL STRESS ANALYSIS
Figures 4.16 through 4.19 show the von Mises stress distribution of the
connecting rod under static axial loading. Figure 4.16 shows the von Mises stress
distribution with tensile load at the piston pin end, while the crank end is restrained.
Figure 4.17 shows the von Mises stress distribution with tensile load at the crank end,
while piston pin end is restrained. Figure 4.18 shows the von Mises stress distribution
with compressive load at the piston pin end, while crank end is restrained. Figure 4.19
shows the von Mises stress distribution with compressive load at the crank end, while
piston pin end is restrained. The load is 26.7 kN in all the cases.
The differences between the four FEA models are now discussed. In order to do
so, the connecting rod has been divided into five regions and nodes were identified for
comparison, as shown in the inset in Figure 4.16. Stresses at the nodes shown in the
Figure 4.16 are compared in Table 4.1. Under tensile load all the five regions must be
compared. Large difference exists between the results of region I, and nodes 3, 4, 5 of
regions II, IV, and V, between FEM-1 and FEM-2. The stress values from the two FEM’s
are very close at nodes 6 and 7 in regions II and node 8 in region III. In FEM-1, the crank
end was completely (all degrees of freedom) restrained, while in FEM-2 the pin end was
completely restrained. The restraints discussed in Section 3.3.2 are representative of a

79
fixed end rather than a pin joint. Therefore, results for regions I and II from FEM-1 and
for regions IV and V from FEM-2 cannot be considered to predict the structural behavior
accurately. A similar argument holds for the case of compressive load (i.e. FEM-3 and
FEM-4). Notice that at nodes 6, 7, 8, and 9, the differences between the stresses predicted
by FEM-3 and FEM-4 are small.
After considering the appropriate regions of the connecting rod, under the tensile
loading, the critical regions in the order of decreasing stress intensity are the oil hole, the
surface of the pin end bore, the piston pin end transition, the extreme end of the cap and
the crank end transition of the connecting rod. Stress distributions at critical regions
under tensile loading have been enlarged in Figures 4.16 and 4.17. Also, the web of the
connecting rod in the transition region shown by the red circle in Figure 4.17 is a critical
region. Under compressive load, the critical regions are the crank end transition and the
pin end transition. Also, the web at the crank end shown in Figure 4.17 has a high stress
region (Figure 4.19).
Figure 4.20 shows the von Mises stress at a few discrete locations at the midplane
along the length of the connecting rod. This plot gives a general idea of the stress
variation along the length of the connecting rod. The static loads for which these stresses
are plotted, are a tensile load of 17.68 kN (load at the crank end at 360o crank angle and
at 5700 rev/min), and a compressive load of 21.8 kN.
The crank end region in Figure 4.20, especially the region near the bolt holes,
shows very low stresses. The highest von Mises stress in the region is about 141 MPa.
However, it should be noted that the bolt hole and the bolt pre-tension are not included in
the finite element model. The bolt pre-tension will induce compressive stresses in this

80
region, which will be beneficial to fatigue life. If this region is to be optimized, the bolt-
hole and the bolt pre-tension should be modeled and considered during the optimization.
Figure 4.20 indicates that the stresses at the small end transition are in the
neighborhood of 400 MPa. Table 4.2 tabulates the von Mises stresses in this region and
the nodes that have been used are shown in Figure 4.21. Table 4.2 also tabulates the von
Mises stresses at the nodes from the web near the crank end of the connecting rod. The
stresses at nodes in this web region, baring node 247, are below 150 MPa. The oil hole is
a region that experiences very high local stresses in tension. FEA results indicate
locations with local stresses in excess of the yield strength (700 MPa). However, it should
be noted that the stresses at the oil hole may not be accurate. This is because the oil hole
is very close to the boundary condition (loading). Moreover, during fatigue testing of the
connecting rod, no failures were observed in the oil hole region (Afzal, 2004).
4.3 COMPARISON OF STATIC AND QUASI-DYNAMIC FEA RESULTS
The maximum load of 17.72 kN at the crank end from the dynamic load analysis
(Figure 2.15) occurs at the crank angle of 362o. The load at the crank end at the crank
angle of 360o is 17.68 kN, a difference of 0.2%. In Figure 4.5 the von Mises stress at
location 9 under a static load of 17.7 kN (the load at 360o crank angle) is superimposed
with the stress variation under dynamic loads (service operating condition). Similar plots
are provided for locations 5, 6, 7, and 8 (Figures 4.3 and 4.4). Evidently, FEA under
static load predicts higher stresses by about 10% at location 9 (compare maximum stress
from quasi-dynamic FEA with static stress), which is one of the critical locations. Similar
trend is observed for locations 5, 6, 7, and 8 in Figures 4.3 and 4.4.

81
The maximum tensile load at the pin end from the dynamic load analysis (Figure
2.16) is 9.44 kN at 362o. At 360o the load (from dynamic analysis) is 9.40 kN. They differ
by about 0.4%. In Figure 4.6 the von Mises stress at location 10 under a static load of
9.40 kN (the load at 360o crank angle) is superimposed with the stress variation of
locations 10 and 11 under dynamic loads (service operating condition). A similar
superimposed plot is provided for locations 3 and 4 (Figure 4.2). Though no significant
difference is observed between the static and the maximum quasi-dynamic stresses for
locations 10 and 11, a difference is observed for locations 3 and 4. As mentioned earlier,
however, locations 10 and 11 are very close to the loading region and the stress values
may not be accurate.
The purpose of the above comparison was to compare load range comprising
static tensile and compressive loads versus a load range comprising dynamic tensile load
and static compressive load. Clearly, the latter is more accurate. So, the dynamic loads,
which simulate the service operating condition, should be incorporated directly into the
design or the optimization process. The cyclic stresses have been discussed in Section
4.4.
As already mentioned in Chapter 3, FE model of the test set up was built up (i.e.
test assembly FEA) and used to verify the strain gage measurements. The axial loads in
the FE model were 44.5 kN tensile load and 55.6 kN compressive load. These are the
loads under which the connecting rod was fatigue tested in the laboratory under R = -1.25
load ratio. Due to the contact problem involved in this FEM, the exact loads were used,
though the analysis was linear elastic. The results from this analysis are presented here
for comparison with other FEA models. Four cases can be identified here for comparison.

82
All the four cases have been diagrammatically represented in Figure 4.22. The first, Case-
1, is the test condition (load ratio R = -1.25) in which the pins at both the ends of the
connecting rod were modeled and connected by contact elements to the connecting rod.
The interference was also modeled and loads and restraints were applied to the pins (the
FE model is also referred to as ‘test assembly FEA’). Second, Case-2, component FEA
with static tensile and compressive loads (load ratio R = -1.25) applied as mentioned in
Section 3.3.1- Static FEA. The third case, Case–3, is the FEA under service condition
considering the overall operating load range of the connecting rod (quasi-dynamic FEA
model used). The fourth case, Case-4, is the FEA under service operating condition,
considering the load range at a constant maximum engine speed of 5700 rev/min (quasi-
dynamic FEA model used). Figure 4.23 compares the R ratios for locations 1, 2, 3, 4, 9,
12, 13, 14, and 15 (locations shown in Figure 3.5) for the four cases mentioned above.
This figure brings out the differences in R ratio under the different cases.
The stresses at locations 5, 6, 7 and 8 are low and, therefore, are not included in
Figure 4.23. The stresses at the oil hole and its vicinity exceeded the yield strength by a
significant margin with the linear elastic FEA at the tensile load of 44.5 kN. However, no
failure was observed in this region during component testing carried out. Evidently the
stresses in this region are not accurate, due to the analysis being linear and the region
being very close to the boundary condition. Therefore, stresses at locations 10 and 11 are
not discussed. However, the other locations considered are at a considerable distance
from the oil hole and stresses are lower than the yield strength of the material. One of the
most prominent observations from the above figure is that the R ratio at these locations
under Case-1 is higher than the R ratio under the overall operating range, Case-3, and less

83
than the operating range at the maximum speed, Case-4 (except for locations 9 and 4).
Connecting rods are also tested in the engine with the load sequence typically consisting
of different engine speeds (Sonsino and Esper, 1994). Notice the difference in R ratio at
location 9 between Case-1 and Case-2.
Figure 4.24 compares the equivalent stress amplitude at R = -1 at the fifteen
different locations under three different cases. The connecting rod was tested under R = -
1.25 load ratio (Afzal, 2004). In order to compare the maximum stress and the stress
amplitude under load ratio of R = -1.25 at loads that are within the operating range of the
connecting rod, the results of Case-2 were scaled for the load of 17.4 kN (the tensile load
at R = -1.25) and compressive load of 21.8 kN
Case-3 and Case-4 are as described in the previous paragraph. Notice that the
equivalent stress amplitude at R = -1 for Case-2 is higher for all the critical locations.
Also the equivalent stress amplitude at R = -1 considering the overall load range is higher
than that at 5700 rev/min constant engine speed. This suggests that axial fatigue testing is
more damaging than engine testing (for all locations, except 5, 6, 7, and 8 which are not
critical locations and the stresses are very low at these locations).
Using the results of FEA in Case-2, Figure 4.25 compares the von Mises stress
under static tensile load of 17.4 kN and maximum positive von Mises stress under engine
operating condition at 5700 rev/min. Figure 4.25 reveals the extent to which the
component will have a higher stress under tensile load (responsible for fatigue damage)
under axial fatigue loading when compared to the service operating condition.

84
4.4 OPTIMIZATION POTENTIAL
Figure 4.26 shows the factor of safety (FS), the ratio of yield strength to
maximum von Mises stress under service operating condition at the fifteen locations
shown in Figure 3.5, over the entire operating load range of the connecting rod. The von
Mises stress used is not the signed von Mises stress. The factor of safety used by the
OEM for the considered connecting rod design is not known, though the FS used for this
connecting rod can be determined.
Figure 4.27 shows the factor of safety, and the ratio of the endurance limit to the
equivalent stress amplitude at R = -1. The FS is 4 or higher in Figure 4.26, and 2.7 or
higher in Figure 4.27 at locations 1, 2, 12, 13, 14 and 15. This clearly shows the large
margins that exist for material removal at these locations. Depending upon the FS used
for optimization, scope for material removal may or may not exist in regions near
locations 3, 4, 9, 10 and 11.
While performing axial fatigue testing of the connecting rods (Afzal, 2004), the
applied load range was much higher than the operational load range. Yet, most
connecting rods failed near the crank end transition. This is an evidence of the extent to
which the connecting rod pin end has been over-designed. Since forces at the pin end are
lower in comparison to the forces at the crank end, the strength of the pin end region
should ideally be lower, in comparison to the strength at the crank end region for
optimum material utilization.
The choice of different locations will definitely show a different picture in terms
of available scope for weight reduction. Stresses at these locations still give a general

85
idea of the scope and direction for optimization. While performing optimization, the
stresses at all the nodes are taken into account rather than stresses at just a few locations.
A linear buckling analysis was performed on the connecting rod. The buckling
load factor for the connecting rod considered is 7.8, which is high. This factor also
indicates that weight reduction is possible. The overall axial displacement of the
connecting rod was measured to be 0.206 mm under the tensile load at 360o crank angle
at 5700 rev/min. This can be seen as a measure of axial stiffness of the connecting rod.
Another important factor for this component is bending stiffness. During optimization of
the connecting rod, this factor has been tackled by attempting to maintain as high a
section modulus as possible.
In summary, the connecting rod design loads are peak gas load as the maximum
compressive load, and dynamic load corresponding to 360o crank angle at 5700 rev/min
engine speed as the maximum tensile load. The connecting rod does have a potential for
weight reduction. Due to high multiaxiality in a few regions of the connecting rod,
equivalent multiaxial stress approach will be used for fatigue design during optimization.
The load range for fatigue design will be the entire operating range as per the industry
trend (Sarihan and Song, 1990). The entire operating range covers the maximum
compressive gas load as one extreme load and the load corresponding to 360o crank angle
at 5700 rev/min engine speed as the other extreme load.

86
Table 4.1: Comparison of static axial stresses under the four FEA model boundary conditions.
Region I II III IV V
Node Label 1 2 3 4 5 6 7 8 9 10 11 12 13 14
Tensile load at pin end (FEM-1)
Stress (MPa) 3.3 46.2 16.8 54.1 221.5 238.9 202.7 192.8 185.3 595.9 147.4 460.3 813.9 952.6
Tensile load at crank end (FEM-2)
Stress (MPa) 465.6 211.7 30.0 108.2 319.9 241.4 200.1 196.6 196.0 355.8 55.4 186.0 4.6 443.0
Compressive load at pin end (FEM-3)
Stress (MPa) 7.3 10.5 2.2 26.2 122.1 249.1 215.4 196.5 202.9 306.7 98.0 57.8 54.0 66.7
Compressive load at crank end (FEM-4)
Stress (MPa) 32.2 26.1 10.3 11.8 175.2 251.4 212.3 196.5 204.7 147.2 11.0 7.7 3.3 8.0
Nodes and regions are shown in Figure 4.16

87
Table 4.2: von Mises stresses at nodes shown in Figure 4.21.
Tensile Load = 15.9 kN Compressive Load = 21.8 kN Node label von Mises stress (MPa) von Mises stress (MPa)
Nodes at the web near the crank end 4933 56 136 7362 98 147 247 98 223
44094 64 116 44102 75 121
Nodes near the pin end transition 212 357 255 216 46 146 272 46 146 266 359 256

88
Figure 4.1: Stress variation over the engine cycle at 5700 rev/min at locations 1 and 2. XX is the σxx component of stress. The stress shown for the static tensile load of 17.7 kN, is the von Mises stress.
Figure 4.2: Stress variation over the engine cycle at 5700 rev/min at locations 3 and 4. XX is the σxx component of stress, YY is the σyy component of stress and so on. The stress shown for the static tensile load of 9.4 kN is the von Mises stress.
X
Y
Z
-150
-100
-50
0
50
100
150
0 200 400 600
Crank Angle- deg
Stre
ss- M
Pa 1-XX
2-XX1-von Mises2-von MisesStatic-17.7 kN
-200
-150
-100
-50
0
50
100
150
200
250
300
0 200 400 600 800
Crank Angle-deg
Stre
ss -
MP
a
3-XX3-YY3-XY3-XZ4-XX4-YY4-XY4-XZ3-von Mises4-von MisesStatic-9.4 kN

89
-50.0
-40.0
-30.0
-20.0
-10.0
0.0
10.0
20.0
30.0
40.0
0 200 400 600
Crank Angle- deg
Stre
ss -
MP
a5-XX5-YY5-XY6-XX6-YY6-XY5-von Mises6-von MisesStatic-17.7 kN
Figure 4.3: Stress variation over the engine cycle at 5700 rev/min at locations 5 and 6. XX is the σxx component of stress, YY is the σyy component and so on. The stress shown for the static tensile load of 17.7 kN is the von Mises stress.
-30.0
-20.0
-10.0
0.0
10.0
20.0
30.0
40.0
0 200 400 600 800
Crank Angle -deg
Stre
ss -M
Pa
7-YY7-XY8-YY8-XY7-von Mises8-von MisesStatic-17.7 kN
Figure 4.4: Stress variation over the engine cycle at 5700 rev/min at locations 7 and 8. YY is the σyy component, XY is the σxy component of stress, and so on. The stress shown for the static tensile load of 17.7 kN is the von Mises stress.

90
-100-50
050
100150200250300350
0 200 400 600
Crank Angle- deg
Stre
ss -
MP
a
9-YY9-von MisesStatic-17.7 kN
Figure 4.5: Stress variation over the engine cycle at 5700 rev/min at location 9. YY is the σyy component. The stress shown for the static tensile load of 17.7 kN is the von Mises stress.
-150-100
-500
50100150200250300350
0 200 400 600
Crank Angle- deg
Stre
ss -
MP
a
10-YY10-ZZ10-YZ11-YY11-ZZ11-YZ10-von Mises11-von MisesStatic-9.4 kN
Figure 4.6: Stress variation over the engine cycle at 5700 rev/min at locations 10 and 11. YY is the σyy component, ZZ is the σzz component of stress and so on. The stress shown for the static tensile load of 9.4 kN is the von Mises stress.

91
-150.0
-100.0
-50.0
0.0
50.0
100.0
0 200 400 600
Crank Angle- deg
Stre
ss -
MP
a 12-XX13-XX12-von Mises13-von MisesStatic-9.4 kN
Figure 4.7: Stress variation over the engine cycle at 5700 rev/min at locations 12 and 13. XX is the σxx component of stress. The stress shown under static tensile load of 9.4 kN is the von Mises stress component.
-100
-50
0
50
100
150
200
250
0 200 400 600
Crank Angle- deg
Stre
ss -
MP
a
14-XX14-YY14-XY15-XX15-YY15-XY14-von Mises15-von MisesStatic-17.7 kN
Figure 4.8: Stress variation over the engine cycle at 5700 rev/min at locations 14 and 15. XX is the σxx component of stress, YY is the σyy component and so on. The stress shown under the static tensile load of 17.7 kN is the von Mises stress.

92
-200
-150
-100
-50
0
50
100
0 1000 2000 3000 4000 5000 6000
Engine RPM
Stre
ss -M
Pa
Max-12Min-12Mean-12Range-12
Figure 4.9: Mean stress, stress amplitude, minimum stress and maximum stress at location 12 (w.r.t. Figure 3.5) on the connecting rod as a function of engine speed. Figure 4.10: Mean stress, stress amplitude, and R ratio of the σxx component, and the equivalent mean stress and equivalent stress amplitude at R = -1 at engine speed of 5700 rev/min at locations 1 through 15.
-50
0
50
100
150
200
250
1 2 3 4 5 6 7 8 9 10 11 12 13 14 15
Location
Stre
ss σ
xx- M
Pa
-12
-10
-8
-6
-4
-2
0
Stre
ss R
atio
Mean Amplitude Eq. Stress Ampl. at R = -1 Eq. Mean Stress R - ratio
-10.47

93
-200
20406080
100120140160180
1 2 3 4 5 6 7 8 9 10 11 12 13 14 15Location
Stre
ss σ
yy- M
Pa
-6
-5
-4
-3
-2
-1
0
Stre
ss R
atio
Mean Amplitude R - ratio
Figure 4.11: Mean stress, stress amplitude and the R ratio of the σyy component at engine speed of 5700 rev/min at locations 1 through 15.
-5
0
5
10
15
20
25
30
1 2 3 4 5 6 7 8 9 10 11 12 13 14 15
Location
Stre
ss σ
zz- M
Pa
-8
-7
-6
-5
-4
-3
-2
-1
0
Stre
ss R
atio
Mean Amplitude R - ratio
Figure 4.12: Mean stress, stress amplitude, and the R ratio of the σzz component at engine speed of 5700 rev/min at locations 1 through 15.

94
Figure 4.13: Mean stress, stress amplitude, and the R ratio of the σxy component at engine speed of 5700 rev/min at locations 1 through 15.
-10
-5
0
5
10
15
20
25
30
1 2 3 4 5 6 7 8 9 10 11 12 13 14 15
Location
Stre
ss σ
xz- M
Pa
-20-18-16-14-12-10-8-6-4-20
Stre
ss R
atio
Mean Amplitude R - ratio
Figure 4.14: Mean stress, stress amplitude, and the R ratio of the σxz component at engine speed of 5700 rev/min at locations 1 through 15.
-30
-20
-10
0
10
20
30
40
50
60
1 2 3 4 5 6 7 8 9 10 11 12 13 14 15
Location
Stre
ss σ
xy- M
Pa
-6
-5
-4
-3
-2
-1
0
Stre
ss R
atio
Mean Amplitude R - ratio
375

95
Figure 4.15: Mean stress, stress amplitude, and the R ratio of the σyz component at engine speed of 5700 rev/min at locations 1 through 15.
Figure 4.16: von Mises stress distribution with static tensile load of 26.7 kN at piston pin end. The crank end was restrained.
-80
-60
-40
-20
0
20
40
60
80
1 2 3 4 5 6 7 8 9 10 11 12 13 14 15
Location
Stre
ss σ
yz- M
Pa
-14
-12
-10
-8
-6
-4
-2
0
Stre
ss R
atio
Mean Amplitude R - ratio
1
2
34
5
67
8
9 1011
1213
14I II III
IVV
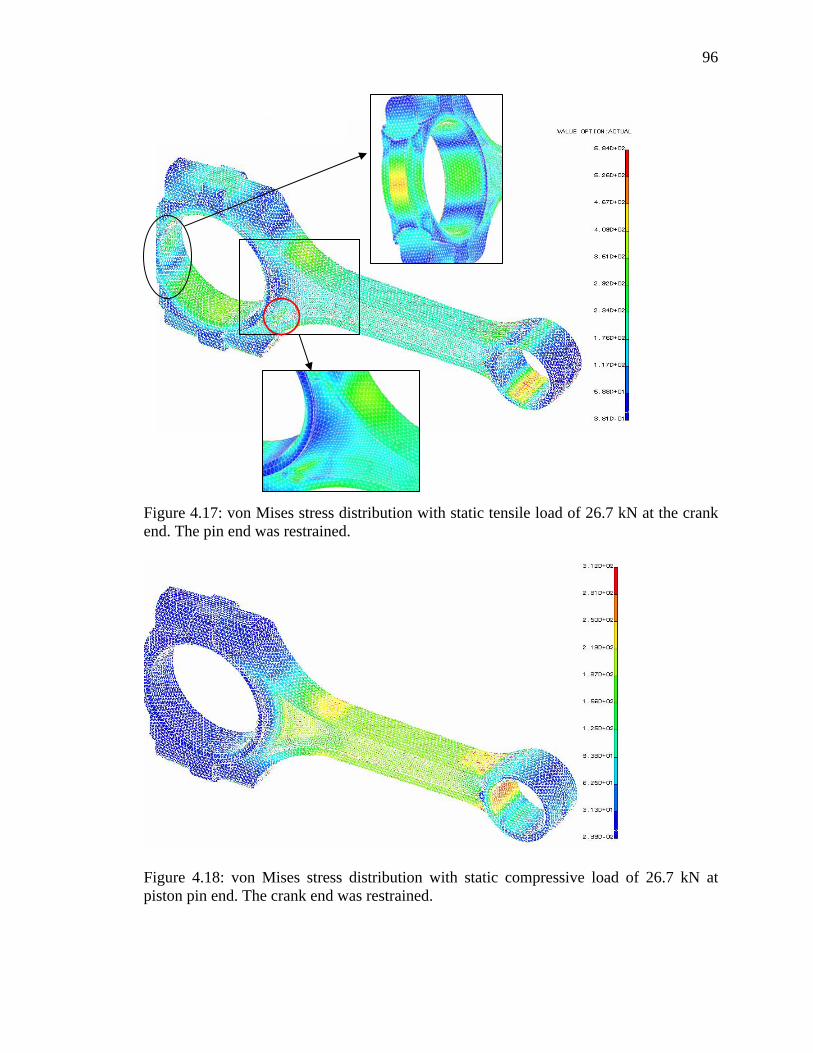
96
Figure 4.17: von Mises stress distribution with static tensile load of 26.7 kN at the crank end. The pin end was restrained.
Figure 4.18: von Mises stress distribution with static compressive load of 26.7 kN at piston pin end. The crank end was restrained.

97
Figure 4.19: von Mises stress distribution with static compressive load of 26.7 kN at the crank end. The piston pin end was restrained. Figure 4.20: von Mises stress at a few discrete locations on the mid plane labeled on the connecting rod, along the length, for tensile (17.7 kN) and compressive loads (21.8 kN).
1
2
34
56 7
8 910
11
12
13
0100200300400500600700800900
1 2 3 4 5 6 7 8 9 10 11 12 13Location
von
Mis
es S
tress
-MP
a
Tensile - 17.7 kN Compressive - 21.8 kN

98
Figure 4.21: Location of the nodes in the web region near the crank end and the pin end transitions, the stresses at which have been tabulated in Table 4.2.
N 247
N 4933 N 44094
N 44102
N 7362
N 272
N 266
N 212
N 216

99
Figure 4.22: Schematic representation of the four loading cases considered for analysis.
0 500
Crank Angle - deg
Forc
e - N Axial
NormalResultantCase 3
Case 4
Curves show load variation at maximum speed
Max. gas load
Case-1: R= -1.25
Case-2: R= -1.25

100
-2.50
-2.00
-1.50
-1.00
-0.50
0.00
0.501 2 3 4 9 12 13 14 15
Location on Connecting Rod
Stre
ss R
atio
Case-1Case-2Case-3Case-4
Figure 4.23: Stress ratios at different locations (shown in Figure 3.5) and for different FEA models. Case-1 is the test assembly FEA, Case-2 is the connecting rod-only FEA (with load range comprising of static tensile and compressive loads for both Case –1 and Case-2), Case-3 is the FEA with overall operating range under service condition, Case-4 is the FEA with operating range at 5700 rev/min under service operating condition. All cases are shown in Figure 4.22.
050
100150200250300350400450
1 2 3 4 5 6 7 8 9 10 11 12 13 14 15Location
Equ
ival
ent s
tress
am
pltu
de a
t R =
-1
Case-2Case-3Case-4
Figure 4.24: Figure shows a comparison of the equivalent stress amplitude at R = -1 (MPa) under three cases. Case-2 is the connecting rod-only FEA (with range comprising of static tensile and compressive loads), Case-3 is the FEA with overall operating range under service condition, Case-4 is the FEA with operating range at 5700 rev/min under service operating condition.

101
0.050.0
100.0150.0200.0250.0300.0350.0400.0450.0
1 2 3 4 9 12 13 14 15Location Label
von
Mis
es S
tress
- MP
a
Case-4Case-2
Figure 4.25: Maximum tensile von Mises stress at different locations on the connecting rod under the two cases. Case-2 is the connecting rod-only FEA (with range comprising of static tensile and compressive loads), and Case-4 is the FEA with operating range at 5700 rev/min under service operating condition.
0
5
10
15
20
25
30
1 2 3 4 5 6 7 8 9 10 11 12 13 14 15Location
FS
0
50
100
150
200
250
300
350
von
Mis
es S
tress
(MP
a)
FS Max. von Mises Stress
Figure 4.26: The factor of safety, ratio of yield strength to the maximum stress, for locations shown in Figure 3.5 and the maximum von Mises stress in the whole operating range.

102
0
5
10
15
20
25
30
1 2 3 4 5 6 7 8 9 10 11 12 13 14 15
Location
FS
0
50
100
150
200
250
Eq.
Stre
ss A
mpl
tude
(MP
a)
FS Eq. Stress Ampltude at R = -1
Figure 4.27: The factor of safety, ratio of the endurance limit to the equivalent stress amplitude at R = -1, at the locations shown in Figure 3.5 and the equivalent stress amplitude at R = -1 considering the whole operating range.

103
5. OPTIMIZATION
Chapter 4 identifies the potential for weight reduction in the existing connecting
rod. It also highlights the fact that if the component is designed on the basis of axial static
load or a load range based on the load variation at the crank end, it will be overdesigned.
In actual operation, few regions of the connecting rod are stressed to much lower stress
levels than under static load corresponding to the load at the crank end. The objective is
to optimize the connecting rod for its weight and manufacturing cost, taking into account
the recent developments.
Optimization carried out here is not in the true mathematical sense. Typically, an
optimum solution is the minimum or maximum possible value the objective function
could achieve under the defined set of constraints. This is not the case here. The weight
of the new connecting rod or the ‘optimized connecting rod’ is definitely lower than the
existing connecting rod. But this may not be the minimum possible weight under the set
of constraints defined. What has been attempted here is an effort to reduce both the
weight and the manufacturing cost of the component. Rather than using numerical
optimization techniques for weight reduction, judgment has been used. The quantitative
results were examined qualitatively, and the structure modified. Since this optimization
task was performed manually, considering manufacturing feasibility and cost, it cannot
be guaranteed that the weight of the ‘optimized part’ is the minimum weight. Cost
reduction has been attempted indirectly by using C-70 steel. C-70 steel was developed

104
not long ago, which is fracture crackable. This fracture cracking technology is one of the
factors that is responsible for the European connecting rod market share shown in Figure
1.1. It eliminates sawing and machining of the rod and cap mating faces and is believed
to reduce the production cost by 25% (Repgen, 1998).
It is difficult, if not impossible, to create a mathematical statement for
optimization taking into account cost, manufacturability, and weight simultaneously. For
this optimization problem, the weight of the connecting rod has very little influence on
the cost of the final component. Change in the material, resulting in a significant
reduction in manufacturing cost, was the key factor in cost reduction. As a result in this
optimization problem, the cost and the weight were dealt with separately.
The following factors have been addressed during the optimization: the buckling
load factor, the stresses under the loads, bending stiffness, and axial stiffness. All of these
have been checked to be within permissible limits. This chapter discusses the constraints
under which weight was reduced, and how the optimized connecting rod compares with
the existing one. It should be noted that the assembly-induced stresses are not included in
the analysis.
5.1 OPTIMIZATION STATEMENT
Objective of the optimization task was to minimize the mass of the connecting rod
under the effect of a load range comprising the two extreme loads, the peak compressive
gas load and the dynamic tensile load corresponding to 360o crank angle at 5700 rev/min,
such that the maximum, minimum, and the equivalent stress amplitude at R = -1 are
within the limits of the allowable stresses. The production cost of the connecting rod was

105
also to be minimized. Furthermore, the buckling load factor under the peak gas load has
to be permissible. The connecting rod has to be interchangeable with the existing one in
the current engine. This requires some of the dimensions in the existing connecting rod to
be maintained. These dimensions are discussed in detail in Section 5.2.4.
Mathematically stated, the optimization statement would appear as follows:
Objective: Minimize Mass and Cost
Subject to:
• Tensile load = dynamic tensile load corresponding to 360o crank angle at
5700 rev/min.
• Compressive load = peak compressive gas load.
• Maximum stress < Allowable stress.
• Equivalent stress amplitude < Allowable stress amplitude (for 106 cycles).
• Side constraints (Component dimensions).
• Manufacturing constraints.
• Buckling load > Factor of safety x the maximum gas load (Recommended
factor of safety, 3 to 6).
5.2 CONSTRAINTS 5.2.1 Applied loads
The load range under which the connecting rod was optimized is comprised of the
tensile load at 360o crank angle at 5700 rev/min and the compressive load of 21.8 kN, as
discussed in the previous chapter. The compressive load of 21.8 kN is independent of the

106
geometry of the connecting rod. The tensile load is, however, dependent upon the specific
geometry, as it is a function of the mass, moment of inertia, and location of C.G.
5.2.2 Allowable stress
Allowable stress is the ratio of yield strength to the factor of safety. A concept
similar to factor of safety, the failure index (FI), was used in this work due to ease of
processing the FEA results. The ratio of the von Mises stress in the existing geometry to
the yield strength of the existing material, referred to as the failure index (FI), was
obtained. The material chosen for the optimized connecting rod was C-70 due to its
fracture crackability. C-70 has a percent elongation of 27%, and the monotonic stress-
strain curve (Adila, 2004) shows the behavior of a relatively ductile material. As a result,
the FI was defined with respect to the yield strength, rather than the ultimate tensile
strength. The factor of safety with respect to the ultimate tensile strength has also been
determined and is discussed later in the chapter. As the name implies, failure index will
be an indication of the failure possibility. The closer the FI to one, the higher the
possibility of failure. A FI or factor of safety was assumed based on work by previous
researchers. Either the assumed FI or the FI in the existing component, whichever was
higher, was used for obtaining the allowable stress at a given location or region of the
connecting rod.
One such critical location is the oil hole at the piston pin end of the connecting
rod. FEA results predict a higher FI at this region than the assumed one. Since the new
material has lower yield strength and fatigue limit, the region was redesigned to maintain
the same FI as the existing connecting rod. At other locations the FI predicted by FEA for
the existing geometry and material (connecting rod) was lower than the assumed value.

107
As a result, the FI at these locations was raised closer to the assumed value in the
optimized part.
The factor of safety applied to the yield strength in this work was 2.1, which
corresponds to a FI of 0.48. The choice was based on the guidelines recommended by
Norton (1996) and also on the ratio of the tensile strength to the tensile stress at a critical
location in the work published by Folgar et al.(1987). In Folgar et al. study, the
maximum tensile stress was 262 MPa and the tensile strength was 552 MPa, for a
connecting rod made of 50-55% by volume Fiber FP reinforced Aluminum casting.
Notice that Folgar et al. (1987) used factor of safety with respect to ultimate tensile
strength. In this work, FS is defined with respect to the yield strength, and will be higher
if defined with respect to the ultimate tensile strength. The factor of safety used in this
work is adequate since, the factors unaccounted for are the angular acceleration of the
crank, which can increase or decrease forces by about 1%, and the assembly stresses
(assembly in engine). Bending stresses can occur due to eccentricities, crankshaft and
case wall deformations, and inertia forces. The bending stresses resulting from inertia
were determined for the existing connecting rod and it was found that the bending
stresses were about 26% of the maximum stress at the section through location 12.
Sonsino and Esper (1994) carried out stress analysis in an engine in which the bending
stresses amounted to only 10% of the axial stresses for a PM connecting rod. This
bending stress included the stresses resulting from inertia, eccentricities and wall and
crankshaft deformations. Therefore, it can be concluded that bending stresses resulting
from eccentricities and crankshaft and wall deformations are small in magnitude.
Bending stresses resulting from inertia have been accounted for and discussed later in this

108
chapter in Section 5.3. This leaves only the bending stresses resulting from eccentricities
and wall deformations, which can now be assumed to be less than 10%, as the
unaccounted factor. Though Sonsino and Esper (1994) performed strain analysis on a PM
connecting rod, similar bending stresses resulting from eccentricities, case wall, and
crankshaft deformation can be expected in a forged steel connecting rod, since they are
dependent on machining of the connecting rod. It is possible to use machining lines with
the same capabilities for connecting rods made of either processes.
The distribution of the FI with respect to the yield strength of the material under
tensile and compressive loads for the existing component was obtained. Figures 5.1 and
5.2 show the FI distribution under tensile and compressive loads, respectively. Figure 5.1
indicates that under the dynamic tensile load, the oil hole has a FI of 0.7, which is the
maximum FI in the component at this load. At the region around the partition on the
piston pin inner surface where the load was applied, the maximum FI is about 0.5. Due to
this region being very close to the boundary condition, the results may not be very
accurate. For the length of the connecting rod between the crank end till nearly the piston
pin center, the maximum FI for the existing connecting rod and material is about 0.4.
Figure 5.2 indicates that under compressive load the maximum FI is 0.395.
For the optimized connecting rod, under tensile load, at the oil hole the maximum
failure index should not exceed 0.7, which means that the stress at the oil hole should not
exceed (0.7 x 574), or 399 MPa. At the piston pin end the strength in the optimized
connecting rod should be nearly the same as that in the exiting component (due to lower
confidence in the stresses at this location). The stresses at the oil hole are sensitive to the
boundary conditions. Similar boundary conditions were used for both the existing and the

109
optimized connecting rods. Moreover, no failures were observed during testing of the
connecting rod or reported by the OEM. Hence, the same high FI was maintained in the
optimized connecting rod at the pin end region near the oil hole. As for the rest of the
connecting rod, the FI could be 0.48 under the tensile and compressive loads, or the
maximum von Mises stress could be 273 MPa (0.48 x 574). The FI discussed in the
above section was with respect to the yield strength of the material. The FI with respect
to the ultimate tensile strength was also determined and is discussed in Section 5.3.
5.2.3 Allowable stress amplitude
Allowable stress amplitude is the ratio of the endurance limit to the factor of
safety. The connecting rod is expected to survive between 108 to 109 cycles. This is the
range into which the expected computed life will fall, assuming that the vehicle will be in
service for 200,000 miles while operating at an average speed of 40 miles/hr, with an
engine speed of 2500 rev/min. Since the S-N curve of steel is known to have a knee at
about 106 cycles, the fatigue strength at 106 cycles can represent the endurance limit for
the material. For the connecting rod to have life on the order of 108 to 109 cycles, the
equivalent stress amplitude for R = -1 at various locations on the connecting rod must be
less than the allowable stress amplitude. Allowable stress amplitude is obtained by
applying a factor of safety to the endurance limit. The endurance limit for steels is known
to exist under non-corrosive conditions and for constant amplitude loading. Sonsino and
Esper (1994) derived endurable stress amplitude, for the connecting rod they designed, at
2 x 10⁶ cycles. Factor of safety was applied to the resulting endurable stress amplitude.
Their PM connecting rod was tested in an engine and found to be satisfactory.

110
The material chosen for the new connecting rod is C-70, which is believed to
decrease the total cost by 25% by virtue of its fracture crackability (Repgen, 1998). Cost
aspects have been discussed in Section 5.6. Properties of the existing material and C-70
material are listed and compared in Table 5.1. Note that while the ultimate tensile
strength is nearly 3% higher, the yield strength of C-70 is 18% lower and the endurance
limit is 20% lower than that of the existing forged steel material. The endurance limit for
the C-70 material is calculated to be 339 MPa, whereas for the existing forged steel
material it is 423 MPa.
The surface finish factor has not been taken into account, since the shot peening
process negates the negative impact that the forged surface finish has on the fatigue life,
by inducing compressive residual stress on the surface.
The equivalent stress amplitude for R = -1 at each node in the FE model is
compared with the allowable stress amplitude of the material. This is tantamount to
comparing the local stresses with the endurance limit of the material, rather than
comparing nominal stress across a section with the endurance limit. Since FEA is used,
the stress concentration effect is inherently accounted for and the stress concentration
factor was not needed.
The FI distribution for the existing geometry with respect to the endurance limit
of the existing material under cyclic load was obtained. The cyclic load consists of the
tensile load at 360o crank angle at 5700 rev/min as one extreme, and maximum
compressive load of 21.8 kN as the other extreme. Figure 5.3 shows the distribution. The
approach used in Section 5.2.1 for deciding the stress limits has been used here. A FI or
factor of safety was assumed based on work by previous researchers. Either the assumed

111
FI or the FI in the existing component, whichever was higher, was used for obtaining the
allowable stress amplitude at a given location or region of the connecting rod. This is
further explained in the following paragraph.
Sonsino and Esper (1994) used a safety factor of 1.66 on the endurable load
amplitude for a PM connecting rod. The same factor was used for the allowable stress
amplitude here. The allowable stress amplitude was thus obtained by applying a factor of
safety of 1.66 to the endurance limit of the material. The allowable equivalent stress
amplitude at R = -1 would then be 204 MPa (338/1.66), or a FI of 0.602. The maximum
FI over the equivalent stress amplitude for R = -1, with respect to the endurance limit of
the material (424 MPa) for the existing connecting rod is 0.87 at the oil hole, which is
greater than 0.602 (maximum allowable FI). As a result, for the optimized connecting rod
to be made of C-70, the maximum FI of 0.87 was used at the oil hole. This means that the
maximum allowable stress amplitude for R = -1 condition is 295 MPa at the oil hole. For
other regions of the optimized connecting rod, from the crank end to the pin end, the
equivalent stress amplitude for R = -1 could be 204 MPa. The existing connecting rod has
a higher factor of safety (or lower FI) at other locations.
5.2.4 Side constraints
The optimized connecting rod is expected to be interchangeable with the existing
one. The diameters of the crank pin hole, D1, the piston pin hole, D2, the overall
thickness of the connecting rod, W1, and the center to center distance, L1, cannot be
changed. These dimensions are indicated in Figure 5.4. The piston pin end fits under the
piston and is supposed to clear off the piston skirt and the piston bottom when in

112
operation. The outer diameter of the piston pin end, D3, and the dimension, H1,
especially at the piston pin transition are ordinarily constrained based on the space
available under the piston. The design and layout of this region and the entire space was
not available. However, these dimensions (D3 and H1) had to be increased to satisfy
stress constraints. The dimensions of the bolts and their holes were also retained. This is
because modeling the bolt-connecting rod interface is a complex problem and beyond the
scope of this work. The dimension H2 was also not changed. All other dimensions of the
connecting rod could be varied, within practical limits.
5.2.5 Buckling load
Linear buckling analysis was performed on the connecting rod with the
compressive load of 21.8 kN, the maximum compressive load in the entire cycle. The
buckling load factor should be between 3 and 6 (Bhandari, 1994). This is further
discussed in Section 5.3.
5.3 OPTIMIZATION UNDER DYNAMIC LOAD
The software used I-DEAS has an optimization module. This optimization
module in I-DEAS has the capability to perform optimization under a set of loads. In the
case of this particular optimization problem, these load sets consist of the tensile load at
360o crank angle at 5700 rev/min and the peak compressive gas load. von Mises stress
under these loads can be constrained. However, one of the constraints defined in Section
5.1 uses equivalent stress amplitude at R = -1 (for life of 106 cycles). I-DEAS does not
offer the capability to define the equivalent stress amplitude at R = -1 as a constraint.

113
The chamfers between the ribs and the web in the connecting rod accounted for a
considerable portion of the cross sectional area. The dimensions of these chamfers varied
over the length of the connecting rod. Problems encountered while using the optimization
module with these chamfers, that had to do with the definition of the geometry, lead to
using an iterative manual procedure using intuition and judgment.
Figures 4.26 and 4.27 were used as a guide to begin optimization. Since the
objective was also to reduce the total production cost of the connecting rod, the material
was changed from the existing forged steel to C-70 steel, which is fracture crackable.
This reduced the yield strength from 700 MPa to 574 MPa. With reference to the
constraints of maximum stress and equivalent stress amplitude in Section 5.1, as
discussed in Sections 5.2.2 and 5.2.3, the allowable maximum von Mises stress is 273
MPa and allowable equivalent stress amplitude at R = -1 is 204 MPa. The loads under
which the results in Figures 4.26 and 4.27 were obtained were as defined in Section 5.1.
Comparing the results in Figure 4.26 with the stress value of 273 MPa and the results in
Figure 4.27 with 204 MPa indicates that regions near locations 1, 2, 12, 13, 14, and 15
(i.e. essentially the entire shank of the connecting rod) offered the greatest potential for
weight reduction. Regions near locations 3, 4, 9, 10, and 11 were already highly stressed.
The regions near locations 5, 6, 7, and 8 also offer potential for weight reduction. This
region involves complex interface between the bolt and the connecting rod and the FEM
would be complex. As a result, it was decided that this region would not be the focus in
this study.
The steps taken for achieving weight reduction can be generalized. The guidelines
followed are with reference to Figure 5.4. In the shank, the rib and the web dimensions,

114
T1 and W3, were reduced. To maintain forgeability, there was a limit to which
dimensions W3 and T1 could be reduced. The section modulus of the new connecting rod
should be high enough to prevent the bending stresses from increasing. In order for the
section modulus to be as high as possible, the width of the rib, W2, was increased and
equated to W4 (i.e. it was increased from 12 mm to 15.9 mm). Obviously the higher the
value of W2, the higher the section modulus. The outer diameter of the pin end, D3, was
increased and the center of the outer surface was offset by O1 in order to add more
material at the oil hole. It was required to increase the strength in this region due to the
lower yield strength and endurance limit of C-70 steel, as compared to the existing forged
steel. O1 is the offset between the centers of the arcs with diameters D3 and D2. In order
to reduce the stress concentration effect at the transition to the pin end the distance
between the ribs of the connecting rod, H1, was increased. The current connecting rod
shank slightly tapers (taper of less than 1o) down from the crank end to the pin end. For
the optimized connecting the shank was parallel since the dimension H1 had to be
increased. Based on the guideline outlined by Repgen (1998), the jig spot was relocated
from the existing location to be entirely on the cap. The radii RB and RS were increased
and L2 decreased to reduce stresses, since relaxing the radii has the effect of reducing the
stress concentration effect. Dimensions W1, H2, L1, D1 and D2 were not changed to
maintain component interchangeability with the existing connecting rod. It must be
mentioned that in addition to the dimensions labeled in Figure 5.4, dimensions of
chamfers in the web and the cap of the connecting rod were varied during optimization.
After following these guidelines and a few iterations, the geometry of the new
connecting rod, as shown in Figure 5.5, was found to be satisfactory in terms of satisfying

115
the constraints listed in Section 5.1. The mass, moment of inertia, and the center of
gravity of the optimized connecting rod were determined and used to obtain the load
variation over the entire cycle of operation of the connecting rod under service operating
conditions. All other parameters (i.e. the piston mass, the engine speed, the pressure
crank angle diagram) were maintained the same as for the previous case (i.e. the existing
connecting rod). This step of determining the load variation was required for every
geometry analyzed. The load corresponding to 360o crank angle at 5700 rev/min
(different from the previous case due to different inertia properties) and the gas load of
21.8 kN were used to perform the FEA. Loads were applied as explained in Section 3.3.1
using the loads tabulated in Table 5.2. Table 5.2 lists few of the results from the dynamic
load analysis performed for the optimized connecting rod.
Following the FEA of this component, the results were processed to obtain the
distribution of the FI with respect to the yield strength (of C-70) under the action of the
tensile and compressive loads, described in Section 5.1, and with respect to the endurance
limit of the C-70 steel under the action of the cyclic load comprising the loads listed in
Section 5.1. When computing FI with respect to the endurance limit, the equivalent stress
amplitude at R = -1 is computed using Equations 4.1, 4.2, and 4.3. The distributions are
shown in Figures 5.6 through 5.8.
Figure 5.6 indicates that the maximum FI under tensile load at the oil hole is 0.68,
which is less than the maximum FI at the oil hole for the existing connecting rod. The
maximum FI under the tensile load for the region of the connecting rod between the
crank end and nearly the center of the piston pin end is 0.454. This is less than the limit
of 0.48 discussed in Section 5.2.2. In Figure 5.6, the inset shows FI distribution on the

116
surface of the pin end bore. Note that the FI is around 0.63, which is higher than the limit
of 0.48. In a study which involved FEA of the connecting rod with the piston pin and the
bushing, it was observed that the stresses in this region (bore of the pin end) were
significantly lower than the stresses predicted with cosine loading. From the results of
this FE analysis (with piston pin and bush) the FI of this region was calculated to be 0.42
(FS of 2.38), which is less than the limit of 0.48 under tensile load. Figure 5.7 indicates
that the maximum FI under compressive load is 0.46, again less than the limit of 0.48.
Figure 5.8 indicates that the maximum FI with respect to the endurance limit of 339 MPa
is 0.79 at the oil hole, which is less than the FI for the existing component of 0.87. The
maximum FI for other regions is 0.48, less than the limit of 0.602. Once a forgeable
connecting rod satisfied the stress constraints, linear buckling analysis was performed on
the connecting rod under the compressive load of 21.8 kN. The Buckling load factor for
the optimized connecting rod is 9.6, which is more than adequate. Mass of the optimized
connecting rod is 395.9 gms, lower than the mass of existing connecting rod by 10%.
Note that this weight does not include the weight of the bolt heads and is the weight of
the connecting rod as shown in Figure 5.5. The 10% weight reduction is computed when
compared with the existing connecting rod, which did not include the bolt heads either.
With the failure index being either equal to that of the existing component or less
than the limit set, the design is clearly acceptable. Table 5.3 compares the minimum
factor of safety (FS) for the existing and the optimized connecting rods in different
regions. These regions have been identified in Figure 5.9. The FS listed in the Table 5.3
are the minimum FS in the region. Regions I and V, as shown in Figure 5.9, are the most
severely stressed regions (the cap and pin end) under the tensile load (Section 5.1). Once

117
again, higher weight reduction may be achieved by applying formal optimization
techniques (i.e. by automating the optimization) than what has been achieved here. The
minimum FS with respect to the yield strength is 2.19 (with the exception of region V,
the oil hole region), and 3.68 with respect to the ultimate tensile strength. By automating
the optimization process the FS in region II under the cyclic load can be made equal to
1.66 (assumed FS discussed in Section 5.2.3) from the current value of 1.69, which can
reduce the weight further.
Based on the discussion so far, it can be concluded that the optimized connecting
rod which was optimized under cyclic load (Section 5.1) has sufficient fatigue strength,
because stress amplitude at R = -1 is less than the allowable stress amplitude, and it has
sufficient strength against yielding, because maximum stress is below the allowable
stress. It also has sufficient strength against buckling (load factor of 9.6).
As already pointed out in Section 4.1, there does not exist an instant of time at
which all the points on the connecting rod experience maximum stress. This is evident
from Figures 4.1 through 4.8, which shows stress variation for the existing connecting
rod. At locations 1, 2, 12, and 13 maximum stress occurs at 348o crank angle (among the
crank angles at which FEA was performed), whereas at locations 3, 4, 7, 8, 9, 10, and 11
maximum stress occurs at 360o crank angle (among the crank angles at which FEA was
performed). At locations 5 and 6 maximum stress occurs at crank angles of 336o and
396o, respectively. Since the optimization was performed under dynamic loads at 360o
crank angle (at 5700 rev/min), a concern is whether the optimized connecting rod with its
new mass and inertia distribution has stresses below the limits at other crank angles. The
concern is due to the fact that in the regions near locations 1, 2, 12 and 13 (Figure 3.5),

118
under the effect of the bending stress the total stress exceeds the stress at 360o crank
angle. The following paragraphs address this concern.
Among the locations selected, regions near locations 5, 6, 7, and 8 are at low
levels of stress, and therefore, are not of concern. At locations 3, 4, 9, 10, 11, 14, and 15
the maximum stress occurred at 360o crank angle in the existing connecting rod. The
same behavior can be expected for the optimized connecting rod.
From Table 5.3, the maximum stress in region II (where locations 1 and 2 are
located) at 360o crank angle can be computed to be 222 MPa. From Figure 4.1, showing
the stress variation for locations 1 and 2 for the existing connecting rod, it is observed
that the maximum stress occurs at 348o crank angle. The bending stress (12 MPa) is about
11% of the axial stress (85 MPa) in that section at 348o crank angle. The weight reduction
in the optimized connecting rod also resulted in a reduction of the bending section
modulus (I/ymax). For the section through location 1, the section modulus reduced by
2.8% for the optimized connecting rod, as compared to the existing one. As a result, the
bending stress for the new connecting would be higher by about 2.8% (assuming the
bending moment to remain the same as in the existing connecting rod, even though the
moment actually decreases due to mass reduction). A 13.8% increase (i.e. 11% + 2.8%)
in 222 MPa stress equals 253 MPa, still within the limit of 273 MPa (maximum allowable
stress). It should also be pointed out that the axial stress at 348o crank angle is lower than
the axial stress at 360o crank angle, so the actual stress will be lower than 253 MPa.
The stress in region III (for locations 12 and 13) at 360o crank angle (tensile load)
is of the order of 116 MPa. This leaves ample margin for bending stresses. In region IV
the maximum stress at 360o crank angle is 229 MPa, below 273 MPa, and the bending

119
stresses are very low in this region. The above discussion validates that the optimized
design is acceptable. It should be noted that the load at 362o crank angle will be higher
than the load at 360o crank angle by less than 1%.
Just as the maximum stress was confirmed to be within the limits of allowable
maximum stress, it is essential to verify that the equivalent stress amplitude at R = -1 is
within the allowable stress amplitude at other crank angles. In region II the minimum FS
from Table 5.3 under cyclic load is 1.69. This minimum FS occurs at a location where the
bending stresses are low and the maximum stress does in fact occur at 360o crank angle
(confirmed using results of Chapter 4). So, there is no concern of the allowable stress
amplitude being violated at other crank angles.
When discussing the FEA results in Chapter 4, the load range comprised the
entire cycle (0o –720o) at 5700 rev/min and the peak compressive gas load. However,
while optimizing the connecting rod, the load range comprised only the load at 360o
crank angle at 5700 rev/min and the maximum gas load. Using results of Chapter 4, it
was found that the equivalent stress amplitude at R = -1 at a few locations of concern (i.e.
locations 2 and 13) between the two load cases differed by less than 2.5%. In addition to
the slight increase in the equivalent stress amplitude at R = -1 due to a difference in the
load range considered, one can expect it to increase also due to the decrease in the section
modulus of 2.8% as previously discussed. The equivalent stress amplitude at R = -1
increased only by about 1% for a 2.8% decrease in the section modulus. Therefore, in
total, one can expect an increase in the equivalent stress amplitude by less than 3.5% at
locations 2 and 13. No differences are observed for other locations ( i.e., locations 1, 12,
14, and 15) between the two load cases.

120
From Table 5.3 the minimum FS under the cyclic load in region II (for locations 1
and 2) is 1.69 (very close to limit of 1.66). However, this minimum FS occurs at a
location where the bending stresses are low and the maximum stress does in fact occur at
360o crank angle. In the optimized connecting rod for regions around locations 1 and 2,
the maximum equivalent stress amplitude at R = -1 is 177 MPa and for regions around
locations 12 and 13 the maximum equivalent stress amplitude at R = -1 is 152 MPa.
Increasing the stress at these locations by 3.6% still keeps the stress within the limit of
204 MPa (Section 5.2.3).
Table 5.4 lists various material and geometric properties for the two connecting
rods. The buckling load factor for the optimized connecting rod (9.6) is higher than the
existing one (7.8). Since no absolute value of permissible displacement was available as a
standard for comparison, a comparison has been made between the existing connecting
rod and the optimized one. Note that, in spite of weight reduction the axial stiffness of the
component has slightly increased (Table 5.4), and IZZ, which is the mass moment of
inertia of the connecting rod about the axis normal to its plane of motion (z axis) and
passing through its C.G., has slightly decreased. The weight is also listed for the two
connecting rods. The weight does not include the weight of the bolt heads and is the
weight of the geometry generated for FEA.
The optimized and existing connecting rod geometries have been superimposed in
Figure 5.10. Notice that the pin end of the optimized connecting rod is slightly larger than
the pin end of the existing connecting rod. The bore diameters at the crank and the pin
ends are the same for the two connecting rods. Material removal from the transition near
the crank end is obvious in this diagram. Figure 5.11 shows the isometric view of the

121
existing and the optimized connecting rod. Figure 5.12 shows a drawing of the optimized
connecting rod. An edge radius of 1.5 mm is required for all the edges (correspondence
with Mr. Tom Elmer from MAHLE Engine Components, Gananoque, ON, Canada). This
radius is not shown in the drawing.
5.4 VALIDATION OF THE CRANK END DESIGN
The crank end of the connecting rod had to be redesigned. Based on the
guidelines by Repgen (1998), the jig spot was relocated so that it would not be in the path
of the fracture crack during the fracture cracking of the cap and rod. In order to validate
the adequacy of the design, a more detailed FEA was performed. In this new FEA, the
bolt holes were modeled, and the cap was split from the rod and connected with two
bolts. The connection between the bolt and the rod, at the threads was modeled using
spring elements with very high stiffness. This region was not modeled with great details,
since the behaviour at the bolt–rod interface was not of interest, as the original design of
the bolt was being retained. The behaviours at the cap-rod interface and of the rod and the
cap under more realistic conditions were of primary interest. The abovementioned model
captures the bolt effect for these behaviours adequately. The bolt pretension was modeled
as shown in Figure 5.13. By applying the bolt pretension load as shown in the Figure
5.13, the behaviour of the rod and cap is captured appropriately, though the behaviour of
the bolt itself is not. The bolt pretension was estimated to be 12.8 kN per bolt. It was
estimated using theory of machine design (Shigley and Mischke, 1989) for a bolt torque
of 20 Nm (specified in OEM workshop manual) for a bolt having major thread diameter
of 7.82 mm. Contact elements were defined between the rod and the cap at their mating

122
surface. Contact elements were also defined between the bolt head and the bolt seat on
the cap. The pin end was restrained, and a tensile load corresponding to 360o crank angle
at 5700 rev/min and a compressive load of 21.8 kN were applied to the connecting rod, as
discussed previously in Section 3.3.1 (tensile load from quasi-dynamic FEA and
compressive load from static FEA). Thus two FEA models were solved, one with a
tensile load and the other with a compressive load. The complete FEA model under
tensile load is shown in Figure 5.14.
Figure 5.15 shows the von Mises stress variation and the displacements of the
model just discussed under the tensile load. The displacement shape of the cap and the
rod, especially at the rod-cap interface indicates that FEM was modeled appropriately.
The von Mises stress in the region of location 9 (Figure 3.5) predicted by the
FEM in Figure 5.14 is 334 MPa. Also, the von Mises stress at the outer corner of rod-cap
interface in Figure 5.15 is in excess of 400 MPa. These are above the limit of 273 MPa by
a significant margin. Of the many nodes on the cap edge shown in Figure 5.16, the node
with minimum radial displacement had a radial displacement value of 0.077 mm. This
displacement is towards the center of the connecting rod bore. However, the clearance
between the crank end bearing and the crankshaft is of the order of 0.026 mm for
connecting rods in this size range (as it was in the case of Goenka and Oh, 1986; Makino
and Koga, 2002).
A few cases were investigated to compare the rigidity of the connecting rod
assembly (with the crank pin and bearing) as opposed to the rigidity of the connecting rod
alone. These included connecting rod with a bearing, connecting rod with bearing in
which the stiffness of the bearing was reduced to a very low value, and a connecting rod

123
with a pin (representing the crankshaft) having radial clearance of 0.026 mm. The
connecting rod used in these cases had the cap integral to the rod.
Comparison of these results indicated that the rigidity of the connecting rod crank
end increased with the bearing assembled in the crank end bore. Moreover, the stresses
and displacements were significantly lower at critical location in the presence of the pin,
indicating that its presence increased the rigidity of the crank end of connecting rod
assembly (when compared with its behavior under cosine loading). The displacements at
the region corresponding to the edge (shown in Figure 5.16) reduced significantly to
lower than the clearance value. The only factor not accounted for in the analysis
mentioned in this paragraph is the presence of the oil film. The oil film is not expected to
reduce the rigidity.
The fracture surface at the cap-rod interface, is also known to increase stiffness
due to a firm contact between the cap and rod (Park et al., 2003). Moreover, from the
discussion in the above paragraph it can be concluded that rigidity of the crank end is
increased in the presence of the crankshaft and the bearing. As a result, springs were
added across the opposite inner edges of the rod and cap to approximately model the
above-mentioned stiffness. Several (twelve) springs with low stiffness (of 1697 N/mm
which, as discussed later was found to be an under-estimated value) were added across
the edges (Figure 5.16) of the cap at the rod-cap interface to uniformly increase the
stiffness. Identical springs were added across the edges of the rod at the rod-cap interface.
The resulting FEM is shown in Figure 5.17. Following the addition of the above stiffness,
the maximum stress at the rod cap interface dropped to about 226 MPa, and the
maximum stress at the crank end cap at location 9 dropped to 248 MPa, both within

124
permissible limits. The stress variation for the FEM shown in Figure 5.17 is shown in
Figure 5.18. Stresses are within the maximum limit of 273 MPa. Note that the outer edge
of the cap at the cap-rod interface is not affected by the springs attachments, even though
stresses at the locations where the springs were connected in the inner edge were very
high. The resulting displacement shape was similar to the one shown in Figure 5.15. The
node with the minimum displacement on the inner edge, for the FEM shown in Figure
5.17, had a displacement value of 0.0367 mm. This is still more than the clearance
between the bearing and the crankshaft. It can, therefore, be concluded that the stiffness
assumed for the springs was not over-estimated, rather it was under estimated. Therefore,
even though stresses are within permissible limits, they are still over-estimated at the
interface.
Figure 5.19 shows the FEM of the assembled connecting rod under compressive
load. The stress distribution for this FEM is shown in Figure 5.20. Note that the stresses
are within the limit of 273 MPa.
Both the rod-cap outer edge and the extreme end of the cap corresponding to
location 9 in Figure 3.5 have nearly R = 0 stress ratio. Since the maximum stress at the
cap edge is 226 MPa, the equivalent stress amplitude at R= -1 is approximately 127 MPa.
Similarly, the maximum stress at the extreme end of the cap is 248 MPa. So the
equivalent stress amplitude at R = -1 is approximately 142 MPa. Both are within the limit
of 204 MPa (Section 5.2.3).

125
5.5 OBSERVATIONS FROM THE OPTIMIZATION EXERCISE
1) The literature survey suggests that connecting rods are typically designed under
static loads. It appears that different regions are designed separately with different static
loads (i.e. such as in Sonsino and Esper, 1994). Doing so increases the number of steps in
the design process. In contrast, a connecting rod could very well be designed under
dynamic loads. Doing so would reduce the number of steps in the design process.
2) Though it is clear from Chapter 4 that the load at 360o crank angle is not
necessarily the worst case loading, it can be concluded from the discussion in Sections
5.3 and 5.4 that a design with this load is clearly satisfactory.
The inertia load on the connecting rod is highest at 360o crank angle. However,
depending on the particular pressure crank angle diagram the maximum load can occur at
a different crank angle. In the case of the connecting rod considered, the peak load
occurred at 362o
3) The applied load distribution at the crank end and at the piston pin end were
based on experimental results (Webster et al., 1983). They were also used in other studies
in the literature by Folgar et al. (1987) and Athavale and Sajanpawar (1991). Since the
details were not discussed by Webster et al., the applicability of the loading to this
connecting rod could not be evaluated.
4) With manual optimization under dynamic loading, at least 10% weight
reduction could be achieved for the same fatigue performance as the existing connecting
rod. This is in spite of the fact that C-70 steel has 18% lower yield strength and 20%
lower endurance limit. Clearly, higher weight reduction may be achieved by automating
the optimization and more accurate knowledge of load distributions at the connecting rod

126
ends. The axial stiffness is about the same as the existing connecting rod and the buckling
load factor is higher than that for the existing connecting rod.
6) A component as shown in Figure 5.21 was also under development. However,
punching out of the cavity in the shank would create distortion issues in the shank during
the operation. From a steel forging point of view the connecting rod as shown in Figure
5.21 with a cavity in the shank is not recommended (correspondence with Mr. Tom
Elmer from MAHLE Engine Components, Gananoque, ON, Canada).
7) C-70 has lower yield strength and endurance limit than the existing material.
As a result it was essential to increase weight in the pin end region. New fracture
cracking materials are being developed (such as micro-alloyed steels) with better
properties (Repgen, 1998). Using these materials can help significantly reduce the weight
of the connecting rod in the pin end and crank end cap. However in the shank region,
manufacturing constraints such as minimum web and rib dimensions for forgeability of
the connecting rod present restrictions to the extent of weight reduction that can be
achieved.
8) Considering static strength, buckling load factor, and fatigue strength, it was
found that the fatigue strength of the connecting rod is the most significant and the
driving factor in the design and optimization of connecting rod.
5.6 MANUFACTURING ASPECTS
The connecting rod manufacturing processes for the conventional steel forging,
powder forging, and fracture crackable steel forging are shown by charts in Figures 5.22,
5.23, and 5.24, respectively. A comparison between the processes can be made by

127
comparing the charts. The following steps in the manufacturing of the existing forged
steel connecting rod can be eliminated by introducing C-70 crackable steel: the heat
treatment, the machining of the mating faces of the crank end, and drilling for the sleeve.
An entire block of machining steps after fracture splitting of C-70 is eliminated.
The fracture splitting process eliminates the need to separately forge the cap and
the body of the connecting rod or the need to saw or machine a one-piece forged
connecting rod into two. In addition, the two fracture split parts share a unique surface
structure at the fractured surface that prevents the rod and the cap from relative
movement (Repgen, 1998). This provides a firm contact and increases the stiffness in this
region (Park et al., 2003).
The fracture splitting is accomplished by making a notch in the connecting rod on
diametrically opposite sides of the crank end bearing surface at the parting line of the rod
and the cap. This notch may be generated by either laser notching, broaching or wire
cutting. A cracking cylinder which runs through the crank end bore and which is
hydraulically operated splits the connecting rod into two. The schematic is shown in
Figure 5.25 (Park et al., 2003).
The only manufacturing aspect taken into account during the optimization process
was maintaining the forgeability of the connecting rod. While reducing the dimensions of
the shank, the web and the rib dimensions were reduced to a certain limit. The web was
retained in the shank for the same reason. Making a cut out in the shank would have
resulted in more efficient utilization of the material, but the shape would not be forgeable
without distortion as discussed in Section 5.5. Another aspect addressed to maintain the

128
forgeability is the draft angle provided on the connecting rod surface. The optimized
geometry shown in Figure 5.12 includes a draft angle of 5o.
5.7 ECONOMIC COST ASPECTS
Paek et al. (1997), introduced a powder metal connecting rod, for their Hyundai
Motor Co. Engine. They note that by adapting powder material for connecting rods,
without loss of stiffness, they saved 10.5% on product cost in comparison with hot steel
forged ConRods. The steel hot forged connecting rods they replaced required machining
at the rod–cap joint face. In a paper published in 1998, Repgen with reference to forged
steel connecting rods notes: “The development of the fracture splitting the connecting
rods achives a total cost reduction up to 25% compared to conventially designed
connecting rods and is widely accepted in Europe”. The result of these two studies
indicate a cost advantage of 15% by switching from powder forged connecting rods to
fracture cracking steel forged connecting rods. Repgen (1998) also makes a similar note:
“In principle, a forged rough part can run on machining lines originally designed for
powder metal connecting rods. An automotive manufacturer analyzed the costs and
proved a cost reduction of 15%”.
Cost is a proprietary issue and is not easily available. There is a study published in
1989, which compared the cost of powder forged and steel forged connecting rods. The
costs are as follows: combined conventional steel forged (single piece rod and cap as
forged) fully machined cost is $5.36 per connecting rod, the fully machined powder
forged connecting rod costs $5.04 per connecting rod. Table 5.5 shows a summary of the
cost break down of forged steel and forged powder metal connecting rods (Clark et al.,

129
1989). Notice that machining steps of a forged steel connecting rod account for 62% of
the total cost, whereas machining of a forged powder metal connecting rod accounts for
42% of the total cost. Connecting rods made of C-70 could have machining cost
significantly less than 62% of the total cost. Elimination of heat treatment
(correspondence with Mr. Tom Elmer from MAHLE Engine Components, Gananoque,
ON, Canada) and lower material costs are other factors responsible for adding to the cost
saving over the powder forged connecting rod.
Without considering the inflation, 25% cost reduction (Repgen, 1998) over the
1989 cost of the connecting rod means a saving of $1.34 per connecting rod. With the
current cost, the savings will be even more.
Costs of the individual processes are also indicated in Figures 5.22 through 5.24.
The study by Clark et al. (1989) was used for obtaining these costs. Using the same study
as a basis, the cost of connecting rod manufactured from C-70 was estimated. For a
fracture splitable steel connecting rod, one can expect similar machining steps as for a
powder forged connecting rod. As a result, it is a reasonable approximation to carry the
machining costs from the powder forging process over to the C-70 forging process. Most
of the other costs in the chart for C-70 have been carried over from the steel forging
process. The cost of the fracture splitting process was not available. As a result, the cost
of shearing the connecting rod and the cap was carried over.
During the optimization of the connecting rod, the material was changed from the
existing forged steel to C-70 steel. In perspective of the above discussion, this change in
material brings down the production cost of the optimized connecting rod by about 25%,
in comparison to the cost of the existing connecting rod. It should be noted that the cost

130
has not been optimized, rather, it has been reduced. For example, consider the factors
listed in Table 5.5. Among these factors it is clear that one important requirement to
reduce machining cost is production of near net shape rough part, which could increase
the forging, heating, and sizing costs. A mathematical model of the cost could be
constructed taking into account all these conflicting factors. One could obtain a solution
for minimum cost within these conflicting parameters. Taking such an approach of
generating a mathematical model of various manufacturing parameters and costs was
beyond the scope of this study.

131
Table 5.1: Summary of mechanical properties of existing forged steel and C-70 steel.
Monotonic Properties Existing Forged Steel C-70 %
ChangeModulus of elasticity (assumed), E, GPa (ksi): 206.8 (29996) 211.5 30674 2.3 Yield strength (0.2% offset), YS , MPa (ksi): 700.0 (101.5) 573.7 (83.2) -18 Ultimate strength, Su , MPa (ksi): 937.7 (136.0) 965.8 (140.1) 2.9 True fracture strength, σf , MPa (ksi): 1266 (183.6) 1141 (165.5) Percent elongation, %EL (%): 24% 27% Percent reduction in area, %RA (%): 42% 25% Hardness, HRC: 28 23
Cyclic Properties
Fatigue strength coefficient, σf' , MPa (ksi): 1,187.9 (172.3) 1,302.6 (188.9) Fatigue strength exponent, b: -0.0711 -0.0928 Cyclic yield strength, YS', MPa (ksi) 619.8 (89.9) 527.6 (76.5) -14.9 Endurance limit*, MPa (ksi) 423.4 (61.4) 338.9 (49.2) -19.9
* Endurance limit computed (for Nf = 106 cycles) using Basquin's equation: Sf = σf' (2Nf)b

132
Table 5.2: Input for quasi-dynamic FEA of the optimized connecting rod, using load analysis results at crankshaft speed of 5700 rev/min.
Crank End Force Piston Pin End Force
Crank Angle
Ang. Vel.
Ang. Acc. Fx Fy Resultant Direction Fx Fy Resultant Direction
Pressure Constant for UDL -N/mm2
Pressure Constant for Cosine Load-
N/mm2
deg rev/s rev/s2 N N N deg N N N deg Crank End
Piston Pin End
Crank End
Piston Pin End*
336 -30.1 -7205 -14255 667 14271 -2.7 7584 1396 7711 10.4 0.00 0.00 22.2 23.2 348 -32.0 -3603 -16078 240 16080 -0.9 8826 815 8863 5.3 0.00 0.00 25.0 26.6 360 -32.7 0 -16854 0 16854 0.0 9404 0 9404 0.0 0.00 0.00 26.2 28.3 362 -32.7 600 -16887 -32 16887 0.1 9443 -145 9444 -0.9 0.00 0.00 26.3 28.4 396 -27.0 10761 -12358 -1223 12418 5.6 6614 -1760 6844 -14.9 0.00 0.00 19.3 20.6
Acceleration at the crank end center is 17,280,197 mm/s2.
Pressure constant for UDL is as defined by Equation 3.6
Pressure constant for cosine load is as defined by Equation 3.3.
* The pressure constants in this column have been corrected for the oil hole.

133
Table 5.3: Minimum factor of safety for regions I through V, shown in Figure 5.9.
Minimum FS for the listed region with respect to Sy.
Minimum FS for the listed region with respect to Su.
Region on Con Rod
Existing Con Rod
New Con Rod -C-70
Existing Con Rod
New Con Rod -C-70
Tensile Load Yield Strength/von Mises
Stress (Tensile Load*) Ultimate Strength/von Mises
Stress (Tensile Load*) I 2.50 2.20 3.35 3.71 II 3.37 2.58 4.51 4.35 III 7.41 4.31 9.92 7.26 IV 2.75 2.25 3.69 3.78 V 1.42 1.42 1.90 2.39
Compressive Load
Yield Strength/von Mises Stress (Compressive Load*)
Ultimate Strength/von Mises Stress (Compressive Load*)
I 20.00 16.10 26.79 27.11 II 2.33 2.19 3.12 3.68 III 4.13 2.36 5.54 3.97 IV 2.68 2.60 3.59 4.38 V 6.37 7.19 8.53 12.11
Cyclic Load Endurance Limit/Equivalent
Stress Amplitude I 2.39 2.09 II 2.56 1.69 III 3.34 1.91 IV 1.72 1.81 V 1.13 1.20
* Loads as defined in Section 5.1.

134
Table 5.4: Comparison of the optimized connecting rod based on dynamic load analysis with the existing connecting rod.
Optimized ConRod
Existing ConRod
% Change
over existing
Material Properties C-70 FS E (GPa) 211.5 206.7 2.3 Yield Strength (MPa) 574 700 -18 Percent Elongation, %EL (%): 27% 24% 12.5
Percent Reduction in Area, %RA (%): 25% 42% -40.5
Ultimate Tensile Strength (MPa) 966 938 2.9 Endurance Limit (MPa) 339 423 -19.9 Other Factors Axial Displacement1 (mm) 0.204 0.206 0.9 Weight2 (gms) 396 440 -10.0
Izz* (kg m2) 0.00139 0.00144 -4.4 Buckling Load Factor 9.6 7.8 23 1Obtained by measuring the overall displacements along the length of the connecting rod under the action of tensile load described in Section 5.1. 2Weight of the connecting rod does not include the weight of the bolt heads. Reported weight is the weight of the solid model generated for FEA. Since both weights are measured under similar conditions, the same weight savings can be expected in actual manufactured connecting rod. *Mass moment of inertia of the connecting rod about the axis normal to the plane of motion and passing through the C.G. of the connecting rod.

135
Table 5.5: Cost split up of forged steel and forged powder metal connecting rods (Clark et al., 1989).
Forged Steel Process $/part Percent Building $0.02 0.40% Raw Material $0.84 15.60% Heating $0.18 3.40% Sizing $0.04 0.80% Forging $0.45 8.30% Trimming $0.13 2.40% Coining $0.11 2.00% Heat treating $0.10 1.80% Shot Blast $0.04 0.80% Shearing $0.04 0.80% Inspection $0.09 1.60% Machining $3.32 62% Total $5.36 100.00%
Powder Metal Process $/part Percent Material $0.91 18.01% Blending $0.08 1.57% Compaction $0.51 10.07% Sintering $0.37 7.33% Forging $0.79 15.60% Machining $2.12 42.01% Building $0.12 2.33% Sawing $0.07 1.40% Inspection $0.08 1.67% Total $5.04 100.00%

136
Figure 5.1: Failure Index (FI), defined as the ratio of von Mises stress to the yield strength of 700 MPa, under the dynamic tensile load at 360o crank angle for the existing connecting rod and material. Maximum FI is 0.696. Figure 5.2: Failure Index (FI), defined as the ratio of von Mises stress to the yield strength of 700 MPa, under peak static compressive load for the existing connecting rod and material. Maximum FI is 0.395.

137
Figure 5.3: Failure Index (FI), defined as the ratio of equivalent stress amplitude at R = -1 to the endurance limit of 423 MPa, for the existing connecting rod and material. Maximum FI is 0.869.

138
Figure 5.4: Drawing of the connecting rod showing few of the dimensions that are design variables and dimensions that cannot be changed. Dimensions that cannot be changed are boxed.

139
Figure 5.5: The geometry of the optimized connecting rod. Figure 5.6: Failure Index (FI), defined as the ratio of von Mises stress to the yield strength of 574 MPa, under the dynamic tensile load occurring at 360o crank angle at 5700 rev/min for the optimized connecting rod. Maximum FI is 0.684.

140
Figure 5.7: Failure Index (FI), defined as the ratio of von Mises stress to the yield strength of 574 MPa, under the peak compressive gas load for the optimized connecting rod. The maximum FI is 0.457. Figure 5.8: Failure Index (FI), defined as the ratio of equivalent stress amplitude at R = -1 to the endurance limit of 339 MPa for the optimized connecting rod. Maximum FI is 0.787.

141
Figure 5.9: The various regions of the connecting rod that were analyzed for Failure Index (FI) or Factor of Safety (FS). Figure 5.10: The existing and the optimized connecting rods superimposed.
II
I
III IV
V
Existing Connecting Rod
Optimized Connecting Rod

142
Figure 5.11: Isometric view of the optimized and existing connecting rod.
Optimized connecting rod
Existing connecting rod

143
Figure 5.12: Drawing of the optimized connecting rod (bolt holes not included).

144
Figure 5.13: Modeling of the bolt pretension in the connecting rod assembly. Figure 5.14: FE model of the connecting rod assembly consisting of the cap, rod, bolt and bolt pre-tension. The external load corresponds to the load at 360o crank angle at 5700 rev/min and was applied with cosine distribution. The pin end was totally restrained.
Pre- tension Load

145
Figure 5.15: von Mises stress variation and displacements of the connecting rod and cap for a FEA model as shown in Figure 5.14 under tensile load described in Section 5.1.The displacement has been magnified 20 times. Figure 5.16: Connecting rod cap on the left shows the edge and the relocated jig spot. The figure of the cap on the right shows the springs connected between the opposite edges of the cap.
Edge Relocated Jig Spot

146
Figure 5.17: FE model of the connecting rod assembly consisting of the cap, rod, bolt and bolt pre-tension. The external load which corresponds to the load at 360o crank angle at 5700 rev/min was applied with cosine distribution. The pin end was totally restrained. Springs were introduced to model stiffness of other components (i.e. crankshaft, bearings, etc.). Figure 5.18: von Mises stress variation for FEM shown in Figure 5.17

147
Figure 5.19: FE model of the connecting rod assembly consisting of the cap, rod, bolt and bolt pre-tension. The external load corresponds to the compressive load of 21.8 kN and was applied as a uniform distribution. The pin end was totally restrained. Figure 5.20: von Mises stress distribution under compressive load of 21.8 kN for the FEM shown in Figure 5.19.

148
Figure 5.21: A trial connecting rod that was considered for optimization. Not a feasible solution since punching out of the hole in the shank would cause distortion.

149
Figure 5.22: Steel forged connecting rod manufacturing process flow chart (correspondence with Mr. Tom Elmer from MAHLE Engine Components, Gananoque, ON, Canada). The number in each box is the cost in $ and the number in the parentheses is the percent of the total cost.
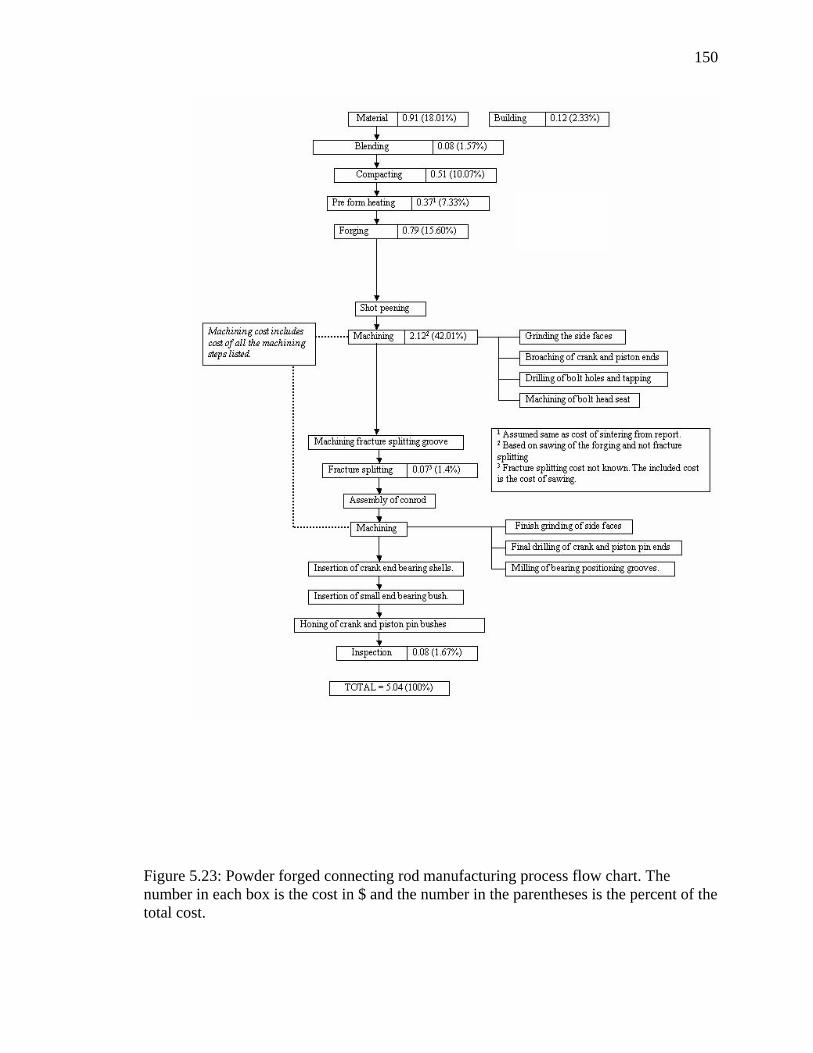
150
Figure 5.23: Powder forged connecting rod manufacturing process flow chart. The number in each box is the cost in $ and the number in the parentheses is the percent of the total cost.

151
Figure 5.24: C-70 connecting rod manufacturing process flow chart (correspondence with Mr. Tom Elmer from MAHLE Engine Components, Gananoque, ON, Canada). The number in each box is the cost in $ and the number in the parentheses is the percent of the total cost.

152
Figure 5.25: The fracture splitting process for steel forged connecting rod (Park et al., 2003).

153
6. SUMMARY AND CONCLUSIONS
This research project investigated weight and cost reduction opportunities that
steel forged connecting rods offer. The connecting rod chosen for this project belonged to
a mid size sedan and was supplied by an OEM. First, the connecting rod was digitized.
Load analysis was performed based on the input from OEM, which comprised of the
crank radius, piston diameter, the piston assembly mass, and the pressure-crank angle
diagram, using analytical techniques and computer-based mechanism simulation tools (I-
DEAS and ADAMS). Quasi-dynamic FEA was then performed using the results from
load analysis to gain insight on the structural behavior of the connecting rod and to
determine the design loads for optimization. The following conclusions can be drawn
from this study:
1) There is considerable difference in the structural behavior of the connecting rod
between axial fatigue loading and dynamic loading (service operating condition). There
are also differences in the analytical results obtained from fatigue loading simulated by
applying loads directly to the connecting rod and from fatigue loading with the pins and
interferences modeled.
2) Dynamic load should be incorporated directly during design and optimization
as the design loads, rather than using static loads. The load range comprising of the peak
gas load and the load corresponding to 360o crank angle at 5700 rev/min (maximum

154
engine speed) can be used for design and optimization (subject to verification for the
particular engine), as the design loads.
3) Bending stresses were significant and should be accounted for. Tensile bending
stresses were about 16% of the stress amplitude (entire operating range) at the start of
crank end transition and about 19% of the stress amplitude (entire operating range) at the
shank center. Bending stresses were negligible at the piston pin end. The R ratio (i.e.
minimum to maximum stress ratio) varies with location on the connecting rod and with
speed of the crankshaft. The stress ratio varies from -0.14 at the extreme end of the
connecting rod cap to -1.95 at the crank end transition, under service operating conditions
considering the entire load range. In the middle of the shank the R ratio varies from –18.8
at 2000 rev/min to -0.86 at 5700 rev/min.
4) The stress multiaxiality is high (the transverse component is 30% of the axial
component), especially at the critical region of the crank end transition. Therefore,
multiaxial fatigue analysis is needed to determine fatigue strength. Due to proportional
loading, equivalent stress approach based on von Mises criterion can be used to compute
the equivalent stress amplitude.
Optimization was performed to reduce weight and manufacturing cost. Cost was
reduced by changing the material of the current forged steel connecting rod to crackable
forged steel (C-70). While reducing the weight, the static strength, fatigue strength, and
the buckling load factor were taken into account. The following conclusions can be
drawn from the optimization part of the study:
1) Fatigue strength was the most significant factor (design driving factor) in the
optimization of this connecting rod.

155
2) The connecting rod was optimized under a load range comprising the dynamic
load at 360o crank angle at maximum engine speed and the maximum gas load. This
connecting rod satisfied all the constraints defined and was found to be satisfactory at
other crank angles also.
3) At locations like the cap-rod outer edge, the extreme end of the cap, and the
surface of the piston pin end bore, the stresses were observed to be significantly lower
under conditions of assembly (with bearings, crankshaft and piston pin and bushing),
when compared to stresses predicted by cosine loading (tensile load).
4) The optimized geometry is 10% lighter and cost analysis indicated it would be
25% less expensive than the current connecting rod, in spite of lower strength of C-70
steel compared to the existing forged steel. PM connecting rods can be replaced by
fracture splitable steel forged connecting rods with an expected cost reduction of about
15% or higher, with similar or better fatigue behaviour.
5) By using other facture crackable materials such as micro-alloyed steels having
higher yield strength and endurance limit, the weight at the piston pin end and the crank
end can be further reduced. Weight reduction in the shank region is, however, limited by
manufacturing constraints.

156
REFERENCES
Afzal, A., 2004, “Fatigue Behavior and Life prediction of Forged Steel and PM Connecting Rods,” Master’s Thesis, University of Toledo. Athavale, S. and Sajanpawar, P. R., 1991, “Studies on Some Modelling Aspects in the Finite Element Analysis of Small Gasoline Engine Components,” Small Engine Technology Conference Proceedings, Society of Automotive Engineers of Japan, Tokyo, pp. 379-389. Balasubramaniam, B., Svoboda, M., and Bauer, W., 1991, “Structural optimization of I.C. engines subjected to mechanical and thermal loads,” Computer Methods in Applied Mechanics and Engineering, Vol. 89, pp. 337-360.
Bhandari, V. B., 1994, “Design of Machine Elements,” Tata McGraw-Hill. Clark, J. P., Field III, F. R., and Nallicheri, N. V., 1989, “Engine state-of-the-art a competitive assessment of steel, cost estimates and performance analysis,” Research Report BR 89-1, Automotive Applications Committee, American Iron and Steel Institute. El-Sayed, M. E. M., and Lund, E. H., 1990, “Structural optimization with fatigue life constraints,” Engineering Fracture Mechanics, Vol. 37, No. 6, pp. 1149-1156.
Folgar, F., Wldrig, J. E., and Hunt, J. W., 1987, “Design, Fabrication and Performance of Fiber FP/Metal Matrix Composite Connecting Rods,” SAE Technical Paper Series 1987, Paper No. 870406. Ferguson, C. R., 1986, “Internal Combustion Engines, Applied Thermosciences,” John Wiley and Sons, Inc.
Goenka, P. K. and Oh, K. P., 1986, “An Optimum Connecting Rod Design Study – A Lubrication Viewpoint,” Journal of Tribology, Transactions of ASME, July 1986, Vol. 108.
Gupta, R. K., 1993, “Recent Developments in Materials and Processes for Automotive Connecting rods,” SAE Technical Paper Series, Paper No. 930491.
Hippoliti, R., 1993, “FEM method for design and optimization of connecting rods for small two-stroke engines,” Small Engine Technology Conference, pp. 217-231.

157
Ishida, S., Hori, Y., Kinoshita, T., and Iwamoto, T., 1995, “Development of technique to measure stress on connecting rod during firing operation,” SAE 951797, pp. 1851-1856. Ludenbach, B., 2002, “Manufacturing Processes and Characteristics of Forged Steel and Forged Powder Metal Connecting Rods,” 24th Forging Industry Technical Conference Proceedings, Forging Industry Association, October 14-16, Cleveland, OH. Makino, T. and Koga, T., Feb 2002, “Crank Bearing Design Based on 3-D Elasto-hydrodynamic Lubrication Theory,” Mitsubishi Heavy Industries, Ltd., Technical Review, Vol. 39, No. 1. Norton R. L., 1996, “Machine Design-An Integrated Approach,” Prentice-Hall. Paek, S. Y., Ryou, H. S., Oh, J. S., and Choo, K. M., 1997, “Application of high performance powder metal connecting rod in V6 engine,” SAE Technical Paper Series, Paper No. 970427. Pai, C. L., 1996, “The shape optimization of a connecting rod with fatigue life constraint,” Int. J. of Materials and Product Technology, Vol. 11, No. 5-6, pp. 357-370.
Park, H., Ko, Y. S., Jung, S. C., Song, B. T., Jun, Y. H., Lee, B. C., and Lim, J. D., 2003, “Development of Fracture Split Steel Connecting Rods,” SAE Technical Paper Series, Paper No. 2003-01-1309.
Rabb, R., 1996, “Fatigue failure of a connecting rod,” Engineering Failure Analysis, Vol. 3, No. 1, pp. 13-28. Repgen, B., 1998, “Optimized Connecting Rods to Enable Higher Engine Performance and Cost Reduction,” SAE Technical Paper Series, Paper No. 980882. Rice, R. C., ed., “SAE Fatigue Design Handbook”, 3rd Edition, Society of Automotive Engineers, Warrendale, PA, 1997. Sarihan, V. and Song, J., 1990, “Optimization of the Wrist Pin End of an Automobile Engine Connecting Rod With an Interference Fit,” Journal of Mechanical Design, Transactions of the ASME, Vol. 112, pp. 406-412.
Serag, S., Sevien, L., Sheha, G., and El-Beshtawi, I., 1989, “Optimal design of the connecting-rod”, Modelling, Simulation and Control, B, AMSE Press, Vol. 24, No. 3, pp. 49-63. Shigley, J. E. and Mischke, C. R., 1989, “Mechanical Engineering Design,” 5th Edition, McGraw-Hill, Inc.
Socie, D. F. and Marquis, G. B., 2000, “Multiaxial Fatigue”, Society of Automotive Engineers, Warrendale, PA.

158
Sonsino, C. M., and Esper, F. J., 1994, “Fatigue Design for PM Components,” European Powder Metallurgy Association (EPMA). Stephens, R. I., Fatemi, A., Stephens, R. R., and Fuchs, H. O., 2000, “Metal Fatigue in Engineering,” 2nd Edition, John Wiley and Sons, Inc.
Webster, W. D., Coffell R., and Alfaro D., 1983, “A Three Dimensional Finite Element Analysis of a High Speed Diesel Engine Connecting Rod,” SAE Technical Paper Series, Paper No. 831322.
Wilson, C. E. and Sadler, P. J., 1993, “Kinematics and Dynamics of Machinery,” 2nd Edition, HarperCollins College Publishers.
Yoo, Y. M., Haug, E. J., and Choi, K. K., 1984, “Shape optimal design of an engine connecting rod,” Journal of Mechanisms, Transmissions, and Automation in Design, Transactions of ASME, Vol. 106, pp. 415-419.

159
APPENDIX I
Analytical Vector Approach To Kinematic And Dynamic Analysis Of The
Connecting Rod.
Figure I.1: Vector representation of slider crank mechanism.
The following quantities will be required for performing FEA to simulate
dynamic conditions using I-DEAS: angular velocity, angular acceleration, loads at the
ends, and linear acceleration of crank end center. Determination of the loads at the ends
requires determination of the inertia load at the center of gravity of the connecting rod
and the inertia load due to piston assembly.
A) Angular velocity of the connecting rod:
Consider the offset slider crank linkage shown in Figure I.1. The linkage can be
described by the following vector equation:
e + r1 + r2 + r3 = 0 (1)
where, e is constant in magnitude and direction. The bold letters represent vector
quantities. Differentiating Equation 1 w.r.t. time:
B
A
O θ
η
C
r1
r3 e
r2
β
ρ

160
e& + r& 1 + r& 2 + r& 3 = 0 (2)
ω1 x r1 + ω2 x r2 – Vp = 0. (3)
where, dr3 / dt = - Vp and t stands for time.
Slider velocity Vp is in x direction and angular velocity vectors are in the z
direction. To eliminate Vp in Equation 3, take the dot product of each term with j:
ω1 x r1 . j + ω2 x r2 . j – Vp . j = 0.
ω1 r1 . i + ω2 r2 . i = 0
ω2 = - ω1 (r1 . i) / (r2 . i) (4)
From Figure I.1, the following equations can be written:
r1 = r1 cosθ i + r1 sinθ j (5)
r2 = r2 cosβ i + r2 sinβ j (6)
Substituting Equations 5 and 6 into Equation 4 gives the magnitude of ω2, the angular
velocity of the connecting rod:
ω2 = - (ω1 r1 cosθ) / (r2 cosβ) (7)
For the case where the offset e = 0, from Figure I.1:
r1 sinθ = r2 sinη = r2 sin(2π –β) = -r2 sinβ
sinβ = - (r1 sinθ) / r2
cosβ = r1 / r2 * [ (r2 / r1)2 - sin2θ ] 0.5 (9)
Equation 7 becomes:
ω2 = - ω1 cosθ / [(r2 / r1)2 - sin2θ] 0.5 where, ω2 = ω2 k (10)

161
B) Angular acceleration of the connecting rod:
To obtain the angular acceleration, consider Equation 3. Differentiating the
equation w.r.t. time, for constant angular velocity of the crank, we get:
ω1 x ω1 x r1 + ω2 x ω2 x r2 + α2 x r2 – ap = 0 (11)
Since the acceleration of the slider is in the x direction, the last term in the above
equation may be eliminated by taking the dot product of each term with the unit vector j.
The result is:
ω1 x ω1 x r1 . j + ω2 x ω2 x r2 . j + α2 x r2 . j = 0
α2 = (- ω1 x ω1 x r1 . j - ω2 x ω2 x r2 . j ) / ( k x r2 . j ) (12)
Evaluating each term:
ω1 x r1 = ω1 k x [r1 cosθ i + r1 sinθ j] = ω1 r1 cosθ (k x i) + ω1 r1 sinθ (k x j)
= ω1 r1 cosθ (j) + ω1 r1 sinθ (-i) = ω1 r1 cosθ j - ω1 r1 sinθ i
ω1 x ω1 x r1 = ω1 k x [ω1 r1 cosθ j - ω1 r1 sinθ i] = -ω12 r1 cosθ i - ω1
2 r1 sinθ j (13)
- ω1 x ω1 x r1 . j = ω12 r1 cosθ i . j + ω1
2 r1 sinθ j . j = ω12 r1 sinθ (14)
ω2 x r2 = ω2 k x [r2 cosβ i + r2 sinβ j] = ω2 r2 cosβ (k x i) + ω2 r2 sinβ (k x j)
= ω2 r2 cosβ j - ω2 r2 sinβ i
ω2 x ω2 x r2 = ω2 k x [ω2 r2 cosβ j - ω2 r2 sinβ i] = ω22 r2 cosβ (k x j) - ω2
2 r2 sinβ (k x i)
= - ω22 r2 cosβ i - ω2
2 r2 sinβ j (15)
-ω2 x ω2 x r2 . j = ω22 r2 cosβ i . j + ω2
2 r2 sinβ j . j = ω22 r2 sinβ (16)
k x r2 . j = k x (r2 cosβ i + r2 sinβ j) . j = r2 cosβ (k x i) . j + r2 sinβ (k x j) . j
= r2 cosβ j . j + r2 sinβ (-i . j) = r2 cosβ (17)
Substituting Equations 14, 16, and 17 into Equation 12 gives the angular
acceleration of the connecting rod:

162
α2 = (1 / r2 cosβ) [ω12 r1 sinθ - ω2
2 r2 sinβ] where, α2 = α2 k (18)
C) Absolute acceleration of the C.G. of the connecting rod:
In order to find the inertia forces at the C.G., we need to find the absolute
acceleration of the C.G. This section will deal with the derivation of absolute acceleration
of any general point on the connecting rod. Substitution of the center of gravity distance
from the crank end center will yield acceleration of the center of gravity.
Absolute acceleration of any point on the connecting rod is given by the following
equation:
a = aA + ω& 2 x ρ + ω 2 x ω 2 x ρ (19)
where, ω& 2 is angular acceleration of the connecting rod, which is equal to α2, and ρ is
the position vector of any point on the connecting rod (refer to Figure I.1). Evaluating
each term in the Equation 19:
aA = - r1 ω12 cos θ i - r1 ω1
2 sin θ j (20)
ρ = u cosβ i + u sinβ j
ω& 2 x ρ = α2 k x [u cosβ i + u sinβ j] = α2 u cosβ (k x i) + α2 u sinβ (k x j)
= α2 u cosβ j + α2 u sinβ (- i) = α2 u cosβ j - α2 u sinβ i (21)
ω 2 x ω 2 x ρ = ω2 x ω2 x ρ
ω2 x ρ = ω2 k x [u cosβ i + u sinβ j] = ω2 u cosβ (k x i) + ω2 u sinβ (k x j)
= ω2 u cosβ j - ω2 u sinβ i
ω2 x ω2 x ρ = ω2 k x [ω2 u cosβ j - ω2 u sinβ i] =ω22 u cosβ (k x j) - ω2
2 u sinβ (k x i)
= ω22 u cosβ (- i) - ω2
2 u sinβ (j) = - ω22 u cosβ i - ω2
2 u sinβ j (22)
Substituting Equations 20, 21, and 22 into Equation 19:

163
a = - r1 ω12 cosθ i - ω2
2 u cosβ i - α2 u sinβ i - r1 ω12 sinθ j - ω2
2 u sinβ j + α2 u cosβ j
= (- r1 ω12 cosθ - ω2
2 u cosβ - α2 u sinβ) i
+ (- r1 ω12 sinθ - ω2
2 u sinβ + α2 u cosβ) j (23)
D) Forces at the connecting rod ends:
Figure 2.2 (b) shows the free body diagram of the piston. By applying dynamic
equilibrium conditions to the piston we get:
FX – mp aP - Gas Load = 0
The corresponding force in the X direction at the pin end is given by:
FBX = – (mp aP + Gas Load) (24)
Figure 2.2 (a) shows the free body diagram of the connecting rod. Application of
dynamic equilibrium conditions to the connecting rod results in the following equations:
FAX + FBX – mc ac.gX = 0 (summing forces in the X direction)
FAY + FBY – mc ac.gY = 0 (summing forces in the Y direction)
Taking moment about point A:
FBX r2 sinη + FBY r2 cosη + (- mc ac.gX) u sinη + (- mc ac.gY) u cosη + (- Izz α2) = 0
Solving the above three equations gives:
FAX = mc ac.gX - FBX (25)
FBY = [mc ac.gY u cosβ - mc ac.gX u sinβ + Izz α2 + FBX r2 sinβ] / r2 cosβ (26)
FAY = mc ac.gY - FBY (27)
From Equation 11 acceleration of the piston is given by:
ap = ω1 x ω1 x r1 + ω2 x ω2 x r2 + α2 x r2 (28)
α2 x r2 = α2 k x (r2 cosβ i + r2 sinβ j) = α2 r2 cosβ (k x i) + α2 r2 sinβ (k x j)
= α2 r2 cosβ j + α2 r2 sinβ (-i) = α2 r2 cosβ j - α2 r2 sinβ i (29)

164
Equation 13: ω1 x ω1 x r1 = - ω12 r1 cosθ i - ω1
2 r1 sinθ j
Equation 15: ω2 x ω2 x r2 = - ω22 r2 cosβ i - ω2
2 r2 sinβ j
Substituting Equations 29, 13, and 15 into Equation 28:
ap = (- ω12 r1 cosθ - ω2
2 r2 cosβ - α2 r2 sinβ) i
+ (- ω12 r1 sinθ - ω2
2 r2 sinβ + α2 r2 cosβ) j (30)
These equations have been used in an EXCEL spreadsheet, referred to in Chapter 2
as DAP (Dynamic Analysis Program), so as to be able to obtain any desired value of
angular velocity, angular acceleration, and reaction forces at the crank and the piston pin
ends for use in Finite Element Analysis.

165
APPENDIX II ReportAppenDyna.xls


