
WIRING DIAGRAMCWD556 + KK01
V1.20
INFORMATION IS SPECIFIC TO OUR PRODUCTS AND CAN CAUSE DAMAGE IF USED WITH NONE COMPATIBLE PRODUCTS SO PLEASE
CHECK WITH YOUR SUPPLIER FOR COMPATIBILITY
© CNC4YOU LTD ALL RIGHTS RESERVED
These drawings are supplied as a guide no guarantees are implied or given. Caution when wiring and check with a qualified professional if unsure. It is your responsibility to check you have complied with your local legislation as to safety requirements for your country as machines can cause injury to users. By using these diagrams you agree to the above safety warning. Documentation will be updated amended at the discretion of CNC4YOU Ltd.
Page 1

Please Read Carefully Before Wiring Your Machine
Tel: 01908 315011© CNC4YOU LTD All Rights Reserved
Certain laws and regulations apply to your use of CNC machines andautomated equipment and it is essential you comply with your local and anyinternational regulations for construction and use of automated equipment.
These diagrams are a guide to wiring your machine and do not constituteadvice or direction to complying with your legal obligations and any healthand safety requirements you must comply with. It is crucial you understandthe dangers and safety implications when automating your machine or systemand special care must be taken when automating your spindle or other cuttingtools or equipment and we are showing a simple setup which will be amendedwithout notice to show the complexity of automating cutting tools, but you areagain responsible for meeting and understanding your specific end customeruse and or meeting all necessary safety regulations and these can and dochange regularly so consult your local regulations and make sure you observeall safety regulations .
You are required and agree to maintain compliance with all applicable lawsand regulations. You understand and agree that you are solely liable forcompliance with such laws and regulations, and under no circumstances shallCNC4YOU Ltd. be responsible or held liable for such compliance. Youunderstand that breach of such laws and regulations may result in bothcriminal and civil sanctions against you. In accordance with these terms andconditions for CNC4YOU Ltd. you agree to indemnify CNC4YOU Ltd. for anyviolation of such laws and regulations. If in doubt seek professional advice ifyou are unsure of your legal obligations.
CNC4YOU Ltd assumes our equipment will be integrated into Industrial controlequipment and as above integrated safely to avoid injury to yourselves or thirdparties. This equipment has not been designed for implicit use for life supportapplications or intrinsically safe designs where life threatening or critically safeuse is required. Our products have not been specifically designed as fail-safeequipment. It is advisable to give adequate training and safety procedures tooperators using automatic equipment.
Before using any drawings or wiring diagrams please check on our website forlatest version, all wiring diagrams should have a version number if not pleasecontact us so we can amend and issue version information.
CONDITIONS OF USE
Page 2

PSU
VCC
GND
VCC = +V = POS
GND = -V = COM
L
N
Brown
Blue
Green/Yellow(Earth)
Tel: 01908 315011© CNC4YOU LTD All Rights Reserved
U�<
UUUU
UUUU
Uo
Uo
3
7 8
4IN OUT LINE LOAD
Earth wire colour Green and yellow.Earth wire bolted to mounting tab.
(FG)
36 Volt 400 Watt PSUProduct Code: 400W36V/11A
48 Volt 480 Watt PSUProduct Code: 500W48V/11A 48 Volt 600 Watt PSUProduct Code: 600W48V/12A
V+L
N
Brown
Blue
Green/Yellow(Earth)(FG)
PSU
Brown
Blue
Green/Yellow
L
N
(Earth)(FG)
(Live)
(Neutral)
5 Volt 1 Amp PSUProduct Code: 5V_2A_PSU 12 Volt 1 Amp PSUProduct Code: 12V_1A_PSU 15 Volt 1 Amp PSUProduct Code: 15V_1A_PSU 24 Volt 2 Amp PSUProduct Code: 24V_2A_PSU
EMI / RFI 10A FilterNo Volt Relay NVR
Product Code: NVR_15AProduct Code: Chassis_Mount_EMI_10A
Product Code: Panel_Mount_IEC 10A
Basic wiring diagram for Machine Power Supplies
This configuration has the following features and shows a basic setup.Power is fed to a NVR (no Volt Relay) which will turn itself OFF if there isa power failure and machine will not restart until Green power button ispressed this is recessed to help avoid accidentally turning power ON.Also Red off button is protruding making it easier to power down machinein an emergency situation. This can be very important as a normal mainsswitch will stay on and when power is returned either manually orautomatically due to power outage being resumed machine could easily start moving without notice and if a simple spindle setup where spindle isturned on with a locked power switch spindle will restart without warning.This can be a real problem when using a Laptop as internal battery can allow Mach 3 or other software to still be running if suitable precautionsaren't observed to stop software when power has been lost, this also applies to computers running from an UPS (uninterruptable power unit).
EMI / RFI filter will help prevent external mains noise causing noise in yoursystem which can result in transients causing spurious steps or triggering limit switch or E-Stop signals, in very noisy environments or industrialpremises it can help reduce transients capable of damaging your electronics.Noise generated by Plasma cutters etc. will require filtering to allow stableoperation of your CNC or automated machinery.
Wiring Diagram for Power Supplies
V-
VCC = +V = POS
GND = -V = COM
L
N
L
N
L
N
Switch Mode PSU's
48 Volt With Our Low InductanceNema 23 Stepper Motors
Page 3

X AXIS WIRING DIAGRAM
YEL
BLK
WHT
BRN
RED
BLU
ORG
GRN
A+ A- B+ B-VCC
GND
P1P3P2
VCC
GND
VCC
GND
VCC
GND
VC
C
GN
D
PSU
5V Regulated
>500mA
VCC GND
+
-
+5V
+5V
+5V
V IN
+5V
+5
V
NO
RLY (Relay)
NO
ENABLE
DIRECTION
STEP
KK
01 C
NC
4YO
U.C
O.U
K
Or PC USB Power
GND- VCC+
Stepper Motor
57HS64-3008 1.5Nm
57HS82-3008B 2.2Nm
60BYGH301B 3.1Nm
60BYGH401-03 4Nm
P1P5P4
P1P7P6
P1P9P8
P1
P17
P16
ST
EP
+
DIR
+
ST
EP
-
DIR
-
RED = RED
BLU = BLUE
YEL = YELLOW
BLK = BLACK
WHT = WHITE
BRN = BROWN
ORG = ORANGE
GRN = GREEN
Product Code: 4_Core_0.5mm_7Amp4 core 0.5mm screened cable
1 2 3 G/Y
Wire 1 to
Wire 2 to
Wire 3 to
Wire G/Y to
ScreenedCableSee Page 3
G/Y = Green and Yellow
WARNINGNEVER Disconnect stepper from Driverwhile power is switched ON as outputMosfets will be damaged. Do not usefuses or isolation switches betweenDriver and Stepper as disconnectionarks can damage output Mosfets
Tel: 01908 315011© CNC4YOU LTD All Rights Reserved
CWD556 Digtal DSP DriverProduct Code: CWD556
Page 4
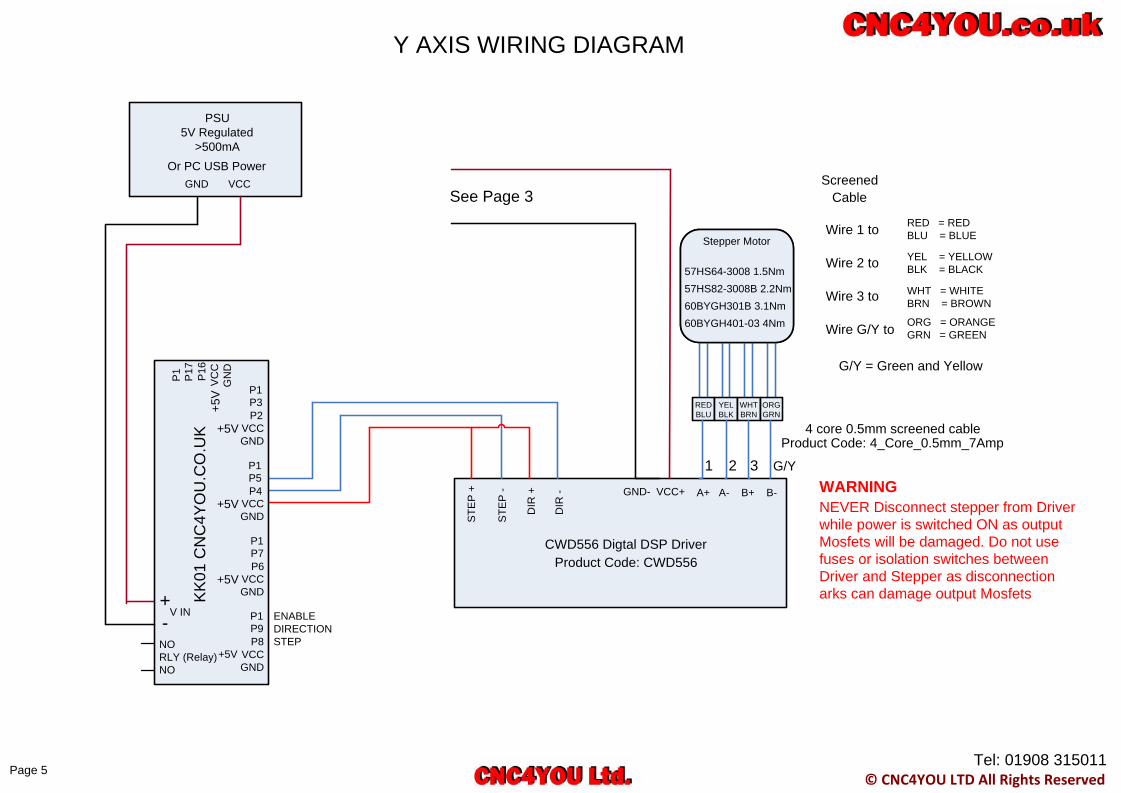
Y AXIS WIRING DIAGRAM
YEL
BLK
WHT
BRN
RED
BLU
ORG
GRN
A+ A- B+ B-
ENABLE
DIRECTION
STEP
Stepper Motor
57HS64-3008 1.5Nm
57HS82-3008B 2.2Nm
60BYGH301B 3.1Nm
60BYGH401-03 4Nm
VCC
GND
P1P3P2
VCC
GND
VCC
GND
VCC
GND
VC
C
GN
D
+
-
+5V
+5V
+5V
V IN
+5V
+5
V
NO
RLY (Relay)
NO
KK
01 C
NC
4YO
U.C
O.U
K
P1P5P4
P1P7P6
P1P9P8
P1
P17
P16
ST
EP
+
DIR
+
ST
EP
-
DIR
- GND- VCC+
PSU
5V Regulated
>500mA
VCC GND
Or PC USB Power
RED = RED
BLU = BLUE
YEL = YELLOW
BLK = BLACK
WHT = WHITE
BRN = BROWN
ORG = ORANGE
GRN = GREEN
Product Code: 4_Core_0.5mm_7Amp4 core 0.5mm screened cable
1 2 3 G/Y
Wire 1 to
Wire 2 to
Wire 3 to
Wire G/Y to
ScreenedCableSee Page 3
G/Y = Green and Yellow
WARNINGNEVER Disconnect stepper from Driverwhile power is switched ON as outputMosfets will be damaged. Do not usefuses or isolation switches betweenDriver and Stepper as disconnectionarks can damage output Mosfets
Tel: 01908 315011© CNC4YOU LTD All Rights Reserved
CWD556 Digtal DSP DriverProduct Code: CWD556
Page 5

Z AXIS WIRING DIAGRAM
YEL
BLK
WHT
BRN
RED
BLU
ORG
GRN
ENABLE
DIRECTION
STEP
A+ A- B+ B-
ST
EP
+
DIR
+ S
TE
P -
DIR
-
VCC
GND
P1P3P2
VCC
GND
VCC
GND
VCC
GND
VC
C
GN
D
+
-
+5V
+5V
+5V
V IN
+5V
+5
V
NO
RLY (Relay)
NO
KK
01 C
NC
4YO
U.C
O.U
K
P1P5P4
P1P7P6
P1P9P8
P1
P17
P16
Stepper Motor
57HS64-3008 1.5Nm
57HS82-3008B 2.2Nm
60BYGH301B 3.1Nm
60BYGH401-03 4Nm
GND- VCC+
PSU
5V Regulated
>500mA
VCC GND
Or PC USB Power
RED = RED
BLU = BLUE
YEL = YELLOW
BLK = BLACK
WHT = WHITE
BRN = BROWN
ORG = ORANGE
GRN = GREEN
Product Code: 4_Core_0.5mm_7Amp4 core 0.5mm screened cable
1 2 3 G/Y
Wire 1 to
Wire 2 to
Wire 3 to
Wire G/Y to
ScreenedCableSee Page 3
G/Y = Green and Yellow
WARNINGNEVER Disconnect stepper from Driverwhile power is switched ON as outputMosfets will be damaged. Do not usefuses or isolation switches betweenDriver and Stepper as disconnectionarks can damage output Mosfets
Tel: 01908 315011© CNC4YOU LTD All Rights Reserved
CWD556 Digtal DSP DriverProduct Code: CWD556
Page 6

A AXIS WIRING DIAGRAM
YEL
BLK
WHT
BRN
RED
BLU
ORG
GRN
EN
AB
LE
DIR
EC
TIO
N
ST
EP
A+ A- B+ B-
ST
EP
+
DIR
+
ST
EP
-
DIR
-
Stepper Motor
57HS64-3008 1.5Nm
57HS82-3008B 2.2Nm
60BYGH301B 3.1Nm
60BYGH401-03 4Nm
VCC
GND
P1P3P2
VCC
GND
VCC
GND
VCC
GND
VC
C
GN
D
+
-
+5V
+5V
+5V
V IN
+5V
+5
V
NO
RLY (Relay)
NO
KK
01 C
NC
4YO
U.C
O.U
K
P1P5P4
P1P7P6
P1P9P8
P1
P17
P16
GND- VCC+
PSU
5V Regulated
>500mA
VCC GND
Or PC USB Power
RED = RED
BLU = BLUE
YEL = YELLOW
BLK = BLACK
WHT = WHITE
BRN = BROWN
ORG = ORANGE
GRN = GREEN
Product Code: 4_Core_0.5mm_7Amp4 core 0.5mm screened cable
1 2 3 G/Y
Wire 1 to
Wire 2 to
Wire 3 to
Wire G/Y to
ScreenedCableSee Page 3
G/Y = Green and Yellow
WARNINGNEVER Disconnect stepper from Driverwhile power is switched ON as outputMosfets will be damaged. Do not usefuses or isolation switches betweenDriver and Stepper as disconnectionarks can damage output Mosfets
Tel: 01908 315011© CNC4YOU LTD All Rights Reserved
CWD556 Digtal DSP DriverProduct Code: CWD556
Page 7

B AXIS WIRING DIAGRAM
YEL
BLK
WHT
BRN
RED
BLU
ORG
GRN
ENABLE
DIRECTION
STEP
A+ A- B+ B-
ST
EP
+
DIR
+
ST
EP
-
DIR
-
VCC
GND
P1P3P2
VCC
GND
VCC
GND
VCC
GND
VC
C
GN
D
+
-
+5V
+5V
+5V
V IN
+5V
+5
V
NO
RLY (Relay)
NO
KK
01 C
NC
4YO
U.C
O.U
K
P1P5P4
P1P7P6
P1P9P8
P1
P17
P16
Stepper Motor
57HS64-3008 1.5Nm
57HS82-3008B 2.2Nm
60BYGH301B 3.1Nm
60BYGH401-03 4Nm
GND- VCC+
PSU
5V Regulated
>500mA
VCC GND
Or PC USB Power
RED = RED
BLU = BLUE
YEL = YELLOW
BLK = BLACK
WHT = WHITE
BRN = BROWN
ORG = ORANGE
GRN = GREEN
Product Code: 4_Core_0.5mm_7Amp4 core 0.5mm screened cable
1 2 3 G/Y
Wire 1 to
Wire 2 to
Wire 3 to
Wire G/Y to
ScreenedCableSee Page 3
G/Y = Green and Yellow
WARNINGNEVER Disconnect stepper from Driverwhile power is switched ON as outputMosfets will be damaged. Do not usefuses or isolation switches betweenDriver and Stepper as disconnectionarks can damage output Mosfets
Tel: 01908 315011© CNC4YOU LTD All Rights Reserved
CWD556 Digtal DSP DriverProduct Code: CWD556
Page 8
YEL
BLK
WHT
BRN
RED
BLU
ORG
GRN
A+ A- B+ B-+ - DIR+ DIR- EN+ EN-
X AXIS WIRING DIAGRAM
STEP
DIR
EC
TIO
N
Tel: 01908 315011
STEPS
TE
P
YEL
BLK
WHT
BRN
RED
BLU
ORG
GRN
A+ A- B+ B-+ - DIR+ DIR- EN+ EN- GND- VCC+STEP
DIR
EC
TIO
N
STEP
ST
EP
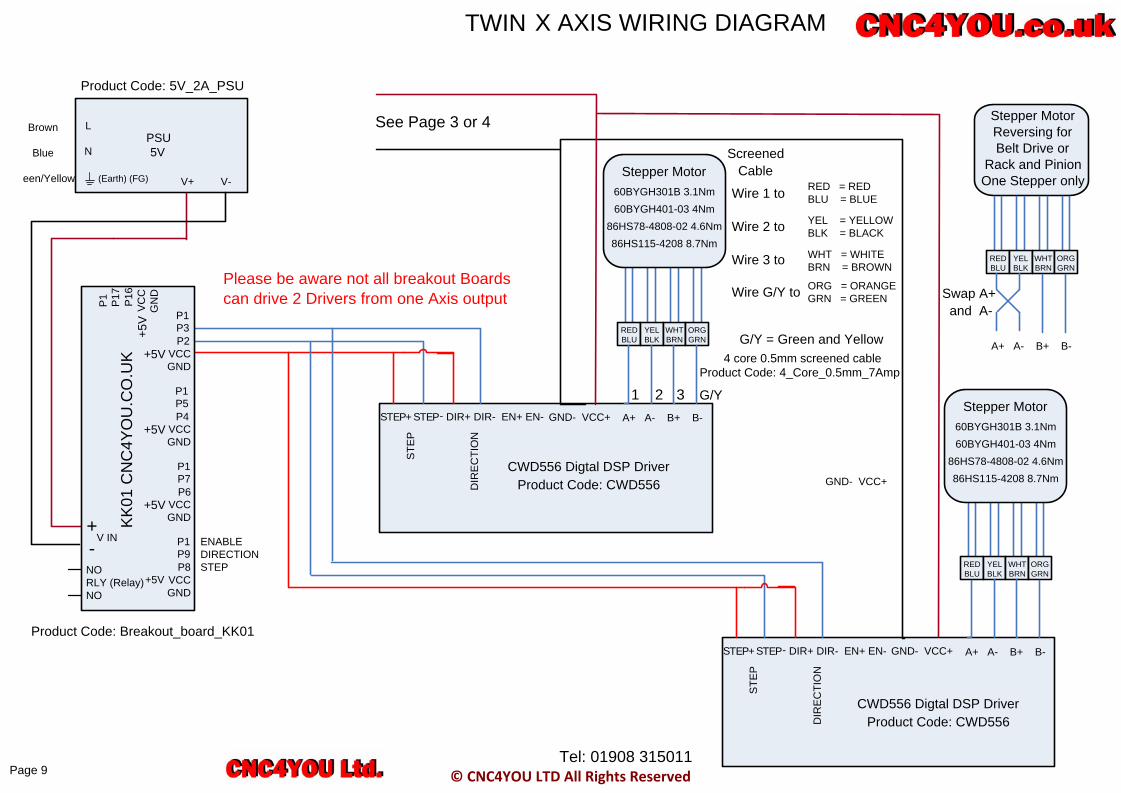
TWIN
Tel: 01908 315011© CNC4YOU LTD All Rights Reserved
YEL
BLK
WHT
BRN
RED
BLU
ORG
GRN
A+ A- B+ B-
Swap A+ and A-
Stepper MotorReversing forBelt Drive or
Rack and PinionOne Stepper onlyRED = RED
BLU = BLUE
YEL = YELLOW
BLK = BLACK
WHT = WHITE
BRN = BROWN
ORG = ORANGE
GRN = GREEN
Product Code: 4_Core_0.5mm_7Amp4 core 0.5mm screened cable
1 2 3 G/Y
Wire 1 to
Wire 2 to
Wire 3 to
Wire G/Y to
ScreenedCable
G/Y = Green and Yellow
Stepper Motor
60BYGH301B 3.1Nm
60BYGH401-03 4Nm
86HS78-4808-02 4.6Nm
86HS115-4208 8.7Nm
Stepper Motor
60BYGH301B 3.1Nm
60BYGH401-03 4Nm
86HS78-4808-02 4.6Nm
86HS115-4208 8.7Nm
Gr
Please be aware not all breakout Boardscan drive 2 Drivers from one Axis output
Product Code: Breakout_board_KK01
PSU
5V
V+
L
N
Brown
Blue
een/Yellow (Earth) (FG)
Product Code: 5V_2A_PSU
V-
CWD556 Digtal DSP DriverProduct Code: CWD556
CWD556 Digtal DSP DriverProduct Code: CWD556
See Page 3 or 4
VCC
GND
P1P3P2
VCC
GND
VCC
GND
VCC
GND
VC
C
GN
D
+
-
+5V
+5V
+5V
V IN
+5V
+5
V
NO
RLY (Relay)
NO
ENABLE
DIRECTION
STEP
KK
01 C
NC
4YO
U.C
O.U
K
P1P5P4
P1P7P6
P1P9P8
P1
P17
P16
GND- VCC+
GND- VCC+
Page 9

YEL
BLK
WHT
BRN
RED
BLU
ORG
GRN
A+ A- B+ B-+ - DIR+ DIR- EN+ EN-
Y AXIS WIRING DIAGRAM
STEP
DIR
EC
TIO
N
Tel: 01908 315011
STEPS
TE
P
YEL
BLK
WHT
BRN
RED
BLU
ORG
GRN
A+ A- B+ B-+ - DIR+ DIR- EN+ EN- GND- VCC+STEP
DIR
EC
TIO
N
STEP
ST
EP
TWIN
Tel: 01908 315011© CNC4YOU LTD All Rights Reserved
YEL
BLK
WHT
BRN
RED
BLU
ORG
GRN
A+ A- B+ B-
Swap A+ and A-
Stepper MotorReversing forBelt Drive or
Rack and PinionOne Stepper onlyRED = RED
BLU = BLUE
YEL = YELLOW
BLK = BLACK
WHT = WHITE
BRN = BROWN
ORG = ORANGE
GRN = GREEN
Product Code: 4_Core_0.5mm_7Amp4 core 0.5mm screened cable
1 2 3 G/Y
Wire 1 to
Wire 2 to
Wire 3 to
Wire G/Y to
ScreenedCable
G/Y = Green and Yellow
Stepper Motor
60BYGH301B 3.1Nm
60BYGH401-03 4Nm
86HS78-4808-02 4.6Nm
86HS115-4208 8.7Nm
Stepper Motor
60BYGH301B 3.1Nm
60BYGH401-03 4Nm
86HS78-4808-02 4.6Nm
86HS115-4208 8.7Nm
Please be aware not all breakout Boardscan drive 2 Drivers from one Axis output
PSU
5V
V+
L
N
Brown
Blue
een/Yellow (Earth) (FG) V-
See Page 3 and 4
Product Code: 5V_2A_PSU
VCC
GND
P1P3P2
VCC
GND
VCC
GND
VCC
GND
VC
C
GN
D
+
-
+5V
+5V
+5V
V IN
+5V
+5
V
NO
RLY (Relay)
NO
KK
01 C
NC
4YO
U.C
O.U
K
P1P5P4
P1P7P6
P1P9P8
P1
P17
P16
Product Code: Breakout_board_KK01
CWD556 Digtal DSP DriverProduct Code: CWD556
CWD556 Digtal DSP DriverProduct Code: CWD556
GND- VCC+
Page 10
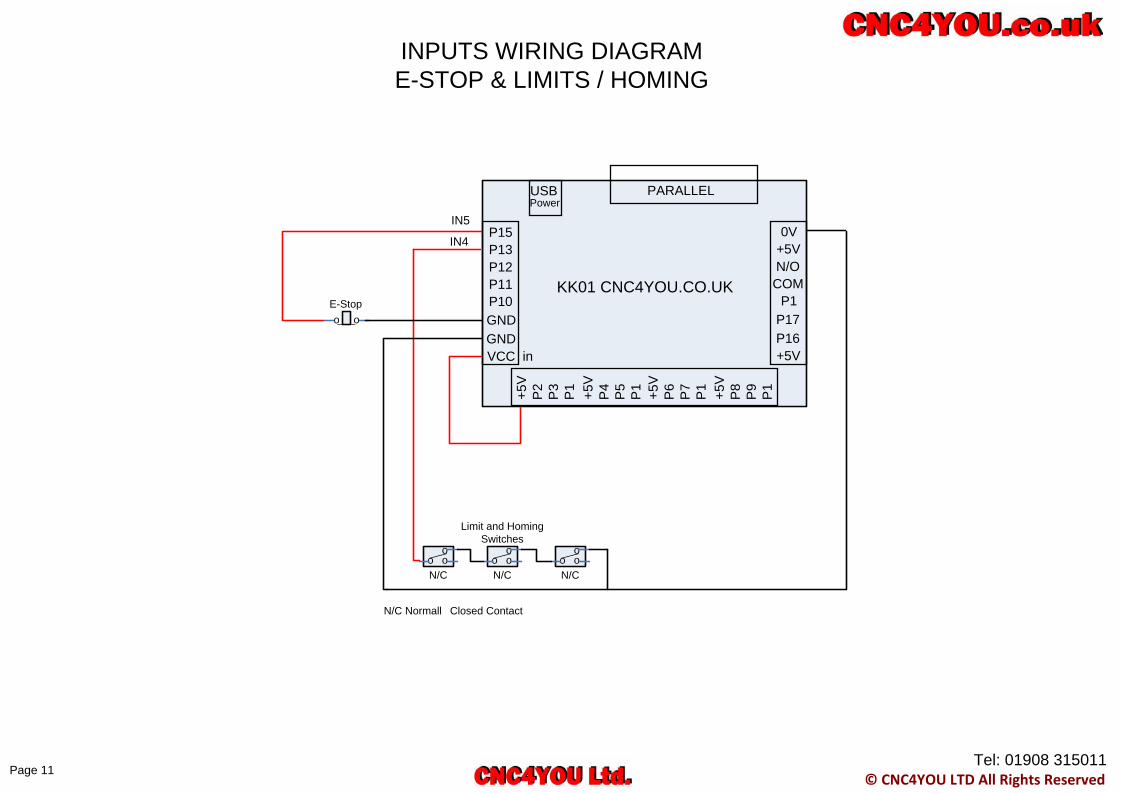
INPUTS WIRING DIAGRAM
E-STOP & LIMITS / HOMING
IN5
IN4
o oo___
o oo___
o oo___
Limit and Homing
Switches
N/C N/C N/C
N/C Normall Closed Contact
KK01 CNC4YOU.CO.UKP10P11P12P13P15
GNDGNDVCC in
USB PARALLEL
P1COMN/O+5V 0V
P17P16+5V
P2
P3
P1
+5V
P4
P5
P1
+5V
P6
P7
P1
+5V
P8
P9
P1
+5V
Power
o o__E-Stop
Tel: 01908 315011© CNC4YOU LTD All Rights Reserved
Page 11

INPUTS WIRING DIAGRAM
E-STOP & LIMITS / HOMING
PROXIMITY SWITCH
LJ12A3-4
Limit and Homing
Proximity Switches
LJ12A3-4
LJ12A3-4
LJ12A3-4(Black )
+6 to 36Volts DC (Brown)
0
Volts
DC (Blue)
IN5
IN1 KK01 CNC4YOU.CO.UKP10P11P12P13P15
GNDGNDVCC in
USB PARALLEL
P1COMN/O+5V 0V
P17P16+5V
P2
P3
P1
+5V
P4
P5
P1
+5V
P6
P7
P1
+5V
P8
P9
P1
+5V
Power
o o__E-Stop
IN4
Tel: 01908 315011© CNC4YOU LTD All Rights Reserved
Page 12

INPUTS WIRING DIAGRAM
TOUCH PROBE
IN3
KK01 CNC4YOU.CO.UKP10P11P12P13P15
GNDGNDVCC in
USB PARALLEL
P1COMN/O+5V 0V
P17P16+5V
P2
P3
P1
+5V
P4
P5
P1
+5V
P6
P7
P1
+5V
P8
P9
P1
+5V
Power
Wireless Probe Receiver
POWER IN 5 - 24V
POWER IN 0V
PSU
5V
V
+
L
N
Brown
Blue
Green/Yellow (Earth) (FG)
Product Code: 5V_2A_PSU
V
-
0V GND
SIGNAL OUT
Product Code: Wireless_Tool_Height_DT02
Wireless Remote Probe Sensor
Tel: 01908 315011© CNC4YOU LTD All Rights Reserved
Page 13

RELAY BOARD WIRING
IN1 IN2 GND
VCC
N/O COM N/C
Relay1 Relay2
N/O COM N/C
Tel: 01908 315011© CNC4YOU LTD All Rights Reserved
PSU
5V
L
N
Brown
Blue
Green/Yellow (Earth) (FG)
Product Code: 5V_2A_PSU
Product Code: 2_Relay_Board
Normally open Switches used for Water PumpsCooling Systems air solenoids etc.Not to be used for safety critical switching likeoperating Spindle Motors etc.
V + V-
VCCGND VCC-JD
RemoveJumper
Relay board should be powered from separatePower Supply this gives isolation from relay to breakout board and electronics so using on board optoisolators as protected interface, also mostbreakout boards do not have the current capacityto drive these types of boards which can lead tomissed steps and other related problems.
EN
AB
LE
DIR
EC
TIO
N
ST
EP
VCC
GND
P1P3P2
VCC
GND
VCC
GND
VCC
GND
VC
C
GN
D
+-
+5V
+5V
+5V
V IN
+5V
+5
V
NO
RLY (Relay)
NO
KK
01 C
NC
4YO
U.C
O.U
K
P1P5P4
P1P7P6
P1P9P8
P1
P17
P16
Page 14

RELAY BOARD WIRING
IN1 IN2 GND
VCC
N/O COM N/C
Relay1 Relay2
N/O COM N/C
Tel: 01908 315011© CNC4YOU LTD All Rights Reserved
PSU
5V
L
N
Brown
Blue
Green/Yellow (Earth) (FG)
Product Code: 5V_2A_PSU
Product Code: 2_Relay_Board
Normally open Switches used for Water PumpsCooling Systems air solenoids etc.Not to be used for safety critical switching likeoperating Spindle Motors etc.
V + V-
VCCGND VCC-JD
RemoveJumper
Relay board should be powered from separatePower Supply this gives isolation from relay to breakout board and electronics so using on board optoisolators as protected interface, also mostbreakout boards do not have the current capacityto drive these types of boards which can lead tomissed steps and other related problems.
VCC
GND
P1P3P2
VCC
GND
VCC
GND
VCC
GND
VC
C
GN
D
+-
+5V
+5V
+5V
V IN
+5V
+5
V
NO
RLY (Relay)
NO
KK
01 C
NC
4YO
U.C
O.U
K
P1P5P4
P1P7P6
P1P9P8
P1
P17
P16
Page 15

ON1 2 3 4 5 6 7 8
UPONOFF
DOWN
DIP SWITCH CURRENT
SETTING
ON1 2 3 4 5 6 7 8
UPONOFF
DOWN
3.8 Amps
Half Current
1/10th Microstep
4.3 Amps
Half Current
1/10th Microstep
Please check CWD556Datasheet forother options
Tel: 01908 315011© CNC4YOU LTD All Rights Reserved
Use this setting for 4Nm Stepper
Use this setting for 3.1Nm Stepper
Page 16

Tel: 01908 315011© CNC4YOU LTD All Rights Reserved
Page 17

MACH 3 SOFTWARE SETUP
If you haven’t already installed Mach3 software Download and install Mach3 software from the
following link unless you are an experienced user please only download Lockdown Version.
http://www.machsupport.com/downloads.php
After download is complete please run or install software and follow all onscreen prompts once
installation is complete please restart your PC to allow drivers to be registered.
Place your licence file in the following folder if default installation has been used or select folder
location you have selected on installation. C:\Mach3 is default location
Open Mach 3 software and you should see a screen similar to the one below but with your licence
name or Demo either way you can setup and run Mach3 but in Demo mode you are restricted to 500
lines for milling.
Notes_____________________________________________________________________________
__________________________________________________________________________________
__________________________________________________________________________________
__________________________________________________________________________________
__________________________________________________________________________________
__________________________________________________________________________________
__________________________________________________________________________________
Tel: 01908 315011© CNC4YOU LTD All Rights Reserved Page 18

Along the top Menu Bar place your mouse on the Config and click to highlight the dropdown menu
as shown in the picture below. Move your mouse down until you are over the Ports and Pins option
and press right mouse button to select.
Notes_____________________________________________________________________________
__________________________________________________________________________________
__________________________________________________________________________________
__________________________________________________________________________________
__________________________________________________________________________________
__________________________________________________________________________________
__________________________________________________________________________________
__________________________________________________________________________________
__________________________________________________________________________________
__________________________________________________________________________________
__________________________________________________________________________________
__________________________________________________________________________________
__________________________________________________________________________________
__________________________________________________________________________________
__________________________________________________________________________________
__________________________________________________________________________________
__________________________________________________________________________________
__________________________________________________________________________________
Tel: 01908 315011© CNC4YOU LTD All Rights Reserved Page 19

The following screen should appear this has information as to your port address chosen operating
frequency etc. that you can customise Mach3 to your machine the guidelines are pertinant to
Cnc4you products but couls be used with caution as a general guide.
Under most circumstance these general default setting are adiquate for most machine types but
further information on using this screen can be found in the Mach3 documentation but unless you
have specific requirements these can be left as default settings.
Notes_____________________________________________________________________________
__________________________________________________________________________________
__________________________________________________________________________________
__________________________________________________________________________________
__________________________________________________________________________________
__________________________________________________________________________________
__________________________________________________________________________________
__________________________________________________________________________________
__________________________________________________________________________________
__________________________________________________________________________________
__________________________________________________________________________________
__________________________________________________________________________________
__________________________________________________________________________________
__________________________________________________________________________________
__________________________________________________________________________________
Tel: 01908 315011© CNC4YOU LTD All Rights Reserved Page 20
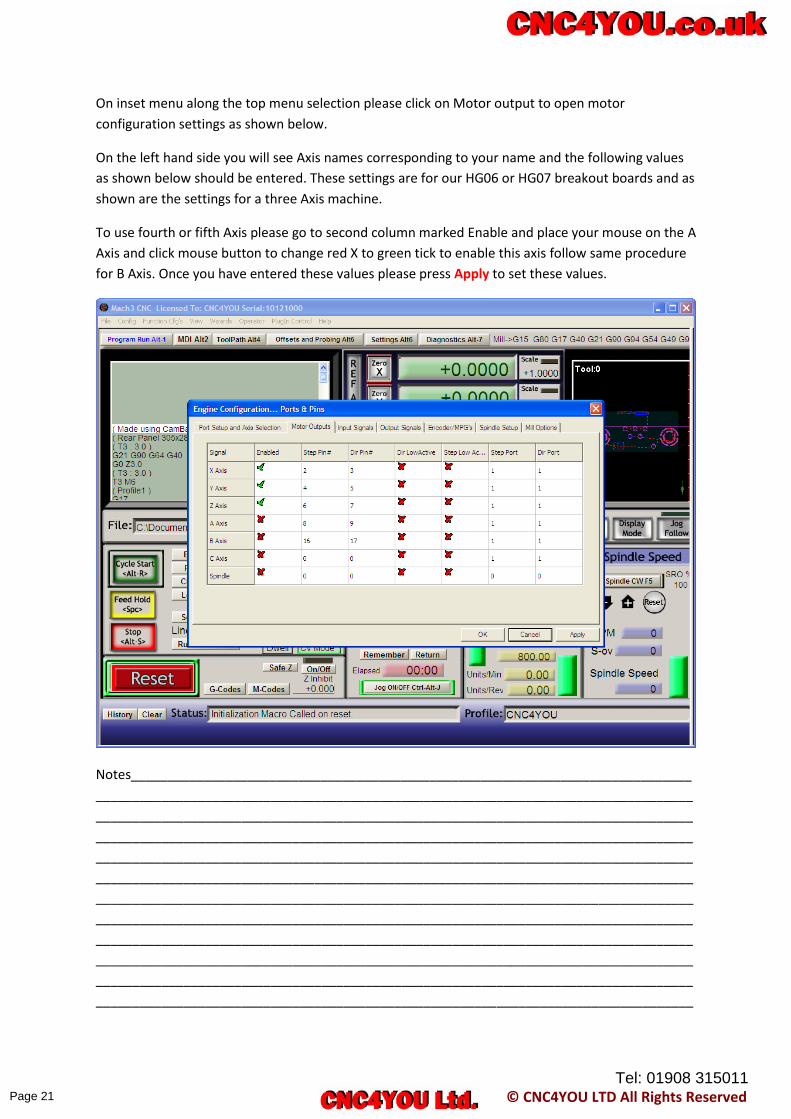
On inset menu along the top menu selection please click on Motor output to open motor
configuration settings as shown below.
On the left hand side you will see Axis names corresponding to your name and the following values
as shown below should be entered. These settings are for our HG06 or HG07 breakout boards and as
shown are the settings for a three Axis machine.
To use fourth or fifth Axis please go to second column marked Enable and place your mouse on the A
Axis and click mouse button to change red X to green tick to enable this axis follow same procedure
for B Axis. Once you have entered these values please press Apply to set these values.
Notes_____________________________________________________________________________
__________________________________________________________________________________
__________________________________________________________________________________
__________________________________________________________________________________
__________________________________________________________________________________
__________________________________________________________________________________
__________________________________________________________________________________
__________________________________________________________________________________
__________________________________________________________________________________
__________________________________________________________________________________
__________________________________________________________________________________
__________________________________________________________________________________
Tel: 01908 315011© CNC4YOU LTD All Rights Reserved Page 21

Place mouse over Input Signal tab and click mouse button to select the screen below will appear
allowing you to set your inputs and some examples are shown for guidance purposes and a generic
setup is shown. These Input Signals can be used for many purposes but a standard setup is shown
below. Again you can select or deselect by placing the mouse over Enable lines and changing an X to
a green tick will enable the signal, these values correspond to the above wiring diagram and for ease
of use an Automatic Setup of Inputs can be clicked and on screen instructions followed for you setup
environment. Once you have entered these values please press Apply to set these values.
Notes_____________________________________________________________________________
__________________________________________________________________________________
__________________________________________________________________________________
__________________________________________________________________________________
__________________________________________________________________________________
__________________________________________________________________________________
__________________________________________________________________________________
__________________________________________________________________________________
__________________________________________________________________________________
__________________________________________________________________________________
__________________________________________________________________________________
__________________________________________________________________________________
__________________________________________________________________________________
__________________________________________________________________________________
Tel: 01908 315011© CNC4YOU LTD All Rights Reserved Page 22

On the far right you can scroll down to show other options available and here we show settings for
Estop and Probe input if you are not setting up the probe at the moment just leave value blank or
just fill as below and leave enable as ared X to leave it desected. Once you have entered these values
please press Apply to set these values.
Notes_____________________________________________________________________________
__________________________________________________________________________________
__________________________________________________________________________________
__________________________________________________________________________________
__________________________________________________________________________________
__________________________________________________________________________________
__________________________________________________________________________________
__________________________________________________________________________________
__________________________________________________________________________________
__________________________________________________________________________________
__________________________________________________________________________________
__________________________________________________________________________________
__________________________________________________________________________________
__________________________________________________________________________________
__________________________________________________________________________________
__________________________________________________________________________________
__________________________________________________________________________________
Tel: 01908 315011© CNC4YOU LTD All Rights Reserved Page 23

Place mouse over Output Signal tab and click mouse button to select the screen below will appear
allowing you to set your outputs. This page allows us to switch On and Off the on board relay under
Mach3 control fill in value below if you want to use this function. Once you have entered these
values please press Apply to set these values.
Notes_____________________________________________________________________________
__________________________________________________________________________________
__________________________________________________________________________________
__________________________________________________________________________________
__________________________________________________________________________________
__________________________________________________________________________________
__________________________________________________________________________________
__________________________________________________________________________________
__________________________________________________________________________________
__________________________________________________________________________________
__________________________________________________________________________________
__________________________________________________________________________________
__________________________________________________________________________________
__________________________________________________________________________________
__________________________________________________________________________________
__________________________________________________________________________________
__________________________________________________________________________________
Tel: 01908 315011© CNC4YOU LTD All Rights Reserved Page 24

Place mouse over Spindle Setup tab and click mouse button to select the screen below will appear
allowing you to set your Spindle settings. If the previous settings have been entered for outputs then
we can set our spindle to switch on automatically and also turn off under Mach3 control.
Make sure Disable Spindle Relays is unchecked and at least M3 Clockwise is set to output# 1 as
shown below. CW Delay Spin UP is set to 6 seconds in this example which will Mach3 wait 6 seconds
before starting to cut to allow spindle to be upto speed, this value will vary with your own setup so
please set correspondingly. CW Delay Spind DOWN is set to value to allow spinle to come to a stop.
Immediate Relay off before delay check box is ticked to switch relay off before delay starts rather
than after. Once you have entered these values please press Apply to set these values.
Notes_____________________________________________________________________________
__________________________________________________________________________________
__________________________________________________________________________________
__________________________________________________________________________________
__________________________________________________________________________________
__________________________________________________________________________________
__________________________________________________________________________________
__________________________________________________________________________________
__________________________________________________________________________________
__________________________________________________________________________________
__________________________________________________________________________________
__________________________________________________________________________________
Tel: 01908 315011© CNC4YOU LTD All Rights Reserved Page 25


