Center for Educational Performance and Information
(CEPI)
Student Transcript and Academic
Record Repository (STARR): Submitting Records to the STARR
Michigan Student Data System (MSDS) STARR User Guide
Questions or comments about this document should be directed to: Email: [email protected]
Phone: 517-335-0505, x3

IHE User's Guide – STARR Application
Last Updated: August 19, 2016 Page 2 of 33
Table of Contents Introduction ..................................................................................................................................................... 3
Background ..................................................................................................................................................... 3
Gaining Access to the MSDS for the STARR Collection ............................................................................... 4
Tips for Gaining Access to the MSDS ................................................................................................................................ 4
Removing Access to the MSDS ...................................................................................................................... 5
XML File Creation ............................................................................................................................................. 6
Searching for Your Entity Code .......................................................................................................................... 7
Logging in to the MSDS ...................................................................................................................................... 8
Navigating the MSDS Home Page ..................................................................................................................... 10
Menu ................................................................................................................................................................................. 10
CEPI Help Desk ................................................................................................................................................................ 11
Submitting Records in the STARR Collection ............................................................................................. 12
File Upload ....................................................................................................................................................................... 12
Checking the File Status ............................................................................................................................... 14
Reviewing Records ....................................................................................................................................... 16
STARR Staging Detail ................................................................................................................................... 18
Validation Status (results of field-level validation) ..................................................................................... 20
UIC Resolution ................................................................................................................................................................. 20
Correcting Errors and Warnings ...................................................................................................................... 23
Quality Review – Certify Collection .................................................................................................................. 26
Decertify Collection .......................................................................................................................................... 30
Additional MSDS Functionality ........................................................................................................................ 32
Student Search .................................................................................................................................................................. 32

IHE User's Guide – STARR Application
Last Updated: August 19, 2016 Page 3 of 33
Introduction This guide has been developed as part of a set of paper-based training materials for the Student Transcript and Academic Record Repository (STARR) Collection in the web-based Michigan Student Data System (MSDS) application. This guide includes directions for gaining access to the MSDS and using the MSDS to upload files, perform UIC Resolution, download reports, view errors and warnings, perform quality review, certify the STARR Collection and use the additional functionality such as the Student Search feature.
Background When Michigan representatives agreed to accept State Fiscal Stabilization Fund dollars under the American Recovery and Reinvestment Act, they also agreed to four education assurances. One of these assurances is that the state of Michigan will connect preschool through postsecondary (P-20) education data into the labor force to evaluate effectiveness of public education at preparing students for postsecondary education and the workforce. Connecting P-20 data requires that the student Unique Identification Codes (UICs) assigned and maintained by the Center for Educational Performance and Information (CEPI) be exchanged among institutions and used at all education levels. In order to fulfill these requirements, Michigan must collect and store each student's academic record in a data application for analysis. The application is called the MSDS. The collection of these data for IHEs is the STARR. The data collected have been developed into reports that are being published on the MI School Data site.

IHE User's Guide – STARR Application
Last Updated: August 19, 2016 Page 4 of 33
Gaining Access to the MSDS for the STARR Collection IHE staff members wishing to have access to the MSDS for the STARR Collection will need to complete a two-step process, which consists of:
1. Obtaining a Single Sign-On (SSO) account and 2. Submitting the security agreement form (Institutions for Higher Education) to CEPI, signed by yourself
and the Institution Registrar. These forms are posted on the Application Security Forms web page in the College/University Users drop-down.
You will receive access to the application when both of the above steps have been completed and verified by CEPI. For more detailed information, please refer to the Single Sign-On User's Guide and security forms posted in the Security section of the CEPI IHE web page. If you experience problems with your account or password, please use the password recovery function at https://sso.state.mi.us/ or contact CEPI at 517-335-0505 x3 or by email at: [email protected].
Tips for Gaining Access to the MSDS
• Security agreements must be signed by the registrar. CEPI staff will verify that the person listed as the registrar on the security agreement form matches the contact listed as the registrar in the membership directory on the MACRAO website.
• CEPI staff will also verify that a subscription request has been submitted in SSO and that the
information provided on the security agreement form matches the request. Once verified, permission will be granted and the requester will be notified by email.
• The SSO subscription expires after 30 calendar days. Please make sure your security agreement form is
sent to CEPI about the same time that you request access to prevent auto-rejection notices.
• Access should be limited to only those persons who will be performing the Request for UIC and STARR Collection functions (should range between 2-5 people). STARR IHE users typically include: technology group members, admissions staff and/or staff from the registrar's office.

IHE User's Guide – STARR Application
Last Updated: August 19, 2016 Page 5 of 33
Removing Access to the MSDS When authorized users leave your organization, a removal request must be sent in. To access the Removal Form:
1. Go to CEPI web page. 2. Under Privacy and Security at the bottom of the page, click on Application Security Forms. 3. Click on User Removal Request Form. 4. Follow the instructions for completion of the Removal Request Form. 5. Once the form is completed, print and sign a copy, and fax to CEPI at 517-335-0488.
IHE User's Guide – STARR Application
Last Updated: August 19, 2016 Page 6 of 33
XML File Creation
The STARR Collection file must be XML compliant. The CEPI IHE web page provides the data elements and student population for upload, as well as the XML schema, sample schema, XML Validation Guide, frequently asked questions, timeline, and a CSV-to-XML conversion tool for the Request for UIC and STARR collection. Your file for upload should first be saved to your desktop or other location on the computer or network so that it can be easily located. The file should not exceed 2GB, and larger files should be separated into smaller zipped files to help ensure faster uploading and processing. For more information about XML and schema validation, please refer to the MSDS Technical Document. The World Wide Web Consortium (W3C) is the ultimate authority on XML data types. All collection schemas will reference the W3C definitions for the base data types. Please reference the appropriate collection schema and the W3C to ensure a valid file submission.

IHE User's Guide – STARR Application
Last Updated: August 19, 2016 Page 7 of 33
Searching for Your Entity Code
When creating the STARR data file, the IHE Entity Code is required. The Entity code information is used for the SubmittingEntityCode and SchoolFacilityNumber characteristics. If you do not know your entity code, follow this look-up procedure in CEPI's Educational Entity Master (EEM):
1. Go to the EEM website at www.michigan.gov/eem. Enter your institution's name in the EEM-Search box. Click Go.
2. Your search will bring up the desired entity information within the Entity Code column. The entity code is a five-digit code which may include a leading zero. Please do not cut off the leading zero, as it is a digit in the code.

IHE User's Guide – STARR Application
Last Updated: August 19, 2016 Page 8 of 33
Logging in to the MSDS
Once you have an SSO account, you can access the MSDS. To access the MSDS:
1. Go to https://sso.state.mi.us/. 2. Enter your SSO User ID and Password. 3. Click the Login button. This will take you to the Application Portal page.
4. If FERPA displays, review the regulations and verify your agreement to comply with the requirements by clicking the button at the bottom of the agreement.
5. Select the Michigan Student Data System (MSDS).

IHE User's Guide – STARR Application
Last Updated: August 19, 2016 Page 9 of 33
The MSDS provides authorized users with various roles depending on the level of access. For the STARR Collection:
6. Select the appropriate role from the Select Profile drop-down menu and click the Continue button. (This only applies to users with multiple roles).
IHE User's Guide – STARR Application
Last Updated: August 19, 2016 Page 10 of 33
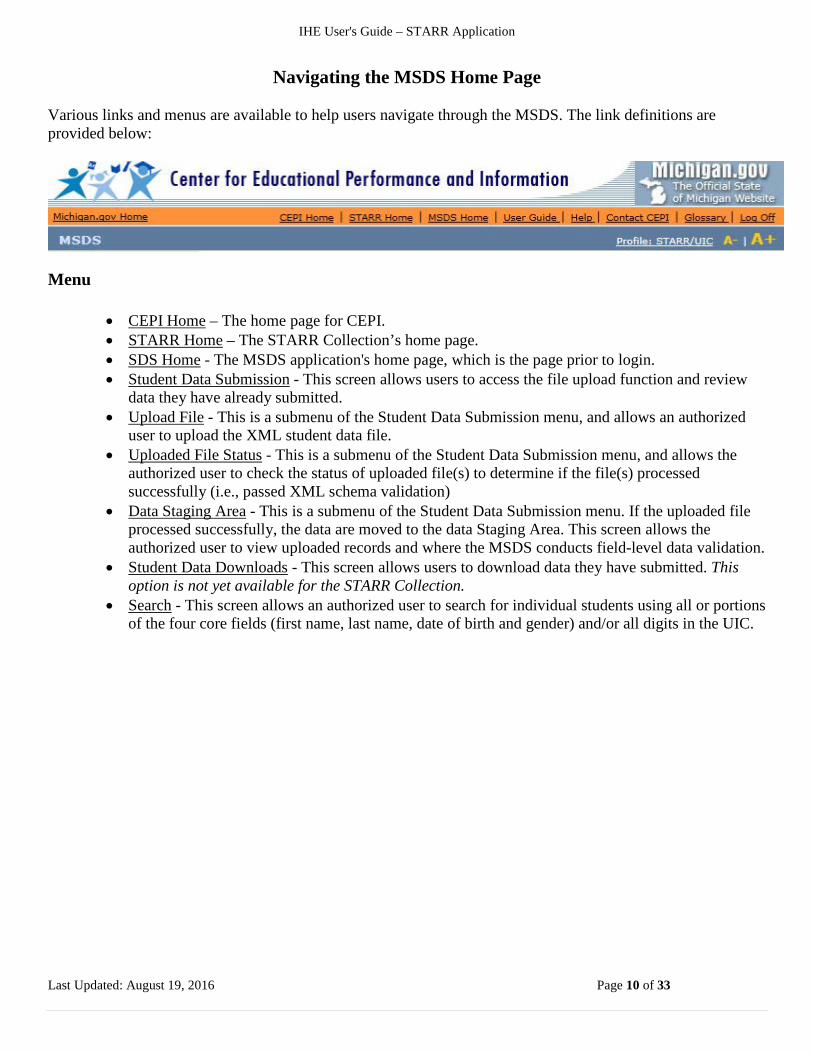
Navigating the MSDS Home Page
Various links and menus are available to help users navigate through the MSDS. The link definitions are provided below:
Menu
• CEPI Home – The home page for CEPI. • STARR Home – The STARR Collection’s home page. • SDS Home - The MSDS application's home page, which is the page prior to login. • Student Data Submission - This screen allows users to access the file upload function and review
data they have already submitted. • Upload File - This is a submenu of the Student Data Submission menu, and allows an authorized
user to upload the XML student data file. • Uploaded File Status - This is a submenu of the Student Data Submission menu, and allows the
authorized user to check the status of uploaded file(s) to determine if the file(s) processed successfully (i.e., passed XML schema validation)
• Data Staging Area - This is a submenu of the Student Data Submission menu. If the uploaded file processed successfully, the data are moved to the data Staging Area. This screen allows the authorized user to view uploaded records and where the MSDS conducts field-level data validation.
• Student Data Downloads - This screen allows users to download data they have submitted. This option is not yet available for the STARR Collection.
• Search - This screen allows an authorized user to search for individual students using all or portions of the four core fields (first name, last name, date of birth and gender) and/or all digits in the UIC.

IHE User's Guide – STARR Application
Last Updated: August 19, 2016 Page 11 of 33
CEPI Help Desk Please visit CEPI IHE web page for the most up-to-date information on the STARR Collection. If you have any questions, please email CEPI customer support at [email protected]. Email provides written documentation and allows the quickest, most efficient method for receiving a response. If email is not an option, contact customer support via telephone at 517-335-0505, x 3. In either case, please include: 1) your name, 2) the application you need help with (in this case it is the MSDS STARR Collection), 3) your telephone number, including area code and extension, 4) your email address and 5) your specific question(s). To receive official notices from CEPI regarding the STARR Collection, sign up for GovDelivery Mailing List.
IHE User's Guide – STARR Application
Last Updated: August 19, 2016 Page 12 of 33
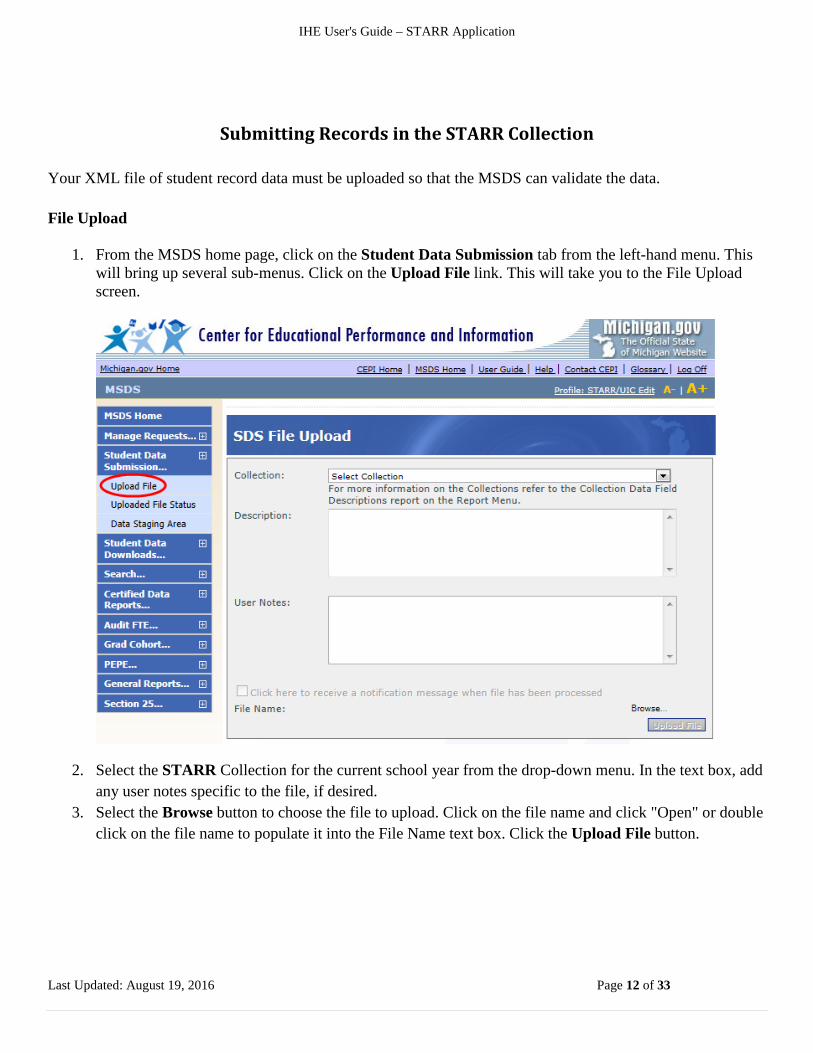
Submitting Records in the STARR Collection
Your XML file of student record data must be uploaded so that the MSDS can validate the data. File Upload
1. From the MSDS home page, click on the Student Data Submission tab from the left-hand menu. This will bring up several sub-menus. Click on the Upload File link. This will take you to the File Upload screen.
2. Select the STARR Collection for the current school year from the drop-down menu. In the text box, add any user notes specific to the file, if desired.
3. Select the Browse button to choose the file to upload. Click on the file name and click "Open" or double click on the file name to populate it into the File Name text box. Click the Upload File button.

IHE User's Guide – STARR Application
Last Updated: August 19, 2016 Page 13 of 33
Once processed, you may receive a message indicating that your file was "uploaded successfully." Receiving this message does not mean it passed file-level validation.
It is important to note how validation occurs in the MSDS.
a. File-Level Validation (File Upload) – Although this does happen when the file is uploaded, ideally you should first validate your file offline. System performance is directly related to the number of files that are uploaded that do not pass file-level validation. Many users have had success using an XML Validation Tool. Please note that an XML Validation Tool will only inform the user if the file passes file-level validation. File-level validation ensures that the file meets the schema.
b. Field-Level Validation – Once a file is uploaded and passes file-level validation, the MSDS processes the Field-Level Validation. Once a file is accepted, it is loaded into a Staging Area. Field-level validation may result in field-level errors/warnings.
c. Collection-Level Validation (Quality Review) – Once errors/warnings are corrected in the staging area, Quality Review should be run. Quality Review is the final step prior to certification. This process checks the entire file for duplicate students.
IHE User's Guide – STARR Application
Last Updated: August 19, 2016 Page 14 of 33
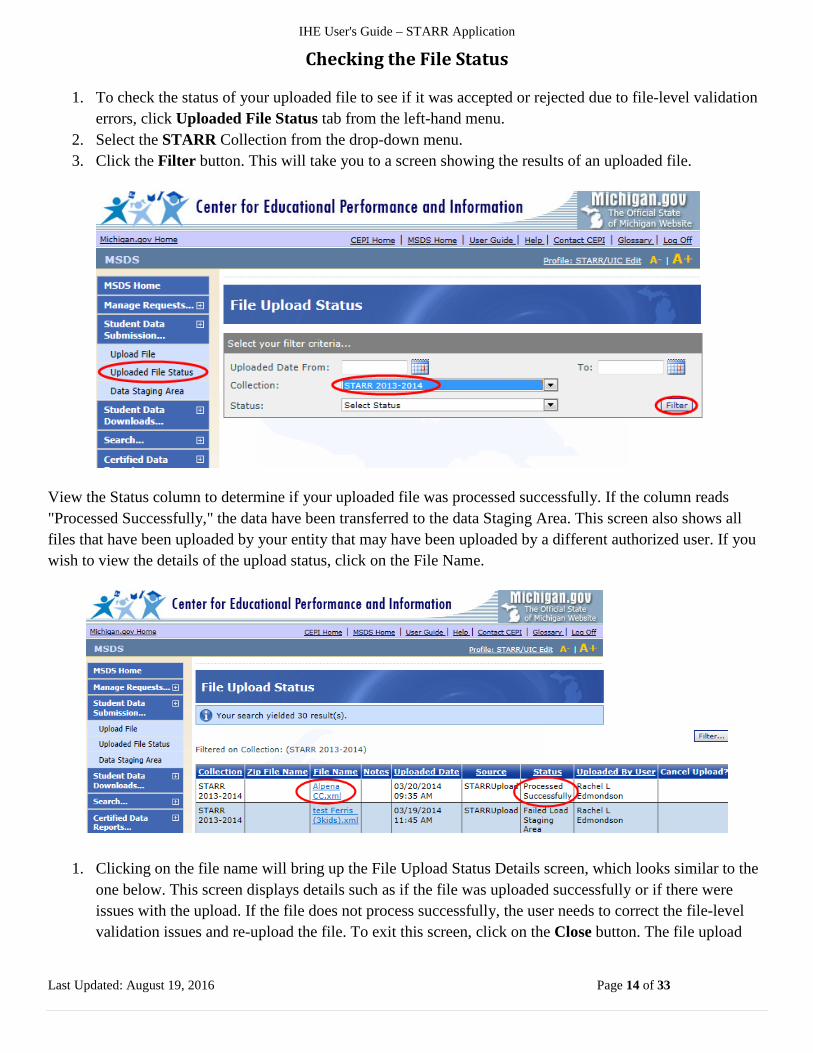
Checking the File Status
1. To check the status of your uploaded file to see if it was accepted or rejected due to file-level validation errors, click Uploaded File Status tab from the left-hand menu.
2. Select the STARR Collection from the drop-down menu. 3. Click the Filter button. This will take you to a screen showing the results of an uploaded file.
View the Status column to determine if your uploaded file was processed successfully. If the column reads "Processed Successfully," the data have been transferred to the data Staging Area. This screen also shows all files that have been uploaded by your entity that may have been uploaded by a different authorized user. If you wish to view the details of the upload status, click on the File Name.
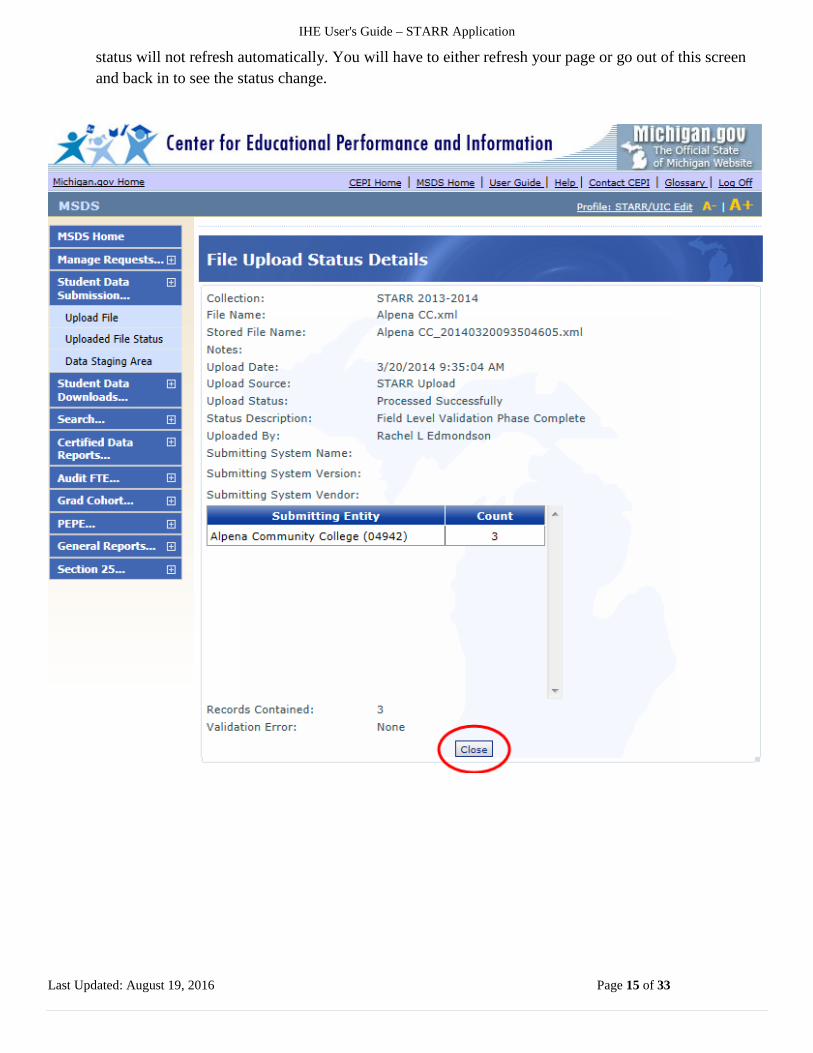
1. Clicking on the file name will bring up the File Upload Status Details screen, which looks similar to the one below. This screen displays details such as if the file was uploaded successfully or if there were issues with the upload. If the file does not process successfully, the user needs to correct the file-level validation issues and re-upload the file. To exit this screen, click on the Close button. The file upload
IHE User's Guide – STARR Application
Last Updated: August 19, 2016 Page 15 of 33
status will not refresh automatically. You will have to either refresh your page or go out of this screen and back in to see the status change.

IHE User's Guide – STARR Application
Last Updated: August 19, 2016 Page 16 of 33
Reviewing Records After viewing the file upload status and confirming that your file processed successfully, you should next open the data Staging Area. The Staging Area is where:
• The file goes through field-level validation and the UIC matching process. • The user can view which records resulted in a new UIC being generated, a match found or requires
resolution. • The user can view field-level errors and warnings. • The user can correct field-level errors.
1. To view the records in the Staging Area, click on the Data Staging Area tab from the left-had menu. 2. In the Staging Area screen, select the STARR Collection in the Collection drop-down box. 3. Click the Filter button. 4. Clicking on the Collection Name will take you to the STARR Staging Details screen.
Your results will have the following link options:
a. Collection Link This link will display if there is a staging area for the STARR collection.
b. Upload Link This link will display if the collection is open.
c. Delete Link This link will display if there are records in the staging area and the collection is open.
d. Certify Link

IHE User's Guide – STARR Application
Last Updated: August 19, 2016 Page 17 of 33
This link will display if there are records in the staging area that have not been certified and the collection is open.
e. Decertify Link This link will display if there are records in the staging area that have been certified and the collection is open.

IHE User's Guide – STARR Application
Last Updated: August 19, 2016 Page 18 of 33
STARR Staging Detail The STARR Staging Detail screen displays the errors and warnings with the uploaded records and is broken into the following five areas:
1. Validation Status (results of field-level validation) Lists the number of records where errors exist, records with warnings and records with no errors or warnings. Clicking on the hyperlink of the validation status will filter those records with that status. The records will display at the bottom of the screen.
2. Validation Reports Allows you to download reports that give details on which records have errors or warnings.
3. UIC Resolution Status (results of UIC matching) Lists the number of records which require resolution, that resulted in a match found and that resulted in a new UIC being generated. Clicking on the hyperlink of the UIC resolution status will filter those records with that status. The records will display at the bottom of the screen.
4. UIC Resolution Reports
Allows you to download reports that give details on which records require resolution, that resulted in a match found and that resulted in a new UIC being generated.
5. General Reports
Allows you to download reports that give details of all students UICs and an indication of whether the assigned UIC in the STARR Collection is different from the submitted UIC.
6. Student Records
Individual records are displayed at the bottom of the screen. Users can filter the list of records by Validation Status, UIC Resolution Status or by students' last name. Users can also filter the list of students by clicking Filter. a. To delete a student record from the STARR Staging Detail screen, check the box beside the
student you wish to delete, then click on the Delete button. A message will appear asking if you are sure you want to delete the record. Click Yes or No.
b. You can sort the student list by clicking on any of the column headers (User Notes, UIC, Last Name, First Name, Gender, Date of Birth, Validation Status and Resolution Status).
c. Click on a student's last name hyperlink to go to the STARR Student Details screen. d. Click on a student’s resolution status hyperlink to go to UIC Resolution screen.
7. Filter
a. Click on any letter of the alphabet to filter the list to show only students whose last names begin with that letter.

IHE User's Guide – STARR Application
Last Updated: August 19, 2016 Page 19 of 33
b. Click on the Filter button to find a specific student or to filter by Validation Status or UIC Resolution Status.

IHE User's Guide – STARR Application
Last Updated: August 19, 2016 Page 20 of 33
Validation Status (results of field-level validation) There are six validation statuses in the STARR Staging Detail screen. Below are all the possible validation statuses you may see with a description of each:
Status Message Description Errors Exist Field-level validation errors must be fixed before certification. Error Free with Warnings Field-level validation errors should be reviewed to determine
if changes are warranted. Error Free with No Warnings No field-level validation errors or warnings exist for the
record. Pending Validation The record has not gone through field-level validation. Processing Validation The record is currently being processed for field-level
validation. Processing Failed Processing of the record failed and should be reported to
CEPI.
a. If your records fall into any of those statuses, the Status Message will be hyperlinked and there will be a number to the left letting you know how many records are affected.
b. Click on the Status Message hyperlink, and the records will appear at the bottom of the screen. c. Clicking on the last name of a student will take you to the STARR Student Detail screen. d. On the STARR Student Detail screen you can see errors or warnings for that student record on the
bottom of the screen. e. You must correct all errors before you can Certify your collection. f. You should also review warnings to make sure the data are correct. The system generates warnings
when the data are outside of the expected parameters for the STARR field, but may still be correct. Warnings will not prevent you from certifying a collection.
UIC Resolution UIC Resolution is the process of ensuring that each student is correctly associated with a particular UIC. The MSDS application matches every submitted record against the Student Master Record table. The fields used for matching include the First Name, Last Name, Date of Birth and Gender fields. Additional fields that the MSDS uses for matching are the UIC, Last Name Suffix and the Middle Name/Middle Initial fields, if they are provided in the submitted record. The fields in the submitted record are compared against the corresponding fields of records in the Student Master Record table to determine if it is the same student or not. Based on the fields used for matching, a score is calculated that determines how closely the submitted record matches to a record(s) in the Student Master Record table. The calculated score determines if a record requires resolution. Records that require resolution necessitate user intervention to determine which UIC should be associated with a student's record. If no match is found, the system automatically creates a new UIC.
IHE User's Guide – STARR Application
Last Updated: August 19, 2016 Page 21 of 33
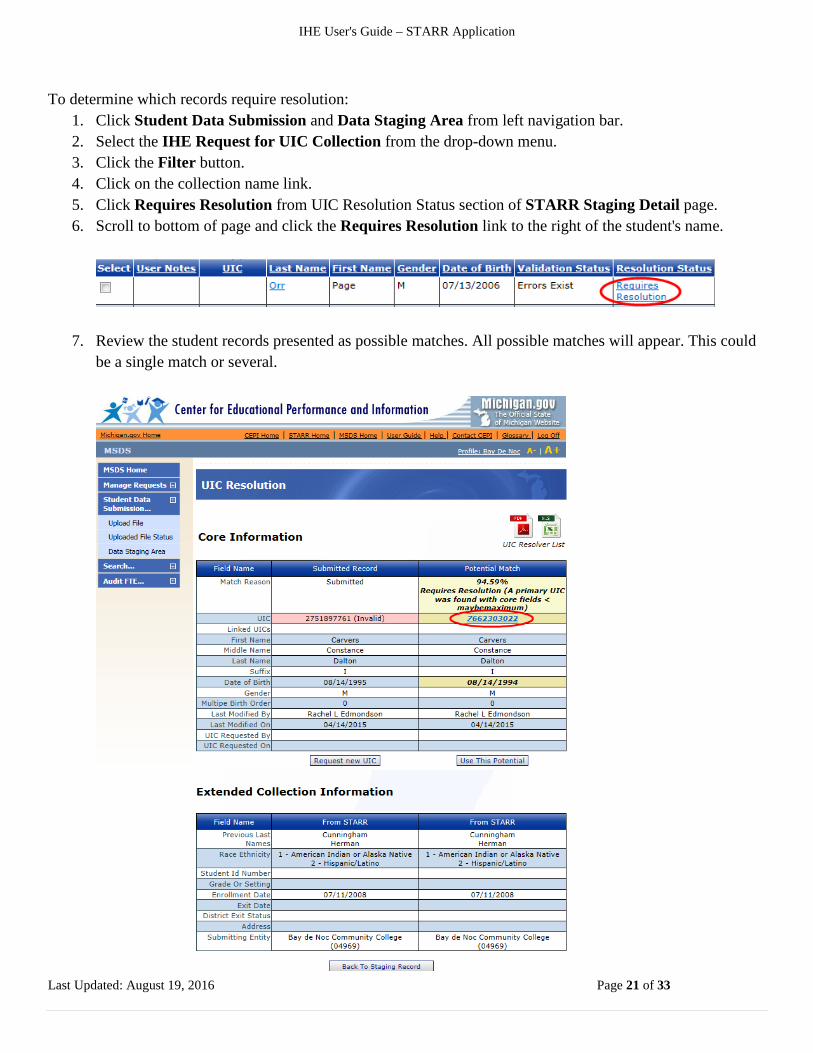
To determine which records require resolution:
1. Click Student Data Submission and Data Staging Area from left navigation bar. 2. Select the IHE Request for UIC Collection from the drop-down menu. 3. Click the Filter button. 4. Click on the collection name link. 5. Click Requires Resolution from UIC Resolution Status section of STARR Staging Detail page. 6. Scroll to bottom of page and click the Requires Resolution link to the right of the student's name.
7. Review the student records presented as possible matches. All possible matches will appear. This could be a single match or several.

IHE User's Guide – STARR Application
Last Updated: August 19, 2016 Page 22 of 33
8. Click the UIC hyperlink of the possible match record to review the student's history. 9. If you determine that a possible match is your student, click "Use this Potential." 10. If you determine that your student is a different student than the student presented as a possible
match(es), click "Request New UIC." 11. Enter reason for new UIC request in the UIC Request Comments pop-up box. For example, if this is a
new student entering a Michigan school at the college level is it because they moved from out of state, went to a private school or were home-schooled? Be sure to enter the justification as to why you are requesting the new UIC and the student does not already have one assigned to them.
12. Click Submit. 13. Requests are placed in a queue that the system administrator reviews and approves or denies based on
the information submitted in the request. Typical turn-around time is one to two business days. You may review the status of your request on the Manage Requests for UIC screen or on the STARR Staging Detail screen.
IHE User's Guide – STARR Application
Last Updated: August 19, 2016 Page 23 of 33
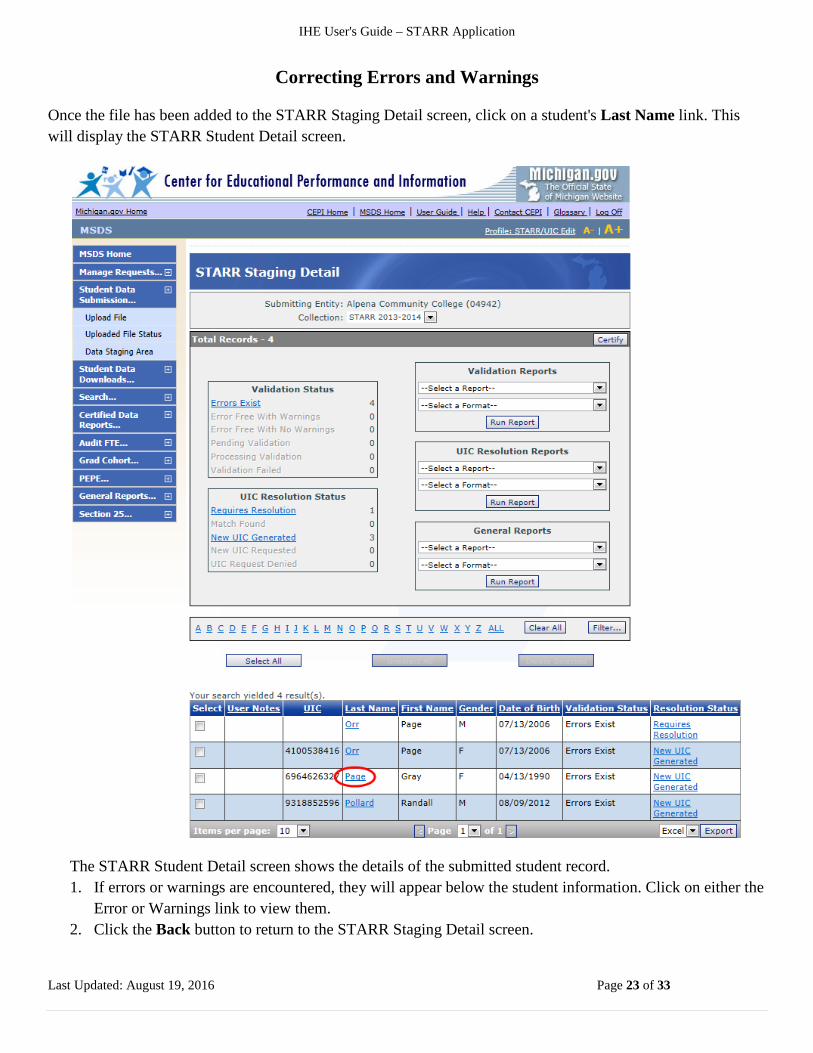
Correcting Errors and Warnings
Once the file has been added to the STARR Staging Detail screen, click on a student's Last Name link. This will display the STARR Student Detail screen.
The STARR Student Detail screen shows the details of the submitted student record. 1. If errors or warnings are encountered, they will appear below the student information. Click on either the
Error or Warnings link to view them. 2. Click the Back button to return to the STARR Staging Detail screen.

IHE User's Guide – STARR Application
Last Updated: August 19, 2016 Page 24 of 33
Correct all errors and review warnings and make pertinent corrections in your Student Information System (SIS) and upload your file again.
IHE User's Guide – STARR Application
Last Updated: August 19, 2016 Page 25 of 33
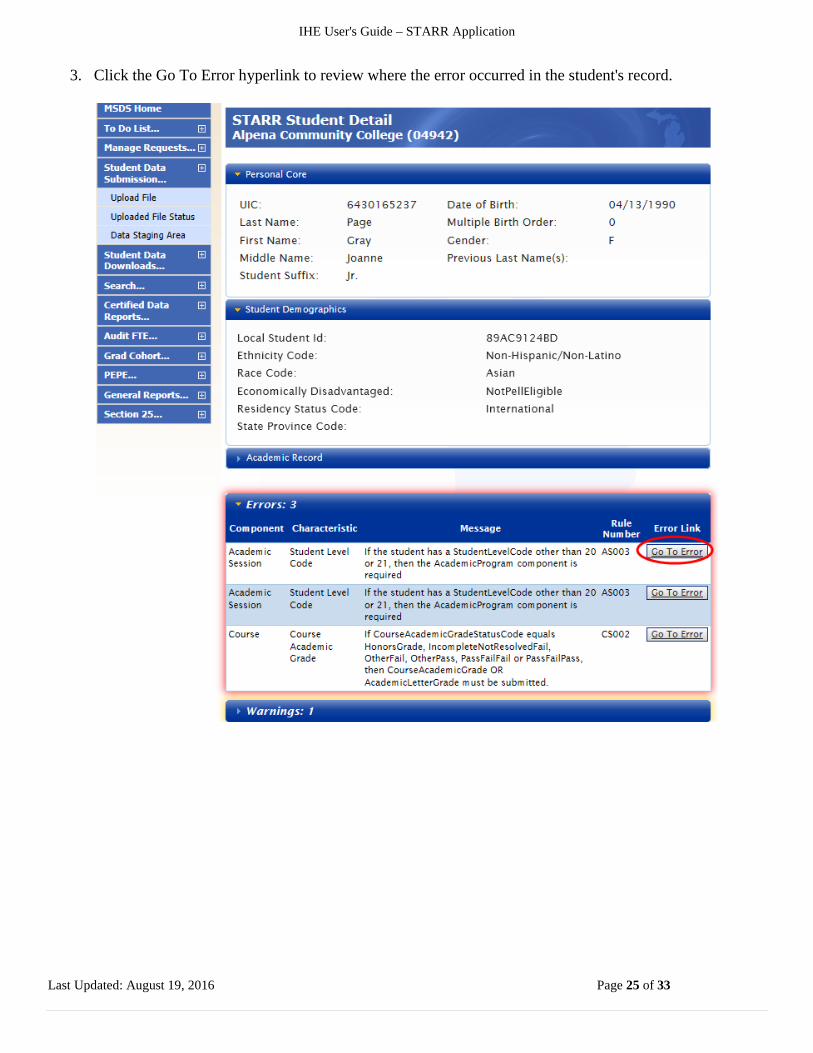
3. Click the Go To Error hyperlink to review where the error occurred in the student's record.

IHE User's Guide – STARR Application
Last Updated: August 19, 2016 Page 26 of 33
Quality Review – Certify Collection
Quality review can be done at any time. It is important to note that new errors could display during the Quality Review process. This is because the Staging Area is looking at field-level validation while the Quality Review process is looking at collection-level validation. After all errors have been corrected, the collection can be certified by clicking on the Certify button.
1. From the STARR Staging Detail screen, click the Certify button. Or from the Staging Area screen, click on the Certify link.
2. Click the Certify button to bring up the Certify STARR Collection screen.
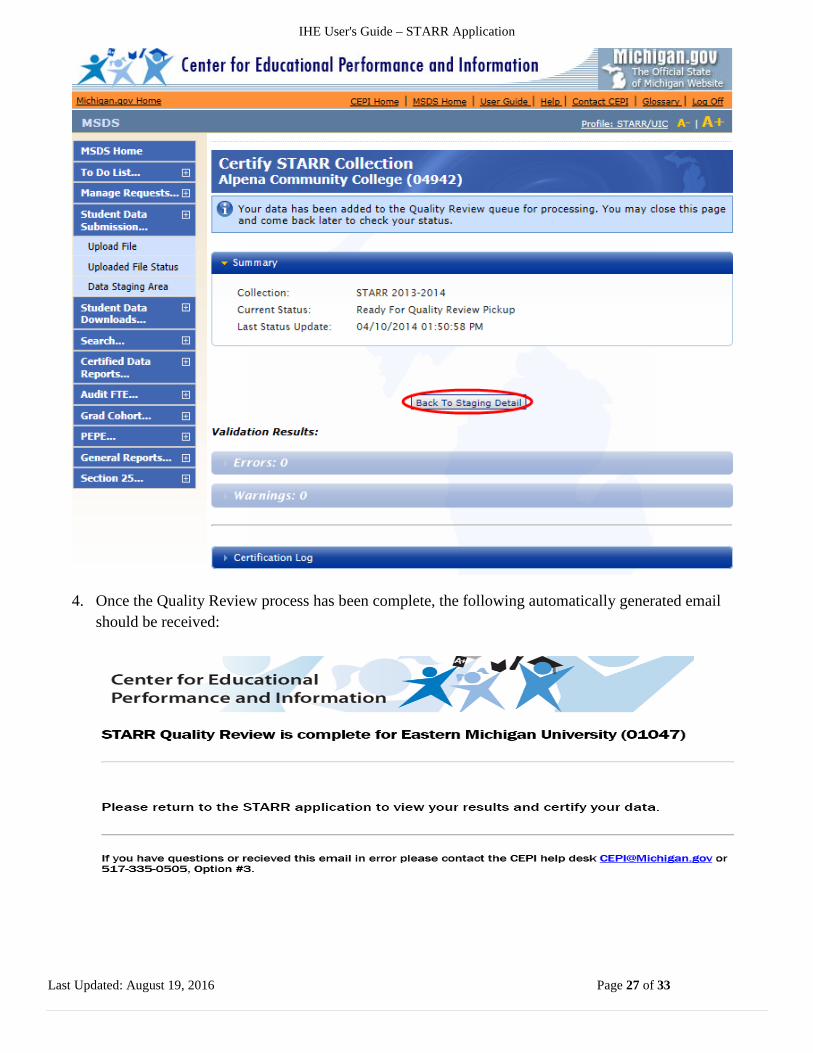
3. This screen does not automatically refresh. After you run Quality Review click on the Back to Staging button and then return back to the Certify STARR Collection screen to resume certifying the collection.
IHE User's Guide – STARR Application
Last Updated: August 19, 2016 Page 27 of 33
4. Once the Quality Review process has been complete, the following automatically generated email should be received:
IHE User's Guide – STARR Application
Last Updated: August 19, 2016 Page 28 of 33
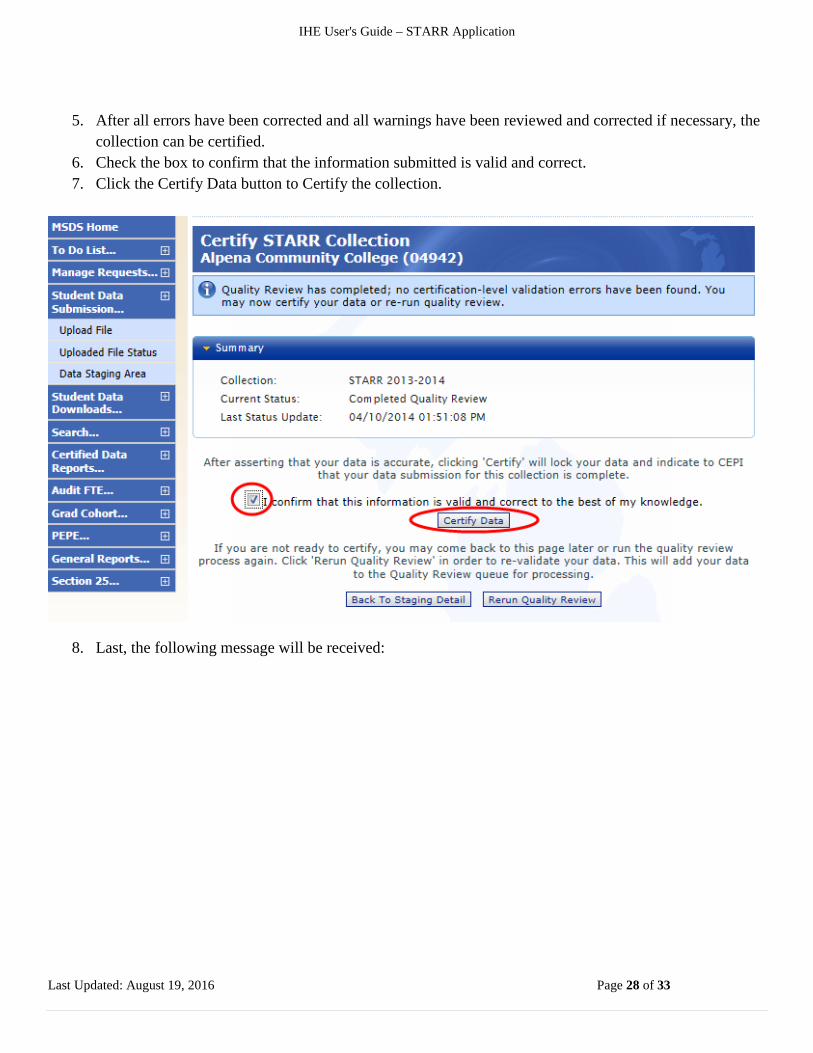
5. After all errors have been corrected and all warnings have been reviewed and corrected if necessary, the collection can be certified.
6. Check the box to confirm that the information submitted is valid and correct. 7. Click the Certify Data button to Certify the collection.
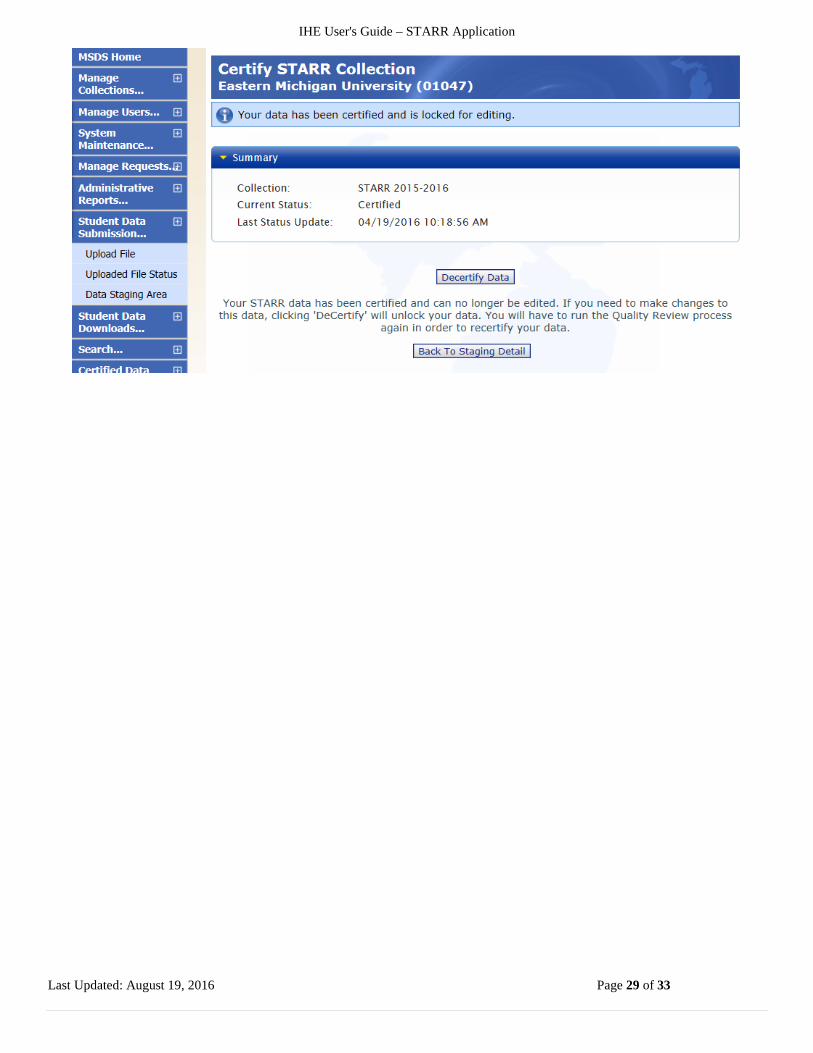
8. Last, the following message will be received:
IHE User's Guide – STARR Application
Last Updated: August 19, 2016 Page 29 of 33
IHE User's Guide – STARR Application
Last Updated: August 19, 2016 Page 30 of 33
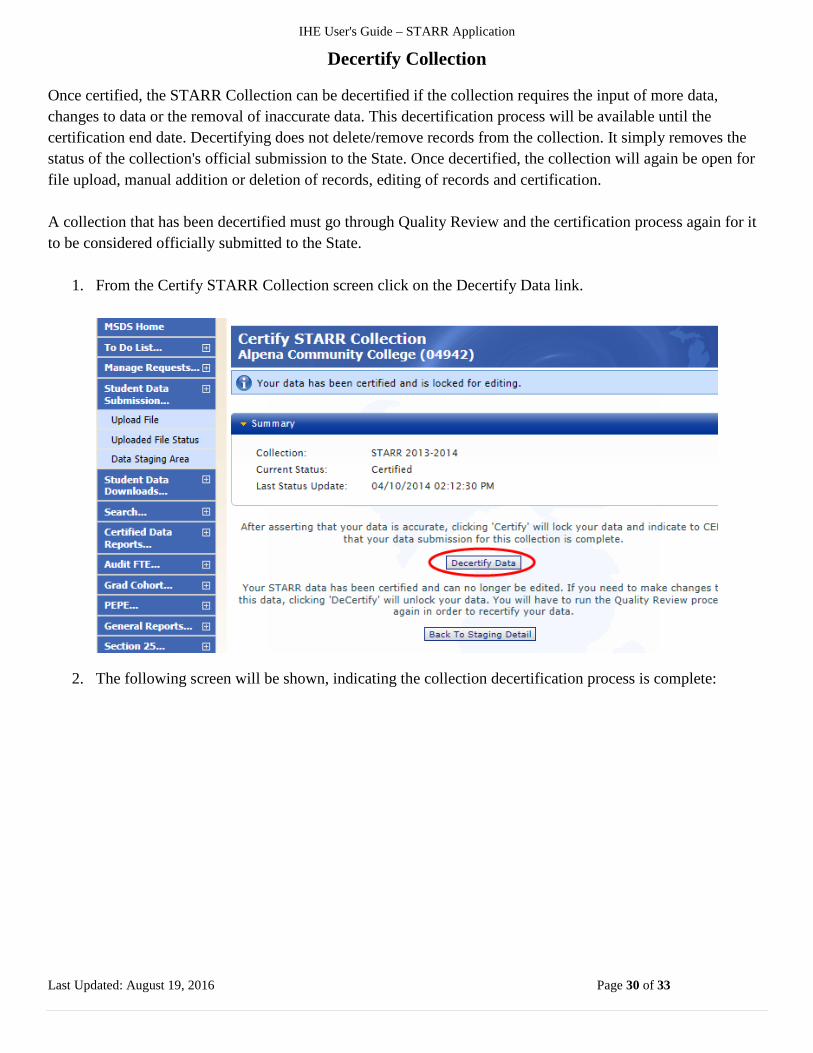
Decertify Collection Once certified, the STARR Collection can be decertified if the collection requires the input of more data, changes to data or the removal of inaccurate data. This decertification process will be available until the certification end date. Decertifying does not delete/remove records from the collection. It simply removes the status of the collection's official submission to the State. Once decertified, the collection will again be open for file upload, manual addition or deletion of records, editing of records and certification. A collection that has been decertified must go through Quality Review and the certification process again for it to be considered officially submitted to the State.
1. From the Certify STARR Collection screen click on the Decertify Data link.
2. The following screen will be shown, indicating the collection decertification process is complete:

IHE User's Guide – STARR Application
Last Updated: August 19, 2016 Page 31 of 33
3. Once a collection decertification is complete, the following automatically generated email should be received:

IHE User's Guide – STARR Application
Last Updated: August 19, 2016 Page 32 of 33
Additional MSDS Functionality
Student Search Use the MSDS Student Search feature when you want to look up individual students to locate their UICs. To perform a student search:
1. Click on the Search tab at the left-hand menu. This will bring up a sub-menu. Click on the Student Search tab. This will take you to the Student Search screen.
2. Click the radio button next to Search By Core Fields. 3. Type in all or portions of the core fields. 4. Click on the Filter button. This will bring up the search results for the student. Note: No search results
will appear if no matches were found in the system. The search results may also bring up multiple matches. If you discover that there are multiple UICs for your student, the UICs should be linked. See the IHE Request for UIC Collection User Guide section on linking UICs for these instructions.
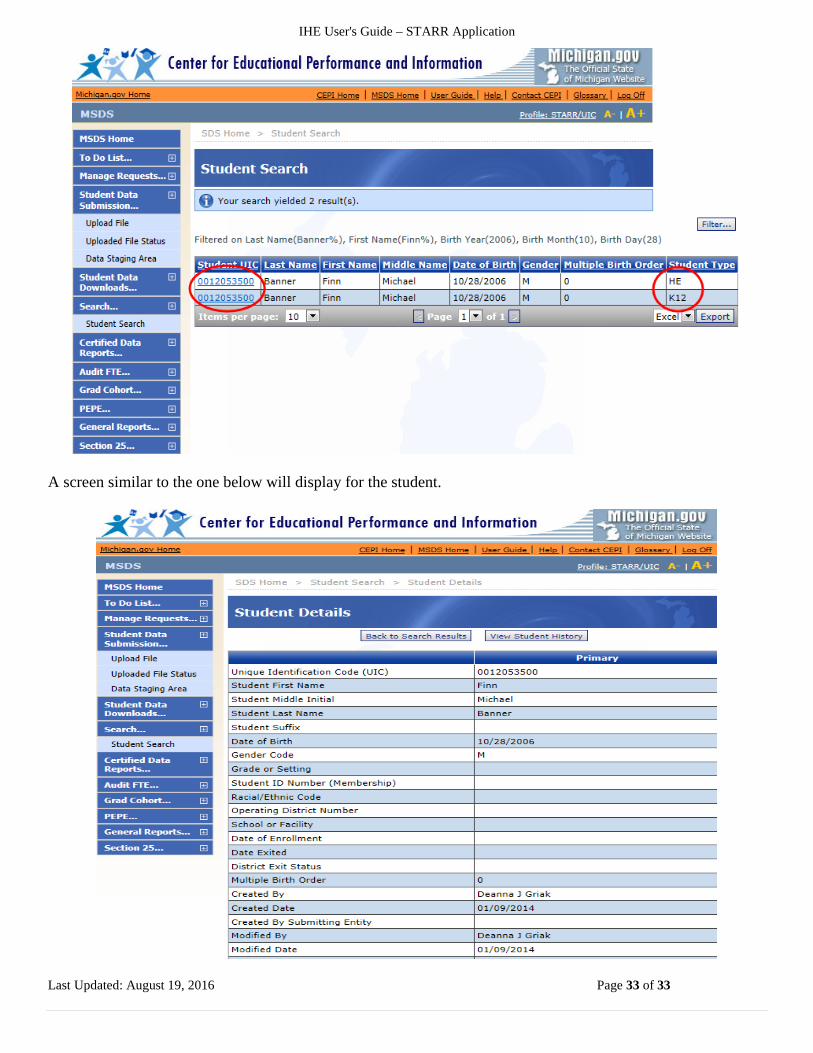
5. The Student Type identifies if the student has a Secondary (K12) and/or a Higher Education (HE) record.
6. Click on the hyperlinked UIC for the student. This will take you to the Student Details screen to view detailed information on the student.
IHE User's Guide – STARR Application
Last Updated: August 19, 2016 Page 33 of 33
A screen similar to the one below will display for the student.


