
By Dilshan R Jayakody 4S5DRJ
This unit is specifically design to work with PC sound
cards, radio receivers and CD/DVD/Blue-Ray players.
Construction
This system use commonly available electronic
components and subs#tute components can also
use.
Supply voltage and current 12V – 15V (5A)
Output power 2 × 6W + 20W on 4Ω load
Output drive 2 full range speakers and 1 bass woofer
Audio input 1 stereo audio input
Bass Cut/Boost ±14dB
Treble Cut/Boost ±14dB
Addi#onal bass boost up to +35dB, and configurable for both 2 speakers and for bass woofer.
Addi#onal audio op#ons Loudness and bass mix
Table1: Techinical features and specifica�ons of 2.1 channel audio amplifier project.
Introduction
This ar#cle introduces high quality digitally
controlled 2.1 channel analog audio power
amplifier system. This project is mainly based on
TDA7377 AF power amplifier and PIC18F452 8bit
microcontroller. Basic technical features of this
receiver are covered in table1.

For maximum quality we recommended to use
components from same manufacturer. For
example some actual capacitor values and resistor
values are slightly varied from manufacture to
manufacturer, and this cause some minor
unbalances in output of amplifiers.
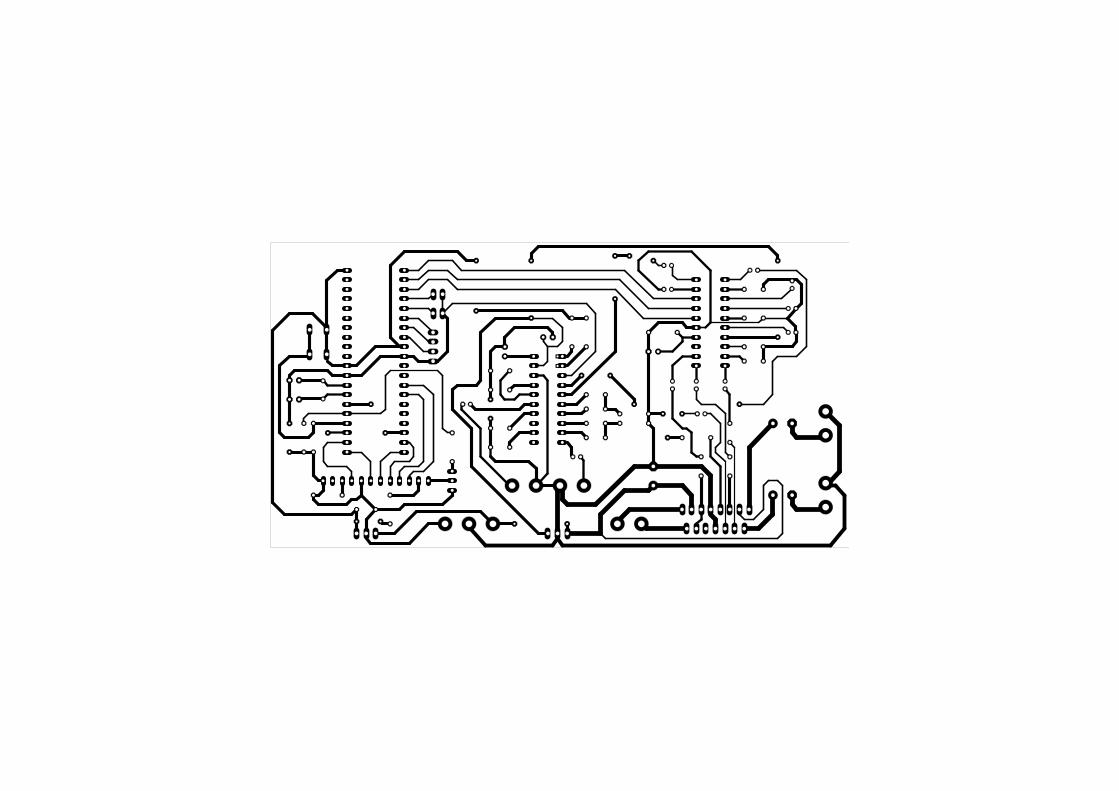
When soldering the PCB we suggested to
soldering small components such as jumper wires,
resistors first and moving to larger components at
last.
FIg.1: Prototype of 2.1 channel audio amplifier.
Also try to use IC sockets for all the DIP and
TDA7377 ICs. In our prototype all the integrated
circuits except 2 voltage regulators (IC5 - 7805
and IC6 - 7808) are connected to mainboard via IC
sockets.
All the controls, I/O and power terminals and
display modules are connected to mainboard
through wires, and for control and display lines
we recommended to use suitable ribbon cables.
For power and output wires 18-20 gauge mul#-
strand cables are recommended (these wires are
commonly used for automo#ve wirings).
In given PCB design 4 wires need to be installed
for I2C bus and MCU STAND-BY lines. For this,
standard Teflon coated 32-30 gauge wires are
sufficient.
Microcontroller�irmware
andsourcecode
This project is an open hardware project and all
the source codes of PIC18F452 MCU are available
to download at project website.
The source code of PIC18F452 is wriEen using
MikroC for PIC compiler and free version of this
compiler is available to download at
Mikroelektronika[1]
home page.
Currently available firmware is design for 8MHz
clock and other required MCU related seJngs are
listed in table 2.
Compiled HEX file for PIC18F452 is also available
to download at project website.
Configura�on Address Value
0x300001 0x0022
0x300002 0x000F
0x300003 0x000E
0x300005 0x0001
0x300006 0x0081
0x300008 0x000F
0x300009 0x00C0
0x30000A 0x000F
0x30000B 0x00E0
Table2: Required MCU configura�on values
[1]: Mikroelectronika home page is hEp://www.mikroe.com.
MikroC for PIC is available to download at hEp://
www.mikroe.com/mikroc/pic

Testingthesystem
AOer assembling the system it is necessary to
check all the power connec#ons are working
properly in this system. To check power lines
follow the steps in below:
1. Connect both AGND and DGND together and
from here onwards this connec#on is referred
as GND.
2. Unplug TDA7377, TDA7315, LA2650,
PIC18F452 and 1602 LCD module from the
mainboard.
3. Disconnect any audio inputs and outputs.
4. Supply 12V – 14V DC input to GND and V+
lines.
5. Check the voltages between IC pins which are
listed in table3.
If voltage readings are correct, plug all the ICs and
LCD module and hold down the SYSTEM-RESET
buEon and apply power to the system. While
holding the SYSTEM-RESET buEon press
Component Posi�ve lead Nega�ve lead Voltage readings
TDA7377 socket 13 9 need to be same as supply
voltage (= 12V – 14V)
TDA7377 socket 3 8 need to be same as supply
voltage (= 12V – 14V)
TDA7315 socket 2 3 between 7.8V to 8.2V
LA2650 socket 14 6 between 7.8V to 8.2V
PIC18F452 socket 32 31 between 4.8V to 5.1V
PIC18F452 socket 11 12 between 4.8V to 5.1V
1602 LCD connector 2 1 between 4.8V to 5.1V
Table3: Voltage readings for audio ICs and microcontroller.
POWER ON/OFF buEon and turn on the system.
Once you got the LCD on, release the SYSTEM-
RESET buEon and adjust the controls and check
the audio outputs.
AOer firmware update or at ini#al run, pressing
the SYSTEM-RESET buEon is essen#al to avoid any
damages to speakers due to high volume levels.
FIg.2: Bo(om side wiring and layout of prototype
amplifier PCB.

Volume Rotate to increase / decrease the volume
Bass
Press
Bass level
Press
Rotate to increase / decrease
Press
Treble
Rotate
Treble level
Press
Rotate to increase / decrease
Press
Loudness
Rotate
Press
Press
Loudness ON → Loudness OFF
Rotate
Balance
Rotate
Press
Press
LeO → LeO+Right → Right
Rotate
Subwoofer
Rotate
Press
Subwoofer ON → Subwoofer OFF
Rotate
Press
Bass Mix
Rotate
Press
Press
Sub Gain
Rotate
Subwoofer level
Press
Rotate to increase / decrease
Press
Bass Mix ON → Bass Mix OFF
Rotate
Bass Add
Rotate
Bass addi#on level
Press
Rotate to increase / decrease
Press
Return
Rotate
Rotate
Press
Menusystemde�inedincurrentversionof�irmware

Partslist
C1, C2 15pF
C12, C13 0.0027µF/50V
C14, C15, C16, C17 0.039µF/50V
C6, C7, C8, C9, C10, C11, C34 0.1µF/50V
C25, C26 0.22µF/50V
C27 0.47µF/50V
C19, C23, C24, C31, C32, C33 1µF/16V
C3, C4 2.2µF/16V
C18, C20, C21 4.7µF/16V
C5 22µF/16V
C22, C35 47µF/16V
C30 47µF/25V
C36 1000µF/25V
C28, C29 2200µF/25V
R2 330Ω
R1 2.2KΩ
R8, R9 4.7KΩ
R6, R7 5.6KΩ
R3, R4, R5, R11 22KΩ
R10 1MΩ
Q1 8.00MHz HC49U Crystal
T1 2SC945
IC1 PIC18F452
IC2 TDA7315
IC3 LA2650
IC4 TDA7377
IC5 L7805
IC6 L7808
S1 4Pin OMRON tac#le switch
S2, S3 2Pin push ON switch
ROT1 360˚ Rotary Encoder with push
buEon
LCD1 1602 - 16×2 LCD with HD44780
base controller
All the resistors are 1/4W carbon film type.
All capacitors which range between 0.0027µF to 0.47µF are Mylar capacitors.
Troubleshooting
The most common problem can occur in this
amplifier system is no audio from the power
amplifier IC. The most possible reasons are excess
supply voltage (which is above 18V) or short
circuits in output terminals of amplifier. TDA7377
is equipped with several protec#on features and
state of the protec#on system can be monitored
through Pin 10 of TDA7377 IC.
Second most common issue is LCD with 16×2
boxes. This occurs due to ini#aliza#on problems
of HD44780 controller. A common reason for this
issue is wrong wiring or faulty PORTD outputs.
If LCD output is too light (or dimmed), change the
value of R1 (2.2KΩ) resistor. We set this value for
commonly available Blue/White 1602 LCD
module.

SYSTEM-RESET
MODE / OPTIONS / VOLUME CONTROL
LEFT-SPK (4R)
RIGHT-SPK (4R)
SUB-SPK (4R)
C36 need to be located near IC4
C34 need to be located near IC5
C35 need to be located near IC2
IC4, IC5 and IC6 need separate sufficient heat-sinks
15V
- 5A
DC
INP
UT
PO
WE
R O
N/O
FF
AU
DIO
MU
TE
J2, J3 - 8R Tweeter and Woofer pairs connected in series
J4 - 4R 100W Bass Woofer
PIC18F452
+5V
+5V
DGND
8.00MHz
15pF
15pF
DGND
LCD-HD447803-HOLES16X2-3-HOLESDGND
+5V
2.2K
DGND
330R
+5V
2SC945
DGND22K
22K
DGND
+5V
22K
DGND
EC
12_S
W
EC
12_S
W
DGND
TDA7315
2.2M
FD/1
6V
2.2M
FD/1
6V
+8V
22MFD/16V
AGND
AGND
0.1M
FD/5
0V
0.1M
FD/5
0V5.
6K
AGND
0.1M
FD/5
0V
0.1M
FD/5
0V5.
6K
AGND DGND
0.1M
FD/5
0V
0.1M
FD/5
0V
AGND AGND
0.00
27M
FD/5
0V
0.00
27M
FD/5
0V
AGND AGND
RD
T103
4
RD
T103
4
DGND
4.7K
4.7K
+5V
AU
DIO
-IN
AGND
LA2650
0.03
9MFD
/50V
AGND
0.03
9MFD
/50V
0.03
9MFD
/50V
0.03
9MFD
/50V
AGND AGND AGND
+8V4.7MFD/16V
1MFD/16V
AGND AGND
AGND
4.7M
FD/1
6V
AGND
4.7M
FD/1
6V
AGND
47M
FD/1
6V
AGND
1M
AGND
1MFD/16V
1MFD/16V
TDA7377
AGND AGND
0.22MFD/50V
0.22MFD/50V
VC
C
0.47MFD/50V
2200MFD/25V
2200MFD/25V
47MFD/25V
AGND
AGND
1MFD/16V
1MFD/16V
1MFD/16V
22K
7805TV 7808T
AGND
VC
C
VC
C
0.1M
FD/5
0V+5
V
47M
FD/1
6V
AGND
+8V
VC
C
AGNDDGND
VC
C
1000
MFD
/25V
AGND
DGND DGND
IC1VDD
VSS
MCLR/VPP1
RA0/AN02
RA1/AN13
RA2/AN24
RA3/AN35
RA4/T0CKI6
RA5/AN47
RE0/RD/AN58
RE1/WR/AN69
RE2/CS/AN710
OSC1/CLKIN13
OSC2/CLKOUT/RA614
RC0/T1OSO/T1CKI15
RC1/T1OSI/CCP216
RC2/CCP117
RC3/SCK/SCL18
RD0/PSP019
RD1/PSP120 RD2/PSP2 21RD3/PSP3 22RC4/SDI/SDA 23RC5/SDO 24RC6/TX/CK 25RC7/RX/DT 26RD4/PSP4 27RD5/PSP5 28RD6/PSP6 29RD7/PSP7 30
1211
RB0/INT0 33RB1/INT1 34RB2/INT2 35RB3/CCP2 36RB4 37RB5/PGM 38RB6/PGC 39RB7/PGD 40
3231
Q1
C1
C2
A
DB0
DB1
DB2
DB3
DB4
DB5
DB6
DB7E K
R/WR
S
VDD
VOVSS
LCD
1
R1
R2
T1
R3
R4
S1
3 124
R5
RO
T1A
AA
BB
CC
RO
T1S
W
IC2INL11
TRIB-L 4
INR6
DGND18 SDA19 SCL20
AGN
D3
VCC
2
TRIB-R 5
OUT-R 16OUT-L 17
LOUD-L 9
LOUD-R 7
BOUT-L13
BOUT-R15
CR
EF1
BIN-L12
BIN-R14
C3
C4
C5
C6 C7
R6
C8 C9
R7
C10 C11 C12 C13
S2
S3
R8
R9
1 J1
IC3INL20
DET.OUT 7
INR1
BOO
ST2
ENABLE3 DATA4 CLK5
GN
D6
VCC
14
LED
8
BASSOUT 9
OUT-R 10OUT-L 11
LPF119
LPF216
LPF313
LPF412
VREF
18
DC
-CU
T17
VCAN
F15
C14 C15 C16 C17
C18
C19
C20
C21
C22 R10
C23
C24
IC4
IN14 OUT1 1
IN25
IN411
IN312
ST-BY7
OUT2 2
OUT3 15
OUT4 14
VCC
113
VCC
23
SVR6
GN
D9
PW-G
ND
8
DIAG 10
C25
C26
C27
C28
C29
C30
1
J2
1
J3
1
J4
C31
C32
C33
R11
IC5
GNDVI1
2
VO 3
IC6
GNDVI1
2
VO 3
C34
C35
J51
C36
HD44780 LCD

A
AB
B
E
E
1234
1
2
1
2
1 21 2 3
112
12
34
123 123
DC 15V INPUT SUB-SPK
LEFT-SPK
RIGHT-SPK
SYSTEM-RESET
1602 LCD DISPLAY
R.E
NC
OD
ER
AUDIO-MUTE
POWER-ON/OFF
IC1
Q1
C1
C2
R1
R2
T1R
3
R4
S1
R5
IC2
C3
C4
C5
C6
C7 R6
C8
C9
R7
C10
C11
C12
C13
R8
R9
J1
IC3C14
C15
C16
C17
C18
C19C20
C21
C22
R10
C23 C24
IC4
C25
C26
C27
C28
C29
C30
J2J3
J4
C31
C32
C33
R11
IC5
C34
C35
J5
C36
J8
IC6
SV1
J6
J7PIC
18F4
52
8.00
MH
z15pF
15pF
2.2K
330R
2SC
945
22K
22K 22K
TDA
7315
2.2MFD/16V
2.2MFD/16V
22M
FD/1
6V
0.1M
FD/5
0V
0.1M
FD/5
0V
5.6K
0.1MFD/50V
0.1MFD/50V
5.6K
0.1M
FD/5
0V
0.1M
FD/5
0V0.
0027
MFD
/50V
0.00
27M
FD/5
0V
4.7K
4.7K
AUDIO-IN
LA26
50
0.039MFD/50V
0.039MFD/50V
0.03
9MFD
/50V
0.03
9MFD
/50V
4.7M
FD/1
6V
1MFD/16V4.7MFD/16V
4.7MFD/16V47MFD/16V
1M
1MFD/16V1MFD/16V
TDA7377
0.22
MFD
/50V
0.22
MFD
/50V
0.47MFD/50V
2200MFD/25V
2200MFD/25V
47M
FD/2
5V
1MFD/16V
1MFD
/16V
1MFD
/16V
22K
7805TV
0.1MFD/50V
47M
FD/1
6V
1000
MFD
/25V
7808TV


