
User Manual Page i
Automatic Calibration Module for Vector Network Analyzers
User Manual

User Manual Page ii
Sheet
Release No. Date Revision Description
Rev. 1.0 Feb.10, 2019 Initial Work
Rev. 1.1 Apri.29, 2019 Add 18 GHz & 26.5 GHz version
Rev. 2.0 Aug.01, 2019 Changed the low freq. specification (300 kHz → 100 kHz)
Rev. 3.0 Sep.01, 2019 Add 4 Ports Specification

User Manual Page iii
Contents
Page #
1. General Information .......................................................................................................2-1
1.1 Overview ......................................................................................................................2-1 1.1.1 Adaptor Port Extension .................................................................................................... 2-1 1.1.2 Thermal Compensation .................................................................................................... 2-1
1.2 Vector Network Analyzer Compatibility .........................................................................2-1
1.3 Automatic Calibration Module Contents ........................................................................2-2
2. System Summary ...........................................................................................................3-1
2.1 Hardware Configurations ..............................................................................................3-1
2.2 Specifications ...............................................................................................................3-1 2.2.1 Effective System Data...................................................................................................... 3-1 2.2.2 General data .................................................................................................................... 3-2
3. Getting Started ................................................................................................................4-1
3.1 USB Driver Installation .................................................................................................4-1 3.1.1 File and printer sharing setting ......................................................................................... 4-5 3.1.2 Windows Firewall setting.................................................................................................. 4-6 3.1.3 Setup socket server of VNA ............................................................................................. 4-6
3.2 Operation Procedure ....................................................................................................4-7
3.3 Firmware Update ..........................................................................................................4-8

1.0 General Information
User Manual
1.0 General Information

1.0 General Information
User Manual Page 2-1
2. GENERAL INFORMATION
1.1 Overview Various vector network analyzers (VNA) models of different vendors are used for component testing in many production sites. Withwave’s Automatic Calibration Modules (WACM) are ideal for users who want fast and easy calibration of various VNAs. (Refer to 1.2 Vector Network Analyzer Compatibility).
This WACMs are powered up via USB or 5.5 DC connector and communicate with VNA via USB or LAN and designed for full one-port through four-port calibrations of VNAs by one-push START button. These units work as host systems, measure and calculate calibration coefficients and send it to VNA.
WACMs offers the following advantages:
• Provide various VNAs compatibility
• Single-connection for full N-port calibration
• Easy port extension using RF adaptor and microSD memory
• Embedded operating system communicates with VNA directly (No need external PC and software)
• Easy firmware update for more VNAs compatibility and more functionality
1.1.1 Adaptor Port Extension
Many kinds of Electronic Calibration Kit with different connector types used for fast and easy calibration. WACMs offers easy and cost-effective solution for port connector type change just by connecting RF adaptor and microSD memory before start calibration. Withwave provide various high-performance RF adaptors optionally. Characteristic data files of RF adaptor stored in microSD memory in binary and touchstone format provided together.
1.1.2 Thermal Compensation
Thermal compensation is used to enhance WACM calibration accuracy in the entire range of the displayed WACM temperatures of 20°C to 30°C. WACM can be work out of range of recommended temperature but accuracy can be degraded. Temperature dependence data of WACM impedance states is collected and stored internal memory. Displayed temperature on front OLED is RF module temperature of WACM and can be different with room temperature.
1.2 Vector Network Analyzer Compatibility VNAs manufacturer provide Electronic Calibration Kit solution but most of all Electronic Calibration Kit can work on same manufacturer’s VNAs only. WACM provide cost-effective calibration solution to user by supporting various VNA models. WACM is compatible with following VNA:
• Keysight PNA series, ENA series
• Rohde & Schwarz ZVL, ZVA series, ZVT series
• Anritsu ShockLine Series
• Copper Mountain Technologies Planar Series

1.0 General Information
User Manual Page 2-2
For some VNA models listed above, may need to do a series of experiment to verify the compatibility Because WACM communicate with VNA using SCPI command through Telnet 5025 port, Telnet service and 5025 port should be enabled in VNA before calibration.
1.3 Contents of Automatic Calibration Module Contents of Automatic Calibration Modules are listed below.
Index Description
1 Automatic Calibration Module (2-Port & 4-Port)
2 Torque wrench, 8 mm, 0.9 N·m
3 Power supply - Input: AC 100~240V, 50~60Hz - Output: USB Type-A female, 5V/2.1A
4 DC power cable - Connector type: USB Type-A male to 5.5 DC plug - Length: 2 meters
5 USB cable - Connector type: USB2.0 Type-A male to micro-USB 5pin - Length: 80 cm
6
OPTION : Data-based Microwave Adapters - 3.5 mm(M) to 3.5 mm(M) - 3.5 mm(M) to 3.5 mm (F) - 3.5 mm(F) to 3.5 mm(F)
1
2
3
4
5
6
2.0 System Summary
User Manual
2.0 SYSTEM SUMMARY
2.0 System Summary
User Manual Page 3-1
3. SYSTEM SUMMARY
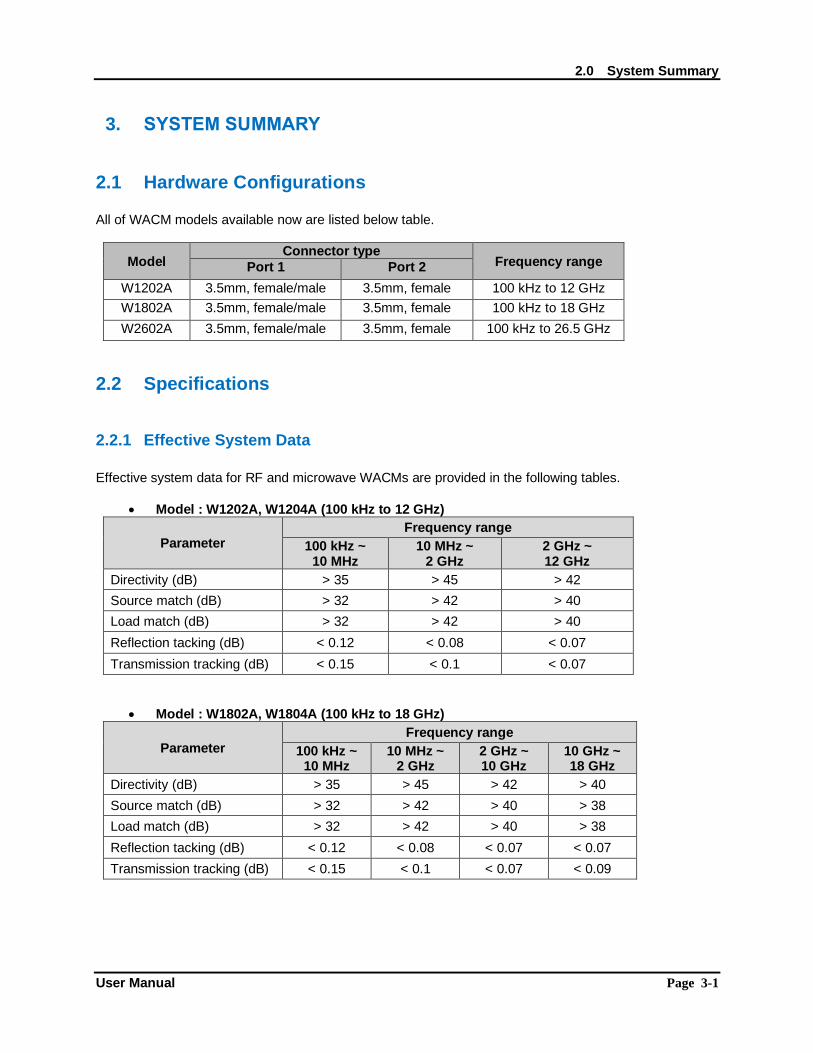
2.1 Hardware Configurations All of WACM models available now are listed below table.
Model Connector type
Frequency range Port 1 Port 2
W1202A 3.5mm, female/male 3.5mm, female 100 kHz to 12 GHz
W1802A 3.5mm, female/male 3.5mm, female 100 kHz to 18 GHz
W2602A 3.5mm, female/male 3.5mm, female 100 kHz to 26.5 GHz
2.2 Specifications
2.2.1 Effective System Data
Effective system data for RF and microwave WACMs are provided in the following tables.
• Model : W1202A, W1204A (100 kHz to 12 GHz)
Parameter Frequency range
100 kHz ~ 10 MHz
10 MHz ~ 2 GHz
2 GHz ~ 12 GHz
Directivity (dB) > 35 > 45 > 42
Source match (dB) > 32 > 42 > 40
Load match (dB) > 32 > 42 > 40
Reflection tacking (dB) < 0.12 < 0.08 < 0.07
Transmission tracking (dB) < 0.15 < 0.1 < 0.07
• Model : W1802A, W1804A (100 kHz to 18 GHz)
Parameter Frequency range
100 kHz ~ 10 MHz
10 MHz ~ 2 GHz
2 GHz ~ 10 GHz
10 GHz ~ 18 GHz
Directivity (dB) > 35 > 45 > 42 > 40
Source match (dB) > 32 > 42 > 40 > 38
Load match (dB) > 32 > 42 > 40 > 38
Reflection tacking (dB) < 0.12 < 0.08 < 0.07 < 0.07
Transmission tracking (dB) < 0.15 < 0.1 < 0.07 < 0.09

2.0 System Summary
User Manual Page 3-2
• Model : W2602A, W2604A (100 kHz to 26.5 GHz)
Parameter Frequency range
100 kHz ~ 10 MHz
10 MHz ~ 2 GHz
2 GHz ~ 10 GHz
10 GHz ~ 20 GHz
20 GHz ~ 26.5 GHz
Directivity (dB) > 35 > 45 > 42 > 40 > 37
Source match (dB) > 32 > 42 > 40 > 38 > 38
Load match (dB) > 32 > 42 > 40 > 38 > 38
Reflection tacking (dB) < 0.12 < 0.08 < 0.07 < 0.07 < 0.07
Transmission tracking (dB) < 0.15 < 0.1 < 0.07 < 0.09 < 0.09
2.2.2 General data
Parameter W1202A, W1204A W1802A, W1804A W2602A, W2602A
Impedance 50 Ohm 50 Ohm 50 Ohm
Operating Temperature +20C ~ +30C +20C ~ +30C +20C ~ +30C
Port max power +10 dBm +10 dBm +10 dBm
Port max DC voltage 10 V 10 V 10 V
Ethernet interface LAN/micro USB LAN/micro USB LAN/micro USB
DC supply 5V/500mA, 5.5 5V/500mA, 5.5 5V/500mA, 5.5
Dimension 94.5 x 108 x 28.5 mm 94.5 x 108 x 28.5 mm 94.5 x 108 x 28.5 mm
Weight 343 g 343 g 343 g

3.0 Getting Started
User Manual
3.0 GETTING STARTED

3.0 Getting Started
User Manual Page 4-1
4. GETTING STARTED
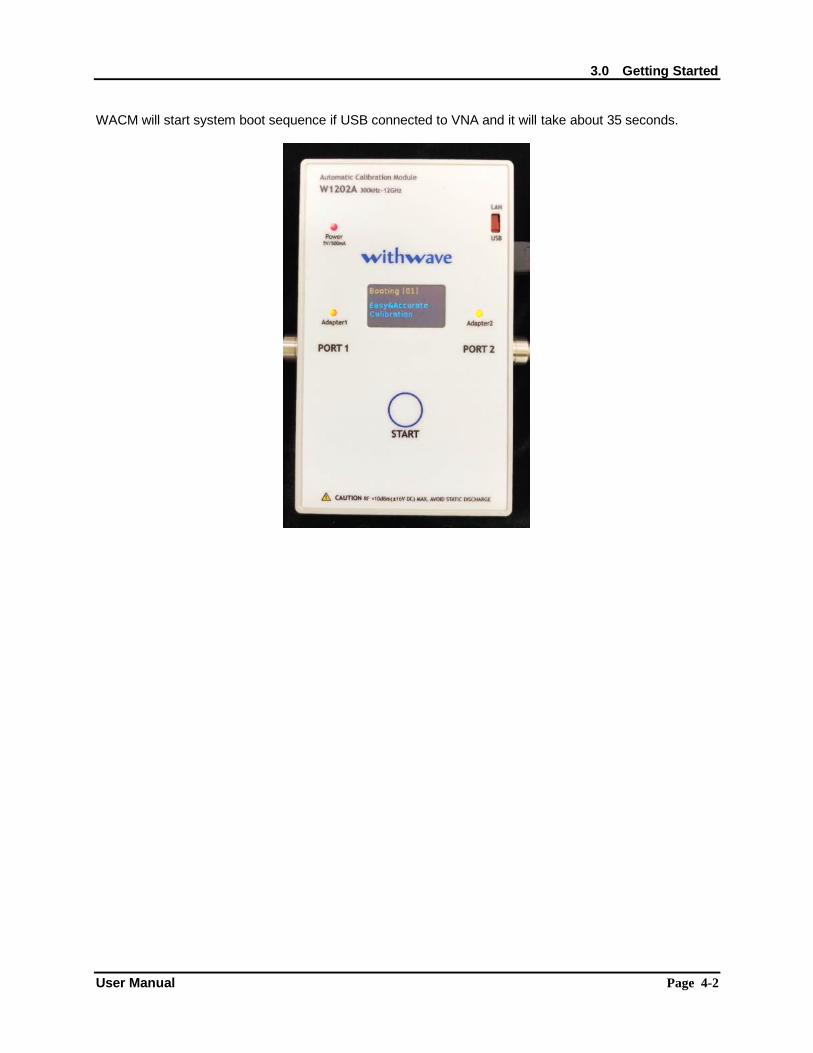
3.1 USB Driver Installation If WACM operate using LAN port only, USB driver installation is not required. Before USB driver install, WACM should be connected with VNA via micro-USB.
3.0 Getting Started
User Manual Page 4-2
WACM will start system boot sequence if USB connected to VNA and it will take about 35 seconds.

3.0 Getting Started
User Manual Page 4-3
Operating system(Window) of VNA will detect Realtek USB Network adapter automatically in Windows 7 and higher systems as below figure.

3.0 Getting Started
User Manual Page 4-4
If VNA's OS fails to detect automatically or is a system below Window 7, the user should install the USB driver manually. The USB drivers can be downloaded from website (https://www.with-wave.com/)
Even though the USB driver has been successfully installed, if WACM’s OLED show “Ethernet disconnected” message shown in the picture below, you must setup either the file and printer sharing settings or turn off Windows firewall of the Network adapter.
If USB ethernet connected successfully, OLED show “Ready for Calibration” message. and turn on START button led as shown picture below.
3.0 Getting Started
User Manual Page 4-5
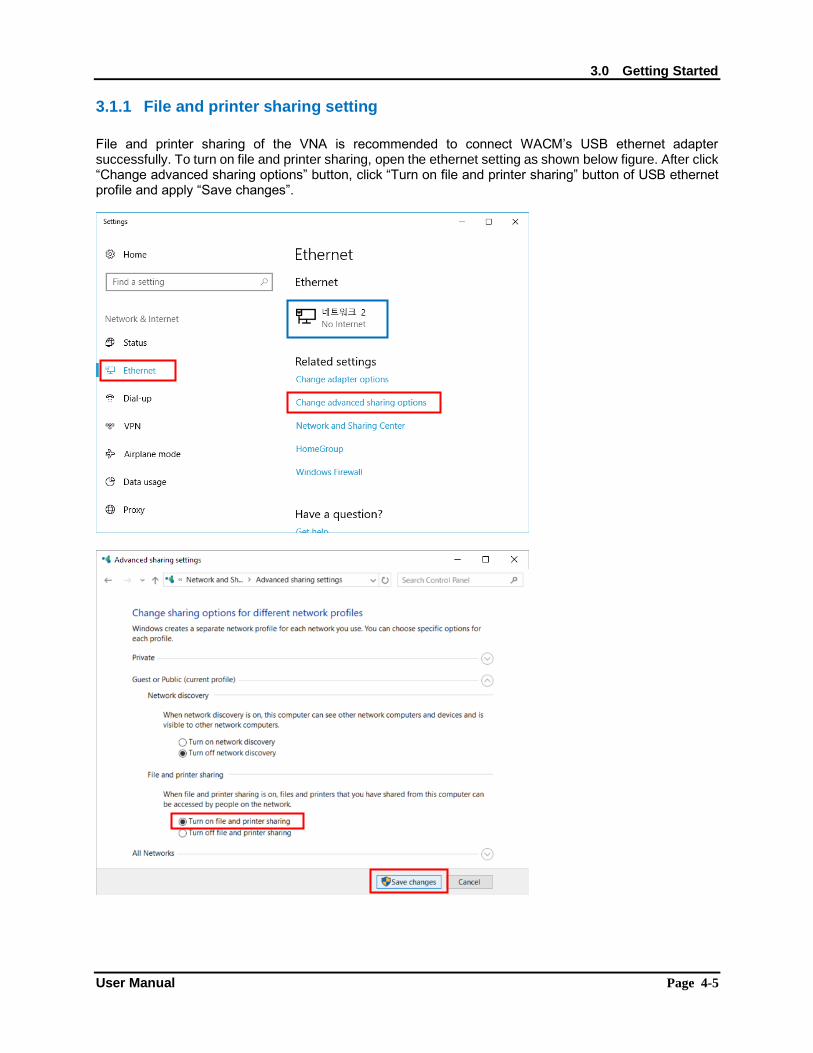
3.1.1 File and printer sharing setting
File and printer sharing of the VNA is recommended to connect WACM’s USB ethernet adapter successfully. To turn on file and printer sharing, open the ethernet setting as shown below figure. After click “Change advanced sharing options” button, click “Turn on file and printer sharing” button of USB ethernet profile and apply “Save changes”.

3.0 Getting Started
User Manual Page 4-6
3.1.2 Windows Firewall setting
WACM’s USB ethernet adapter can be connected successfully by turn off the windows firewall setting. After click Network button (blue box) at the ethernet setting as shown above figure, click the “Configure firewall and security settings” button. Select same profile network at the Windows Defender Security Center window, “Public network” button in this case and turn off Windows Defender Firewall.

3.0 Getting Started
User Manual Page 4-7
3.1.3 Setup socket server of VNA
WACM can communicate with VNA after enable the socket server setup. Socket server setup menu is different with VNA model. Refer the below instructions.
1. Keysight PNA series - System > Configure > SICL/GPIB/SCPI >
2. Keysight ENA series - System > Misc Setup > Network Setup > Telnet Server [ON]
3. Anritsu ShockLine Series - Utilities > System > Network Interface
- Check see If IP Address is same with WACM’s USB ethernet adapter. If the IP Address is different, Click “Network Connections” button and enable “WACM’s USB ethernet adapter” and disable the other network adapters - Set “TCP Port Number” to “5025”
4. Copper Mountain Technologies Planar series - System > Misc Setup > Network Remote Control Settings > Telnet Server [ON]
3.2 Operation Procedure
1. Connect WACM with VNA via a USB cable or LAN cable. 2. Setup VNA test environment
- Frequency range: start/stop or center/span, number of point - Source power, Sweep type, IF bandwidth
3. Push START button for starting calibration if START button led turn on. 4. WACM will be remain ready state for other calibration as soon as calibration complete
Sockets Enabled Telnet Enabled

3.0 Getting Started
User Manual Page 4-8
3.3 Firmware Update The updated firmware will be announced on the website. For firmware updates, connect the WACM to VNA or user PC and input the "\\192.168.100.1" in File Explorer as shown figure below.
Input the “guest” for ID and click “OK” button.
After go into the “update” folder, copy the downloaded firmware file. Firmware file will be moved to the WACM’s system folder and be updated automatically at the next boot sequence.

3.0 Getting Started
User Manual Page 4-9


