Download - AR-15 User Manual - ABC Rifle Company

PHONE: 702-998-4797
envelope EMAIL: [email protected]
WWW.ABCRIFLE.COM
Map-marked-alt 4640 POLARIS AVE.LAS VEGAS NV, 89103

PAGE 1
WARNING!SAFE GUN HANDLING IS YOUR RESPONSIBILITY!
DISCLAIMER OF LIABILITY
GENERAL SAFETY WARNINGS
Important warning and safety precautions,
Which should be read and understood before using this firearm.
Disregarding warning and safety precautions in this manual
may result in injury or death to you and others and damage to property.
Only when you are certain you have fully familiarized yourself with the function of your firearm should
you practice loading, unloading, and firing with live rounds of ammunition.
ABC Rifle Company shall not be responsible for product malfunction or for physical injury, death or
damage to property resulting from either intentional or accidental discharge of this firearm, criminal
use or negligence, unauthorized modifications or alteration, use of defective or improper or faulty re-
manufactured ammunition. ABC Rifle Company highly recommends the use of high quality commercially
manufactured ammunition in new condition that is best suitable to the caliber of your rifle. ABC Rifle
Company shall not be responsible for the damages resulting from use of defective,
improper or reloaded ammunition.
1. Careless and improper handling of this gun could result in unintended discharge causing injury, death or property
damage. Safety must be the first and constant consideration when handling a firearm and ammunition.
2. This rifle was designed to function properly in its original condition. Do not alter any parts or replace parts.
3. This rifle should always be carried with chamber empty and with the safety on "SAFE" to prevent accidental discharge.
4. Always handle and treat your firearm as if it were loaded so you will never fire it accidentally when you think it is
unloaded. Never take anyone's word that it is unloaded. Always check it yourself with your fingers off the trigger and
the gun pointed in a safe direction.
5. Never place your fingers inside the trigger guard area unless you intend to fire.
6. Keep the gun's muzzle pointed in a safe direction at all times. Never let the muzzle of a firearm point at any part of your
body, another person or at anything you do not intend to shoot. Always be sure of your target before firing.
7. UNLOAD ALL FIREARMS WHEN NOT IN USE. NEVER STORE A LOADED FIREARM. Firearms and ammunition should be safely stored
separately so that they are inaccessible to children or unauthorized users.
8. Always make sure your firearm is not loaded before cleaning, storing, or handing it to another person.
9. Always wear and encourage others to wear ear protection and safety glasses when shooting, especially on the
range. Repeated exposure to shooting noise could result in permanent hearing loss.
10. disregard for your safety and that of others. Never use a firearm while you are taking medication unless you have
checked with your doctor to ensure your fitness to handle your firearm safely.

PAGE 2
FLASH H
IDE
BARREL
HAN
DGUARD
TRIG
GER
BOLT R
ELEASE LEV
ER
CHARGIN
G H
AN
DLE
6 P
OSITIO
N TELES
TOCK
PIS
TOL G
RIP TELES
TOCK LATC
H
REA
R S
LING S
WIV
EL
30 R
OUN
D M
AGAZIN
E
SAFETY
SELEC
TOR LEV
ER
FORW
ARD A
SSIS
T KN
OB
MAGAZIN
E RELEA
SE B
UTTO
N
BRASS D
EFLECTO
R
EJECTIO
N P
ORT C
OVER
BOLT C
ARRIER
GROUP (B
CG)
PAGE 3
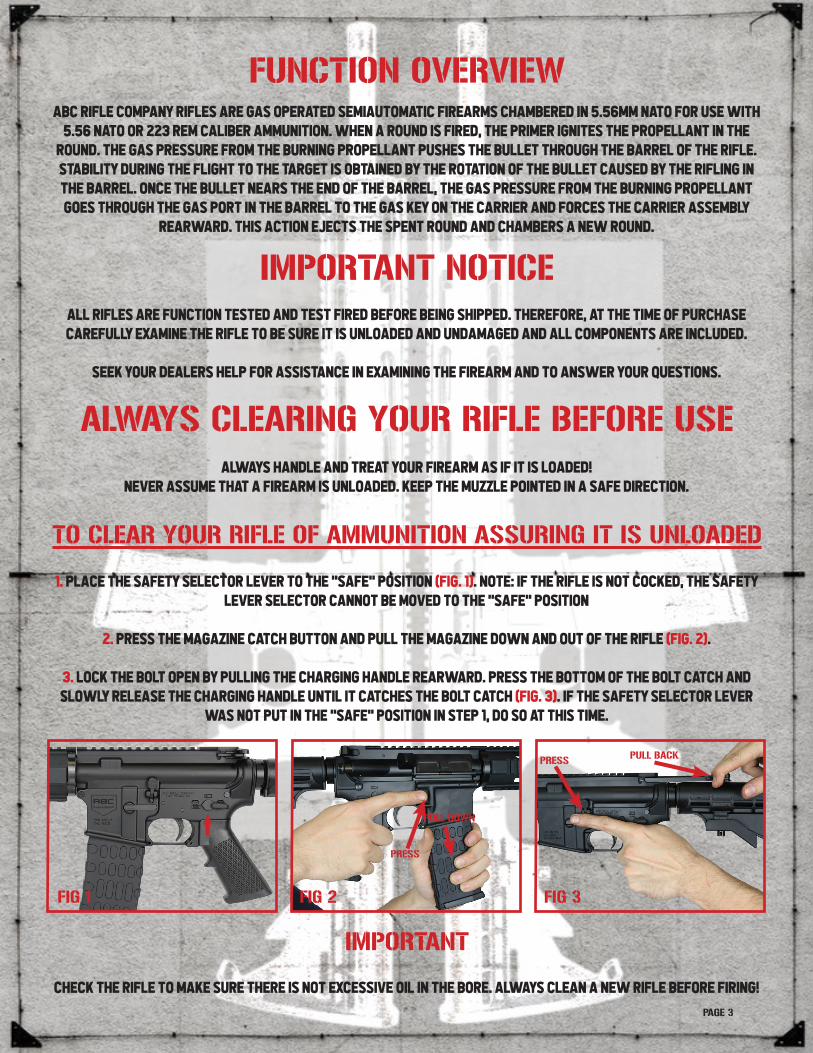
FUNCTION OVERVIEW
IMPORTANT NOTICE
ALWAYS CLEARING YOUR RIFLE BEFORE USE
TO CLEAR YOUR RIFLE OF AMMUNITION ASSURING IT IS UNLOADED
IMPORTANT
ABC Rifle company rifles are gas operated semiautomatic firearms chambered in 5.56mm NATO for use with
5.56 NATO or 223 Rem caliber ammunition. When a round is fired, the primer ignites the propellant in the
round. The gas pressure from the burning propellant pushes the bullet through the barrel of the rifle.
Stability during the flight to the target is obtained by the rotation of the bullet caused by the rifling in
the barrel. Once the bullet nears the end of the barrel, the gas pressure from the burning propellant
goes through the gas port in the barrel to the gas key on the carrier and forces the carrier assembly
rearward. This action ejects the spent round and chambers a new round.
All rifles are function tested and test fired before being shipped. Therefore, at the time of purchase
carefully examine the rifle to be sure it is unloaded and undamaged and all components are included.
Seek your dealers help for assistance in examining the firearm and to answer your questions.
Always handle and treat your firearm as if it is loaded!
Never ASSUME that a firearm is unloaded. Keep the muzzle pointed in a safe direction.
1. Place the safety selector lever to the "SAFE" position (Fig. 1). Note: If the rifle is not cocked, the Safety
Lever Selector cannot be moved to the "SAFE" position
2. Press the Magazine Catch Button and pull the magazine down and out of the rifle (Fig. 2).
3. Lock the bolt open by pulling the Charging Handle rearward. Press the bottom of the Bolt Catch and
slowly release the Charging Handle until it catches the Bolt Catch (Fig. 3). If the Safety Selector Lever
was not put in the "SAFE" position in step 1, do so at this time.
Check the rifle to make sure there is not excessive oil in the bore. Always clean a new rifle before firing!
FIG 1 FIG 2 FIG 3
PRESS
PRESS
PULL DOWN
PULL BACK

PAGE 4
SAFETY SELECTOR LEVER FUNCTION AND CHECK
ALWAYS POSITION THE SAFETY SELECTOR LEVER IN THE SAFE POSITION WHEN LOADING AND UNLOADING THE RIFLE!
The safety selector is located on the left side on the lower receiver of your
rifle and has 2 positions: "Fire" and "Safe."
Note: If the rifle is not cocked, the Safety Selector Lever cannot be moved to the Safe position.
However, with the Charging Handle locked in the rearward position,
the Safety Selector Lever can be moved to either position.
With the Safety Selector Lever in the horizontal position on the left side and
pointing to "SAFE" the firearm is in the safe position (Fig. 4).
On the right side of the lower receiver the "-" witness mark will be pointing to "SAFE" (Fig 5).
In this position a cam bears on the trigger blocking the movement and prevents
the hammer from being released.
With the Safety Selector Lever in the vertical position and pointing to "FIRE" on the left side of the lower
receiver, the firearm will fire a single shot each time the trigger is pulled (Fig. 6). In the fire position the
"-" witness mark will point to the "FIRE" mark on the right side of the receiver (Fig. 7)
FIG 6 FIG 7
FIG 4 FIG 5
PAGE 5
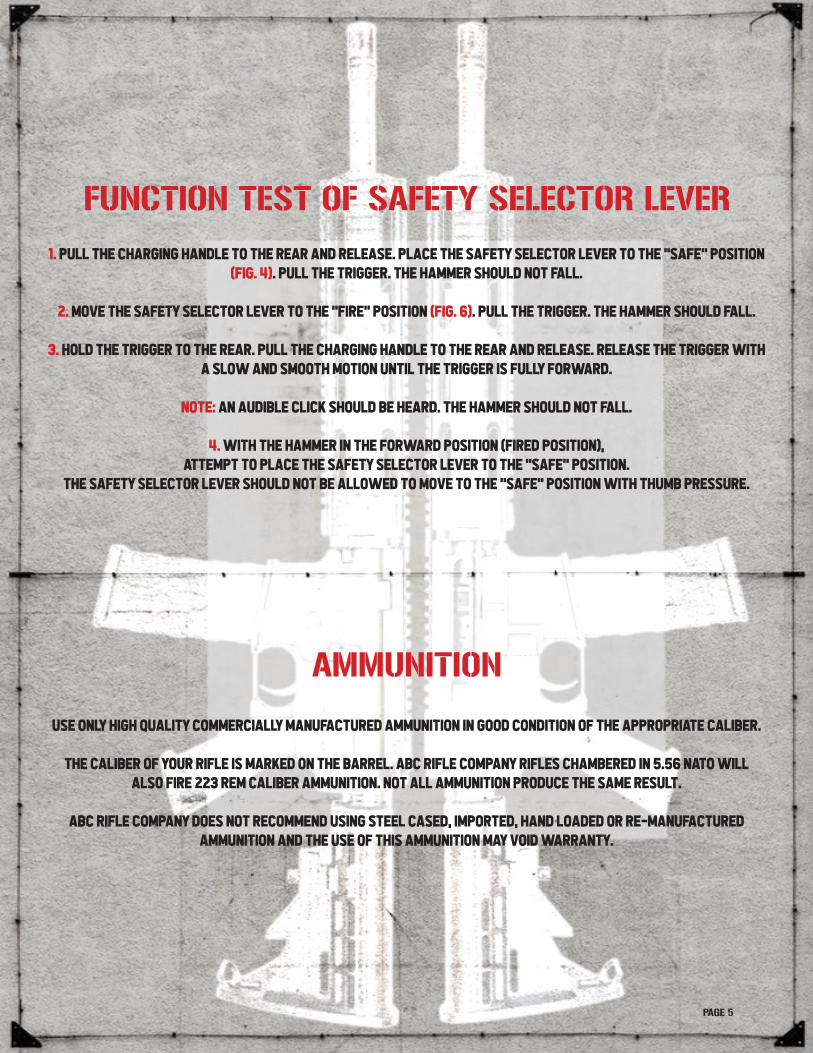
FUNCTION TEST OF SAFETY SELECTOR LEVER
1. Pull the charging handle to the rear and release. Place the Safety Selector Lever to the "SAFE" position
(Fig. 4). Pull the trigger. The hammer should not fall.
2. Move the Safety Selector Lever to the "FIRE" position (Fig. 6). Pull the trigger. The hammer should fall.
3. Hold the trigger to the rear. Pull the charging handle to the rear and release. Release the trigger with
a slow and smooth motion until the trigger is fully forward.
Note: An audible click should be heard. The hammer should not fall.
4. With the hammer in the forward position (fired position),
attempt to place the Safety Selector Lever to the "SAFE" position.
The Safety Selector Lever should not be allowed to move to the "SAFE" position with thumb pressure.
AMMUNITION
Use only high quality commercially manufactured ammunition in good condition of the appropriate caliber.
The caliber of your rifle is marked on the barrel. ABC Rifle Company rifles chambered in 5.56 NATO will
also fire 223 Rem caliber ammunition. Not all ammunition produce the same result.
ABC Rifle Company does not recommend using steel cased, imported, hand loaded or re-manufactured
ammunition and the use of this ammunition may void warranty.

PAGE 6
LOAD THE MAGAZINE
Using only high quality commercial 5.56mm or 223 Remington
ammunition; load the magazine. With the front of the magazine
forward (Fig. 8), place a round between the magazine lips with
the round pointed forward. Push the round down into the
magazine until it is retained by the magazine lips. Place the next
round on top of the previous round and press down again. Repeat
until the desired number of rounds are loaded.
LOADING YOUR RIFLE
With the Bolt in the closed position and the Safety Selector
Lever on "SAFE,' insert the loaded magazine in the magazine well
and push it up until it is retained by the Magazine Catch. Tap the
bottom of the magazine to ensure that it is seated properly (Fig.
9). Pull the Charging Handle rearward and release and this will
chamber a round. Tap the Forward Assist with the heel of your
hand to ensure the Bolt is fully forward and locked (Fig 10).
The rifle can also be loaded with the Bolt in the rear position.
Pull the Charging Handle rearward and hold; depress the bottom
of the Bolt Release Lever and then slowly release the Charging
Handle until it catches the Bolt Release Lever (Fig 11). Put the
Safety Selector Lever to the "SAFE" position. Insert the loaded
magazine into the magazine well and push it up until is retained by
the Magazine Catch.
Tap the bottom of
the magazine to
ensure it is properly seated (Fig. 9). Depress the top of the Bolt
Release Lever and the bolt will close and chamber a round. Tap
the Forward Assist with the heel of your hand to ensure the Bolt
is fully forward and locked (Fig. 10).
Your rifle is now ready to be fired with a round in the chamber
and the Safety Selector Lever on "SAFE.'
LOADING YOUR MAGAZINEAlways check that the ammunition is clean and undamaged. Forcing damaged ammunition into the chamber
could result in disaster causing injury, and or damage to your rifle.
FIG 8
FIG 9
FIG 10
FIG 11
PULL BACKPRESS

PAGE 7
FIRING YOUR RIFLEDo not chamber a round until you are ready to fire the rifle. Always keep the muzzle pointed in a safe
direction. Do not disengage the safety until you are ready to fire.
Always wear eye and hearing protection when firing your rifle.
1. With the rifle loaded and Safety Selector Lever on "SAFE," firmly position the buttstock to your
shoulder with one hand on the handguard and the other hand on the pistol grip with the trigger finger
along the side of the trigger guard. Do not have your trigger finger on the trigger at this time.
2. Align the front and rear sights to the target.
3. Move the Safety Selector Lever to the "FIRE" position (Fig. 12).
4. Gently pull the trigger until the hammer releases and the rifle fires. Release the trigger. The semi-
automatic rifle will automatically eject the spent round and load the next round from the magazine into
the chamber. Repeat pulling the trigger and releasing to fire the next round and subsequent rounds. This
can be continued until the magazine is empty.
5. When finished firing, remove the finger from the trigger and move the Safety Selector Lever to the
"SAFE" position. After the last
round is fired from the magazine,
the Bolt Carrier will lock in the
rear position.
6. The empty magazine can be
removed by pushing the Magazine
Release Button. To continue the
firing sequence, insert another
loaded magazine, release the Bolt
Catch and a new round will be
chambered.FIG 12
PAGE 8
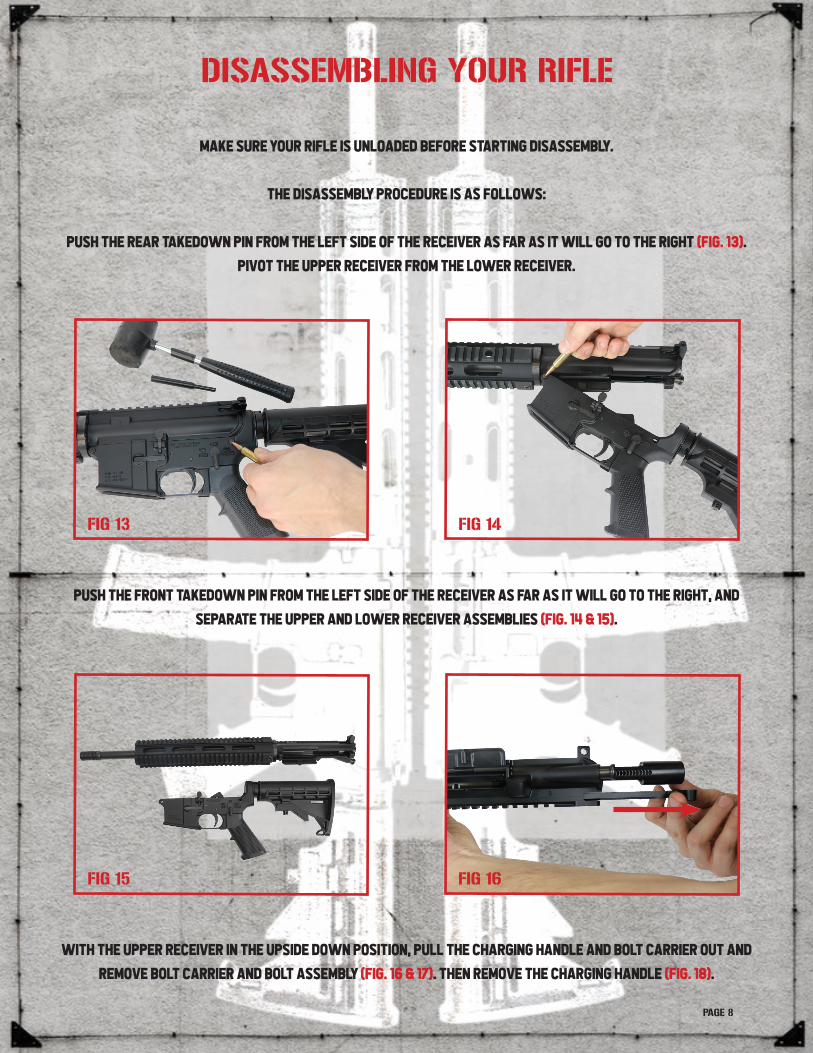
DISASSEMBLING YOUR RIFLE
Make sure your rifle is unloaded before starting disassembly.
The disassembly procedure is as follows:
Push the rear takedown pin from the left side of the receiver as far as it will go to the right (Fig. 13).
Pivot the upper receiver from the lower receiver.
Push the front takedown pin from the left side of the receiver as far as it will go to the right, and
separate the upper and lower receiver assemblies (Fig. 14 & 15).
With the upper receiver in the upside down position, pull the charging handle and bolt carrier out and
remove bolt carrier and bolt assembly (Fig. 16 & 17). Then remove the charging handle (Fig. 18).
FIG 13 FIG 14
FIG 15 FIG 16

PAGE 9
FIG 17 FIG 18
FIG 19 FIG 20
Remove the firing pin from the rear of the bolt carrier (Fig. 20).
Remove the firing pin retaining pin from the bolt carrier (Fig. 19).

PAGE 10
FIG 21
FIG 22
FIG 23
Push the bolt to the closed and locked position (Fig. 21).
Rotate the cam pin 1/4 turn and lift out of the bolt carrier (Fig. 22).
Pull the bolt assembly straight out from the bolt carrier (Fig. 23).
PAGE 11
CLEANING
LUBRICATION
Always check that the barrel is clean and dry before firing your rifle.
After firing your rifle, clean it as soon as possible to prevent corrosion and make the job easier.
When your rifle has not been fired, clean it once or twice a year.
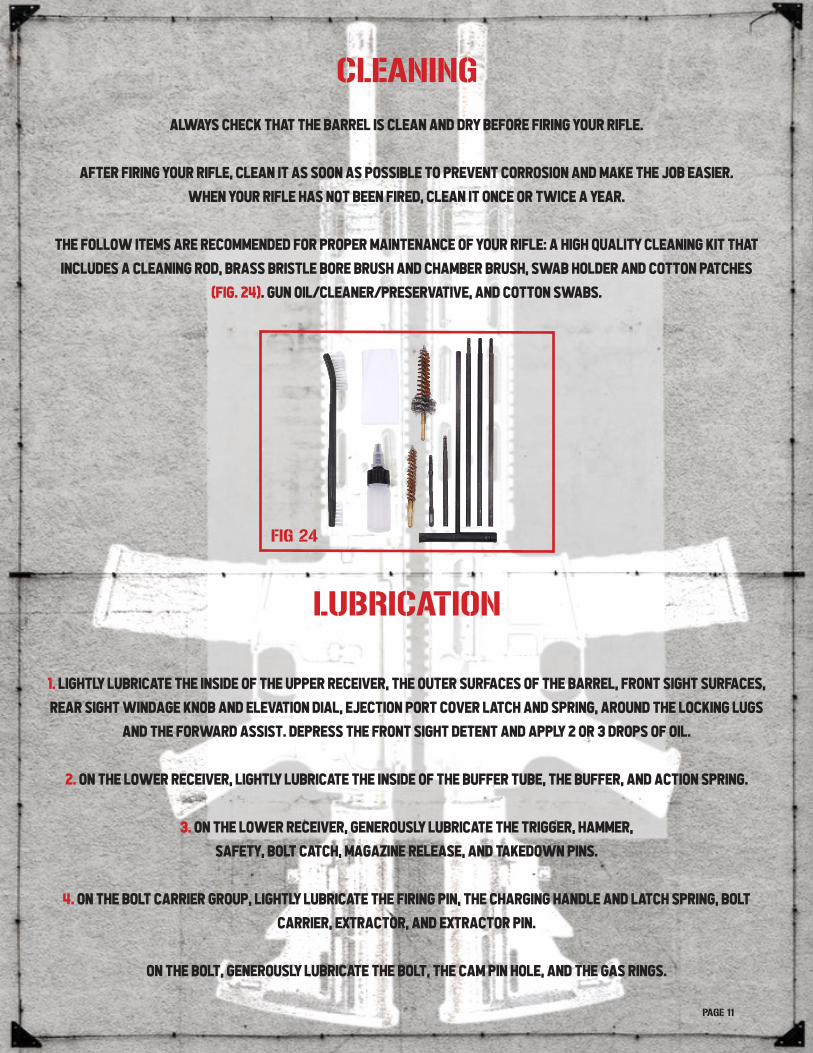
The follow items are recommended for proper maintenance of your rifle: a high quality cleaning kit that
includes a cleaning rod, brass bristle bore brush and chamber brush, swab holder and cotton patches
(Fig. 24). Gun oil/cleaner/preservative, and cotton swabs.
1. Lightly lubricate the inside of the upper receiver, the outer surfaces of the barrel, front sight surfaces,
rear sight windage knob and elevation dial, ejection port cover latch and spring, around the locking lugs
and the forward assist. Depress the front sight detent and apply 2 or 3 drops of oil.
2. On the lower receiver, lightly lubricate the inside of the buffer tube, the buffer, and action spring.
3. On the lower receiver, generously lubricate the trigger, hammer,
safety, bolt catch, magazine release, and takedown pins.
4. On the bolt carrier group, lightly lubricate the firing pin, the charging handle and latch spring, bolt
carrier, extractor, and extractor pin.
On the bolt, generously lubricate the bolt, the cam pin hole, and the gas rings.
FIG 24

PAGE 12
CLEANING PROCEDURE
Always clean from the barrel bore chamber end to the muzzle. Attach a cotton patch to the cleaning rod,
insert it in the chamber and pass it through the bore. Continue until the patch comes out clean. If the gun
has been fired, attach a brass bristle bore brush to the cleaning rod and dip the brush in gun cleaning
solution and thoroughly scrub out the barrel (Fig 25). Make sure to go all the way through the barrel and
out the muzzle end before reversing direction. (Fig. 26).
1. Clean the carbon and powder residue around the gas tube in the upper receiver, the bolt assembly and
inside the bolt carrier.
2. Wipe components clean and inspect damage, excessive wear, and corrosion. Clean out the gas key and
carrier vent holes with a cotton swab
3. Clean the lower receiver. Never use a wire brush or any abrasive to clean the aluminum lower or upper
receiver. Clean the trigger mechanism, magazine release button, the cavity of the magazine catch on the
left side of the receiver, bolt catch, takedown pins, buffer, action spring, and inside of the buffer tube.
FIG 25 FIG 26
PAGE 13
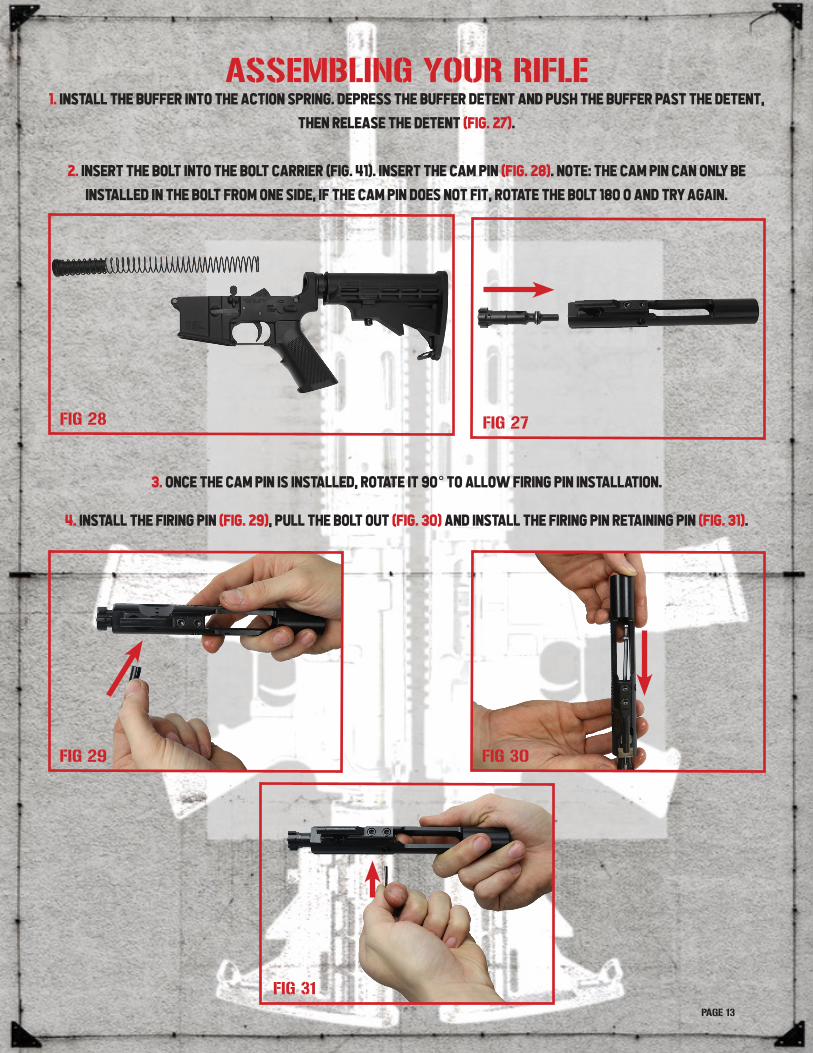
1. Install the Buffer into the Action Spring. Depress the Buffer Detent and push the Buffer past the Detent,
then release the Detent (Fig. 27).
2. Insert the bolt into the Bolt Carrier (Fig. 41). Insert the Cam Pin (Fig. 28). Note: The Cam Pin can only be
installed in the bolt from one side, if the Cam Pin does not fit, rotate the Bolt 180 0 and try again.
3. Once the Cam Pin is installed, rotate it 90° to allow Firing Pin installation.
4. Install the Firing Pin (Fig. 29), pull the Bolt out (Fig. 30) and install the Firing Pin Retaining Pin (Fig. 31).
FIG 27FIG 28
FIG 30
FIG 31
FIG 29
ASSEMBLING YOUR RIFLE

PAGE 14
5. Insert the Charging Handle into the Upper Receiver and
lower the Handle until
the side tabs on the front end of the Handle fit into the
cutouts in the Receiver.
Then slide the Charging Handle partially into the Receiver.
6. Insert the complete Bolt Carrier assembly into the Upper
Receiver so that the Gas Key fits into the groove of the
Charging Handle (Fig. 32).
Note: The bolt must be in the out position in the Carrier for
installation.
7. Push the Bolt Carrier assembly and Charging Handle all the
way into the Upper Receiver until the
Charging Handle Latch locks onto the Receiver (Fig. 33).
8. Mate the Upper Receiver to the Lower Receiver. Position the
Pivot Pin Lug of the Upper Receiver into the slot at the front
of the Lower Receiver and push the Pivot Pin into place (Fig.
34).
9. Make sure the Safety Selector Lever is in the "SAFE" position
before pivoting the Upper Receiver down to the Lower
Receiver.
10. After the Receivers are closed, push in the rear Takedown
Pin.
FIG 32
FIG 33
FIG 34
FIG 35

PAGE 15
STATEMENT OF LIMITED LIFETIME WARRANTY
How long is the warranty period?
Limited Lifetime from the date of purchase (Original Purchaser Only)
What is covered?
Any defect in materials or workmanship (performed by ABC Rifle Company) encountered during normal use.
ABC Rifle Company reserves the right to determine what constitutes the unreasonable or excessive use of the firearm.
This Lifetime Warranty covers FUNCTIONAL defects ONLY; it DOES NOT INCLUDE the firearm’s finish, grips, magazines, sights, firing
pins, bolt assembly or accessories etc.
What is NOT covered?
ABC Rifle Company shall not be liable for consequential or incidental damages or injury. Personal injury, property damage,
and/or damage to the firearm caused by: Normal wear and tear /rust or corrosion Blemishes, scratches, and or discoloration
in finish Damage due to Improper maintenance and or negligence to provide proper care and maintenance. `Barrel obstructions,
Bolt assemblies, firing pins.
IMPORTANT NOTE:
ANY UNAUTHORIZED ALTERATION,REPAIR OR MODIFICATION OF THE FIREARM OR USE OF PARTS OR COMPONENTS NOT ORIGINALLY MANUFACTURED
AND OR INSTALLED BY ABC RIFLE COMPANY SHALL VOID THIS WARRANTY. ABC RIFLE COMPANY SHALL NOT BE RESPONSIBLE FOR ANY CLAIMS
INVOLVING THIS FIREARM THAT RESULT FROM THE USE OF FAULTY, NONSTANDARD, RE-MANUFACTURED, RELOADED AND OR IMPORTED STEEL CASED
AMMUNITION AND THE USE OF SUCH AMMUNITION SHALL ALSO VOID THIS WARRANTY.
ABC Rifle Company will, at its sole discretion, repair or replace any firearm manufactured by ABC Rifle Company that fails due to
a defect in materials or workmanship. Parts and labor are included. Repairs are warranted for the duration of the warranty.
ABC Rifle Company reserves the right to substitute parts needed to complete a warranty request if the model of firearm is no
longer offered or parts needed for replacement and or repair are not available. ABC Rifle Company advises that the customer
remove all optics, lasers, etc. prior to shipping and will not be held responsible for lost or damaged accessories.
RETURN SHIPPING
Returned Firearms must be packaged securely in an unmarked sturdy box. ABC Rifle Company shall NOT be held liable for return
SHIPPING COST on warranty claims after 30 days from date of purchase. It is recommended that you send your return using
a reliable carrier and a method that can be tracked and insured. We are not responsible for any RETURN packages lost or
damaged in transit. All returns must be pre-authorized by ABC Rifle Company and you must be issued a RMA # before returning
any part and or firearm. All accessories must be removed from firearm prior to returning and ABC Rifle Company shall not be
held liable for damaged and or missing accessories if shipped along with a return firearm.
Email: [email protected] for Return Authorization Number
Email: [email protected] for Return Authorization Number