
All Right Reserved © JiJi Technologies Pvt Ltd
Apps4.Pro Planner Manager Edge Extension – User Guide
Apps4.Pro Planner Manager is a web-based extension that can be installed in Edge Chromium
browser. This extension helps you to successfully export all planner data to excel file from selected
plan, you can use this exported excel file as template and import the template into another plan.
Using this app, you can also update existing Planner tasks. This extension supports following key
features:
• Generate tasks and statistics report from multiple plans.
• Create new task, update and delete tasks.
• Create custom fields and update custom fields in individual tasks.
• Create new plan, update plan, add bulk members from CSV or Excel and copy members
between Plans (Group).
• Export tasks from multiple plans.
• Import tasks to new plan in new group / new plan in existing group / existing plan.
• Import tasks includes User assignments, Checklist, Attachments, Comments, Custom Fields,
Task Dependencies, WBS and other common fields.
• Copy task’s attachment file from old plan’s group to new plan’s group.
• Bulk update existing tasks using Excel.
• OneDrive Backup: You can configure automated schedule job to backup tasks in OneDrive
storage.
1. How to install You can install this add-in from Edge Store using below link:
https://microsoftedge.microsoft.com/addons/detail/apps4pro-
plannermanager/dikkemgbicnfdghhdpaahkdkgbddphmn
2. How to access Once you have installed this extension from Edge Store, you can access the add-in by clicking the app
short-cut icon from top-right corner of your Edge Chromium browser as shown in below image.

All Right Reserved © JiJi Technologies Pvt Ltd
3. Permissions required No special permissions required. The user account should be a member of all the plans in which you want
to manage tasks.
4. Steps to get started Before proceeding to work with this app features, go to Account tab and sign-in with your Office 365
account under both Account & Graph API Account sections.
5. Reports and Task Management You can pick multiple plans and instantly generate tasks report. In report grid, you can easily select
required tasks and update details with quick actions.
5.1 All Tasks report Select required plans in plan picker and click Generate button to populate tasks from selected plans.
By default, the task report populates only limited number of columns, if you need more columns,
click Edit Columns button and add required columns as shown in below image.

All Right Reserved © JiJi Technologies Pvt Ltd
5.2 Quick Actions
5.2.1 Add Task
Click Add (+) button to create a new planner task.
5.2.2 Edit Task
You can edit individual task either by double-clicking on the required task or select the required task
and click Edit button to open the Edit Task window. You can update task details, post comments,
upload attachments and update custom fields.
Note: To update custom field values, you should have already created custom field settings for the
task’s associated plan. You can refer the below section (10.1 Custom Field Settings) to know more
about how to create custom field settings

All Right Reserved © JiJi Technologies Pvt Ltd
5.2.3 Update Multiple Tasks
You can select multiple tasks and update task fields, Progress, Start date, Due date, Bucket, User
Assignment and Label.
5.2.4 Delete Tasks
After selecting required tasks, you can click Delete button to remove the tasks permanently from
Planner portal.
Note: You can’t recover the deleted tasks, so be cautious before deleting tasks.
5.2.5 Copy Tasks
You can copy existing Planner tasks into different plan with task attachments and comments.
5.2.6 Move Tasks
You can move existing Planner tasks to different plan with task attachments and comments.

All Right Reserved © JiJi Technologies Pvt Ltd
5.3 Usage and Statistic Reports You can generate following usage and statistic reports:
Report Description
Members with their tasks (All
Tasks)
Reports members with their task count for selected plans.
Members with Unfinished Tasks Reports you the unfinished task count against each member from the selected plans.
Top N members with unfinished tasks
Reports you the top N members with tasks that are in progress. Here, N is selected by you.
Top N Busy Members with in next
N days
Reports you the users with most tasks for next N days
All Unassigned Tasks Reports you the tasks which are not assigned to anyone.
Buckets with their Tasks Reports you the task’s count for each bucket in a plan.
Plans with their Overdue Tasks Reports you the task’s count against each plan which are not completed within a duration.
All Overdue Tasks Reports you the tasks which are not completed within a duration.
5.3 Report Grid -> Filter, Grouping and Search You can easily filter the report by adding proper condition with every available column and you can
also group report by dragging required columns into grouping panel.

All Right Reserved © JiJi Technologies Pvt Ltd
5.4 Save current view as Report Once you have applied required filters and grouping, you can easily save the current view as new
custom report by following the steps shown in below image. You can access the custom reports from
Report Picker panel.
6. Plans
6.1 Reports You can generate All Plans and All Groups report.
6.2 Add Plan You can create new plan with new group, and you can also create new plan in existing group.

All Right Reserved © JiJi Technologies Pvt Ltd
6.3 Edit Plan Select a single plan and click Edit Plan button, currently this tool supports only to rename the plan.
To view and edit more Plan settings, you can click the button as shown in below image (View in
Planner portal), it will open the selected plan in Planner web portal and you can update required
settings from portal.
6.4 Manage Group Members You can add or remove multiple users in selected plan’s associated group. This action supports
multiple plans update.
6.5 Add Bulk Users from Excel or CSV Using this action, you can add bulk users as member of existing groups. Your Excel or CSV file should
include the column header “UserName”, the column “GroupName” is optional, if your file does not
include GroupName, then the tool asks you to choose the target group.

All Right Reserved © JiJi Technologies Pvt Ltd
6.6 Copy Group Members You can easily copy group members from one group to another group.
6.7 Add New Bucket This action allows you to create a new bucket in the selected plans.
7. Export Tasks You can export tasks from single and multiple plans to Excel file.
• Export includes Task Title, Progress, Bucket, Start date, Due date, Labels, User assignments,
Checklist, Attachments, Comments, Custom Fields, Task Dependencies, WBS (Work
Breakdown Structure) and more…
• You can export user assignments, checklists, attachments and comments as separate Tab in
Excel file.

All Right Reserved © JiJi Technologies Pvt Ltd
7.1 Export Plan as Template
For repetitive project, you need to create tasks every time when you create plan, you can overcome
this repetitive work by creating common tasks in a plan and export that plan as a template for future
work. The template is nothing but the exported Excel file, you can make required changes in that
template and import them into another new plan/existing plan.
You can export Checklists, Attachments and Comments as separate tab in Excel file, so that you can
easily add new checklist items in that tab itself before importing into new plan.
If you are using Apps4.Pro Gantt and created sub tasks and task dependencies, you can also export
those details in template.

All Right Reserved © JiJi Technologies Pvt Ltd
8. Import Plan Template (Excel tasks)
You can export required Plan and Task details to Excel file and keep this file as Template (Refer
section 7. Export Tasks). During Excel import, you can pick this template Excel file and Planner
Manager will create new Plan and create Buckets and Tasks and add users to Plan and assign tasks
for them.
You can import following Plan details from Excel:
- Buckets
- Labels
- Plan Members
You can import following Task details from Excel:
- Task Title
- User Assignments
- Applied Labels
- Bucket
- Progress
- Start and Due dates
- Description
- Checklists
- Attachments
- Comments
8.1 Import tasks into New plan in New group Users can choose option to create new Plan in new Office 365 group and import all tasks into this
new plan.
8.2 Import into New plan in existing group Users can choose option to create new Plan in existing Office 365 group.

All Right Reserved © JiJi Technologies Pvt Ltd
8.3 Import tasks into existing Plan
Instead of creating new plan, you can also import all your Excel tasks into existing Planner plan.
Note: When you import tasks into existing Plan, if the Excel includes the field Task Id, then the
extension looks for the Planner task for the specified task id and update the task with current details
that found in Excel file.
8.4 Map Excel column headers with Planner fields
When you import the Excel file that was exported from Planner Manager, you don’t need to worry
about this Column Mappings as it will automatically get mapped. But if you are importing the Excel
file that was downloaded from different source (Ex: MS Project), then you need to map the Excel
fields with Planner fields.
All Right Reserved © JiJi Technologies Pvt Ltd
8.5 Update existing Planner tasks using Excel file
Along with creating new tasks you can also use this extension to update existing Planner task fields.
Follow the below steps to update existing plan tasks:
• Export tasks with all fields (including Task Id) from a single plan that you want to update.
• In Excel file, do the required changes for the tasks you want update (Ex: Start date, Due date,
Assigned to, etc..) and save the Excel file.
• Go to Import tab -> select the modified Excel file and choose the Existing Plan option and
select the Plan (the source plan where you exported the tasks).
• Now proceed the import process, the tool finds the original task by task id field in the
selected plan and update the changes.
Note: The Excel file should have the field “Task Id” and every task that you want change should have
the value for Task Id field. If any task found without Task Id field value, the tool creates a new task.
8.6 Copy Task attachment file from old Plan’s SharePoint site to new Plan’s SharePoint site
If you have created Excel template by exporting tasks with attachments, the attachment URL path
points the SharePoint site of the source plan’s associated group, when you import into another plan
the attachment URL simply target the group site of old plan. So, if you want to download the
attachment file from old plan and upload it into new plan, you should have signed-into Graph API
account under Account tab.
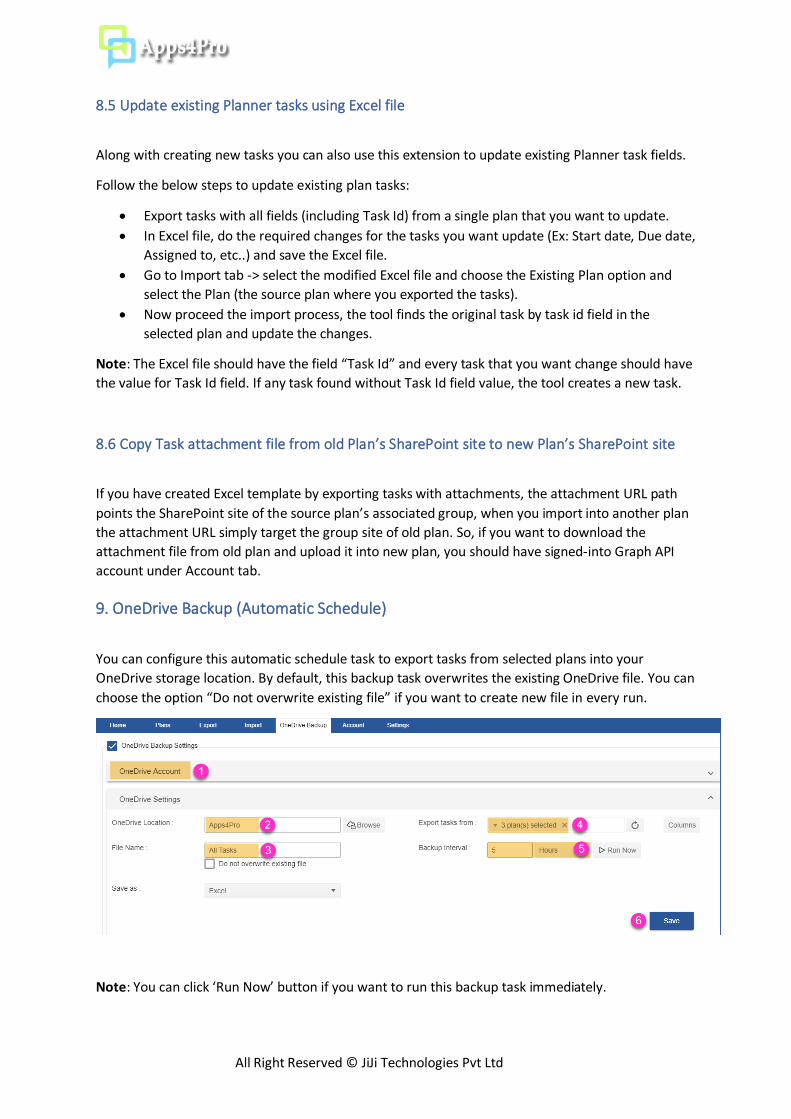
9. OneDrive Backup (Automatic Schedule)
You can configure this automatic schedule task to export tasks from selected plans into your
OneDrive storage location. By default, this backup task overwrites the existing OneDrive file. You can
choose the option “Do not overwrite existing file” if you want to create new file in every run.
Note: You can click ‘Run Now’ button if you want to run this backup task immediately.

All Right Reserved © JiJi Technologies Pvt Ltd
10. Settings
10.1 Custom Field Settings To set custom values in Planner tasks, first you need to create required Custom Fields in required
plans. The custom fields are unique to specific plan, if you want to use same fields in multiple plans
then you need to create (or copy) fields in every plan.
Note: The tool will create a Planner task with the name “Apps4.Pro Settings” in the particular plan
and save the custom field settings in this task. You should not delete or edit this task to keep the
custom field settings. If you delete this task, you won’t lose the custom field values that you have
configured in the individual tasks, but the custom field settings will be removed, and you need to re-
create the fields in this case.
10.2 Tracer Logs For troubleshooting and analyse, the tool logs the required details in local web storage (Indexed DB).
If you face any problem, you can Export Logs and send to [email protected] to get more
help for your problem.
10.3 Date & Time Format You can set your own Date & Time display format as shown in below image. Based on this setting,
the datetime value will be displayed in Report grid, Add and Edit task window.

All Right Reserved © JiJi Technologies Pvt Ltd
11. Planner Web Portal Integration
This extension adds the customized buttons Export & Import in Planner Web portal
(tasks.office.com), so you can easily export and import tasks from Planner portal itself.


