Download - Administrator’s Guide - GFI

Kerio Operator
Administrator’s Guide
Kerio Technologies

2016 Kerio Technologies s.r.o.

3
Contents
Installing Kerio Operator . . . . . . . . . . . . . . . . . . . . . . . . . . . . . . . . . . . . . . . . . . . . . . . . . . . . . . 14
Product Editions . . . . . . . . . . . . . . . . . . . . . . . . . . . . . . . . . . . . . . . . . . . . . . . . . . . . . . . . . 14
Kerio Operator Software Appliance . . . . . . . . . . . . . . . . . . . . . . . . . . . . . . . . . . . . . . . 14
How to connect Kerio Operator to network . . . . . . . . . . . . . . . . . . . . . . . . 14
Kerio Operator VMware Appliance . . . . . . . . . . . . . . . . . . . . . . . . . . . . . . . . . . . . . . . . 15
Kerio Operator Box . . . . . . . . . . . . . . . . . . . . . . . . . . . . . . . . . . . . . . . . . . . . . . . . . . . . . . 16
How to connect box to network . . . . . . . . . . . . . . . . . . . . . . . . . . . . . . . . . . . 16
Logging into Kerio Operator Administration . . . . . . . . . . . . . . . . . . . . . . . . . . . . . . . . . . . 17
Overview . . . . . . . . . . . . . . . . . . . . . . . . . . . . . . . . . . . . . . . . . . . . . . . . . . . . . . . . . . . . . . . . 17
How to login . . . . . . . . . . . . . . . . . . . . . . . . . . . . . . . . . . . . . . . . . . . . . . . . . . . . . . 17
First login . . . . . . . . . . . . . . . . . . . . . . . . . . . . . . . . . . . . . . . . . . . . . . . . 17
Using Dashboard in Kerio Operator . . . . . . . . . . . . . . . . . . . . . . . . . . . . . . . . . . . . . . . . . . . 20
Dashboard overview . . . . . . . . . . . . . . . . . . . . . . . . . . . . . . . . . . . . . . . . . . . . . . . . . . . . . 20
Licenses and registrations . . . . . . . . . . . . . . . . . . . . . . . . . . . . . . . . . . . . . . . . . . . . . . . . . . . . . 21
How to register Kerio Operator in the administration interface . . . . . . . . . . . . 21
Why to register the trial version . . . . . . . . . . . . . . . . . . . . . . . . . . . . . . . . . . . 21
Registering full version . . . . . . . . . . . . . . . . . . . . . . . . . . . . . . . . . . . . . . . . . . . 22
Manual import the license key . . . . . . . . . . . . . . . . . . . . . . . . . . . . . . . . . . . . . 23
Registering via a web browser . . . . . . . . . . . . . . . . . . . . . . . . . . . . . . . . . . . . . . . . . . . . 23
Securing Kerio Operator . . . . . . . . . . . . . . . . . . . . . . . . . . . . . . . . . . . . . . . . . . . . . . . . . . . . . . . 24
Issues to address . . . . . . . . . . . . . . . . . . . . . . . . . . . . . . . . . . . . . . . . . . . . . . . . . . . . . . . . 24
Configuring firewall in local network . . . . . . . . . . . . . . . . . . . . . . . . . . . . . . . . . . . . . 24
Configuring firewall integrated in Kerio Operator . . . . . . . . . . . . . . . . . . . . . . . . . 25
Configuring protection against password guessing . . . . . . . . . . . . . . . . . . . . . . . . 26
What to do in case of an attack . . . . . . . . . . . . . . . . . . . . . . . . . . . . . . . . . . . . . . . . . . . 27
Creating user accounts . . . . . . . . . . . . . . . . . . . . . . . . . . . . . . . . . . . . . . . . . . . . . . . . . . . . . . . . 28
User accounts overview . . . . . . . . . . . . . . . . . . . . . . . . . . . . . . . . . . . . . . . . . . . . . . . . . . 28
Adding new accounts . . . . . . . . . . . . . . . . . . . . . . . . . . . . . . . . . . . . . . . . . . . . . . . . . . . . 28
Adding local accounts . . . . . . . . . . . . . . . . . . . . . . . . . . . . . . . . . . . . . . . . . . . . 28
Adding accounts from directory service . . . . . . . . . . . . . . . . . . . . . . . . . . . 28
Assigning extensions to users . . . . . . . . . . . . . . . . . . . . . . . . . . . . . . . . . . . . . . . . . . . . 29
Configuring ringing rules . . . . . . . . . . . . . . . . . . . . . . . . . . . . . . . . . . . . . . . . . . . . . . . . 29

4
Redirecting calls . . . . . . . . . . . . . . . . . . . . . . . . . . . . . . . . . . . . . . . . . . . . . . . . . . . . . . . . . . . . . . 30
Overview . . . . . . . . . . . . . . . . . . . . . . . . . . . . . . . . . . . . . . . . . . . . . . . . . . . . . . . . . . . . . . . . 30
Configuring ringing rules in the administration . . . . . . . . . . . . . . . . . . . . . . . . . . . 30
Additional configuration . . . . . . . . . . . . . . . . . . . . . . . . . . . . . . . . . . . . . . . . . . . . . . . . . 31
Configuring extensions to allow only one incoming call . . . . . . . . . . . . . 31
Applying ringing rules to calls coming from call queues and
ringing groups . . . . . . . . . . . . . . . . . . . . . . . . . . . . . . . . . . . . . . . . . . . . . . . . . . . 32
Configuring call forwarding in Kerio Operator Softphone . . . . . . . . . . . . . . . . . . 33
Creating extensions . . . . . . . . . . . . . . . . . . . . . . . . . . . . . . . . . . . . . . . . . . . . . . . . . . . . . . . . . . . 34
Extension overview . . . . . . . . . . . . . . . . . . . . . . . . . . . . . . . . . . . . . . . . . . . . . . . . . . . . . . 34
Adding new extensions . . . . . . . . . . . . . . . . . . . . . . . . . . . . . . . . . . . . . . . . . . . . . . . . . . 34
Creating a standalone extension . . . . . . . . . . . . . . . . . . . . . . . . . . . . . . . . . . . . . . . . . . 34
SIP username and SIP password . . . . . . . . . . . . . . . . . . . . . . . . . . . . . . . . . . . . . . . . . . 35
Using SIP username/password . . . . . . . . . . . . . . . . . . . . . . . . . . . . . . . . . . . . 35
Encrypting calls . . . . . . . . . . . . . . . . . . . . . . . . . . . . . . . . . . . . . . . . . . . . . . . . . . . . . . . . . 36
Configuring multiple registration of an extension . . . . . . . . . . . . . . . . . . . . . . . . . . . . . 37
Multiple registration overview . . . . . . . . . . . . . . . . . . . . . . . . . . . . . . . . . . . . . . . . . . . . 37
Creating multiple registrations . . . . . . . . . . . . . . . . . . . . . . . . . . . . . . . . . . . . . . . . . . . 37
Displaying, hiding and overriding phone numbers . . . . . . . . . . . . . . . . . . . . . . . . . . . . 40
Hiding users´ phone number . . . . . . . . . . . . . . . . . . . . . . . . . . . . . . . . . . . . . . . . . . . . . 40
Changing phone number to a name . . . . . . . . . . . . . . . . . . . . . . . . . . . . . . . . . . . . . . . 40
Extending display names for incoming calls . . . . . . . . . . . . . . . . . . . . . . . . . . . . . . . 41
Connecting Kerio Operator to directory service . . . . . . . . . . . . . . . . . . . . . . . . . . . . . . . 42
Which directory services are supported in Kerio Operator . . . . . . . . . . . . . . . . . 42
What is the connection used for . . . . . . . . . . . . . . . . . . . . . . . . . . . . . . . . . . . . . . . . . . 42
Connecting to a directory service . . . . . . . . . . . . . . . . . . . . . . . . . . . . . . . . . . . . . . . . . 43
Microsoft Active Directory . . . . . . . . . . . . . . . . . . . . . . . . . . . . . . . . . . . . . . . . 43
Apple Open Directory . . . . . . . . . . . . . . . . . . . . . . . . . . . . . . . . . . . . . . . . . . . . . 43
Activating users from a directory service . . . . . . . . . . . . . . . . . . . . . . . . . . . . . . . . . 44
Configuring automatic phone provisioning . . . . . . . . . . . . . . . . . . . . . . . . . . . . . . . . . . . . 45
Phone provisioning overview . . . . . . . . . . . . . . . . . . . . . . . . . . . . . . . . . . . . . . . . . . . . . 45
What you need . . . . . . . . . . . . . . . . . . . . . . . . . . . . . . . . . . . . . . . . . . . . . . . . . . . . . . . . . . 46
How to add a phone . . . . . . . . . . . . . . . . . . . . . . . . . . . . . . . . . . . . . . . . . . . . . . . . . . . . . 46
Adding phones manually . . . . . . . . . . . . . . . . . . . . . . . . . . . . . . . . . . . . . . . . . . 47
Importing from CSV file . . . . . . . . . . . . . . . . . . . . . . . . . . . . . . . . . . . . . . . . . . . 48
Restarting provisioned phones . . . . . . . . . . . . . . . . . . . . . . . . . . . . . . . . . . . . 49
Firmware . . . . . . . . . . . . . . . . . . . . . . . . . . . . . . . . . . . . . . . . . . . . . . . . . . . . . . . . . 49
Uploading a phone provisioning module . . . . . . . . . . . . . . . . . . . . . . . . . . . 50
Overriding templates . . . . . . . . . . . . . . . . . . . . . . . . . . . . . . . . . . . . . . . . . . . . . 50
What to do if you want to know the password of your phone . . . . . . . 50

5
Configuring inter-digit timeout . . . . . . . . . . . . . . . . . . . . . . . . . . . . . . . . . . . . 50
How phone provisioning works . . . . . . . . . . . . . . . . . . . . . . . . . . . . . . . . . . . . . . . . . . . 51
Using provisioning tools . . . . . . . . . . . . . . . . . . . . . . . . . . . . . . . . . . . . . . . . . . . . . . . . . . . . . . 53
Provisioning tools overview . . . . . . . . . . . . . . . . . . . . . . . . . . . . . . . . . . . . . . . . . . . . . . 53
Using provisioning tools . . . . . . . . . . . . . . . . . . . . . . . . . . . . . . . . . . . . . . . . . . 53
Accessing company contacts through LDAP on provisioned phones . . . . . . . . . . . 54
LDAP configuration overview . . . . . . . . . . . . . . . . . . . . . . . . . . . . . . . . . . . . . . . . . . . . . 54
Connecting to Kerio Connect LDAP/Microsoft Active Directory . . . . . . . . . . . . 54
Connecting to LDAP in general . . . . . . . . . . . . . . . . . . . . . . . . . . . . . . . . . . . . . . . . . . . 56
Displaying your company logo on the provisioned phones . . . . . . . . . . . . . . . . . . . . 57
Summary . . . . . . . . . . . . . . . . . . . . . . . . . . . . . . . . . . . . . . . . . . . . . . . . . . . . . . . . . . . . . . . . 57
What you need . . . . . . . . . . . . . . . . . . . . . . . . . . . . . . . . . . . . . . . . . . . . . . . . . . . . . . . . . . 57
Which type of logo do you need . . . . . . . . . . . . . . . . . . . . . . . . . . . . . . . . . . . . . . . . . . 57
Adding your logo to phones . . . . . . . . . . . . . . . . . . . . . . . . . . . . . . . . . . . . . . . . . . . . . . 58
Provisioning of Kerio Operator Softphone for mobile devices . . . . . . . . . . . . . . . . . . 59
Softphone provisioning overview . . . . . . . . . . . . . . . . . . . . . . . . . . . . . . . . . . . . . . . . . 59
Prerequisites . . . . . . . . . . . . . . . . . . . . . . . . . . . . . . . . . . . . . . . . . . . . . . . . . . . . . . . . . . . . 59
Configuring provisioning for Kerio Operator Softphone . . . . . . . . . . . . . . . . . . . 59
Securing Kerio Operator Softphone with SSL certificates . . . . . . . . . . . . . . . . . . . 60
Configuring a dial plan . . . . . . . . . . . . . . . . . . . . . . . . . . . . . . . . . . . . . . . . . . . . . . . . . . . 60
Creating rules . . . . . . . . . . . . . . . . . . . . . . . . . . . . . . . . . . . . . . . . . . . . . . . . . . . . 60
Example 1: International calls from USA . . . . . . . . . . . . . . . . . . . 61
Example 2: Outgoing prefix 9 . . . . . . . . . . . . . . . . . . . . . . . . . . . . . . 62
Example 3: International calls in Europe (replacing “+”
by “00”) . . . . . . . . . . . . . . . . . . . . . . . . . . . . . . . . . . . . . . . . . . . . . . . . . . . 62
Configuring parameter 66 in DHCP server in Kerio Control . . . . . . . . . . . . . . . . . . . . 63
What is parameter 66 in a DHCP server? . . . . . . . . . . . . . . . . . . . . . . . . . . . . . . . . . . 63
How to set parameter 66 in Kerio Control . . . . . . . . . . . . . . . . . . . . . . . . . . . . . . . . . 63
Uploading configuration files to Kerio Operator TFTP server . . . . . . . . . . . . . . . . . . 64
Why to use phone or other device configuration file . . . . . . . . . . . . . . . . . . . . . . . 64
Obtaining the configuration file . . . . . . . . . . . . . . . . . . . . . . . . . . . . . . . . . . . . . . . . . . 64
Uploading new or changed configuration files to Kerio Operator . . . . . . . . . . . 65
What you need . . . . . . . . . . . . . . . . . . . . . . . . . . . . . . . . . . . . . . . . . . . . . . . . . . . 65
How to enable SSH in Kerio Operator . . . . . . . . . . . . . . . . . . . . . . . . . . . . . . 65
Connecting to VoIP service providers . . . . . . . . . . . . . . . . . . . . . . . . . . . . . . . . . . . . . . . . . 66
Overview . . . . . . . . . . . . . . . . . . . . . . . . . . . . . . . . . . . . . . . . . . . . . . . . . . . . . . . . . . . . . . . . 66
Prerequisites . . . . . . . . . . . . . . . . . . . . . . . . . . . . . . . . . . . . . . . . . . . . . . . . . . . . . . . . . . . . 66
Adding an interface . . . . . . . . . . . . . . . . . . . . . . . . . . . . . . . . . . . . . . . . . . . . . . . . . . . . . . 66

6
One or multiple numbers . . . . . . . . . . . . . . . . . . . . . . . . . . . . . . . . . . . . . . . . . 67
Interval of numbers . . . . . . . . . . . . . . . . . . . . . . . . . . . . . . . . . . . . . . . . . . . . . . . 68
Configuring additional SIP details . . . . . . . . . . . . . . . . . . . . . . . . . . . . . . . . . . . . . . . . 69
Configuring DTMF method . . . . . . . . . . . . . . . . . . . . . . . . . . . . . . . . . . . . . . . . . . . . . . . 71
Configuring outgoing headers . . . . . . . . . . . . . . . . . . . . . . . . . . . . . . . . . . . . . . . . . . . . 71
Resolving domain names of SIP providers . . . . . . . . . . . . . . . . . . . . . . . . . . . . . . . . . 74
Mapping of numbers . . . . . . . . . . . . . . . . . . . . . . . . . . . . . . . . . . . . . . . . . . . . . . . . . . . . . 74
Mapping external and internal numbers . . . . . . . . . . . . . . . . . . . . . . . . . . . . . . . . . . . . . . . 75
Overview . . . . . . . . . . . . . . . . . . . . . . . . . . . . . . . . . . . . . . . . . . . . . . . . . . . . . . . . . . . . . . . . 75
Routing incoming calls . . . . . . . . . . . . . . . . . . . . . . . . . . . . . . . . . . . . . . . . . . . . . . . . . . . 75
Example: . . . . . . . . . . . . . . . . . . . . . . . . . . . . . . . . . . . . . . . . . . . . . . . . . . . . . . . . . 75
Mapping a trunk of numbers . . . . . . . . . . . . . . . . . . . . . . . . . . . . . . . . . . . . . . 76
Mapping a single number or multiple numbers . . . . . . . . . . . . . . . . . . . . . 77
Routing outgoing calls . . . . . . . . . . . . . . . . . . . . . . . . . . . . . . . . . . . . . . . . . . . . . . . . . . . 78
Example: . . . . . . . . . . . . . . . . . . . . . . . . . . . . . . . . . . . . . . . . . . . . . . . . . . . . . . . . . 78
Rules for outgoing calls . . . . . . . . . . . . . . . . . . . . . . . . . . . . . . . . . . . . . . . . . . . 79
Exceptions to the outgoing routes . . . . . . . . . . . . . . . . . . . . . . . . . . . . . . . . . 80
Working with prefixes for outgoing calls . . . . . . . . . . . . . . . . . . . . . . . . . . . 81
Example . . . . . . . . . . . . . . . . . . . . . . . . . . . . . . . . . . . . . . . . . . . . . . . . . . 81
Changing the order of prefixes . . . . . . . . . . . . . . . . . . . . . . . . . . . . 82
Using Opus codec for Kerio Operator Softphone . . . . . . . . . . . . . . . . . . . . . . . . . . . . . . . 84
Overview . . . . . . . . . . . . . . . . . . . . . . . . . . . . . . . . . . . . . . . . . . . . . . . . . . . . . . . . . . . . . . . . 84
Connecting multiple Kerio Operators . . . . . . . . . . . . . . . . . . . . . . . . . . . . . . . . . . . . . . . . . . 85
Overview . . . . . . . . . . . . . . . . . . . . . . . . . . . . . . . . . . . . . . . . . . . . . . . . . . . . . . . . . . . . . . . . 85
Prerequisites . . . . . . . . . . . . . . . . . . . . . . . . . . . . . . . . . . . . . . . . . . . . . . . . . . . . . . . . . . . . 86
Connecting servers . . . . . . . . . . . . . . . . . . . . . . . . . . . . . . . . . . . . . . . . . . . . . . . . . . . . . . 86
Routing calls between multiple Kerio Operators and the PSTN . . . . . . . . . . . . . . . . . 88
Overview . . . . . . . . . . . . . . . . . . . . . . . . . . . . . . . . . . . . . . . . . . . . . . . . . . . . . . . . . . . . . . . . 88
Calling to the PSTN through the main server . . . . . . . . . . . . . . . . . . . . . . . . . . . . . . 89
Routing incoming calls from the PSTN to the branch server . . . . . . . . . . . . . . . . 91
Using speed dial extensions . . . . . . . . . . . . . . . . . . . . . . . . . . . . . . . . . . . . . . . 91
Using number rewriting . . . . . . . . . . . . . . . . . . . . . . . . . . . . . . . . . . . . . . . . . . . 93
Configuring standard phone interfaces . . . . . . . . . . . . . . . . . . . . . . . . . . . . . . . . . . . . . . . . 95
Overview . . . . . . . . . . . . . . . . . . . . . . . . . . . . . . . . . . . . . . . . . . . . . . . . . . . . . . . . . . . . . . . . 95
Supported cards . . . . . . . . . . . . . . . . . . . . . . . . . . . . . . . . . . . . . . . . . . . . . . . . . . . . . . . . . 95
Prerequisites . . . . . . . . . . . . . . . . . . . . . . . . . . . . . . . . . . . . . . . . . . . . . . . . . . . . . . . . . . . . 95
Configuring interfaces . . . . . . . . . . . . . . . . . . . . . . . . . . . . . . . . . . . . . . . . . . . . . . . . . . . 96
One or multiple numbers . . . . . . . . . . . . . . . . . . . . . . . . . . . . . . . . . . . . . . . . . 96
Interval of numbers . . . . . . . . . . . . . . . . . . . . . . . . . . . . . . . . . . . . . . . . . . . . . . . 97
Overlap dialing . . . . . . . . . . . . . . . . . . . . . . . . . . . . . . . . . . . . . . . . . . . . . . . . . . . . . . . . . . 98

7
Configuring additional details for an interface . . . . . . . . . . . . . . . . . . . . . . . . . . . . 98
Adjusting audio gain for standard phone interfaces . . . . . . . . . . . . . . . . 99
Configuring Type of number (TON) . . . . . . . . . . . . . . . . . . . . . . . . . . . . . . . 100
Increasing sensitivity of the DTMF detection . . . . . . . . . . . . . . . . . . . . . . 101
Mapping of numbers . . . . . . . . . . . . . . . . . . . . . . . . . . . . . . . . . . . . . . . . . . . . . . . . . . . 102
Configuring and using conferences . . . . . . . . . . . . . . . . . . . . . . . . . . . . . . . . . . . . . . . . . . . 103
Telephone conferences overview . . . . . . . . . . . . . . . . . . . . . . . . . . . . . . . . . . . . . . . 103
Statically configured conference . . . . . . . . . . . . . . . . . . . . . . . . . . . . . . . . . . . . . . . . 103
Configuring statically configured conferences . . . . . . . . . . . . . . . . . . . . . 103
Connecting to a statically configured conference . . . . . . . . . . . . . . . . . . 104
Dynamic conferences . . . . . . . . . . . . . . . . . . . . . . . . . . . . . . . . . . . . . . . . . . . . . . . . . . 104
Configuring dynamic conferences . . . . . . . . . . . . . . . . . . . . . . . . . . . . . . . . 104
Connecting to a dynamic conference . . . . . . . . . . . . . . . . . . . . . . . . . . . . . 104
Creating a dynamic conference . . . . . . . . . . . . . . . . . . . . . . . . . . . . . . . . . . . 104
Where to monitor conference activities . . . . . . . . . . . . . . . . . . . . . . . . . . . . . . . . . 105
Configuring call queues . . . . . . . . . . . . . . . . . . . . . . . . . . . . . . . . . . . . . . . . . . . . . . . . . . . . . . 106
Call queues overview . . . . . . . . . . . . . . . . . . . . . . . . . . . . . . . . . . . . . . . . . . . . . . . . . . 106
Configuring call queues . . . . . . . . . . . . . . . . . . . . . . . . . . . . . . . . . . . . . . . . . . . . . . . . 106
How to select a queue strategy . . . . . . . . . . . . . . . . . . . . . . . . . . . . . . . . . . . . . . . . . 107
What is the difference between permanently assigned and dynamic agents 107
Recording calls from call queues . . . . . . . . . . . . . . . . . . . . . . . . . . . . . . . . . . . . . . . 108
Configuring a call queue timeout . . . . . . . . . . . . . . . . . . . . . . . . . . . . . . . . . . . . . . . 108
Configuring a music on hold and a while waiting period . . . . . . . . . . . . . . . . . 109
Configuring a queue length . . . . . . . . . . . . . . . . . . . . . . . . . . . . . . . . . . . . . . . . . . . . 109
Configuring exit keys . . . . . . . . . . . . . . . . . . . . . . . . . . . . . . . . . . . . . . . . . . . . . . . . . . 110
Configuring call queues without agents . . . . . . . . . . . . . . . . . . . . . . . . . . . . . . . . . 111
Prioritizing call queues . . . . . . . . . . . . . . . . . . . . . . . . . . . . . . . . . . . . . . . . . . . . . . . . 112
Displaying missed calls on phones in call queues . . . . . . . . . . . . . . . . . . . . . . . 113
Monitoring active call queues . . . . . . . . . . . . . . . . . . . . . . . . . . . . . . . . . . . . . . . . . . 113
Configuring auto attendant scripts . . . . . . . . . . . . . . . . . . . . . . . . . . . . . . . . . . . . . . . . . . . 114
What is auto attendant script . . . . . . . . . . . . . . . . . . . . . . . . . . . . . . . . . . . . . . . . . . . 114
How to add new auto attendant script . . . . . . . . . . . . . . . . . . . . . . . . . . . . . . . . . . 114
Setting time conditions in auto attendant scripts . . . . . . . . . . . . . . . . . . . . . . . . . . . . . 122
Time conditions are best explained in an example . . . . . . . . . . . . . . . . . . . . . . . 122
Setting time intervals for auto attendant scripts . . . . . . . . . . . . . . . . . . . . . . . . . 122
Creating auto attendant scripts in Kerio Operator . . . . . . . . . . . . . . . . . . . . . . . 123

8
Creating ringing groups . . . . . . . . . . . . . . . . . . . . . . . . . . . . . . . . . . . . . . . . . . . . . . . . . . . . . . 128
Overview . . . . . . . . . . . . . . . . . . . . . . . . . . . . . . . . . . . . . . . . . . . . . . . . . . . . . . . . . . . . . . 128
Adding new ringing groups . . . . . . . . . . . . . . . . . . . . . . . . . . . . . . . . . . . . . . . . . . . . 128
Using PBX services . . . . . . . . . . . . . . . . . . . . . . . . . . . . . . . . . . . . . . . . . . . . . . . . . . . . . . . . . . . 130
PBX services overview . . . . . . . . . . . . . . . . . . . . . . . . . . . . . . . . . . . . . . . . . . . . . . . . . . 130
Creating voice files . . . . . . . . . . . . . . . . . . . . . . . . . . . . . . . . . . . . . . . . . . . . . . . . . . . . 131
Configuring and using call parking . . . . . . . . . . . . . . . . . . . . . . . . . . . . . . . . . . . . . . . . . . . 132
Overview . . . . . . . . . . . . . . . . . . . . . . . . . . . . . . . . . . . . . . . . . . . . . . . . . . . . . . . . . . . . . . 132
Configuring call parking . . . . . . . . . . . . . . . . . . . . . . . . . . . . . . . . . . . . . . . . . . . . . . . 132
Using call parking . . . . . . . . . . . . . . . . . . . . . . . . . . . . . . . . . . . . . . . . . . . . . . . . . . . . . 133
Monitoring active calls . . . . . . . . . . . . . . . . . . . . . . . . . . . . . . . . . . . . . . . . . . . . . . . . . . . . . . . 135
Call monitoring overview . . . . . . . . . . . . . . . . . . . . . . . . . . . . . . . . . . . . . . . . . . . . . . . 135
Configuring call monitoring . . . . . . . . . . . . . . . . . . . . . . . . . . . . . . . . . . . . . . . . . . . . 135
Setting call permissions . . . . . . . . . . . . . . . . . . . . . . . . . . . . . . . . . . . . . . . . . . . . . . . . 137
Using call monitoring . . . . . . . . . . . . . . . . . . . . . . . . . . . . . . . . . . . . . . . . . . . . . . . . . . 139
Configuring call pickup . . . . . . . . . . . . . . . . . . . . . . . . . . . . . . . . . . . . . . . . . . . . . . . . . . . . . . 141
What to use call pickup for . . . . . . . . . . . . . . . . . . . . . . . . . . . . . . . . . . . . . . . . . . . . . 141
How to configure call pickup rooms . . . . . . . . . . . . . . . . . . . . . . . . . . . . . . . . . . . . 141
How to configure directed call pickup . . . . . . . . . . . . . . . . . . . . . . . . . . . . . . . . . . 142
Video calling in Kerio Operator . . . . . . . . . . . . . . . . . . . . . . . . . . . . . . . . . . . . . . . . . . . . . . . 143
About video calls . . . . . . . . . . . . . . . . . . . . . . . . . . . . . . . . . . . . . . . . . . . . . . . . . . . . . . 143
Adding video codecs to extensions . . . . . . . . . . . . . . . . . . . . . . . . . . . . . . . . . . . . . 144
Adding video codecs to interfaces . . . . . . . . . . . . . . . . . . . . . . . . . . . . . . . . . . . . . . 145
Troubleshooting . . . . . . . . . . . . . . . . . . . . . . . . . . . . . . . . . . . . . . . . . . . . . . . . . . . . . . . 145
Example of improper configuration . . . . . . . . . . . . . . . . . . . . . . . . . . . . . . . 145
Example of proper configuration . . . . . . . . . . . . . . . . . . . . . . . . . . . . . . . . . 146
Phones do not display any video . . . . . . . . . . . . . . . . . . . . . . . . . . . . . . . . . 146
Phones do not transmit video . . . . . . . . . . . . . . . . . . . . . . . . . . . . . . . . . . . . 146
Video is unstable . . . . . . . . . . . . . . . . . . . . . . . . . . . . . . . . . . . . . . . . . . . . . . . . 146
Customizing the Kerio Operator Softphone login page . . . . . . . . . . . . . . . . . . . . . . . . 147
Adding your custom logo . . . . . . . . . . . . . . . . . . . . . . . . . . . . . . . . . . . . . . . . . . . . . . 147
Configuring your custom button style . . . . . . . . . . . . . . . . . . . . . . . . . . . . . . . . . . 148
Adding your custom text . . . . . . . . . . . . . . . . . . . . . . . . . . . . . . . . . . . . . . . . . . . . . . . 148
Creating and using speed dial . . . . . . . . . . . . . . . . . . . . . . . . . . . . . . . . . . . . . . . . . . . . . . . . 150
Speed dial overview . . . . . . . . . . . . . . . . . . . . . . . . . . . . . . . . . . . . . . . . . . . . . . . . . . . . 150
Adding speed dial . . . . . . . . . . . . . . . . . . . . . . . . . . . . . . . . . . . . . . . . . . . . . . . . . . . . . 150
Configuring speed dial with DTMF . . . . . . . . . . . . . . . . . . . . . . . . . . . . . . . . . . . . . . 150
Configuring speed dial with DTMF . . . . . . . . . . . . . . . . . . . . . . . . . . . . . . . . 151

9
Using paging groups and services . . . . . . . . . . . . . . . . . . . . . . . . . . . . . . . . . . . . . . . . . . . . 152
Paging overview . . . . . . . . . . . . . . . . . . . . . . . . . . . . . . . . . . . . . . . . . . . . . . . . . . . . . . . 152
Configuring paging groups . . . . . . . . . . . . . . . . . . . . . . . . . . . . . . . . . . . . . . . . . . . . . 152
Configuring a paging service . . . . . . . . . . . . . . . . . . . . . . . . . . . . . . . . . . . . . . . . . . . 153
Securing paging . . . . . . . . . . . . . . . . . . . . . . . . . . . . . . . . . . . . . . . . . . . . . . . . . . . . . . . 153
List of supported and tested phones . . . . . . . . . . . . . . . . . . . . . . . . . . . . . . . . . . . . 154
Configuring voicemail . . . . . . . . . . . . . . . . . . . . . . . . . . . . . . . . . . . . . . . . . . . . . . . . . . . . . . . . 155
Configure voicemail . . . . . . . . . . . . . . . . . . . . . . . . . . . . . . . . . . . . . . . . . . . . . . . . . . . . 155
What is direct access to voicemail inbox and how to configure it . . . 155
Enabling caller to escape voicemail by dialing 0 . . . . . . . . . . . . . . . . . . . 156
Configuring forwarding of voicemail messages to user’s email
inbox . . . . . . . . . . . . . . . . . . . . . . . . . . . . . . . . . . . . . . . . . . . . . . . . . . . . . . . . . . . 156
My mailserver is Kerio Connect . . . . . . . . . . . . . . . . . . . . . . . . . . . 157
My mailserver is a different SMTP server . . . . . . . . . . . . . . . . . . 157
Configuring the welcome message for callers . . . . . . . . . . . . . . . . . . . . . 157
Changing the extension and voicemail PIN . . . . . . . . . . . . . . . . . . . . . . . . 158
Accessing voicemail . . . . . . . . . . . . . . . . . . . . . . . . . . . . . . . . . . . . . . . . . . . . . . . . . . . 158
Removing voicemail data for selected user . . . . . . . . . . . . . . . . . . . . . . . . . . . . . . 158
Managing voicemail via Kerio Operator Softphone . . . . . . . . . . . . . . . . . . . . . . . 160
Voicemail Menu . . . . . . . . . . . . . . . . . . . . . . . . . . . . . . . . . . . . . . . . . . . . . . . . . . . . . . . 160
Integrating Kerio Connect and Kerio Operator . . . . . . . . . . . . . . . . . . . . . . . . . . . . . . . . 161
What are the possibilities of Kerio Operator and Kerio Connect integration 161
Integrating voicemail . . . . . . . . . . . . . . . . . . . . . . . . . . . . . . . . . . . . . . . . . . . . 161
Searching the address book on Kerio Connect on provisioned
phones . . . . . . . . . . . . . . . . . . . . . . . . . . . . . . . . . . . . . . . . . . . . . . . . . . . . . . . . . 161
Calling directly from Kerio Connect Client . . . . . . . . . . . . . . . . . . . . . . . . 161
Configuring voicemail integration . . . . . . . . . . . . . . . . . . . . . . . . . . . . . . . . . . . . . . 162
Troubleshooting . . . . . . . . . . . . . . . . . . . . . . . . . . . . . . . . . . . . . . . . . . . . . . . . . . . . . . . 162
Setting emergency numbers . . . . . . . . . . . . . . . . . . . . . . . . . . . . . . . . . . . . . . . . . . . . . . . . . . 164
Emergency numbers overview . . . . . . . . . . . . . . . . . . . . . . . . . . . . . . . . . . . . . . . . . . 164
Configuring emergency numbers . . . . . . . . . . . . . . . . . . . . . . . . . . . . . . . . . . . . . . . 164
Enabling direct dialing . . . . . . . . . . . . . . . . . . . . . . . . . . . . . . . . . . . . . . . . . . . . . . . . . 164
Configuring SSL certificates . . . . . . . . . . . . . . . . . . . . . . . . . . . . . . . . . . . . . . . . . . . . . . . . . . 166
SSL certificates overview . . . . . . . . . . . . . . . . . . . . . . . . . . . . . . . . . . . . . . . . . . . . . . . 166
Creating self-signed certificates . . . . . . . . . . . . . . . . . . . . . . . . . . . . . . . . . . . . . . . . 166
Creating certificates signed by certification authority . . . . . . . . . . . . . . . . . . . . 167
Intermediate certificates . . . . . . . . . . . . . . . . . . . . . . . . . . . . . . . . . . . . . . . . . . . . . . . 167
Securing Kerio Operator Softphone with SSL certificates . . . . . . . . . . . . . . . . . 168

10
Language settings in Kerio Operator . . . . . . . . . . . . . . . . . . . . . . . . . . . . . . . . . . . . . . . . . . 169
Languages in Kerio Operator are: . . . . . . . . . . . . . . . . . . . . . . . . . . . . . . . . . . . . . . . 169
Changing the application language . . . . . . . . . . . . . . . . . . . . . . . . . . . . . . . . . . . . . 169
Changing the language of the PBX . . . . . . . . . . . . . . . . . . . . . . . . . . . . . . . . . . . . . . 170
How to change the language for individual users . . . . . . . . . . . . . . . . . . 171
How to change the PBX language for a group of users . . . . . . . . . . . . . 172
Setting a different language for a call queue . . . . . . . . . . . . . . . 173
How to add a new language to the PBX . . . . . . . . . . . . . . . . . . . . . . . . . . . . 173
Changing indication tones according to countries . . . . . . . . . . . . . . . . . . . . . . . 173
Example . . . . . . . . . . . . . . . . . . . . . . . . . . . . . . . . . . . . . . . . . . . . . . . . . . . . . . . . . . . . . . . 173
Customization of voice sets . . . . . . . . . . . . . . . . . . . . . . . . . . . . . . . . . . . . . . . . . . . . . . . . . . 175
Summary . . . . . . . . . . . . . . . . . . . . . . . . . . . . . . . . . . . . . . . . . . . . . . . . . . . . . . . . . . . . . . 175
Details . . . . . . . . . . . . . . . . . . . . . . . . . . . . . . . . . . . . . . . . . . . . . . . . . . . . . . . . . . . . . . . . 175
Configuring server date, time and time zone in Kerio Operator . . . . . . . . . . . . . . . 176
Time Settings . . . . . . . . . . . . . . . . . . . . . . . . . . . . . . . . . . . . . . . . . . . . . . . . . . . . . . . . . . 176
Configuring synchronization with NTP . . . . . . . . . . . . . . . . . . . . . . . . . . . . . . . . . . 176
Configuring time zone . . . . . . . . . . . . . . . . . . . . . . . . . . . . . . . . . . . . . . . . . . . . . . . . . 177
CRM integration using AMI . . . . . . . . . . . . . . . . . . . . . . . . . . . . . . . . . . . . . . . . . . . . . . . . . . . 178
Asterisk Manager Interface (AMI) overview . . . . . . . . . . . . . . . . . . . . . . . . . . . . . . 178
Connecting Kerio Operator with other applications . . . . . . . . . . . . . . . . . . . . . . 178
How to connect a client application (desktop application for
dialing numbers) with Kerio Operator . . . . . . . . . . . . . . . . . . . . . . . . . . . . 178
How to connect a server (CRM system) with Kerio Operator . . . . . . . . 178
Application we have tried and prepared a configuration guide . . . . . . . . . . . 179
What to do when communication fails . . . . . . . . . . . . . . . . . . . . . . . . . . . . . . . . . . 179
Consult the logs in Kerio Operator: . . . . . . . . . . . . . . . . . . . . . . . . . . . . . . . 179
Configure the internal firewall of Kerio Operator . . . . . . . . . . . . . . . . . . 179
Salesforce integration with Kerio Operator . . . . . . . . . . . . . . . . . . . . . . . . . . . . . . . . . . . 180
Salesforce integration overview . . . . . . . . . . . . . . . . . . . . . . . . . . . . . . . . . . . . . . . . . 180
Configuring Kerio Operator . . . . . . . . . . . . . . . . . . . . . . . . . . . . . . . . . . . . . . . . . . . . 180
Configuring salesforce.com . . . . . . . . . . . . . . . . . . . . . . . . . . . . . . . . . . . . . . . . . . . . 181
Adding Kerio Operator Call Center . . . . . . . . . . . . . . . . . . . . . . . . . . . . . . . 182
Adding users to the call center . . . . . . . . . . . . . . . . . . . . . . . . . . . . . . . . . . . 182
Installing the Kerio Operator Open CTI Package . . . . . . . . . . . . . . . . . . . 183
Configuring number transformation for calls from Salesforce . . . . . . . . . . . . 184
Saving Kerio Operator configuration to FTP or local storage . . . . . . . . . . . . . . . . . . 185
Backup overview . . . . . . . . . . . . . . . . . . . . . . . . . . . . . . . . . . . . . . . . . . . . . . . . . . . . . . . 185
Saving backups to an FTP server . . . . . . . . . . . . . . . . . . . . . . . . . . . . . . . . . . . . . . . . 185
Saving a single backup file . . . . . . . . . . . . . . . . . . . . . . . . . . . . . . . . . . . . . . . . . . . . . 186
Recovering data from a backup . . . . . . . . . . . . . . . . . . . . . . . . . . . . . . . . . . . . . . . . . 186

11
Blocking incoming calls in Kerio Operator . . . . . . . . . . . . . . . . . . . . . . . . . . . . . . . . . . . . 188
About the blacklist . . . . . . . . . . . . . . . . . . . . . . . . . . . . . . . . . . . . . . . . . . . . . . . . . . . . 188
Adding numbers to the blacklist . . . . . . . . . . . . . . . . . . . . . . . . . . . . . . . . . . . . . . . . 188
Adding numbers from Call History . . . . . . . . . . . . . . . . . . . . . . . . . . . . . . . 189
Adding/removing numbers with a PBX service . . . . . . . . . . . . . . . . . . . . 189
Importing blacklists . . . . . . . . . . . . . . . . . . . . . . . . . . . . . . . . . . . . . . . . . . . . . . . . . . . 190
Exporting blacklists . . . . . . . . . . . . . . . . . . . . . . . . . . . . . . . . . . . . . . . . . . . . . . . . . . . . 191
Setting outgoing calls constraints in Kerio Operator . . . . . . . . . . . . . . . . . . . . . . . . . . 192
Overview . . . . . . . . . . . . . . . . . . . . . . . . . . . . . . . . . . . . . . . . . . . . . . . . . . . . . . . . . . . . . . 192
Restricting outgoing calls . . . . . . . . . . . . . . . . . . . . . . . . . . . . . . . . . . . . . . . . . . . . . . 192
Restricting the length of individual outgoing calls . . . . . . . . . . . . . . . . . 192
Restricting the number and length of outgoing calls . . . . . . . . . . . . . . . 192
Example . . . . . . . . . . . . . . . . . . . . . . . . . . . . . . . . . . . . . . . . . . . . . . . . . 192
Configuring Built-in DHCP server in Kerio Operator . . . . . . . . . . . . . . . . . . . . . . . . . . 194
Why to use built-in DHCP server . . . . . . . . . . . . . . . . . . . . . . . . . . . . . . . . . . . . . . . . 194
Configuring DHCP server . . . . . . . . . . . . . . . . . . . . . . . . . . . . . . . . . . . . . . . . . . . . . . . 194
Assigning IP addresses . . . . . . . . . . . . . . . . . . . . . . . . . . . . . . . . . . . . . . . . . . . 194
Example — LAN segment is dedicated to voice traffic . . . . . . . . . . . . . . . . . . . . 195
Configuring NAT . . . . . . . . . . . . . . . . . . . . . . . . . . . . . . . . . . . . . . . . . . . . . . . . . . . . . . . . . . . . . 197
Kerio Operator is behind NAT and phones are in the Internet . . . . . . . . . . . . 197
Kerio Operator is in the company network and hardware phones are
behind NAT . . . . . . . . . . . . . . . . . . . . . . . . . . . . . . . . . . . . . . . . . . . . . . . . . . . . . . . . . . . . 198
Kerio Operator is behind NAT and hardware phones are in the Internet . . 199
Configuring music on hold . . . . . . . . . . . . . . . . . . . . . . . . . . . . . . . . . . . . . . . . . . . . . . . . . . . 200
Overview . . . . . . . . . . . . . . . . . . . . . . . . . . . . . . . . . . . . . . . . . . . . . . . . . . . . . . . . . . . . . . 200
Adding new collections . . . . . . . . . . . . . . . . . . . . . . . . . . . . . . . . . . . . . . . . . . . . . . . . 200
Setting Default Collection . . . . . . . . . . . . . . . . . . . . . . . . . . . . . . . . . . . . . . . . . . . . . . 201
Disabling outgoing calls to certain countries or regions . . . . . . . . . . . . . . . . . . . . . . . 202
Overview . . . . . . . . . . . . . . . . . . . . . . . . . . . . . . . . . . . . . . . . . . . . . . . . . . . . . . . . . . . . . . 202
Disabling outgoing calls . . . . . . . . . . . . . . . . . . . . . . . . . . . . . . . . . . . . . . . . . . . . . . . . 202
Assigning call permission groups to extensions . . . . . . . . . . . . . . . . . . . . . . . . . 204
Adding area codes to called numbers . . . . . . . . . . . . . . . . . . . . . . . . . . . . . . . . . . . 205
Adding area codes to called numbers . . . . . . . . . . . . . . . . . . . . . . . . . . . . . . . . . . . . . . . . . 206
How to add a prefix for outgoing calls . . . . . . . . . . . . . . . . . . . . . . . . . . . . . . . . . . 206
Disabling outgoing calls to certain countries or regions . . . . . . . . . . . . . . . . . 206

12
Fax support in Kerio Operator . . . . . . . . . . . . . . . . . . . . . . . . . . . . . . . . . . . . . . . . . . . . . . . . 207
Using fax in Kerio Operator . . . . . . . . . . . . . . . . . . . . . . . . . . . . . . . . . . . . . . . . . . . . 207
T.38 support . . . . . . . . . . . . . . . . . . . . . . . . . . . . . . . . . . . . . . . . . . . . . . . . . . . . . . . . . . 207
Connecting a fax machine to Kerio Operator . . . . . . . . . . . . . . . . . . . . . . 207
Configuring an ATA device . . . . . . . . . . . . . . . . . . . . . . . . . . . . . . . 207
Receiving faxes to a user’s email address . . . . . . . . . . . . . . . . . . . . . . . . . . . . . . . 208
Configuring fax detection (CNG signal) . . . . . . . . . . . . . . . . . . . . . . . . . . . . 208
Receiving all faxes to a specific email address . . . . . . . . . . . . . . . . . . . . . . . . . . . 209
My provider does not support T.38 . . . . . . . . . . . . . . . . . . . . . . . . . . . . . . . . . . . . . 210
Enabling G.711 A-law/U-law codecs for the interface . . . . . . . . . . . . . . 210
Disabling the T.38 support . . . . . . . . . . . . . . . . . . . . . . . . . . . . . . . . . . . . . . . . . . . . . 211
Sending PDF to fax . . . . . . . . . . . . . . . . . . . . . . . . . . . . . . . . . . . . . . . . . . . . . . . . . . . . . 212
Distinctive ringing support . . . . . . . . . . . . . . . . . . . . . . . . . . . . . . . . . . . . . . . . . . . . . . . . . . . 213
Distinctive ringing overview . . . . . . . . . . . . . . . . . . . . . . . . . . . . . . . . . . . . . . . . . . . . 213
Supported strings . . . . . . . . . . . . . . . . . . . . . . . . . . . . . . . . . . . . . . . . . . . . . . . . . . . . . 213
Configuring a telephone (example: snom 360) . . . . . . . . . . . . . . . . . . . . . . . . . . . 213
Using Click to Call for Kerio Operator plugin for Chrome and Firefox . . . . . . . . . 215
Click to Call for Kerio Operator plugin overview . . . . . . . . . . . . . . . . . . . . . . . . 215
Installing and configuring the Click to Call for Kerio Operator plugin
for Chrome . . . . . . . . . . . . . . . . . . . . . . . . . . . . . . . . . . . . . . . . . . . . . . . . . . . . . . . . . . . . 215
Configuring the Click to Call for Kerio Operator plugin for Firefox . . . . . . . 217
Using the Click to Call for Kerio Operator plugin . . . . . . . . . . . . . . . . . . . . . . . . 219
Enabling/disabling Click to Call for Kerio Operator . . . . . . . . . . . . . . . . 220
Selecting the phone number manually . . . . . . . . . . . . . . . . . . . . . . . . . . . . 220
Monitoring Kerio Operator . . . . . . . . . . . . . . . . . . . . . . . . . . . . . . . . . . . . . . . . . . . . . . . . . . . 222
Monitoring overview . . . . . . . . . . . . . . . . . . . . . . . . . . . . . . . . . . . . . . . . . . . . . . . . . . . 222
Monitoring active calls . . . . . . . . . . . . . . . . . . . . . . . . . . . . . . . . . . . . . . . . . . . . . . . . . 222
Call History . . . . . . . . . . . . . . . . . . . . . . . . . . . . . . . . . . . . . . . . . . . . . . . . . . . . . . . . . . . 222
Monitoring Recorded Calls . . . . . . . . . . . . . . . . . . . . . . . . . . . . . . . . . . . . . . . . . . . . . 223
Monitoring a Kerio Operator dial plan . . . . . . . . . . . . . . . . . . . . . . . . . . . . . . . . . . 224
Changing the Dial Plan . . . . . . . . . . . . . . . . . . . . . . . . . . . . . . . . . . . . . . . . . . . 224
Monitoring active conferences . . . . . . . . . . . . . . . . . . . . . . . . . . . . . . . . . . . . . . . . . . 224
Monitoring call queues . . . . . . . . . . . . . . . . . . . . . . . . . . . . . . . . . . . . . . . . . . . . . . . . . 224
System Health . . . . . . . . . . . . . . . . . . . . . . . . . . . . . . . . . . . . . . . . . . . . . . . . . . . . . . . . . 225
Managing logs in Kerio Operator . . . . . . . . . . . . . . . . . . . . . . . . . . . . . . . . . . . . . . . . . . . . . 226
What are Kerio Operator logs for . . . . . . . . . . . . . . . . . . . . . . . . . . . . . . . . . . . . . . . 226
Configuring logs . . . . . . . . . . . . . . . . . . . . . . . . . . . . . . . . . . . . . . . . . . . . . . . . . . . . . . . 226
Types of logs . . . . . . . . . . . . . . . . . . . . . . . . . . . . . . . . . . . . . . . . . . . . . . . . . . . . . . . . . . 226
Auth . . . . . . . . . . . . . . . . . . . . . . . . . . . . . . . . . . . . . . . . . . . . . . . . . . . . . . . . . . . . 226
Config . . . . . . . . . . . . . . . . . . . . . . . . . . . . . . . . . . . . . . . . . . . . . . . . . . . . . . . . . . . 227

13
Debug . . . . . . . . . . . . . . . . . . . . . . . . . . . . . . . . . . . . . . . . . . . . . . . . . . . . . . . . . . . 227
Error . . . . . . . . . . . . . . . . . . . . . . . . . . . . . . . . . . . . . . . . . . . . . . . . . . . . . . . . . . . . 227
Event . . . . . . . . . . . . . . . . . . . . . . . . . . . . . . . . . . . . . . . . . . . . . . . . . . . . . . . . . . . . 227
Kernel . . . . . . . . . . . . . . . . . . . . . . . . . . . . . . . . . . . . . . . . . . . . . . . . . . . . . . . . . . . 227
Security . . . . . . . . . . . . . . . . . . . . . . . . . . . . . . . . . . . . . . . . . . . . . . . . . . . . . . . . . 228
Warning . . . . . . . . . . . . . . . . . . . . . . . . . . . . . . . . . . . . . . . . . . . . . . . . . . . . . . . . . 228
Legal Notice . . . . . . . . . . . . . . . . . . . . . . . . . . . . . . . . . . . . . . . . . . . . . . . . . . . . . . . . . . . . . . . . . . 229
Trademarks and registered trademarks . . . . . . . . . . . . . . . . . . . . . . . . . . . . . . . . . 229
Used open source software . . . . . . . . . . . . . . . . . . . . . . . . . . . . . . . . . . . . . . . . . . . . . 229

14
Installing Kerio Operator
Product Editions
Software Appliance
Kerio Operator Software Appliance is an all-in-one package of Kerio Operator which also
includes a special operating system.
Designed to be installed on a computer without an operating system, this edition is dis-
tributed as an installation disc. Software Appliance cannot be installed on a computer
with another operating system and it does not allow to install other applications.
VMware Virtual Appliance
A virtual appliance designed for use in VMware products.
VMware Virtual Appliance is a Software Appliance edition pre-installed on a virtual host
for VMware. The virtual appliance is distributed as OVF and VMX.
Kerio Operator Box
Hardware device ready for network connection. There are two types which differ in per-
formance.
Kerio Operator Software Appliance
For Kerio Operator system requirements, refer to the Kerio Operator product pages.
You obtain Kerio Operator as a standard ISO image which you need to burn on a CD. Boot
from this CD and install the Kerio Operator operating system. The Kerio Operator application
is also installed during the process.
How to connect Kerio Operator to network
After booting the system, a console with the IP address for Kerio Operator is displayed.
If you use a DHCP service on your network, Kerio Operator will be assigned an IP address
automatically and will connect to the network. If you do not use or do not wish to use DHCP
for Kerio Operator, you have to set the IP address manually.
The current network configuration is displayed (and can be changed) in the Kerio Operator
console in section Network Configuration. To set a static network address:
1. Select the Assign static IP address option in the console menu.
2. In the network interface on which the PBX should communicate, select the Assign static
IP address option and enter the IP address, subnet mask and IP addresses of gateway
and DNS server.

1.3 Kerio Operator VMware Appliance
15
If you know the DNS name of the PBX, you can connect to it and configure it via the web
interface.
Immediately after you connect Kerio Operator to the network, we recommend to read
article concerning the security measures. Meeting security principles for Kerio Operator
operation is extremely important. If the PBX is not protected by a firewall and supporting
security rules, your internal telephone extension can be misused which may result in
unexpected financial costs.
Kerio Operator VMware Appliance
For supported VMware product versions, check
http://www.kerio.com/operator/requirements/
Use an installation package in accordance with the type of your VMware product:
• For products VMware Server, Workstation, Player and Fusion, download the
compressed VMX distribution file (*.zip), unpack it and open the file with extension
.vmx.
• You can import a virtual appliance directly to VMware ESX/ESXi from the URL of the
OVF file — for example:
http://download.kerio.com/dwn/operator/
kerio-operator-appliance-2.3.0-2500-vmware.ovf
VMware ESX/ESXi automatically downloads the OVF configuration file and
a corresponding disk image (.vmdk).
If you import virtual appliance in the OVF format, bear the following specifics in mind:
• In the imported virtual appliance, time synchronization between the host and
the virtual appliance is disabled. However, Kerio Operator features a proprietary
mechanism for synchronization of time with public Internet time servers. Therefore,
it is not necessary to enable synchronization with the host.
• Tasks for shutdown or restart of the virtual machine will be set to default values after
the import. These values can be set to “hard” shutdown or “hard” reset. However,
this may cause a loss of data on the virtual appliance. Kerio Operator VMware
Virtual Appliance supports so called Soft Power Operations which allow to shut down
or restart hosted operating system properly. Therefore, it is recommended to set
shutdown or restart of the hosted operating system as the value.
For more information, see section Network Connection.

Installing Kerio Operator
16
Kerio Operator Box
For currently supported Kerio Operator Box configurations, refer to the Kerio Operator
product pages.
For detailed information on connecting the device into the network, see the Kerio Operator
Box 1000/3000 Series and Kerio Operator Box V300 installation guides.
How to connect box to network
Upon the first start, the appliance has a static IP address set to 10.10.10.1 on ethernet port
1. There are two ways to change the configuration:
• In the console — use an Ethernet cable to connect to the console. In the console menu,
select the Network Configuration option and change the configuration.
• In the administration interface in section System.
To connect to Kerio Operator, set the following TCP/IP parameters on your computer:
• IP address: 10.10.10.2
• Subnet mask: 255.255.255.0
To shut down the appliance:
1. Connect to Kerio Operator via the console and select the Shutdown command.
2. Kerio Operator series 1000 will shut down.
Kerio Operator series 3000 will stop the server, however, the physical appliance stays
switched on. Wait until you are not able to connect to Kerio Operator via Kerio Operator
administration and turn the appliance off using the pwr button on the appliance.

17
Logging into Kerio Operator Administration
Overview
We recommend to use the supported browsers to connect to Kerio Operator Administration.
For the list of the browsers, refer to the Kerio Operator product pages.
Kerio Operator Administration is currently localized into several languages. Select yours in
the top right corner of the interface. The default language is set according to your browser
language settings.
How to login
Before you login the first time, make sure you have:
• DNS name of the server with Kerio Operator.
• Supported browser
To login, enter the DNS name of the computer with Kerio Operator:
kerio.operator.name/admin
Administration runs solely via the HTTPS protocol on port 4021. The address is automatically
redirected to:
https://kerio.operator.name:4021/admin
If the PBX is located behind firewall, HTTPS on port 4021 must be enabled.
If the URL is entered correctly, your browser displays a warning about a SSL certificate. After
the installation, Kerio Operator creates a certificate which is not signed by a trusted certificate
authority — it is a self-signed certificate (for more information, read article about the SSL
certificates). Since you know the certificate can be trusted, you can add the security exception
and continue to a login page.
First login
When you connect to the PBX for the first time, a configuration wizard is displayed where you:
1. Set the configuration wizard language.
2. Accept the Kerio Operator license agreement.

Logging into Kerio Operator Administration
18
3. Set a password for the administration account (be sure to remember the password, you
will need it to login to the PBX).
This admin password is synchronized with password of user root in the
operating system where Kerio Operator is installed (Kerio OS).
4. Set the time zone of Kerio Operator (requires a restart of the PBX).
5. Set the PBX language for communication with you and other users (warnings, auto
attendant scripts, voicemail, etc.).
6. Configure the first extension number. If you use phone provisioning, extensions will be
created automatically beginning with the number you enter here.
After successful configuration, the login page is displayed. Enter the username and password
you created earlier.

2.1 Overview
19
To change the password, use the following steps:
1. Login to Kerio Operator using the HTTPS protocol
(e.g. https://operator.company.com/admin)
2. Open the Configuration → Users section.
3. In the user list, select the administrator account you are logged in with and double-click
on it.
4. Change the password on tab General.

20
Using Dashboard in Kerio Operator
Dashboard overview
Kerio Operator includes a customizable Dashboard. Dashboard consists of tiles. Each tile
displays a different type of information (graphs, statistics, etc.)
Dashboard is displayed in Kerio Operator after each login.
To display Dashboard later, go to Configuration → Dashboard.

21
Licenses and registrations
How to register Kerio Operator in the administration interface
You can register the product from the welcome page of the administration interface which is
displayed after each login.
If Kerio Operator is protected by a firewall, it is necessary to allow outgoing HTTPS
traffic for Kerio Operator at port 443. Unless HTTPS traffic is allowed, Kerio Operator cannot
use the port to connect to the Kerio Technologies registration server.
When installed, the product can be registered as trial or as a full version.
Why to register the trial version
The trial version is intended to allow the customer to become familiar with the product’s
features and configuration. Once you register the trial version, you will be provided free Kerio
Technologies technical support during the entire trial period (up to 30 days).
Figure 1 A Product Registration tile

Licenses and registrations
22
The trial version can be registered by clicking on Become a registered trial user on Dashboard
(see screenshot above). In the dialog box just opened, set the following parameters:
1. enter security code (CAPTCHA) from the image.
2. enter information about your company and agree with the privacy policy terms.
3. choose how many computers do you have in your company and how you learned of Kerio
Operator.
Now, a special identification code called Trial ID gets generated. This ID is later required for
contacting the technical support. After a successful registration, Trial ID can be found in the
license information in the administration interface.
Once you purchase the product, your Trial ID will become your license number (it will
not change).
Registering full version
If your trial version is registered, the license key (licence.key file) is automatically imported
to your product within 24 hours from your purchase. The Trial ID you entered in your product
upon registration will be activated as a standard license number.
If you haven’t registered your trial version:
1. Open the administration interface.
2. Click Register product with a purchased license number on Dashboard.
3. In the first step of the registration, enter the license number and enter the security code
from the image.
The code is not case-sensitive.
4. Click Next to make Kerio Operator establish a connection to the registration server and
check validity of the number entered.
If the number is invalid, the registration cannot be completed.
5. Type the registration information about the company the product is registered to.
6. Kerio Operator connects to the registration server, checks whether the data inserted is
correct and downloads automatically the license key (digital certificate).
7. Click Finish to close the wizard.

4.2 Registering via a web browser
23
Manual import the license key
If you need to import a license key manually (for example from a backup), use the following
steps:
1. Prepare the license key.
2. Login to Kerio Operator administration.
3. Click Install license on Dashboard.
4. In the Install License dialog, click Browse.
5. In the Open dialog, find the file .key with the license key and click Open.
6. In the Install License dialog, click OK.
7. Check the result in the License tile on Dashboard.
Kerio Operator installs the licence key.
Registering via a web browser
You purchased a license and your Kerio Operator cannot access the Internet? Follow these
steps to register the product:
1. Go to https://secure.kerio.com/reg/
2. Register using your purchased license number.
3. By registering, you will receive a license key which must be imported to Kerio Operator.
The trial version of Kerio Operator cannot be registered via the website.

24
Securing Kerio Operator
Issues to address
• Restrict communication on firewall to necessary IP addresses and ports, especially if
the PBX runs in the Internet.
• Restrict communication on the integrated firewall in Kerio Operator.
• Create strong SIP passwords.
• Restrict the number of attempts to enter SIP passwords.
• Using special rules, forbid international outgoing calls to countries you do not
communicate with
• Restrict international outgoing calls to countries where you rarely call
• Encrypt your calls
The following sections describe these settings in detail.
Configuring firewall in local network
Kerio Operator is usually protected by firewall (in your local network or in the Internet).
Certain ports need to be opened (or mapped) on firewall.

5.3 Configuring firewall integrated in Kerio Operator
25
Service (default port) Outbound connection Inbound connection
SIP (5060) allow allow for SIP servers of your
provider
IMAP (143) allow if integration with Kerio
Connect is enabled and there is
a firewall between Kerio Connect
and Kerio Operator.
deny
LDAP (389) allow deny
LDAPS (636) allow allow if you use mapping from
Active Directory or Open
Directory and there is a firewall
between the directory service and
Kerio Operator.
HTTP (80) allow deny
HTTPS (443) allow allow if you wish users to be able
to connect to Kerio Operator
Softphone from the Internet.
HTTPS (4021) allow allow if you wish users to be able
to connect to the administration
interface from the Internet.
Table 1 Services to be allowed on the firewall
Configuring firewall integrated in Kerio Operator
Prepare groups of IP addresses which you wish to allow for individual services (create them in
Definitions → IP Address Groups).
You can configure the integrated firewall in section Network → Firewall.
Web server
If you want to restrict connections to Kerio Operator administration and softphone, check
this option and select an IP group with addresses from which access will be allowed. Bear
in mind that all the PBX users should be allowed to connect to Kerio Operator Softphone
at least from their own workstation.
SIP
We recommend to restrict the SIP protocol solely to your internal network and external
IP addresses of your SIP provider.

Securing Kerio Operator
26
Phone provisioning
For security reasons, we recommend to restrict automatic phone provisioning solely to
your internal network because TFTP sends configuration data as plain text.
CRM integration
For security reasons, we recommend to restrict communication solely to your internal
network.
SNMP monitoring
For security reasons, we recommend to restrict communication solely to your internal
network and IP adressess where monitoring servers are running.
If the options are unchecked, no restrictions are set.
Configuring protection against password guessing
Login data guessing is one of the most common attacks on a PBX. In Kerio Operator, attackers
try to guess extension numbers and SIP passwords. This type of attack is defined by many
unsuccessful attempts to enter extension number and SIP password during a login. Kerio
Operator security settings enable you to limit the number of attempts of a phone (both
software and hardware) to connect to the PBX. Apply settings as described below:
1. In the administration interface, go to Security.
2. Set the limit of unsuccessful attempts (usually 3 to 10 attempts) and set the time period
during which attempts will be counted.
Setting the time period protects real users who have forgotten their password or who have
made mistakes during several logins. When the time limit expires, they can try to login to
the PBX again.
3. Set the time during which Kerio Operator will block the source IP address.
4. You can also enter an email address that will be used for sending warnings about blocked
IP addresses.
How to recognize there has been an attack attempt
In log Security look for the Authentication failed string. If there are many messages of
this kind, somebody is trying to use a dictionary attack.

5.5 What to do in case of an attack
27
What to do in case of an attack
In case of an attack, apply the following instructions as soon as possible:
1. In section Status → Calls and in logs, look for information on which account has been
abused.
2. Change the SIP password of this account.
3. Instruct users about handling their login details and secure behavior on the Internet.
4. The PBX is blocked, so it needs to be unlocked again.

28
Creating user accounts
User accounts overview
User accounts in Kerio Operator are used for:
• Login users to Kerio Operator Softphone
• Link users with an extension
• Set access rights to the system
Adding new accounts
You can create either a local user or map existing users from a directory service.
Adding local accounts
If you do not use directory services, create a local user in the Kerio Operator administration:
1. In the Configuration → Users section, click Add.
2. The Add User dialog box opens.
3. On the General tab, type username and password.
The username must not contain spaces, diacritics and special symbols.
4. Click OK.
The user account appears in the Users section and the user can connect to Kerio Operator
Softphone.
Adding accounts from directory service
Mapping differs according to the directory service used:
• Microsoft Active Directory
• Apple Open Directory
You need basic login credentials to connect directory service to Kerio Operator.
For more information, read Connecting Kerio Operator to directory service.

6.3 Assigning extensions to users
29
Assigning extensions to users
An extension is an internal telephone line. Each user can have assigned one or more extensions
in Kerio Operator.
1. In the Configuration → Users section, select a user and click Edit.
The Edit User dialog box opens.
2. On the Extensions tab, click Add.
The Select Extensions dialog box opens.
3. In the Select Extensions dialog box, click Add.
The Add Extension dialog box opens with predefined unused extension.
4. If the extension number meets your dial plan, click OK. If not, rewrite the extension
number and then click OK.
5. Save the settings.
The users can use their Kerio Operator phone extension.
For more information about extensions, read the Creating extensions article.
Configuring ringing rules
For more information, read the Redirecting Calls article.

30
Redirecting calls
Overview
Redesigned in Kerio Operator 2.4!
Kerio Operator can route incoming calls to different internal extensions or external numbers.
You can configure ringing rules (call forwarding) for each user in the Ringing Rules section.
Users can also change their ringing rules in the Kerio Operator Softphone interface in
the Forwarding section.
Configuring ringing rules in the administration
See the following example:
Bob has the internal extension 11 and a cell phone with the number5550155. He wants to
receive calls on his cell phone. When he is busy, calls fallback to voicemail.
1. In the administration interface, go to Configuration → Users.
2. Select an account and click Edit.
The Edit User dialog box opens.
3. Go to the Extensions tab.
4. Select an extension and click Ringing Rules.
5. Enable the Ring extension option.
6. Select a number for Timeout.
When the specified time runs out, Kerio Operator forwards the call.
7. For When busy, select the Continue option.
8. Click Add and type the number 5550155 and a description (cell phone).
9. Select a number for Timeout.
10. Enable the Fallback to voicemail option.
11. Click OK to save your changes.

7.3 Additional configuration
31
Figure 1
Additional configuration
New in Kerio Operator 2.4!
For ringing rules, you can configure additional settings:
• Configure extension to allow only one incoming call
• Apply ringing rules to calls coming from call queues and ringing groups
Configuring extensions to allow only one incoming call
If your phones support multiple calls, you can configure your extensions to reject or redirect
additional incoming calls when an extension is already busy with a call.

Redirecting calls
32
To allow only one incoming call at a time:
1. In the administration interface, go to Configuration → Users.
2. Select an account and click Edit.
The Edit User dialog box opens.
3. Go to the Extensions tab.
4. Select an extension and click Ringing Rules.
5. Enable the Allow only one incoming call option.
6. Click OK.
Kerio Operator now handles incoming calls using the configuration set in the Ringing Rules
dialog box.
Applying ringing rules to calls coming from call queues and ringing groups
To configure ringing rules for calls from call queues and ringing groups:
1. In the administration interface, go to Configuration → Users.
2. Select an account and click Edit.
The Edit User dialog box opens.
3. Go to the Extensions tab.
4. Select an extension and click Ringing Rules.
5. Enable the Use the above rules also for Ringing Groups and Call Queues option.
6. Click OK.
Figure 2

7.4 Configuring call forwarding in Kerio Operator Softphone
33
Configuring call forwarding in Kerio Operator Softphone
Users can also redirect calls to another number in their Kerio Operator Softphone. For more
information, see Redirecting calls in Kerio Operator Softphone.
34
Creating extensions
Extension overview
An extension is an internal telephone line. Each user can have assigned one or more extensions
in Kerio Operator.
The total number of extensions is limited to three times the number of licensed users.
Service extensions configured on the PBX services tab are not counted by the license
file.
Adding new extensions
You have three options to add a new extension:
• An extension is created automatically when you connect a provisioned phone to the
network.
• You can create an extension in Configuration → Users — the extension is assigned to
a particular user.
• Create an extension in Configuration → Extensions — the extension is created as
standalone (without being assigned to a user).
Creating a standalone extension
If you have a phone which is not used by any particular user, you can create a standalone
extension for it.
1. In the administration interface, go to Configuration → Extensions.
2. Click Add → Add Extension.
3. Type an extension number.
The field suggests an unused extension. You can change the extension number manually
if necessary.
4. Save the settings.

8.4 SIP username and SIP password
35
SIP username and SIP password
Each extension has a SIP username and a SIP password. Kerio Operator uses SIP
usernames and SIP passwords for authentication of phones to Kerio Operator. You use SIP
username/password for connecting softphones or hardware phones to Kerio Operator (read
more in the Configuring multiple registration of an extension article).
SIP usernames/passwords cannot be used to login into Kerio Operator or Kerio Operator
Softphone.
Using SIP username/password
1. In the Kerio Operator administration interface, go to Configuration → Extensions.
2. Select an extension and click Edit....
3. In the Edit Extension dialog, you can see fields SIP username and SIP password.
4. To display the SIP password, click the keys icon.
Figure 1 SIP username and SIP password
Now you can view the SIP username/password and use it for connecting a phone to Kerio
Operator.

Creating extensions
36
Encrypting calls
In Kerio Operator, you can encrypt your calls for any extensions.
1. In the Kerio Operator administration interface, go to Configuration → Extensions.
2. Select an extension and click Edit...
3. Click the Advanced tab and select Encrypt communication (TLS and SRTP).
4. Click OK.
Now Kerio Operator encrypts all calls for the selected extension.
For more information about security, see Securing Kerio Operator.

37
Configuring multiple registration of an extension
Multiple registration overview
Do you want to use your extension with various phones? Softphone in your cell phone or IP
phone in your smartphone? The solution is multiple registration.
Multiple registration (in contrary to assigning more extensions to one user) gives user
the possibility to call from the same extension any time they make a call.
Example:
User Brenda Roar with username broar working at the Marketing department uses the
extension 224. When necessary, she also works from home. She uses the following to
communicate:
1. She has an automatically provisioned phone Cisco 7940 in his office.
2. She has X-Lite softphone on her home computer.
3. Occasionally, when connected via WiFi, she uses a SIP client on her mobile phone.
With correct settings of multiple registration that will be described in the following chapter
she can use all the before-mentioned methods to authenticate.
Creating multiple registrations
1. Open section Configuration → Extensions.
2. Select Brenda Roar’s extension (224). Click on Add → Add Another Registration.
3. A new registration is added to the user table. Add another registration. The result should
be similar to the following image.

Configuring multiple registration of an extension
38
Figure 1 Extensions → Add Another Registration
Figure 2 Extensions → Multiple registration
4. Double-click the 224p1 registration and note the SIP username and SIP password from the
opened dialog.
5. Click OK.
6. In the X-Lite settings (detailed info for installation can be found in article Configuring the
X-Lite software phone), enter the newly generated string into User ID and the SIP password
into Password.
7. Repeat steps 4 to 6 for the second registration for the SIP client on a mobile phone.
9.2 Creating multiple registrations
39
Figure 3 Edit Extension → Login information for X-Lite

40
Displaying, hiding and overriding phone numbers
Hiding users´ phone number
Redesigned in Kerio Operator 2.4!
To hide users´ phone numbers for outgoing calls:
1. In the administration interface, go to the Configuration → Call Routing → Routing of
outgoing calls section, select a prefix and click Edit.
The Edit Outgoing Route dialog box opens.
2. Go to the Exceptions tab.
3. Add an extension.
4. Select the box in the Hide Caller ID column.
5. Click OK.
Some VoIP service providers do not allow hiding of phone numbers. If you use one of
these providers, this settings do not work. See article Connecting to VoIP service provider.
Changing phone number to a name
For outgoing calls, you can change the phone number to display a name:
1. In the administration interface, go to the Configuration → Call Routing → Interfaces and
routing of incoming calls section, select an interface and click Edit.
The Edit External Interface dialog box opens.
2. Go to the Advanced tab.
3. In the Outgoing calls section, select the Override display name with option, and type
a new name.
4. Click OK.
10.3 Extending display names for incoming calls
41
Extending display names for incoming calls
New in Kerio Operator 2.4!
In Kerio Operator, you can extend the display name of incoming calls. The configuration works
for all numbers that reach the interface and Kerio Operator adds the configured text to the
beginning of the number or the caller’s ID.
For example, a call center provides a technical support for several companies (for example,
Workplace). Administrator wants to extend a display name of incoming calls with the
company name, so the call center employees know from where comes the call:
1. In the administration interface, go to the Configuration → Call Routing → Interfaces and
routing of incoming calls section.
2. Select an interface and click Edit.
The Edit External Interface dialog box opens.
3. Go to the Advanced tab.
4. In the Incoming calls section, select the Prepend display name with option, and type
Workplace -.
5. Click OK.
After this configuration, Kerio Operator extends all incoming calls to this interface with Work-
place - (for example, Workplace - 555 0155).
Figure 1

42
Connecting Kerio Operator to directory service
Which directory services are supported in Kerio Operator
Kerio Operator supports the following directory services:
• Microsoft Active Directory
• Apple Open Directory
What is the connection used for
In practice, mapping accounts from a directory service provides the following benefits:
Easy account administration
Apart from the internal database of user accounts, Kerio Operator can also import
accounts and groups from an LDAP database. Using LDAP, user accounts can be managed
from a single location. This reduces possible errors and simplifies administration.
Online cooperation of Kerio Operator and directory service
Additions, modifications or removals of user accounts/groups in the LDAP database are
applied to Kerio Operator immediately.
Using domain name and password for login
Users may use the same credentials for Kerio Operator Softphone login and domain login.
• Mapping is one-way only, data are synchronized from directory service to Kerio
Operator. Adding a new user in Kerio Operator creates a local account — it will not
be duplicated into the directory service database.
• When creating user accounts in a directory service, ASCII must be used to specify
usernames. If the username includes special characters or symbols, user may not
be able to login to Kerio Operator Softphone or the administration interface.
• If you disable users in Microsoft Active Directory, they are also disabled in Kerio
Operator (they will not be able to login to Kerio Operator Softphone, make or receive
calls with their extensions).
• If you disable users in Apple Open Directory, they stay enabled in Kerio Operator.

11.3 Connecting to a directory service
43
Phone extensions can be managed in a directory service (if available) or locally in Kerio
Operator. Select the most convenient option.
Connecting to a directory service
To map users from a directory service:
• Connect to directory service in section Integration → Directory Service.
• Activate users.
All information about directory services can be found in the Config log.
Microsoft Active Directory
In the administration interface, go to Integration → Directory Service.
1. Check the Map user accounts from a directory service option and select your directory
service type.
2. In the Domain name field, enter the name of your Microsoft Active Directory domain —
the domain name is then copied in other necessary fields.
3. In the Hostname field, enter the DNS name or IP address of the Microsoft Active Directory
server. If you have a backup server, enter its name in the Secondary hostname filed.
4. In the Username and Password fields, enter the authentication data of a user with at least
read rights for Microsoft Active Directory database. Username format is user@domain.
5. Within the communication of the Microsoft Active Directory database with the PBX,
sensitive data may be transmitted (such as user passwords). For this reason, it is
recommended to secure such traffic by using SSL. To enable LDAPS in Microsoft Active
Directory, it is necessary to run a certification authority on the domain controller that is
considered as trustworthy by Kerio Operator.
6. The rest of the items in the dialog are completed automatically. Do not change them
unless you have a special reason to do so. These items are Microsoft Apple Open Directory
domain name and Kerberos Realm which has to match the Microsoft Active Directory
domain name, written in capital letters.
Apple Open Directory
In the administration interface, go to Integration → Directory Service.
1. Check the Map user accounts from a directory service option and select your directory
service type.
2. In the Domain name field, enter the name of your Apple Open Directory domain — the
domain name is then copied in other necessary fields.
Connecting Kerio Operator to directory service
44
3. In the Hostname field, enter the DNS name or IP address of the Apple Open Directory
server. If you have a backup server, enter its name in the Secondary hostname filed.
4. In the Username and Password fields, enter the authentication data of a user
with at least read rights for Apple Open Directory database. Username format is:
uid=root,cn=users,dc=domain,dc=tld.
5. Within the communication of the Apple Open Directory database with the PBX, sensitive
data may be transmitted (such as user passwords). For this reason, it is recommended to
secure such traffic by using SSL. To enable LDAPS in Apple Open Directory, it is necessary
to run a certification authority on the domain controller that is considered as trustworthy
by Kerio Operator.
6. The rest of the items in the dialog are completed automatically. Do not change them
unless you have a special reason to do so. These items are Apple Open Directory domain
name and Kerberos Realm which has to match the Apple Open Directory domain name,
written in capital letters.
Activating users from a directory service
Once the mapping is set, select individual users and map them to the PBX. This is how to map
users:
1. Open the Configuration → Users section.
2. Click Import → Import from a Directory Service.
3. In the dialog, select all users you wish to map (you can also add users later) and click Next.
4. If users in the directory service have phone extensions assigned, you can either keep them
or disable them. If you disable them, you have to assign new extensions. You can do it,
for example, while changing your dial plan.
5. Click on Finish. Activated users are displayed in section Configuration → Users.
Only extensions in attributes telephoneNumber (Microsoft Active Directory, Apple
Open Directory) and otherTelephone (Microsoft Active Directory) can be mapped (are
displayed). If you create special attributes in a directory service for your phone numbers,
you will not be able to map such extensions.

45
Configuring automatic phone provisioning
Phone provisioning overview
Watch the Configuring automatic phone provisioning in Kerio Operator video.
Phone provisioning is used for automatic configurations of selected hardware SIP phones.
Phone provisioning means:
• phone automatically connects to the PBX after booting and is assigned a phone
extension,
• extensions are managed in the administration interface,
• if you confirm or plan it, the system will perform an automatic restart of provisioned
phones if needed,
• phone firmware is automatically updated,
• displaying a company logo on hardware phones supported by Kerio Operator
• accessing company contacts through LDAP
Automatic firmware update is not supported for the Polycom phones and the original
Cisco phones (Cisco SPA is supported). However, there is a possibility to update the
firmware. You can upload all necessary files to folder /var/tftp in Kerio Operator
manually. For detailed information see article Uploading configuration files to Kerio
Operator TFTP server.
Use of phone provisioning is not always suitable. If Kerio Operator is located and
runs in the Internet, for security reasons we do not recommend to use automatic phone
provisioning.

Configuring automatic phone provisioning
46
What you need
1. In your local network, you need a DHCP server supporting parameter 66 (TFTP server
address). Enter the address of Kerio Operator in this parameter.
DHCP server integrated in Kerio Control supports parameter 66.
2. Only selected phones support automatic phone provisioning.
3. Appropriate settings need to be done in Kerio Operator.
If you wish to connect a phone which is not currently supported in Kerio Operator,
you cannot use automatic provisioning. The configuration must be done on the hardware
phone.
How to add a phone
1. In the administration interface, go to Provisioned Phones → Hardware Phones.
2. Click Provisioning Settings. The configuration dialog windows is opened.
3. Check the Enable provisioning option. The option must be checked.
4. Check option Create new extension for newly registered phones in case you create users
locally (do not map them from a directory service).
The Create new extension for newly registered phones option is checked
by default. If you uncheck it, you cannot use automatic remote phone restart —
you will have to restart phones manually if needed.
5. Each telephone must be authenticated when connecting to the PBX. Extension number and
password are used for SIP authentication (Master Password in this case). Option Mas-
ter password for phones is enabled enables to create one password for all provisioned
phones. The password is saved in the configuration file which is sent to the phone upon
the first connection to the network and the phone will use this password to authenticate
at Kerio Operator.
If you disable option Master password for phones is enabled, all phones will have their
own passwords (it can be viewed in the configuration dialog of each phone).

12.3 How to add a phone
47
Now the general environment for the provisioned phones is configured. Once a phone is
connected to your network, it will be listed in section Provisioned Phones.
Adding phones manually
Phones which are not connected to the network can also be provisioned. You may do so
manually — you need the phone’s hardware address and the type of the phone. The procedure
is described below:
Figure 1 Connecting a phone manually

Configuring automatic phone provisioning
48
1. In section Provisioned Phones, click Add.
2. This opens a dialog which requires the hardware address of the phone (MAC address of
the network card in the phone). The address may lack the colons. Once you save it, the
colons will be added automatically.
3. Select the correct type of the hardware phone (special configuration scripts are created
according to the phone type).
4. (Optional) Set a label of the phone (for example the name of your company).
The upper label on the phone display.
5. Assign the phone user or users who will use it.
If you do not know to which person the extension will be assigned, check
option Generate new extension number and the extension will be assigned
automatically. Phones without extensions assigned cannot be provisioned.
Importing from CSV file
Phones can be imported from a CSV file. Data in the file must follow certain rules:
• hwAddress — hardware address of the phone,
• phoneManufacturer — name of the phone’s manufacturer,
• phoneType — phone type,
• extension1; extension2; ... — extensions assigned to the phone. The maximum number
of extensions depends on the phone type.
Each phone uses one line and all items are separated by a semicolon.
The file may look as follows:
00:1a:a0:be:1e:cd;Cisco;7940;111;112
00:1b:b0:cd:e1:ca;Cisco;7960;115
00:1c:c0:ab:a2:24;Linksys;SPA942;113;114
Import data from a CSV file as described below:
1. In the Provisioned Phones section, click on Advanced → Import from a CSV file.
2. This opens dialog Import from a CSV file — click on Upload CSV file.
3. If the data in the file are correct, a list of all the phones and extensions is displayed. Check
those you want to import.

12.3 How to add a phone
49
4. Click OK.
5. The imported phones are displayed in the Provisioned Phones table.
Restarting provisioned phones
When you change configuration which affects provisioned phones, the phones need to be
restarted (for example, when you create a new call route). When you do so, a dialog window
recommending phone restart is displayed. You can do it immediately or wait for a more
convenient time (for example to an off-peak time). To restart phones later:
1. Open the Provisioned Phones section.
2. Click Advanced → Restart All Phones.
Some Cisco telephones from newer series are not able to restart automatically. In
case of configuration changes you have to check the result. If anything is wrong, restart the
phones manually.
This warning doesn’t relate to Cisco SPA phones.
Firmware
Kerio Operator allows easy installation of phone firmware which are managed through the
phone provisioning:
1. Go to section Provisioned Phones and click on the Advanced → Firmwares button.
2. In the Firmwares and Logos dialog, select a firmware and click Edit.
3. In the Edit firmware dialog, select Verify the firmware.
Kerio Operator vrifies if the firmware includes all important files and information.
4. Click Upload File.
5. This opens a dialog where you select a firmware file and confirm the selection.
6. In the New firmware dialog, select the appropriate phone.
7. Click OK.
The new firmware is installed and after the restart will be installed to phones.

Configuring automatic phone provisioning
50
Uploading a phone provisioning module
If you want to change or create a provisioning module (archived templates + PHP scripts which
can change phones behavior), download Provisioning Developer Documentation and read it
carefully.
When the provisioning module is prepared and archived, upload it to Kerio Operator:
1. Go to administration interface.
2. In section Provisioned Phones, click Advanced → Provisioning Modules..
3. Click Upload.
4. Restart your phones.
Overriding templates
If you want to change a provisioning template (remote changing BLF, speed dials, etc.), go to
the Editing provisioning templates article.
What to do if you want to know the password of your phone
If any of your users needs to know the password of their phone, we do not recommend to
provide them with the Master Password. We have a specific solution:
1. In the administration interface, go to Provisioned Phones → Hardware Phones.
2. Click Provisioning Settings.
3. Disable master password.
Once you disable it, each phone will have their own password which can be shared with
individual users.
Configuring inter-digit timeout
Inter-digit timeout sets the time between dialing the last digit and automatic dial. If your users
complains that it is too long or too short, you can adjust it:
1. Go to the administration interface.
2. In section Provisioned Phones, go to Provisioning Settings.
3. In the Phone Provisioning Settings, set the Inter-digit timeout.

12.4 How phone provisioning works
51
How phone provisioning works
Figure 2 Automatic HW phone provisioning
This is how the automatic phone provisioning works:
• The telephone boots in the network and sends a DHCP request for an IP address.
• DHCP server accepts the request, assigns an IP address and sends it back in a DHCP
reply. Besides the IP address, the message also contains TFTP (Trivial File Transfer
Protocol) server address — Kerio Operator, in our case.
• SIP phone connects to TFTP server integrated in Kerio Operator.
• Kerio Operator checks whether the phone is new:
• if it is new, Kerio Operator generates a new phone extension for the phone;
• if it is not new, Kerio Operator finds the extension which the phone has used.
• Kerio Operator generates a configuration file suitable for the particular phone type
and sends it via the TFTP protocol.
• The phone is configured using the values it has acquired in the configuration file and
is ready to be used.

Configuring automatic phone provisioning
52
Some phones perform an automatic restart during the configuration.

53
Using provisioning tools
Provisioning tools overview
New in Kerio Operator 2.3!
Kerio Operator includes tools for phone administration. These tools can:
• display the phone web interface.
• open a packet sniffer for a communication between the phone and Kerio Operator.
• ping IP address of the phone.
Using provisioning tools
1. In the administration interface, go to Provisioned Phones.
2. Right-click a provisioned phone and in the context menu select Tools.
3. Select a tool and use it.

54
Accessing company contacts through LDAP on pro-
visioned phones
LDAP configuration overview
Kerio Operator offers searching in your LDAP directory from your provisioned phones.
Cisco79xx phones are not supported.
Polycom phones are not supported with Kerio Connect LDAP.
Connecting to Kerio Connect LDAP/Microsoft Active Directory
1. In the administration interface, go to Provisioned Phones.
2. Click the Provisioning Settings button.
3. In the Phone Provisioning Settings dialog, select option Directory configuration is en-
abled.
4. Click Configure.
5. Click Configuration Wizard.
6. Select type of a service:
• Kerio Connect LDAP — type Kerio Connect hostname, username and password.
• Active Directory — type domain name and hostname of your Active Directory and
credentials of account with at least read-only access to Active Directory,

14.2 Connecting to Kerio Connect LDAP/Microsoft Active Directory
55
Figure 1 The Directory Configuration dialog after finishing Kerio Connect LDAP configuration
We recommend to create a special account with read-only access and use
credentials of this account.
7. Save the settings.
8. In Provisioned Phones, click Advanced and restart all provisioned phones.
Phones read the new configuration and start to communicate directly with the LDAP
server.

Accessing company contacts through LDAP on provisioned phones
56
Try this feature on your phone. Find a directory on the phone and check the contact list.
For information on how to use your phone directory, read the manual of your phone.
Connecting to LDAP in general
1. In the administration interface, go to Provisioned Phones.
2. Click the Provisioning Settings button.
3. In the Phone Provisioning Settings dialog, select option Directory configuration is en-
abled.
4. Click Configure.
5. Fill the Directory Configuration dialog.
6. Save the settings.
7. In Provisioned Phones, click Advanced and restart all provisioned phones.
Phones read the new configuration and start to communicate directly with LDAP server.
Try this feature on your phone. Find a directory on the phone and check the contact list.
For information on how to use your phone directory, read the manual of your phone.
57
Displaying your company logo on the provisioned
phones
Summary
You can display your company logo on hardware phones supported by Kerio Operator.
What you need
• Logo — each phone firmware needs a logo in a different format.
• Phones must be provisioned.
Which type of logo do you need
1. In the administration interface, go to Provisioned Phones.
2. Click the Advanced → Logos button.
3. In the Firmwares and Logos dialog, go to tab Logos.
4. Find the firmware type installed on your phones and click Edit.
In Notes, you can find the logo parameters.

Displaying your company logo on the provisioned phones
58
Figure 1 Logo parameters in the Edit Logo dialog
Adding your logo to phones
The Kerio Operator logo is set by default and you have to change it:
1. In the administration interface, go to Provisioned Phones.
2. Click the Advanced → Logos button.
3. Find the logo type for your phone and click Edit.
4. Click Upload File and upload your logo.
5. Close the dialog.
6. In Provisioned Phones, click the Provisioning Settings button.
7. In the Phone Provisioning Settings dialog, select Display logo on the screen.
8. Save the settings.
9. Restart all phones manually.

59
Provisioning of Kerio Operator Softphone for mo-
bile devices
Softphone provisioning overview
Auto-provisioning and its functionality is described in a special article — Configuring
automatic phone provisioning.
This article describes auto-provisioning of Kerio Operator Softphone for mobile devices.
Prerequisites
• Kerio Operator must have a DNS name. Type the DNS name in the Configuration →
Network section.
To secure your Kerio Operator Softphones on Android devices,
you must have a fully qualified domain name in the SSL certificate of the
Kerio Operator server.
• Kerio Operator must use a valid SSL certificate. The certificate name must correspond
with the Kerio Operator DNS name.
For more information, see Securing Kerio Operator Softphone with SSL certificates.
Configuring provisioning for Kerio Operator Softphone
First, to users who want to use Kerio Operator Softphone, add a new extension or a new
registration of their existing extension.
Second, add users to provisioning:
1. In the administration interface, go to Configuration → Provisioned Phones → Softphones
2. Click Add.
3. In the Select User dialog, select the user who wants to use Kerio Operator Softphone.
4. Save the settings.
Third, users must configure their mobile devices and connect to Kerio Operator.

Provisioning of Kerio Operator Softphone for mobile devices
60
Securing Kerio Operator Softphone with SSL certificates
To secure your Kerio Operator Softphones, you must have one of the following SSL certificates:
• A paid SSL certificate signed by a certification authority.
These certificates do not require any further configuration.
Do not use wildcard certificates. Kerio Operator Softphone
follows the RFC 5922 standard.
• A self-signed certificate created by your Kerio Operator server.
If you use a self-signed certificate, users must download and install the certificate
manually. For more information, see Using the self-signed certificate from your Kerio
Operator server section in the Configuring Kerio Operator Softphone article.
Configuring a dial plan
Users with Kerio Operator Softphone want to use their contact list, where phone numbers are
stored in different formats. The Dial Plan translates phone numbers from the format used in
a user’s contact lists to the format that can be dialed via your Kerio Operator PBX:
1. In the administration interface, go to Provisioned Phones → Softphones.
2. Click Dial Plan Configuration.
3. Click Add to create a new rule.
4. Save the rule and click Test in the Dial Plan Configuration dialog.
5. If you need more rules, create another one.
6. Sort rules from specific to general.
Rules are applied from top to bottom.
7. Save the settings.
Creating rules
You can use the following characters when creating new rules.

16.5 Configuring a dial plan
61
Character Description
0 to 9 digits
x a single wildcard
*#+ Keyboard symbols
[ ] A collection that can include a range. For example [6-9] means 6 7 8 9. Or
[136-9] means 1 3 6 7 8 9.
. Repeat the last element 0 or more times. For example, with the pattern “12.” the
following input will match: 1 (The “2” is repeated zero times) 12, 122, 1222 and
so on
Table 1 Characters for your dial plan
Example 1: International calls from USA
Match number: +x.
Remove prefix: +
Add prefix: 011
The following image describes a scenario when you wan to call from the USA (prefix 011) to
GB (prefix +44) and outgoing prefix of your company is 9.
Figure 1 International calls from USA to GB

Provisioning of Kerio Operator Softphone for mobile devices
62
Example 2: Outgoing prefix 9
Match number: x.
Remove prefix: leave empty.
Add prefix: 9
Example 3: International calls in Europe (replacing “+” by “00”)
Match number: +x.
Remove prefix: +
Add prefix: 00

63
Configuring parameter 66 in DHCP server in Kerio
Control
What is parameter 66 in a DHCP server?
The DHCP protocol assigns IP addresses. Apart from these addresses you can also send
additional parameters via the DHCP protocol. Parameter 66 configures the TFTP server
address.
How to set parameter 66 in Kerio Control
1. In the administration interface, go to section DHCP server.
2. If you use the automatically generated scopes, use Click to configure scopes manually.
3. Select a scope and open its settings (the Edit Scope dialog).
4. Click Add.
5. Add parameter 66.
6. Type an IP address through which Kerio Operator communicates.

64
Uploading configuration files to Kerio Operator
TFTP server
Why to use phone or other device configuration file
• phone provisioning of unsupported devices (hardware phones or other devices with a
TFTP client)
• phone firmware upgrade
• BLF configuration, ring tones (different ring tones for different phones)
• password change for all extension assigned to one phone
Obtaining the configuration file
The following instructions will come in handy, if you wish to change the configuration file of
a provisioned phone:
1. In the administration interface, go to Configuration → Provisioned Phones.
2. Right-click the phone whose configuration file you wish to download.
Figure 1 Downloading the configuration
18.3 Uploading new or changed configuration files to Kerio Operator
65
3. Click Download Configuration and select the interface.
Each interface has a different configuration — different IP addresses.
4. The ZIP file with the current configuration will be automatically saved on your computer.
Uploading new or changed configuration files to Kerio Operator
What you need
The file must be uploaded via SSH using SCP.
Locate configuration files to /var/tftp
How to enable SSH in Kerio Operator
Follow these instructions:
1. In the administration interface, go to section Status → System Health.
2. Click Tasks while pressing the Shift key.
3. Select Enable SSH.
4. Connect to Kerio Operator via SCP (use for example WinSCP for Windows) and upload the
file via SSH using SCP.
For access use username root and password of a Kerio Operator administrator.

66
Connecting to VoIP service providers
Overview
Redesigned in Kerio Operator 2.4!
You can connect Kerio Operator to your VoIP service provider’s SIP server or to a standard
phone network. This article deals with the first option: connecting to a VoIP service provider.
Prerequisites
Before you configure an interface, you need to know:
• Telephone number (or numbers) from your SIP provider
• Domain/hostname of SIP server
• Username and password for authentication
• At least one internal extension defined in Kerio Operator — preferably the extension
of an employee who redirects the calls
Adding an interface
To configure an interface, you must first configure call routing. Once you configure incoming
call routing, a configuration wizard configures outgoing call routing automatically.
1. In the administration interface, go to Configuration → Call Routing and click Add SIP
interface. This opens the configuration wizard.
2. Type a name for the interface (for example, the provider’s name).
The name must not contain spaces or special characters and must be unique.
3. Select New provider.
The configuration differs for settings with one number or multiple numbers and for a SIP
trunk with an interval of phone numbers.

19.3 Adding an interface
67
One or multiple numbers
1. If you acquire one or multiple phone numbers from your provider, type the numbers in
the New provider → With external number field. You can:
• Separate individual numbers with commas (for example, 555450, 555451, 555452,
and so on)
• Type the whole range using a dash (for example, 555450-555459)
2. Click Next.
3. Select an extension that receives all calls from the provider.
4. (Optional) In the Prefix to dial out field, type a prefix for outgoing calls and click Next.
Kerio Operator uses the prefix to route calls to your provider’s SIP server. This prefix can
be the same for other providers. See Working with prefixes for outgoing calls.
5. Type the domain name or the IP address acquired from your provider.
Type the username and password if the server requires authentication.
6. Select Required to register (the majority of providers require registration to a SIP server)
and click Next.
7. Verify the information in the Summary section.
If you need to add more information from your provider (for example, outbound proxy,
inbound proxy, registrar, and so on), select the Edit details of the created interface option.
For more information, see the Configuring additional SIP details section.
8. Click Finish.
9. (Optional) Double-click the interface and enable the Send keep-alive requests every 20
seconds option.
If your SIP provider does not send keep-alive packets, or your firewall or
router has short and unchangeable NAT timeout for UDP connections, use this
option to keep the UDP session open.

Connecting to VoIP service providers
68
10. Click OK to save your changes.
11. Create a rewriting rule to correctly map numbers to internal user extensions.
Interval of numbers
1. If you acquire a SIP trunk with an interval of numbers from your provider, type an x in
place of the digits that vary (for example, 555xxx).
2. Click Next.
3. Select the extension to which you want Kerio Operator to redirect all calls to unassigned
(unused) extensions.
4. (Optional) In the Prefix to dial out field, type a prefix for outgoing calls.
Kerio Operator uses the prefix to route calls to your provider’s SIP server. This prefix can
be the same for other providers. See Working with prefixes for outgoing calls.
5. Click Next.
6. Type the domain name or the IP address acquired from your provider.
Type the username and password if the server requires authentication.
7. Select the Required to register option if the provider requires registration. With large
number intervals, some providers do not require registration. Instead they use the IP
address of your Kerio Operator. The address must be static and the provider needs to
know about any changes that may occur.
8. Verify the information in the Summary section.
If you need to add more information from your provider (for example, outbound proxy,
inbound proxy, registrar, and so on), select the Edit SIP details of created interface option.
For more information, see the Configuring additional SIP details section.
9. Click Finish.
10. Create a rewriting rule to correctly map numbers to internal user extensions.

19.4 Configuring additional SIP details
69
Configuring additional SIP details
To set additional settings in your interface for incoming and outgoing calls:
1. In the administration interface, go to Configuration → Call Routing → Interfaces and
routing of incoming calls, select a SIP interface and click Edit.
2. On the SIP Details tab, you can:
• Type addresses to outbound proxy, inbound proxy and registrar (Kerio Operator
uses domain by default)
• Change the transport protocol
• Change the DTMF method
• Type an authentication username (Kerio Operator uses the SIP username by
default)
• Change outgoing headers
3. Click OK to save your changes.

Connecting to VoIP service providers
70
Figure 1

19.5 Configuring DTMF method
71
Configuring DTMF method
New in Kerio Operator 2.4!
For some SIP providers, the default configuration of DTMF detection, Auto (RFC 2833 / In-
band), does not work. You must find out the correct method from your SIP provider and
configure it manually, as follows:
1. In the administration interface, go to Configuration → Call Routing → Interfaces and
routing of incoming calls.
2. Select a SIP interface and click Edit.
3. Go to the SIP Details tab.
4. Select the correct DTMF method.
5. Click OK.
Figure 2
Configuring outgoing headers
New in Kerio Operator 2.4!
For some providers, you must add additional configuration to the SIP headers they provide.
To configure outgoing headers:
1. In the administration interface, go to Configuration → Call Routing → Interfaces and
routing of incoming calls.
2. Select a SIP interface and click Edit.
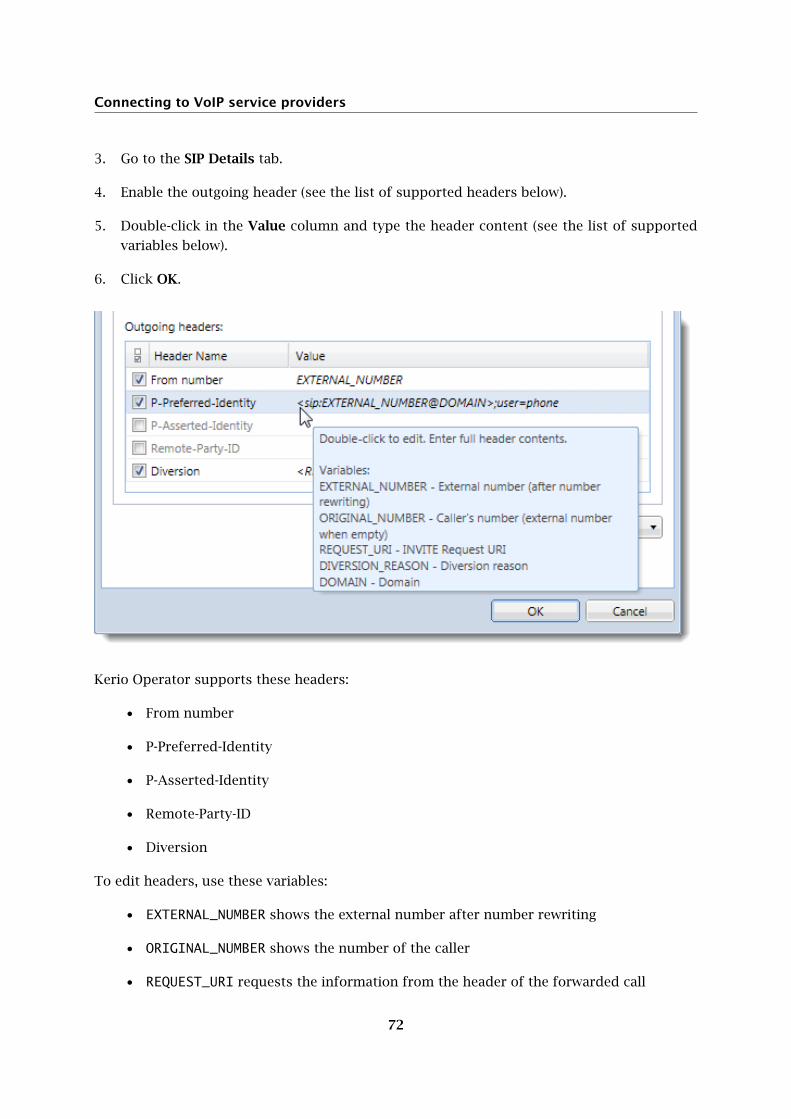
Connecting to VoIP service providers
72
3. Go to the SIP Details tab.
4. Enable the outgoing header (see the list of supported headers below).
5. Double-click in the Value column and type the header content (see the list of supported
variables below).
6. Click OK.
Kerio Operator supports these headers:
• From number
• P-Preferred-Identity
• P-Asserted-Identity
• Remote-Party-ID
• Diversion
To edit headers, use these variables:
• EXTERNAL_NUMBER shows the external number after number rewriting
• ORIGINAL_NUMBER shows the number of the caller
• REQUEST_URI requests the information from the header of the forwarded call

19.6 Configuring outgoing headers
73
• DIVERSION_REASON sends the reason of the call forwarding
• DOMAIN shows the domain of the interface
If you forward your calls, you can send the original number in the Diversion header:
1. In the administration interface, go to Configuration → Call Routing → Interfaces and
routing of incoming calls.
2. Select a SIP interface and click Edit.
3. Go to the SIP Details tab.
4. Enable the Diversion header.
This option is enabled by default.
5. (Optional) Double-click in the Value column and type the header content.
6. Click OK
If your providers support and work with Diversion header, they can send the receiver
information about call forwarding.
If your device supports this information, you can see, for example, a different icon or both
numbers on your display.
Reading the Caller ID from outgoing headers
New in Kerio Operator 2.4.4!
If your provider does not send the information about calling or called numbers in default
headers (From for calling number and Request-Line for called numbers), you can configure
Kerio Operator to read this information from different headers (for example, P-Asserted-
Identity):
1. In the administration interface, go to Configuration → Call Routing → Interfaces and
routing of incoming calls.
2. Select a SIP interface and click Edit.
3. Go to the SIP Details tab.
4. For the fields Read calling number from and Read called number from, select a new
header.
5. Click OK to save your settings.

Connecting to VoIP service providers
74
Resolving domain names of SIP providers
Your SIP providers may change their IP address for your registration without prior notice.
To avoid inaccessibility, configure Kerio Operator to periodically resolve domain names and
renew the registration:
1. In the administration interface, go to Call Routing → Interfaces and routing of incoming
calls.
2. Select a SIP interface and click Edit.
3. Go to the SIP Details tab.
4. Select the Periodically resolve domain names option.
5. Click OK.
Kerio Operator now periodically resolves domain names of your SIP provider and renews your
registration whenever the IP address changes.
Mapping of numbers
See the Mapping external and internal numbers article for more information.

75
Mapping external and internal numbers
Overview
Redesigned in Kerio Operator 2.4!
In Kerio Operator you can map external numbers to internal extensions. You can:
• Strip the first 0-n digits from the number, including reducing the number to an empty
string
• Add other digits to the beginning of the number
Routing incoming calls
In Kerio Operator, you can use rewriting rules to map numbers for SIP and standard phone
interfaces. Depending on your provider’s requirements, you may need to strip out or change
numbers
Example:
• A company has 100 phone numbers from a telephone provider.
• For incoming calls, the provider sends the whole number.
• For outgoing calls, the provider requires the whole number.
• Internal extensions have the format 2xx.
• The prefix for outgoing calls is 9.
When external Phone A (with the number 5550399) calls internal Phone B (with the number
5550101 and the internal extension 201):
1. Phone A dials Phone B’s number and a signal goes to the provider.
2. The provider sends the number to Kerio Operator.
3. The rewriting rule strips five digits from the left and adds the prefix 2.
4. The call connects.
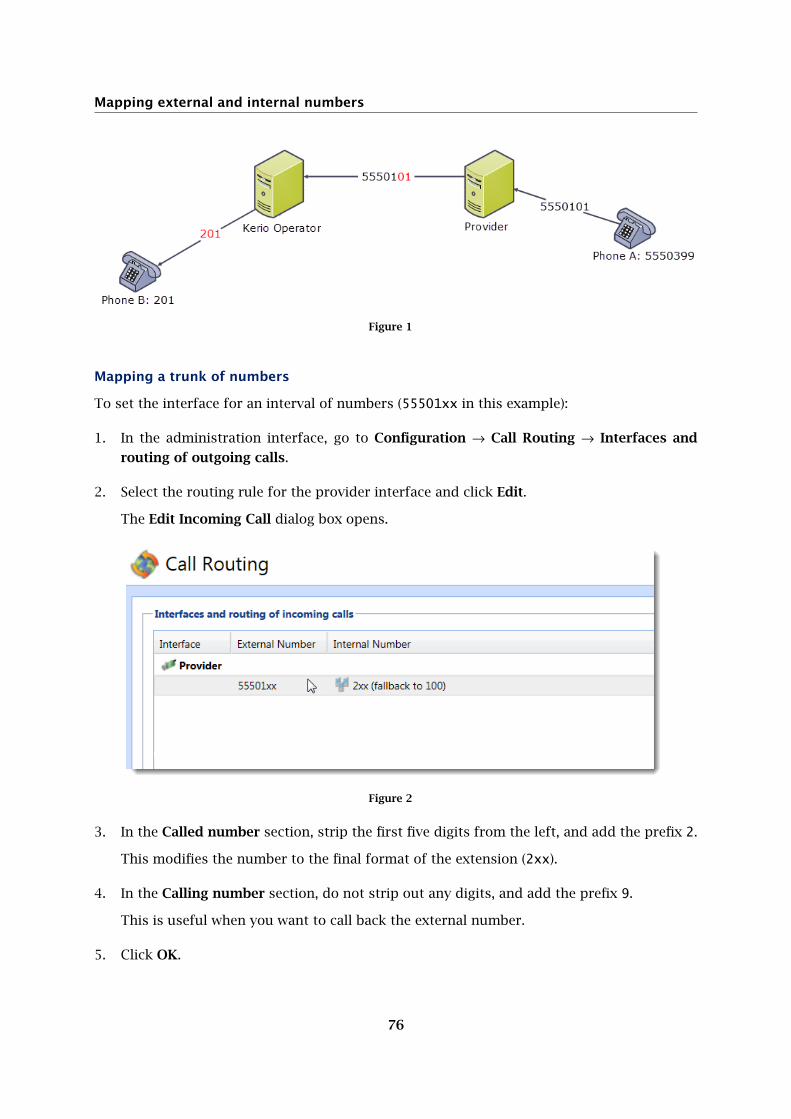
Mapping external and internal numbers
76
Figure 1
Mapping a trunk of numbers
To set the interface for an interval of numbers (55501xx in this example):
1. In the administration interface, go to Configuration → Call Routing → Interfaces and
routing of outgoing calls.
2. Select the routing rule for the provider interface and click Edit.
The Edit Incoming Call dialog box opens.
Figure 2
3. In the Called number section, strip the first five digits from the left, and add the prefix 2.
This modifies the number to the final format of the extension (2xx).
4. In the Calling number section, do not strip out any digits, and add the prefix 9.
This is useful when you want to call back the external number.
5. Click OK.
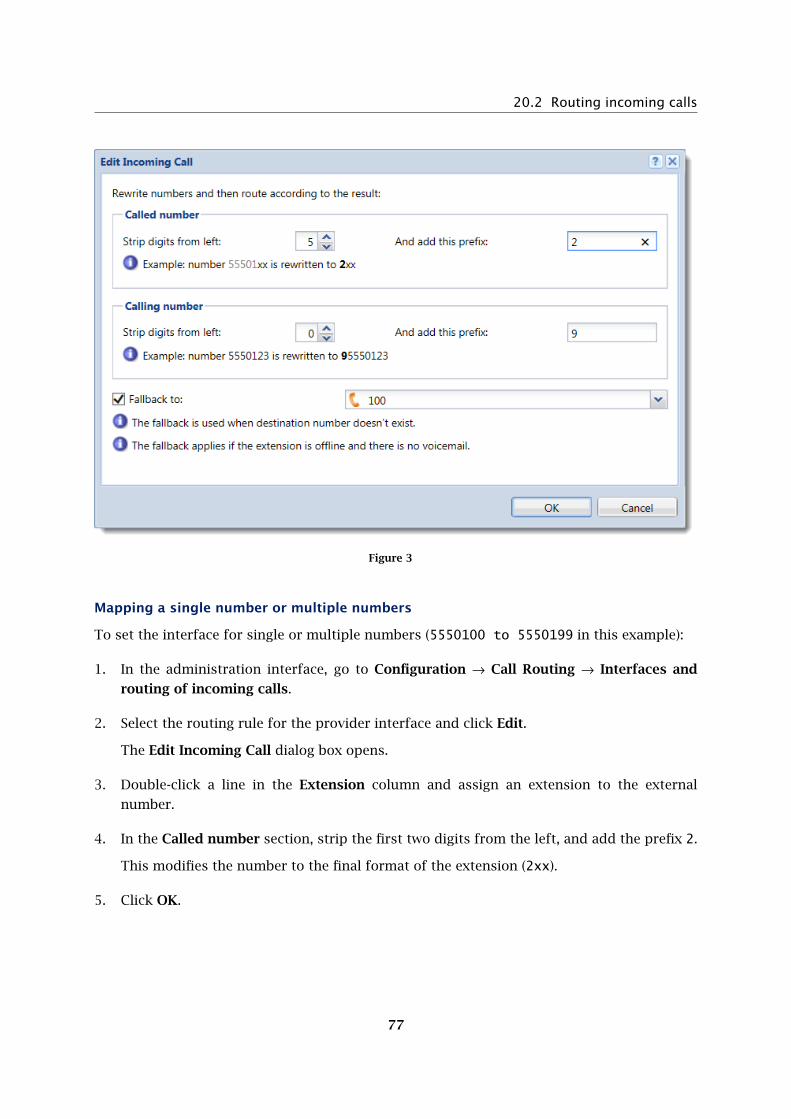
20.2 Routing incoming calls
77
Figure 3
Mapping a single number or multiple numbers
To set the interface for single or multiple numbers (5550100 to 5550199 in this example):
1. In the administration interface, go to Configuration → Call Routing → Interfaces and
routing of incoming calls.
2. Select the routing rule for the provider interface and click Edit.
The Edit Incoming Call dialog box opens.
3. Double-click a line in the Extension column and assign an extension to the external
number.
4. In the Called number section, strip the first two digits from the left, and add the prefix 2.
This modifies the number to the final format of the extension (2xx).
5. Click OK.

Mapping external and internal numbers
78
Figure 4
Routing outgoing calls
You can configure outgoing calls when creating an interface, either SIP or hardware cards.
For rewriting the numbers, you need additional configuration.
Example:
• External Phone A has the number 5550199.
• Internal Phone B has the number 5550101 and the internal extension 201.
• For outgoing calls, Kerio Operator uses the prefix 9.
• The provider needs the whole number for outgoing calls.
Figure 5

20.3 Routing outgoing calls
79
When Phone B calls Phone A:
1. Phone B dials the number with the 9 prefix (95550199).
2. Kerio Operator uses rewriting rules and strips out the first digit (9).
The number Kerio Operator sends to the provider is 5550199.
3. The provider connects to Phone A.
To achieve this configuration:
1. In the administration interface, go to Configuration → Call Routing → Routing of outgo-
ing calls.
2. Select an interface and click Edit.
The Edit Outgoing Route dialog box opens.
3. In the Called number section, strip one digit from left and do not add a prefix.
4. Click OK.
Figure 6
Rules for outgoing calls
You can configure rules for outgoing calls:
1. In the administration interface, go to Configuration → Call Routing → Routing of outgo-
ing calls.
2. Select an interface and click Edit.
3. In the Calling number (Caller ID) section, select one of these options:

Mapping external and internal numbers
80
• Map extensions to external numbers based on routing of incoming calls if you
want to use a table of external numbers configured for the provider
• Assign the default number to all extensions if you want to use a default number
for all extensions
• Rewrite extension numbers (default number not used) if you want to rewrite
numbers in a specific way
Figure 7
Exceptions to the outgoing routes
To create an exception:
1. In the administration interface, go to Configuration → Call Routing → Routing of outgo-
ing calls.
2. Select an interface and click Edit.
3. Enable the Use route only for numbers defined in exceptions option.
4. Click the Exceptions tab and click Add.
5. To change the internal number, double-click the displayed extension and select a new
extension.
6. To change the external number, double-click the displayed number and select a new
number.
7. If you want to hide this extension’s number so the call recipient cannot see it, select the
box in the Hide Caller ID column (see Displaying, hiding and overriding phone numbers
for more details).
8. Click OK.

20.3 Routing outgoing calls
81
Figure 8
Working with prefixes for outgoing calls
New in Kerio Operator 2.4!
Kerio Operator works with prefixes for outgoing calls in a specific schema and you can use
one prefix for multiple providers. Kerio Operator uses the longest prefix matching the dialed
number. If that dial attempt fails, Kerio Operator tries the next route with the same prefix.
Example
• Use the prefix 011 for two providers (provider1 and provider2) and the prefix 0 for
outgoing calls.
• Dials the number 011 234 567.
After dialing this number:
1. Kerio Operator goes through the Routing of outgoing calls table and tries to match the
prefix.
2. Kerio Operator finds two matching prefixes, 0 and 011, and uses the longest prefix.
3. Kerio Operator tries the 011 prefix to connect to provider2.

Mapping external and internal numbers
82
Figure 9
4. If the connection does not work, Kerio Operator uses the same prefix to connect to
provider1.
5. If the connection still does not work, Kerio Operator does not try to use the last prefix (in
this example, the 0 prefix), and the call fails.
Changing the order of prefixes
New in Kerio Operator 2.4!
Kerio Operator works with providers for the same prefix in order from top to bottom. You
can change that order by the using arrows on the right side of the administration interface to
move it up or down.

20.3 Routing outgoing calls
83
Figure 10
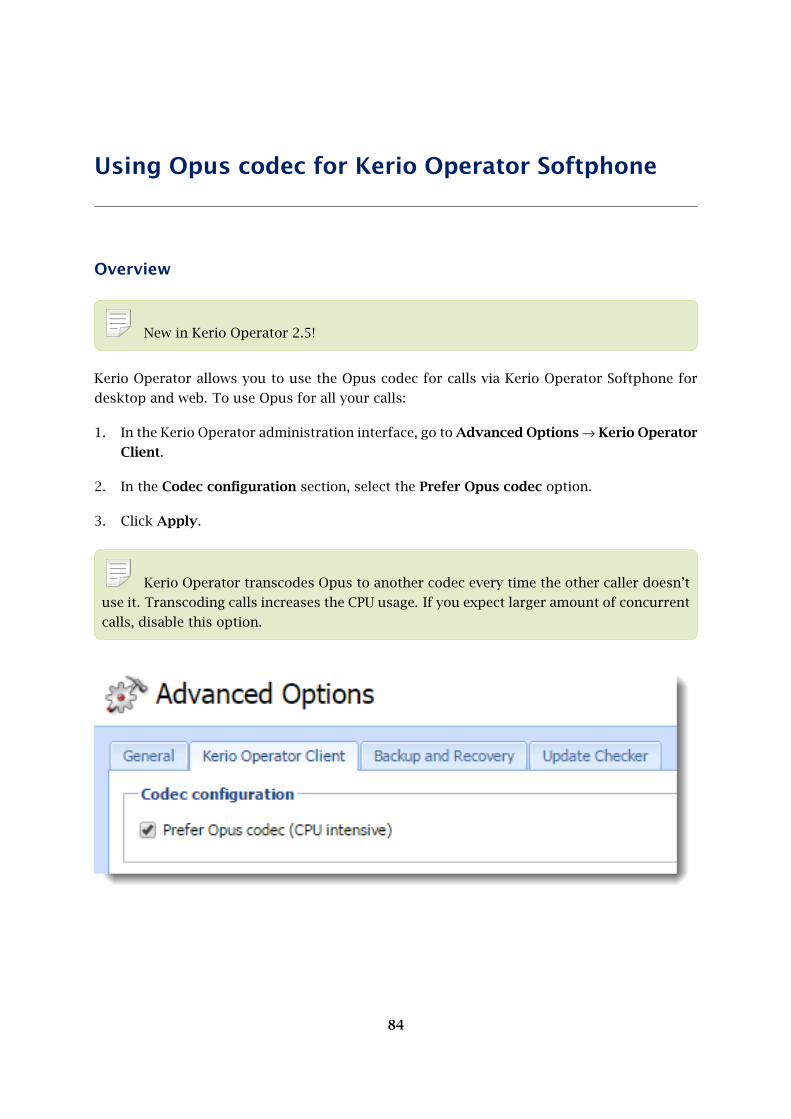
84
Using Opus codec for Kerio Operator Softphone
Overview
New in Kerio Operator 2.5!
Kerio Operator allows you to use the Opus codec for calls via Kerio Operator Softphone for
desktop and web. To use Opus for all your calls:
1. In the Kerio Operator administration interface, go to Advanced Options → Kerio Operator
Client.
2. In the Codec configuration section, select the Prefer Opus codec option.
3. Click Apply.
Kerio Operator transcodes Opus to another codec every time the other caller doesn’t
use it. Transcoding calls increases the CPU usage. If you expect larger amount of concurrent
calls, disable this option.

85
Connecting multiple Kerio Operators
Overview
Redesigned in Kerio Operator 2.4!
In Kerio Operator, you can connect multiple Kerio Operator servers. This enables you to
directly reach remote phones by their extensions for free and send or receive external calls
through a relay server.
The section below describes how to connect these two servers:
• The main server, which has internal extensions 100 — 199
• The branch server, which has internal extensions 300 — 399

Connecting multiple Kerio Operators
86
For more information about routing of calls between Kerio Operator servers and the
PSTN, see Routing calls between multiple Kerio Operators and the PSTN.
Prerequisites
Before the start of the configuration, you need:
• Two Kerio Operator servers up and running
• Extension schemes for both phone networks, each of which has a unique set of
extensions
• Both servers with public IP addresses or connected to the same network with a VPN
tunnel
Connecting servers
On each Kerio Operator server, add a SIP interface for the other server.
1. In the administration interface, go to Configuration → Call Routing → Interfaces and
routing of incoming calls.
2. Click Add SIP interface.
The Add SIP Interface dialog box opens.
3. Type a name for the interface and select Link to another PBX (without an external num-
ber).
4. Click Next.
5. In the Prefix to reach the other PBX field, type the appropriate number:
• On the main server, type the prefix 3 (the first digit of each extension on the
branch server)
• On the branch server, type the prefix 1 (the first digit of each extension on the
main server)
6. Click Next.
7. In the Domain (IP address/hostname) field, type the domain or the IP address:
• On the main server, type the IP address of the branch server.
• On the branch server, type the IP address of the main server.

22.3 Connecting servers
87
8. Disable the Required to register option.
9. Click Next.
10. Verify the information in the Summary section.
11. Click Finish.
After the configuration of interfaces, Kerio Operator creates incoming and outgoing routes
that use configured prefixes. These routes do not rewrite any numbers. Make test calls
between the connected servers to reach their extensions.
Example of a test call
Call number 305 from extension 110 on the main server:
1. The user with an extension 110 dials number 305.
2. Kerio Operator on the main server recognizes the prefix 3 and routes the call to the branch
server.
3. The call arrives at the branch server and rings on the 305 extension.
88
Routing calls between multiple Kerio Operators and
the PSTN
Overview
Redesigned in Kerio Operator 2.4!
This article describes how to:
• Reach the public switched telephone network (PSTN) from your connected Kerio
Operator servers
• Route incoming calls from the PSTN to your branch servers
For more information about connecting multiple Kerio Operator servers, see
Connecting multiple Kerio Operators.
The sections below use the following example:
• Two connected Kerio Operator servers up and running:
• The main server, which has internal extensions 100 — 199
• The branch server, which has internal extensions 300 — 399
• Outgoing calls from the branch server to the PSTN go through the main server.
• Incoming calls from the PSTN to the branch server go through the main server.
• The prefix for outgoing calls to the PSTN is 0.
• External numbers from the SIP provider have the format 555 5xxx.

23.2 Calling to the PSTN through the main server
89
Calling to the PSTN through the main server
To call to the PSTN via the interface of the main server:
• Configure the interface on the main server.
• Create an outgoing route on the branch server.
In the administration interface of the main server:
1. Go to Configuration → Call Routing → Interfaces and routing of incoming calls.
2. Double-click the interface for the branch server.
3. Go to the Advanced tab.
4. Select the Allow incoming calls to use outgoing routes option.
5. Click OK.

Routing calls between multiple Kerio Operators and the PSTN
90
In the administration interface of the branch server:
1. Go to Configuration → Call Routing → Routing of outgoing calls.
2. Click Add.
3. Type the prefix for outgoing calls of the main server (0 in our example)
4. Select the interface of the main server.
5. Click OK.
Make a test call to reach a number in the PSTN from the branch server.
Example of a test call
Call 555-9999 from extension 305:
1. The user with an extension 305 dials the number 0-555-9999.
2. Kerio Operator on the branch server recognizes the prefix 0 and routes the call to the main
server.

23.3 Routing incoming calls from the PSTN to the branch server
91
3. The call arrives at the main server.
4. Kerio Operator on the main server recognizes the prefix 0 and strips the prefix off.
5. The main server routes the call to the SIP provider.
Routing incoming calls from the PSTN to the branch server
To route incoming calls to the branch server:
• If you have separate numbers, use speed dial extensions
• If you have a trunk of numbers, rewrite called numbers to match the internal
extensions of the branch server
Using speed dial extensions
To use speed dial extensions:
1. Create a speed dial extension (9305 in the example) that dials an extension of the branch
server (305 in the example).

Routing calls between multiple Kerio Operators and the PSTN
92
For more details, see Creating and using speed dial.
2. Go to Call Routing and double-click the interface for the branch server.
3. Go to the Advanced tab.
4. (Optional) To enable users to return calls, select Do not substitute the calling number
when forwarding calls and click OK.
This option also displays the caller ID of the caller instead of the number of the speed dial
extension.
5. Double-click the number from your provider that you want to map.
6. In the Route incoming calls to field, select the speed dial extension and click OK.
7. Repeat steps 1—6 for all extensions you want to map to the branch server.
From now on, Kerio Operator uses the speed dial extension for all incoming calls that reach
the external number and routes the call to extension 305 of the branch server.
Make a test call to reach an extension on the branch server.
Example of a test call
Call 555-5305 from 555-9999:
1. Caller dials the number 555-5305.
2. The call arrives at the main server.
3. Kerio Operator routes the call to the 9305 extension and then to 305.
4. The main server recognizes the prefix 3 and routes the call to the branch server.
5. The call arrives at the branch server and rings on the 305 extension.

23.3 Routing incoming calls from the PSTN to the branch server
93
Using number rewriting
To rewrite called numbers from your trunk and route them to the branch server:
1. In the administration interface of the main server, go to Configuration → Call Routing →
Interfaces and routing of incoming calls.
2. Double-click the interface for the branch server.
3. Go to the Advanced tab.
4. (Optional) To enable users to return calls, select Do not substitute the calling number
when forwarding calls and click OK.
This option also displays the caller ID of the caller instead of the number of the speed dial
extension.
5. Double-click the interface for your provider.
6. Go to the Advanced tab.
7. Enable the Allow incoming calls to use outgoing routes option.
8. Double-click the trunk of numbers to verify that Kerio Operator rewrites the called number
correctly.

Routing calls between multiple Kerio Operators and the PSTN
94
9. Click OK.
After configuring the interface, make a test call to reach an extension on the branch server
from the PSTN.
Example of a test call
Call 555-5310 from 555-9999:
1. Caller dials the number 555-5310.
2. The call arrives at the main server.
3. Kerio Operator matches the call to a SIP interface and strips off the first four digits of the
number.
4. The call automatically uses the outgoing route with the prefix 3 and arrives to the branch
server.
5. The call rings on the 310 extension.

95
Configuring standard phone interfaces
Overview
Redesigned in Kerio Operator 2.4!
You can connect Kerio Operator to your provider using hardware cards.
You can use the card distributed with Kerio Operator Box series 3000 or you can use your own
card and connect it to your Kerio Operator server.
Supported cards
Kerio Operator supports the following cards:
• PRI card — The number of concurrent calls varies depending on whether you have a
contract with an American or European provider:
• T1 (in the USA) allows 23 concurrent calls.
• E1 (in the EU) allows 30 concurrent calls.
• BRI card — Has four ports, each of which can operate two concurrent calls.
• FXO card — Has four ports each of which can operate only one call at a time.
For a specific list of supported cards, see the Supported Phone Cards section on the Kerio
website.
Prerequisites
Before you configure an interface, you need to know:
• Telephone number (or numbers) from your telephone provider
• (PRI/BRI only) Which ISDN type to use for communication. This usually differs by your
location: for example, EuroISDN for the EU, Nation ISDN Type 2 for the USA, and so
on)
• Whether your provider requires overlap dialing

Configuring standard phone interfaces
96
• Whether the provider sends or requires whole or abbreviated telephone numbers. See
the Mapping external and internal numbers article for details.
• At least one internal extension defined in Kerio Operator (for example, the extension
of an employee who redirects the calls).
Configuring interfaces
After connecting a card, configure the interface:
1. In the administration interface, go to the section Configuration → Call Routing.
The Interface and routing of incoming calls table shows one of the following, depending
on your card:
• PRI card: one standard telephone interface
• BRI or FXO card: four interfaces (one for each of the four ports)
2. Double-click an unconfigured interface.
The configuration wizard opens.
3. Type a name for the interface (for example, your provider’s name).
The name must not contain spaces or special characters and must be unique.
One or multiple numbers
1. If you acquire one or multiple phone numbers from your provider, type the numbers in
the New provider → With external number field. You can:
• Separate individual numbers with commas (for example, 555450, 555451, 555452,
and so on)
• Type the whole range using - (for example, 555450-555459)
2. Click Next.
3. Select an extension to receive all calls from the provider.
4. (Optional) In the Prefix to dial out field, type a prefix for outgoing calls.
Kerio Operator uses the prefix to route calls to your provider. This prefix can be same for
other providers. See Working with prefixes for outgoing calls
5. Click Next.

24.4 Configuring interfaces
97
6. (PRI and BRI only) Select the Switch type in the dialog box:
• If you are in the EU, select the EuroISDN option
• If you are in the USA, select the National ISDN Type 2 option
7. Click Next.
8. Verify the information in the Summary section.
If you need to add more information from your provider select the Edit details of created
interface option. For more information, see the Configuring additional details for an
interface section.
9. Click Finish.
10. Create a rewriting rule to correctly map numbers to internal user extensions.
Interval of numbers
1. If you acquire a trunk with an interval of numbers from your provider, type the numbers
in the New provider → With external number field.
Use x in place of the numbers that vary (for example, 555xxx).
2. Click Next.
3. Select an extension to which you want Kerio Operator redirect all calls to unassigned
(unused) extensions.
4. (Optional) In the Prefix to dial out field, type a prefix for outgoing calls.
Kerio Operator uses the prefix to route calls to your provider. This prefix can be same for
other providers. See Working with prefixes for outgoing calls
5. Click Next.
6. (PRI and BRI only) Select the Switch type in the dialog box:
• If you are in the EU, select the EuroISDN option
• If you are in the USA, select the National ISDN Type 2 option
7. Click Next.
8. Verify the information in the Summary section.
If you need to add more information from your provider select the Edit details of created
interface option. For more information, see the Configuring additional details for an
interface section.

Configuring standard phone interfaces
98
9. Click Finish.
10. Create a rewriting rule to correctly map numbers to internal user extensions.
Overlap dialing
Some telephone providers require telephone numbers as a whole, others require the telephone
numbers one digit at a time. Ask your provider about their requirements. Follow these steps
to configure the interface:
1. In the administration interface, go to the section Configuration → Call Routing.
2. Select an interface and click Edit.
The Edit External Interface dialog opens.
3. Go to Interface Card.
4. Select the Overlap dialing option.
5. Click OK.
Configuring additional details for an interface
To set additional settings in your interface for incoming and outgoing calls:
1. In the administration interface, go to Configuration → Call Routing → Interfaces and
routing of incoming calls.
2. Select an interface and click Edit.
3. On the Interface Card tab, change the interface settings.
See the following chapters for details.
4. Click OK.
If you select the Edit details of the created interface option on the last page of the
interface configuration wizard, this dialog box displays automatically.

24.6 Configuring additional details for an interface
99
Figure 1
Adjusting audio gain for standard phone interfaces
New in Kerio Operator 2.4!
To adjust audio gain:
1. In Configuration → Call Routing → Interfaces and routing of incoming calls, select an
interface and click Edit
2. Go to the Interface Card tab.
3. Set Rx gain [db].
4. Set Tx gain [db].
5. Click OK.

Configuring standard phone interfaces
100
Figure 2
Configuring Type of number (TON)
New in Kerio Operator 2.4!
Some providers send a stripped number with additional information about the type of the
number. Kerio Operator can read these types and assign a prefix to the stripped number.
To configure prefixes for Type of number (TON):
1. In Configuration → Call Routing → Interfaces and routing of incoming calls, select an
interface and click Edit.
2. Go to the Interface Card tab.
3. Click Configure next to Type of number (TON).
4. Type the prefixes you want to set.
5. Click OK.

24.6 Configuring additional details for an interface
101
Figure 3
Increasing sensitivity of the DTMF detection
New in Kerio Operator 2.4!
To enable this option:
1. In Configuration → Call Routing → Interfaces and routing of incoming calls, select an
interface and click Edit.
2. Go to the Interface Card tab.
3. Select Increase sensitivity of the DTMF detection.
4. Click OK.

Configuring standard phone interfaces
102
Mapping of numbers
See the Mapping external and internal numbers article for more information.

103
Configuring and using conferences
Telephone conferences overview
Telephone conference is one telephone call of three or more users.
Telephone conferences allow participation of Kerio Operator users and external participants.
To join a conference, participants must dial the conference number and PIN.
You can use two different types of conferences — statically or dynamically configured.
Statically configured conference
Statically configured means that conferences are created in the administration interface and
each new conference uses one extension.
If there is a lack of extensions, use dynamically configured conferences instead.
Configuring statically configured conferences
1. Go to section Status → Dial Plan and make sure that the extension you have selected for
the conference is not used.
2. In Configuration → Conferences, click Add. The Add conference dialog is dispayed.
3. Enter the conference extension and its description.
4. In the menu Conference type, choose the Statically configured option.
5. Optional: Limit the number of participants.
6. Each conference can be protected by a PIN required from all participants upon attempting
to enter the conference. If you wish to secure a conference, set a PIN and deliver it to the
members.
7. To enable call recording, select Record Calls.
Please note that call recording is a subject to special laws in many
countries. It maybe illegal in your jurisdiction or require notice to the other party
on the call. Accordingly, you assume all liability for using the call recording
functions and are responsible for notifying all users of this system of this
potential restriction, if applicable.

Configuring and using conferences
104
Connecting to a statically configured conference
1. Dial the conference telephone number / extension.
2. If the conference is protected, you will be asked to enter the PIN.
To leave the conference, simply terminate the call.
Dynamic conferences
A dynamic conference is created on one extension only. Users set the conference number and
PIN after dialing the extension or the whole telephone number. On one extension, users can
set unlimited number of conferences with different conference numbers.
The disadvantage of dynamic conference is that user has to enter three numbers when dialing
the conference (the extension, the conference number and the PIN).
Configuring dynamic conferences
1. Go to Status → Dial Plan and make sure that the conference extension is not used by a
user.
2. In Configuration → Conferences, click Add. The Add conference dialog is dispayed.
3. Enter the conference extension and its description.
4. In the Conference type menu, choose option Dynamic, created on demand.
5. To enable call recording, select Record Calls.
Please note that call recording is a subject to special laws in many
countries. It maybe illegal in your jurisdiction or require notice to the other party
on the call. Accordingly, you assume all liability for using the call recording
functions and are responsible for notifying all users of this system of this
potential restriction, if applicable.
Connecting to a dynamic conference
To connect to an existing conference, enter the conference number and PIN (if required).
Creating a dynamic conference
1. Dial the conference telephone number / extension.
2. Enter any number for the conference.

25.4 Where to monitor conference activities
105
3. Set PIN (if required).
4. Communicate these access numbers (extension, conference number and PIN) to other
attendees.
To leave the conference, simply terminate the call.
Where to monitor conference activities
All current calls can be viewed under Status → Conferences.

106
Configuring call queues
Call queues overview
Call queues are used to distribute incoming calls between agents.
Figure 1 Call queue
Configuring call queues
1. In the administration interface, go to Configuration → Call Queues.
2. Click Add to open the Add Call Queue dialog. On the General tab, type the new queue
extension number.
3. Select the queue strategy.
4. Click the Agents tab.
5. If you want your agents to log in dynamically, type login and logout code. For example,
12345 to login, and 54321 to logout. The calls will only go to agents logged into the queue.
If you want to assign specific agents permanently to the queue, click Add to select their
extensions.

26.3 How to select a queue strategy
107
Both methods can be combined. One queue may have agents who are
assigned permanently and agents who log in dynamically.
6. Click the Announcements tab.
An announcement is a pre-recorded message that callers hear while waiting in a call queue.
You can import pre-recorded announcements into Kerio Operator (see article Language
settings in Kerio Operator) or record them by going to Configuration → PBX Services →
Record audio (see article Using PBX services).
How to select a queue strategy
• Round robin with memory mode uses circular call distribution. It remembers the last
agent who answered the phone, and new calls are directed to the next agent in the
round queue.
• Ring all agents — calls always ring at all agents until one of them answers the
particular call.
• Ring least recently called agent — the system selects the agents who have not
answered the phone for the longest period.
• Ring agent with fewest calls — the system assigns the call to the agent with the lowest
number of calls answered so far.
• Ring random agent — if you select this option, the system will choose an agent
randomly.
• Ring in order — only for permanently assigned agents. You specify a fixed order
in which they are always selected. This strategy is for companies where all calls
are answered by a receptionist. In case the receptionist is not answering, the call
is directed to the next agent in order (for example, an administration assistant).
What is the difference between permanently assigned and dynamic agents
• Permanent assignment — agent’s extension is assigned permanently to the queue.
• Dynamic login — agents use special code for logging in and out of the queue.

Configuring call queues
108
Recording calls from call queues
Kerio Operator allows recording calls from call queues. No other module or equipment is
necessary. Setting can be done as follows:
1. Open the Configuration → Call Queues section and select the queue in which you wish to
record the calls.
2. On the General tab, select Record calls.
To play back recorded calls
Please note that call recording is subject to special laws in many countries. It
may not be legal in your jurisdiction, or may require notice to the other party on the
call. Accordingly, you assume all liability for using the call recording functions and are
responsible for notifying all users of this system of this potential restriction, if applicable.
Section Status → Recorded Calls displays all calls recorded from call queues. Select a call to
listen to it, download it to your computer or remove it.
Deleting Recorded Calls
Recorded calls can be periodically deleted once their total size reaches a certain limit. The
limit can be set in section Status → Recorded Calls.
1. Click Advanced → Periodically Remove Old Recorded Calls.
2. In Remove Old Recorded Calls dialog box, enter the maximum size of recorded calls on
a disk (in MB).
Configuring a call queue timeout
The call queue timeout period determines the maximum amount of time a caller can be placed
in a call queue. Configuring the limit prevents from waiting in a queue infinitely.
The timeout limit is unlimited by default. For setting the limit, perform these steps:
1. In administration, go to Configuration → Call Queues.
2. Click Add/Edit.
3. On tab General, set Queue timeout.
4. (Optional) Go to tab Announcements and select Timeout announcement. Such
announcement will play when the limit is reached and should include information about
what happens next (tab Exceptions).
26.7 Configuring a music on hold and a while waiting period
109
5. Go to tab Exceptions.
6. Choose an action for exceeded limit:
• Callers receive a busy signal — if announcement was set, recording plays before
call termination.
• Forward to — type an extension. Kerio Operator forwards callers to the extension.
If announcement was set, recording plays.
7. Save the settings.
Timeout is configured. If you want to check your settings, lower the limit to several seconds
and dial the queue from several phones.
Configuring a music on hold and a while waiting period
A while waiting period is the period when users are waiting in a call queue for an agent. You
can set what is playing during the period:
1. In administration, go to Configuration → Call Queues.
2. Click Add/Edit.
3. On tab General, select While waiting:
• Music on hold — a music sounds during the while waiting period.
• Ringtone — a ringtone sounds during the while waiting period.
4. If you selected the Music on hold option, select the particular recording in the Music on
hold menu.
If you want to add a new recording to Kerio Operator, go to the Definitions → Music on
Hold section.
5. Save the settings.
Configuring a queue length
A queue length determines max. number of callers in the queue at the same time. Configuring
the limit prevents from waiting too long in the queue.
The queue length is unlimited by default. For setting the limit, perform these steps:
1. In administration, go to Configuration → Call Queues.
2. Click Add/Edit.

Configuring call queues
110
3. On tab General, set Queue length.
4. (Optional) Go to tab Announcements, select Full queue announcement. Such
announcement will play when the limit is reached and should include information about
what happens next (tab Exceptions).
5. Click the Exceptions tab.
6. Select an action for exceeded limit:
• Callers receive a busy signal — if an announcement was set, recording plays
before a call is terminated.
• Forward to — type an extension. Kerio Operator forwards callers to the extension.
If an announcement is set, Kerio Operator plays the recording.
7. Save the settings.
The queue length is configured. If you want to check your settings, lower the limit to 1 and
dial the queue from two phones.
Configuring exit keys
You can set exit keys for each call queue. Callers can use an exit key for transfer to an
extension.
1. In administration, go to Configuration → Call Queues.
2. Click Add/Edit.
3. On tab General, click Edit next to Exit keys.
4. Edit Exit Keys, click Add.
5. In the Add Exit Key dialog, type an exit key (for example 1).
6. Type an existing extension to transfer calls.
7. Type a description.
8. Save the settings.
When users standing in the queue use the exit key, they are transferred to pre-configured
extension.

26.10 Configuring call queues without agents
111
Configuring call queues without agents
Follow these steps if no agents are logged into the queue:
1. In administration, go to Configuration → Call Queues.
2. Click Add/Edit.
3. (Optional) Go to the Announcements tab, select No agents announcement. Kerio
Operator plays the announcement when there are no agents in the queue.
4. Go to tab Exceptions.
5. Select an action if the queue has no agents:
• Callers cannot join the queue. Callers already waiting are removed — Kerio
Operator disconnects all callers. If No agents announcement is selected, Kerio
Operator plays the recording.
• Callers can join the queue — new callers can connect to the queue. Current callers
stay in the queue. If No agents announcement is selected, Kerio Operator plays
the recording.
• Callers cannot join the queue — new callers cannot connect to the queue. Current
callers stay in the queue. If No agents announcement is selected, Kerio Operator
plays the recording.
6. If you selected Callers cannot join the queue or Callers cannot join the queue. Callers
already waiting are removed, select one of these actions:
• Callers receive a busy signal
• Forward to — type an extension or external phone number. Kerio Operator
forwards callers to the number.
7. Save the settings.
Settings are complete now. If you want to check your configuration, test these cases:
1. No agent serves the queue. Try to join the queue as a caller.
2. One agent serves the queue. Join the queue as a caller. Agent logs out.

Configuring call queues
112
Prioritizing call queues
Agents can operate several call queues. In the following example, an agent is assigned to three
queues.
Figure 2 Operating multiple queues at once
To help agents identify the queues, you can upload various audio records for each queue. The
record identifying the queue is played to the agent before a call from this queue is connected.
Upload new audio record as follows:
1. Select a call queue or create a new one in section Configuration → Call Queues.
2. In the displayed dialog, go to the Announcements tab.
3. Check the Help agents identify the source queue by playing this announcement and
click on Select.
4. In the Select Audio File dialog box, double-click a record to select it, or upload your own
record to Kerio Operator (it must be in WAV or GSM format). Use the Upload button.
It is also possible to set priorities for individual queues:
1. Open the Configuration → Call Queues section.
2. Select a queue or create a new one.

26.12 Displaying missed calls on phones in call queues
113
3. In the displayed dialog, go to the General tab and set the desired priority.
4. Repeat the configuration for other queues.
Queues with higher priority are processed first.
Displaying missed calls on phones in call queues
When an incoming calls rings in the call queue and an agent answers it, other devices in the
queue register the call as missed anyway.
To not display missed calls on other devices:
1. In the Kerio Operator administration interface, go to Configuration → Call Queues.
2. Select an extension and click Edit.
3. Switch to Advanced tab.
4. Select Do not display missed calls on the phones.
5. Click OK.
Monitoring active call queues
1. In the administration interface, go to section Status → Call Queues.
2. The top table shows currently active queues.
3. The other tables display agents and callers in a queue. Just select a queue and the details
in table Agents and Callers are updated.
You can also reset the call queue statistics to start from zero. Use the Reset Statistics button.

114
Configuring auto attendant scripts
What is auto attendant script
Auto attendant script is a simple collection of voice menus, submenus and announcements
and actions defined for each of them according to the caller’s behavior. It can:
• connect to an extension or voicemail,
• play an announcement,
• navigate through menus and submenus.
•
New in Kerio Operator 2.5!
send any faxes to a configured email.
Menus can be recorded in various formats. Kerio Operator supports the following formats:
Supported formats Audio format
gsm 8KHz
wav 8KHz, 16 bits per sample, mono (Kerio Operator encodes all WAV files
into this format automatically)
Table 1 Kerio Operator — supported audio formats
How to add new auto attendant script
See the following description of an auto attendant script as an example. Create a script which:
• starts after dialing extension 200,
• contains a voice menu with the following text: “LOL! You have just reached the Live
And Let Laugh company’s hotline (fiendish laugh).”
• For Sales Department, press 1.
• For Quality Assurance Department, press 2.

27.2 How to add new auto attendant script
115
• For Technical Support Department, press 3.
• If you wish to speak to the receptionist, press 4.
The Sales Department manages two flagship products of the company. Therefore, two
submenus (Joke Lite, Laugh Home 2012) are created.
• For Joke Lite, press 1.
• For Laugh Home 2012, press 2.
• If you wish to talk to the receptionist, press 3.
Create the same menu for technical support.
Before creating the script, it is necessary to create extensions (in the assigned range
123456XXX) which will be used in the script.
• extension 100 — reception of Live And Let Laugh Inc. One of the receptionists Joan
Giggle or Brian Snigger will connect the calls if the caller makes no selection from the
menu.
• extension 203 — Quality Assurance Department extension (David Jester).
• extension 301 — common extension (you can create a call queue or a ringing group)
for Joke Lite experts, such as Frederic Jovial, George Funpoker, Anne Kdotte.
• extension 302 — common extension for Laugh Home 2012 experts (Tamara Bellylaugh,
Otto Spass, Mary Merry).
• extension 501 — call queue for Joke Lite technical support (Andrew Widegrin).
• extension 502 — call queue for Technical Support of Laugh Home 2012 (Alan Tickle).
Script settings
Configure the script in the administration interface in section Configuration → Auto Atten-
dant Scripts:
1. Click Add and enter the Script extension (extension 200 in our example) and some
description.
2.

Configuring auto attendant scripts
116
Figure 1 Auto Attendant
New in Kerio Operator 2.5!
(Optional) To receive faxes to configured email address, select Detect faxes and send
them by email to and type an email address.
3. Click Edit and open the Edit Menu dialog.
4. In the Announcement field, select the recording for the main script. The Select button
offers existing recordings or you can upload your own announcement to the PBX.

27.2 How to add new auto attendant script
117
If you open the administration interface in Safari browser and you cannot
play any recordings, read article Cannot play voicemails or audio files in Safari.
5. Set Number of playbacks to two which will ensure the menu is played to the caller twice.
6. Once the announcement is played, timeout is started with the default action taken upon
its expiration. Set the timeout to 10 seconds. The default action is the preset hang up
action. This means that if the announcement is played twice and the customer does not
make any selection within 10 seconds, the call will be terminated.
7. Click Add. The Key column states the key which confirms the customer’s choice. Enter
number 1. Enter 1 in this column. Column Action defines what happens when the caller
presses a key on their phone. Select Go to submenu. We need to direct calling customers
to the extension of the product they are interested in (either Joke Lite or Laugh Home
2012). In the Announcement column, you can add a record which will be played upon
pressing the particular key (for example: Stay tuned, now you will be redirected to the Live
And Let Laugh Inc Sales Department). Finish the table according to figure.
Figure 2 Editing main menu
8. Check Interpret any other input as extension number and dial it. This option allows to
specify a direct extension while the auto attendant script is running.
9. Confirm the settings and return to the Add Auto Attendant Script dialog which is now
similar to the one in picture above.
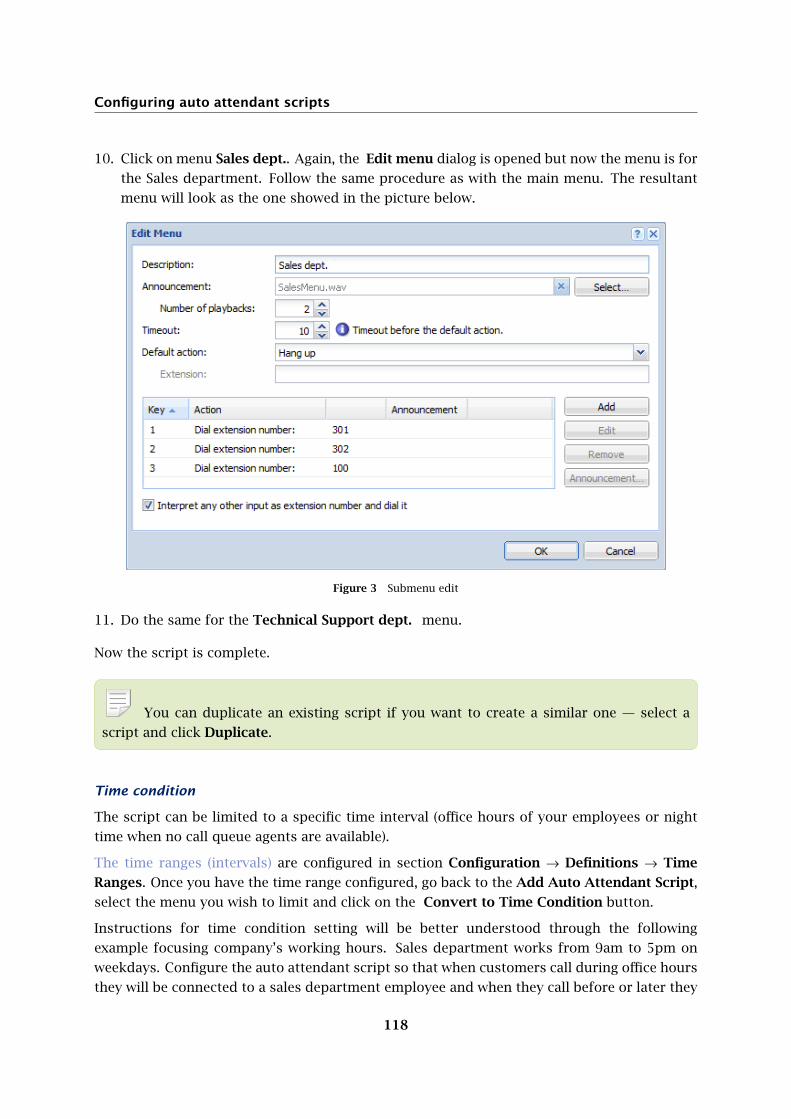
Configuring auto attendant scripts
118
10. Click on menu Sales dept.. Again, the Edit menu dialog is opened but now the menu is for
the Sales department. Follow the same procedure as with the main menu. The resultant
menu will look as the one showed in the picture below.
Figure 3 Submenu edit
11. Do the same for the Technical Support dept. menu.
Now the script is complete.
You can duplicate an existing script if you want to create a similar one — select a
script and click Duplicate.
Time condition
The script can be limited to a specific time interval (office hours of your employees or night
time when no call queue agents are available).
The time ranges (intervals) are configured in section Configuration → Definitions → Time
Ranges. Once you have the time range configured, go back to the Add Auto Attendant Script,
select the menu you wish to limit and click on the Convert to Time Condition button.
Instructions for time condition setting will be better understood through the following
example focusing company’s working hours. Sales department works from 9am to 5pm on
weekdays. Configure the auto attendant script so that when customers call during office hours
they will be connected to a sales department employee and when they call before or later they
27.2 How to add new auto attendant script
119
will hear a message announcing that the sales department is closed. To create the condition
script, follow these instructions:
1. In the administration interface, go to Configuration → Definitions → Time Ranges.
2. Click Add. Dialog Add Time Range opens.
3. In section Add to a group, select the Create new option and enter a name for the new
interval (for example, Sales Department Office Hours).
4. The Description is optional, for example Weekdays from 9am to 5pm.
5. Select daily in the Type menu and set the desired interval from 9 to 5 in the From and
To fields.
6. In the Valid on menu, select Weekdays.
7. Click OK to confirm the changes.
8. Open the Configuration → Auto Attendant Scripts section.
9. Click on Add.
10. In the Add Auto Attendant Script dialog, create a corresponding menu (the script created
in the previous section will be used in this example — see the picture below).
11. Select the Sales Department submenu and click Convert to Time Condition.
12. Divide the Sales Department submenu in two time conditions. The first one is played if the
condition is met and the second if the condition is not met. Click on the red highlighted
text Set up the time condition.
13. This opens dialog Edit Time Condition. In the For time range menu, select Sales
Department Office Hours.
14. Click on the submenu representing the positive result of the condition. It is currently
called Unnamed. In the dialog Edit Menu just opened, simply add a description (for
example Sales Department condition met).
15. Click on the submenu representing the negative part of the condition (now it is empty and
unnamed).
16. This opens dialog Edit Time Condition allowing to add a description (for example Sales
Department --- condition not met).
17. Now you can modify the script. For example, in the Announcement field, add a message
announcing that office hours of the Sales Department are from 9am to 5pm on weekdays.
18. Save the submenu. The resultant script is displayed in the next picture.
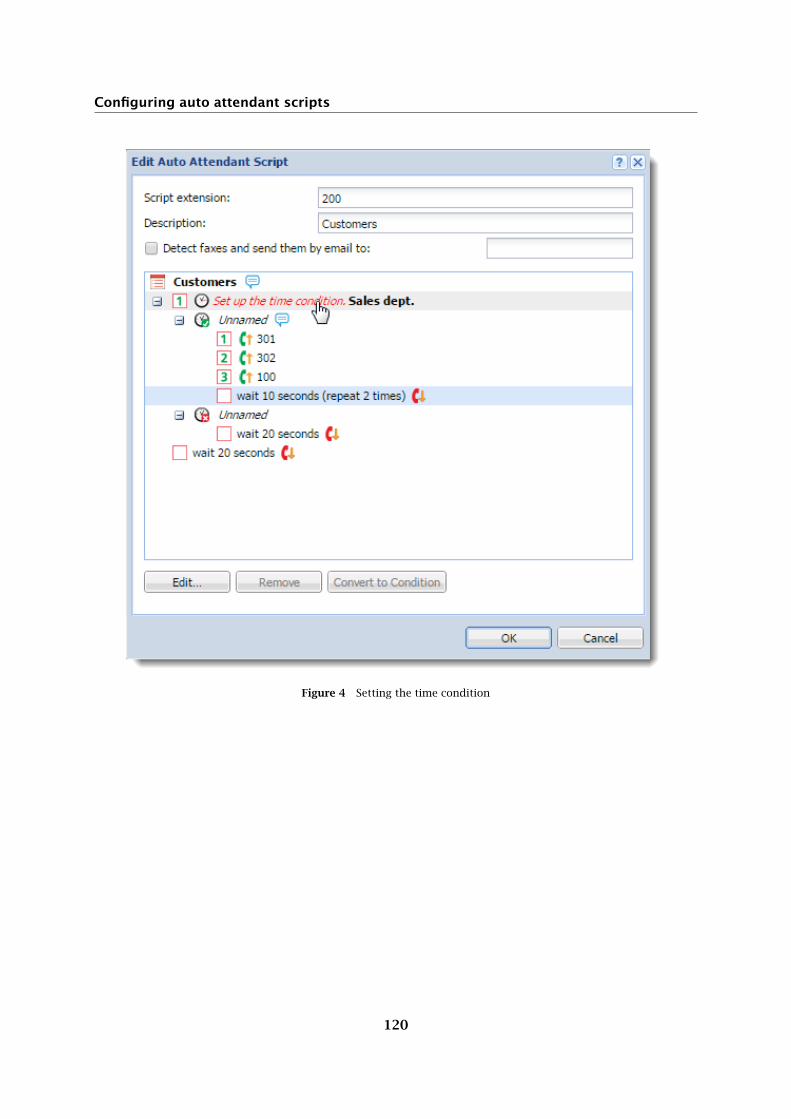
Configuring auto attendant scripts
120
Figure 4 Setting the time condition

27.2 How to add new auto attendant script
121
Figure 5 Time condition applied in the script

122
Setting time conditions in auto attendant scripts
Time conditions are best explained in an example
When configuring auto attendant scripts, Bob encountered the following problem. The
company management created a new quality department. The responsible person is Alice. Bob
created a new extension for this department. Alice came to Bob complaining that dissatisfied
customers are calling constantly and she does not even have time for lunch.
Bob knew that Alice needs an auto attendant script which respects her working hours. And
how to do it?
1. Bob created new time intervals for Alice’s working hours, her lunch break and also for
public holidays.
2. He created records for the following announcements:
Hello. You are calling Live And Let Laugh Inc. We are having a delicious lunch at the
moment. If you call after 1pm, we will gladly hear what you have to say. Talk to ya later!”
“Hello. You are calling Live And Let Laugh Inc. We are off the clock at the moment. Please,
call us on weekdays from 8am to 12pm or after lunch from 1pm to 6pm. We will gladly
hear what you have to say. Talk to ya later!”
“Hello. You are calling Live And Let Laugh Inc. Have a very merry holiday today. If you
wish to make a complaint, call us on weekdays from 8am to 12pm or after lunch from
1pm to 6pm. We will gladly hear what you have to say. Talk to ya later!”
3. He created a new auto attendant script with time conditions.
You can also use the Day/night mode to create time conditions without a specific
time set (see Using the Day/night mode in auto attendant scripts.
Setting time intervals for auto attendant scripts
1. In the administration interface, go to section Definitions → Time ranges.
2. Add three new time ranges. Two ranges will be of the daily time — Lunch break and
Working Hours. Both ranges will be valid on weekdays.
3. The third range will be absolute. Add the first public holiday when creating the range.
Add also other public holidays and do not forget to add them into the existing group
Holidays.

28.3 Creating auto attendant scripts in Kerio Operator
123
Figure 1 Setting time ranges for working hours, lunch break and holidays
Creating auto attendant scripts in Kerio Operator
The script will follow this scheme:
If Holidays
publicholidays.wav
Else
If Working hours
If Lunch break
lunchbreak.wav
Else
Action: Redirecting to Alice’s extension.
Else
offtheclock.wav
1. In the administration interface, go to Auto Attendant Scripts.
2. Add a new script, assign it extension 300 and add a description (Scripts for
complaints desk).
3. Create the first condition: Click Convert to Time Condition.
Double-click on the red link Set up the time condition and in the Edit Time Condition
dialog, select range Holidays. Save the settings.
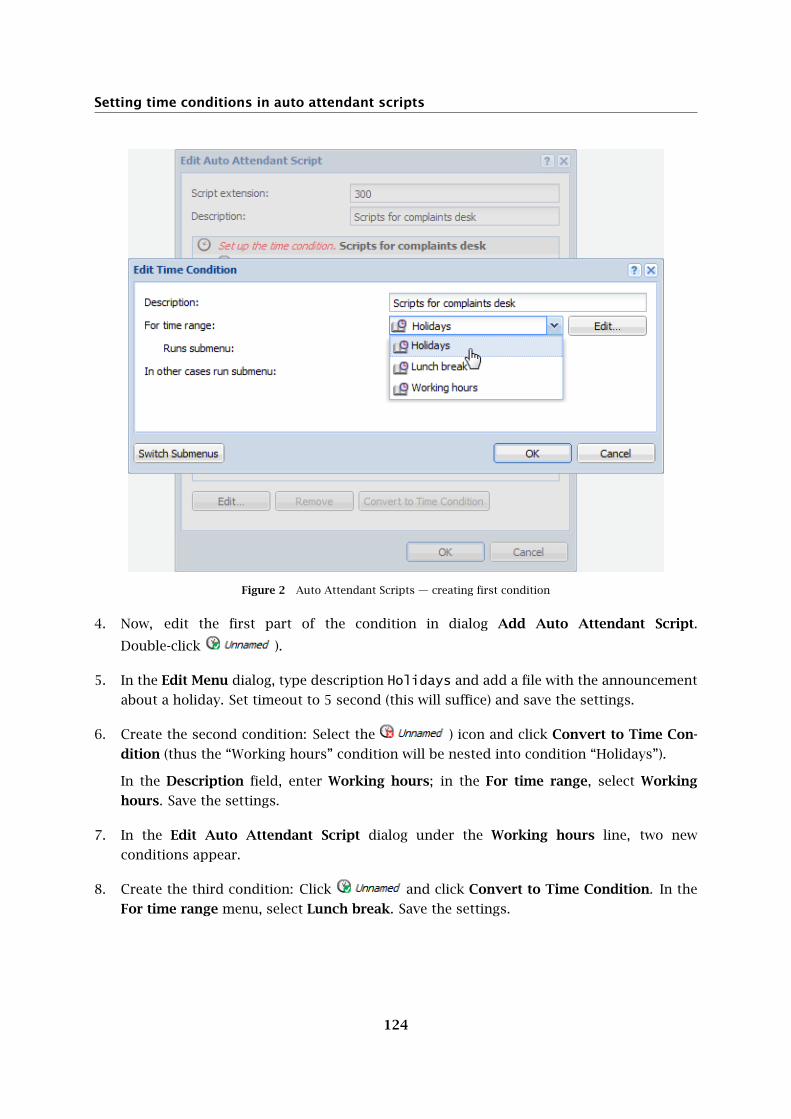
Setting time conditions in auto attendant scripts
124
Figure 2 Auto Attendant Scripts — creating first condition
4. Now, edit the first part of the condition in dialog Add Auto Attendant Script.
Double-click ).
5. In the Edit Menu dialog, type description Holidays and add a file with the announcement
about a holiday. Set timeout to 5 second (this will suffice) and save the settings.
6. Create the second condition: Select the ) icon and click Convert to Time Con-
dition (thus the “Working hours” condition will be nested into condition “Holidays”).
In the Description field, enter Working hours; in the For time range, select Working
hours. Save the settings.
7. In the Edit Auto Attendant Script dialog under the Working hours line, two new
conditions appear.
8. Create the third condition: Click and click Convert to Time Condition. In the
For time range menu, select Lunch break. Save the settings.

28.3 Creating auto attendant scripts in Kerio Operator
125
Figure 3 Auto Attendant Scripts — creating second condition

Setting time conditions in auto attendant scripts
126
Figure 4 Auto Attendant Scripts — creating third condition
9. Double-click the last icon. In the Edit Menu dialog, type description Lunch
break and add a file with the announcement about a lunch break. Set timeout to 5 second
and save the settings.
10. Double-click the icon (last but one in the scheme). In the Edit Menu dialog, type
description Working hours (dial Alice).
You can add an Announcement with information about redirecting to the Complaints
department. Set Timeout to 1 second. In the Default action menu, select Dial extension
number. Type Alice’s extension (211) in the Extension field and save the settings.
11. Double-click the last condition (icon ). In the Edit Menu dialog, type description
After Hours and add a file with the announcement that the Complaints department is
close at the moment. Set timeout to 5 second and save the settings.
If you open the administration interface in Safari browser and you cannot play any
recordings, read article Cannot play voicemails or audio files in Safari.

28.3 Creating auto attendant scripts in Kerio Operator
127
The resultant script is displayed in figure Auto attendant script for the Complaints
department.
Figure 5 Auto attendant script for the Complaints department

128
Creating ringing groups
Overview
You can use ringing groups to make calls ring simultaneously on multiple extensions.
Adding new ringing groups
1. In the Kerio Operator administration interface, go to Ringing Groups and click Add.
2. In the Group extension field, type the extension number for the group.
3. Add extensions you want to ring simultaneously to the table.
4. (Optional) To redirect the call to another extension when no one answers the phone, select
Fall back to another extension when the group is not responding and set a timeout and
destination extension.
5. (Optional) If you don’t want to display the answered call as missed on other phones in the
group, go to Advanced tab and select Do not display missed calls on the phones.
6. Click OK.

29.2 Adding new ringing groups
129

130
Using PBX services
PBX services overview
Kerio Operator has special phone extensions which run the following services:
• Directed call pickup
• Call parking
• Call monitoring
• Call pickup
• Voicemail — a service extension to access voicemail. Kerio Operator recognizes which
extension is used and you can set if PIN is required or not.
This service is set automatically for provisioned phones.
• Voicemail with login prompt —a service extension to access voicemail. Kerio
Operator is not able to recognize which extension is used. Users must authenticate
with typing their extension and PIN.
• Echo — this option helps you monitor whether phones are correctly connected and
what is the sound delay. Speak to the phone after hearing the automated message. If
done correctly, your message is recorded and played back.
• Music — music plays upon dialing the extension (used for checking the connection).
• Current time — auto attendant tells the current date and time.
• Dial by extension — auto attendant invites the user to enter the extension which the
operator will dial.
• Dial by name — user enters first several letters of the callee’s surname and system
searches among the users created in Kerio Operator and dials the extension.
• Record audio — Kerio Operator starts recording. Thus you can easily create records
for auto attendant scripts in excellent quality.
• Receive fax messages — the service enables you to receive fax to defined email
address. Necessary condition for enabeling the service is entering email address for
receiving faxes in PDF format.
To configure PBX services, go to the administration interface → PBX Services.

30.2 Creating voice files
131
If you wish to use any service, tick the box next to this service. Extensions offering
the services are disabled by default.
Creating voice files
This chapter shows how to create a records for an auto attendant script easily, fast and in
sufficient quality.
1. Prepare texts.
2. In the administration interface, go to PBX Services, enable Record audio and save the
settings.
3. Pick up the handset of your phone which is connected to Kerio Operator.
4. Dial the Record audio service.
5. Say individual voice recordings into the headset.
The record is stored in the audio file library in Kerio Operator. You can listen and manage the
recordings in the Definitions → Audio File Library.
If you open the administration interface in Safari browser and you cannot play any
recordings, read article Cannot play voicemails or audio files in Safari.
Figure 1

132
Configuring and using call parking
Overview
Call parking is a special type of call transfers. Parked calls wait for the callee on a special
number.
Configuring call parking
You can park calls on numbers which consist of:
• PBX service prefix
• Parking position number
1. In the administration interface, go to the PBX Services section.
2. Double-click Call parking to open the Edit Service dialog box.
3. Select the Service is enabled option.
4. In the Service extension field, type the call parking prefix.
You can leave the default prefix setting *5.
5. Set the timeout (40 seconds by default).
When the timeout expires, the call falls back to the original extension.
6. Set the number of digits for parking positions.
se the same number of digits as for extensions (your dial plan). Users can
park calls on positions which match their extension numbers.
7. Save your settings.
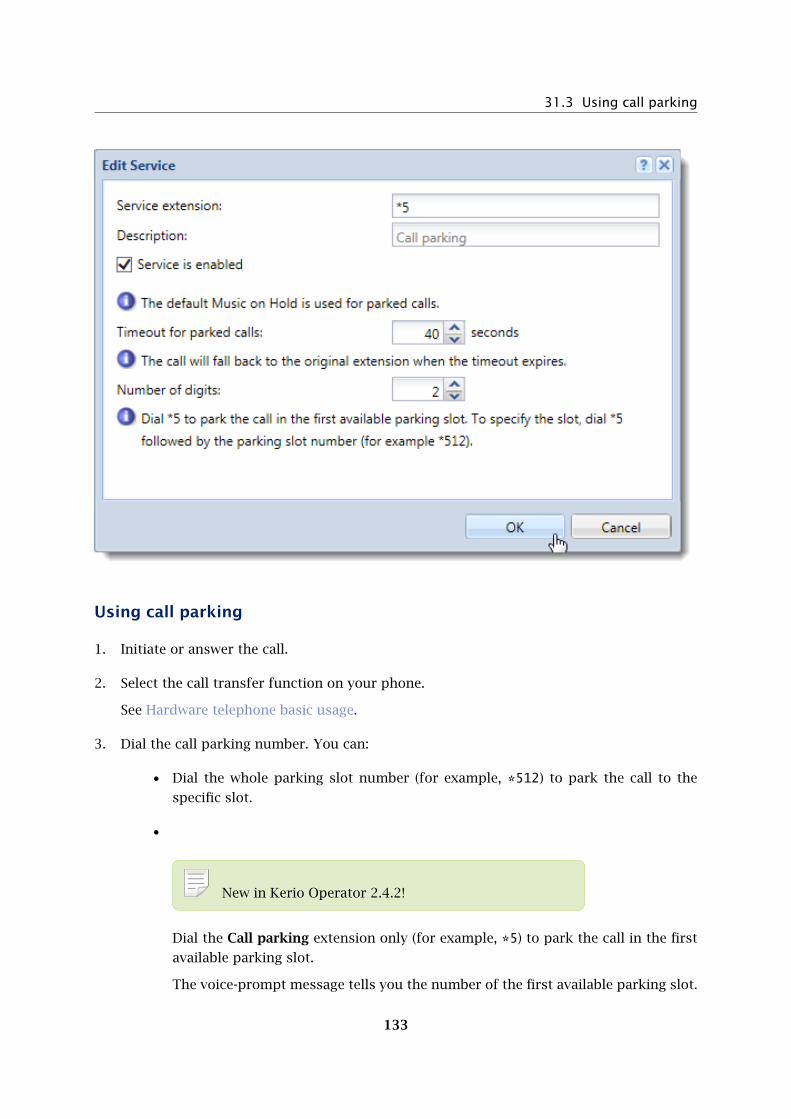
31.3 Using call parking
133
Using call parking
1. Initiate or answer the call.
2. Select the call transfer function on your phone.
See Hardware telephone basic usage.
3. Dial the call parking number. You can:
• Dial the whole parking slot number (for example, *512) to park the call to the
specific slot.
•
New in Kerio Operator 2.4.2!
Dial the Call parking extension only (for example, *5) to park the call in the first
available parking slot.
The voice-prompt message tells you the number of the first available parking slot.

Configuring and using call parking
134
4. Select the call transfer function on your phone.
5. Terminate the call.
To answer a parked call:
1. Pick up the phone.
2. Dial the call parking number (for example, *512).
If nobody answers the parked call before the timeout expires, the call falls back to the original
extension.

135
Monitoring active calls
Call monitoring overview
New in Kerio Operator 2.3!
Call monitoring allows you to participate in any active call by dialing a special prefix, followed
by an extension.
You can use call monitoring in call centers where supervisors need to monitor trainees during
coversations with customers.
When you join an active call, the active callers have no indication that you have joined
the call.
Call monitoring is protected by a PIN number. Whoever knows the PIN can listen to any
extension in your telephony subsystem. Therefore, we recommend to set special call
permissions for people who can use the call monitoring prefix.
The default prefix for call monitoring is *6, and it is configured in the
PBX services. The prefix is disabled by default and you have to enable it manually.
Configuring call monitoring
To configure the call monitoring service, follow these steps:
1. In the administration interface, go to PBX Services.
2. Double-click Call monitoring.
3. In the Edit Service dialog, you can change the service extension.
4. Check the Service is enabled option.
5. Read the disclaimer carefully and click I Agree.

Monitoring active calls
136
6. Click the keys icon and remember the PIN number. You can also change the PIN number.
The PIN protects the call monitoring from misuse.
7. Select the Audio mode:
• Listen only — muted
When joining an active call in listen only mode, there is no indication to the active
callers that you have joined the call.
• Whisper to the extension only — muted only to remote party
• Talk to both — unmuted
8. To allow users to change the audio mode with DTMF codes, check the Allow the monitor-
ing user to change the mode using DTMF codes (4, 5, 6) option.
Users can change the audio mode with a key on their phone devices (4 is for Listen only,
5 is for Whisper to the extension only and 6 is for Talk to both).
9. Click OK.

32.3 Setting call permissions
137
The call monitoring service is configured.
Setting call permissions
Set a call permission group for users who can use the call monitoring feature (people who
knows the PIN number):
• call monitoring is allowed on extensions, which can be monitored (rules 1, 2 and 3 in
the figure)
• other calls with *6 are forbidden (rule 4 in the figure)
Example:
The first three rules allow call monitoring on extensions 111, 112, 113:
1. In the administration interface, go to Definitions → Call Permission Groups.
2. Click Add.
3. In the Add Call Permission Group dialog, add the name of the group.
4. In the Description field, type Group restricts call monitoring to listed
extensions.
5. Click Add.
6. In the Add Prefix dialog, type *6111.
7. Switch the rule to Allowed and click OK.
8. Repeat the steps 5, 6 and 7 for extensions 112 and 113.
The fourth rule disables general usage of *6 prefix:
1. Click Add in the Add Call Permission Group dialog (it is still opened).
2. In the Add Prefix dialog, type *6.
3. Switch the rule to Denied and click OK.
Now, you can compare your result with figure. They should be the same.
The denial rule must be placed below the allowing rules.
4. Click OK in the Add Call Permission Group dialog.

Monitoring active calls
138
Figure 1 Call permission group for call monitoring
The group for call monitoring is established.
Now, you must assign the group to users eligible to use the call monitoring prefix and know
the PIN number:
1. In the administration interface, go to Configuration → Extensions.
2. Select an extension assigned to John Smith (in figure it is extension 201) and click the Edit
button.
3. In the Edit Extension dialog, change Call permissions group to Call monitoring group
(see screenshot).
4. Click OK.
5. If the user has assigned more extensions, you must set Call monitoring group for all of
them to avoid a risk of misuse of the call monitoring.

32.4 Using call monitoring
139
The cal monitoring group is assigned the user who is eligible to use the call monitoring prefix.
Figure 2 Call permission group for call monitoring
Using call monitoring
To use the call monitoring service you must know:
• the service extension (*6 by default),
• the PIN,
• the monitored extension (for example 111).
For extension 111, dial *6111 to listen to the conversation. Then, you will be asked for the PIN
number. Now, you are silently connected to the call on extension 111.
If you are connected to the 111 extension, you can change a mode during the call (if allowed
by the call monitoring service):
• press 4 for listen only mode

Monitoring active calls
140
• press 5 for whisper to the extension only
• press 6 for talk to both
You can also monitor all employees in your office:
• extensions in your office start with 11
• five of them are assigned to employees (111, 112, 113, 114, 115)
If you dial *611, you can connect to the first ongoing call from all extensions starting with 11
If you dial *61, you can connect to the first ongoing call from all extensions starting with 1
If you dial *6, you can connect to the first ongoing call from all extensions of your telephony
subsystem.
Pressing * key will look for another call to monitor.
As you can see, the user can monitor all calls in your telephony subsystem.
Therefore, it is important to set call permissions for all users, who are eligible to use the
call monitoring prefix.

141
Configuring call pickup
What to use call pickup for
This function enables users to answer a call ringing on an extension on a device at another
extension. The PBX distinguishes between two types of call pickup:
• Call pickup within defined groups (so called rooms) by using specific code (by default,
this code is *8),
• Call pickup by using a special code (by default, this code is **) with the called extension
appended at the end.
How to configure call pickup rooms
1. In the administration interface, go to Configuration → PBX Services, enable Call Pickup
and save the settings. Keep the default pickup code (*8) unless you do have a reason to
change it.
2. Go to Definitions → Call Pickup Rooms and click Add to open dialog Add Call Pickup
Room.
3. Type the name of the department or the office in the Name field.
4. In the table, add all users and extensions that will be able to pick up calls for one another.
5. Make sure the Room is enabled option is checked.
Example:
The Live And Let Laugh company network administrator uses the Add Call Pickup Room
dialog to add a group with room name Local Sales for HPR (Happy people Republic). He
adds all sales assistants for local market and their extensions: Frederic Jovial, Mary Merry,
George Funpoker.
Frederic Jovial has a day off today. His phone is ringing. Thanks to the call pickup rooms
feature, Mary Merry does not need to dash for the Frederic’s desk every time a customer
calls his extension. She simply dials the magic code *8 and serves the customer at her desk.

Configuring call pickup
142
How to configure directed call pickup
Directed call pickup is a service allowing to pickup calls directed to any extension at the PBX.
Imagine the following situation:
• the managing director Peter Prank uses extension 101
• the financial director Oscar Jape uses extension 102
• they share an assistant, Ms Alessandra G. Uffaw.
If Alessandra’s phone shows information that someone is calling the managing director (Peter
Prank) during his meeting with the financial director (Oscar Jape), she can accept the call by
dialing **101. Once she picks up the call, she learns that the caller is the International laughter
Association manager and arranges a meeting for him and her company’s executive manager.
A few minutes later, the phone at the desk of the financial director Oscar Jape starts ringing.
Again, the assistant can accept this call at her desk phone. now she enters the code **102 and
recommends the caller (the Cirque de Rire ringmaster) to call Mr Jape back later.
As you can see, by dialing the call pickup code, you can answer a call for any extension of the
PBX.
For directed call pickup, apply settings as described below:
1. In the administration interface, go to Configuration → PBX Services.
2. Enable Directed Call Pickup.
3. Directed call pickup is now fully functional.
You can use directed call pickup in Kerio Operator Client.

143
Video calling in Kerio Operator
About video calls
New in Kerio Operator 2.4!
Kerio Operator now supports video calls with video enabled devices or software.
Prerequisites:
• Devices or software that use the same supported video codecs
• Configured extensions and interfaces to use the same video codec as your devices
Kerio Operator supports these video codecs (all are pass-through only):
• H.261 Video
• H.263 Video
• H.263+ Video
• H.264
• MPEG4 Video

Video calling in Kerio Operator
144
Adding video codecs to extensions
To enable video codecs for any extension:
1. In the administration interface, go to Configuration → Extensions.
2. Select an extension and click Edit.
The Edit Extension dialog box opens.
3. Go to the Codecs tab.
4. Select a codec and click Add to insert the codec in the Selected codecs list.
Figure 1

34.3 Adding video codecs to interfaces
145
5. Click OK to save your settings.
All extensions participating in a video call must have the same codec.
You can select a single codec and assign it to all your extensions.
Adding video codecs to interfaces
To enable video codecs for any interface:
1. In the administration interface, go to Configuration → Call Routing → Interfaces and
routing of incoming calls.
2. Select an interface and click Edit.
The Edit External Interface dialog box opens.
3. Go to the Codecs tab.
4. Select a codec and click Add to insert the codec in the Selected codecs list.
5. Click OK to save your settings.
Interfaces must have the same codecs as all extensions participating in a video call.
Troubleshooting
Video codecs in Kerio Operator are pass-through only and Kerio Operator cannot transcode
them. For a proper connection, all devices must use the same codec. See the examples below:
Example of improper configuration
Device A tries to manage a video call with Device B:
• Device A works with the H.261 Video codec.
• Device B works with the H.263+ Video codec.
This configuration does not work, because the devices have different codecs and Kerio
Operator cannot transcode them.

Video calling in Kerio Operator
146
Example of proper configuration
Device A tries to manage a video call with Device B:
• Device A works with the H.264 Video codec.
• Device B also works with the H.264 Video codec.
This configuration works, because both devices work with the same codec, so Kerio Operator
does not need to transcode any codecs.
Phones do not display any video
If your phone does not display any video during the call:
• Set the same codecs for each device.
To verify which codecs devices use, see the call history.
• Lower the resolution on the caller’s phone.
For example, Grandstream GXV3272 sends video call with 720p resolution to Grandstream
GXV3140, but Grandstream GXV3140 cannot decode the video. User decreases the resolution
on Grandstream GXV3272 and both phones start to display the video.
Figure 2
Phones do not transmit video
If your phone does not transmit video call, configure the device to make a video call.
For example, before you make the call, configure Yealink VP-530 to prefer video calls.
Video is unstable
Devices with slow CPU or without a hardware acceleration can have problems with decoding
the video:
• Decrease the resolution on the caller’s phone.
• Verify that the network is not jammed.
For example, transmitting a VGA signal using a H.264 codec takes 400 kbps in each
direction.

147
Customizing the Kerio Operator Softphone login
page
The login page of the administration login page does not change.
Adding your custom logo
To change a logo of your login page:
1. In the administration interface, go to Configuration → Advanced Options → Kerio Oper-
ator Client.
2. Select the Use custom logo on login page option.
3. Click Select PNG image file and locate the new logo file.
The logo must be in the PNG format. The recommended maximum size is 325 x 80 pixels.
4. Click Apply to save your settings.

Customizing the Kerio Operator Softphone login page
148
Configuring your custom button style
To change a style of a button:
1. In the administration interface, go to Configuration → Advanced Options → Kerio Oper-
ator Client.
2. Select the Use custom button style option.
3. Type a color’s hex value for Text color (for example, #ffffff).
4. Type a color’s hex value for Background color (for example, #669900).
5. Click Apply to save your settings.
Adding your custom text
To add a text to your login page:
1. In the administration interface, go to Configuration → Advanced Options → Kerio Oper-
ator Client.
2. Select the Add the following text to the page (supports HTML) option.
3. Type your text (for example, In case of emergency issues, call 555-1234).
4. Click Apply to save your settings.

35.3 Adding your custom text
149

150
Creating and using speed dial
Speed dial overview
Speed dial is a shortcut for phone numbers (for both the internal extensions and external
phone numbers).
Adding speed dial
Before you begin creating speed dial, select a numerical range you will use. Speed dial must be
different from current extensions. Generally, it is convenient to create speed dial so that they
will not coincide with your dial plan in future.
1. Open Speed Dial.
2. Click Add.
3. In the Add Speed Dial dialog box, type a speed dial in the Speed dial extension field.
4. In Dial number, type the callee’s phone number including the prefix for outbound calls.
5. Click OK.
Configuring speed dial with DTMF
The speed dial with DTMF (Dual-tone multi-frequency signaling) is intended for calling special
services likelong distance phone service providers. If you need to place a call via such a service,
you usually need:
• provider’s number (usually it is a toll-free number that starts with 800: 800555333)
• user ID (78901234)
• PIN (8808)
• a number you want to call (011420111222333)
• # character — denotes the end of the number and starts the call.
When you set the speed dial with DTMF, the number of steps is shortened to dialing the speed
dial extension followed by the number you want to call: 89011420111222333

36.3 Configuring speed dial with DTMF
151
Configuring speed dial with DTMF
1. In the administration interface, go to Speed Dial.
2. Click Add.
3. In the Add Speed Dial dialog box, type a speed dial in the Speed dial extension field (
In our example it is 89.
4. In Dial number, type the provider’s access number including the prefix for outbound calls.
5. Select DTMF tones are enabled.
Once you enable DTMF, the speed dial behaves as a dial-out prefix.
6. In the DTMF prefix field, type the access code and PIN.
Your provider’s IVR system may require a pause between typing the access code and PIN.
Therefore use the w character for a half second pause.
In our example it is 78901234w8808.
7. In the DTMF suffix field, type #
8. Click OK.
Figure 1 Add Speed Dial dialog
What is happen if you use the speed dial 89?
You want to call the number 011420111222333.
To place the call, you dial: 89011420111222333. The service will dial the access number
800555333 and once the call is connected, the following DTMF digits are sent:
789012348808 011420111222333 #

152
Using paging groups and services
Paging overview
Paging, also known as “intercom” or “public address”, enables Kerio Operator users to
broadcast a message to a user or a group using a phone’s speakers. Phones included in the
paging group or service answer the call automatically, and activate the loud speaker.
Paging works with phones that support auto-answer functionality.
The paging group is a group of users to whom you can make a call with using loud speaker.
The paging service is a prefix for paging. You dial the prefix + an extension to page a particular
user.
Configuring paging groups
1. In the Kerio Operator administration interface, click Paging.
2. Click Add Group.
3. Type the paging group extension.
4. To add members to the group, click Add.
5. (Optional) Check Page only idle extensions.
Paging does not interrupt active calls.
6. (Optional) Check Beep when the call is established.
Your phone beeps when all phones from the paging group are connected.
7. Select audio transfer strategy:
Select only to the receiving party to broadcast the message without giving paging group
members ability to answer.
Select in both directions to enable two-way communication.
8. (Optional) To enable call recording, select Record Calls.
9. Click OK.

37.3 Configuring a paging service
153
If you want to check your configuration, dial the group extension and do a test call.
Configuring a paging service
1. Go to the administration interface, and click Paging.
2. Click Add Service.
3. Type Paging service prefix.
4. (Optional) Check Page only idle extensions.
Paging do not interrupt active calls.
5. (Optional) Check Beep when the call is established.
Your phone beeps when all phones from the paging group are connected.
6. Decide, if you want to transfer audio only to the receiving party (telephones play the
message and users cannot answer) or in both directions (telephones play the message
and users can answer).
7. (Optional) To enable call recording, select Record Calls.
8. Click OK.
If you want to check your configuration, dial the service prefix and an extension and do a test
call.
Securing paging
Anyone who knows the extension or whole telephone number of the paging group can use this
feature. You can secure your paging groups and service with Call Permissions. You can create
a new call permission group, where paging an extension or a prefix is denied and add people
without permission for using paging:
1. In the administration interface, go to Definitions → Call Permission Groups.
2. Click Add.
3. In the Edit Call Permission Group dialog, type a group name (for example Paging).
4. Click Add.
5. In the Add Prefix dialog, type a paging extension or service.
6. Click OK.

Using paging groups and services
154
7. Go to Configuration → Extensions.
8. Select the user who will have paging disabled and click Edit.
9. In the Call permissions group menu, select the paging rule (in our example it is Paging).
10. Repeat step 9 to disable paging for additional users.
For testing purposes you can add yourself to restricted group called Paging. Try to call the
paging group or service.
List of supported and tested phones
Paging was tested by Kerio Technologies with the following telephones:
• Cisco SPA508G, SPA525G
• Linksys SPA942, SPA922
• Polycom IP335, IP650
• Well SIP-T38G
• Snom 360, 820 and MeetingPoint

155
Configuring voicemail
Configure voicemail
Voicemail does not need any configuration. It works automatically once Kerio Operator starts.
All users have forwarding to voicemail inbox enabled by default:
• when unavailable
• when busy
You can change the settings in section Users (Ringing rules). Users can also modify the settings
in their Kerio Operator Softphone.
You can find the advanced voicemail configuration in the administration interface in section
Voicemail
Figure 1 Configuration → Voicemail
What is direct access to voicemail inbox and how to configure it
Direct access to users’ voicemail enables the receptionist to connect calls directly to callee’s
voicemail.
1. In the administration interface, go to Voicemail → General.
2. Check Allow direct dialing to user’s voicemail boxes.

Configuring voicemail
156
3. Type a prefix in Prefix for direct dialing.
4. (Optional) Set an announcement (greeting message). If a call is redirected to voicemail, the
caller hears a recorded message. This message can consist of two parts:
• Instructions inform callers what they should do next: “Leave a message after the
beep”.
• Message informs callers that the callee is unavailable (the phone is switched off)
or busy (the callee speaks with someone else).
5. (Optional) To change the size of users’ voicemail boxes, adjust the value in Maximum
messages in each voicemail box.
6. (Optional) To automatically delete read messages in full voicemail boxes, select Automat-
ically delete the oldest read message if the voicemail box is full.
7. Click Apply.
Now the receptionist can dial the extension for direct access followed by the user’s extension.
The caller will be directed to the voicemail box of the person they are calling.
Enabling caller to escape voicemail by dialing 0
If you want to enable escaping voicemail by dialing 0, you must set an extension where the call
is redirected:
1. In the administration interface, go to Voicemail → General.
2. Select After pressing the 0 key, dial extension.
3. Type an extension.
4. Click Apply.
Configuring forwarding of voicemail messages to user’s email inbox
To send voicemail messages to email inboxes of the users, you need to set their email
addresses in the administration interface in Users.
If the users’ INBOXes are unavailable (the mailserver is down), the user accounts are
disconnected from voicemail and try to reconnect every 5 minutes. Each attempt to connect
is recorded in logs.

38.1 Configure voicemail
157
My mailserver is Kerio Connect
You can find more information in article Integrating Kerio Connect and Kerio Operator.
My mailserver is a different SMTP server
1. On your mail server, create a special user which will be used for sending the voicemail
messages. You can name them for example operator.
2. Go to administration interface to Voicemail → tab Email and check Send each message
to user’s email.
3. In Mail server hostname, type the SMTP server hostname and click SMTP Configuration.
4. Set the port number of the port used by your SMTP server.
usually 25 for SMTP and 465 for SMTPS
5. Decide, whether to communicate through secured connection. If the configuration of your
mail server allows it, we recommend the encrypted connection to establish more secure
communication.
6. If your SMTP server requires authentication, check Server requires authentication. Use
the username and password for the account you created on your mail server in step 1.
7. Click OK.
8. In Voicemail → tab Email, type a valid email address in Sender email address (so that your
antispam rules accept it). The address should also represent the origin of the message.
Example: [email protected]
Configuring the welcome message for callers
If a call is redirected to voicemail, the caller hears a recorded message. This message can
consist of two parts:
Instructions inform callers what they should do next: “Leave a message after the beep”.
Message informs callers that the callee is unavailable.
How to set the greeting message?
1. Open section Voicemail.
2. In the Greeting message menu, select whether the caller will hear the instruction, the
message or both.

Configuring voicemail
158
Greeting message for the direct dialing is described in the What is direct access to voicemail
inbox and how to configure it section.
Changing the extension and voicemail PIN
Users use a special extension number to access their voicemail (by default: 50 or 51) and PIN.
To change the extension or enable/disable PIN, go to section PBX Services and read article
Using PBX services.
Figure 2 PBX Services
To set the user’s PIN, go to account configuration in section Users to tab Extensions.
Accessing voicemail
• On your phone, press voicemail button or dial voicemail number and play the message.
• Through Kerio Operator Softphone.
For users of Apple iPhone, iPad or Apple Mac OS X: If you cannot
play your voicemail messages in Kerio Operator Softphone, contact the
Kerio Operator administrator. An invalid certificate may be the reason.
• By forwarding voicemail to your mailbox (to get more information on this option,
contact your network administrator).
Removing voicemail data for selected user
You can remove all local data connected with the particular user.
Local data is:
• voicemail
• custom voicemail greeting message

38.3 Removing voicemail data for selected user
159
Local data means that you cannot use this feature when you use the Kerio Connect
integration — voice messages are stored in Kerio Connect in this case.
1. In the administration interface, go to Users.
2. Right-click the table heading.
3. In the context menu, select Columns → Voicemail and Columns → Local Voicemail Size.
Figure 3 Table context menu

Configuring voicemail
160
4. Right-click the selected user and click Erase Local Voicemail Data.
Figure 4 User’s context menu
If you succeed, there is value 0B in the Local Voicemail Size column.
Managing voicemail via Kerio Operator Softphone
You can find more information in the Using voicemail section.
Voicemail Menu
For more information visit the Voicemail Menu section.

161
Integrating Kerio Connect and Kerio Operator
What are the possibilities of Kerio Operator and Kerio Connect integration
There are several posibilities how to integrate Kerio Operator and Kerio Connect:
Integrating voicemail
The integration synchronizes flags which marks whether a voicemail message has been
read/played. If you mark a message as read in Kerio Operator Softphone or if the message is
marked as read after you hear it on your phone, the message will also be flagged as read in
your mailbox (and vice versa).
If integration with Kerio Connect is set, voicemail messages are not stored in Kerio Operator
but in user’s Inbox on the mailserver.
Limitation: You can integrate Kerio Connect with a single Kerio Operator only.
Searching the address book on Kerio Connect on provisioned phones
For more details, refer to the Accessing company contacts through LDAP on provisioned
phones article.
Calling directly from Kerio Connect Client
New in Kerio Operator 2.3!
Users of Kerio Connect Client can click a contact’s phone number to initiate a call from Kerio
Operator. By clicking a number, you can select the registered phone/device to dial from. The
selected phone/device will ring. Answer the call and Kerio Operator will place the outbound
call to the dialed number.
To set up and use the Click to Call feature in Kerio Operator, go to the Using number
transformation article.
To set up and use the Click to Call feature in Kerio Connect, go to the Integrating Kerio Connect
with Kerio Operator article.

Integrating Kerio Connect and Kerio Operator
162
If you want to Click to Call for Kerio Operator plugin for Chrome and Firefox, go to the Using
Click to Call for Kerio Operator plugin for Chrome and Firefox article.
Configuring voicemail integration
If you want to set up voicemail integration, follow these steps:
1. Go to Configuration → Users.
2. In the users’ settings, type their email addresses.
Use the primary email address (not an alias) — otherwise sending of
messages to Inbox will not work.
3. Go to Configuration → Voicemail → Email.
4. Change the SMTP server settings to Integrate with Kerio Connect.
5. Click Configure and type the DNS name of Kerio Connect.
If the IMAP service runs on a nonstandard port in Kerio Connect, enter the
server name including the port number (hostname:12345)
6. Specify the name and password of a user with admin rights for Kerio Connect.
Authentication details are used for the first connection to Kerio Connect and creation of
a special account using JSON-RPC2 API for authentication. Once this special account is created,
the PBX drops the administrator’s name and password.
To synchronize flags between the two servers, Kerio Operator uses protocol IMAP
with TLS or IMAPS. If Kerio Connect is behind firewall, enable at least one service on standard
port. The IMAP or IMAPS services need to be allowed on Kerio Connect server.
Troubleshooting
If Kerio Connect is protected by firewall, open the ports for the IMAP/IMAPS protocols.
The IMAP/IMAPS services must be running in Kerio Connect.

39.3 Troubleshooting
163
If you cannot connect Kerio Operator with Kerio Connect, consult the following logs:
• In Kerio Operator, consult the Warning log for any problems with the IMAP service.
• In Kerio Operator, consult the Error log for problems with connection to Kerio
Connect’s IMAP server.
• In Kerio Connect, consult the Mail log for information about delivered voicemails.

164
Setting emergency numbers
Emergency numbers overview
When configuring emergency numbers, you can:
• add emergency numbers to the system,
• enable direct dialing (without the prefix for calling external networks).
Call permitions and security restrictions are not applied to emergency numbers.
Configuring emergency numbers
1. In the administration interface, go to Configuration → Call Routing.
2. Click the Emergency Numbers button placed in the lower left corner.
3. Click Overwrite and select the country.
4. If the lists of emergency numbers do not suit your needs, click Add to create your own
emergency numbers.
Enabling direct dialing
All outgoing calls to external networks use a prefix. You can configure an exception for
emergency numbers:
1. In the administration interface, go to Configuration → Call Routing.
2. Click the Emergency Numbers button placed in the lower left corner.
3. Check Enable direct dialing.
4. Select Used outgoing route.
This route will be used for all calls to the emergency numbers.

40.3 Enabling direct dialing
165
If the direct dialing is enabled, you cannot create extensions which equal the
emergency numbers.

166
Configuring SSL certificates
SSL certificates overview
To secure the PBX by SSL/TLS encryption, you need a SSL certificate. SSL certificates
authenticate an identity on a server.
Kerio Operator creates the first self-signed certificate during the installation. The server can
use this certificate but users will have to confirm they want to go to an untrustworthy page.
To avoid this, generate a new certificate request in Kerio Operator and send it to a certification
authority for authentication.
• If you use the Safari browser in your environment (on Apple iPhone, Apple iPad,
Mac OS X systems and on Microsoft Windows), you will not be able to play voice
messages in Kerio Operator Softphone on their devices with a self-signed certificate.
You must have a trustworthy certificate available.
• If you use a self-signed certificate, users with Apple mobile devices will not be able
to play voice messages in Kerio Operator Softphone on their devices. They must
have a trustworthy certificate available.
• To encrypt the communication between Kerio Operator and hardware phones (and
only a self-signed certificate available), you have to import or configure information
in the phones that the invalid certificate is to be ignored.
Creating self-signed certificates
To create a self-signed certificate, follow these instructions:
1. In the Kerio Operator administration interface, open section Definitions → SSL Certifi-
cates.
2. Click New → New Certificate.
3. In the New Certificate dialog box, type the hostname of Kerio Operator, the official name
of your company, city and country where your company resides and the period of validity.
The Hostname and Country entries are required fields.

41.3 Creating certificates signed by certification authority
167
4. Click OK.
5. To enable the server to use this certificate, select the certificate and click Set as Active.
Creating certificates signed by certification authority
If you wish to create and use a certificate signed by a trustworthy certification authority, follow
these instructions:
1. In the Kerio Operator administration interface, open section Definitions → SSL Certifi-
cates.
2. Click New → New Certificate Request.
3. In the New Certificate Request dialog box, type the hostname of Kerio Operator, the
official name of your company, city and country where your company resides and the
period of validity.
The Hostname and Country entries are required fields.
4. Click OK.
5. Select the certificate and click Export.
6. Save the certificate to your disk and email it to a certification organization.
7. Once you obtain your certificate signed by a certification authority, go to Definitions →
SSL Certificates.
8. Click Import.
9. To enable the server to use this certificate, select the certificate and click Set as Active.
Intermediate certificates
Kerio Operator supports intermediate certificates.
To add an intermediate certificate to Kerio Operator, follow these steps:
1. In a text editor, open the server certificate and the intermediate certificate.
2. Copy the intermediate certificate into the server certificate file and save.
The file may look like this:
MIIDOjCCAqOgAwIBAgIDPmR/MA0GCSqGSIb3DQEBBAUAMFMxCzAJBgNVBAYTAl
MSUwIwYDVQQKExxUaGF3dGUgQ29uc3VsdGluZyAoUHR5KSBMdGQuMR0wGwYDVQ
..... this is a server SSL certificate ...
ukrkDt4cgQxE6JSEprDiP+nShuh9uk4aUCKMg/g3VgEMulkROzFl6zinDg5grz

Configuring SSL certificates
168
QspOQTEYoqrc3H4Bwt8=
-----END CERTIFICATE-----
-----BEGIN CERTIFICATE-----
MIIDMzCCApygAwIBAgIEMAAAATANBgkqhkiG9w0BAQUFADCBxDELMAkGA1UEBh
WkExFTATBgNVBAgTDFdlc3Rlcm4gQ2FwZTESMBAGA1UEBxMJQ2FwZSBUb3duMR
..... this is an intermediate SSL certificate which
signed the server certificate...
5BjLqgQRk82bFi1uoG9bNm+E6o3tiUEDywrgrVX60CjbW1+y0CdMaq7dlpszRB
t14EmBxKYw==
3. In the administration interface, go to section Definitions → SSL Certificates.
4. Import the modified server certificate by clicking on Import → Import a New Certificate.
If you have multiple intermediate certificates, add them one by one to the server
certificate file.
Securing Kerio Operator Softphone with SSL certificates
For more information about securing Kerio Operator Softphone, see the Securing Kerio
Operator Softphone with SSL certificates section in the Provisioning for Kerio Operator Soft-
phone article.

169
Language settings in Kerio Operator
Languages in Kerio Operator are:
• Application language — language for the administration interface and for Kerio
Operator Softphone.
• PBX language — “the voice of the PBX”. Voice records which are used for
communication with users (internal and external).
You can also change the type of indication tones according to individual countries (read
section Changing indication tones according to countries).
Changing the application language
The language for the administration and softphone interfaces can be set in the Admin menu
in the right top corner of the of the application window.
Figure 1 Changing the application language

Language settings in Kerio Operator
170
Changing the language of the PBX
You can change the default language of the PBX in the administration interface in section
Configuration → Advanced Options → General.
There, you can also upload new language version or different voice records of the same
language (for example, less formal records).
When setting language, bear in mind the following rules:
• Default language set in section Advanced Options → General has lower priority than
settings of individual users in section Users. If users do not have any language set,
the default one is used.
• Default language set in section Advanced Options → General has lower priority than
settings for interfaces for incoming calls (section Call Routing). The language set for
the interface of incoming calls has lower priority than files uploaded to call queues
(see screenshot below). If no language is set, the default one is used. The same goes
for call queues.

42.3 Changing the language of the PBX
171
Figure 2 Language settings priority
How to change the language for individual users
Thomas Punchline, the network administrator at Live And Let Laugh Inc, faces the following
problem: New employee has arrived in the company. Alessandra G. Uffaw has moved from
the Bliss Seekers Land to the Happy People Republic and cannot speak the Happish language.
She complains she can’t understand her voicemail. Thomas has to switch the PBX language to
the Cravish language for her. Do you need to solve a similar problem? Check the following
example:
1. In the administration interface, go to Configuration → Users.
2. In the user’s settings, go to tab General and change the Phone language.

Language settings in Kerio Operator
172
How to change the PBX language for a group of users
Thomas was instructed to create a new interface in Kerio Operator and change its language
to the Cravish. He has to create a new interface for incoming calls and set a language for
this interface. He called his VoIP service provider and purchased new phone numbers for
the employees who will communicate with foreign customers. And how he configured Kerio
Operator?
1. In the administration interface in section Configuration → Call Routing , add a new route
for incoming calls.
2. Connect it to the provider, open the edit dialog by clicking on the route in table Interfaces
and routing of incoming calls.
3. Select a language on tab Advanced.
4. Select a country on tab Advanced.
Each country has different standards for indication tones during calls (e.g. beeps, ringing
tones, etc.).
Figure 3 Changing a language for an entire route

42.4 Changing indication tones according to countries
173
Setting a different language for a call queue
If you wish to change the language for call queues, not for the entire route, go to section
Configuration → Call Queues.
Language files used in call queues has automatically higher priority than language set
for incoming calls.
How to add a new language to the PBX
If the language sets (voice records) provided in Kerio Operator do not satisfy your needs, you
can download or buy different language sets and import them to the PBX. You can download
the language sets (free or paid), for example, in the following sites:
• http://www.voip-info.org/
• http://downloads.asterisk.org/
You can extract any language set archive and create your own voice records (provided you
keep the file structure).
Changing indication tones according to countries
Each country has different standards for indication tones during calls (e.g. beeps, ringing
tones, etc.).
You can change the settings in the administration interface.
To select a default country for your PBX, go to table Miscellaneous in section Configuration
→ Advanced Options → tab General.
Figure 4 Changing the default country
Example
Live And Let Laugh Inc has the following configuration:
• Joan Giggle, receptionist and operator, uses extension 100 and wishes the phone to
communicate with her in the Happish language.
• Brian Snigger, receptionist and operator, uses extension 200 and is satisfied with the
default language, which is English.
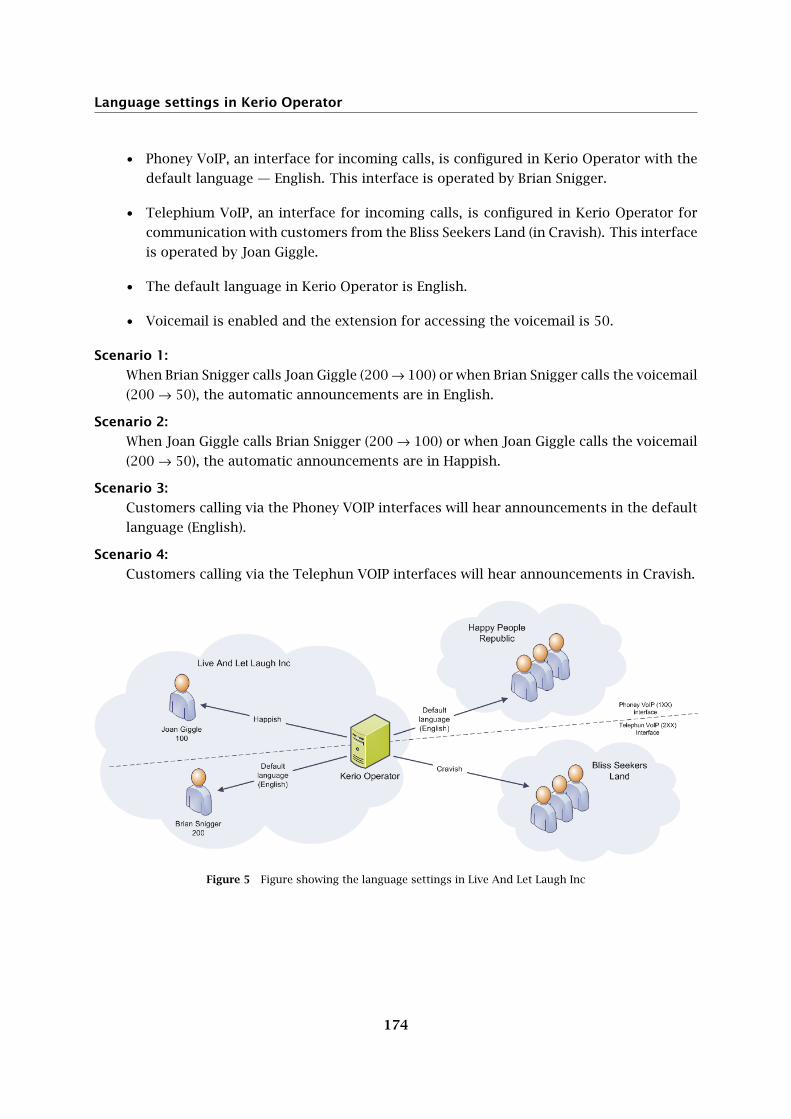
Language settings in Kerio Operator
174
• Phoney VoIP, an interface for incoming calls, is configured in Kerio Operator with the
default language — English. This interface is operated by Brian Snigger.
• Telephium VoIP, an interface for incoming calls, is configured in Kerio Operator for
communication with customers from the Bliss Seekers Land (in Cravish). This interface
is operated by Joan Giggle.
• The default language in Kerio Operator is English.
• Voicemail is enabled and the extension for accessing the voicemail is 50.
Scenario 1:
When Brian Snigger calls Joan Giggle (200 → 100) or when Brian Snigger calls the voicemail
(200 → 50), the automatic announcements are in English.
Scenario 2:
When Joan Giggle calls Brian Snigger (200 → 100) or when Joan Giggle calls the voicemail
(200 → 50), the automatic announcements are in Happish.
Scenario 3:
Customers calling via the Phoney VOIP interfaces will hear announcements in the default
language (English).
Scenario 4:
Customers calling via the Telephun VOIP interfaces will hear announcements in Cravish.
Figure 5 Figure showing the language settings in Live And Let Laugh Inc

175
Customization of voice sets
Summary
This summary provides information on how to customize/change voice sets in Kerio Operator.
Details
The Internet provides many sources of localized and customized basic sounds and voice
prompts. Voice sets for various languages can be found at http://www.voip-info.org.
If you wish to customize a voice set (for example, substitute numerals), begin with the basic
sounds:
1. Unpack them.
2. Substitute relevant files.
3. Renew the archive or zip the folder tree (Kerio Operator supports many formats for
archiving).
4. Login to Kerio Operator administration.
5. Open Advanced Options → General.
6. Click Configure which is located next to option Default phone language.
Once you upload a voice and sound set, you can use it for Kerio Operator, individual interfaces
or individual users. For detailed information on this setting, refer to article Configuring
languages in Kerio Operator.

176
Configuring server date, time and time zone in
Kerio Operator
Time Settings
Correct time and time zone settings of your PBX are necessary for correct configuration of
telephone communication, time ranges and logs. If the time zone is not set properly, log
messages or call history may contain confusing information. Therefore Kerio Operator is
automatically synchronized with an NTP server.
Do not change the settings unless you have a good reason.
NTP (Network Time Protocol) is a protocol for synchronizing time in your computer with time
of the NTP server.
Time and time zone settings on this tab refer to the administration interface time. It
is the server time. Kerio Operator Softphone will display the time zone using the computer
settings. If users are in a different zone to Kerio Operator, logs in call history will be
displayed in users’ time zone.
Configuring synchronization with NTP
1. In the administration interface, go to section Advanced Options → General.
2. Select the Keep synchronized with NTP servers.
Date and time can be set manually but it is better to use an NTP server which provides
information about the current time and allows automatic management of the firewall’s
system time.
3. Kerio Technologies offers the following free NTP servers for this purpose:
0.kerio.pool.ntp.org, 1.kerio.pool.ntp.org, 2.kerio.pool.ntp.org and 3.kerio.pool.ntp.org.
4. Click Apply.

44.3 Configuring time zone
177
Figure 1 Advanced Options — date and time settings
Configuring time zone
1. In the administration interface, go to section Advanced Options → General.
2. Select a time zone from the Server time zone list.
3. Click Apply.
The current date and time will be changed according to the new time zone.

178
CRM integration using AMI
Asterisk Manager Interface (AMI) overview
Asterisk Manager Interface (AMI) is an interface which enables other applications to connect
to Kerio Operator (which includes Asterisk) and to communicate via the AMI commands. You
can use it to make phone calls. It enables you to:
• dial calls from your CRM system,
• monitor call statuses in your CRM system (e.g., create logs),
• direct calls to another extension or terminate calls in your CRM system.
Connecting Kerio Operator with other applications
You can connect an application with Kerio Operator very easily. The settings are different
for connections with a client (the “server-to-client” connection) and with a server (the
“server-to-server” connection).
How to connect a client application (desktop application for dialing numbers) with Kerio
Operator
To connect the applications, you need the username and password of the client application
user:
1. In the administration interface, go to Configuration → Users.
2. Select a user and open the Edit User dialog.
3. Go to tab Advanced and check option Password for dialer (AMI).
4. Click on the icon and note down the displayed password.
5. Enter the username and password in the client application to authenticate.
How to connect a server (CRM system) with Kerio Operator
You need the authentication data which you enter to your CRM system:
1. In the administration interface, go to Configuration → Integration → General.
2. Click Configure at Third party CTI integration (AMI).

45.3 Application we have tried and prepared a configuration guide
179
3. Check Third party CTI integration is enabled.
4. Click Add.
5. Enter Account name (usually the name of the CRM system).
6. The password is generated automatically. Click on the icon and note down the
password.
7. To test the communication, set the permissions to full control. If the communication is
successful, you may limit the permissions.
Some applications allows you only to originate calls but they use asterisk
commands which require a higher level of permission (usually full control).
8. Login to your CRM system and enter the password for the AMI integration.
9. Test the communication by dialing an extension.
Application we have tried and prepared a configuration guide
OutCALL configuration for dialing from the Microsoft Outlook contacts
What to do when communication fails
Consult the logs in Kerio Operator:
1. In the administration interface, go to section Logs → Debug.
2. Right-click on the log screen and select option Messages in the context menu.
3. This opens the Logging Messages dialog box. Check the AMI (CRM Integration, Desktop
Dialer Applications).
Configure the internal firewall of Kerio Operator
1. In the administration interface, go to section Configuration → Network → Firewall and
check the settings.
2. If your CRM system is located outside your local network, add its IP address in section
Configuration → Definitions → IP Address Groups,
3. Go back to section Configuration → Network → Firewall and select a new IP address
group for the integration with the CRM system.

180
Salesforce integration with Kerio Operator
Salesforce integration overview
Kerio Operator App for Salesforce is based on Call Center. The Call Center is an application
embedded in Salesforce and integrates Salesforce with Kerio Operator. For more information
about Call Centers, go to https://help.salesforce.com/.
Kerio Operator App for Salesforce enables:
• click-to-dial
• displaying contacts, accounts and leads during the call
• logging calls into Salesforce
To use Kerio Operator App for Salesforce, install the application. You can download it from
Kerio Operator administration interface.
Kerio Operator supports:
• Salesforce Enterprise Edition
• Salesforce Performance Edition
• Salesforce Unlimited Edition
This article helps you to install and configure Kerio Operator App for Salesforce. If you need
to use Kerio Operator App for Salesforce, go to Using Kerio Operator App for Salesforce.
Configuring Kerio Operator
Add the Salesforce hostname to Kerio Operator and download Call Center Definition for
Salesforce.
1. In the administration interface, go to Integration.
2. In the Salesforce integration section, click Configure.
3. Login to your Salesforce and copy the Salesforce hostname.
Paste the hostname to Salesforce hostname in Kerio Operator.

46.3 Configuring salesforce.com
181
4. Check if the Kerio Operator’s hostname is complete.
If the field is empty, type a correct Kerio Operator’s hostname.
5. Save the settings.
6. Click Download Call Center Definition.
The communication is based on HTTPS by default. Verify that port 443 is open in
both directions and make sure that the hostname of the SSL certificate matches the Kerio
Operator hostname (read more in the Configuring SSL certificates article).
Configuring salesforce.com
Configuration is divided into three steps:
• Adding Call Center
• Adding users to the Kerio Operator Call Center
• Installing the Kerio Operator Open CTI Package
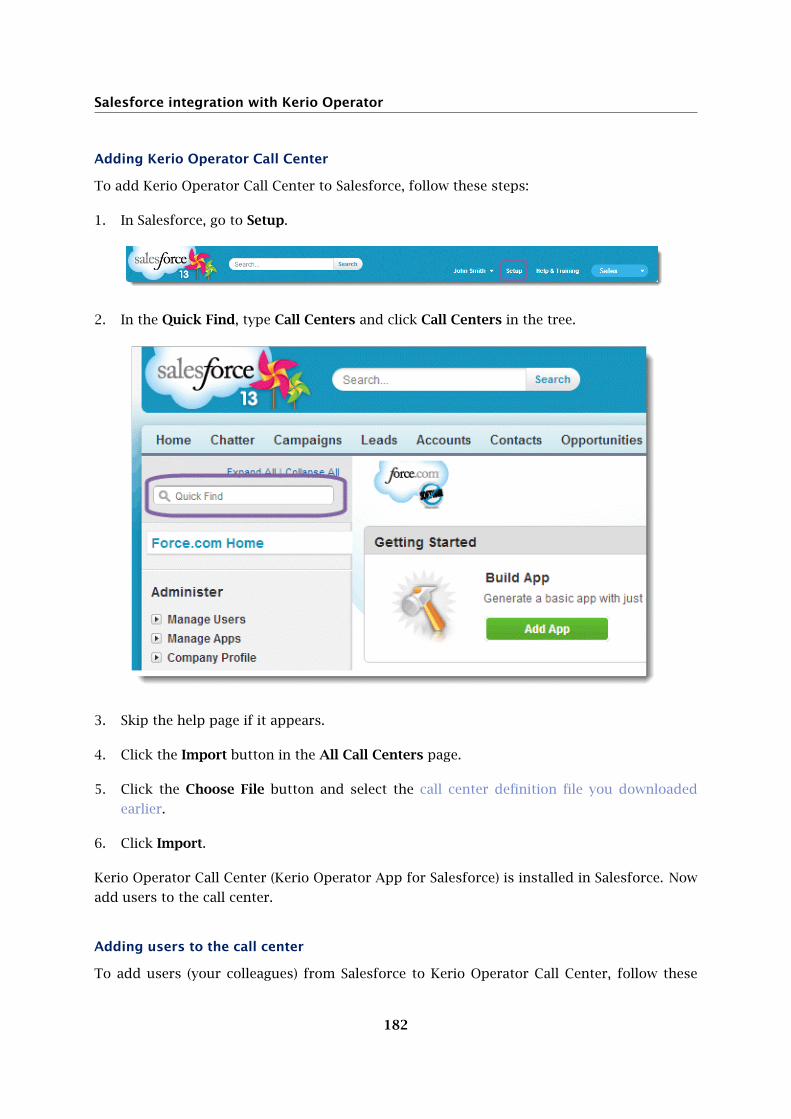
Salesforce integration with Kerio Operator
182
Adding Kerio Operator Call Center
To add Kerio Operator Call Center to Salesforce, follow these steps:
1. In Salesforce, go to Setup.
2. In the Quick Find, type Call Centers and click Call Centers in the tree.
3. Skip the help page if it appears.
4. Click the Import button in the All Call Centers page.
5. Click the Choose File button and select the call center definition file you downloaded
earlier.
6. Click Import.
Kerio Operator Call Center (Kerio Operator App for Salesforce) is installed in Salesforce. Now
add users to the call center.
Adding users to the call center
To add users (your colleagues) from Salesforce to Kerio Operator Call Center, follow these

46.3 Configuring salesforce.com
183
steps:
1. In Kerio Operator Call Center, click Manage Call Center Users.
2. Click Add More Users.
3. Leave the form as it is and click Find.
4. Select users and click Add to Call Center.
The users appear in the Kerio Operator Call Center: Manage Users table.
Go to Home in the main menu. You can see the Kerio Operator Call Center application if your
user account is added in the Kerio Operator Call Center.
Installing the Kerio Operator Open CTI Package
Kerio Operator Open CTI Package enables searching salesforce contacts, accounts and leads
in the Kerio Operator Call Center application.
1. Go to Salesforce.
2. In the address bar of your browser, add this string after your Salesforce hostname (in our
case it is https://eu2.salesforce.com/):
packaging/installPackage.apexp?p0=04tb0000000QG2n
The final result is similar to:
https://eu2.salesforce.com/packaging/installPackage.apexp?p0=04tb0000000QG2n
A Package Upgrade Details page is opened.
3. On page Package Upgrade Details, click Continue.
4. On page KerioOperatorOpenCti, click Next.
5. Select Grant access to all users and click Next.
6. Click Install.
7. If you are successful, the application answers that the installation is complete.
You can test all features of Kerio Operator App for Salesforce. For details, go to article Using
Kerio Operator App for Salesforce.

Salesforce integration with Kerio Operator
184
Configuring number transformation for calls from Salesforce
To make calling via Kerio Operator App for Salesforce easy, add number transformations
which ensure that numbers are dialed correctly from Salesforce.
Read the article Using number transformation for detailed information.
Configuring outgoing prefixes
You can also configure prefixes in Kerio Operator Call Center. However, number
transformation is recommended.
1. Go to Kerio Operator Call Center.
2. Click Edit.
3. Change prefixes in the Dialing Options section.
4. Click Save.
Prefixes are the same for Kerio Operator and Salesforce now.

185
Saving Kerio Operator configuration to FTP or local
storage
Backup overview
Kerio Operator can back up system settings and data:
• to an FTP server
• to your local storage (the file can be downloaded from Kerio Operator)
• to MyKerio
Kerio Operator can backup the following items:
• System configuration — system settings, IVR (auto attendant scripts), users, logos,
firmwares etc.
• Local voicemail data — if you use integration with Kerio Connect, Kerio Operator sends
voicemails via IMAP to Kerio Connect. These voicemails are not backed up.
• SSL certificate — only an active SSL certificate is backed up.
• System logs — all logs from the Logs section.
• Call history log — all logs from the Status → Call History section.
• License — a .key file with your licence.
• Recorded calls — locally saved recorded calls.
You can also back up recorded calls to a FTP server.
• Custom provisioning files /var/tftp
Saving backups to an FTP server
1. In the administration interface, go to section Integration → Remote Storage.
2. Type a hostname of your FTP server
3. Type a username and password if it is necessary.
4. Click Apply.

Saving Kerio Operator configuration to FTP or local storage
186
5. Go to Advanced Options → Backup and Recovery.
6. Change Type to FTP.
7. Test the settings by clicking on the Backup on Remote Storage button.
8. Select Enable automatic backup to remote storage.
9. In the Start at field, specify the time at which backups should be performed.
10. In the Period field, specify how often backups should be performed.
11. Next to Content, click Edit and select content types for backup.
By default, Kerio Operator backs up only a system configuration. Full backup (all items
are selected) increases size of the backup.
12. Save the settings.
Saving a single backup file
1. Go to Advanced Options → Backup and Recovery.
2. In the Backup section, click Download Backup File.
3. Select a backup content.
By default, Kerio Operator creates a full backup.
4. Click Create Backup for Download.
5. Click Download and save the file.
Recovering data from a backup
1. Download a backup file from an FTP server or locally saved backup from your computer.
2. In the administration interface, go to Advanced Options → Backup and Recovery.
3. Click Upload Backup File.
4. Select the file and upload the backup to Kerio Operator.
5. When the Recovery dialog box appears, select the configuration and data for recovery.
6. Click Recovery.
7. A warning about restart appears, click OK.

47.4 Recovering data from a backup
187
After the restart, the backup recovery is complete.
After restoring from a backup, restart your browser in order to log back into the
administration interface.

188
Blocking incoming calls in Kerio Operator
About the blacklist
New in Kerio Operator 2.3.3!
If you want to block incoming calls from certain numbers, you can add the numbers to Kerio
Operator’s Blacklist .
Kerio Operator then blocks all numbers in the blacklist. No incoming calls from these numbers
are connected.
Adding numbers to the blacklist
1. In the administration interface, go to Configuration → Blacklist.
2. Click Add.

48.2 Adding numbers to the blacklist
189
3. Type the number you want to block (Match number).
You can match an entire number, or you can use X for single characters and . (dot) for
multiple characters.
4. Add a description to document the reason for blacklisting the number.
5. Click OK.
6. Add as many rules as you need.
7. (Optional) You can also block anonymous callers.
Do not use this option if your provider does not show the caller’s number.
Otherwise, all incoming calls are blocked.
8. Click Apply.
When you receive a call from any of the numbers in the blacklist, your extension appears to
be busy and the call is not connected.
Adding numbers from Call History
In Call History, you can select any incoming call number to add to the blacklist.
Right-click the number (a line) and select Blacklist.
When a call is blocked by blacklisting, you see Blacklisted in the Status column in Call History.
Adding/removing numbers with a PBX service
You can also use your phone to add numbers to the blacklist.
Kerio Operator has three pre-defined PBX services:
• *30 for adding numbers to the blacklist
• *31 for removing numbers from the blacklist
• *32 for adding the last caller to the blacklist
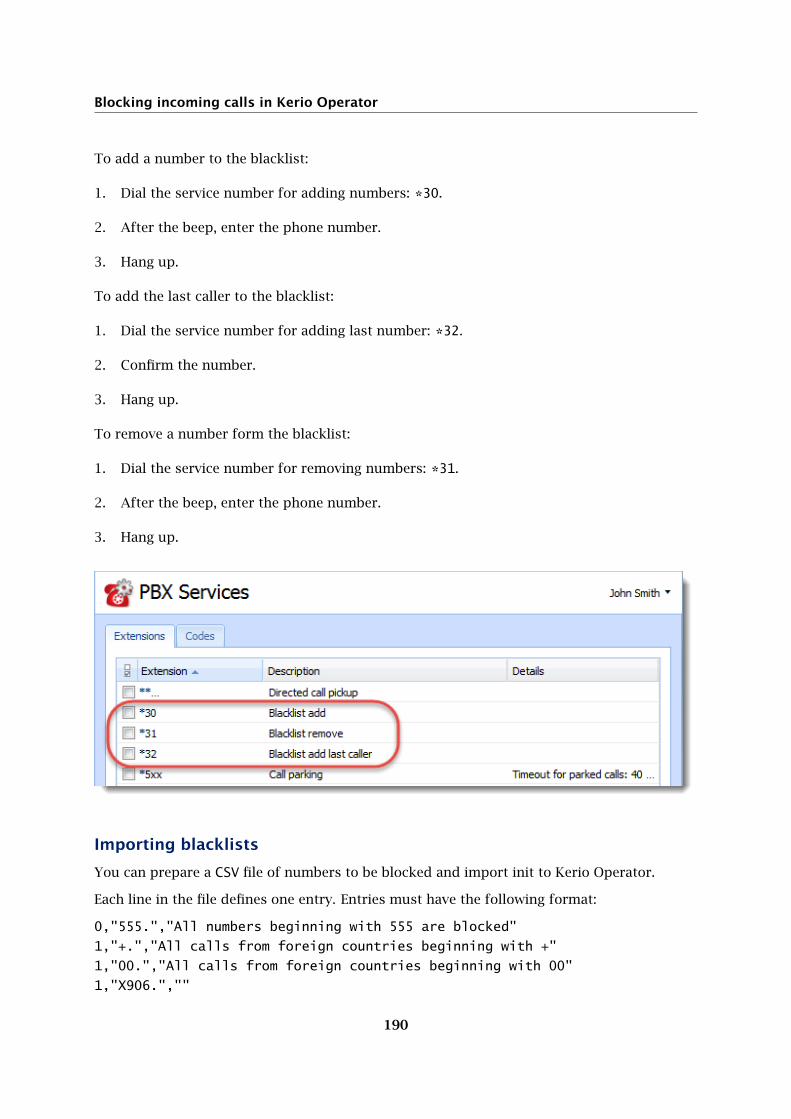
Blocking incoming calls in Kerio Operator
190
To add a number to the blacklist:
1. Dial the service number for adding numbers: *30.
2. After the beep, enter the phone number.
3. Hang up.
To add the last caller to the blacklist:
1. Dial the service number for adding last number: *32.
2. Confirm the number.
3. Hang up.
To remove a number form the blacklist:
1. Dial the service number for removing numbers: *31.
2. After the beep, enter the phone number.
3. Hang up.
Importing blacklists
You can prepare a CSV file of numbers to be blocked and import init to Kerio Operator.
Each line in the file defines one entry. Entries must have the following format:
0,"555.","All numbers beginning with 555 are blocked"
1,"+.","All calls from foreign countries beginning with +"
1,"00.","All calls from foreign countries beginning with 00"
1,"X906.",""

48.4 Exporting blacklists
191
Notes:
• All items are separated by commas
• Number definitions and descriptions must be inside quotation marks
• If any item is empty, keep the quotation marks
To import the file, go to the Blacklist section and click Import from a CSV file.
Exporting blacklists
You can export the list of blacklisted numbers to a *.csv file.
1. Click Export to a CSV file.
2. Go to the correct folder, assign a file name, and save.

192
Setting outgoing calls constraints in Kerio Operator
Overview
You may want to limit some or all outgoing calls for a variety of reasons. For example, should
an outside party obtain the username and password of one of your employees, they could
use your PBX for international calls—possibly involving fraud and costing you money. It is
therefore critical to have calls to external networks well configured.
You can set outgoing call constraints to prevent these types of attacks.
Restricting outgoing calls
Restricting the length of individual outgoing calls
To set the maximum call duration:
1. In the administration interface, go to Configuration → Security.
2. Set Maximum duration of each outgoing call. The recommended value is 2 hours.
Restricting the number and length of outgoing calls
You can limit all outgoing calls by creating special rules in the section Configuration → Secu-
rity in table Outgoing calls constraints.
The default rule limits the number of outgoing calls to 50 per hour and total call duration to
2 hours per day.
Example
A manufacturer in the United States sells and primarily has contacts just in the U.S. and
Canada, but has a factory in Mexico. Management wants to limit calls to other countries.
1. In the administration interface, open Configuration → Security and click Add.
2. Type a rule name, such as Constraints for Mexico).
3. In the Apply to these outgoing calls section, select All except listed and click Add.
4. Add the calling prefixes as a single string:

49.2 Restricting outgoing calls
193
• For local calls: 9 (outside line)
• For U.S. and Canada: 91 (outside line + 1 preceding the area code)
• For Mexico: 901152 (outside line + 011 for international call + 52 for Mexico’s
country code)
5. Define the conditions: Set Maximum calls count to 10 per hour and Maximum total calls
duration to 1 hour a day.
6. When the conditions are met, Kerio Operator can send a warning email or block all
outgoing calls.
We recommend creating:
• One soft rule with lower limits that sends warning messages via email.
• Another rule with higher limits that blocks the PBX.
If the limits are reached and the PBX is blocked, no one will be able to make calls to
the restricted prefixes. However, an administrator can unlock the PBX in section Configu-
ration → Security. We recommend making a thorough analysis of your calls before setting
restrictions so that the PBX is not blocked by standard operations.
In addition to these settings, you can also configure similar rules for specific users or groups
of users. See Disabling outgoing calls to certain prefixes.

194
Configuring Built-in DHCP server in Kerio Operator
Why to use built-in DHCP server
Kerio Operator includes a built-in DHCP server. There are deployment scenarios in which it is
useful to have a separate DHCP server for VoIP devices:
• In larger networks, you may need a LAN segment dedicated to voice traffic.
• In smaller networks, the router/firewall sometimes does not support the DHCP option
66 for automatic provisioning of phones.
DHCP server is disabled in the default mode so that it does not collide with your
existing DHCP server.
Configuring DHCP server
The built-in DHCP server must have a static IP address:
1. In Kerio Operator administration interface, go to the Network section.
2. Select a network interface and click Edit.
3. In the Interface Properties dialog, switch configuration to Use the following configura-
tion and type a new static IP address, mask and gateway.
4. Check Enable DHCP server.
5. Click OK to save the settings.
Kerio Operator will derive the configuration of the DHCP server from the values you set for
the interface’s IP address, network mask, and gateway. The DHCP server sends option 66 to
Kerio Operator’s own address with every address lease.
Assigning IP addresses
Kerio Operator generates the range of IP addresses from a configured mask of a network
interface and assigns these addresses automatically.

50.3 Example — LAN segment is dedicated to voice traffic
195
Example:
• The configured IP address for a network interface is 192.168.62.1
• The configured mask is 255.255.255.0
• The gateway has the address 192.168.62.254
In this example, the range of IP addresses is 192.168.62.2 — 192.168.62.253.
Example — LAN segment is dedicated to voice traffic
In our example, you have LAN and you need to add an other network interface as a special
telephony segment (see scheme DHCP is running on the particular segment).
Figure 1 DHCP is running in the particular segment —scheme
You need to configure two interfaces in Kerio Operator administration interface:
1. Go to section Configuration → Network → General.
2. Configure interfaces as displayed in the screenshot DHCP is running on the particular
segment.

Configuring Built-in DHCP server in Kerio Operator
196
Figure 2 DHCP is running in the particular segment

197
Configuring NAT
Kerio Operator is behind NAT and phones are in the Internet
1. In the administration interface, open section Network → General.
2. In the NAT support section, enable NAT by checking the option.
3. Enter the public address which should be used in SIP protocol messages.
4. For phones in the same private network as Kerio Operator, create an appropriate IP
address group in section Configuration → Definitions → IP Address Groups with all
addresses on which phones communicate in your private network. Thus, the PBX will
communicate with phones within the network directly.
5. (Optional) You can also limit the RTP port range.
Each call requires 4 ports for communication.
6. Also, map the following ports from firewall to Kerio Operator:
• TCP+UDP/5060
• TCP/5061
• UDP/443
• TCP+UDP/3478
• TCP+UDP/3479
It is usually necessary to map a port range for RTP (according to the specified interval).

Configuring NAT
198
Figure 1 Kerio Operator is behind NAT and hardware phones are in the Internet
Kerio Operator is in the company network and hardware phones are be-
hind NAT
Firstly, configure NAT for Kerio Operator.
The scenario in figure requires only one minor configuration in the PBX settings:
1. In the administration interface, open the Extensions section.
2. Select the extension of the user whose phone is in a private network.
3. In the Edit extension dialog, go to tab Advanced.
4. Check the Extension is behind NAT option.

51.3 Kerio Operator is behind NAT and hardware phones are in the Internet
199
Figure 2 Kerio Operator is in the company network and hardware phones are behind NAT
Kerio Operator is behind NAT and hardware phones are in the Internet
Firstly, configure NAT for Kerio Operator.
If the telephone is in the Internet (not behind NAT), Kerio Operator does not require special
configuration.
Phones which are in the Internet cannot be managed in section Provisioned Phones.

200
Configuring music on hold
Overview
While a caller is waiting for connection or in a call queue (see the Configuring call queues
article), they can hear recorded music. Kerio Operator has a default music collection. You can
add and configure other audio files. You can upload any file in GSM and WAV format in section
Definitions → Music On Hold.
Adding new collections
To add a new music collection (with one or more file), follow these instructions:
1. Go to Definitions → Music On Hold and click the Add button.
2. In the Add Music on Hold Collection, enter a name for the collection and a description.
3. Click the Add button situated on the right side of the table with added audio files.
4. In the Select Audio File dialog, add file one by one by clicking Upload.
5. Select a file in the list and double-click it. Repeat this step until all your uploaded files are
listed in table Audio files in the collection.

52.3 Setting Default Collection
201
Figure 1 Adding New Collection
Setting Default Collection
In the Add Music on Hold Collection dialog, check the Make this collection the default music
on hold to ensure this collection is used as default in all other Kerio Operator Administration
settings.
The default collection is used while holding the line (usually the Hold button on most phones).
The other collections can be used, for example, in call queues.

202
Disabling outgoing calls to certain countries or re-
gions
Overview
For security reasons, disable calls to countries users never call, create call permission groups
and assign them to extensions.
Call permission groups can:
• Allow everything and disable certain prefixes, or
• Disable everything and allow certain prefixes
Disabling outgoing calls
1. In the administration interface, go to Definitions → Call Permission Groups.
2. Click Add or select an existing group and click Duplicate.
3. In the Add Call Permission Group dialog box, type the name and a description for the
group and click Add.
4. Type a specific string of numbers, and choose the option to allow or deny access.
To limit outgoing calls, include the prefix for outbound calls (usually 9).
5. (Optional) Repeat steps 2 and 3 to add additional numbers.
6. Click OK to save the settings.
Kerio Operator applies the calls permissions in order, one by one.

53.2 Disabling outgoing calls
203
Figure 1 Call permission groups settings

Disabling outgoing calls to certain countries or regions
204
Example
Live and Let Laugh Inc.’s headquarters is located in Mountain View, California. Employees
in this office can make calls within the United States and Canada, and to the branch office
in Mexico City. Calls to other countries are expensive and there is no reason to make such
calls. Thomas Punchline (the company network administrator) can change the settings to
block such calls.
• The prefix for calling to an external network (outside line) must be a part of the
string (number 9 in our example).
• All international calls (011) are forbidden.
• To enable the prefix for Mexico City, allow prefix (country code = 52, city code = 55).
Including the prefix 9 for outside dialing, the prefix is 90115255.
Apply the following settings:
1. In the Configuration → Definitions → Call Permission Groups section, click Add.
2. Type a name for the group (for example, International calls disabled) and a description.
3. In the Add Call Permission Group dialog box, click Add and enter the prefix for calls
to external networks (9), followed by the prefix for international calls 011. The result is
9011.
4. Set the rule to Deny.
5. Repeat step 3 to add another rule for calls to Mexico City: 90115255.
6. Set the rule to Allow.
Here is an example of the final configuration:
Assigning call permission groups to extensions
1. In the administration interface, go to Configuration → Extensions and assign the created
call permission groups to individual extensions.
2. Select an extension and click Edit.
The Edit Extension dialog box opens.
3. Select a Call permissions group.
4. Click OK.

53.4 Adding area codes to called numbers
205
To assign a call permission group for multiple extensions, select multiple extensions
and click Edit.
Adding area codes to called numbers
For adding area codes to your called numbers, see this article.

206
Adding area codes to called numbers
How to add a prefix for outgoing calls
In some situations you need to add an area code to your dialed numbers. In Kerio Operator,
you can set the area code automatically.
Example:
• You use only 7-digit schema for your phone numbers (for example 555-5555)
• Your provider accepts only 10-digit numbers
To change your schema from 7-digit to 10-digit numbers:
1. Go to Configuration → Call Routing.
2. Click Add... under the Routing of outgoing calls section.
3. On the General tab, add prefix number (for example 9).
4. Select your interface.
5. For Called Numbers set Strip digits from left to 0 and type a 3-digit number prefix (for
example 450).
6. Click OK.
After that, all outgoing calls dialed with the 9 prefix have 10-digit format (in our example
450555-5555 instead of 555-5555).
Disabling outgoing calls to certain countries or regions
For disabling calls to certain countries or regions, see this article.

207
Fax support in Kerio Operator
Using fax in Kerio Operator
Kerio Operator supports:
• T.38 protocol
• Fax-to-email
• PDF-to-fax
T.38 support
T.38 is a protocol for realtime transmission of fax over IP.
Kerio Operator uses T.38 by default. Ask your provider whether they support this protocol. If
not, read section My provider does not support T.38.
Connecting a fax machine to Kerio Operator
1. Connect your fax machine to an Analog Telephone Adapter device (ATA — for example,
Cisco SPA 112).
2. Assign one of Kerio Operator extensions to the ATA device.
Fax machine is connected to the network. You can send and receive faxes.
Configuring an ATA device
You can use various ATA devices. Each device has different settings. The following must be
configured:
1. enable T.38
2. set fax passthru to ReInvite
Phone provisioning in Kerio Operator sets these variables automatically.

Fax support in Kerio Operator
208
Receiving faxes to a user’s email address
You can enable fax-to-email service for any extension. Kerio Operator then sends all incoming
faxes to the user’s email address as PDF attachments.
In the administration interface, define SMTP relay in section Advanced Options →
General so that your Kerio Operator can send emails.
In the administration interface:
• go to Users and enter an email address for each user.
• go to Extensions and enable option Forward incoming faxes to user’s address for
the particular user’s extension.
Figure 1 Forward incoming faxes to user’s address
Configuring fax detection (CNG signal)
A CNG signal is the fax machine sound you may hear when there is a fax machine connected
to the other end of line. Kerio Operator can detect the signal and start receiving faxes
automatically.
1. In the administration interface, go to Extensions.
2. Double-click a selected extension.
3. On tab Advanced, select:
• Dial extension, wait for answer, detect CNG — PBX dials an extension, waits for
an answer and then starts detecting the CNG signal. User has to answer a call first

55.4 Receiving all faxes to a specific email address
209
in order to receive faxes. When a fax tone is detected, the call will be taken over
by Kerio Operator.
• Answer, detect CNG, dial extension — PBX answers a call first, then detects the
CNG signal and immediately dials an extension. If users don’t answer the phone,
a fax mail is received and users have a missed call on their phone display. This
option is good for occasional fax transmissions.
• Answer, detect CNG, wait 3.5 seconds, dial extension — Extension is dialed after
a 3.5 seconds delay which is used to detect faxes. There will not be any missed
calls shown on the phone’s display. Regular calls will be automatically answered
and will be followed by a 3.5 second delay of silence. This option is good for more
frequent fax usage.
• Answer, detect CNG, wait 3.5 seconds (ringing tone), dial extension — the PBX
will generate a ringing tone instead of waiting in silence. This option is also good
for more frequent fax usage and may be less confusing to human callers.
4. Save the settings.
Receiving all faxes to a specific email address
Kerio Operator can send all incoming faxes to a single email address.
1. Go to PBX Services.
2. Open Receive fax messages.
3. Type email address in the Send received faxes by email to field.
Figure 2 Setting a service for sending incoming fax to email address

Fax support in Kerio Operator
210
Kerio Operator will send all incoming fax messages to the specified email address.
My provider does not support T.38
Fax support without T.38 is not reliable. Using codecs G.711 A-law/U-law instead of
T.38 is a workaround.
If your SIP provider does not support T.38, you have to solve these issues:
• Enable codecs G.711 A-law/U-law for the transmission. High compression codecs
would distort signal.
• Reduce the speed on your fax machines (if supported).
Enabling G.711 A-law/U-law codecs for the interface
1. Login to the administration interface.
2. Go to Configuration → Call Routing.
3. Click the provider’s interface.
Figure 3 Choosing the provider’s interface
4. Click the Codecs tab.
5. Move G.711 A-law and G.711 U-law to the Selected codecs table.
6. Move G.711 A-law and G.711 U-law codecs up in the table.
Moving G.711 A-law/U-law codecs up in the table can cause bandwidth
consumption.

55.6 Disabling the T.38 support
211
7. Click OK.
Fax messaging now uses codecs G.711 A-law/U-law.
Figure 4 Moving codecs up
Disabling the T.38 support
Although your SIP provider supports T.38 protocol, you may experience some difficulties in
communication. Conclusion is disabling a support of the T.38 protocol:
1. In the administration interface, go to Configuration → Advanced Options.
2. On the General tab, click Configure... next to the SIP Configuration.
3. Unselect Use T.38 standard for faxing.

Fax support in Kerio Operator
212
If you still have problems with a fax communication, visit Enabling G.711 A-law/U-law codecs
for the interface section.
Sending PDF to fax
This feature is described in a special article: Sending PDF to fax in Kerio Operator Softphone.

213
Distinctive ringing support
Distinctive ringing overview
Kerio Operator supports setting different ring tones for different types of calls (external calls,
internal calls or ringing groups).
Supported strings
The types of calls are represented by alert-info strings. Kerio Operator supports the following
strings:
• operator-external (calls from an interface)
• operator-queue (calls from a call queue)
• operator-group (calls to a ringing group)
Configuring a telephone (example: snom 360)
1. Go to web administration of your telephone.
2. Go to Setup → Preferences
3. Find the alert-info settings.
4. Set different ringers for different alert-info strings (see screenshot).
5. Save the settings.
For testing purposes: Try to make a call from an external telephone number, from an internal
extension and to ringing group.

Distinctive ringing support
214
Figure 1 Customising Alert-Info strings

215
Using Click to Call for Kerio Operator plugin for
Chrome and Firefox
Click to Call for Kerio Operator plugin overview
New in Kerio Operator 2.3!
Click to Call for Kerio Operator allows you to dial any phone number in Chrome and Firefox
browsers.
Click to Call for Kerio Operator provides the following features for users whose phone is
connected to the Kerio Operator PBX:
• The plugin detects phone numbers in the web page and makes them clickable.
• The detection of phone numbers is enabled/disabled by clicking on the extension’s
icon.
• The detection of phone numbers is repeated when the web page changes.
• You can select the phone number manually and then dial it from the context menu
(right-click on the selected text).
If you want to use Click to Call in Kerio Connect Client, go to the Integrating Kerio
Connect and Kerio Operator article.
Installing and configuring the Click to Call for Kerio Operator plugin for
Chrome
Kerio Operator does not need any configuration, however, users must configure the Click to
Call for Kerio Operator plugin.
Follow these steps to install the Chrome version of the plugin:
1. Open the following link in the Chrome browser:
Click to Call for Kerio Operator
2. Install the plugin.
A configuration dialog appears after the installation.
3. In the configuration dialog, type the Kerio Operator URL.

Using Click to Call for Kerio Operator plugin for Chrome and Firefox
216
Figure 1 Click to Call for Kerio Operator

57.3 Configuring the Click to Call for Kerio Operator plugin for Firefox
217
If you want to display the configuration dialog later, right-click the Click to
Call for Kerio Operator icon placed next to the address bar and select Options.
Figure 2 Click to Call for Kerio Operator context menu
4. Check the Automatically search for phone numbers and make them clickable option.
This option enables/disables the Click to Call for Kerio Operator plugin.
5. If you know some websites, which should not use the Click to Call for Kerio Operator
plugin, type the URLs into the Blacklisted domains field.
6. Click Save.
Click to Call for Kerio Operator is configured.
Configuring the Click to Call for Kerio Operator plugin for Firefox
Kerio Operator does not need any configuration, however, you have to configure the Click to
Call for Kerio Operator plugin.
Follow these steps to install the plugin:
1. Open the following link in the Firefox browser:

Using Click to Call for Kerio Operator plugin for Chrome and Firefox
218
Click to Call for Kerio Operator
2. Install the plugin.
The plugin appears on the Firefox Extensions after successful installation (type
about:addons in your browser).
Figure 3 Firefox Extensions
3. Click Options.
4. In the configuration dialog, type the Kerio Operator URL.
Figure 4 Click to Call for Kerio Operator — Options

57.4 Using the Click to Call for Kerio Operator plugin
219
5. Check the Automatically search for phone numbers and make them clickable option.
This option enables/disables the Click to Call for Kerio Operator plugin.
6. If you know some websites, which should not use the Click to Call for Kerio Operator
plugin, type the URLs into the Blacklisted domains field.
7. Click Save.
Click to Call for Kerio Operator is configured.
Using the Click to Call for Kerio Operator plugin
Click to Call for Kerio Operator plugin allows you to initiate a call from Kerio Operator using
Chrome and Firefox browsers:
1. Double-click the phone number marked with Kerio Operator logo.

Using Click to Call for Kerio Operator plugin for Chrome and Firefox
220
2. The browser opens the Kerio Operator Softphone interface in another browser tab. The
phone number is predefined.
3. Click Dial.
Dialing in the Kerio Operator Softphone works on a callback basis. Kerio Operator
Softphone connects directly with the PBX and the PBX contacts back your phone. Your
phone starts ringing as well as the called person’s one. Pick it up and wait for the called
person to answer.
Enabling/disabling Click to Call for Kerio Operator
To enable/disable Click to Call for Kerio Operator, click Kerio Operator icon in the browser
(see figure below).
Selecting the phone number manually
You can select the phone number manually and then dial it by right-click on the selected text
(see figure below).
The context menu option is available even if the plugin is disabled.

57.4 Using the Click to Call for Kerio Operator plugin
221

222
Monitoring Kerio Operator
Monitoring overview
When you are experiencing problems with your connection, we recommend to use tools for
monitoring the status of your PBX. The tools are available in section Status:
• Calls
• Call History
• Recorded Calls
• Dial Plan
• Conferences
• Call Queues
• System Health
Monitoring active calls
All current calls can be viewed under Status → Calls.
You can see a table where each call occupies one line and a graph displays a number of calls
in time in the Calls section.
Go to the Calls section, especially in case that you plan to restart the PBX which may result in
an undesired termination of a call in progress.
Call History
The Call History section keeps a list of all internal and outbound calls of the PBX.
Call History can be viewed under Status → Call History.
To add or remove columns in the call history:
1. In the administration interface, go to Status → Call History.
2. Mouse-over a name of a column and click the arrow on the right side.
3. In Columns, you can:
• select new columns to add them to the Call History,
• deselect columns to remove them.

58.4 Monitoring Recorded Calls
223
Each line contains information about one call. The following actions can be applied to the call
history:
Export to a CSV file
You can click on Advanced → Export to a CSV file to save the file on your local drive.
Clear
Click on Advanced → Clear and confirm your decision in the corresponding dialog.
Individual users can delete their history in the Kerio Operator Softphone.
However, this operation only hides the data. They are not removed from the PBX
and logs.
Monitoring Recorded Calls
Section Status → Recorded Calls displays all calls recorded from call queues. This section
displays a table where each recorded call occupies one row. Select a call to listen to it,
download it to your computer or remove it.
Click Settings to record calls locally or to a remote storage. For more details, refer to the
Setting optional call recording article.

Monitoring Kerio Operator
224
Monitoring a Kerio Operator dial plan
A dial plan contains a list of all the used extensions and their users. You can export this list
to a CSV file or print it.
Go to section Status → Dial Plan to see the list:
Export to CSV — the button exports the data in the format described in table.
Extension Number Type ID Description
111 1 Winston Smith
112 1 Ada Monroe
50 7 Voicemail
Table 1 CSV file content
Changing the Dial Plan
If you use automatic phone provisioning and the change in your dial plan may affect
automatically provisioned phones, update of the phones configuration is needed. Kerio
Operator detects such changes automatically and displays a warning. If you confirm this
warning, phones will be restarted at the time you selected in the dialog. You can restart the
phones later manually in section Provisioned Phones. To restart the phones, click on the
Advanced → Restart all phones button.
Monitoring active conferences
All current conferences can be viewed under Status → Conferences. The window displays
two tables. Each line in the first table displays one conference. The second table displays
information about individual conferences. Just select a conference and the details in the
bottom table are updated.
Monitoring call queues
All active call queues and their parameters can be observed in section Status → Call Queues.
The window displays three tables. Each line in the first table displays one call queue.
The other tables display agents and callers in a queue. Just select a queue and the details in
table Agents and Callers are updated.
You can also reset the call queue statistics to start from zero. Use the Reset button.

58.8 System Health
225
System Health
The administration interface allows you to view the status of CPU, memory and disk space of
your computer with Kerio Operator.
System status can be viewed under Status → System Health.
In this section, click Tasks to:
• restart telephony subsystem
• reboot Kerio Operator
• power off Kerio Operator
• do factory reset of Kerio Operator
The Support information link generates an asterisk configuration file and last 100 lines of all
logs. This information may be helpful especially when solving issues in cooperation with the
Kerio Technologies technical support.
See detailed information about disk space usage by clicking on Details. This opens a dialog
with information about disk usage of audio files, voicemail and configuration file of Kerio
Operator.

226
Managing logs in Kerio Operator
What are Kerio Operator logs for
Logs are files where information about certain events (e.g. error and warning reports,
debugging information) is recorded. Each item is represented by one row starting with
a timestamp (date and time of the event). Messages in logs are displayed in English for every
language version of Kerio Operator.
Configuring logs
Logs are available in the Kerio Operator administration interface in section Logs.
When you right-click in a log, you can configure the following settings (available in all logs):
Save log
You can save whole logs or a selected part in a txt or HTML format. See also Log Settings
option.
Highlighting
You can save any part of text in logs for better reference. Specify a substring or regular
expression and all rows containing such text will be highlighted.
Log Settings
Apart from immediate savings, you can configure regular saves of individual logs,
specifying the size and number of saved files.
You can also enable external logging to a Syslog server.
Clear Log
Use this option for deleting a log.
Types of logs
Auth
The Auth log includes information about all successful attempts to login to Kerio Operator (to
the administration or client interfaces).

59.3 Types of logs
227
Failed login attempts are logged into the Security log.
Config
The Config log stores the complete history of communication between Kerio Operator
Administration and the server. It is possible to determine what administration tasks were
performed by a specific user.
Debug
Debug log is a special log which can be used to monitor specific information. This is especially
useful for problem-solving.
To enable the Debug log, right-click in the log window and select the Messages option in the
context menu. In the opened dialog window, select specific information you wish to monitor.
In addition, displaying too much information slows Kerio Operator’s performance.
We recommend that you only display information that you are interested in and only when
necessary.
Error
The Error log displays serious errors that affect the functionality of the entire PBX. The
Kerio Operator administrator should check this log regularly and try to eliminate problems
found here. Otherwise, users might have problems with some services or/and serious security
problems might arise.
Event
New in Kerio Operator 2.3.3!
The Event log gives information about phone and interface registrations, phone provisioning,
new versions of Kerio Operator, etc.
Kernel
The Kernel log contains records generated by the operating system. It includes information
about starting and stopping of the server, logs generated by individual processes, etc.

Managing logs in Kerio Operator
228
Security
The Security log contains the failed login attempts to Kerio Operator.
Warning
The Warning log shows error warnings which are not severe. Typical examples of such
warnings are messages stating that a user with administrator rights has a blank password
or that a user account of a given name does not exist.
Events recalling warning messages in this log do not seriously affect the PBX functionality.
However, they can point at current or possible problems. The Warning log can help if for
example a user is complaining that services are not working.

229
Legal Notice
Trademarks and registered trademarks
Aastra is registered trademark of Aastra Technologies Limited.
Active Directory is registered trademark of Microsoft Corporation.
Cisco and Linksys are registered trademarks of Cisco Systems, Inc.
Digium is registered trademark of Digium, Inc.
Firefox is registered trademark of Mozilla Foundation.
Grandstream is a registered trademark of Grandstream Networks, Inc.
Internet Explorer is registered trademark of Microsoft Corporation.
Polycom is registered trademark of Polycom, Inc.
Safari is registered trademark of Apple Inc.
Salesforce and Salesforce.com are registered trademarks of salesforce.com, Inc.
SJphone is registered trademark of SJ Labs, Inc.
snom is registered trademark of snom technology AG.
snom is registered trademark of snom technology AG.
Wireshark is registered trademark of Wireshark Foundation.
X-Lite is a software phone developed by CounterPath Corporation with registered trademark
of CounterPath.
Used open source software
This product contains the following open-source libraries:
adapter.js
Shim to insulate apps from spec changes and prefix differences.
Copyright (c) 2014, The WebRTC project authors. All rights reserved.
Appliance OS Sources
Kerio Operator devices are based on open software from various resources. For detailed
information on conditions of each particular software used in the product, refer to
acknowledgments.
To download the source package, go to http://download.kerio.com/archive/.

Legal Notice
230
asterisk
Asterisk - An open source telephony toolkit.
Copyright 1999 - 2012 Digium, Inc. and others.
AudioContext-Polyfill
Polyfill for AudioContext and its parties on Web Audio API.
Copyright (c) 2013 - 2014 Shinnosuke Watanabe
coturn
coturn TURN server project
Copyright (C) 2011, 2012, 2013 Citrix Systems
Heimdal Kerberos
Heimdal is an implementation of Kerberos 5, largely written in Sweden. It is freely
available under a three clause BSD style license (but note that the tar balls include
parts of Eric Young’s libdes, which has a different license). Other free implementations
include the one from MIT, and Shishi. Also Microsoft Windows and Sun’s Java come with
implementations of Kerberos.
Copyright 1997-2000 Kungliga Tekniska Hogskolan (Royal Institute of Technology,
Stockholm, Sweden). All rights reserved.
Copyright 1995-1997 Eric Young. All rights reserved.
Copyright 1990 by the Massachusetts Institute of Technology
Copyright 1988, 1990, 1993 The Regents of the University of California. All rights
reserved.
Copyright 1992 Simmule Turner and Rich Salz. All rights reserved.
jsonrpccpp
C++ framework for json-rpc (json remote procedure call)
Copyright (C) 2011-2014 Peter Spiess-Knafl
Kerio Asterisk Module
The Kerio Asterisk Module extends the functionality of the Asterisk PBX to match Kerio
Operator needs. It is distributed and licensed under GNU General Public License version
2. The complete source code is available at:
http://download.kerio.com/archive/
Copyright 2010 Kerio Technologies s.r.o
Copyright 2000-2006 T.I.P Group S.A. and the IBPP Team (www.ibpp.org).
libcurl
Libcurl is a free and easy-to-use client-side URL transfer library. This library supports the
following protocols: FTP, FTPS, HTTP, HTTPS, GOPHER, TELNET, DICT, FILE and LDAP.
Copyright 1996-2008, Daniel Stenberg.
libiconv
Libiconv converts from one character encoding to another through Unicode conversion.
Copyright 1999-2003 Free Software Foundation, Inc.
Author: Bruno Haible

60.2 Used open source software
231
Homepage: http://www.gnu.org/software/libiconv/
The libiconv library is distributed and licensed under GNU Lesser General Public License
version 3.
Kerio Operator includes a customized version of this library. Complete source codes of
the customized version of libiconv library are available at:
http://download.kerio.com/archive/
libmbfl
libmbfl is a streamable multibyte character code filter and converter library. The libmbfl
library is distributed under LGPL license version 2.
Copyright 1998-2002 HappySize, Inc. All rights reserved.
The library is available for download at:
http://download.kerio.com/archive/
libopus
Opus is a high-quality audio codec developed in cooperation among Xiph.org, Broadcom,
and Microsoft (Skype). The codec is standardized in RFC 6716. The reference
implementation of the codec is licensed under a 3-clause BSD-style license. The copyright
and patent licenses for the Opus algorithm are automatically granted to everyone and do
not require application or approval. The patent licenses are included below together with
the BSD-style license.
Copyright (c) 2011-2014 Opus contributors
libxml2
XML parser and toolkit.
Copyright 1998-2003 Daniel Veillard. All Rights Reserved.
Copyright 2000 Bjorn Reese and Daniel Veillard.
Copyright 2000 Gary Pennington and Daniel Veillard
Copyright 1998 Bjorn Reese and Daniel Stenberg.
nginx-nchan
Fast, horizontally scalable, multiprocess pub/sub queuing server and proxy
for HTTP, long-polling, Websockets and EventSource (SSE), powered by Nginx.
https://nchan.slact.net/
Written by Leo Ponomarev (slact) 2009-2015.
nginx-upload-module
A module for nginx web server for handling file uploads using multipart/form-data
encoding (RFC 1867). http://www.grid.net.ru/nginx/upload.en.html
Copyright (c) 2006, 2008, Valery Kholodkov
OpenLDAP
Freely distributable LDAP (Lightweight Directory Access Protocol) implementation.
Copyright 1998-2007 The OpenLDAP Foundation
Copyright 1999, Juan C. Gomez, All rights reserved
Copyright 2001 Computing Research Labs, New Mexico State University

Legal Notice
232
Portions Copyright1999, 2000 Novell, Inc. All Rights Reserved
Portions Copyright PADL Software Pty Ltd. 1999
Portions Copyright 1990, 1991, 1993, 1994, 1995, 1996 Regents of the University of
Michigan
Portions Copyright The Internet Society (1997)
Portions Copyright 1998-2003 Kurt D. Zeilenga
Portions Copyright 1998 A. Hartgers
Portions Copyright 1999 Lars Uffmann
Portions Copyright 2003 IBM Corporation
Portions Copyright 2004 Hewlett-Packard Company
Portions Copyright 2004 Howard Chu, Symas Corp.
OpenSSL
An implementation of Secure Sockets Layer (SSL v2/v3) and Transport Layer Security (TLS
v1) protocol.
This product includes software developed by the OpenSSL Project for use in the OpenSSL
Toolkit (http://www.openssl.org/).
This product includes cryptographic software written by Eric Young.
This product includes cryptographic software written by Tim Hudson.
PHP
PHP is a widely-used scripting language that is especially suited for Web development
and can be embedded into HTML.
Copyright 1999-2006 The PHP Group. All rights reserved.
This product includes PHP software, freely available from http://www.php.net/software/
php-ev
ev provides interface to libev library - high performance full-featured event loop written
in C.
Copyright (c) 2012,2013,2014 Ruslan Osmanov <[email protected]>
PHP-JWT
A simple library to encode and decode JSON Web Tokens (JWT) in PHP, conforming to
RFC 7519.
Copyright 2011, Neuman Vong
pjproject
Asterisk fork of PJSIP
Copyright (C) 2003-2008 Benny Prijono <[email protected]>
Copyright (C) 2008-2011 Teluu Inc. (http://www.teluu.com)
ScoopyNG
This product includes software developed by Tobias Klein.
Copyright 2008, Tobias Klein. All rights reserved.
233
SIP.js
A simple, intuitive, and powerful JavaScript signaling library http://sipjs.com
Copyright (c) 2014 Junction Networks, Inc. http://www.onsip.com
tftpd
TFTP daemon. TFTP is a simple protocol used for file transmission.
Copyright 1983 Regents of the University of California. All rights reserved.
uwsgi
uWSGI application server container http://projects.unbit.it/uwsgi
Copyright (C) 2009-2014 Unbit S.a.s. <[email protected]>
WAVPlayerProject
WAV player.
Denis Kolyako May 28, 2007, see http://etcs.ru/copyright/
zlib
General-purpose library for data compressing and decompressing.
Copyright 1995-2005 Jean-Loup Gailly and Mark Adler.


