
Accelerating MLPerf Training v0.6 Deep Learning Performance on Red Hat OpenShift
with Supermicro
September 2019
by
Diane Feddema1
Mehnaz Mahbub2
Reeann Zhang2
David Gray1
Mayur Shetty1 Kevin Yu2
George Chang2
Jason Zhu2
1 Red Hat Inc. 2 Supermicro
Red Hat and Supermicro Benchmark
2
Table of Contents Abstract....................................................................................................................................... 3 Executive Summary .................................................................................................................... 3 Solution Reference Architecture .................................................................................................. 4
Solution Building Blocks ..................................................................................................... 5 Benchmark Suite ....................................................................................................................... 10 Benchmark Results ................................................................................................................... 11
Benchmark Hardware/Software Stack Details .................................................................. 14 Preparing OpenShift for GPU workloads .......................................................................... 15 Solution Benefits .............................................................................................................. 18 Monitoring Environment ................................................................................................... 18
Conclusions and Future Work ................................................................................................... 20
APPENDIX: Installing the GPU device plug-in in OpenShift Container Platform ........................ 22 Host Preparation .............................................................................................................. 22
Part 1: NVIDIA Driver Installation ................................................................................. 22 Adding the nvidia-container-runtime-hook ............................................................... 23 Adding the SELinux policy module .......................................................................... 24 Check and restore the labels on the node ............................................................... 24 Verify SELinux and prestart hook functionality ........................................................ 25
Part 2: OpenShift 3.11 with the GPU Device Plugin ..................................................... 25 Deploy the NVIDIA Device Plugin Daemonset ....................................................... 25 Deploy a pod that requires a GPU ........................................................................... 27

Red Hat and Supermicro Benchmark
3
Abstract In this white paper we run the AI workload, MLPerf Training v0.6, on the Red Hat® OpenShift® Container Platform with SUPERMICRO® hardware and compare it to the MLPerf Training v0.6 results published by NVIDIA1 We present a Supermicro reference architecture for OpenShift with NVIDIA GPUs and describe how this AI infrastructure allows you to run and monitor MLPerf Training v0.6 in containers based on Red Hat® Enterprise Linux®. To our knowledge, this is the first time Red Hat Enterprise Linux-based containers were created for MLPerf v0.6 and running on Supermicro Multi-GPU system and 100G network, as opposed to commonly used NVIDIA NGC containers and Nvidia DGX-1. In addition to excellent performance, we demonstrate how OpenShift provides easy access to high-performance machine learning model training when running on this SUPERMICRO reference architecture.
Executive Summary AI Infrastructure is increasingly requiring higher performance computing. Companies are creating and training ever more complex deep learning neural networks, or DNNs, in their data centers. These DNNs are getting a lot of attention because they can outperform humans at classifying images and can beat the world’s best Go player. Training DNNs is very compute-intensive so it is worthwhile to reduce training times with hardware accelerators and software tuning. Last year a group of researchers from industry and universities developed MLPerf, a suite of compute intensive AI benchmarks representing real world AI workloads, for measuring performance of AI Infrastructure. In Supermicro’s Cloud Center of Excellence (CCoE) in San Jose, CA, we created a reference architecture running Red Hat OpenShift Container Platform software and ran the latest version of MLPerf Training to assess its performance relative to published results from NVIDIA. The Red Hat/Supermicro MLPerf Training v0.6 benchmark results closely match the NVIDIA DGX-1 closed division published results (within -6.13% to +2.29%; where negative means slower, and positive values are faster than the NVIDIA results). This outcome demonstrates that containerization provides the benefit of software portability, improved collaboration, and data reproducibility without significantly affecting performance.
1 NVIDIA MLPerf Training v0.6 Results, published July 2019; https://mlperf.org/training-results-0-6
Red Hat and Supermicro Benchmark
4
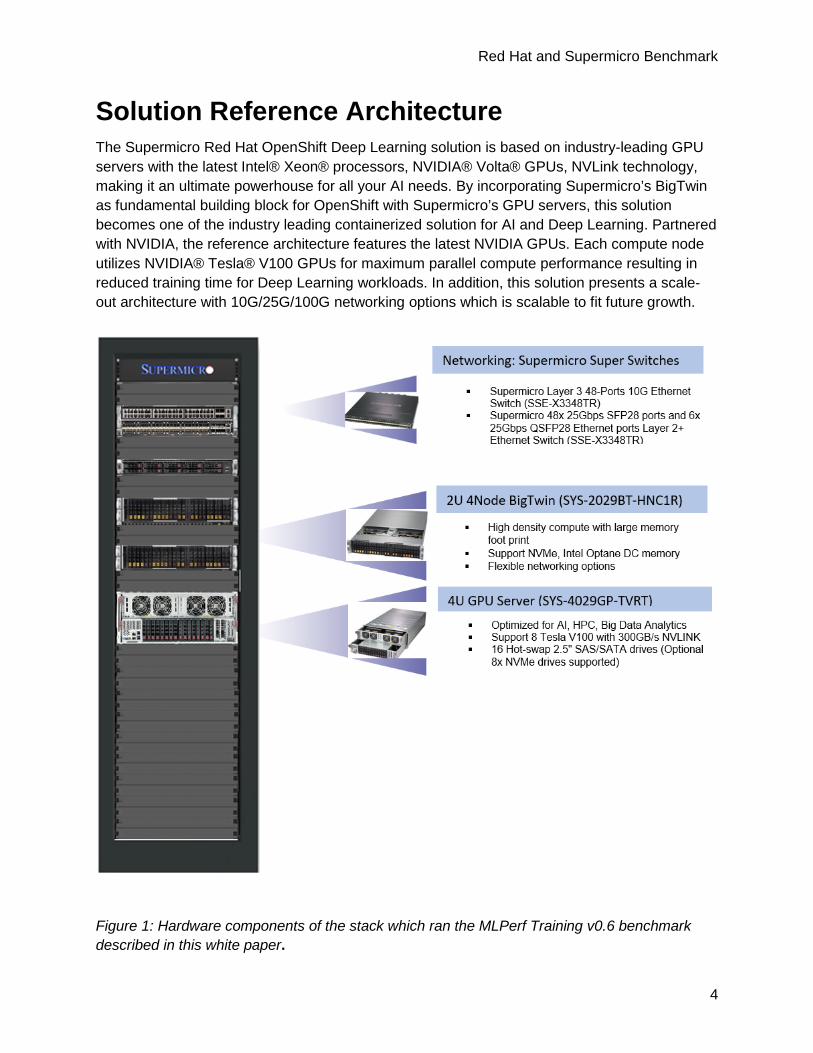
Solution Reference Architecture The Supermicro Red Hat OpenShift Deep Learning solution is based on industry-leading GPU servers with the latest Intel® Xeon® processors, NVIDIA® Volta® GPUs, NVLink technology, making it an ultimate powerhouse for all your AI needs. By incorporating Supermicro’s BigTwin as fundamental building block for OpenShift with Supermicro’s GPU servers, this solution becomes one of the industry leading containerized solution for AI and Deep Learning. Partnered with NVIDIA, the reference architecture features the latest NVIDIA GPUs. Each compute node utilizes NVIDIA® Tesla® V100 GPUs for maximum parallel compute performance resulting in reduced training time for Deep Learning workloads. In addition, this solution presents a scale-out architecture with 10G/25G/100G networking options which is scalable to fit future growth.
Figure 1: Hardware components of the stack which ran the MLPerf Training v0.6 benchmark described in this white paper.

Red Hat and Supermicro Benchmark
5
Solution Building Blocks
• Supermicro BigTwin™
Performance: Dual Socket P (LGA 3647) support 2nd Gen. Intel® Xeon® Scalable Processors, 24 DIMMs; up to 6TB 3DS ECC, DDR4-2933MHz† RDIMM/LRDIMM, Supports Intel® Optane™ DCPMM; 24 DIMMs; up to 6TB 3DS ECC DDR4-2933MHz RDIMM/LRDIMM, Supports Intel® Optane™ DCPMM.
Density: High density with up to 4 hot swappable nodes in a 2U form factor with flexible
and robust IO options--1G, 10G, 25G, or 100G Ethernet or 100G InfiniBand, and up to 2 additional low-profile PCI-E 3.0 x16 expansion slots per node.
Efficiency: Designed with power and cost efficiency in mind, the BigTwin™ reduces
power consumption with shared cooling and power design, leveraging redundant 2600W/2200W high efficiency (96%) power supplies. (Full redundancy based on configuration and application load)
Figure 2: Supermicro BigTwin™: SYS-2029BT-HNC1R
• Supermicro GPU Optimized SuperServer
High Performance and Low Latency: Dual Socket P (LGA 3647) support, 2nd Gen. Intel® Xeon® Scalable processors, 24 DIMMs; up to 6TB 3DS ECC DDR4-2933MHz† RDIMM/LRDIMM, Supports Intel® Optane™ DCPMM, 4 PCI-E 3.0 x16 (LP), GPU tray for GPU Direct RDMA, 2 PCI-E 3.0 x16 (LP, CPU tray).
Red Hat and Supermicro Benchmark
6
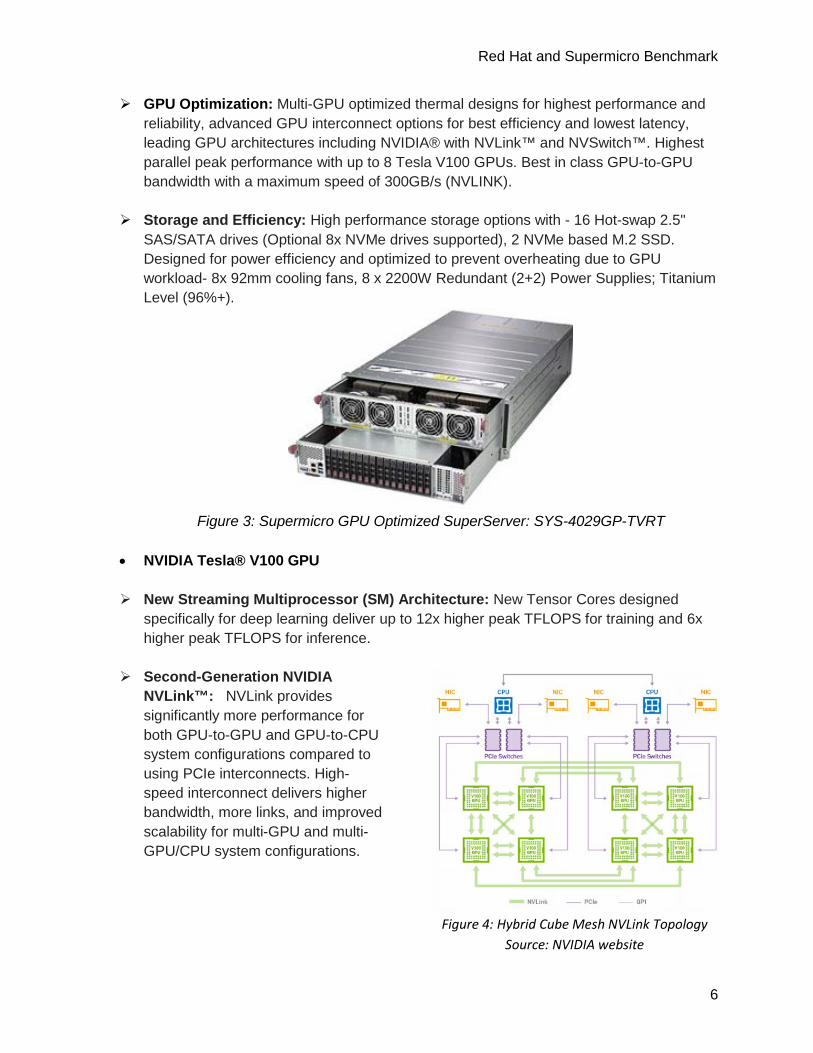
GPU Optimization: Multi-GPU optimized thermal designs for highest performance and reliability, advanced GPU interconnect options for best efficiency and lowest latency, leading GPU architectures including NVIDIA® with NVLink™ and NVSwitch™. Highest parallel peak performance with up to 8 Tesla V100 GPUs. Best in class GPU-to-GPU bandwidth with a maximum speed of 300GB/s (NVLINK).
Storage and Efficiency: High performance storage options with - 16 Hot-swap 2.5" SAS/SATA drives (Optional 8x NVMe drives supported), 2 NVMe based M.2 SSD. Designed for power efficiency and optimized to prevent overheating due to GPU workload- 8x 92mm cooling fans, 8 x 2200W Redundant (2+2) Power Supplies; Titanium Level (96%+).
Figure 3: Supermicro GPU Optimized SuperServer: SYS-4029GP-TVRT
• NVIDIA Tesla® V100 GPU
New Streaming Multiprocessor (SM) Architecture: New Tensor Cores designed
specifically for deep learning deliver up to 12x higher peak TFLOPS for training and 6x higher peak TFLOPS for inference.
Second-Generation NVIDIA
NVLink™: NVLink provides significantly more performance for both GPU-to-GPU and GPU-to-CPU system configurations compared to using PCIe interconnects. High-speed interconnect delivers higher bandwidth, more links, and improved scalability for multi-GPU and multi-GPU/CPU system configurations.
Figure 4: Hybrid Cube Mesh NVLink Topology
Source: NVIDIA website

Red Hat and Supermicro Benchmark
7
Volta Optimized Software: New versions of deep learning frameworks such as Caffe2,
MXNet, CNTK, TensorFlow, and others harness the performance of Volta to deliver dramatically faster training times and higher multi-node training performance. Volta-optimized versions of GPU accelerated libraries such as cuDNN, cuBLAS, and TensorRT leverage the new features of the Volta GV100 architecture to deliver higher performance for both deep learning inference and High Performance Computing (HPC) applications. The NVIDIA CUDA Toolkit version 9.0 includes new APIs and support for Volta features to provide even easier programmability.
Figure 5: NVIDIA® Tesla® V100 SXM2 GPU Table 1: Tested Hardware Configuration Supermicro BigTwin (OpenShift Master Nodes)
Part Number Description Capacity
Server SYS-2029BT-HNC1R 1 x BigTwin, 2U 4 nodes, performance
CPU P4X-CLX6248-SRF90 2 x CLX-SRV 6248 20C 2.5 GHz 27.5M 80T
Memory MEM-DR432L-SL03-ER26 4 x 32GB DDR4 2666MHz 128 GB
SSD HDS-I2T2-SSDSC2KB480G7
2 x Intel S4500 480GB SSD 480 GB
NVMe HDS-IUN2-SSDPE2KE020T7
3 x Intel P4600 2TB NVMe 6TB
AOC AOC-S25G-m2S 1 x AOC Mellanox, 2x SFP+ 25G ports 2
AOC-MH25G-m2S2TM 1 x SIOM, Mellanox, 2x RJ45 10G plus 2x SFP+ 25G ports
Red Hat and Supermicro Benchmark
8
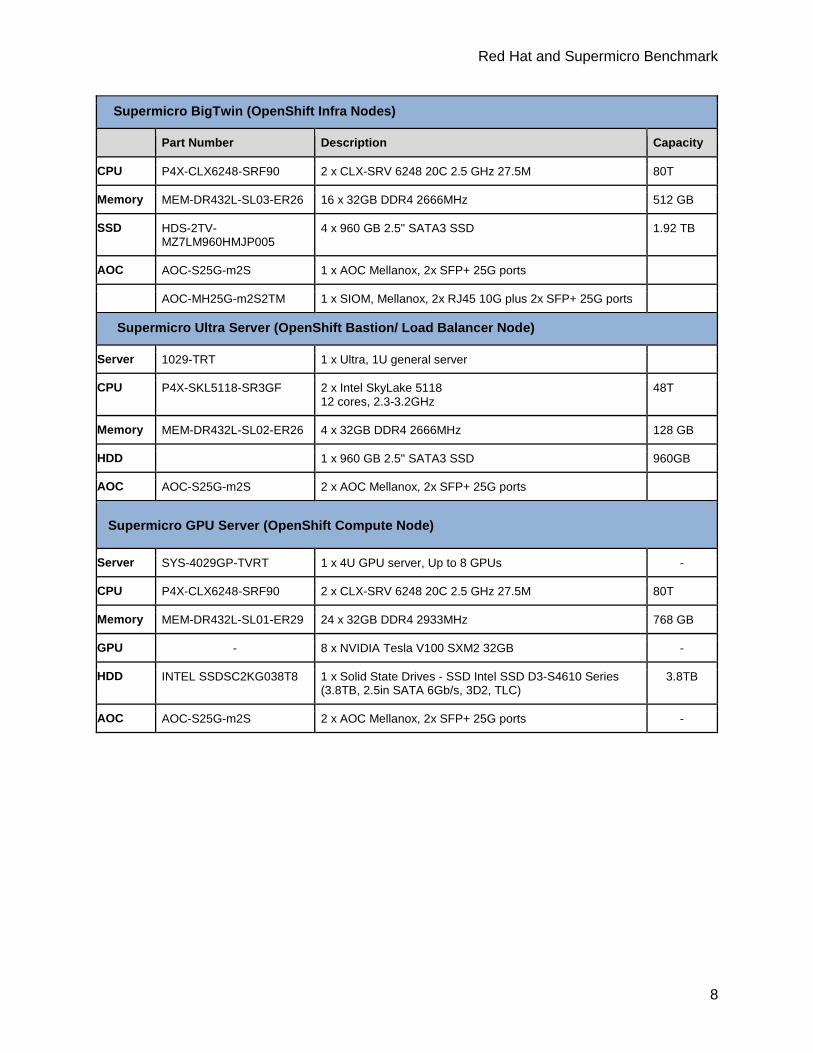
Supermicro BigTwin (OpenShift Infra Nodes)
Part Number Description Capacity
CPU P4X-CLX6248-SRF90 2 x CLX-SRV 6248 20C 2.5 GHz 27.5M 80T
Memory MEM-DR432L-SL03-ER26 16 x 32GB DDR4 2666MHz 512 GB
SSD HDS-2TV-MZ7LM960HMJP005
4 x 960 GB 2.5" SATA3 SSD 1.92 TB
AOC AOC-S25G-m2S 1 x AOC Mellanox, 2x SFP+ 25G ports
AOC-MH25G-m2S2TM 1 x SIOM, Mellanox, 2x RJ45 10G plus 2x SFP+ 25G ports
Supermicro Ultra Server (OpenShift Bastion/ Load Balancer Node)
Server 1029-TRT 1 x Ultra, 1U general server
CPU P4X-SKL5118-SR3GF 2 x Intel SkyLake 5118 12 cores, 2.3-3.2GHz
48T
Memory MEM-DR432L-SL02-ER26 4 x 32GB DDR4 2666MHz 128 GB
HDD 1 x 960 GB 2.5" SATA3 SSD 960GB
AOC AOC-S25G-m2S 2 x AOC Mellanox, 2x SFP+ 25G ports
Supermicro GPU Server (OpenShift Compute Node)
Server SYS-4029GP-TVRT 1 x 4U GPU server, Up to 8 GPUs -
CPU P4X-CLX6248-SRF90 2 x CLX-SRV 6248 20C 2.5 GHz 27.5M 80T
Memory MEM-DR432L-SL01-ER29 24 x 32GB DDR4 2933MHz 768 GB
GPU - 8 x NVIDIA Tesla V100 SXM2 32GB -
HDD INTEL SSDSC2KG038T8 1 x Solid State Drives - SSD Intel SSD D3-S4610 Series (3.8TB, 2.5in SATA 6Gb/s, 3D2, TLC)
3.8TB
AOC AOC-S25G-m2S 2 x AOC Mellanox, 2x SFP+ 25G ports -

Red Hat and Supermicro Benchmark
9
Table 2: Hardware Node Setup
Hardware Description Functions Qty
Supermicro BigTwin (SYS-2029BT-HNC1R)
3 Master, 3 Infra, 2 App 2
Supermicro Ultra Server (SYS-1029U-E1CRT)
1 Bastion/ Load Balancer 1
Supermicro GPU Server (SYS-4029GP-TVRT)
1 App (GPU) 1
Supermicro 10G Ethernet Switch (SSE-X3348TR)
Management, 10G Interconnection
1
Supermicro 100G SDN Super Switch (SSE-C3632S)
100G Interconnection 1
Figure 6: Network Diagram
Red Hat and Supermicro Benchmark
10
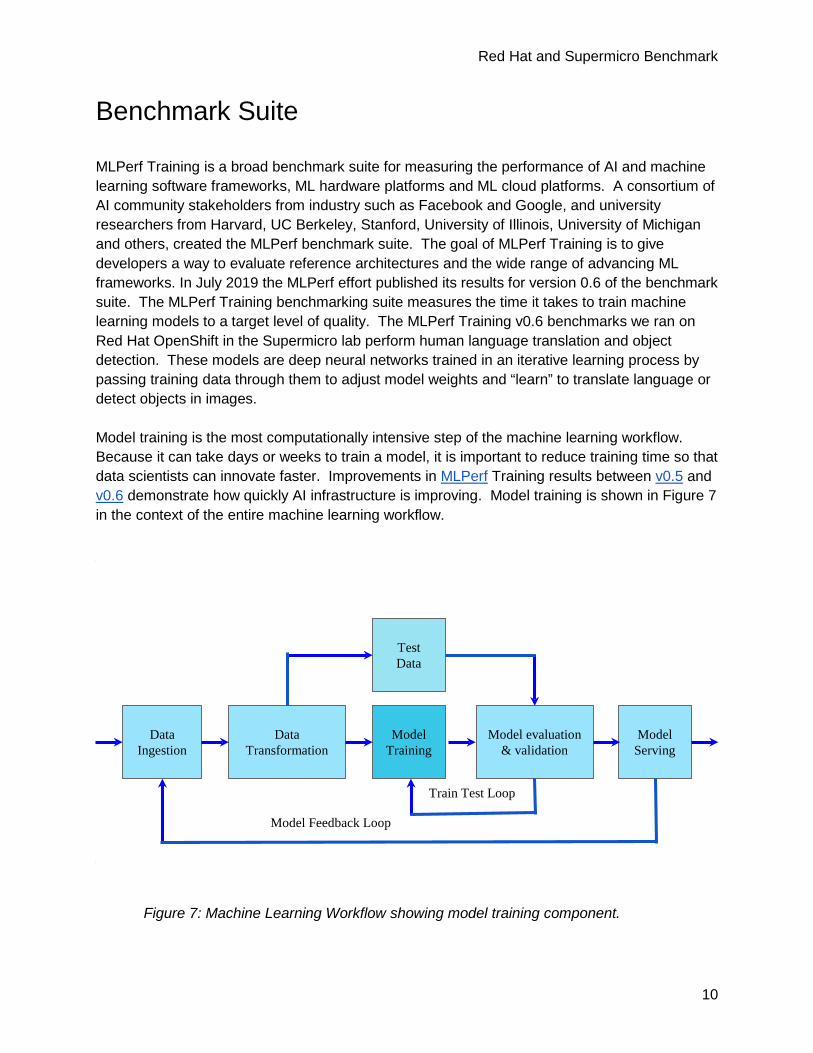
Benchmark Suite MLPerf Training is a broad benchmark suite for measuring the performance of AI and machine learning software frameworks, ML hardware platforms and ML cloud platforms. A consortium of AI community stakeholders from industry such as Facebook and Google, and university researchers from Harvard, UC Berkeley, Stanford, University of Illinois, University of Michigan and others, created the MLPerf benchmark suite. The goal of MLPerf Training is to give developers a way to evaluate reference architectures and the wide range of advancing ML frameworks. In July 2019 the MLPerf effort published its results for version 0.6 of the benchmark suite. The MLPerf Training benchmarking suite measures the time it takes to train machine learning models to a target level of quality. The MLPerf Training v0.6 benchmarks we ran on Red Hat OpenShift in the Supermicro lab perform human language translation and object detection. These models are deep neural networks trained in an iterative learning process by passing training data through them to adjust model weights and “learn” to translate language or detect objects in images. Model training is the most computationally intensive step of the machine learning workflow. Because it can take days or weeks to train a model, it is important to reduce training time so that data scientists can innovate faster. Improvements in MLPerf Training results between v0.5 and v0.6 demonstrate how quickly AI infrastructure is improving. Model training is shown in Figure 7 in the context of the entire machine learning workflow.
Figure 7: Machine Learning Workflow showing model training component.
Data Ingestion
Data Transformation
Model Training
Model Serving
Model evaluation & validation
Test Data
Train Test Loop
Model Feedback Loop
Red Hat and Supermicro Benchmark
11
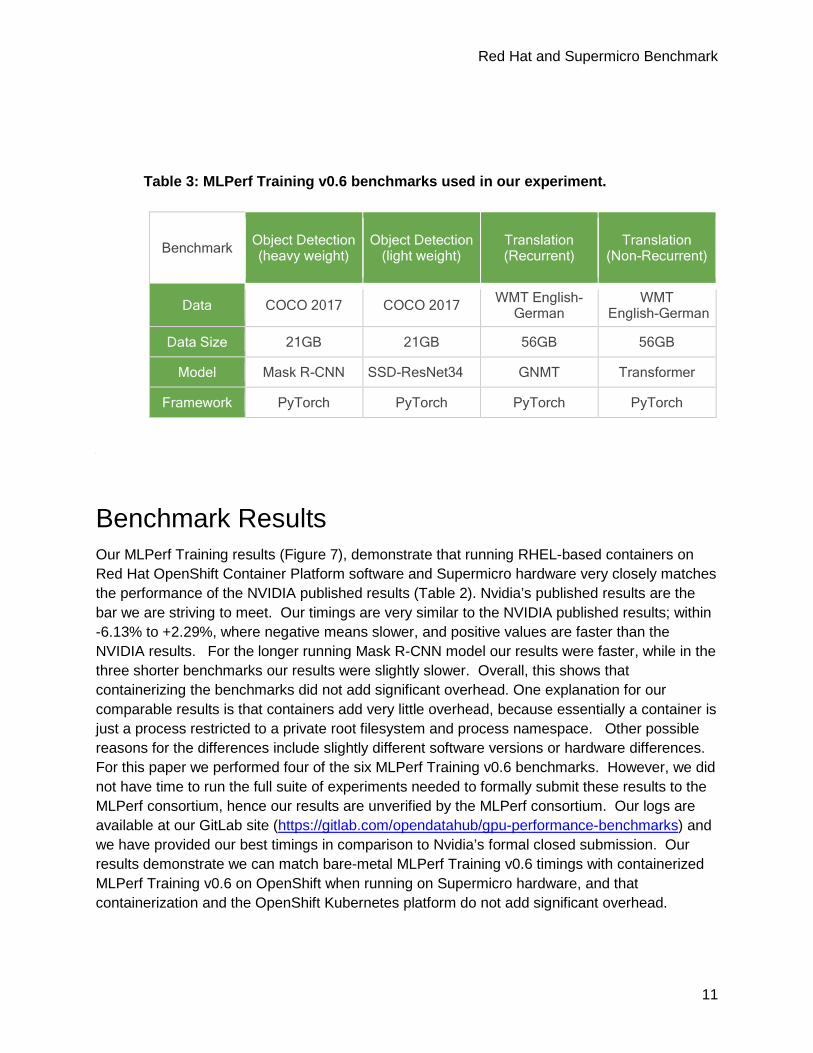
Table 3: MLPerf Training v0.6 benchmarks used in our experiment.
Benchmark Object Detection (heavy weight)
Object Detection (light weight)
Translation (Recurrent)
Translation (Non-Recurrent)
Data COCO 2017 COCO 2017 WMT English-German
WMT English-German
Data Size 21GB 21GB 56GB 56GB
Model Mask R-CNN SSD-ResNet34 GNMT Transformer
Framework PyTorch PyTorch PyTorch PyTorch
Benchmark Results Our MLPerf Training results (Figure 7), demonstrate that running RHEL-based containers on Red Hat OpenShift Container Platform software and Supermicro hardware very closely matches the performance of the NVIDIA published results (Table 2). Nvidia’s published results are the bar we are striving to meet. Our timings are very similar to the NVIDIA published results; within -6.13% to +2.29%, where negative means slower, and positive values are faster than the NVIDIA results. For the longer running Mask R-CNN model our results were faster, while in the three shorter benchmarks our results were slightly slower. Overall, this shows that containerizing the benchmarks did not add significant overhead. One explanation for our comparable results is that containers add very little overhead, because essentially a container is just a process restricted to a private root filesystem and process namespace. Other possible reasons for the differences include slightly different software versions or hardware differences. For this paper we performed four of the six MLPerf Training v0.6 benchmarks. However, we did not have time to run the full suite of experiments needed to formally submit these results to the MLPerf consortium, hence our results are unverified by the MLPerf consortium. Our logs are available at our GitLab site (https://gitlab.com/opendatahub/gpu-performance-benchmarks) and we have provided our best timings in comparison to Nvidia’s formal closed submission. Our results demonstrate we can match bare-metal MLPerf Training v0.6 timings with containerized MLPerf Training v0.6 on OpenShift when running on Supermicro hardware, and that containerization and the OpenShift Kubernetes platform do not add significant overhead.

Red Hat and Supermicro Benchmark
12
We quantify the deep learning training performance of Red Hat Enterprise Linux-based containerized MLPerf Training v0.6 benchmarking suite running on Supermicro Super Servers with NVIDIA V100 GPUs, and compare these results with NVIDIA published DGX-1 MLPerf Training v0.6 results. MLPerf Training workloads are performance-sensitive and GPUs are particularly effective at running them efficiently by exploiting the parallelism inherent in their neural network models. In our lab we ran containerized MLPerf Training v0.6 to demonstrate the efficiency of training real-world AI models on OpenShift with Supermicro GPU optimized Super Servers and BigTwin and Ultra server optimized for Red Hat OpenShift. We demonstrate that model training with Red Hat Enterprise Linux-based containers runs as efficiently on OpenShift and Supermicro hardware as NVIDIA published MLPerf Training v0.6 NGC container results. In Figure 8, we show NVIDIA timeseries metrics displayed in Grafana dashboards for easy understanding of performance data and identification of bottlenecks. The advantage of containerizing these models is that it provides software portability, improved collaboration, and data reproducibility without significantly affecting performance. Using Red Hat Enterprise Linux containers to run AI/ML applications hides the plumbing from the user and allows them to concentrate on data science so they can innovate faster. AI models can be difficult for non-experts to install and train due to many dependencies on specific versions of libraries and compilers. Additionally, maintaining multiple runtime environments allowing models with different dependencies to run on the same cluster is a burden for the cluster administrator. Containerizing these models helps overcome these challenges.

Red Hat and Supermicro Benchmark
13
Figure 8: Benchmark results showing that MLPerf v0.6 on OpenShift was faster than the
NVIDIA published timing for Mask R-CNN and only .05 to 6.13% slower for SDD-ResNet34, GMNT and Transformer.2
2 Results not verified by MLPerf Consortium

Red Hat and Supermicro Benchmark
14
Table 4: MLPerf Training v0.6 Results
Source: https://mlperf.org/training-results-0-6
Benchmark Hardware/Software Stack Details This section provides background on similarities and differences between the Supermicro setup and the NVIDIA setup against which we are comparing our results. The reference architecture in the Supermicro lab and the NVIDIA System lab are compared in Table 3.

Red Hat and Supermicro Benchmark
15
Table 5: Hardware and Software stack details.
Supermicro System NVIDIA System (published)
GPUs - memory 8 V100s - 32GB DGX-1 (8 V100s) - 32GB
Container base layer RHEL-based containers Ubuntu-based containers
Container orchestration OpenShift 3.11 NA
Operating System RHEL 7.6 Ubuntu 18.04
Framework PyTorch NVIDIA Release 19.05 PyTorch NVIDIA Release 19.05
CUDA and Cuda driver Cuda 10.1.168, Cuda driver 418.67
Cuda 10.1.163, Cuda driver 418.67
CUDNN CUDNN 7.5.0 CUDNN 7.6.0
NCCL NCCL 2.3.7 NCCL 2.4.6
MLPerf Training v0.6 v0.6
Prometheus Prometheus 2.12 NA
Grafana Grafana 6.3 NA
Preparing OpenShift for GPU workloads The procedures to make containerized GPU workloads possible in OpenShift 3.11 are shown in the Appendix. These steps must be applied after you install Openshift 3.11 and before you run the containerized benchmarks in this experiment. GPU-accelerated model training example We containerized each of the MLPerf Training v0.6 benchmarks to demonstrate the benefits of running ML applications in containers on OpenShift and to show the speed of the Supermicro reference architecture. This section describes the procedure used to containerize and deploy the MLPerf Training benchmarks on OpenShift.

Red Hat and Supermicro Benchmark
16
Steps 1 through 4 of this procedure builds the container image and deploys it on a GPU-enabled node in OpenShift:
1. Create a dockerfile for the model with the mlcc tool from Red Hat. We add statements to the dockerfile to build NVIDIA Pytorch from source and add a command to run each MLPerf Training benchmark script. The docker files we used in this experiment are available here: https://gitlab.com/opendatahub/gpu-performance-benchmarks
2. Create a container image for each benchmark with the podman tool and the dockerfile created in the previous step. For example, to create the container image for benchmark Mask-R-CNN, run the following command with the dockerfile (maskrcnn_dockerfile) from gitlab link in step 1. # podman build -f maskrcnn_dockerfile -t rhel_maskrcnn_smc
3. Push the image to Quay.io (note: you will use your own pathname for quay.io). # podman push quay.io/dfeddema/rhel_maskrcnn_smc
4. Deploy a pod for the MLPerf Training benchmark which requires GPUs.
# oc create -f maskrcnn.yaml
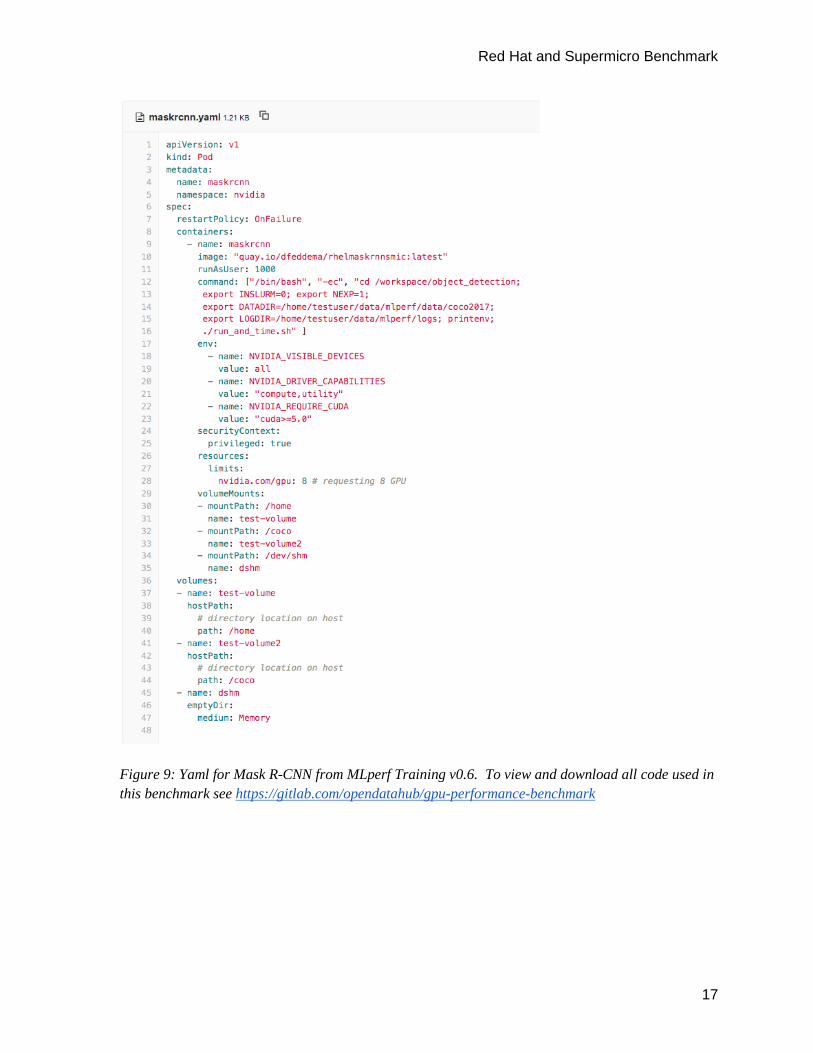
Figure 9 shows the yaml to deploy the Mask-R-CNN benchmark.
Red Hat and Supermicro Benchmark
17
Figure 9: Yaml for Mask R-CNN from MLperf Training v0.6. To view and download all code used in this benchmark see https://gitlab.com/opendatahub/gpu-performance-benchmark

Red Hat and Supermicro Benchmark
18
Solution Benefits Containers provide software portability, improved collaboration, and data reproducibility
without affecting performance. High-density compute architecture supporting Multi-GPUs accelerators and 100G high
bandwidth/low latency network to minimize deep learning training time GPUs-accelerate model training by taking advantage of inherent parallelism in Neural
Networks. OpenShift provides built-in monitoring capability with Prometheus and Grafana and an
easy-to-use graphical interface, described in the following “Monitoring Environment” section.
Monitoring Environment We used Prometheus and Grafana to collect and display metrics for these experiments. Both Prometheus and Grafana are installed by default with OpenShift 3.11. We added an NVIDIA exporter, to export GPU metrics in Prometheus format. These GPU metrics were scraped by Prometheus and stored in its time series database. Prometheus is configured as a data source for Grafana which displays the metrics in time series format. We created Grafana dashboards to display the metrics we collected. JSON for the Grafana dashboards shown in Figures 10 through 12 is available in the open datahub performance gitlab repo.
At a glance this time series view of the GPU metrics allows you to see whether any of the GPUs were under-utilized during the model training run. You can click on any of the GPU labels in the legend at the bottom of the graph and see only metrics for that GPU.

Red Hat and Supermicro Benchmark
19
Figure 10: Monitoring GPU % Usage instant and time series The dashboard in figure 11 monitors GPU memory usage for each GPU. You can tune your application for efficient use of GPU memory using this dashboard. For instance, when training a neural network, you can tune batch size for better utilization of GPU memory and view the outcome here. Batch size is a hyper-parameter that sets the number of training examples per iteration.
Figure 11: Monitoring GPU % used and Memory Usage

Red Hat and Supermicro Benchmark
20
The dashboard in figure 12 monitors GPU temperature and power usage. You can use prometheus alerting to send an email, text, pagerduty or slack message if the temperature of one of your GPUs is above some threshold.
Figure 12: Monitoring GPU temperature and power usage
Conclusions and Future Work In this paper we ran the AI workload MLPerf Training v0.6 to compare the performance of Supermicro hardware and Red Hat Enterprise Linux-based containers on OpenShift with NVIDIA MLPerf Training v0.6 published results. We were able to show that the Red Hat Enterprise Linux-based containers running on the OpenShift Container Platform and Supermicro hardware ran faster for the Mask R-CNN benchmark than NVIDIA’s MLPerf Training v0.6 results, and only slightly slower (0.5%-6%) for the shorter tests. Our GNMT timing was 6.13% slower which could have been due to the initial random seed used by the benchmark. Future work could include analysis of stability of GNMT for different random seeds.

Red Hat and Supermicro Benchmark
21
For more information
Link to MLPerf Training v0.6 yaml and dockerfiles: https://gitlab.com/opendatahub/gpu-performance-benchmarks
Link to Openshift getting started docs: https://www.openshift.com/learn/get-started/
Link to the MLCC tool: https://github.com/bgray-at-rh/mlcc.git
Red Hat and Supermicro Benchmark
22
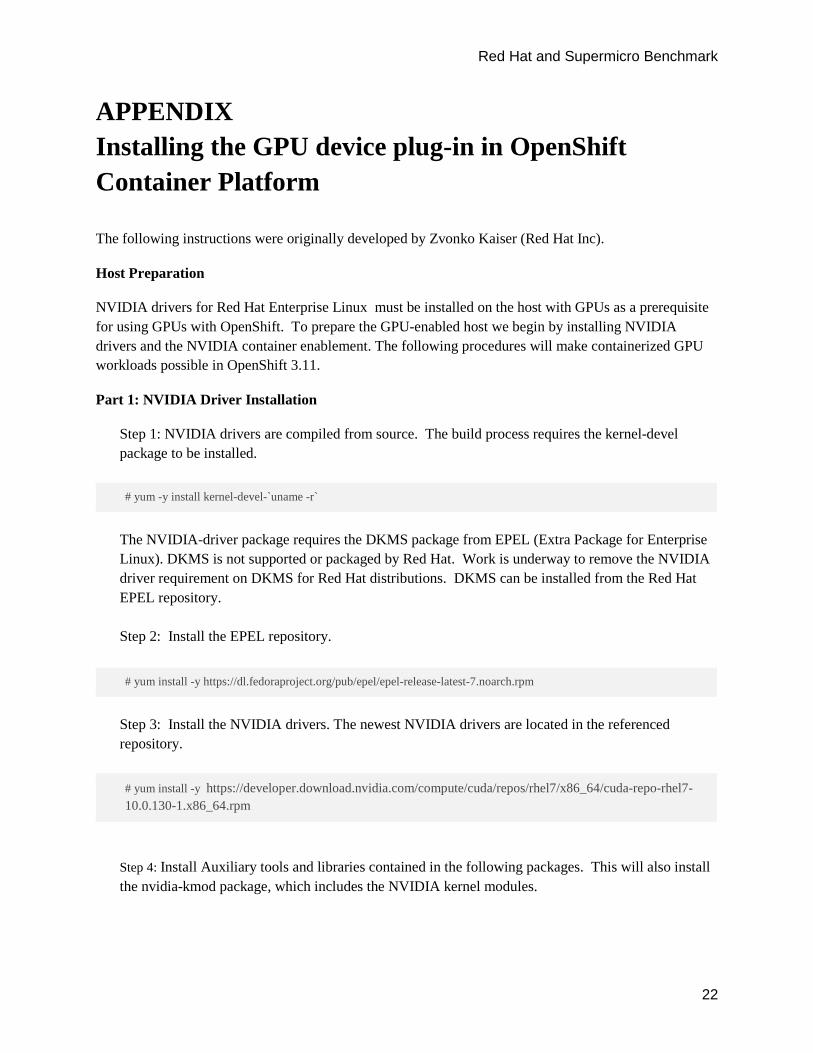
APPENDIX Installing the GPU device plug-in in OpenShift Container Platform
The following instructions were originally developed by Zvonko Kaiser (Red Hat Inc).
Host Preparation
NVIDIA drivers for Red Hat Enterprise Linux must be installed on the host with GPUs as a prerequisite for using GPUs with OpenShift. To prepare the GPU-enabled host we begin by installing NVIDIA drivers and the NVIDIA container enablement. The following procedures will make containerized GPU workloads possible in OpenShift 3.11.
Part 1: NVIDIA Driver Installation
Step 1: NVIDIA drivers are compiled from source. The build process requires the kernel-devel package to be installed.
# yum -y install kernel-devel-`uname -r`
The NVIDIA-driver package requires the DKMS package from EPEL (Extra Package for Enterprise Linux). DKMS is not supported or packaged by Red Hat. Work is underway to remove the NVIDIA driver requirement on DKMS for Red Hat distributions. DKMS can be installed from the Red Hat EPEL repository. Step 2: Install the EPEL repository.
# yum install -y https://dl.fedoraproject.org/pub/epel/epel-release-latest-7.noarch.rpm
Step 3: Install the NVIDIA drivers. The newest NVIDIA drivers are located in the referenced repository.
# yum install -y https://developer.download.nvidia.com/compute/cuda/repos/rhel7/x86_64/cuda-repo-rhel7-10.0.130-1.x86_64.rpm
Step 4: Install Auxiliary tools and libraries contained in the following packages. This will also install the nvidia-kmod package, which includes the NVIDIA kernel modules.

Red Hat and Supermicro Benchmark
23
# yum -y install nvidia-driver nvidia-driver-cuda nvidia-modprobe
Step 5: Remove the nouveau kernel module, (otherwise the NVIDIA kernel module will not load). The installation of the NVIDIA driver package will blacklist the driver in the kernel command line (nouveau.modeset=0 rd.driver.blacklist=nouveau video=vesa:off ), so that the nouveau driver will not be loaded on subsequent reboots.
# modprobe -r nouveau
Step 6: Load the NVIDIA module and the unified memory kernel modules.
# nvidia-modprobe && nvidia-modprobe -u
Step 7: Verify that the installation and the drivers are working. Extracting the name of the GPU can later be used to label the node in OpenShift.
# nvidia-smi --query-gpu=gpu_name --format=csv,noheader --id=0 | sed -e 's/ /-/g' Tesla-V100-SXM2-16GB
Adding the nvidia-container-runtime-hook
The version of docker shipped by Red Hat includes support for OCI runtime hooks. Because of this, we only need to install the nvidia-container-runtime-hook package. On other distributions of docker, additional steps may be necessary. See NVIDIA’s documentation for more information. Step 1: install libnvidia-container and the nvidia-container-runtime repositories.
# curl -s -L https://nvidia.github.io/nvidia-container-runtime/centos7/nvidia-container-runtime.repo | tee /etc/yum.repos.d/nvidia-container-runtime.repo
Step 2: install an OCI prestart hook. The prestart hook is responsible for making NVIDIA libraries and binaries available in a container (by bind-mounting them in from the host). Without the hook, users would have to include libraries and binaries into each and every container image that might use a GPU. Hooks simplify management of container images by ensuring only a single copy of libraries and binaries are required. The prestart hook is triggered by the presence of certain environment variables in the container: NVIDIA_DRIVER_CAPABILITES=compute,utility.
# yum -y install nvidia-container-runtime-hook
Red Hat and Supermicro Benchmark
24
This package will install also the config/activation files for docker/podman/cri-o. Beware that the hook json in the package will only work with cri-o >= 1.12 for crio-1.11 use the following json file:
# cat <<'EOF' >> /usr/share/containers/oci/hooks.d/oci-nvidia-hook.json {
"hasbindmounts": true, "hook": "/usr/bin/nvidia-container-runtime-hook", "stage": [ "prestart" ] } EOF
Adding the SELinux policy module
To run NVIDIA containers contained and not privileged, we have to install an SELinux policy tailored for running CUDA GPU workloads. The policy creates a new SELinux type (nvidia_container_t) with which the container will be running. Furthermore, we can drop all capabilities and prevent privilege escalation. See the invocation below to have a glimpse into how to start a NVIDIA container. Next, install the SELinux policy module on all GPU worker nodes.
# wget https://raw.githubusercontent.com/zvonkok/origin-ci-gpu/master/selinux/nvidia-container.pp # semodule -i nvidia-container.pp
Check and restore the labels on the node
The new SELinux policy heavily relies on the correct labeling of the host. Therefore, we must make sure that the required files have the correct SELinux label. Step 1: Restorecon all files that the prestart hook will need.
# nvidia-container-cli -k list | restorecon -v -f -
Step 2: Restorecon all accessed devices.
Red Hat and Supermicro Benchmark
25
# restorecon -Rv /dev
Step 3: Restorecon all files that the device plugin will need.
# restorecon -Rv /var/lib/kubelet
Everything is now set up for running a GPU-enabled container.
Verify SELinux and prestart hook functionality
To verify correct operation of driver and container enablement, try running a cuda-vector-add container. We can run the container with docker or podman.
# podman run --user 1000:1000 --security-opt=no-new-privileges --cap-drop=ALL \ --security-opt label=type:nvidia_container_t \ docker.io/mirrorgooglecontainers/cuda-vector-add:v0.1
# docker run --user 1000:1000 --security-opt=no-new-privileges --cap-drop=ALL \ --security-opt label=type:nvidia_container_t \ docker.io/mirrorgooglecontainers/cuda-vector-add:v0.1
If the test passes, the drivers, hooks and the container runtime are functioning correctly and we can move on to configuring OpenShift.
Part 2: OpenShift 3.11 with the GPU Device Plugin
Install the NVIDIA device plugin. To schedule the device plugin on nodes that include GPUs, label the node as follows:
# oc label node <node-with-gpu> openshift.com/gpu-accelerator=true node "<node-with-gpu>" labeled
This label will be used in the next step.
Deploy the NVIDIA Device Plugin Daemonset
The next step is to deploy the NVIDIA device plugin Note that the NVIDIA Device Plugin (and more generally, any hardware manufacturer’s plugin) is supported by the vendor, and is not shipped or supported by Red Hat.

Red Hat and Supermicro Benchmark
26
Clone the following repository; there are several yaml files for future use.
# git clone https://github.com/redhat-performance/openshift-psap.git # cd openshift-psap/blog/gpu/device-plugin
Here is an example daemonset (device-plugin/nvidia-device-plugin.yml) which will use the label we created in the last step so that the plugin pods will only run where GPU hardware is available. Now create the NVIDIA device plugin daemonset.
# oc create -f nvidia-device-plugin.yml
Let’s verify the correct execution of the device plugin. You can see there is only one running since only one node was labeled in the previous step.
# oc get pods -n kube-system NAME READY STATUS RESTARTS AGE nvidia-device-plugin-daemonset-s9ngg 1/1 Running 0 1m
Once the pod is running, let’s have a look at the logs.
# oc logs nvidia-device-plugin-daemonset-7tvb6 -n kube-system 2018/07/12 12:29:38 Loading NVML 2018/07/12 12:29:38 Fetching devices. 2018/07/12 12:29:38 Starting FS watcher. 2018/07/12 12:29:38 Starting OS watcher. 2018/07/12 12:29:38 Starting to serve on /var/lib/kubelet/device-plugins/nvidia.sock 2018/07/12 12:29:38 Registered device plugin with Kubelet
At this point the node itself will advertise the nvidia.com/gpu extended resource in its capacity:
# oc describe node <gpu-node> | egrep 'Capacity|Allocatable|gpu' Capacity: nvidia.com/gpu: 2 Allocatable: nvidia.com/gpu: 2

Red Hat and Supermicro Benchmark
27
Nodes that do not have GPUs installed will not advertise GPU capacity. Deploy a pod that requires a GPU
Let’s run a GPU-enabled container on the cluster. We can use the cuda-vector-add image that was used in the host preparation step. Use the following file (device-plugin/cuda-vector-add.yaml) as a pod description for running the cuda-vector-add image in OpenShift. Note the last line requests one NVIDIA GPU from OpenShift. The OpenShift scheduler will see this and schedule the pod to a node that has a free GPU. Once the pod-create request arrives at a node, the Kubelet will coordinate with the device plugin to start the pod with a GPU resource. First create a project that will group all of our GPU work.
# oc new-project nvidia
The next step is to create and start the pod.
# oc create -f cuda-vector-add.yaml
After a couple of seconds, the container finishes.
# oc get pods NAME READY STATUS RESTARTS AGE cuda-vector-add 0/1 Completed 0 3s nvidia-device-plugin-daemonset-s9ngg 1/1 Running 0 9m
Check the logs for any errors. We are looking for Test PASSED in the pod logs.
# oc logs cuda-vector-add [Vector addition of 50000 elements] Copy input data from the host memory to the CUDA device CUDA kernel launch with 196 blocks of 256 threads Copy output data from the CUDA device to the host memory Test PASSED Done
This output is the same as when we ran the container directly using podman or docker. If you see a permission denied error, check to see that you have the correct SELinux label.


