doc demo management ed5 - edemo.al-mydemo.comedemo.al-mydemo.com/doc/doc demo management ed5.pdf ·...
TRANSCRIPT

dition Date Author Modifications / Comments / Details
1 2017-06-29 Serge Le Louet Creation
2 2017-10-20 Serge Le Louet Modification : 8770 wbm
3 2017-11-03 Serge Le Louet Modification : Msad
4 2017-12-01 GilbertdeCauwer Demo script
5 2018-01-02 Serge Le Louet Modification: demo Booking
Management
Demo Guide Ed5
M a n a g e m e n t D E M O G U I D E

Sommaire
1 I n t r o d u c t i o n 3
2 A r c h i t e c t u r e 3
3 C o n n e c t i o n 4
4 O x e W b m 4
4.1 Introduction ...................................................................................... 4
4.2 High Level Architecture Diagram ............................................................. 5
4.3 Configuration ..................................................................................... 5
4.4 Demo Script ...................................................................................... 6
5 O m n iv i s t a 8 7 7 0 8
5.1 Introduction ...................................................................................... 8
5.2 Access: OmniVista client ....................................................................... 8
5.3 Demo Script ...................................................................................... 8
6 O m n i V i s t a W e bC l i e n t 1 9
6.1 Introduction .................................................................................... 19
6.2 Login and access ............................................................................... 20
7 M s a d 2 3
7.1 Introduction .................................................................................... 23
7.2 High Level Architecture Diagram ........................................................... 23
7.3 Configuration ................................................................................... 23
7.4 Demo Script .................................................................................... 25

1 Introduction
The aim of this document is to describe all aspects of the management. It contains the
architecture of the demo, and explains how to configure each component of the Management
demo. This document also contains demo scripts, which will help the demonstrator carry out the
various demos cases.
This demo guide includes 3 demos:
• OxeWbm
• Omnivista 8770
• Msad
Before a demo please book and check system availability on:
http://edemo.al-mydemo.com/?page_id=2677
2 Architecture

3 Connection
Details for Rdp connection:
4 OxeWbm
4.1 Introduction
Key Message: This demo supports the value proposition message about
The OmniPCX Enterprise Web Based Management (OXE WBM) application is a web based
interface that is part of the OmniPCX Enterprise solution. Available from R12.0, the OXE WBM
enables to configure the OmniPCX Enterprise settings in a quick and user-friendly way through
one single web interface.
The OXE WBM is directly accessible by a dedicated URL address reachable from standard
industry internet browsers. This web client does not require any plug-in to run on a web
browser. It runs in a secure way (https connection to or from the OmniPCX Enterprise).

The authentication of users opening an OXE WBM session can be performed remotely by a
RADIUS server. In this configuration, authentication is not handled by the OmniPCX Enterprise,
which sends authentication requests to the RADIUS server.
Document Reference: OXE System: Web Based Management Administrator Manual 8AL91034ENAA Ed. 01
4.2 High Level Architecture Diagram
4.3 Configuration
From the desktop select: oxewbm
Use login: mtcl
And password: Aledemo2017 !
You can choose the interface language.

4.4 Demo Script
4.4.1 Introduce interface
(1) Information and command
available.
Available support according
to their position in the tree
(2).
(2) About tree positioning.
(3) Model base on OXE
(4) Command available
(5) Information area and filtering
4.4.2 Find a user
(1) Choose USERS object
(2) Select options
(3) Apply or cancel
(4) The result is display on the tree.
Information: In the filters and sort menu
if you choose set function equals profile
you can display Meta-Profile using in the
USER application in OV8770
En
Fr
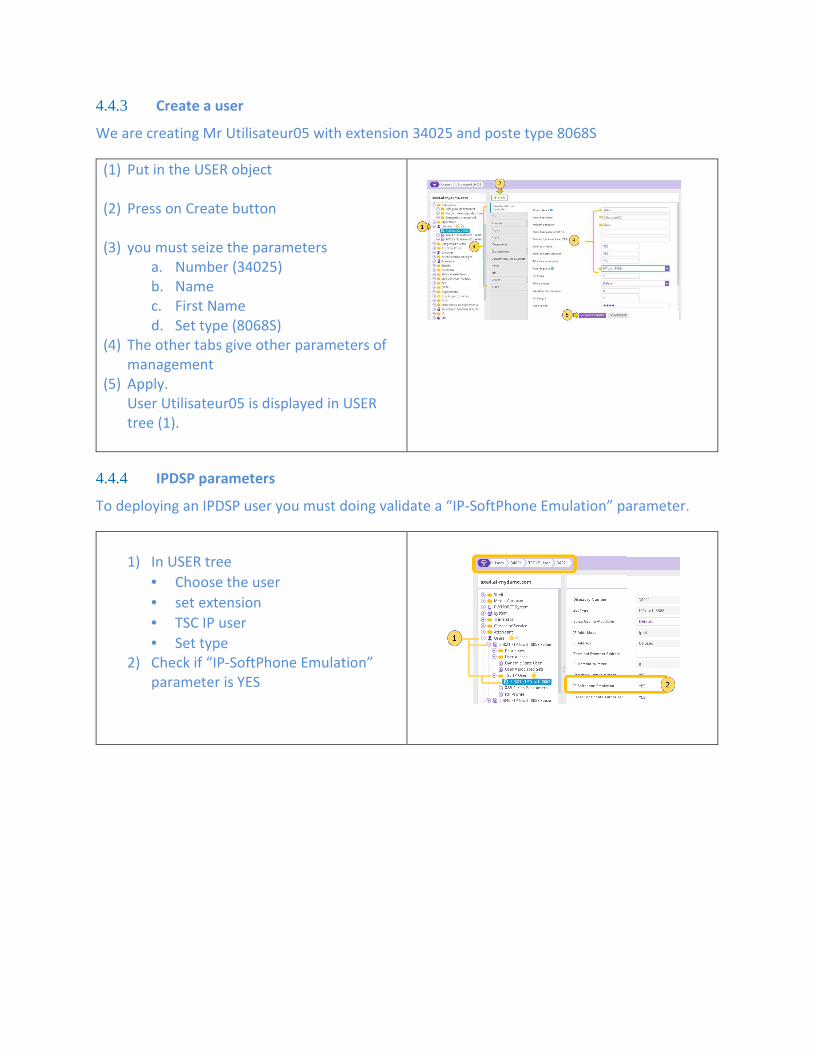
4.4.3 Create a user
We are creating Mr Utilisateur05 with extension 34025 and poste type 8068S
(1) Put in the USER object
(2) Press on Create button
(3) you must seize the parameters
a. Number (34025)
b. Name
c. First Name
d. Set type (8068S)
(4) The other tabs give other parameters of
management
(5) Apply.
User Utilisateur05 is displayed in USER
tree (1).
4.4.4 IPDSP parameters
To deploying an IPDSP user you must doing validate a “IP-SoftPhone Emulation” parameter.
1) In USER tree
• Choose the user
• set extension
• TSC IP user
• Set type
2) Check if “IP-SoftPhone Emulation”
parameter is YES

5 Omnivista 8770
5.1 Introduction
The OmniVista 8770 Network Management System suite is a comprehensive set of applications
designed to help telecom managers and administrators in their day-to-day tasks. It can aid
them in making strategic choices for their converged networks, by combining reliability, assured
availability, performance information, access security, configuration management and
telecommunication cost tracking. …. Message: This demo supports the value proposition
message about
5.2 Access: OmniVista client
From the desktop select: OmniVista8770
Client
Use login: Ov8770Demo
or: BasicOV8770
Password: Aledemo2017!
5.3 Demo Script
5.3.1 Introduce the level of services between both administrators
We have 2 administrator’s logins, Ov8770 and BasicOV8770. The first have all right and the
second have restricted rights on OXE4 server.
a) Use the basic login and show the differences icons

b) Use the Ov8770 login and show them its different properties.
With the basic login,
1) the OV8770 applications (1) are
limited at USER and
configuration.
2) In configuration app /connect to
OXE4
3) Model object (2) of OXE are
limited at
• Users
• Groups
• Speed Dialing
With the complete login
administration login: Ov8770Demo
And password: Aledemo2017!
5.3.2 Find a user with search area on USER application.
Start USER application

Area definition
(1) Ov8770 applications available
(2) Tree structure. (more
information in chapter 2 in
am_adminmanual
(3) Search area
(4) Properties area (2).
In the field WHERE on search area
Dans la zone de recherche dans le
champ :
Where = Last name
Contains = Utili
Apply with
(No case sensitive)
The result is display on area properties
(2).
The icon display the result in the
tree structure
come back to script
5.3.3 Create a user with AD (Activ Dyretory) connector.
On the desktop

In the folder: Forum2010/MSAD
Create a new user (3)
Create a new object in MSAD
- First Name
- Name
- Mail address
- Next
- Enter a password (1234)
- Next
- Finish
(1) Click right on the new user
(2) Chose: Alcatel-Lucent Unified
Management
(3) Enter one mail address.
(4) Chose a Meta-profil
(5) Fields available but completed
automatically by the profile.
(6) Create
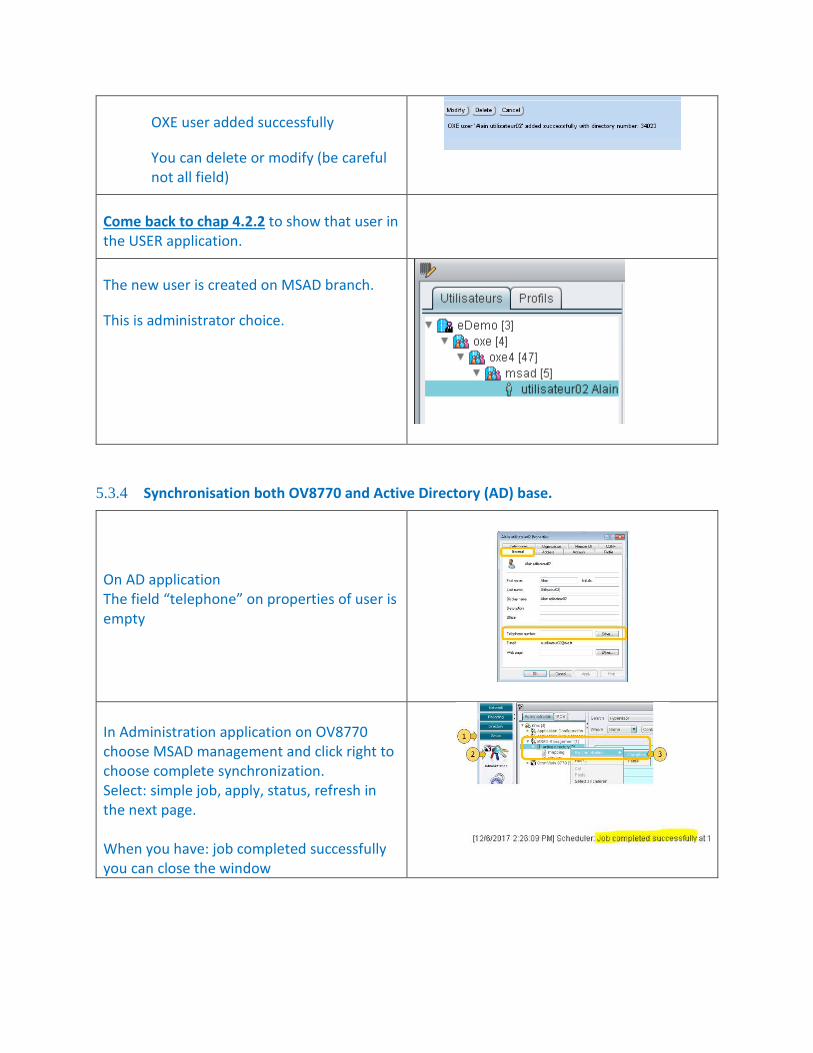
OXE user added successfully
You can delete or modify (be careful
not all field)
Come back to chap 4.2.2 to show that user in
the USER application.
The new user is created on MSAD branch.
This is administrator choice.
5.3.4 Synchronisation both OV8770 and Active Directory (AD) base.
On AD application
The field “telephone” on properties of user is
empty
In Administration application on OV8770
choose MSAD management and click right to
choose complete synchronization.
Select: simple job, apply, status, refresh in
the next page.
When you have: job completed successfully
you can close the window
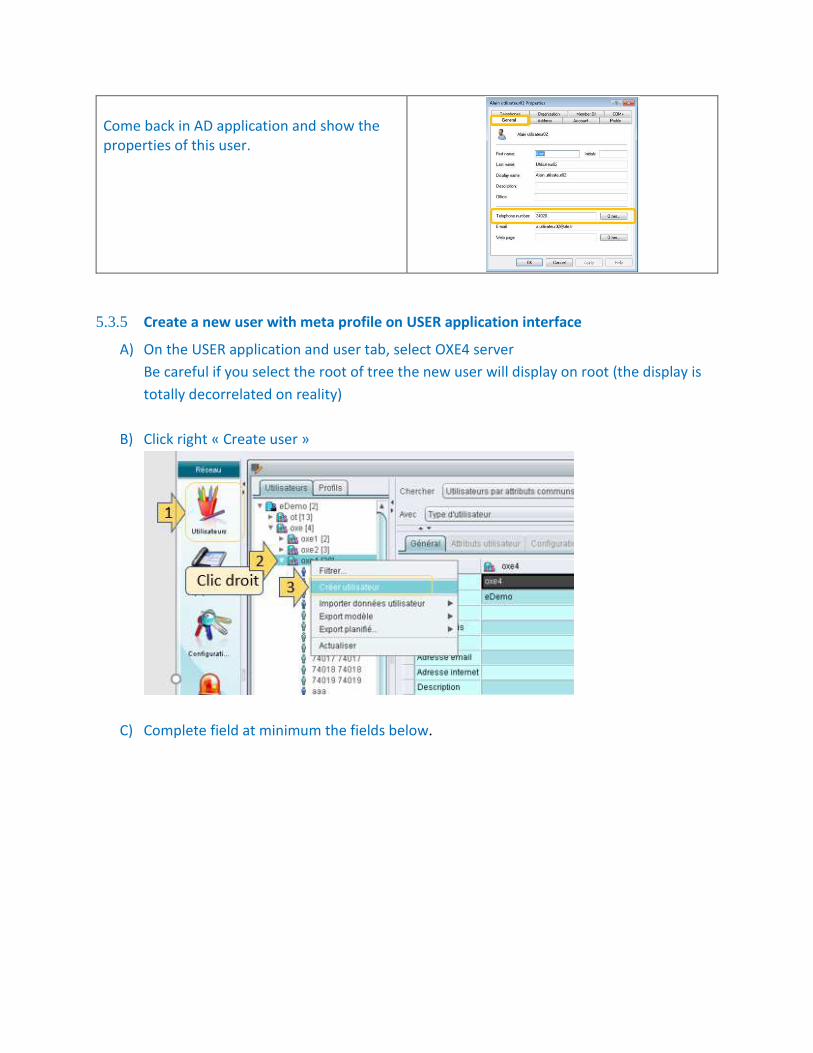
Come back in AD application and show the
properties of this user.
5.3.5 Create a new user with meta profile on USER application interface
A) On the USER application and user tab, select OXE4 server
Be careful if you select the root of tree the new user will display on root (the display is
totally decorrelated on reality)
B) Click right « Create user »
C) Complete field at minimum the fields below.

- (1) user type = OXE
- Salutation
- Last name
- First name
- @mail (use by OT application)
- (2) Meta profile: choose 8078S_OT
Have a right on OpenTouch (you will
can associate a smartphone)
- (3) apply
D) After couple seconds mr USER is available
5.3.6 Append a secondary set (DECT or SmartPhone)
You can add a secondary set at on user with USER application.
The secondary set can be:
a) A user OXE if is DECT user
b) A User SIP if is user OT (OTC-PC or OTC-mobile)
DECT SET:
In the user list click right and
select: add a secondary set.
You can choose an existing set if
there is already exist or add a
new set.
- case1: existing
- Case2: add new

Cas1: if the DECT already exist
Select in the windows the right
user
Cas2: if the set does not exist
Complete the OXE directory
number
When you have finished the
secondary set is displayed below
the main user.

5.3.7 Add OpenTouch right (OTC mobile)
You can add OpenTouch right at the OXE user. The right can be voicemail or OTC mobile for
smartphone (include REX)
To open the right, you must enter
the email address (2) and valid
the applications OT (1)
Chose the OT instance

1) When you chose the
profile (oxeUser) quite a
few fields are completed
automatically
2) All this fields must be
fulfilled manually.
3) This fields are mandatory
to create REX and mobile
parameters
Rules: xxx= 3 digits latest on
directory number (34020 for this
case)
OT device directory number
� 1034 xxx or 1034020
Remote extension number
� 1036 xxx or 1036020
System speed dial number
� AdirectoryNumber or A34020
1) Don’t forget the login
(indentifiant)
2) And password user, SIP and
TUI
At the end M. Utilisateur have 2
secondary’s sets.
One DECT and one OTC mobile

5.3.8 Display the profile OT
In the application
Select OT-OXE
Click right: configure
(1) Select tab PROFIL
(2) Chose « oxeUser »
Associated applications (2) are
showing in the licences tab (1)

5.3.9 Displaying and modification user’s keys
On CONFIGURATION application choose OXE4 server in
tree and select a submenu CONFIGURE (1) with right
click
• Choose on USER in the tree and right click to display
a graphical view.
Be careful choice a user with IPTouch type set
• You can be writing directly in the graphic view
6 OmniVista WebClient
6.1 Introduction
The OmniVista 8770 Web Based Management (OmniVista 8770 WBM) client is a web based
interface that is part of the OmniVista 8770 solution. This web client enables to provision users
and their devices in a quick and user-friendly way through one single web interface.
The OmniVista 8770 WBM is a lightweight client which does not require any plug-in and license
to run on a web browser. It runs in a secure way via an HTTPS connection (to or from the
OmniVista 8770 server).
The OmniVista 8770 WBM client is accessible directly by a dedicated URL address reachable from
standard industry internet browsers such as Google Chrome or Mozilla Firefox. The OmniVista
8770 WBM home page opens immediately after login.

6.2 Login and access
You can access to the web management OmniVista8770 choose OmniVista8770 URL.
1) Choose OmniVista URL
2) Choose option
Directory or
Management
3) Choose the usual
language
6.2.1 Directory Consultation
Directory option
This option use one licence
OV8770
1) Search bar
2) Display tree
3) Display area
4) Authentication and
associate set (for click to
call)

6.2.2 Mangement
Management option
Login : Ov8770Demo
Password : ALEdemo2017!
You can change language
You can create a user with OT
option


7 Msad
7.1 Introduction
Key Message: This demo supports the value proposition message about
The MSAD (Microsoft Active Directory) plug-in is used when the OmniVista 8770 server
operates with an Active Directory server. This plug-in is installed locally on the server hosting
the Active Directory.
The MSAD plug-in enables to launch an OmniVista 8770 user management web tool from the
Active Directory. This web tool is connected via HTTPS to the OmniVista 8770 server.
The OmniVista 8770 user management web tool allows the creation, update or deletion of the
OXE and OT users from the list of users declared in the Active Directory. User information is
sent to the OmniVista 8770 server in the body part of HTTP requests.
7.2 High Level Architecture Diagram
7.3 Configuration
Msad Configuration :

8770 Meta Profile Configuration:
Each metaprofile is linked to:
- Oxe free range number
- Oxe Profile

-
- Key Profile
-
- Cost Center
-
-
Range
Number
Phone
Type
Oxe Profile Key Profile Cost Center
ADM ADM : 34O40-
34059
8068 ADM8068 Company 2 401: ADM
DSI DSI: 34020-
34039
8068 DSI8068 Company 3 402: DSI
DECT DECT:34060-
34079
GAP+ DECT 403: DECT
IPdsp Company:
34000-34019
8068 IPDSP Company 404:
Company
7.4 Demo Script
In Organisation Unit “Msad”

Choose :
- oxe metaprofile
-

Click on Create
User is created in 8770
If User is already declared in 8770 users Management:
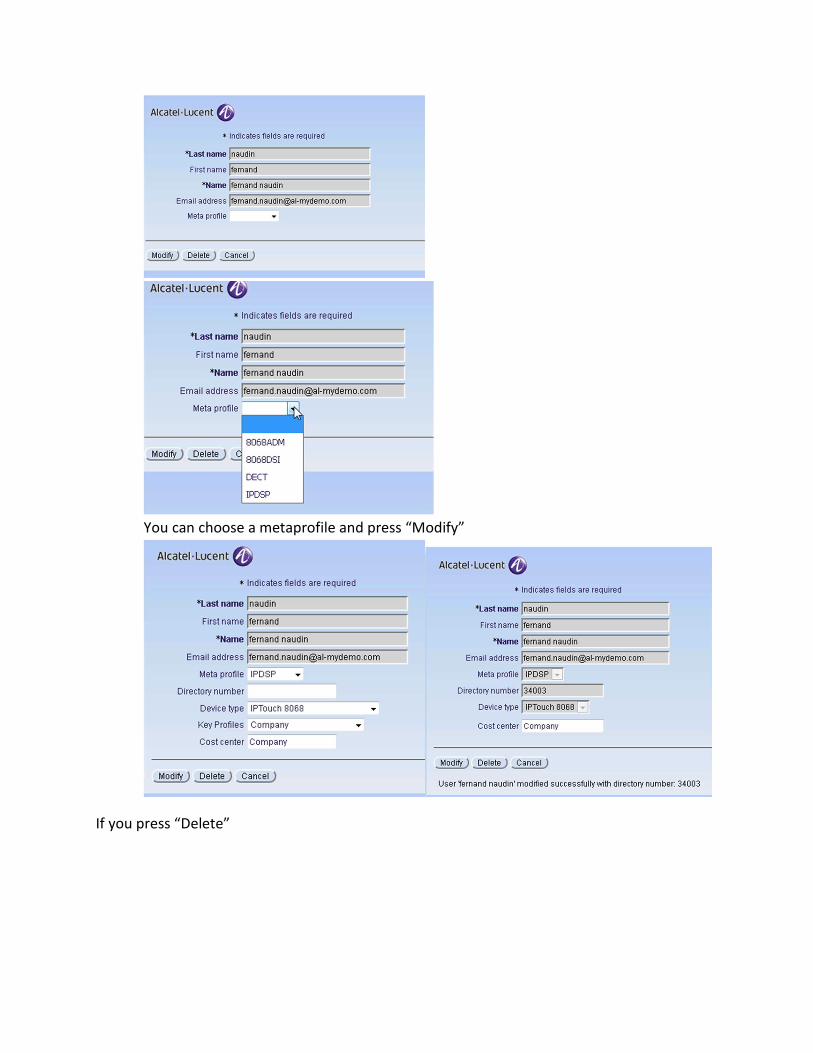
You can choose a metaprofile and press “Modify”
If you press “Delete”
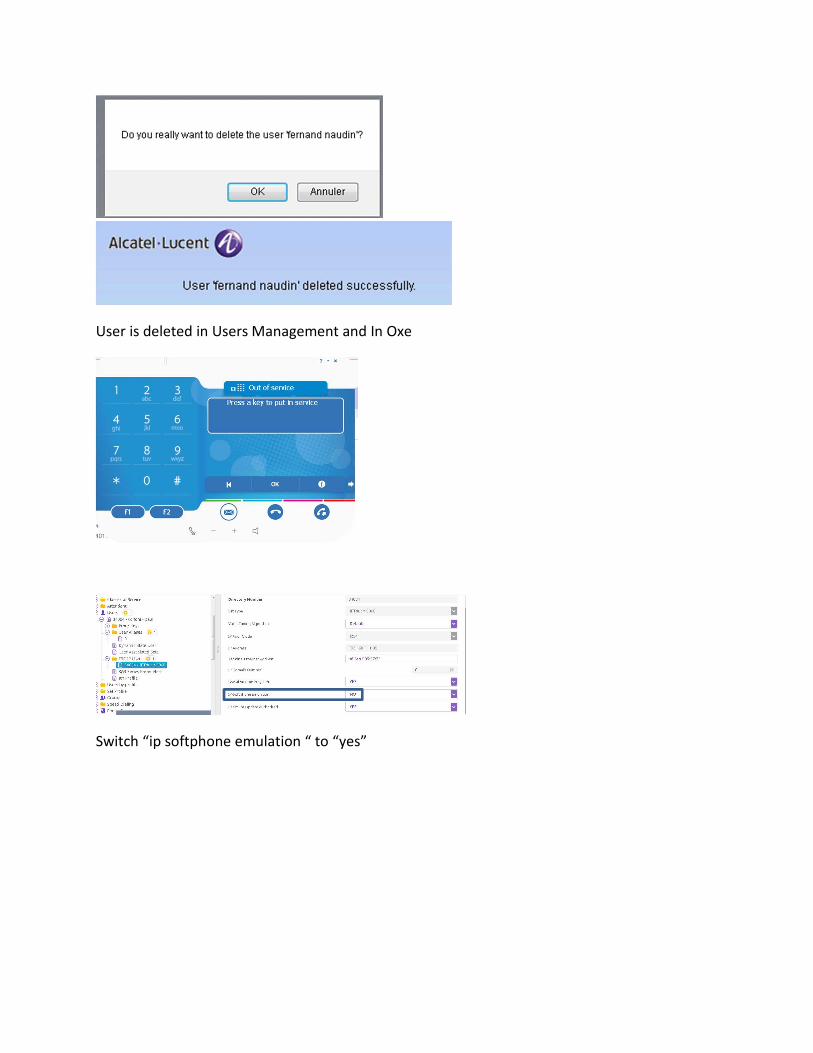
User is deleted in Users Management and In Oxe
Switch “ip softphone emulation “ to “yes”
