dlp projector - optoma.com
TRANSCRIPT
Multimedia Manual
DLP® Projector
English2
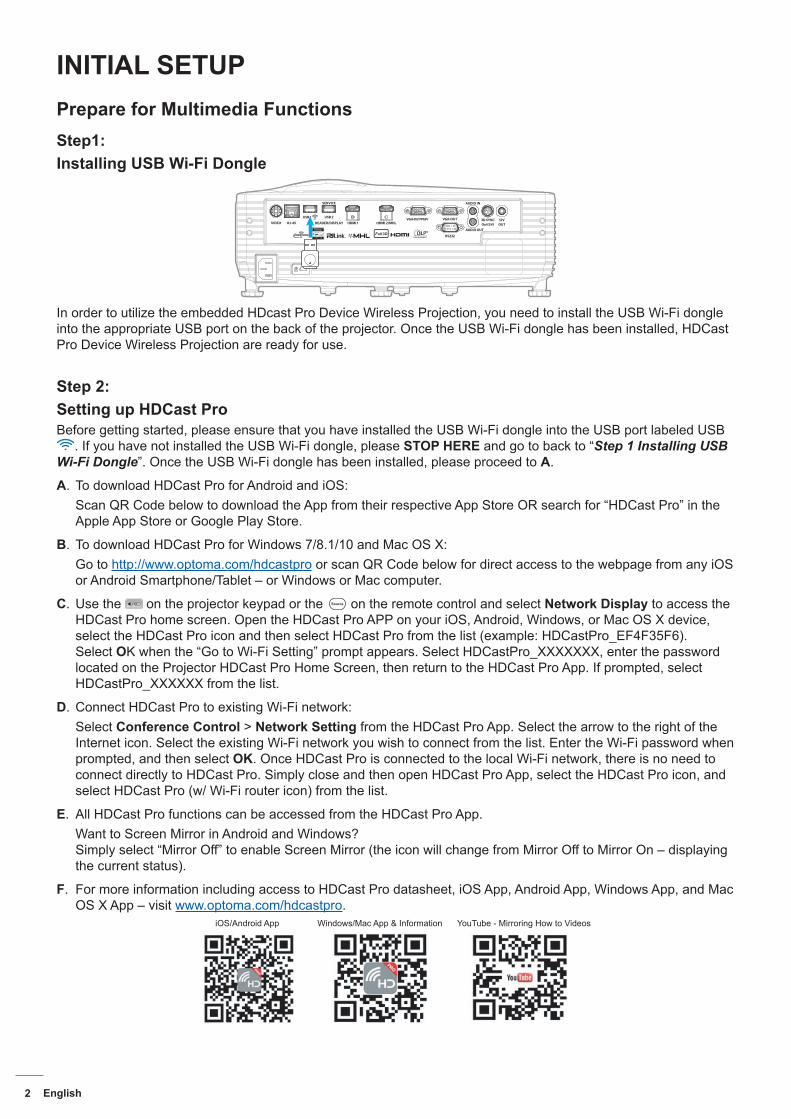
INITIAL SETUPPrepare for Multimedia FunctionsStep1:Installing USB Wi-Fi Dongle
In order to utilize the embedded HDcast Pro Device Wireless Projection, you need to install the USB Wi-Fi dongle into the appropriate USB port on the back of the projector. Once the USB Wi-Fi dongle has been installed, HDCast Pro Device Wireless Projection are ready for use.
Step 2:Setting up HDCast ProBefore getting started, please ensure that you have installed the USB Wi-Fi dongle into the USB port labeled USB
. If you have not installed the USB Wi-Fi dongle, please STOP HERE and go to back to “Step 1 Installing USB Wi-Fi Dongle”. Once the USB Wi-Fi dongle has been installed, please proceed to A.
A. To download HDCast Pro for Android and iOS:Scan QR Code below to download the App from their respective App Store OR search for “HDCast Pro” in the Apple App Store or Google Play Store.
B. To download HDCast Pro for Windows 7/8.1/10 and Mac OS X:Go to http://www.optoma.com/hdcastpro or scan QR Code below for direct access to the webpage from any iOS or Android Smartphone/Tablet – or Windows or Mac computer.
C. Use the on the projector keypad or the Source on the remote control and select Network Display to access the HDCast Pro home screen. Open the HDCast Pro APP on your iOS, Android, Windows, or Mac OS X device, select the HDCast Pro icon and then select HDCast Pro from the list (example: HDCastPro_EF4F35F6). Select OK when the “Go to Wi-Fi Setting” prompt appears. Select HDCastPro_XXXXXXX, enter the password located on the Projector HDCast Pro Home Screen, then return to the HDCast Pro App. If prompted, select HDCastPro_XXXXXX from the list.
D. Connect HDCast Pro to existing Wi-Fi network:Select Conference Control > Network Setting from the HDCast Pro App. Select the arrow to the right of the Internet icon. Select the existing Wi-Fi network you wish to connect from the list. Enter the Wi-Fi password when prompted, and then select OK. Once HDCast Pro is connected to the local Wi-Fi network, there is no need to connect directly to HDCast Pro. Simply close and then open HDCast Pro App, select the HDCast Pro icon, and select HDCast Pro (w/ Wi-Fi router icon) from the list.
E. All HDCast Pro functions can be accessed from the HDCast Pro App. Want to Screen Mirror in Android and Windows? Simply select “Mirror Off” to enable Screen Mirror (the icon will change from Mirror Off to Mirror On – displaying the current status).
F. For more information including access to HDCast Pro datasheet, iOS App, Android App, Windows App, and Mac OS X App – visit www.optoma.com/hdcastpro.
iOS/Android App Windows/Mac App & Information YouTube - Mirroring How to Videos

English 3
MULTIMEDIAUSB Reader
Photo and document viewerUsers do not always require a PC or mobile device to display content. With the built-in USB reader, simply by plugging in a USB storage device, users can directly view photos and documents including PowerPoint, Word, Excel and PDF file formats.
Note: A USB flash disk must be plugged into the projector if you want to use the USB Reader function.
Follow these steps to playback photo or office files on your projector:
1. Connect one end of the power lead to the projector and the other end to the wall outlet. Then turn on the projector by pressing the “ ” button on the projector keypad or the remote control.
2. Plug in a USB flash disk to your projector.3. Press the on the projector keypad or the Source on the remote control and select USB Reader.
The USB Reader page opens.
4. Access the USB Reader menu and select the multimedia files: Photo or Office. Or select the Settings option to change settings for photo or office.
USB support format
Storage Device type File system File & Dir LevelUSB USB Flash FAT16, FAT32, NTFS,
ExFAT � Supports up to 999 directories/files � Path name length limit is 100
characters
Note: The supported USB storage size is up to 64GB.
English4
MULTIMEDIA
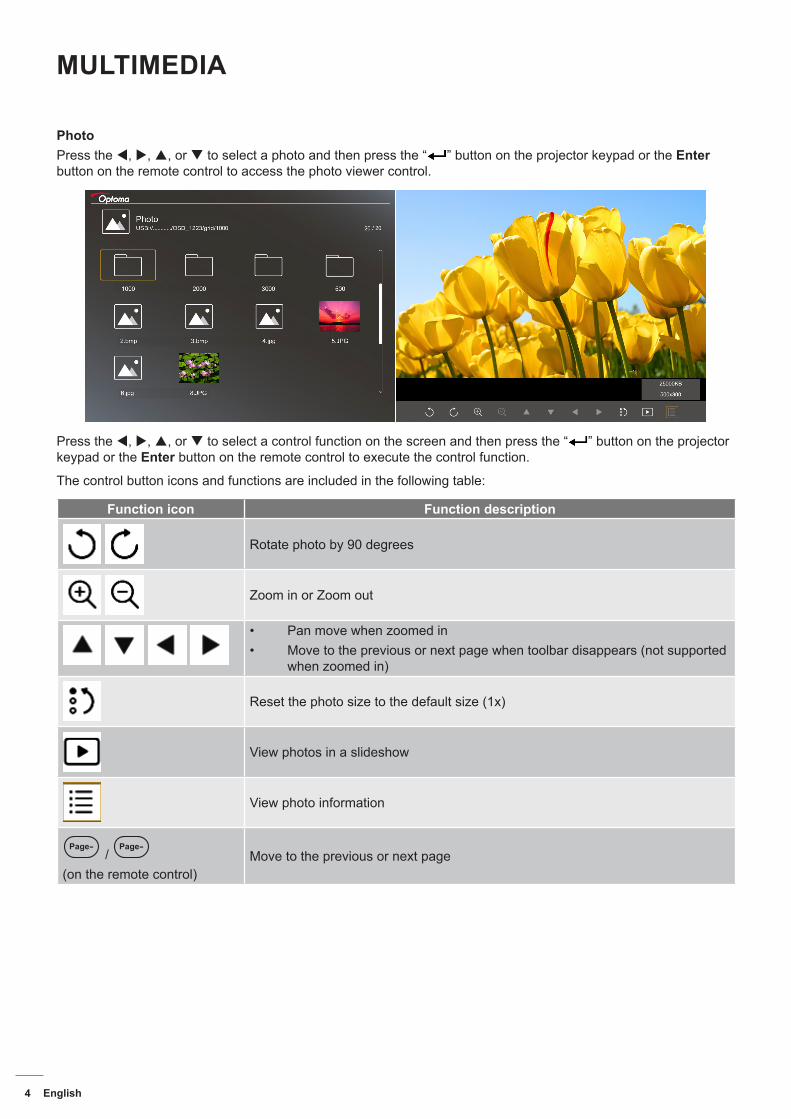
PhotoPress the t, u, p, or q to select a photo and then press the “ ” button on the projector keypad or the Enter button on the remote control to access the photo viewer control.
Press the t, u, p, or q to select a control function on the screen and then press the “ ” button on the projector keypad or the Enter button on the remote control to execute the control function.
The control button icons and functions are included in the following table:
Function icon Function description
Rotate photo by 90 degrees
Zoom in or Zoom out
� Pan move when zoomed in � Move to the previous or next page when toolbar disappears (not supported
when zoomed in)
Reset the photo size to the default size (1x)
View photos in a slideshow
View photo information
Page- /
Page-
(on the remote control)Move to the previous or next page
English 5
MULTIMEDIA
Photo support format
Image format Profile Color space Size limitationJPEG Baseline YUV400 8000*6000
YUV420 8000*6000YUV422 8000*6000YUV440 8000*6000YUV444 8000*6000
Progressive YUV400 Width <= 8000 and height <= 6000YUV420YUV422YUV440YUV444
� Suggestion: Limit supported size of BMP and JPG progressive file.
� BMP resolution supports up to 1600x1200.
� JPEG progressive resolution support up to 1600x1200.
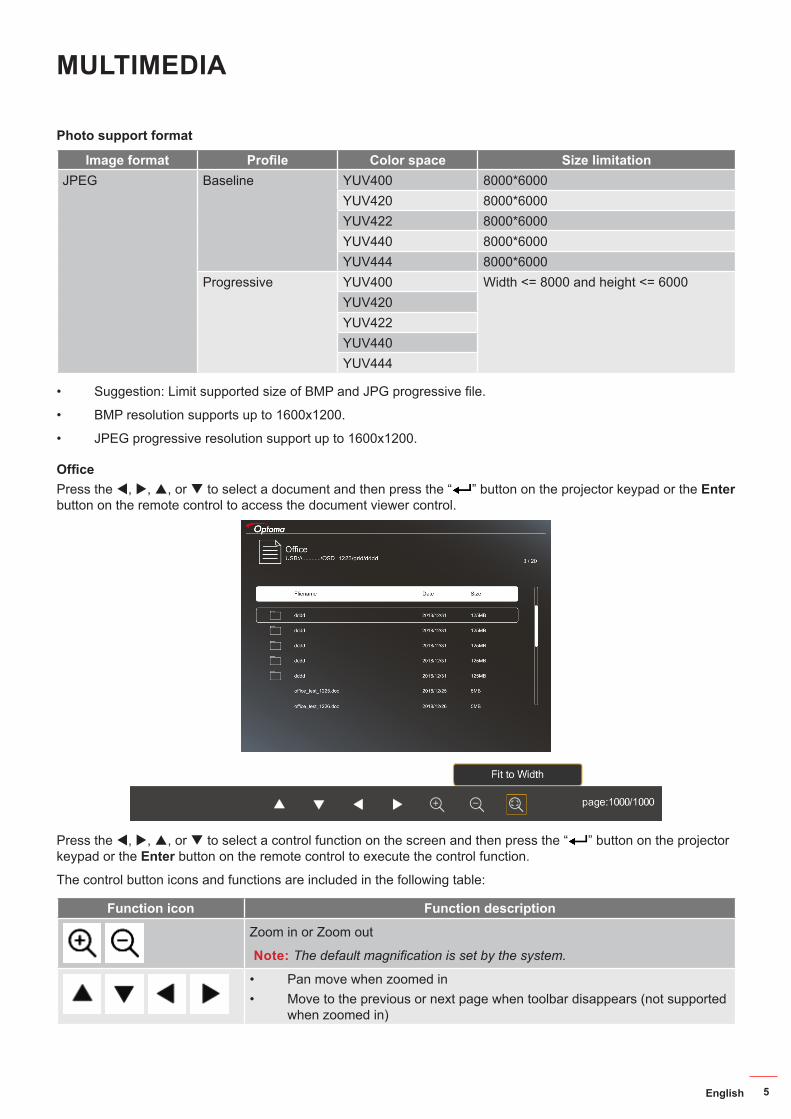
OfficePress the t, u, p, or q to select a document and then press the “ ” button on the projector keypad or the Enter button on the remote control to access the document viewer control.
Press the t, u, p, or q to select a control function on the screen and then press the “ ” button on the projector keypad or the Enter button on the remote control to execute the control function.
The control button icons and functions are included in the following table:
Function icon Function description
Zoom in or Zoom out
Note: The default magnification is set by the system.
� Pan move when zoomed in � Move to the previous or next page when toolbar disappears (not supported
when zoomed in)
English6
MULTIMEDIA
Function icon Function description
Fit to height, Fit to width, or Fit to screen
page: 1000 / 1000 Current page / Total pages
Page- / Page- (on the remote control)
� Move to the previous or next page � Switch the worksheet in Excel
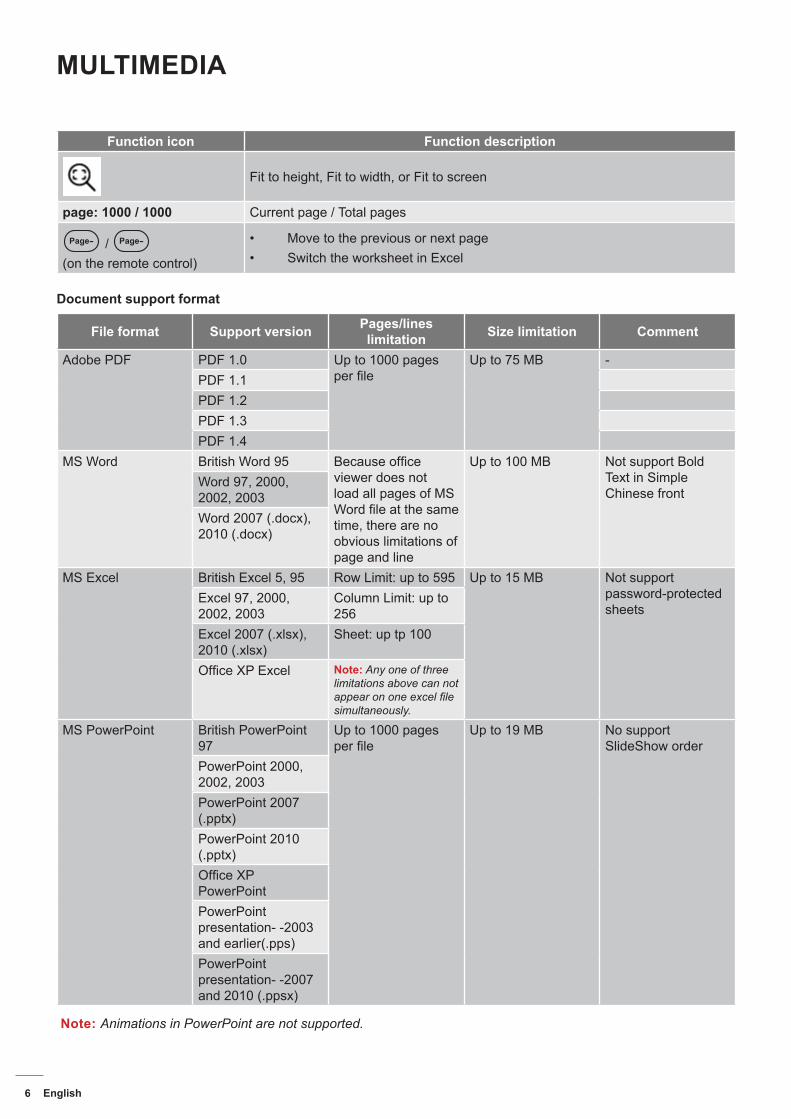
Document support format
File format Support version Pages/lineslimitation Size limitation Comment
Adobe PDF PDF 1.0 Up to 1000 pages per file
Up to 75 MB -PDF 1.1PDF 1.2PDF 1.3PDF 1.4
MS Word British Word 95 Because office viewer does not load all pages of MS Word file at the same time, there are no obvious limitations of page and line
Up to 100 MB Not support Bold Text in Simple Chinese front
Word 97, 2000, 2002, 2003Word 2007 (.docx), 2010 (.docx)
MS Excel British Excel 5, 95 Row Limit: up to 595 Up to 15 MB Not support password-protected sheets
Excel 97, 2000, 2002, 2003
Column Limit: up to 256
Excel 2007 (.xlsx), 2010 (.xlsx)
Sheet: up tp 100
Office XP Excel Note: Any one of three limitations above can not appear on one excel file simultaneously.
MS PowerPoint British PowerPoint 97
Up to 1000 pages per file
Up to 19 MB No support SlideShow order
PowerPoint 2000, 2002, 2003PowerPoint 2007 (.pptx)PowerPoint 2010 (.pptx)Office XP PowerPointPowerPoint presentation- -2003 and earlier(.pps)PowerPoint presentation- -2007 and 2010 (.ppsx)
Note: Animations in PowerPoint are not supported.
English 7
MULTIMEDIA
USB Display (mobile device connect to USB port directly)
Screen mirroring by USB cableMirror your iOS or Android screen by connecting the device to the projector with your USB charging cable. Conveniently and easily share your content to the big screen.
Note: � The USB Display function requires a tethered connection from the smart device to the projector. � Mirror your iOS or Android screen by connecting the device to the projector with your USB charging cable.
Conveniently and easily share your content to the big screen. � Android devices need to download the free mobile APP for the screen mirroring.
Follow these steps to mirror your smart device’s screen to the projector:
1. Connect one end of the power lead to the projector and the other end to the wall outlet. Then turn on the projector by pressing the “ ” button on the projector keypad or the remote control.
2. Do any of the following:
For iOS:
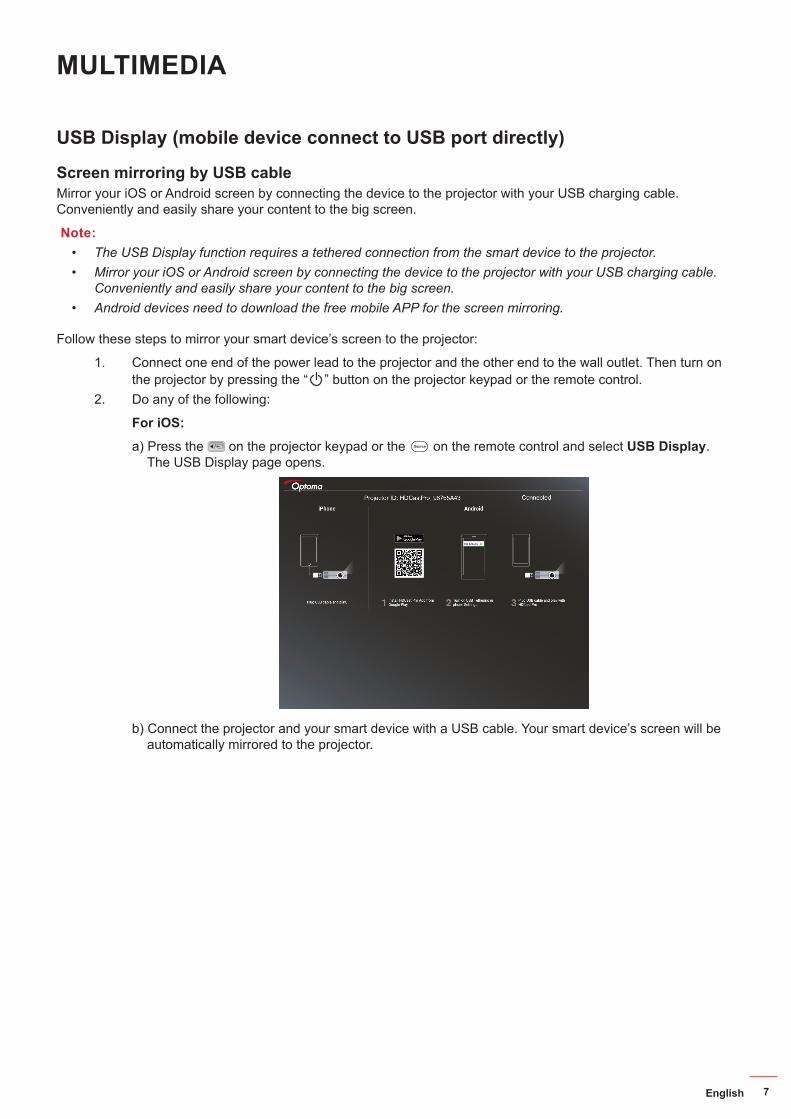
a) Press the on the projector keypad or the Source on the remote control and select USB Display. The USB Display page opens.
b) Connect the projector and your smart device with a USB cable. Your smart device’s screen will be automatically mirrored to the projector.
English8
MULTIMEDIA
For Android:
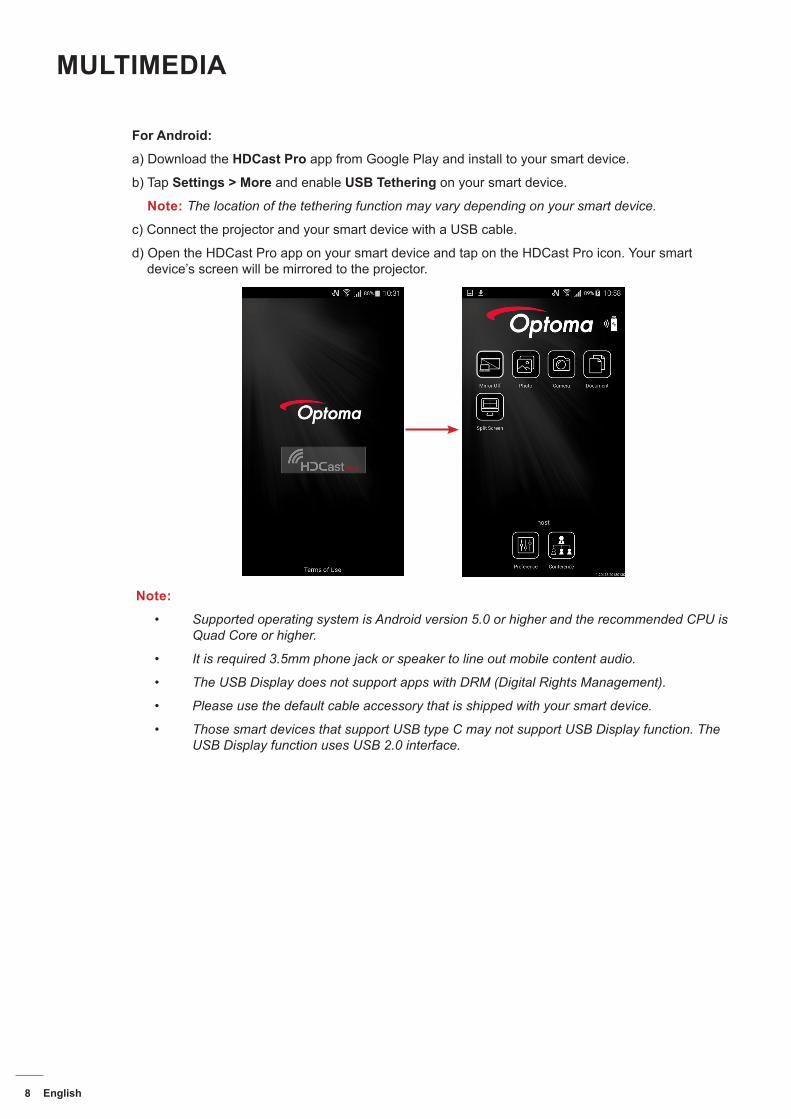
a) Download the HDCast Pro app from Google Play and install to your smart device.
b) Tap Settings > More and enable USB Tethering on your smart device.
Note: The location of the tethering function may vary depending on your smart device.
c) Connect the projector and your smart device with a USB cable.
d) Open the HDCast Pro app on your smart device and tap on the HDCast Pro icon. Your smart device’s screen will be mirrored to the projector.
Note:
� Supported operating system is Android version 5.0 or higher and the recommended CPU is Quad Core or higher.
� It is required 3.5mm phone jack or speaker to line out mobile content audio.
� The USB Display does not support apps with DRM (Digital Rights Management).
� Please use the default cable accessory that is shipped with your smart device.
� Those smart devices that support USB type C may not support USB Display function. The USB Display function uses USB 2.0 interface.
English 9
MULTIMEDIA
Network Display
Wireless projection with optional WiFi dongleWith an optional WiFi dongle and using the free mobile APP, you can wirelessly connect to your laptop, tablet or mobile device and project your content to the big screen. Up to 4 devices can be connected to the projector simultaneously.With WiFi display, you can eliminate cable clutter and increase connection versatility.
Follow these steps to mirror your smart device’s screen to the projector:
1. Connect one end of the power lead to the projector and the other end to the wall outlet. Then turn on the projector by pressing the “ ” button on the projector keypad or the remote control.
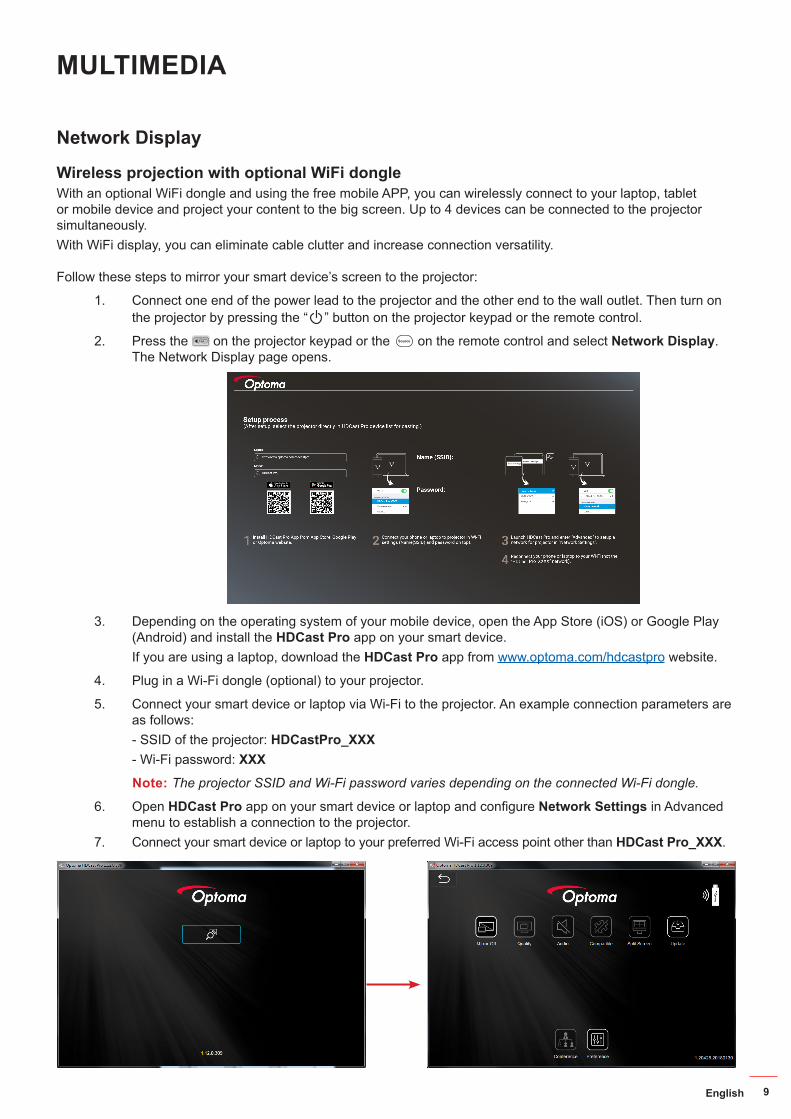
2. Press the on the projector keypad or the Source on the remote control and select Network Display. The Network Display page opens.
3. Depending on the operating system of your mobile device, open the App Store (iOS) or Google Play (Android) and install the HDCast Pro app on your smart device.If you are using a laptop, download the HDCast Pro app from www.optoma.com/hdcastpro website.
4. Plug in a Wi-Fi dongle (optional) to your projector.
5. Connect your smart device or laptop via Wi-Fi to the projector. An example connection parameters are as follows:- SSID of the projector: HDCastPro_XXX- Wi-Fi password: XXX
Note: The projector SSID and Wi-Fi password varies depending on the connected Wi-Fi dongle.
6. Open HDCast Pro app on your smart device or laptop and configure Network Settings in Advanced menu to establish a connection to the projector.
7. Connect your smart device or laptop to your preferred Wi-Fi access point other than HDCast Pro_XXX.
English10
MULTIMEDIA
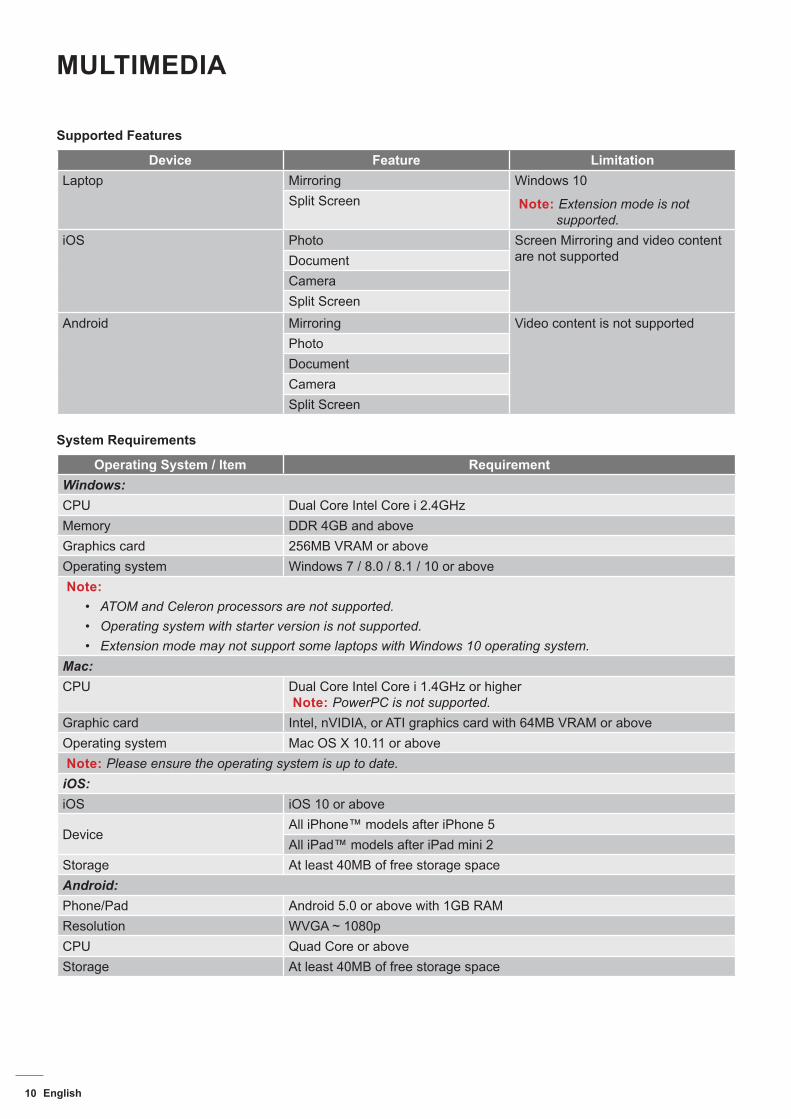
Supported Features
Device Feature LimitationLaptop Mirroring Windows 10
Note: Extension mode is not supported.
Split Screen
iOS Photo Screen Mirroring and video content are not supportedDocument
CameraSplit Screen
Android Mirroring Video content is not supportedPhotoDocumentCameraSplit Screen
System Requirements
Operating System / Item RequirementWindows:CPU Dual Core Intel Core i 2.4GHzMemory DDR 4GB and aboveGraphics card 256MB VRAM or aboveOperating system Windows 7 / 8.0 / 8.1 / 10 or aboveNote:
� ATOM and Celeron processors are not supported. � Operating system with starter version is not supported. � Extension mode may not support some laptops with Windows 10 operating system.
Mac:CPU Dual Core Intel Core i 1.4GHz or higher
Note: PowerPC is not supported.Graphic card Intel, nVIDIA, or ATI graphics card with 64MB VRAM or aboveOperating system Mac OS X 10.11 or aboveNote: Please ensure the operating system is up to date.
iOS:iOS iOS 10 or above
DeviceAll iPhone™ models after iPhone 5All iPad™ models after iPad mini 2
Storage At least 40MB of free storage spaceAndroid:Phone/Pad Android 5.0 or above with 1GB RAMResolution WVGA ~ 1080pCPU Quad Core or aboveStorage At least 40MB of free storage space

www.optoma.com