diy-di proposal - black sheepblacksheep.parry.org/wp-content/uploads/2010/03/diy-di.pdf · diy-di...
TRANSCRIPT

DIY-DI
By Chad Parry
Do-It-Yourself Dependency Injection The “dependency injection” (DI) technique is a way to improve testability and maintainability of object-
oriented code. Typically adoption of dependency injection is coupled with adoption of a dependency
injection framework, such as Guice1 or Spring2. This proposal shows how dependency injection can be
accomplished without any framework. The same benefits provided by frameworks can be realized using
“do-it-yourself” (DIY) handcrafted code. This model is named DIY-DI, pronounced die-die. The
instructions here will illustrate the boilerplate code and the guidelines that are needed to introduce
dependency injection to a project.
Objectives Projects use dependency injection to increase unit test coverage. A typical application is composed of
some business logic and some glue code. It is the business logic portions that stand most in need of
testing. On the other hand, the glue code is just trivial method invocations with sprawling dependencies.
It is not necessary, nor is it easy, to test the glue code. The natural solution is to segregate out the
business logic. Once the business logic is isolated, it becomes easy to write the tests, and developers are
naturally more likely to create high quality test cases.
The recommended flavor of dependency injection is “constructor injection.” This means that a
constructor asks for all the resources that the object needs. For example, if an object needs read access
to a file, then it should have a constructor parameter for the file contents. The object should avoid
references to the file system service that provides the file contents, because that behavior would be
harder to test. The object shouldn’t worry about who will provide the file contents or how they will do
it, because that is a problem that will be solved in the glue code.
Framework Marriage Many developers treat it as a foregone conclusion that dependency injection techniques are unwieldy
without the help of a framework. The case to support this claim is based on straw man arguments,
where the benefits of a framework are contrasted with a naïve implementation that has poor code
reuse. The industry has largely ignored the possibility of achieving dependency injection merely through
appropriate coding guidelines.
Using a framework to implement dependency injection is a fine option for many projects. Frameworks
inherently carry two disadvantages, however. First, the project code becomes tightly coupled to the
framework’s syntax. It would be costly to extricate the code from an entrenched framework and switch
1 The Guice homepage is http://code.google.com/p/google-guice/.
2 The Spring homepage is http://www.springsource.org/.

2
to a different vendor in the future. Second, most frameworks perform a lot of magic behind the scenes.
Developers sometimes feel that important product logic is hidden from them. Worse, most frameworks
delay injection errors until runtime, although ideally a system would surface injection errors at compile
time.
DIY-DI realizes dependency injection using handcrafted code that does not require an external
framework. A typical project using DIY-DI will need specialized injection code consisting of several extra
classes containing more than one hundred lines. This amount of code is larger, but not drastically larger,
than what would be required to integrate with an injection framework. DIY-DI has the advantage that
the code is all present within the project, making it easier for developers to review and understand.
Another advantage is that the injection rules can be enforced at compile time rather than at runtime.
All or Nothing It is very hard to benefit from dependency injection when only some classes in a project use the
technique. Dependency injection becomes viral, in the sense that a class cannot use dependency
injection unless all classes that depend on it are also refactored. An attempt to introduce dependency
injection in one object at the leaves of the dependency graph results in a violent propagation all the way
up to the root objects. Before using dependency injection in a project, the team should decide to make a
full commitment to eventually refactor the entire project. The team should also define a migration plan,
which typically is just to refactor classes one at a time, but only when each class needs to be modified
anyway during the course of regular maintenance.
Assemble the Machinery These steps show everything that a project needs to do to initiate adoption of DIY-DI. Developers that
want to perform refactoring using DI will be blocked until the classes described here have been created
for the project.
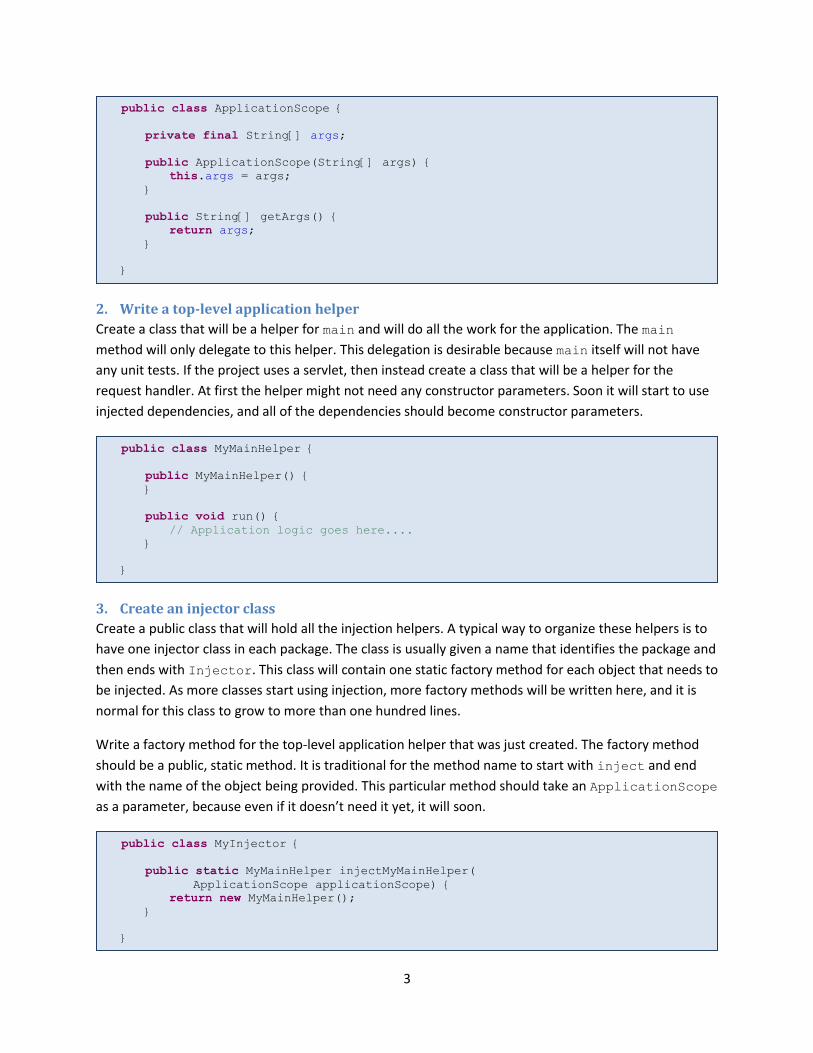
1. Create an application scope class
Create a public class that will hold all the application configuration parameters, and any other objects
that have the lifetime of a singleton. This class is usually named ApplicationScope. The constructor
should have a parameter for each configuration file or other environment variable that can affect the
application. A getter should be written for each field. Fields in a scope object can usually be immutable,
and all getters should be idempotent. For example, if the application needs to parse command-line
arguments, then the arguments should be given to the constructor, as shown below. As another
example, if the application uses a servlet, then there should be a class called RequestScope that asks
for an HttpServletRequest and HttpServletResponse in its constructor. If it is unclear what
parameters the application may require, then start off with an empty class and add parameters when
necessary. The team may also need to add other scope objects later as its use of dependency injection
matures.
3
2. Write a top-level application helper
Create a class that will be a helper for main and will do all the work for the application. The main
method will only delegate to this helper. This delegation is desirable because main itself will not have
any unit tests. If the project uses a servlet, then instead create a class that will be a helper for the
request handler. At first the helper might not need any constructor parameters. Soon it will start to use
injected dependencies, and all of the dependencies should become constructor parameters.
3. Create an injector class
Create a public class that will hold all the injection helpers. A typical way to organize these helpers is to
have one injector class in each package. The class is usually given a name that identifies the package and
then ends with Injector. This class will contain one static factory method for each object that needs to
be injected. As more classes start using injection, more factory methods will be written here, and it is
normal for this class to grow to more than one hundred lines.
Write a factory method for the top-level application helper that was just created. The factory method
should be a public, static method. It is traditional for the method name to start with inject and end
with the name of the object being provided. This particular method should take an ApplicationScope
as a parameter, because even if it doesn’t need it yet, it will soon.
public class MyInjector {
public static MyMainHelper injectMyMainHelper(
ApplicationScope applicationScope) {
return new MyMainHelper();
}
}
public class MyMainHelper {
public MyMainHelper() {
}
public void run() {
// Application logic goes here....
}
}
public class ApplicationScope {
private final String[] args;
public ApplicationScope(String[] args) {
this.args = args;
}
public String[] getArgs() {
return args;
}
}

4
The body of this method should only call the constructor and return. If the constructor has any
parameters, then this glue code is responsible for providing them. Each parameter can be retrieved by
invoking another factory method. The scope objects themselves should not be passed to constructors,
because scope objects are part of the injection infrastructure. For example, suppose that the
MyMainHelper constructor takes two parameters. The first parameter is a file name that was specified
on the command line. Since the application needs to interpret command-line arguments, a class called
MyArgs will be added to encapsulate the parsing. The second parameter is a timeout duration. For
simplicity, the timeout value will be hard-coded in a field in the application scope. Based on those
requirements, it would be reasonable for the MyInjector implementation to look like the following
example.
The injector classes have strict guidelines for the code that they are allowed to contain. Only trivial glue
code is permitted. Each factory method should have the sole purpose of returning a single object
instance. In order to produce this instance, it is allowed to invoke a getter, a factory method, or a
constructor. There should be no reason for a factory method to contain multiple statements. Usually the
only parameters to these factory methods are scope objects.
4. Write a trivial main method
Write a main method. Its sole purpose should be to set up the application scope and then delegate
everything to the helper. There will be no unit tests for the main method, so the team needs to be
disciplined about preserving a trivial implementation here too. If the code is for a servlet, then instead
write a trivial doGet or doPost method that delegates to a helper.
public class MyInjector {
public static MyMainHelper injectMyMainHelper(
ApplicationScope applicationScope) {
return new MyMainHelper(
injectMyFileName(applicationScope),
injectMyTimeout(applicationScope));
}
public static String injectMyFileName(ApplicationScope applicationScope) {
return injectMyArgs(applicationScope).getFileName();
}
public static MyArgs injectMyArgs(ApplicationScope applicationScope) {
return new MyArgs(applicationScope.getArgs());
}
public static int injectMyTimeout(ApplicationScope applicationScope) {
return applicationScope.getMyTimeout();
}
}
5
Get Infected The next step is to infect each class with the dependency injection technique. The success of
dependency injection in the project will depend on how disciplined the team is about following these
rules.
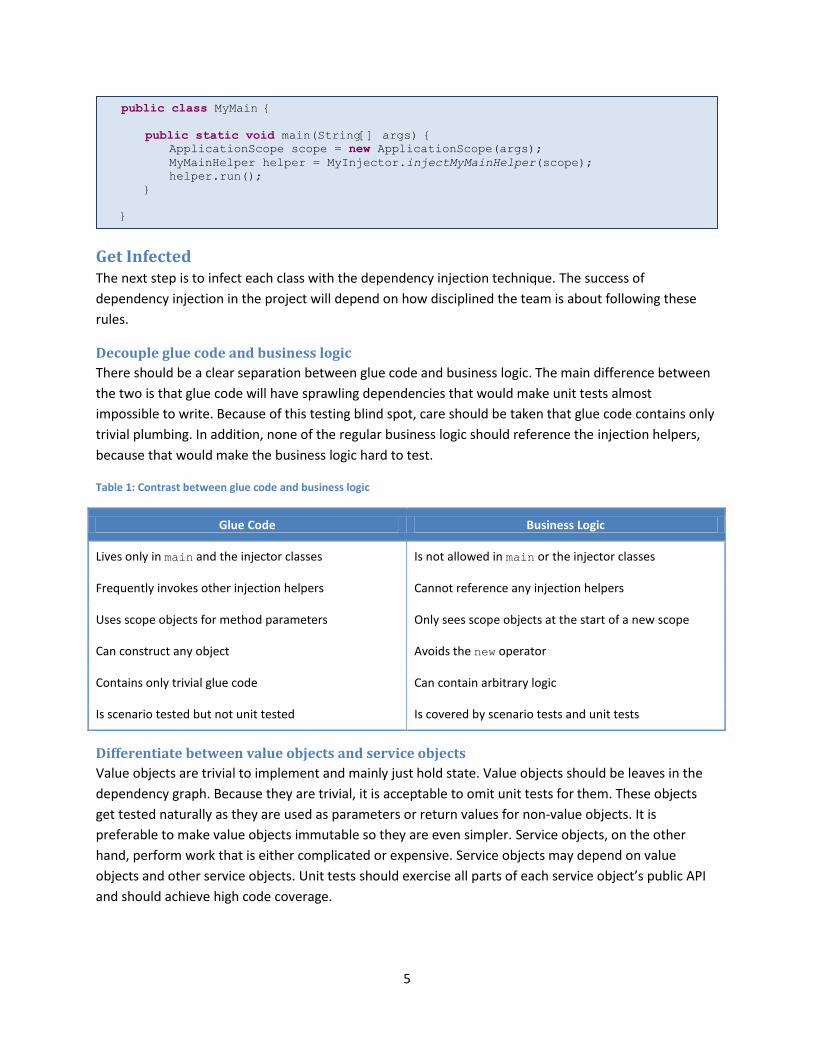
Decouple glue code and business logic
There should be a clear separation between glue code and business logic. The main difference between
the two is that glue code will have sprawling dependencies that would make unit tests almost
impossible to write. Because of this testing blind spot, care should be taken that glue code contains only
trivial plumbing. In addition, none of the regular business logic should reference the injection helpers,
because that would make the business logic hard to test.
Table 1: Contrast between glue code and business logic
Glue Code Business Logic
Lives only in main and the injector classes Is not allowed in main or the injector classes
Frequently invokes other injection helpers Cannot reference any injection helpers
Uses scope objects for method parameters Only sees scope objects at the start of a new scope
Can construct any object Avoids the new operator
Contains only trivial glue code Can contain arbitrary logic
Is scenario tested but not unit tested Is covered by scenario tests and unit tests
Differentiate between value objects and service objects
Value objects are trivial to implement and mainly just hold state. Value objects should be leaves in the
dependency graph. Because they are trivial, it is acceptable to omit unit tests for them. These objects
get tested naturally as they are used as parameters or return values for non-value objects. It is
preferable to make value objects immutable so they are even simpler. Service objects, on the other
hand, perform work that is either complicated or expensive. Service objects may depend on value
objects and other service objects. Unit tests should exercise all parts of each service object’s public API
and should achieve high code coverage.
public class MyMain {
public static void main(String[] args) {
ApplicationScope scope = new ApplicationScope(args);
MyMainHelper helper = MyInjector.injectMyMainHelper(scope);
helper.run();
}
}

6
Use constructor injection
Objects should ask for all their dependencies in their constructors. Avoid any use of the new operator in
the business logic. Instead, refactor so that all object creation is managed by the injection helpers. Avoid
static methods and global state, because they tend to create hidden dependencies. Both product code
and test code could have unexpected failures because of an object that relies on global state.
There are exceptions when it is acceptable to invoke new or a static method. Developers should just be
aware that tests will be forced to exercise the product code and these hard-coded dependencies
together. As long as the dependencies are trivial, this does not pose any practical problem. For example,
it is normal to use new to construct a simple value object. As another example, it is good to invoke
stateless static helpers such as Collections.max.
Occasionally constructor injection will cause a constructor to look awkward because it has too many
parameters. This is a normal side-effect. An object that has nine dependencies, for example, needs to
have nine constructor parameters. The real problem with such a class is that it should not have that
many dependencies to begin with. A well-designed object should have a single purpose, and it probably
shouldn’t require more than three dependencies. So constructor injection isn’t the cause of the
problem; constructor injection just highlights a preexisting design problem that the developer hadn’t
noticed before. The solution is to refactor the class, separating out the various concerns, so the number
of dependencies can be reduced.
Dependency injection does not usually make it easier to refactor individual methods. The techniques
tend to work on a class level. Use constructor injection to guide better class design, and use other
object-oriented best practices to improve thorny methods. You may find that dependency injection
encourages developers to refactor large classes into many smaller, simpler classes, which indirectly
improves the readability of the application.
Write trivial constructors
Constructors should never perform any work. Since tests always have to invoke the constructor, an
expensive constructor hampers unit testing. Moving expensive code to an init method doesn’t help,
because most tests need to work with an initialized object. At the same time, an object should be ready
to use as soon as it is constructed. It is awkward when an object requires certain setters to be invoked
before it is viable. Clients may resort to guess-and-check programming to find all the methods that need
to be invoked in order to make the object usable. The solution is to ask for fully-initialized dependencies
in the constructor. For example, instead of connecting to a database in a constructor or an init
method, add a constructor parameter for either an open Connection object or preferably for the
actual queried data.
Law of Demeter
According to the Law of Demeter, objects should ask directly for the dependencies they need, and not
acquire unnecessary dependencies. For example, if a service needs an object that is produced by a
factory, it should ask for the object directly. It should not ask for the factory. It certainly should not ask

7
for a service locator that can supply the factory. These extra dependencies lead to tight coupling in a
project and increased maintenance costs.
Whenever a test requires a mock object, the Law of Demeter might be broken. The mock object is
usually wired to return a result from within the product code. A quick investigation will usually show
that the product code does not need the dependency on the mocked object, and instead should depend
directly on the returned result. Mocking is only rarely needed in projects that use dependency injection.
Providers Occasionally it is impossible to remove a dependency on a factory. One example of that is when lazy
instantiation is required, so the factory should not be invoked unless it is actually needed. Another
example is when the factory is going to be used to produce multiple instances, and the number of
instances is not known in advance. In these situations it is desirable to make the dependency on the
factory as simple as possible. The following interface can be used in any of these situations.
This provider interface is more convenient to use than concrete factories, because it is easier to test.
Tests don’t need to use mock objects to exercise the product code. Instead, the following Providers
utility can be added to the testing library and used by all the tests. To create a provider in a test, the test
just needs to invoke “Providers.of(value)”. To create a provider that returns different instances
each time it is called, the test should invoke “Providers.of(value1, value2, value3)”.
Unfortunately, the Provider interface cannot be used if the factory is capable of throwing a checked
exception. The only solution is to create a different interface with a throws clause in its signature. This
workaround is an unavoidable inconvenience due to checked exceptions in the Java language. The
public class Providers {
/**
* Creates a {@link Provider} for the given values that will throw
* {@code NoSuchElementException} if it runs out of values
*/
public static <Result> Provider<Result> of(Result... results) {
final Iterator<Result> resultCursor = Arrays.asList(results).iterator();
return new Provider<Result>() {
public Result get() {
return resultCursor.next();
}
};
}
}
/**
* Abstraction to hide a concrete factory
*/
public interface Provider<Result> {
Result get();
}

8
following ThrowingProvider shows how this interface should be declared. Note that the
ThrowingProvider is only capable of throwing a single checked exception type. Normally this is
sufficient. For situations where multiple checked exceptions are required, consider using traditional
techniques like using the hard-coded factory in the product code and using mock objects in the tests.
For tests that need to create a ThrowingProvider, the following utility should be added to the testing
code. It uses a builder pattern because the requirements are more complicated than for the simple
Provider. Test code can request any behavior by chaining the desired answers together, such as
“ThrowingProviders<MyValue, MyException>.of(v1, v2).throwing(e3).of(v4)”.
/**
* Abstraction to hide a concrete factory that can throw
*/
public interface ThrowingProvider<Result, E extends Throwable> {
Result get() throws E;
}

9
Scopes Scopes are one of the difficult concepts to master, and unfortunately they are necessary for a working
implementation. Scopes are used to manage lifetimes of variables and to make sure that dependencies
public class ThrowingProviders {
/**
* Creates a {@link ThrowingProvider} that will return the given values
*/
public static <Result, E extends Throwable>
ThrowingProviderBuilder<Result, E> of(Result... results) {
return new ThrowingProviderBuilder<Result, E>().of(results);
}
/**
* Creates a {@link ThrowingProvider} that will throw the given exceptions
*/
public static <Result, E extends Throwable>
ThrowingProviderBuilder<Result, E> throwing(E... exceptions) {
return new ThrowingProviderBuilder<Result, E>().throwing(exceptions);
}
public static class ThrowingProviderBuilder<Result, E extends Throwable>
implements ThrowingProvider<Result, E>
{
private final Queue<ThrowingProvider<Result, E>> delegates =
new LinkedList<ThrowingProvider<Result, E>>();
public Result get() throws E {
return delegates.remove().get();
}
/**
* Chains additional results for this provider to return
*/
public ThrowingProviderBuilder<Result, E> of(Result... results) {
for (final Result result : results) {
delegates.add(
new ThrowingProvider<Result, E>() {
public Result get() {
return result;
}
});
}
return this;
}
/**
* Chains additional exceptions for this provider to throw
*/
public ThrowingProviderBuilder<Result, E> throwing(E... exceptions) {
for (final E exception : exceptions) {
delegates.add(
new ThrowingProvider<Result, E>() {
public Result get() throws E {
throw exception;
}
});
}
return this;
}
}
}
10
are available when they are requested. Here are examples of common scopes that might be needed in
an application.
1. Application scope has the lifetime of the entire application run.
2. Session scope has the lifetime of a web conversation. The object for this scope can be
preserved in the servlet session.
3. Request scope has the lifetime of an isolated web request.
4. Thread scope has the lifetime of the thread and can refer to thread-local storage.
To illustrate the necessity of different scopes, imagine an application that processes batches of trade
requests. For the purposes of this example, there are three different scopes that any variable may have:
1) application scope, 2) trade scope or 3) no scope. Variables like the location of the batch file have
application scope. Variables like the symbol being traded have trade scope. Variables with trade scope
cannot be given application scope because they are not available before the batch processing begins,
and they change values while the batch processing progresses. Giving these variables trade scope
ensures that they can remain immutable during the entire scope, which is important for guaranteeing
consistent behavior. Even though trade scope is not one of the common scopes used by applications, it
makes sense in a domain that has lots of logic built around trade processing. Finally, there are variables
like the loop indices for iterating over the tax lots within a trade. These variables don’t have any scope,
because they change values over shorter periods than any scope lifetime. These variables cannot be
injected, and so they always must be passed around as regular method parameters.
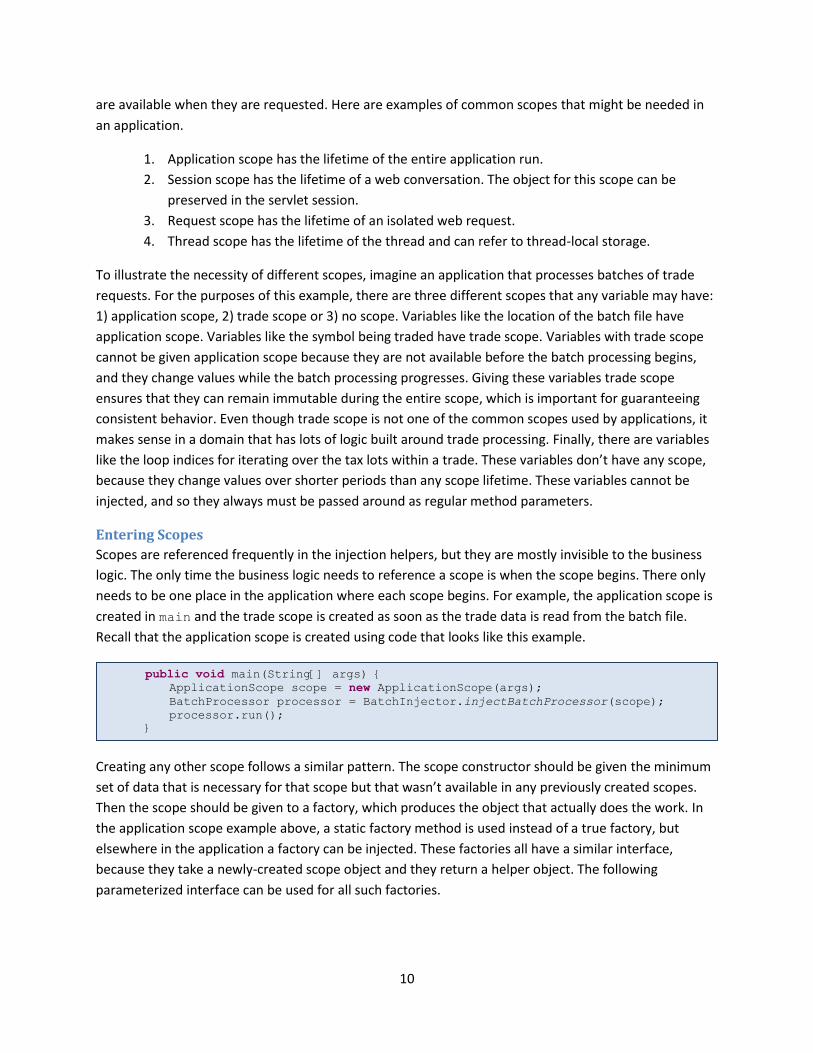
Entering Scopes
Scopes are referenced frequently in the injection helpers, but they are mostly invisible to the business
logic. The only time the business logic needs to reference a scope is when the scope begins. There only
needs to be one place in the application where each scope begins. For example, the application scope is
created in main and the trade scope is created as soon as the trade data is read from the batch file.
Recall that the application scope is created using code that looks like this example.
Creating any other scope follows a similar pattern. The scope constructor should be given the minimum
set of data that is necessary for that scope but that wasn’t available in any previously created scopes.
Then the scope should be given to a factory, which produces the object that actually does the work. In
the application scope example above, a static factory method is used instead of a true factory, but
elsewhere in the application a factory can be injected. These factories all have a similar interface,
because they take a newly-created scope object and they return a helper object. The following
parameterized interface can be used for all such factories.
public void main(String[] args) {
ApplicationScope scope = new ApplicationScope(args);
BatchProcessor processor = BatchInjector.injectBatchProcessor(scope);
processor.run();
}

11
Suppose that there is a method called BatchLineReader.processLine that is invoked once for each
trade that is found in the batch file. The manner of creating a trade scope is shown in the following
example.
There also needs to be glue code somewhere to make sure the BatchLineReader constructor can be
given the correct parameters. There should be a factory method in the injector class that handles this
complexity. Assuming that the TradeProcessor can be created using some information from
application scope and some information from trade scope, the following code shows a possible
implementation. This example uses an anonymous class to implement the ScopeEntrance.
Caching
Scopes can also be used to cache objects that are expensive to create. These cached objects should be
held in fields of the corresponding scope objects. For simplicity, however, the developer should prefer to
public static BatchLineReader injectBatchLineReader(
ApplicationScope applicationScope) {
return new BatchLineReader(injectTradeScopeEntrance(applicationScope));
}
public static ScopeEntrance<TradeScope, TradeProcessor>
injectTradeScopeEntrance(final ApplicationScope applicationScope) {
return new ScopeEntrance<TradeScope, TradeProcessor>() {
public TradeProcessor get(TradeScope tradeScope) {
return injectTradeProcessor(applicationScope, tradeScope);
}
};
}
public class BatchLineReader {
private final ScopeEntrance<TradeScope, TradeProcessor> tradeScopeEntrance;
public BatchLineReader(
ScopeEntrance<TradeScope, TradeProcessor> tradeScopeEntrance) {
this.tradeScopeEntrance = tradeScopeEntrance;
}
public void processLine(String[] tradeFields) {
TradeScope scope = new TradeScope(tradeFields);
TradeProcessor processor = tradeScopeEntrance.get(scope);
processor.process();
}
}
/**
* Abstraction to hide the first injection in a newly created scope
*/
public interface ScopeEntrace<Scope, Result> {
Result get(Scope scope);
}

12
create objects anew each time they are requested so that caching can be omitted. The following
example shows an application scope that holds a cached object of type MyService.
This implementation uses a simple ScopeCache helper to manage the cache. The helper first invokes
the provider to populate the cache, and then subsequent calls all hit the cache. Because a provider is
used, the scope object doesn’t have a dependency on the glue code that creates the cached object. The
ScopeCache can be implemented once, as shown below, and then reused throughout the project.
Anti-Patterns There are some coding idioms that are anti-patterns because they do not take advantage of dependency
injection.
/**
* Caches the result from a provider (but does not cache exceptions)
*/
public class ScopeCache<T> {
private boolean full = false;
private T cache = null;
/**
* Invokes {@code freshProvider} once and returns the value every time
*/
public synchronized T get(Provider<? extends T> freshProvider) {
if (!full) {
cache = freshProvider.get();
full = true;
}
return cache;
}
}
public class ApplicationScope {
private final String[] args;
private final ScopeCache<MyService> myServiceCache =
new ScopeCache<MyService>();
public ApplicationScope(String[] args) {
this.args = args;
}
public String[] getArgs() {
return args;
}
public MyService getMyService(Provider<MyService> freshMyServiceProvider) {
return myServiceCache.get(freshMyServiceProvider);
}
}

13
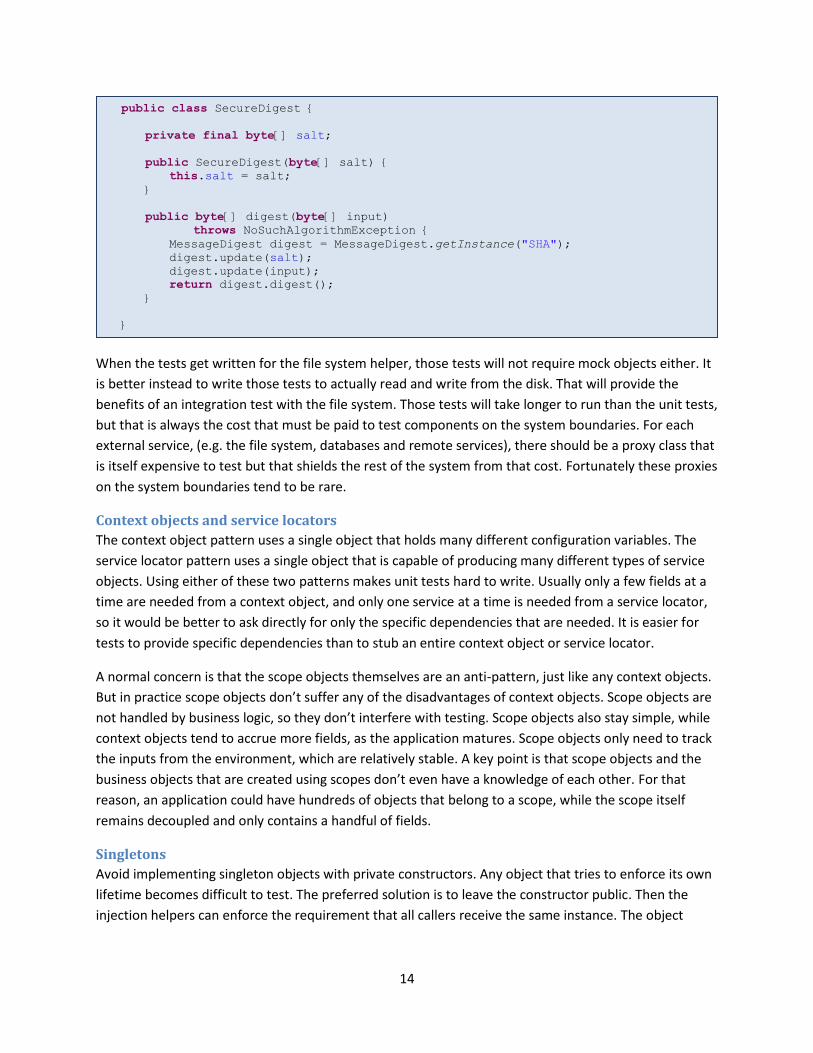
Mock objects
Too many mock objects, or mock objects that return other mock objects, should be a code smell. Ideally
a unit test won’t use any mocks or stubs or fakes or dummies. Refactor the product code using inversion
of control techniques, so that all classes ask directly for the values they need, not for the intermediaries
that produce those values. (Good developers have spent the last few years honing their skills with mock
objects, so this advice may come as a surprise. Strong testing habits no longer require the use of
sophisticated mocking libraries.)
Here is an example of a naïve implementation that would require complicated mocking in the unit test.
A File mock would have to work with the streams to provide all the salt data.
Here is an improved version that could be unit tested with only a few lines of code. It asks for the salt
data directly in the constructor. The code for slurping the file data has been moved to a separate object.
Decoupling the file system logic from the digest logic is the correct decision anyway, because the
refactored design has a better separation of concerns.
public class SecureDigest {
private final File saltFile;
public SecureDigest(File saltFile) {
this.saltFile = saltFile;
}
public byte[] digest(byte[] input)
throws IOException, NoSuchAlgorithmException {
DataInputStream saltStream = new DataInputStream(
new BufferedInputStream(
new FileInputStream(saltFile)));
byte[] salt = new byte[(int) saltFile.length()];
saltStream.readFully(salt);
MessageDigest digest = MessageDigest.getInstance("SHA");
digest.update(salt);
digest.update(input);
return digest.digest();
}
}
14
When the tests get written for the file system helper, those tests will not require mock objects either. It
is better instead to write those tests to actually read and write from the disk. That will provide the
benefits of an integration test with the file system. Those tests will take longer to run than the unit tests,
but that is always the cost that must be paid to test components on the system boundaries. For each
external service, (e.g. the file system, databases and remote services), there should be a proxy class that
is itself expensive to test but that shields the rest of the system from that cost. Fortunately these proxies
on the system boundaries tend to be rare.
Context objects and service locators
The context object pattern uses a single object that holds many different configuration variables. The
service locator pattern uses a single object that is capable of producing many different types of service
objects. Using either of these two patterns makes unit tests hard to write. Usually only a few fields at a
time are needed from a context object, and only one service at a time is needed from a service locator,
so it would be better to ask directly for only the specific dependencies that are needed. It is easier for
tests to provide specific dependencies than to stub an entire context object or service locator.
A normal concern is that the scope objects themselves are an anti-pattern, just like any context objects.
But in practice scope objects don’t suffer any of the disadvantages of context objects. Scope objects are
not handled by business logic, so they don’t interfere with testing. Scope objects also stay simple, while
context objects tend to accrue more fields, as the application matures. Scope objects only need to track
the inputs from the environment, which are relatively stable. A key point is that scope objects and the
business objects that are created using scopes don’t even have a knowledge of each other. For that
reason, an application could have hundreds of objects that belong to a scope, while the scope itself
remains decoupled and only contains a handful of fields.
Singletons
Avoid implementing singleton objects with private constructors. Any object that tries to enforce its own
lifetime becomes difficult to test. The preferred solution is to leave the constructor public. Then the
injection helpers can enforce the requirement that all callers receive the same instance. The object
public class SecureDigest {
private final byte[] salt;
public SecureDigest(byte[] salt) {
this.salt = salt;
}
public byte[] digest(byte[] input)
throws NoSuchAlgorithmException {
MessageDigest digest = MessageDigest.getInstance("SHA");
digest.update(salt);
digest.update(input);
return digest.digest();
}
}

15
should be cached in the ApplicationScope to make sure it has the correct lifetime. This will provide
the benefits of being a singleton without sacrificing testability.
Guice Bake-Off For the sake of comparison, a DIY-DI injector can be shown side-by-side with an equivalent Guice
configuration class.
A simple application was described earlier in the paper. For reference, here is the main method that
was written using DIY-DI techniques.
If the same application had been written using the Guice framework, then the main method would have
a similar appearance3. The injection would then be performed dynamically using reflection and Guice
magic, rather than through handcrafted code.
For the DIY-DI method, a scope object needs to be written explicitly. The scope object is a Plain Old Java
Object that holds the command-line arguments. Unless the scope supports explicit caching for an object,
all objects are generated anew each time they are requested. With Guice, on the other hand, an existing
scope object can usually be used. Objects in Guice’s default scope are never cached, but objects in all
other scopes are cached.
The DIY-DI injector class for this sample application is shown again here.
3 Documentation on the Guice API is at http://code.google.com/docreader/#p=google-guice&s=google-
guice&t=GettingStarted.
public class MyMain {
public static void main(String[] args) {
Injector injector = Guice.createInjector(new MyModule(args));
MyMainHelper helper = injector.getInstance(MyMainHelper.class);
helper.run();
}
}
public class MyMain {
public static void main(String[] args) {
ApplicationScope scope = new ApplicationScope(args);
MyMainHelper helper = MyInjector.injectMyMainHelper(scope);
helper.run();
}
}

16
If the application were using Guice, then equivalent functionality could be supported with the following
configuration module. Some bindings are easier to write in Guice, because Guice provides intelligent
defaults. For example, there is only one MyArgs value in the system, so Guice can reliably provide it
without any user-specified configuration settings. Other bindings are more complicated in Guice. For
example, to configure the file name provision, an annotation needs to be written that distinguishes that
String from every other String in the system.
public class MyInjector {
public static MyMainHelper injectMyMainHelper(
ApplicationScope applicationScope) {
return new MyMainHelper(
injectMyFileName(applicationScope),
injectMyTimeout(applicationScope));
}
public static String injectMyFileName(ApplicationScope applicationScope) {
return injectMyArgs(applicationScope).getFileName();
}
public static MyArgs injectMyArgs(ApplicationScope applicationScope) {
return new MyArgs(applicationScope.getArgs());
}
public static int injectMyTimeout(ApplicationScope applicationScope) {
return applicationScope.getMyTimeout();
}
}
17
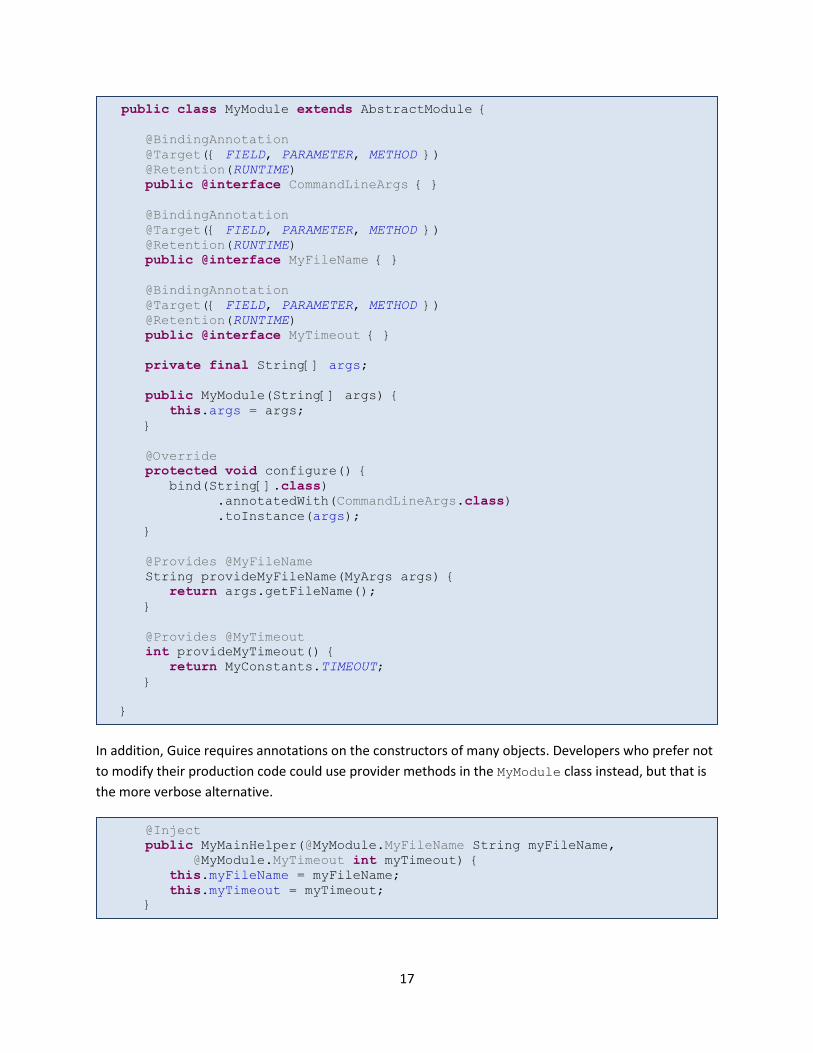
In addition, Guice requires annotations on the constructors of many objects. Developers who prefer not
to modify their production code could use provider methods in the MyModule class instead, but that is
the more verbose alternative.
@Inject
public MyMainHelper(@MyModule.MyFileName String myFileName,
@MyModule.MyTimeout int myTimeout) {
this.myFileName = myFileName;
this.myTimeout = myTimeout;
}
public class MyModule extends AbstractModule {
@BindingAnnotation
@Target({ FIELD, PARAMETER, METHOD })
@Retention(RUNTIME)
public @interface CommandLineArgs { }
@BindingAnnotation
@Target({ FIELD, PARAMETER, METHOD })
@Retention(RUNTIME)
public @interface MyFileName { }
@BindingAnnotation
@Target({ FIELD, PARAMETER, METHOD })
@Retention(RUNTIME)
public @interface MyTimeout { }
private final String[] args;
public MyModule(String[] args) {
this.args = args;
}
@Override
protected void configure() {
bind(String[].class)
.annotatedWith(CommandLineArgs.class)
.toInstance(args);
}
@Provides @MyFileName
String provideMyFileName(MyArgs args) {
return args.getFileName();
}
@Provides @MyTimeout
int provideMyTimeout() {
return MyConstants.TIMEOUT;
}
}

18
The Guice configuration code is often less verbose than the DIY-DI injector. In this example, the Guice
configuration is longer, because the application relies heavily on primitive types. Other applications that
might be simpler to configure using DIY-DI are applications that need custom scope objects, and
applications that need context-sensitive injection, (i.e. the “robot legs problem”).
@Inject
public MyArgs(@MyModule.CommandLineArgs String[] args) {
this.args = args;
}