diy concrete party bar...diy concrete party bar thanks for downloading the diy concrete party bar...
TRANSCRIPT

DIY Concrete Party Bar
Thanks for downloading the DIY Concrete Party Bar Plans!
The complete Youtube video and project tutorial photos to go along with these plans can be found at http://www.diypete.com/concretepartybar I invite you to make changes to the plans as you find necessary to best fit your needs. Good luck with the project and have fun building it! Please post project photos on the Facebook page at www.facebook.com/DIYPROJECTSWITHPETE or elsewhere tagged with #DIYPETE
1 http://www.diypete.com/concretepartybar Copyright 2016 DIY PETE, LLC
Tools Needed *Please note By using these links to purchase tools you are helping support DIYPete.com. Miter Saw– I’d recommend a 12 inch sliding, miter saw. Drill– I use Ryobi drills. Orbital Sander– Ryobi makes a nice one. Kreg Jig (Optional) Circular Saw – Could be used in place of a miter saw Table Saw To rip the side strips Socket wrench and socket for leg bolts Rubber Mallet Plastic Tub and Mason’s Hoe Small bucket Trowel Flat chisel Speed Square Bolt cutter Tape Measure, Ruler, Pencil or Sharpie Marker Eye and Ear protection, Rubber Gloves, Mask, Work gloves Clamps– Clamps are helpful for any project. Optional: Concrete Wet Polisher If exposing aggregate Concrete Polishing Pads If exposing aggregate
Supplies Needed for Concrete Top Approximate cost: $93 for concrete top materials (not including sealer) Melamine – Qty 1 2 foot by 4 foot sheet $14 Melamine Qty 1 12 inch by 6 foot board (to make side strips) $13 Small Sheet of clear acrylic ¼ inch thick $28 2 bags of concrete (Quikrete) $11 total Foam Qty 1 Sheet of 1 ½ inch thick foam 2 feet by 4 feet $5.00 4x8 sheet of steel reinforcement $7.99 Cheng Concrete Sealer $30 Or a stone/tile sealer 1 ⅝ inch Wood screws $6.00
2 http://www.diypete.com/concretepartybar Copyright 2016 DIY PETE, LLC

100% Silicone Caulk $5.00 Sandpaper Clear packaging tape $4.00 Rubbing alcohol and paper towels Microfiber rag Optional: Portland Cement to fill voids if any $10.00 Concrete Colorant Fiber Reinforcement Plastic or tarp to cover concrete Supplies Needed for Wood Base $173 approximate cost: Qty: 18 1x6x6 cedar pickets $2.65/board $48 (slats and trim) Qty: 9 2x4x8 boards $8.50/board $76.50 Qty: 4 3 inch caster wheels $8/wheel $32 total Qty: 16 2 inch long and ¼ inch diameter lag bolts $6.00 Wood finish 2 ½” wood screws or pocket holes $10 1 ½” screws or 1 ½” long 16 gauge nails to attach pickets Battery Powered LED lights (Optional) $52
Total Approximate Cost for all project Supplies: $266 (does not include tools or LED lights)
3 http://www.diypete.com/concretepartybar Copyright 2016 DIY PETE, LLC

Overall Dimensions: 48” wide x 24” deep x 41” tall including wheels and 1 ½” thick concrete top.
4 http://www.diypete.com/concretepartybar Copyright 2016 DIY PETE, LLC

Inside of bar:
5 http://www.diypete.com/concretepartybar Copyright 2016 DIY PETE, LLC

Cut List Concrete Mold:
QTY 2 25 1/2” long x 2 1/4” wide x ¾” thick QTY 2 48” long x 2 ¼ wide x ¾” thick QTY 1 48” long x 24” wide x ¾” thick QTY 4 4” x 4” x ¼” thick acrylic QTY 4 3 ½” x 3 ½” x 1 ½” thick foam QTY 1 1 ½” thick foam cut to shape for cooler
Wood Base: Qty 8 37” long x 3 ½” wide x 1 ½ inch ( legs ) Qty 5 43 ½” long x 3 ½” wide x 1 ½ inch ( long horizontal supports ) Qty 10 16 ½” long x 3 ½” wide x 1 ½ inch ( short horizontal supports ) Qty 4 3 ½” long x 3 ½” wide x 1 ½ inch ( corner blocks to mount wheels to ) Qty 1 21” long by 3 ½” wide x 1 ½ inch ( front of middle shelf ) Qty 1 18” long x 3 ½” wide x 1 ½ inch ( far right of bar, middle shelf height ) Trim: Qty 4 12 ½” long x 3” wide x ¾ inch (side trim) Qty 2 39 ½” long x 3” wide x ¾ inch (front trim)
6 http://www.diypete.com/concretepartybar Copyright 2016 DIY PETE, LLC

Build the mold Cut the base of the mold to 24 inches by 48 inches. Home Depot does typically stock this size of melamine. Next use a table saw to cut the sidewall strips. Cut two strips that are 25 ½” long by 2 ¼” wide. Cut the two longer strips to 48” long by 2 ¼” wide. Attach the strips to the base piece using 1 ⅝” screws.
7 http://www.diypete.com/concretepartybar Copyright 2016 DIY PETE, LLC

Create the knockouts and acrylic coasters. Make the acrylic coasters into 4” squares. Cut the coaster foam knockouts to 3 ½” squares. Cut the cooler knockout as needed to fit your container. The knockout should be slightly smaller than the container. For more information please refer to the video at www.diypete.com/concretepartybar.
8 http://www.diypete.com/concretepartybar Copyright 2016 DIY PETE, LLC

Build the Base Cut the legs to 37” in height. You’ll need a total of 8. Orientate the boards so you will not see a seam on the front or back side (similar to diagram below). Connect the boards using pocket holes and glue. If you don’t have a pocket hole jig I’d recommend using normal wood screws.
9 http://www.diypete.com/concretepartybar Copyright 2016 DIY PETE, LLC

Connect all four corners using the 2x4 boards (actually 1 ½” by 3 ½”). The longer horizontal boards are 43 ½ inches and the shorter boards are 16 ½”. Use 2 ½ inch screws to connect the boards to the corners from the inside. Assembling this section upside down on a flat surface works well.
10 http://www.diypete.com/concretepartybar Copyright 2016 DIY PETE, LLC

Connect the lower shelf supports to the legs. They will sit ¾ of an inch up from the bottom of each corner. Use a couple scrap boards that are ¾ inches thick as spacers to help hold up the supports while screwing them in.
11 http://www.diypete.com/concretepartybar Copyright 2016 DIY PETE, LLC

Add center supports to the top and bottom of the frame. Make sure you leave plenty of room for the cooler in the top area. These boards are each 16 ½” long.
12 http://www.diypete.com/concretepartybar Copyright 2016 DIY PETE, LLC

Add 3 ½ inch square blocks in each corner. These are used to provide extra surface area for mounting caster wheels.
13 http://www.diypete.com/concretepartybar Copyright 2016 DIY PETE, LLC

Attach the middle supports and shelf. The front board of the shelf is 21 inches. Use 2 ½” wood screws. You can use pocket holes if you’d prefer. Attach the boards at the corners from the inside using 2 ½ inch screws. Always predrill and you may need to slightly angle a few of the screws.
14 http://www.diypete.com/concretepartybar Copyright 2016 DIY PETE, LLC

The far right middle support is 18 inches.
15 http://www.diypete.com/concretepartybar Copyright 2016 DIY PETE, LLC

Cut slats for the shelves down to 19 ½” long. You’ll need about 12 of them. Cut widths down on the outside boards as needed to get a perfect fit. Leave a small gap between each board (roughly a ¼ of an inch). Use a nail gun and glue for this process, or screws and nails.
16 http://www.diypete.com/concretepartybar Copyright 2016 DIY PETE, LLC

Attach the front pickets. These are 37” long and you’ll use 8 boards. I used 16 gauge nails so they are less visible. Screws could be used though. Rip the boards as needed. You can rip them all if you’d like to have all boards uniform. You can simply rip the center or outside boards if you’d prefer.
17 http://www.diypete.com/concretepartybar Copyright 2016 DIY PETE, LLC

Attach the side pickets. These are 37” long and you’ll use 3 boards on each end. Rip the boards to width on a table saw.
18 http://www.diypete.com/concretepartybar Copyright 2016 DIY PETE, LLC

Rip a few fence boards to 3 inches in width. These will be used as trim. Attach two longer trim pieces on the front, and 2 shorter pieces on each end.
19 http://www.diypete.com/concretepartybar Copyright 2016 DIY PETE, LLC
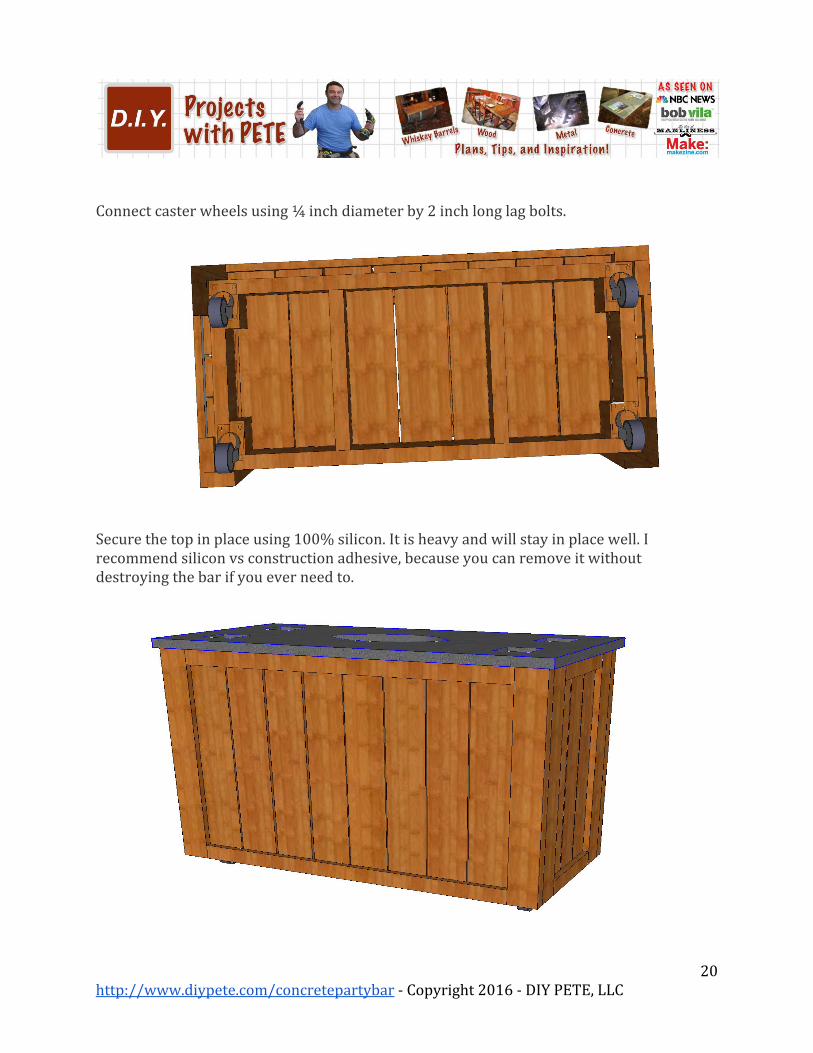
Connect caster wheels using ¼ inch diameter by 2 inch long lag bolts.
Secure the top in place using 100% silicon. It is heavy and will stay in place well. I recommend silicon vs construction adhesive, because you can remove it without destroying the bar if you ever need to.
20 http://www.diypete.com/concretepartybar Copyright 2016 DIY PETE, LLC

Enjoy! You’ve done the work, now reap the benefits of your DIY Concrete Party Bar! Modify your build as needed and share this project with your friends. Thanks for following along and be sure to check out the free blog post and video tutorial at http://www.diypete.com/concretepartybar.
Cheers! Thanks so much for checking out the Outdoor Gas Fireplace plans and I’d love to hear how your project goes! Please post photos on Facebook at www.facebook.com/diyprojectswithpete and subscribe to my Youtube channel at www.youtube.com/diyprojectswithpete. Cheers from Montana,
* Please refer to the post at http://www.diypete.com/concretepartybar and check out the video tutorial for more information, instructions, and tips.
21 http://www.diypete.com/concretepartybar Copyright 2016 DIY PETE, LLC