dishwasher compact · spares operation - r.kurzke 02/05 - 6 - 599 521 951 en circulation pump the...
TRANSCRIPT
- 1 -Spares Operation - R.Kurzke 02/05 599 521 951 EN
SERVICE MANUAL
© AEG Hausgeräte GmbHMuggenhofer Straße 135D-90429 NürnbergGermany
Fax +49 (0)911 323 1420
Spares Operation
Publ.-Nr.:599 521 951
02.05
EN
Edition:
DISHWASHERCOMPACT
MIDI + EDW 500
Dishwasher
COMPACTMIDI + EDW 500

- 2 -Spares Operation - R.Kurzke 02/05 599 521 951 EN
Index1. Technical data / Dimensions / Installation water drainage ............................ 3
2. Programs ................................................................................................... 4
3. Components ............................................................................................... 5
Interference Filter ........................................................................................ 5
Pressure Switch ......................................................................................... 5
Flow Heater ................................................................................................ 5
Circulation Pump ........................................................................................ 6
Drain Pump ................................................................................................ 6
NTC Temperature Sensor ........................................................................... 6
Electronic ................................................................................................... 6
Detergent / Rinse Aid Combination Dispenser Unit .................................... 7
Water Softening .......................................................................................... 8
Setting of water Softening ........................................................................... 9
4. Position of Components ........................................................................... 10
5. Water Course Scheme ............................................................................. 11
6. Leakage Protection .................................................................................. 12
Safety level ............................................................................................... 12
7. Water Inlet ................................................................................................ 13
8. Static filling ............................................................................................... 13
9. Washing ................................................................................................... 14
Circulation system .................................................................................... 14
Heating ..................................................................................................... 14
10. Regeneration ............................................................................................ 15
11. Rinse out after regeneration ...................................................................... 16
12. Anti sifon .................................................................................................. 16
13. Drain ........................................................................................................ 16
14. In- and Output elements ............................................................................ 17
Position of pushbuttons, LEDs and lamps ................................................. 17
15. Service menu ........................................................................................... 18
Service functions ...................................................................................... 18
16. Overview error displays ............................................................................ 19
17. Service Tips / Replace of components ............................................... 21 - 27
18. Wirings ..................................................................................................... 28
19. Measurement Points ................................................................................. 30

- 3 -Spares Operation - R.Kurzke 02/05 599 521 951 EN
Compact dishwasher MIDI
Wash programs: Intensive 70,Normal 65,Normal Bio 50,Quick 50,Prewash extra
Heating: flowheater
Energie WaterIntensiv 70 °C: 1,15 kWh 9 lNormal 65 °C: 0,80 kWh 7 lNormal Bio 55 °C: 0,63 kWh 7 lQuick 50 °C: 0,40 kWh 6 lGlas 40 °C: 0,39 kWh 6 l
Installation water drainage
Place the discharge hose over the sink as illustrated.
It may not at any point be higher then 75 cm over the surfacewhich the dishwasher is standing on. If runs higher, operation ofthe dishwasher might be impaired.
It is also important to ensure that the inside diameter of the hoseis not less than 13 mm at any point. If the discharge hose is toolong it can easily be cut to the right length.
Cut the hose to a suitable length, using a sharp knife.
Fit the elbow supplied onto the end of the hose.
Volt: 230 VFrequency: 50 HzHeatung element: 1100 WConnected load: 1200 WFuse required: 10 A
Height: 447 mmWidth: 546 mmDepth: 480 mm
Noise: 49 dBWater pressures: min. 80 KPa (0,8 bar)
max. 1000 kPa (10 bar)Inlet hose length: 130 cmOutlet hose length: 130 cmCord length: 170 cm
1. Technical data / dimensions Typical features for use

- 4 -Spares Operation - R.Kurzke 02/05 599 521 951 EN
2. Programs
- 5 -Spares Operation - R.Kurzke 02/05 599 521 951 EN
3. Components
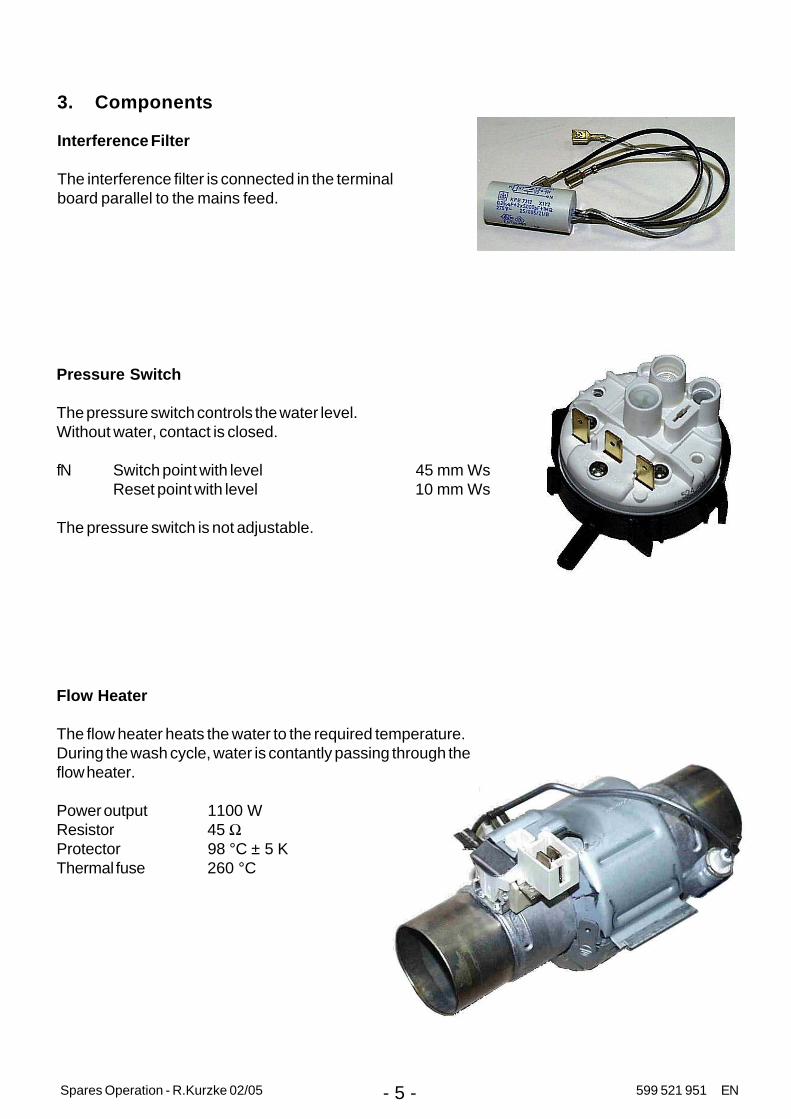
Interference Filter
The interference filter is connected in the terminalboard parallel to the mains feed.
Pressure Switch
The pressure switch controls the water level.Without water, contact is closed.
fN Switch point with level 45 mm WsReset point with level 10 mm Ws
The pressure switch is not adjustable.
Flow Heater
The flow heater heats the water to the required temperature.During the wash cycle, water is contantly passing through theflow heater.
Power output 1100 WResistor 45 ΩProtector 98 °C ± 5 KThermal fuse 260 °C

- 6 -Spares Operation - R.Kurzke 02/05 599 521 951 EN
Circulation Pump
The circulation pump is driven by an asynchronous motorwith an auxiliary winding.
The auxiliary winding ist in circuit with a 2,5 uF capacitor.
Speed for rinsing:2800 1/min
Drain Pump
The drain pump is driven by a synchronous motor.Power output 26 W.Pump rate 15 l/min.
NTC-TemperaturfühlerTemperature sensor NTC-resistorTemperatur/Widerstand 20 °C / 6032 Ωtemperature/resistor 25 °C / 4829 Ω(nur bei vollelektron. 30 °C / 3891 ΩGeschirrspüler) 40 °C / 2573 Ω(only for fully electronic dishw asher) 50 °C / 1741 Ω
55 °C / 1444 Ω60 °C / 1204 Ω65 °C / 1009 Ω70 °C / 849 Ω
NTC-Temperaturfühler
Electronic
On electronic models, a micro processor controls allcomponents, this is done using triacs. The electronic alsomemorizes all programme data.
The heating is switched by a relay on the electronic board.

- 7 -Spares Operation - R.Kurzke 02/05 599 521 951 EN
Detergent / Rinse Aid Combination Dispenser Unit
Dosing of detergent prewash 10 mlwash 20 – 30 ml
Dosing of rinse-aid position 1 – 6 2 ml – 7 mlCapacity 140 ml
The detergent dispenser isactivated by a release coil.
The first operation adds thedetergent, and the second therinse aid. If the door is opened,the latching bar is reset to thedetergent dosage position.
display “lack of rinse-aid”
dosing of rinse-aidmaximum filling level
outlet of rinse-aid
detergent tray
detergent tray for prewash
The detergent compartment 1 is filling corresponding to theset dosing quantity when the door is open. Possibly existingrinse-aid in compartments 2 and 3 flows back into thestorage tank of the rinse-aid. The detergent trays are filledup. The door will be closed and the detergent for prewash willbe rinsed out through the slots in the detergent dispensercover.
During the washing cycle the coil is switched on and thedetergent compartment cover releases the detergent. Therinse-aid flows from compartment 1 into compartment 2.
After switching off the coil, the rinse-aid flows from compartment2 into compartment 3.
coil onoff
time
coil onoff
time
coil onoff
time
coil onoff time
During the rinse cycle, the coil will be switched on when therinse is warmed and the rinse-aid runs from compartment 3into the rinse tank. At the same time, the remaining rinse-aid(15 %) runs from compartment 1 into compartment 2.
- 8 -Spares Operation - R.Kurzke 02/05 599 521 951 EN
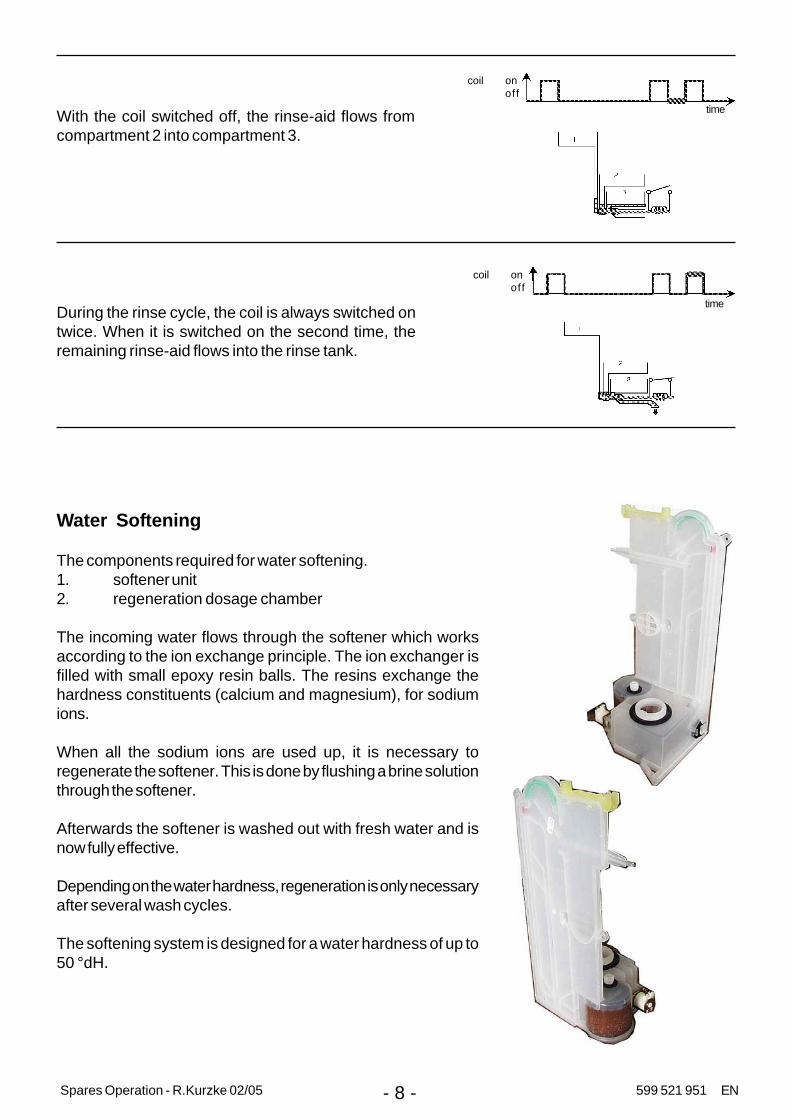
Water Softening
The components required for water softening.1. softener unit2. regeneration dosage chamber
The incoming water flows through the softener which worksaccording to the ion exchange principle. The ion exchanger isfilled with small epoxy resin balls. The resins exchange thehardness constituents (calcium and magnesium), for sodiumions.
When all the sodium ions are used up, it is necessary toregenerate the softener. This is done by flushing a brine solutionthrough the softener.
Afterwards the softener is washed out with fresh water and isnow fully effective.
Depending on the water hardness, regeneration is only necessaryafter several wash cycles.
The softening system is designed for a water hardness of up to50 °dH.
With the coil switched off, the rinse-aid flows fromcompartment 2 into compartment 3.
During the rinse cycle, the coil is always switched ontwice. When it is switched on the second time, theremaining rinse-aid flows into the rinse tank.
coil onoff
time
coil onoff
time

- 9 -Spares Operation - R.Kurzke 02/05 599 521 951 EN
Customers menu: Water hardness
With this procedure it is possible to modify the regeneration level selection (depending on the waterhardness).
Regeneration selection
To activate the function:
1. Press and hold down button S1.
2. Turn the knob to Position 1:- The LEDs LD0 and LD1 flash- Release button S1
3. Press button S1- The regeneration level is displayed by the End of cycleLED which flashes and pauses at intervals: for thedecodification, see summary table of alarms.
Press button S1 to increase the regeneration levelaccording to the following values:
- 10 -Spares Operation - R.Kurzke 02/05 599 521 951 EN
1
2
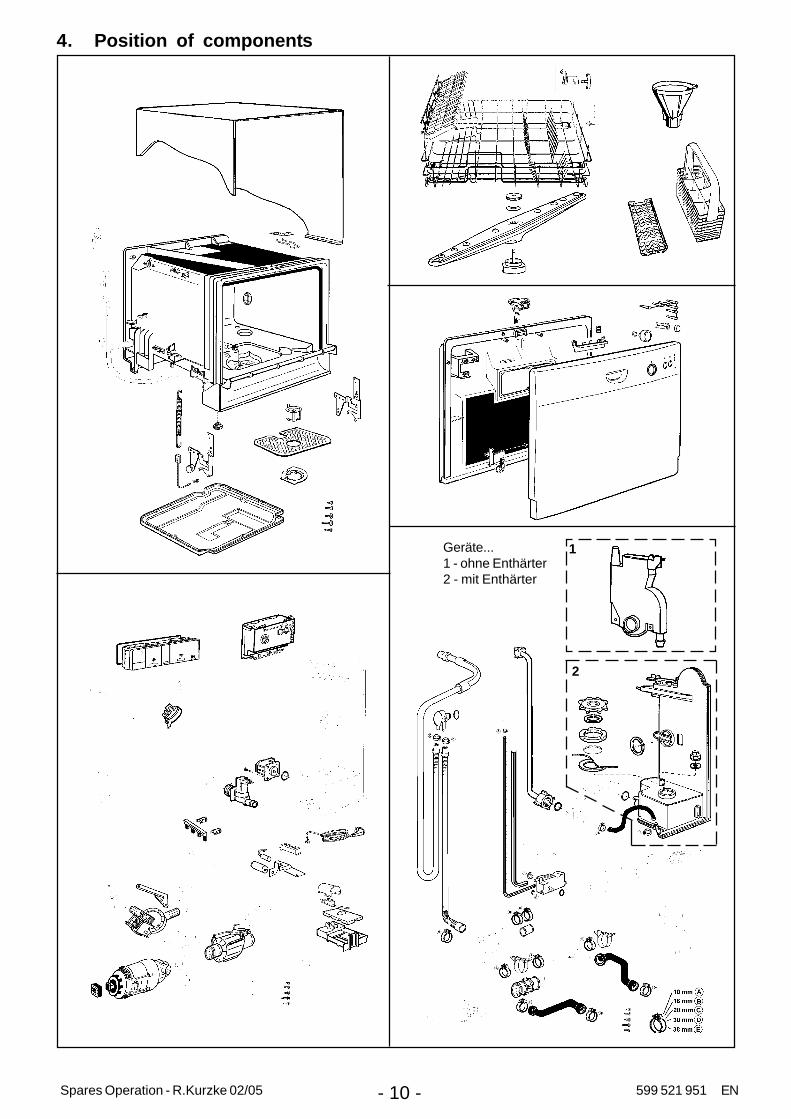
Geräte...1 - ohne Enthärter2 - mit Enthärter
4. Position of components
- 11 -Spares Operation - R.Kurzke 02/05 599 521 951 EN
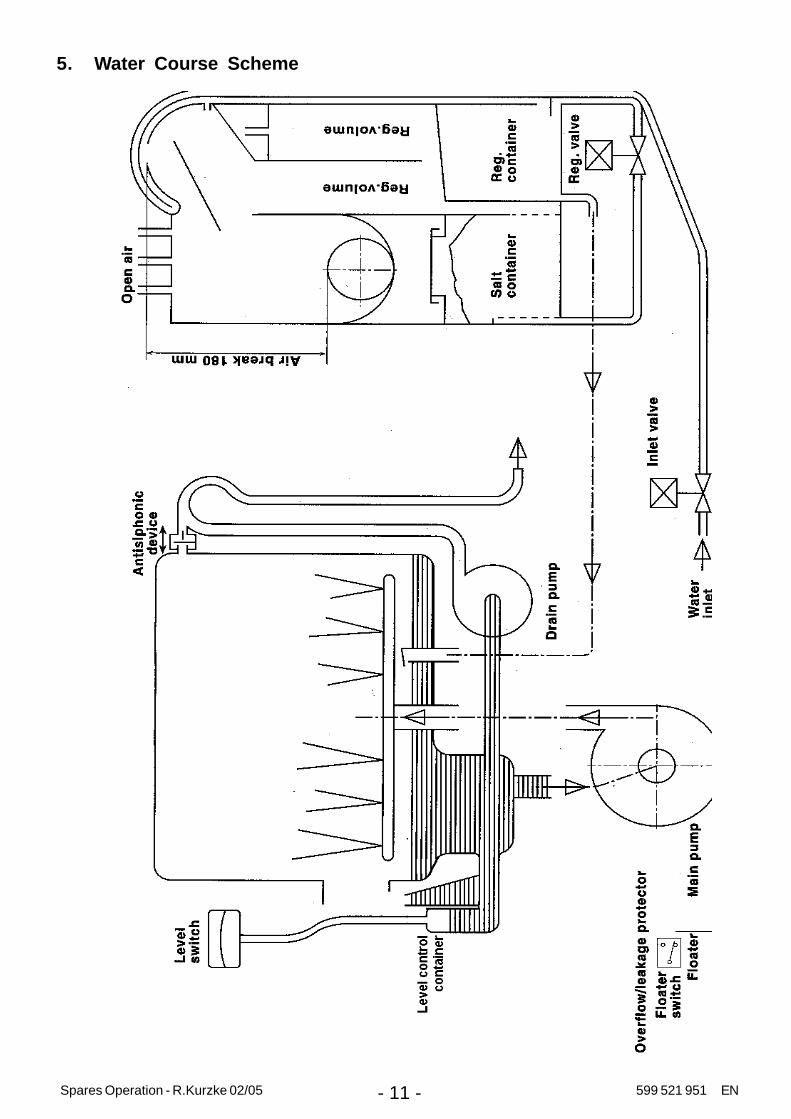
5. Water Course Scheme

- 12 -Spares Operation - R.Kurzke 02/05 599 521 951 EN
6. Leakage Protection
The anti-flood switch in the base tray will activate the drain pump and drain the water from the tub inthe event of an internal leakage.If the float switch is activated, all electric components are switched off except the drain pump.
Overflow protectionThe filling phase fills up to the level, monitored by a pressure monitor. If the pressure monitor doesnot switch in, this filling phase is generally limited electronically to 2 minutes.
If the pressure monitor has not switched in by then, the electronics jump to the error mode "shut offtap", and the program is stopped.
If the pressure monitor switches back during the cycle, a maximum of 10 sec. further filling ispossible. If the pressure monitor has not switched in by then, the electronics jump to the errormode "shut off tap", and the program is stopped.
Safety level
If the safety level is reached by over-fillling more than 3,2 litres, floater switch starts the drainpump.
Safety level

- 13 -Spares Operation - R.Kurzke 02/05 599 521 951 EN
Power supply interruption during water fill
If the water fill phase is interrupted by opening the door or due to a power failure, thecontents of the counters are stored in memory; when the door is re-closed or when thepower supply is restored, the water fill resumes from the point at which it was interrupted;the new counter values are added to those previously memorized.
8. Static filling
- Static filling until pressure switch point.failure code:If this point isnt reached after max. 2 minutes, a failure code is displayed and the pro-gram is stopped.
7. Water Inlet
The water flows into the regeneration dosage chamber via inlet valve, over air break, into regenerationdosage chambers and into softenerThe level control chamber built into the sump operates the pressure switch.
- 14 -Spares Operation - R.Kurzke 02/05 599 521 951 EN
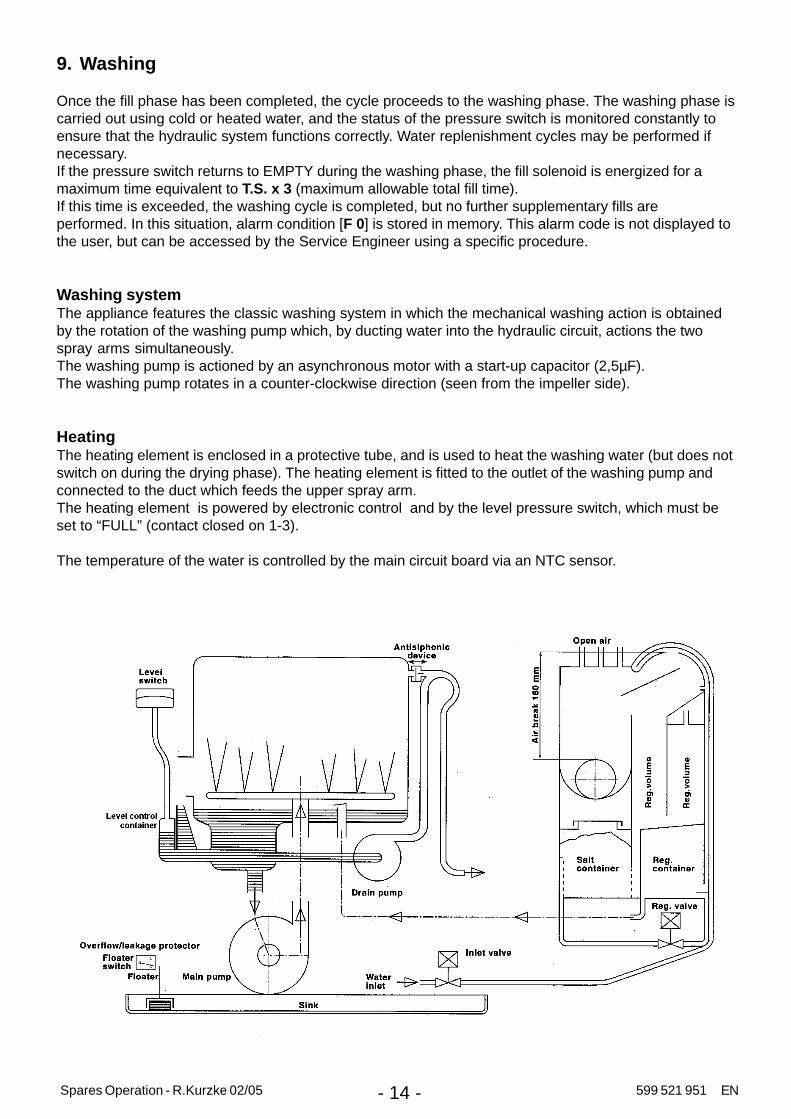
9. Washing
Once the fill phase has been completed, the cycle proceeds to the washing phase. The washing phase iscarried out using cold or heated water, and the status of the pressure switch is monitored constantly toensure that the hydraulic system functions correctly. Water replenishment cycles may be performed ifnecessary.If the pressure switch returns to EMPTY during the washing phase, the fill solenoid is energized for amaximum time equivalent to T.S. x 3 (maximum allowable total fill time).If this time is exceeded, the washing cycle is completed, but no further supplementary fills areperformed. In this situation, alarm condition [F 0] is stored in memory. This alarm code is not displayed tothe user, but can be accessed by the Service Engineer using a specific procedure.
Washing systemThe appliance features the classic washing system in which the mechanical washing action is obtainedby the rotation of the washing pump which, by ducting water into the hydraulic circuit, actions the twospray arms simultaneously.The washing pump is actioned by an asynchronous motor with a start-up capacitor (2,5µF).The washing pump rotates in a counter-clockwise direction (seen from the impeller side).
HeatingThe heating element is enclosed in a protective tube, and is used to heat the washing water (but does notswitch on during the drying phase). The heating element is fitted to the outlet of the washing pump andconnected to the duct which feeds the upper spray arm.The heating element is powered by electronic control and by the level pressure switch, which must beset to “FULL” (contact closed on 1-3).
The temperature of the water is controlled by the main circuit board via an NTC sensor.

- 15 -Spares Operation - R.Kurzke 02/05 599 521 951 EN
10. Regeneration
The water chamber for regeneration contains 230 ml water. During regeneration, the regeneration valveis energized. The 230 ml water runs into the salt container and mixes with the salt to form a brinesolution.
In the top of the salt container there is an opening with a small filter, from here the brine solution entersthe softener where the resins are regenerated.
Regeneration of the water softening system, which takes around 4 min, is usually performed at the startof the drying phase.Every time regeneration is performed (with activation of regeneration solenoid 4), the accumulationchamber is completely emptied of its contents (about 230 cc of water). Regeneration is controlled by theelectronic control system “Ad Hoc”, i.e. not at each washing cycle, but rather at intervals determined bythe level of regeneration selected:
- If level [1] is selected, regeneration is never performed and the SALT LED (if featured) always remainsunlit.
- If level [10] is selected, regeneration is performed twice during each cycle; first at the end of thewashing phase, and then at the beginning of the drying phase.
The regeneration solenoid is powered on the main board and by the contacts of the door switch.Some models may feature a salt sensor, whose Reed contact is connected to the board.When there is no salt, the contact closes and the relative LED lights up (on display board).

- 16 -Spares Operation - R.Kurzke 02/05 599 521 951 EN
13. Drain
At the end of the drain phase, a control procedure is performed to check that the contact of the levelpressure switch is open on EMPTY. If this is the case, the appliance proceeds to the subsequent phase.
If, as a result of a problem in the drain phase, the pressure switch contact remains closed on FULL(i.e. if there is water in the hydraulic circuit), the drain phase is repeated.
On completion of this second drain phase, the status of the pressure switch is again checked. If it is stillclosed on FULL, alarm [i20] is generated (failure to drain). The time-out for each of these two phases is120 seconds.
N.B. The washing programmes always begin with a drain phase.
11. Rinse out after regeneration
Recycling takes place after the rinsingprocess, as the final step.Rinsing out then follows automaticallywith the start of the next wash program.
The pumping off stage usually takesabout 50 seconds.
12. Antisiphonic device
If the end of the take-off hose is below the level ofthe water in the wash space, a siphon effect ispossible, that is, the machine runs empty. This isavoided by the ventilation through the anti-siphonvalve.
pump 30 sec
1. fill & pump 8 sec.
pump 15 sec.
2. fill & pump (wh 1 + 2) 8 sec.
pump 15 sec.
3. fill & pump 8 sec.
pump 30 sec.

- 17 -Spares Operation - R.Kurzke 02/05 599 521 951 EN
14. In- and Output elements

- 18 -Spares Operation - R.Kurzke 02/05 599 521 951 EN
15. SERVICE MODE
With this procedure it is possible to access the Service Diagnostics System. Once this mode isaccessed, it is possible to:- read and cancel the alarms- control the operation of the various components of the appliance- start the Service diagnostics mode
Reading the alarms and activating the individual components
To activate the function:1) Press and hold down the button S1.2) Turn the knob anti-clockwise till Position 5:
- The LEDs LD0 and LD1 flash.- Release button S1.- Press button S1.- the first memorised alarm is displayed: the End of
cycle LED flashes and pauses: for the decodification,please refer to table of alarm codes.
4) Press again button S1 to display the second alarm.5) Pressing button S1 again, the third alarm is displayed.6) Pressing button S1 for the fourth time, the appliance
actuators are activated:- 4th actuation: regeneration solenoid- 5th actuation: drain pump- 6th actuation: water fill solenoid and washing pump
(water up to level)- 7th actuation: heating (only if water up to level)- 8th actuation: washing pump- 9th actuation: detergent/rinse-aid dispenser- 10th actuation:- 11th actuation: it starts again from the first alarm
All positions can be repeated pushing button S1 sequentially.The components are powered with door closed.If button S1 is not pressed for 60 seconds, the diagnostics terminate automatically.
Cancelling alarm codes from memory / test of LEDs
It is good practise to cancel the alarm memorised:- after reading the alarm code, to check whether it is repeated
during the diagnostics test.- after repairing the appliance, to check whether it is repeated
during the testing cycle.
To activate the function:1) Press and hold down button S1.2) Turn the knob anti-clockwise till Position 5:
- the LEDs LD0 and LD1 flash.- release button S1.
3) Turn the knob till Position 4.- press button S1.- all LEDs start to flash for 30 seconds.
- 19 -Spares Operation - R.Kurzke 02/05 599 521 951 EN
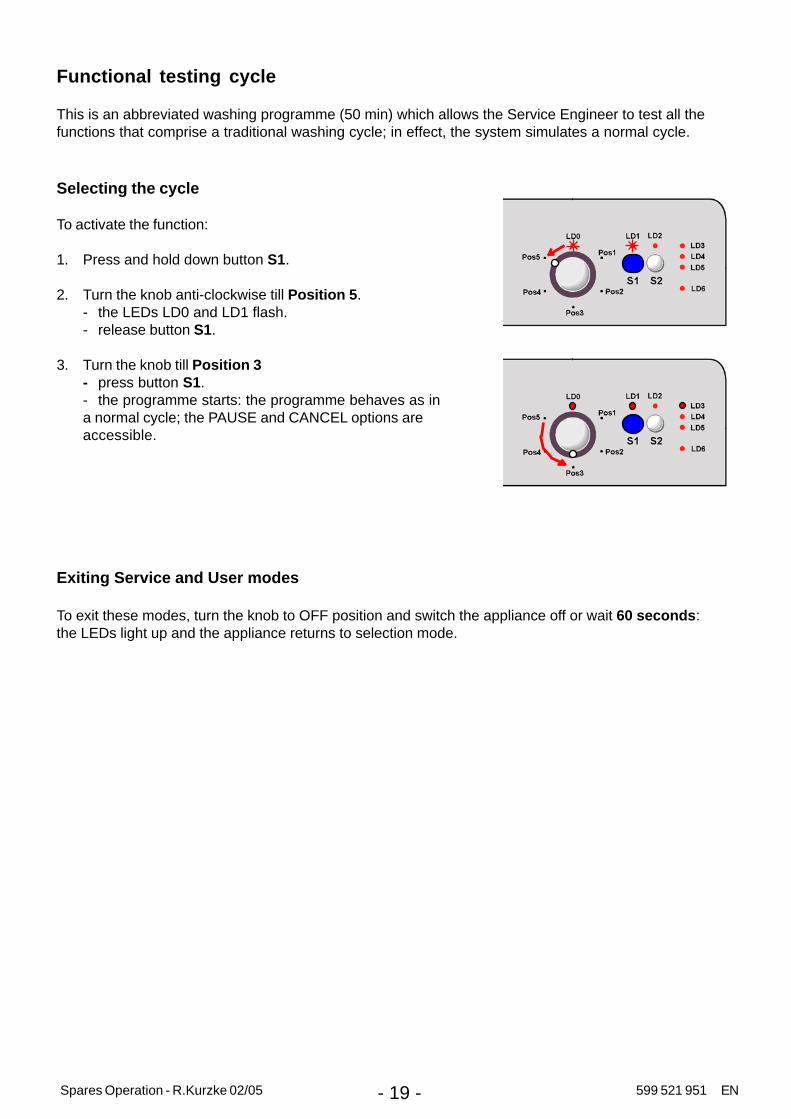
Functional testing cycle
This is an abbreviated washing programme (50 min) which allows the Service Engineer to test all thefunctions that comprise a traditional washing cycle; in effect, the system simulates a normal cycle.
Selecting the cycle
To activate the function:
1. Press and hold down button S1.
2. Turn the knob anti-clockwise till Position 5.- the LEDs LD0 and LD1 flash.- release button S1.
3. Turn the knob till Position 3- press button S1.- the programme starts: the programme behaves as ina normal cycle; the PAUSE and CANCEL options areaccessible.
Exiting Service and User modes
To exit these modes, turn the knob to OFF position and switch the appliance off or wait 60 seconds:the LEDs light up and the appliance returns to selection mode.

- 20 -Spares Operation - R.Kurzke 02/05 599 521 951 EN
16. Alarms
When an abnormal situation occurs that may interfere with machine functioning, the main board activates a safetysystem which in most cases interrupts the washing cycle. The last three alarm situations are stored in memory.Using a special procedure, service personnel can display all the alarms stored in memory. The user is only shownfour of the alarms in progress.The END OF CYCLE LED flashes repeatedly.
Type of Alarm
No. flashes of end-of-cycle LED
Displayed to the user
Description of the alarm condition Machine status Possible causes
i10 1 yes
Water fill time-out (The pressure switch does not close on FULL after 90 sec. static fill, or never closes on “FULL” during the initial 60 sec of
the dynamic fill at 2800 rpm)
The drain pump switches on, then the cycle stops
Tap closed; water mains pressure too low; fill solenoid / wiring faulty; hydraulic circuit
of pressure switch obstructed; level pressure switch / wiring faulty; circuit board
faulty
i20 2 yes
Water drain time-out (The pressure switch does not return to EMPTY after two drain phases lasting 120
seconds)
The drain pump switches on, then the cycle stops
Drain circuit obstructed/blocked; drain pump interrupted or jammed (foreign
bodies); level pressure switch blocked on FULL (1-3); hydraulic circuit of pressure switch obstructed; wiring faulty; circuit
board faulty
i30 3 yes Intervention of Anti-flooding system
(the drain pump switches on) The cycle is interrupted and the
drain pump switches on
Water leakage from the tub - sump and various connections (pump, upper spray arm duct etc.). Floating sensor blocked
mechanically. Microswitch faulty. Fill solenoid blocked mechanically. Circuit
board faulty (solenoid triac short-circuited)
i50 5 yes Motor triac short-circuited (the
washing pump runs uncontrolled at maximum speed)
Water fill to level (if necessary), deactivation of the other
actuators, cycle interrupted. The washing motor runs at
maximum speed and the alarm is displayed.
Circuit board faulty
i60 6 no
Heating Time-out (the check takes place every 3 minutes: the
temperature must increase by a certain amount at each step)
The programme continues to the end without heating (the
washing result will probably be unsatisfactory)
Heating element faulty; intervention of safety thermostats (open); wiring faulty;
NTC sensor (poor thermal contact); insufficient water circulating in the tub;
washing pump faulty (impeller stripped); circuit board faulty.
i70 7 no NTC sensor short-circuited or open
The programme continues to the end without heating (the
washing result will probably be unsatisfactory)
NTC sensor faulty; wiring short-circuited / open; circuit board faulty.
i80 8 no Communication error between the microprocessor and the EEPROM
Machine inoperative: no selection possible (*)
Circuit board faulty.
i90 9 no Problems with software
configuration
The fault occurs when switching on: no selection
possible (*)
Circuit board faulty (configuration software incorrect).
ib0 11 no Problems with the turbidity meter [if
featured] (Calibration Time-out)
The programme continues as if a “heavy soiling” condition had
been detected.
Turbidity sensor faulty; sensor wiring faulty; circuit board faulty.
id0 13 no
Problems with the washing motor: no signal from the tachometric
generator (washing pump powered, but no signal from the generator)
The heating element is switched off. If the fault persists after the Time-out, the washing
pump operates at maximum speed and the alarm code is stored in memory (the cycle
continues)
Motor winding interrupted / short-circuited; motor jammed (foreign bodies); wiring to
washing motor faulty; motor capacitor faulty; Tachometric generator interrupted /
short-circuited; circuit board faulty.
iF0 15 no Water replenishment Time-out (3 times during the T.S. Time-out)
The cycle continues until the next phase without
supplementary fills and without heating. The error is cancelled on completion of a drain phase.
Dishes upside-down; central filter clogged; excessive foam; leaks from the sump-
pressure switch coupling; pressure switch faulty / false contacts.

- 21 -Spares Operation - R.Kurzke 02/05 599 521 951 EN
Service tips
Replacement of the components within the door.
Remove the screws from the frame.
Carefully unclip the front of the door.
Before finally opening, unclip the on/off LED.
The electronics can then besnapped out.
You needscrewdriverTorx TX20
The dosing unit is held byscrews.
After removing these screws, thecomponents can be removed
from the door breech.
Re-assembly is carried out in thereverse order.
After removing the spring, thedoor-opener can be removed
from its hinges.
- 22 -Spares Operation - R.Kurzke 02/05 599 521 951 EN
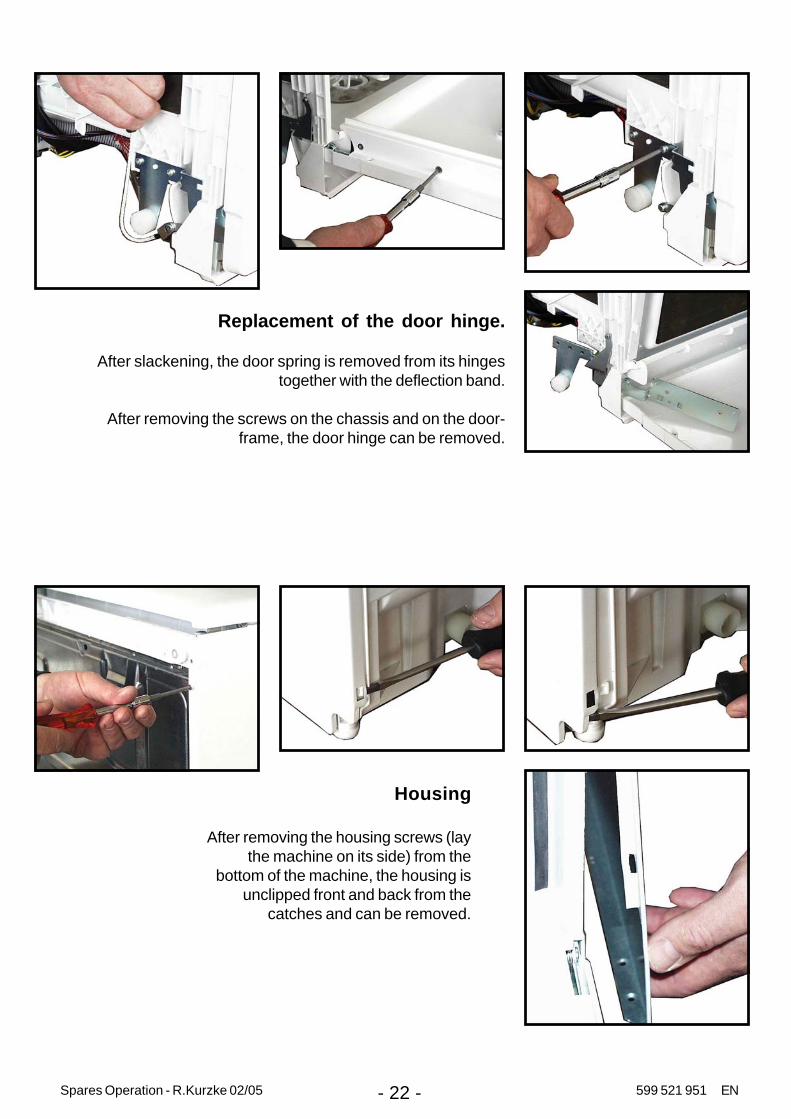
Replacement of the door hinge.
After slackening, the door spring is removed from its hingestogether with the deflection band.
After removing the screws on the chassis and on the door-frame, the door hinge can be removed.
Housing
After removing the housing screws (laythe machine on its side) from the
bottom of the machine, the housing isunclipped front and back from the
catches and can be removed.

- 23 -Spares Operation - R.Kurzke 02/05 599 521 951 EN
The take-off hose ventilation can be unscrewed forcleaning when necessary, in case these rubber parts inthe interior of this valve become dirty or stuck because ofresidues.
The pressure monitor issimply unscrewed.
The air should be able toenter the hose from the hol-der - not the other wayaround!

- 24 -Spares Operation - R.Kurzke 02/05 599 521 951 EN
The floor of the machine is held with screwsat the front, and clipped in at the back.
It contains the bosses for the overflowwater and the flooding switch.
After removal you come to the mostimportant functional components.
After loosening the screwsof the two holders and theyoke, the tumble pump/continuous flow heater unitcan be taken out.
The bayonet breech of thepump chamber can besimply released, forpossible cleaning.

- 25 -Spares Operation - R.Kurzke 02/05 599 521 951 EN
To release the hose clamps, it is recommended that thisassembly be taken off its hinges.
After the removal of the hose, the valve can be drawnout of the chassis with suitable pliers.
The mounting for thethermostats is screwedin behind the leachpump.
After its release, thethermostats can beremoved.

- 26 -Spares Operation - R.Kurzke 02/05 599 521 951 EN
To dismount the leach pump, the hose clamps arereleased and the screws removed.
The flooding switch is snapped out witha small screwdriver and can be taken
out of its mounting.
After removing the protective cap, themicroswitch can be snapped out.
Here you can see howthe hose clamps can bere-tensioned with wirecutting pliers.

- 27 -Spares Operation - R.Kurzke 02/05 599 521 951 EN
To dismount the watersoftener, these attachmentscrews are removed.
The connections on thereed switch are removed.
The hose connections aredetached.
The large nut of the salt hol-der can be released with thehelp of a V-belt. A spanneris useful in removing therecycling inlet nut.
Now the complete unit canbe removed.
After undoing thescrews of therecycling valve, thiscan be removed.

- 28 -Spares Operation - R.Kurzke 02/05 599 521 951 EN
18.1. Connections

- 29 -Spares Operation - R.Kurzke 02/05 599 521 951 EN
18.2. Wiring
- 30 -Spares Operation - R.Kurzke 02/05 599 521 951 EN
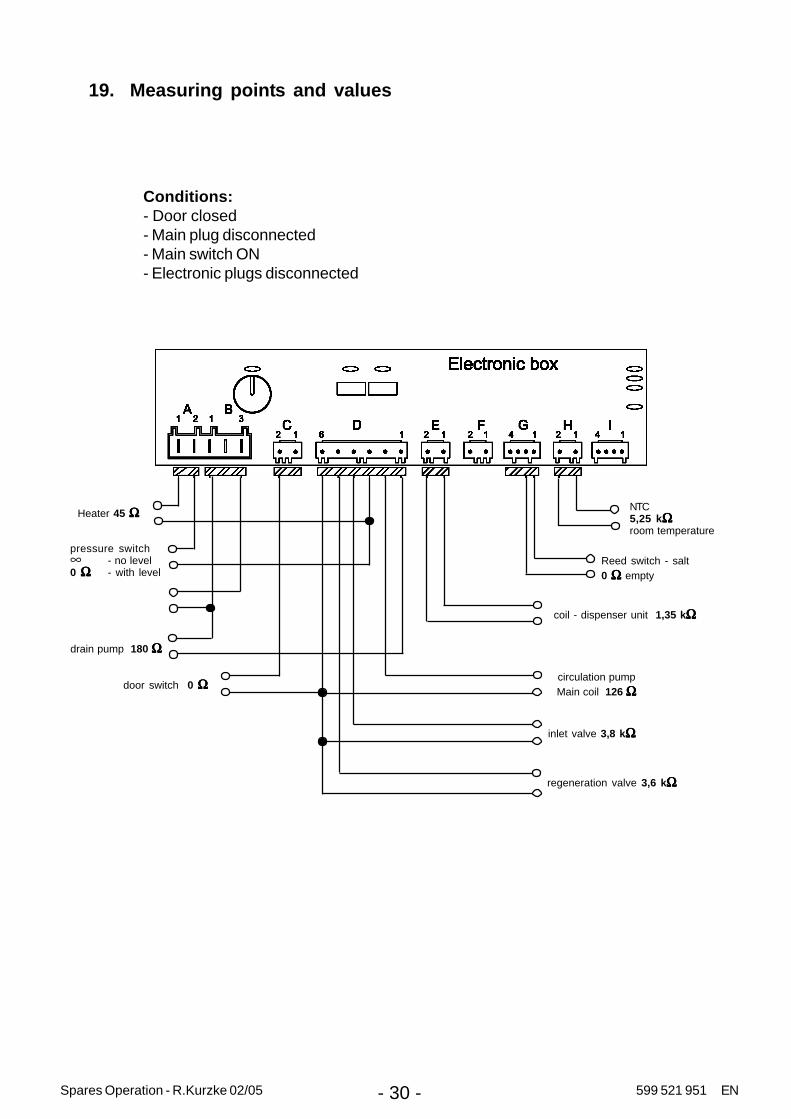
Conditions:- Door closed- Main plug disconnected- Main switch ON- Electronic plugs disconnected
19. Measuring points and values
Reed switch - salt0 ΩΩΩΩΩ empty
NTC5,25 kΩΩΩΩΩroom temperature
coil - dispenser unit 1,35 kΩΩΩΩΩ
regeneration valve 3,6 kΩΩΩΩΩ
inlet valve 3,8 kΩΩΩΩΩ
circulation pumpMain coil 126 ΩΩΩΩΩ
Heater 45 ΩΩΩΩΩ
drain pump 180 ΩΩΩΩΩ
door switch 0 ΩΩΩΩΩ
pressure switch∞ - no level0 ΩΩΩΩΩ - with level