digital notepad md 85276 aus final rev
TRANSCRIPT

After Sales Support TEL: 1 300 884 987 WEB Support: www.medion.com.au
1
Digital Notepad
What your 1 year warranty means Great care has gone into the manufacture of this product and it should therefore provide you with years of good service when used properly. In the event of product failure within its intended use over the course of the first year after the date of purchase, we will remedy the problem as quickly as possible once it has been brought to our attention. In the unlikely event of such an occurrence, or if you require any information about the product please contact us via our after sales support services, details of which can be found in this manual and on the product itself.
Copyright © 2007
All rights reserved. This manual is protected by Copyright.
Trademarks:
MS-DOS® and Windows® are registered trademarks of Microsoft®. Pentium® is a registered trademark of Intel®. Other trademarks are the property of their respective owners.
Medion® makes no warranty of any kind with regard to this material, including, but not limited to, the implied warranties of merchantability and fitness for a particular purpose.
Medion® shall not be liable for errors contained herein or for incidental or consequential damages in connection with the furnishing, performance, or use of this material.
Medion® assumes no responsibility for the use or reliability of its software on equipment that is not furnished by Medion®.
This document contains proprietary information that is protected by copyright. All rights are reserved. No part of this docu-ment may be photocopied, reproduced, or translated to another language without the prior written consent of Medion®.
The information in this document is subject to change without notice.

After Sales Support TEL: 1 300 884 987 WEB Support: www.medion.com.au
2
Contents:
Safety and service ...................................................................................................3 Safety notes ...................................................................................................................................... 3 Battery Handling............................................................................................................................. 5 Repairs ................................................................................................................................................ 6 Cleaning ............................................................................................................................................. 6 Recycling and Disposal................................................................................................................. 6
Introduction.............................................................................................................7 Notes on these instructions........................................................................................................ 7 Box contents..................................................................................................................................... 8 System requirements .................................................................................................................... 8 Technical data.................................................................................................................................. 8
Views ........................................................................................................................9 Symbols in the LCD display.......................................................................................................10 Function keys .................................................................................................................................10
Starting the device................................................................................................11 Inserting or changing batteries...............................................................................................11 Inserting paper ..............................................................................................................................13 Attaching the digital pen...........................................................................................................13 Installation of software...............................................................................................................14
Operation...............................................................................................................15 Switching the device on and off .............................................................................................15 Making notes..................................................................................................................................15 Using the memory and memory cards .................................................................................16 Administrating documents.......................................................................................................17
Moving between the pages .................................................................................................17 Moving between the files .....................................................................................................17 Creating new pages ................................................................................................................17 Creating new files ....................................................................................................................17 Deleting files and pages ........................................................................................................18
Replacing the pen refills.............................................................................................................19 Removing refill ..........................................................................................................................19 Putting in a refill .......................................................................................................................19
Connecting to your computer .................................................................................................20 Use as a digitizer tablet ..............................................................................................................20
Customer service...................................................................................................21 Errors and possible causes....................................................................................................21 Is Further Assistance Necessary? ........................................................................................22

After Sales Support TEL: 1 300 884 987 WEB Support: www.medion.com.au
3
Safety and service
Safety notes Please read through this section carefully. Following all the instructions will guarantee reliable operation and years of enjoyment from your new Digital Notepad.
Always keep these instructions near your Digital Notepad for easy reference.
Keep these instructions and packaging safe. Use the original packaging in the event that you need to ship or transport your Digital Notepad.
Operating safety • Never open the housing of the Digital Notepad! This could lead to an electrical short-
circuit, damage to your Digital Notepad or fire.
• Never insert any objects through the slits and openings into the inside of the Digital Notepad. Doing so could lead to an electrical short circuit or damage to your Digital Notepad.
• The device is not intended for use by young children or infirm persons without supervi-sion.
• Keep packing materials such as foil away from children as there is a danger of suffoca-tion.
• This Digital Notepad is intended for personal use only and is not intended for commercial use of any kind.
• Do not press heavily on the digital pen. Doing so may cause damage to the pen tip or the pen itself resulting in malfunction.
• In the first hours of operation, new devices may emit a typical, unavoidable but com-pletely harmless smell, which will decline increasingly in the course of time. We recommend you ventilate the room regularly, to counteract the formation of the smell.
Point of use • Keep your Digital Notepad and all connected equipment away from moisture, dust, heat
and direct sunlight in order to avoid malfunctions.
• Only use in a suitable ambient temperature:

After Sales Support TEL: 1 300 884 987 WEB Support: www.medion.com.au
4
Environment conditions • The Digital Notepad can be operated at an ambient temperature of 10° C/40° F to 40°
C/104° F and a relative humidity of 35% to 80% (not condensing).
• When switched off the Digital Notepad can be stored at temperature from -10° C/14 °F to 60° C/140°F at a relative humidity of 20 % to 80 % (not condensing).
After transporting your Digital Notepad wait until it has reached room temperature before turning on. In the event of major variations in the temperature or humidity, condensation can form on the inside of the Digital Notepad which can cause an electrical short-circuit.
Electro-magnetic compatibility • When connecting the Digital Notepad observe the guidelines for electro-magnetic
compatibility (EMC).
• Maintain a distance of at least 3 feet from sources of high frequency and magnetic in-terference (television sets, loudspeakers, mobile telephones, etc.), in order to avoid mal-functions and data loss.
Connecting Observe the following instructions to connect your Digital Notepad properly:
• Route the cable so that no one can step on it or stumble over it.
• To avoid damage to the cable do not place any objects or furniture on the cable.
Data security Every time you update your computer’s data make back-up copies on an external storage medium, i.e. CDR disc. We cannot assume a liability for data loss or associated subsequent damage.
After Sales Support TEL: 1 300 884 987 WEB Support: www.medion.com.au
5
Battery Handling Batteries may contain combustible materials. Misusing them may cause battery leakage, heat, explosion or ignition, bringing about injury or damage to the product or YOU. Please observe strictly the following:
• KEEP CHILDREN AWAY from batteries.
• If by any chance, batteries are swallowed, consult a medical doctor immediately.
• DO NOT CHARGE batteries (except rechargeable batteries).
• DO NOT FORCIBLY DISCHARGE batteries.
• DO NOT SHORT-CIRCUIT batteries.
• DO NOT HEAT or DISPOSE OF BATTERIES IN FIRE.
• DO NOT DISASSEMBLE or DEFORM batteries. Your hands and fingers may be injured, or the liquid of the battery may get into your eyes or adhere to your skin. If this happens, rinse with a large quantity of water immediately and consult a medical doctor.
• DO NOT expose batteries to strong impacts by dropping or throwing the batteries.
• DO NOT reverse the positive (+) and negative (-) terminals to avoid short-circuit.
• REMOVE PROMPTLY any used battery from the device.
• REPLACE THE BATTERY with a new battery of the same type.
• INSULATE THE TERMINAL parts with tape or the like when storing or at disposal of the bat-teries.
DO NOT throw drained batteries in with the domestic rubbish! Respect the environment and dispose of them in the specific containers for separate collection. If necessary, turn to your reseller or to our service centre. Thank you!

After Sales Support TEL: 1 300 884 987 WEB Support: www.medion.com.au
6
Repairs Please contact the MEDION Australia Helpdesk on 1300 884 987 if you have any problems with your Digital Notepad. ONLY have repairs completed only by our authorised service centre.
Contact you the MEDION Australia Helpdesk on 1300 884 987 when...
• Liquid has got into the Digital Notepad
• The Digital Notepad does not operate properly
• The Digital Notepad is dropped or the housing is damaged.
Cleaning • Clean the Digital Notepad with a moist cloth.
• Do not use any type of solvents, caustic or gaseous cleaning agents.
Recycling and Disposal
Device
At the end of its life, the appliance must not be disposed of in household rubbish. Enquire about the options for environmentally-friendly disposal at your retail store.
Batteries
Do not dispose of used batteries in the household rubbish! They must be deposited at a collec-tion point for used batteries.
Packaging
The packaging from your Digital Notepad is produced mostly from materials which can be dis-posed of in an environmentally friendly manner and be professionally recycled.
Should you have any questions concerning the disposal please contact your dealer or our service. Please refer to the hotline number in the footnote.
After Sales Support TEL: 1 300 884 987 WEB Support: www.medion.com.au
7
Introduction
Notes on these instructions We have arranged these instructions so that you can quickly find the subject related information in the table of contents. The purpose of these instructions is to help you operate your Digital Notepad safely, quickly and easily.
Our target group Thank your for purchasing this Digital Notepad. We thank you for your confidence in our prod-ucts and are pleased to welcome you as a new customer. These instructions are intended for novice users as well as advanced users. Regardless of possible professional functions, this Digital Notepad is intended for domestic home use only.
Quality We focused on great features, ease of use, safety and reliability in manufacturing this Digital Notepad.
The balanced hardware and software design offers you an advanced Digital Notepad which will provide you a great deal of functionality for business or entertainment purposes.
Service Service and support is available any time you use your Digital Notepad. Contact us, we will be glad to help you.

After Sales Support TEL: 1 300 884 987 WEB Support: www.medion.com.au
8
Box contents Please check the contents of the box and notify us within 14 days of purchase if the contents of the box is incomplete. Your Digital Notepad includes:
• Digital Notepad
• Digital pen
• Note block (paper)
• Plastic foil cover (for use in the Digitizer Tablet Mode)
• 2 pen refills and 2 plastic refills (for use in the Digitizer Tablet Mode) Advice: one of each refills are located in the Refills compartment [11]
• USB cable
• AAA batteries: - 4 for the digital notepad - 1 for the digital pen
• Installation and application software
• Operating instructions
System requirements • Computer PC/AT compatible computer
• Processor type Pentium III 1 GHz or higher
• Operating system Windows® XP/Vista®
• Memory 256 MB or more
• Installation Optical Drive (CD or DVD)
• Connections USB interface
Technical data • Technology Electromagnetic
• Discernible area 216 x 280 mm
• Interface USB 1.1
• Dimensions 332 x 253 x 13.5 mm
• Weight 704 g
• Energy supply Device: 4 Type AAA batteries Pen: 1 Type AAA battery Digitizer Tablet Mode: through USB port
• Operating environment Temperature: 10° C – 40° C Relative air humidity: 35 % – 80 %

After Sales Support TEL: 1 300 884 987 WEB Support: www.medion.com.au
9
Views
Battery cover [5]
Battery compartment [6]
Reset [7] ISP [8] - not occupied
Card slot [9]
Paper clamp [10]
Refills compartment [11]
[1] USB connection
[2] On/ Off switch
[3] LCD display
[4] Function keys
[4] LED display
Lower surface
Pen cap [12] Battery status LED [13]
Writable Area
216 mm x 280 mm (8,5“ x 11“)
After Sales Support TEL: 1 300 884 987 WEB Support: www.medion.com.au
10
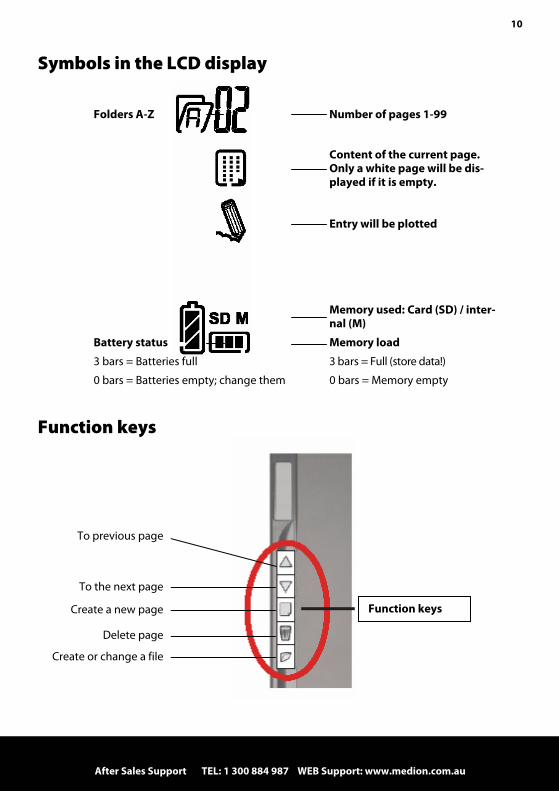
Function keys
To previous page
To the next page
Create a new page
Delete page
Create or change a file
Symbols in the LCD display
Function keys
Folders A-Z Number of pages 1-99
Content of the current page. Only a white page will be dis-played if it is empty.
Entry will be plotted
Memory used: Card (SD) / inter-nal (M)
Battery status Memory load
3 bars = Batteries full 3 bars = Full (store data!)
0 bars = Batteries empty; change them 0 bars = Memory empty

After Sales Support TEL: 1 300 884 987 WEB Support: www.medion.com.au
11
Starting the device
Inserting or changing batteries Digital writing block:
The Battery Status Symbol on the LCD display [3] will show you the status of the batteries. Three bars will be displayed if the batteries are new. The more the batteries are used, the fewer bars will be shown. The batteries will have to be changed if bars are no longer visible.
The battery compartment [6] is located on the back of the device.
1. Open the battery compartment by pressing lightly on the dotted area and pushing the cover upwards.
2. Remove used batteries, if necessary and insert four new AAA batteries in accordance with the following illustration:
Note:
Pay attention to the correct polarity (+/-). You could damage the digital writing block by inserting the batteries incorrectly.
3. Close the battery compartment again by repositioning the cover and pushing it back to the starting position carefully.
We recommend the use of alkaline batteries for practical application. Operation with NiMH bat-teries is also possible.
New batteries will have a writing period of about 20 hours. However, the actual time will heavily depend on the brand and the quality of the batteries used.
- + - + + - + -

After Sales Support TEL: 1 300 884 987 WEB Support: www.medion.com.au
12
Digital pen:
If the LED [13] starts to flash or the lines are no longer correctly displayed, the batteries of the digital pen are almost empty and need to be replaced.
The pen has no On / Off switch. It will be activated automatically if it comes into the proximity of the entry surface and will switch off when it leaves this area.
1. Open the battery compartment by unscrewing the digital pen.
2. Remove the used battery and insert a new AAA battery in accordance with the following illustration, if necessary:
3. Screw the digital pen back together.
Note:
Read the notes from Page 5 for dealing with batteries safely.
+ -

After Sales Support TEL: 1 300 884 987 WEB Support: www.medion.com.au
13
Inserting paper
Paper clamp
Note:
The stack or block of paper must not exceed a height of 13mm (~135 sheets), because the movements of the pen will not be recognized correctly otherwise.
The applicable writing area has dimensions of 216mm x 280mm (8.5“ x 11“ = letter format).
1. Press the paper clamp and introduce the paper flush to the edges.
2. Release the paper clamp, in order to stabilize the paper.
Attaching the digital pen You can attach the digital pen to your Digital Notepad when it is not in use by sliding the pen cap on the indentation of the paper clamp.

After Sales Support TEL: 1 300 884 987 WEB Support: www.medion.com.au
14
Installation of software Contents of the Software disc:
• USB Pen Pad Driver : Necessary for installing the drivers of you Digital Notepad
• MyInk Suite : Software for administering projects
• Power Presenter RE : Program to assist working on source files
• Free Notes & Office Ink : Program for administering and converting
• Pen Soft : Program to assist the Taskbar with extended functions
Contents of the MyScript Notes disc:
• Main program for script recognition.
Important:
You should install the necessary software (drivers and image processing) first, be-fore you connect the Digital Notepad.
WARNING!
Your important files can be changed or deleted during the installation of software. Make sure that you back up your hard disk, to avoid problems when using older files after any installation.
1. Insert the supplied disc labelled “Software” to start the installation automatically.
Note: If the installation does not occur automatically, the "Autorun" feature is probably disabled.
Manual installation without Autorun function:
1. Open the "Start menu" and select the entry "Run".
2. Now enter the letter of the disk drive followed by a colon and the pro-gram name "Setup".
3. Confirm by clicking on "OK".
2. Install the drivers first. Afterwards you are free to choose all application and tools that you would like to use. To install the main application for script recognition you need to swap discs.
3. Restart your computer after all installations have been completed.

After Sales Support TEL: 1 300 884 987 WEB Support: www.medion.com.au
15
Operation
Switching the device on and off 1. Press the On / Off switch [2] until the LCD
display [3] switches on and gives you in-formation about the status of the device.
2. Press the On / Off switch [2] again, in order to switch the device off. The device will switch off automatically if it has not been used for some time.
Making notes You should have made the following preparations before beginning to store your handwriting notes:
• Turn the device on (from Page 11).
• Familiarize yourself with the symbols of the LCD display (Page 9).
• Make sure you know the use of each of the Function keys (Page 10 and 17).
1. Remove the pen cap [12] from your digital pen or pull the pen out of the pen cap at-tached to the paper clamp. The pen has no on and off switch. It will be activated automatically if it comes into the proximity of the entry area and will switch off when it leaves this area.
2. Write on the writable area. The Pen symbol will appear on the LCD display [3] while you are writing. The symbol will change from an empty sheet (no data) to a dotted sheet (data present), if the document was previously empty.
3. Your note will be stored immediately, so that even an unintended switching off of your device will not cause any loss of data.
4. Switch the device off and put the pen back into the cap when you have finished making notes.
Writable Area
After Sales Support TEL: 1 300 884 987 WEB Support: www.medion.com.au
16
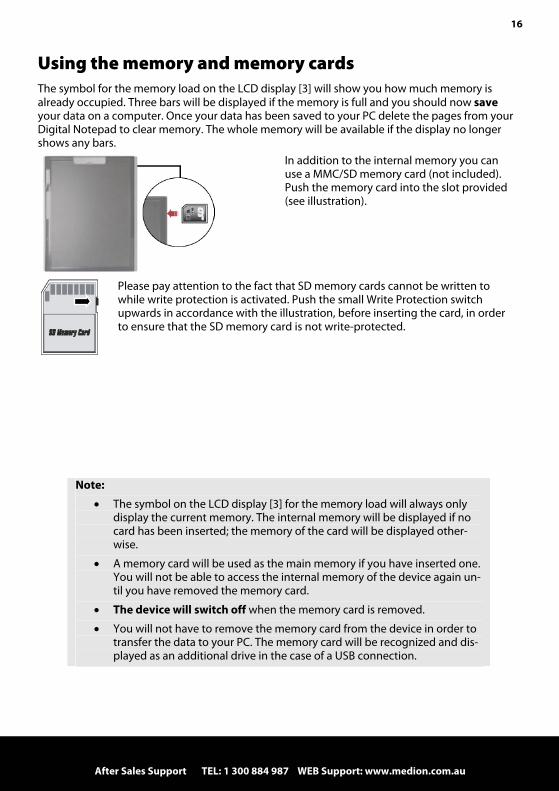
Using the memory and memory cards The symbol for the memory load on the LCD display [3] will show you how much memory is already occupied. Three bars will be displayed if the memory is full and you should now save your data on a computer. Once your data has been saved to your PC delete the pages from your Digital Notepad to clear memory. The whole memory will be available if the display no longer shows any bars.
In addition to the internal memory you can use a MMC/SD memory card (not included). Push the memory card into the slot provided (see illustration).
Please pay attention to the fact that SD memory cards cannot be written to while write protection is activated. Push the small Write Protection switch upwards in accordance with the illustration, before inserting the card, in order to ensure that the SD memory card is not write-protected.
Note:
• The symbol on the LCD display [3] for the memory load will always only display the current memory. The internal memory will be displayed if no card has been inserted; the memory of the card will be displayed other-wise.
• A memory card will be used as the main memory if you have inserted one. You will not be able to access the internal memory of the device again un-til you have removed the memory card.
• The device will switch off when the memory card is removed.
• You will not have to remove the memory card from the device in order to transfer the data to your PC. The memory card will be recognized and dis-played as an additional drive in the case of a USB connection.
After Sales Support TEL: 1 300 884 987 WEB Support: www.medion.com.au
17
Administrating documents You will have the possibility of creating several data files (A-Z) and documents (1-99), so that you will be able to organize your notes.
You will find yourself at the document last worked on automatically and in the corresponding file if the device has been switched on.
Moving between the pages 1. Press the Function key, to move to the next page; press the Function key, to move
to the previous page.
Moving between the files 1. Press the Function key. The File indicator will start to flash and will display the current
file letter.
2. Press the Function key, to move to the next file: press the Function key, to move to the previous file.
Creating new pages A new page can always be created in the current file.
1. Press the Function key. A new page will be created and given the highest number of pages, until a maximum of 99 pages has been reached. The new page will be active and can be written on immediately.
Creating new files A new page will always also be created when a new file is created.
1. Press the Function key. The File indicator will start to flash and will show the current file letter.
2. Press the Function key now. A new file will be set up and will receive the next available letter, until Z has been reached. Several files can be set up by pressing the key several times.
3. Press the Function key again. The File indicator will stop flashing and you will be able to carry out a new action. The display will stop flashing after some seconds, even if you do not press the Function key.

After Sales Support TEL: 1 300 884 987 WEB Support: www.medion.com.au
18
Deleting files and pages Files cannot be deleted on the device. Use the File Explorer on your PC to do this once the device has been connected to it by USB.
To delete a page:
1. Please press the Recycle Basket Function key, in order to delete the content of the cur-rent page.
2. Now change the selection from ‘No’ to ‘Yes’ with the Arrow keys.
3. Confirm your action by pressing the Recycle Basket Function key again. The symbol for ‘Empty Page’ will appear on the LCD display once more, after the page has been deleted.
Note:
• The deleted content will have been deleted irrevocably and it will not be possible to retrieve it.
• You will be able to prevent the deletion of the page by selecting ‘No’, if you have pressed the Recycle Basket Function key unintentionally.
• A deleted page will always still be available as a file. Only the content will have been deleted. Use the File Explorer on your PC to do this once the device has been connected to it by USB.

After Sales Support TEL: 1 300 884 987 WEB Support: www.medion.com.au
19
Replacing the pen refills You can store up to two refills in the side compartment [11] of your device.
Removing refill 1. Open the side compartment [11], by pushing the cover to the right with a light pressure.
2. To remove the old point from the pen place the pen point into the boring in the side compartment and tilt the pen.
3. Now, you will be able to pull out the refill easily.
Putting in a refill You will be able to put in the new refill after you have removed the empty refill successfully.
Note:
• You should use as little force as possible when you exchange a refill, in order not to damage the refill or the pen.
• Pay attention that the refill has sufficient space to be springy, because damage can arise otherwise.
• Buying new refills at your local office supply store: The dimensions of the refills are approx. 2.4mm x 67mm. We recommend using products of the KANGHER, MINI STAR, SCHMIDT 628F and ROTRING brands. Unsuitable refills can influence the function-ality of the digital pen and cause damage.
1. Carefully push the new refill into the pen until it locks into position.

After Sales Support TEL: 1 300 884 987 WEB Support: www.medion.com.au
20
Connecting to your computer Please make sure that you have installed the software as described on Page 14.
1. Connect the smaller connector of the USB cable supplied with the device to the USB con-nection [1] of the device.
2. Push the other end of the USB cable into a free USB connection of your computer.
3. The following indication will appear on the LCD display [3], if the connection has been made:
4. The computer will recognize that a new device has been connected and will allocate two drives to the device.
Use as a digitizer tablet You should attach the protective cover for the writing surface supplied with the device with the aid of the paper clip [10], before using the Digitizer Tablet function. Replace the pen point with a plastic refill. This is to ensure the delicate surface of the device is protected.
You will be able to move the cursor on your PC monitor (as your mouse does) with the digital pen in the Digitizer Table function. The recognizable area is set proportionately to the screen, as illus-trated.
The LED will begin to shine as soon as you are in the recognizable area with the digital pen. The LED will go out again once you start writing.
You will be able to simulate the mouse buttons with the aid of the Function keys of the device, if you own a special digitizer tablet pen (not supplied with the device).
Left mouse button: Press the tip of the digital pen.
Right mouse button: Press the Recycle Basket Function key.
Double-click: Press on the tip of the digital pen twice in succession quickly or operate the Function key.
You will be able to allocate other functions to the Function keys with the help of the software supplied with the device. You will find information about this in the online Help.

After Sales Support TEL: 1 300 884 987 WEB Support: www.medion.com.au
21
Customer service
Errors and possible causes The device is not recognized or not activated.
• Have you connected the cable in accordance with the installation instructions? Please check all the cable connections.
• Have you restarted the computer after the installation?
The device cannot be switched on.
• Make sure the batteries have been inserted correctly.
• Check the energy status of the batteries.
• Release the connection to the PC.
The lettering changes or even disappears at some points.
• Change the pressure or the speed with which you are writing.
• Change the angle of the pen to the surface of the device.
The lettering appears uneven and illegible to you.
• The refill could have been inserted incorrectly. Remove the refill and re-insert it correctly.
The lettering is severely distorted, slow or not present.
• Check the energy status of the batteries if you have not used the device for a long time.
• Check that a new refill has been inserted correctly if you have replaced the refill in the meantime.
‘M’ will continue to be shown in the LCD display, instead of ‘SD’, after an SD card has been inserted.
• Make sure that the SD card has been inserted into the card slot correctly and that the Write Protection switch is positioned at ‘Open’.
• Is the card compatible?
The device switches off automatically.
• This should happen when a memory card is removed.
• The device switches off after a specific time, so that the batteries are not used unnecessar-ily.
The Pen symbol does not appear in the LCD display.
• Change the writing pressure.
• Check the energy status of the batteries.
• Make sure that you are writing in the recognizable area.
• Signal failures can arise. Restart the device or carry out a Reset (press the Reset button [7] on the back of the device).

After Sales Support TEL: 1 300 884 987 WEB Support: www.medion.com.au
22
The content of a page has been overwritten.
• Create a new, empty page and continue to write there.
Is Further Assistance Necessary? If the suggestions listed above are not enough to resolve the problem, then contact us. The fol-lowing information will help us to help you resolve your problem:
• Configuration of the computer
• Any additional peripherals you may have connected
• Any messages that appear on the Digital Notepad display
• Any Windows programs that were being used when the problem arose
• Solutions you have tried to resolve the problem
• If you have a customer code, please have it ready before you call.