digital media player/recorder - inxtron - external hard drive
TRANSCRIPT

EN
R2-3500Digital Media Player/Recorder
User Manual May 26, 2009 - v1.0 Firmware: 20090512
The diagrams and images contained in this document may not fully represent the actual product and are there for illustration purposes only.

R2-3500 Media Player/Recorder Table of Contents
Table of Contents
1 Getting Started ........................................................................................................................ 1 1.1 About this Device .............................................................................................................. 1 1.2 Detailed View .................................................................................................................... 2 1.3 Before Use ........................................................................................................................ 6
2 Basic Operation....................................................................................................................... 9 2.1 Turning on the Power ........................................................................................................ 9 2.2 About the Main Screen...................................................................................................... 9 2.3 Recording (Video In) ......................................................................................................... 9 2.4 Transferring Files (File Copy).......................................................................................... 10 2.5 Playing back Media Files (Browser) ................................................................................ 10 2.6 Setup Menu (Setup) ........................................................................................................ 11 2.7 Scheduled Recording (Timer REC)................................................................................. 11
3 Examples ............................................................................................................................... 12 3.1 Video In ........................................................................................................................... 12 3.2 File Copy ......................................................................................................................... 14 3.3 Browser ........................................................................................................................... 16 3.4 Timer REC....................................................................................................................... 22
4 Setup Menu............................................................................................................................ 25 4.1 Audio ............................................................................................................................... 25 4.2 Video ............................................................................................................................... 25 4.3 REC................................................................................................................................. 26 4.4 Network ........................................................................................................................... 27 4.5 System ............................................................................................................................ 28 4.6 Photo............................................................................................................................... 29
5 Appendix................................................................................................................................ 30 5.1 Specifications .................................................................................................................. 30 5.2 Precautions ..................................................................................................................... 31 5.3 Trademarks ..................................................................................................................... 32 5.4 Important Notices ............................................................................................................ 32 5.5 FAQ................................................................................................................................. 32

R2-3500 Media Player/Recorder Getting Started
1 Getting Started
1.1 About this Device The R2-3500 is a digital media player that can be connected to the TV and playback media files from USB drives, its internal hard drive, media cards and network folders, as well as record videos directly to its internal SATA hard drive. It supports high definition video playback, offers digital HDMI output and features both scheduled recording and time shifting.
Page 1

R2-3500 Media Player/Recorder Getting Started
1.2 Detailed View 1.2.1 Front Standby button
LED indication & infrared receiver
Card reader slot (SD/SDHC/MS/MSPro)
USB#1 host port
Composite analogue audio & video input
LED Indication Power LED; lights up blue when the power is ON, turns purple during video recording and turns
off when system is in standby mode. Standby LED; lights up orange when the system is in standby mode. LAN LED; lights up yellow during network activity. Card Reader LED; normally green but turns off when a card is inserted into the card reader. 1.2.2 Rear
Ethernet port
USB device port
USB#2 host port HDMI digital audio/video output SPDIF digital audio output Composite analogue
audio/video output YPbPr component video output
Power receptacle
Page 2

R2-3500 Media Player/Recorder Getting Started
1.2.3 Top Pause/Step TV System
Mute Card Copy Home (main screen) Record
Stop
Arrow keys for navigation
Play/Enter
Page 3

R2-3500 Media Player/Recorder Getting Started
1.2.4 Remote Control For a detailed description of the functions for each button, please refer to the table on the next page. Standby Rec List (context menu) Browser (file browser) N/A Setup Menu Timer (scheduled recording) Audio (audio track selection) TV System (video output) Copy Menu
Numeric key pad
Mute GoTo (jump to chapter/time)
Zoom In (photos/videos) Return to previous screen
Enter Arrow keys for navigation
No function No function Pause/Step Play Recording Stop
Fast Forward Previous File/Page Fast Reverse Next File/Page Instant replay of previous 10sec CM Skip (skips 30 seconds) Slow Motion (¾, ½, ¼, 1/8, 1/16) Volume Up
Set A-B repeat points Music Repeat (chapter, title, off) Volume Down Subtitles (video subtitles) Guide Menu
Display file/status information Time Shift
Note Insert two triple A batteries (AAA) before using the remote control the first time.
Page 4

R2-3500 Media Player/Recorder Getting Started
Button Function
Power Turns system ON or puts it into stand-by mode.
Source N/A (only one source available, Video1 = Composite audio/video)
Rec List Opens context menu to rename or delete the selected folder/file in the browser menu. Opens context menu to add, remove and delete shortcuts under My_Shortcuts for shared folders.
Browser Jumps to browser menu.
Setup Opens setup menu.
TV System Changes TV output (press multiple times for different outputs).
Timer Jumps to recording schedule (Timer REC).
Audio Changes audio track.
Copy Jumps to file copy menu.
Mute Mutes audio sound.
Go To Opens search window to jump to a specific title, chapter or time during video playback.
Zoom In Zooms in during photo display (2x/4x/8x/16x) or video playback (2x/3x/4x/8x).
Zoom Out N/A
Return Returns to previous screen and moves up by one directory.
Delete N/A
Rec Starts or stops recording.
Pause/Step Pauses playback and plays frames step by step.
Play Starts or continues playback.
Stop Stops playback.
FR/FF Fast reverse or fast forward video playback.
Prev/Next Previous or next file/page.
Slow Slow motion playback for videos.
Ins Replay Jumps 10 seconds back to replay previous scene.
CM Skip Jumps 30 seconds forward to skip commercial.
1/All Sets repeat mode to Chapter, Title or Off.
A-B Sets A-B points for repeat mode.
Music N/A
Volume Increases or decreases volume.
Display Displays time and other information during playback, time shifting and recording.
Subtitle Turns external subtitle (SRT) ON or OFF.
Guide Displays main screen.
Time Shift Activates time shift function and starts recording. Press Play to start playback and pause to temporarily pause playback. Time shift recording continues until the Stop button is pressed.
Page 5

R2-3500 Media Player/Recorder Getting Started
1.3 Before Use 1.3.1 Hard Drive Assembly The internal SATA hard drive is not required for the basic functions of the R2-3500 media player but it is recommended to install a drive in order to make use of all the functions this device offers and also have a convenient storage place to store your media files.
1. Remove the two screws from the bottom, push the side cover from the front to slide it off the back and lift it off the case. Remove the screws for the metal shielding and take it off.
2. Remove the screws for the HDD bracket and lift it out of the casing. Install the hard drive, mount it to the HDD bracket, connect the cables and then replace the assembled drive in the casing.
3. Replace the metal shielding and fasten the screws. Align the side cover with the casing, slide it into place and fasten the screws to finish the assembly.
Page 6
R2-3500 Media Player/Recorder Getting Started
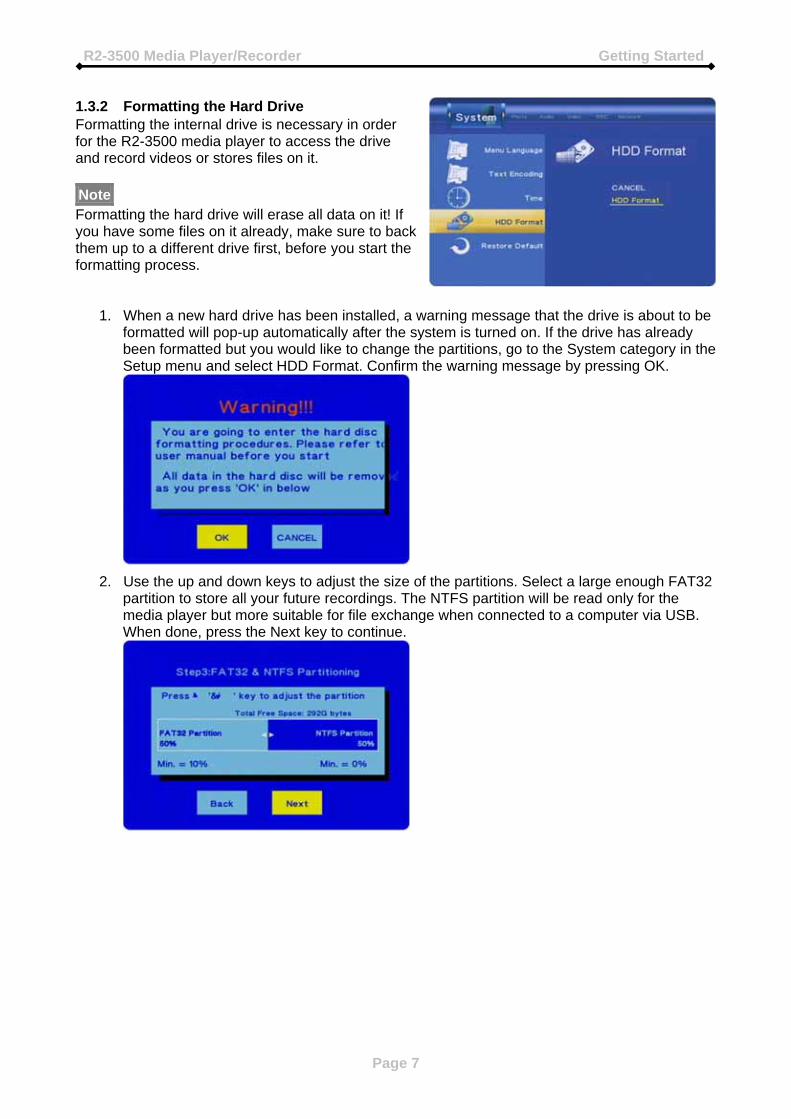
1.3.2 Formatting the Hard Drive Formatting the internal drive is necessary in order for the R2-3500 media player to access the drive and record videos or stores files on it. Note Formatting the hard drive will erase all data on it! If you have some files on it already, make sure to back them up to a different drive first, before you start the formatting process.
1. When a new hard drive has been installed, a warning message that the drive is about to be formatted will pop-up automatically after the system is turned on. If the drive has already been formatted but you would like to change the partitions, go to the System category in the Setup menu and select HDD Format. Confirm the warning message by pressing OK.
2. Use the up and down keys to adjust the size of the partitions. Select a large enough FAT32 partition to store all your future recordings. The NTFS partition will be read only for the media player but more suitable for file exchange when connected to a computer via USB. When done, press the Next key to continue.
Page 7

R2-3500 Media Player/Recorder Getting Started
Page 8
3. Confirm the next dialog and start formatting by pressing Format. During the process, do not turn off the power or interrupt the device in any other way.
4. Once the formatting has completed, a new Congratulation dialog will appear. Press OK to close it and exit the disk utility. The device will restart automatically.
Note The R2-3500 media player will be able to write to the first FAT32 partition only. NTFS partitions can only be used to read and play files. 1.3.3 Supported Devices Hard Drive: 3.5" SATA-I or SATA-II HDD (1.5Gb/s or 3.0Gb/s), 20GB - 1TB Media Cards: SD, SDHC, MS, MS Pro USB Devices (mass storage class): USB hard drive, USB flash drive, USB card reader

R2-3500 Media Player/Recorder Basic Operation
2 Basic Operation
2.1 Turning on the Power Connect the power supply to your R2-3500 media player and plug it into the wall socket. The device will start up automatically. During the start up, a splash screen will be shown and as soon as it’s ready, the main screen with further options will appear. If you do not see the main screen after about one minute and your display stays black, check the video connection and make sure the correct input channel has been selected. To change the video output on the R2-3500 media player, press the TV System button on your remote control until you see a signal. When the device is inactive for more than 5 minutes, the screen saver will turn on. To turn it off, press the power switch on the device or use the power button on the remote control. Note When not in use for longer periods of time, it is recommended to turn off the device completely by removing the power supply from the wall socket.
2.2 About the Main Screen After turning on the power and during the start up procedure, a splash screen will be shown. As soon as the media player is ready, the main screen will be displayed. Use the arrow buttons to highlight a menu and the Enter button to select it. Note To get back to the main screen, press the Guide button on your remote control or the Home button on the media player’s touch panel.
2.3 Recording (Video In) To start recording and using the time shift function, select the Video In menu. The display will change and show the signal from the device that is connected to the AV in ports, which are located under the front panel. The R2-3500 media player can record from a VCR, set top box, DVD player or camcorder as an example. To return to the main screen, either press the Return button or the Guide button. Recordings will be stored under HDD1 or USB in “My Recordings”. [Display] Press the Display button to display the destination drive where the recordings are going to be stored, the current time and the input source. [Rec] Press the Rec button to start recording. Press it multiple times to select one of the pre-set recording times in minutes (30/60/90/120/180/240/Off). Press the Stop button to stop recording. [Time Shift] Press the Time Shift button to activate the time shift function. A few seconds after starting it, a navigation bar will appear and you can use Play and Pause to playback. Press the Display button to hide the navigation bar and use the Stop button to stop the recording and time shift function.
Page 9

R2-3500 Media Player/Recorder Basic Operation
2.4 Transferring Files (File Copy) To enter the file copy menu, select File Copy from the main screen or press the Copy button on your remote control. This function allows you to copy files back and forth between different devices, such as attached USB drives, media cards, the internal SATA drive and shared network folders.
folders.
To copy files, select a source from where to copy and a destination where the files are to be copied. [Up/Down] Use the up and down buttons to navigate the different directories and [Enter] Press the Enter button to open the selected folder or confirm a command. [Left/Right] Use the left and right buttons to continue to the next step or go back to the source [Return] Press the Return button to cancel and return back to the beginning of the file copy. [Play] Press the Play button to select the file(s) or folder to be copied. A tick will be placed beside the selected file. Note The destination drive must be formatted using the FAT32 file system. The NTFS file system can only be used as source but not as destination. The media cards can be found under USB devices.
2.5 Playing back Media Files (Browser) To enter the browser mode, select Browser from the main screen or press the Browser button on your remote control. This function allows you to access different devices such as attached USB drives, media cards (see USB), the internal SATA drive and shared network folders to browse for and display your media files. By default, it will show all types of media files. To sort it by media type, select Music to only show audio files, select Photo to only show images and select Movies to only show videos. [Left/Right] Use the left and right buttons to select one of the pre-set filters, in order to only display certain media types. [Up/Down] Use the up and down buttons to select the folders and files. [Enter/Play] Press the Enter button to open the selected folder and the Play button to start playback for the selected file. [Return] Press the Return key to go up by one directory and return to the previous screen.
Page 10

R2-3500 Media Player/Recorder Basic Operation
Page 11
2.6 Setup Menu (Setup) To configure the settings of the R2-3500 media player and for more details, refer to chapter 4.
2.7 Scheduled Recording (Timer REC) To open the recording schedule, select Timer REC from the main screen. This function allows you to create, edit and delete recording schedules as well as view the current status and history of the recordings. Select Edit to create new schedules, select delete to remove already scheduled programs, select Status to view the current status of the scheduled recordings and select history for an overview of the previous recordings. [Left/Right/Up/Down] Use the navigation buttons to select the functions and different options. [Enter] Press the Enter button to confirm and select. [Return] Press the Return button to cancel and return to the previous screen.

R2-3500 Media Player/Recorder Examples
3 Examples
3.1 Video In The R2-3500 media player can record from a VCR, set top box, DVD player or camcorder as an example but it will only record whatever the current input on its AV in connectors is. For the recordings to work, make sure that the device connected to the AV in port is turned on and playing or the correct channel on your TV is selected. If there is no input, the recording will fail. If the wrong channel is selected, it will also record the wrong channel. 3.1.1 Recording
1. Select Video In from the main screen.
2. Press the REC button on your remote control to start recording.
3. Press the REC button multiple times to select one of the pre-set times.
4. Press the Stop button to stop recording.
Page 12

R2-3500 Media Player/Recorder Examples
3.1.2 Time Shift 1. Select Video In from the main screen.
2. Press the Time Shift button on your remote control to start the time shift function. The time shift function will be initialized and the recording starts.
3. Once the recording message disappears, you can use the Play, Pause and FF/FR buttons for playback control just like when watching recorded videos.
4. Press the Display button to hide and show the navigation screen.
S
Viewing Point Start Time / Current Time
tart Time Current Time Viewing Point Time Shift Buffer
5. Press the Stop button to stop the time shift function.
Page 13

R2-3500 Media Player/Recorder Examples
3.2 File Copy 3.2.1 Transferring files from USB to HDD
1. Select File Copy from the main screen or press the Copy button on the remote control.
2. Use the Up and Down buttons to select the source and press Enter to confirm it. Use the Up and Down buttons to select the destination and press Enter to confirm it.
3. Use the Up/Down and Enter buttons to locate and highlight the file. Press the Play button to place a tick behind the selected file. Repeat this step for any other files that you also would like to copy.
Page 14

R2-3500 Media Player/Recorder Examples
4. Press the Right button and select the destination.
5. To create a new directory, select NEW-DIRECTORY and press Enter. Use the virtual keyboard to name the new directory and select OK to create the new folder.
6. Once the destination has been defined, press the Right button to continue. Confirm the dialog by selecting OK and pressing Enter.
7. The file(s) will be copied to the destination. Once finished, confirm the dialog by selecting OK to open the Browser menu or No to continue copying files.
Page 15

R2-3500 Media Player/Recorder Examples
3.3 Browser 3.3.1 Playback Media Files
1. Select Browser from the main screen or press the Browser button on the remote control.
2. Use the Right and Left buttons to filter the content by media types (Music/Photo/Movies) or select All to display all types.
3. Use the Up/Down and Enter buttons to locate the media file(s).
4. For images and videos, a small preview is shown. To view it full screen, press the Enter or Play button to start playback and Stop to return to the browser window.
5. Press the Return button to go up one directory and return to the previous screen.
Page 16

R2-3500 Media Player/Recorder Examples
3.3.2 Browse the Local Network 1. Go to the Network category in the Setup menu and make sure the device is configured
correctly and has successfully acquired an IP address.
2. Select Browser from the main screen or press the Browser button on the remote control.
3. Select NET and press Enter.
4. In this example, both the computer with the shared folder and the NAS belong to Workgroup, so select Workgroup and press Enter to browse for the shared folders in the group Workgroup. This only works for folders on the local network.
Page 17

R2-3500 Media Player/Recorder Examples
5. Select a shared folder, in this example the Taurus LAN NAS and press Enter to access it.
6. Select one of the available shares and press Enter to access it.
7. If required, enter an ID and password to login. Select the ID and press Enter to open the virtual keyboard in order to enter your user ID. Confirm it by selecting OK. Repeat the same steps for the password. If you plan on accessing this folder frequently, you can add it to My Shortcuts, making it easier to quickly find and access it again the next time, otherwise simply click OK to confirm and login.
8. After successfully connecting to the shared folder, you can browse the media files the same way as you would browse the files on the internal SATA hard drive.
Page 18

R2-3500 Media Player/Recorder Examples
3.3.3 My Shortcuts If the shared folder can not be found by browsing the local network or just to add a shortcut manually, in order to quickly find and access a certain folder, use My Shortcuts.
1. Select Browser from the main screen or press the Browser button on the remote control.
2. Select NET and press Enter. Select My_Shortcuts and press Enter again.
3. Press the Rec List button on the remote control to open the context menu. Select Add and press Enter.
Page 19

R2-3500 Media Player/Recorder Examples
4. Select the user ID, press Enter and use the virtual keyboard to enter the correct login. Do the same for the password and then use the number keys to enter the IP address. Press OK and confirm the next dialog by selecting OK and pressing Enter to save the settings.
5. For the advanced user, before saving the settings, click on Detail to show more options. It will now also be possible to modify the label of the shortcut, add a domain and add a host name.
6. To manage the existing shortcuts, simply select a shortcut and press the Rec List button again to open the context menu. You will be able to modify the existing settings or delete the shortcut.
Note For PC users running Microsoft Windows, an additional Transcode Server program is available, in order to convert formats on the fly and support even more file formats (e.g. MOV, H.264, WMV9). After installing and starting the Transcode Server program, make sure your shared folder is listed in the program under Net Share Dialog. All files in that folder will then be transcoded automatically.
Page 20

R2-3500 Media Player/Recorder Examples
3.3.4 Editing Files 1. Select Browser from the main screen or press the Browser button the remote control.
2. Locate the file or folder that you would like to modify. Only files on a drive formatted using the FAT32 file system can be modified.
3. Highlight the file or folder and press the Rec List button on the remote control to open the context menu.
4. Select Rename and press the Enter button to open the virtual keyboard and rename the file.
5. Select Delete and press the Enter button to erase the file.
Page 21

R2-3500 Media Player/Recorder Examples
3.4 Timer REC 3.4.1 Creating Schedules
1. Select the Timer REC from the main screen or press the Timer button on the remote control. In the Edit category, select Add a new schedule and press the Enter button.
2. Modify the settings according to your preferences. The Source is set to Video 1, which is the AV in connection on the front of your media player. The start time and recording length can be set with the Up and Down buttons. Repeat can be set to Once only or to one of the presets depending on the day of the week (e.g.: Everyday, Mon-Fri, Mon-Sat or a specific day). The device is the destination where the recorded files will be stored and Quality will determine the video quality and bit rate. Refer to the Rec category in the Setup menu for more details.
3. Press Enter once all settings have been adjusted. Select Confirm to add the new settings to the schedule. The new schedule is now listed and the status set to Ready.
Page 22

R2-3500 Media Player/Recorder Examples
4. Before the scheduled recording starts, a reminder will announce that recording will start shortly, so make sure that the device connected to the AV in is turned on and playing or the correct channel on your TV is selected. During the recording, the status will change to Lock.
5. Once the recording is finished and if the repeat mode was set to once only, the schedule will be removed from the list. Refer to the history to see which schedules have been completed already.
6. To watch the recording, open the browser menu and locate your files. Depending on the device settings of your recordings, they will be either on the internal HDD or an external USB drive. The system will automatically create a folder called “My Recordings” the first time the recording function is used., so in this example, the video has been stored under HDD1 inside the “My Recordings” folder. The file name is using the date and start time of the scheduled recording.
Note The R2-3500 media player will record whatever the current input on its AV in connectors is. For the recordings to work, make sure that the device connected to the AV in port is turned on and playing or the correct channel on your TV is selected. If there is no input, the recording will fail. If the wrong channel is selected, it will also record the wrong channel.
Page 23

R2-3500 Media Player/Recorder Examples
Page 24
3.4.2 Editing Schedules 1. To edit an existing schedule, use the Left/Right buttons and go to the Edit menu.
2. Select one of the schedules from the list and press Enter to modify it.
3.4.3 Deleting Schedules
1. To delete an existing schedule, use the Left/Right buttons and go to the Delete menu.
2. Select one of the schedules from the list and press Enter.
3. Select “Delete the selected schedule” to remove only the selected schedule or select “Delete all schedules” to remove all existing schedules.
3.4.4 Changing the Status
1. To change the status of an existing schedule that hasn’t started recording yet, use the Left/Right buttons and go to the Status menu.
2. Select one of the schedules from the list and press Enter.
3. Select one of the two options. If the current status is set to Ready, select “Pause the selected schedule” to temporarily pause it. If the current status is set to Pause, select “Enable the timer by user’s settings” to re-enable the schedule.

R2-3500 Media Player/Recorder Setup Menu
4 Setup Menu
To enter the menu, select Setup from the main screen (press the Guide button to return to the main screen if you are somewhere else) or press the Setup button on the remote control. Use the arrow keys on your remote control to navigate the setup menu, use the Enter key to open and confirm settings, and use the Return key to cancel out of a menu.
4.1 Audio 4.1.1 Night Mode Night mode can be used to reduce the maximum volume, preventing excessive sound in the evening. Off: Unrestricted output (maximum volume). On: Maximum output set to low volume. Comfort: Maximum output set to medium volume. 4.1.2 Digital Output RAW is the preferred output when the receiver/amplifier is capable of decoding the signal. If there is no sound on your system, switch to LPCM.
.
HDMI LPCM: LPCM audio output via high definition multimedia interface cable. HDMI RAW: RAW audio signal via high definition multimedia interface cable. SPDIF LPCM: LPCM audio output via optical audio cable. SPDIF RAW: RAW audio signal via optical audio cable.
4.2 Video 4.2.1 Brightness The brightness is set to a value of 25 by default but it can be adjusted to a value from 0 to 50 4.2.2 Contrast The contrast is set to a value of 25 by default but it can be adjusted to a value from 0 to 50. 4.2.3 TV System Select the corresponding TV system depending on your current connection. Instead of the setup menu and when the current screen is not visible, press the TV System button on your remote control until you see the correct output. HDMI: High definition multimedia interface NTSC/PAL: Composite analogue video connection 480p ~ 1080i: YPbPr colour component video connection
Page 25

R2-3500 Media Player/Recorder Setup Menu
4.2.4 Aspect Ratio Set the TV aspect ratio, depending on your display and preferences.
Pan Scan: For standard 4:3 displays (full screen but cuts off the sides for widescreen films). Letter Box: For standard 4:3 displays (adds black bars on top and bottom for widescreen films). 16:9: For 16:9 widescreen displays (full screen).
16:9 Wide Screen 4:3 Letter Box 4:3 Pan Scan
4.3 REC 4.3.1 Permanent Time Shift Option to enable or disable the time shift function. 4.3.2 REC Device Define the target device where the recorded videos are to be stored. HDD: Internal SATA HDD USB#1: USB front port USB#2: USB rear port 4.3.3 Quality The higher the recording quality, the larger the resulting video file will be and the sooner the storage space will be used up. HQ produces the best quality, whereas SLP creates the smallest file. HQ: High quality, 720x480, bit rate 8764kbps, approx. 24 hours for a 120GB HDD. SP: Standard quality, 720x480, bit rate 4389kbps, approx. 48 hours for a 120GB HDD. LP: Long quality, 720x480, bit rate 2842kbps, approx. 72 hours for a 120GB HDD. EP: Extended quality, 720x480, bit rate 2060kbps, approx. 96 hours for a 120GB HDD. SLP: Super long quality, 720x480, bit rate 1397kbps, approx. 144 hours for a 120GB HDD.
Page 26

R2-3500 Media Player/Recorder Setup Menu
4.4 Network 4.4.1 Wired LAN Setup Cancel: Returns to Network menu without making
any changes to the network setup. DHCP IP (Auto): Automatically acquires IP
address and network information from DHCP server.
Fix IP (Manual): Allows the administrator to set a fixed IP address, subnet mask and gateway.
4.4.2 Wireless Setup Connection Mode: Depending on your wireless
setup, select either Infrastructure (AP) or Peer to Peed (Ad Hoc). In most cases, the Infrastructure (AP) option will be the correct setting.
Wireless SSID: Select Auto to automatically search for available networks or select Manual and enter the SSID name of your AP manually.
Wireless Security: Select Open System for unrestricted access or one of the encrypted options. This device supports WEP encryption with passwords using numbers from 0-9 and letters from a-f. It also supports WPA encryption with passwords using numbers from 0-9 and letters from a-z or A-Z.
IP Address: Select Auto to automatically acquire the IP address and network information from the DHCP server or select Manual to set a fixed IP address, subnet mask and gateway.
Note The network connection is only required when streaming media files from a shared network folder on the local network. It is not possible to access the data on the R2-3500 media player via network connection and the R2-3500 is also not capable of browsing the World Wide Web. For PC users running Microsoft Windows, an additional Transcode Server program is available, in order to convert formats on the fly and support even more file formats. In order to use the wireless network connection, an additional wireless LAN USB dongle (802.11b/g) is required. This extra piece of hardware is not included in the standard package but is available as an optional accessory. 3rd party USB dongles are not supported.
Page 27

R2-3500 Media Player/Recorder Setup Menu
4.5 System 4.5.1 Menu Language Select your preferred menu language from the list of available languages. English Traditional Chinese Japanese Spanish French German Italian Korean Dutch Simplified Chinese 4.5.2 Text Encoding Text encoding for external subtitles (SRT).
Unicode (UTF8): Standard encoding suitable for most languages. Simplified Chinese (GBK): Select this when your subtitles are in Simplified Chinese. 4.5.3 Time Select Manual to set the date and time of the R2-3500 media player. Although this is only required for scheduled recording, we recommend always setting the correct date and time in order for the other time stamps, especially during recording, to be accurate. Note If the time is reset to factory default after a power loss or when the power adapter has been removed, replace the battery for the real time clock (CR2032 battery). 4.5.4 HDD Format Disk utility to format the internal SATA hard drive. It is recommended to format the drive using this utility and set the FAT32 partition large enough to store all the recordings. The NTFS partition will be read only and can not be used to record videos. Cancel: Returns to System menu without formatting the drive. HDD Format: Opens the disk utility with further options to format the drive. 4.5.5 Restore Default Restores all settings back to factory default. Resetting the configuration is recommended after each firmware update.
Page 28

R2-3500 Media Player/Recorder Setup Menu
Page 29
4.6 Photo 4.6.1 Slideshow Timing Select an interval time for the slideshow from the list of presets, ranging from 2 seconds to 2 minutes or disable the automatic slideshow by selecting Off. 4.6.2 Transition Effect Select Off to turn the transition effects off, select All Effect Shuffle to use a random effect or select one of the presets from the list. Cross Fade: Fades in and out. Left to Right: Loads new image from left to right. Top to Bottom: Loads new image from top to bottom. Waterfall: Dissolves in vertical stripes from top to bottom. Snake: Dissolves in horizontal stripes. Dissolve: Dissolves in pixels. Strip Left Down: Loads new image from top left to bottom right. 4.6.3 Background Music Off: Disables background music during the slideshow presentation. Folder: Plays background music from the same folder as the images. Playlist: No function.

R2-3500 Media Player/Recorder Appendix
5 Appendix
5.1 Specifications
Supported music files MP3, WAV, AAC (AAC/MP4)
Available audio outputs Stereo analogue audio, digital audio (Dolby and DTS not supported)
Supported video files MPEG-1 VCD (DAT, MPG, MPEG), MPEG-2 (VOB, TS, ISO), MPEG-4 (AVI, XviD, RMVB) up to 720p resolution
Supported video subtitles SRT (SubRIP format), IDX/SUB
Available video outputs NTSC/PAL composite video, analogue YPbPr video, HDMI up to 1080i
Menu languages English, Spanish, French, German, Italian, Dutch, Simplified & Traditional Chinese, Japanese, Korean
Composite RCA, left audio RCA, right audio RCA Component YPbPr video 3 RCA HDMI digital audio/video Output ports
USB 2.0 High Speed
Input ports
USB 2.0 host for USB HDD or card reader Ethernet 10/100M connection for video streaming Optional wireless LAN connection (802.11b/g) SD/SDHC/MS/MS Pro card reader NTSC/PAL analogue composite video and stereo audio
Recording format MPEG-1 (MPG), AC3 (2 channel stereo)
Supported HDD Internal 3.5” SATA HDD (20GB ~ 1TB)
Supported file systems FAT32 and NTFS (read only)
Target computer Windows XP, Windows Vista
Power (AC adapter) AC: 100-240V, 0.5A, 50-60Hz DC: +12V/2A
Dimensions 19.5cm x 18.6cm x 6.8cm
Operating Temperature/Humidity
5°C ~ 40°C / 5%RH ~ 80%RH non condensing
Storage Temperature/Humidity
5°C ~ 30°C / 10%RH ~ 90%RH non condensing
Note Design and specifications are subject to change without prior notice and will depend on the current firmware release.
Page 30

R2-3500 Media Player/Recorder Appendix
5.2 Precautions Before using your R2-3500 media player, please carefully read the following paragraphs relating to the safety issues of your device. 5.2.1 Power on/off precautions The R2-3500 remote control provides the power ON/OFF button that controls the power status of your device when connected to the TV. It is highly recommended to switch the unit off when not in use. To re-locate the R2-3500 media player and connect it to the computer and when not in use for a longer period of time, we strongly recommend removing the power supply from the wall socket. 5.2.2 Location and placing precautions Set the media player up in a vertical position and do not place any other objects on top of it. Do not place the unit on an amplifier or other equipment that can become hot. Avoid positioning your media player in the following places: Locations with direct sunlight, next to radiators, other sources of heat, or in vehicles that are
parked directly in the sun with the windows and doors closed. Locations with very high temperature (more than 38° C) or humidity (more than 90%). Very dusty or sandy locations. Locations subject to vibration, shock, or with a sloping base. 5.2.3 Electricity and power plug Careful attention must be paid to the following points in order to avoid operational faults with the equipment and to prevent electric shock, fire, and/or injury: When removing the power cable from the socket, always pull on the plug and never on the
cable. Do not connect and remove the power cable with wet hands. Keep the power cable away from heaters. Never try to repair the power cable yourself or to modify it in any way. If the unit is dropped or becomes damaged in any other way, unplug the power cable. If the unit should emit smoke, unusual smell, or noise, switch it off and unplug the power cable.
In such cases, please contact your vendor. If the unit is not used for extended periods of time, then the power plug should be removed from
the socket. 5.2.4 Cables Use only the cables supplied or recommended by your vendor in order to avoid the risk of malfunction, electric shock, and/or possible interference to the device.
Page 31

R2-3500 Media Player/Recorder Appendix
5.3 Trademarks MS-DOS, Microsoft, Windows 2000/XP/Vista are trademarks of Microsoft Corporation. Apple Macintosh and Mac are trademarks of Apple Computer. Dolby® and Dolby® Digital are registered trademarks of Dolby Laboratories, Inc. “Memory Stick” and “Memory Stick PRO” are trademarks of Sony Corporation. All other third party brands and names are the property of their respective owners.
5.4 Important Notices 5.4.1 About this Manual This manual was written for the R2-3500 media player/recorder with the firmware version as seen on the front page. Images and descriptions may slightly vary between this document and the actual product you have, depending on the current firmware release. 5.4.2 About Data Backup To protect your files and help prevent the loss of your data, we strongly recommend that you keep two copies of your data, one copy on your R2-3500 media player and a second copy either on your internal drive or another storage media such as a CD, DVD, Tape or an additional external drive. Any loss or corruption of data while using the R2-3500 media player is the sole responsibility of the user, and under no circumstances will the manufacturer be held liable for compensation or the recovery of this data. 5.4.3 Intellectual Property The R2-3500 media player is not designed or intended to, and may not be used to violate any copyrights or other IP (Intellectual Property) rights. Each user of the R2-3500 media player may only use it in connection with materials legally owned by or licensed to the user and only extend such ownership or license rights that will permit such use.
5.5 FAQ Q: Can I connect the AV out from my TV directly to the AV in on the R2-3500 and record? A: Yes, this is possible, however the media player does not have a built in TV tuner, so it can only record whatever signal is currently being transmitted. If you change the TV channel, the recorded channel will change accordingly and if the TV is turned off, it will not be possible to record anything. Q: Why is there no sound? A: Make sure the cables are connected correctly, mute is disabled and that the audio format is supported. Dolby and DTS are not supported, so there will be no sound. If you are using the digital audio output via SPDIF or HDMI cable, go to the Audio category in the Setup menu and select the corresponding output. Q: How do I share a folder on the local network? A: Use a network attached storage drive (NAS) that comes with a SMB server, allowing you to create folders and share the files or use a Windows computer, right click on a folder, select Properties, go to the Sharing tab and enable the function called “Share this folder on the network”. Make sure your firewall is set to allow the sharing of folders and that both devices are on the same local network. Q: Where can I see the current firmware version of my media player? A: Select Video In from the main screen, press Enter, then press Stop and hold the Pause button.
Page 32

R2-3500 Media Player/Recorder Appendix
Page 33
Q: I can not see anything on my TV screen but the media player is connected and turned on! A: If the device is connected correctly and turned on but there is no output, we recommend first removing the power supply and reconnecting it. If after 2 minutes there is still no signal, press the TV System button on the remote control to change the video output until you see the main screen. Q: What are external SRT subtitles? A: External SRT subtitles are text files that contain subtitles to an AVI video. They can be used to display subtitles without the need to re-encode the video to embed them. The text file has to be in the so called SubRIP format (SRT), it has to be renamed using the same file name and stored in the same folder as the video. During playback of the AVI file, the Subtitle button on the remote control can be used to turn the subtitle on or disable it. Make sure the Text Encoding in the setup menu matches the subtitle. Q: Why do my JPG images look strange or can not be displayed? A: The media player only supports JPG images in sRGB up to about 5616x3744 pixels and does not support images saved in progressive mode. If your file is not supported, open it in a photo editor, convert it to sRGB and save it as JPG, making sure to use either the baseline or optimized option. Q: I can not find any shared folders when browsing the network, what do I do? A: First of all, go to the Network category in the setup menu and make sure the settings are correct and the device has acquired an IP address. Second, make sure the shared folders are on the same local network as the media player and the folders are accessible and not blocked by a firewall. If this has been done already, restart both the media player and the device or computer where the folder is being shared. If even this does not help, go to “My Shortcuts” instead and add the remote folder manually, by typing in the IP address and the corresponding login details. Q: Can I watch a video and record at the same time? A: Yes, this is possible although for optimal performance, it is recommend only doing one at the time. Q: Can I rotate images during a slideshow presentation? A: Yes, press the Right or Left button to rotate the image and then press the Play button to resume playback. Q: Why are some of the settings in the setup menu disabled? A: During recording, certain functions are disabled. Stop recording and then access the setup menu again.
© Copyright 2009 by Macpower & Tytech Technology Co., Ltd. all Rights Reserved The information contained in this manual is believed to be accurate and reliable. Macpower & Tytech Technology assumes no responsibility for any errors contained in this manual. Macpower & Tytech Technology reserves the right to make changes in the specifications and/or design of this product without prior notice. The diagrams contained in this manual may also not fully represent the product that you are using and are there for illustration purposes only. Macpower & Tytech Technology assumes no responsibility for any differences between the product mentioned in this manual and the product you may have.