diff and patch (tutorial)
TRANSCRIPT
8/7/2019 diff and patch (tutorial)
http://slidepdf.com/reader/full/diff-and-patch-tutorial 1/10
Introduction: Using diff and patch (tutorial) rechosen Tutorials diff , introduction , patch , usage
The commands diff and patch form a powerful combination. They are widely used to getdifferences between original files and updated files in such a way that other people who onlyhave the original files can turn them into the updated files with just a single patch file thatcontains only the differences. This tutorial explains the basics of how to use these greatcommands.
Difficulty: Medium
This tutorial assumes some basic Linux and command line knowledge, like changing directories,copying files and editing text files.
Using diff to create a simple patchThe most simple way of using diff is getting the differences between two files, an original fileand an updated file. You could, for example, write a few words in a normal text file, make somemodifications, and then save the modified content to a second file. Then, you could comparethese files with diff, like this:
[rechosen@localhost ~]$ diff originalfile updatedfile
Of course, replace originalfile and updatedfile with the appropiate filenames of your case. Youwill most probably get an output like this:
1c1< These are a few words.\ No newline at end of file---> These still are just a few words.\ No newline at end of file
N ote: to demonstrate the creation of a simple patch, I used the file originalfile with the content "These are a few words." and the file updatedfile with the content "These still are just a fewwords.". You can create these files yourself if you want to run the commands in the tutorial and get about the same output.
The 1c1 is a way of indicating line numbers and specifying what should be done. Note that thoseline numbers can also be line ranges (12,15 means line 12 to line 15). The "c" tells patch toreplace the content of the lines. Two other characters with a meaning exist: "a" and "d", with "a"meaning "add" or "append" and "d" meaning "delete". The syntax is (line number or range)(c, aor d)(line number or range), although when using "a" or "d", one of the (line number or range)parts may only contain a single line number.

8/7/2019 diff and patch (tutorial)
http://slidepdf.com/reader/full/diff-and-patch-tutorial 2/10
y W hen using "c", the line numbers left of it are the lines in the original file that should bereplaced with text contained in the patch, and the line numbers right of it are the lines thecontent should be in in the patched version of the file.
y W hen using "a", the line number on the left may only be a single number, meaning whereto add the lines in the patched version of the file, and the line numbers right of it are the
lines the content should be in in the patched version of the file.y W hen using "d", the line numbers left of it are the lines that should be deleted to createthe patched version of the file, and the line number on the right may only be a singlenumber, telling where the lines would have been in the patched version of the file if theywouldn't have been deleted. You might think that that last number is redundant, butremember that patches can also be applied in a reverse way. I'll explain more about thatlater on in this tutorial.
The "<" means that patch should remove the characters after this sign, and the ">" means that thecharacters after this sign should be added. W hen replacing content (a "c" between the linenumbers), you will see both the < and the > sign. When adding content (an "a" between the line
numbers), you'll only see the > sign, and when deleting content (a "d" between the line numbers),only the < sign.
The "\", followed by "No newline at end of file", is only there because I didn't press enter after typing the words. Generally, it always is good practice to add a final newline to every text fileyou create. Certain pieces of software can't do without them. Therefore, the absence of a finalnewline is reported so explicit by diff. Adding final newlines to the files makes the output a lotshorter:
1c1< These are a few words.
---> These still are just a few words.
As you may have noticed, I omitted explaining what the 3 -'s are for. They indicate the end of thelines that should be replaced and the beginning of the lines that should replace them. Theyseparate the old and the new lines. You will only see these when replacing content (a "c"between the line numbers).
If we want to create a patch, we should put the output of diff into a file. Of course, you could dothis by copying the output from your console and, after pasting it in your favourite text editor,saving the file, but there is a shorter way. We can let bash write diff's output to a file for us thisway:
[rechosen@localhost ~]$ diff originalfile updatedfile > patchfile.patch
Again, replace the filenames with the ones appropiate in your case. You might like to know thattelling bash to write a command's output to a file using > works with every command. This canbe very useful to save to output of a command to a (log) file.

8/7/2019 diff and patch (tutorial)
http://slidepdf.com/reader/full/diff-and-patch-tutorial 3/10
A pplying the simple patch we created
Well then, did we just create a patch? The short answer is: yes, we did. We can use the patchfileto change a copy of originalfile to a copy of updatedfile. Of course, it wouldn't make that muchsense to apply the patch on the files we created the patch from. Therefore, copy the original fileand the patchfile to an other place, and go to that place. Then, try applying the patch this way:
[rechosen@localhost ~]$ patch originalfile -i patchfile.patch -o updatedfile
Again, replace the filenames where necessary. If all went well, the file updatedfile just created bypatch should be identical to the one you had at first, when creating the patch with diff. You cancheck this using diff's -s option:
[rechosen@localhost ~]$ diff -s updatedfile [/path/to/the/original/updatedfile]/updatefile
Replace the part between [ and ] with the path to the original update file. For example, if theupdatedfile you used when creating the patch is located in the parent directory of your currentdirectory, replace "[/path/to/the/original/updatedfile]" with ".." (bash understands this as theparent directory of the current working directory). And of course, also replace the filenamesagain where appropiate.
Congratulations! If diff reported the files to be equal, you just succesfully created and used apatch! However, the patch format we just used is not the only one. In the next chapter, I willexplain about an other patch format.
Contextual patching
In the first chapter, we created a patch using diff's normal format. This format, however, doesn'tprovide any of the lines of context around the ones to be replaced, and therefore, a change in theline numbers (one or more extra newlines somewhere, or some deleted lines) would make it verydifficult for the patch program to determine which lines to change instead. Also, if a different filethat is being patched by accident contains the same lines as the original file at the right places,patch will happily apply the patchfile's changes to this file. This could result in broken code andother unwanted side-effects. Fortunately, diff supports other formats than the normal one. Let'screate a patch for the same files, but this time using the context output format:
[rechosen@localhost ~]$ diff -c originalfile updatedfile
By now, it should be clear that you should replace the filenames where necessary =). You shouldget an output like this:
*** originalfile 2007-02-03 22:15:48.000000000 0100--- updatedfile 2007-02-03 22:15:56.000000000 0100****************** 1 ****

8/7/2019 diff and patch (tutorial)
http://slidepdf.com/reader/full/diff-and-patch-tutorial 4/10
! These are a few words.--- 1 ----! These still are just a few words.
As you can see, the filenames are included. This will save us some typing when applying the
patch. The timestamps you can see next to the filenames are the date and time of the lastmodification of the file. The line with 15 *'s indicates the starting of a hunk. A hunk describeswhich changes, like replacements, additions and deletions, should be made to a certain block of text. The two numbers 1 are line numbers (again, these can also be line ranges (12,15 means line12 to line 15)), and ! means that the line should be replaced. The line with a ! before the three -'s(hey, where did we see those before?) should be replaced by the second line with a !, after thethree -'s (of course, the ! itself will not be included; it's context format syntax).
As you can see, there aren't any c's, a's and d's here. The action to perform is determined by thecharacter in front of the line. The !, as explained, means that the line should be replaced. Theother available characters are +, - and " " (a space). The + means add (or append), the - means
delete, and the " " means nothing: patch will only use it as context to be sure it's modifying theright part of the file.
Applying this patch is a bit easier: under the same circumstances as before (let bash write the diff output to a file again, then copy the patchfile and the original file to an other location), you'llneed to run:
[rechosen@localhost ~]$ patch -i patchfile.patch -o updatedfile
You'll probably think now: why do we still have to specify the new filename? Well, that'sbecause patch was made with the intention to update existing files in mind, not to create new
updated files. This usually comes in handy when patching source trees of programs, which ispretty much the main use of patch. And that brings us to our next subject: to patch a wholesource tree, multiple files should included in the patchfile. The next chapter will tell how to dothis.
G etting the differences between multiple files
The easiest way to get the differences between multiple files is to put them all in a directory andto let diff compare the whole directories. You can just specify directories instead of files, diff will autodetect whether you're giving it a file or a directory:
[rechosen@localhost ~]$ diff originaldirectory/ updateddirectory/
N ote: if the directories you're comparing also include subdirectories, you should add the -r option to make diff compare the files in subdirectories, too.
This should give an output like this:

8/7/2019 diff and patch (tutorial)
http://slidepdf.com/reader/full/diff-and-patch-tutorial 5/10
diff originaldirectory/file1 updateddirectory/file11c1< This is the first original file.---> This is the first updated file.
diff originaldirectory/file2 updateddirectory/file21c1< This is the second original file.---> This is the second updated file.14d13< We're going to add something in this file and to delete this line.26a26> This is line has been added to this updated file.
N ote: for this example, I created some example files. You can download an archive containing
these files here: http://www.linuxtutorialblog.com/post/introduction-using-diff-and-patch-tutorial/diffpatchexamplefiles.tar.gz .
As you can see, the normal output format only specifies filenames when comparing multiplefiles. You can also see examples of the addition and deletion of lines.
Now, let's have a look at the output of the same comparison in the context format:
diff -c originaldirectory/file1 updateddirectory/file1*** originaldirectory/file1 2007-02-04 16:17:57.000000000 +0100--- updateddirectory/file1 2007-02-04 16:18:33.000000000 +0100
****************** 1 ****! This is the first original file.--- 1 ----! This is the first updated file.diff -c originaldirectory/file2 updateddirectory/file2*** originaldirectory/file2 2007-02-04 16:19:37.000000000 +0100--- updateddirectory/file2 2007-02-04 16:20:08.000000000 +0100****************** 1,4 ****! This is the second original file.
SO--- 1,4 ----! This is the second updated file.
SO

8/7/2019 diff and patch (tutorial)
http://slidepdf.com/reader/full/diff-and-patch-tutorial 6/10
****************** 11,17 ****CE
- We're going to add something in this file and to delete this line.
SO--- 11,16 ----****************** 24,28 ****--- 23,28 ----CE
+ This is line has been added to this updated file.Something will be added above this line.
The first thing you should notice is increase in length; the context format provides moreinformation than the normal format. This wasn't that visible in the first example, as there wasn'tany context to include. However, this time there was context, and that surely lenghtens the patcha lot. You might also have noticed that the filenames are mentioned twice every time. This isprobably done either to make it easier for patch to recognize when to start patching the next file,or to provide better backwards-compatibility (or both).
The other way to let diff compare multiple files is writing a shell script that runs diff multipletimes and correctly adds all output to one file, including the lines with the diff commands. I willnot tell you how to do this as the other way (putting the files in a directory) is a lot easier and isused widely.
Creating this patch with diff was considerably easy, but the use of directories kicks in a newproblem: will patch just patch the mentioned files in the current working directory and forgetabout the directory they were in when creating the patch, or will it patch the files inside thedirectories specified in the patch? Have a look at the next chapter to find out!
P atching multiple files
In the chapter before this one, we created a patch that can be used to patch multiple files. If youhaven't done so already, save diff's output to an actual patchfile in a way like this:
[rechosen@localhost ~]$ diff -c originaldirectory/ updateddirectory/ > patchfile.patch
N ote: we'll be using the context format patch here as it generally is good practice to use a format that provides context.

8/7/2019 diff and patch (tutorial)
http://slidepdf.com/reader/full/diff-and-patch-tutorial 7/10
It's time to try using our patchfile. Copy the original directory and the patchfile to an other location, go to that other location, and apply the patch with this command:
[rechosen@localhost ~]$ patch -i patchfile.patch
Huh? It reports that it cannot find the file to patch! Yep, that's right. It is trying to find the filefile1 in the current directory (patch defaultly strips away all directories in front of the filename).Of course, this file isn't there because we're trying to update the file in the directoryoriginaldirectory. For this reason, we should tell patch not to strip away any directories in thefilenames. That can be done this way:
[rechosen@localhost ~]$ patch -p0 -i patchfile.patch
N ote: you might think you could also just move into originaldirectory and run the patchcommand there. Don't! This is bad practice: if the patchfile includes any files to patch insubdirectories, patch will look for them in the working directory, and, obviously, not find them or
find the wrong ones. Use the -p option to make patch look in subdirectories as it should. The -p options tells patch how many slashes (including what's before them, usually directories) itshould strip away before the filename (note that, when using the option -p0, patch looks for thefiles to patch in both originaldirectory and updateddirectory, in our case). In this case, we set it to0 (do not strip away any slash), but you can also set it to 1 (to strip away the first slash includinganything before it), or 2 (to strip away the first two slashes including everything before it), or anyother amount. This can be very useful if you've got a patch which uses a different directorystructure than you. For example: if you'd have a patch that uses a directory structure like this:
(...)
*** /home/username/sources/program/originaldirectory/file1 2007-02-04 16:17:57.000000000+0100--- /home/username/sources/program/updateddirectory/file1 2007-02-04 16:18:33.000000000+0100(...)
You could just count the slashes (/ (1) home/ (2) username/ (3) sources/ (4) program/ (5)) andgive that value with the -p option. If you're using -p5, patch would look for bothoriginaldirectory/file1 and updateddirectory/file1. Please do note that patch considers two slashesnext to each other (like in /home/username//sources) as a single slash. This is because scriptssometimes (accidently or not) put an extra slash between directories.
R eversing an applied patch
Sometimes a patch is applied while it shouldn't have been. For example: a patch introduces anew bug in some code, and a fixed patch is released. However, you already applied the old,buggy patch, and you can't think of a quick way to get the original files again (maybe they werealready patched dozens of times). You can then apply the buggy patch in a reversive way. The
8/7/2019 diff and patch (tutorial)
http://slidepdf.com/reader/full/diff-and-patch-tutorial 8/10
patch command will try to undo all changes it did by swapping the hunks. You can tell patch totry reversing by passing it the -R option:
[rechosen@localhost ~]$ patch -p0 -R -i patchfile.patch
Usually, this operation will succeed, and you'll get back the original files you had. By the way,there is another reason why you'd want to reverse a patch: sometimes (especially when sleepy),people release a patch with the files swapped. You've got a big chance that patch will detect thisautomatically and ask you if you want it to try patching reversively. Sometimes, however, patchwill not detect it and wonder why the files don't seem to match. You can then try applying thepatch in a reversed way manually, by passing the -R option to patch. It is good practice to make abackup before you try this, as it is possible that patch messes up and leaves you withirrecoverably spoiled files.
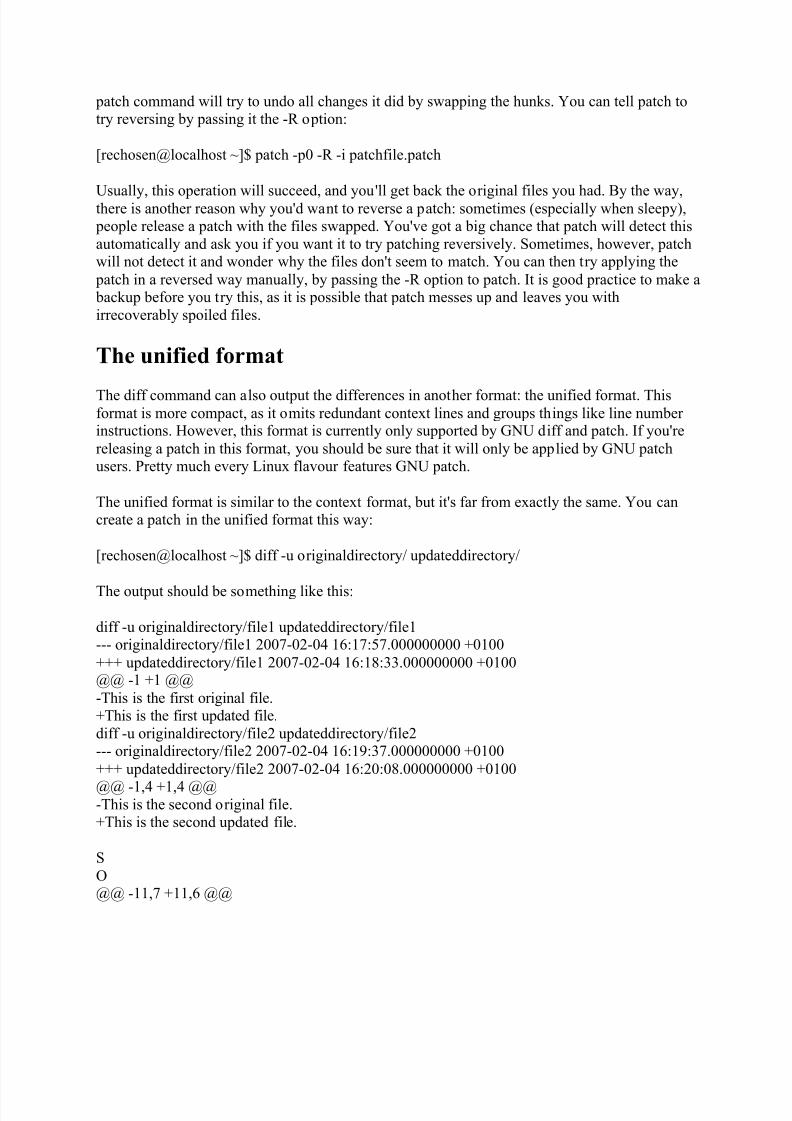
T he unified format
The diff command can also output the differences in another format: the unified format. Thisformat is more compact, as it omits redundant context lines and groups things like line number instructions. However, this format is currently only supported by GNU diff and patch. If you'rereleasing a patch in this format, you should be sure that it will only be applied by GNU patchusers. Pretty much every Linux flavour features GNU patch.
The unified format is similar to the context format, but it's far from exactly the same. You cancreate a patch in the unified format this way:
[rechosen@localhost ~]$ diff -u originaldirectory/ updateddirectory/
The output should be something like this:
diff -u originaldirectory/file1 updateddirectory/file1--- originaldirectory/file1 2007-02-04 16:17:57.000000000 +0100+++ updateddirectory/file1 2007-02-04 16:18:33.000000000 +0100@@ -1 +1 @@-This is the first original file.+This is the first updated file.diff -u originaldirectory/file2 updateddirectory/file2--- originaldirectory/file2 2007-02-04 16:19:37.000000000 +0100+++ updateddirectory/file2 2007-02-04 16:20:08.000000000 +0100@@ -1,4 +1,4 @@-This is the second original file.+This is the second updated file.
SO@@ -11,7 +11,6 @@

8/7/2019 diff and patch (tutorial)
http://slidepdf.com/reader/full/diff-and-patch-tutorial 9/10
CE
-We're going to add something in this file and to delete this line.
SO@@ -24,5 +23,6 @@CE
+This is line has been added to this updated file.
Something will be added above this line.
As you can see, the line numbers/ranges are grouped and placed between @'s. Also, there is no
extra space after + or -. This saves some bytes. Another difference: the unified format does notfeature a special replacement sign. It simply deletes (the - sign) the old line and adds (the + sign)the altered line instead. The only difference between adding/deleting and replacing can be foundin the line numbers/ranges: when replacing a line, these are the same, and when adding or deleting, they differ.
F ormat comparison
Having read about three formats, you probably wonder which one to choose. Here's a smallcomparison:
y The normal format features the best compatibility: pretty much every diff/patch-likecommand should recognize it. The lack of context is a big disadvantage, though.
y The context format is widely supported, though not every diff/patch-like commandknows it. However, the advantage of being able to include context makes up for that.
y The unified format features context, too, and is more compact than the context format,but is only supported by a single brand of diff/patch-like commands.
If you're sure that the patch will be used by GNU diff/patch users only, unified is the best choice,as it keeps your patch as compact as possible. In most other cases, however, the context format isthe best choice. The normal format should only be used if you're sure there's a user withoutcontext format support.
V arying the amount of context lines
It is possible to make diff include less lines of context around the lines that should be changed.Especially in big patchfiles, this can strip away a lot of bytes and make your patchfile moreportable. However, if you include too few lines of context, patch might not work correctly.

8/7/2019 diff and patch (tutorial)
http://slidepdf.com/reader/full/diff-and-patch-tutorial 10/10
Quoting the GNU diff man page: "For proper operation, patch typically needs at least two linesof context."
Specifying the amount of context lines can be done in multiple ways:
y If you want to use the context format, you can combine it into one option, the -C option.Example:
[rechosen@localhost ~]$ diff -C 2 originaldirectory/ updateddirectory/
The above command would use the context format with 2 context lines.
y If you want to use the unified format, you can combine it into one option, the -U option.Example:
[rechosen@localhost ~]$ diff -U 2 originaldirectory/ updateddirectory/
The above command would use the unified format with 2 context lines.
y Regardless which format you choose, you can specify the number of lines like this:
[rechosen@localhost ~]$ diff -2 originaldirectory/ updateddirectory/
However, this will only work if you also specify a context-supporting format. You'd haveto combine this option either with -c or -u.
F inal words
Although this tutorial describes a lot of features and workings of diff and patch, it does by far notdescribe everything you can do with these powerful tools. It is an introduction in the form of atutorial. If you want to know more about these commands, you can read, for example, their manpages and GNU's documentation about diff and patch .
Well then, I hope this tutorial helped you. Thank you for reading! If you liked this tutorial,browse around this blog and see if there are more you like. Please help this blog to grow byleaving a link here and there, and let other people benefit from the growing amount of knowledge on this site. Thanks in advance and happy patching