dfx v4 user guide - b&h photo video user guide is a reference for the tiffen dfx digital filter...
TRANSCRIPT

Dfx v4 User Guide

•
Copyright 2
••••••
COPYRIGHT
No part of this document may be reproduced or transmitted in any form or by
any means, electronic or mechanical, including photocopying and recording,
for any purpose without the express written consent of Digital Film Tools.
Copyright © Digital Film Tools, LLC. 2014. All Rights Reserved
September 16, 2014
Dfx User Guide•••••

•
About Us 3
• • • •••
ABOUT US
Tiffen has been a leading manufacturer and supplier of photographic filters and
lens accessories for the consumer/professional imaging and the motion picture
and broadcast television industries for over 69 years.
The company has a rich history of innovative product design, superior optical
consistency and unparalleled quality. Tiffen has been recognized for its product
and engineering excellence earning two Technical Achievement Awards and a
Scientific and Engineering Award from the Academy of Motion Picture Arts &
Sciences, as well as an Emmy Award from the Academy of Television Arts and
Sciences.
The company's Special Effects optical filters, once an exclusive of the Motion
Picture and Television industry are now available to still photographers and
videographers through the Tiffen Hollywood F/X filter line and digitally through
the Dfx line of software. The Dfx software is produced in collaboration with
Digital Film Tools, a computer software company which is an off-shoot of a Los
Angeles based motion picture visual effects facility. Their work includes
hundreds of feature films, commercials and television shows. Together, our
combined understanding of optical filters and computer software creates an
unbeatable combination.
Dfx User Guide • • •••

•
About this Guide 4
• • • •••
ABOUT THIS GUIDE
This User Guide is a reference for the Tiffen Dfx Digital Filter Suite. You can
read from start to finish or jump around as you please. This guide is available
in Acrobat PDF format.
Trademark RecognitionBlack Diffusion/FX®, Black Pearlescent®, Black Pro-Mist®, Black Satin®,
Bronze Glimmerglass®, Color-Grad®, Glimmerglass®, Gold Diffusion/FX®,
HDTV/FX®, HFX® Star, Nude/FX®, Pearlescent®, Pro-Mist®, Smoque®,
Satin®, Soft/FX®, 812® Warming, Warm Black Pro-Mist®, Warm Pro-Mist®
and Warm Soft/FX® are trademarks of The Tiffen Company, LLC.
All other product names used in this manual are the properties of their
respective owners and are acknowledged. All other references to trademarks
or registered trademarks are the property of their respective owners.
Dfx User Guide • • •••

•
About this Guide 5
• • • •••
Dfx User Guide • • •••

•
Table of Contents 6
• • • •••
• • • • • • Table of Contents
Copyright .......................................................................................... 2About Us........................................................................................... 3About this Guide.............................................................................. 4Table of Contents............................................................................. 6Introduction...................................................................................... 23
Tiffen Dfx Digital Filter Suite......................................................... 23
Dfx Features................................................................................. 25
Filter Categories ........................................................................... 26
Installation........................................................................................ 32Photo Plug-ins .............................................................................. 32
Uninstalling ...................................................................................... 34Activating, Deactivating and Transferring Licenses .................... 35
Activation Options ........................................................................ 35
Deactivation Options .................................................................... 35
License Transfer........................................................................... 36
General Tutorials ............................................................................. 37Dfx Workflow ................................................................................ 37
Applying a Single Filter................................................................. 37
Tagging and Sorting Favorite Presets.......................................... 41
Adjusting Filter Parameters and Creating Presets ....................... 42
Applying Multiple Filters ............................................................... 43
Applying Multiple Layer Blend Modes .......................................... 44
Viewing Individual Layers............................................................. 45
Comparing Images ....................................................................... 46
Editing Multiple Filters .................................................................. 49
Creating Variations....................................................................... 52
Applying a Gradient Mask to a Layer ........................................... 54
Applying a Selection Mask to a Layer .......................................... 57
Applying a Path Mask to a Layer.................................................. 61
Applying a Snap Mask to a Layer................................................. 63
Dfx User Guide • • •••

•
Table of Contents 7
• • • •••
Applying a EZ Mask to a Layer .................................................... 68
Applying a Paint Mask to a Layer................................................. 78
Applying Multiple Masks to a Layer.............................................. 79
Drag and Drop Layers, Filters and Masks.................................... 82
Setups .......................................................................................... 84
Filter Tutorials .................................................................................. 86Ambient Light ............................................................................... 86
Auto Adjust ................................................................................... 86
Black and White ........................................................................... 87
Bleach Bypass.............................................................................. 87
Blur ............................................................................................... 88
Borders......................................................................................... 89
Cartoon......................................................................................... 90
Center Spot / Warm Center Spot ................................................. 90
Chromatic Aberration ................................................................... 91
Close-Up Lens.............................................................................. 92
Color Correctors ........................................................................... 93
Color-Grad®................................................................................. 94
Color Infrared ............................................................................... 95
Colorize Gradient ......................................................................... 95
Color Shadow............................................................................... 96
Color Spot .................................................................................... 97
Cross Processing ......................................................................... 98
Curves .......................................................................................... 99
Day for Night ................................................................................ 100
Defog............................................................................................ 101
DeFringe....................................................................................... 102
Depth of Field ............................................................................... 103
Detail ............................................................................................ 104
Diffusion ....................................................................................... 106
Diffusion/FX® ............................................................................... 107
Dfx User Guide • • •••

•
Table of Contents 8
• • • •••
Double Fog................................................................................... 108
Dual Grad ..................................................................................... 110
Edge Glow.................................................................................... 111
Enhancing .................................................................................... 112
Eye Light ...................................................................................... 113
Film Stocks................................................................................... 114
Flashing........................................................................................ 116
FL-B/D® ....................................................................................... 117
Flag / Dot...................................................................................... 118
Fog ............................................................................................... 118
Gels .............................................................................................. 119
Glimmerglass® / Bronze Glimmerglass®..................................... 120
Glow ............................................................................................. 121
Glow Darks................................................................................... 122
Grain............................................................................................. 123
Grunge ......................................................................................... 124
Halo .............................................................................................. 125
Harris Shutter ............................................................................... 126
Haze / Sky .................................................................................... 126
HDTV/FX® ................................................................................... 127
HFX® Star .................................................................................... 128
High Contrast ............................................................................... 129
Ice Halos ...................................................................................... 130
Infrared ......................................................................................... 131
Kelvin............................................................................................ 132
Key Light ...................................................................................... 133
Lens Distortion ............................................................................. 134
Levels ........................................................................................... 135
Light.............................................................................................. 137
Low Contrast ................................................................................ 138
Match............................................................................................ 139
Dfx User Guide • • •••

•
Table of Contents 9
• • • •••
ND-Grad ....................................................................................... 140
Night Vision .................................................................................. 141
Nude/FX®..................................................................................... 142
Overexpose .................................................................................. 143
Ozone........................................................................................... 144
Paint ............................................................................................. 145
Pastel ........................................................................................... 148
Pearlescent®................................................................................ 149
Pencil............................................................................................ 150
Photographic ................................................................................ 150
Polarizer ....................................................................................... 151
Pro-Mist® ..................................................................................... 153
Rack Focus .................................................................................. 154
Radial Exposure ........................................................................... 155
Radial Tint .................................................................................... 156
Rainbow ....................................................................................... 157
Rays ............................................................................................. 158
ReLight ......................................................................................... 158
Reflector ....................................................................................... 160
Satin®........................................................................................... 161
Selective Color Correct ................................................................ 162
Selective Saturation ..................................................................... 163
Sepia / 812® Warming ................................................................. 164
Sharpen........................................................................................ 164
Smoque® ..................................................................................... 165
Soft Contrast ................................................................................ 166
Soft/FX® / Warm Soft/FX® .......................................................... 167
Soft Light ...................................................................................... 168
Split Field...................................................................................... 168
Split Tone ..................................................................................... 169
Streaks ......................................................................................... 170
Dfx User Guide • • •••

•
Table of Contents 10
• • • •••
Sunset/Twilight ............................................................................. 171
Texture ......................................................................................... 172
Three Strip / Two Strip ................................................................. 172
Tint ............................................................................................... 174
Tone Adjust .................................................................................. 175
Ultra Contrast ............................................................................... 176
Vari-Star ....................................................................................... 177
Vignette ........................................................................................ 178
Water Droplets ............................................................................. 178
Wide Angle Lens .......................................................................... 180
X-Ray ........................................................................................... 180
Dfx User Interface ............................................................................ 181Viewer .......................................................................................... 182
Filters............................................................................................ 182
Presets and Parameters............................................................... 183
Variations ..................................................................................... 185
Effect ............................................................................................ 186
Histogram..................................................................................... 187
Magnifier....................................................................................... 188
Toolbar ......................................................................................... 188
Windows and Adjustments ........................................................... 188
Image Info .................................................................................... 192
Pull-down Menus ............................................................................. 193File................................................................................................ 193
Edit ............................................................................................... 196
View.............................................................................................. 196
Help .............................................................................................. 198
Viewer ............................................................................................... 200Zoom and Pan.............................................................................. 200
Compare....................................................................................... 201
Viewer Options ............................................................................. 205
Viewer Keyboard Shortcuts.......................................................... 208
Dfx User Guide • • •••

•
Table of Contents 11
• • • •••
Filters ................................................................................................ 209Presets and Parameters .................................................................. 211
Presets ......................................................................................... 211
Parameters................................................................................... 215
Variations.......................................................................................... 218Variation Controls......................................................................... 219
Effect ................................................................................................. 221Layer Controls .............................................................................. 222
Manipulating Layers, Filters and Masks ....................................... 224
Toolbar.............................................................................................. 228Add Mask ..................................................................................... 228
Adjusting Toolbar Controls ........................................................... 229
Masks................................................................................................ 230General Mask Controls................................................................. 230
Gradient Mask .............................................................................. 234
Spot Mask .................................................................................... 236
Path Mask .................................................................................... 237
Snap Mask ................................................................................... 241
EZ Mask ....................................................................................... 250
Selection Mask ............................................................................. 258
Paint Mask.................................................................................... 264
Common Filter Controls.................................................................. 268Blur ............................................................................................... 268
Black and White ........................................................................... 268
DVE.............................................................................................. 269
Grad ............................................................................................. 270
Matte ............................................................................................ 271
Spot .............................................................................................. 273
Temperature................................................................................. 274
View.............................................................................................. 274
Ambient Light................................................................................... 275Description ................................................................................... 275
Controls ........................................................................................ 275
Dfx User Guide • • •••

•
Table of Contents 12
• • • •••
Auto Adjust....................................................................................... 277Description ................................................................................... 277
Controls ........................................................................................ 277
Black and White ............................................................................... 279Description ................................................................................... 279
Controls ........................................................................................ 279
Bleach Bypass ................................................................................. 281Description ................................................................................... 281
Controls ........................................................................................ 281
Blur.................................................................................................... 283Description ................................................................................... 283
Controls ........................................................................................ 283
Borders ............................................................................................. 285Description ................................................................................... 285
Controls ........................................................................................ 285
Cartoon ............................................................................................. 288Description ................................................................................... 288
Controls ........................................................................................ 288
Center Spot / Warm Center Spot .................................................... 290Description ................................................................................... 290
Controls ........................................................................................ 291
Chromatic Aberration ...................................................................... 293Description ................................................................................... 293
Controls ........................................................................................ 294
Close-Up Lens.................................................................................. 295Description ................................................................................... 295
Controls ........................................................................................ 295
Color Correctors .............................................................................. 297Description ................................................................................... 297
Master, Shadows, Midtones, Highlights ....................................... 298
Color Correct ................................................................................ 299
F-Stop........................................................................................... 301
Printer Points................................................................................ 301
Dfx User Guide • • •••

•
Table of Contents 13
• • • •••
Telecine........................................................................................ 302
Temperature................................................................................. 302
Color-Grad® ..................................................................................... 304Description ................................................................................... 304
Filters............................................................................................ 304
Color Infrared ................................................................................... 306Description ................................................................................... 306
Controls ........................................................................................ 306
Colorize Gradient ............................................................................. 308Description ................................................................................... 308
Controls ........................................................................................ 308
Color Shadow................................................................................... 310Description ................................................................................... 310
Controls ........................................................................................ 310
Color Spot......................................................................................... 312Description ................................................................................... 312
Controls ........................................................................................ 312
Cross Processing ............................................................................ 314Description ................................................................................... 314
Controls ........................................................................................ 314
Curves............................................................................................... 316Description ................................................................................... 316
Day for Night .................................................................................... 320Description ................................................................................... 320
Controls ........................................................................................ 320
DeBand ............................................................................................. 322Description ................................................................................... 322
Controls ........................................................................................ 322
DeBlock............................................................................................. 323Description ................................................................................... 323
Controls ........................................................................................ 323
DeFog................................................................................................ 324Description ................................................................................... 324
Dfx User Guide • • •••

•
Table of Contents 14
• • • •••
Controls ........................................................................................ 324
DeFringe ........................................................................................... 326Description ................................................................................... 326
Controls ........................................................................................ 326
DeNoise............................................................................................. 328Description ................................................................................... 328
Controls ........................................................................................ 328
Depth of Field ................................................................................... 329Description ................................................................................... 329
Controls ........................................................................................ 329
Detail ................................................................................................. 331Description ................................................................................... 331
Controls ........................................................................................ 331
Develop............................................................................................. 333Description ................................................................................... 333
Controls ........................................................................................ 333
Diffusion ........................................................................................... 336Description ................................................................................... 336
Controls ........................................................................................ 336
Diffusion/FX® ................................................................................... 339Description ................................................................................... 339
Controls ........................................................................................ 340
Double Fog ....................................................................................... 341Description ................................................................................... 341
Controls ........................................................................................ 341
Dual Grad.......................................................................................... 344Description ................................................................................... 344
Controls ........................................................................................ 344
Edge Glow ........................................................................................ 346Description ................................................................................... 346
Controls ........................................................................................ 346
Enhancing......................................................................................... 348Description ................................................................................... 348
Dfx User Guide • • •••

•
Table of Contents 15
• • • •••
Controls ........................................................................................ 348
Eye Light........................................................................................... 350Description ................................................................................... 350
Controls ........................................................................................ 350
Film Stocks....................................................................................... 352Description ................................................................................... 352
Controls ........................................................................................ 352
Flashing ............................................................................................ 358Description ................................................................................... 358
Controls ........................................................................................ 358
FL-B/D® ............................................................................................ 360Description ................................................................................... 360
Controls ........................................................................................ 360
Flag / Dot........................................................................................... 361Description ................................................................................... 361
Controls ........................................................................................ 361
Fog .................................................................................................... 363Description ................................................................................... 363
Controls ........................................................................................ 363
Gels ................................................................................................... 365Description ................................................................................... 365
Controls ........................................................................................ 368
Glimmerglass®, Bronze Glimmerglass®....................................... 370Description ................................................................................... 370
Controls ........................................................................................ 371
Glow .................................................................................................. 372Description ................................................................................... 372
Controls ........................................................................................ 372
Glow Darks ....................................................................................... 374Description ................................................................................... 374
Controls ........................................................................................ 374
Grain.................................................................................................. 376Description ................................................................................... 376
Dfx User Guide • • •••

•
Table of Contents 16
• • • •••
Controls ........................................................................................ 376
Grunge .............................................................................................. 379Description ................................................................................... 379
Controls ........................................................................................ 379
Halo ................................................................................................... 383Description ................................................................................... 383
Controls ........................................................................................ 383
Harris Shutter ................................................................................... 385Description ................................................................................... 385
Controls ........................................................................................ 386
Haze / Sky ......................................................................................... 387Description ................................................................................... 387
Controls ........................................................................................ 388
HDTV/FX®......................................................................................... 390Description ................................................................................... 390
Controls ........................................................................................ 390
HFX® Star ......................................................................................... 392Description ................................................................................... 392
Controls ........................................................................................ 392
High Contrast ................................................................................... 396Description ................................................................................... 396
Controls ........................................................................................ 396
Ice Halos ........................................................................................... 397Description ................................................................................... 397
Controls ........................................................................................ 397
Infrared.............................................................................................. 400Description ................................................................................... 400
Controls ........................................................................................ 400
Kelvin ................................................................................................ 402Description ................................................................................... 402
Controls ........................................................................................ 402
Key Light........................................................................................... 404Description ................................................................................... 404
Dfx User Guide • • •••

•
Table of Contents 17
• • • •••
Controls ........................................................................................ 404
Lens Distortion................................................................................. 406Description ................................................................................... 406
Controls ........................................................................................ 407
Levels................................................................................................ 408Description ................................................................................... 408
Input Levels .................................................................................. 409
Output Levels ............................................................................... 410
Light .................................................................................................. 411Description ................................................................................... 411
Presets ......................................................................................... 412
Light.............................................................................................. 412
Shadow ........................................................................................ 414
Gobos........................................................................................... 414
Matte ............................................................................................ 418
Looks: Black/White & Color............................................................ 419Description ................................................................................... 419
Controls ........................................................................................ 420
Low Contrast .................................................................................... 422Description ................................................................................... 422
Controls ........................................................................................ 422
Match................................................................................................. 424Description ................................................................................... 424
Controls ........................................................................................ 424
ND-Grad ............................................................................................ 426Description ................................................................................... 426
Controls ........................................................................................ 426
Night Vision...................................................................................... 428Description ................................................................................... 428
Controls ........................................................................................ 428
Tint ............................................................................................... 429
Glow ............................................................................................. 429
Additional Controls ....................................................................... 429
Dfx User Guide • • •••

•
Table of Contents 18
• • • •••
Nude/FX®.......................................................................................... 431Description ................................................................................... 431
Controls ........................................................................................ 431
Overexpose ...................................................................................... 433Description ................................................................................... 433
Controls ........................................................................................ 433
Ozone................................................................................................ 435Description ................................................................................... 435
Controls ........................................................................................ 436
Zone Controls............................................................................... 437
Zone Thumbnail ........................................................................... 440
Paint .................................................................................................. 441Description ................................................................................... 441
Brushes ........................................................................................ 441
Brush Settings .............................................................................. 446
Paint Keyboard Shortcuts............................................................. 449
Pastel ................................................................................................ 450Description ................................................................................... 450
Controls ........................................................................................ 450
Pearlescent® .................................................................................... 451Description ................................................................................... 451
Controls ........................................................................................ 452
Pencil ................................................................................................ 453Description ................................................................................... 453
Controls ........................................................................................ 453
Photographic.................................................................................... 455Description ................................................................................... 455
Controls ........................................................................................ 456
Polarizer / Warm Polarizer............................................................... 458Description ................................................................................... 458
Controls ........................................................................................ 459
Pro-Mist®.......................................................................................... 462Description ................................................................................... 462
Dfx User Guide • • •••

•
Table of Contents 19
• • • •••
Controls ........................................................................................ 464
Rack Focus....................................................................................... 466Description ................................................................................... 466
Controls ........................................................................................ 466
Radial Exposure............................................................................... 468Description ................................................................................... 468
Controls ........................................................................................ 468
Radial Tint......................................................................................... 470Description ................................................................................... 470
Controls ........................................................................................ 470
Rainbow............................................................................................ 473Description ................................................................................... 473
Controls ........................................................................................ 473
Rays .................................................................................................. 476Description ................................................................................... 476
Controls ........................................................................................ 477
ReLight.............................................................................................. 478Description ................................................................................... 478
Light.............................................................................................. 478
Light Source ................................................................................. 479
Matte ............................................................................................ 480
Reflector ........................................................................................... 481Description ................................................................................... 481
Controls ........................................................................................ 482
Satin® ............................................................................................... 483Description ................................................................................... 483
Controls ........................................................................................ 484
Selective Color Correct ................................................................... 486Description ................................................................................... 486
Color Correct ................................................................................ 486
Matte ............................................................................................ 488
Selective Saturation......................................................................... 494Description ................................................................................... 494
Dfx User Guide • • •••

•
Table of Contents 20
• • • •••
Controls ........................................................................................ 494
Sepia / 812® Warming ..................................................................... 496Description ................................................................................... 496
Controls ........................................................................................ 496
Sharpen............................................................................................. 498Description ................................................................................... 498
Controls ........................................................................................ 498
Smoque® .......................................................................................... 500Description ................................................................................... 500
Controls ........................................................................................ 500
Soft Contrast .................................................................................... 502Description ................................................................................... 502
Controls ........................................................................................ 502
Soft/FX®, Warm Soft/FX® ............................................................... 504Description ................................................................................... 504
Soft Light .......................................................................................... 506Description ................................................................................... 506
Controls ........................................................................................ 506
Split Field.......................................................................................... 508Description ................................................................................... 508
Controls ........................................................................................ 508
Split Tone.......................................................................................... 510Description ................................................................................... 510
Controls ........................................................................................ 510
Streaks.............................................................................................. 513Description ................................................................................... 513
Controls ........................................................................................ 513
Sunset/Twilight ................................................................................ 515Description ................................................................................... 515
Controls ........................................................................................ 515
Texture.............................................................................................. 517Description ................................................................................... 517
Controls ........................................................................................ 517
Dfx User Guide • • •••

•
Table of Contents 21
• • • •••
Three Strip / Two Strip..................................................................... 519Controls ........................................................................................ 520
Tint .................................................................................................... 522Description ................................................................................... 522
Controls ........................................................................................ 522
Tone Adjust ...................................................................................... 525Description ................................................................................... 525
Controls ........................................................................................ 525
Ultra Contrast ................................................................................... 527Description ................................................................................... 527
Controls ........................................................................................ 527
Vari-Star ............................................................................................ 529Description ................................................................................... 529
Controls ........................................................................................ 529
Vignette............................................................................................. 531Description ................................................................................... 531
Controls ........................................................................................ 531
Water Droplets ................................................................................. 533Description ................................................................................... 533
Controls ........................................................................................ 533
Wide Angle Lens.............................................................................. 537Description ................................................................................... 537
X-Ray................................................................................................. 538Description ................................................................................... 538
Controls ........................................................................................ 538
Blend Modes..................................................................................... 540Keyboard Shortcuts......................................................................... 545
Dfx User Guide • • •••

•
Table of Contents 22
• • • •••
Dfx User Guide • • •••

•
Introduction 23
•• • •••
INTRODUCTION
Tiffen Dfx Digital Filter SuiteThe Tiffen Dfx digital filter suite is the definitive set of digital optical filters. Up to
2000 filters, including simulations of many popular award-winning Tiffen glass
filters, specialized lenses, optical lab processes, film grain, exacting color
correction plus natural light and photographic effects--are now in a controlled
digital environment using either 8, 16 or 32 bit per channel point processing.
Available in various configurations: as a powerful but user friendly standalone
application, or as plug-ins for either photo or video and film post production
software, Tiffen Dfx filters expand your creative experience.
Dfx provides you with everything you will need to enhance your images using
a staggering amount of filter presets. Using the Dfx Standalone or photo plug-
in versions, any filter can be limited to a portion of the screen using
sophisticated but simple to use masking controls. A layering system to apply
multiple filters as well as the Standalone’s batch processing system rounds out
Dfx’s set of tools.
Whether you are an amateur or professional photographer, a video or film
editor, or graphic designer, Dfx’s visual workflow and easy to use tools will help
you create stunning images.
Dfx is comprised of the following filters: Ambient Light, Auto Adjust, Black and
White, Black/White Looks, Black Diffusion/FX®, Black Pearlescent®, Black
Pro-Mist®, Black Satin®, Bleach Bypass, Blur, Borders, Bronze
Glimmerglass®, Cartoon, Center Spot, Chromatic Aberration, Close-Up
Lens, Color Compensating, Color Conversion, Color Correct, Color-Grad®,
Color Infrared, Colorize Gradient, Color Looks, Color Shadow, Color Spot,
Cool Pro-Mist®, Cross Processing, Curves, Day for Night, DeBand, DeBlock,
DeFog, DeFringe, DeNoise, Depth of Field, Detail, Develop, Diffusion, Dot,
Double Fog, Dual Grad, Edge Glow, Enhancing, Eye Light, Film Stocks, Flag,
FL-B/D®, Flashing, Fog, F-Stop, Gels, Glimmerglass®, Glow, Glow Darks,
Gold Diffusion/FX®, Gold Reflector, Grain, Grunge, Halo, Harris Shutter,
Haze, HDTV/FX®, High Contrast, HFX® Star, Ice Halos, Infrared, Kelvin,
Dfx User Guide•••••

•
Introduction 24
•• • •••
Key Light, Lens Distortion, Levels, Light, Light Balancing, Low Contrast,
Match, ND-Grad, Night Vision, Nude/FX®, Overexpose, Ozone, Paint, Pastel,
Pearlescent®, Pencil, Photographic, Polarizer, Printer Points, Pro-Mist®,
Rack Focus, Radial Exposure, Radial Tint, Rainbow, Rays, ReLight, Satin®,
Selective Color Correct, Selective Saturation, Sepia, Sharpen, Sky, Silver
Reflector, Smoque®, Soft Contrast, Soft/FX®, Soft Light, Split Field, Split
Tone, Streaks, Sunset/Twilight, Telecine, Temperature, Texture, Three Strip,
Tint, Tone Adjust, Two Strip, Ultra Contrast, Vari-Star, Vignette, 812®
Warming, Warm Black Pro-Mist®, Warm Center Spot, Warm Polarizer, Warm
Pro-Mist®, Warm Soft/FX®, Water Droplets, Wide Angle Lens, and X-Ray.
Dfx User Guide• • •••

•
Introduction 25
• • • •••
Dfx Features• 133 individual filters
• Thousands of customizable presets
• Simulation of Tiffen glass camera filters, specialized lenses, optical lab processes, film grain, exacting color correction as well as natural light and photographic effects
• Presets for 288 different color and black and white still photographic film stocks, motion picture films stocks and historical photographic processes
• Rosco and GamColor Gel libraries
• Rosco and Gam Gobo libraries for lighting effects
• Paint system that includes Black/White, Blur, Clone, Color, Eraser, Mosaic, Red-Eye, Repair and Scatter brushes
• Layering system for multiple filter application
• Sophisticated but easy to use masking tools
• Variation generator for effect parameters
• 8, 16, 32 bit image processing
• Mac Retina Display Support
• Multi-processor acceleration
• GPU acceleration
Dfx User Guide • • •••

•
Introduction 26
• • • •••
Filter CategoriesThe Filters are categorized by filter function: Color, Film Lab, HFX Diffusion,
HFX Grads/Tints, Image, Lens, Light, and Special Effects.
Color1 Auto Adjust
2 Black and White
3 Color Correct
4 Curves
5 Develop
6 Enhancing
7 F-Stop
8 FL-B/D®
9 High Contrast
10 Kelvin
11 Levels
12 Low Contrast
13 Match
14 Ozone
15 Printer Points
16 Selective Color Correct
17 Selective Saturation
18 Soft Contrast
19 Telecine
20 Temperature
21 Tone Adjust
22 Ultra Contrast
Film Lab1 Bypass
2 Cross Processing
Dfx User Guide • • •••

•
Introduction 27
• • • •••
3 Film Stocks
4 Flashing
5 Grain
6 Grunge
7 Overexpose
8 Three Strip
9 Two Strip
HFX Diffusion1 Center Spot
• Center Spot
• Warm Center Spot
2 Diffusion
3 Diffusion/FX®
• Black Diffusion/FX®
• Gold Diffusion/FX®
4 Double Fog
5 Glimmerglass®
• Glimmerglass®
• Bronze Glimmerglass®
6 Fog
7 HDTV/FX®
8 Pearlescent®
• Black Pearlescent®
• Pearlescent®
9 Pro-Mist®
• Pro-Mist®
• Cool Pro-Mist®
• Warm Pro-Mist®
• Black Pro-Mist®
Dfx User Guide • • •••

•
Introduction 28
• • • •••
• Warm Black Pro-Mist®
10 Satin®
• Black Satin®
• Satin®
11 Smoque®
12 Soft/FX®
• Soft/FX®
• Warm Soft/FX®
HFX Grads/Tints1 812® Warming
2 Color Spot
3 Color-Grad®
4 Colorize Gradient
5 Dual Grad
6 Gels
• GamColor
• GamColor Cine Filters
• GamColor Naked Cosmetics
• Gels
• Rosco CalColor
• Rosco Cinegel
• Rosco Cinelux
• Rosco Storaro Matte
7 ND-Grad
8 Nude/FX®
9 Photographic
• Color Compensating
• Color Conversion
• Light Balancing
Dfx User Guide • • •••

•
Introduction 29
• • • •••
• Photographic
10 Radial Tint
11 Sepia
12 Split Tone
13 Sunset/Twilight
14 Tint
Image1 DeBand
2 DeBlock
3 DeFog
4 DeNoise
5 Detail
6 Haze
7 Paint
8 Polarizer
• Polarizer
• Warm Polarizer
9 Sharpen
10 Sky
Lens1 Blur
2 Chromatic Aberration
3 Close-Up Lens
4 DeFringe
5 Depth of Field
6 Lens Distortion
7 Rack Focus
8 Radial Exposure
9 Split Field
Dfx User Guide • • •••

•
Introduction 30
• • • •••
10 Vignette
11 Wide Angle Lens
Light1 Ambient Light
2 Dot
3 Edge Glow
4 Eye Light
5 Flag
6 Glow
7 Glow Darks
8 Halo
9 HFX® Star
10 Ice Halos
11 Key Light
12 Light
13 Rainbow
14 Rays
15 Reflector
• Gold Reflector
• Silver Reflector
16 ReLight
17 Soft Light
18 Streaks
19 Vari-Star
20 Water Droplets
Special Effects1 Borders
2 Cartoon
3 Color Infrared
Dfx User Guide • • •••

•
Introduction 31
• • • •••
4 Color Shadow
5 Day for Night
6 Harris Shutter
7 Infrared
8 Looks
• Black/White Looks
• Color Looks
9 Night Vision
10 Pastel
11 Pencil
12 Texture
13 X-Ray
Dfx User Guide • • •••

•
Installation 32
• • • •••
INSTALLATION
Photo Plug-ins1 Download Dfx at www.tiffensoftware.com
2 Double-click on the file that was downloaded and run through the installation process.
3 When prompted, select the destination programs to install to. You can choose from Photoshop, Photoshop Elements, Lightroom and Aperture.
4 Start your program and load or select an image.
5 Apply Dfx:
• Photoshop/Elements: In the Filter menu, select Dfx v4 from the Tiffen group.
• Lightroom: In the Photo menu, select Edit In and then choose Edit in Dfx v4.0.
• Aperture: In the Photos menu, select Edit with Plug-in and then choose Edit in Tiffen Dfx v4.0.
A dialog box pops up when you run Dfx.
6 If you purchased the software, select Activate Dfx and follow the instructions.
or
7 Select Request Trial Activation (Internet Required) and click Next to receive a fully functioning version of Dfx for the specified trial period. At the end of the trial period, Dfx reverts to a limited demo mode.
or
8 Select Run in Demo Mode and click Finish.
Note: In Demo Mode, a watermark is superimposed over the image.
Dfx User Guide • • •••

•
Installation 33
• • • •••
Adding Dfx to Lightroom as an External EditorIf Lightroom is found during the installation of Dfx, Dfx will automatically be
added as an external editor. If for some reason Dfx does not show up as an
external editor, you can manually add Dfx as an external editor by following the
steps below.
1 Open the Preferences in Lightroom.
2 Click the External Editing tab.
3 In the Additional External Editor section, select TIFF for File Format, sRGB for Color Space, 8 or 16 bits/component for Bit Depth, set the desired Resolution, and choose None for Compression.
Note: Dfx is only compatible with TIFF files (8 or 16-bit, with no compression).
4 Click on Choose to select an application. Navigate to the location of Dfx.
• On Windows, the default installation location for Dfx will be: C:\Program Files\Tiffen\Dfx v4
• On Macintosh, the default installation location for Dfx will be: /Macintosh HD/Applications/Tiffen/Dfx v4
5 Select the Dfx Lightroom file and click Choose.
6 Under the Preset drop-down menu, select Save Current Settings as New Preset… and name the preset Dfx v4.0.
Dfx can now be easily accessed under the Photo menu as a preset external
editor.
Dfx User Guide • • •••

•
Uninstalling 34
• • • •••
UNINSTALLING
WindowsFrom the Windows Start Menu, select Programs > Digital Film Tools > Dfx v4 >
Uninstall Dfx.
MacintoshGo to Applications/Digital Film Tools/Dfx v4 and double-click on Uninstall Dfx.
Dfx User Guide • • •••

•
Activating, Deactivating and Transferring Licenses 35
• • • •••
ACTIVATING, DEACTIVATING AND TRANSFERRING LICENSES
Activation Options
Internet ActivateActivates Dfx over the Internet.
Request License from Self-Service WebsiteIf you do not have an Internet Connection on the computer where you want to
run Dfx, use this option. The self-service website will generate a license file
which you can then transfer to the desired computer.
Install a License FileLoads a license file obtained from the self-service website or received by email.
Note: If you experience an error when using Internet Activate, it is because you or your company uses a proxy server to access the Internet and/or your firewall is blocking our program’s access to the Internet. For proxy server users, select Advanced Options and enter the appropriate proxy server settings. For firewall users, open your firewall software and allow our software to access the Internet.
Deactivation OptionsOnce Dfx has been activated, you can access the Deactivation Options by
selecting the License menu.
Internet DeactivateDeactivates Dfx over the Internet and is only available if you initially activated
over the Internet. Use this method to return your Product Code back to the
activation server. You will then be able to use your Product Code to activate Dfx
on another computer.
Dfx User Guide • • •••

•
Activating, Deactivating and Transferring Licenses 36
• • • •••
License TransferYour Product Code allows you to run Dfx on one computer at a time. However,
you may transfer the license by deactivating on one computer and activating on
another.
Internet Deactivate / Internet Activate is the preferred method of license
transfer between computers, but is only available if you initially activated over
the Internet and currently have Internet access. If you do not have Internet
access, you will need to contact customer support to assist you in transferring
the license.
To transfer a license:
1 Select License from the Help menu.
2 Choose Internet Deactivate and click Next.
Dfx is now deactivated.
3 On the target computer, select Activate Dfx and follow the instructions.
Dfx will then activate on the new computer.
Dfx User Guide • • •••

•
General Tutorials 37
• • • •••
GENERAL TUTORIALS
Dfx Workflow1 Apply Dfx to an image.
2 Choose a filter category.
3 Select a filter.
4 Try out the various filter presets.
5 Adjust the filter parameters to your liking.
6 Use masks to limit where the filter is applied.
7 Add additional filters.
8 Click the Done button to apply the filters to your image.
Applying a Single FilterThe General Tutorials build on one another and are designed to be done in
order.
1 Apply Dfx:
• Photoshop/Elements: In the Filter menu, select Dfx v3.0 from the Tiffen group.
• Lightroom: In the Photo menu, select Edit In and then choose Edit in Dfx.
• Aperture: In the Photos menu, select Edit with Plug-in and then choose Edit in Tiffen Dfx v3.0.
Dfx User Guide • • •••

•
General Tutorials 38
• • • •••
The image appears in the Viewer and thumbnails (small images) are created
for all of the effects in the current category of the Filters window.
2 Click on one of the categories in the Filters window and select a filter.
Presets for the selected filter are generated in the Presets window and the
default preset for the filter is applied to the image in the Viewer.
Dfx User Guide • • •••

•
General Tutorials 39
• • • •••
3 Select from the various filter presets by clicking them in the Presets window.
The image in the Viewer is updated as each Preset is clicked.
Dfx User Guide • • •••

•
General Tutorials 40
• • • •••
You can set the opacity of the filter using the Layer Opacity control in the Effect
window.
4 Click on the greater than character “>” to the right of the Layer Opacity spin controls to bring up the slider so that it can be adjusted.
In addition to opacity, Layers can be combined with the layer below using a
variety of Blend modes.
Go to Blend Modes for explanations of the various modes.
Dfx User Guide • • •••

•
General Tutorials 41
• • • •••
5 Click the Done button to apply the filter to your image.
The next time you apply Dfx in Photoshop or Aperture, your previous Dfx setup consisting of filters, layers and masks will all be displayed and can be modified. For the Dfx setup information to be remembered in Lightroom, you need to use “Edit Copy with Lightroom Adjustments” and render the result. If you then apply Dfx to the newly rendered version and use “Edit Original”, your previous Dfx setup will also be displayed and can be modified. This behavior in Lightroom and Aperture can be disabled via the Save setup with image preference.
Tagging and Sorting Favorite PresetsPresets can be tagged as a Favorite allowing them to be sorted separately in
the Presets window as well as in the Favorites tab of the Filters window.
1 Apply a Dfx filter with presets.
2 Tag a preset as a Favorite by selecting the preset and pressing the Toggle Favorite icon located at the top right of the Presets window.
Presets tagged as a favorite display a yellow star at the top right of the preset.
Dfx User Guide • • •••

•
General Tutorials 42
• • • •••
3 To sort the Presets window by Favorites, select Favorites in the Presets pop-up menu.
Adjusting Filter Parameters and Creating Presets1 Select a Dfx filter and choose a preset.
When the Parameters tab is selected at the bottom of the Presets and
Parameters window, the Parameters window is visible and displays the current
filter’s parameters.
2 If the Parameters window is not showing, click the Parameters tab at the bottom of the Presets window.
Dfx User Guide • • •••

•
General Tutorials 43
• • • •••
3 In the Parameters window, adjust the filter parameters to your liking.
Adjusting the parameters will update and change the image in the Viewer.
Next, you can save your settings as a new custom preset, but you must first
create a new name.
4 In the name field to the left of the Create Custom Preset icon, type in a new name.
5 Click the Create Custom Preset icon to create a new preset in the Presets window based on the current parameter settings.
6 Click the Presets tab at the bottom of the Parameters window to show the Presets window.
7 In the Presets window, you will see the newly created custom preset.
Applying Multiple Filters1 Select a Dfx filter and choose a preset.
2 Adjust the filter parameters if you’d like.
Dfx User Guide • • •••

•
General Tutorials 44
• • • •••
Before another filter can be added, the first filter must be added as a layer in
the Effect window.
3 Click the Add Layer icon at the top left of the Effect window.
The first filter drops down one position in the Effect window and is added as a
layer. Multiple filters can be added in this manner.
Note: You can also use Add Layer even if no filter is applied. This way Layer Blend Modes can be used to create effects between layers.
Applying Multiple Layer Blend ModesInstead of adding filters to a layer, you can use only the Layer Blend Mode to
create an effect.
1 Select a Layer Blend Mode.
Go to Blend Modes for explanations of the various modes.
Dfx User Guide • • •••

•
General Tutorials 45
• • • •••
2 Before another Layer Blend Mode can be added, click the Add Layer icon at the top left of the Effect window.
The first layer drops down one position in the Effect window and a new layer is
added.
3 Select a different Layer Blend Mode for the new layer.
Multiple Layer Blend Mode’s can be added in this manner.
Viewing Individual Layers1 Apply a couple of filters to your image and add them as layers.
2 Click on the image thumbnail in the Effect window to display that layer in the Viewer.
With each click of the mouse, the Viewer displays each individual layer.
3 When you are finished, click on the top layer’s image thumbnail.
Click
Dfx User Guide • • •••

•
General Tutorials 46
• • • •••
Comparing ImagesDfx can compare images using Side-by-Side, Vertical Split, Horizontal Split,
A/B or Snapshot comparison modes. By default, the current filter and original
image are selected for comparison.
The View/Compare icon in the Effect window changes which layers are used in
the comparison.
1 Apply a Dfx filter and make sure it is affecting the image in some way.
2 Click on the Side-by-Side Comparison icon.
Dfx User Guide • • •••

•
General Tutorials 47
• • • •••
Horizontal images are stacked vertically and vertical images are placed side by
side.
3 Click the Vertical Split Comparison mode icon.
Dfx User Guide • • •••

•
General Tutorials 48
• • • •••
You can now compare the images using a vertical split.
4 Move your cursor into the image area over the split line and when the cursor changes to a double-arrow, click and drag to move the split.
Depending on the filter used, the split line may not be obvious, so triangular
sashes on the outside of the image help you find it. If you drag the sash all the
way around, it will swap directions.
5 Enable the A/B Comparison icon and then click the Show Other View icon that appears to cycle the current filter with the original image.
6 When done, press the A/B Comparison icon to turn it off.
7 Press the Snapshot icon.
Dfx User Guide • • •••

•
General Tutorials 49
• • • •••
Once clicked, a snapshot of the image in the Viewer is taken as well as the
layer’s mask, if there is one.
8 Press the View Snapshot icon that appears.
View Snapshot allows you to now use the various comparison modes to
compare the snapshot to other layers or different filter settings.
9 Turn off View Snapshot when done.
Editing Multiple FiltersWhen multiple filters have been applied, you have the choice of viewing and
editing one layer at a time or viewing one layer while editing another.
By default, the Viewer and Parameters window display the image and controls
for the top most layer. The layer displayed in the Viewer is controlled with the
View/Compare icon
while the controls shown in the Parameters and Presets window are displayed
with the Edit icon.
Both of these icons are located in the Effect window above each layer’s
thumbnail.
Dfx User Guide • • •••

•
General Tutorials 50
• • • •••
View and Edit One Layer at a Time1 Apply a couple of filters to your image and add them as layers.
2 To simultaneously view and edit a different layer, double-click on its image thumbnail.
The View/Compare and Edit icons automatically activate for the new layer,
while the Viewer, Parameters and Presets windows update to display the new
layer’s image and effect controls.
3 Use the effect controls in the Parameters window to edit the new layer.
Dfx User Guide • • •••

•
General Tutorials 51
• • • •••
View One Layer while Editing AnotherThere are many instances where it is very useful to view one layer while editing
another.
1 Double-click on the top most layer’s image thumbnail.
You are now viewing and editing the top layer. The layer that you are editing is
considered the active layer. You can tell the active layer by the gray border
around it’s thumbnail image in the Effect window.
Change the active layer by clicking on a lower layer’s Edit icon.
2 Adjust the effect controls in the Parameters window or choose a new preset in the Presets window.
You are now Viewing the top layer while editing a layer below.
Dfx User Guide • • •••

•
General Tutorials 52
• • • •••
Creating VariationsVariations based on either one or two parameters can be created and are
displayed as thumbnails in a window below the Parameters and Presets
window.
1 Apply a Dfx filter.
2 If the Parameters window is not showing, click the Parameters tab at the bottom of the Presets window.
Dfx User Guide • • •••

•
General Tutorials 53
• • • •••
3 Click on a parameter name in the Parameters window.
Variable parameters are Ranges, Toggles, and Colors.
When you select a parameter, the Variations appear and you'll see the
variations being generated on that parameter.
4 Click on a second parameter and it will generate variations between the two.
The first parameter you click on will be the dominant parameter - it'll go across
the top of the Variations tab. So, you can get different results depending on the
order you select the parameters.
5 Click on a selected parameter to toggle it back off again.
Note: You can only have one or two parameters selected at a time. If you click on a third parameter, the last parameter you clicked on will deselect itself. If you deselect both of the parameters or switch effects, the Variations window will disappear because the variations are no longer being generated.
Variations are generated based on the current effect parameters. So, you can
pick some parameters for your variation, then go back to the Presets window
and pick a different Preset, and the variations will regenerate.
See Variations for more information.
Dfx User Guide • • •••

•
General Tutorials 54
• • • •••
Applying a Gradient Mask to a LayerMasks allow you to limit the effect of a filter by revealing it only in white areas
of the mask. White is on, black is off and gray areas in between represent a
level of transparency.
Masks are displayed to the right of the filter thumbnail in the Effect window.
The following mask types can be applied to a layer: Gradient, Spot, Path, Snap,
EZ Mask, Selection and Paint by clicking the Add Mask icon in the Toolbar.
1 Apply Dfx to an image.
Select a filter and preset that changes the image in an obvious way.
Photo © THINKSTOCK LLC--www.thinkstock.com
Dfx User Guide • • •••

•
General Tutorials 55
• • • •••
2 For instance, select the HFX Grads/Tints > Tint filter.
3 Click the Add Mask icon in the Toolbar and choose Gradient.
When the mask is applied to your layer, a couple of things happen. First, a
mask thumbnail appears to the right of the image thumbnail. Second, the filter
that was applied to the image is now limited to the white areas of the mask.
Third, controls are added to the Toolbar as well as the Viewer depending upon
the type of mask selected.
Photo © THINKSTOCK LLC--www.thinkstock.com
Dfx User Guide • • •••

•
General Tutorials 56
• • • •••
4 Click and drag the corner points in the Viewer to adjust the position of the Gradient mask.
The direction and size of the Gradient can also be adjusted using the controls
in the Toolbar.
5 Adjust the size of the gradient by first clicking the Gradient Size icon in the Toolbar and then dragging the slider that appears.
See Gradient Mask for more information.
Dfx User Guide • • •••

•
General Tutorials 57
• • • •••
Applying a Selection Mask to a LayerSelection masks can be used to manipulate, isolate and protect specific parts
of an image when making adjustments or applying filters.
Using advanced image slicing algorithms, masks are created using luminance,
hue, saturation, average, red, green, blue, cyan, magenta, and yellow values.
1 Apply Dfx to an image.
2 Select a filter and preset that changes the image in an obvious way.
3 Click the Add Mask icon in the Toolbar and choose Selection.
A number of controls appear in the Toolbar above the Viewer. The first control
is called Extract On which determines which image values are used to create
the mask. The default mask type is luminance, meaning brightness.
4 Press the M key or the Show Mask icon above the Viewer to display the mask.
Position and Range ControlsThe Position and Range parameters are key to isolating specific image values.
1 Change the Position parameter if you want to select different values to be used for the mask. The parameter can be adjusted by first clicking the Position icon in the Toolbar and then dragging the slider that appears.
Photo © THINKSTOCK LLC--www.thinkstock.com
Dfx User Guide • • •••

•
General Tutorials 58
• • • •••
Using the Luminance extraction method, a higher Position value shows more
white values from the original image as white values in the mask. A lower
Position value shows more black values from the original image as white values
in the mask.
Once you’ve selected the “Position”, you can then add or subtract the “Range”
of values to be included in the mask.
2 Adjust the Range parameter by clicking it’s icon in the Toolbar and then dragging the slider that appears.
A higher Range value includes more white values in the mask while a lower
Range value includes less values in the mask.
Position 0, Range 25 Position 100, Range 25Original
Dfx User Guide • • •••

•
General Tutorials 59
• • • •••
In addition to using the slider controls in the Toolbar, the Position, Range and
Radius parameters can be set using on-screen controls. Click on the image to
place the on-screen control which consists of a center point and a solid circle.
The Position value is set by the location of the center point, while the Range is
set by sizing the circle. The larger the circle, the larger the range.
Position 100, Range 25 Position 100, Range 75Original
Range
Position
Dfx User Guide • • •••

•
General Tutorials 60
• • • •••
3 Adjust the Radius parameter by clicking it’s icon in the Toolbar and then dragging the slider that appears.
When the Radius control is increased, a soft, circular mask is created to limit
the selection. If the on-screen controls are used, the Radius is represented as
a dashed circle.
In this case, the Radius allows me to isolate the clouds from the water.
4 You may want to adjust Black Clip to add more values to the black part of the mask and adjust White Clip to add more values to the white part of the mask.
5 If needed, Shrink/Grow can be used to make the mask smaller or larger and the Blur controls can soften the mask.
Radius
Dfx User Guide • • •••

•
General Tutorials 61
• • • •••
6 Press the M key to display the full color image in the Viewer.
See Selection Mask for more information.
Applying a Path Mask to a LayerA Path is an outline created by placing sequential points along an object. Think
of it as connecting the dots if you will. Although paths can be open or closed,
Dfx only makes use of closed paths. Drawing a path is often a good solution for
objects that can’t be masked in any other way.
1 Apply Dfx to an image.
2 Select a filter and preset that changes the image in an obvious way.
3 Click the Add Mask icon in the Toolbar and select Path.
Once Path is selected, the effect of the filter in the Viewer can no longer be
seen until a mask is created.
4 Click repeatedly in the Viewer to create a new shape.
Photo © THINKSTOCK LLC--www.thinkstock.com
Dfx User Guide • • •••

•
General Tutorials 62
• • • •••
5 When done, click on the first point that was added to close the path.
The filter now appears only in the area contained within the path. To change the
shape of the path, move the controls points.
6 Click on one point to select it or click and drag a box around a group of points.
7 Click and drag on one of the selected points to move them.
If needed, you can add new points by Alt+clicking on the path between two
points. Points are deleted by selecting them and hitting the Delete key.
8 Create as many paths as you’d like.
When paths overlap, a hole in the mask occurs.
See Path Mask for more information.
Dfx User Guide • • •••

•
General Tutorials 63
• • • •••
Applying a Snap Mask to a LayerThe Snap masking tool provides instant visual feedback by snapping an
editable curve to an object's boundary even if it has vague or low contrast
edges. This is made possible by utilizing unique graph-cutting and
segmentation algorithms.
1 Apply Dfx to an image.
2 Select a filter and preset that changes the image in an obvious way.
FG Mark
Boundary BG Mark
BG Mark
Photo © THINKSTOCK LLC--www.thinkstock.com
Dfx User Guide • • •••

•
General Tutorials 64
• • • •••
3 Click the Add Mask icon in the Toolbar and select Snap.
Once Snap is selected, the effect of the filter in the Viewer can no longer be
seen until a mask is created.
4 Define the area to be isolated by drawing a foreground line with the left mouse button.
The Mark Foreground icon is selected by default when you apply a Snap mask
and that is why you can just start drawing with the left mouse button.
5 Define background areas by drawing lines with the right mouse button.
or
Dfx User Guide • • •••

•
General Tutorials 65
• • • •••
6 Alternatively, you could select the Mark Background icon and draw with the left mouse button.
As soon as the first background line is drawn, Snap calculates a boundary
curve that is displayed as a black and white dashed line around the object.
7 Draw additional foreground and background lines as needed until the object that you’d like to isolate is roughly surrounded by a boundary.
Dfx User Guide • • •••

•
General Tutorials 66
• • • •••
Where the boundary doesn’t correctly follow the edge of your object, refine the
boundary by using either the Edit Points or Override Edge icons in the Toolbar.
When either of these tools is selected, the boundary created in the object
marking step is converted into editable polygons and you will see a noticeable
refinement in the boundary.
8 Click the Edit Points icon in the Toolbar and drag a point to adjust the shape of the polygon.
and / or
Before After
Dfx User Guide • • •••

•
General Tutorials 67
• • • •••
9 Click the Override Edge icon in the Toolbar and draw a mark along the edge of your object where the boundary doesn’t correctly follow the edge.
10 When happy with the boundary you have created, click the Convert Curve to a Path icon in the Toolbar to apply it to the layer and convert it to an editable path.
A slider pops up to control the amount of points to be included in the path.
11 Drag the slider to reduce the number of path points or just click it to accept the current setting.
By default, Edit Points is selected after the path is created so that you can view
and edit the points.
Before After
Photo © THINKSTOCK LLC--www.thinkstock.com
Dfx User Guide • • •••

•
General Tutorials 68
• • • •••
12 To create a new boundary, select the Mark Foreground icon and repeat the above steps.
When boundaries overlap, a hole in the mask is created.
See Snap Mask for more information.
Applying a EZ Mask to a LayerEZ Mask is an easy to use interactive image masking tool capable of isolating
almost any object in an image--even if you are dealing with fine hair detail,
smoke, or reflections.
To work this magic, EZ Mask iteratively estimates the transparency value for
every pixel in the image, based on a small sample of foreground (what you want
to isolate) and background pixels marked by simple strokes on the image.
Results show that compared with previous approaches, our method is more
efficient and requires minimal effort to extract high quality masks for
foregrounds with significant semi-transparent regions.
Stroke Trimap TutorialEZ Mask creates masks by using a trimap--a pre-segmented image consisting
of three regions of foreground (what you want to isolate), background and
unknown. Partial opacity values are then computed only for pixels inside the
unknown region. Two trimap methods can be used: Stroke and Filled. This
tutorial will use the Stroke method.
Dfx User Guide • • •••

•
General Tutorials 69
• • • •••
Our trimaps can be relatively sparse consisting of individual foreground and
background brush strokes. All pixels left unmarked will be treated as unknown.
After processing, if any fine foreground details are missing from the mask, the
Unknown brush can be used in these areas to help recover lost detail.
1 Apply Dfx to an image.
2 Select a filter and preset that changes the image in an obvious way.
3 Click the Add Mask icon in the Toolbar and select EZ Mask.
Note: Once EZ Mask is selected, the effect of the filter in the Viewer can no longer be seen until a mask is created.
A good stroke technique is to draw an inner outline around the object you are
extracting using the Paint Foreground brush and an outer outline using the
Paint Background brush.
4 Define the area to be cutout by drawing foreground lines with the left mouse button. You can quickly draw straight lines if you click with the left mouse button, press Shift and then click in a different location. If you keep Shift depressed while clicking, you will create interconnected straight lines.
The Paint Foreground brush is selected by default when you enter EZ Mask
and that is why you can just start drawing with the left mouse button.
User Input Mask
Dfx User Guide • • •••

•
General Tutorials 70
• • • •••
The strokes should be near the boundary of the foreground, but not right up
against the edge. Strokes that are closer to the boundary will dominate the
creation of the mask. Also, if the foreground has varying colors, the strokes
should cover these colors.
Note: The general rule is don’t put different stroke types too close together unless you need to.
5 Define background areas by drawing with the right mouse button.
or
6 Alternatively, you could select the Paint Background brush and draw with the left mouse button.
Dfx User Guide • • •••

•
General Tutorials 71
• • • •••
If the background has varying colors, the strokes should cover these colors.
Warning: If you only provide a few sparse strokes, a Stroke trimap will take longer to process than a filled trimap.
7 Click the Generate Mask icon or press the Enter key.
Once EZ Mask is done processing, the mask will be shown in the mask
thumbnail of the Effect window.
8 Press the M key to view the Mask in the Viewer.
In the Mask, white is foreground, black is background and any gray areas in
between represent a level of transparency. If the mask is not acceptable after
processing, add a few strokes near the region where the mask is not accurate.
Note: To quickly toggle off the display of your strokes, click on the layer’s image thumbnail. Click the mask thumbnail to re-display the strokes.
Good Stroke Example Bad Stroke Example
Dfx User Guide • • •••

•
General Tutorials 72
• • • •••
9 If you see gray areas in the foreground object that should be completely white, make additional foreground marks in those areas.
10 If you see gray areas in the background that should be completely black, make additional background marks.
When drawing a stroke trimap, certain foreground details may be missing after
the mask is generated. Using the Paint Missing brush in these areas can
sometimes help recover lost detail.
11 Press the M key again to view the full color image.
12 If any fine foreground details are missing from the mask, click on the Paint Missing brush and draw over them with the left mouse button as illustrated by the purple strokes in the dog’s hair.
The purple colored strokes represent the missing areas.
13 Click the Generate Mask icon or the Enter key again to see how any new foreground, background and unknown strokes affect the mask.
See EZ Mask for more information.
Dfx User Guide • • •••

•
General Tutorials 73
• • • •••
Filled Trimap TutorialEZ Mask creates masks by using a trimap--a pre-segmented image consisting
of three regions of foreground (what you want to isolate), background and
unknown. Partial opacity values are then computed only for pixels inside the
unknown region. Two trimap methods can be used: Stroke and Filled. This
tutorial will use the Filled method.
Foreground and background brush strokes are used to mark definite
foreground and background pixels while the Unknown brush is used to mark
unknown, or mixed regions. Using this method, the entire image is painted/filled
with one of the three brushes.
1 Apply Dfx to an image.
2 Select a filter and preset that changes the image in an obvious way.
3 Click the Add Mask icon in the Toolbar and select EZ Mask.
Note: Once EZ Mask is selected, the effect of the filter in the Viewer can no longer be seen until a mask is created.
Foreground Filled Trimap
Dfx User Guide • • •••

•
General Tutorials 74
• • • •••
When drawing a filled trimap, the best method is to draw the unknown areas
first. Unknown areas are typically areas where the foreground is transitioning
to the background. In the image below, the hairy edges of the Alpaca would be
considered unknown areas.
4 Define unknown areas by selecting the Paint Unknown brush and drawing around the edges of the foreground with the left mouse button. You can quickly draw straight lines if you click with the left mouse button, press Shift and then click in a different location. If you keep Shift depressed while clicking, you will create interconnected straight lines.
Dfx User Guide • • •••

•
General Tutorials 75
• • • •••
Include as little solid foreground areas as possible, but be sure to draw over all
of the unknown regions. Ideally, the unknown region in the trimap should only
cover transparent pixels whose actual values are not completely foreground or
background. In other words, the unknown region in the trimap should be as thin
as possible to achieve the best masking result.
5 Define the area to be cutout by selecting the Paint Foreground brush and the Fill tool.
Using the current brush, the Fill tool fills a region defined by a brush stroke or
the edges of the screen.
6 Click inside the area defined by the blue, unknown brush.
Dfx User Guide • • •••

•
General Tutorials 76
• • • •••
The area inside of the blue, unknown boundary automatically fills in with the
green foreground brush. Using the Fill tool is much easier than drawing the
entire area by hand.
7 Define background areas by using the Paint Background brush and the Fill tool. Since the Fill tool is already enabled, you don’t need to select it again.
8 Click on the background outside of the area defined by the blue, unknown brush.
The background area automatically fills in with the red background brush.
Dfx User Guide • • •••

•
General Tutorials 77
• • • •••
9 Click the Generate Mask icon or press the Enter key.
Once EZ Mask is done processing, the mask will be shown in the mask
thumbnail.
10 Press the M key to view the Mask in the Viewer.
In the Mask, white is foreground, black is background and any gray areas in
between represent a level of transparency.
Note: To quickly toggle off the display of your strokes, click on the layer’s image thumbnail. Click the mask thumbnail to re-display the strokes.
11 If you see gray areas in the foreground object that should be completely white, make additional foreground marks in those areas.
12 If you see gray areas in the background that should be completely black, make additional background marks.
Dfx User Guide • • •••

•
General Tutorials 78
• • • •••
13 If there are areas that should be marked as unknown, make additional marks with the Paint Unknown brush.
14 Click the Generate Mask icon or Enter key again to see how any new foreground, background and unknown strokes affect the mask.
15 Press the M key again to view the full color image.
See EZ Mask for more information.
Applying a Paint Mask to a LayerOrganic masks are created using a paint brush.
1 Apply Dfx to an image.
2 Select a filter and preset that changes the image in an obvious way.
3 Click the Add Mask icon in the Toolbar and select Paint.
Once the Paint mask is selected, the effect of the filter in the Viewer can no
longer be seen until a paint stroke is made.
Dfx User Guide • • •••

•
General Tutorials 79
• • • •••
4 To set the brush size, click on the Brush Size icon in the Toolbar, and drag the slider that appears.
or
5 Resize the brush in the Viewer by holding Ctrl(Win)/Cmd(Mac) and dragging in or out.
The Brush Softness and Opacity can also be adjusted by clicking their
respective icons in the Toolbar.
6 Using the left mouse button, click and drag a portion of the Viewer.
The filter appears only in the area of the paint stroke.
7 To quickly erase a portion of the painted mask, paint with the right mouse button. Alternatively, select a O Brush Opacity and paint with the left mouse button.
Painting with a brush intensity that is a level of gray will apply the filter
proportionate to that brush intensity. White areas in the mask apply the filter at
full intensity while black areas show no filter.
See Paint Mask for more information.
Applying Multiple Masks to a LayerMore than one mask can be applied to a layer.
1 Apply Dfx to an image.
2 Select a filter and preset that changes the image in an obvious way.
Dfx User Guide • • •••

•
General Tutorials 80
• • • •••
3 Click the Add Mask icon in the Toolbar and choose Selection.
4 Click the Add Mask icon again and select Spot.
A Spot mask thumbnail appears to the right of the Selection mask and is
automatically combined with it. View the Mask channel to see the results of the
two masks.
5 Click the Show Mask icon above the Viewer so that you can see the combination of all your masks.
To change how the active mask is combined with the previous mask, use the
Blend modes in the Toolbar.
Photo © THINKSTOCK LLC--www.thinkstock.com
Dfx User Guide • • •••

•
General Tutorials 81
• • • •••
6 Select the Multiply blend mode to see how it affects the way the masks are combined.
7 Click the M shortcut key to switch the Viewer to display the full color image.
When you have multiple masks, the mask with the gray border around it is
considered the active mask and it’s controls are displayed in the Toolbar.
To change the active mask, simply click on the thumbnail of another mask.
Dfx User Guide • • •••

•
General Tutorials 82
• • • •••
Drag and Drop Layers, Filters and Masks
Drag and Drop LayersThe ordering of layers in the Effect window can be changed by dragging and
dropping them to a new location.
1 Apply a filter and create a mask.
2 Click the Add Layer icon and a second filter and mask.
3 An entire layer can be moved to a new location by clicking and dragging on the layer’s title bar to the right of the filter name and releasing the mouse in the new location.
When the mouse button is released, the layer is moved to the new location.
Before After
Dfx User Guide • • •••

•
General Tutorials 83
• • • •••
Drag and Drop Filters and MasksFilters and masks from one layer can be copied to another layer using drag and
drop.
1 Choose a layer that has a filter applied to it.
2 Click and drag on the layer’s image thumbnail and release the mouse on the layer’s thumbnail where you want to copy the filter. When the cursor hovers over the image thumbnail of another layer, the cursor changes to a + sign indicating that it is OK to release the mouse.
When the mouse button is released, the destination filter is replaced with the
source filter.
Before After
Dfx User Guide • • •••

•
General Tutorials 84
• • • •••
3 Click and drag on one of the layer’s mask thumbnails and release the mouse on the layer’s mask thumbnail where you want to copy the mask. When the cursor hovers over the mask thumbnail of another mask, the cursor changes to a + sign indicating that it is OK to release the mouse.
When the mouse button is released, the destination mask is replaced with the
source mask. If you release the mouse over a layer without a mask, the mask
will be added to the layer.
SetupsA Setup takes a snapshot of the filters and parameter settings applied to your
image. Setups can be saved and loaded and are independent of the image they
were originally applied to.
1 Apply a Dfx filter.
Before After
Dfx User Guide • • •••

•
General Tutorials 85
• • • •••
2 Choose a preset and make some parameter adjustments.
3 Add additional filters if you like by clicking the Add Layer icon at the top of the Effect Window and then selecting another filter.
4 Select File > Save Setup.
5 When the file browser opens, enter a name and click Save.
You can now apply this setup to a different image using File > Open Setup.
Dfx User Guide • • •••

•
Filter Tutorials 86
• • • •••
FILTER TUTORIALS
Ambient LightAmbient creates light without a defined source and contributes to the overall
brightness of a scene without casting shadows.
1 Apply Ambient Light from the Light category.
2 Try out some of the presets.
3 If the Parameters window is not showing, click the Parameters tab at the bottom of the Presets window.
4 Adjust the Brightness to set the intensity of the ambient light.
5 To apply a custom light color to the image, click on the Color box and select a color.
6 To apply a colored gel to the light, select one from the GamColor Presets pop-up menu.
7 Click the Done button to apply the filter to your image.
See the Ambient Light filter for more information.
Auto AdjustAutomatically adjusts the image using Auto Color, Auto Contrast and Auto
Levels processes.
1 Apply Auto Adjust from the Color category.
2 Try out the presets.
The only choices in Auto Adjust are Auto Color, Auto Contrast and Auto Levels.
3 If the Parameters window is not showing, click the Parameters tab at the bottom of the Presets window.
Dfx User Guide • • •••

•
Filter Tutorials 87
• • • •••
4 Use the Opacity slider to set the amount of auto adjustment.
See the Auto Adjust filter for more information.
Black and WhiteBlack and White converts color images to black and white simulating the look
of Black and White photographic filters.
1 Apply Black and White from the Color category.
2 Try out some of the presets.
3 If the Parameters window is not showing, click the Parameters tab at the bottom of the Presets window.
4 From the Filter pop-up, select the type of black and white filter to be applied to your color image.
Your choice of filter can dramatically change the black and white result.
5 Use the Brightness, Contrast and Gamma controls to further adjust the image.
6 Click the Done button to apply the filter to your image.
See the Black and White filter for more information.
Bleach BypassBleach Bypass is a film laboratory technique where, by skipping the bleach
stage in the color processing sequence, silver is retained in the image along
with the color dyes. The result is effectively a black and white image
superimposed on a color image. Bleach Bypass images have increased
contrast, reduced saturation, often giving a pastel effect.
1 Apply Bleach Bypass from the Film Lab category.
2 Try out some of the presets.
At the top left of the Presets window, the presets are categorized into various
groups located inside a pop-up menu.
Dfx User Guide • • •••

•
Filter Tutorials 88
• • • •••
3 In the Presets window, choose a new preset group from the pop-up menu to see a different set of filter presets.
4 If the Parameters window is not showing, click the Parameters tab at the bottom of the Presets window.
5 Use the Amount slider to control the strength of the Bleach Bypass filter.
6 Saturation, Contrast and Temperature sliders are provided for additional enhancement.
7 Click the Done button to apply the filter to your image.
See the Bleach Bypass filter for more information.
BlurBlurs the image with individual horizontal and vertical controls. It’s fast, high
quality and blurs outside the frame which removes the dark inward bleeding
edges of most blurs.
1 Apply Blur from the Lens category.
2 If the Parameters window is not showing, click the Parameters tab at the bottom of the Presets window.
3 Adjust the Blur-Horizontal slider.
Since Gang is activated by default, the Blur-Vertical amount will match the
Horizontal value.
4 Un-click the Gang and now the Horizontal and Vertical sliders can be moved independently.
5 Set the Position of the blur if you’d like.
By default, the Position is set to Centered, where the image is equally blurred
inward and outward. You can also set the Position to Inner or Outer. Inner and
Outer are good for shrinking or growing mattes.
Dfx User Guide • • •••

•
Filter Tutorials 89
• • • •••
6 Click the Done button to apply the filter to your image.
See the Blur filter for more information.
BordersSelect from a variety of different pre-made borders or create your own.
1 Apply Borders from the Special Effects category.
2 Try out some of the presets.
At the top left of the Presets window, the presets are categorized into various
groups located inside a pop-up menu.
3 In the Presets window, choose a new preset group from the pop-up menu to see a different set of filter presets.
4 If the Parameters window is not showing, click the Parameters tab at the bottom of the Presets window.
5 If you selected one of the pre-made Border 1-11 presets, you can adjust the Orientation, Invert state, Softness, Roughness and Randomization of the edge.
Variable colored, softened borders can also be created using Border > Type >
Custom.
6 Select Border > Type > Custom. You can then adjust the Size, Color, Softness, Roughness and Randomization of the edge.
7 To adjust the image within the border, click and drag the center image point to the desired location.
8 You can also use the DVE > Scale and Rotate controls to transform the image within the border.
9 Click the Done button to apply the filter to your image.
See the Borders filter for more information.
Dfx User Guide • • •••

•
Filter Tutorials 90
• • • •••
CartoonConverts the image into a cartoon.
1 Apply Cartoon from the Special Effects category.
2 Select the Magnifier tool in the Viewer.
When the Magnifier is selected, a portion of the image is displayed at a 1:1 pixel
ratio in the Magnifier window and shows the actual pixels of the image with the
Cartoon filter applied. The Magnifier will accurately represent what the Cartoon
filter will look like when applied to the full size image.
3 Try out some of the presets.
4 If the Parameters window is not showing, click the Parameters tab at the bottom of the Presets window.
5 Adjust the Amount to the desired level.
6 Set the Detail. Increasing the value shows more detail while decreasing the value shows less detail.
7 Adjust the Line control to set the amount of outlining.
8 Click the Done button to apply the filter to your image.
See the Cartoon filter for more information.
Center Spot / Warm Center SpotCenter Spot diffuses and blurs distracting backgrounds while keeping a center
spot in focus. The center spot can be moved, sized and the amount of blur can
be controlled. Warm Center Spot combines the benefits of Center Spot with a
warming filter making it ideal for portraits and skintones.
1 Apply Center Spot from the HFX Diffusion category.
2 Try out some of the presets.
Dfx User Guide • • •••

•
Filter Tutorials 91
• • • •••
At the top left of the Presets window, the presets are categorized into various
groups located inside a pop-up menu.
3 In the Presets window, choose a new preset group from the pop-up menu to see a different set of filter presets.
4 If the Parameters window is not showing, click the Parameters tab at the bottom of the Presets window.
5 Adjust the Spot > Position by clicking and dragging the center image point to the desired location.
6 Set the Radius, Falloff Radius and Falloff.
The area covered by the spot will be in focus with all other areas blurred.
7 If you are curious, you can see what the Spot looks like by changing your View to Spot. Change your View to Output when done.
8 Adjust the Horizontal and Vertical Blur to your liking.
9 If you applied a Warm Center Spot preset, adjust the Temperature > Color and Opacity sliders to your liking.
10 Click the Done button to apply the filter to your image.
See the Center Spot / Warm Center Spot filters for more information.
Chromatic AberrationChromatic aberration is caused by a lens having a different refractive index for
different wavelengths of light and is seen as fringes of color around the edges
of the image. This fringing is removed by un-distorting the individual color
channels.
1 Apply Chromatic Aberration from the Lens category.
2 Select the Magnifier tool in the Viewer.
Dfx User Guide • • •••

•
Filter Tutorials 92
• • • •••
When the Magnifier is selected, a portion of the image is displayed at a 1:1 pixel
ratio in the Magnifier window and shows the actual pixels of the image with the
Chromatic Aberration filter applied. The Magnifier will accurately represent
what the Chromatic Aberration filter will look like when applied to the full size
image.
Note: The Magnifier zoom controls are disabled in Chromatic Aberration for performance reasons.
3 Look at the edges of the image and determine if the chromatic aberration is red/cyan, green/magenta, or blue/yellow.
4 Start by adjusting the Distortion parameter for the particular color fringing that you are trying to remove. For instance, if you see red/cyan fringing, adjust the Distortion slider in the Red/Cyan group.
If you are using anamorphic motion picture lenses or are experiencing non-
radial, asymmetric fringing, you may need to adjust the Anamorphic Squeeze
and Curvature X/Y parameters.
5 Click the Done button to apply the filter to your image.
Note: Chromatic Aberration must be applied as the first layer (bottom of the layer stack) when multiple layers are used. Otherwise, all filters below will not be rendered.
See the Chromatic Aberration filter for more information.
Close-Up LensSimulates close-up lenses that allow you to zoom in extra close using high
quality digital filtering.
1 Apply Close-Up Lens from the Lens category.
2 Adjust Scale X to zoom into the center of the image.
By default, the Scale X and Scale Y sliders are ganged together so the image
is proportionately scaled when Scale X is used.
3 To select a different portion of the image to zoom in on, click and drag the center image point.
4 You can also use the Rotate slider if needed.
Dfx User Guide • • •••

•
Filter Tutorials 93
• • • •••
5 Click the Done button to apply the filter to your image.
Note: Close-Up Lens must be applied as the first layer (bottom of the layer stack) when multiple layers are used. Otherwise, all filters below will not be rendered.
See the Close-Up Lens filter for more information.
Color CorrectorsDfx includes a number of different color correctors that are handy for adjusting
an image’s color. They include: Color Correct, F-Stop, Printer Points, Telecine
and Temperature.
1 Apply Color Correct, F-Stop, Printer Points, Telecine or Temperature from the Color category.
2 Adjust any of the controls in the Master group.
The master settings affect the entire image. However, you can also use mattes
in the shadow, midtone and highlight regions to adjust the color selectively in
those areas.
Note: Lift, Gamma and Gain in the Telecine filter are the same as Shadows, Midtones and Highlights.
3 Change your View to Shadows, Midtones or Highlights to see the matte values.
The areas that are white in the matte are the areas that will be adjusted by the
color controls. The areas defined as shadows, midtones or highlights can be
adjusted by modifying the Position and Range parameters.
4 Use the Shadows, Midtones or Highlights Position parameters if you want to select different values for the adjustment.
5 Increase the Shadows, Midtones or Highlights Range controls to add more values to the adjustment. Decrease for less values.
6 Change your View to Output to see the image.
7 Adjust the color controls in the Shadows, Midtone or Highlight controls to see how it affects your image.
Dfx User Guide • • •••

•
Filter Tutorials 94
• • • •••
8 Click the Done button to apply the filter to your image.
See the Color Correctors for more information.
Color-Grad®Color-Grad® can transform an average sunrise or sunset into something
spectacular or convert a dull, washed-out sky to a breathtaking blue. Add color
selectively while leaving the rest of the scene unaffected by using a graduated
transition between the colored portion and the original image.
1 Apply Color-Grad® from the HFX Grads/Tints category.
2 Try out some of the presets.
3 If the Parameters window is not showing, click the Parameters tab at the bottom of the Presets window.
4 Adjust the Grad > Type, Corner Points, Size and Angle.
To adjust the Corner Points, just click and drag them to the desired location.
Note: On some host programs, you must highlight the effect title in the Effect Controls window to see the on-screen controls.
Go to the Grad section of Common Filter Controls to see how the Grad controls
work.
5 If you are curious, you can see what the Grad looks like by changing your View to Grad. Change your View to Output when done.
The white area of the Grad will be tinted.
6 If you want less coloring of the image, turn down the Filters > Opacity.
7 Image highlights can be retained by adjusting the Filters > Preserve Highlights control to a value of 100.
8 Click the Done button to apply the filter to your image.
See the Color-Grad® filter for more information.
Dfx User Guide • • •••

•
Filter Tutorials 95
• • • •••
Color InfraredColor Infrared simulates infrared filters used in conjunction with infrared
sensitive film or sensors to produce very interesting false-color images with a
dreamlike or sometimes lurid appearance.
1 Apply Color Infrared from the Special Effects category.
2 Try out some of the presets.
3 If the Parameters window is not showing, click the Parameters tab at the bottom of the Presets window.
4 Adjust the Magenta and Blue sliders to your liking.
5 Changing the Hue will only adjust hue in non-blue areas.
Color Infrared images usually have high contrast.
6 Lower the Contrast setting if it is too high for your image.
7 Click the Done button to apply the filter to your image.
See the Color Infrared filter for more information.
Colorize Gradient1 Apply Colorize Gradient from the HFX Grads/Tins category.
2 Try out some of the presets.
3 If the Parameters window is not showing, click the Parameters tab at the bottom of the Presets window.
4 Choose your color by clicking on the Shadows, Midtones or Highlights > Color boxes and selecting a color.
5 Adjusting the Shadows, Midtones or Highlights > Position slider will set where the colors are applied to the image.
6 If you want less coloring of the image, turn down Opacity.
Dfx User Guide • • •••

•
Filter Tutorials 96
• • • •••
You can also use a gradient to control where the colorization is applied.
7 To use a gradient, click on Grad > Enable.
8 Adjust the Grad > Type, Corner Points, Size and Angle.
To adjust the Corner Points, just click and drag them to the desired location.
Note: On some host programs, you must highlight the effect title in the Effect Controls window to see the on-screen controls.
Go to the Grad section of Common Filter Controls to see how the Grad controls
work.
9 If you are curious, you can see what the Grad looks like by changing your View to Grad. Change your View to Output when done.
Go to the Colorize Gradient filter for more information.
Color ShadowCreates a high contrast image overlayed with a gradient.
1 Apply Color Shadow from the Special Effects category.
2 Try out some of the presets.
3 If the Parameters window is not showing, click the Parameters tab at the bottom of the Presets window.
4 Adjust the Threshold to obtain the desired amount of image detail.
The color gradient can be adjusted to your specific image.
5 Adjust the Grad > Direction, Corner Points and Size to position and adjust the grad.
To adjust the Corner Points, just click and drag them to the desired location.
Go to the Grad section of Common Filter Controls to see how the Grad controls
work.
6 To change the background or gradient colors, click on the Background Color, Color 1 or Color 2 > Color boxes and select a color.
Color 1 sets the top of the gradient and Color 2 sets the bottom of the gradient.
Dfx User Guide • • •••

•
Filter Tutorials 97
• • • •••
7 Click the Done button to apply the filter to your image.
See the Color Shadow filter for more information.
Color SpotTints the image using presets for common photographic filters except for a
center spot which retains normal color. The center spot can be moved, sized
and the amount of blur can be controlled.
1 Apply Color Spot from the HFX Grads/Tints category.
2 Try out some of the presets.
3 If the Parameters window is not showing, click the Parameters tab at the bottom of the Presets window.
4 Adjust the Spot > Position by clicking and dragging the center image point to the desired location.
5 Set the Spot > Radius, Falloff Radius and Falloff.
6 If you are curious, you can see what the Spot looks like by changing your View to Spot. Change your View to Output when done.
The white area of the spot will be tinted.
7 If you want less coloring of the image, turn down the Color > Opacity.
8 Image highlights can be retained by adjusting the Color > Preserve Highlights control to a value of 100.
9 Click the Done button to apply the filter to your image.
See the Color Spot filter for more information.
Dfx User Guide • • •••

•
Filter Tutorials 98
• • • •••
Cross ProcessingCross-processing is a photographic technique where print film (C41) is
processed in the set of chemicals usually used to process slide film (E6) or vice
versa. The final result yields images with oddly skewed colors and increased
contrast and saturation. Different film stocks produce different results, so we
have created what we feel is a representative look.
1 Apply Cross Processing from the Film Lab category.
2 Try out some of the presets.
At the top left of the Presets window, the presets are categorized into various
groups located inside a pop-up menu.
3 In the Presets window, choose a new preset group from the pop-up menu to see a different set of filter presets.
4 If the Parameters window is not showing, click the Parameters tab at the bottom of the Presets window.
5 Use the Amount slider to control the strength of the Cross Processing filter.
6 Switch the Mode to Slide to Print.
Both Print to Slide and Slide to Print modes are available.
7 Click the Done button to apply the filter to your image.
See the Cross Processing filter for more information.
Dfx User Guide • • •••

•
Filter Tutorials 99
• • • •••
CurvesCurves adjusts the entire tonal range of an image by changing the shape of
RGB, Red, Green or Blue curves. Curve points can be adjusted throughout the
range of shadows to highlights.
1 Apply Curves from the Color category.
2 Select RGB, Red, Green or Blue from the Curve Type pop-up menu. You can also click directly on an existing curve in the graph to select it.
Adding and deleting points from the curve is quick and easy.
3 Click directly on the curve to add a new point. Up to five points can be added.
4 Delete points by clicking and dragging them to the edge of the graph.
5 Move points by clicking and dragging them.
Adjust curve points to achieve a specific result.
Adjust Black
Adjust White
Adjust Gray
Curve Type
Dfx User Guide • • •••

•
Filter Tutorials 100
• • • •••
6 Move a point in the top portion of the curve to adjust the shadows.
7 Move a point in the center of the curve to adjust the midtones.
8 Move a point in the top portion of the curve to adjust the highlights.
9 Move the curve upward or downward to lighten or darken the image. The steeper sections of the curve represent areas of higher contrast; flatter sections represent areas of lower contrast.
10 To darken highlights, move a point near the top of the curve downward. Moving a point either down or to the right maps the input value to a lower output value, and the image darkens.
11 To lighten the shadows, move a point near the bottom of the curve upward. Moving a point either up or to the left maps a lower input value to a higher output value, and the image lightens.
12 Use the RGB, Red, Green and Blue sliders to globally adjust the curves.
13 Click the Done button to apply the filter to your image.
See the Curves filter for more information.
Day for NightDay for Night simulates a technique used for shooting exteriors in daylight
made to look like they were photographed at night.
1 Apply Day for Night from the Special Effects category.
Day for Night uses a type of diffusion that grows darks areas into bright areas.
2 Try out some of the presets.
3 If the Parameters window is not showing, click the Parameters tab at the bottom of the Presets window.
4 Adjust the Diffusion > Blur and Opacity parameters to your liking.
The Day for Night effect relies on a blue tint to simulate moonlight. You can
modify the color of the tint as well as its intensity using the Moonlight controls.
5 Use the Moonlight controls to adjust the tint applied to the image.
Dfx User Guide • • •••

•
Filter Tutorials 101
• • • •••
Photographically the image is underexposed by two stops or so. We duplicate
the underexposure by using a combination of color correction controls. Modify
the color correct presets brighter or darker depending on your image.
6 Change the Color Correct settings if necessary.
7 Click the Done button to apply the filter to your image.
See the Day for Night filter for more information.
DefogUsing advanced deweathering algorithms, Defog restores clear day contrasts
and colors of a scene taken in bad weather such as fog and mist. It is also
successful in removing the effects of optical Fog and Diffusion filters.
1 Apply Defog from the Special Effects category.
2 Try out some of the presets.
3 If the Parameters window is not showing, click the Parameters tab at the bottom of the Presets window.
4 Click on the Defog > Color picker and click on an area of fog.
This sets the color of the fog to be removed.
5 Adjust the Defog > Defog parameter to remove more fog or mist.
The fog is removed in a radial pattern emanating from the vanishing point. For
instance, if your fog moves in the direction of top right to bottom left, set your
vanishing point towards the top right corner and the fog removal will be more
intense at the upper right and fall off at the bottom left. However, in most cases,
the vanishing point can be left in the center of the screen and you will obtain
acceptable results.
6 If needed, move the Vanishing Point to a new location by clicking and dragging the on-screen control in the center of the screen.
Dfx User Guide • • •••

•
Filter Tutorials 102
• • • •••
If the defogging operation causes the shadow areas to become too contrasty,
adjust the Min Depth slider to a lower value. This will bring back some shadow
detail.
7 Lower the Min Depth value if you have lost to much detail in the shadow portions of the image.
8 Click the Done button to apply the filter to your image.
See the Defog filter for more information.
DeFringePurple or blue fringing around overexposed areas is a result of sensor
overloading in video as well as digital still cameras. DeFringe isolates and
removes the various types of color fringing.
1 Apply DeFringe from the Lens category.
Determine the color of the fringing that you would like to remove. Let’s say that
you have purple fringing in the highlight areas of your image.
2 If the Parameters window is not showing, click the Parameters tab at the bottom of the Presets window.
3 Go to the Magenta parameter group.
4 Move the Magenta slider to the right until the purple fringing is gone.
5 If the purple fringing is not being removed when the Magenta slider is adjusted, you may need to adjust the Position slider.
6 Change your View to Magenta to see the matte values.
The areas that are white in the matte are the areas that will be defringed.
7 Change your View back to Output.
8 Move the Position slider to the right or left until you see the fringing go away.
This may be necessary if your purple fringing is not the same hue of what we
consider to be magenta.
Dfx User Guide • • •••

•
Filter Tutorials 103
• • • •••
9 If there is still some magenta left, you may want to increase the value of the Range slider to include more values considered as magenta.
10 Click the Done button to apply the filter to your image.
See the DeFringe filter for more information.
Depth of FieldDepth of Field can be added to a scene by isolating and blurring only a portion
of the image. The amount of blurring is directly proportionate to the luminance
of the depth source.
1 Apply Depth of Field from the Lens category.
2 Try out some of the presets.
3 If the Parameters window is not showing, click the Parameters tab at the bottom of the Presets window.
4 Set the Depth > Depth to Matte.
5 Adjust the Blur sliders to your liking.
In some of the filters, a matte is generated to create the desired effect--in this
case, depth of field.
6 Change your View to Depth to see the matte values.
The areas that are white in the matte are the areas where blur will be
introduced. The location of the blur within the scene can be adjusted by
modifying the Matte > Position and Range parameters.
7 Change the Matte > Position parameter if you want to select different values to be used for the matte.
8 Increase the Matte > Range control to add more values to the matte. Decrease for less values.
9 Increase the Matte > Blur parameter to soften the transition areas of the matte.
10 Change your View to Output to see the filtered image.
Dfx User Guide • • •••

•
Filter Tutorials 104
• • • •••
The Depth of Field filter can also use a grad or an image as the depth source
instead of the matte.
11 Set the Depth to Grad.
12 Adjust the Grad > Type, Corner Points, Size and Angle.
To adjust the Corner Points, just click and drag them to the desired location.
Note: On some host programs, you must highlight the effect title in the Effect Controls window to see the on-screen controls.
Go to the Grad section of Common Filter Controls to see how the Grad controls
work.
13 To use an image as the depth source:
• Change Depth > Depth to Input.
• Click the Depth > Input > Browse button.
• Select a file.
14 Click the Done button to apply the filter to your image.
See the Depth of Field filter for more information.
DetailDetail presents a new technique for performing selective sharpening, detail
enhancement and edge aware smoothing.
1 Apply Detail from the Image category.
2 Select the Magnifier tool in the Viewer.
When the Magnifier is selected, a portion of the image is displayed at a 1:1 pixel
ratio in the Magnifier window and shows the actual pixels of the image with the
Detail filter applied. The Magnifier will accurately represent what the Detail filter
will look like when applied to the full size image.
3 Try out some of the presets.
Dfx User Guide • • •••

•
Filter Tutorials 105
• • • •••
At the top left of the Presets window, the presets are categorized into various
groups located inside a pop-up menu.
4 In the Presets window, choose a new preset group from the pop-up menu to see a different set of filter presets.
5 If the Parameters window is not showing, click the Parameters tab at the bottom of the Presets window.
6 To sharpen or enhance detail, increase the values of the Detail > Coarse, Medium and Fine controls. Increasing the values sharpens/enhances detail while decreasing the values smooths/decreases detail.
7 Enable Detail > Gang to move all sliders at once.
If there are unwanted areas of the image that are being affected, you can
optionally use a matte to isolate the effect.
8 Activate Matte > Enable.
9 Change your View to Matte to see the matte values.
The idea here is to generate a matte that isolates the areas of the image that
will be affected. The white areas of the matte are the areas that will be modified
by the Detail controls. The matte has been preset to a highlight luminance
matte, but this can be easily changed.
10 Select the appropriate Matte > Extract On option for your image.
11 If needed, change the Matte > Position parameter so that the image areas you are trying to smooth are as white as possible in the matte.
12 Adjust the Matte > Range value so that the white values of the matte are limited as much as possible to the image areas that you are trying to isolate.
13 Increase the Matte > Blur parameter if you want to soften the transition areas of the matte.
14 Change your View to Output to see the filtered image.
15 Click the Done button to apply the filter to your image.
See the Detail filter for more information.
Dfx User Guide • • •••

•
Filter Tutorials 106
• • • •••
DiffusionDiffusion creates atmosphere by reducing contrast while creating a glow
around highlights or shadows using an extensive texture library.
1 Apply Diffusion from the HFX Diffusion category.
2 Try out some of the presets.
Each preset uses a different texture to create the diffusion effect.
3 If the Parameters window is not showing, click the Parameters tab at the bottom of the Presets window.
4 Adjust the Diffusion > Brightness parameter to control the amount of diffusion added to the image.
You can either use the texture by itself or combine it with a matte using one of
the Texture > Blend modes. The areas that are white in the matte are the areas
where diffusion will be introduced.
5 Combine the texture with a matte by changing Texture > Blend from Texture Only to Multiply.
I like the Multiply blend mode because it only adds the texture in the areas of
the matte.
6 Change your View to Matte to see the matte values.
The areas that are white in the matte are the areas where diffusion will be
introduced. The location of the diffusion within the scene can be adjusted by
modifying the Matte > Position and Range parameters.
7 Change the Matte > Position parameter if you want to add diffusion to different areas of the image.
8 Adjust the Matte > Range slider to increase or decrease the image areas affected by the diffusion.
9 Change your View to Output to see the filtered image.
10 Adjust the position of the texture by clicking and dragging the center image point to the desired location.
11 You can also use the Texture > DVE controls to transform the texture.
12 Adjust the Diffusion > Brightness, Blur and Color of the diffusion to your liking.
Dfx User Guide • • •••

•
Filter Tutorials 107
• • • •••
13 Click the Done button to apply the filter to your image.
See the Diffusion filter for more information.
Diffusion/FX®Black Diffusion/FX® gives a silky-smooth look to textured surfaces, suppresses
facial blemishes and wrinkles, while maintaining a clear, focused image.
Creates a diffused image that doesn't look like it's been shot through a filter.
Gold Diffusion/FX® infuses special warmth by adding a soft, golden tint to
shadows.
1 Apply Diffusion/FX® from the HFX Diffusion category.
2 Select the Magnifier tool in the Viewer.
When the Magnifier is selected, a portion of the image is displayed at a 1:1 pixel
ratio in the Magnifier window and shows the actual pixels of the image with the
Diffusion/FX® filter applied. The Magnifier will accurately represent what the
Diffusion/FX® filter will look like when applied to the full size image.
3 Try out some of the presets.
At the top left of the Presets window, the presets are categorized into various
groups located inside a pop-up menu.
4 In the Presets window, choose a new preset group from the pop-up menu to see a different set of filter presets.
5 If the Parameters window is not showing, click the Parameters tab at the bottom of the Presets window.
6 Adjust Detail > Smoothing to smooth out fine detail.
Dfx User Guide • • •••

•
Filter Tutorials 108
• • • •••
Smoothing uses an edge aware smoothing algorithm to minimize fine image
detail so that areas with courser detail are unaffected. However, if there are
unwanted areas of the image that are being affected, you can optionally use a
matte to isolate the effect.
7 Activate Matte > Enable.
8 Change your View to Matte to see the matte values.
The idea here is to generate a matte that isolates the areas of the image that
need to be smoothed. For instance, you might be trying to isolate and smooth
the skin on a person’s face. The white areas of the matte are the areas that will
be smoothed. The matte has been preset to a highlight luminance matte, but
this can be easily changed.
9 Select the appropriate Matte > Extract On option for your image.
10 If needed, change the Matte > Position parameter so that the image areas you are trying to smooth are as white as possible in the matte.
11 Adjust the Matte > Range value so that the white values of the matte are limited as much as possible to the image areas that you are trying to isolate.
12 Increase the Matte > Blur parameter if you want to soften the transition areas of the matte.
13 Change your View to Output to see the filtered image.
14 If you applied a Gold Diffusion/FX® preset, adjust the Temperature controls to your liking.
15 Click the Done button to apply the filter to your image.
See the Diffusion/FX® filters for more information.
Double FogThe Double Fog filter creates a soft, misty atmosphere over the image by first
applying fog using a vanishing point along the direction of increasing distance
in the image. Then, a second pass blooms image highlights.
1 Apply Double Fog from the Diffusion category.
2 Try out some of the presets.
Dfx User Guide • • •••

•
Filter Tutorials 109
• • • •••
3 If the Parameters window is not showing, click the Parameters tab at the bottom of the Presets window.
4 Click on the Fog > Color parameter to set the color of the fog.
This sets the color of the fog to be added.
5 Adjust the Fog > Fog parameter to control how much overall fog is added to the image.
The fog is added in a radial pattern emanating from the vanishing point. For
instance, if want your fog to move in the direction of top right to bottom left, set
your vanishing point towards the top right corner and the fog will be more
intense at the upper right and fall off at the bottom left. However, in most cases,
the vanishing point can be left in the center of the screen and you will obtain
acceptable results.
6 If needed, move the Vanishing Point to a new location by clicking and dragging the on-screen control in the center of the screen.
You can limit where the fog is added to your image by using the Min/Max Depth
sliders. Min Depth controls how much fog is added in the darker areas of the
image, while Max Depth controls how much fog is added in the brighter areas
of the image.
7 Change the Min/Max Depth values if you want to control how fog is added in the shadow and highlight areas of the image.
Secondary fogging effects can be achieved using the Glow parameters. A
portion of the screen is isolated with a matte, and based on this matte,
additional fog and glow can be added.
8 Adjust the Glow > Brightness, Blur and Color settings to your liking.
In some of the filters, a matte is generated to create the desired effect--in this
case, highlight glow.
9 Change your View to Matte to see the matte values.
Dfx User Guide • • •••

•
Filter Tutorials 110
• • • •••
The areas that are white in the matte are the areas where glow will be
introduced. For instance, If you want to put glow around bright lights, make sure
that the light sources appear as white in the matte. The location and amount of
the additional glow within the scene can be adjusted by modifying the Matte >
Position and Range parameters.
10 Change the Matte > Position parameter if you want to select different luminance values to be used for the matte.
11 Increase the Matte > Range value to add more glow into the scene. Decrease for less glow.
12 Increase the Matte > Blur parameter to soften the transition areas of the matte.
13 Change your View to Output to see the filtered image.
14 To create Glow effects around highlights such as bright lights, change your Glow > Blend parameter to Add and make sure that your matte includes only the light sources.
15 Click the Done button to apply the filter to your image.
See the Double Fog filter for more information.
Dual GradDual Grad applies two photographic filters to the image which are blended
together with a gradient.
1 Apply Dual Grad from the HFX Grads/Tints category.
2 Try out some of the presets.
3 If the Parameters window is not showing, click the Parameters tab at the bottom of the Presets window.
The color gradient can be adjusted to your specific image.
4 Adjust the Grad > Direction, Corner Points and Size to position and adjust the grad.
To adjust the Corner Points, just click and drag them to the desired location.
Dfx User Guide • • •••

•
Filter Tutorials 111
• • • •••
Go to the Grad section of Common Filter Controls to see how the Grad controls
work.
5 To set the Dual Grad colors, click on the Color 1 or Color 2 > Color boxes and select a color.
6 If you want less coloring of the image, turn down the Color 1 or Color 2 > Opacity.
7 Image highlights can be retained by adjusting the Preserve Highlights control to a value of 100.
8 Change your View to Grad to see the color gradient being applied to the image.
9 Change your View back to Output to see the filtered image.
10 Click the Done button to apply the filter to your image.
See the Dual Grad filter for more information.
Edge GlowEdge Glow isolates lines and edges in an image and then adds glow only to
these areas resulting in a stylized look.
1 Apply the Edge Glow filter from the Light category.
2 Try out some of the presets.
3 If the Parameters window is not showing, click the Parameters tab at the bottom of the Presets window.
4 Select either the Add or Screen Blend mode. Add will burn out highlights while the Screen mode will retain them.
5 Adjust the Glow > Brightness, Blur and Color settings to your liking.
In Edge Glow, an edge matte is generated to create the desired effect.
6 Change your View to Edge to see the matte values.
The areas that are white in the edge matte are the areas where glow will be
introduced.
Dfx User Guide • • •••

•
Filter Tutorials 112
• • • •••
7 Adjust the Edge > Brightness to make sure that you have sufficient white areas in the edge matte.
8 Set the Edge > Blur to smooth out the edge matte.
9 Change your View to Output to see the filtered image.
10 Click the Done button to apply the filter to your image.
See the Edge Glow filter for more information.
EnhancingMakes reds, rust browns and oranges pop, with minimal effect on other colors.
Perfect for fall foliage, earthtone rock formations, architecture, woodwork,
faded rustic barns and any photos where red, brown and orange subjects
should be enriched or appear more intense. In addition, the green or blue areas
of the image can be isolated and enhanced with minimal effect on other colors.
1 Apply the Enhancing filter from the Color category.
2 Try out some of the presets.
At the top left of the Presets window, the presets are categorized into various
groups located inside a pop-up menu.
3 In the Presets window, choose a new preset group from the pop-up menu to see a different set of filter presets.
4 If the Parameters window is not showing, click the Parameters tab at the bottom of the Presets window.
5 Adjust the Enhancing slider to make the red, orange and brown values pop.
In some of the filters, a matte is generated to create the desired effect--in this
case, the enhancement effect. By default, the Matte > Hue is preset to red
values.
6 Change your View to Matte to see the matte values.
Dfx User Guide • • •••

•
Filter Tutorials 113
• • • •••
The areas that are white in the matte are the red, orange and brown areas of
the image that will be enhanced. The enhancement effect within the scene can
be adjusted by modifying the Matte > Hue and Range parameters.
7 Choose another Matte > Preset or change the Matte > Hue parameter if you want to add enhancement to different areas of the image.
8 Adjust the Matte > Range slider to increase or decrease the areas affected by the enhancement.
9 Change your View to Output to see the image.
10 Click the Done button to apply the filter to your image.
See the Enhancing filter for more information.
Eye LightCreates a targeted light to be placed around a person's eyes.
1 Apply Eye Light from the Light category.
2 Adjust the position of the eye light by clicking and dragging the center image point to the desired location.
3 You can also use the DVE controls to transform the eye light.
4 Select either the Light > Blend > Add or Screen Blend mode.
Add will burn out highlights while the Screen Mode will retain them.
5 Adjust the Light > Brightness to set the intensity of the light.
Note: You can darken the entire image except for the eye light shape by adjusting the Shadow > Brightness.
6 Use the Light > Blur sliders to control the softness of the light.
7 To apply a custom light color to the image, click on the Color box and select a color.
8 To apply a colored gel to the light, select one from the Gamcolor Presets pop-up menu.
Dfx User Guide • • •••

•
Filter Tutorials 114
• • • •••
9 Click the Done button to apply the filter to your image.
See the Eye Light filter for more information.
Film StocksFilm Stocks is a unique filter that simulates a 113 different color and black and
white photographic film stocks.
1 Apply Film Stocks from the Film Lab category.
2 Try out some of the presets.
At the top left of the Presets window, the film stocks are categorized into various
groups located inside a pop-up menu.
3 In the Presets window, choose a new preset group from the pop-up menu to see a different set of film stock presets.
4 If the Parameters window is not showing, click the Parameters tab at the bottom of the Presets window.
Each preset sets a combination of the various parameters to achieve the
desired effect, but only the parameters that are necessary. You can modify the
existing settings including adjusting those controls that were not previously set.
5 Use the Amount slider to set the amount of the selected preset. The Amount mixes between the full effect of the preset and the original image.
To mimic the characteristics of a particular film stock, a combination of settings
for the RGB channels have been set to form a film response curve.
6 Change the Film Response > RGB, R, G and B sliders. They will minimize or accentuate the pre-configured film response curve.
Note: If you are using a black and white preset, the grayscale film response curve is adjusted using RGB.
7 Adjust any of the Black and White, Color Correct, Filter, Sharpen, Diffusion, Vignette or Grain settings to your liking.
Dfx User Guide • • •••

•
Filter Tutorials 115
• • • •••
In the Dfx interface, you can use Film Response > Curves to adjust the entire
tonal range of an image by changing the shape of the curve. The Curves
adjustment lets you adjust points throughout the tonal range of an image (from
shadows to highlights).
8 Select RGB, Red, Green or Blue from the Curve Type pop-up menu. You can also click directly on an existing curve in the graph to select it.
Adding and deleting points from the curve is quick and easy.
9 Click directly on the curve to add a new point. Up to five points can be added.
10 Delete points by clicking and dragging them to the edge of the graph.
11 Move points by clicking and dragging them.
Adjust curve points to achieve a specific result.
12 Move a point in the top portion of the curve to adjust the shadows.
13 Move a point in the center of the curve to adjust the midtones.
14 Move a point in the top portion of the curve to adjust the highlights.
Adjust Black
Adjust White
Adjust Gray
Curve Type
Dfx User Guide • • •••

•
Filter Tutorials 116
• • • •••
15 Move the curve upward or downward to lighten or darken the image. The steeper sections of the curve represent areas of higher contrast; flatter sections represent areas of lower contrast.
16 To darken highlights, move a point near the top of the curve downward. Moving a point either down or to the right maps the input value to a lower output value, and the image darkens.
17 To lighten the shadows, move a point near the bottom of the curve upward. Moving a point either up or to the left maps a lower input value to a higher output value, and the image lightens.
18 Click the Done button to apply the filter to your image.
See the Film Stocks filter for more information.
FlashingFlashing allows you to use photographic filters to lower the contrast of your
shadows or highlights. The motion picture lab can expose a small amount of
light to the film at various stages of the developing and printing process. For
example, Negative plus Dupe Negative flashing lifts blacks, while Print plus
Master Positive flashing softens whites.
1 Apply Flashing from the Film Lab category.
2 Try out some of the presets.
At the top left of the Presets window, the presets are categorized into various
groups located inside a pop-up menu.
3 In the Presets window, choose a new preset group from the pop-up menu to see a different set of filter presets.
4 If the Parameters window is not showing, click the Parameters tab at the bottom of the Presets window.
5 Adjust the Shadows > Brightness slider to brighten shadow areas.
6 Adjust the Highlights > Brightness slider to darken highlight areas.
Dfx User Guide • • •••

•
Filter Tutorials 117
• • • •••
7 To flash the Shadows or Highlights with a custom color, click on the Shadows or Highlights > Color box and select a color.
8 To choose one of the preset filters, select a filter from the Shadows or Highlights > Presets list.
9 Once colors have been chosen, adjust the Shadows or Highlights > Brightness sliders to set the amount of color added to either the Shadows or Highlights.
10 Change your View to Shadows or Highlights to see the matte values.
In some of the filters, a matte is generated to create the desired effect--in this
case, flashing. The areas that are white in the matte are the areas that will be
adjusted by either the Shadows or Highlights sliders. The areas defined as
Shadows or Highlights can be adjusted by modifying the Position and Range
parameters.
11 Use the Shadows or Highlights Position parameters if you want to select different values to be used for the matte.
12 Increase the Shadows or Highlights Range controls to add more values to the matte. Decrease for less values.
13 Change your View to Output to see the image.
14 Click the Done button to apply the filter to your image.
See the Flashing filter for more information.
FL-B/D®Provides correct color, removing the harsh green cast caused by fluorescent
bulbs.
1 Apply Fluorescent from the Color category.
2 Try out some of the presets.
3 If the Parameters window is not showing, click the Parameters tab at the bottom of the Presets window.
4 Adjust the Temperature slider as needed.
Dfx User Guide • • •••

•
Filter Tutorials 118
• • • •••
5 Click the Done button to apply the filter to your image.
See the FL-B/D® filter for more information.
Flag / DotFlags and Dots are rectangular and circular lighting control devices used to
create shadow areas on a motion picture or photographic set. This concept has
been extended to digital so that areas of the image can be selectively
darkened.
1 Apply Flag or Dot from the Light category.
2 Adjust the position of the flag or dot by clicking and dragging the center image point to the desired location.
3 You can also use the DVE controls to transform the flag or dot.
4 Adjust the Flag or Dot > Brightness to set the intensity.
5 Use the Flag or Dot > Blur sliders to control the softness.
6 Click the Done button to apply the filter to your image.
See the Flag and Dot filters for more information.
FogThe Fog filter creates a soft, misty atmosphere over the image and glows
highlights.
1 Apply Fog from the Diffusion category.
2 Try out some of the presets.
3 If the Parameters window is not showing, click the Parameters tab at the bottom of the Presets window.
4 Adjust the Fog > Brightness, Blur and Color settings to your liking.
Dfx User Guide • • •••

•
Filter Tutorials 119
• • • •••
In some of the filters, a matte is generated to create the desired effect--in this
case, fog.
5 Change your View to Matte to see the matte values.
The areas that are white in the matte are the areas where fog will be introduced.
The location of the fog within the scene can be adjusted by modifying the Matte
> Position and Range parameters.
6 Change the Matte > Position parameter if you want to select different luminance values to be used for the matte.
7 Increase the Matte > Range value to add more fog into the scene. Decrease for less fog.
8 Change your View to Output to see the filtered image.
9 Increase the Matte > Blur parameter to soften the transition areas of the matte.
10 Click the Done button to apply the filter to your image.
See the Fog filter for more information.
GelsPhotographers, cinematographers and lighting designers use colored filters or
gels in front of lights. We have created digital equivalents of the lighting gels
and these same exact colors can be applied to the entire image or inside a
gradient. In cooperation with Gamproducts and Rosco, we have created digital
versions of their popular gels.
1 Apply Gels from the HFX Grads/Tints category.
2 Try out some of the presets.
At the top left of the Presets window, the gels are categorized into various
groups located inside a pop-up menu.
3 In the Presets window, choose a new presets group from the pop-up menu to see a different set of gel presets.
Dfx User Guide • • •••

•
Filter Tutorials 120
• • • •••
4 If the Parameters window is not showing, click the Parameters tab at the bottom of the Presets window.
5 Adjust the Color > Opacity, Preserve Highlights and Exposure Compensation sliders to your liking.
The selected gel can be applied through a gradient creating a graduated
transition between the colored portion and the original image.
6 Click on the Grad > Enable checkbox to activate the Grad.
7 Adjust the Grad > Type, Corner Points, Size and Angle.
To adjust the Corner Points, just click and drag them to the desired location.
Go to the Grad section of Common Filter Controls to see how the Grad controls
work.
8 Click the Done button to apply the filter to your image.
See the Gels filter for more information.
Glimmerglass® / Bronze Glimmerglass®Softens fine details in a unique manner, while adding a mild glow to highlights.
Bronze Glimmerglass® adds a warming filter.
1 Apply Glimmerglass® from the HFX Diffusion category.
2 Try out some of the presets.
At the top left of the Presets window, the presets are categorized into various
groups located inside a pop-up menu.
3 In the Presets window, choose a new preset group from the pop-up menu to see a different set of filter presets.
4 If the Parameters window is not showing, click the Parameters tab at the bottom of the Presets window.
5 Adjust the Mist > Brightness, Blur and Color settings to your liking.
Dfx User Guide • • •••

•
Filter Tutorials 121
• • • •••
In some of the filters, a matte is generated to create the desired effect--in this
case, mist.
6 Change your View to Matte to see the matte values.
The areas that are white in the matte are the areas where mist will be
introduced. The location of the mist within the scene can be adjusted by
modifying the Matte > Position and Range parameters.
7 Change the Matte > Position parameter if you want to select different values to be used for the matte.
8 Increase the Matte > Range control to add more values to the matte. Decrease for less values.
9 Increase the Matte > Blur parameter to soften the transition areas of the matte.
10 Change your View to Output to see the filtered image.
11 If you applied a Bronze Glimmerglass® preset, adjust the Temperature controls to your liking.
12 Click the Done button to apply the filter to your image.
See the Glimmerglass® and Bronze Glimmerglass® filters for more
information.
GlowGlow creates glows around selected areas of the image based on a generated
matte.
1 Apply Glow from the Light category.
2 Try out some of the presets.
3 If the Parameters window is not showing, click the Parameters tab at the bottom of the Presets window.
4 Select either the Glow > Blend > Add or Screen blend mode.
Add will burn out highlights while the Screen Mode will retain them.
Dfx User Guide • • •••

•
Filter Tutorials 122
• • • •••
5 Adjust the Glow > Brightness, Blur and Color settings to your liking.
In some of the filters, a matte is generated to create the desired effect--in this
case, glow.
6 Change your View to Matte to see the matte values.
The areas that are white in the matte are the areas where glow will be
introduced. The location of the glow within the scene can be adjusted by
modifying the Matte > Position and Range parameters.
7 Change the Matte > Position parameter if you want to select different values to be used for the matte.
8 Increase the Matte > Range control to add more values to the matte. Decrease for less values.
9 Increase the Matte > Blur parameter to soften the transition areas of the matte.
10 Change your View to Output to see the filtered image.
11 Click the Done button to apply the filter to your image.
See the Glow filter for more information.
Glow DarksGlows and grows the darks areas of the image
1 Apply Glow Darks from the Light category.
2 Try out some of the presets.
3 If the Parameters window is not showing, click the Parameters tab at the bottom of the Presets window.
4 Adjust the Glow > Amount and Blur settings to your liking.
In some of the filters, a matte is generated to create the desired effect--in this
case, glowing darks.
5 Change your View to Matte to see the matte values.
Dfx User Guide • • •••

•
Filter Tutorials 123
• • • •••
The areas that are white in the matte are the areas where glow will be
introduced. The location of the glow within the scene can be adjusted by
modifying the Matte > Position and Range parameters.
6 Change the Matte > Position parameter if you want to select different values to be used for the matte.
7 Increase the Matte > Range control to add more values to the matte. Decrease for less values.
8 Increase the Matte > Blur parameter to soften the transition areas of the matte.
9 Change your View to Output to see the filtered image.
10 Click the Done button to apply the filter to your image.
See the Glow Darks filter for more information.
GrainGrain simulates film grain with control of size, intensity and softness.
1 Apply Grain from the Film Lab category.
2 Select the Magnifier tool in the Viewer.
When the Magnifier is selected, a portion of the image is displayed at a 1:1 pixel
ratio in the Magnifier window and shows the actual pixels of the image with the
Grain filter applied. The Magnifier will accurately represent what the Grain filter
will look like when applied to the full size image.
3 Try out some of the presets.
4 If the Parameters window is not showing, click the Parameters tab at the bottom of the Presets window.
5 Adjust the Size parameter.
The larger the Size setting, the larger the grain will be.
Dfx User Guide • • •••

•
Filter Tutorials 124
• • • •••
6 Manipulate the Red, Green and Blue Amount parameters.
The Amount parameters set the red, green and blue intensities of the grain.
Film stocks generally have varying amounts of red, green and blue intensities
with the blue intensity generally higher than the rest. If you turn the red, green
and blue amount sliders to a value of 0, the grain will disappear.
7 Change the Softness parameter.
The Softness parameter sets the softness of the grain. Normally, only minor
softness adjustments are necessary, usually between a value of 0-1.
8 Adjust the Response Position and Response Range to control where you will see grain in the image.
In most cases, film grain is apparent over the entire image except the brightest
whites with the black areas being the most affected. A low Response Position
value places grain in the darkest image values, while a high Response Position
value places grain in the brightest areas. Response Range will increase or
decrease the area where grain is added to the image based on the value of the
slider.
9 If you want, use Response Minimum to set the minimum level of grain that is always added to the image.
10 Click the Done button to apply the filter to your image.
See the Grain filter for more information.
GrungeAdds film dirt, hair, scratches, stains, splotches, vignetting and grain--all to
make your pristine image look like damaged film.
1 Apply Grunge from the Film Lab category.
2 Try out some of the presets.
3 If the Parameters window is not showing, click the Parameters tab at the bottom of the Presets window.
Dfx User Guide • • •••
•
Filter Tutorials 125
• • • •••
4 Use any combination of dirt, hair, scratches, stains, splotches, vignetting and grain by adjusting the respective element’s Opacity slider.
5 Change the Randomize slider and you will have a new pattern of whatever element you are adding.
Each grunge element can either be black or white depending on whether
Positive or Negative is selected in the Type pop-up menu. Positive films have
black grunge elements and negative films have white elements.
6 Choose either Positive or Negative in the Type pop-up menu for each grunge element.
7 Click the Done button to apply the filter to your image.
See the Grunge filter for more information.
HaloHalo causes dark areas to glow into bright areas and bright areas to glow into
dark areas along with a bit of diffusion.
1 Apply Halo from the Light category.
2 Try out some of the presets.
3 If the Parameters window is not showing, click the Parameters tab at the bottom of the Presets window.
4 Adjust the Diffusion > Blur and Opacity parameters to your liking.
The Halo effect is enhanced by using a combination of color correction controls
in addition to the diffusion.
5 Change the Color Correct settings if necessary.
6 Click the Done button to apply the filter to your image.
See the Halo filter for more information.
Dfx User Guide • • •••

•
Filter Tutorials 126
• • • •••
Harris ShutterThe Harris Shutter filter uses separate images for the red, green and blue
channels.
1 Apply Harris Shutter from the Special Effects category.
2 Select the source for the Red, Green and Blue channels.
If an image is not assigned using the Source parameters, the original image’s
color channel will be used.
3 Adjust the Red, Green and Blue > Amounts to the desired level.
4 Click the Done button to apply the filter to your image.
See the Harris Shutter filter for more information.
Haze / Sky
HazeReduces excessive blue by absorbing UV light and eliminates haze which
tends to wash out color and image clarity.
SkyReduces UV light, haze and is pink tinted for added warmth and better colors.
It is especially useful for images shot in outdoor open shade and on overcast
days.
1 Apply Haze or Sky from the Image category.
2 Try out some of the presets.
3 If the Parameters window is not showing, click the Parameters tab at the bottom of the Presets window.
4 Set the amount of haze to be removed from the scene using the Haze control.
5 Adjust the Temperature and Cyan/Magenta parameters to your liking.
Note: Cyan/Magenta is only included in the Sky filter.
Dfx User Guide • • •••

•
Filter Tutorials 127
• • • •••
6 Click the Done button to apply the filter to your image.
See the Haze and Sky filters for more information.
HDTV/FX®With the increase in HD production for both TV and Motion Pictures,
HDTV/FX® filters address both contrast and sharpness issues associated with
HD. Creates a “film look” and provides subtle improvements in shadow detail.
1 Apply HDTV/FX® from the HFX Diffusion category.
2 Select the Magnifier tool in the Viewer.
When the Magnifier is selected, a portion of the image is displayed at a 1:1 pixel
ratio in the Magnifier window and shows the actual pixels of the image with the
HDTV/FX® filter applied. The Magnifier will accurately represent what the
HDTV/FX® filter will look like when applied to the full size image.
3 Try out some of the presets.
4 If the Parameters window is not showing, click the Parameters tab at the bottom of the Presets window.
5 Adjust Detail > Smoothing to smooth out fine detail.
Smoothing uses an edge aware smoothing algorithm to minimize fine image
detail so that areas with courser detail are unaffected. However, if there are
unwanted areas of the image that are being affected, you can optionally use a
matte to isolate the effect.
6 Activate Matte > Enable.
7 Change your View to Matte to see the matte values.
Dfx User Guide • • •••

•
Filter Tutorials 128
• • • •••
The idea here is to generate a matte that isolates the areas of the image that
need to be smoothed. For instance, you might be trying to isolate and smooth
the skin on a person’s face. The white areas of the matte are the areas that will
be smoothed. The matte has been preset to a highlight luminance matte, but
this can be easily changed.
8 Select the appropriate Matte > Extract On option for your image.
9 If needed, change the Matte > Position parameter so that the image areas you are trying to smooth are as white as possible in the matte.
10 Adjust the Matte > Range value so that the white values of the matte are limited as much as possible to the image areas that you are trying to isolate.
11 Increase the Matte > Blur parameter if you want to soften the transition areas of the matte.
12 Change your View to Output to see the filtered image.
13 Adjust the Contrast > Shadows and Highlights to your liking.
14 Click the Done button to apply the filter to your image.
See the HDTV/FX® filter for more information.
HFX® StarExciting and dazzling star effects are generated from original point or reflected
light sources with the added glitter and sparkle of these exclusive, natural
looking asymmetrical designs and shapes. Great for water scenes, candle
flames, street lights and more!
1 Apply HFX® Star from the Light category.
2 Try out some of the presets.
3 If the Parameters window is not showing, click the Parameters tab at the bottom of the Presets window.
4 You can also select different star types by choosing them from the Star > Type pop-up menu.
Dfx User Guide • • •••

•
Filter Tutorials 129
• • • •••
5 Adjust the Star > Brightness, Size and Color settings to your liking.
In some of the filters, a matte is generated to create the desired effect--in this
case, a star filter.
6 Change your View to Matte to see the matte values.
The matte has been preset to a highlight matte to generate the stars. Different
luminance values can be selected with the Matte > Position parameter and the
range of matte values can be adjusted using Matte > Range.
7 Change the Matte > Position parameter if you want to select different luminance values to be used for the matte.
Stars will be generated wherever there are white values in the matte.
8 Change your View to Stars to see the generated stars.
9 Increase the Matte > Range value to add more stars into the scene. Decrease for less stars.
10 Change your View to Output to see the filtered image.
11 Click the Done button to apply the filter to your image.
See the HFX® Star filter for more information.
High ContrastCreates an extreme high contrast image.
1 Apply High Contrast from the Color category.
2 Try out some of the presets.
3 If the Parameters window is not showing, click the Parameters tab at the bottom of the Presets window.
4 Adjust the Contrast and Amount sliders until you achieve the desired amount of contrast.
Dfx User Guide • • •••

•
Filter Tutorials 130
• • • •••
5 Click the Done button to apply the filter to your image.
See the High Contrast filter for more information.
Ice HalosIce halos are created when small ice crystals in the atmosphere generate halos
by reflecting and refracting light. Most notably, circles form around the sun or
moon as well as rare occurrences when the entire sky is painted with a web of
arcing halos.
1 Apply Ice Halos from the Light category.
2 Try out some of the presets.
3 If the Parameters window is not showing, click the Parameters tab at the bottom of the Presets window.
4 You can also choose different ice halos by adjusting the Halo > Sun Altitude slider.
5 Choose Light > Blend > Add or Screen blend mode.
Add will burn out highlights while Screen will retain them.
6 In the Light menu, adjust the Brightness as well as the Displacement and Blur of the ice halo if you’d like.
7 Adjust the position of the ice halo by clicking and dragging the center image point to the desired location.
8 You can also use the Halo > Scale control to transform the ice halo.
9 Combine the ice halo with a matte by changing Halo > Blend from Halo Only to Matte.
Matte only adds the ice halo in the areas of the matte. If you are not seeing
enough of the ice halo, your matte should be adjusted.
10 Change your View selector to Matte to see the matte values.
Dfx User Guide • • •••

•
Filter Tutorials 131
• • • •••
The default matte settings are preset to a highlight matte. The areas that are
white in the matte are the areas where the ice halo will be added into the image.
The location of the ice halo within the scene can be adjusted by changing the
Matte > Position and Range parameters.
11 Change the View selector from Matte to Output.
12 Change the Matte > Position parameter if you want to change where you see the ice halo.
13 Increase the Matte > Range value to add more of the ice halo to the scene. Decrease to see less of the ice halo.
14 Increase the Matte > Blur parameter to soften the matte.
15 Click the Done button to apply the filter to your image.
See the Ice Halos filter for more information.
InfraredInfrared simulates infrared filters used in conjunction with infrared sensitive film
or sensors to produce very interesting black and white images with glow in
highlight areas.
1 Apply Infrared from the Special Effects category.
2 Try out some of the presets.
3 If the Parameters window is not showing, click the Parameters tab at the bottom of the Presets window.
4 Choose the type of black and white filter to be applied to your color image from the Black and White pop-up menu.
The type of Black and White filter that you choose can dramatically change the
look of your image.
5 Set the Mist > Brightness and Blur to your liking.
6 If you want, you can use the Color Correct controls to modify the Brightness, Contrast and Gamma of the image.
Dfx User Guide • • •••

•
Filter Tutorials 132
• • • •••
In some of the filters, a matte is generated to create the desired effect--in this
case, diffusion.
7 Change your View to Matte to see the matte values.
The areas that are white in the matte are the areas where diffusion will be
introduced. The location of the diffusion within the scene can be adjusted by
modifying the Matte > Position and Range parameters.
8 Change the Matte > Position parameter if you want to select different values to be used for the matte.
9 Increase the Matte > Range control to add more values to the matte. Decrease for less values.
10 Increase the Matte > Blur parameter to soften the transition areas of the matte.
11 Change your View to Output to see the filtered image.
12 Click the Done button to apply the filter to your image.
See the Infrared filter for more information.
KelvinDegrees Kelvin is the standard unit of measure for color temperature which is
a way to characterize the spectral properties of a light source. Low color
temperature implies warmer (redder) light, while high color temperature implies
a colder (bluer) light.
1 Apply Kelvin from the Color category.
2 Try out some of the presets.
3 If the Parameters window is not showing, click the Parameters tab at the bottom of the Presets window.
The Color Temperature of the image is determined by the difference of the
Destination and Source Kelvin parameters.
4 Adjust the Destination Kelvin slider.
Dfx User Guide • • •••

•
Filter Tutorials 133
• • • •••
Presets for a number of different light sources and conditions are provided in
degrees Kelvin, the standard unit of measure for color temperature.
5 If you want less coloring of the image, turn down the Color Temperature > Opacity.
6 Image highlights can be retained by adjusting the Color Temperature > Preserve Highlights control to a value of 100.
The temperature adjustment can be applied through a gradient creating a
graduated transition between the colored portion and the original image.
7 Click on the Grad > Enable checkbox to activate the Grad.
8 Adjust the Grad > Type, Corner Points, Size and Angle.
To adjust the Corner Points, just click and drag them to the desired location.
Go to the Grad section of Common Filter Controls to see how the Grad controls
work.
9 If you are curious, you can see what the Grad looks like by changing your View to Grad. Change your View to Output when done.
10 Click the Done button to apply the filter to your image.
See the Kelvin filter for more information.
Key LightUsing Key Light, an image can be relit by with either a directional or point light.
1 Apply Key Light from the Light category.
Parallel is the default light source type and creates a directional light source.
2 Select the Magnifier tool in the Viewer.
Dfx User Guide • • •••

•
Filter Tutorials 134
• • • •••
When the Magnifier is selected, a portion of the image is displayed at a 1:1 pixel
ratio in the Magnifier window and shows the actual pixels of the image with the
Key Light filter applied. The Magnifier will accurately represent what the Key
Light filter will look like when applied to the full size image.
3 Adjust the Angle to change the direction of the light source.
4 Set the Strength slider for the desired light intensity.
5 Switch the Type to Point.
A point light is used where the light either emanates from or fades into a
vanishing point depending on the state of the Invert control.
6 Move the point control in the center of the screen to change the Point light location.
7 Activate Invert and the light source will fade into a vanishing point.
8 Set the Strength slider.
9 Click the Done button to apply the filter to your image.
See the Key Light filter for more information.
Lens DistortionLens Distortion corrects for pin-cushioning and barrel distortion of camera
lenses. It is also useful for creating the look of a wide angle lens.
1 Apply Lens Distortion from the Lens category.
2 Start by adjusting the Distortion control to straighten out any curved lines that should be straight.
Note: Positive Distortion parameters correct Pin-cushioning while negative values correct Barrel distortion.
Depending on the lens that was used, you may need to also adjust the
Anamorphic Squeeze and Curvature X and Y parameters.
Dfx User Guide • • •••

•
Filter Tutorials 135
• • • •••
3 Click the Done button to apply the filter to your image.
Note: Lens Distortion must be applied as the first layer (bottom of the layer stack) when multiple layers are used. Otherwise, all filters below will not be rendered.
See the Lens Distortion filter for more information.
LevelsLevels is an image adjustment tool which can move and stretch the brightness
levels of an image histogram. It has the power to adjust brightness, contrast,
and tonal range by specifying the location of complete black, complete white,
and midtones in a histogram
1 Apply Levels from the Color category.
2 To adjust the shadows and highlights, drag the black and white Input Levels sliders at either end of the histogram.
For example, if you move the black point slider to the right at level 23.1,
Photoshop maps all the pixels at level 23.1 and lower to black. Similarly, if you
move the white point slider to the left at level 89.1, Photoshop maps all pixels
Dfx User Guide • • •••

•
Filter Tutorials 136
• • • •••
at level 89.1 and higher to white. The mapping affects the darkest and lightest
pixels in each channel. The corresponding pixels in the other channels are
adjusted proportionately to avoid altering the color balance.
Note: You can also enter values directly into any of the numeric input fields.
3 To adjust midtones, use the middle Input slider to make a gamma adjustment.
Moving the middle Input slider to the left makes the overall image lighter.
Moving the middle Input slider to the right has the opposite effect, making the
image darker.
4 To decrease the contrast of the image, use the Output Levels.
You can view the adjusted histogram by either pressing the H key or by
selecting View > Window > Histogram.
5 Click the Done button to apply the levels adjustment to your image.
See the Levels filter for more information.
Dfx User Guide • • •••

•
Filter Tutorials 137
• • • •••
LightLight can be added to a scene where none existed before just as if you were
adding light at the time of shooting. Realistic lighting and shadow is introduced
using digital versions of the entire gobo libraries created by Gamproducts and
Rosco.
1 Apply Light or Gobo from the Light category.
2 Try out some of the presets.
At the top left of the Presets window, the gobos are categorized into various
groups located inside a pop-up menu.
3 In the Presets window, choose a new gobo group from the pop-up menu to see a different set of gobo presets.
4 If the Parameters window is not showing, click the Parameters tab at the bottom of the Presets window.
5 Choose Light > Blend > Add, Screen or Subtract for the blend mode.
Add will burn out highlights while Screen will retain them. Subtract, on the other
hand, will add shadow in place of light in the area of the gobo.
6 In the Light menu, adjust the Brightness, Displacement, and Blur of the light.
Adding blur to the light makes the light glow.
7 Adjust the position of the gobo by clicking and dragging the center image point to the desired location.
8 You can also use the Gobo > DVE controls to transform the gobo.
9 To apply a custom light color to the image, click on the Light > Color box and select a color.
10 To apply a colored gel to the light, select one from the Light > Gels pop-up menu.
11 Combine the gobo with a matte by changing Gobo > Blend from Gobo Only to Multiply.
I like the Multiply blend mode because it only adds the gobo in the areas of the
matte.
12 Change your View selector to Matte to see the matte values.
Dfx User Guide • • •••

•
Filter Tutorials 138
• • • •••
The default matte settings are preset to a highlight matte to create the light
effect. If you are not seeing sufficient light, your matte should be adjusted. The
areas that are white in the matte are the areas where light will be added into the
image. The location of the light within the scene can be adjusted by changing
the Matte > Position and Range parameters.
13 Change the Matte > Position parameter if you want to select different values to be used for the light.
14 Increase the Matte > Range value to add more light into the scene. Decrease for less light.
15 Increase the Matte > Blur parameter to soften the transition areas of the light.
16 Change the View selector from Matte to Output.
17 The softness of the light can also be adjusted using the Light > Blur setting.
18 To use your own image as a light source:
• Select Gobo > Gobo > Browse.
• When the file browser opens, navigate to your image and select it.
19 Click the Done button to apply the filter to your image.
See the Light filter for more information.
Low ContrastLow Contrast spreads highlights into darker areas, lowers contrast and keeps
bright areas bright.
1 Apply Low Contrast from the Color category.
2 Try out some of the presets.
3 If the Parameters window is not showing, click the Parameters tab at the bottom of the Presets window.
4 Adjust the Contrast > Light Brightness and Contrast > Light Spread to control the brightness and distance of the light being spread into the shadow areas.
Dfx User Guide • • •••

•
Filter Tutorials 139
• • • •••
In some of the filters, a matte is generated to create the desired effect--in this
case, low contrast.
5 Change your View to Matte to see the matte values.
The areas that are white in the matte will be the image areas used to spread
light into the shadow areas. The location of the low contrast within the scene
can be adjusted by modifying the Matte > Position and Range parameters.
6 Change the Matte > Position parameter if you want to select different values to be used for the matte.
7 Increase the Matte > Range control to add more values to the matte. Decrease for less values.
8 Change your View to Spread to see the special matte used to create the low contrast effect.
The Spread matte will change as the Contrast > Light Spread slider is adjusted.
9 Move the Contrast > Light Spread slider to see how it affects the Spread matte. Leave it at a value of 200 when you are done.
10 Change your View to Output to see the filtered image.
11 Adjust the Contrast > Shadow Brightness if your shadows are still too dark.
12 Click the Done button to apply the filter to your image.
See the Low Contrast filter for more information.
MatchMatches the Brightness, Color, Detail, Grain and Tone of one image and
applies it to another.
1 Apply the Match filter from the Color category to a target image.
2 Select the source image to be matched using the Source selector.
3 Click the Match box.
The Color, Detail, Grain and Tone of the source image are analyzed and
applied to your target image.
Dfx User Guide • • •••

•
Filter Tutorials 140
• • • •••
4 Adjust the Brightness, Color, Detail, Grain and Tone parameters to your liking.
Note: The Brightness and Detail parameters behave differently depending on the source image. For instance, the Brightness slider can either brighten or darken while the Detail slider can either sharpen or soften. They are dual use controls.
5 If matching grain, select the Magnifier tool in the Viewer.
When the Magnifier is selected, a portion of the image is displayed at a 1:1 pixel
ratio in the Magnifier window and shows the actual pixels of the image with the
Match filter applied. The Magnifier will accurately represent what the grain will
look like when applied to the full size image.
6 Click the Done button to apply the filter to your image.
See the Match filter for more information.
ND-GradThe ND or Neutral Density Grad darkens only a portion of the image using a
graduated transition between the darkened portion and the original image. It
selectively adjusts brightness without affecting color balance. The most likely
use for the ND-Grad would be to balance the difference between the sky and
the ground.
1 Apply ND-Grad from the HFX Grads/Tints category.
2 Try out some of the presets.
3 If the Parameters window is not showing, click the Parameters tab at the bottom of the Presets window.
4 Adjust the Exposure slider to vary the amount of neutral density being applied to the image.
5 Adjust the Grad > Type, Corner Points, Size and Angle.
To adjust the Corner Points, just click and drag them to the desired location.
Dfx User Guide • • •••

•
Filter Tutorials 141
• • • •••
Go to the Grad section of Common Filter Controls to see how the Grad controls
work.
6 If you are curious, you can see what the Grad looks like by changing your View to Grad. Change your View to Output when done.
7 If you want less darkening of the image in the area of the Grad, adjust F-Stop > Exposure.
8 Click the Done button to apply the filter to your image.
See the ND-Grad filter for more information.
Night VisionNight Vision creates the effect of a Night Vision lens by tinting the image green,
blooming highlights and adding grain.
1 Apply Night Vision from the Special Effects category.
2 Select the Magnifier tool in the Viewer.
When the Magnifier is selected, a portion of the image is displayed at a 1:1 pixel
ratio in the Magnifier window and shows the actual pixels of the image with the
Night Vision filter applied. The Magnifier will accurately represent what the
Night Vision filter will look like when applied to the full size image.
3 Try out some of the presets.
At the top left of the Presets window, the presets are categorized into various
groups located inside a pop-up menu.
4 In the Presets window, choose a new preset group from the pop-up menu to see a different set of filter presets.
5 If the Parameters window is not showing, click the Parameters tab at the bottom of the Presets window.
Dfx User Guide • • •••

•
Filter Tutorials 142
• • • •••
6 Choose the type of black and white filter to be applied to your color image from the Black and White pop-up menu.
The type of Black and White filter that you choose can dramatically change the
look of your image.
7 Adjust the Glow > Brightness and Blur as well as the Grain > Size and Amount settings to your liking.
8 If you want, you can use the Color Correct controls to modify the color of the image.
In some of the filters, a matte is generated to create the desired effect--in this
case, glow.
9 Change your View to Matte to see the matte values.
The areas that are white in the matte are the areas where glow will be
introduced. The location of the glow within the scene can be adjusted by
modifying the Matte > Position and Range parameters.
10 Change the Matte > Position parameter if you want to select different values to be used for the matte.
11 Increase the Matte > Range control to add more values to the matte. Decrease for less values.
12 Increase the Matte > Blur parameter to soften the transition areas of the matte.
13 Change your View to Output to see the filtered image.
14 Click the Done button to apply the filter to your image.
See the Night Vision filter for more information.
Nude/FX®A series of different skin tone enhancing filters that offer ultimate flexibility and
control for skintones. Perfect for headshots and close-ups.
1 Apply Nude/FX® from the HFX Grads/Tints category.
2 Try out some of the presets.
Dfx User Guide • • •••

•
Filter Tutorials 143
• • • •••
3 If the Parameters window is not showing, click the Parameters tab at the bottom of the Presets window.
4 Adjust the Color > Opacity, Preserve Highlights and Exposure Compensation sliders to your liking.
The selected color can be applied through a gradient creating a graduated
transition between the colored portion and the original image.
5 Click on the Grad > Enable checkbox to activate the Grad.
6 Adjust the Grad > Type, Corner Points, Size and Angle.
To adjust the Corner Points, just click and drag them to the desired location.
Go to the Grad section of Common Filter Controls to see how the Grad controls
work.
7 Click the Done button to apply the filter to your image.
See the Nude/FX® filter for more information.
OverexposeOverexpose simulates the overexposure that occurs when a film camera is
stopped.
1 Apply Overexpose from the Film Lab category.
2 Try out some of the presets.
3 If the Parameters window is not showing, click the Parameters tab at the bottom of the Presets window.
4 Adjust the Amount, Intensity and Blur controls to achieve the desired effect.
5 Click the Done button to apply the filter to your image.
See the Overexpose filter for more information.
Dfx User Guide • • •••

•
Filter Tutorials 144
• • • •••
OzoneThe Ozone filter allows you to manipulate the color of an image with incredible
flexibility and accuracy. The spectrum of image values is divided into 11
discrete zones using proprietary image slicing algorithms. When using
Luminance as the method for slicing up the image, the Position and Range
sliders are preset so that each zone is twice as bright as the previous zone,
proceeding from black towards white. The color values of each zone can then
be independently adjusted until you’ve painted a new picture. Your adjustments
occur on a zone by zone basis, but you view the result of all color corrections
simultaneously.
1 Apply Ozone from the Color category.
2 Look at Zones 0-10 by setting the View to Zone and clicking on the various zones in the Zone menu.
Note: Once you click in the Zone selector, you can use the left and right arrow keys to cycle through the zones.
The selected zone is represented as a black and white image. The values
shown as white in the selected zone are the portions of the image that will be
modified when using the color adjustments. As the values drop-off to black, so
does the strength of whatever adjustments you’ll make. Although the zone’s
Position and Range parameters are preset according to the Digital Zone
system, they can be changed if you want.
3 If you’d like, change the Position and Range parameters for the selected zone.
The Position value pinpoints the color values to be used in the selected zone.
For instance, if the zones are created using Luminance, a high Position value
shows the brightest image values as white values in the zone. A low Position
value shows the darkest image values as white values in the zone. The Range
value increases or decreases the range of values in the selected zone.
4 Make sure that the View is set to Output.
The Viewer now shows the full color image.
5 To modify your image, adjust any combination of the Hue, Saturation, Brightness, Contrast, Gamma, Red, Green, Blue, Temperature, and Cyan/Magenta sliders for each zone.
Dfx User Guide • • •••

•
Filter Tutorials 145
• • • •••
Your adjustments occur on a zone by zone basis, but you view the result of all
color corrections simultaneously.
6 Click the Done button to apply the filter to your image.
See the Ozone filter for more information.
PaintPaints your image using Black/White, Blur, Clone, Color, Eraser, Mosaic, Red-
Eye, Repair and Scatter brushes.
Color BrushPaints the image with the current color.
1 Apply Paint from the Image category.
When Paint is selected in the Filter window, it’s controls appear in the Toolbar.
2 Select the Color brush from the Toolbar.
3 To set the brush size, click on the Brush Size icon in the Toolbar, and drag the slider that appears.
or
Dfx User Guide • • •••

•
Filter Tutorials 146
• • • •••
4 Resize the brush in the Viewer by holding Ctrl(Win)/Cmd(Mac) and dragging in or out.
The Brush Softness and Opacity can also be adjusted by clicking their
respective icons in the Toolbar.
5 Choose a color to paint with by clicking the Color icon and picking a color.
or
6 Select the eyedropper icon and click on a color within the image.
7 Use your pen and tablet or mouse to paint with the Color brush.
To erase previously painted brush strokes, use the Eraser brush.
8 Pick the Eraser brush and erase any unwanted strokes.
The Eraser brush can be accessed immediately using the right-mouse button
or the equivalent button using a pen and tablet.
Clone BrushPaints the image using another part of the image.
1 Apply Paint from the Image category.
When Paint is selected in the Filter window, it’s controls appear in the Toolbar.
2 Select the Clone brush from the Toolbar.
3 Press and hold down the Shift key.
4 Click, drag and release to set the clone offset.
Dfx User Guide • • •••

•
Filter Tutorials 147
• • • •••
The first click sets the clone source and where you drag and release is the
clone destination.
5 Paint with the Clone brush.
The Clone source can be nudged using the Arrow keys. One press of the Arrow
key moves the Clone source 1 pixel. Using the Shift key in conjunction with the
Arrow keys moves the Clone source 10 pixels.
6 To quickly reset the clone offset, press Shift and without moving the cursor, click your mouse or tap your pen on the screen once.
Red-Eye BrushRemoves red-eye.
1 Apply Paint from the Image category.
When Paint is selected in the Filter window, it’s controls appear in the Toolbar.
2 Select the Red-Eye brush from the Toolbar.
Dfx User Guide • • •••

•
Filter Tutorials 148
• • • •••
3 Use Ctrl(Win) or Cmd(Mac) and drag in or out to size the brush to roughly match the size of the red pupil.
4 Paint in the area of the red pupil being careful not to paint on any skin areas.
Use the Eraser brush if you mistakenly paint on any skin areas.
See the Paint filter for more information.
PastelConverts the image into pastel artwork.
1 Apply Pastel from the Special Effects category.
2 Try out some of the presets.
3 If the Parameters window is not showing, click the Parameters tab at the bottom of the Presets window.
4 Adjust the Amount to the desired level.
5 Set the Detail. Increasing the value shows more detail while decreasing the value shows less detail.
Dfx User Guide • • •••

•
Filter Tutorials 149
• • • •••
6 Click the Done button to apply the filter to your image.
See the Pastel filter for more information.
Pearlescent®Creates a subtle new look with a slight softening of contrast and a luxurious
pearlescent halo around highlights. This filter aids cinematographers in taking
the edge off the image from modern lenses and cameras, especially with 4K
acquisition sensors.
Black Pearlescent® offers all the benefits of the Pearlescent® filter in a more
subtle form. Highlight flares are controlled and contrast is lowered for a more
delicate effect
1 Apply Pearlescent® from the HFX Diffusion category.
2 Try out some of the presets.
At the top left of the Presets window, the presets are categorized into various
groups located inside a pop-up menu.
3 In the Presets window, choose a new preset group from the pop-up menu to see a different set of filter presets.
4 If the Parameters window is not showing, click the Parameters tab at the bottom of the Presets window.
5 Adjust the Mist > Brightness, Blur and Color settings to your liking.
In some of the filters, a matte is generated to create the desired effect--in this
case, halation.
6 Change your View to Matte to see the matte values.
The areas that are white in the matte are the areas where halation will be
introduced. The location of the halation within the scene can be adjusted by
modifying the Matte > Position and Range parameters.
7 Change the Matte > Position parameter if you want to select different values to be used for the matte.
Dfx User Guide • • •••

•
Filter Tutorials 150
• • • •••
8 Increase the Matte > Range control to add more values to the matte. Decrease for less values.
9 Increase the Matte > Blur parameter to soften the transition areas of the matte.
10 Change your View to Output to see the filtered image.
11 Click the Done button to apply the filter to your image.
See the Pearlescent® filters for more information.
PencilPencil converts your image to a pencil sketch.
1 Apply Pencil from the Special Effects category.
2 Try out some of the presets.
3 If the Parameters window is not showing, click the Parameters tab at the bottom of the Presets window.
4 Vary your result by adjusting both the Amount and Color controls.
5 Click the Done button to apply the filter to your image.
See the Pencil filter for more information.
PhotographicThe most complete line of Kodak® filters for photographic uses is available in
the form of gelatin films and are known as Wratten® Gelatin Filters. Our
Photographic filter is a digital equivalent of the Wratten set and were created
using the spectral transmission curves for each optical filter. The Color
Conversion, Light Balancing and Color Compensating preset groups are
subsets of the Photographic filters.
1 Apply Photographic from the HFX Grads/Tints category.
Dfx User Guide • • •••

•
Filter Tutorials 151
• • • •••
2 Try out some of the presets.
At the top left of the Presets window, the presets are categorized into various
groups located inside a pop-up menu.
3 In the Presets window, choose a new preset group from the pop-up menu to see a different set of filter presets.
4 If the Parameters window is not showing, click the Parameters tab at the bottom of the Presets window.
5 If you want less coloring of the image, turn down the Color > Opacity.
6 Image highlights can be retained by adjusting the Filters > Preserve Highlights control to a value of 100.
The selected filter can be applied through a gradient creating a graduated
transition between the colored portion and the original image.
7 Click on the Grad > Enable checkbox to activate the Grad.
8 Adjust the Grad > Type, Corner Points, Size and Angle.
To adjust the Corner Points, just click and drag them to the desired location.
Go to the Grad section of Common Filter Controls to see how the Grad controls
work.
9 If you are curious, you can see what the Grad looks like by changing your View to Grad. Change your View to Output when done.
10 Click the Done button to apply the filter to your image.
See the Photographic filter for more information.
PolarizerThe Polarizer creates a darkened, deep blue sky. Through the use of a matte
and a gradient, the color of the sky can be adjusted. Warm Polarizer adds a
warming filter.
1 Apply Polarizer or Warm Polarizer from the Image category.
Dfx User Guide • • •••

•
Filter Tutorials 152
• • • •••
2 Try out some of the presets.
At the top left of the Presets window, the presets are categorized into various
groups located inside a pop-up menu.
3 In the Presets window, choose a new preset group from the pop-up menu to see a different set of filter presets.
4 If the Parameters window is not showing, click the Parameters tab at the bottom of the Presets window.
5 Change your View to Matte to see the matte values.
In some of the filters, a matte is generated to create the desired effect--in this
case, polarization.
6 Change the Matte > Hue parameter if you want to select different blue values to be used for the sky matte.
A matte is generated based on the blue values in the sky. Skies vary in their
color of blue, so you can adjust the matte to accommodate your sky. The blue
that is used to create the matte can be modified by using Matte > Hue to select
the exact blue value and Matte > Range to select the amount of blue values to
be used for the matte.
7 Increase the Matte > Range control to add more values to the sky matte. Decrease for less values.
8 Increase the Matte > Blur parameter to soften the transition areas of the matte.
Remember, the areas that are white in the matte are the areas that will be
polarized.
9 Change your View to Output to see the filtered image.
10 Adjust the Sky color settings to make the sky look polarized--usually Brightness and Saturation.
11 If the polarization is affecting areas other than they sky, enable the Grad and adjust it to limit the areas of polarization.
To adjust the Corner Points, just click and drag them to the desired location.
Go to the Grad section of Common Filter Controls to see how the Grad controls
work.
Dfx User Guide • • •••

•
Filter Tutorials 153
• • • •••
12 If you applied Warm Polarizer, adjust the Warming > Color and Opacity sliders to your liking.
13 Click the Done button to apply the filter to your image.
See the Polarizer filter for more information.
Pro-Mist®This popular motion picture effect creates a special atmosphere by softening
excess sharpness and contrast. It generates a pearlescent halo around
highlights. Black Pro-Mist® offers all the benefits of the Pro-Mist® filter in a
more subtle form. Highlight flares are controlled and contrast is lowered for a
more delicate effect. The Warm Pro-Mist’s® add a warming filter while Cool
Pro-Mist® adds a cooling filter.
1 Apply Pro-Mist® from the HFX Diffusion category.
2 Select the Magnifier tool in the Viewer.
When the Magnifier is selected, a portion of the image is displayed at a 1:1 pixel
ratio in the Magnifier window and shows the actual pixels of the image with the
Pro-Mist® filter applied. The Magnifier will accurately represent what the Pro-
Mist® filter will look like when applied to the full size image.
3 Try out some of the presets.
At the top left of the Presets window, the presets are categorized into various
groups located inside a pop-up menu.
4 In the Presets window, choose a new preset group from the pop-up menu to see a different set of filter presets.
5 If the Parameters window is not showing, click the Parameters tab at the bottom of the Presets window.
6 Adjust Detail > Smoothing to smooth out fine detail.
Dfx User Guide • • •••

•
Filter Tutorials 154
• • • •••
Smoothing uses an edge aware smoothing algorithm to minimize fine image
detail so that areas with courser detail are unaffected.
7 Adjust the Mist > Brightness, Blur and Color settings to your liking.
In some of the filters, a matte is generated to create the desired effect--in this
case, mist.
8 Change your View to Matte to see the matte values.
The areas that are white in the matte are the areas where mist will be
introduced. The location of the mist within the scene can be adjusted by
modifying the Matte > Position and Range parameters.
9 Change the Matte > Position parameter if you want to select different values to be used for the matte.
10 Increase the Matte > Range control to add more values to the matte. Decrease for less values.
11 Increase the Matte > Blur parameter to soften the transition areas of the matte.
12 Change your View to Output to see the filtered image.
13 If you applied one of the Warm or Cool Pro-Mist® presets, adjust the Temperature > Color and Opacity sliders to your liking.
14 Click the Done button to apply the filter to your image.
See the Pro-Mist filters for more information.
Rack FocusRack Focus replicates a true camera defocus by introducing lens Bokeh
effects. Bokeh is the Japanese term that describes the quality of out-of-focus
points of light. In defocused areas, each point of light becomes a shape--either
a circle or a polygon. The shape grows in size as the amount of defocusing is
increased.
1 Apply Rack Focus from the Lens category.
2 Try out some of the presets.
Dfx User Guide • • •••

•
Filter Tutorials 155
• • • •••
3 If the Parameters window is not showing, click the Parameters tab at the bottom of the Presets window.
4 Adjust the Blur to your liking.
5 Set the Aperture > Brightness and Color settings.
6 Change the Aperture > Facets to control the polygon’s shape and use Angle to rotate the Bokeh.
7 Set the Aperture > Curvature to 100 if you prefer the Bokeh to be circular in shape.
In some of the filters, a matte is generated to create the desired effect--in this
case, Bokeh effects.
8 Set your View to Matte to see the matte values.
The matte has been preset to a highlight matte to generate the Bokeh effect.
The areas that are white in the matte are the areas where Bokeh will be
introduced. The location of the Bokeh within the scene can be adjusted by
modifying the Matte > Position and Range controls.
9 Change the Matte > Position parameter if you want to select different luminance values to be used for the matte.
Bokeh will be generated wherever there are white values in the matte.
10 Change your View to Aperture to see the Bokeh.
11 Increase the Matte > Range value to add more Bokeh into the scene. Decrease for less Bokeh.
12 Change your View to Output to see the filtered image.
13 Click the Done button to apply the filter to your image.
See the Rack Focus filter for more information.
Radial ExposureLightens and/or darkens the center or edges of an image to correct lens
vignetting.
Dfx User Guide • • •••

•
Filter Tutorials 156
• • • •••
1 Apply Radial Exposure from the Lens category.
2 Adjust the Exposure > Edges or Center parameters.
The radial gradient used to lighten or darken the edges or center of the image
can be adjusted to suit your image.
3 Adjust the Spot > Position, Radius, Falloff Radius and Falloff.
4 If you are curious, you can see what the Spot looks like by changing your View to Spot. Change your View to Output when done.
5 Click the Done button to apply the filter to your image.
See the Radial Exposure filter for more information.
Radial TintTints the image using multi-color, radially graduated filters.
1 Apply Radial Tint from the HFX Grads/Tints category.
2 Try out some of the presets.
3 If the Parameters window is not showing, click the Parameters tab at the bottom of the Presets window.
4 Adjust the Radial Grad > Position, Size, Rotation and Aspect.
5 To set your own radial gradient colors, click on the Color 1, 2, 3 or 4 > Color boxes and select colors.
Color 1 is the top left quadrant of the image, Color 2 is the top right quadrant,
Color 3 is the bottom right quadrant and Color 4 is the bottom left quadrant.
6 If you want less coloring of the image, turn down Color 1, Color 2, Color 3 or Color 4 > Opacity.
7 Image highlights can be retained by adjusting the Preserve Highlights control to a value of 100.
8 Change your View to Gradient to see the color gradient being applied to the image.
9 Change your View back to Output to see the filtered image.
Dfx User Guide • • •••

•
Filter Tutorials 157
• • • •••
You can also mask out a portion of the Radial Tint effect using a Spot mask.
10 To use a Spot mask with the Radial Tint, click on Spot > Enable.
11 Set the Spot > Radius, Falloff Radius and Falloff.
12 Click the Done button to apply the filter to your image.
See the Radial Tint filter for more information.
RainbowRecreates arced rainbows of spectral colors, usually identified as red, orange,
yellow, green, blue, indigo, and violet, that appear in the sky as a result of the
refractive dispersion of sunlight in drops of rain or mist.
1 Apply Rainbow from the Light category.
2 Choose Light > Blend > Add, Screen or Normal blend mode.
Add will burn out highlights while Screen will retain them. Normal uses a normal
composite function to add the rainbow.
3 In the Light menu, adjust the Brightness, and if you’d like, set the Displacement and Blur of the rainbow.
4 Set the base of the rainbow using Crop > Offset, Angle and Softness.
5 Adjust the position of the rainbow by clicking and dragging the center image point to the desired location.
6 Set the Rainbow > Radius, Aspect, and Thickness as desired.
7 Combine the rainbow with a matte by changing Rainbow > Blend from Rainbow Only to Matte.
Matte only adds the rainbow in the areas of the matte. If you are not seeing
enough of the rainbow, your matte should be adjusted.
8 Change your View selector to Matte to see the matte values.
The default matte settings are preset to a highlight matte. The areas that are
white in the matte are the areas where the rainbow will be added into the image.
The location of the rainbow within the scene can be adjusted by changing the
Matte > Position and Range parameters.
Dfx User Guide • • •••

•
Filter Tutorials 158
• • • •••
9 Change the View selector from Matte to Output.
10 Change the Matte > Position parameter if you want to change where you see the rainbow.
11 Increase the Matte > Range value to add more of the rainbow to the scene. Decrease to see less of the rainbow.
12 Increase the Matte > Blur parameter to soften the matte.
13 Click the Done button to apply the filter to your image.
See the Rainbow filter for more information.
RaysCreate stunning and realistic light ray effects quickly and easily.
1 Apply Rays from the Light category.
2 Move the point control in the center of the screen to change the source point from which the rays will emanate.
3 Adjust the Rays > Length, Color > Brightness and Color as desired.
4 To limit the amount of rays, increase the Rays > Threshold parameter.
Threshold controls the amount of rays based on a brightness threshold. Fewer
rays with more definition are generated at higher threshold values.
5 Use the Shimmer > Amount and Phase to randomize the rays.
6 Click the Done button to apply the filter to your image.
See the Rays filters for more information.
ReLightLight can be added to a scene where none existed before. A complete set of
light source controls allow you to adjust the light just as you would at the time
of shooting.
Dfx User Guide • • •••

•
Filter Tutorials 159
• • • •••
1 Apply Relight from the Light category.
2 Using the Light Source > DVE > Crop, Scale, and Rotate controls, you can move the light source around.
To adjust the light source position, drag the point control in the center of the
Viewer and to adjust the Corner Points, just click and drag to the desired
location.
3 In the Light menu, adjust the Brightness, Displacement, and Blur of the light.
Adding blur to the light makes the light glow.
4 To apply a custom light color to the image, click on the Light > Color box and select a color.
5 To choose one of the GamColor gels, select a gel from the Light > GamColor Presets list.
6 Combine the light source with a matte by changing Shape > Blend from Shape Only to Multiply.
I like the Multiply blend mode because it only adds the light source in the areas
of the matte.
7 Change your View selector to Matte to see the matte values.
The default Matte settings are preset to a highlight matte to create the light
effect. If you are not seeing sufficient light, your matte should be adjusted. The
areas that are white in the matte are the areas where light will be added into the
image. The location of the light within the scene can be adjusted by changing
the Matte > Position and Range parameters.
8 Change the Matte > Position parameter if you want to select different values to be used for the matte.
9 Increase the Matte > Range control to add more values to the matte. Decrease for less values.
10 Change the View selector from Matte to Output.
11 Increase the Matte > Blur parameter to soften the transition areas of the matte.
12 Click the Done button to apply the filter to your image.
See the ReLight filter for more information.
Dfx User Guide • • •••

•
Filter Tutorials 160
• • • •••
ReflectorSilver and gold reflectors allow you to add white or gold light into shadow areas.
1 Apply Reflector from the Light category.
2 Try out some of the presets.
At the top left of the Presets window, the presets are categorized into various
groups located inside a pop-up menu.
3 In the Presets window, choose a new preset group from the pop-up menu to see a different set of filter presets.
4 If the Parameters window is not showing, click the Parameters tab at the bottom of the Presets window.
5 Adjust the Brightness and Color settings to your liking.
In some of the filters, a matte is generated to create the desired effect--in this
case, light reflecting into the shadow areas.
6 Change your View to Matte to see the matte values.
The areas that are white in the matte are the areas where light will be
introduced. The location of the light within the scene can be adjusted by
modifying the Position and Range parameters.
7 Change the Position parameter if you want to select different values to be used for the matte.
8 Increase the Range controls to add more values to the matte. Decrease for less values.
9 Change your View to Output to see the filtered image.
10 Click the Done button to apply the filter to your image.
See the Reflector filter for more information.
Dfx User Guide • • •••

•
Filter Tutorials 161
• • • •••
Satin®Designed with modern digital lenses and camera sensors specifically in mind
to enhance the natural beauty of talent with minimal signs of filtration. This filter
gently adds a minimal flare to highlights and reduces contrast while
suppressing facial blemishes and wrinkles.
The Black Satin® filter gently controls highlights, reduces contrast and adds a
grittier look than regular satin filters, while also suppressing facial blemishes
and wrinkles.
1 Apply Satin® from the HFX Diffusion category.
2 Select the Magnifier tool in the Viewer.
When the Magnifier is selected, a portion of the image is displayed at a 1:1 pixel
ratio in the Magnifier window and shows the actual pixels of the image with the
Satin® filter applied. The Magnifier will accurately represent what the Satin®
filter will look like when applied to the full size image.
3 Try out some of the presets.
At the top left of the Presets window, the presets are categorized into various
groups located inside a pop-up menu.
4 In the Presets window, choose a new preset group from the pop-up menu to see a different set of filter presets.
5 If the Parameters window is not showing, click the Parameters tab at the bottom of the Presets window.
6 Adjust Detail > Smoothing to smooth out fine detail.
Smoothing uses an edge aware smoothing algorithm to minimize fine image
detail so that areas with courser detail are unaffected.
7 Adjust the Mist > Brightness, Blur and Color settings to your liking.
In some of the filters, a matte is generated to create the desired effect--in this
case, mist.
Dfx User Guide • • •••

•
Filter Tutorials 162
• • • •••
8 Change your View to Matte to see the matte values.
The areas that are white in the matte are the areas where mist will be
introduced. The location of the mist within the scene can be adjusted by
modifying the Matte > Position and Range parameters.
9 Change the Matte > Position parameter if you want to select different values to be used for the matte.
10 Increase the Matte > Range control to add more values to the matte. Decrease for less values.
11 Increase the Matte > Blur parameter to soften the transition areas of the matte.
12 Change your View to Output to see the filtered image.
13 Click the Done button to apply the filter to your image.
See the Satin filters for more information.
Selective Color CorrectColors can be selectively isolated through the use of a matte and adjusted
using hue, saturation, brightness, gamma, contrast, temperature,
cyan/magenta, red, green, and blue controls.
1 Apply Selective Color Correct from the Color category.
2 Change your View to Matte to see the matte values.
In some of the filters, a matte is generated to create the desired effect--in this
case, selective color correction.
3 Adjust the matte controls so that the areas that you want to color correct are white in the matte.
Go to the Matte parameters to see how they work.
4 Change your View to Output to see the image.
5 Adjust the color correct parameters to your liking.
6 Click the Done button to apply the filter to your image.
Dfx User Guide • • •••

•
Filter Tutorials 163
• • • •••
See the Selective Color Correct filter for more information.
Selective SaturationThe saturation of the image can be adjusted independently in the shadows,
midtones and highlights.
1 Apply Selective Saturation from the Color category.
2 Try out some of the presets.
3 If the Parameters window is not showing, click the Parameters tab at the bottom of the Presets window.
4 Adjust the Saturation in the Shadows, Midtones or Highlights.
In some of the filters, a matte is generated to create the desired effect--in this
case, selective saturation. Shadow, midtone and highlight mattes have been
preset for you to adjust the saturation selectively in those areas.
5 Change your View to Shadows, Midtones or Highlights to see the matte values.
The areas that are white in the matte are the areas that will be adjusted by the
Saturation sliders. The areas defined as shadows, midtones or highlights can
be adjusted by modifying the Position and Range parameters.
6 Use the Shadows, Midtones or Highlights Position parameters if you want to select different values to be used for the matte.
7 Increase the Shadows, Midtones or Highlights Range controls to add more values to the matte. Decrease for less values.
8 Change your View to Output to see the image.
9 Click the Done button to apply the filter to your image.
See the Selective Saturation filter for more information.
Dfx User Guide • • •••

•
Filter Tutorials 164
• • • •••
Sepia / 812® WarmingSepia creates a warm brown tone for that nostalgic feeling while the 812®
Warming filter, a Tiffen exclusive, improves skintones and is ideal for portraits
taken on a cloudy day or in outdoor shade on a sunny day.
1 Apply Sepia or 812® Warming from the HFX Grads/Tints category.
2 Try out some of the presets.
3 If the Parameters window is not showing, click the Parameters tab at the bottom of the Presets window.
4 Adjust the Color > Amount, Opacity, Preserve Highlights and Exposure Compensation sliders to your liking.
The Sepia or 812® Warming color can be applied through a gradient creating
a graduated transition between the colored portion and the original image.
5 Click on the Grad > Enable checkbox to activate the Grad.
6 Adjust the Grad > Type, Corner Points, Size and Angle.
To adjust the Corner Points, just click and drag them to the desired location.
Go to the Grad section of Common Filter Controls to see how the Grad controls
work.
7 Click the Done button to apply the filter to your image.
See the Sepia and 812® Warming filters for more information.
SharpenEnhances the sharpness or focus by selectively increasing the contrast
between adjacent pixels along edges in an image.
1 Apply Sharpen from the Image category.
Dfx User Guide • • •••

•
Filter Tutorials 165
• • • •••
2 Select the Magnifier tool in the Viewer.
When the Magnifier is selected, a portion of the image is displayed at a 1:1 pixel
ratio in the Magnifier window and shows the actual pixels of the image with the
Sharpen filter applied. The Magnifier will accurately represent what the
Sharpen filter will look like when applied to the full size image.
3 Try out some of the presets.
4 If the Parameters window is not showing, click the Parameters tab at the bottom of the Presets window.
Note: If you are applying multiple filters, it is best to apply the Sharpen filter first.
5 Adjust the Radius to determine the size of the edges you wish to sharpen.
6 Drag the Amount slider to control how much contrast is added at the edges.
The Threshold control determines how different the sharpened pixels must be
from surrounding areas before they are considered edge pixels and sharpened.
7 Move the Threshold slider if necessary.
Low values sharpen more image areas while higher threshold values sharpen
less.
See the Sharpen filter for more information.
Smoque®Mechanical smoke generators are often used to enhance realism where smoke
is normally encountered. This can be difficult, costly and less desirable to work
in a smoke-filled environment. The Smoque® filter creates the look of smoke
without the cost and hassle of smoke generators.
1 Apply Smoque® from the HFX Diffusion category.
2 Try out some of the presets.
Dfx User Guide • • •••

•
Filter Tutorials 166
• • • •••
3 If the Parameters window is not showing, click the Parameters tab at the bottom of the Presets window.
4 Adjust the Smoke > Brightness, Blur and Color settings to your liking.
In some of the filters, a matte is generated to create the desired effect--in this
case, smoke.
5 Change your View to Matte to see the matte values.
The areas that are white in the matte are the areas where smoke will be
introduced. The location of the smoke within the scene can be adjusted by
modifying the Matte > Position and Range parameters.
6 Change the Matte > Position parameter if you want to select different luminance values to be used for the matte.
7 Increase the Matte > Range value to add more smoke into the scene. Decrease for less smoke.
8 Change your View to Output to see the filtered image.
9 Increase the Matte > Blur parameter to soften the transition areas of the matte.
10 Click the Done button to apply the filter to your image.
See the Smoque® filter for more information.
Soft ContrastSoft Contrast diminishes highlights while retaining the darker look of the
shadows.
1 Apply Soft Contrast from the Color category.
2 Try out some of the presets.
3 If the Parameters window is not showing, click the Parameters tab at the bottom of the Presets window.
Dfx User Guide • • •••

•
Filter Tutorials 167
• • • •••
In some of the filters, a matte is generated to create the desired effect--in this
case, lowering highlight contrast.
4 Change your View to Highlights to see the matte values.
The areas that are white in the matte are the areas that will be adjusted using
the Highlights slider. The areas defined as highlights can be adjusted by
modifying the Position and Range parameters.
5 Use the Position parameter if you want to select different values to be used for the matte.
6 Increase the Range control to add more values to the matte. Decrease for less values.
7 Change your View to Output to see the image.
8 Click the Done button to apply the filter to your image.
See the Soft Contrast filter for more information.
Soft/FX® / Warm Soft/FX®Softens and minimizes facial imperfections while retaining overall image clarity.
Warm Soft/FX® Effects adds a warming filter.
1 Apply Soft/FX® from the HFX Diffusion category.
2 Try out some of the presets.
At the top left of the Presets window, the presets are categorized into various
groups located inside a pop-up menu.
3 In the Presets window, choose a new preset group from the pop-up menu to see a different set of filter presets.
4 If the Parameters window is not showing, click the Parameters tab at the bottom of the Presets window.
5 Adjust the Blur and Opacity parameters to your liking.
6 If using a Warm Soft/FX® preset, adjust the Temperature > Color, Opacity, Preserve Highlights and Exposure Compensation sliders to your liking.
Dfx User Guide • • •••

•
Filter Tutorials 168
• • • •••
7 Click the Done button to apply the filter to your image.
See the Soft/FX® / Warm Soft/FX® filters for more information.
Soft LightProvides soft, digitally diffused and virtually shadowless light.
1 Apply Soft Light from the Light category.
2 Try out some of the presets.
3 If the Parameters window is not showing, click the Parameters tab at the bottom of the Presets window.
4 Select either the Blend > Add or Screen Blend mode.
Add will burn out highlights while the Screen Mode will retain them.
5 Adjust the Brightness to set the intensity of the light.
6 Use the Blur sliders to control the softness of the light.
7 To apply a custom light color to the image, click on the Color box and select a color.
8 To apply a colored gel to the light, select one from the Gamcolor Presets pop-up menu.
9 Click the Done button to apply the filter to your image.
See the Soft Light filter for more information.
Split FieldSplit Field splits the image with a line that can be positioned, rotated and
blurred. On one side of the line, the image is blurred and on the other, it is in
focus.
1 Apply Split Field from the Lens category.
Dfx User Guide • • •••

•
Filter Tutorials 169
• • • •••
2 Try out some of the presets.
3 If the Parameters window is not showing, click the Parameters tab at the bottom of the Presets window.
4 Adjust the Blur controls.
5 Position, Rotate and Blur the split line using the Split controls.
6 Click the Done button to apply the filter to your image.
See the Split Field filter for more information.
Split ToneShadows, midtones and highlights can be individually tinted with the Split tone
filter.
1 Apply Split Tone from the HFX Grads/Tints category.
2 Turn up the Opacity slider in the Shadows, Midtones or Highlights.
3 Change the Split Tone colors by clicking on the Color boxes.
In some of the filters, a matte is generated to create the desired effect--in this
case, split toning.
4 Change your View to Shadows, Midtones or Highlights to see the matte values.
The areas that are white in the matte are the areas that will be tinted by the
selected tint color. The areas defined as Shadows, Midtones or Highlights can
be adjusted by modifying the Position and Range parameters.
5 Adjust the Shadows, Midtones or Highlights > Position and Range controls to change what is considered to be Shadows, Midtones or Highlights.
6 Change your View to Output to see the image.
7 Click the Done button to apply the filter to your image.
See the Split Tone filter for more information.
Dfx User Guide • • •••
•
Filter Tutorials 170
• • • •••
StreaksThe Streaks filter creates horizontal or vertical streaks around highlights in the
image.
1 Apply Streaks from the Light category.
2 Try out some of the presets.
At the top left of the Presets window, the presets are categorized into various
groups located inside a pop-up menu.
3 In the Presets window, choose a new preset group from the pop-up menu to see a different set of filter presets.
4 If the Parameters window is not showing, click the Parameters tab at the bottom of the Presets window.
5 Adjust either the Vertical or Horizontal Streaks controls.
Note: If you adjust both the Vertical and Horizontal Streak controls at the same time, the Streak effect will be lost.
6 Select either the Add or Screen Blend mode. Add will burn out highlights while the Screen mode will retain them.
7 Adjust the Streak > Brightness and Color settings to your liking.
In some of the filters, a matte is generated to create the desired effect--in this
case, streaks.
8 Change your View to Matte to see the matte values.
The areas that are white in the matte are the areas where streaks will be
introduced. The location of the streaks within the scene can be adjusted by
modifying the Matte > Position and Range parameters.
9 Change the Matte > Position parameter if you want to select different values to be used for the matte.
10 Increase the Matte > Range control to add more values to the matte. Decrease for less values.
11 Change your View to Output to see the filtered image.
Dfx User Guide • • •••

•
Filter Tutorials 171
• • • •••
12 Click the Done button to apply the filter to your image.
See the Streaks filter for more information.
Sunset/TwilightSunset/Twilight applies three photographic filters to the image which are
blended together with a gradient.
1 Apply Sunset/Twilight from the HFX Grads/Tints category.
2 Try out some of the presets.
3 If the Parameters window is not showing, click the Parameters tab at the bottom of the Presets window.
4 Adjust the Grad > Type, Corner Points, Size and Angle.
To adjust the Corner Points, just click and drag them to the desired location.
Go to the Grad section of Common Filter Controls to see how the Grad controls
work.
5 To change the Sunset/Twilight colors, click on the Color 1, 2 or 3 > Color box and select a color.
6 If you want less coloring of the image, turn down Color 1, Color 2 or Color 3 > Opacity.
7 Image highlights can be retained by adjusting the Preserve Highlights control to a value of 100.
8 Change your View to Grad to see the color gradient being applied to the image.
9 Change your View back to Output to see the filtered image.
10 Click the Done button to apply the filter to your image.
See the Sunset/Twilight filter for more information.
Dfx User Guide • • •••

•
Filter Tutorials 172
• • • •••
TextureApplies textures to an image for a stylized look.
1 Apply Texture from the Special Effects category.
2 Try out some of the presets.
3 If the Parameters window is not showing, click the Parameters tab at the bottom of the Presets window.
4 Adjust the Amount slider to control how much texture is applied to the image.
5 Increase the Complexity to generate a more detailed, repetitive texture.
6 Use Randomize to change the look of the texture.
7 Adjust the position of the texture by clicking and dragging the center image point to the desired location.
8 You can also use the DVE controls to transform the texture.
9 Click the Done button to apply the filter to your image.
See the Texture filter for more information.
Three Strip / Two Strip
Three StripKnown and celebrated for it ultra-realistic, saturated levels of color, the
Technicolor® Three Strip process was commonly used for musicals, costume
pictures and animated films. It was created by photographing three black and
white strips of film each passing through red, green and blue filters on the
camera lens and then recombining them in the printing process. Our Three
Strip filter was created under the direction of Academy Award Winning Visual
Effects Supervisor Rob Legato.
Dfx User Guide • • •••

•
Filter Tutorials 173
• • • •••
Two StripThe Technicolor® Two Strip process was the first stab at producing color
motion pictures and consisted of simultaneously photographing two black and
white images using red and green filters. This look creates an odd but pleasing
hand-painted look where faces appear normal and green takes on a blue-green
quality, while the sky and all things blue appear cyan. Our Two Strip filter was
created under the direction of Academy Award Winning Visual Effects
Supervisor Rob Legato.
1 Apply Three Strip or Two Strip from the Film Lab category.
2 Try out some of the presets.
3 If the Parameters window is not showing, click the Parameters tab at the bottom of the Presets window.
4 Change your View to Red, Green or Blue to see the matte values.
In some of the filters, a matte is generated to create the desired effect--in this
case, modifying the intensity of the red, green and blue values.
Normally, the areas that are white in the matte are the areas that will be
adjusted by a particular filter or control. The Red, Green and Blue Intensities,
on the other hand, make adjustments where you see black in the matte.
5 Adjust the Intensity of whatever color channel you are viewing and you will see that certain values become darker. These are the values that will be intensified in the color image.
6 Change your View to Output to see the color image.
7 Adjust the Red, Green and Blue Intensities until you have the desired levels of red, green and blue in the image.
Note: When using the Two Strip filter, adjusting the Blue Intensity will darken image areas that were blue in the source image.
8 You may need to use the Red, Green and Blue Smooth controls to smooth out any noise that may have appeared if the intensities were turned up to high values.
The Smooth controls are set to a low value by default.
9 Set the Opacity to a lower level if the strength of the effect looks too strong.
Dfx User Guide • • •••

•
Filter Tutorials 174
• • • •••
Color Correct controls are also provided for additional control.
10 Click the Done button to apply the filter to your image.
See the Three Strip / Two Strip filters for more information.
TintTints the entire image with a selected color using a variety of colorization
modes.
1 Apply Tint from the HFX Grads/Tints category.
2 Try out some of the presets.
3 If the Parameters window is not showing, click the Parameters tab at the bottom of the Presets window.
4 To apply a different color to the image, click on the Tint > Color box and select a new color.
5 Try out the different colorization methods in the Color > Color Mode pop-up menu.
6 If you want less tinting of the image, turn down the Tint > Opacity.
If you want, the image can be converted to black and white before the tint is
applied.
7 From the Black and White > Filter pop-up menu, select the type of black and white filter to be applied to your color image.
Your choice of filter can dramatically change the black and white result.
Use the Brightness, Contrast and Gamma controls to further adjust the image.
You can also use a gradient in combination with the Tint.
8 To use a gradient with the Tint, click on Grad > Enable.
9 Adjust the Grad > Type, Corner Points, Size and Angle.
To adjust the Corner Points, just click and drag them to the desired location.
Dfx User Guide • • •••

•
Filter Tutorials 175
• • • •••
Go to the Grad section of Common Filter Controls to see how the Grad controls
work.
10 If you are curious, you can see what the Grad looks like by changing your View to Grad. Change your View to Output when done.
11 Click the Done button to apply the filter to your image.
See the Tint filter for more information.
Tone AdjustTone Adjust approximates the appearance of high dynamic range images by
adjusting the tonal values. Specifically, detail is recovered from the darker
portions of the images and can optionally be denoised.
1 Apply Tone Adjust from the Color category.
2 Try out some of the presets.
3 If the Parameters window is not showing, click the Parameters tab at the bottom of the Presets window.
4 Adjust the Amount slider to brighten shadow areas.
5 If image noise becomes more prominent as a result of the Amount adjustment, use the DeNoise slider to minimize the noise in those areas.
In some of the filters, a matte is generated to create the desired effect--in this
case, brightening shadow areas.
6 Change your View to Matte to see the matte values.
The areas that are white in the matte are the areas that will be adjusted. The
shadow areas to be brightened can be adjusted by modifying the Position and
Range parameters.
7 Use the Position parameter if you want to select different values to be used for the matte.
8 Increase the Range control to add more values to the matte. Decrease for less values.
Dfx User Guide • • •••

•
Filter Tutorials 176
• • • •••
9 Change your View to Output to see the image.
10 Click the Done button to apply the filter to your image.
See the Tone Adjust filter for more information.
Ultra ContrastTiffen was recognized with a Technical Achievement Award from the Academy
of Motion Picture Arts and Sciences for the Ultra Contrast optical filter which
redistributes ambient light to capture details that would be lost in shadows.
Contrast is lowered evenly throughout the image with no flare or halation.
1 Apply Ultra Contrast from the Color category.
2 Try out some of the presets.
3 If the Parameters window is not showing, click the Parameters tab at the bottom of the Presets window.
4 Adjust the Shadows > Shadows slider to brighten shadow areas.
5 Adjust the Highlights > Highlights slider to darken highlight areas.
In some of the filters, a matte is generated to create the desired effect--in this
case, lowering contrast.
6 Change your View to Shadows or Highlights to see the matte values.
The areas that are white in the matte are the areas that will be adjusted by
either the Shadows or Highlights sliders. The areas defined as Shadows or
Highlights can be adjusted by modifying the Position and Range parameters.
7 Use the Shadows or Highlights > Position parameters if you want to select different values to be used for the matte.
8 Increase the Shadows or Highlights > Range controls to add more values to the matte. Decrease for less values.
9 Change your View to Output to see the image.
Dfx User Guide • • •••

•
Filter Tutorials 177
• • • •••
10 Click the Done button to apply the filter to your image.
See the Ultra Contrast filter for more information.
Vari-StarVariable multi-point star patterns are generated on highlights in the image.
1 Apply Vari-Star from the Light category.
2 Try out some of the presets.
3 If the Parameters window is not showing, click the Parameters tab at the bottom of the Presets window.
4 Adjust the Star > Brightness, Spokes, Size and Color settings to your liking.
In some of the filters, a matte is generated to create the desired effect--in this
case, a star filter.
5 Change your View to Matte to see the matte values.
The matte has been preset to a highlight matte to generate the stars. Different
luminance values can be selected with the Matte > Position parameter and the
range of matte values can be adjusted using Matte > Range.
6 Change the Matte > Position parameter if you want to select different luminance values to be used for the matte.
Stars will be generated wherever there are white values in the matte.
7 Change your View to Stars to see the generated stars.
8 Increase the Matte > Range value to add more stars into the scene. Decrease for less stars.
9 Change your View to Output to see the filtered image.
10 Click the Done button to apply the filter to your image.
See the Vari-Star filter for more information.
Dfx User Guide • • •••

•
Filter Tutorials 178
• • • •••
VignetteA vignette, or soft fade, is a popular photographic effect where the photo
gradually fades into the background, usually in a circular or rectangular shape.
The vignette can be any color as well as thrown out of focus.
1 Apply Vignette from the Lens category.
2 Try out some of the presets.
3 If the Parameters window is not showing, click the Parameters tab at the bottom of the Presets window.
4 Adjust the Shape > Roundness to make the vignette either circular or rectangular and use Shape > Softness to control the softness of the vignette’s edge.
5 To give the vignette’s edge a random shape, use the Distortion, Distortion Size and Randomize controls.
6 Set the Vignette > Color and Opacity.
The vignette can be either colored or defocused or a combination of the two.
7 Turn down the Vignette > Opacity if you would like to see only a blurred vignette.
8 Turn up the Vignette > Horizontal and Vertical Blur to your liking.
9 Click the Done button to apply the filter to your image.
See the Vignette filter for more information.
Water DropletsSimulates the circular, rainbow colored optical effects produced by tiny water
droplets in clouds, mist and fog.
1 Apply Water Droplets from the Light category.
2 Try out some of the presets.
Dfx User Guide • • •••

•
Filter Tutorials 179
• • • •••
3 If the Parameters window is not showing, click the Parameters tab at the bottom of the Presets window.
4 Choose Light > Blend > Add or Screen blend mode.
Add will burn out highlights while Screen will retain them.
5 In the Light menu, adjust the Brightness as well as the Displacement and Blur of the rainbow if you’d like.
6 Adjust the position of the rainbow by clicking and dragging the center image point to the desired location.
7 You can also use the Rainbow > Scale control to transform the rainbow.
8 Combine the rainbow with a matte by changing Rainbow > Blend from Rainbow Only to Matte.
Matte only adds the rainbow in the areas of the matte. If you are not seeing
enough of the rainbow, your matte should be adjusted.
9 Change your View selector to Matte to see the matte values.
The default matte settings are preset to a highlight matte. The areas that are
white in the matte are the areas where the rainbow will be added into the image.
The location of the rainbow within the scene can be adjusted by changing the
Matte > Position and Range parameters.
10 Change the View selector from Matte to Output.
11 Change the Matte > Position parameter if you want to change where you see the rainbow.
12 Increase the Matte > Range value to add more of the rainbow to the scene. Decrease to see less of the rainbow.
13 Increase the Matte > Blur parameter to soften the matte.
14 Click the Done button to apply the filter to your image.
See the Water Droplets filter for more information.
Dfx User Guide • • •••

•
Filter Tutorials 180
• • • •••
Wide Angle LensSimulates the effect of a wide angle lens.
1 Apply Wide Angle Lens from the Lens category.
2 Start by adjusting the Distortion control to add the desired wide angle look.
You may need to also adjust the X and Y Correction parameters which
compensate for the deformation introduced with the Distortion parameter.
3 Click the Done button to apply the filter to your image.
Note: Wide Angle Lens must be applied as the first layer (bottom of the layer stack) when multiple layers are used. Otherwise, all filters below will not be rendered.
See the Wide Angle Lens filter for more information.
X-RaySimulates the look of X-Ray images.
1 Apply X-Ray from the Special Effects category.
2 Try out some of the presets.
3 If the Parameters window is not showing, click the Parameters tab at the bottom of the Presets window.
4 From the Black and White > Filter pop-up menu, select the type of black and white filter to be applied to your color image.
Your choice of filter can dramatically change the black and white result.
5 Use the Brightness, Contrast and Gamma controls to further adjust the image.
6 Adjust the Color if you would like to tint the image to something other than blue.
7 Click the Done button to apply the filter to your image.
See the X-Ray filter for more information.
Dfx User Guide • • •••

•
Dfx User Interface 181
• • • •••
DFX USER INTERFACE
Dfx is comprised of 4 main components: Viewer, Filters, Presets/Parameters,
and Effect.
Effect
Viewer
Filters
Parameters & Presets
Dfx User Guide • • •••

•
Dfx User Interface 182
• • • •••
ViewerThe Viewer is where images are viewed, edited and manipulated.
FiltersThe Filters window at the bottom of the screen is categorized by filter function
and displays a thumbnail for each filter.
Dfx User Guide • • •••

•
Dfx User Interface 183
• • • •••
Presets and ParametersPresets and Parameters share the same window space on the right side of the
screen.
PresetsThe Presets window allows you to select from existing filter presets.
Dfx User Guide • • •••

•
Dfx User Interface 184
• • • •••
ParametersThe Parameters window displays the current filter’s parameters. Adjusting the
parameters will update and change the image in the Viewer.
Dfx User Guide • • •••

•
Dfx User Interface 185
• • • •••
VariationsThe Variations window allows you to create your own filter variations and
becomes visible when a parameter name is selected in the Parameters
window.
Dfx User Guide • • •••

•
Dfx User Interface 186
• • • •••
EffectThe Effect window shows all filters that have been applied to your image.
Dfx User Guide • • •••
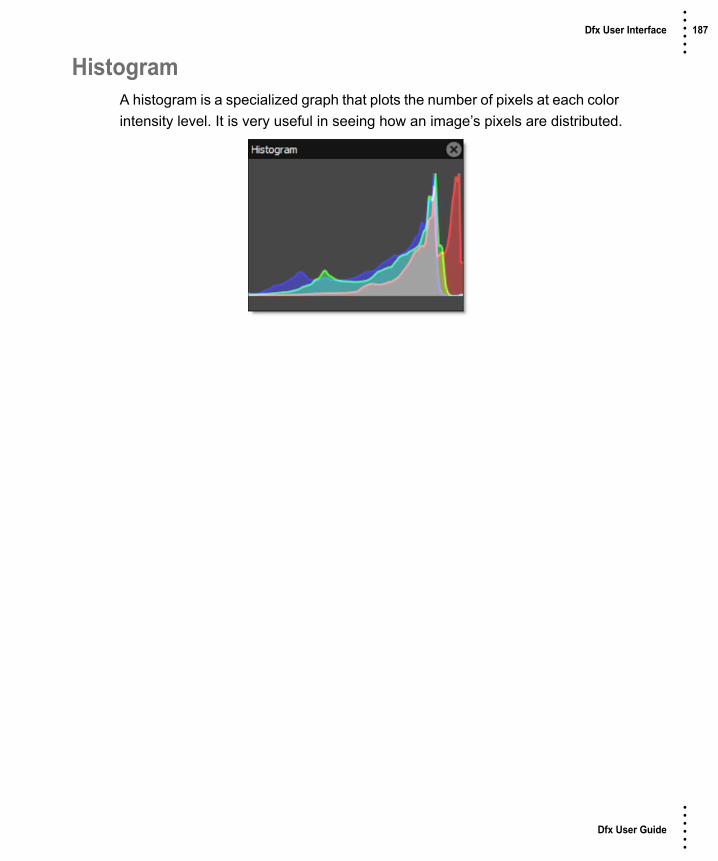
•
Dfx User Interface 187
• • • •••
HistogramA histogram is a specialized graph that plots the number of pixels at each color
intensity level. It is very useful in seeing how an image’s pixels are distributed.
Dfx User Guide • • •••

•
Dfx User Interface 188
• • • •••
MagnifierWhen the Magnifier is selected, a portion of the image is displayed at a 1:1 pixel
ratio in the Magnifier window and shows the actual pixels of the image with the
current filter applied.
ToolbarThe Toolbar contains various tools to manipulate your image.
Windows and AdjustmentsThe Dfx interface contains multiple windows. Windows can be closed, torn off
to be a floating window, or moved to a new location.
Dfx User Guide • • •••

•
Dfx User Interface 189
• • • •••
Opening and Closing1 Windows:
• Double-click on a window’s title bar to make it a floating window.
• A floating window can be re-docked by double-clicking it’s title bar.
• Click the Close (X) icon to close a window.
• Once a window has been closed, it can be reopened by selecting it from the View > Window pull-down menu.
Moving Windows:
• Click and drag a docked window’s title bar and place it in a new location in the user interface. Note how the interface adjusts to accommodate the moved window.
• Click and drag a floating window’s title bar and place it in a new location.
• If you drop the window in the center of an existing window, a tab will be created so that both windows will share the same space.
Title Bar
Dfx User Guide • • •••

•
Dfx User Interface 190
• • • •••
SashesBy clicking and dragging the sashes, dividing lines between areas of the
screen, you can customize the Dfx interface.
Tool TipsHovering the cursor over an icon will pop up a tool tip that displays its function.
Dfx User Guide • • •••

•
Dfx User Interface 191
• • • •••
Value Field LengthYou can resize the Value field by clicking and dragging the dividing line between
Parameter and Value at the top of the Parameters window. This is useful if the
Parameter names are getting cut off.
Parameter GroupsParameter groups in the Parameters window can be expanded and collapsed
using the plus and minus icons located to the left of the group.
Slider PrecisionYou can adjust any slider with finer precision by pressing Ctrl(Win)/Cmd(Mac)
while dragging the slider.
Dfx User Guide • • •••

•
Dfx User Interface 192
• • • •••
Combo Box AdjustmentCombo boxes allow you to adjust a parameter in various ways.
Number FieldHighlight the numbers, type in a new number and hit Enter.
Spin ControlsClick on the up and down triangles of the Spin controls to adjust the value.
Slider Pop-UpThe slider is hidden but can be accessed by clicking either the parameter icon
or on the greater than character “>” to the right of the Spin controls.
Image InfoLocated at the bottom-right of the Dfx interface, the Image Info displays the
image size and bit depth.
Number Field
Spin Controls
Slider Pop-Up
Dfx User Guide • • •••

•
Pull-down Menus 193
• • • •••
PULL-DOWN MENUS
File
SetupsA Setup takes a snapshot of the filters and masks applied to your image in the
Effect window. Setups can be saved and loaded and are independent of the
image they were originally applied to.
Open SetupOpens a previously saved Setup.
Save SetupTakes a snapshot of all filters and masks applied to your image in the Effect
window and saves it as a Setup file. This Setup file can later be loaded to the
same or a different image.
Recent SetupsThe last five recently opened or saved Setups can be selected and opened
here.
PreferencesPreferences allow you to customize default settings.
Language
NormalThe language displayed in Dfx is set according to your operating system.
EnglishForces the language to English.
FrenchForces the language to French.
GermanForces the language to German.
Dfx User Guide • • •••

•
Pull-down Menus 194
• • • •••
JapaneseForces the language to Japanese.
SpanishForces the language to Spanish.
Note: A restart is required after changing the Language preference for the selected language to be displayed.
Thumbnail SizeYou can select whether the Dfx interface uses either a small or large thumbnail
size. Medium thumbnails are the default.
SmallSmall thumbnails are used in the Dfx interface.
MediumMedium thumbnails are used in the Dfx interface.
LargeLarge thumbnails are used in the Dfx interface.
Preview SizeDfx works at a maximum resolution as defined by the Preview Size--the default
being 1024 by 1024 pixels. Never fear, when your image is saved, Dfx always
processes at the resolution of the original image.
1024Dfx works at a maximum resolution of 1024 x 1024 pixels.
2048Dfx works at a maximum resolution of 2048 x 2048 pixels.
4096Dfx works at a maximum resolution of 4096 x 4096 pixels.
DownsamplingAt large preview sizes, interaction may slow down when adjusting filter
parameters. To maintain fast processing during adjustments, you can enable
Downsampling.
Dfx User Guide • • •••

•
Pull-down Menus 195
• • • •••
AdaptiveAutomatically downsamples the image if required.
2:1Automatically downsamples the image by a factor of 2.
4:1Automatically downsamples the image by a factor of 4.
8:1Automatically downsamples the image by a factor of 8.
Preview Scaling
PointUses a lower quality scaling method when displaying the image in the Viewer.
Point is more accurate when applying filters such as grain and sharpen, but
when zooming in, the image will display “chunky” artifacts.
BicubicUses a smooth scaling method when displaying the image in the Viewer.
Bicubic can mask the effect of grain and sharpen filters because of its inherent
smoothing, but doesn’t suffer from the Point methods chunkiness when
zooming in.
GPU RenderingEnables or disables GPU rendering.
Save Setup With Image
ApertureAperture can now retrieve your Dfx setup information consisting of filters, layers
and masks. To do this, apply Dfx and render. If you then apply Dfx to the newly
rendered version, your previous Dfx setup will be shown and can be modified.
This behavior can be disabled via the Save setup with image preference.
Dfx User Guide • • •••

•
Pull-down Menus 196
• • • •••
LightroomLightroom can now retrieve your Dfx setup information consisting of filters,
layers and masks. To do this, you need to use “Edit Copy with Lightroom
Adjustments” and render the result. If you then apply Dfx to the newly rendered
version and use “Edit Original”, your previous Dfx setup will be shown and can
be modified.
Photoshop
By default, Photoshop remembers your previous Dfx setup consisting of filters, layers
and masks will all be displayed when you reapply Dfx and they can all be modified.
Edit
Undo/RedoUndo or redo operations.
Undo/Redo HistoryUndo/Redo has a history, so you can jump to any item in the history by picking
it from the menu.
DeleteDeletes the selected filter.
View
WindowThe Dfx user interface is broken up into individual windows which can be
opened or closed by selecting or deselecting them from the View menu. The
following windows can be opened or closed:
ConsoleDisplays diagnostic information.
Copy to ClipboardCopies the contents of the Console to the Clipboard.
Dfx User Guide • • •••

•
Pull-down Menus 197
• • • •••
OptionsOpenGL
Displays the OpenGL version information.
Rendering Statistics
Displays rendering times.
EffectOpens or closes the Effect window. See Effect for more information.
FiltersOpens or closes the Filters window. See Filters for more information.
HistogramOpens or closes the Histogram window. See Histogram for more information.
MagnifierOpens or closes the Magnifier window. See Magnifier for more information.
ParametersOpens or closes the Parameters window. See Parameters for more
information.
PresetsOpens or closes the Presets window. See Presets for more information.
VariationsOpens or closes the Variations window. See Variations for more information.
ResetResets the window layout the next time Dfx is started. This is useful if you have
tweaked your windows beyond recognition.
Zoom InZooms the image in.
Zoom OutZooms the image out.
Dfx User Guide • • •••

•
Pull-down Menus 198
• • • •••
Fit Image to WindowFits the image to the window.
LayoutsThere are 4 preset layouts that automatically arrange the interface windows
into different configurations.
Default LayoutThe interface is configured with the default Dfx layout where all windows are
shown.
Edit LayoutThe Edit Layout shows the Viewer, Presets and Parameters windows.
View LayoutThe View Layout shows only the Viewer.
Dual Monitor LayoutThe Dual Monitor Layout shows the Viewer on the left monitor and all other
windows on the right monitor.
Layout Shortcuts
Help
User GuideOpens the Dfx User Guide.
Shortcut Action
F2 Selects the Default Layout
F3 Selects the Edit Layout
F4 Selects the View Layout
F5 Selects the Dual Monitor Layout
Dfx User Guide • • •••

•
Pull-down Menus 199
• • • •••
Help Shortcuts
AboutShows the Dfx version.
LicenseOpens the Deactivation Options window which has two choices: Internet
Deactivate (Recommended) and Advanced Options.
Shortcut Action
F1 Opens the Dfx User Guide
Dfx User Guide • • •••

•
Viewer 200
• • • •••
VIEWER
The Viewer is where images are viewed, edited and manipulated.
Zoom and Pan
Zoom InZooms the image in.
Zoom LevelDisplays the zoom level as a percentage.
Dfx User Guide • • •••

•
Viewer 201
• • • •••
Zoom OutZooms the image out.
Zoom to FitFits the entire image inside the Viewer.
ZoomSelect the Zoom Region icon and drag select a square region in the Viewer to
zoom in on that area.
PanPans the image left, right, up and down.
See the Viewer Keyboard Shortcuts for more zooming and panning options.
CompareCompares images using Side-by-Side, Vertical Split, Horizontal Split, A/B or
Snapshot comparison modes. By default, the current filter and original image
are selected for comparison. Choose one of the comparison modes using the
icons above the Viewer.
The View/Compare icon in the Effect window determines which layers are used
in the comparison.
Dfx User Guide • • •••

•
Viewer 202
• • • •••
Side-by-Side ComparisonCompares images side by side in the Viewer.
Dfx User Guide • • •••

•
Viewer 203
• • • •••
Vertical Split ComparisonCompares images using a vertical split. Move your cursor into the image area
over the split line and when the cursor changes to a double-arrow, click and
drag to move the split. Depending on the filter used, the split line may not be
obvious, so triangular sashes on the outside of the image help you find it. If you
drag the sash all the way around, it will swap directions.
Dfx User Guide • • •••

•
Viewer 204
• • • •••
Horizontal Split ComparisonCompares images using a horizontal split. Move your cursor into the image
area over the split line and when the cursor changes to a double-arrow, click
and drag to move the split. Depending on the filter used, the split line may not
be obvious, so triangular sashes on the outside of the image help you find it. If
you drag the sash all the way around, it will swap directions.
A/B ComparisonWhen the A/B Comparison button is selected,
a Show Other View icon appears. Clicking it cycles through the images.
Dfx User Guide • • •••

•
Viewer 205
• • • •••
SnapshotWhen the Snapshot icon is enabled, a snapshot of the image in the Viewer is
taken as well as the layer’s mask, if there is one.
A View Snapshot icon then appears and allows the use of the various
comparison modes to compare the snapshot to the other layers or different filter
settings.
Viewer Options
Show MaskCycles the display between the full color image and the Mask channel.
HistogramA histogram is a specialized graph that plots the number of pixels at each color
intensity level. It is very useful in seeing how an image’s pixels are distributed.
Dfx User Guide • • •••

•
Viewer 206
• • • •••
MagnifierWhen the Magnifier is selected, a portion of the image is displayed at a 1:1 pixel
ratio in the Magnifier window and shows the actual pixels of the image with the
current filter applied.
Why use the Magnifier? Well, for best performance, Dfx works at a maximum
resolution as defined by the Preference > Preview Size--the default being 1024
by 1024 pixels. Never fear, when your image is saved, Dfx always processes
at the resolution of the original image. In any case, for certain filters such as
Chromatic Aberration, DeNoise, Faux Film, Film Stocks, Grain, Match, Night
Vision, Sharpen, Diffusion/FX®, Glimmerglass®, and HDTV/FX®, it is best to
make adjustments while viewing the image at a 1:1 pixel ratio. The Magnifier
accurately represents what the filter will look like when applied to the full size
image.
Dfx User Guide • • •••

•
Viewer 207
• • • •••
1:1Makes the image in the Magnifier window a 1:1 zoom ratio and shows the
actual pixels of the image. The 1:1 setting accurately represents what the filter
will look like when applied to the full size image.
Zoom InClick the Zoom In icon to zoom into the image within the Magnifier. This is only
available once the image has been zoomed out and you can’t zoom in beyond
100%.
Zoom OutClick the Zoom Out icon to zoom out on the image within the Magnifier.
Magnifier Notes:
-The Magnifier window will only display the current layer’s filter.
- When using the Clone brush in the Paint filter, the clone source must be visible in the Magnifier window to see painted areas of the frame.
- The Magnifier zoom controls are disabled for the following filters for performance reasons: Chromatic Aberration, Close-Up Lens, Lens Distortion, Paint’s Clone brush and Wide Angle Lens.
To navigate the Magnifier window:
1 Select the Magnifier tool above the Viewer.
2 Click and drag in the Magnifier window to pan.
3 Use the Magnifier zoom controls to zoom the image in or out within the Magnifier.
4 Resize the Magnifier window to see more of the image when using the 1:1 zoom settings.
Dfx User Guide • • •••

•
Viewer 208
• • • •••
Viewer Keyboard Shortcuts
Shortcut Action
Middle-mouse drag Pans the image
Space Bar+drag Pans the image
I Key Zooms the image in
O Key Zooms the image out
Zoom icon+Drag a square Zooms into the defined area
Scroll wheel over image Zooms the image in and out
Middle-mouse double click Fits the image to the window
Ctrl(Win)/Cmd(Mac)+click A/B Comparison
Turns off A/B Comparison mode, if enabled,
F Fits the image to the window
M Cycles the display between the full color image and the Mask channel
H Opens the Histogram window
1 Opens the Magnifier window
Dfx User Guide • • •••

•
Filters 209
• • • •••
FILTERS
The Filters window at the bottom of the screen is categorized by filter function
and displays a thumbnail for each filter. The following filter categories are listed:
Film Lab, HFX Diffusion, HFX Grads/Tints, Image, Lens, Light and Special
Effects.
You can find detailed information on each filter later in this guide.
Dfx User Guide • • •••

•
Filters 210
• • • •••
Wrap FiltersCertain filter categories have a lot of filters and depending on the size of the
window, there may be a horizontal scroll bar so that you can navigate to any
filter not currently shown on the screen. To change to a vertical scroll bar, click
the Wrap Filters icon at the far right of the Filters window.
Dfx User Guide • • •••

•
Presets and Parameters 211
• • • •••
PRESETS AND PARAMETERS
Presets and Parameters share the same window space on the right side of the
screen, with Presets shown as the default. Either Presets or Parameters is
selectable in a tab at the bottom of the window.
PresetsThe Presets window allows you to select from a set of pre-defined presets.
When the Presets tab is selected at the bottom of the Presets and Parameters
window (the default), the Presets window is visible and displays the current
filter’s available presets.
Dfx User Guide • • •••

•
Presets and Parameters 212
• • • •••
Presets for most filters have been created so that you can easily click through
the various choices.
Most filters contain multiple preset groups which are selectable at the top of the
window.
Dfx User Guide • • •••

•
Presets and Parameters 213
• • • •••
Clicking once on a preset modifies the image in the Viewer. As you click on
different presets, the image in the Viewer will update. This allows you to quickly
try out several different presets.
Once you have found a preset that you like, click on the Add Layer icon at the
top left of the Effect window to add the filter as a layer. Additional filters can then
be added.
Note: Double-clicking on a thumbnail in the Presets window automatically adds the filter to the image in the Viewer as well as a layer in the Effect window.
Preset SearchingPresets can be searched for by entering text in the search field located at the
top of the Presets window. The pattern remains in effect when you switch filters,
but it will clear automatically when you switch layers in the Effect window or
apply a preset. Clear the search text to return the Presets window to it’s normal
state.
To search for a preset:
1 Select a filter, for instance HFX Grads/Tints > Gels.
2 In the Presets window search field, type red.
All presets with red in the name are shown.
3 In the search field, type sun|blue.
Any preset with sun or blue in the name is shown.
Dfx User Guide • • •••

•
Presets and Parameters 214
• • • •••
FavoritesPresets can be tagged as a Favorite allowing them to be sorted separately in
the Presets window as well as in the Favorites tab of the Filters window.
You can tag a preset as a Favorite by selecting the preset and pressing the
Toggle Favorite icon located at the top right of the Presets window.
Presets tagged as a favorite display a yellow star at the top right of the preset.
To sort the Presets window by Favorites, select Favorites in the Presets pop-
up menu.
Presets Right-Click MenuRight-click over a preset to open Preset options.
RenameRight-click on a preset, select Rename and type in the new name.
Dfx User Guide • • •••

•
Presets and Parameters 215
• • • •••
DeleteRight-click on a preset and select Delete.
Make DefaultRight-click on a preset and select Make Default. The default preset is the one
that is applied to the image when a filter is selected and the one shown in the
Filter window. Changing the default will take effect the next time you start Dfx.
Restore
Default PresetsRestores the Default preset for each filter. The restore happens the next time
you select the filter.
Deleted PresetsRestores deleted presets.
Renamed PresetsRestores renamed presets. The restore happens the next time you select the
filter.
To Factory DefaultRestores all presets to the default factory settings.
ParametersWhen the Parameters tab is selected at the bottom of the Presets and
Parameters window, the Parameters window is visible and displays the current
filter’s parameters.
Dfx User Guide • • •••

•
Presets and Parameters 216
• • • •••
Adjusting the parameters will update and change the image in the Viewer.
Slider controls can be adjusted in the following ways:
• Clicking and dragging the slider.
• You can adjust with finer precision by pressing Ctrl(Win)/Cmd(Mac) while dragging the slider.
• Clicking on the number to the right of the slider, typing in the desired value and hitting Enter.
• Hover the cursor over a slider and use the mouse scroll wheel to make the adjustment. Scrolling up raises the value while scrolling down lowers it.
Pop-up menus can be adjusted in the following ways:
• Click on the pop-up menu and make a selection.
• Hover the cursor over a pop-up menu and use the mouse scroll wheel to change the selection.
Dfx User Guide • • •••

•
Presets and Parameters 217
• • • •••
Create Custom PresetCreates a custom preset in the Presets window based on the current parameter
settings. You must name the preset prior to creating it by using the name field
to the left of the Add Preset icon.
Reset to DefaultsResets all of the parameters for the currently selected preset to the built-in
defaults.
Dfx User Guide • • •••

•
Variations 218
• • • •••
VARIATIONS
Variations based on either one or two parameters can be created and are
displayed as thumbnails in a window below the Parameters and Presets
window.
To display the Variations window and create variations, pick a filter and click on
a parameter name in the Parameters window.
Dfx User Guide • • •••

•
Variations 219
• • • •••
Ranges, Toggles, and Color parameters are available for creating variations.
When you select a parameter, the Variations window appears and you'll see the
variations being generated on that parameter. Click on a second parameter and
it will generate variations between the two.
The first parameter you click on will be the dominant parameter - it'll go across
the top of the Variations tab. So, you can get different results depending on the
order you select the parameters. Click on a selected parameter to toggle it back
off again.
Note: You can only have one or two parameters selected at a time. If you click on a third parameter, the last parameter you clicked on will deselect itself. If you deselect both of the parameters or switch effects, the Variations window will disappear because the variations are no longer being generated.
Variations are generated based on the current effect parameters. So, you can
pick some parameters for your variation, then go back to the Presets window
and pick a different Preset, and the variations will regenerate.
Variation Controls
Maximum Number of VariationsSets the number of variations.
Parameter Value SpreadDetermines the difference from one variation to another.
Dfx User Guide • • •••

•
Variations 220
• • • •••
Auto GenerateVariations are constantly being generated every time you select a parameter or
click on a variation thumbnail.
GenerateWhen Auto Generate is off, you must click the Generate icon to update the
variations after new parameters are selected.
Dfx User Guide • • •••

•
Effect 221
• • • •••
EFFECT
The Effect window shows all filters that have been applied to your image. The
most recently applied filter is at the top of the stack, while the earlier
applications are at the bottom. When you click on a thumbnail, the Viewer
displays that layer.
Dfx User Guide • • •••

•
Effect 222
• • • •••
Layer Controls
Layer NameDisplays the Layer name. Just type in this field to rename the layer.
Layer OpacitySets the Layer’s opacity.
Layer Blend ModeLayers can be combined with the layer below using a variety of Blend modes.
The following layer blend modes are available: Normal, Darken, Multiply, Color
Burn, Linear Burn, Darker Color, Lighten, Screen, Color Dodge, Linear Dodge
(Add), Lighter Color, Overlay, Soft Light, Hard Light, Vivid Light, Linear Light,
Pin Light, Difference, Exclusion, Subtract, Hue, Saturation, and Color.
Go to Blend Modes for explanations of the various modes.
Add LayerWhen a filter has been selected, pressing Add Layer applies the current filter to
the image and creates a new layer.
Note: You can also use Add Layer even if no filter is applied. This way Layer Blend Modes can be used to create effects between layers.
EditClicking the Edit icon for a particular layer makes it active. Once active, you can
adjust the filter settings or replace the current filter with a different one.
Dfx User Guide • • •••

•
Effect 223
• • • •••
View/CompareThe View/Compare icon indicates which layer is shown in the Viewer and when
enabled for multiple layers, the Viewer’s Side-by-Side, Vertical Split, Horizontal
Split or A/B Comparison viewing modes become active. See the Compare
section of the Viewer for more information.
Clicking on the image thumbnail in the Effect window automatically activates
the View/Compare icon only for that layer and displays it in the Viewer.
Enable FilterDeactivate the filter by clicking the Enable Filter icon.
Enable MaskEnables masks attached to the layer. Masks can be used to limit where a filter
is applied to an image and are displayed to the right of the filter thumbnail.
See Masks for more information.
Click
Dfx User Guide • • •••

•
Effect 224
• • • •••
Manipulating Layers, Filters and Masks
Replacing EffectsDouble-click on an image thumbnail to make it the active layer or click the Edit
icon. Once active, you can replace the current filter with a different one. You can
tell which layer is active by the gray border surrounding it.
Deleting FiltersThere are a number of ways to delete a filter.
1 Double-click an image thumbnail in the Effect window and hit the Delete key.
2 Click on the X at the top right of an image thumbnail.
3 Right-click on an image thumbnail and select Delete Filter.
Deleting MasksThere are a number of ways to delete a mask.
1 Double-click a mask thumbnail in the Effect window and hit the Delete key.
2 Click on the X at the top right of a mask thumbnail.
3 Right-click on a mask thumbnail and select Delete Mask.
4 Right-click on an image thumbnail and select Delete Masks to delete all masks for the selected layer.
Deleting LayersRight-click on an image thumbnail and select Delete Layer. Delete Layer is only
available when a layer has been added in the Effect window.
Dfx User Guide • • •••

•
Effect 225
• • • •••
Drag and Drop LayersThe ordering of layers in the Effect window can be changed by dragging and
dropping them to a new location. To do so, click and drag on the layer’s title bar
to the right of the filter name and release in the new location.
When the mouse button is released, the layer is moved to the new location.
Before After
Dfx User Guide • • •••

•
Effect 226
• • • •••
Drag and Drop Filters and MasksDrag and Drop FiltersFilters from one layer can be copied to another layer using drag and drop. Click
and drag on the layer’s image thumbnail and release the mouse on the layer’s
image thumbnail where you want to copy the filter. When the cursor hovers over
the image thumbnail of another layer, the cursor changes to a + sign indicating
that it is OK to release the mouse.
When the mouse button is released, the destination filter is replaced with the
source filter.
Before After
Dfx User Guide • • •••

•
Effect 227
• • • •••
Drag and Drop MasksMasks can be copied using drag and drop. Click and drag on one of the layer’s
mask thumbnails and release the mouse on the layer’s mask thumbnail where
you want to copy the mask. When the cursor hovers over the mask thumbnail
of another mask, the cursor changes to a + sign indicating that it is OK to
release the mouse.
When the mouse button is released, the destination mask is replaced with the
source mask. If you release the mouse over a layer without a mask, the mask
will be added to the layer.
Before After
Dfx User Guide • • •••

•
Toolbar 228
• • • •••
TOOLBAR
The Toolbar contains Done, Cancel, Reset and Add Mask buttons. When Add
Mask is clicked on and a mask type is chosen, it’s controls also appear in the
Toolbar.
DoneThe values of the parameter adjustments in the Dfx user interface are
transferred to your host application.
CancelCloses without making any changes.
Reset AllResets Dfx back to the original image with nothing applied to it.
Add MaskAdds a Mask to the current layer. Masks can be used to limit where a filter is
applied to an image and are displayed to the right of the filter thumbnail.
See Add Mask in the Masks section for more information.
Dfx User Guide • • •••

•
Toolbar 229
• • • •••
Adjusting Toolbar ControlsWhen certain tools are selected, for instance the masking tools, their controls
appear in the Toolbar. Adjusting the controls is pretty straightforward except in
the case of tools with numeric values where the slider is hidden, but can be
accessed by clicking either the parameter icon or on the greater than character
“>” to the right of the Spin controls.
As with the numeric controls in the Parameters window, you can also click
directly on the numbers, type in a new number and hit Enter.
Dfx User Guide • • •••

•
Masks 230
• • • •••
MASKS
Masks allow you to limit the effect of a filter by revealing it only in white areas
of the mask. White is on, black is off and gray areas in between represent a
level of transparency.
Masks are displayed to the right of the image thumbnail in the Effect window.
General Mask ControlsThe various mask types consist of a combination of on-screen and toolbar
controls.
Photo © THINKSTOCK LLC--www.thinkstock.com
Dfx User Guide • • •••

•
Masks 231
• • • •••
Add MaskUsing the Add Mask icon in the Toolbar, one of seven mask types can be
applied to a layer: Gradient, Spot, Path, Snap, EZ Mask, Selection and Paint.
Masks can be used to limit where a filter is applied to an image and are
displayed to the right of the layer’s image thumbnail in the Effect window.
Mask Blend ModeThe Blend mode controls how the current mask is combined with the previous
mask and is only active when more than one mask has been applied.
NormalNormal blends masks based on each mask’s transparency.
Dfx User Guide • • •••

•
Masks 232
• • • •••
SubtractThe pixels of one mask are subtracted from another mask.
MultiplyProduces a result where there is a union of pixels from two masks.
Invert MaskInverts the current mask.
Mask OpacitySets the opacity of the current mask.
Mask BlurSets the blur level of the EZ Mask, Path, Selection and Snap masks.
Inner BlurThe mask is blurred inward from the edge of the mask.
Centered BlurThe blur is centered on the edge of the mask, equally blurring inward and
outward.
Dfx User Guide • • •••

•
Masks 233
• • • •••
Outer BlurThe mask is blurred outward from the edge of the mask.
Dfx User Guide • • •••

•
Masks 234
• • • •••
Gradient MaskCreates a linear top to bottom or left to right gradient and is adjusted using the
four points around the corners of the image as well as controls in the Toolbar.
Go to the Gradient Mask Tutorial to see how it works.
The Gradient Mask consists of a combination of on-screen and toolbar controls.
Photo © THINKSTOCK LLC--www.thinkstock.com
Dfx User Guide • • •••

•
Masks 235
• • • •••
On-Screen ControlsCorner PointsThere are four points around the four corners of the image. By clicking and
dragging any of the four points, the Gradient mask can be adjusted.
Toolbar ControlsTop-to-bottomThe direction of the Gradient mask is from top to bottom.
Bottom-to-topThe direction of the Gradient mask is from bottom to top.
Left-to-rightThe direction of the Gradient mask is from left to right.
Right-to-leftThe direction of the Gradient mask is from right to left.
Gradient SizeThe size of the Gradient mask.
Dfx User Guide • • •••

•
Masks 236
• • • •••
Spot MaskCreates a circular spot mask and is adjusted using the two circular on-screen
controls as well as parameters in the Toolbar.
Spot Mask consists of a combination of on-screen and toolbar controls.
Photo © THINKSTOCK LLC--www.thinkstock.com
Dfx User Guide • • •••

•
Masks 237
• • • •••
On-Screen ControlsRadiusThe un-blurred radius of the spot is controlled using the inner on-screen circle.
Falloff RadiusThe blurred edge radius is controlled using the outer on-screen circle.
Toolbar ControlsAspect RatioThe aspect ratio of the spot.
FalloffMoves the falloff towards the spot centerpoint.
Path MaskA Path is an outline created by placing sequential points along an object. Think
of it as connecting the dots if you will. Although paths can be open or closed,
Dfx only makes use of closed paths. Drawing a path is often a good solution for
objects that can’t be masked in any other way.
Photo © THINKSTOCK LLC--www.thinkstock.com
Dfx User Guide • • •••

•
Masks 238
• • • •••
Go to the Path Mask Tutorial to see how it works.
Create a PathCreate a path by clicking on the image in the Viewer. With each click of the
mouse, a point is created. When done, click on the first point that was added to
close the shape.
Note: If shapes overlap, a hole in the path is created.
Closing Open PathsIf you neglect to close a path and would later like to close it, select one of the
end points and then select the other end point. The path will then close.
Selecting PointsIndividual or multiple points can be selected. Once selected, various point
editing operations are available.
Dfx User Guide • • •••

•
Masks 239
• • • •••
Point Selecting Shortcuts
Point EditingSignificant modification to the path is made possible by point editing controls
available through pop-up menus or keyboard shortcuts.
Point Editing Shortcuts
Shortcut Action
Click a point Selects one point
Click and drag over multiple points Selects multiple points
Ctrl+click on a point Toggles the selection on or off
Shift+click a point Adds the point to the current selection
Shortcut Action
Alt+click on a path Inserts a new point along the path
Delete key Delete all selected points
Click and drag selected points All selected points move
Click and drag an unselected point Moves one point
Alt+click+drag on a point Opens a slider to adjust the point’s tension. Left of center forces the path to curve through the point (Cardinal spline). The center position creates a corner point while the right position moves the curve towards the center of the path (B-Spline). If multiple points have been selected, they will all be set to the same tension.
Alt+click+drag+Shift on a point Snaps the point tension to Cardinal, Corner or B-Spline positions
Dfx User Guide • • •••

•
Masks 240
• • • •••
Point Editing Pop-up MenuRight-click over a path point or set of path points to open the Point pop-up
menu.
Show Control PointsIt is sometimes helpful to turn off the display of path points to see the accuracy
of your path. When turned off, you can still adjust the hidden points by
click+dragging on the path and the nearest point will be adjusted.
Menu Option Action
Cardinal Creates a path that passes smoothly through each point
Corner Creates a corner point
B-Spline Creates a path that is determined by the surrounding points
Dfx User Guide • • •••

•
Masks 241
• • • •••
Snap MaskSnap is an easy to use interactive image masking tool. Snap provides instant
visual feedback by snapping an editable curve to an object's boundary even if
it has vague or low contrast edges.
Go to the Snap Mask Tutorial to see how it works.
Snap consists of a combination of on-screen and toolbar controls.
Photo © THINKSTOCK LLC--www.thinkstock.com
Dfx User Guide • • •••

•
Masks 242
• • • •••
WorkflowUsing a coarse to fine editing approach, an area of the image is selected by first
marking the object and then refining the boundary. Object marking occurs at a
coarse level, which roughly defines an object by marking a few lines. Next,
boundary editing works at a finer scale by either clicking and dragging polygon
points to edit the object boundary or drawing a stroke along the object’s edge.
Dfx User Guide • • •••

•
Masks 243
• • • •••
Object MarkingInstead of tracing the boundary of an object, Snap uses lines and curves to
define the object.
FG Mark
Boundary BG Mark
BG Mark
Dfx User Guide • • •••

•
Masks 244
• • • •••
Mark ForegroundClick the Mark Foreground icon and draw lines to mark the foreground area--
the region to be isolated. With each click and drag of the mouse, a green line
is drawn.
Dfx User Guide • • •••

•
Masks 245
• • • •••
Mark BackgroundClick the Mark Background icon and draw lines to mark the background area.
With each click and drag of the mouse, a red line is drawn.
Note: You can automatically draw background lines by clicking the right mouse button and dragging.
As soon as the first background line is drawn, Snap calculates a boundary
curve that is displayed as a black and white dashed line around the object.
Dfx User Guide • • •••

•
Masks 246
• • • •••
Add additional FG and BG lines as needed so that your object is surrounded
by the boundary. Don't be concerned at this point if the boundary is not exactly
following your object. The curve can be refined further using the boundary
editing tools.
Boundary EditingEven though object marking does a pretty good job of creating an accurate
boundary, there can still be some errors, especially around vague or low
contrast edges. To remedy these errors, there are simple polygon point editing
tools to refine the object's boundary. Two tools are provided for polygon editing:
Edit Points and Override Edge. When either of these tools is selected, the
boundary created in the object marking step is converted into editable polygons
and you will see a noticeable refinement in the boundary.
Dfx User Guide • • •••

•
Masks 247
• • • •••
Edit PointsClick the Edit Points icon and drag points to adjust the shape of the polygon.
Compared with a simple polygon where you need to modify many points, Snap
uses far fewer points to define the object shape. You should see variation in the
boundary even though there are no points directly over the variations.
Note: The Edit Points icon can also be used to display and edit control points after the boundary is converted to a path.
Point Editing Shortcuts
Override Edge Click the Override Edge icon and draw a stroke along the edge of your object
where the boundary doesn’t correctly follow the edge.
Before After
Shortcut Action
Alt+click between two points Add points
Hover over point + Delete Key Delete points
Alt+drag a point Uses magnetism to snap a point to an object’s boundary
Dfx User Guide • • •••

•
Masks 248
• • • •••
Once a stroke has been drawn, Snap optimizes the object boundary. The
optimized boundary automatically snaps to the object boundary even though
the polygon points may not be on it.
An entire segment of the polygon is replaced by drawing a single stroke and is
much easier than dragging individual points.
Clear Foreground / Background MarksClears all foreground ad background marks.
Before Mark
After
Dfx User Guide • • •••

•
Masks 249
• • • •••
Convert Curve to a PathWhen happy with the boundary you have created, click the Convert Curve to a
Path icon to apply it to the layer and convert it to an editable path. Additional
boundaries can be created and applied to the layer. When boundaries overlap,
a hole in the mask is created.
Show Control PointsIt is sometimes helpful to turn off the display of path points to see the accuracy
of your path. When turned off, you can still adjust the hidden points by
click+dragging on the path and the nearest point will be adjusted.
Dfx User Guide • • •••

•
Masks 250
• • • •••
EZ MaskEZ Mask is an easy to use interactive image masking tool capable of isolating
almost any object in an image--even if you are dealing with fine hair detail,
smoke, or reflections.
To work this magic, EZ Mask iteratively estimates the transparency value for
every pixel in the image, based on a small sample of foreground (what you want
to isolate) and background pixels marked by simple strokes on the image.
Results show that compared with previous approaches, our method is more
efficient and requires minimal effort to extract high quality masks for
foregrounds with significant semi-transparent regions.
Go to the EZ Mask Tutorial to see how it works.
EZ Mask consists of a combination of on-screen and toolbar controls.
User Input Mask
Dfx User Guide • • •••

•
Masks 251
• • • •••
Mask CreationTrimapsEZ Mask creates masks by using a trimap--a pre-segmented image consisting
of three regions of foreground (what you want to isolate), background and
unknown. Partial opacity values are then computed only for pixels inside the
unknown region. Two trimap methods can be used: Stroke and Filled. When
creating masks, start with the Stroke method and move on to the Filled method
if the results are not satisfying.
StrokeUnlike previous approaches, our trimaps can be relatively sparse consisting of
individual foreground and background brush strokes. All pixels left unmarked
will be treated as unknown. After processing, if any fine foreground details are
missing from the mask, the Unknown brush can be used in these areas to help
recover lost detail.
Stroke trimaps require little user input, but when color ambiguity exists between
the foreground and background, a Filled trimap may create a more accurate
mask. In addition, Stroke trimaps will also take longer to render as they require
an extra calculation step.
Stroke Trimap Creation Tips & Tricks• Make sure you place enough foreground and background strokes. A good stroke
technique is to draw an inner outline around the object you are extracting using the Paint Foreground brush and an outer outline using the Paint Background brush.
Strokes Mask
Dfx User Guide • • •••

•
Masks 252
• • • •••
• The strokes should be near the boundary of the object, but not right up against the edge.
• Strokes that are closer to the boundary will dominate the creation of the mask.
• If the foreground or background has varying colors, the strokes should cover these colors.
• After processing the mask, if you see gray areas in the foreground object that should be completely white, make additional foreground marks in those areas.
• If you see gray mask areas in the background that should be completely black, make additional background marks.
• If any fine foreground details are missing from the mask, click on the Unknown brush and draw over them with the left mouse button. This instructs EZ Mask to pay special attention to these areas and will help recover lost detail.
• The general rule is don’t put different stroke types too close together unless you need to.
Warning: If you only provide a few sparse strokes, a Stroke trimap will take longer to process than a filled trimap.
Good Stroke Example Bad Stroke Example
Dfx User Guide • • •••

•
Masks 253
• • • •••
FilledForeground and background brush strokes are used to mark definite
foreground and background pixels while the Unknown brush is used to mark
unknown, or mixed regions. Using this method, the entire image is painted/filled
with one of the three brushes.
Filled trimaps process faster than Stroke trimaps and can result in extracting a
more accurate mask, most notably when color ambiguity exists between the
foreground and background. However, they can be tedious to create and tend
to fail for images with large portions of semi-transparent foreground where the
trimap is difficult to create manually.
Filled Trimap Creation Tips & Tricks• First, define unknown areas by selecting the Paint Unknown brush and drawing
around the edges of the foreground (what you want to isolate) with the left mouse button. Include as little solid foreground areas as possible.
• Ideally, the unknown region in the trimap should only cover transparent pixels whose actual values are not completely foreground or background. In other words, the unknown region in the trimap should be as thin as possible to achieve the best masking result.
• Next, fill in the solid foreground area by selecting the Paint Foreground brush and the Fill tool. Click inside the area defined by the blue, Unknown brush. The foreground area automatically fills in with the green foreground color.
• Last, mark background areas by using the Paint Background brush and the Fill tool. Since the Fill tool is already enabled, you don’t need to select it again. Click outside of the area defined by the blue, Unknown brush. The background area automatically fills in with the red background color.
Note: Large foreground objects take longer to process than small ones.
Filled Mask
Dfx User Guide • • •••

•
Masks 254
• • • •••
BrushesPaint ForegroundClick the Paint Foreground icon and draw to mark the foreground area--the
region to be isolated. With each click and drag of the mouse, a green line is
drawn.
Note: If you click with the left mouse button, press Shift and then click in a different location, a straight line is drawn. This will work with any brush type. If you keep Shift depressed while clicking, you will create interconnected straight lines. This is very useful when using a mouse.
Paint BackgroundClick the Paint Background icon and draw to mark the background area. With
each click and drag of the mouse, a red line is drawn.
Note: You can quickly create background strokes without selecting the Paint Background brush by painting with the right-mouse button. This temporarily draws with the Paint Background brush and when the right-mouse button is released, the previously selected brush becomes active.
Paint UnknownClick the Paint Unknown icon and draw to mark the unknown area. With each
click and drag of the mouse, a blue line is drawn.
When drawing a stroke trimap, certain foreground details may be missing after
the mask is generated. Using the Paint Unknown brush in these areas can
sometimes help recover lost detail.
Dfx User Guide • • •••

•
Masks 255
• • • •••
Paint MissingThe Paint Missing brush is used to mark missing foreground areas--fine details
such as strands of hair that may be missing after the mask is generated. Using
the Paint Missing brush in these areas can sometimes help recover lost detail.
With each click and drag of the mouse, a purple line is drawn.
Note: The Paint Missing brush has a Sensitivity parameter located in Settings (Wrench icon) > Process Options. It’s preset value will work for most images. However, the higher the value, the more details are brought out.
EraserErases existing brush strokes.
FillUsing the current brush, the Fill tool fills a region defined by a brush stroke or
the edges of the screen.
Brush Parameters
SizeSets the size of the brush.
Dfx User Guide • • •••

•
Masks 256
• • • •••
To set the brush size:
1 Click on the Brush Size icon, and drag the slider that appears.
or
2 Enter a value in the number field next to the Brush Size icon and hit Enter.
or
3 Resize the brush in the Viewer by holding Ctrl(Win)/Cmd(Mac) and dragging in or out.
Paint Overlay OpacitySets the opacity of the foreground, background and unknown brush strokes.
To set the paint overlay opacity:
1 Click on the Paint Overlay Opacity icon, and drag the slider that appears.
Dfx User Guide • • •••
•
Masks 257
• • • •••
or
2 Enter a value in the number field next to the Paint Overlay Opacity icon and hit Enter.
SettingsVarious EZ Mask preferences can be set by clicking the Settings icon.
Foreground ColorSets the color of the Paint Foreground brush.
Background ColorSets the color of the Paint Background brush.
Unknown ColorSets the color of the Paint Unknown brush.
Missing ColorSets the color of the Paint Missing brush.
Process Options
DeartifactBlurry artifacts can be generated while attempting to extract objects that have
drop shadows, similar colors to the background or out of focus edges.
Deartifact can be used to limit these artifacts.
Deartifact
Turns deartifact on or off.
Amount
Sets the amount of deartifacting.
Missing BrushSensitivity
Sets the sensitivity of the Missing Brush. The higher the value, the more details are brought out.
Dfx User Guide • • •••

•
Masks 258
• • • •••
ResetClears all brush strokes.
Mask Processing (Enter)Generate MaskGenerates the mask. Click this after creating either foreground and background
strokes or a filled trimap. You can use the Enter key to trigger the mask
processing.
Selection MaskSelection masks, also known as mattes, can be used to manipulate, isolate and
protect specific parts of an image when making adjustments or applying filters.
Dfx User Guide • • •••

•
Masks 259
• • • •••
Using advanced image slicing algorithms, masks are created using luminance,
hue, saturation, average, red, green, blue, cyan, magenta, and yellow values.
Go to the Selection Mask Tutorial to see how it works.
The Selection Mask consists of a combination of on-screen and toolbar
controls.
Extract OnExtract On selects the type of mask. Select whichever type isolates the desired
values.
A mask is created based on one of the following:
LuminanceA mask is created based on the luminance of the image.
HueA mask is created based on the hue of the image. When adjusting the Position
parameter, you are selecting different hues.
Original Mask
Hue Mask
Dfx User Guide • • •••

•
Masks 260
• • • •••
SaturationA mask is created based on the saturation of the image.
AverageA mask is created based on the average of the image’s RGB values.
RedA mask is created based on the image’s red values.
GreenA mask is created based on the image’s green values.
BlueA mask is created based on the image’s blue values.
CyanA mask is created based on the image’s cyan values.
MagentaA mask is created based on the image’s magenta values.
YellowA mask is created based on the image’s yellow values.
PositionThe Position value pinpoints the color values to be used in the mask. For a
luminance mask, a Position value of 100 would make a white mask of the
highlights and a value of 0 would make a white mask of the shadows. In our
Dfx User Guide • • •••

•
Masks 261
• • • •••
flower image, look at how the mask varies for different Position values in a red
extraction. When the Position is at a value of 100, the red flowers are shown as
white in the mask.
When the Position is moved to 50, the red flowers turn black.
Position=100, Range=25
Position=50, Range=25
Dfx User Guide • • •••

•
Masks 262
• • • •••
RangeIncreases or decreases the range of values in the mask. A low Range value
indicates a narrow range of values. A high Range value indicates a large range
of values included in the mask.
RadiusWhen the Radius control is increased, a soft, circular mask is created to limit
the mask.
On-Screen ControlsWhen using the Selection Mask, the Position, Range and Radius parameters
can be set using on-screen controls. Click on the image to place the on-screen
control which consists of a center point and a solid circle. The Position value is
Position=100, Range=50
Radius=50
Dfx User Guide • • •••

•
Masks 263
• • • •••
set by the location of the center point, while the Range is set by sizing the circle.
The larger the circle, the larger the range. If Radius is used, a dashed circle will
also appear.
Black ClipBlacks in the mask are made blacker by increasing this value. As the value
increases, more values are clipped to black. This is helpful for getting rid of
unwanted gray areas in what should be the black part of the mask.
Radius
Range
Position
Mask with No Black Clip Black Clip=50
Dfx User Guide • • •••

•
Masks 264
• • • •••
White ClipWhites in the mask are made whiter by increasing this value. As the value
increases, more values are clipped to white. This is helpful for getting rid of
unwanted gray areas in what should be the white part of the mask.
Paint MaskOrganic masks are created using a paint brush and the filter appears only in the
area of the paint stroke.
Go to the Paint Mask Tutorial to see how it works.
Paint Mask consists of a combination of on-screen brushes and toolbar
controls.
Note: If you have a large area that needs to be masked out, it may be more efficient to first use the Path Mask since Paint’s brush size does not exceed 500 pixels.
Mask with No White Clip White Clip=50
Dfx User Guide • • •••

•
Masks 265
• • • •••
Brush SizeSets the size of the brush.
To set the brush size:
1 Click on the Brush Size icon in the Toolbar, and drag the slider that appears.
or
2 Enter a value in the number field next to the Brush Size icon and hit Enter.
or
3 Resize the brush in the Viewer by holding Ctrl(Win)/Cmd(Mac) and dragging in or out.
Dfx User Guide • • •••

•
Masks 266
• • • •••
Brush SoftnessSets the brush softness.
To set the brush softness:
1 Click on the Brush Softness icon in the Toolbar, and drag the slider that appears.
or
2 Enter a value in the number field next to the Brush Softness icon and hit Enter.
Dfx User Guide • • •••

•
Masks 267
• • • •••
Brush OpacitySets the brush opacity. Painting with the right-mouse button automatically
paints with O opacity or black.
To set the brush opacity:
1 Click on the Brush Opacity icon in the Toolbar, and drag the slider that appears.
or
2 Enter a value in the number field next to the Brush Opacity icon and hit Enter.
Dfx User Guide • • •••

•
Common Filter Controls 268
• • • •••
COMMON FILTER CONTROLS
There are a number of common filter controls that appear in Dfx. For simplicity
they are listed here.
BlurHorizontalThe image is blurred by a quality blur along the X-axis.
VerticalThe image is blurred by a quality blur along the Y-axis.
GangThe horizontal and vertical slider values can be ganged together. When
ganged, moving the slider affects both values.
Black and WhiteSelects the type of black and white filter to be applied to your color image.
NormalConverts the color image to a monochrome image.
RedSimulates a red filter in black and white photography.
GreenSimulates a green filter in black and white photography.
BlueSimulates a blue filter in black and white photography.
YellowSimulates a yellow filter in black and white photography.
Dfx User Guide • • •••

•
Common Filter Controls 269
• • • •••
OrangeSimulates an orange filter in black and white photography.
DVEThe DVE allows you to transform your image using Position, Scale, Rotation,
Corner Pin and Crop controls. Why the name DVE? DVE is an acronym for
digital video effects and refers to a real-time image manipulation device which
does pans, rotations, flips as well as various hardware-specific effects such as
page turns or customized wipes. In the film and video post production industry,
DVE is frequently used in reference to transforming the image in some way.
CropTopCrops the image from the top down.
BottomCrops the image from the bottom up.
Left Crops the image from left to right.
RightCrops the image from right to left.
Corner PinThere are four points around the four corners of the image. By clicking and
dragging any of the four points, the image can be adjusted.
PositionPosition can be adjusted by clicking and dragging an on-screen control in the
center of the image.
ScaleScale XThe horizontal scale.
Dfx User Guide • • •••

•
Common Filter Controls 270
• • • •••
Scale YThe vertical scale.
Gang ScaleThe Scale X and Scale Y slider values can be ganged together.
RotateIn addition to the standard position and scale controls, you can rotate. Positive
values rotate clockwise and negative values rotate counter-clockwise.
GradGrad is the gradient transition area between the filtered image and the original.
Its direction, corners, size and angle can be adjusted.
EnableTurns the grad on and off.
ND BrightnessDarkens the colored portion of the grad.
TypeControls the direction of the grad.
Top-to-bottomThe direction of the grad is from top to bottom.
Bottom-to-topThe direction of the grad is from bottom to top.
Left-to-rightThe direction of the grad is from left to right.
Right-to-leftThe direction of the grad is from right to left.
Horizontal StripHorizontal strip grad.
Dfx User Guide • • •••

•
Common Filter Controls 271
• • • •••
Vertical StripVertical strip grad.
SizeThe size of the grad.
AngleThe angle of the grad.
Corner PinThere are four points around the four corners of the image. By clicking and
dragging any of the four points, the Grad can be adjusted.
MatteIn some of the filters, a matte is generated to create the desired effect. The
Matte controls consist of Position, Range and Blur parameters, and they work
the same in all of the filters. The white areas of the matte are the areas that will
Photo © THINKSTOCK LLC--www.thinkstock.com
Dfx User Guide • • •••

•
Common Filter Controls 272
• • • •••
be affected by the filter, while the black areas remain unaffected. The matte is
extracted based on luminance, in most cases, and is created using the Position
and Range parameters.
PositionSelects the values to be included in the matte. A higher Position value shows
more white values from the original image as white values in the matte. A lower
Position value shows more black values from the original image as white values
in the matte.
Position 0, Range 25 Position 100, Range 25Original
Photo © THINKSTOCK LLC--www.thinkstock.com
Dfx User Guide • • •••

•
Common Filter Controls 273
• • • •••
RangeControls the range of values to be used for the matte. Once you’ve selected the
“Position”, you can then add or subtract the “Range” of values to be included in
the matte. A higher Range value includes more white values in the matte while
a lower Range value includes less values in the matte.
BlurThe matte is blurred by a quality blur.
SpotA spot in the form of a radial gradient is used to limit the effect of the filter.
PositionThere is an on-screen control in the center of the image. By clicking and
dragging the on-screen control, the position of the spot can be adjusted.
AspectThe aspect ratio of the spot.
RadiusThe un-blurred radius of the spot.
Falloff RadiusThe blurred edge radius.
Position 100, Range 25 Position 100, Range 75Original
Dfx User Guide • • •••

•
Common Filter Controls 274
• • • •••
FalloffMoves the falloff towards the spot center point.
InvertInverts the spot.
Temperature
ColorSets the color through the use of a standard color picker.
OpacitySets the opacity of the warming or cooling.
Preserve HighlightsPreserves the white areas of the image.
Exposure CompensationExposure Compensation adds back the brightness loss as a result of the
warming or cooling.
ViewChooses what to view. The choices in this menu will change depending on the
filter.
Dfx User Guide • • •••

•
Ambient Light 275
• • • •••
AMBIENT LIGHT
DescriptionAmbient creates light without a defined source and contributes to the overall
brightness of a scene without casting shadows.
Go to the Ambient Light Tutorial to see how the filter works.
CategoryLight.
Controls
PresetsTo select a preset, pick one from the Presets window.
BrightnessSets the intensity of the light.
Before After
Copyright © 2008--www.iofoto.com
Dfx User Guide • • •••

•
Ambient Light 276
• • • •••
GamColor PresetsDigital equivalents of the lighting gels created by Gamproducts can be applied
to your light source. Select one of the GamColor presets from the pop-up list.
For detailed information about Gamproducts gels, visit their website at
www.gamonline.com.
ColorSets the color of the light through the use of a standard color picker.
Dfx User Guide • • •••

•
Auto Adjust 277
• • • •••
AUTO ADJUST
DescriptionAutomatically adjusts the image using Auto Color, Auto Contrast and Auto
Levels processes.
Go to the Auto Adjust Tutorial to see how the filter works.
CategoryColor.
Controls
PresetsTo select a preset, pick one from the Presets window.
TypeSelects from one of the three automatic adjustment processes.
Before After
Copyright © 2008--www.iofoto.com
Dfx User Guide • • •••

•
Auto Adjust 278
• • • •••
Auto ColorAuto Color adjusts the contrast and color of an image and is good for
neutralizing color casts.
Auto ContrastAuto Contrast automatically adjusts image contrast.
Auto LevelsAuto Levels automatically adjusts the white point and black point in an image.
Since each color channel is adjusted individually, it may remove or introduce
color casts.
OpacitySets the amount of auto adjustment.
Dfx User Guide • • •••

•
Black and White 279
• • • •••
BLACK AND WHITE
DescriptionBlack and White converts color images to black and white simulating the look
of Black and White photographic filters.
Go to the Black and White Tutorial to see how the filter works.
CategoryColor.
Controls
PresetsTo select a preset, pick one from the Presets window.
FilterThe Filter pop-up selects the type of black and white filter to be applied to your
color image. Go to the Black and White section of Common Filter Controls to
see how the Black and White controls work.
Before After
Copyright © 2008--www.iofoto.com
Dfx User Guide • • •••

•
Black and White 280
• • • •••
BrightnessAdjusts the brightness of the image. Positive values brighten, negative values
darken.
ContrastAdjusts the contrast of the image. Positive values increase contrast, negative
values decrease contrast.
GammaAdjusts the gamma of the image. The gamma adjustment leaves the white and
black points the same and only modifies the values in-between. Positive values
lighten the midtones, negative values darken the midtones.
Dfx User Guide • • •••

•
Bleach Bypass 281
• • • •••
BLEACH BYPASS
DescriptionBleach Bypass is a film laboratory technique where, by skipping the bleach
stage in the color processing sequence, silver is retained in the image along
with the color dyes. The result is effectively a black and white image
superimposed on a color image. Bleach Bypass images have increased
contrast, reduced saturation, often giving a pastel effect.
Go to the Bleach Bypass Tutorial to see how the filter works.
CategoryFilm Lab.
Controls
PresetsTo select a preset, pick one from the Presets window.
AmountSets the intensity of the bleach effect.
SaturationAdjusts the saturation of the image. Positive values saturate, negative values
desaturate.
Before After
Copyright © 2008--www.iofoto.com
Dfx User Guide • • •••

•
Bleach Bypass 282
• • • •••
ContrastAdjusts the contrast of the image. Positive values increase contrast, negative
values decrease contrast.
TemperatureSets the color temperature of the image. Dragging the slider to the right makes
the image cooler (bluer) and dragging the slider to the left makes the image
warmer (redder).
Dfx User Guide • • •••

•
Blur 283
• • • •••
BLUR
DescriptionBlurs the image with individual horizontal and vertical controls. It’s fast, high
quality and blurs outside the frame which removes the dark inward bleeding
edges of most blurs.
Go to the Blur Tutorial to see how the filter works.
CategoryLens.
Controls
BlurHorizontalThe image is blurred by a fast, quality blur along the X-axis.
VerticalThe image is blurred by a fast, quality blur along the Y-axis.
Before After
Copyright © 2008--www.iofoto.com
Dfx User Guide • • •••

•
Blur 284
• • • •••
GangThe horizontal and vertical slider values can be ganged together. When
ganged, moving the slider affects both values.
Dfx User Guide • • •••

•
Borders 285
• • • •••
BORDERS
DescriptionSelect from a variety of different pre-made borders or create your own.
Go to the Borders Tutorial to see how the filter works.
CategorySpecial Effects.
Controls
PresetsTo select a preset, pick one from the Presets window.
BorderTypeChoose from 11 different borders or Custom to create variable colored,
softened borders.
Before After
Copyright © 2008--www.iofoto.com
Dfx User Guide • • •••

•
Borders 286
• • • •••
OrientationThe orientation of border.
O degreesThe default orientation of the border.
90 degreesRotates the border 90 degrees.
180 degreesRotates the border 180 degrees.
270 degreesRotates the border 270 degrees.
InvertInverts the color of the border.
Note: Orientation and Invert are only used for the pre-made Border’s 1-11.
SizeThe size of the border.
ColorThe border color.
SoftnessThe softness of the border.
RoughnessThe roughness of the border.
RandomizeRandomizes the roughness of the border.
DVEThe DVE allows you to transform the image within the border using Position,
Scale, and Rotation. Why the name DVE? DVE is an acronym for digital video
effects and refers to a real-time image manipulation device which does pans,
rotations, flips as well as various hardware-specific effects such as page turns
Dfx User Guide • • •••

•
Borders 287
• • • •••
or customized wipes. In the film and video post production industry, DVE is
frequently used in reference to transforming the image in some way. Go to the
DVE section of Common Filter Controls to see how the DVE Controls work.
Dfx User Guide • • •••

•
Cartoon 288
• • • •••
CARTOON
DescriptionConverts the image into a cartoon.
Go to the Cartoon Tutorial to see how the filter works.
CategorySpecial Effects.
Controls
AmountAdjusts the amount of the cartoon effect.
DetailAdjusts the detail. If the slider is increased, you will see more detail while
decreasing the slider will have an overall smoothing effect.
Before After
Photo © THINKSTOCK LLC--www.thinkstock.com
Dfx User Guide • • •••

•
Cartoon 289
• • • •••
LineAdjusts the size of the cartoon’s outline.
Note: It is important to view the line strength in the Magnifier as there will be a difference in what you see in the Viewer. What you see in the Magnifier is what will be rendered.
Dfx User Guide • • •••

•
Center Spot / Warm Center Spot 290
• • • •••
CENTER SPOT / WARM CENTER SPOT
Description
Center SpotDiffuses and blurs distracting backgrounds while keeping a center spot in
focus. The center spot can be moved, sized and the amount of blur can be
controlled.
Before After
Copyright © 2008--www.iofoto.com
Dfx User Guide • • •••

•
Center Spot / Warm Center Spot 291
• • • •••
Warm Center SpotCombines the benefits of Center Spot with a warming filter making it ideal for
portraits and skintones.
Go to the Center Spot / Warm Center Spot Tutorial to see how the filters
work.
CategoryHFX Diffusion.
Controls
PresetsTo select a preset, pick one from the Presets window. If you would like to view
presets from a different category, use the pop-up menu at the top left of the
Presets window.
BlurSets how much the image is blurred.
Before After
Copyright © 2008--www.iofoto.com
Dfx User Guide • • •••

•
Center Spot / Warm Center Spot 292
• • • •••
SpotA spot in the form of a radial gradient is used to control where blur is added to
the image. Go to the Spot section of Common Filter Controls to see how the
Spot controls work.
TemperatureApplies a warming filter to the image. Go to the Temperature section of
Common Filter Controls to see how the Temperature controls work.
Dfx User Guide • • •••

•
Chromatic Aberration 293
• • • •••
CHROMATIC ABERRATION
DescriptionChromatic aberration is caused by a lens having a different refractive index for
different wavelengths of light and is seen as fringes of color around the edges
of the image. This fringing is removed by un-distorting the individual color
channels.
Go to the Chromatic Aberration Tutorial to see how the filter works.
There are some new types of color fringes that are not chromatic aberration.
These effects might be visible as purple or blue fringes and are visible around
overexposed areas in most cases. If the following conditions apply, your image
most likely has true chromatic aberration as opposed to color fringing caused
by sensor overloading:
• Corners should show most color fringes whereas the center should show none.
• Color fringes should be not only at the edges of overexposed areas but at lower contrast edges, too.
• Color fringes should be of complementary color (red-cyan, green/magenta, and blue-yellow) on opposite sides of a dark or bright area.
• Color fringes should be in all corners with the same direction and pointing out from the center.
Note: Chromatic Aberration must be applied as the first layer (bottom of the layer stack) when multiple layers are used. Otherwise, all filters below will not be rendered.
Before After
Dfx User Guide • • •••

•
Chromatic Aberration 294
• • • •••
CategoryLens.
Controls
Red/Cyan, Green/Magenta, Blue/YellowUse the appropriate color group to remove the chromatic aberration. For
instance, if you see red/cyan fringing, use the Red/Cyan group. Start by
adjusting the Distortion parameter.
Warning: The Viewer does not show an accurate representation of what the filter will look like when rendered. To visualize the final render, you must use the Magnifier at a 1:1 pixel ratio.
DistortionPulls the corners of the image in or out. Negative values pull the corners of the
image inward while positive values pull the corners of the image outward.
Anamorphic SqueezeAnamorphic Squeeze corrects for the squeeze found in anamorphic motion
picture lenses.
Curvature X and YCurvature X and Y correct for non-radial, asymmetric distortions found in
anamorphic motion picture lenses.
Note: Anamorphic Squeeze and Curvature X and Y only work once the Distortion parameter has been adjusted.
Center X and YDetermines the center point for the distortion.
Dfx User Guide • • •••

•
Close-Up Lens 295
• • • •••
CLOSE-UP LENS
DescriptionSimulates close-up lenses that allow you to zoom in extra close using high
quality digital filtering.
Go to the Close-Up Lens Tutorial to see how the filter works.
CategoryLens.
Note: Close-Up Lens must be applied as the first layer (bottom of the layer stack) when multiple layers are used. Otherwise, all filters below will not be rendered.
Controls
Scale XThe horizontal scale of the image.
Scale YThe vertical scale of the image.
Gang ScaleThe Scale X and Scale Y slider values can be ganged together.
Before After
Copyright © 2008--www.iofoto.com
Dfx User Guide • • •••

•
Close-Up Lens 296
• • • •••
PositionThe position of the image can be adjusted by clicking and dragging an on-
screen control in the center of the image.
RotateRotates the image. Positive values rotate clockwise and negative values rotate
counter-clockwise.
Dfx User Guide • • •••

•
Color Correctors 297
• • • •••
COLOR CORRECTORS
DescriptionDfx includes a number of different color correctors that are handy for adjusting
an image’s color. They include: Color Correct, F-Stop, Printer Points, Telecine
and Temperature.
Color CorrectColor Correct manipulates hue, saturation, brightness, contrast, gamma,
temperature, cyan/magenta, red, green and blue values of the overall image
and separately in user definable shadow, midtone and highlight areas.
F-StopF-Stop manipulates red, green and blue values of the overall image and
separately in user definable shadow, midtone and highlight areas using F-Stops
as the unit of measure. In camera terminology, F-Stops measure the size of the
lens opening, otherwise known as aperture. Each F-Stop is twice as bright as
the next.
Printer PointsPrinter Points manipulate the red, green and blue values of the overall image
and separately in user definable shadow, midtone and highlight areas using
motion picture laboratory printer points as the unit of measure. When creating
Before After
Copyright © 2008--www.iofoto.com
Dfx User Guide • • •••

•
Color Correctors 298
• • • •••
color prints for motion pictures, a contact printer performs scene-to-scene color
corrections. The most popular printing method is additive printing that uses
three separate colored sources - red, green, and blue which are combined to
form the light source that exposes the film. The red, green, and blue light valves
in the printer are adjusted in values of 1, 2, 3... up to 60 for each primary color
and are called printer points or printer lights.
TelecineTelecine emulates the method of color correction done in a telecine film to tape
transfer suite. Hue, saturation, brightness, contrast, gamma and pedestal
values of the overall image can be adjusted as well as separately in user
definable shadow, midtone and highlight areas.
TemperatureTemperature manipulates the temperature, cyan/magenta and brightness
values of the overall image and separately in user definable shadow, midtone
and highlight areas.
Go to the Color Correctors Tutorial to see how the filters work.
CategoryColor.
Master, Shadows, Midtones, HighlightsAll of the color correctors can adjust an image by using it’s master, shadows,
midtones and highlight groups. The Telecine filter uses the following
terminology: Lift (shadows), Gamma (midtones) and Gain (highlights). The
master settings affect the entire image while adjusting parameters within the
shadows, midtones and highlights will only affect those specific areas.
If you are unsure about what values are included in the shadows, midtones and
highlights, you can use the View pop-up menu. It will allow you to view the
shadows, midtones and highlights as a black and white matte. The white areas
are the areas that will be adjusted by that particular group. For instance, if you
see white areas while viewing the midtones, then midtone color adjustments
Dfx User Guide • • •••

•
Color Correctors 299
• • • •••
will affect only those white areas. If you want to change the default areas
defined by the shadows, midtones and highlights, you would use the Position
and Range sliders.
PositionThe Position slider pinpoints the values to be considered as shadows,
midtones, or highlights. A low Position value uses the darkest image values,
while a high Position value uses the brightest.
RangeIncreases or decreases the range of values considered as shadows, midtones
or highlights. A low Range value indicates a narrow range of values, while a
high Range value indicates a large range of values.
Go to the Matte section of Common Filter Controls to see how the Position and
Range controls work.
Color Correct
HueRotates the hue of the image.
SaturationAdjusts the saturation of the image. Positive values saturate, negative values
desaturate.
BrightnessAdjusts the brightness of the image. Positive values brighten, negative values
darken.
Original Shadows Midtones Highlights
Dfx User Guide • • •••

•
Color Correctors 300
• • • •••
ContrastAdjusts the contrast of the image. Positive values increase contrast, negative
values decrease contrast.
Gamma Adjusts the gamma of the image. The gamma adjustment leaves the white and
black points the same and only modifies the values in-between. Positive values
lighten the midtones, negative values darken the midtones.
TemperatureSets the color of the image to be either warmer or cooler. Dragging the slider to
the right makes the image cooler (bluer) and dragging the slider to the left
makes the image warmer (redder).
Cyan/MagentaAdds either Cyan or Magenta to the image. Dragging the slider to the right
makes the image more magenta and dragging the slider to the left makes the
image more cyan.
RedAdds or subtracts red from the image.
GreenAdds or subtracts green from the image.
BlueAdds or subtracts blue from the image.
FlashingThe Flash parameters mix a color into the image through the use of a standard
color picker. The default color is white. What in the world is this for? It is a great
way to add atmosphere to an element. Flash comes from the film term
“flashing”, which describes the optical process of lowering the contrast of an
image by flashing it with light.
Flash Amount Sets the opacity of the Flash Color.
Dfx User Guide • • •••

•
Color Correctors 301
• • • •••
Flash ColorThe Flash Color can be set through the use of a standard color picker.
F-Stop
Red ExposureAdds or subtracts red from the image.
Green ExposureAdds or subtracts green from the image.
Blue ExposureAdds or subtracts blue from the image.
GangThe Red, Blue and Green Exposure slider values can be ganged together.
When ganged, drag any exposure slider to affect all three values.
Printer PointsThe Red, Green and Blue Exposure are set to a value of 25 which represent no
adjustment. Printer “lights” or points set to 25, 25, 25 are considered to be the
normal or standard printer setup at most motion picture labs.
Red ExposureAdds or subtracts red from the image. As in motion picture printing, higher
values subtract and lower values add.
Green ExposureAdds or subtracts green from the image. As in motion picture printing, higher
values subtract and lower values add.
Blue ExposureAdds or subtracts blue from the image. As in motion picture printing, higher
values subtract and lower values add.
Dfx User Guide • • •••

•
Color Correctors 302
• • • •••
GangThe Red, Blue and Green Exposure slider values can be ganged together.
When ganged, drag any Exposure slider to affect all three values.
Telecine
HueRotates the hue of the image.
SaturationAdjusts the saturation of the image. Positive values saturate, negative values
desaturate.
BrightnessAdjusts the brightness of the image. Positive values brighten, negative values
darken.
ContrastAdjusts the contrast of the image. Positive values increase contrast, negative
values decrease contrast.
Gamma Adjusts the gamma of the image. The gamma adjustment leaves the white and
black points the same and only modifies the values in-between. Positive values
lighten the midtones, negative values darken the midtones.
PedestalAdjusts the black level of the image.
Temperature
TemperatureSets the color of the image to be either warmer or cooler. Dragging the slider to
the right makes the image cooler (bluer) and dragging the slider to the left
makes the image warmer (redder).
Dfx User Guide • • •••

•
Color Correctors 303
• • • •••
Cyan/MagentaAdds either Cyan or Magenta to the image. Dragging the slider to the right
makes the image more magenta and dragging the slider to the left makes the
image more cyan.
BrightnessAdjusts the brightness of the image.
Dfx User Guide • • •••

•
Color-Grad® 304
• • • •••
COLOR-GRAD®
DescriptionColor-Grad® can transform an average sunrise or sunset into something
spectacular or convert a dull, washed-out sky to a breathtaking blue. No other
filter has done as much to improve landscape photography as the graduated
filter. Add color selectively while leaving the rest of the scene unaffected by
using a graduated transition for a smooth color blend between the colored
portion and the original image. Presets for your favorite Color-Grad® filters are
provided as well as the ability to create custom colors.
Go to the Color-Grad® Tutorial to see how the filter works.
CategoryHFX Grads/Tints.
Filters
PresetsTo select a preset, pick one from the Presets window.
Before After
Copyright © 2008--www.iofoto.com
Dfx User Guide • • •••

•
Color-Grad® 305
• • • •••
ColorThe Color parameter sets the color of the grad through the use of a standard
color picker.
OpacitySets the opacity of the color filter.
Preserve HighlightsPreserves the white areas of the image.
Exposure CompensationExposure Compensation adds back the brightness loss as a result of the filter
application.
GradGrad is the transition area that goes from the tinted image to the original image.
Its direction, corners and size can be adjusted. Go to the Grad section of
Common Filter Controls to see how the Grad controls work.
Dfx User Guide • • •••

•
Color Infrared 306
• • • •••
COLOR INFRARED
DescriptionColor Infrared simulates infrared filters used in conjunction with infrared
sensitive film or sensors to produce very interesting false-color images with a
dreamlike or sometimes lurid appearance.
Go to the Color Infrared Tutorial to see how the filter works.
CategorySpecial Effects.
Controls
PresetsTo select a preset, pick one from the Presets window.
MagentaAdjusts the amount of magenta.
Before After
Copyright © 2008--www.iofoto.com
Dfx User Guide • • •••

•
Color Infrared 307
• • • •••
BlueAdjusts the amount of blue.
HueAdjusts the hue in any non-blue areas.
ContrastAdjusts the contrast of the image.
Dfx User Guide • • •••

•
Colorize Gradient 308
• • • •••
COLORIZE GRADIENT
DescriptionUsing multiple colors, Colorize Gradient colorizes the image according to the
image’s brightness values.
Go to the Colorize Gradient Tutorial to see how the filter works.
CategoryHFX Grads/Tints.
Controls
PresetsTo select a preset, pick one from the Presets window.
OpacitySets the overall opacity of the colorization.
Before After
Photos © THINKSTOCK LLC--www.thinkstock.com
Dfx User Guide • • •••

•
Colorize Gradient 309
• • • •••
ShadowsEnableDetermines whether or not the color contributes to the gradient.
ColorPicks the color that the image will be colorized with. Select the desired color
using the color picker.
PositionDetermines where the colorization is applied to the image. By default, Shadows
are set to 0, which is the shadow areas. A value of 50 would be the midtones,
while 100 would be highlights.
MidtonesThe Midtones controls are the same as the controls for the Shadows, except by
default, the colorization is applied to the midtones of the image.
HighlightsThe Highlights controls are the same as the controls for the Shadows, except
by default, the colorization is applied to the highlights of the image.
GradYou can optionally use a gradient that limits where the filter is applied. Grad is
the transition area that goes from the colorized image to the original image. Its
direction, corners and size can be adjusted. Go to the Grad section of Common
Filter Controls to see how the Grad controls work.
Dfx User Guide • • •••

•
Color Shadow 310
• • • •••
COLOR SHADOW
DescriptionCreates a high contrast image overlayed with a gradient.
Go to the Color Shadow Tutorial to see how the filter works.
CategorySpecial Effects
Controls
PresetsTo select a preset, pick one from the Presets window.
ThresholdSets the amount of image detail.
InvertChanges whether the gradient is in the background or foreground.
Before After
Copyright © 2008--www.iofoto.com
Dfx User Guide • • •••

•
Color Shadow 311
• • • •••
Background ColorSets the color of the background. Select the desired color using the color
picker.
Color 1Sets the color for the top half of the image. Select the desired color using the
color picker.
Color 2Sets the color for the bottom half of the image. Select the desired color using
the color picker.
Grad Grad is the transition area between the two colors. Its direction, corners and
size can be adjusted. Go to the Grad section of Common Filter Controls to see
how the Grad controls work.
Dfx User Guide • • •••

•
Color Spot 312
• • • •••
COLOR SPOT
DescriptionTints the image using presets for common photographic filters except for a
center spot which retains normal color. The center spot can be moved, sized
and the amount of blur can be controlled.
Go to the Color Spot Tutorial to see how the filter works.
CategoryHFX Grads/Tints.
Controls
PresetsTo select a preset, pick one from the Presets window.
ColorColorThe Color parameter sets the color through the use of a standard color picker.
Before After
Copyright © 2008--www.iofoto.com
Dfx User Guide • • •••

•
Color Spot 313
• • • •••
OpacitySets the opacity of the color filter.
Preserve HighlightsPreserves the white areas of the image.
Exposure CompensationExposure Compensation adds back the brightness loss as a result of the filter
application.
SpotA spot in the form of a radial gradient is used to control where color is added to
the image. Go to the Spot section of Common Filter Controls to see how the
Spot controls work.
Dfx User Guide • • •••

•
Cross Processing 314
• • • •••
CROSS PROCESSING
DescriptionCross-processing is a photographic technique where print film (C41) is
processed in the set of chemicals usually used to process slide film (E6) or vice
versa. The final result yields images with oddly skewed colors and increased
contrast and saturation. Different film stocks produce different results, so we
have created what we feel is a representative look.
Go to the Cross Processing Tutorial to see how the filter works.
CategoryFilm Lab.
Controls
PresetsTo select a preset, pick one from the Presets window.
AmountSets the intensity of the cross process effect.
Before After
Copyright © 2008--www.iofoto.com
Dfx User Guide • • •••

•
Cross Processing 315
• • • •••
ModePrint to SlideSimulates the effect of print film (C41) being processed in slide (E6) chemicals.
Slide to PrintSimulates the effect of slide film (E6) being processed in print (C41) chemicals.
Dfx User Guide • • •••

•
Curves 316
• • • •••
CURVES
DescriptionCurves adjusts the entire tonal range of an image by changing the shape of
RGB, Red, Green or Blue curves. Curve points can be adjusted throughout the
range of shadows to highlights.
CategoryColor.
Go to the Curves Tutorial to see how the filter works.
Before After
Copyright © 2008--www.iofoto.com
Dfx User Guide • • •••

•
Curves 317
• • • •••
Controls
Curves
RGBAdjusts the RGB values and has the effect of brightening or darkening the
image.
RedAdjusts the red values in the image.
GreenAdjusts the green values in the image.
BlueAdjusts the blue values in the image.
Adjust Black
Adjust White
Adjust Gray
Curve Type
Dfx User Guide • • •••

•
Curves 318
• • • •••
Selecting Curves
• Select RGB, Red, Green or Blue from the Curve Type pop-up menu.
• Click directly on an existing curve in the graph to select it.
Adding and Deleting Points:
• Click directly on the curve to add a new point. Up to five points can be added.
• Points can be deleted by clicking and dragging a point to the edge of the graph.
Adjusting Points:
• Moving a point in the top portion of the curve adjusts the shadows.
• Moving a point in the center of the curve adjusts the midtones.
• Moving a point in the top portion of the curve adjusts the highlights.
• Moving the curve upward or downward lightens or darkens the image. The steeper sections of the curve represent areas of higher contrast; flatter sections represent areas of lower contrast.
• To darken highlights, move a point near the top of the curve downward. Moving a point either down or to the right maps the input value to a lower output value, and the image darkens.
• To lighten the shadows, move a point near the bottom of the curve upward. Moving a point either up or to the left maps a lower input value to a higher output value, and the image lightens.
Sliders
RGBGlobally adjusts the RGB curve.
RedGlobally adjusts the Red curve.
GreenGlobally adjusts the Green curve.
Dfx User Guide • • •••

•
Curves 319
• • • •••
BlueGlobally adjusts the Blue curve.
Dfx User Guide • • •••

•
Day for Night 320
• • • •••
DAY FOR NIGHT
DescriptionDay for Night simulates a technique used for shooting exteriors in daylight
made to look like they were photographed at night. Typically, it involves
underexposing by two to two-and-a-half stops and using a filter to provide a tint,
that is often a lavender-blue, as it mimics twilight and appears to emulate the
mood of moonlight.
Go to the Day for Night Tutorial to see how the filter works.
CategorySpecial Effects.
Controls
PresetsTo select a preset, pick one from the Presets window.
DiffusionBlurSets how much the image is diffused.
Before After
Copyright © 2008--www.iofoto.com
Dfx User Guide • • •••

•
Day for Night 321
• • • •••
OpacitySets the amount of diffusion mixed into the original image. The higher the
setting, the more the image is blurred.
MoonlightColorThe Color parameter sets the color of the moonlight through the use of a
standard color picker. The default color is blue.
OpacitySets the opacity of the moonlight color.
Preserve HighlightsPreserves the white areas of the image.
Exposure CompensationExposure Compensation adds back the brightness loss as a result of the color
application.
Color CorrectGo to the Color Correct filter to see how the Color Correct controls work.
Dfx User Guide • • •••

•
DeBand 322
• • • •••
DEBAND
DescriptionDeBand removes banding artifacts from an image by smoothing pixels in
banded areas while retaining detail.
CategoryImage.
Controls
PresetsTo select a preset, pick one from the Presets window.
AmountSets the amount of debanding.
Before After
Copyright © 2008--www.iofoto.com
Dfx User Guide • • •••

•
DeBlock 323
• • • •••
DEBLOCK
DescriptionBlocking artifacts created as a result of high compression factors can be
removed with the DeBlock filter.
CategoryImage.
ControlsThere are no controls for the DeBlock filter since it automatically finds blocks
and removes them.
Before After
Copyright © 2008--www.iofoto.com
Dfx User Guide • • •••

•
DeFog 324
• • • •••
DEFOG
DescriptionUsing advanced deweathering algorithms, Defog restores clear day contrasts
and colors of a scene taken in bad weather such as fog and mist. It is also
successful in removing the effects of optical Fog and Diffusion filters.
Go to the Defog Tutorial to see how the filter works.
CategorySpecial Effects.
Controls
PresetsTo select a preset, pick one from the Presets window.
DefogColorThe Color parameter sets the color of the fog to be removed through the use of
a standard color picker. The default color is white.
Before After
Copyright © 2008--www.iofoto.com
Dfx User Guide • • •••

•
DeFog 325
• • • •••
Vanishing PointA vanishing point along the direction of increasing distance in the image is used
to remove fog. By default, the vanishing point is set to the center of the screen.
Essentially, the fog is removed in a radial pattern emanating from the vanishing
point. So at the default center position, fog is removed in a circular pattern with
a greater amount of fog being removed from the center while falling off at the
edges. For instance, if your fog moves in the direction of top right to bottom left,
set your vanishing point towards the top right corner and the fog removal will
be more intense at the upper right and fall off at the bottom left. However, in
most cases, the vanishing point can be left in the center of the screen and you
will obtain acceptable results.
There is an on-screen control in the center of the image. By clicking and
dragging the on-screen control, the position of the vanishing point can be
adjusted.
DefogSets the amount of fog to be removed from the scene.
Min DepthControls how much fog is removed from the darker areas of the image.
Max DepthControls how much fog is removed from the brighter areas of the image.
Color CorrectGo to the Color Correct filter to see how the Color Correct controls work.
Dfx User Guide • • •••

•
DeFringe 326
• • • •••
DEFRINGE
DescriptionPurple or blue fringing around overexposed areas is a result of sensor
overloading in video as well as digital still cameras. DeFringe isolates and
removes the various types of color fringing.
Go to the DeFringe Tutorial to see how the filter works.
CategoryLens.
Controls
PresetsTo select a preset, pick one from the Presets window.
RedRedAdjusts the saturation of red values in areas defined by the Position and Range
controls. Positive values saturate, negative values desaturate.
PositionA matte is generated to isolate red fringing. The areas that are white in the red
matte are the areas that will be defringed. Moving the Position slider will change
the hue that is used for the red matte.
Before After
Dfx User Guide • • •••

•
DeFringe 327
• • • •••
RangeIncreases or decreases the range of values considered as red fringing. A low
Range value indicates a narrow range of values, while a high Range value
indicates a large range of values.
Go to the Matte section of Common Filter Controls to see how the Position and
Range controls work.
Green, Blue, Cyan, Magenta, and YellowThe Green, Blue, Cyan, Magenta and Yellow groups work in a similar fashion
to the Red group.
Dfx User Guide • • •••

•
DeNoise 328
• • • •••
DENOISE
DescriptionRemoves film grain and noise.
CategoryImage.
Controls
PresetsTo select a preset, pick one from the Presets window.
AmountSets the amount of denoising.
Warning: You may not see an accurate representation of the grain and noise removal in the Viewer unless you use the Magnifier with this filter.
Before After
Dfx User Guide • • •••

•
Depth of Field 329
• • • •••
DEPTH OF FIELD
DescriptionDepth of Field can be added to a scene by isolating and blurring only a portion
of the image. The amount of blurring is directly proportionate to the luminance
of the matte settings, a gradient or an input image.
Go to the Depth of Field Tutorial to see how the filter works.
CategoryLens.
Controls
PresetsTo select a preset, pick one from the Presets window.
DepthSelects the source for the selective blur effect.
Before Matte
Copyright © 2008--www.iofoto.com
After
Dfx User Guide • • •••

•
Depth of Field 330
• • • •••
MatteUse a matte for the depth source.
GradUse a gradient for the depth source.
InputUse an image as the depth source. This is useful for 3D programs which render
out depth mattes.
To use an image as the depth source:
• Change Depth > Depth to Input.
• Click the Depth > Input > Browse button.
• Select a file.
BlurSets how much the image is blurred.
Grad Depth of Field can optionally use a gradient that limits where the filter is applied.
Grad is the transition area that goes from the blurred portion to the original
image. Its direction, corners and size can be adjusted. Go to the Grad section
of Common Filter Controls to see how the Grad controls work.
MatteA matte can be used to create the depth of field effect. Go to the Matte section
of Common Filter Controls to see how the Matte controls work.
Dfx User Guide • • •••

•
Detail 331
• • • •••
DETAIL
DescriptionDetail presents a new technique for performing selective sharpening, detail
enhancement and edge aware smoothing. Our approach decomposes the
image into three detail layers: Coarse, medium and fine. Each of the detail
layers can be manipulated separately in various ways, for instance, sharpening
or smoothing. Add to that sophisticated, but easy to use masking and you have
quick isolation of image features for selective filtering.
Go to the Detail Tutorial to see how the filter works.
CategoryImage.
Controls
CoarseAdjusts the Coarse detail layer. Increasing the value sharpens while decreasing
the value smooths.
MediumAdjusts the medium detail layer. Increasing the value sharpens while decreasing the value smooths.
Before After
Copyright © 2008--www.iofoto.com
Dfx User Guide • • •••

•
Detail 332
• • • •••
FineAdjusts the fine detail layer. Increasing the value sharpens while decreasing the value smooths.
GangThe Coarse, Medium and Fine slider values can be ganged together so that
they all move simultaneously. This will generate an overall sharpening effect if
the sliders are increased and an overall smoothing effect if decreased.
Note: Since Detail works at a proxy resolution, you will need to view the result of Detail at a 1:1 pixel ratio using the Magnifier window to determine what the final output will look like.
MatteA matte can be used to limit the detail effect. Wherever there is white in the
matte is where the detail adjustment will occur. Go to the Matte parameters to
see how they work.
Dfx User Guide • • •••

•
Develop 333
• • • •••
DEVELOP
DescriptionProvides useful developing controls for globally adjusting the color and tonal
scale of your images.
CategoryColor.
Controls
Auto-EqualizeAuto-Equalize uses the calculated white point for camera RAW images. This is
disabled when Develop is applied to non camera RAW images, since adjusting
the white point does nothing in this case.
TemperatureSets the color of the image to be either warmer or cooler. Dragging the slider to
the right makes the image cooler (bluer) and dragging the slider to the left
makes image warmer (redder).
Before After
Copyright © 2008--www.iofoto.com
Dfx User Guide • • •••

•
Develop 334
• • • •••
TintAdds either Green or Magenta to the image. Dragging the slider to the right
makes the image more magenta and dragging the slider to the left makes the
image more green.
ExposureSets the overall image brightness, with a greater effect in the high values.
Adjust the slider until the image looks good and the whites are at the right level.
Use Recovery to bring highlight values down. Exposure values are in
increments equivalent to f-stops. An adjustment of +1.00 is similar to increasing
the aperture 1 stop. Similarly, an adjustment of –1.00 is similar to reducing the
aperture 1 stop.
RecoveryReduces the tones of extreme highlights and attempts to recover highlight
detail lost because of overexposure.
Fill LightLightens shadows to reveal more detail while maintaining blacks. Take care not
to over apply the setting and reveal image noise.
BlacksSpecifies which image values map to black. Moving the slider to the right
increases the areas that become black, sometimes creating the impression of
increased image contrast. The greatest effect is in the shadows, with much less
change in the midtones and highlights.
BrightnessAdjusts image brightness, mainly affecting midtones. Set the overall tonal scale
by setting Exposure, Recovery, and Blacks. Then set the overall image
brightness. Large brightness adjustments can affect shadow or highlight
clipping, so you may want to readjust the Exposure, Recovery, or Blacks slider
after adjusting brightness.
Dfx User Guide • • •••

•
Develop 335
• • • •••
ContrastIncreases or decreases image contrast, mainly affecting midtones. When you
increase contrast, the middle-to-dark image areas become darker, and the
middle-to-light image areas become lighter. The image tones are inversely
affected as you decrease contrast.
VibranceAdjusts the saturation so that clipping is minimized as colors approach full
saturation, changing the saturation of all lower-saturated colors with less effect
on the higher-saturated colors. Vibrance also prevents skin tones from
becoming over saturated.
SaturationAdjusts the saturation of all image colors equally.
Dfx User Guide • • •••

•
Diffusion 336
• • • •••
DIFFUSION
DescriptionDiffusion creates atmosphere by reducing contrast while creating a glow
around highlights or shadows using an extensive texture library.
Go to the Diffusion Tutorial to see how the filter works.
CategoryHFX Diffusion.
Controls
PresetsTo select a preset, pick one from the Presets window.
DiffusionBlendDetermines the blend mode to be used to create the diffusion effect.
AddThe diffusion is added to your image.
Before After
Copyright © 2008--www.iofoto.com
Dfx User Guide • • •••

•
Diffusion 337
• • • •••
ScreenThe diffusion is combined with the image using a Screen blend mode. This
looks kind of like the Add blend mode, but highlights are retained.
BrightnessSets the intensity of the diffusion.
BlurSets the softness of the diffusion.
ColorThe Color parameter sets the color of the diffusion through the use of a
standard color picker. The default color is white.
Color CorrectGo to the Color Correct filter to see how the Color Correct controls work.
TextureTextureSelects the texture which will be used to add diffusion to the image.
BlendTextures can be used as the source of the diffusion as well as combined with a
matte using a variety of Blend modes. Go to Blend Modes for explanations of
the various modes.
I like the Multiply blend mode for combining textures with the matte because it
only puts the texture within the areas of the generated matte.
DVEThe DVE allows you to transform your texture using Position, Scale, Rotation,
Corner Pin and Crop controls. Why the name DVE? DVE is an acronym for
digital video effects and refers to a real-time image manipulation device which
does pans, rotations, flips as well as various hardware-specific effects such as
page turns or customized wipes. In the film and video post production industry,
Dfx User Guide • • •••

•
Diffusion 338
• • • •••
DVE is frequently used in reference to transforming the image in some way. Go
to the DVE section of Common Filter Controls to see how the DVE Controls
work.
MatteA matte can be used to create the diffusion effect. Go to the Matte section of
Common Filter Controls to see how the Matte controls work.
Dfx User Guide • • •••

•
Diffusion/FX® 339
• • • •••
DIFFUSION/FX®
Description
Black Diffusion/FX®Gives a silky-smooth look to textured surfaces, suppresses facial blemishes
and wrinkles, while maintaining a clear, focused image. Creates a diffused
image that doesn't look like it's been shot through a filter.
Gold Diffusion/FX®Offers all the benefits of the Black Diffusion/FX® filter, but also infuses special
warmth by adding a soft, golden tint to shadows.
Go to the Diffusion/FX Tutorial to see how the filters works.
CategoryHFX Diffusion.
Before Black After
Copyright © 2008--www.iofoto.com
Gold After
Dfx User Guide • • •••

•
Diffusion/FX® 340
• • • •••
Controls
PresetsTo select a preset, pick one from the Presets window. If you would like to view
presets from a different category, use the pop-up menu at the top left of the
Presets window.
DetailSmoothingFine image details, such as facial wrinkles and blemishes, are minimized using
edge aware smoothing.
TemperatureApplies a warming filter to the image. Go to the Temperature section of
Common Filter Controls to see how the Temperature controls work.
MatteA matte can be used to limit the smoothing effect. Wherever there is white in
the matte is where the smoothing will occur. Go to the Matte parameters to see
how they work.
Dfx User Guide • • •••

•
Double Fog 341
• • • •••
DOUBLE FOG
DescriptionThe Double Fog filter creates a soft, misty atmosphere over the image by first
applying fog using a vanishing point along the direction of increasing distance
in the image. Then, a second pass blooms image highlights.
Go to the Double Fog Tutorial to see how the filter works.
CategoryDiffusion.
Controls
PresetsTo select a preset, pick one from the Presets window.
Before After
Copyright © 2008--www.iofoto.com
Dfx User Guide • • •••

•
Double Fog 342
• • • •••
FogColorThe Color parameter sets the color of the fog to be added through the use of a
standard color picker. The default color is white.
Vanishing PointA vanishing point along the direction of increasing distance in the image is used
to add fog. By default, the vanishing point is set to the center of the screen.
Essentially, the fog is added in a radial pattern emanating from the vanishing
point. So at the default center position, fog is added in a circular pattern with a
greater amount of fog being added in the center while falling off at the edges.
For instance, if you would like your fog to move in the direction of top right to
bottom left, set your vanishing point towards the top right corner and the fog will
be more intense at the upper right and fall off at the bottom left. However, in
most cases, the vanishing point can be left in the center of the screen and you
will obtain acceptable results.
There is an on-screen control in the center of the image. By clicking and
dragging the on-screen control, the position of the vanishing point can be
adjusted.
FogSets the amount of fog to be added to the scene.
Min DepthControls how much fog is added in the darker areas of the image.
Max DepthControls how much fog is added in the brighter areas of the image.
GlowThe Glow controls are used to add additional atmosphere and are useful in
adding glow to highlights. By default, a wide matte of highlights are glowed in
the image and blended with the Screen blend mode. This works well for adding
additional fog. To add glow around highlights such as light sources, it is best to
set the Blend mode to Add and lower the Matte > Range parameter to limit the
areas of glow to only include the light sources.
Dfx User Guide • • •••

•
Double Fog 343
• • • •••
BlendDetermines the blend mode to be used to create the glow effect.
AddThe glow is added to your image.
ScreenThe glow is combined with the image using a Screen blend mode. This looks
kind of like the Add blend mode, but highlights are retained.
BrightnessSets the intensity of the glow.
BlurSets the softness of the glow.
ColorThe Color parameter sets the color of the glow through the use of a standard
color picker. The default color is white.
MatteA matte is used to create the glow effect. Go to the Matte section of Common
Filter Controls to see how the Matte controls work.
Dfx User Guide • • •••

•
Dual Grad 344
• • • •••
DUAL GRAD
DescriptionDual Grad applies two photographic filters to the image which are blended
together with a gradient. Presets for your favorite Color-Grad® filters are
provided as well as the ability to create custom colors.
Go to the Dual Grad Tutorial to see how the filter works.
CategoryHFX Grads/Tints.
Controls
PresetsTo select a preset, pick one from the Presets window.
Color 1Sets the color for the top half of the image. Select the desired color using the
color picker or choose a filter preset.
Before After
Copyright © 2008--www.iofoto.com
Dfx User Guide • • •••

•
Dual Grad 345
• • • •••
PresetsSelect one of the filters from the pop-up list.
ColorThe Color parameter sets the color of the grad through the use of a standard
color picker.
OpacitySets the opacity of the color filter.
Color 2The Color 2 controls are the same as the controls for Color 1 except it is applied
to the bottom half of the image.
Preserve HighlightsPreserves the white areas of the image.
Exposure CompensationExposure Compensation adds back the brightness loss as a result of the filter
application.
Grad Grad is the transition area between the two tints. Its direction, corners and size
can be adjusted. Go to the Grad section of Common Filter Controls to see how
the Grad controls work.
Dfx User Guide • • •••

•
Edge Glow 346
• • • •••
EDGE GLOW
DescriptionEdge Glow isolates lines and edges in an image and then adds glow only to
these areas resulting in a stylized look.
Go to the Edge Glow Tutorial to see how the filter works.
CategoryLight.
Controls
PresetsTo select a preset, pick one from the Presets window.
GlowBlendDetermines the blend mode to be used to create the edge glow effect.
Before After
Copyright © 2008--www.iofoto.com
Dfx User Guide • • •••

•
Edge Glow 347
• • • •••
AddThe edge glow is added to your image.
ScreenThe edge glow is combined with the image using a Screen blend mode. This
looks kind of like the Add blend mode, but highlights are retained.
BrightnessSets the intensity of the edge glow.
BlurSets the softness of the edge glow.
ColorThe Color parameter sets the color of the edge glow through the use of a
standard color picker. The default color is white.
EdgeAn edge matte is created to produce the edge glow effect.
BrightnessDetermines the brightness of the edge matte.
BlurBlurs the edge matte.
Dfx User Guide • • •••
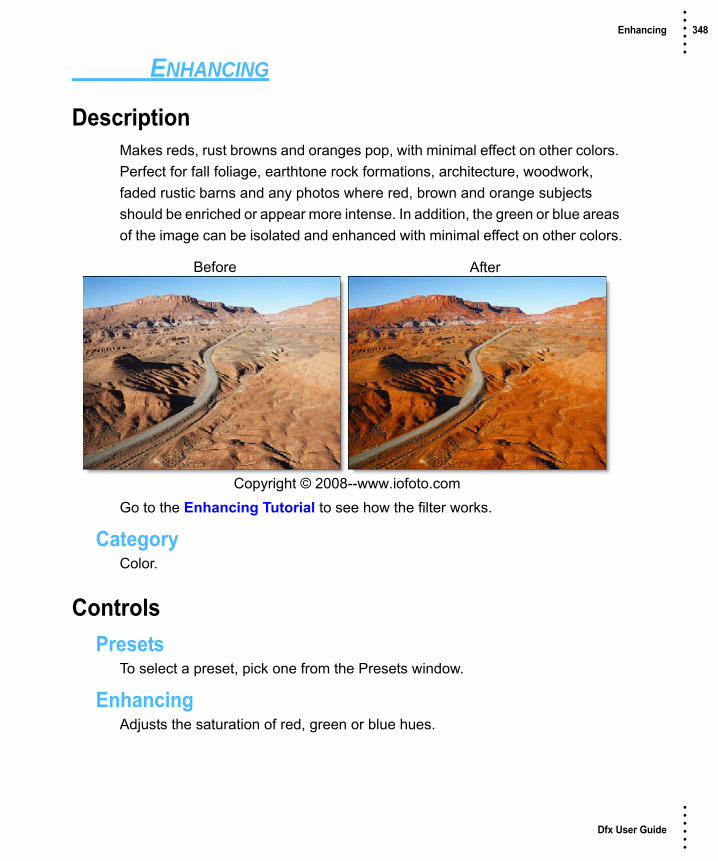
•
Enhancing 348
• • • •••
ENHANCING
DescriptionMakes reds, rust browns and oranges pop, with minimal effect on other colors.
Perfect for fall foliage, earthtone rock formations, architecture, woodwork,
faded rustic barns and any photos where red, brown and orange subjects
should be enriched or appear more intense. In addition, the green or blue areas
of the image can be isolated and enhanced with minimal effect on other colors.
Go to the Enhancing Tutorial to see how the filter works.
CategoryColor.
Controls
PresetsTo select a preset, pick one from the Presets window.
EnhancingAdjusts the saturation of red, green or blue hues.
Before After
Copyright © 2008--www.iofoto.com
Dfx User Guide • • •••

•
Enhancing 349
• • • •••
MattePresetsA matte is created based on the hue of the image to create the enhancement
effect. Select from Red, Green or Blue preset hue mattes from the pop-up list
or use the Hue eyedropper to pick a color off of the screen.
HueWhen adjusting the Hue parameter, you are selecting the hue of the image
which will be enhanced.
RangeIncreases or decreases the range of values in the hue matte. A low Range
value indicates a narrow range of values. A high Range value indicates a large
range of values included in the matte.
BlurSets the softness of the matte by using a fast, quality blur.
Go to the Matte parameters to see how they work.
Dfx User Guide • • •••

•
Eye Light 350
• • • •••
EYE LIGHT
DescriptionCreates a targeted light to be placed around a person's eyes.
Go to the Eye Light Tutorial to see how the filter works.
CategoryLight.
Controls
LightBlendDetermines the blend mode to be used to add the light.
AddThe light is added to your image.
ScreenThe light is combined with the image using a Screen blend mode. This looks
kind of like the Add blend mode, but highlights are retained.
BrightnessSets the intensity of the light.
Before After
Copyright © 2008--www.iofoto.com
Dfx User Guide • • •••

•
Eye Light 351
• • • •••
BlurSets the softness of the light.
GamColor PresetsDigital equivalents of the lighting gels created by Gamproducts can be applied
to your light source. Select one of the GamColor presets from the pop-up list.
For detailed information about Gamproducts gels, visit their website at
www.gamonline.com.
ColorSets the color of the light through the use of a standard color picker.
ShadowBrightnessSets the intensity of the shadows. The Brightness parameter will darken only
those areas that are not being brightened by the Light settings.
DVEThe DVE allows you to transform your eye light using Position, Scale, Rotation
and Corner Pincontrols. Why the name DVE? DVE is an acronym for digital
video effects and refers to a real-time image manipulation device which does
pans, rotations, flips as well as various hardware-specific effects such as page
turns or customized wipes. In the film and video post production industry, DVE
is frequently used in reference to transforming the image in some way. Go to
the DVE section of Common Filter Controls to see how the DVE Controls work.
Dfx User Guide • • •••

•
Film Stocks 352
• • • •••
FILM STOCKS
DescriptionFilm Stocks is a unique filter that simulates 288 different color and black and
white still photographic film stocks, motion picture films stocks and historical
photographic processes.
Go to the Film Stocks Tutorial to see how the filter works.
CategoryFilm Lab.
Controls
PresetsTo select a preset, pick one from the Presets window. If you would like to view
presets from a different category, use the pop-up menu at the top left of the
Presets window.
AmountSets the amount of the selected preset.
Before Fuji Sensia
Copyright © 2008--www.iofoto.com
Dfx User Guide • • •••

•
Film Stocks 353
• • • •••
Black and WhiteRed, Green and Blue controls allow you to determine the contribution of each
color channel in the black and white conversion.
EnableEnables the Black and White conversion.
RedSets the amount of the red channel that contributes to the black and white
conversion.
GreenSets the amount of the green channel that contributes to the black and white
conversion.
BlueSets the amount of the blue channel that contributes to the black and white
conversion.
Film ResponseTo mimic the characteristics of a particular film stock, a combination of settings
for the RGB channels have been set.
Dfx User Guide • • •••

•
Film Stocks 354
• • • •••
CurvesYou can use Curves to adjust the entire tonal range of an image by changing
the shape of the curve in the Curves adjustment. The Curves adjustment lets
you adjust points throughout the tonal range of an image (from shadows to
highlights).
Note: Curves are only available in the Dfx interface.
Selecting Curves
• Select RGB, Red, Green or Blue from the Curve Type pop-up menu.
• Click directly on an existing curve in the graph to select it.
Adding and Deleting Points:
• Click directly on the curve to add a new point. Up to five points can be added.
• Points can be deleted by clicking and dragging a point to the edge of the graph.
Adjusting Points:
• Moving a point in the top portion of the curve adjusts the shadows.
• Moving a point in the center of the curve adjusts the midtones.
Adjust Black
Adjust White
Adjust Gray
Curve Type
Dfx User Guide • • •••

•
Film Stocks 355
• • • •••
• Moving a point in the top portion of the curve adjusts the highlights.
• Moving the curve upward or downward lightens or darkens the image. The steeper sections of the curve represent areas of higher contrast; flatter sections represent areas of lower contrast.
• To darken highlights, move a point near the top of the curve downward. Moving a point either down or to the right maps the input value to a lower output value, and the image darkens.
• To lighten the shadows, move a point near the bottom of the curve upward. Moving a point either up or to the left maps a lower input value to a higher output value, and the image lightens.
RGBControls the RGB film response curve. If you are using a black and white
preset, the grayscale film response curve will be adjusted.
RedControls the Red film response curve.
GreenControls the Green film response curve.
BlueControls the Blue film response curve.
Color CorrectColor Correct manipulates the Temperature, Cyan/Magenta, Brightness,
Contrast, Shadow, Midtone, Highlight, and Saturation values of the image. Go
to the Color Corrector filters to see how it works.
FilterAdds a color filter to the image.
PresetsSelect one of the filters from the pop-up list.
ColorSets the color through the use of a standard color picker.
Dfx User Guide • • •••

•
Film Stocks 356
• • • •••
OpacitySets the opacity of the color filter.
HighlightsPreserves the white areas of the image.
SharpenAmountDetermines how much contrast is added at the edges.
RadiusControls the size of the edges you wish to sharpen.
ThresholdThe threshold setting is used to sharpen more pronounced edges, while
leaving more subtle edges untouched. Low values sharpen more image areas
while higher threshold values sharpen less.
DiffusionBlendDetermines the blend mode to be used to create the diffusion/glow effect.
AddThe diffusion/glow is added to your image.
NormalThe diffusion is mixed with the original image. In this mode, the Amount slider
only shows changes up to a value of 100.
ScreenThe diffusion/glow is combined with the image using a Screen blend mode.
This looks kind of like the Add blend mode, but highlights are retained.
AmountSets the amount of diffusion.
BlurSets the softness of the image.
Dfx User Guide • • •••

•
Film Stocks 357
• • • •••
ColorThe Color parameter sets the color of the diffusion/glow through the use of a
standard color picker or eyedropper. The default color is white.
PositionWhen using the Add and Screen blend modes, Position selects the values used
to create the glow effect. A higher Position value uses the brightest image
values to create the glow. A lower Position value uses the darkest image values
to create the glow.
RangeWhen using the Add and Screen blend modes, Range controls the range of
values to be used for the glow. Once you’ve selected the “Position”, you can
then add or subtract the “Range” of values to be used in the glow source. A
higher Range value includes more values in the glow source while a lower
Range value includes less values.
VignetteA vignette is a popular photographic effect where the photo gradually fades into
a color. Go to the Vignette filter to see how it works.
GrainGrain simulates film grain with control of the size, softness and intensity. In
addition, a Film Response parameter controls where you will see grain in the
image. Go to the Grain filter to see how it works.
Warning: You may not see the grain size change in the Viewer unless you use
the Magnifier with this filter.
Dfx User Guide • • •••

•
Flashing 358
• • • •••
FLASHING
DescriptionFlashing allows you to use photographic filters to lower the contrast of your
shadows or highlights. The motion picture lab can expose a small amount of
light to the film at various stages of the developing and printing process. For
example, Negative plus Dupe Negative flashing lifts blacks, while Print plus
Master Positive flashing softens whites.
Go to the Flashing Tutorial to see how the filter works.
CategoryFilm Lab.
Controls
PresetsTo select a preset, pick one from the Presets window.
ShadowsBrightnessRaises the brightness of the shadows using either the Shadow > Color or
Shadow > Presets.
Before After
Copyright © 2008--www.iofoto.com
Dfx User Guide • • •••

•
Flashing 359
• • • •••
PresetsSelect one of the filters from the pop-up list.
ColorThe Color parameter sets the color of the flashing through the use of a standard
color picker.
PositionSelects the shadow values to be adjusted.
RangeControls the range of values to be used for the shadows. A higher Range value
considers more values as shadows.
HighlightsBrightnessLowers the brightness of the highlights using either the Highlights > Color or
Highlights > Presets.
PresetsSelect one of the filters from the pop-up list.
ColorThe Color parameter sets the color of the flashing through the use of a standard
color picker.
PositionSelects the highlight values to be adjusted.
RangeControls the range of values to be used for the highlights. A higher Range value
considers more values as highlights.
Go to the Matte section of Common Filter Controls to see how the Position and
Range controls work.
Dfx User Guide • • •••

•
FL-B/D® 360
• • • •••
FL-B/D®
DescriptionProvides correct color, removing the harsh green cast caused by fluorescent
bulbs.
Go to the FL-B/D® Tutorial to see how the filter works.
CategoryColor.
Controls
PresetsTo select a preset, pick one from the Presets window.
TemperatureRemoves the greenish tone caused by photographing under fluorescent lights.
Before After
Copyright © 2008--www.iofoto.com
Dfx User Guide • • •••

•
Flag / Dot 361
• • • •••
FLAG / DOT
DescriptionFlags and Dots are rectangular and circular lighting control devices used to
create shadow areas on a motion picture or photographic set. This concept has
been extended to digital so that areas of the image can be selectively
darkened.
Go to the Flag / Dot Tutorial to see how the filters works.
CategoryLight.
Controls
Flag / DotBrightnessSets the intensity of the flag or dot.
Before After
Copyright © 2008--www.iofoto.com
Dfx User Guide • • •••

•
Flag / Dot 362
• • • •••
BlurSets the softness of the flag or dot.
DVEThe DVE allows you to transform your flag or dot using Position, Scale,
Rotation and Corner Pincontrols. Why the name DVE? DVE is an acronym for
digital video effects and refers to a real-time image manipulation device which
does pans, rotations, flips as well as various hardware-specific effects such as
page turns or customized wipes. In the film and video post production industry,
DVE is frequently used in reference to transforming the image in some way. Go
to the DVE section of Common Filter Controls to see how the DVE Controls
work.
Dfx User Guide • • •••

•
Fog 363
• • • •••
FOG
DescriptionThe Fog filter creates a soft, misty atmosphere over the image and glows
highlights.
Go to the Fog Tutorial to see how the filter works.
CategoryDiffusion.
Controls
PresetsTo select a preset, pick one from the Presets window.
FogBlendDetermines the blend mode to be used to create the fog effect.
Before After
Copyright © 2008--www.iofoto.com
Dfx User Guide • • •••

•
Fog 364
• • • •••
AddThe fog is added to your image.
ScreenThe fog is combined with the image using a Screen blend mode. This looks kind
of like the Add blend mode, but highlights are retained.
BrightnessSets the intensity of the fog.
BlurSets the softness of the fog.
ColorThe Color parameter sets the color of the fog through the use of a standard
color picker. The default color is white.
MatteA matte is used to create the fog effect. Go to the Matte section of Common
Filter Controls to see how the Matte controls work.
Dfx User Guide • • •••

•
Gels 365
• • • •••
GELS
DescriptionPhotographers, cinematographers and lighting designers use colored filters or
gels in front of lights. Whether they want to create a romantic moonlit setting or
a vicious, angry fight, they have the colors they need to achieve the effect. In
cooperation with Gamproducts and Rosco, we have created digital versions of
their popular gels.
Go to the Gels Tutorial to see how the filter works.
CategoryHFX Grads/Tints.
GamColor GelsDigital equivalents of the lighting gels created by Gamproducts can be applied
to the entire image or inside a gradient. Three GamColor gel groups contain
digital gels from the GamColor, CineFilters and Naked Cosmetics collections.
For detailed information about Gamproducts gels, visit their website at
www.gamonline.com.
Before After
Copyright © 2008--www.iofoto.com
Dfx User Guide • • •••

•
Gels 366
• • • •••
GamColorThe GamColor system divides the visible spectrum into nine color sections
convenient to the lighting designer. It is a circular classification of colors by hue,
referencing the primaries, secondaries and important subdivisions. The
GamColor gels are arranged according to this system, making it easy to locate
any color in a logical manner.
Dfx User Guide • • •••

•
Gels 367
• • • •••
GamColor CineFiltersCineFilters change the color temperature to balance your lighting situation
using a variety of filters including CTO (sunlight to incandescent), CTB
(incandescent to daylight), ND (light reducing), Minus Green(eliminates the
peak green output of fluorescent lights) and Plus Green (incandescent to
fluorescent).
GamColor Naked CosmeticsNaked Cosmetics™ are designed to modify skin tones. Use them to blend and
enhance skin tones while masking undesirable undertones. The choice of
which Naked Cosmetics™ gel to use depends on a few variables. Skin color of
the subjects, costumes, make-up, the recording medium, the desired effect,
and most important, your artistic taste.
GelsA set of generic lighting gels are provided in the Gels preset group.
Rosco GelsDigital equivalents of the lighting gels created by Rosco can now be applied to
the entire image or inside a gradient. Four Rosco gel groups contain gels from
the Calcolor, Cinegel, Cinelux and Storaro collections.
For detailed information about Rosco gels, visit their website at
www.rosco.com.
Rosco CalcolorCalibrated color, by Rosco, is a series of color effects lighting gels designed
specifically to the spectral sensitivity of color film. The series includes the
primary colors Blue, Green and Red, along with the secondary colors Yellow,
Magenta and Cyan followed by Pink and Lavender. Each color is designed in
four densities: 15, 30, 60 and 90, corresponding to the familiar ½, 1, 2 and 3
stop calibrations.
Dfx User Guide • • •••

•
Gels 368
• • • •••
Rosco CinegelThe Rosco Cinegel range includes over 75 tools for controlling light including
Tungsten Conversion Filters, Daylight Conversion Filters, Sun 85 & Neutral
Density Filters, Filters for Controlling Carbon ARC & HMI Lighting as well as
Fluorescent Light Filters. In 1974, Cinegel won an Academy Award for
technical achievement.
Rosco Cinelux
Cinelux is a selection from the Roscolux range of color gels.
Rosco StoraroThe Storaro group contains ten color effects lighting gels designed to the
personal specifications of eminent cinematographer Vittorio Storaro. These ten
colors represent key chromatic elements of the visible spectrum, and are
intended for dramatic effect and strong emotional response.
Controls
PresetsTo select a gel, pick one from the Presets window. If you would like to view
presets from a different category, use the pop-up menu at the top left of the
Presets window.
ColorColorThe Color parameter sets the color through the use of a standard color picker.
OpacitySets the opacity of the color filter.
Preserve HighlightsPreserves the white areas of the image.
Exposure CompensationExposure Compensation adds back the brightness loss as a result of the gel
application.
Dfx User Guide • • •••

•
Gels 369
• • • •••
Grad Gels can optionally use a gradient that limits where the filter is applied. Grad is
the transition area between the colored portion and the original image. Its
direction, corners and size can be adjusted. Go to the Grad section of Common
Filter Controls to see how the Grad controls work.
Dfx User Guide • • •••

•
Glimmerglass®, Bronze Glimmerglass® 370
• • • •••
GLIMMERGLASS®, BRONZE GLIMMERGLASS®
Description
Glimmerglass®Softens fine details in a unique manner, while adding a mild glow to highlights.
Bronze Glimmerglass®Same as Glimmerglass® but combined with a warming filter.
Go to the Glimmerglass® / Bronze Glimmerglass® Tutorial to see how the
filters work.
CategoryHFX Diffusion.
Before Glimmerglass® After
Copyright © 2008--www.iofoto.com
Bronze Glimmerglass® After
Dfx User Guide • • •••

•
Glimmerglass®, Bronze Glimmerglass® 371
• • • •••
Controls
PresetsTo select a preset, pick one from the Presets window. If you would like to view
presets from a different category, use the pop-up menu at the top left of the
Presets window.
MistThe Mist controls add a mild glow to image highlights.
BlendDetermines the blend mode to be used to create the mist effect.
AddThe mist is added to your image.
ScreenThe mist is combined with the image using a Screen blend mode. This looks
kind of like the Add blend mode, but highlights are retained.
BrightnessSets the intensity of the mist.
BlurSets the softness of the mist.
ColorSets the color of the mist.
Color CorrectGo to the Color Correct filter to see how the Color Correct controls work.
TemperatureApplies a warming filter to the image. Go to the Temperature section of
Common Filter Controls to see how the Temperature controls work.
MatteA matte is used to create the mist effect. Go to the Matte section of Common
Filter Controls to see how the Matte controls work.
Dfx User Guide • • •••

•
Glow 372
• • • •••
GLOW
DescriptionThe Glow filter creates glows around selected areas of the image.
Go to the Glow Tutorial to see how the filter works.
CategoryLight.
Controls
PresetsTo select a preset, pick one from the Presets window.
GlowBlendDetermines the blend mode to be used to create the glow effect.
AddThe glow is added to your image.
Before After
Copyright © 2008--www.iofoto.com
Dfx User Guide • • •••

•
Glow 373
• • • •••
ScreenThe glow is combined with the image using a Screen blend mode. This looks
kind of like the Add blend mode, but highlights are retained.
BrightnessSets the intensity of the glow.
BlurSets the softness of the glow.
ColorThe Color parameter sets the color of the glow through the use of a standard
color picker. The default color is white.
Color CorrectGo to the Color Correct filter to see how the Color Correct controls work.
MatteA matte is used to create the glow effect. Go to the Matte section of Common
Filter Controls to see how the Matte controls work.
Dfx User Guide • • •••

•
Glow Darks 374
• • • •••
GLOW DARKS
DescriptionGlows and grows the darks areas of the image.
Go to the Glow Darks Tutorial to see how the filter works.
CategoryLight.
Controls
PresetsTo select a preset, pick one from the Presets window.
GlowAmountSets the intensity of the glow.
BlurSets the softness of the glow.
Color CorrectGo to the Color Correct filter to see how the Color Correct controls work.
Before After
Copyright © 2008--www.iofoto.com
Dfx User Guide • • •••

•
Glow Darks 375
• • • •••
MatteA matte is used to create the glow effect. Go to the Matte section of Common
Filter Controls to see how the Matte controls work.
Dfx User Guide • • •••

•
Grain 376
• • • •••
GRAIN
DescriptionGrain simulates film grain with control of size, intensity and softness. In
addition, a Film Response parameter controls where you will see grain in the
image. Popular film stock presets are provided as a starting point to adding
grain.
Go to the Grain Tutorial to see how the filter works.
CategoryFilm Lab.
Controls
PresetsTo select a preset, pick one from the Presets window.
MonochromeWhen checked, the grain is monochrome. In this mode, only the Red Size, Red
Amount and Red Softness sliders are active. Since the grain is monochrome,
only one slider is needed.
Before After
Copyright © 2008--www.iofoto.com
Dfx User Guide • • •••

•
Grain 377
• • • •••
SizeThe Size parameter controls the size of the grain. The larger the Size setting,
the larger the grain will be.
Warning: You may not see the grain size change in the Viewer unless you use the Magnifier with this filter.
AmountThe Amount parameters set the red, green and blue intensities of the grain.
Film stocks generally have varying amounts of red, green and blue intensities
with the blue intensity generally higher than the rest. If you turn the red, green
and blue amount sliders to a value of 0, the grain will disappear.
Red AmountControls the intensity of the red grain.
Green AmountControls the intensity of the green grain.
Blue AmountControls the intensity of the blue grain.
SoftnessThe Softness parameter controls the softness of the grain. Normally, only minor
softness adjustments are necessary, usually between a value of 0-1.
Film ResponseThe Film Response parameter allows the adjustment of where you will see
grain in the image. In most cases, film grain is apparent over the entire image
except the brightest whites with the black areas being the most affected.
PositionThe Position slider defines the portions of the image where grain will be added.
A low Position value places grain in the darkest image values, while a high
Position value places grain in the brightest areas.
Dfx User Guide • • •••

•
Grain 378
• • • •••
RangeIncreases or decreases the area where grain is added to the image based on
the value of the Position slider. A low Range value indicates a narrow range of
values, while a high Range value indicates a large range of values.
MinimumSets the minimum level of grain that is always added to the image.
Note: A Position value of 0 and a Range of 80 is typical of standard film, with grain applied to the entire range except the brightest whites with black being the most affected.
Dfx User Guide • • •••

•
Grunge 379
• • • •••
GRUNGE
DescriptionAdds film dirt, hair, scratches, stains, splotches, vignetting and grain--all to
make your pristine image look like damaged film.
Go to the Grunge Tutorial to see how the filter works.
CategoryFilm Lab.
Controls
PresetsTo select a preset, pick one from the Presets window.
RandomizeRandomizes the applied elements.
DirtOpacityThe opacity of the dirt.
AmountThe number of pieces of dirt.
Before After
Copyright © 2008--www.iofoto.com
Dfx User Guide • • •••

•
Grunge 380
• • • •••
SizeThe size of the dirt.
Type
PositiveThe dirt is black as it is in positive film.
NegativeThe dirt is white as it is in negative film.
HairOpacityThe opacity of the hair.
AmountThe number of hairs.
SizeThe size of the hairs.
Type
PositiveThe hair is black as it is in positive film.
NegativeThe hair is white as it is in negative film.
ScratchesOpacityThe opacity of the scratches.
AmountThe number of scratches.
WidthThe width of the scratches.
Dfx User Guide • • •••

•
Grunge 381
• • • •••
LengthRandomly changes the length of the scratches.
RoughnessThe roughness of the scratches.
Type
PositiveThe scratches are black as they are in positive film.
NegativeThe scratches are white as they are in negative film.
StainsOpacityThe opacity of the stains.
AmountThe number of stains.
SizeThe size of the stains.
Type
PositiveThe stains are black as they are in positive film.
NegativeThe stains are white as they are in negative film.
SplotchesOpacityThe opacity of the splotches.
AmountThe number of splotches.
Dfx User Guide • • •••

•
Grunge 382
• • • •••
SizeThe size of the splotches.
Type
PositiveThe splotches are black as they are in positive film.
NegativeThe splotches are white as they are in negative film.
VignetteA vignette is a popular photographic effect where the photo gradually fades into
a color. Go to the Vignette filter to see how it works.
GrainGrain simulates film grain with control of the size, softness and intensity. In
addition, a Film Response parameter controls where you will see grain in the
image. Go to the Grain filter to see how it works.
Warning: You may not see the grain size change in the Viewer unless you use the Magnifier with this filter.
Dfx User Guide • • •••

•
Halo 383
• • • •••
HALO
DescriptionHalo causes dark areas to glow into bright areas and bright areas to glow into
dark areas along with a bit of diffusion.
Go to the Halo Tutorial to see how the filter works.
CategoryLight.
Controls
PresetsTo select a preset, pick one from the Presets window.
DiffusionBlurSets the softness of the image.
OpacitySets the amount of diffusion mixed into the original image. The higher the
setting, the more the image is blurred.
Before After
Copyright © 2008--www.iofoto.com
Dfx User Guide • • •••

•
Halo 384
• • • •••
Color CorrectGo to the Color Correct filter to see how the Color Correct controls work.
Dfx User Guide • • •••

•
Harris Shutter 385
• • • •••
HARRIS SHUTTER
DescriptionInvented by Robert S. “Bob” Harris of Kodak, the Harris Shutter was originally
a strip device with three color filters used for making color photographs with the
different primary color layers exposed in separate time intervals in succession.
The same frame of film was re-exposed through red, green and blue filters in
turn, while keeping the camera steady.
Our digital version of the Harris Shutter uses separate images for the red, green
and blue channels. In the case of a time interval between images used for the
red, green and blue channels, this will generate a rainbow of color around any
object that moves within the frame. Some good candidates for subjects include
waterfalls, clouds blowing over a landscape or people walking across a busy
street.
Go to the Harris Shutter Tutorial to see how the filter works.
CategorySpecial Effects.
Before After
Dfx User Guide • • •••

•
Harris Shutter 386
• • • •••
Controls
RedSourceSets the source image to be used as the red channel. If an image is not
assigned using Source, the original image’s color channel will be used.
Note: Only JPG, PNG and TIFF files can be loaded.
AmountControls how much of the image is contributed to the composite image.
GreenThe green controls are the same as the those for red except they are applied
to the green channel.
BlueThe blue controls are the same as the those for red except they are applied to
the green channel.
Dfx User Guide • • •••

•
Haze / Sky 387
• • • •••
HAZE / SKY
Description
HazeReduces excessive blue by absorbing UV light and eliminates haze which
tends to wash out color and image clarity.
Before After
Copyright © 2008--www.iofoto.com
Dfx User Guide • • •••

•
Haze / Sky 388
• • • •••
SkyReduces UV light, haze and is pink tinted for added warmth and better colors.
It is especially useful for images shot in outdoor open shade and on overcast
days
Go to the Haze / Sky Tutorial to see how the filter works.
CategoryImage.
Controls
PresetsTo select a preset, pick one from the Presets window.
HazeSets the amount of haze to be removed from the scene.
TemperatureSets the color of the image to be either warmer or cooler. Dragging the slider to
the right makes the image cooler (bluer) and dragging the slider to the left
makes the image warmer (redder).
Before After
Copyright © 2008--www.iofoto.com
Dfx User Guide • • •••

•
Haze / Sky 389
• • • •••
Cyan/MagentaAdds either Cyan or Magenta to the image. Dragging the slider to the right
makes the image more magenta and dragging the slider to the left makes the
image more cyan.
Note: Cyan/Magenta is only included in the Sky filter.
Dfx User Guide • • •••

•
HDTV/FX® 390
• • • •••
HDTV/FX®
DescriptionWith the increase in HD production for both TV and Motion Pictures,
HDTV/FX® filters address both contrast and sharpness issues associated with
HD. Creates a “film look” and provides subtle improvements in shadow detail.
Go to the HDTV/FX® Tutorial to see how the filter works.
CategoryHFX Diffusion.
Controls
PresetsTo select a preset, pick one from the Presets window.
Before After
Copyright © 2008--www.iofoto.com
Dfx User Guide • • •••

•
HDTV/FX® 391
• • • •••
DetailSmoothingFine image details, such as facial wrinkles and blemishes, are minimized using
edge aware smoothing.
ContrastShadowsRaises the brightness of the shadows.
HighlightsLowers the brightness of the highlights.
MatteA matte can be used to limit the smoothing effect. Wherever there is white in
the matte is where the smoothing will occur. Go to the Matte parameters to see
how they work.
Dfx User Guide • • •••

•
HFX® Star 392
• • • •••
HFX® STAR
DescriptionExciting and dazzling star effects are generated from original point or reflected
light sources with the added glitter and sparkle of these exclusive, natural
looking asymmetrical designs and shapes. Great for water scenes, candle
flames, street lights and more!
Go to the HFX® Star Tutorial to see how the filter works.
CategoryLight.
Controls
PresetsTo select a preset, pick one from the Presets window.
Before After
Copyright © 2008--www.iofoto.com
Dfx User Guide • • •••

•
HFX® Star 393
• • • •••
StarThe Star settings control the various qualities of the star patterns.
TypeChooses the type of star pattern to use.
Hyper Star
Hollywood Star
Dfx User Guide • • •••

•
HFX® Star 394
• • • •••
North Star
Vector Star
BlendDetermines the blend mode to be used when adding the stars.
AddThe stars are added to your image.
ScreenThe stars are combined with the image using a Screen blend mode. This looks
kind of like the Add blend mode, but highlights are retained.
Dfx User Guide • • •••

•
HFX® Star 395
• • • •••
BrightnessDetermines the brightness of the stars.
SizeSets the star size.
AngleRotates the stars.
ColorSets the star color.
MatteA matte is used to create the star effect. Go to the Matte section of Common
Filter Controls to see how the Matte controls work.
Dfx User Guide • • •••

•
High Contrast 396
• • • •••
HIGH CONTRAST
DescriptionCreates an extreme high contrast image.
Go to the High Contrast Tutorial to see how the filter works.
CategoryColor.
Controls
PresetsTo select a preset, pick one from the Presets window.
ContrastSets the amount of contrast to be applied to the scene.
AmountSets the mix amount between the original and filtered version.
Before After
Copyright © 2008--www.iofoto.com
Dfx User Guide • • •••

•
Ice Halos 397
• • • •••
ICE HALOS
DescriptionIce halos are created when small ice crystals in the atmosphere generate halos
by reflecting and refracting light. Most notably, circles form around the sun or
moon as well as rare occurrences when the entire sky is painted with a web of
arcing halos.
Go to the Ice Halos Tutorial to see how the filter works.
CategoryLight.
Controls
PresetsTo select a preset, pick one from the Presets window.
LightBlendDetermines the blend mode to be used to add the ice halo.
AddThe ice halo is added to your image.
Before After
Copyright © 2008--www.iofoto.com
Dfx User Guide • • •••

•
Ice Halos 398
• • • •••
ScreenThe ice halo is combined with the image using a Screen blend mode. This looks
kind of like the Add blend mode, but highlights are retained.
BrightnessSets the intensity of the ice halo.
DisplacementDisplaces the ice halo by the luminance values of the image. This “fakes” the
effect of the ice halo wrapping over objects in the image.
BlurSets the softness of the ice halo.
HaloBlendThe ice halo can be added to the entire image or limited to a matte.
Halo OnlyThe ice halo is added to the entire image.
MatteThe ice halo is added only in areas of the matte.
Sun AltitudeSelects the appropriate ice halo pattern based on the sun’s altitude.
PositionThe ice halo position can be adjusted by clicking and dragging an on-screen
control in the center of the image.
Scale
Scale XThe horizontal scale of the ice halo.
Scale YThe vertical scale of the ice halo.
Dfx User Guide • • •••

•
Ice Halos 399
• • • •••
Gang ScaleThe Scale X and Scale Y slider values can be ganged together.
MatteA matte can be used to limit where the ice halo will be placed. Wherever there
is white in the matte is where the ice halo will be added. Go to the Matte
parameters to see how they work.
Note: To use a matte to limit where the ice halo will be added, Halo > Blend must be set to Matte.
Dfx User Guide • • •••

•
Infrared 400
• • • •••
INFRARED
DescriptionInfrared simulates infrared filters used in conjunction with infrared sensitive film
or sensors to produce very interesting black and white images with glow in
highlight areas.
Go to the Infrared Tutorial to see how the filter works.
CategorySpecial Effects.
Controls
PresetsTo select a preset, pick one from the Presets window.
Black and WhiteSelects the type of black and white filter to be applied to your color image. Go
to the Black and White section of Common Filter Controls to see how the
Black and White controls work.
Before After
Copyright © 2008--www.iofoto.com
Dfx User Guide • • •••

•
Infrared 401
• • • •••
MistBlendDetermines the blend mode to be used to create the glow effect.
AddThe glow is added to your image.
ScreenThe glow is combined with the image using a Screen blend mode. This looks
kind of like the Add blend mode, but highlights are retained.
BrightnessSets the intensity of the glow.
BlurSets the softness of the glow.
Color CorrectGo to the Color Correct filter to see how the Color Correct controls work.
MatteA matte is used to create the glow effect. Go to the Matte section of Common
Filter Controls to see how the Matte controls work.
Dfx User Guide • • •••

•
Kelvin 402
• • • •••
KELVIN
DescriptionDegrees Kelvin is the standard unit of measure for color temperature which is
a way to characterize the spectral properties of a light source. Low color
temperature implies warmer (redder) light, while high color temperature implies
a colder (bluer) light. Presets for a number of different light sources and
conditions are provided in degrees Kelvin.
Go to the Kelvin Tutorial to see how the filter works.
CategoryColor.
Controls
PresetsTo select a preset, pick one from the Presets window.
Color TemperatureThe Color Temperature of the image is determined by the difference of the
Destination and Source Kelvin parameters. For instance, if your Source Kelvin
is 3200 degrees Kelvin and you adjust the Destination Kelvin to 6500 degrees,
Before After
Copyright © 2008--www.iofoto.com
Dfx User Guide • • •••

•
Kelvin 403
• • • •••
your image would turn blue. This is the same as using tungsten indoor film
meant to be used with lighting balanced for 3200 degrees Kelvin outside in
daylight which is 6500 degrees Kelvin.
Destination KelvinSets the destination color temperature of the image in degrees Kelvin.
Source KelvinSets the source color temperature of the image in degrees Kelvin.
OpacitySets the opacity of the color temperature adjustment.
Preserve HighlightsPreserves the white areas of the image.
Exposure CompensationExposure Compensation adds back the brightness loss as a result of the color
temperature application.
Grad Kelvin can optionally use a gradient that limits where the filter is applied. Grad
is the transition area between the colored portion and the original image. Its
direction, corners and size can be adjusted. Go to the Grad section of Common
Filter Controls to see how the Grad controls work.
Dfx User Guide • • •••

•
Key Light 404
• • • •••
KEY LIGHT
DescriptionUsing Key Light, an image can be relit by with either a directional or point light.
The result looks natural even though the relighting is done without computing
any scene geometry.
Go to the Key Light Tutorial to see how the filter works.
CategoryLight.
Controls
TypeParallelA directional light source.
PointA point light where the light either emanates from or fades into a vanishing
point. Move the point control in the center of the screen to change the Point light
location.
StrengthSets the strength of the light.
Before After
Copyright © 2008--www.iofoto.com
Dfx User Guide • • •••

•
Key Light 405
• • • •••
AngleUsed in conjunction with Parallel, Angle sets the direction of the light source.
InvertUsed in conjunction with Point, Invert determines whether the light source
emanates from or fades into a vanishing point.
Note: Since Key Light works at a proxy resolution, you will need to view the result of Key Light at a 1:1 pixel ratio using the Magnifier window to determine what the final output will look like.
Dfx User Guide • • •••

•
Lens Distortion 406
• • • •••
LENS DISTORTION
DescriptionLens Distortion corrects for pin-cushioning and barrel distortion of camera
lenses. It is also useful for creating the look of a wide angle lens.
Go to the Lens Distortion Tutorial to see how the filter works.
CategoryLens.
Note: Lens Distortion must be applied as the first layer (bottom of the layer stack) when multiple layers are used. Otherwise, all filters below will not be rendered.
Barrel Distortion Pin Cushion Distortion
Original
Dfx User Guide • • •••

•
Lens Distortion 407
• • • •••
Controls
DistortionPulls the corners of the image in or out. Negative values pull the corners of the
image outward while positive values pull the corners of the image inward.
Anamorphic SqueezeAnamorphic Squeeze corrects for the squeeze found in anamorphic motion
picture lenses.
Curvature X and YCurvature X and Y correct for non-radial, asymmetric distortions found in
anamorphic motion picture lenses.
Note: Anamorphic Squeeze and Curvature X and Y only work once the Distortion parameter has been moved.
CenterDetermines the center point for the distortion. There is an on-screen control in
the center of the image. By clicking and dragging the on-screen control, the
Center can be adjusted.
Before After
Copyright © 2008--www.iofoto.com
Dfx User Guide • • •••

•
Levels 408
• • • •••
LEVELS
DescriptionLevels is an image adjustment tool which can move and stretch the brightness
levels of an image histogram. It has the power to adjust brightness, contrast,
and tonal range by specifying the location of complete black, complete white,
and midtones in a histogram.
CategoryColor.
Go to the Levels Tutorial to see how the filter works.
Before After
Copyright © 2008--www.iofoto.com
Dfx User Guide • • •••

•
Levels 409
• • • •••
Since every photo's histogram is unique, there is no single way to adjust the
levels for all your photos. A proper understanding of how to adjust the levels of
an image histogram will help you better represent tones in the final image.
Input LevelsThe outer two Input Levels sliders map the black point and white point to the
settings of the Output sliders. By default, the Output sliders are at level 0, where
the pixels are black, and level 100, where the pixels are white. With the Output
sliders in the default positions, moving the black Input slider maps the pixel
value to level 0 and moving the white Input slider maps the pixel value to level
100. The remaining levels are redistributed between levels 0 and 100. This
redistribution increases the tonal range of the image, in effect increasing the
overall contrast of the image.
Note: When shadows are clipped, the pixels are black, with no detail. When highlights are clipped, the pixels are white, with no detail.
The middle Input slider adjusts the gamma in the image. It moves the midtone
and changes the intensity values of the middle range of gray tones without
dramatically altering the highlights and shadows.
A. Shadows B. Midtones C. Highlights
A B C
Dfx User Guide • • •••

•
Levels 410
• • • •••
Output LevelsThe Output Levels decrease the contrast of the image.
Dfx User Guide • • •••

•
Light 411
• • • •••
LIGHT
DescriptionLight can be added to a scene where none existed before just as if you were
adding light at the time of shooting. Realistic lighting and shadow is introduced
using digital versions of the entire gobo libraries created by Gamproducts and
Rosco.
Gobos (patterns) are widely used by designers in theatre, film, photography
and television to create atmosphere, project scenery, and generally enhance
the visual impact of their lighting. Normally used in front of lights during
photography, these same exact gobos can be applied digitally to the entire
image or inside a matte.
Go to the Light Tutorial to see how the filters work.
CategoryLight.
Before After
Copyright © 2008--www.iofoto.com
Dfx User Guide • • •••

•
Light 412
• • • •••
PresetsTo select a gobo, pick one from the Presets window. If you would like to view
gobos from a different category, use the pop-up menu at the top left of the
Presets window.
Light
BlendDetermines the blend mode to be used to add the light.
AddThe light is added to your image.
ScreenThe light is combined with the image using a Screen blend mode. This looks
kind of like the Add blend mode, but highlights are retained.
Dfx User Guide • • •••

•
Light 413
• • • •••
SubtractThe light is subtracted from your image creating shadow instead of light.
BrightnessSets the intensity of the light.
DisplacementDisplaces the gobo by the luminance values of the image. This “fakes” the
effect of light wrapping over objects in the image.
BlurSets the softness of the light.
GelsDigital equivalents of the lighting gels created by Gamproducts and Rosco can
be applied to the light source. Select one of the gel presets from either the Gam
or Rosco pop-up list. For detailed information about Gamproducts and Rosco
gels, visit their websites at www.gamonline.com and www.rosco.com.
ColorSets the color of the light through the use of a standard color picker.
Displaced Gobo
Dfx User Guide • • •••

•
Light 414
• • • •••
Shadow
BrightnessSets the intensity of the shadows. The Brightness parameter will darken only
those areas that are not being affected by the Light settings.
GobosThe gobos are organized into different categories. Light uses Gamproducts
gobos while Gobo uses Rosco gobos. For detailed information about
Gamproducts and Rosco gobos, visit their websites at www.gamonline.com
and www.rosco.com.
Gamproducts GobosThe Gamproducts line of gobos are used in Light with 565 designs to choose
from including Breakups; Fire, Water & Natural Elements; Flowers, Foliage &
Trees; Holidays, Symbols & Religion; Pinspots, Vignettes & Spirals; Signage,
Themes & Class of; Sky, Stars, Clouds & Moons; Skylines, Structures, Fences
& Stone; Windows, Graphics, Grids & Grilles.
Dfx User Guide • • •••

•
Light 415
• • • •••
Rosco GobosThe Rosco line of gobos are used in Gobo with 1300 designs to choose from
including Abstract; Architectural & Retail; Boundaries & Wildlife; Breakups;
Churches & Heraldics; Clouds Water & Sky; Fire & Ice; Foliage Breakups;
Graphics & Grills; Occasions & Holidays; Rotation, Symbols & Signs; Trees &
Flowers; Windows, Doors & Blinds; and World Around Us.
GoboClicking the Gobo > Browse button allows you to load your own image as the
light source.
To use your own image as a light source:
• Select Gobo > Gobo > Browse.
• When the file browser opens, navigate to your image and select it.
BlendThe gobo can be added to a matte using a variety of Blend modes. Go to Blend
Modes for explanations of the various modes.
Dfx User Guide • • •••

•
Light 416
• • • •••
I like the Multiply blend mode for combining gobos with the matte because it
only puts the gobo within the areas of the matte.
OpacitySets the opacity of the gobo.
Matte Gobo
Multiply
Dfx User Guide • • •••

•
Light 417
• • • •••
BlurSets the softness of the gobo.
DVEThe DVE allows you to transform your gobo using Position, Scale, Rotation,
Corner Pin and Crop controls. Why the name DVE? DVE is an acronym for
digital video effects and refers to a real-time image manipulation device which
does pans, rotations, flips as well as various hardware-specific effects such as
page turns or customized wipes. In the film and video post production industry,
DVE is frequently used in reference to transforming the image in some way. Go
to the DVE section of Common Filter Controls to see how the DVE Controls
work.
Matte with Shape Blur=20
Dfx User Guide • • •••

•
Light 418
• • • •••
MatteA matte can be used to create areas of light or limit where gobos will be added.
Wherever there is white in the matte is where the light will be added. When
using the Light and Gobo filters, it is usually helpful to blur the matte. Go to the
Matte parameters to see how they work.
Note: To use a matte to create light, Gobo > Blend must be set to something other than Gobo Only for the Matte controls to be active.
Matte
Dfx User Guide • • •••

•
Looks: Black/White & Color 419
• • • •••
LOOKS: BLACK/WHITE & COLOR
DescriptionLooks is a unique filter meant to simulate a variety of color and black and white
photographic/film looks, diffusion and color grad camera filters, lighting gels,
film stocks and optical lab processes. By selecting from the available presets,
parameters in the various modules are automatically set to achieve a variety of
different effects.
Original Reminiscing Cool
Antique Steel Bleach
Glamour Day for Night Halo
Copyright © 2008--www.iofoto.com
Dfx User Guide • • •••

•
Looks: Black/White & Color 420
• • • •••
CategorySpecial Effects.
ControlsThe Looks filters are made up of Color Correct, Diffusion, Color-Grad®, Gels,
Lab, Grain and Post Color Correct groups. Together, they simulate a variety of
photographic and film looks. By selecting from the available presets,
parameters in the various groups are automatically set to achieve a variety of
different effects.
PresetsTo select a preset, pick one from the Presets window. If you would like to view
presets from a different category, use the pop-up menu at the top left of the
Presets window.
Color CorrectColor Correct manipulates the Black and White, Hue, Saturation, Brightness,
Contrast, Gamma, Red, Green and Blue values of the image. Go to the Color
Correct filter to see how it works.
DiffusionDiffusion creates atmosphere by reducing contrast while creating a glow
around highlights or shadows. It simulates diffusion and fog filters as well as
glows. Go to the Diffusion section of the Film Stocks filter to see how it works.
Color-Grad®Color-Grad® can transform an average sunrise or sunset into something
spectacular or convert a dull, washed-out sky to a breathtaking blue. No other
filter has done as much to improve landscape photography as the graduated
filter. Add color selectively while leaving the rest of the scene unaffected by
using a graduated transition for a smooth color blend between the colored
portion and the original image. Presets for your favorite Color-Grad® filters are
provided as well as the ability to create custom colors. Go to the Color-Grad®
filter to see how it works.
Dfx User Guide • • •••

•
Looks: Black/White & Color 421
• • • •••
GelsPhotographers, cinematographers and lighting designers use colored filters or
gels in front of lights. Whether they want to create a romantic moonlit setting or
a vicious, angry fight, they have the colors they need to achieve the effect. We
have created digital equivalents to the lighting gels and these same exact
colors can be applied to the entire image. Go to the Gels filter to see how it
works.
LabThe Lab group simulates a variety of different optical lab processes including
Bleach Bypass, Cross Processing, Flashing and Overexposure. Go to the
Bleach Bypass filter, Cross Processing filter, Flashing and the Overexpose
filter to see how they work.
GrainGrain simulates film grain with individual control of red, green, and blue grain
size, softness and intensity. In addition, a Film Response parameter controls
where you will see grain in the image. Go to the Grain filter to see how it works.
Warning: You may not see an accurate representation of the grain in the Viewer unless you use the Magnifier with this filter.
Post Color CorrectPost Color Correct gives you further color correction after all other operations
have been processed. This is often helpful as some of the operations affect the
brightness, contrast and color of the image. In addition, Temperature controls
allow you to make the scene warmer or cooler, and cyan or magenta. Go to the
Color Correct filter to see how it works.
Dfx User Guide • • •••

•
Low Contrast 422
• • • •••
LOW CONTRAST
DescriptionLow Contrast spreads highlights into darker areas, lowers contrast and keeps
bright areas bright.
Go to the Low Contrast Tutorial to see how the filter works.
CategoryColor.
Controls
PresetsTo select a preset, pick one from the Presets window.
ContrastLight BrightnessSets the intensity of the light that is spread into darker areas.
Before After
Copyright © 2008--www.iofoto.com
Dfx User Guide • • •••

•
Low Contrast 423
• • • •••
Light SpreadSets how far light is spread from bright areas to darker areas.
Shadow BrightnessAdjusts the brightness of the shadow areas.
MatteA matte is used to create the light spread effect. Go to the Matte section of
Common Filter Controls to see how the Matte controls work.
Dfx User Guide • • •••

•
Match 424
• • • •••
MATCH
DescriptionMatches the Brightness, Color, Detail, Grain and Tone of one image and
applies it to another.
Go to the Match Tutorial to see how the filter works.
CategoryColor.
Controls
SourceSelects a source image to be matched. Click the Browse button to select an
image.
MatchAnalyzes the source image’s settings.
Source Target
Copyright © 2008--www.iofoto.com
After
Dfx User Guide • • •••

•
Match 425
• • • •••
Matching Clips:
1 Apply the Match filter to a target image.
2 Select the source image to be matched using the Source selector.
3 Click the Match box.
The Color, Detail, Grain and Tone of the source image are analyzed and
applied to your target image.
Adjust the Color, Detail, Grain and Tone parameters to your liking.
BrightnessMatches the brightness of the source image.
Note: The Brightness parameter behaves differently depending on the source image. For instance, the slider can either brighten or darken. It is a dual use control.
ColorMatches the color of the source image.
DetailMatches the sharpness of the source image.
Note: The Detail parameter behaves differently depending on the source image. For instance, the slider can either sharpen or soften. It is a dual use control.
GrainSimulates the grain of the source image.
Warning: You may not see an accurate representation of the grain in the Viewer unless you use the Magnifier with this filter.
ToneMatches the tint of the source image. With some source images, a duotone
effect is created.
Dfx User Guide • • •••

•
ND-Grad 426
• • • •••
ND-GRAD
DescriptionThe ND or Neutral Density Grad darkens only a portion of the image using a
graduated transition between the darkened portion and the original image. It
selectively adjusts brightness without affecting color balance. The most likely
use for the ND-Grad would be to balance the difference between the sky and
the ground.
Go to the ND-Grad Tutorial to see how the filter works.
CategoryHFX Grads/Tints.
Controls
PresetsTo select a preset, pick one from the Presets window.
F-StopPresetsSelect one of the ND-Grad presets from the pop-up list.
Before After
Copyright © 2008--www.iofoto.com
Dfx User Guide • • •••

•
ND-Grad 427
• • • •••
ExposureDarkens the image using F-Stops as the unit of measure.
Preserve HighlightsPreserves the white areas of the image.
GradGrad is the transition area between the darkened portion and the original
image. Its direction, corners and size can be adjusted. Go to the Grad section
of Common Filter Controls to see how the Grad controls work.
Dfx User Guide • • •••

•
Night Vision 428
• • • •••
NIGHT VISION
DescriptionThe Night Vision filter creates the effect of a Night Vision lens--that green,
glowy, grainy look.
Go to the Night Vision Tutorial to see how the filter works.
CategorySpecial Effects.
Controls
PresetsTo select a preset, pick one from the Presets window.
Black and WhiteSelects the type of black and white filter to be applied to your color image. Go
to the Black and White section of Common Filter Controls to see how the
Black and White controls work.
Before After
Copyright © 2008--www.iofoto.com
Dfx User Guide • • •••

•
Night Vision 429
• • • •••
Tint
ColorSets the color that the image will be tinted with. The color is preset to a night
vision green, but feel free change it by using the color picker.
OpacitySets the opacity of the tint color.
Glow
BlendDetermines the blend mode to be used to create the glow effect.
AddThe glow is added to your image.
ScreenThe glow is combined with the image using a Screen blend mode. This looks
kind of like the Add blend mode, but highlights are retained.
BrightnessSets the intensity of the glow.
BlurSets the softness of the glow.
Additional Controls
GrainGrain SizeControls the size of the grain.
Warning: You may not see the grain size change in the Viewer unless you use the Magnifier with this filter.
Grain AmountControls the intensity of the grain.
Dfx User Guide • • •••

•
Night Vision 430
• • • •••
Color CorrectGo to the Color Correct filter to see how the Color Correct controls work.
MatteA matte is used to create the glow effect. Go to the Matte section of Common
Filter Controls to see how the Matte controls work.
Dfx User Guide • • •••

•
Nude/FX® 431
• • • •••
NUDE/FX®
DescriptionA series of different skin tone enhancing filters that offer ultimate flexibility and
control for skintones. Perfect for headshots and close-ups.
Go to the Nude/FX® Tutorial to see how the filter works.
CategoryHFX Grads/Tints.
Controls
PresetsTo select a preset, pick one from the Presets window.
ColorColorThe Color parameter sets the color through the use of a standard color picker.
Before After
Copyright © 2008--www.iofoto.com
Dfx User Guide • • •••

•
Nude/FX® 432
• • • •••
OpacitySets the opacity of the color filter.
Preserve HighlightsPreserves the white areas of the image.
Exposure CompensationExposure Compensation adds back the brightness loss as a result of the filter
application.
Grad The Nude/FX® filters can optionally use a gradient that limits where the filter is
applied. Grad is the transition area between the colored portion and the original
image. Its direction, corners and size can be adjusted. Go to the Grad section
of Common Filter Controls to see how the Grad controls work.
Dfx User Guide • • •••

•
Overexpose 433
• • • •••
OVEREXPOSE
DescriptionOverexpose simulates the overexposure that occurs when a film camera is
stopped.
Go to the Overexpose Tutorial to see how the filter works.
CategoryFilm Lab.
Controls
PresetsTo select a preset, pick one from the Presets window.
AmountControls the amount of overexposure.
IntensitySets the intensity of the overexposure.
Before After
Copyright © 2008--www.iofoto.com
Dfx User Guide • • •••

•
Overexpose 434
• • • •••
BlurSets the softness of the overexposure.
Dfx User Guide • • •••

•
Ozone 435
• • • •••
OZONE
DescriptionThe Ozone filter allows you to manipulate the color of an image with incredible
flexibility and accuracy. Inspired by Ansel Adams’ Zone System for still
photography, we have created “The Digital Zone System”. Just what is the
Digital Zone System? The world around us contains an infinite palette of colors,
tones and brightness. To reproduce this vast range of brightness, the Digital
Zone System takes the spectrum of image values and divides them into 11
discrete zones using proprietary image slicing algorithms. Zones can be
created using luminance, hue, saturation, average, red, green, blue, cyan,
magenta, and yellow values. Look at how the image below is divided into hue
zones.
Zone 0 Zone 1 Zone 2 Zone 3 Zone 4 Zone 5 Zone 6 Zone 7 Zone 8 Zone 9 Zone 10
Dfx User Guide • • •••

•
Ozone 436
• • • •••
With Ozone, the color values of each zone can be independently adjusted until
you’ve painted a new picture. Your adjustments occur on a zone by zone basis,
but you view the result of all color corrections simultaneously.
Go to the Ozone Tutorial to see how the filter works.
CategoryColor.
Controls
ZoneSelects one of the 11 zones. Once you click in the Zone selector, you can use
the left and right arrow keys to cycle through the zones.
Extract OnThe Extract On pop-up menu allows you to specify the image values to be used
for dividing the image into the 11 individual zones.
LuminanceZones are created using the image’s luminance values.
Before After
Copyright © 2008--www.iofoto.com
Dfx User Guide • • •••

•
Ozone 437
• • • •••
HueZones are created using the image’s hue. When adjusting the Position
parameter, you are selecting different hues.
SaturationZones are created using the image’s saturation values.
AverageZones are created based on the average of the image’s RGB values.
RedZones are created using the image’s red values.
GreenZones are created using the image’s green values.
BlueZones are created using the image’s blue values.
CyanZones are created using the image’s cyan values.
MagentaZones are created using the image’s magenta values.
YellowZones are created using the image’s yellow values.
Zone ControlsWhen using Luminance as the method for slicing up the image, the Position
and Range sliders are preset so that each zone is twice as bright as the
previous zone, proceeding from black towards white.
Zone 0 Zone 1 Zone 2 Zone 3 Zone 4 Zone 5 Zone 6 Zone 7 Zone 8 Zone 9 Zone 10
Dfx User Guide • • •••

•
Ozone 438
• • • •••
Pure black is defined as Zone 0, Zone 5 as middle gray and pure white as Zone
10. By using the View menu, you can look at the zone which is helpful in
determining the portions of the image you are going to adjust. The values
shown as white in the selected zone are the areas of the image that will be
modified by the color adjustments. Alternatively, at the bottom of the Parameter
window is a small image thumbnail of the selected zone.
Go to the Matte section of Common Filter Controls to see how the Position and
Range controls work.
PositionThe Position value pinpoints the color values to be used in the selected zone.
This value has been preset according to the Digital Zone System, but can be
changed if you choose. If the zones are created using Luminance, a high
Position value shows the brightest image values as white values in the zone. A
low Position value shows the darkest image values as white values in the zone.
RangeThe Range value increases or decreases the range of values in the selected
zone. This value has been preset according to the Digital Zone System, but can
be changed if you want.
HueRotates the hue of the zone.
SaturationAdjusts the saturation of the zone. Positive values saturate, negative values
desaturate.
BrightnessAdjusts the brightness of the zone. Positive values brighten, negative values
darken.
ContrastAdjusts the contrast of the zone. Positive values increase contrast, negative
values decrease contrast.
Dfx User Guide • • •••

•
Ozone 439
• • • •••
Gamma Adjusts the gamma of the zone. The gamma adjustment leaves the white and
black points the same and only modifies the values in-between. Positive values
lighten the midtones, negative values darken the midtones.
RedAdds or subtracts red from the zone.
GreenAdds or subtracts green from the zone.
BlueAdds or subtracts blue from the zone.
TemperatureSets the color temperature of the zone. Dragging the slider to the right makes
the image cooler (bluer) and dragging the slider to the left makes the image
warmer (redder).
Cyan/MagentaAdds either Cyan or Magenta to the zone. Dragging the slider to the right
makes the image more magenta and dragging the slider to the left makes the
image more cyan.
Dfx User Guide • • •••

•
Ozone 440
• • • •••
Zone ThumbnailAt the bottom of the Parameter window is a thumbnail of the selected zone to
help you see which areas of the image will be adjusted.
Dfx User Guide • • •••

•
Paint 441
• • • •••
PAINT
DescriptionPaints your image using Black/White, Blur, Clone, Color, Eraser, Mosaic, Red-
Eye, Repair and Scatter brushes.
Go to the Paint Tutorial to see how the filter works.
CategoryImage.
BrushesWhen Paint is selected in the Filter window, it’s controls appear in the Toolbar.
Black/White (B)The Black/White brush converts color images to black and white simulating the
look of Black and White photographic filters.
ModeSelects the method by which the color image is converted to a monochrome
image.
LuminanceCreates a monochrome image using the brightness of the image.
Before After
Dfx User Guide • • •••

•
Paint 442
• • • •••
AverageCreates a monochrome image using the average of the red, green and blue
channels.
RedSimulates a red filter in black and white photography.
GreenSimulates a green filter in black and white photography.
BlueSimulates a blue filter in black and white photography.
YellowSimulates a yellow filter in black and white photography.
OrangeSimulates a orange filter in black and white photography.
Blur (Shift+B)Blurs the image.
AmountSets the amount of blur to be applied.
Clone (C)Paints the image using another part of the image.
Using the Clone brush:
1 Select the Clone brush in the Toolbar.
2 Press and hold down the Shift key.
3 Click, drag and release to set the clone offset.
Dfx User Guide • • •••

•
Paint 443
• • • •••
The first click sets the clone source and where you drag and release is the
clone destination.
4 Use your pen and tablet or mouse to paint with the Clone brush.
To quickly reset the clone offset:
• Press shift and without moving the cursor, click your mouse or tap your pen on the screen once.
The clone offset is quickly reset.
Nudging the Clone SourceThe Clone source can be nudged using the Arrow keys. One press of the
Arrow key moves the Clone source 1 pixel. Using the Shift key in conjunction
with the Arrow keys moves the Clone source 10 pixels.
Color (Shift+C)Paints the image with the current color.
Dfx User Guide • • •••

•
Paint 444
• • • •••
ColorDisplays the currently selected color. Clicking on the Color icon opens a
standard color picker.
EyedropperColors can be picked off of the screen using the eyedropper icon.
ModeSelects how color is applied to the image.
NormalThe current color is added to the image.
TintThe current color is used to tint the image by replacing hue and saturation.
HueThe current color is used to tint the image by only replacing hue.
LightenPixels darker than the paint color are replaced, and pixels lighter than the paint
color do not change.
DarkenPixels lighter than the paint color are replaced, and pixels darker than the paint
color do not change.
Eraser (E)Erases previously painted brush strokes.
Painting with the right-mouse button automatically paints with the Eraser brush.
Dfx User Guide • • •••

•
Paint 445
• • • •••
Mosaic (Shift+M)Divides the picture up into square tiles.
SizeControls the size of the square tiles. A small size value will create many square
tiles.
Red-Eye (R)Removes red-eye.
To remove red-eye:
1 Select the Red-Eye brush in the Toolbar.
2 Use Ctrl(Win) or Cmd(Mac) and drag in or out to size the brush to roughly match the size of the red pupil.
3 Paint in the area of the red pupil being careful not to paint on any skin areas.
Dfx User Guide • • •••

•
Paint 446
• • • •••
Repair (Shift+R)Paints the image with the color level sampled at the beginning of each stroke.
Scatter (S)Scatters pixels in a random fashion.
RadiusSets the amount of scattering.
Brush SettingsCustomize your brush using the following settings:
ProfileThe profile setting controls the shape of the brush.
CircleThe brush profile is set to a circular shape.
SquareThe brush profile is set to a square shape.
SizeSets the size of the brush.
Dfx User Guide • • •••

•
Paint 447
• • • •••
To set the brush size:
1 Click on the Brush Size icon, and drag the slider that appears.
or
2 Enter a value in the number field next to the Brush Size icon and hit Enter.
or
3 Resize the brush in the Viewer by holding Ctrl(Win)/Cmd(Mac) and dragging in or out.
SoftnessSets the brush softness.
Dfx User Guide • • •••

•
Paint 448
• • • •••
To set the brush softness:
1 Click on the Brush Softness icon, and drag the slider that appears.
or
2 Enter a value in the number field next to the Brush Softness icon and hit Enter.
OpacitySets the brush opacity.
To set the brush opacity:
1 Click on the Brush Opacity icon, and drag the slider that appears.
or
2 Enter a value in the number field next to the Brush Opacity icon and hit Enter.
Dfx User Guide • • •••

•
Paint 449
• • • •••
Paint Keyboard Shortcuts
Shortcut Action
B Selects the Black/White brush
Shift+B Selects the Blur brush
C Selects the Clone brush
Shift+C Selects the Color brush
E Selects the Eraser brush
Shift+M Selects the Mosaic brush
R Selects the Red-Eye brush
Shift+R Selects the Repair brush
S Selects the Scatter brush
Ctrl(Win)/Cmd(Mac)+drag Sizes the brush
[ ] Sizes the brush
Shift with clone brush Sets the clone offset
Shift+click or tap Resets the clone offset
Arrow keys Moves the Clone source by 1 pixel
Shift+Arrow keys Moves the Clone source by 10 pixels
Hold down Arrow keys Moves the Clone source continuously
Right-mouse drag Paints with the Eraser brush
Dfx User Guide • • •••

•
Pastel 450
• • • •••
PASTEL
DescriptionConverts the image into pastel artwork.
Go to the Pastel Tutorial to see how the filter works.
CategorySpecial Effects.
Controls
AmountAdjusts the amount of the pastel effect.
DetailAdjusts the detail. If the slider is increased, you will see more detail while
decreasing the slider will have an overall smoothing effect.
Before After
Copyright © 2008--www.iofoto.com
Dfx User Guide • • •••

•
Pearlescent® 451
• • • •••
PEARLESCENT®
Description
Pearlescent®Creates a subtle new look with a slight softening of contrast and a luxurious
pearlescent halo around highlights. This filter aids cinematographers in taking
the edge off the image from modern lenses and cameras, especially with 4K
acquisition sensors.
Black Pearlescent®Offers all the benefits of the Pearlescent® filter in a more subtle form. Highlight
flares are controlled and contrast is lowered for a more delicate effect.
Before After
Copyright © 2008--www.iofoto.com
Before After
Copyright © 2008--www.iofoto.com
Dfx User Guide • • •••

•
Pearlescent® 452
• • • •••
Go to the Pearlescent® Tutorial to see how the filters work.
CategoryHFX Diffusion.
Controls
PresetsTo select a preset, pick one from the Presets window.
MistThe Mist controls add a mild glow to image highlights.
BlendDetermines the blend mode to be used to create the mist effect.
AddThe mist is added to your image.
ScreenThe mist is combined with the image using a Screen blend mode. This looks
kind of like the Add blend mode, but highlights are retained.
BrightnessSets the intensity of the mist.
BlurSets the softness of the mist.
ColorSets the color of the mist.
Color CorrectGo to the Color Correct filter to see how the Color Correct controls work.
MatteA matte is used to create the mist effect. Go to the Matte section of Common
Filter Controls to see how the Matte controls work.
Dfx User Guide • • •••

•
Pencil 453
• • • •••
PENCIL
DescriptionPencil converts your image to a pencil sketch.
Go to the Pencil Tutorial to see how the filter works.
CategorySpecial Effects.
Controls
PresetsTo select a preset, pick one from the Presets window.
AmountSets the intensity of the pencil effect.
ColorThe Color parameter sets the color of the pencil effect through the use of a
standard color picker.
Before After
Copyright © 2008--www.iofoto.com
Dfx User Guide • • •••

•
Pencil 454
• • • •••
BackgroundMixes in the original image.
Dfx User Guide • • •••

•
Photographic 455
• • • •••
PHOTOGRAPHIC
DescriptionThe most complete line of Kodak® filters for photographic uses is available in
the form of gelatin films and are known as Wratten® Gelatin Filters. Our
Photographic filter is a digital equivalent of the Wratten set and were created
using the spectral transmission curves for each optical filter. The Color
Conversion, Light Balancing and Color Compensating preset groups are
subsets of the Photographic filters.
Go to the Photographic Tutorial to see how the filter works.
PhotographicDigital versions of the complete line of Kodak® Wratten® Gelatin Filters.
Color ConversionColor Conversion filters correct for significant differences in color temperature
between your light source and recording media.
Before After
Copyright © 2008--www.iofoto.com
Dfx User Guide • • •••

•
Photographic 456
• • • •••
Light BalancingLight Balancing filters correct for minor differences in color temperature
between your light source and recording media.
Color CompensatingColor Compensating filters control color by attenuating specific parts of the
spectrum. They can be used to make changes in color balance or compensate
for deficiencies in the image’s spectral quality.
CategoryHFX Grads/Tints.
Controls
PresetsTo select a preset, pick one from the Presets window. If you would like to view
presets from a different category, use the pop-up menu at the top left of the
Presets window.
ColorColorThe Color parameter sets the color of the filter through the use of a standard
color picker.
OpacitySets the opacity of the color filter.
Preserve HighlightsPreserves the white areas of the image.
Exposure CompensationExposure Compensation adds back the brightness loss as a result of the filter
application.
Dfx User Guide • • •••
•
Photographic 457
• • • •••
Grad These filters can optionally use a gradient that limits where the filter is applied.
Grad is the transition area between the colored portion and the original image.
Its direction, corners and size can be adjusted. Go to the Grad section of
Common Filter Controls to see how the Grad controls work.
Dfx User Guide • • •••

•
Polarizer / Warm Polarizer 458
• • • •••
POLARIZER / WARM POLARIZER
Description
PolarizerThe greatest use of polarizing filters is to achieve a darkened, deep blue sky.
Our digital version of the Polarizer is designed to do just that. Through the use
of a matte and an adjustable gradient, the color of the sky can be adjusted.
Before After
Copyright © 2008--www.iofoto.com
Dfx User Guide • • •••

•
Polarizer / Warm Polarizer 459
• • • •••
Warm PolarizerCombines the benefits of the Polarizer with a warming filter making it ideal for
portraits and scenics.
Go to the Polarizer Tutorial to see how the filter works.
CategoryImage.
Controls
PresetsTo select a preset, pick one from the Presets window. If you would like to view
presets from a different category, use the pop-up menu at the top left of the
Presets window.
SkyColor Correct controls are provided to adjust the sky.
HueRotates the hue of the sky.
Before After
Copyright © 2008--www.iofoto.com
Dfx User Guide • • •••

•
Polarizer / Warm Polarizer 460
• • • •••
SaturationAdjusts the saturation of the sky. Positive values saturate, negative values
desaturate.
BrightnessAdjusts the brightness of the sky. Positive values brighten, negative values
darken.
ContrastAdjusts the contrast of the sky. Positive values increase contrast, negative
values decrease contrast.
Gamma Adjusts the gamma of the sky. The gamma adjustment leaves the white and
black points the same and only modifies the values in-between. Positive values
lighten the midtones, negative values darken the midtones.
RedAdds or subtracts red from the sky.
GreenAdds or subtracts green from the sky.
BlueAdds or subtracts blue from the sky.
TemperatureSets the color temperature of the sky. Dragging the slider to the right makes the
sky cooler (bluer) and dragging the slider to the left makes the sky warmer
(redder).
TemperatureApplies a warming filter to the image. Go to the Temperature section of
Common Filter Controls to see how the Temperature controls work.
Dfx User Guide • • •••

•
Polarizer / Warm Polarizer 461
• • • •••
GradThe Polarizer can optionally use a gradient that limits where the filter is applied.
For instance, if the polarization is affecting areas other than the sky, enable the
Grad and adjust it to limit the areas of polarization. Go to the Grad section of
Common Filter Controls to see how the Grad controls work.
MatteHueThe Polarizer isolates the sky using a matte based on a blue hue. Use the Hue
eyedropper to select the exact color of the sky if you are not seeing enough
polarization.
RangeIncreases or decreases the range of values in the hue matte. A low Range
value indicates a narrow range of values. A high Range value indicates a large
range of values included in the matte.
BlurSets the softness of the matte by using a quality blur.
Go to the Matte parameters to see how they work.
Dfx User Guide • • •••

•
Pro-Mist® 462
• • • •••
PRO-MIST®
Description
Pro-Mist®This popular motion picture effect creates a special atmosphere by softening
excess sharpness and contrast. It generates a pearlescent halo around
highlights.
Warm Pro-Mist®Same as Pro-Mist® but combined with a warming filter. It is useful in outdoor
open shade situations where there is excessive blue in the image and when
total control over lighting may not be possible.
Before After
Copyright © 2008--www.iofoto.com
Before After
Copyright © 2008--www.iofoto.com
Dfx User Guide • • •••

•
Pro-Mist® 463
• • • •••
Cool Pro-Mist®Same as Pro-Mist® but combined with a cooling filter.
Black Pro-Mist®Offers all the benefits of the Pro-Mist® filter in a more subtle form. Highlight
flares are controlled and contrast is lowered for a more delicate effect.
Before After
Copyright © 2008--www.iofoto.com
Before After
Copyright © 2008--www.iofoto.com
Dfx User Guide • • •••

•
Pro-Mist® 464
• • • •••
Warm Black Pro-Mist®Same as Black Pro-Mist® but combined with a warming filter.
Go to the Pro-Mist® Tutorial to see how the filters work.
CategoryHFX Diffusion.
Controls
PresetsTo select a preset, pick one from the Presets window. If you would like to view
presets from a different category, use the pop-up menu at the top left of the
Presets window.
DetailSmoothingFine image details, such as facial wrinkles and blemishes, are minimized using
edge aware smoothing.
MistThe Mist controls add a mild glow to image highlights.
BlendDetermines the blend mode to be used to create the mist effect.
Before After
Copyright © 2008--www.iofoto.com
Dfx User Guide • • •••

•
Pro-Mist® 465
• • • •••
AddThe mist is added to your image.
ScreenThe mist is combined with the image using a Screen blend mode. This looks
kind of like the Add blend mode, but highlights are retained.
BrightnessSets the intensity of the mist.
BlurSets the softness of the mist.
ColorSets the color of the mist.
Color CorrectGo to the Color Correct filter to see how the Color Correct controls work.
TemperatureApplies a warming or cooling filter to the image. Go to the Temperature section
of Common Filter Controls to see how the Temperature controls work.
MatteA matte is used to create the mist effect. Go to the Matte section of Common
Filter Controls to see how the Matte controls work.
Dfx User Guide • • •••

•
Rack Focus 466
• • • •••
RACK FOCUS
DescriptionRack Focus replicates a true camera defocus by introducing lens Bokeh
effects. Bokeh is the Japanese term that describes the quality of out-of-focus
points of light. In defocused areas, each point of light becomes a shape--either
a circle or a polygon. The shape grows in size as the amount of defocusing is
increased.
Go to the Rack Focus Tutorial to see how the filter works.
CategoryLens.
Controls
PresetsTo select a preset, pick one from the Presets window.
BlurThe image is blurred by using a quality blur.
Before After
Copyright © 2008--www.iofoto.com
Dfx User Guide • • •••

•
Rack Focus 467
• • • •••
ApertureBlendDetermines the blend mode to be used when adding Bokeh.
AddBokeh’s are added to your image.
ScreenThe Bokeh are combined with the image using a Screen blend mode. This
looks kind of like the Add blend mode, but highlights are retained.
BrightnessBrightens the Bokeh.
FacetsSet the number of Bokeh facets when the Curvature parameter is set to 0.
CurvatureControls the curvature of the Bokeh. When set to 100, the Bokeh are
completely round. Set to a value of 0 to see a polygonal shape.
AngleRotates the Bokeh.
ColorSets the Bokeh color.
BlurSets the softness of the Bokeh. This can be useful when using high threshold
values.
MatteA matte is used to create the Bokeh effect. Go to the Matte section of Common
Filter Controls to see how the Matte controls work.
Dfx User Guide • • •••

•
Radial Exposure 468
• • • •••
RADIAL EXPOSURE
DescriptionLightens and/or darkens the center or edges of an image to correct lens
vignetting.
Go to the Radial Exposure Tutorial to see how the filter works.
CategoryLens.
Controls
ExposureEdgesLightens or darkens the edges of the image.
CenterLightens or darkens the center of the image.
Before After
Copyright © 2008--www.iofoto.com
Dfx User Guide • • •••

•
Radial Exposure 469
• • • •••
SpotA radial gradient is used to lighten or darken the edges or center of the image.
Go to the Spot section of Common Filter Controls to see how the Spot controls
work.
Dfx User Guide • • •••

•
Radial Tint 470
• • • •••
RADIAL TINT
DescriptionTints the image using multi-color, radially graduated filters.
Go to the Radial Tint Tutorial to see how the filter works.
CategoryHFX Grads/Tints.
Controls
PresetsTo select a preset, pick one from the Presets window.
Tint ModeSelects how color is applied to the image.
NormalTints the image while retaining highlights.
Before After
Copyright © 2008--www.iofoto.com
Dfx User Guide • • •••

•
Radial Tint 471
• • • •••
TintThe image is tinted by replacing hue and saturation.
HueThe image is tinted by only replacing hue.
LightenPixels darker than the color are replaced, and pixels lighter than the color do
not change.
DarkenPixels lighter than the color are replaced, and pixels darker than the color do
not change.
Color 1Sets the color for the top left quadrant of the image.
ColorSets the color through the use of a standard color picker.
OpacitySets the opacity of the color.
Color 2The Color 2 controls are the same as the controls for Color 1 except it is applied
to the top right quadrant of the image.
Color 3The Color 3 controls are the same as the controls for Color 1 except it is applied
to the bottom right quadrant of the image.
Color 4The Color 4controls are the same as the controls for Color 1 except it is applied
to the bottom left quadrant of the image.
Radial GradSets the position, rotation and aspect ratio of the radial gradient.
Dfx User Guide • • •••

•
Radial Tint 472
• • • •••
PositionThere is an on-screen control in the center of the image. By clicking and
dragging the on-screen control, the position of the grad can be adjusted.
SizeThe size of the grad.
RotationThe rotation of the grad.
AspectThe aspect ratio of the grad.
HighlightsPreserve HighlightsPreserves the white areas of the image.
Exposure CompensationExposure Compensation adds back the brightness loss as a result of the filter
application.
SpotA spot in the form of a radial gradient can optionally be used to control where
color is added to the image. Go to the Spot section of Common Filter Controls
to see how the Spot controls work.
Dfx User Guide • • •••

•
Rainbow 473
• • • •••
RAINBOW
DescriptionRecreates arced rainbows of spectral colors, usually identified as red, orange,
yellow, green, blue, indigo, and violet, that appear in the sky as a result of the
refractive dispersion of sunlight in drops of rain or mist.
Go to the Rainbow Tutorial to see how the filter works.
CategoryLight.
Controls
LightBlendDetermines the blend mode to be used to add the rainbow.
AddThe rainbow is combined with the image using an Add blend mode.
ScreenThe rainbow is combined with the image using a Screen blend mode. This
looks kind of like the Add blend mode, but highlights are retained.
Before After
Copyright © 2008--www.iofoto.com
Dfx User Guide • • •••

•
Rainbow 474
• • • •••
NormalThe rainbow is added to the image using a normal composite function.
AmountSets the intensity of the rainbow.
DisplacementDisplaces the rainbow by the luminance values of the image. This “fakes” the
effect of the rainbow wrapping over objects in the image.
BlurSets the softness of the rainbow.
RainbowBlendThe rainbow can be added to the entire image or limited to a matte.
Rainbow OnlyThe rainbow is added to the entire image.
MatteThe rainbow is added only in areas of the matte.
PositionThe rainbow position can be adjusted by clicking and dragging an on-screen
control in the center of the image.
RadiusThe size of the rainbow.
AspectSets the aspect ratio of the rainbow. Positive values stretch the rainbow
horizontally and negative values stretch it vertically.
ThicknessSets the thickness of the rainbow’s bands.
Dfx User Guide • • •••

•
Rainbow 475
• • • •••
CropOffsetThe rainbow is cropped based on the Offset value. The higher the value, the
more rainbow you see. A value of -100 shows no rainbow at all while 100
displays a complete 360 degree rainbow.
AngleSets the angle of the crop.
SoftnessSets the softness of the crop’s edge.
MatteA matte can be used to limit where the rainbow will be placed. Wherever there
is white in the matte is where the rainbow will be added. Go to the Matte
parameters to see how they work.
Note: To use a matte to limit where the rainbow will be added, Rainbow > Blend must be set to Matte.
Dfx User Guide • • •••

•
Rays 476
• • • •••
RAYS
DescriptionCreate stunning and realistic light ray effects quickly and easily. Known as
volumetric lighting in computer graphics or crepuscular rays in atmospheric
optics, this dramatic effect adds polish and style. Since the rays are only added
to highlight areas, they have the effect of passing through objects and add a
third dimensional quality. Add shafts of light streaming through clouds, rays
filtering through a forest canopy, beams of light on a foggy night or rays
shooting out from text. Rays adds a striking and dramatic quality to any image.
Go to the Rays Tutorial to see how the filter works.
Note: The Magnifier controls are disabled for performance reasons when using Rays.
CategoryLight.
Before After
Copyright © 2010--Brand X Design
Dfx User Guide • • •••

•
Rays 477
• • • •••
Controls
RaysLengthSets the ray length.
ThresholdControls the amount of rays based on a brightness threshold. Fewer rays with
more definition are generated at higher threshold values.
PositionMove the point control in the center of the screen to change the source point
from which the rays will emanate.
ColorBrightnessSets the brightness of the rays.
ColorSets the color of the rays.
ShimmerRandomizes the rays.
AmountSets the amount of shimmering.
PhaseSets the randomness of the shimmering.
OpacityRaysSets the opacity of the rays.
SourceSets the opacity of your image.
Dfx User Guide • • •••

•
ReLight 478
• • • •••
RELIGHT
DescriptionLight can be added to a scene where none existed before. A complete set of
light source controls allow you to adjust the light just as you would at the time
of shooting.
Go to the ReLight Tutorial to see how the filter works.
CategoryLight.
Light
BlendDetermines the blend mode to be used to add the light.
AddThe light is added to your image.
Before After
Copyright © 2008--www.iofoto.com
Dfx User Guide • • •••

•
ReLight 479
• • • •••
ScreenThe light is combined with the image using a Screen blend mode. This looks
kind of like the Add blend mode, but highlights are retained.
BrightnessSets the intensity of the light.
DisplacementDisplaces the light source by the luminance values of the image. This “fakes”
the effect of light wrapping over objects in the image.
BlurSets the softness of the light.
GamColor PresetsDigital equivalents of the lighting gels created by Gamproducts can be applied
to your light source. Select one of the GamColor presets from the pop-up list.
For detailed information about Gamproducts gels, visit their website at
www.gamonline.com.
ColorSets the color of the light through the use of a standard color picker.
Light Source
BlendThe light source can be added to the matte using a variety of Blend modes. Go
to Blend Modes for explanations of the various modes.
I like the Multiply blend mode for combining the light source with the matte
because it only puts the light source within the areas of the matte.
OpacitySets the opacity of the light source.
AspectThe aspect ratio of the light source.
Dfx User Guide • • •••

•
ReLight 480
• • • •••
RadiusThe un-blurred radius of the light source.
Falloff RadiusThe blurred edge radius.
FalloffMoves the falloff towards the light centerpoint.
InvertInverts the light source.
DVEThe DVE allows you to transform your light source using Position, Scale,
Rotation, Corner Pin and Crop controls. Why the name DVE? DVE is an
acronym for digital video effects and refers to a real-time image manipulation
device which does pans, rotations, flips as well as various hardware-specific
effects such as page turns or customized wipes. In the film and video post
production industry, DVE is frequently used in reference to transforming the
image in some way. Go to the DVE section of Common Filter Controls to see
how the DVE Controls work.
MatteA matte can be used to limit the area of added light. Wherever there is white in
the matte is where the light will be added. When using ReLight, it is usually
helpful to blur the matte. Go to the Matte parameters to see how they work.
Note: Light Source > Blend must be set to something other than Shape Only for the Matte controls to be active.
Dfx User Guide • • •••

•
Reflector 481
• • • •••
REFLECTOR
DescriptionOne of the oldest and still most popular means of lighting an exterior set is by
taking a reflective surface and redirecting sunlight or artificial light exactly
where it is needed. Unfortunately, it is nearly impossible for actors to keep their
eyes open when looking into a reflector, resulting in squinting eyes. Our silver
and gold reflectors allow you to add white or gold light into shadow areas
without the squinting.
Go to the Reflector Tutorial to see how the filter works.
CategoryLight.
Before After
Copyright © 2008--www.iofoto.com
Dfx User Guide • • •••

•
Reflector 482
• • • •••
Controls
PresetsTo select a preset, pick one from the Presets window. If you would like to view
presets from a different category, use the pop-up menu at the top left of the
Presets window.
BrightnessSets the intensity of the reflector.
ColorThe Color parameter sets the color of the reflector through the use of a
standard color picker. The default color is gold for Gold Reflector and white for
Silver Reflector.
PositionSelects the shadow values that will be adjusted with the Brightness slider.
RangeControls the range of shadow values that will be adjusted with the Brightness
slider.
Go to the Matte section of Common Filter Controls to see how the Position and
Range controls work.
Dfx User Guide • • •••

•
Satin® 483
• • • •••
SATIN®
Description
Satin®Designed with modern digital lenses and camera sensors specifically in mind
to enhance the natural beauty of talent with minimal signs of filtration. This filter
gently adds a minimal flare to highlights and reduces contrast while
suppressing facial blemishes and wrinkles.
Black Satin®Black Satin® offers all the benefits of the Satin® filter in a more subtle form.
This filter gently controls highlights, reduces contrast and adds a grittier look
than regular satin filters, while suppressing facial blemishes and wrinkles.
Go to the Satin® Tutorial to see how the filters work.
CategoryHFX Diffusion.
Before Satin® After
Copyright © 2008--www.iofoto.com
Black Satin® After
Dfx User Guide • • •••

•
Satin® 484
• • • •••
Controls
PresetsTo select a preset, pick one from the Presets window. If you would like to view
presets from a different category, use the pop-up menu at the top left of the
Presets window.
DetailSmoothingFine image details, such as facial wrinkles and blemishes, are minimized using
edge aware smoothing.
MistThe Mist controls add a mild glow to image highlights.
BlendDetermines the blend mode to be used to create the mist effect.
AddThe mist is added to your image.
ScreenThe mist is combined with the image using a Screen blend mode. This looks
kind of like the Add blend mode, but highlights are retained.
BrightnessSets the intensity of the mist.
BlurSets the softness of the mist.
ColorSets the color of the mist.
Color CorrectGo to the Color Correct filter to see how the Color Correct controls work.
Dfx User Guide • • •••

•
Satin® 485
• • • •••
MatteA matte is used to create the mist effect. Go to the Matte section of Common
Filter Controls to see how the Matte controls work.
Dfx User Guide • • •••

•
Selective Color Correct 486
• • • •••
SELECTIVE COLOR CORRECT
DescriptionColors can be selectively isolated through the use of a matte and adjusted
using hue, saturation, brightness, gamma, contrast, temperature,
cyan/magenta, red, green, and blue controls.
Go to the Selective Color Correct Tutorial to see how the filter works.
CategoryColor.
Color CorrectCertain parts of the image are isolated by the creation of a matte. Whatever is
shown as white in the matte can be adjusted by the color controls below.
HueRotates the hue of the image.
Before
After
Dfx User Guide • • •••

•
Selective Color Correct 487
• • • •••
SaturationAdjusts the saturation of the image. Positive values saturate, negative values
desaturate.
BrightnessAdjusts the brightness of the image. Positive values brighten, negative values
darken.
ContrastAdjusts the contrast of the image. Positive values increase contrast, negative
values decrease contrast.
Gamma Adjusts the gamma of the image. The gamma adjustment leaves the white and
black points the same and only modifies the values in-between. Positive values
lighten the midtones, negative values darken the midtones.
TemperatureSets the color of the image to be either warmer or cooler. Dragging the slider to
the right makes the image cooler (bluer) and dragging the slider to the left
makes the image warmer (redder).
Cyan/MagentaAdds either Cyan or Magenta to the image. Dragging the slider to the right
makes the image more magenta and dragging the slider to the left makes the
image more cyan.
RedAdds or subtracts red from the image.
GreenAdds or subtracts green from the image.
BlueAdds or subtracts blue from the image.
Dfx User Guide • • •••

•
Selective Color Correct 488
• • • •••
TemperatureSets the color temperature of the image. Dragging the slider to the right makes
the image cooler (bluer) and dragging the slider to the left makes the image
warmer (redder).
MatteA matte is created to isolate areas to be color corrected. Using advanced image
slicing algorithms, mattes are created using luminance, hue, saturation,
average, red, green, blue, cyan, magenta, and yellow values.
Extract OnExtract On selects the type of matte. Select whichever type isolates the desired
values.
A matte is created based on one of the following:
LuminanceA matte is created based on the luminance of the image.
Original Matte
Hue Matte
Dfx User Guide • • •••

•
Selective Color Correct 489
• • • •••
HueA matte is created based on the hue of the image. When adjusting the Position
parameter, you are selecting different hues.
SaturationA matte is created based on the saturation of the image.
AverageA matte is created based on the average of the image’s RGB values.
RedA matte is created based on the image’s red values.
GreenA matte is created based on the image’s green values.
BlueA matte is created based on the image’s blue values.
CyanA matte is created based on the image’s cyan values.
MagentaA matte is created based on the image’s magenta values.
YellowA matte is created based on the image’s yellow values.
PositionThe Position value pinpoints the color values to be used in the matte. For a
luminance matte, a Position value of 100 would make a white matte of the
highlights and a value of 0 would make a white matte of the shadows. In the
Dfx User Guide • • •••

•
Selective Color Correct 490
• • • •••
flower image below, look at how the matte varies for different Position values in
a red extraction. When the Position is at a value of 100, the red flowers are
shown as white in the matte.
When the Position is moved to 50, the red flowers turn black.
RangeIncreases or decreases the range of values in the matte. A low Range value
indicates a narrow range of values. A high Range value indicates a large range
of values included in the matte.
Position=100, Range=25
Position=50, Range=25
Position=100, Range=50
Dfx User Guide • • •••

•
Selective Color Correct 491
• • • •••
Black ClipBlacks in the matte are made blacker by increasing the value of the slider. As
the slider value increases, more values are clipped to black. This is helpful for
getting rid of unwanted gray areas in what should be the black part of the matte.
White ClipWhites in the matte are made whiter by increasing the value of the slider. As
the slider value increases, more values are clipped to white. This is helpful for
getting rid of unwanted gray areas in what should be the white part of the matte.
Matte with No Black Clip Black Clip=50
Matte with No White Clip White Clip=50
Dfx User Guide • • •••

•
Selective Color Correct 492
• • • •••
Shrink/GrowShrinks or grows the matte. Negative values shrink and positive values grow
the matte.
BlurBlurs the matte.
Invert• Off
Does nothing to the matte.
• On
Original
Shrink=-2 Grow=1.5
No Blur Blur=10
Dfx User Guide • • •••

•
Selective Color Correct 493
• • • •••
Inverts the luminance values of the matte.
Invert Off Invert On
Dfx User Guide • • •••

•
Selective Saturation 494
• • • •••
SELECTIVE SATURATION
DescriptionThe saturation of the image can be adjusted independently in the shadows,
midtones and highlights.
Go to the Selective Saturation Tutorial to see how the filter works.
CategoryColor.
Controls
PresetsTo select a preset, pick one from the Presets window.
ShadowsSaturationAdjusts the saturation of the image in the shadows. Positive values saturate,
negative values desaturate.
PositionSelects the shadow values to be adjusted.
Before After
Copyright © 2008--www.iofoto.com
Dfx User Guide • • •••

•
Selective Saturation 495
• • • •••
RangeControls the range of values to be used for the shadows. A higher Range value
considers more values as shadows.
MidtonesSaturationAdjusts the saturation of the image in the midtones. Positive values saturate,
negative values desaturate.
PositionSelects the midtones values to be adjusted.
RangeControls the range of values to be used for the midtones. A higher Range value
considers more values as midtones.
HighlightsSaturationAdjusts the saturation of the image in the highlights. Positive values saturate,
negative values desaturate.
PositionSelects the highlight values to be adjusted.
RangeControls the range of values to be used for the highlights. A higher Range value
considers more values as highlights.
Go to the Matte section of Common Filter Controls to see how the Position and
Range controls work.
Dfx User Guide • • •••

•
Sepia / 812® Warming 496
• • • •••
SEPIA / 812® WARMING
Description
SepiaCreates a warm brown tone for that nostalgic feeling.
812® WarmingThe 812® Warming filter, a Tiffen exclusive, improves skintones and is ideal for
portraits taken on a cloudy day or in outdoor shade on a sunny day.
Go to the Sepia / 812® Warming Tutorial to see how the filters work.
CategoryHFX Grads/Tints.
Controls
PresetsTo select a preset, pick one from the Presets window.
Before After
Copyright © 2008--www.iofoto.com
Dfx User Guide • • •••

•
Sepia / 812® Warming 497
• • • •••
ColorAmountDetermines the intensity of the color added to the image.
OpacitySets the opacity of the filter.
Preserve HighlightsPreserves the white areas of the image.
Exposure CompensationExposure Compensation adds back the brightness loss as a result of the filter
application.
Grad Sepia and 812® Warming can optionally use a gradient that limits where the
filter is applied. Grad is the transition area between the colored portion and the
original image. Its direction, corners and size can be adjusted. Go to the Grad
section of Common Filter Controls to see how the Grad controls work.
Dfx User Guide • • •••

•
Sharpen 498
• • • •••
SHARPEN
DescriptionEnhances the sharpness or focus by selectively increasing the contrast
between adjacent pixels along edges in an image.
Go to the Sharpen Tutorial to see how the filter works.
CategoryImage.
Controls
PresetsTo select a preset, pick one from the Presets window.
AmountDetermines how much contrast is added at the edges.
RadiusControls the size of the edges you wish to sharpen.
Before After
Copyright © 2008--www.iofoto.com
Dfx User Guide • • •••

•
Sharpen 499
• • • •••
ThresholdThe threshold setting is used to sharpen more pronounced edges, while
leaving more subtle edges untouched. Low values sharpen more image areas
while higher threshold values sharpen less.
Dfx User Guide • • •••

•
Smoque® 500
• • • •••
SMOQUE®
DescriptionMechanical smoke generators are often used to enhance realism where smoke
is normally encountered. This can be difficult, costly and less desirable to work
in a smoke-filled environment. The Smoque® filter creates the look of smoke
without the cost and hassle of smoke generators.
Go to the Smoque® Tutorial to see how the filter works.
CategoryHFX Diffusion.
Controls
PresetsTo select a preset, pick one from the Presets window.
Before After
Copyright © 2008--www.iofoto.com
Dfx User Guide • • •••

•
Smoque® 501
• • • •••
SmokeBlendDetermines the blend mode to be used to create the smoke effect.
AddThe smoke is added to your image.
ScreenThe smoke is combined with the image using a Screen blend mode. This looks
kind of like the Add blend mode, but highlights are retained.
BrightnessSets the intensity of the smoke.
BlurSets the softness of the smoke.
ColorThe Color parameter sets the color of the smoke through the use of a standard
color picker. The default color is white.
MatteA matte is used to create the smoke effect. Go to the Matte section of Common
Filter Controls to see how the Matte controls work.
Dfx User Guide • • •••

•
Soft Contrast 502
• • • •••
SOFT CONTRAST
DescriptionSoft Contrast diminishes highlights while retaining the darker look of the
shadows.
Go to the Soft Contrast Tutorial to see how the filter works.
CategoryColor.
Controls
PresetsTo select a preset, pick one from the Presets window.
HighlightsLowers the brightness of the highlights.
PositionSelects the highlight values to be adjusted.
Before After
Copyright © 2008--www.iofoto.com
Dfx User Guide • • •••

•
Soft Contrast 503
• • • •••
RangeControls the range of values to be used for the highlights. A higher Range value
considers more values as highlights.
Go to the Matte section of Common Filter Controls to see how the Matte
controls work.
Dfx User Guide • • •••

•
Soft/FX®, Warm Soft/FX® 504
• • • •••
SOFT/FX®, WARM SOFT/FX®
Description
Soft/FX®Softens and minimizes facial imperfections while retaining overall image clarity.
Ideal portrait filter.
Warm Soft/FX®Combines all of the benefits of Soft/FX® with a warming filter.
Go to the Soft/FX® / Warm Soft/FX® Tutorial to see how the filters work.
CategoryHFX Diffusion.
Before After
Copyright © 2008--www.iofoto.com
Before After
Copyright © 2008--www.iofoto.com
Dfx User Guide • • •••

•
Soft/FX®, Warm Soft/FX® 505
• • • •••
PresetsTo select a preset, pick one from the Presets window. If you would like to view
presets from a different category, use the pop-up menu at the top left of the
Presets window.
BlurSets the softness of the image.
OpacitySets the amount of diffusion mixed into the original image. The higher the
setting, the more the image is blurred.
TemperatureApplies a warming filter to the image. Go to the Temperature section of
Common Filter Controls to see how the Temperature controls work.
Dfx User Guide • • •••

•
Soft Light 506
• • • •••
SOFT LIGHT
DescriptionProvides soft, digitally diffused and virtually shadowless light.
Go to the Soft Light Tutorial to see how the filter works.
CategoryLight.
Controls
PresetsTo select a preset, pick one from the Presets window.
BlendDetermines the blend mode to be used to add the light.
AddThe light is added to your image.
Before After
Copyright © 2008--www.iofoto.com
Dfx User Guide • • •••

•
Soft Light 507
• • • •••
ScreenThe light is combined with the image using a Screen blend mode. This looks
kind of like the Add blend mode, but highlights are retained.
BrightnessSets the intensity of the light.
BlurSets the softness of the light.
GamColor PresetsDigital equivalents of the lighting gels created by Gamproducts can be applied
to your light source. Select one of the GamColor presets from the pop-up list.
For detailed information about Gamproducts gels, visit their website at
www.gamonline.com.
ColorSets the color of the light through the use of a standard color picker.
Dfx User Guide • • •••

•
Split Field 508
• • • •••
SPLIT FIELD
DescriptionSplit Field splits the image with a line that can be positioned, rotated and
blurred. On one side of the line, the image is blurred and on the other, it is in
focus.
Go to the Split Field Tutorial to see how the filter works.
CategoryLens.
Controls
PresetsTo select a preset, pick one from the Presets window.
BlurSets the softness of the split portion of the image.
Before After
Copyright © 2008--www.iofoto.com
Dfx User Guide • • •••

•
Split Field 509
• • • •••
SplitThe Split controls manipulate the position, rotation and blur of the split line.
PositionThere is an on-screen control in the center of the image. By clicking and
dragging the on-screen control, the position of the split line can be adjusted.
RotateRotates the split line.
BlurBlurs the split line using a quality blur.
Dfx User Guide • • •••

•
Split Tone 510
• • • •••
SPLIT TONE
DescriptionShadows, midtones and highlights can be individually tinted with the Split tone
filter.
Go to the Split Tone Tutorial to see how the filter works.
CategoryHFX Grads/Tints.
Controls
ShadowsOpacitySet the opacity of the tint color.
ColorThe Color parameter sets the color of the shadow tint through the use of a
standard color picker.
PositionSelects the shadow values to be adjusted.
Before After
Copyright © 2008--www.iofoto.com
Dfx User Guide • • •••

•
Split Tone 511
• • • •••
RangeControls the range of values to be used for the shadows. A higher Range value
considers more values as shadows.
MidtonesOpacitySet the opacity of the tint color.
ColorThe Color parameter sets the color of the midtone tint through the use of a standard color picker.
PositionSelects the midtone values to be adjusted.
RangeControls the range of values to be used for the midtones. A higher Range value
considers more values as midtones.
HighlightsOpacitySet the opacity of the tint color.
ColorThe Color parameter sets the color of the highlight tint through the use of a standard color picker.
PositionSelects the highlight values to be adjusted.
RangeControls the range of values to be used for the highlights. A higher Range value
considers more values as highlights.
Go to the Matte section of Common Filter Controls to see how the Position and
Range controls work.
Dfx User Guide • • •••

•
Split Tone 512
• • • •••
Preserve HighlightsPreserves the white areas of the image.
Exposure CompensationExposure Compensation adds back the brightness loss as a result of the
tinting.
Dfx User Guide • • •••

•
Streaks 513
• • • •••
STREAKS
DescriptionThe Streaks filter creates horizontal or vertical streaks around highlights in the
image.
Go to the Streaks Tutorial to see how the filter works.
CategoryLight.
Controls
PresetsTo select a preset, pick one from the Presets window.
StreaksBlendDetermines the blend mode to be used to create the streak effect.
Before After
Copyright © 2008--www.iofoto.com
Dfx User Guide • • •••

•
Streaks 514
• • • •••
AddThe streaks are added to your image.
ScreenThe streaks are combined with the image using a Screen blend mode. This
looks kind of like the Add blend mode, but highlights are retained.
BrightnessSets the intensity of the streaks.
Streaks
Horizontal StreaksCreates horizontal streaks.
Vertical StreaksCreates vertical streaks.
ColorThe Color parameter sets the color of the streaks through the use of a standard
color picker. The default color is white.
MatteA matte is used to create the streak effect. Go to the Matte section of Common
Filter Controls to see how the Matte controls work.
Dfx User Guide • • •••

•
Sunset/Twilight 515
• • • •••
SUNSET/TWILIGHT
DescriptionSunset/Twilight applies three photographic filters to the image which are
blended together with a gradient. Presets for your favorite Color-Grad® filters
are provided as well as the ability to create custom colors.
Go to the Sunset/Twilight Tutorial to see how the filter works.
CategoryHFX Grads/Tints.
Controls
PresetsTo select a preset, pick one from the Presets window.
Color 1Sets the color for the top third of the image. Select the desired color using the
color picker or choose a filter preset.
PresetsSelect one of the filters from the pop-up list.
Before After
Copyright © 2008--www.iofoto.com
Dfx User Guide • • •••

•
Sunset/Twilight 516
• • • •••
ColorThe Color parameter sets the color of the grad through the use of a standard
color picker.
OpacitySets the opacity of the color filter.
Color 2The Color 2 controls are the same as the controls for Color 1 except it is applied
to the middle third of the image.
Color 3The Color 3 controls are the same as the controls for Color 1 except it is applied
to the bottom third of the image.
HighlightsPreserve HighlightsPreserves the white areas of the image.
Exposure CompensationExposure Compensation adds back the brightness loss as a result of the filter
application.
Grad Grad is the combination of the three blended tints. Its direction, corners and
size can be adjusted.Go to the Grad section of Common Filter Controls to see
how the Grad controls work.
Dfx User Guide • • •••

•
Texture 517
• • • •••
TEXTURE
DescriptionApplies textures to an image for a stylized look.
Go to the Texture Tutorial to see how the filter works.
CategorySpecial Effects.
Controls
PresetsTo select a preset, pick one from the Presets window.
AmountSets the amount of texture applied to the image.
ComplexityGenerates a more detailed, repetitive texture.
Before After
Copyright © 2008--www.iofoto.com
Dfx User Guide • • •••

•
Texture 518
• • • •••
RandomizeRandomizes the texture.
DVEThe DVE allows you to transform your texture using Position, Scale, Rotation,
Corner Pin and Crop controls. Why the name DVE? DVE is an acronym for
digital video effects and refers to a real-time image manipulation device which
does pans, rotations, flips as well as various hardware-specific effects such as
page turns or customized wipes. In the film and video post production industry,
DVE is frequently used in reference to transforming the image in some way. Go
to the DVE section of Common Filter Controls to see how the DVE Controls
work.
Dfx User Guide • • •••

•
Three Strip / Two Strip 519
• • • •••
THREE STRIP / TWO STRIP
Three StripKnown and celebrated for it ultra-realistic, saturated levels of color, the
Technicolor® Three Strip process was commonly used for musicals, costume
pictures and animated films. It was created by photographing three black and
white strips of film each passing through red, green and blue filters on the
camera lens and then recombining them in the printing process. Our Three
Strip filter was created under the direction of Academy Award Winning Visual
Effects Supervisor Rob Legato.
Two StripThe Technicolor® Two Strip process was the first stab at producing color
motion pictures and consisted of simultaneously photographing two black and
white images using red and green filters. This look creates an odd but pleasing
hand-painted look where faces appear normal and green takes on a blue-green
Before After
Copyright © 2008--www.iofoto.com
Dfx User Guide • • •••

•
Three Strip / Two Strip 520
• • • •••
quality, while the sky and all things blue appear cyan. Our Two Strip filter was
created under the direction of Academy Award Winning Visual Effects
Supervisor Rob Legato.
Go to the Three Strip / Two Strip Tutorial to see how the filters work.
CategoryFilm Lab.
Controls
PresetsTo select a preset, pick one from the Presets window.
OpacitySets the intensity of the of the effect.
StripsRed IntensityIntensifies red values in the image.
Before After
Copyright © 2008--www.iofoto.com
Dfx User Guide • • •••

•
Three Strip / Two Strip 521
• • • •••
Red SmoothBlurs the red matte that is used to isolate the red values. Use this control to
smooth out any noise that may appear if the Red Intensity is turned up to a high
value.
Green IntensityIntensifies green values in the image.
Green SmoothBlurs the green matte that is used to isolate the green values. Use this control
to smooth out any noise that may appear if the Green Intensity is turned up to
a high value.
Blue IntensityIntensifies blue values in the image when using the Three Strip filter, but
darkens image areas that were blue in the source image when using the Two
Strip filter.
Blue SmoothBlurs the blue matte that is used to isolate the blue values. Use this control to
smooth out any noise that may appear if the Blue Intensity is turned up to a high
value.
Color CorrectGo to the Color Correct filter to see how the Color Correct controls work.
Dfx User Guide • • •••

•
Tint 522
• • • •••
TINT
DescriptionTints the entire image with a selected color using a variety of colorization
modes.
Go to the Tint Tutorial to see how the filter works.
CategoryHFX Grads/Tints.
Controls
PresetsTo select a preset, pick one from the Presets window.
Black and WhiteEnableConverts the image to Black and White.
Before After
Copyright © 2008--www.iofoto.com
Dfx User Guide • • •••

•
Tint 523
• • • •••
FilterThe Filter pop-up selects the type of black and white filter to be applied to your
color image. Go to the Black and White section of Common Filter Controls to
see how the Black and White controls work.
BrightnessAdjusts the brightness of the image. Positive values brighten, negative values
darken.
ContrastAdjusts the contrast of the image. Positive values increase contrast, negative
values decrease contrast.
Gamma Adjusts the gamma of the image. The gamma adjustment leaves the white and
black points the same and only modifies the values in-between. Positive values
lighten the midtones, negative values darken the midtones.
TintColorSets the color that the image will be colorized with. Select the desired color
using the color picker.
OpacitySets the opacity of the color.
ModeSelects how color is applied to the image.
NormalTints the image while retaining highlights.
TintThe image is tinted by replacing hue and saturation.
HueThe image is tinted by only replacing hue.
Dfx User Guide • • •••

•
Tint 524
• • • •••
LightenPixels darker than the color are replaced, and pixels lighter than the color do
not change.
DarkenPixels lighter than the color are replaced, and pixels darker than the color do
not change.
GradTint can optionally use a gradient that limits where the filter is applied. Grad is
the transition area that goes from the tinted image to the original image. Its
direction, corners and size can be adjusted. Go to the Grad section of Common
Filter Controls to see how the Grad controls work.
Dfx User Guide • • •••

•
Tone Adjust 525
• • • •••
TONE ADJUST
DescriptionTone Adjust approximates the appearance of high dynamic range images by
adjusting the tonal values. Specifically, detail is recovered from the darker
portions of the images and can optionally be denoised.
Go to the Tone Adjust Tutorial to see how the filter works.
CategoryColor
Controls
AmountLightens shadows to reveal more detail. Take care not to over apply this setting
and reveal image noise.
DeNoiseRemoves film grain and noise in the shadow areas.
Before After
Copyright © 2009--Brand X Design
Dfx User Guide • • •••

•
Tone Adjust 526
• • • •••
PositionSelects the shadow values to be adjusted.
RangeControls the range of values to be used for the shadows. A higher Range value
considers more values as shadows.
Dfx User Guide • • •••

•
Ultra Contrast 527
• • • •••
ULTRA CONTRAST
DescriptionTiffen was recognized with a Technical Achievement Award from the Academy
of Motion Picture Arts and Sciences for the Ultra Contrast optical filter which
redistributes ambient light to capture details that would be lost in shadows.
Contrast is lowered evenly throughout the image with no flare or halation.
Go to the Ultra Contrast Tutorial to see how the filter works.
CategoryColor.
Controls
PresetsTo select a preset, pick one from the Presets window.
Before After
Copyright © 2008--www.iofoto.com
Dfx User Guide • • •••

•
Ultra Contrast 528
• • • •••
ShadowsShadowsRaises the brightness of the shadows.
PositionSelects the shadow values to be adjusted.
RangeControls the range of values to be used for the shadows. A higher Range value
considers more values as shadows.
HighlightsHighlightsLowers the brightness of the highlights.
PositionSelects the highlight values to be adjusted.
RangeControls the range of values to be used for the highlights. A higher Range value
considers more values as highlights.
Go to the Matte section of Common Filter Controls to see how the Position and
Range controls work.
Dfx User Guide • • •••

•
Vari-Star 529
• • • •••
VARI-STAR
DescriptionVariable multi-point star patterns are generated on highlights in the image.
Go to the Vari-Star Tutorial to see how the filter works.
CategoryLight.
Controls
PresetsTo select a preset, pick one from the Presets window.
StarThe Star settings control the various qualities of the generated star patterns.
BlendDetermines the blend mode to be used when adding the stars.
Before After
Copyright © 2008--www.iofoto.com
Dfx User Guide • • •••

•
Vari-Star 530
• • • •••
AddThe stars are added to your image.
ScreenThe stars are combined with the image using a Screen blend mode. This looks
kind of like the Add blend mode, but highlights are retained.
BrightnessDetermines the brightness of the stars.
SpokesControls the number of star spokes.
SizeSets the star size.
AngleRotates the stars.
ColorSets the star color.
MatteA matte is used to create the star effect. Go to the Matte section of Common
Filter Controls to see how the Matte controls work.
Dfx User Guide • • •••

•
Vignette 531
• • • •••
VIGNETTE
DescriptionA vignette, or soft fade, is a popular photographic effect where the photo
gradually fades into the background, usually in a circular or rectangular shape.
The vignette can be any color as well as thrown out of focus.
Go to the Vignette Tutorial to see how the filter works.
CategoryLens.
Controls
PresetsTo select a preset, pick one from the Presets window.
VignetteColorThe Color parameter sets the color of the vignette through the use of a standard
color picker. The default color is black.
OpacitySets the opacity of the colored vignette. For defocused vignettes, you may want
to turn down the Opacity so you can see the defocused effect.
Before After
Copyright © 2008--www.iofoto.com
Dfx User Guide • • •••

•
Vignette 532
• • • •••
BlurSets the softness of the image in the area of the vignette.
ShapeRoundnessSets the roundness of the vignette. The vignette can either be circular or square
or anywhere in between.
SizeSets the size of the vignette.
Aspect RatioChanges the aspect ratio of the vignette. A value of -100 would be wider, and
100 would be taller.
RotationRotates the vignette.
DistortionDistorts the edge of the vignette.
Distortion SizeSets the size of the distortion.
RandomizeRandomizes the distortion.
SoftnessThe Softness parameters control the softness of the vignette edge.
Dfx User Guide • • •••

•
Water Droplets 533
• • • •••
WATER DROPLETS
DescriptionSimulates the circular, rainbow colored optical effects produced by tiny water
droplets in clouds, mist and fog.
Go to the Water Droplets Tutorial to see how the filter works.
CategoryLight.
Controls
PresetsTo select a preset, pick one from the Presets window.
LightBlendDetermines the blend mode to be used to add the rainbow.
Before After
Copyright © 2008--www.iofoto.com
Dfx User Guide • • •••

•
Water Droplets 534
• • • •••
AddThe rainbow is added to your image.
ScreenThe rainbow is combined with the image using a Screen blend mode. This
looks kind of like the Add blend mode, but highlights are retained.
BrightnessSets the intensity of the rainbow.
DisplacementDisplaces the rainbow by the luminance values of the image. This “fakes” the
effect of the rainbow wrapping over objects in the image.
BlurSets the softness of the rainbow.
RainbowBlendThe rainbow can be added to the entire image or limited to a matte.
Rainbow OnlyThe rainbow is added to the entire image.
MatteThe rainbow is added only in areas of the matte.
Dfx User Guide • • •••

•
Water Droplets 535
• • • •••
Type
CoronaA corona has a bright center and is surrounded by a number of concentric
colored rings.
FogbowA fogbow is similar to a rainbow, but because of the very small size of water
droplets that cause fog, the fogbow has little color and appears white.
Dfx User Guide • • •••

•
Water Droplets 536
• • • •••
GloryFormed when light is scattered backwards by water droplets, glories have
multiple colored rings with a bright center, but not as bright as a corona’s. In
addition, the rings dissipate much slower than those of the corona.
PositionThe rainbow position can be adjusted by clicking and dragging an on-screen
control in the center of the image.
Scale
Scale XThe horizontal scale of the rainbow.
Scale YThe vertical scale of the rainbow.
Gang ScaleThe Scale X and Scale Y slider values can be ganged together.
MatteA matte can be used to limit where the rainbow will be placed. Wherever there
is white in the matte is where the rainbow will be added. Go to the Matte
parameters to see how they work.
Note: To use a matte to limit where the rainbow will be added, Rainbow > Blend must be set to Matte.1
Dfx User Guide • • •••

•
Wide Angle Lens 537
• • • •••
WIDE ANGLE LENS
DescriptionSimulates the effect of a wide angle lens.
Go to the Wide Angle Lens Tutorial to see how the filter works.
CategoryLens.
Note: Wide Angle Lens must be applied as the first layer (bottom of the layer stack) when multiple layers are used. Otherwise, all filters below will not be rendered.
DistortionPulls the corners of the image outward.
X and Y CorrectionX and Y Correction compensate for the deformation introduced with the
Distortion parameter.
Before After
Copyright © 2008--www.iofoto.com
Dfx User Guide • • •••

•
X-Ray 538
• • • •••
X-RAY
DescriptionSimulates the look of X-Ray images.
Go to the X-Ray Tutorial to see how the filters work.
CategorySpecial Effects.
Controls
PresetsTo select a preset, pick one from the Presets window.
Black and WhiteFilterThe Filter pop-up selects the type of black and white filter to be applied to your
color image. Go to the Black and White section of Common Filter Controls to
see how the Black and White controls work.
Before After
Copyright © 2008--www.iofoto.com
Dfx User Guide • • •••

•
X-Ray 539
• • • •••
BrightnessAdjusts the brightness of the image. Positive values brighten, negative values
darken.
ContrastAdjusts the contrast of the image. Positive values increase contrast, negative
values decrease contrast.
Gamma Adjusts the gamma of the image. The gamma adjustment leaves the white and
black points the same and only modifies the values in-between. Positive values
lighten the midtones, negative values darken the midtones.
ColorOpacitySets the opacity of the color.
ColorThe Color parameter sets the color of the x-ray through the use of a standard
color picker and defaults to blue.
Dfx User Guide • • •••

•
Blend Modes 540
• • • •••
BLEND MODES
Blend modes are used to combine images in a variety of different ways.
NormalEdits each pixel to make it the result color. This is the default mode. Changing
the opacity results in a mix between two layers.
DarkenLooks at the color information in each channel and selects the base or blend
color—whichever is darker—as the result color. Pixels lighter than the blend
color are replaced, and pixels darker than the blend color do not change.
MultiplyLooks at the color information in each channel and multiplies the base color by
the blend color. The result color is always a darker color. Multiplying any color
with black produces black. Multiplying any color with white leaves the color
unchanged.
Color BurnLooks at the color information in each channel and darkens the base color to
reflect the blend color by increasing the contrast between the two. Blending
with white produces no change.
Linear BurnLooks at the color information in each channel and darkens the base color to
reflect the blend color by decreasing the brightness. Blending with white
produces no change.
Darker ColorCompares the total of all channel values for the blend and base color and
displays the lower value color. Darker Color does not produce a third color,
which can result from the Darken blend, because it chooses the lowest channel
values from both the base and the blend color to create the result color.
Dfx User Guide • • •••

•
Blend Modes 541
• • • •••
LightenLooks at the color information in each channel and selects the base or blend
color—whichever is lighter—as the result color. Pixels darker than the blend
color are replaced, and pixels lighter than the blend color do not change.
AddThe pixels of one image are added to another image
ScreenLooks at each images color information and multiplies the inverse of the two
images. This looks kind of like the Add blend mode, but highlights are retained.
Color DodgeLooks at the color information in each channel and brightens the base color to
reflect the blend color by decreasing contrast between the two. Blending with
black produces no change.
Linear Dodge (Add)Looks at the color information in each channel and brightens the base color to
reflect the blend color by increasing the brightness. Blending with black
produces no change.
Lighter ColorCompares the total of all channel values for the blend and base color and
displays the higher value color. Lighter Color does not produce a third color,
which can result from the Lighten blend, because it chooses the highest
channel values from both the base and blend color to create the result color.
OverlayMultiplies or screens the colors, depending on the base color. Patterns or colors
overlay the existing pixels while preserving the highlights and shadows of the
base color. The base color is not replaced, but mixed with the blend color to
reflect the lightness or darkness of the original color.
Dfx User Guide • • •••

•
Blend Modes 542
• • • •••
Soft LightDarkens or lightens the colors, depending on the blend color. The effect is
similar to shining a diffused spotlight on the image. If the blend color (light
source) is lighter than 50% gray, the image is lightened as if it were dodged. If
the blend color is darker than 50% gray, the image is darkened as if it were
burned in.
Hard LightMultiplies or screens the colors, depending on the blend color. The effect is
similar to shining a harsh spotlight on the image. If the blend color (light source)
is lighter than 50% gray, the image is lightened, as if it were screened. This is
useful for adding highlights to an image. If the blend color is darker than 50%
gray, the image is darkened, as if it were multiplied. This is useful for adding
shadows to an image.
Vivid LightBurns or dodges the colors by increasing or decreasing the contrast,
depending on the blend color. If the blend color (light source) is lighter than 50%
gray, the image is lightened by decreasing the contrast. If the blend color is
darker than 50% gray, the image is darkened by increasing the contrast.
Linear LightBurns or dodges the colors by decreasing or increasing the brightness,
depending on the blend color. If the blend color (light source) is lighter than 50%
gray, the image is lightened by increasing the brightness. If the blend color is
darker than 50% gray, the image is darkened by decreasing the brightness.
Pin LightReplaces the colors, depending on the blend color. If the blend color (light
source) is lighter than 50% gray, pixels darker than the blend color are
replaced, and pixels lighter than the blend color do not change. If the blend
color is darker than 50% gray, pixels lighter than the blend color are replaced,
and pixels darker than the blend color do not change. This is useful for adding
special effects to an image.
Dfx User Guide • • •••

•
Blend Modes 543
• • • •••
DifferenceLooks at the color information in each channel and subtracts either the blend
color from the base color or the base color from the blend color, depending on
which has the greater brightness value. Blending with white inverts the base
color values; blending with black produces no change.
ExclusionCreates an effect similar to but lower in contrast than the Difference mode.
Blending with white inverts the base color values. Blending with black produces
no change.
SubtractLooks at the color information in each channel and subtracts the blend color
from the base color. In 8 and 16-bit images, any resulting negative values are
clipped to zero.
HueCreates a result color with the luminance and saturation of the base color and
the hue of the blend color.
SaturationCreates a result color with the luminance and hue of the base color and the
saturation of the blend color.
ColorCreates a result color with the luminance of the base color and the hue and
saturation of the blend color. This preserves the gray levels in the image and is
useful for coloring monochrome images and for tinting color images.
Dfx User Guide • • •••

•
Blend Modes 544
• • • •••
Dfx User Guide • • •••

•
Keyboard Shortcuts 545
• • • •••
KEYBOARD SHORTCUTS
Crop Shortcuts
EZ Mask Shortcuts
Help Shortcuts
Layout Shortcuts
Shortcut Action
Drag on one of the vertical boundaries Crops horizontally
Drag on one of the horizontal boundaries Crops vertically
Drag bounding box corner Scales the Crop
Drag inside the bounding box Moves the Crop
Shortcut Action
Enter Processes the mask
Shortcut Action
F1 Opens the Dfx User Guide
Shortcut Action
F2 Selects the Default Layout
F3 Selects the Edit Layout
F4 Selects the View Layout
F5 Selects the Dual Monitor Layout
Dfx User Guide • • •••

•
Keyboard Shortcuts 546
• • • •••
Paint Keyboard Shortcuts
Path Mask Point Selecting Shortcuts
Shortcut Action
B Selects the Black/White brush
Shift+B Selects the Blur brush
C Selects the Clone brush
Shift+C Selects the Color brush
E Selects the Eraser brush
Shift+M Selects the Mosaic brush
R Selects the Red-Eye brush
Shift+R Selects the Repair brush
S Selects the Scatter brush
Ctrl(Win)/Cmd(Mac)+drag Sizes the brush
[ ] Sizes the brush
Shift with clone brush Sets the clone offset
Shift+click or tap Resets the clone offset
Arrow keys Moves the Clone source by 1 pixel
Shift+Arrow keys Moves the Clone source by 10 pixels
Hold down Arrow keys Moves the Clone source continuously
Right-mouse drag Paints with the Eraser brush
Shortcut Action
Click a point Selects one point
Click and drag over multiple points Selects multiple points
Ctrl+click on a point Toggles the matte on or off
Shift+click a point Adds the point to the current matte
Dfx User Guide • • •••

•
Keyboard Shortcuts 547
• • • •••
Path Mask Point Editing Shortcuts
Path Mask Point Editing Pop-up Menu
Snap Mask Point Editing Shortcuts
Shortcut Action
Alt+click on a path Inserts a new point along the path
Delete key Delete all selected points
Click and drag selected points All selected points move
Click and drag an unselected point Moves one point
Alt+click+drag on a point Opens a slider to adjust the point’s tension. Left of center forces the path to curve through the point (Cardinal spline). The center position creates a corner point while the right position moves the curve towards the center of the path (B-Spline). If multiple points have been selected, they will all be set to the same tension.
Alt+click+drag+Shift on a point Snaps the point tension to Cardinal, Corner or B-Spline positions
Menu Option Action
Cardinal Creates a path that passes smoothly through each point
Corner Creates a corner point
B-Spline Creates a path that is determined by the surrounding points
Shortcut Action
Alt+click between two points Add points
Hover over point + Delete Key Delete points
Alt+drag a point Uses magnetism to snap a point to an object’s boundary
Dfx User Guide • • •••

•
Keyboard Shortcuts 548
• • • •••
Viewer Keyboard Shortcuts
Shortcut Action
Middle-mouse drag Pans the image
Space Bar+drag Pans the image
I Key Zooms the image in
O Key Zooms the image out
Zoom icon+Drag a square Zooms into the defined area
Scroll wheel over image Zooms the image in and out
Middle-mouse double click Fits the image to the window
Ctrl(Win)/Cmd(Mac)+click A/B Comparison
Turns off A/B Comparison mode, if enabled,
F Fits the image to the window
M Cycles the display between the full color image and the Mask channel
H Opens the Histogram window
1 Opens the Magnifier window
Dfx User Guide • • •••

•
Keyboard Shortcuts 549
• • • •••
Dfx User Guide • • •••