dexcenter version 13 administration and configuration guide
TRANSCRIPT

1 DEXcenter Administration and Configuration Guide
DEXcenter Version 13 Administration and Configuration Guide
5303 DuPont Circle, Milford, OH, 45150 | Toll Free USA: 1-888-783-9199 International: +44 (0) 1954 234300 | [email protected] | www.iti-global.com

2 DEXcenter Administration and Configuration Guide
SECTION 1. INTRODUCTION ........................................................................................................ 3
CHAPTER 1. WHO SHOULD READ THIS MANUAL? ........................................................................................... 3 CHAPTER 2. DEXCENTER CONCEPTS ............................................................................................................... 5
SECTION 2. ADMINISTRATION FUNCTIONS ............................................................................ 7
CHAPTER 1. ALL SESSIONS ................................................................................................................................ 7 CHAPTER 2. COMPANIES ................................................................................................................................. 10 CHAPTER 3. USER MANAGEMENT .................................................................................................................. 13 CHAPTER 4. USER GROUPS ............................................................................................................................. 35 CHAPTER 5 - MESSAGING ................................................................................................................................ 39 CHAPTER 6. USER ACTIVATION ..................................................................................................................... 40 CHAPTER 7. LOGGING ...................................................................................................................................... 42 CHAPTER 8. DIAGNOSTIC ............................................................................................................................... 43
SECTION 2. REPORTS .................................................................................................................. 45
CHAPTER 1. REPORTS ...................................................................................................................................... 45
SECTION 3. CONFIGURATION ................................................................................................... 48
CHAPTER 1. DATASTORES .............................................................................................................................. 48 CHAPTER 2. SYSTEM AND USER PREFERENCES........................................................................................... 50
SECTION 4. CAD APPLICATION CUSTOMIZATION ............................................................. 52
CHAPTER 1. CONFIGURING APPLICATIONS IN DEXCENTER ....................................................................... 53 CHAPTER 2. ENABLING APPLICATIONS AND RECOGNIZED CAD FORMATS ............................................. 53 CHAPTER 3. CONFIGURING CATIA V5 WITHIN DEXCENTER .................................................................. 55 CHAPTER 4. CONFIGURING NX WITHIN DEXCENTER ................................................................................ 57 CHAPTER 5. CONFIGURING CREO PARAMETRIC WITHIN DEXCENTER .................................................... 59 CHAPTER 6. CONFIGURING CADIQ WITHIN DEXCENTER ........................................................................ 62 CHAPTER 7. LOGIC TASK ................................................................................................................................. 64 CHAPTER 8. CADFIX AS A DIRECT TRANSLATOR ....................................................................................... 65 CHAPTER 9. CONFIGURING SOLIDWORKS ..................................................................................................... 66 CHAPTER 10. CONFIGURING AUTOCAD ...................................................................................................... 66 CHAPTER 12. BATCH INPUT ........................................................................................................................... 67 CHAPTER 13. SOA API INTERFACE .............................................................................................................. 71

3 DEXcenter Administration and Configuration Guide
Section 1. Introduction Chapter 1. Who should read this manual? This manual is for the persons responsible for DEXcenter administration and configuration. This manual discusses the typical operations to monitor and manage daily use as well as configuration after the initial installation.
- Managing Companies, Users, and Groups - Monitoring, Accessing, Checking user sessions - Creating Reports - Monitoring DEXcenter operation functions - Managing File access repositories.
Primary usage of DEXcenter is covered in the User’s Guide with handy commands identified in the User’s Quick Reference Guide.
The Deployment Guide provides instructions for initial installation and configuration. Requirements for configuration after the initial installation are covered in this guide.
Most administrator functions can be performed using the DEXcenter web interface when logged in as a user with DEXcenter administrator privileges.
The administrator functions are accessed from the “Administration” menu.
Administration functions involve managing members, companies, sessions, groups, generating reports, and performing basic diagnostic checks.
Most DEXcenter configuration is performed outside of the DEXcenter GUI by modifying the database and pertinent control files. The Configuration menu provides access to a limited set of configuration information and functionality for users which have ROLE_CONFIG authority.
Additionally, there is a ‘Help” menu which provides documentation and support information.

4 DEXcenter Administration and Configuration Guide

5 DEXcenter Administration and Configuration Guide
Chapter 2. DEXcenter Concepts DEXcenter is a server application which manages the scheduling and execution of other applications, especially CAD related applications. DEXcenter consists of a primary web server control application and many satellite translation servers which perform the requested application operations.
The following terms will be used throughout this manual:
DXS DEXcenter Server. The DXS is the main control server for DEXcenter. Users, profiles, translations, and jobs are all managed by the DXS. The DXS can be a single server or part of a clustered environment.
DTS DEXcenter Translation Server. There may be many DEXcenter Translation Servers. Each computer providing translation functions is a DTS. DTS systems can be clustered or non-clustered.
DDS DEXcenter Data Store. DEXcenter can be configured to store data locally on the DXS or via FTP or SFTP on another system.
DDB The DEXcenter database is used to store and manage configuration as well as user information. DEXcenter can use MySQL, Oracle, or SQLServer as the database.
Session Each exchange of data is termed a Session. Users Create Sessions to send data to another user. Recipients receive data by accessing a Session.
Users Each person using DEXcenter must be registered in DEXcenter. Each User has a unique id and password, a Profile of exchange preferences, and their own unique Session area.
Roles Each user is assigned a Role which controls access to DEXcenter functions. ROLE_USER allows access to the DEXcenter user function. ROLE_ADMIN allows access to the DEXcenter AdminConsole. ROLE_CONFIG allows access to the Configuration menu within the AdminConsole.
Groups Groups are Groups of Users. Groups serve several roles: to provide a convenient means to find and manage related members, to provide access to repositories, and to configure approval authority.
Profile Each User has a profile which identifies the requirements and preferences for that User. This includes the desired CAD system and File Format and transmission method for receiving data as well as additional processing options.

6 DEXcenter Administration and Configuration Guide
Application server
The DEXcenter application works in conjunction with an application server. DEXcenter uses the JBOSS Application Server
Authentication Each User must log into DEXcenter with a unique user name and password. The method of authentication varies depending upon the infrastructure. DEXcenter provides a basic authentication function. The JBOSS application server can be configured to support LDAP or SSO.
SSO Single Sign On. A common method of authentication. Often used when DEXcenter is associated with a corporate portal. By signing onto the corporate portal, users can gain access to DEXcenter without a separate login process.
SSL Secure Sockets Layer. An industry standard encryption method.
Job A Session which has been submitted becomes a Job. The job is put into a Queue and awaits execution based upon the queue rules.
Workflow All processing in DEXcenter occurs based upon a workflow managed by the CAMUNDA workflow engine.
Path Workflow
An overall workflow which manages the processing associated with DEXcenter Action types. For instance, for a translation, a path workflow would manage all tasks associated with translating from one CAD system to another.
Task Workflow
A Task is an element of a path. For example, the Catia V5 to STEP task creates a step formatted file from a native Catia V5 file.
Flavor Flavors control the execution of Tasks within a Path. For instance, to have a STEP translator generate a STEP AP203 or AP214 format.

7 DEXcenter Administration and Configuration Guide
Section 2. Administration Functions Chapter 1. All Sessions The All Sessions page under DEXcenter Administration functions allows an Administrator to list, view, and delete any session in the DEXcenter. As in the User application, the Sessions page is paginated. Any column can be sorted by clicking on it. Sessions can be filtered based upon any displayed data item.
There is an icon bar of 4 icons for available Actions to perform on the listed sections.
Hold the mouse pointer over the icons to see a brief description of each.
The icon Actions are as follows:
- Select / unselect all sessions (checkmarks - left most icon) - View session(s) – (eye – 2nd icon from left) - Delete (s) – (trashcan – 3rd icon from left) - Refresh Sessions – (circular arrow rightmost icon)
Except for the Refresh icon, the procedure is to select a session or sessions by clicking on the box to the left of the Session ID and then click one of the icons. The selected action will be performed on all the selected sessions.
The Refresh icon refreshes the Sessions page. It does not utilize selected sessions only.

8 DEXcenter Administration and Configuration Guide
View Sessions To view one or more sessions, click the box to the left of the session ID and then click the View icon (“eye” - 2nd from left). The session or sessions will open in individual tabs for viewing. Sessions are organized as they are in the User application except that the Admin automatically sees all data regardless of sender and recipient profile settings.
The sessions opened will appear under “Sessions” in the menu bar to the left. Close the session by clicking on the “X” to the right of the session number in the menu bar.

9 DEXcenter Administration and Configuration Guide
Delete Sessions Delete a Session by checking the box to the left of the Session Title, then click the Delete icon (“Trashcan” – 3rd icon from left).
Refresh Sessions
Click on the refresh icon (rightmost icon) to refresh the list of sessions shown.

10 DEXcenter Administration and Configuration Guide
Chapter 2. Companies The Companies menu manages company information. Users are associated with a company. Since many users may be associated with the same company, it is convenient to capture company information once and then reference it as appropriate. The Companies form also allows unique Company data to be included.
When “Companies” is selected, a list of defined Companies is displayed.
To add a new company, select “Add”, complete the form displayed, and select “Save”.

11 DEXcenter Administration and Configuration Guide
The red circles to the right of the fields on the form (OEM, Country) indicate these are required entries and cannot be left blank.
You can choose to enter a Company ID or let DEXcenter automatically generate one.
Select “Save” from the buttons above the Company list to save the new Company profile.
To Edit the Company information, select the Company name, modify as appropriate and then “Save”
The Export Authorization Required allows notifications and tracking of data to ensure compliance with government export regulations. If checked, then data sent to Users of this Company will require Export Authorization (ITAR/EAR, etc.) information to be provided.
A Proprietary Information Agreement (PIA) can be specified associated with the company to ensure that an intellectual property data sharing agreement exists before any data can be released. Click the PIA Agreement slider and then complete the form boxes which appear. The Effective and Expiration date fields are required. Click in the date box to select a date from a pop up calendar. When a session is submitted the current date is compared to the date range in the PIA agreement. If the current date is not within the allowable range, the session cannot be submitted and a message appears on the Create Session form.

12 DEXcenter Administration and Configuration Guide

13 DEXcenter Administration and Configuration Guide
Chapter 3. User Management An Administrator manages DEXcenter Users by selecting the “User Management” menu. The administrator has these options available:
• Creating (Adding) new User Profiles • Viewing and Modifying Existing Users • Disabling User Profiles • Deleting User Profiles • Unlocking User Profiles
Select “Administration”, “User Management” to display the User Editor page where User Profiles can be created, modified, deleted, disabled, or unlocked.

14 DEXcenter Administration and Configuration Guide
User Profiles User Profiles have 5 distinct sections which are in separate sections on the right side of the page. When a user profile is selected, these section tabs appear. To view or edit any section, simply click on the tab. A form with the parameters for that section is displayed.
Contact Information Section – basic contact information.
General Preferences Section – Overall system preferences which control the individual user’s DEXcenter operation.
Sender Preferences Section – Preferences which control DEXcenter operations when this User is Creating Sessions to send data.
Recipient Preferences Section – Preferences which define the data this User wants to receive when others send sessions to him.
Visibility Preferences Section – parameters to control the groups to which this user belongs as well as the groups and individual users which this user can select.

15 DEXcenter Administration and Configuration Guide
Adding User Profiles
Select “Create User” button to add a new user. At a minimum, the Contact information section and the Visibility Preferences sections should be completed. The other profile sections will automatically be set to default entries. Modify the parameters as appropriate. It is helpful to set all default parameter values as desired before starting to create users. That way fewer parameters need to be changed. The process for setting the defaults is described later in this chapter.
Click the “Create” button at the bottom of the page to save the new user.
Note that a Company selection is required. Create a Company using the Administration, Company menu if the desired Company does not exist.
The Fields that show a red circle to the right of the field are required fields and must be entered. If a field has been incorrectly set or a required field omitted, DEXcenter will not allow the profile to be saved and will display a message at the top of the page indicating the parameter is missing or does not meet requirements and will highlight the affected field box in red.

16 DEXcenter Administration and Configuration Guide

17 DEXcenter Administration and Configuration Guide
Contact Information
The Contact Information contains general information about the user including name, user id, password, email, telephone, etc. Each entry is described below.
Information to be entered includes:
Username* The id that the user uses to log into DEXcenter. Note that the ID is case sensitive.
First Name* The user's first or given name which is visible to other users.
Last Name* The user's last or family name which is visible to other users.
Password* The user's login password (Must conform to configured password policies- see below).

18 DEXcenter Administration and Configuration Guide
A password is only required for DEXcenter authentication. It is not required for LDAP or SSO authentication.
The pink background will remain on the box until the policie are satisfied. Mouse over or click on the box to see what requirements must still be met.
Confirm Password* Retype the password for verification. The box background will remain pink until the passwords match.
Company*
Company name. Use pulldown to select a Company. If the desired company does not exist, create one at Administration, Companies before proceeding. The address information will be inherited from the Company.
Department A department or other organizational unit within the Company to further distinguish it.
Email* The user's e-mail address
User specific address fields
Although the main address comes from the Company, the user can also enter additional unique address information (bldg, mail stop, etc)
Phone numbers Phone, mobile phone, and fax can be entered.
Title The User’s title.
Alternate email An alternate email can be entered.
Role*
Roles define the authority the User has within DEXcenter. Most users will have only ROLE_USER which provides access to the DEXcenter user application. ROLE_ADMIN is required to access the AdminConsole application.
ROLE_CONFIG is required to access the Configuration section of the AdminConsole.
ROLE_SOA is required to access DEXcenter using the SOA API capability.
ROLE_REPORT is required to generate reports from within the AdminConsole.
Note that required fields are displayed with an * above.
Click the “Create” button at the bottom to create the user profile.

19 DEXcenter Administration and Configuration Guide
General Preferences
General Preferences define key parameters affecting the User’s operation of DEXcenter. Each entry is described below.
Default Language Specifies the language in which DEXcenter pages are displayed.
DEXcenter Administrator Specifies the assigned DEXcenter Administrator who receives email messages if the User’s sessions fail.
Purge Days The number of days after which a User’s Sessions will be removed.
Authentication Specifies the User’s Authentication method (DEXcenter, LDAP, SSO).
User Password Required Specifies whether a User is required to enter a password. For DEXcenter authentication, a password is required. For LDAP or SSO, it is not.
Buffer Size / Buffers in Chunk
Specifies the buffer size and the number of buffers which are processed together for uploading files.
Citizenship Specifies the User’s Citizenship
Edit Own Profile If NO, the User cannot edit any part of their own profile. If YES, the member can edit part or all of their profile. A similar setting for individual Preference parameters can

20 DEXcenter Administration and Configuration Guide
further limit member privileges to edit certain parts of their profile.
Edit Own Path Determines if the User can edit their translation paths.
Email format Specifies HTML or text as the email format.
Upload Default Directory Specifies the default directory which appears in the browser when selecting files.
Note that for most parameters, the Administrator can control whether or not the User can edit a parameter in their profile or override in the Create Session form. To prevent the user from being able to edit a parameter, click on the box next to the parameter under “User Editable” column to remove the check mark.
In addition to allowing the user to edit a parameter, the Administrator can also control which parameters are even visible to the User. If the Administrator clicks on the Visibilities button to the far right of the entry, a pop up dialogue appears which controls where the parameters are visible.
• If “Create Session” is checked, the parameter is visible in the Create Session overrides. • If “User Profile” is selected, the parameter shows in the User’s Profile. Note that this is
independent of whether or not a user can edit the parameter. A parameter can be visible but still not be editable.
• If “View Session” is selected, the parameter may be visible on the session page if appropriate.

21 DEXcenter Administration and Configuration Guide
Sender Preferences
The Sender Preferences section specifies the default DEXcenter behavior when the User is Sending sessions to others. There are both General Parameters which apply for all Action types and there are other parameters which apply only for specific Action types. Select the desired Action from the “Display Parameters For:” pulldown at the top of the page to view and set Action specific parameters.

22 DEXcenter Administration and Configuration Guide
Sender Processing Preferences are described below. Note that not all parameters may be visible for your DEXcenter instance. Parameters which are not applicable to your site can be disabled and thus would not be shown.
PREFERENCE DESCRIPTION
Default Action Type Determines the User’s default action type displayed on the Create Session form. A User can be restricted to only one action type by removing the User Editable privilege.
Session Priority Can set a different default priority for users when multiple jobs are simultaneously queued.

23 DEXcenter Administration and Configuration Guide
CC email sender Email addresses here will automatically receive email notifications whenever the User does. This does not allow them access to the sessions themselves but only the email.
BCC email sender Email addresses here will automatically receive bcc email notifications whenever the User does. This does not allow them access to the sessions themselves but only the email.
CC Self If YES, specifies that the sender receives an email notification of the completed Session.
Include Original Files If checked, the Sender sees the Originally submitted files in their sessions. This is the default condition for a Sender.
Include Translated Files If checked, the Sender sees the Translated files delivered to Recipients in their sessions.
Include Intermediate Files If checked, the Sender sees any Intermediate files created as a part of the processing. Examples include CAD neutral formats (STEP, IGES, DXF, etc) when CAD neutral translation methods are used and UPR when Proficiency translation method is used.
Include Log Files If checked, then Log files are available in the Session.
Include Quality Files If checked and Model Quality is included in the processing, then the Model Quality results are visible in the Session by clicking on the Quality value. The specific Quality files to be displayed are controlled by the other Include Quality “filetype” Files parameters.
Include Quality IQJZ Files If checked and Include Quality Files is checked and Model Quality processing is enabled, then Model Quality IQJZ files will be displayed and available.
Include Quality Report Files If checked and Include Quality Files is checked and Model Quality processing is enabled, then Model Quality Report files will be displayed and available.
Include Quality PDF Files If checked and Include Quality Files is checked and Model Quality processing is enabled, then Model Quality PDF files will be displayed and available.
Expand Compressed Files If YES, compressed files will be expanded to extract and process the individual files for Transmit Only sessions.
If NO, compressed files will be transmitted as compressed files for Transmit Only sessions. Compressed files are automatically expanded

24 DEXcenter Administration and Configuration Guide
when processing of CAD or other files contained in them is required.
Review Translation Results Before Sending
DEXcenter can be enabled to allow a user to review any translated results before they are automatically sent to the intended recipient.
Review Transmit Results Before Sending
DEXcenter can be enabled to allow a user to review any transmit results before they are automatically sent to the intended recipient.
Review Quality Results Before Sending
DEXcenter can be enabled to allow a user to review any Quality results before they are automatically sent to the intended recipient.
Review Compare Results Before Sending
DEXcenter can be enabled to allow a user to review any Compare results before they are automatically sent to the intended recipient.
CATEXP Multiple Model Grouping
If checked, and Catia V4 model files are being translated into Catia CATEXP files, then all V4 models are put into one CATEXP file. Otherwise individual CATEXP files will be created for each Catia V4 model file.

25 DEXcenter Administration and Configuration Guide
Recipient Preferences Recipient preferences specify how DEXcenter will process Sessions being sent to the User. Note that not all parameters may be enabled in your DEXcenter deployment.
Recipient Preferences are described below.
PREFERENCE DESCRIPTION
Approval Required Determines if Approval is required for data delivered to this user.
Target 3D Application Preferred Application for 3D parts and assemblies. Data will be delivered

26 DEXcenter Administration and Configuration Guide
compatible with this Application.
Target 3D Application Version
Preferred Version of the 3D Application.
Target 3D File Format The file format in which to deliver the CAD data. Possible choices (dependent upon your DEXcenter configuration) include NATIVE (the proprietary format of each CAD system), IGES, STEP, Parasolid, ACIS, CATIA_EXP, and PDF.
Target 2D Application Preferred CAD system for 2D drawings. Data will be delivered compatible with this CAD system.
Target 2D Application Version
Preferred Version of the 2D Application.
Target 2D File Format The file format in which to deliver the CAD data. Possible choices (dependent upon your DEXcenter configuration) include NATIVE (the proprietary format of each CAD system), IGES, DXF, and CATIA_EXP.
“Action” Method If multiple methods are available for different “Action” types (eg Transmit, Translate, Compare, etc), this provides the ability to specify a preferred method. When processing data, DEXcenter automatically determines workflows based upon the source and target data. If a method is specified but no workflow with that Methods exists for that source and target combination, then the highest priority workflow available will be used.
CC email recipient If email addresses are specified, then they will receive copies of emails sent to this user as a recipient. They do not have access to the Sessions themselves in DEXcenter.
BCC email recipient If email addresses are specified, then they will receive bcc copies of emails sent to this user as a recipient. They do not have access to the Sessions themselves in DEXcenter.
Compression Method Select GNU ZIP or ZIP to always have data sent to you in the selected compressed format.
Include Directories in Compressed File
If Checked, then directories will be included in the compressed file for different subsessions
Include Original Files If checked, the User as Recipient sees the Originally submitted files in their sessions.
Include Intermediate Files
If YES, intermediate files will be provided in addition to any NATIVE file formats requested. Intermediate files include neutral formats (IGES, STEP, DXF) as well as any additional formats requested (JT, etc.)

27 DEXcenter Administration and Configuration Guide
Include Log Files If checked, then Log files are available in the Session.
Include Quality Files If checked and Model Quality is included in the processing, then the Model Quality results are visible in the Session by clicking on the Quality value.
Include Quality IQJZ Files If checked and if Include Model Quality Results and Model Quality are also both checked, then Quality IQJZ files will be displayed and accessible.
Include Quality REPORT Files
If checked and if Include Model Quality Results and Model Quality are also both checked, then Quality Report files will be displayed and accessible.
Include Quality PDF Files If checked and if Include Model Quality Results and Model Quality are also both checked, then Quality PDF files will be displayed and accessible.
JT Export If YES and JT translators are configured, JT graphics files will be created when processing NATIVE models for you.
Model Healing If YES, CADfix healing will be performed on any neutral files.
Model Quality If YES and CADIQ is appropriately configured, CAD data will be analyzed for quality issues before being translated, and translated results compared to the originals.
Transmission Method Specifies the method by which files are transmitted to you. If DEXcenter, then files are downloaded from the DEXcenter server using http or https as configured. If FTP or SFTP, then files are also FTP’ed or SFTP’ed to a specified FTP or SFTP server. The additional FTP or SFTP server access info must be specified.
Create Session / subsession directories in XMETH root
If FTP or SFTP Transmission Methods (XMETH) are defined, then checking this enables directories and subdirectories to be created within the root directory. If not checked, all files are put into the same specified directory.
Email frequency Can be either Session or Subsession. If Session, then the User receives an email only once a session is totally completed. If Subsession, the User is notified each time a subsession within a session completes.
Once all values have been set, select the “Apply” button to store this profile info.

28 DEXcenter Administration and Configuration Guide
Visibility Preferences
The visibility preferences section is used to define the Groups to which this user belongs, and which groups and individuals are available for this user to select and send data files.

29 DEXcenter Administration and Configuration Guide
Viewing, Modifying, Disabling, Deleting, and Unlocking Existing Users Existing Users are displayed in the Users section in the center of the page. All Users are automatically displayed. The Users displayed can be filtered using several mechanisms.
Group – Select the Group radio button and then select a Group from the pulldown. Only members belonging to that Group are displayed.
Companies– Select the Companies radio button and then select a Company from the pull down. Only Users which are affiliated with that Company are displayed.
To View a User’s Profile information, select the User from the box. The User’s profile information is displayed in the Contact and Preferences boxes.
To Modify a User’s profile, select the User from the box. Select the section to modify, modify the parameter(s) desired and then click the “Apply” button.
To Disable a User, select the User and then click the “Disable User” button. The User’s profile and login authorization are disabled. Disabled users appear with a strike though their name. A disabled user remains in the DEXcenter database and may be re-activated at any time. The Disable User / Enable User button is a toggle.

30 DEXcenter Administration and Configuration Guide
When users are “enabled”, the button displays “Disable User”. If a user is “disabled”, then the button displayed “Enable User”. To re-activate a user, select the user name and click Enable User
To Delete a User, select the User and then click the “Delete” button. The user and all sessions for that user are deleted.
A User’s Profile may be locked if they have more than the allowed number of login failures. In this case, their User Name appears in red and has a strikethrough line.

31 DEXcenter Administration and Configuration Guide
To Unlock their profile, select their name. An Unlock button will appear. Select Unlock to unlock selected user profiles.

32 DEXcenter Administration and Configuration Guide
Password Policies
DEXcenter has password policies used for DEXcenter authentication to ensure the safety and security of the data in the system. By default, all policies are enabled. The system administrator can disable or modify any of the policies by modifying the appropriate parameters in the DEXcenter database. Note that these policies do not apply to LDAP or SSO authentication. The authentication policies of those specific methods apply.
Defining Password Policies The table below identifies each policy, provides a brief description, identifies the default value, and identifies the SYSTEM parameter in the DEXcenter database which enables the policy and sets the allowed value.
Password rules are enabled or disabled in the SYSTEM_PARAMETERS table along with the conditions to be checked. The “ENABLE” parameters turn the various rules on if Parameter Value = Y or off if Parameter Value =N. Companion parameters set the required values.
Policy Description Default Value
SYSTEM Parameter
Length Enable or disable min and max password length
Y ENABLE_PASSWORD_LENGTH_RULE
Lower case alphabetic
Enables / disables requirement for lower case alphabetic chars
Y ENABLE_PASSWORD LOWER_CASE_CHAR_RULE
Upper case alphabetic
Enables / disables requirement for upper case alphabetic chars
Y ENABLE_PASSWORD_UPPER_CASE_CHAR_RULE
Digits Enables / disables requirement for numeric characters
Y ENABLE_PASSWORD_DIGIT_RULE
Non-Alpha Enables / disables requirement for non-alphabetic characters.
Y ENABLE_PASSWORD_NON_ALPHA_CHAR_RULE
History Enables / disables requirement of restricting password reuse
Y ENABLE_PASSWORD_HISTORY_RULE
Dictionary Enables / disables requirement that dictionary words cannot be used
Y ENABLE_PASSWORD_DICTIONARY_RULE
Min Length Minimum allowed length of password 6 PASSWORD_MIN_LENGTH
Max Length Maximum allowed length of password 20 PASSWORD_MAX_LENGTH
Min Lower Case
Minimum # of lowercase characters required
1 PASSWORD_NUM_LOWER_CASE_CHARS

33 DEXcenter Administration and Configuration Guide
Min Upper Case
Minimum # of uppercase characters required
1 PASSWORD_NUM_UPPER_CASE_CHARS
Min digits Minimum # of digits (numeric) chars required
1 PASSWORD_NUM_DIGIT_CHARS
Min Non-Alpha
Minimum # of non-alphabetic characters 1 PASSWORD_NUM_NON_ALPHA_CHARS
Expiration Age in days at which the password expires
30 PASSWORD_EXPIRATION_PERIOD
Expiration Notification
Days before password expiration when user is sent a notification of impending expiration
5 PASSWORD_EXPIRATION_NOTIFICATION_PERIOD
History This number of most recently used passwords cannot be reused
3 PASSWORD_HISTORY_COUNT
Dictionary Dictionary words are defined in PARAMETER_ALLOWED_VALUES table with parameter id of this parameter
<null> PASSWORD_DICTIONARY
Max Failed Login Attempts
After this number of failed login attempts, the user account is locked.
3 MAX_FAILED_LOGIN_ATTEMPTS
Using Password Policies
Some important notes about using password policies.
Users are required to change their password the first time they log in.
When a password is entered into a password field, the field border will change to red if the password policies have not been met.
If the field border remains red after entering the password, hold the cursor over the field and a pop up will identify the rules in violation.
If a user fails to login successfully after the maximum number of allowed attempts, their account is locked. A message indicates this on the login page. They must contact an Administrator in order to have their account unlocked and optionally have their password reset.

34 DEXcenter Administration and Configuration Guide
Managing User Profile Parameters
DEXcenter is shipped with the most frequently used set of parameters enabled with their most common default values. Because different sites may have different CAD systems or different operating procedures, some parameters may not apply, or different default values may be desired. These parameters can be disabled to avoid confusion, or their default values modified. Parameters can be modified for the entire site (e.g. All Users) or only for selected users. There may be some power users who would like the additional functionality, but other users may find the options more confusing.
Parameters are modified in the database tables.
Two tables are used to define parameters. An overall Parameters table and a User Parameters table. To disable a parameter for all users, change the Enabled value to “0”. The default value of the parameter for new users can also be set. Parameters for individual users can be changed in the User Parameters table. It may be more convenient to directly modify parameters in the database when a change affecting all or many users is being made.
To disable a parameter, set the value in the “Enabled” column to 0. To change the default value of a parameter to be different, change the value in the “Default_Value” column. Note that the value must be consistent with the type of the value expected (e.g. number, upper case alpha, Y, N, etc.) or unexpected results may occur.
No other columns associated with the parameter should be modified.

35 DEXcenter Administration and Configuration Guide
Chapter 4. User Groups
User Groups can be used both for convenience and for controlling user access to various functions.
User Groups can be Added, Deleted or Edited from the DEXcenter AdminConsole, “Administration, User Groups” menu. Site defined User Groups can be used to control access to Repository and TDP Repository file systems, to simplify recipient selection, to limit which recipients can be selected, for specifying Approvers and for other organizational purposes. This is also where Approval Groups and Approvers are defined.
View and Modify Groups To view Groups defined in the DEXcenter installation, select “Administration”, “User Groups”. The Groups are displayed on the web page form. Select any Group in the “Select Group” box and the name, description, and members are displayed in the other boxes. Use the “To” and “From” arrows to add and remove users from a selected Group. Change the Description in the top right box. When done with modifications, select the “Save” button.

36 DEXcenter Administration and Configuration Guide
Approvers and Approval Groups
If using Approval, Approvers and Approval Groups are defined here. A group becomes an Approval Group by adding an Approver to the Group. To add an Approver, first add the User into the Group and then move the User into the Approvers box using the arrows. Note that the Approval System parameters must be enabled in the database for the Approver functions to work.

37 DEXcenter Administration and Configuration Guide
Add Groups To add a Group, select the “Add” button, complete the form and then select the “Save” button.

38 DEXcenter Administration and Configuration Guide
Removing Groups To Remove a Group or Groups, select the Group(s) and select the “Remove” Button. Then click “OK” in the pop up dialogue to confirm.

39 DEXcenter Administration and Configuration Guide
Chapter 5 - Messaging The Administration -> Messaging function allows a message to be sent to all or selected DEXcenter users. Select “Send to All” box to send message to all users or use the “To” button to select specific users. Enter the Subject and message as desired and click the “Send” button. HTML tags are available for formatting.
Note that “Send to All” generates as many emails as there are users defined.

40 DEXcenter Administration and Configuration Guide
Chapter 6. User Activation
The User Activation function allows the Administrator to activate user accounts for users who have requested them. Users who have requested an account on the Login page will appear on this page. Select the user, modify the user parameters as appropriate and select Approve to approve the account. The user will automatically be notified about their account approval if the “Notify user via email” box is checked.
Note that to ensure Companies are consistent, the user supplied Company information is not used directly. Rather it is supplied as reference to help the user in choosing the appropriate Company. Once a Company is selected, the user is prompted to replace the user supplied Company information.

41 DEXcenter Administration and Configuration Guide

42 DEXcenter Administration and Configuration Guide
Chapter 7. Logging
The Logging function allows the administrator to change the logging level or review the logs associated with the DEXcenter or AdminConsole applications.

43 DEXcenter Administration and Configuration Guide
Chapter 8. Diagnostic
The Diagnostic function provides some basic diagnostics regarding the health of the DEXcenter deployment. Simply click the Run button. A passing diagnostic shows with a RESULT equal to “Pass”. A failing diagnostic shows a RESULT of “Failed”
Data Store – Verifies that connectivity exists to the defined Data Store.
License – verifies that the DEXcenter license server and licenses are valid.
Workflow – verifies that DEXcenter can connect to the workflow engine.
Data Space - verifies that sufficiency disk space is available.
Database Connection – verifies that the DEXcenter database can be accessed.

44 DEXcenter Administration and Configuration Guide
Click on the result (Pass or Fail) to get more information about the diagnostic.

Section 2. Reports Chapter 1. Reports
DEXcenter includes an interactive Report Generation capability. Numerous standard reports are provided, and additional reports can be added. Start by selecting a report. A dialogue box will then appear asking for the criteria to be used in generating the report. Then click the “OK” button to generate the report.
The report will be displayed on the screen.

DEXcenter User’s Guide 46
Click “EXPORT REPORT” button to save the report in either Excel or PDF format.
“EXPORT DATA” button allows the data used for the report to be exported into a csv file.

DEXcenter User’s Guide 47

DEXcenter User’s Guide 48
Section 3. Configuration DEXcenter is initially configured automatically when it is installed. Once installed however, it may be necessary to modify or augment the automatic configuration. Some configuration functions can be performed from this web page, but most require direct database changes. This section describes how to perform these functions.
Configuration functions are accessed via the main menu “Configuration”. Submenus allow viewing and editing Datastores and Preferences.
Chapter 1. Datastores
DEXcenter includes several types of Datastores:
Default Datastore – this is the main storage location where files on which DEXcenter operates are stored. The Datastore can be a local disk or an ftp or sftp server location.
Upload Directory – The upload directory is the location where files are saved temporarily on the DXS system when uploaded.
Repositories – Repositories are locations accessible from the DEXcenter server from which the User can select files. Repositories can be configured to allow access only to certain users.
All datastores can be of various types: a local disk directory, an FTP server site, and SFTP server site. Each requires appropriate configuration information.

DEXcenter User’s Guide 49

DEXcenter User’s Guide 50
Chapter 2. System and User Preferences
The System and User Preferences menus allow the administrator to view System and User parameters without directly accessing the database.
Modifications to the parameters can only be made directly in the database.

DEXcenter User’s Guide 51

DEXcenter User’s Guide 52
Section 4. CAD Application Customization • Chapter 1. Configuring Applications in DEXcenter • Chapter 2. Enabling Applications and Recognized CAD Formats • Chapter 3. Configuring CATIA V5 • Chapter 4. Configuring UG • Chapter 5. Configuring Creo Parametric • Chapter 6. CADIQ Qualify and Compare • Chapter 7. Logic Task • Chapter 8. CADfix As A Direct Translator • Chapter 9. Configuring Solidworks • Chapter 10. Configuring AutoCAD • Chapter 11. Configuring IGESworks • Chapter 12. Batch Input • Chapter 13. SOA API Interface

DEXcenter User’s Guide 53
Chapter 1. Configuring Applications in DEXcenter
Multiple levels of configuration are required to enable execution of Applications. These include:
- Database enablement and format recognition - System access and execution - Application licensing - Workflow flavors
These areas are discussed in the chapters which follow.
Chapter 2. Enabling Applications and Recognized CAD Formats DEXcenter is automatically configured for most possible CAD applications and application formats.
DEXcenter supports recent versions of the major CAD systems: Catia V4, Catia V5, NX, Creo Parametric, Solidworks, and Autocad.
Each application can support numerous file formats. This includes NATIVE, IGES, STEP, DXF, Parasolid, CATIA_EXP, JT, PROE_GRANITE, PROE_NEUTRAL. Supported formats vary by CAD system and by the actual translators which exist at a given installation. By default, the recognized file formats for an application are its NATIVE ones. For neutral standards, the application is defined as Generic and the neutral standard as a file format.
Application_File_formats table To ensure users do not inadvertently try to create translations which are not possible with the DEXcenter configuration, the database table application_file_formats should be modified.
A row exists in the application_file_formats table for each valid combination of file extension, CAD system, CAD format, and datatype. If the combination in the row is supported in the DEXcenter installation, then the ENABLED column should be set to Y. If not, it should be set to N. Only those formats which have ENABLED set as Y are selectable in member profile preferences and on Create Session forms.
After making all changes in application_file_formats table, access the Help functions in the DEXcenter application as an Admin user. Choose the option to update the tables. This will synchronize other changes that are required.
SYSTEM.CFG Enabling applications also requires modifying the SYSTEM.CFG and Defaults.dat files in each DEXcenter DTS where the application will be executed. The parameters in these files define how to execute the various applications. Each application has specific parameters as

DEXcenter User’s Guide 54
defined below. These files are located in the …\dts\translate\master directory on each DTS. Note that multiple versions of a specific CAD application can be enabled simultaneously. Since most CAD applications can read native files created by older versions, usually the newest version enabled is configured to read and process all files. Older versions are typically only used when it is necessary supply specific versions of native files to partners.
Flavors Finally, each application has unique “flavors” to control its execution. The Flavors control how each task is executed. DEXcenter is delivered with hundreds of pre-defined flavors representing “best practice” results. Adding and modifying flavors provide the ability to customize translations for different recipient needs.
Flavors are specified as part of each workflow. To use a different flavor, create a new flavor and upload a new workflow that utilizes the flavor.
Flavor files are specific to each application. The format and content of application specific flavors are defined in the Application specific sections below.

DEXcenter User’s Guide 55
Chapter 3. Configuring CATIA V5 within DEXcenter Several steps must be completed to correctly configure DEXcenter for CATIA V5 Support. This chapter discusses some of the changes made to the configuration files and also how to make additional necessary changes for use of DEXcenter with CATIA V5.
Configuration The SYSTEM.CFG.<dtshost> file must be modified to include the location of the Catia application. There are general parameters which apply to all Catia versions and there are specific Catia version parameters which must be defined. The comments in the SYSTEM.cfg file identify the different parameters.
CATIA V5 Licensing To enable Catia V5 execution within DEXcenter, a valid Catia V5 license file must be generated and copied to /DexRoot/translate/master/catia. Note that sometimes Catia package licenses which include numerous modules are used while at other times individual licenses for translators or other features may need to be specified. Each unique Catia license required must be copied to the location above.
Follow this procedure to enable Catia V5 licensing:
1. Login to the Windows translation server as the DEXcenter owner (usually "dex"). 2. Execute Catia V5 interactively and select a valid Catia V5 license configuration. 3. In the DEXcenter owner profiles area, there should now be a CATSettings directory containing
the file "Licensing.CATSettings". Copy this file to /DexRoot/translate/master/catia/Licensing_"version5".CATsettings. The location is typically C:\Documents and Settings\"user"\Application Data\DassaultSystemes\CATSettings.
Note:
If the Catia license information changes, this file must be updated. An invalid license file will cause the Catia V5 translation to hang indefinitely until cancelled.
To generate a new License.CATSettings file, you can delete (or move) the existing one from the user's "CATSettings" directory and run Catia5 again. This will force the
license configuration window to pop up.
Catia V5 Flavors Catia V5 stores it settings in binary files. To add Catia V5 flavors to DEXcenter, first access Catia V5 interactively and modify the options desired. Catia saves these in a .CATSettings file in the users default directory.
Within DEXcenter, the flavors are controlled via an "ini" flavor file (.flv) which points to the various .CATSettings files.

DEXcenter User’s Guide 56
Testing has determined that .CATSettings files are platform independent, therefore no differentiation is made between platforms for CATSettings files. Only CATIA V5 versions (V5R10, V5R11, etc) are differentiated.
When performing a V4 to V5 migration interactively within CATIA, the Options page allows the user to control many different settings. Within the Options page there are 5 tabs. The settings on each tab is stored in a specific .CATSettings file. The tab names and their corresponding .CATSettings files are described in Catia V5 documentation.
Catia V5 Search Paths and Assembly Load Options Catia V5 provides various assembly load options. DEXcenter is delivered with Catia enabled to search for assembly components in the same directory as the assembly file. This requires that the assembly (.CATProduct) file and all referenced part (.CATPart) files must be selected and uploaded at the same time.
To enable other options such as “As Saved” or specific “Search Directories”, the following operations must be performed:
Interactively execute Catia and save the desired .CATSettings options file.
Enable the .CATSettings file within DEXcenter as a flavor.
The DEXcenter translation servers for Catia V5 must have access to any referenced file systems exactly as referenced in the Catia V5 assembly.
Catia V5 Utility – Migration V4 To V5 Tool DEXcenter includes support for the CATIA V5 MigrateV4ToV5 batch utility. The output of this functionality will be one or more .CATPart, .CATProduct, and/or .CATDrawing files and a log file.
This functionality is utilized by including the task CATIA_V5R’ver’_MIGRATE_V4_TO_V5
‘ver’ is the specific version 21, 22, etc.
The MigrateV4ToV5 task is not automatically inserted into any path workflows. It can be placed into a customized CATIA V4 to CATIA V5 path which may involve branching.

DEXcenter User’s Guide 57
Chapter 4. Configuring NX within DEXcenter
Configuration The SYSTEM.CFG.<dtshost> file must be modified to include the location of the NX application and license information. There are general parameters which apply to all NX versions and there are specific NX version parameters which must be defined. The comments in the SYSTEM.cfg file identify the different parameters.
NX Flavors For DEXcenter NX IGES and DXF translations, the flavor files are the .def files created by NX. To create a specific set of options, interactively access NX and set the options into a .def file. Add the .def files into DEXcenter as flavors which are referenced by a path workflow.
For STEP translations, a .flv file must be created with two sections as follows:
[application_protocol]
step_ap=203
[def_file]
filename=step203ug.def
The first section defines the STEP AP. The second section defines the corresponding NX .def file. Specific NX options are set in the designated .def file.
NX Search Paths and Load Options DEXcenter can use NX search paths. This allows NX to access cad files which reside in archived directories, without the user having to submit them.
This is enabled using NX functionality. To enable:
Set up UGI_SEARCH_DIRS in the NX .def files.
Enable the ugpc assembly check function to utilize the –a option in SYSTEM.CFG.<dtshost>.
Ensure each NX DTS has access to the search directories.
NX provides various assembly load options. DEXcenter is delivered with NX enabled to search for assembly components in the same directory as the assembly file.
To enable other options such as “As Saved” or specific “Search Directories”, the following operations must be performed:

DEXcenter User’s Guide 58
Modify the default NX flavor or copy it to create a new one. Include the appropriate NX .def file parameters in the flavor.
The DEXcenter translation servers for NX must have access to any referenced file systems exactly as referenced in the NX assembly.
DEXcenter User’s Guide 59
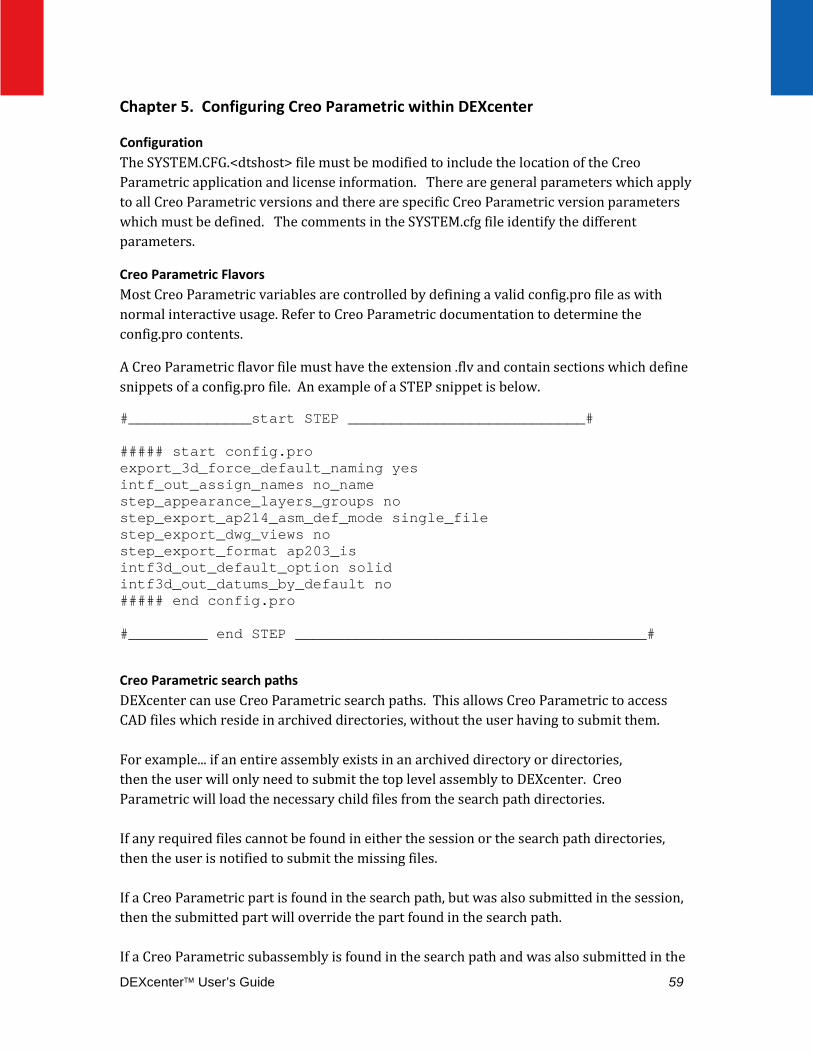
Chapter 5. Configuring Creo Parametric within DEXcenter
Configuration The SYSTEM.CFG.<dtshost> file must be modified to include the location of the Creo Parametric application and license information. There are general parameters which apply to all Creo Parametric versions and there are specific Creo Parametric version parameters which must be defined. The comments in the SYSTEM.cfg file identify the different parameters.
Creo Parametric Flavors Most Creo Parametric variables are controlled by defining a valid config.pro file as with normal interactive usage. Refer to Creo Parametric documentation to determine the config.pro contents.
A Creo Parametric flavor file must have the extension .flv and contain sections which define snippets of a config.pro file. An example of a STEP snippet is below.
#______________start STEP ___________________________# ##### start config.pro export_3d_force_default_naming yes intf_out_assign_names no_name step_appearance_layers_groups no step_export_ap214_asm_def_mode single_file step_export_dwg_views no step_export_format ap203_is intf3d_out_default_option solid intf3d_out_datums_by_default no ##### end config.pro #_________ end STEP ________________________________________#
Creo Parametric search paths DEXcenter can use Creo Parametric search paths. This allows Creo Parametric to access CAD files which reside in archived directories, without the user having to submit them. For example... if an entire assembly exists in an archived directory or directories, then the user will only need to submit the top level assembly to DEXcenter. Creo Parametric will load the necessary child files from the search path directories. If any required files cannot be found in either the session or the search path directories, then the user is notified to submit the missing files. If a Creo Parametric part is found in the search path, but was also submitted in the session, then the submitted part will override the part found in the search path. If a Creo Parametric subassembly is found in the search path and was also submitted in the

DEXcenter User’s Guide 60
session, then the submitted subassembly will be treated as a top level item and Creo Parametric will use the subassembly found in the search path. Creo Parametric search paths support all of the different Creo Parametric reference types supported by DEXcenter. Creo Parametric search paths are configurable separately for each Creo Parametric version. To configure search paths, do the following: 1) Create the search path file. This is simply a text file containing the fully qualified directory names from which Creo Parametric should load models. Enter one directory per line. Creo Parametric does not recursively search through directories, so all subdirectories must be listed separately. The default name for this file in Creo Parametric terminology is "search.pro" but it can be named differently if desired. 2) Store the search path file in <dexroot>/translate/master/proe on the Creo Parametric DTS computer. Note the directories listed must be accessible from the DTS. 3) On the DEXcenter server, uncomment the SYSTEM.CFG.<dtshost> parameter called "PRO_version_SEARCHPATH_FILE". Modify it to specify the name and location of the searchpath file as accessible by the Pro/E DTS.
Pro/Intralink Revision Parameter Included in Neutral File Names Creo Parametric files can have various parameters defined within them, both user-defined as well as system parameters. One parameter in particular, "PROI_REVISION", is a system parameter which cannot typically be created or modified by a Creo Parametric user. This parameter is set in the file by Pro/INTRALINK. PROI_REVISION functionality in DEXcenter DEXcenter supports the use of this parameter. If this functionality is turned on, and if a Creo Parametric file has PROI_REVISION defined within it, then the exported DXF/IGES/STEP filename will have the PROI_REVISION value appended to it. To activate this functionality, set the following SYSTEM.CFG.<dtshost> variable:
PRO_WILDFIRE_APPEND_PROI_REVISION=1

DEXcenter User’s Guide 61
This variable is set to 0 (off) by default in the template files. This functionality is supported for Wildfire and later versions. It does NOT support 2000i2 or 2001, due to Creo Parametric limitations. NOTES - It is possible to force Creo Parametric to let you create this parameter in any Creo Parametric file. To do this, you must have the following option set in your config.pro: allow_create_pdm_param yes - If you use shrinkwrap for a Creo Parametric file which has PROI_REVISION defined, the resultant shrinkwrap part will NOT have the PROI_REVISION parameter. However, DEXcenter supports this by extracting the PROI_REVISION parameter before the shrinkwrap operation. The revision value is then appended to the neutral file exported from the shrinkwrapped part.
Extracting Parameters from Creo Native models DEXcenter has a task which can extract parameters from a Creo model and put them into the DEXcenter database for use in later tasks. This task is not included automatically in any path workflows but can be added as needed.

DEXcenter User’s Guide 62
Chapter 6. Configuring CADIQ Within DEXcenter
Support is included for CADIQ to perform validation, comparison, ECO documentation, and Producibility analysis of CAD files in many different neutral and native formats.
CADIQ Tasks are CAD system and version specific and are automatically created during installation when CADIQ is identified for the specific CAD system version. CADIQ tasks are also created when CADIQ updates are made.
DEXcenter is delivered with various workflow combinations of source and target CAD system versions for comparison but not all possible combinations. Additional workflow combinations can be provided upon request.
For CADIQ to be executed within a workflow, two conditions must be met:
• CADIQ tasks must be configured within the Path workflow being utilized. • The “Model Quality” box in the Recipient Profile or Create Session Preferences
sections must be checked. Even if CADIQ is in the Translation Path, it will be skipped unless the “Model Quality” box is checked.
CADIQ Quality results are always available to the Sender. The results are also available to the Recipient if the “Include Quality Files” box is checked in the recipient’s profile or in the Create Session Preference form. Specific Quality results file are available based upon which “Include Quality ‘format’ Files” boxes are checked in the Sender Profile section.
Configuration The SYSTEM.CFG.<dtshost> file must be modified to include the location of the CADIQ application and license information. There are specific CADIQ parameters for different CAD systems and versions. There are general parameters which apply to all CADIQ CAD applications and versions. The comments in the SYSTEM.CFG file identify the different parameters.
Flavors CADIQ execution is controlled by CADIQ configuration files (.iqj, .cfg) which may be different for different path workflows. The file <dexroot>/dts/procdefs/flavoring/cadiq/cadiq.flavor file identifies which CADIQ configuration files to use in each workflow.
CADIQ Output Files
The CADIQ task creates several output files as follows:
“model”.iqjz file – graphic file of results for “model” which is viewed in the CADIQ viewer application.

DEXcenter User’s Guide 63
“model” report.txt file – text file of analysis results for “model”
“model”_report.pdf file – PDF file of results for “model”
results.ini – ini formatted file of key analysis results which can be used by DEXcenter logic task to control execution
License requirements
CADIQ has many functions some of which require specific licenses. Licenses for the specific CADIQ functions as well as CAD licenses for native model analysis must be available.

DEXcenter User’s Guide 64
Chapter 7. Logic Task
DEXcenter provides the ability to include logical decisions within a path.
This functionality is implemented using a "logic" task. This task executes on the DEXcenter DXS server. Based on some configurable criteria, the logic task will cause DEXcenter to execute a specific set of tasks identified by their sequence numbers, or it may also cause DEXcenter to stop processing all remaining tasks in that path workflow.
The logic intelligence is contained within the task's flavor file. The flavor file is a snippet of python code which imports key parameters defined in an ini format from a previously executed DEXcenter task. Task execution decisions can be made based upon values of the key parameters.
For the case of logic based on CADIQ, a "<cadsys>_CADIQ.ini" file is created containing information from the CADIQ watch file (.iqw). There are specific key values defined. Any such key value can be used in the logic flavor. This implementation uses key values defining QUALITY, SOLIDS, SURFACES, and SHELLS. Based upon the values of the parameters, DEXcenter executes a specified list of tasks identified by their task sequence numbers. Any valid task number or numbers may be specified. For example, a list of translation tasks and/or another logic task may be specified by number. To stop processing, an empty set ([]) should be specified.
The CADfix task creates CADFIX.ini respectively which include information pertinent to the logic task.
Care must be taken when configuring logic within a path. The decisions are made based on task numbers, so whenever a task is added or removed to a path, be sure to change the appropriate logic flavor file(s) accordingly.
Note that the CADFIX_TRANSLATE task should be used in any paths where logic choices are being made. This forces the CADfix task to always be executed instead of conditionally being executed based upon the value of the MODEL HEALING option. Otherwise the task numbers change based upon the MODEL HEALING option which will make the logic flavor parameters invalid.
A sample logic flavor template is provided at <deroot>/procdefs/flavoring/logic.

DEXcenter User’s Guide 65
Chapter 8. CADfix As A Direct Translator The normal CADfix task is automatically created and configured into appropriate standard paths. This CADfix task is executed or skipped based upon the Model Healing parameter in the member Profile Preferences or as overridden during session creation.
When CADfix is to be used as a direct translator, CADfix should always be executed without regard for the Model Healing parameter. This is allowed by using a different task name, CADFIX_TRANSLATE, in applicable paths. This task is created automatically when CADfix is enabled in the installation. It must be manually inserted into the appropriate paths however.
Configuration The SYSTEM.CFG.<dtshost> file must be modified to include the location of the CADfix application and license information. The comments in the SYSTEM.CFG file identify the different parameters.
CADfix Flavors Both the CADfix and CADFIX_TRANSLATE tasks use standard CADfix wizards as flavor files. When using CADFIX_TRANSLATE to operate as a direct translator, the appropriate wizard must be referenced as a flavor to generate the desired output file.
CADfix flavor files are CADfix wizards (.cwc extension). To create a new flavor, simply create a wizard file in CADfix and add to DEXcenter. To ensure complete batch execution, the following parameters within the CADfix wizard should be enabled:
continueOnError [0, 1] : 1
repair,buildOption [SOLIDS, FACES, SOLIDS+FACES, UNKNOWN] : UNKNOWN
export,always [0, 1] : 1

DEXcenter User’s Guide 66
Chapter 9. Configuring Solidworks
If Solidworks is enabled the Application Server (JBOSS, Wildfly) service must be enabled to allow “interaction with desktop”. If it is not, Solidworks translations will fail and not provide useful information.
Configuration The SYSTEM.CFG.<dtshost> file must be modified to include the location of the Solidworks application and license information. There are specific Solidworks parameters for different versions. The comments in the SYSTEM.CFG file identify the different parameters.
Solidworks Flavors Solidworks flavoring is controlled by setting various user preference values in the form “swApp.SetUserPreferenceToggle #,’value’” or “swApp.SetUserPreferenceIntegerValue #,’value’” where # is the corresponding number of the preference parameter as defined in the Solidworks swconst.h file. Value is a value to which the preference parameter can be set.
Chapter 10. Configuring AutoCAD
Configuration The SYSTEM.CFG.<dtshost> file must be modified to include the location of the AutoCAD application and license information. There are specific Autocad parameters for different versions. The comments in the SYSTEM.CFG file identify the different parameters.
AutoCad Flavors For DEXcenter AutoCAD translations, the flavor files are the .opt files created by AutoCAD. To create a specific set of options, interactively access AutoCAD and set the options into a .opt file. Add the .opt files into DEXcenter as flavors.
Chapter 11. Configuring IGESworks
Configuration The SYSTEM.CFG.<dtshost> file must be modified to include the location of the IGESworks application and license information. The comments in the SYSTEM.CFG file identify the different parameters.
IGESworks Flavors IGESworks flavors are IGESworks scripts. The script should begin operating on an already opened IGES file and will need to save the file with the same name when complete.
DEXcenter User’s Guide 67
Chapter 12. Batch Input DEXcenter provides a batch input capability to allow easy integration with other applications which may want to send data to DEXcenter for translation or transmission. For instance, a PLM system can push data to DEXcenter by generating the required batch input files.
Two input files are required:
• A uniquely named .ini file which describes the session. • The actual data file(s) themselves. These can be individual files or a tar or zip file.
To execute a batch operation:
Place the .ini and data files into the <DexRoot>/batch_inputs directory.
To execute immediately, as the dex owner, enter the command <DexRoot>/utilities/scripts/BatchIniClient
The files in the tar/zip files will be extracted into a session within DEXcenter and sent to the recipient specified using the recipients profile settings unless otherwise indicated in the batchcron.ini file.
The batch input queue is enabled automatically during installation. To change the frequency of execution, edit the crontab.
Note: Once the batchcron.exe file is run, the .ini file and tar/zip files are removed from the batch_inputs
directory.

DEXcenter User’s Guide 68
Example of a batchcron.ini file [CREATE_SESSION]
SUBMIT=Input [ Input | Transmit_Only | Translate ] Default: Translate
TITLE=Session Title Default: DEXcenter Batch Input from {ORIGINATOR}
EMAILTEXT= Default: msg: bcron_batch_job_ready
CCEMAIL=
*SENDER=jxs [DEXcenter user ID]
RECIPIENT= [DEXcenter user ID(s) comma separated] Default: SENDER
SELECTSELF= [ YES | NO | NULL ] Default: NULL
TARGET_CAD_SYSTEM=AUTOMATIC Default: AUTOMATIC
TARGET_CAD_FORMAT=AUTOMATIC Default: AUTOMATIC
PATH=PROFILE [ PROFILE | AUTOMATIC ] Default: PROFILE
HEALING=NO [ YES | NO | PROFILE ] Default: PROFILE
MODEL_QUALITY=NO [ YES | NO | PROFILE ] Default: PROFILE
MODELQUALITY_SOURCE=NA [ YES | NO | NA ] Default: NA
MODELQUALITY_TARGET=NA [ YES | NO | NA ] Default: NA
JT_EXPORT=NO [ YES | NO | PROFILE ] Default: PROFILE
INTERMEDIATE=YES [ YES | NO | PROFILE ] Default: PROFILE
PROCZIP=NO [ YES | NO | NULL ] Default: NULL
PROECOORD=NO [ YES | NO | NULL ] Default: NULL
SKIPMISSING=NO [ YES | NO | NULL ] Default: NULL
[FILE_1]
*FILENAME=batchcron.zip or batchcron.tar
SOURCE_CAD_SYSTEM=AUTODETECT Default: AUTODETECT
SOURCE_CAD_FORMAT=AUTODETECT Default: AUTODETECT
SOURCE_DATA_TYPE=PART [PART | DRAW | ASSEMBLY] Default: PART
[FILE_2]
*FILENAME=batchcron.zip or batchcron.tar
etc. …. repeat for all files
* = required parameter
[ ] = specific allowable values. If omitted, any text is allowed.
Default = value used if not specifically defined in .ini file
Automated Batch Input DEXcenter provides a simplified method to submit files for automatic translation. Models to be translated will be placed into an input directory whose name matches the name of an existing DEXcenter user. DEXcenter will automatically create the corresponding batchcron .ini and zip files and place them into the batch input directory. Operations will be based entirely upon the named user’s default profile settings.
This simplified method is valid for the following conditions:
A DEXcenter userid must exactly match a corresponding input directory.

DEXcenter User’s Guide 69
The recipient is the sender.
The sender / recipient profile preferences are used for the processing.
All files placed into the input folder will be incorporated into a single session when the batchcron executes. If assembly components, DEXcenter will automatically group them into unique assemblies. If multiple parts or assemblies are submitted, they will become unique subsessions.
For example, to configure DEXcenter to correspond to particular CAD system versions and projects, the following configuration may be used:
To convert to V5 for XX146 Project:
$BASE/in/Catia_V5_XX146
To convert to V5 for YY400 Project:
$BASE/in/Catia_V5_YY400
To convert to V4 for XX146 Project:
$BASE/in/Catia_V4_XX146
To convert to V4 for YY400 Project:
$BASE/in/Catia_V4_YY400
To convert to UG for XX146 Project:
$BASE/in/UG_XX146
The input directories are easily configurable, so directories can be added, modified, or deleted as needed. Configuration is via the file <dexroot>/config/automated_batch_input.cfg containing the following entries in this format:
export NUMBER_DIRECTORIES=5
export BASE=/tmp
export IN_DIR1=$BASE/in/userid1

DEXcenter User’s Guide 70
export IN_DIR2=$BASE/in/userid2
export IN_DIR3=$BASE/in/userid3
export IN_DIR4=$BASE/in/userid4
export IN_DIR5=$BASE/in/userid5
DEXcenter user profiles will be created with names corresponding to the pickup directories:
userid1
userid2
userid3
userid4
userid5
Each DEXcenter profile will specify the corresponding parameters for translation and transmission. This will include at least the following:
Target CAD system, the appropriate workflow path, translation tasks.
A function checks for the existence of files in each input directory.
For each file found, a separate DEXcenter batch input file (.ini) is created.
The batch input file and the CAD file are moved to the DEXcenter batch input directory.
The function operates as a cron job at a designated frequency if enabled.
For Catia V4 models, the correct Catia V4 environment will be determined from the project portion of the directory name.
Configuration
The directories to be monitored by the automated_batch_input function are configured in the file <dexroot>/config/automated_batch_input.cfg.
The file <dexroot>/scripts/launch_abi.csh must be edited to identify the correct DEXcenter port and to direct output to a corresponding log file.

DEXcenter User’s Guide 71
Chapter 13. SOA API Interface
DEXcenter includes an SOA API interface capability which allows applications to programmatically Create Sessions, check the status of sessions, and retrieve results from sessions. This provides more control over executing DEXcenter than a simple batch capability.
The SOA API interface is described in a separate document.