devtest solutions - 9.5 reference - ca technologies · devtest solutions - 9.5 ... reference 9...
TRANSCRIPT

25-Jul-2016Date:
DevTest Solutions - 9.5Reference


DevTest Solutions - 9.5
25-Jul-2016 3/448
This Documentation, which includes embedded help systems and electronically distributed materials, (hereinafter referred to as the “Documentation”) is for your informational purposes only and is subject to change or withdrawal by CA at any time. This Documentation is proprietary information of CA and may not be copied, transferred, reproduced, disclosed, modified or duplicated, in whole or in part, without the prior written consent of CA.
If you are a licensed user of the software product(s) addressed in the Documentation, you may print or otherwise make available a reasonable number of copies of the Documentation for internal use by you and your employees in connection with that software, provided that all CA copyright notices and legends are affixed to each reproduced copy.
The right to print or otherwise make available copies of the Documentation is limited to the period during which the applicable license for such software remains in full force and effect. Should the license terminate for any reason, it is your responsibility to certify in writing to CA that all copies and partial copies of the Documentation have been returned to CA or destroyed.
TO THE EXTENT PERMITTED BY APPLICABLE LAW, CA PROVIDES THIS DOCUMENTATION “AS IS” WITHOUT WARRANTY OF ANY KIND, INCLUDING WITHOUT LIMITATION, ANY IMPLIED WARRANTIES OF MERCHANTABILITY, FITNESS FOR A PARTICULAR PURPOSE, OR NONINFRINGEMENT. IN NO EVENT WILL CA BE LIABLE TO YOU OR ANY THIRD PARTY FOR ANY LOSS OR DAMAGE, DIRECT OR INDIRECT, FROM THE USE OF THIS DOCUMENTATION, INCLUDING WITHOUT LIMITATION, LOST PROFITS, LOST INVESTMENT, BUSINESS INTERRUPTION, GOODWILL, OR LOST DATA, EVEN IF CA IS EXPRESSLY ADVISED IN ADVANCE OF THE POSSIBILITY OF SUCH LOSS OR DAMAGE.
The use of any software product referenced in the Documentation is governed by the applicable license agreement and such license agreement is not modified in any way by the terms of this notice.
The manufacturer of this Documentation is CA.
Provided with “Restricted Rights.” Use, duplication or disclosure by the United States Government is subject to the restrictions set forth in FAR Sections 12.212, 52.227-14, and 52.227-19(c)(1) - (2) and DFARS Section 252.227-7014(b)(3), as applicable, or their successors.
Copyright © 2016 CA. All rights reserved. All trademarks, trade names, service marks, and logos referenced herein belong to their respective companies.

Reference 4
Table of Contents
Assertion Descriptions ............................................................................... 17HTTP Assertions ....................................................................................................................................... 17
Highlight HTML Content for Comparison ............................................................................................ 17
Check HTML for Properties in Page .................................................................................................... 20
Ensure HTTP Header Contains Expression ........................................................................................ 22
Check HTTP Response Code ............................................................................................................. 22
Simple Web Assertion ......................................................................................................................... 23
Check Links on Web Responses ........................................................................................................ 23
Database Assertions ................................................................................................................................. 24
Ensure Result Set Size ....................................................................................................................... 24
Ensure Result Set Contains Expression ............................................................................................. 25
XML Assertions ......................................................................................................................................... 26
Highlight Text for Comparison ............................................................................................................. 26
Ensure Result Contains String ............................................................................................................ 28
Ensure Step Response Time .............................................................................................................. 29
Graphical XML Side-by-Side Comparison .......................................................................................... 29
Output During Execution ............................................................................................................ 30
XML Compare Options ............................................................................................................... 31
XML XPath Assertion .......................................................................................................................... 34
Ensure XML Validation ........................................................................................................................ 35
Validation Tab ............................................................................................................................ 36
Schemas Tab ............................................................................................................................. 37
JSON Assertions ....................................................................................................................................... 37
Ensure Result Equals .......................................................................................................................... 37
Determining the JSON Path and Expected Value ...................................................................... 39
Secure Prefixes .......................................................................................................................... 39
Ensure Result Contains ...................................................................................................................... 39
Secure Prefixes .......................................................................................................................... 40
Ensure JSON Schema ........................................................................................................................ 40
Select Contents Tab ................................................................................................................... 41
Settings Tab ............................................................................................................................... 41
Virtual Service Environment Assertion ...................................................................................................... 42
Assert on Execution Mode .................................................................................................................. 42
Other Assertions ........................................................................................................................................ 43
Highlight Text Content for Comparison ............................................................................................... 43
Ensure Non-Empty Result Assertion ................................................................................................... 46

Reference 5
Ensure Result Contains String Assertion ............................................................................................ 47
Ensure Result Contains Expression Assertion .................................................................................... 47
Ensure Property Matches Expression Assertion ................................................................................. 48
Ensure Step Response Time Assertion .............................................................................................. 48
Scripted Assertion ............................................................................................................................... 48
Ensure Properties Are Equal Assertion ............................................................................................... 50
Assert on Invocation Exception Assertion ........................................................................................... 51
File Watcher Assertion ........................................................................................................................ 51
Check Content of Collection Object Assertion .................................................................................... 52
WS-I Basic Profile 1.1 Assertion ......................................................................................................... 53
Messaging VSE Workflow Assertion ................................................................................................... 54
Validate SWIFT Message Assertion .................................................................................................... 54
Mobile Testing Assertions ......................................................................................................................... 57
Mobile-Specific Assertions .................................................................................................................. 58
Ensure Same Mobile Screen ..................................................................................................... 58
Ensure Screen Element Matches Expression ............................................................................ 59
Ensure Screen Element is Removed ......................................................................................... 60
Mobile Target Predicate ...................................................................................................................... 60
Asset Descriptions ..................................................................................... 62Email Connection Asset ............................................................................................................................ 62
IBM MQ Native Assets .............................................................................................................................. 64
JDBC Connection Assets .......................................................................................................................... 65
JMS Client Assets ..................................................................................................................................... 68
Connection Factories .......................................................................................................................... 69
Connections ........................................................................................................................................ 70
Sessions .............................................................................................................................................. 71
Producers ............................................................................................................................................ 72
Consumers .......................................................................................................................................... 72
Destinations ........................................................................................................................................ 72
JNDI Initial Context Asset .......................................................................................................................... 73
Mobile Assets ............................................................................................................................................ 73
RabbitMQ Assets ...................................................................................................................................... 73
Connection .......................................................................................................................................... 74
Queue ................................................................................................................................................. 75
Exchange ............................................................................................................................................ 76
Temp Queue ....................................................................................................................................... 77
Channel ............................................................................................................................................... 78
SAP JCo Destination Assets ..................................................................................................................... 78
SSL Assets ................................................................................................................................................ 81

Reference 6
Basic Scenarios .................................................................................................................................. 82
Just a trust store: The Key Store File Asset ............................................................................... 82
A trust store and key store using the default key: Two Key Store File Assets ........................... 83
Advanced Scenarios ........................................................................................................................... 84
Forgoing the trust store: The "Trust All" Trust Manager Asset ................................................... 84
Using a specific client key: The Key Manager Asset ................................................................. 85
Full configuration: The "Generic" Trust Manager Asset ............................................................. 85
SSL Context Parameters ..................................................................................................................... 86
Companion Descriptions ........................................................................... 87Web Browser Simulation Companion ........................................................................................................ 87
Browser Bandwidth Simulation Companion .............................................................................................. 88
HTTP Connection Pool Companion .......................................................................................................... 88
Configure DevTest to Use a Web Proxy Companion ................................................................................ 89
Set Up a Synchronization Point Companion ............................................................................................. 90
Set Up an Aggregate Step Companion ..................................................................................................... 91
Execute Event-driven Subprocess Companion ......................................................................................... 91
Observed System VSE Companion .......................................................................................................... 92
Configuration Information .................................................................................................................... 92
Data Set Source Example ................................................................................................................... 94
Observed System Data Provider (Wily) Source .................................................................................. 98
Run Time Priorities ............................................................................................................................ 100
VSE Think Scale Companion .................................................................................................................. 101
Batch Response Think Time Companion ................................................................................................ 102
Recurring Period Think Time Companion ............................................................................................... 104
Create a Sandbox Class Loader for Each Test Companion ................................................................... 105
Set Final Step to Execute Companion .................................................................................................... 105
Negative Testing Companion .................................................................................................................. 106
Fail Test Case Companion ...................................................................................................................... 106
XML Diff Ignored Nodes Companion ....................................................................................................... 106
JSON Ignored Nodes Companion ........................................................................................................... 106
Correlation Schemes ............................................................................... 109Overview of Correlation Schemes ........................................................................................................... 109
Correlation ID .......................................................................................................................................... 110
Message ID to Correlation ID .................................................................................................................. 110
Payload ................................................................................................................................................... 110

Reference 7
ReplyTo and Temporary Response Queues ........................................................................................... 111
Data Set Descriptions .............................................................................. 112Read Rows from a Delimited Data File Data Set .................................................................................... 112
Create Your Own Data Sheet Data Set ................................................................................................... 113
Create Your Own Set of Large Data Data Set ........................................................................................ 116
Convert to Comma-Separated Value (CSV) File .............................................................................. 118
Read Rows from a JDBC Table Data Set ............................................................................................... 118
Create a Numeric Counting Data Set ...................................................................................................... 119
Read Rows from Excel File Data Set ...................................................................................................... 120
Read DTOs from Excel File Data Set ...................................................................................................... 122
Building the Excel spreadsheet ......................................................................................................... 124
Unique Code Generator Data Set ........................................................................................................... 127
Random Code Generator Data Set ......................................................................................................... 128
Message-Correlation ID Generator Data Set .......................................................................................... 128
Load a Set of File Names Data Set ......................................................................................................... 129
XML Data Set .......................................................................................................................................... 130
Basic Settings Tab ............................................................................................................................ 132
Advanced Settings Tab ..................................................................................................................... 132
Record Editing Panel ........................................................................................................................ 133
Action Buttons .......................................................................................................................... 133
Record Number Selector .......................................................................................................... 134
Visual XML Tab ................................................................................................................................. 134
Visual XML Editor ..................................................................................................................... 135
Raw XML Tab ................................................................................................................................... 135
Event Descriptions .................................................................................. 136
Filter Descriptions .................................................................................... 142Utility Filters ............................................................................................................................................. 142
Create Property Based on Surrounding Values ................................................................................ 142
Handling Nonunique Tokens .................................................................................................... 144
Store Step Response ........................................................................................................................ 145
Override Last Response Property ..................................................................................................... 145
Save Property Value to File .............................................................................................................. 146
Parse Property Value As Argument String ........................................................................................ 146
Save Property from One Key to Another ........................................................................................... 147

Reference 8
Time Stamp Filter .............................................................................................................................. 148
Database Filters ...................................................................................................................................... 148
Extract Value from JDBC Result Set ................................................................................................. 149
Size of JDBC Result Set ................................................................................................................... 151
Set Size of a Result Set to a Property ............................................................................................... 151
Get Value For Another Value in a Result Set Row ........................................................................... 152
Messaging/ESB Filters ............................................................................................................................ 154
Extract Payload and Properties from Messages ............................................................................... 154
Convert an MQ Message to a VSE Request ..................................................................................... 155
Convert a JMS Message to a VSE Request ..................................................................................... 155
HTTP/HTML Filters ................................................................................................................................. 156
Create Resultset from HTML Table Rows ........................................................................................ 156
Parse Web Page for Properties ........................................................................................................ 158
Parse HTML/XML Result for the Value of a Specific Tag or Attribute ............................................... 161
Parse HTML Result for Specific Value and Parse It ......................................................................... 163
Parse HTML Result for the Child Text of a Tag ................................................................................ 164
Parse HTML Result for HTTP Header Value .................................................................................... 165
Parse HTML Result for the Value of an Attribute .............................................................................. 165
Parse HTML Result for DevTest Tag ................................................................................................ 166
Choose Random HTML Attribute ...................................................................................................... 166
Parse HTML into List of Attributes .................................................................................................... 167
Parse HTTP Header Cookies ............................................................................................................ 168
Dynamic Form Filter .......................................................................................................................... 168
Parse HTML Result by Searching Tag Attribute Values ................................................................... 169
Inject HTTP Header .......................................................................................................................... 170
XML Filters .............................................................................................................................................. 171
Parse Text from XML ........................................................................................................................ 171
Read Attribute from XML Tag ........................................................................................................... 173
Parse XML Result for DevTest Tag .................................................................................................. 175
Choose Random XML Attribute ........................................................................................................ 175
XML XPath Filter ............................................................................................................................... 175
JSON Filters ............................................................................................................................................ 176
JSON Path Filter ............................................................................................................................... 176
Java Filters .............................................................................................................................................. 178
Java Override Last Response Property Filter ................................................................................... 179
Java Store Step Response Filter ...................................................................................................... 179
Java Save Property Value to File Filter ............................................................................................. 180
VSE Filters .............................................................................................................................................. 180
Data Protocol Filter ........................................................................................................................... 180
CAI Filters ................................................................................................................................................ 181
DevTest Integration Support for CA CAI ........................................................................................... 181

Reference 9
DevTest Integration Support for webMethods Integration Server ..................................................... 182
Copybook Filters ..................................................................................................................................... 182
Copybook Filter ................................................................................................................................. 182
Metrics Descriptions ................................................................................ 184DevTest Whole Test Metrics ................................................................................................................... 184
DevTest Test Event Metrics .................................................................................................................... 185
SNMP Metrics ......................................................................................................................................... 186
JMX Metrics ............................................................................................................................................. 187
Enable JMX Metrics for Tomcat ........................................................................................................ 189
TIBCO Hawk Metrics ............................................................................................................................... 190
Windows Perfmon Metrics ....................................................................................................................... 191
UNIX Metrics Via SSH ............................................................................................................................. 193
Property Descriptions .............................................................................. 195DevTest Property File (lisa.properties) .................................................................................................... 195
Enterprise Dashboard Properties ...................................................................................................... 196
Comma-Separated List of Paths for Javadoc and Source Code ...................................................... 196
System Properties ............................................................................................................................. 197
Server Properties .............................................................................................................................. 197
OS X Properties ................................................................................................................................ 198
Update Notifications .......................................................................................................................... 198
Basic Defaults ................................................................................................................................... 198
HTTP Header Keys Properties .......................................................................................................... 200
HTTP Field Editor Properties ............................................................................................................ 200
Test Case Execution Parameters ..................................................................................................... 201
TestEvent Handling Customizations ................................................................................................. 202
Test Manager/Editor Properties ........................................................................................................ 203
J2EE Server Parameters .................................................................................................................. 204
Native Browser Information to Use for Internal Rendering ................................................................ 205
Test Manager/Monitor Properties ...................................................................................................... 206
Built-In String-Generator Patterns ..................................................................................................... 206
JMX Information ................................................................................................................................ 206
Test Manager/Interactive Test Run Properties ................................................................................. 208
External Command Shells ................................................................................................................. 208
Testing Parameters ........................................................................................................................... 208
Properties for Use by StdSchedulerFactory to Create a Quartz Scheduler Instance ....................... 208
VSE Properties .................................................................................................................................. 210
Network Port Properties .................................................................................................................... 218

Reference 10
CA Continuous Application Insight Properties .................................................................................. 219
Database Properties ......................................................................................................................... 223
Mainframe Properties ........................................................................................................................ 225
Selenium Integration Properties ........................................................................................................ 226
VSEasy Properties ............................................................................................................................ 227
Solr Properties .................................................................................................................................. 228
CAI Stateful Baseline Parameterization ............................................................................................ 228
CAI Shelve Frames ........................................................................................................................... 228
CA Agile Central Integration Properties ............................................................................................ 228
Custom Property Files ............................................................................................................................. 229
Local Properties File ......................................................................................................................... 229
Autoconnection Properties ....................................................................................................... 230
License Properties ................................................................................................................... 230
VSE Properties ......................................................................................................................... 231
Enterprise Dashboard Properties ............................................................................................. 236
Interconnectivity Properties ...................................................................................................... 236
License Properties if Using an HTTP Proxy Server ................................................................. 237
SDK Properties ........................................................................................................................ 238
SSL Properties ......................................................................................................................... 238
HTTP Authorization Properties ................................................................................................ 239
Kerberos Authentication Properties ......................................................................................... 240
HTTP Proxy Server Properties ................................................................................................. 240
XML Serialization Settings ....................................................................................................... 241
Workstation Management Properties ....................................................................................... 241
IP Spoofing ............................................................................................................................... 242
Quick Start Recent Items Properties ........................................................................................ 242
lisa-invoke Properties ............................................................................................................... 242
Server Host Name Properties .................................................................................................. 243
DevTest to DevTest Communication Encryption Properties .................................................... 243
IBM WebSphere MQ Properties ............................................................................................... 244
JMS Properties ......................................................................................................................... 244
Miscellaneous Properties ......................................................................................................... 244
User Session Lifetime Properties ............................................................................................. 247
Mobile Properties ..................................................................................................................... 248
Site Properties File ............................................................................................................................ 248
DevTest Enterprise Dashboard Properties .............................................................................. 249
Database Properties ................................................................................................................ 249
Oracle Properties ..................................................................................................................... 250
MS SQL Server Properties ....................................................................................................... 250
DB2 Properties ......................................................................................................................... 251
MySQL Properties .................................................................................................................... 251
Derby Properties ...................................................................................................................... 251

Reference 11
DCM Settings ........................................................................................................................... 252
logging.properties .............................................................................................................................. 252
Enterprise Dashboard Properties (dradis.properties) ........................................................................ 258
Alternative database connection string templates .................................................................... 258
Enable HTTP/S and Set Up the Web Server SSL Keystore .................................................... 259
REST Invoke API .................................................................................... 260Explore the REST Invoke API from the Web Interface ............................................................................ 260
Change the Execution Mode Using the REST Invoke API ...................................................................... 261
Create a Virtual Service from R/R Pairs Using the REST Invoke API ..................................................... 262
Request/Response Pairs .................................................................................................................. 262
Configuring How the Virtual Service Is Created and Deployed ......................................................... 263
Using a serviceProperties.xml File ........................................................................................... 263
Structure of serviceProperties.xml ........................................................................................... 263
Sample serviceProperties.xml File for Creating HTTP Virtual Service (Without SSL) ............. 265
Virtual Recording Session (VRS) File ...................................................................................... 265
Test Step Descriptions ............................................................................ 266Standard Options in Test Steps .............................................................................................................. 266
Abort the Test .................................................................................................................................... 266
End the Test ...................................................................................................................................... 267
Fail the Test ...................................................................................................................................... 267
Web-Web Services Steps ....................................................................................................................... 267
HTTP-HTML Request Step ............................................................................................................... 267
URL Transaction Info Tab ........................................................................................................ 268
HTTP Headers Tab .................................................................................................................. 271
Response Tab .......................................................................................................................... 271
SSL Tab ................................................................................................................................... 271
REST Step ........................................................................................................................................ 275
JSON Content .......................................................................................................................... 276
Web Service Execution (XML) Step .................................................................................................. 276
Connection Tab ........................................................................................................................ 277
Basic Configuration .................................................................................................................. 277
Web Service Execution Tab ..................................................................................................... 279
Design Time Execution ............................................................................................................ 288
Advanced Settings ................................................................................................................... 297
Security Example ..................................................................................................................... 305
WSDL Validation ............................................................................................................................... 313
Base64 Encoder ................................................................................................................................ 314
Multipart MIME Step .......................................................................................................................... 315

Reference 12
SAML Assertion Query ...................................................................................................................... 316
Connection ............................................................................................................................... 318
Subject ..................................................................................................................................... 319
Response (deprecated) ............................................................................................................ 319
Query ....................................................................................................................................... 320
Java-J2EE Steps ..................................................................................................................................... 321
Dynamic Java Execution ................................................................................................................... 321
RMI Server Execution ....................................................................................................................... 324
Enterprise JavaBean Execution ........................................................................................................ 328
Example ................................................................................................................................... 328
Connecting to WebSphere with DevTest Solutions using SIBC .............................................. 331
Other Transaction Steps ......................................................................................................................... 332
SQL Database Execution (JDBC) ..................................................................................................... 332
SQL Database Execution (JDBC with Asset) .................................................................................... 335
CORBA Execution ............................................................................................................................. 338
Utilities Steps ........................................................................................................................................... 338
Save Property as Last Response ...................................................................................................... 339
Output Log Message ......................................................................................................................... 339
Write to Delimited File ....................................................................................................................... 339
Read Properties from a File .............................................................................................................. 341
Do-Nothing Step ................................................................................................................................ 342
Parse Text as Response ................................................................................................................... 342
Audit Step .......................................................................................................................................... 342
Start Monitoring Mode .............................................................................................................. 343
Apply Audit Document Mode .................................................................................................... 343
Base64 Encoder Step ....................................................................................................................... 343
Checksum Step ................................................................................................................................. 344
Convert XML to Element Object ........................................................................................................ 344
Compare Strings for Response Lookup ............................................................................................ 346
Compare Strings for Next Step Lookup ............................................................................................ 348
Send Email ........................................................................................................................................ 349
External-Subprocess Steps ..................................................................................................................... 350
Execute External Command ............................................................................................................. 351
File System Snapshot ....................................................................................................................... 353
Execute Subprocess ......................................................................................................................... 353
Execute JUnit Test Case-Suite ......................................................................................................... 354
Read a File (Disk URL or Classpath) ................................................................................................ 355
External - FTP Step ........................................................................................................................... 356
JMS Messaging Steps ............................................................................................................................. 357
JMS Messaging (JNDI) ..................................................................................................................... 357
Base Tab .................................................................................................................................. 359
Selector Query Tab .................................................................................................................. 363

Reference 13
Send Message Data Tab ......................................................................................................... 364
Response Message Tab .......................................................................................................... 364
JMS Messaging - Message Consumer ............................................................................................. 365
JMS Send Receive Step ................................................................................................................... 369
Send and Receive .................................................................................................................... 370
JMS Message .......................................................................................................................... 370
Test the JMS Send Receive Step ............................................................................................ 371
Monitor and Close Cached Asset Instances ............................................................................ 372
Tutorial - Send and Receive a JMS Message ................................................................................... 373
Step 1 - Create JMS and JNDI Assets ..................................................................................... 373
Step 2 - Configure the JMS Send Receive Step ...................................................................... 373
Step 3 - Examine JMS and JNDI Assets .................................................................................. 374
Step 4 - Test the JMS Send Receive Step .............................................................................. 375
BEA Steps ............................................................................................................................................... 375
Message Consumer .......................................................................................................................... 375
Read a File ........................................................................................................................................ 375
Web Service Execution (XML) .......................................................................................................... 375
FTP Step ........................................................................................................................................... 376
WebLogic JMS (JNDI) ....................................................................................................................... 376
Base Tab .................................................................................................................................. 377
Selector Query Tab .................................................................................................................. 380
Send Message Data Tab ......................................................................................................... 381
Response Message Tab .......................................................................................................... 381
Sun JCAPS Steps ................................................................................................................................... 381
JCAPS Messaging (Native) ............................................................................................................... 382
Base Tab .................................................................................................................................. 383
JCAPS Messaging (JNDI) ................................................................................................................. 384
Oracle Steps ............................................................................................................................................ 385
Oracle OC4J (JNDI) .......................................................................................................................... 385
TIBCO Steps ........................................................................................................................................... 386
TIBCO Rendezvous Messaging ........................................................................................................ 386
Base Tab .................................................................................................................................. 387
Send Message Data ................................................................................................................. 390
Response Message Tab .......................................................................................................... 390
TIBCO EMS Messaging .................................................................................................................... 391
TIBCO Direct JMS ............................................................................................................................. 391
Sonic Steps ............................................................................................................................................. 392
SonicMQ Messaging (Native) ........................................................................................................... 392
SonicMQ Messaging (JNDI) .............................................................................................................. 393
webMethods Steps .................................................................................................................................. 393
webMethods Broker .......................................................................................................................... 394
Base Tab .................................................................................................................................. 395

Reference 14
Send Message Data Tab ......................................................................................................... 398
Response Message Tab .......................................................................................................... 398
Default Step Names ................................................................................................................. 398
webMethods Integration Server Services .......................................................................................... 398
Base Tab Server Connection Info ............................................................................................ 398
Pipeline Input Tab .................................................................................................................... 401
Pipeline Output Tab ................................................................................................................. 402
Default Step Names ................................................................................................................. 402
IBM Steps ................................................................................................................................................ 403
IBM WebSphere MQ Step ................................................................................................................. 403
IBM WebSphere MQ Base Tab ................................................................................................ 404
IBM MQ Native Send Receive Step .................................................................................................. 408
IBM MQ Native Put and Get ..................................................................................................... 409
IBM MQ Native RFH2 Header .................................................................................................. 410
Test the IBM MQ Native Send Receive Step ........................................................................... 410
Monitor and Close Cached Asset Instances ............................................................................ 411
RabbitMQ Steps ...................................................................................................................................... 412
RabbitMQ Send Receive Step .......................................................................................................... 412
Send and Receive .................................................................................................................... 413
Message Properties ................................................................................................................. 413
Message Contents ................................................................................................................... 414
Correlation Schemes ................................................................................................................ 414
Test the RabbitMQ Send Receive Step ................................................................................... 415
Monitor and Close Cached Asset Instances ............................................................................ 415
SAP Steps ............................................................................................................................................... 416
SAP RFC Execution .......................................................................................................................... 416
SAP IDoc Sender .............................................................................................................................. 419
SAP IDoc Status Retriever ................................................................................................................ 419
Selenium Integration Steps ..................................................................................................................... 421
Create and Export a Selenium Builder Recording ............................................................................ 422
Import a Selenium Builder JSON into CA Application Test ............................................................... 423
Install the CA Application Test for Selenium Builder 1.0 Plugin ............................................... 425
Edit Selenium Test Steps Within CA Application Test ............................................................. 426
Export a Test Case with Selenium Test Steps to a JSON Script ...................................................... 428
Virtual Service Environment Steps .......................................................................................................... 429
CAI Steps ................................................................................................................................................ 429
Execute Transaction Frame .............................................................................................................. 429
Mobile Steps ............................................................................................................................................ 432
Modify Mobile Test Steps .................................................................................................................. 432
Edit XPath Expressions in Mobile Tests .................................................................................. 435
Filters and Assertions in Mobile Tests ..................................................................................... 437
Image Options in Mobile Tests ................................................................................................. 439

Reference 15
Validate External Links in Mobile Tests ................................................................................... 440
Swipe Table Gesture ................................................................................................................ 441
Custom Extension Steps ......................................................................................................................... 443
Custom Test Step Execution ............................................................................................................. 444
Java Script Step (deprecated) ........................................................................................................... 444
Execute Script (JSR-223) Step ......................................................................................................... 445
Opaque Data Listener Step ............................................................................................................... 447
DevTest Solutions - 9.5
25-Jul-2016 16/448
ReferenceThis section provides detailed descriptions of elements that are commonly used in DevTest Solutions.
This section also provides an overview of the REST Invoke API. The overview includes a link to the full API documentation.
Assertion Descriptions (see page 17)Asset Descriptions (see page 62)Companion Descriptions (see page 87)Correlation Schemes (see page 109)Data Set Descriptions (see page 112)Event Descriptions (see page 136)Filter Descriptions (see page 142)Metrics Descriptions (see page 184)Property Descriptions (see page 195)REST Invoke API (see page 260)Test Step Descriptions (see page 266)

DevTest Solutions - 9.5
25-Jul-2016 17/448
Assertion DescriptionsAn is an element that runs after a step and all its filters have run.assertion
This section describes the following assertions:HTTP Assertions (see page 17)Database Assertions (see page 24)XML Assertions (see page 26)JSON Assertions (see page 37)Virtual Service Environment Assertion (see page 42)Other Assertions (see page 43)Mobile Testing Assertions (see page 57)
Regular expressions are used for comparison purposes in many assertions. For more information about regular expressions, see .Regular Expressions (http://psoug.org/reference/regexp.html)
HTTP AssertionsThe following assertions are available in the HTTP assertions list for any test step:
Highlight HTML Content for Comparison (see page 17)Check HTML for Properties in Page (see page 20)Ensure HTTP Header Contains Expression (see page 22)Check HTTP Response Code (see page 22)Simple Web Assertion (see page 23)Check Links on Web Responses (see page 23)
Highlight HTML Content for ComparisonThe Highlight HTML Content for Comparison assertion lets you base a comparison on the contents of an HTML page. This assertion uses the "paint the screen" technique that is designed to work with HTML pages. For example, if there is a large HTML document, then you can identify the data before and after the "content of interest". Then, you simply identify what to compare the "content of interest" against (typically an expected value that is supplied in a data set).
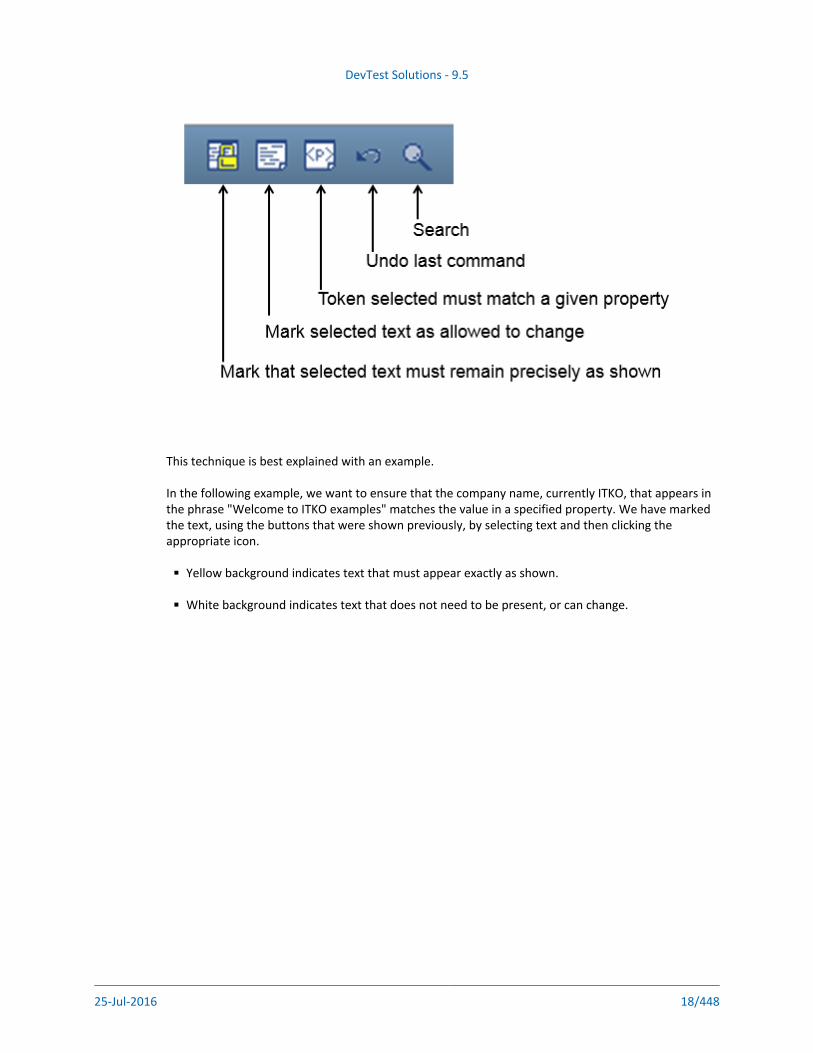
The text is marked using the icons at the bottom of the editor:
DevTest Solutions - 9.5
25-Jul-2016 18/448
This technique is best explained with an example.
In the following example, we want to ensure that the company name, currently ITKO, that appears in the phrase "Welcome to ITKO examples" matches the value in a specified property. We have marked the text, using the buttons that were shown previously, by selecting text and then clicking the appropriate icon.
Yellow background indicates text that must appear exactly as shown.
White background indicates text that does not need to be present, or can change.

DevTest Solutions - 9.5
25-Jul-2016 19/448
Red background identifies the text that must match the property that was entered into the dialog.
HTML Content for Comparison assertion, Select Property dialog
This screen shows the HTML that is rendered in a browser in the top panel, and the actual HTML text in the bottom panel. We want to make the phrases "Welcome to" and "examples" required. We have
set the boundaries around those phrases, and clicked the icon. Then we selected the Mustcompany name text, "ITKO", inside the highlighted content, and clicked the icon. We Propertyentered the property name correctCompany into the dialog. This property is compared to the text that appears between the two bounding phrases. The company name text has been replaced with the name of the property.
To execute an assertion, click .Run Assertion
When this assertion is run, the value of the property correctCompany is inserted between the phrases "Welcome to" and "examples". The resulting phrase is compared to the corresponding phrase in the HTML response. The phrase "Welcome to correctCompany examples" can change its location in the HTML and it is still found.

DevTest Solutions - 9.5
25-Jul-2016 20/448
Check HTML for Properties in PageUse the Check HTML for Properties in Page assertion when the web page contains property data that might be used the assertion can use. The property data is made available for assertion by parsing the web page for the following items:
Meta tags
Title tags
Hidden form fields
Other tags that the product can automatically parse, including <lisaprop> tags and the DevTest Integration API.
Here is a sample of the available properties table.

DevTest Solutions - 9.5
25-Jul-2016 21/448
Check HTML for Properties in Page window listing some properties referenced in page
Complete the following fields:
NameDefines the name of the assertion.
IfSpecifies the behavior of the assertion from the drop-down list.
thenSpecifies the step to which to redirect if the assertion fires.
LogIdentifies event text to print if the assertion fires.

DevTest Solutions - 9.5
25-Jul-2016 22/448
Click to execute the assertion.Run Assertion
Note: You may be prompted to install the Parse HTML for Tag filter.
Ensure HTTP Header Contains ExpressionThe Ensure HTTP Header Contains Expression assertion lets you check that a specific HTTP result header contains a field that matches a specified regular expression.
Complete the following fields:
NameDefines the name of the assertion.
IfSpecifies the behavior of the assertion from the drop-down list.
thenSpecifies the step to which to redirect if the assertion fires.
LogIdentifies event text to print if the assertion fires.
Header FieldThe name of the header field.
RegExpressionThe regular expression that must appear in the header field.
Click to execute the assertion.Run Assertion
Check HTTP Response CodeThe Check HTTP Response Code assertion lets you verify that the HTTP response code matches a specified regular expression.
Complete the following fields:
NameDefines the name of the assertion.
IfSpecifies the behavior of the assertion from the drop-down list.

DevTest Solutions - 9.5
25-Jul-2016 23/448
thenSpecifies the step to which to redirect if the assertion fires.
LogIdentifies event text to print if the assertion fires.
RegExpressionThe regular expression that must appear in the response code. For example, to verify that the HTTP response code is in the 400-499 range, set the to 4\d\d.RegExpression
Click to execute the assertion.Run Assertion
Simple Web AssertionThe Simple Web assertion reads the return code from the web application. If the application returns code 404 (page not found), 500 (server error), or any other error, the assertion returns true.
The test case in the project has this type of assertion.multi-tier-combo examples
Complete the following fields:
NameDefines the name of the assertion.
IfSpecifies the behavior of the assertion from the drop-down list.
thenSpecifies the step to which to redirect if the assertion fires.
LogIdentifies event text to print if the assertion fires.
Click to execute the assertion.Run Assertion
Check Links on Web ResponsesThe Check Links on Web Responses assertion verifies that every link on the returned web page is valid and does not return an HTTP error like a 404 error, or others. This assertion is commonly used to ensure that the links are working properly across the application and there are no inactive links on the page.
Complete the following fields:
NameDefines the name of the assertion.

DevTest Solutions - 9.5
25-Jul-2016 24/448
IfSpecifies the behavior of the assertion from the drop-down list.
thenSpecifies the step to which to redirect if the assertion fires.
LogIdentifies event text to print if the assertion fires.
The following criteria can be checked for the links:
Check only links in the same domainChecks only links in the current domain of the returned web page.
Include query stringsIf any query strings are present on the returned web page, then they are checked.
Include anchors (<_a>)Any anchor links in the current web page are checked.
Include imagesAll the images on the returned web page are checked.
Include assets (<_link> & <_script>)The current web page is checked for script and links.
Skip Links Matching RegExEnter a RegEx expression for any links you want to skip.
Database AssertionsThe following assertions are available in the Database assertions list for any test step:
Ensure Result Set Size (see page 24)Ensure Result Set Contains Expression (see page 25)
Ensure Result Set SizeThe Ensure Result Set Size assertion counts the rows in a result set and verifies that the size falls between an upper and lower value.
An example of this assertion could be verifying that the number of rows in an HTML table matches a specified expected value from a data set.
Complete the following fields:
NameDefines the name of the assertion.

DevTest Solutions - 9.5
25-Jul-2016 25/448
IfSpecifies the behavior of the assertion from the drop-down list.
thenSpecifies the step to which to redirect if the assertion fires.
LogIdentifies event text to print if the assertion fires.
Result set has warningsIf selected, the database could return warnings in the result set. To determine whether your database supports warnings in the result set, consult your system administrator.
Row Count >=The minimum number of rows in the result set. -1 indicates no minimum.
Row Count <_=The maximum number of rows in the result set. -1 indicates no maximum.
Click to execute the assertion.Run Assertion
For example, to ensure that a Database Assertion step returns one, and only one, row, set the Row field to "1" and the field to "1".Count >= Row Count <=
Ensure Result Set Contains ExpressionThe Ensure Result Set Contains Expression assertion verifies that a supplied expression matches at least one value in a specific column in a result set.
Complete the following fields:
NameDefines the name of the assertion.
IfSpecifies the behavior of the assertion from the drop-down list.
thenSpecifies the step to which to redirect if the assertion fires.
LogIdentifies event text to print if the assertion fires.
ColumnDefines a column that contains the text to verify. This value can be a column name or an index.
Regular ExpressionThe regular expression to match in the column.
Click to execute the assertionRun Assertion
For example, to verify that at least one row that a query returned has a login value that starts with

DevTest Solutions - 9.5
25-Jul-2016 26/448
For example, to verify that at least one row that a query returned has a login value that starts with "wp", set the field to "login" and the field to "wp.*".Column Regular Expression
XML AssertionsThe following assertions are available in the XML assertions list for any test step:
Highlight Text for Comparison (see page 26)Ensure Result Contains String (see page 28)Ensure Step Response Time (see page 29)Graphical XML Side-by-Side Comparison (see page 29)XML XPath Assertion (see page 34)Ensure XML Validation (see page 35)
Highlight Text for ComparisonThe Highlight Text Content for Comparison assertion uses the "paint the screen" technique that is designed to work with HTML pages. For example, if there is a large HTML document, then you identify the data before and after the content of interest. Then, you identify what to compare the content of interest against (usually this content is an expected value that is supplied in a data set).
Mark the text with the icons at the bottom of the editor:
In the following example, we want to:
Ensure that the buffer contains specific files
Compare the size of one of the files to the value of a property

DevTest Solutions - 9.5
25-Jul-2016 27/448
We have marked the text using the three icons that were shown in the previous graphic, by selecting text, and then clicking the appropriate icon.
Yellow background indicates text that must appear exactly as shown.
White background indicates text that does not need to be present, or can change.
Red background identifies the text that must match the property that is entered into the dialog.
Highlight Text Content for Comparison assertion window with Select Property dialog
The set of tokens that is shown in the previous graphic can be read this way:
The buffer must start with the phrase in yellow: "Snapshot of: C:\Lisa\".

DevTest Solutions - 9.5
25-Jul-2016 28/448
A number of files may or may not be in the buffer in the next token. Because the next token is an "Any" token, the variance is immaterial.
The file "i4jinst.dll" and "rw" attributes must appear.The red filesize means that the value associated with the property key filesize is swapped into the expression, and then the comparison made.
The text "06/08/2011" must appear.
The file "install.prop" must appear.
The buffer can have any amount of content afterward.
After you have finished the markup, enter the following parameters:
NameDefines the name of the assertion.
IfSpecifies the behavior of the assertion from the drop-down list.
thenSpecifies the step to which to redirect if the assertion fires.
LogIdentifies event text to print if the assertion fires.
Click to execute the assertion.Run Assertion
Note: "Must" blocks must always appear on both sides of "Property" blocks.
Ensure Result Contains StringThe Ensure Result Contains String assertion lets you search the response (as text) for a string.
Complete the following fields:
NameDefines the name of the assertion.
IfSpecifies the behavior of the assertion from the drop-down list.
thenSpecifies the step to which to redirect if the assertion fires.

DevTest Solutions - 9.5
25-Jul-2016 29/448
LogIdentifies event text to print if the assertion fires.
Contains StringThe string to search for in the step result - this string can contain a property. To use a property, put the property name in double braces. An example is {{color}}, where the color property is defined and has a value.
Ensure Step Response TimeThe Ensure Step Response Time assertion lets you define the minimum and maximum bounds on the response time and assert that the response time is in those bounds.
Complete the following fields:
NameDefines the name of the assertion.
IfSpecifies the behavior of the assertion from the drop-down list.
thenSpecifies the step to which to redirect if the assertion fires.
LogIdentifies event text to print if the assertion fires.
Time must be at least (millis)Enter the lower bound in milliseconds.
Time must not be more than (millis)Enter the upper bound in milliseconds. This value is ignored if set to -1.
Note: Parameters can contain properties.
Graphical XML Side-by-Side ComparisonThe Graphical XML Side-by-Side Comparison assertion lets you compare a test XML value received from a test with a control XML value. If the responses are the same or different, the assertion can return true. This assertion provides the flexibility to compare XML documents at various steps in a business process to ensure they match expected criteria. This approach is known as "exclusive" testing, where an entire response is compared except for a few values that are known to change.
The assertion editor works by comparing a left and right side of XML to each other. The left side is known as Control Content. The right side is known as Test Content. For example, Control Content is the expected XML returned from a web service in the application under test, while the Test Content is actual content. By default, Test Content is loaded from the last response of the test step that is

DevTest Solutions - 9.5
25-Jul-2016 30/448
is actual content. By default, Test Content is loaded from the last response of the test step that is associated with the assertion, signified by the empty property key. Otherwise, any valid property key can be used and the Test Content is loaded from it.
Alternatively, you can complete one of the following actions in test case authoring mode so that a quick graphical diff can be performed:
Load XML from a file
Enter XML manually for Control and Test Content
To perform the diff, click the green arrow.
Graphical XML Side-by-Side Comparison assertion window before diff is performed
After a diff is executed, the results appear in the visualizer in the Diff Viewer tab in the assertion editor.
Graphical XML Side-by-Side Comparison assertion window after diff is performed
Output During ExecutionWhen an assertion is executed, DevTest logs the diff results as test events.

DevTest Solutions - 9.5
25-Jul-2016 31/448
An Info message EventID containing the XML diff results is always logged.
If the assertion fires, an Assertion fired EventID containing the XML diff results is logged.
The diff results are reported in a format resembling the original UNIX diff utility. An example of a text diff report is:
Assert [Assert1] fired false of type Graphical XML Diff AssertionXML is [Different]=====1,2[ELEMENT_NAME_CHANGED]1,2<! <test2><! </test2>--->! <test>>! </test>
Each difference is displayed with a heading of the format:
<First Start Line>, <First End Line>'['<Diff Type>']'<Second Start Line>,<Second End Line>
Then the difference in the first content is displayed, followed by the separator '---', followed by the difference in the second content.
The + character indicates addition, the - character indicates a deletion, and the ! character indicates a change. When these characters are present, they indicate that an actual change occurred on the line of content (instead of to a context line).
XML Compare OptionsThe following comparison options are available for use by the diff engine:
General
Case sensitiveWhether case sensitivity is used during the comparison (enabled by default).
Whitespace
Trim whitespaceDuring a comparison, all leading and trailing whitespace is removed from element text and attribute values (enabled by default).
Collapse whitespaceIn addition to trimming whitespace, any sequence of one or more whitespace characters inside text is converted to a single space character.
Normalize whitespaceAny sequence of one or more whitespace characters is converted to a single space character.
Ignore all whitespaceAll whitespace is ignored during the comparison.

DevTest Solutions - 9.5
25-Jul-2016 32/448
Namespaces
Ignore namespacesThe namespace value of an element or attribute is ignored.
Ignore namespace prefixesThe namespace prefix of an element or attribute is ignored (enabled by default).
Ordering
Ignore child element orderingIgnore the order of child elements in the XML document.
Ignore attribute orderingIgnore the order of attributes in the XML document (enabled by default).
Node Types
Ignore element textIgnore all element text.
Ignore attribute valuesCompare attribute names but ignore attribute values.
Ignore attributesIgnore attribute names and values.
Ignored NodesIgnored nodes are created from a list of XPaths that are run against the left and right documents. Each evaluated XPath that returns a node set is aggregated. When the diff occurs, any node that is found in the aggregate set is ignored.
Ignored node XPaths can be any arbitrary query that returns a node set. For example, the XPath //* excludes all nodes in an XML document. excludes the first text node child of the /example/text()
element in an XML document. is the XPath to ignore the example /example/@myattr myattr attribute, including the attribute text value, belonging to the element in an XML document.example

DevTest Solutions - 9.5
25-Jul-2016 33/448
Graphical XML Side-by-Side Comparison assertion window Ignored Nodes tab
A right-click menu item also lets a node be selected directly inside an XML document and its XPath is added to the list.Ignored Nodes

DevTest Solutions - 9.5
25-Jul-2016 34/448
Graphical XML Side-by-Side Comparison assertion window Ignored Nodes tab,
XML XPath AssertionThe XML XPath assertion lets you use an XPath query that runs on the response. When this assertion is selected, the last response is loaded into the content panel.
Think of XPath as the "SQL for XML." XPath is a powerful query language that makes parsing the XML simple. XPath assertions are useful for validating a web service response in a more sophisticated way than simply parsing the entire result for a specific string. For example, you can ensure the second and third order item contains and the value of those line items is greater than ten.price
You can view the response as an XML document or as a DOM Tree. However, you can only make the XPath selection from the DOM Tree view.
You can construct the XPath query in the following ways:
Manually enter the XPath expression in the XPath Query text box.
Select an element from the DOM tree and let DevTest construct the XPath expression.
Select an element from the DOM tree, and then edit the XPath that DevTest constructs. For example, you can modify it to use a property, or a counter data set.
Complete the following fields:
NameDefines the name of the assertion.

DevTest Solutions - 9.5
25-Jul-2016 35/448
IfSpecifies the behavior of the assertion from the drop-down list.
thenSpecifies the step to which to redirect if the assertion fires.
LogIdentifies event text to print if the assertion fires.
Now construct the XPath query using one of the methods that was described previously.
After an XPath query has been constructed, test it by clicking the button on the top of Run Assertionthe panel. The results of the query are displayed in the panel.Query Results
The previous example uses the fourth occurrence of the <wsdl:part> tag.
A common use case is to select an XPath node in a web service result and compare the node to a text value. You can then assert that a response contains the expected value. For this common use case, you can add an equality operator to the end of the initial expression that is provided. For example, if we select the new password that is returned in the response (BobPass):
DevTest builds the following XPath expression:
string(/env:Envelope/env:Body/ns2:updatePasswordResponse/[name()='return']/[name()='pwd'])=
Adding ='NewPassword' (as in the following example) compares the string of the result to the value of the property that is used to set the new password. If the equality test does not match, the assertion fails.
string(/env:Envelope/env:Body/ns2:updatePasswordResponse/[name()='return']/[name()='pwd'])='NewPassword'
This expression checks the web service response, looking for the new password and making sure it matches as expected.
Ensure XML ValidationThe Ensure XML Validation assertion lets you validate an XML document. You can verify whether the XML document is well-formed, you can validate against a Document Type Definition (DTD), or you can validate against one or more schemas. If you have an XML fragment, you can specify to have DevTest add the XML declaration tag. You can also specify that DevTest reports warnings as errors. You enter the XML to validate as a property.
Complete the following fields:
NameDefines the name of the assertion.
IfSpecifies the behavior of the assertion from the drop-down list.

DevTest Solutions - 9.5
25-Jul-2016 36/448
thenSpecifies the step to which to redirect if the assertion fires.
LogIdentifies event text to print if the assertion fires.
SourceThe property that contains the XML. If this field is left blank, the last response is used.
ValidateMultiple validation options can be selected:
Well Formed XMLCheck that XML is well-formed.
DTD ConformanceCheck conformance with a DTD.
Schema(s)Check conformance with one or more schemas.
XML FragmentIf XML is a fragment, an XML declaration is added to the top of the XML fragment.
Treat Warnings As ErrorsWarnings are reported as errors.
Honor All Schema LocationsIf you have multiple imports for the same namespace, this option opens each schema location instead of only the first one.
Click to execute the assertion.Run Assertion
Validation TabYou can run the validation by clicking the button. Any resulting validation errors are Run Validationdisplayed in the . You can use the option buttons to select how Validation Error List Validation Typeto handle the errors:
No Errors AllowedThe validation fails on any error.
Error Message ExpressionsErrors can be marked to be ignored in the validation. If you select this option, you can select the errors to ignore in the .Validation Error List

DevTest Solutions - 9.5
25-Jul-2016 37/448
Schemas Tab
Ensure XML Validation Schemas tab
Enter the information for each schema you want to use in the validation. You can also specify the default schema:
Default Schema URLOptionally, specify the default URL of the schema.
WSDL URLOptionally, specify a URL of a WSDL.
JSON AssertionsThe following assertions are available in the JSON assertions list for any test step:
Ensure Result Equals (see page 37)Ensure Result Contains (see page 39)Ensure JSON Schema (see page 40)
Ensure Result EqualsThe Ensure Result Equals assertion lets you ensure that a JSON Path result is equal to an expected value.
The following graphic shows the editor:

DevTest Solutions - 9.5
25-Jul-2016 38/448
Screen capture of Ensure Result Equals assertion.
Complete the following fields:
NameDefines the name of the assertion.
IfSpecifies the behavior of the assertion from the drop-down list.
thenSpecifies the step to which to redirect if the assertion fires.
LogIdentifies event text to print if the assertion fires.
JSON PathDesignates an expression that consists of a sequence of JSON properties in a JSON document. The
represents a path to a destination JSON property.JSON Path
Expected valueDefines the expected value of the result. Two arrays are considered equal when the JSON Pathorder of the elements in both arrays is equal, because an array is an ordered list.
Run AssertionTo run and execute the assertion, click .Run Assertion

DevTest Solutions - 9.5
25-Jul-2016 39/448
Ignore order of array elementsTwo JSON arrays with the same set of elements but different element order are considered equal in comparison.
If you click and the assertion result is false, the area displays Run Assertion Run Assertion Resultinformation about the failure.
Determining the JSON Path and Expected ValueThe right portion of the assertion editor can help you determine the values of the and JSON Path
fields. First, use one of the following approaches to load the expected JSON:Expected value
From ContentSelect a file that contains the expected JSON.
From URLEnter a URL path to the expected JSON.
From PropertyEnter a property that defines the expected JSON. The default value is the response property for the test case.
After you load the expected JSON, it appears in the , , and columns.Name Type Value
Select a node in the column. The and fields are populated.Name JSON Path Expected value
Note: The expected JSON in the right panel is not persistent. If you save, close, and reopen the test case, the expected JSON no longer appears in the right panel.
Secure PrefixesJSON has a security issue that can be addressed by adding a prefix. The prefix prevents an attacker from hijacking the JSON.
Before this assertion performs the comparison, it removes any prefixes from the JSON content.
Ensure Result ContainsThe Ensure Result Contains assertion lets you ensure that a JSON Path result that is a JSON object or a JSON array contains any or all of the values in a specified list.
Complete the following fields:
NameDefines the name of the assertion.

DevTest Solutions - 9.5
25-Jul-2016 40/448
IfSpecifies the behavior of the assertion from the drop-down list.
thenSpecifies the step to which to redirect if the assertion fires.
LogIdentifies event text to print if the assertion fires.
JSON PathDesignates an expression that consists of a sequence of JSON properties in a JSON document. The
represents a path to a destination JSON property.JSON Path
or Contains all expected values Contains any expected valuesDefines the parameters with which to match the and the . If you select JSON Path Expected valuethe check box, the result must include all values in the Contains all expected values JSON Path
list to pass the assertion. If you select the check Expected value Contains any expected valuesbox, the result must include at least one value in the list to pass the JSON Path Expected valueassertion.
Expected valueDefines a list of values that the result must include. To stop editing values in the JSON Path
field, hold down and click . For an OS X system, hold down Expected value Cntl Enter Commandand click .Enter
Ignore order of array elementsTwo JSON arrays with the same set of elements but different element order are considered equal in comparison.
Run AssertionTo run and execute the filter, click .Run Assertion
Secure PrefixesJSON has a security issue that can be addressed by adding a prefix. The prefix prevents an attacker from hijacking the JSON.
Before this assertion performs the comparison, it removes any prefixes from the JSON content.
Ensure JSON SchemaThe Ensure JSON Schema assertion lets you ensure that a JSON schema is valid and that the payload of a JSON response is valid for that schema.
Complete the following fields:
NameDefines the name of the assertion.
IfSpecifies the behavior of the assertion from the drop-down list.

DevTest Solutions - 9.5
25-Jul-2016 41/448
thenSpecifies the step to which to redirect if the assertion fires.
LogIdentifies event text to print if the assertion fires.
Validate Payload Against SchemaIndicates whether to validate both the JSON schema and the payload (the response). When cleared, only the schema is validated.
selectedDefault:
Select Contents TabThe tab lets you select the origin of the JSON schema and the payload, and inspect Select Contentstheir contents.
Complete the following fields:
SchemaIndicates the source of the JSON schema for this assertion. From the drop-down list, select from:
From Content: Loads the JSON schema from a flat file on your file system. To select the file, click .Browse File Selection
From URL: Loads the JSON schema from a URL. Enter the URL in the field. To browse URL Path
the file system, click Browse . To reload the URL, click Refresh .
From Property: Loads the JSON schema from a property. To refresh the property value, click
Refresh .
PayloadIndicates the source of the payload, or JSON text. From the drop-down list, select from:
From Content: Loads the JSON schema from a flat file on your file system. To select the file, click .Browse File Selection
From URL: Loads the JSON schema from a URL. Enter the URL in the field. To browse URL Path
the file system, click Browse . To reload the URL, click Refresh .
From Property: Loads the JSON schema from a property. To refresh the property value, click
Refresh .
Settings TabThe Settings tab lets you set advanced options for the Ensure JSON Schema assertion.
Complete the following fields:

DevTest Solutions - 9.5
25-Jul-2016 42/448
Use SubschemaInstructs the application to look for a specific subschema. Enter the subschema in the Subschema
field.Filter
Referencing ModeIndicates the dereferencing mode to use.To dereference all resolved URIs, select . To dereference URIs within the schema, select Canonical
.Inline CanonicalDefault:
Run AssertionTo run and execute the filter, click .Run Assertion
Virtual Service Environment AssertionThe following assertion is available in the Virtual Service Environment assertions list for any test step:
Assert on Execution Mode (see page 42)
Assert on Execution ModeThe Assert on Execution Mode assertion checks the current execution mode to its reference and fires if they match. This assertion is primarily used to control step flow for virtual service models.
Complete the following fields:
NameDefines the name of the assertion.
IfSpecifies the behavior of the assertion from the drop-down list.
thenSpecifies the step to which to redirect if the assertion fires.
LogIdentifies event text to print if the assertion fires.
Execution ModeSelect the execution mode from the available options in the drop-down. For more information about execution modes, see Monitor Virtual Services (https://docops.ca.com/display/DTS95
/Monitor+Virtual+Services) .
Click to execute the assertion.Run Assertion

DevTest Solutions - 9.5
25-Jul-2016 43/448
Other AssertionsThe following assertions are available in the Other assertions list for any test step:
Highlight Text Content for Comparison (see page 43)Ensure Non-Empty Result Assertion (see page 46)Ensure Result Contains String Assertion (see page 47)Ensure Result Contains Expression Assertion (see page 47)Ensure Property Matches Expression Assertion (see page 48)Ensure Step Response Time Assertion (see page 48)Scripted Assertion (see page 48)Ensure Properties Are Equal Assertion (see page 50)Assert on Invocation Exception Assertion (see page 51)File Watcher Assertion (see page 51)Check Content of Collection Object Assertion (see page 52)WS-I Basic Profile 1.1 Assertion (see page 53)Messaging VSE Workflow Assertion (see page 54)Validate SWIFT Message Assertion (see page 54)
Highlight Text Content for ComparisonThe Highlight Text Content for Comparison assertion uses the "paint the screen" technique that was designed to work with HTML pages. For example, if there is a large HTML document, you identify the data before and after the content of interest. Then, you simply identify what to compare the "content of interest" against (typically an expected value that is supplied in a data set).
The text is marked using the icons at the bottom of the editor:

DevTest Solutions - 9.5
25-Jul-2016 44/448
This technique is best explained by using an example.
In the following example, we want to complete the following actions:
Ensure that specific files appear in the buffer
Compare one of the file sizes to the value of a property
The text is marked using the three icons that are shown in the previous graphic, by selecting text and clicking the appropriate icon.
Yellow background indicates text that must appear exactly as shown.
White background indicates text that does not need to be present, or can change.
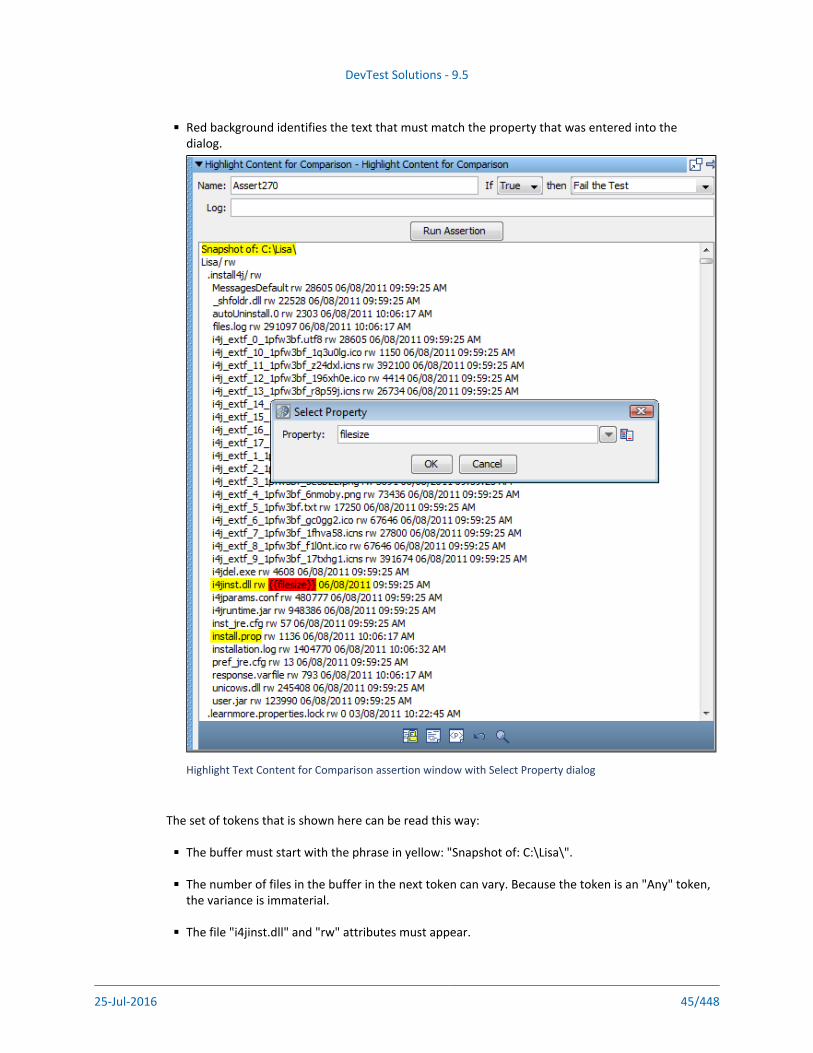
DevTest Solutions - 9.5
25-Jul-2016 45/448
Red background identifies the text that must match the property that was entered into the dialog.
Highlight Text Content for Comparison assertion window with Select Property dialog
The set of tokens that is shown here can be read this way:
The buffer must start with the phrase in yellow: "Snapshot of: C:\Lisa\".
The number of files in the buffer in the next token can vary. Because the token is an "Any" token, the variance is immaterial.
The file "i4jinst.dll" and "rw" attributes must appear.

DevTest Solutions - 9.5
25-Jul-2016 46/448
The red filesize means that the value associated with the property key filesize are swapped into the expression, then the comparison made.
The text "06/08/2011" must appear.
The file "install.prop" must appear.
The buffer can have any amount of content afterward.
After you have finished the markup, enter the following parameters:
NameDefines the name of the assertion.
IfSpecifies the behavior of the assertion from the drop-down list.
thenSpecifies the step to which to redirect if the assertion fires.
LogIdentifies event text to print if the assertion fires.
Click to execute the assertion.Run Assertion
Note: "Must" blocks must always appear on both sides of "Property" blocks.
Ensure Non-Empty Result AssertionThe Ensure Non-Empty Result assertion checks the return value from the step to verify that some value has been returned. If there is no response (timeout) or the return value has a length of 0, the return value is considered empty. When the If field is set to True, this assertion fails the test unless it receives an empty response. When the If field is set to False, this assertion fails the test when it receives an empty response.
If the result is NULL, a Fail event is raised and the assertion's evaluate() method returns. Therefore, the If/then logic of the assertion is never reached.
Complete the following fields:
NameDefines the name of the assertion.
IfSpecifies the behavior of the assertion from the drop-down list.

DevTest Solutions - 9.5
25-Jul-2016 47/448
thenSpecifies the step to which to redirect if the assertion fires.
LogIdentifies event text to print if the assertion fires.
Click to execute the assertion.Run Assertion
No other attributes are required.
Note: Use this assertion carefully, because it does not have any content validation.
Ensure Result Contains String AssertionIf the Ensure Result Contains String assertion finds the value being searched anywhere in the response, the assertion returns true. This assertion is typically used to ensure that the response contains a required value such as a unique ID that was supplied during the request.
For more information, see .Ensure Result Contains String (see page 28)
Ensure Result Contains Expression AssertionThe Ensure Result Contains Expression assertion lets you verify that a specified regular expression occurs somewhere in the result, as text.
Complete the following fields:
NameDefines the name of the assertion.
IfSpecifies the behavior of the assertion from the drop-down list.
thenSpecifies the step to which to redirect if the assertion fires.
LogIdentifies event text to print if the assertion fires.
Regular ExpressionDefines the regular expression for which to search in the step result. For example, to verify that the result contains a number in the 400s, set this parameter to "4/d/d".
Click to execute the assertion.Run Assertion

DevTest Solutions - 9.5
25-Jul-2016 48/448
Ensure Property Matches Expression AssertionThe Ensure Property Matches Expression assertion lets you verify that the current value of a property matches a specified regular expression.
Complete the following fields:
NameDefines the name of the assertion.
IfSpecifies the behavior of the assertion from the drop-down list.
thenSpecifies the step to which to redirect if the assertion fires.
LogIdentifies event text to print if the assertion fires.
Property KeyThe name of the property to be checked. Enter the property name, select from the drop-down list of properties, select an existing string pattern, or create a string pattern.
RegExpressionThe regular expression that must appear in the current value of the property.
Click to execute the assertion.Run Assertion
Ensure Step Response Time AssertionThe Ensure Step Response Time assertion lets you define an upper and lower threshold for application response time. If the performance is either too fast or too slow, the test case can be failed by using this assertion. Sometimes an application that returns a response quickly can be a sign that the transaction was not properly processed.
For more information, see .Ensure Step Response Time (see page 29)
Scripted AssertionThe Scripted Assertion assertion lets you write and run scripts. The result must be a Boolean, or false is returned.
Complete the following fields:
NameDefines the name of the assertion.

DevTest Solutions - 9.5
25-Jul-2016 49/448
IfSpecifies the behavior of the assertion from the drop-down list.
thenSpecifies the step to which to redirect if the assertion fires.
LogIdentifies event text to print if the assertion fires.
Click to execute the assertion.Run Assertion
LanguageDesignates the scripting language to use.Values:
Applescript (for OS X)
Beanshell
Freemarker
Groovy
JavaScript
Velocity
Default: BeanshellTo use additional scripting languages, see Enabling Additional Scripting Languages (https://docops.
.ca.com/display/DTS95/Enabling+Additional+Scripting+Languages)
Copy properties into scopeAllows you to specify which properties to download for use in the step.Values:
Test state and system properties: all properties for the test case and system
Test state properties: properties that provide information about the test case
TestExec and logger only: only the TestExec and logger properties
Default: Test state properties
Enter your script into the script editor on the left.
All the objects available for use in the script editor are listed in the panel on the Available Objectsright. The list includes primitive types of data (strings and numbers) and objects such as EJB response objects that were executed in the test case. Double-click an entry in the Available Objects table to paste that variable name into the editor area.
Click to open a window with the result of the script execution or a description of the errors that Testoccurred.

DevTest Solutions - 9.5
25-Jul-2016 50/448
When you save the test case, the assertion is checked for syntax errors.
Some things to remember:
If you use a property - - in a script, it is substituted for the property value at run {{someprop}}time before the script is executed.
If you need access to a property with a "." in the name, such properties are imported into the script environment replacing "." with "_". So in a script is the same as .{{foo.bar}} foo_bar
You can produce a DevTest log event inside a script step or assertion by using the object. testExecTo produce a DevTest log event, code the following line, as opposed to using the log4j logger. The
method causes an actual DevTest event to be raised. You can see the event in the testExec.log()ITR.
testExec.log("Got here");
Ensure Properties Are Equal AssertionThe Ensure Properties Are Equal assertion lets you compare the values of two properties to ensure that they are same. Typically this assertion is used with a data set and supplied "expected value" to ensure that the application functionality is correct.
Complete the following fields:
NameDefines the name of the assertion.
IfSpecifies the behavior of the assertion from the drop-down list.
thenSpecifies the step to which to redirect if the assertion fires.
LogIdentifies event text to print if the assertion fires.
First PropertyThe first property in the comparison. Enter the property name, select from the drop-down list of properties, select an existing string pattern, or create a string pattern (https://docops.ca.com/display
./DTS95/String+Patterns)
Second PropertyThe second property in the comparison. Enter the property name, select from the drop-down list of properties, select an existing string pattern, or create a string pattern (https://docops.ca.com
./display/DTS95/String+Patterns)
Click to execute the assertion.Run Assertion

DevTest Solutions - 9.5
25-Jul-2016 51/448
Assert on Invocation Exception AssertionThe Assert on Invocation Exception assertion lets you alter the test flow, in regard to the occurrence of a Java exception. The assertion asserts true if a specific Java exception is returned in the response.
Complete the following fields:
NameDefines the name of the assertion.
LogIdentifies event text to print if the assertion fires.
AssertSelect the behavior of the assertion using the option buttons.
ExecuteSelect the step to redirect to if the assertion fires.
ExpressionThe expression to search for in the invocation exception. The expression can be a regular expression. The expression '.*' is common.
File Watcher AssertionThe File Watcher assertion lets you monitor a file for specific content, and react to the presence (or absence) of a specific expression. This assertion runs in the background while your test case is executing.
Complete the following fields:
NameDefines the name of the assertion.
LogIdentifies event text to print if the assertion fires.
The amount of time (in seconds) to delay before checking the file contentsThe number of seconds to wait before checking the file at the beginning of the step that contains this assertion.
The amount of time (in seconds) to wait between checks on the file contentsThe number of seconds to wait between each check.
The time (in seconds) the File Watcher will give up watching for the expressionThe total number of seconds this assertion checks for the expression.
The url of the file to watchThe URL or path to the file being watched.

DevTest Solutions - 9.5
25-Jul-2016 52/448
The expression to watch for in the fileThe regular expression being watched for in the response.
Note: The times are in seconds and must be integers. The times default to 0.
Check Content of Collection Object AssertionThe Check Content of Collection Object assertion lets you make simple assertions on the contents of a collection. This assertion is a useful way to find out if specific tokens are in the collection, with the option of adding some simple constraints. For example, if data that a bank web service returns includes an account list, this assertion can verify whether the account IDs match expected values.
Complete the following fields:
NameDefines the name of the assertion.
IfSpecifies the behavior of the assertion from the drop-down list.
thenSpecifies the step to which to redirect if the assertion fires.
LogIdentifies event text to print if the assertion fires.
Property to Check (blank for whole response)The name of the property holding the object that you want to use in the assertion. Leave this field blank to use the last response. The object must be of type Java Collection or Array.
Field to Check (blank for "toString")Enter the name of a field and DevTest calls its get method.
Tokens To Find (value1, value2)A comma-delimited string of tokens for which to check.
Exact Match OnlyThe token names much match exactly.
Must be in this orderSelect this check box if the tokens must be found in the same order as in the Tokens To Findstring.
Must only contain these tokens (no extra objects)The tokens in the string must be the only tokens found.Tokens To Find
Click to execute the assertion.Run Assertion
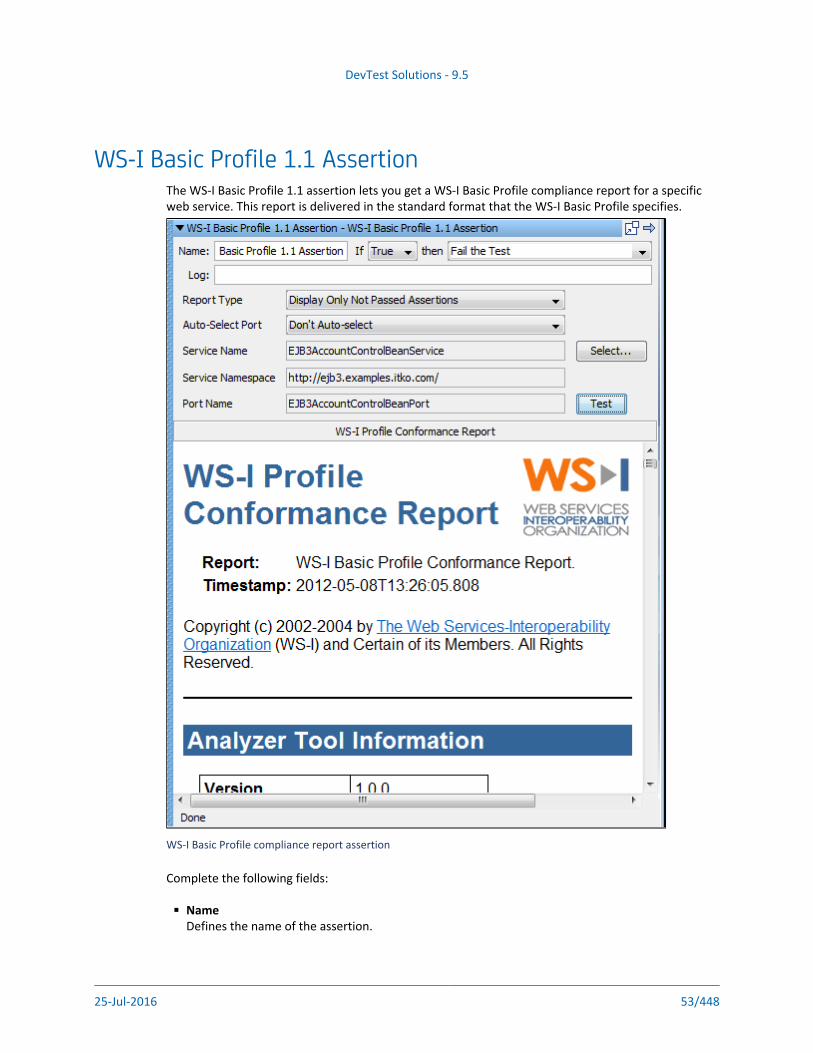
DevTest Solutions - 9.5
25-Jul-2016 53/448
WS-I Basic Profile 1.1 AssertionThe WS-I Basic Profile 1.1 assertion lets you get a WS-I Basic Profile compliance report for a specific web service. This report is delivered in the standard format that the WS-I Basic Profile specifies.
WS-I Basic Profile compliance report assertion
Complete the following fields:
NameDefines the name of the assertion.

DevTest Solutions - 9.5
25-Jul-2016 54/448
LogIdentifies event text to print if the assertion fires.
Report TypeSelect one of the following levels of (WS-I) assertions to include in the report:
Display All Assertions
Display All But Info Assertions
Display Only Failed Assertions
Display Only Not Passed Assertions
Auto-Select PortDetermine how the port is selected - a specific port or "Don't Auto-select".
Service NameSelect a service name from the list. This name can auto-populate from the step.
Service NamespaceIs automatically populated based on the service name.
Port NameIs automatically populated based on the service name.
Click to run the assertion.Test
Messaging VSE Workflow AssertionThe Messaging VSE Workflow Assertion assertion is automatically added from the VSE recorder. The assertion serves a specific purpose that makes VSE recordings work properly. Use it with care. If the assertion was added to a step in a VSE model, do not remove or edit it.
Click to execute the assertion.Run Assertion
Validate SWIFT Message AssertionThe Validate SWIFT Message assertion lets you validate the syntax and semantics of SWIFT messages.
The assertion includes the following fields:
NameDefines the name of the assertion.
IfSpecifies the behavior of the assertion from the drop-down list.

DevTest Solutions - 9.5
25-Jul-2016 55/448
thenSpecifies the step to which to redirect if the assertion fires.
LogIdentifies event text to print if the assertion fires.
The assertion also includes the following SWIFT-specific fields:

DevTest Solutions - 9.5
25-Jul-2016 56/448
SWIFT Message TypeSpecifies the message type with which to validate the message. The available message types are MT, MX, and SEPA. The default message type is MT.For the message type MT, DevTest supports the following categories:
MT1nnCustomer Payments
MT2nnFinancial Institution Transfers
MT3nnFX, Money Market, and Derivatives
MT4nnCollections and cash letters
MT5nnSecurities Markets
MT7nnDocumentary Credits and Guarantees
MT9nnCash Management and Customer Status
For the message type SEPA, DevTest supports the following categories:
Resolution of Investigation (camt.029.001.03)
Payment Cancelation Request (camt.056.001.01)
Customer Credit Transfer Initiation(pain.001.001.03)
Customer Payment Status Report (pain.002.001.03)
Financial Institution Payment Status Report (pacs.002.001.03S2)
Payment Return (pacs.004.001.02)
Financial Institution Customer Credit Transfer (pacs.008.001.02)
For the message type MX, DevTest supports the latest versions (as of February 2014) of the full catalog of , which are ISO20022 messages (http://www.http//www.iso20022.org/full_catalogue.page)listed at http://www.iso20022.org/full_catalogue.page.
DevTest Solutions - 9.5
25-Jul-2016 57/448
Validation Syntax onlySpecifies whether the assertion validates syntax and semantics.Values:
Selected: The assertion validates only the syntax.
Cleared: The assertion validates both syntax and semantics.
Default: Cleared
If you click , any validation errors appear in the window.Run Assertion System Messages
Notes:
Ensure that lines in MT messages end with the required Carriage Return/Line Feed characters (0D0A in ASCII hex; 0D25 in EBCDIC hex). Otherwise, the following error is reported.
"The input Swift message cannot be parsed because of invalid syntax. Please check the message structure. Take notice of block separators,carriage-return line-feed characters and the presence of mandatory blocks."
Ensure that an MT message has no invalid trailing spaces before the end of a line. The reported errors are sometimes unclear.For example, if the following line
:32A:071119EUR50000,
contains an invalid trailing space before the end of the line, DevTest reports the error message:
"T43 - The integer part of Rate must contain at least one digit. A decimal comma is mandatory and is included in the maximum length tag:32A."
Ensure that the MX messages conform to the supported versions.For example, is supported but the older is not.camt.052.001.04 camt.052.001.01
Mobile Testing AssertionsTwo types of mobile assertions apply to a test step, depending on the type of test you are creating:
Mobile assertions strictly for mobile testsThese assertions only apply to mobile tests and cannot be obtained outside of the Mobile Test Step Editor.

DevTest Solutions - 9.5
25-Jul-2016 58/448
Mobile Target PredicateThe Mobile Target predicate assertion can apply to any DevTest Solutions step, but a mobile step must come before it to initialize the mobile session. So in that sense, the predicate depends on the presence of a mobile step.
Mobile-Specific AssertionsThese assertions are only available for a mobile test step that you edit within the Mobile test step editor.
The following assertions are available in the Mobile assertions list for any test step:Ensure Same Mobile Screen (see page 58)Ensure Screen Element Matches Expression (see page 59)Ensure Screen Element is Removed (see page 60)
Ensure Same Mobile ScreenThe Mobile Ensure Same Mobile Screen assertion verifies that all screen elements on the mobile device match the original recording. By default, if any element on the screen is different, the test step fails.
Complete the following fields:
NameThe name of the assertion. The default value is .Assert same screen
IfSelect one of the following values.
True: The action that you define in the field is executed when all screen elements on the Then mobile device match the original recording.
False: The action that you define in the field is executed when the screen elements on Then the mobile device do not match the original recording. is the default value.False
ThenSelect the action to take when the conditions of the selected If statement are met:
Generate a warning or error.
End, fail, or abort the test.
Select the next test step to run.
LogThe text that appears as log event text when the assertion runs.Click to execute the assertion.Run Assertion

DevTest Solutions - 9.5
25-Jul-2016 59/448
Difference ThresholdThe difference threshold lets you define the level of precision to use when comparing screens. Subtle differences can exist between the application and the recorded screen shots, even when the application has not changed. For example, your test could compare a table in your application to a screenshot of that same table. If the screenshot included a highlighted row, but no rows were highlighted in the application, a precise pixel-by-pixel comparison shows these tables as nonmatching.The default difference threshold is , but you can adjust this number if you find that your test 1000case is returning incorrect matches. The following values provide some guidance for your settings:
0: Indicates an exact match where every pixel on the screen must match every pixel on the recording.
1000: Indicates that the screen and the recording are close enough to each other to be considered a match.
2000+: Indicates that the screen and the recording can almost certainly be classified as nonmatching.
Start of StepSelecting this check box indicates that the screen comparison occurs at the beginning of the step.
End of StepSelecting this check box indicates that the screen comparison occurs at the end of the step.
Consider image pixelsSelecting this check box indicates that pixel comparisons are used to determine the screen matches.
Consider screen structureSelecting this check box indicates that the structure of the screen is used instead of a pixel comparison to determine screen matches. For example, you might have a screen that displays the current date and time. The date and time in a recording that was performed two days ago do not match a test that you run today. This option lets you ensure that the same screen structure is in place, even though the specific values on the screen do not match.
Consider component bounds
Ensure Screen Element Matches ExpressionThe Mobile Ensure Screen Matches Expression assertion verifies that the data entered for a screen element matches your specified regular expression. By default, if the value entered for the screen element does not match the specified expression, the test step fails.
When you select the Ensure Screen Element Matches Expression assertion, the system prompts you to enter an expression that you want the screen element to match. Once entered, the name and expression appear as a Key/Value pair in the Actions section of the tab. You can double-click these fields to modify them.
For example, the regular expression "ame" would match the names "Cameron" and "Pamela". If you want to ensure that a value entered for a screen element starts with a capital letter, and then three lower-case letters, enter this regular expression:
'[A-Z][a-z]{3}'

DevTest Solutions - 9.5
25-Jul-2016 60/448
'[A-Z][a-z]{3}'
For more information about regular expressions, see .Assertion Descriptions (see page 17)
Complete the following fields:
Expression to Match (Value)The regular expression to match for the specified screen element.
If no match, execute stepSelect a step from the drop-down list to execute if a match is not made.
Ensure Screen Element is RemovedThe Ensure Screen Element is Removed assertion verifies that a specified screen element on the mobile device has been removed before proceeding to the next step. By default, if the specified element is present, the test step fails.
When you add this assertion (https://docops.ca.com/display/DTS95, a pop-up dialog lets you select the screen to test that the /Add+an+Assertion+to+a+Mobile+Test+Step)
element has been removed.
For example, you could have a test case that includes three steps. The last step involves clicking the Back button. To ensure the Back button is included on the first step, you would add the Ensure notScreen Element is Removed assertion for the Back button on the last step, and select that first step in the drop-down list.
Mobile Target PredicateThe Mobile Target Predicate assertion exists outside of the Mobile Test Step Editor and provides the ability to find and check values of a mobile element. This assertion can apply to any test within DevTest Workstation that has a mobile step.
Complete the following fields:
NameDefines the name of the assertion.
IfSpecifies the behavior of the assertion from the drop-down list.
thenSpecifies the step to which to redirect if the assertion fires.
LogIdentifies event text to print if the assertion fires.
Execution ModeSelect the execution mode from the available options in the drop-down. For more information about execution modes, see Monitor Virtual Services (https://docops.ca.com/display/DTS95/Monitor+Virtual+Services).
The top drop-down list and text field define the search terms for the mobile target:

DevTest Solutions - 9.5
25-Jul-2016 61/448
The top drop-down list and text field define the search terms for the mobile target:
XPathTakes an XPath to the element in the page source. Click Edit next to the XPath field to open the
.XPath editor (see page 435)
NameTakes the name of the element, which corresponds to the name attribute in HTML/Hybrid page sources.
IdTakes the ID of the element, which corresponds to the ID attribute in HTML/Hybrid page sources.
TextMatches the full text value of an element.
PartialTextMatches a substring of the full text value of an element.
The second drop-down list and true/false option defines the attribute of the element to match once the element has been found. The following attributes are supported:
DisplayedTrue if the element is visible.
EnabledTrue if the element is enabled.
SelectedTrue if the element has focus.
TextMatches the text of the element.
TagNameMatches the tag name of the element.
The two check boxes apply if you use Text or TagName:
Partial MatchReturns a partial match of any Text or TagName you enter.
Ignore CaseIgnores the case of the text or TagName.
TimeoutThis field defines a timeout for the full operation. In other words, if the element is found but fails the predicate, the assertion will retry until the timeout is reached or the predicate succeeds.

DevTest Solutions - 9.5
25-Jul-2016 62/448
Asset DescriptionsAn is a set of configuration properties that are grouped into a logical unit.asset
This section describes the following assets:Email Connection Asset (see page 62)IBM MQ Native Assets (see page 64)JDBC Connection Assets (see page 65)JMS Client Assets (see page 68)JNDI Initial Context Asset (see page 73)Mobile Assets (see page 73)RabbitMQ Assets (see page 73)SAP JCo Destination Assets (see page 78)SSL Assets (see page 81)
Email Connection AssetTo define the connection information to the SMTP mail server, use a connection asset (https://docops.
.ca.com/display/DTS95/Assets)
If you have predefined connection assets, you can select one from the drop-down list in Connection
the step editor. To create an asset from the step editor, click . To edit an asset from Add Asset
the step editor, click .Edit Asset
To create an asset:

DevTest Solutions - 9.5
25-Jul-2016 63/448
1.
2.
Define the following fields for this asset. You can use properties for SMTP connection parameters.
NameDefines the name of the asset. This name appears in the field in the step Connectioneditor. Use a name that is meaningful for your SMTP mail system.
DescriptionSpecifies information that provides more details about the system that the asset targets.
ServerSpecifies the name of the SMTP mail server.
SecuritySpecifies which type of encryption to use to secure a communication channel.Values:
None: The communication uses no encryption.
SSL/TLS: The communication uses SSL/TLS encryption.
Port(Optional) Specifies the port on which the SMTP mail server connects.Defaults:
25: The default when is specified for .None Security
465: The default when is specified for .SSL/TLS Security
AuthenticationSpecifies whether to use authentication to connect to an email serverl.Values:
Off: The email server requires no authentication.
Password Authentication: The email server requires user and password authentication.
User(Optional) Specifies the user ID that the SMTP mail server uses to authenticate the connection. This field is disabled when is .Authentication Off
Password(Optional) Specifies the password that the SMTP mail server validates. This field is disabled when is .Authentication Off
To display the advanced mode, click in the upper right corner of the asset editor. The PROadvanced mode allows you to specify the runtime scope (https://docops.ca.com/display/DTS95
of the asset./Runtime+Scope)

DevTest Solutions - 9.5
25-Jul-2016 64/448
IBM MQ Native AssetsYou can create the following types of assets for WebSphere MQ:
IBM MQ Native Queue ManagerA queue manager provides WebSphere MQ services to applications.
IBM MQ QueueNative A queue is where messages are placed in WebSphere MQ.
IBM MQ Temporary QueueNative A type of dynamic queue that is deleted when the client that created it closes the queue.
Note: These assets are for WebSphere MQ in native mode. If you are using WebSphere MQ in JMS mode, we recommend that you use the assets.IBM MQ JMS
In the editor for each asset, each parameter has a tooltip that describes the purpose of the parameter.
The queue and temporary queue assets require you to specify a queue manager asset.
The following graphic shows a queue manager asset.
Screen capture of queue manager asset.
To add authentication information, click the plus sign and select the and fields.User ID Password

DevTest Solutions - 9.5
25-Jul-2016 65/448
1.
To add authentication information, click the plus sign and select the and fields.User ID Password
The following graphic shows a queue asset. The parameter where you specify the queue manager asset is highlighted.
Screen capture of queue asset.
For information about testing the assets, see Verify Assets (https://docops.ca.com/display/DTS95./Verify+Assets)
JDBC Connection AssetsTo define the connection information to your JDBC system, use a destination asset (https://docops.ca.
. The asset class for JDBC connection assets is named com/display/DTS95/Assets) JDBC Connection .Assets
Prerequisites: The JDBC driver appropriate for your database must be on the DevTest classpath. You can place the driver JAR file in the hot deploy directory. The Derby client driver is included in the DevTest classpath, so you do not need to add it again.
Parameter Requirements: Have the name of the JDBC driver class, the JDBC URL for your database, and a user ID and password for the database. You also must know the schemas for the tables in the database to construct your SQL queries.
If you have predefined destination assets, you can select one from the drop-down field in Destination
the step editor. To create an asset from the step editor, select the icon. To edit an Add Assetasset from the step editor, select the icon.Edit Asset
To create an asset:
Define the following fields for this asset. You can use properties for connection parameters.

DevTest Solutions - 9.5
25-Jul-2016 66/448
1. Define the following fields for this asset. You can use properties for connection parameters.

DevTest Solutions - 9.5
25-Jul-2016 67/448
1.
NameThe name of the asset. This name appears in the field in the step editor. Use a Destinationname that is meaningful for your JDBC system.
DescriptionInformation that provides more details about the system that the asset targets.
JDBC DriverEnter or select the full package name of the appropriate driver class. Standard driver classes are available in the drop-down list. You can also use the button to browse Browsethe DevTest class path for the driver class.
Connect StringThe connect string is the standard JDBC URL for your database. Enter or select the URL. The drop-down list contains JDBC URL templates for the common database managers.
User IDEnter a user ID (if the database requires it).
PasswordEnter a password (if the database requires it).
Use Connection PoolWhen you select , you can configure the connection pool size can be Use Connection Poolconfigured with the property in the lisa.jdbc.asset.pool.size lisa.properties (see page 223)file.
JDBC Connection assets panel

DevTest Solutions - 9.5
25-Jul-2016 68/448
2. To display the advanced mode, select the icon in the upper right corner of the asset PROeditor. The advanced mode allows you to specify the run-time scope (https://docops.ca.com
of the asset./display/DTS95/Runtime+Scope)
JMS Client AssetsThe Java Message Service (JMS) is a specification that allows Java programs to interact with enterprise messaging systems. The original version is 1.0. The latest version is 1.1.
JMS includes the following terminology:
JMS clientA Java program that uses JMS to communicate with a messaging system.
JMS providerA messaging system that implements JMS.
You can create assets for the following types of objects that the JMS clients use:
Connection factory
Connection
Session
Producer
Consumer
Destination
In the editor for each JMS client asset, each parameter has a tooltip that describes the purpose of the parameter.
The following graphic shows how a JMS client handles request messages and response messages.

DevTest Solutions - 9.5
25-Jul-2016 69/448
Connection FactoriesA connection factory is used to create connections.
The connection factories can be characterized in terms of how they are initialized:
Generic connection factoryInitialized by using the Java Naming and Directory Interface (JNDI).
Direct connection factoryInitialized in a way that is specific to a JMS provider. This type of connection factory has its own, often large, set of parameters.
The connection factories can also be characterized in terms of the destinations that they support:
Queue connection factorySupports queues only. This type is from JMS version 1.0.

DevTest Solutions - 9.5
25-Jul-2016 70/448
Topic connection factorySupports topics only. This type is from JMS version 1.0.
Connection factoryIf a connection factory is not specified as either of the preceding types, then it supports both queues and topics.
Most connection factory assets are a combination of these two categories. For example, the Direct JMS 1.0 Topic Connection Factory for TIBCO EMS asset is a direct connection factory that supports topics only.
The following connection factory assets are available:
JMS Generic Connection Factory
JMS 1.0 Generic Queue Connection Factory
JMS 1.0 Generic Topic Connection Factory
Direct JMS Connection Factory for ActiveMQ
Direct JMS Connection Factory for IBM MQ
Direct JMS 1.0 Queue Connection Factory for IBM MQ
Direct JMS 1.0 Topic Connection Factory for IBM MQ
Direct JMS Connection Factory for JCAPS
Direct JMS 1.0 Queue Connection Factory for JCAPS
Direct JMS 1.0 Topic Connection Factory for JCAPS
Direct JMS Connection Factory for SonicMQ
Direct JMS 1.0 Queue Connection Factory for SonicMQ
Direct JMS 1.0 Topic Connection Factory for SonicMQ
Direct JMS Connection Factory for TIBCO EMS
Direct JMS 1.0 Queue Connection Factory for TIBCO EMS
Direct JMS 1.0 Topic Connection Factory for TIBCO EMS
Notice that ActiveMQ has one version of the connection factory asset, instead of three versions.
ConnectionsA connection represents an active connection with a JMS provider. Connections are used to create sessions.

DevTest Solutions - 9.5
25-Jul-2016 71/448
Connections can be characterized in terms of the destinations that they support:
Queue connectionSupports queues only. This type is from JMS version 1.0.
Topic connectionSupports topics only. This type is from JMS version 1.0.
ConnectionIf a connection is not specified as either of the preceding types, then it supports both queues and topics.
A connection must remain open while its sessions are open.
The following connection assets are available:
JMS Connection
JMS 1.0 Queue Connection
JMS 1.0 Topic Connection
TIBCO Admin Connection
SessionsA session is used to create producers and consumers.
Sessions can be characterized in terms of the destinations that they support:
Queue sessionSupports queues only. This type is from JMS version 1.0.
Topic sessionSupports topics only. This type is from JMS version 1.0.
SessionIf a session is not specified as either of the preceding types, then it supports both queues and topics.
A session must remain open while its producers and consumers are active.
The following session assets are available:
JMS Session
JMS 1.0 Queue Session
JMS 1.0 Topic Session

DevTest Solutions - 9.5
25-Jul-2016 72/448
ProducersA producer is used to send a message to a destination.
One producer asset is available: JMS Producer.
ConsumersA consumer is used to receive a message from a destination.
One consumer asset is available: JMS Consumer. However, you can use the asset in either of two ways:
SynchronouslyWhile a client is waiting to receive a message, the client cannot do anything else.
AsynchronouslyWhile a client is waiting to receive a message, the client can perform other tasks.
DestinationsA destination represents a location on the JMS platform where messages are placed.
Destinations are divided into queues and topics:
QueueA destination that supports the point-to-point messaging model. When a message is sent to a queue, only one receiver can receive the message.
TopicA destination that supports the publish/subscribe messaging model. When a message is sent to a topic, multiple receivers can receive the message.
Destinations can also be characterized in terms of how they are created:
JNDI destinationInitialized by using the Java Naming and Directory Interface (JNDI).
Temp JNDI destinationA JMS session can be used to create a destination temporarily. This destination exists as long as the session is open, and is deleted when the session is closed.
DestinationA static destination is not specified as either of the preceding types, and is obtained through the JMS session.
Destination assets are a combination of these two categories. For example, the JMS JNDI Queue asset is a point-to-point destination that is initialized through JNDI.
The following destination assets are available:

DevTest Solutions - 9.5
25-Jul-2016 73/448
The following destination assets are available:
JMS Queue
JMS JNDI Queue
JMS Temporary Queue
JMS Topic
JMS JNDI Topic
JMS Temporary Topic
JNDI Initial Context AssetThe Java Naming and Directory Interface (JNDI) is a specification that allows Java programs to interact with naming and directory services.
DevTest includes a asset. The use the JNDI Initial Context JMS client assets (see page 68) JNDI Initial asset to locate JMS connection factories and destinations.Context
In the editor for the asset, each parameter has a tooltip that describes the JNDI Initial Contextpurpose of the parameter.
Mobile AssetsMobile assets are no longer required when you create a new test case with Mobile Testing. Instead, properties are used to define mobile configuration options. See Assets vs. Mobile Properties (
for more information.https://docops.ca.com/display/DTS95/Assets+vs.+Mobile+Properties)
Mobile test cases created with previous versions of DevTest Solutions can include assets, but all new test cases use properties.
RabbitMQ AssetsYou can create the following types of assets for RabbitMQ:
RabbitMQ Connection
RabbitMQ Queue
RabbitMQ Exchange
RabbitMQ Temp Queue
RabbitMQ Channel

DevTest Solutions - 9.5
25-Jul-2016 74/448
In the editor for each asset, each parameter has a tooltip that describes the purpose of the parameter.
Prerequisites: Using DevTest with this application requires that you make one or more files available to DevTest. For more information, see Third-Party File Requirements (https://docops.ca.com/display
./DTS95/Third-Party+File+Requirements)
Connection (see page 74)Queue (see page 75)Exchange (see page 76)Temp Queue (see page 77)Channel (see page 78)
ConnectionThe connection asset lets you establish a connection to the RabbitMQ server.
Specify the following information:
Host name and port number of the RabbitMQ server
User name and password for accessing the RabbitMQ server
When you configure the connection asset, you can use the green button to confirm that the Verifyserver can be reached.
The following graphic shows a connection asset.
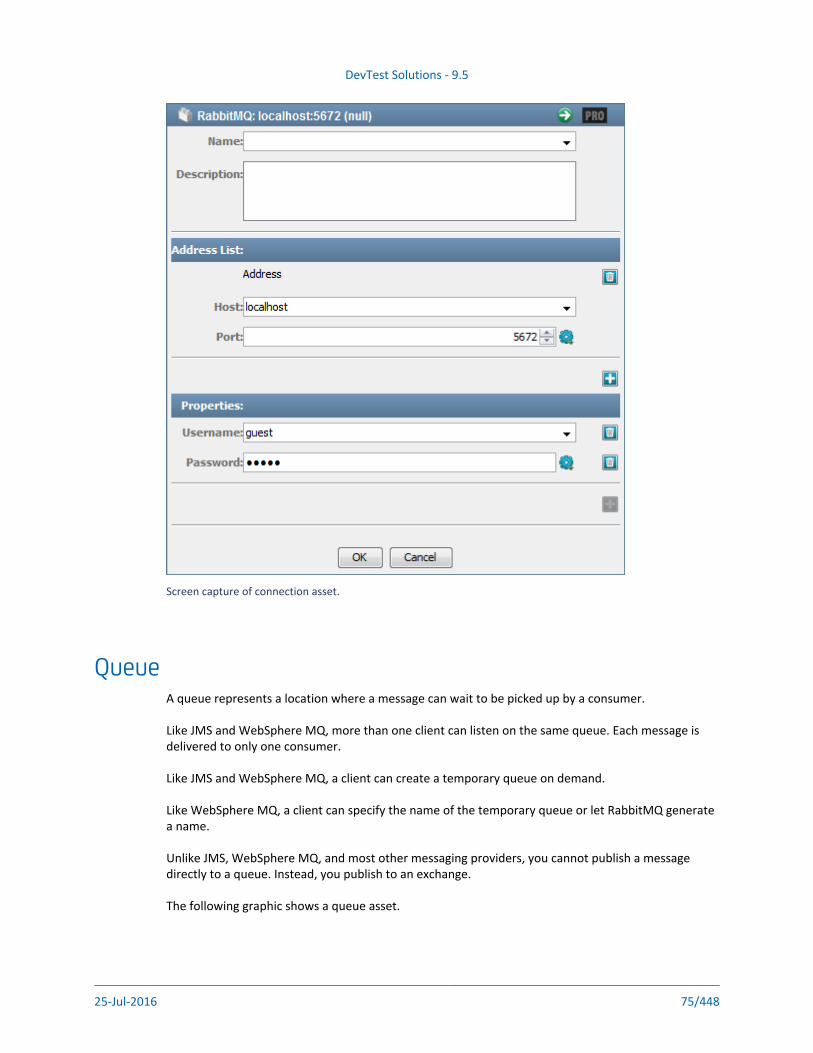
DevTest Solutions - 9.5
25-Jul-2016 75/448
Screen capture of connection asset.
QueueA queue represents a location where a message can wait to be picked up by a consumer.
Like JMS and WebSphere MQ, more than one client can listen on the same queue. Each message is delivered to only one consumer.
Like JMS and WebSphere MQ, a client can create a temporary queue on demand.
Like WebSphere MQ, a client can specify the name of the temporary queue or let RabbitMQ generate a name.
Unlike JMS, WebSphere MQ, and most other messaging providers, you cannot publish a message directly to a queue. Instead, you publish to an exchange.
The following graphic shows a queue asset.

DevTest Solutions - 9.5
25-Jul-2016 76/448
Screen capture of queue asset.
The field must be set to a channel asset or a connection asset.Channel
ExchangeAn is an additional routing layer that exists between publishers and queues.exchange
A consumer binds the queue it is listening on to an exchange using a routing key. This routing key tells the exchange which messages should be routed to the queue. The exact interpretation of the routing key depends on the type of exchange.
A publisher sends a message to an exchange along with its own routing key. This routing key tells the exchange how to route the message to one or more destination queues. Again, the exact interpretation of the routing key depends on the type of exchange.
The routing key used by the publisher to send a message to the exchange and the routing key used by the consumer that receives the message on its queue are usually matched in some way, but they are not necessarily equal.

DevTest Solutions - 9.5
25-Jul-2016 77/448
If a message is published to an exchange with a routing key that does not match any currently bound queues, the message is discarded. So while the queue side is like a JMS queue, where a message waits to be consumed, the exchange side is like a JMS topic, where a queue has to be bound to the exchange with a matching routing key at the time the message is published in order to receive it. Also like a topic, if more than one queue has binding parameters that match a given message according to the exchange's routing rules, the message is forwarded to all of those queues at the same time.
The exchange types have different routing strategies:
DefaultIf you do not specify the name of an exchange when publishing a message, the default exchange is used. Each queue created on a RabbitMQ server, including temp queues, is automatically bound to the default exchange with a routing key equal to the queue name. Therefore, publishing with an empty exchange name and the queue name as the routing key is the closest you can get to publishing directly to a queue.
DirectWith a direct exchange, each consumer's queue is bound to the exchange with a unique string as its routing key. The routing key might be the name of the queue or something completely different. Publishers send a message to the exchange with a routing key. The message is routed to every queue that is bound with the same routing key.
TopicTopic exchanges are almost the same as direct exchanges. However, with a topic exchange the routing key used to bind a queue can be a routing pattern that can match more than one message routing key. Basically, routing patterns are dot-delimited strings where the text between each dot can be a literal string or one of two wildcards. The star wildcard (*) matches one string. The hash wildcard (#) matches zero or more dot-delimited strings.
HeadersRather than routing based on the routing key, a headers exchange routes based on one or more custom message properties. A queue is bound to the headers exchange with one or more custom bind properties that must match the custom properties on a message sent to that exchange. By default, to be routed to a queue a message must have properties that match all the properties that the queue was bound with. An additional bind property can change this behavior so that only one of the message's properties must match.
FanoutA fanout exchange routes every message to every queue bound to it. It does not use the routing key or any other routing logic.
The field must be set to a channel asset or a connection asset.Channel
Temp QueueTemp queues are probably much more prevalent with RabbitMQ RPC-style services than they are with other messaging providers. The reason is that message filtering is not done at the queue level. All the filtering is done at the exchange level with routing rules. Once a message is passed on to a
particular queue, then there it is going to be delivered to one of the consumers on that queue.

DevTest Solutions - 9.5
25-Jul-2016 78/448
particular queue, then there it is going to be delivered to one of the consumers on that queue. Basically, a one-to-one correspondence exists between consumers and queues. The only reason to have more than one consumer on the same queue is to load balance or parallelize the processing of messages from that queue; all of those consumers must necessarily do the same processing.
Because each consumer needs its own queue and temp queues are so easy to create, it makes sense to use temp queues for the response side of most RPC applications as a standard practice. Temp queues also work well with the exchange-based correlation schemes. An exchange does not care whether the queue that it is routing messages to is a temp queue or not.
The following graphic shows a temp queue asset.
Screen capture of temp queue asset.
The field must be set to a channel asset or a connection asset.Channel
ChannelThe channel asset represents a RabbitMQ channel. Typically, you do not need to create this type of asset.
SAP JCo Destination AssetsTo define the connection information to your SAP system, use a destination asset (https://docops.ca.
. One asset class is used for all three SAP steps. The class is named com/display/DTS95/Assets) SAP JCo .Destination Assets

DevTest Solutions - 9.5
25-Jul-2016 79/448
1.
If you have predefined destination assets, you can select one from the drop-down field in Destination
the step editor. To create an asset from the step editor, click . To edit an asset from Add Asset
the step editor, click .Edit Asset
To create an asset:
Define the following fields for this asset. You can use properties for SAP connection parameters.
NameThe name of the asset. This name appears in the field in the step editor. Use a Destinationname that is meaningful for your SAP system.
DescriptionInformation that provides more details about the system that the asset targets.
Server TypeSelect or .Application Server Message Server
HostHostname or IP address of SAP system
System NumberSAP system number (for Application Server)
R/3 NameR/3 name (for Message Server)
GroupGroup of SAP application servers (for Message Server)
UserSAP username
PasswordSAP user password
ClientSAP client
The following graphics illustrate destination asset definitions for both application and message servers.

DevTest Solutions - 9.5
25-Jul-2016 80/448
1.
SAP JCo Destination Assets message server

DevTest Solutions - 9.5
25-Jul-2016 81/448
1.
2.
3.
SAP JCo assets - application server
To display the advanced mode, select in the upper right corner of the asset editor. The PROadvanced mode allows you to specify the runtime scope (https://docops.ca.com/display/DTS95
of the asset./Runtime+Scope)
To select advanced SAP connection properties, click . You can Advanced Connection Settingsoverride the default value of a setting by entering a value for the setting. Select the settings that you want, and click .OK
SSL AssetsHistorically, the only way to configure most SSL operations was to define global properties in the
file:local.properties
javax.net.ssl.keyStore=keystore.jksjavax.net.ssl.keyStorePassword=12345javax.net.ssl.trustStore=truststore.jksjavax.net.ssl.trustStorePassword=12345

DevTest Solutions - 9.5
25-Jul-2016 82/448
The problem with this approach is that it reconfigures SSL globally, affecting every SSL connection that is made.
As of release 8.1, the following assets let you define an :SSL context
IBM MQ Native Queue Manager
Direct JMS Connection Factory for IBM MQ
Direct JMS 1.0 Queue Connection Factory for IBM MQ
Direct JMS 1.0 Topic Connection Factory for IBM MQ
As of release 9.0, the RabbitMQ Connection asset lets you define an SSL context.
As of release 9.5, the Direct JMS Connection Factory for ActiveMQ asset lets you define an SSL context.
An SSL context is a way to encapsulate the key store and trust store information in a way that applies to a single operation, not globally.
You can set the SSL context to either of the following SSL assets:
Key Store File
SSL Context
A full setup is complicated, involving at least five assets, so there are shortcuts that cover common scenarios. This page describes the scenarios in order from the simplest to the most complex.
Basic Scenarios (see page 82)Just a trust store: The Key Store File Asset (see page 82)A trust store and key store using the default key: Two Key Store File Assets (see page 83)
Advanced Scenarios (see page 84)Forgoing the trust store: The "Trust All" Trust Manager Asset (see page 84)Using a specific client key: The Key Manager Asset (see page 85)Full configuration: The "Generic" Trust Manager Asset (see page 85)
SSL Context Parameters (see page 86)
Basic ScenariosThe first two scenarios mirror what is possible to do through the file.local.properties
Just a trust store: The Key Store File AssetThis is the one-way SSL situation, in which you add a server-side certificate to a trust store.
Historically, this scenario would have required the following global configuration in the local. file:properties
javax.net.ssl.trustStore=truststore.jks

DevTest Solutions - 9.5
25-Jul-2016 83/448
1.
2.
1.
2.
3.
javax.net.ssl.trustStore=truststore.jksjavax.net.ssl.trustStorePassword=12345
To configure the scenario with SSL assets, follow these steps:
Create a Key Store File asset that references the trust store.
Select this asset in the field.SSL Context
The following graphic shows this configuration.
Screen capture of Key Store File asset scenario.
This configuration is equivalent to the lines, but applies only to the IBM MQ local.propertiesconnection.
Note: Key store files and trust store files use the same file format. It is still called a "key store" in most places, even if it is being used as a trust store.
A trust store and key store using the default key: Two Key Store File AssetsThis is the standard two-way SSL situation, where we need a trust store for the server certificate and a key store containing the client private key.
Historically, this scenario would have required the following global configuration in the local. file:properties
javax.net.ssl.keyStore=keystore.jksjavax.net.ssl.keyStorePassword=12345javax.net.ssl.trustStore=truststore.jksjavax.net.ssl.trustStorePassword=12345
To configure the scenario with SSL assets, follow these steps:
Create a Key Store File asset that references the trust store.
Create a Key Store File asset that references the client key store.
Create an SSL Context asset, and select the trust store and key store assets.
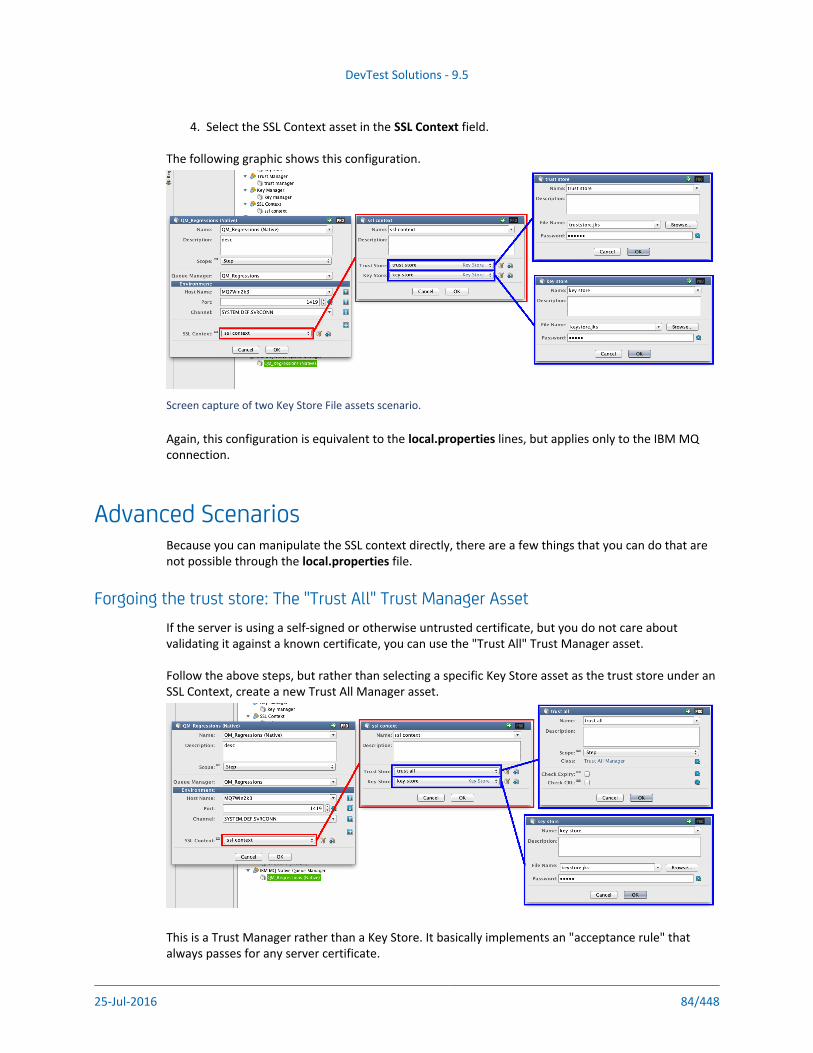
DevTest Solutions - 9.5
25-Jul-2016 84/448
4. Select the SSL Context asset in the field.SSL Context
The following graphic shows this configuration.
Screen capture of two Key Store File assets scenario.
Again, this configuration is equivalent to the lines, but applies only to the IBM MQ local.propertiesconnection.
Advanced ScenariosBecause you can manipulate the SSL context directly, there are a few things that you can do that are not possible through the file.local.properties
Forgoing the trust store: The "Trust All" Trust Manager AssetIf the server is using a self-signed or otherwise untrusted certificate, but you do not care about validating it against a known certificate, you can use the "Trust All" Trust Manager asset.
Follow the above steps, but rather than selecting a specific Key Store asset as the trust store under an SSL Context, create a new Trust All Manager asset.
This is a Trust Manager rather than a Key Store. It basically implements an "acceptance rule" that always passes for any server certificate.

DevTest Solutions - 9.5
25-Jul-2016 85/448
Note: If you want to use the Trust All Manager without a client-side key store, you can leave the Key Store field in the SSL Context blank. However, you cannot select a Trust All Manager directly from the SSL Context field in the IBM MQ Native Queue Manager asset.
Using a specific client key: The Key Manager AssetOccasionally you run into a key store that contains multiple client-side private keys. When configuring the key store through , there is no way to select which key to use; which key that gets local.propertiesused is undefined.
However, because we are controlling the SSL Context directly, we have the option of telling it which key to use. Instead of adding a Key Store asset directly to the SSL Context under the Key Store field, instead add a Key Manager asset. This allows you to specify the alias of the client-side private key to use. The Key Store asset is now selected under the Key Manager instead of directly under the SSL Context.
Screen capture of Key Manager asset scenario.
This also allows you to specify a password for the private key. This is necessary if the private key's password is different from the key store's password, in fact, this is the only way to support that scenario.
Full configuration: The "Generic" Trust Manager AssetSimilar to the Key Manager asset, there is also a generic Trust Manager asset that wraps a Key Store asset specifying the trust store file. There are no parameters on this Trust Manager asset besides the key store, but it serves two purposes.
When you select a Key Store asset directly as the Trust Store under an SSL Context asset, what happens internally is that a Trust Manager asset is automatically configured so we conform to Java's SSL API. The same thing applies to the Key Manager if just a Key Store is selected for that. In other words, if you followed the above scenario labeled "Two Key Manager Assets", where just an SSL Context and two Key Stores are provided, what actually gets auto-configured under the covers looks like this:

DevTest Solutions - 9.5
25-Jul-2016 86/448
Screen capture of Generic Trust Manager asset scenario
The generic Trust Manager asset and the Trust All Manager asset are the same type. As a result, you can override one with the other in child configs if you want to turn certificate checking on or off under certain environments.
SSL Context ParametersThe following SSL Context parameters are available in advanced mode:
ProtocolAllows you to force it to use a particular version of SSL. The list of options is built dynamically by querying the Java SSL API for supported protocols.
ProviderAllows you to select a different SSL implementation. The list of options is built dynamically by querying the Java SSL API for installed providers.
Verify HostnameSpecifies whether to verify the server host name used to establish a TCP connection against the host name provided in the SSL certificate.
Secure RandomThis parameter is reserved for future use.

DevTest Solutions - 9.5
25-Jul-2016 87/448
Companion DescriptionsA is an element that runs before and after every test case execution.companion
This section describes the following companions:Web Browser Simulation Companion (see page 87)Browser Bandwidth Simulation Companion (see page 88)HTTP Connection Pool Companion (see page 88)Configure DevTest to Use a Web Proxy Companion (see page 89)Set Up a Synchronization Point Companion (see page 90)Set Up an Aggregate Step Companion (see page 91)Execute Event-driven Subprocess Companion (see page 91)Observed System VSE Companion (see page 92)VSE Think Scale Companion (see page 101)Batch Response Think Time Companion (see page 102)Recurring Period Think Time Companion (see page 104)Create a Sandbox Class Loader for Each Test Companion (see page 105)Set Final Step to Execute Companion (see page 105)Negative Testing Companion (see page 106)Fail Test Case Companion (see page 106)XML Diff Ignored Nodes Companion (see page 106)JSON Ignored Nodes Companion (see page 106)
Web Browser Simulation CompanionThe Web Browser Simulation companion lets you simulate various web browsers. The web browsers identify themselves to a web server using the User-Agent HTTP header. You configure DevTest to simulate several user-agents when you are running several virtual users in a staged test. Each user-agent string is assigned a relative weight, allowing one browser to appear more often than others.
To specify the weights, use the default Browser Selection Companion Editor.
To configure the Web Browser Selection companion, enter or edit the list of browser agents and the weights:
Complete the following fields:
User-AgentThe browser to simulate.
WeightThe weight for this browser. For example, assume you want to assign weights of 25 percent, 25 percent, and 50 percent for three browsers. Enter the weights as 1, 1, and 2 for the three rows, and 0 for the others (or delete the extra rows).

DevTest Solutions - 9.5
25-Jul-2016 88/448
When the test case is run, DevTest selects one of the browsers to emulate: all HTTP transactions sent from DevTest include the string for that browser. The selection criteria is random, with User-Agenteach browser weight representing one “chance” that the browser will be selected.
DevTest only selects a browser to emulate when the test case initializes. The browser agent string that DevTest selects remains in effect during the execution of the test case. To simulate a distribution of browsers, run the test case multiple times inside a suite.
To add another user-agent, click .Add
To delete a line, click .Delete
Browser Bandwidth Simulation CompanionThe Browser Bandwidth Simulation companion lets you simulate varied bandwidths for the virtual users. Some testing scenarios call for the simulations of different types of internet connections.
To configure the Browser Bandwidth Simulation companion:
Complete the following fields:
BytesPerSecThe connection speed. For example, to simulate a connection speed of 56K, enter a BytesPerSec of 7000 (56000 bits / 8 bits per byte = 7000 bytes per second).
WeightThe weight that is given to this row. For example, to assign weights of 25 percent, 25 percent, and 50percent to three rows, set the Weight columns of the rows to 1, 1, and 2. In the example that is shown, half the virtual users connect at 6000 bytes per second and half at 100,000 bytes per second.
To add a line, use the button.Add
To delete a line, use the button.Delete
HTTP Connection Pool CompanionThe HTTP Connection Pool companion lets you limit the number of HTTP connections for each target server. This companion applies only to the HTTP/HTML Request and REST test steps.
DevTest typically uses one HTTP connection for each virtual user. For example, if you run a test with 100 virtual users, the client and the server each have 100 sockets open.
If you run a load test with thousands of virtual users for each simulator, the underlying operating system can run out of available sockets. In this scenario, use the HTTP Connection Pool companion.
The parameter specifies the number of connections to allocate to each Connections Per Target Hostunique endpoint.

DevTest Solutions - 9.5
25-Jul-2016 89/448
Assume that a test case has two steps:
An HTTP step to go to web server 1
An HTTP step to go to web server 2
The test case has the HTTP Connection Pool companion with a setting of five connections for each target host. The staging document is configured to run 100 virtual users. Because there are two simulator servers, they get 50 virtual users each by default.
Simulator 1 creates five connections to web server 1, and five connections to web server 2. Simulator 2 does the same thing. Each web server now has 10 client connections. At the first HTTP step, a virtual user must wait for one of the five connections to web server 1 to become available. The virtual user uses the connection to make the HTTP call, and the connection goes back into the pool.
The following graphic illustrates this scenario. Simulator 1 has five connections to web server 1 and five connections to web server 2. Simulator 2 has five connections to web server 1 and five connections to web server 2.
Configure DevTest to Use a Web Proxy CompanionThe Configure DevTest to use a Web Proxy companion lets you set up a proxy for all web testing steps. If your environment dictates the use of a proxy, use this companion. Proxy information is specific to your organization. Consult your operations team for the proxy settings for your company.
To configure the Web Proxy Setup companion, enter the following parameters:
Web Proxy Server (Host & Port)The name or IP address of the proxy server in the first field, and the port number in the second field.
Bypass web proxy for these Hosts & DomainsNames of the domains and hosts for which you want proxy to be bypassed.

DevTest Solutions - 9.5
25-Jul-2016 90/448
Secure Web Proxy Server (SSL Proxy Host & Port)The name or IP address of the SSL proxy server in the first field, and the port number in the second field.
Bypass secure web proxy for these Hosts & DomainsNames of the domains and hosts for which you want the secure proxy to be bypassed.
Exclude Simple HostnamesSelect to exclude hostnames like localhost or servername.company.com.
Proxy Server AuthenticationThe domain name with the user name and password, if necessary, for authenticating to the proxy server.
Send PreemptivelySelect , , or .Wait for Challenge Send BASIC Send NTLM
DevTest can also use its local.properties file to assign a web proxy for all test cases. This file is in the DevTest home directory. Update the and properties lisa.http.webProxy.host lisa.http.webProxy.portas appropriate and restart DevTest. If you do not already have a local.properties file in the DevTest home directory, rename the existing _local.properties to local.properties, and use it.
Set Up a Synchronization Point CompanionThe Set up a Synchronization Point companion lets you select a test step to use as a synchronization point in a test case or a test suite. At a synchronization point, virtual users pause and wait until each one has reached this step. Then all virtual users are released to execute the step simultaneously. This capability is useful when setting up load tests for concurrent testing or peak resource utilization.
For example, you could set up a 100-user test so all users log in to your application and order the same seat in a theater simultaneously.
Synchronization points apply to a single test or you can apply them to all tests in a test suite. In test suites, the synchronization point name must be the same across the suite, but the can be At Stepdifferent. Multiple test scenarios (and test suites) must be set to run in parallel, because serial tests cannot access the synchronization point simultaneously by definition. Multiple synchronization points can be defined in a test case or test suite.
To configure the Set up a Synchronization Point companion, enter the following parameters:
Sync Point NameThe name that you specify for the synchronization point.
At StepSelect the step for the synchronization point from the drop-down list. The virtual users pause before executing this step.
Time out secs (0 for none)The number of seconds to wait for the synchronization to occur. All virtual users must reach the
before the timeout period elapses.At Step
DevTest Solutions - 9.5
25-Jul-2016 91/448
Set Up an Aggregate Step CompanionThe Set up an Aggregate Step companion lets you aggregate and report several physical test steps as one logical step for metrics collection and reporting. The companion automatically sets all included steps to .Quiet
Enter the following parameters:
Aggregate nameDefines the name for the aggregation step. Spaces are allowed.
Starting stepSpecifies the start (first) step of the aggregation.
ParticipantsSelect the steps to include in the aggregate (exclude the Starting and Ending steps).
Ending stepSpecifies the end (last) step of the aggregation from the pull-down menu.
All reports show the aggregate step.
A test case can have only one Aggregate Step companion.
Execute Event-driven Subprocess CompanionThe Execute Event-driven Subprocess companion lets you run a subprocess test case when one or more specified events happen.
Enter the following parameters:
Identify Event TypesClick to display a drop-down list of event types. Select any number of events from the list.Add
Click to delete an event type from the list.Delete
Define PropertiesSelect a component name and associated property from the drop-down list. You can add
components by clicking and delete components by clicking .Add Delete
Configure Subprocess CallEnter the parameters for the subprocess, as documented in .Execute Subprocess (see page 353)
DevTest Solutions - 9.5
25-Jul-2016 92/448
Observed System VSE CompanionThe Observed System VSE companion is used to support modeling response times based on an observed set of real response times.
Before LISA 6.0.6, the response time for an inbound request came from the think time specification on the specific response that was determined for that request. Sometimes, primarily during load and performance testing scenarios, the response times should be modeled after the times from a live system. For example, a live system can show a drop in performance equivalent to twice the nominal response times during peak load. In this case, it is helpful to have VSE emulate this response time curve. It is also helpful to let VSE cover (or play back) this curve over an arbitrary interval to allow, for example, a 12-hour period of observed response time metrics to be played out over a 3-hour test.
The Observed System VSE companion supports these requirements. If a virtual service will provide this behavior, add and configure this companion.
Configuration Information (see page 92)Data Set Source Example (see page 94)Observed System Data Provider (Wily) Source (see page 98)Run Time Priorities (see page 100)
Configuration InformationThe Observed System companion requires the following parameters:
Start date/time and End date/timeDefines a time "window" in which to read observed response times. These timestamps are inclusive. Timestamp data from your data set or data provider that is outside this window is ignored.
Assumed run lengthDefines a duration that represents the interval over which the virtual service "fits" the response time curve. For the previous example, this value would be set to three hours.For example, with the following values:
The assumed run length is 30 minutes
The Start date/time window is 30 minutes
The End date/time window is 30 minutes
The buffer size is 10 minutes
we get the buffer for the first 10 minutes, then for 10-20 minutes, then for 20-30 minutes, then 45-60 minutes.With the following values:
The assumed run length is 15 minutes

DevTest Solutions - 9.5
25-Jul-2016 93/448
The Start date/time window is 30 minutes
The End date/time window is 30 minutes
The buffer size is 10 minutes
The first 10 minutes plays back in the first 5 minutes, the second 10 minutes plays back in the second 5 minutes, and the third 10 minutes plays back in the third 5 minutes.
Buffer sizeDefines a duration in minutes and can be used to control how much of the response time data is acquired at once. The parameter defaults to one hour of data at a time.For example, an assumed run length of 1 hour and a buffer size of 15 minutes provides the following results:
We get the buffer for the first 15 minutes
Then for 15-30 minutes
Then for 30-45 minutes
Then 45-60 minutes
Then refetch the data from the first 15 minutes
Observed System Data ProviderThis parameter tells the companion where to get the data. We currently provide a DevTest data set data provider and a CA Application Performance Management (Wily) data provider.
Any data provider must provide the following pieces of information:
An ID (which is a string)
A timestamp
The response time at the timestamp
The DevTest data set data provider requires that the data set provide this information in fields labeled "id", "timestamp" and "responseTime", respectively. The timestamp value, if not an actual Date object, must be a string in the form "yyyy-MM-dd HH:mm:ss.SSS". How the ID maps to any specified inbound request is data-provider specific. For the data set provider, it must match the operation of the request. The CA Application Performance Management (Wily) provider uses a regular expression-based approach.
Note: For DevTest 8.2 and later, the from CA APM must be in the libmetric-data-service.jar /core folder in the DevTest directory.

DevTest Solutions - 9.5
25-Jul-2016 94/448
1.
2.
Data Set Source ExampleIn this example, a data set provides the input for the Observed System VSE companion. The definition of the data that this companion provides lets you change the response time for a transaction, or for multiple transactions over time.
The service image that is shown contains one transaction, and the is set to 15 Think time specmilliseconds.
Observed System Companion service image-SCR
The virtual service model that is associated with this service image has a few simple steps.
To add a companion, click under the panel.Add Companions
Select VSE Companions, Observed System VSE Companion.
Observed System Companion - adding a companion to a test case
The top part of the panel provides general information about the parameters for the companion.
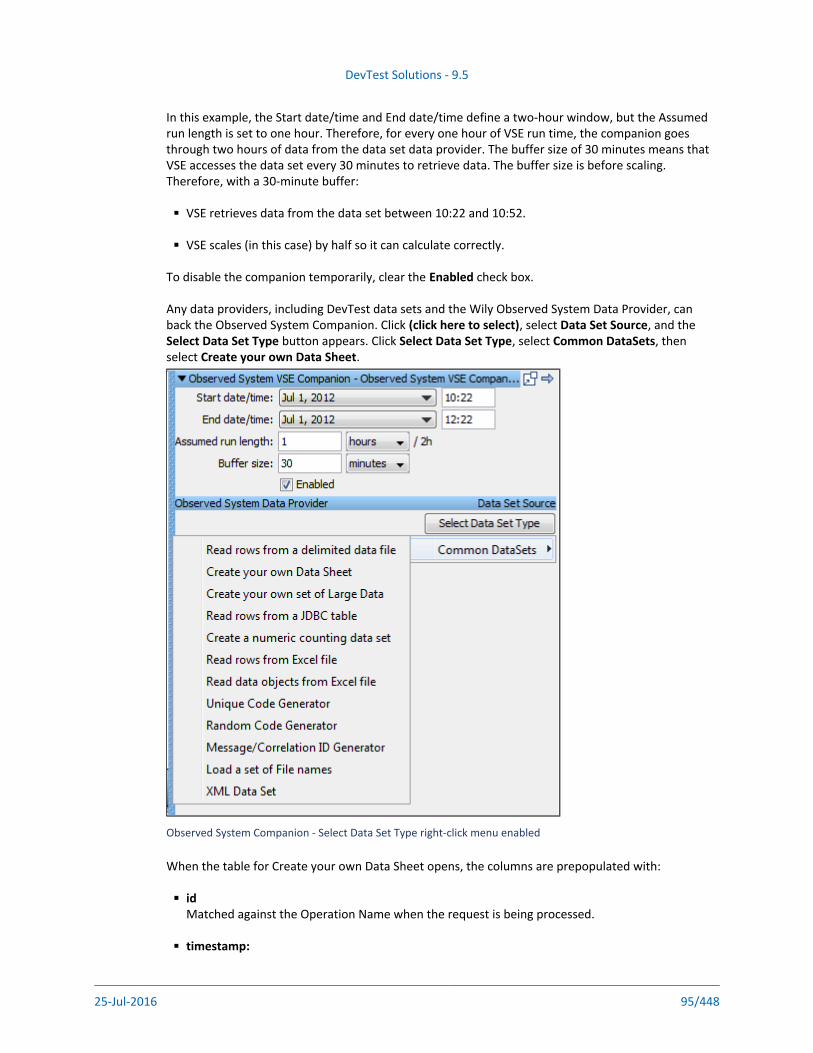
DevTest Solutions - 9.5
25-Jul-2016 95/448
In this example, the Start date/time and End date/time define a two-hour window, but the Assumed run length is set to one hour. Therefore, for every one hour of VSE run time, the companion goes through two hours of data from the data set data provider. The buffer size of 30 minutes means that VSE accesses the data set every 30 minutes to retrieve data. The buffer size is before scaling. Therefore, with a 30-minute buffer:
VSE retrieves data from the data set between 10:22 and 10:52.
VSE scales (in this case) by half so it can calculate correctly.
To disable the companion temporarily, clear the check box.Enabled
Any data providers, including DevTest data sets and the Wily Observed System Data Provider, can back the Observed System Companion. Click , select , and the (click here to select) Data Set Source
button appears. Click , select , then Select Data Set Type Select Data Set Type Common DataSetsselect .Create your own Data Sheet
Observed System Companion - Select Data Set Type right-click menu enabled
When the table for Create your own Data Sheet opens, the columns are prepopulated with:
idMatched against the Operation Name when the request is being processed.
timestamp:

DevTest Solutions - 9.5
25-Jul-2016 96/448
responseTimeIf the value is 0, the defines the interval to use during playback. standardDeviation responseTimeUse the mathematical formula that is described for the column for non-zero standardDeviationvalues. This response time calculation overrides the think time spec of 15 milliseconds that was set in the service image.
standardDeviationDefines the statistical data that represents the standard deviation from the mean value of the response time. The response time that is used during playback is within +/- 3sigma of the average response time. If is the and is the , the response time during x responseTime y standardDeviationplayback is a random value in the range -3 ) and ( +3 ).(x y x y
These columns are required for any type of data set provider that you use to provide information for this companion.
In this example, copy the Operation Name of GET / dsdpTest from the service image and enter it in the field. In the field, enter 150.id responseTime
Observed System Companion - Select Data Set Type right-click menu enabled
In the field, enter a date and time that falls into the time window that timestamp Start date/timeand define.End date/time
To continue the example, we use an existing project with a prepopulated data set.

DevTest Solutions - 9.5
25-Jul-2016 97/448
Observed System Companion example using data set as source
The data set response times define an increase of 100 milliseconds every 30 seconds. Therefore, this companion should always override the Think time spec of 15 milliseconds that is set in the virtual service model.
Note: When you deploy the virtual service, do not enter a of 0 percent.Think time scale

DevTest Solutions - 9.5
25-Jul-2016 98/448
Observed System Companion example Deploy Virtual Service dialog
Observed System Data Provider (Wily) SourceThe Observed System VSE Companion can also receive input from the CA Application Performance Management (Wily) application. To configure the companion to work with Wily, enter the configuration information in the top part of the panel. Then click , and select (click here to select)
of Wily Source.Data Set Source
Parameters for the Wily Observed System companion are:
Web Service URLSpecifies the URL for the Wily web service.
Agent RegexSpecifies a regular expression that identifies the agent.
Metric RegexSpecifies a regular expression that identifies the metric. This metric RegEx is wrapped as the middle part of the metric RegEx that is sent to the Wily server. The metric RegEx sent to the server is:
".*WebServices\|Server\|<user entered pattern>:Average Response Time.*"
For example, if you want to query the metric:
"WebServices\|Server\|http_//ejb3\.examples\.itko\.com/\|(.*)Average Response Time \(ms\)"
you can input
"http_//ejb3\.examples\.itko\.com/"

DevTest Solutions - 9.5
25-Jul-2016 99/448
This example fetches all the Average Response Time metrics for the web service. To retrieve the metrics for specific operations, use a custom RegEx.
".*"Default:
Service UsernameSpecifies the user name used to access the Wily service.
Service PasswordSpecifies the password that is associated with the , if necessary.Service Username
To test the behavior of the companion, stage a quick test.
The test case in this example had one step, an output log message step. You can see the output in the tab of the window.Test Events Quick Stage Run
Observed System Companion example Quick Stage results
In the config file that is used for this test case, setting the property debug to true means that the log message appears in the output.

DevTest Solutions - 9.5
25-Jul-2016 100/448
Observed System Companion example Properties Editor
Run Time PrioritiesThe process that is followed at run time is:
The think time specification from the VSE response is examined when the delay factor is being determined.
If the think time specification contains state (that is, a double-brace expression), it is evaluated directly and the result is used as the response time for the response.
If the think time specification does not contain state and the virtual service contains the Observed System companion, the companion is asked to determine the response time for the response.
If the companion is not present or cannot determine a response time, the think time specification is used as the response time.
For example, an assumed run length of 1 hour and a buffer size of 15 provides the following results:
We get the buffer for the first 15 minutes
Then for 15-30 minutes
Then for 30-45 minutes
Then 45-60 minutes
Then refetch the data from the first 15 minutes

DevTest Solutions - 9.5
25-Jul-2016 101/448
VSE Think Scale CompanionThe VSE Think Scale companion can be added to a virtual service model. This companion allows the think scale percent for the service to change over time by specifying the graph of think scale changes over time.
VSE Think Scale Companion graph

DevTest Solutions - 9.5
25-Jul-2016 102/448
Click , , and to add, delete, and reorder Transition Points. You can directly edit the Add Delete Move and entries. You can also click and drag the lines in the Timeline display to indicate Delay Think Scale
the delay and scale that you want. The Transition Points table is updated to correspond.
Relative TSCalculated based on the delay you enter, in format hh:mm:ss.ms.
DelayThe interval, in minutes and seconds, to wait before the specified think scale is applied.
Think ScaleThe think scale is a percentage that is applied to the think times in the responses.
Start over when timeline runs outIf the end of the timeline is reached, start from the first Relative TS.
If you click the label for the right-most tick mark on the horizontal axis, you can adjust the total timeline of the companion. This label is the "1h" label in the previous window. The Update Timeline
dialog opens. If you update the timeline duration to be shorter than your transition points, Durationyou receive a warning that some transition points are removed.
VSE Think Scale Companion Update Timeline Duration dialog
As you move your cursor over the graph, tooltips display that show time on vertical lines and think scale percentages on horizontal lines.
Batch Response Think Time CompanionThe Batch Response Think Time companion varies the think scale so that a virtual service model sends a defined number of responses at specified times.
This companion lets you batch responses for a virtual service model. You can specify a schedule for sending responses. For example, you can send 100 responses every day at 8:15. The requests can arrive at any time, but VSE only responds at 8:15. If there are fewer than 100 pending responses, VSE sends all the responses. If there are more than 100 pending responses, VSE sends 100 responses and saves the rest until the next batch.
VSE only responds to incoming requests; it does not generate unsolicited responses. If VSE receives 12 requests, it sends 12 responses, even if the is greater than 12.Quantity
This companion is useful only for the SAP transport protocol.
Enter the following parameters in the companion editor:

DevTest Solutions - 9.5
25-Jul-2016 103/448
EnabledSpecifies whether to enable the companion.
TimeDefines when to send the responses.
00:00 to 23:59.Values:
QuantityDefines the maximum number of responses to send.
Click , , , and to add, move, and delete rows in the table.Add Up Down Delete Response Schedule
Repeat dailySpecifies whether to send responses each day.
Send all at onceSpecifies how to distribute the responses.Values:
Selected: Sends the responses all at once or as the requests arrive for the specified interval until the size limit is reached.
Cleared: Spreads the responses evenly between the time for the current batch until the time for the next batch or the scheduled end time.
Schedule End TimeIf the check box is cleared, this field defines the end time for the last-scheduled Send all at oncetime in the table.Response Schedule
00:00 to 23:59.Values: The value must be later than the last-scheduled time in the table.Limits: Response Schedule
Example:
Assume that the table contains two entries:Response Schedule
The first entry has the values 08:00 and 10.
The second entry has the values 08:10 and 10.
Also assume that the check box is cleared and the field is set to Send all at once Schedule End Time08:15.
When you deploy the virtual service model, the results of this configuration are:
One response each minute between 08:00 and 08:10
One response every 30 seconds between 08:10 and 08:15.
These results assume that the service receives enough requests with matching responses during those periods.

DevTest Solutions - 9.5
25-Jul-2016 104/448
Recurring Period Think Time CompanionThe companion adjusts response think time to send a batch of Recurring Period Think Timeresponses for every time period that you specify.
This companion lets you batch responses for a virtual service model. You can specify a schedule for sending responses. For example, you can send 100 responses every hour. The requests can arrive at any time, but VSE only responds on the hour. If there are fewer than 100 pending responses, VSE sends all the responses. If there are more than 100 pending responses, VSE sends 100 responses and saves the rest until the next batch.
VSE only responds to incoming requests; it does not generate unsolicited responses. If VSE receives 12 requests, it sends 12 responses, even if the is greater than 12.Quantity
This companion is useful only for the SAP transport protocol.
Enter the following parameters in the companion editor:
EnabledSpecifies whether to enable the companion.
StartDefines when the timer starts.
Values:
Immediately
On the Quarter Hour
On the Half Hour
On the Hour
EveryDefines the number of minutes or hours to wait between sending responses.
QuantityDefines the maximum number of responses to send.
Repeat dailySpecifies whether to send responses each day.
Send all at onceSpecifies how to distribute the responses.Values:
Selected: Sends the responses all at once or as the requests arrive until the size limit is reached.
Cleared: Spreads the responses evenly over the configured period.
Example:

DevTest Solutions - 9.5
25-Jul-2016 105/448
Example:
Assume that the field is set to Immediately and the field is set to 5 minutes. Also assume Start Everythat the field is set to 10 and the check box is cleared.Quantity Send all at once
When you deploy the virtual service model, the result of this configuration is one response every 30 seconds. This result assumes that the service receives enough requests that have matching responses during those periods.
Create a Sandbox Class Loader for Each Test Companion
The Create a Sandbox Class Loader for Each Test companion lets you verify that every test run executes in its own Java Class loader (JVM). This companion is valuable when testing local Java objects that are not designed for multithreaded or multiuser access. Most testing does not require this companion. It is usually only necessary when testing local Java objects with the Dynamic Java Execution step.
To configure the Class Loader Sandbox companion, use the Class Path Sandbox companion editor.
If the directory contains the class you want to run, select the hotDeploy Add Hot Deploy Path Entriescheck box.
If the directory does not contain the class you want to run, click to add a line in hotDeploy Addthe list, then add the appropriate class path.Class Path Directories
Note: Any Java objects that you want to edit or run must be in the class path or the directory. They must not be in the DevTest or directories. The Class hotDeploy lib bin
Loader Sandbox will not work because of the way the Java VM loads classes.
Set Final Step to Execute CompanionThe Set Final Step to Execute companion lets you verify that the system under test is left in a consistent state regardless of the test result. You specify which step is always run last when the normal test flow is circumvented.
A common use is to ensure that resources are released at the end of the test. Specifying the first step is not commonly needed, but there are many scenarios where specifying the final step is important.
The final step is executed even if the test case reaches an End step or the test case is instructed to end abruptly.
The final step is not shown in the Execution History list in the ITR. The results can be seen in the Events tab for the last step that was executed.
The Set Final Step companion Editor is used to set the final step.

DevTest Solutions - 9.5
25-Jul-2016 106/448
The Set Final Step companion Editor is used to set the final step.
To configure the Set Final Step companion, enter the following parameter:
Final StepSelect the final step to execute from the drop-down list.
A step that is designated as the final step to execute is noted with a green flag icon.
Negative Testing CompanionThe Negative Testing companion is useful when you want all your steps to fail. To cause a normal-ending test case to fail if any contained test step passes, use this companion.
This companion has no configuration parameters.
Fail Test Case CompanionIf a step in a test case has an error, the Fail Test Case companion marks a test case as failed, even if it ends successfully. The companion registers an event listener for the EVENT_TRANSFAILED event.
Example: A WSDL validation assertion on a web service step has an error. You want to be informed that the validation failed, but you also want the test case to continue.
This companion has no configuration parameters.
XML Diff Ignored Nodes CompanionThe XML Diff Ignored Nodes companion lets you enter XPath expressions that return one or more nodes in the following table. The companion uses an OR operation to collect these nodes, then ignores them during all XML diff comparisons for this test case.
JSON Ignored Nodes CompanionThe JSON Ignored Nodes companion works with the JSON Ensure Result Equals assertion. Without this companion, the result of applying the JSON Path to a JSON response must be equivalent to the
for the assertion to pass. However, some JSON properties (for example, a timestamp) Expected valuethat are returned as part of the response are different each time a response is returned. To exclude these properties from the baseline comparison, enter the or into the JSON JSON Name JSON ValueIgnored Nodes Companion.

DevTest Solutions - 9.5
25-Jul-2016 107/448
JSON Ignored Nodes Companion

DevTest Solutions - 9.5
25-Jul-2016 108/448
JSON Ensure Result Equals assertion

DevTest Solutions - 9.5
25-Jul-2016 109/448
Correlation SchemesYou can enable correlation in the following test steps:
JMS Send Receive Step (see page 369)
IBM MQ Native Send Receive Step (see page 408)
RabbitMQ Send Receive Step (see page 412)
Overview of Correlation SchemesConsider a messaging service with two clients that are running simultaneously. Each client can send a request message to the same request queue. The service can process the requests in any order and can send the response messages to a response queue. How does each client receive its own response and not receive the response that is meant for the other client?
The most common solution is to incorporate some type of identifier into the request, and copy the identifier into the response. This identifier is known as a . Each client uses a unique correlation IDcorrelation ID. Some mechanism is used to ensure that each client can only receive a response containing the correlation ID for that client.
The following graphic shows an example of correlation IDs being used with two clients.
Correlation schemes differ based on:

DevTest Solutions - 9.5
25-Jul-2016 110/448
Correlation schemes differ based on:
How they route responses to the correct client by correlation ID
Where the correlation ID is located in the request and response messages
Correlation IDMost messaging platforms have a correlation ID field. In this scheme, the client generates a unique ID and sends a request message containing that ID in the correlation ID field. Before the service sends the response message, the service copies the correlation ID from the request message to the response message. The client listens for a response message that contains the same correlation ID as the original request.
By default, the correlation ID is automatically generated. To specify the value manually, use the field.Manual Value
The list indicates whether to generate a new correlation ID for each new transaction or use Reuse IDthe same correlation ID throughout the test.
Message ID to Correlation IDThis scheme is similar to the Correlation ID scheme.
Most messaging platforms also have a message ID field, which contains a unique identifier for the message. The message ID is automatically generated.
Before the service sends the response message, the service copies the message ID of the request message to the correlation ID of the response message. The client listens for a response message that contains a correlation ID that matches the message ID of the original request.
You cannot specify the message ID manually. You cannot reuse message IDs.
PayloadThis scheme is based on a correlation ID that is embedded in the payload of the request and response messages. The scheme has an associated that controls how the correlation ID is payload schemeembedded. The default payload scheme lets you define XPath expressions for obtaining the correlation ID from the messages.
The following graphic shows an example of the JMS Payload correlation scheme with the XPath payload scheme.

DevTest Solutions - 9.5
25-Jul-2016 111/448
Screen capture of JMS Payload correlation scheme.
The list indicates whether to generate a new correlation ID for each new transaction or use Reuse IDthe same correlation ID for the duration of the test.
You cannot mix the Payload correlation scheme with the other two correlation schemes on the same queue. If one listener is listening on a queue with the Payload correlation scheme, then all listeners on that queue must be using the Payload correlation scheme. However, you can use Correlation ID and Message ID to Correlation ID as payload schemes for the Payload correlation scheme.
ReplyTo and Temporary Response QueuesThis approach is not a correlation scheme that you can select in a test step, but it achieves the same goal.
In some messaging applications, rather than having a set response queue, the client specifies its own response queue when sending the request. This queue is called the ReplyTo queue. The service sends the response to that queue.
Usually, this approach is used with temporary queues. The client creates its own temporary queue, sends that in its request as the ReplyTo queue, receives a response on that temporary queue, and deletes the temporary queue when finished.

DevTest Solutions - 9.5
25-Jul-2016 112/448
Data Set DescriptionsA is a collection of values that can be used to set properties in a test case or virtual service data setmodel at run time.
This section describes the following data sets:Read Rows from a Delimited Data File Data Set (see page 112)Create Your Own Data Sheet Data Set (see page 113)Create Your Own Set of Large Data Data Set (see page 116)Read Rows from a JDBC Table Data Set (see page 118)Create a Numeric Counting Data Set (see page 119)Read Rows from Excel File Data Set (see page 120)Read DTOs from Excel File Data Set (see page 122)Unique Code Generator Data Set (see page 127)Random Code Generator Data Set (see page 128)Message-Correlation ID Generator Data Set (see page 128)Load a Set of File Names Data Set (see page 129)XML Data Set (see page 130)
Read Rows from a Delimited Data File Data SetThe Read Rows from a Delimited Data File data set assigns values to properties based on the contents of a text file. It is the most commonly used type of data set in DevTest Solutions. The first line of the text file specifies the names of the properties into which the data values are stored. The subsequent lines list the data values to be used for these properties. The text file is created using a simple text editor.
The following example shows a comma-delimited data file. The first row shows the property names in this data set.
Notepad file with month,day,year - example of a Delimited Data File data set
The Data Set Editor is used to define the data set.
Complete the following fields:

DevTest Solutions - 9.5
25-Jul-2016 113/448
NameEnter the name of the data set.
LocalDesignates whether the data set is global or local. Global is the default. Local data sets are created with one for each simulator. Global data sets are created once and shared by all simulators.
RandomWhether the record after the current record (sequential access) is read, or a random record is read. Sequential reading is the default.
Max Records to FetchThe upper bound on the number of records to fetch for random access. This text field is disabled if the check box is not selected.Random
At End Of DataSelect the action for the end of the data set. You can start over, reading values from the start of the data set, or you can select the step to execute.
File LocationThe full path name of the text file, or browse to file with the Browse button.
File EncodingAccept the default encoding of UTF-8 or select an alternate encoding from the drop-down list. You can also select and click to have an encoding type selected for you.Auto-detect Detect
DelimiterThe delimiter being used. Any character can be a delimiter. The drop-down list contains common delimiters.
Click to test and load the data. You get a message that confirms that the data set can Test and Keepbe read, and shows the first set of data.
Test successful message dialog
Create Your Own Data Sheet Data SetThe Create Your Own Data Sheet data set lets you generate your data set data in DevTest, without requiring any reference to an external file.
DevTest Solutions - 9.5
25-Jul-2016 114/448
The data sheet consists of a data table. The column headings specify the property names and the table rows specify the data values for those properties. The table skeleton is built by specifying the number of rows and the column names (properties). The default name is Create your own Data Sheet. Subsequent data sheets that are created have "~number" appended to the data sheet name.
Complete the following fields:
NameEnter the name of the data set.
LocalDesignates whether the data set is global or local. Global is the default. Local data sets are created with one for each simulator. Global data sets are created once and shared by all simulators.
RandomWhether the record after the current record (sequential access) is read, or a random record is read. Sequential reading is the default.
Max Records to FetchThe upper bound on the number of records to fetch for random access. This text field is disabled if the check box is not selected.Random
At End Of DataSelect the action for the end of the data set. You can start over, reading values from the start of the data set, or you can select the step to execute.
Number of RowsThe initial estimate of the number of rows. This value can be modified later.
Column NamesComma delimited list of column names. These names are also the property names.
Click and enter your data into the table.Create Data Sheet Skeleton
To sort ascending or descending on a column, click the column labels. Right-click the column label for a column menu.
Encrypt ColumnTo encrypt all values in the column, select this option. An encrypted column has a lock icon and all values appear as a row of asterisks. Exporting shows that the column is <name>_enc and the data is encrypted.
:Change column nameTo rename the column, select this option.
Sort AscendingTo sort the column values ascending, select this option. To change the sort to descending, click again.
Reset SortTo sort the column values as they were originally, select this option.

DevTest Solutions - 9.5
25-Jul-2016 115/448
:Column Resize ModeSelect , , , , or .Automatic Subsequent Next Last Manual
Maximize All ColumnsSelecting this option changes the to . The columns are all displayed, Column Resize Mode Manualand scroll bars are available.
To create and modify the table, use the functions in the bottom toolbar.
AddAdd rows to the table.
Up and DownSelect a row and move it up or down in the table.
DeleteDelete the selected row.
Add ColumnAdd a column to your table.
Delete ColumnDelete a column. Select a cell in the column you want deleted, making sure that the cell is selected for editing, and click this button.
Click to test and load the data. You get a message that confirms that the data set can Test and Keepbe read, and shows the first set of data.
Test successful message dialog
You can also complete the following actions:
To sort the rows, double-click the column header.
To change the column name, right-click on the column name
To select the toolbar functions and to edit the cell, select and then right-Launch Extended Viewclick a cell.
To convert your data sheet to a data set or a file, click at the bottom of the Convert to Data Setpanel.
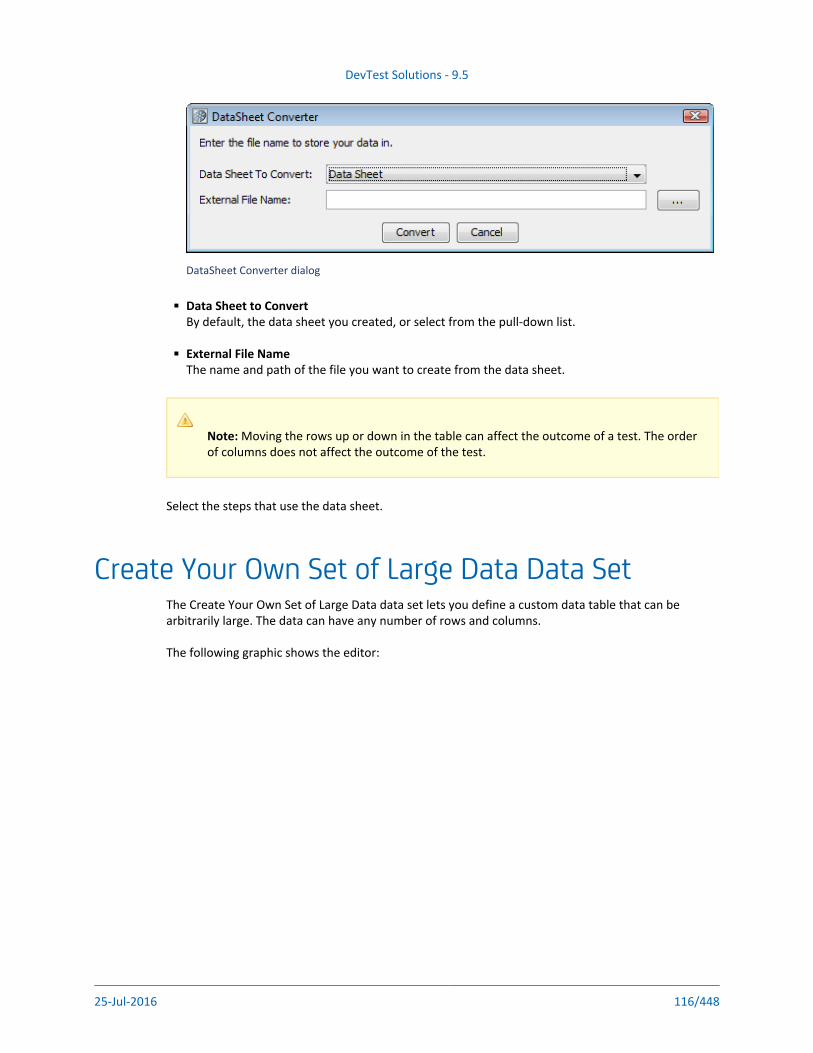
DevTest Solutions - 9.5
25-Jul-2016 116/448
DataSheet Converter dialog
Data Sheet to ConvertBy default, the data sheet you created, or select from the pull-down list.
External File NameThe name and path of the file you want to create from the data sheet.
Note: Moving the rows up or down in the table can affect the outcome of a test. The order of columns does not affect the outcome of the test.
Select the steps that use the data sheet.
Create Your Own Set of Large Data Data SetThe Create Your Own Set of Large Data data set lets you define a custom data table that can be arbitrarily large. The data can have any number of rows and columns.
The following graphic shows the editor:

DevTest Solutions - 9.5
25-Jul-2016 117/448
Create Large Data Set window with data and all parameters specified
Complete the following fields:
NameEnter the name of the data set.
LocalDesignates whether the data set is global or local. Global is the default. Local data sets are created with one for each simulator. Global data sets are created once and shared by all simulators.
RandomWhether the record after the current record (sequential access) is read, or a random record is read. Sequential reading is the default.
Max Records to FetchThe upper bound on the number of records to fetch for random access. This text field is disabled if the check box is not selected.Random
At End Of DataSelect the action for the end of the data set. You can start over, reading values from the start of the data set, or you can select the step to execute.
Backing File NameThe name of the file in which the data is stored. This file is created automatically.
The button opens a dialog that lets you specify more parameters for file creation.Create
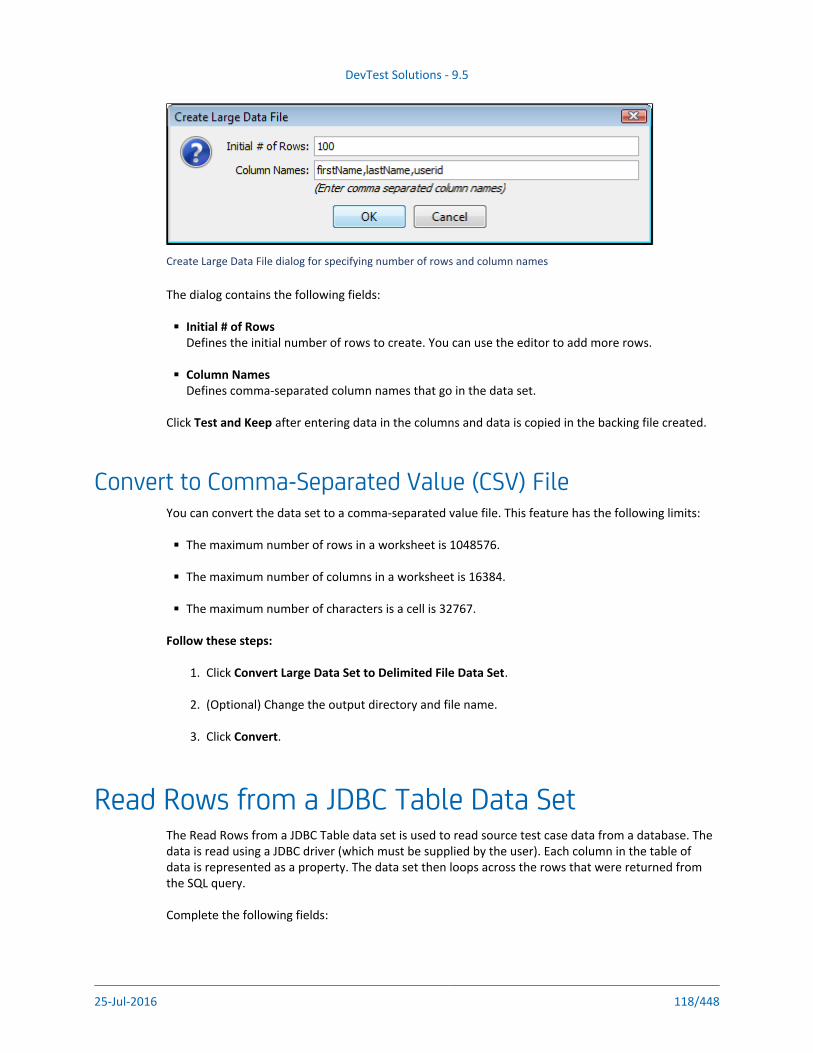
DevTest Solutions - 9.5
25-Jul-2016 118/448
1.
2.
3.
Create Large Data File dialog for specifying number of rows and column names
The dialog contains the following fields:
Initial # of RowsDefines the initial number of rows to create. You can use the editor to add more rows.
Column NamesDefines comma-separated column names that go in the data set.
Click after entering data in the columns and data is copied in the backing file created.Test and Keep
Convert to Comma-Separated Value (CSV) FileYou can convert the data set to a comma-separated value file. This feature has the following limits:
The maximum number of rows in a worksheet is 1048576.
The maximum number of columns in a worksheet is 16384.
The maximum number of characters is a cell is 32767.
Follow these steps:
Click .Convert Large Data Set to Delimited File Data Set
(Optional) Change the output directory and file name.
Click .Convert
Read Rows from a JDBC Table Data SetThe Read Rows from a JDBC Table data set is used to read source test case data from a database. The data is read using a JDBC driver (which must be supplied by the user). Each column in the table of data is represented as a property. The data set then loops across the rows that were returned from the SQL query.
Complete the following fields:

DevTest Solutions - 9.5
25-Jul-2016 119/448
NameEnter the name of the data set.
LocalDesignates whether the data set is global or local. Global is the default. Local data sets are created with one for each simulator. Global data sets are created once and shared by all simulators.
RandomWhether the record after the current record (sequential access) is read, or a random record is read. Sequential reading is the default.
Max Records to FetchThe upper bound on the number of records to fetch for random access. This text field is disabled if the check box is not selected.Random
At End Of DataSelect the action for the end of the data set. You can start over, reading values from the start of the data set, or you can select the step to execute.
Driver ClassEnter or select the full package name of the appropriate driver class. Standard driver classes are available in the pull-down menu.
Connect StringThe connect string is the standard JDBC URL for your database. Enter or select the URL. The pull-down menu contains JDBC URL templates for common database managers.
User IDEnter a user ID (if the database requires it).
PasswordEnter a password (if the database requires it).
SQL QueryThe SQL query that is used to create the data set.
Click to test and load the data. You get a dialog window that confirms that the data set Test and Keepcan be read, and shows the first set of data.
Create a Numeric Counting Data SetThe Create a Numeric Counting data set assigns a number to a property. The number assigned starts at a specific value and changes by a fixed amount every time the data set is used until it exceeds a known limit. This data set is used to simulate a "for" loop, or to set the number of times something occurs. The following example shows how to use the Create a Numeric Counting data set to make 100 calls to the same step.
Complete the following fields:
Name

DevTest Solutions - 9.5
25-Jul-2016 120/448
NameEnter the name of the data set.
LocalDesignates whether the data set is global or local. Global is the default. Local data sets are created with one for each simulator. Global data sets are created once and shared by all simulators.
RandomWhether the record after the current record (sequential access) is read, or a random record is read. Sequential reading is the default.
Max Records to FetchThe upper bound on the number of records to fetch for random access. This text field is disabled if the check box is not selected.Random
At End Of DataSelect the action for the end of the data set. You can start over, reading values from the start of the data set, or you can select the step to execute.
Property KeyThe name of the property into which the counter value is stored.
FromThe initial counter value.
ToThe final counter value.
IncrementThe counter step amount. To use counter data set to count backwards, set a negative Increment value.
Click to test and load the data. A message confirms that the data set can be read, and Test and Keepshows the first set of data.
Read Rows from Excel File Data SetThe Read Rows from Excel File data set assigns values to properties based on the contents of an Excel spreadsheet.
The first nonblank row of the Excel spreadsheet specifies the names of the properties to which the data values are assigned. The subsequent rows list the data values to be used for these properties. The first full row of empty cells is treated as the end of data.
For example, you can test a set of first name, last name, user ID, and password combinations.

DevTest Solutions - 9.5
25-Jul-2016 121/448
Complete the following fields:
NameEnter the name of the data set.
LocalDesignates whether the data set is global or local. Global is the default. Local data sets are created with one for each simulator. Global data sets are created once and shared by all simulators.
RandomWhether the record after the current record (sequential access) is read, or a random record is read. Sequential reading is the default.
Max Records to FetchThe upper bound on the number of records to fetch for random access. This text field is disabled if the check box is not selected.Random
At End Of DataSelect the action for the end of the data set. You can start over, reading values from the start of the data set, or you can select the step to execute.
File LocationEnter the full path name of the Excel file, or browse to file with the browse button. You can use a property in the path name (for example, LISA_HOME).
Sheet NameEnter the name of the sheet in the Excel spreadsheet.
Click to test and load the data. You get a message that confirms that the data set can Test and Keepbe read, and shows the first set of data.
Select the steps that use the data set.
You can click to open and edit the Excel spreadsheet.Open XLS File

DevTest Solutions - 9.5
25-Jul-2016 122/448
1.
You can click to open and edit the Excel spreadsheet.Open XLS File
Tip: The Excel spreadsheet must not contain formulas.
Note: Excel File data sets and Excel DTO data sets can use Excel 2007 or later spreadsheets. Excel DTO data sets are still created using the XLS format.
Read DTOs from Excel File Data SetThe Read DTOs from Excel File data set lets you parameterize Java data transfer objects (DTOs) in your test steps. The data set gives you an easy way, through Excel spreadsheets, to provide data values for those parameters.
The Read DTOs from Excel file data set assigns values to the properties of a DTO and stores the object in a property. This property can then be used whenever the DTO is required as a parameter. The data in the data set can be simple data types like numbers or strings, or complex data types such as DTOs, arrays, and collections. The data that is represented in Excel is converted into the proper data types automatically when needed. The only complex part of using this data set is the initial creation of the Excel spreadsheet. Fortunately, the creation is done for you. Given the package name of the DTO, a template is created, using one or more Excel sheets that represent the object. Data types such as primitives, strings, arrays of primitives and simple individual DTOs can be represented on a single sheet. More complex data types, such as arrays of objects, require more Excel sheets to represent the full DTO.
Often, a web service endpoint expects complex DTOs. The Excel data set simplifies creating objects to use as parameters to the web service. When the web service is first referenced, it is given a name and a URL for the WSDL. Java DTO classes in the form are com.lisa.wsgen.SERVICENAME.OBJECTNAMEautomatically generated and made available on the classpath. You can browse to that generated class in the DTO class browser, generate an Excel file, and simply fill in the template. See the following example.
Building the data set is a two-step process. First, let DevTest build the template in Excel. Then open the Excel spreadsheet and fill in the data fields in all the sheets that are produced.
To build the template:
Enter the following parameters in the Data Set Editor:
NameThe name of the data set. This name becomes the property that is used to store the current DTO object.

DevTest Solutions - 9.5
25-Jul-2016 123/448
1.
2.
3.
4.
LocalDesignates whether the data set is global or local. Global is the default. Local data sets are created with one for each simulator. Global data sets are created once and shared by all simulators.
RandomWhether the record after the current record (sequential access) is read, or a random record is read. Sequential reading is the default.
Max Records to FetchThe upper bound on the number of records to fetch for random access. This text field is disabled if the check box is not selected.Random
At End Of DataSelect the action for the end of the data set. You can start over, reading values from the start of the data set, or you can select the step to execute.
FileThe fully qualified path name, or browse to the Excel file using the browse pull-down menu.
DTO Class NameThe full package name, or browse to, the DTO object. The class file must be on Test Manager. Your class can be copied to the hotDeploy directory to put it on the Test Manager.
let you specify:Advanced Settings
Use flattened child property notation during generationSelect to override child property flattening during Excel DTO data set generation. If cleared, child properties are generated as references with their own worksheets.
Use new empty cell semantics for flattened propertiesEmpty cell semantics for flattened properties means how empty cells are interpreted in a DTO spreadsheet. For example, given the following flattened properties:
{ "prop1.subprop1", "prop1.subprop2" }
if both subprop1 and subprop2 have empty cell values, then under the new semantics the reference to "prop1" is set to null. Under the old semantics, prop1 would be not null, but references to subprop1 and subprop2 would both be null. The new semantics should be used by default, especially by web services with WSDLs that use nonnillable types. If not used in the case of nonnillable types, the intermediate not null references for containing properties that are automatically created when reading a DTO spreadsheet could result in the generation of invalid XML according to the schema (because cell values are empty).
Click . DevTest builds the template and the system messages report when Generate Templatethe file is built.
Click .Open XLS FileThe spreadsheet contains everything that is necessary to construct the object. We will show how to add data in the next section.
Close the XLS file.

DevTest Solutions - 9.5
25-Jul-2016 124/448
5. Click to test and load the data. You see a window that confirms that the data Test and Keepset can be read, and shows the first set of data.
Building the Excel spreadsheetTo facilitate this explanation, we use an actual DTO object: com.itko.example.dto.Customer. This class is included with the DevTest examples and can be found by browsing the Test Manager by clicking .Browse
The Customer DTO has the following properties:
Property Name Type
balance Double
id int
name String
poAddr Address
since Date
types int[]
locations Address[]
The Address DTO has the following properties:
Property Name Type
city String
line1 String
line2 String
state String
zip String
The first six Customer DTO properties can appear on one Excel spreadsheet. However, the locations property, an array of Address objects, requires a second Excel spreadsheet.
Looking at the first spreadsheet, at the top, DevTest lists the DTO spec (Customer) and the current DTO object (Customer). The spreadsheet would also list the Java doc location, if available. The following graphic shows the data sheet, with a row specifying property names, followed by a row specifying the data types. The first field (column) is not a DTO property, but a special field (Primary key), that holds a unique value for each row.

DevTest Solutions - 9.5
25-Jul-2016 125/448
Excel file with with a row specifying property names, followed by a row specifying the data types
Looking at the data sheet we can see:
Each row contains the data for a single Customer DTO.
The poAddr property, of type Address, has been "flattened" and its properties are listed on this sheet. These properties are prefixed with poAddr and then the property name in the address object (that is, poAddr.city).
The since property, of type date, is prefilled with the current date. This entry is to show you the required format for the date mm/dd/yyyy. All dates must have this format in the Excel template.
The types property, of type int[], is a single cell that can contain the array elements as a comma-separated list. This list is only possible for arrays of primitives or strings.
The location property, of type Address[], does not appear on this sheet. Because it is an array of objects, the location property is on the second sheet in the Excel file. This sheet contains the data for an Address object in each row. There are wo special fields in this sheet: "Primary Key", and the "reference the containing DTO" field that is used to link the rows in this sheet to the rows in the primary sheet.
Excel file his sheet contains the data for an Address object in each row
Because each Customer object can have several locations, several rows in the locations sheet belong to an object specified in a single row of the Customer sheet. The second sheet manifests this by listing the primary key of the parent Customer object in the "reference the containing DTO" field of each location that belongs to the Customer. This is similar to primary/foreign key relationships in databases.

DevTest Solutions - 9.5
25-Jul-2016 126/448
Excel spread sheet, second sheet example
Excel file for Read DTOs from Excel File Data Set
When you save the spreadsheet and click in DevTest, you see the first Customer DTO Test and Keepin the message.
Message - Test successful
Depending on the complexity of your DTO, you could have several more Excel sheets in the Excel workbook. However, the process is the same as in the previous example.

DevTest Solutions - 9.5
25-Jul-2016 127/448
To see how you could use this Customer DTO as a property, see the sections on testing Java objects in Test Steps (see page 266).
Unique Code Generator Data SetThe Unique Code Generator data set provides a unique token (or code) each time DevTest calls it. The token can be numeric or alphanumeric, and can have a user-defined prefix prepended to it. The Unique Code Generator is commonly used in testing to create new users, accounts, and so on. By using the generator, you can ensure that the generated token or code does not use a value that is already inside a system.
Complete the following fields:
NameEnter the name of the data set.
LocalDesignates whether the data set is global or local. Global is the default. Local data sets are created with one for each simulator. Global data sets are created once and shared by all simulators.
RandomWhether the record after the current record (sequential access) is read, or a random record is read. Sequential reading is the default.
Max Records to FetchThe upper bound on the number of records to fetch for random access. This text field is disabled if the check box is not selected.Random
At End Of DataSelect the action for the end of the data set. You can start over, reading values from the start of the data set, or you can select the step to execute.
TypeThe type of token to return. The choices are number or alphanumeric.
Prefix (opt)Prefix to be prepended (optional).
Click to test and load the data. A dialog opens to verify that the data set is readable. Test and KeepThis dialog shows the first set of data.
This data set always returns a token. The section of the Data Set Editor has no At End of Datameaning for this data set type.

DevTest Solutions - 9.5
25-Jul-2016 128/448
Random Code Generator Data SetThe Random Code Generator data set generates numeric or alphanumeric data randomly for use in a test case. This data set is similar to the Unique Code Generator data set, but it lets you set a length for the result. This data set can be used to create a specific type of unique value, such as a telephone number or Social Security number.
Complete the following fields:
NameEnter the name of the data set.
LocalDesignates whether the data set is global or local. Global is the default. Local data sets are created with one for each simulator. Global data sets are created once and shared by all simulators.
RandomWhether the record after the current record (sequential access) is read, or a random record is read. Sequential reading is the default.
Max Records to FetchThe upper bound on the number of records to fetch for random access. This text field is disabled if the check box is not selected.Random
At End Of DataSelect the action for the end of the data set. You can start over, reading values from the start of the data set, or you can select the step to execute.
Prefix (opt)Adds a prefix to the generated data. This field is optional.
TypeThis field allows either alphanumeric or number type of data set to be generated.
LengthThis field restricts the length of the random data that is generated to the value set here.
Click to test and load the data. You get a message that confirms that the data set can Test and Keepbe read, and shows the first set of data.
Message-Correlation ID Generator Data SetThe Message/Correlation ID Generator data set is a specialized unique code generator useful for messaging. The data set generates a 24-byte unique code. The data set is designed specifically for an IBM MQ Series correlation ID, but can also be used for any JMS provider. This data set creates or updates two special properties: and . The messaging lisa.jms.correlation.id lisa.mq.correlation.idsteps recognize these properties and set the message correlation ID appropriately.

DevTest Solutions - 9.5
25-Jul-2016 129/448
Complete the following fields:
NameEnter the name of the data set.
LocalDesignates whether the data set is global or local. Global is the default. Local data sets are created with one for each simulator. Global data sets are created once and shared by all simulators.
RandomWhether the record after the current record (sequential access) is read, or a random record is read. Sequential reading is the default.
Max Records to FetchThe upper bound on the number of records to fetch for random access. This text field is disabled if the check box is not selected.Random
At End Of DataSelect the action for the end of the data set. You can start over, reading values from the start of the data set, or you can select the step to execute.
Prop to setDevTest property to set. The default is .lisa.jms.correlation.id
Load a Set of File Names Data SetThe Load a Set of File Names data set assigns a value to a property based on a filtered set of file names from the file system.
The set of file names can include all the files in a specific directory, or a set that a "file pattern" filters. Another option lets you include subdirectories in the set, recursively. The files are returned in a case-sensitive, alphabetical order, top directories first, followed by subdirectories (using depth first ordering). Each time the data set is used, it returns the next file name (full path name) in the data set. This file name is stored in a property with the same name as the data set.
Complete the following fields:
NameEnter the name of the data set.
LocalDesignates whether the data set is global or local. Global is the default. Local data sets are created with one for each simulator. Global data sets are created once and shared by all simulators.
RandomWhether the record after the current record (sequential access) is read, or a random record is read. Sequential reading is the default.

DevTest Solutions - 9.5
25-Jul-2016 130/448
Max Records to FetchThe upper bound on the number of records to fetch for random access. This text field is disabled if the check box is not selected.Random
At End Of DataSelect the action for the end of the data set. You can start over, reading values from the start of the data set, or you can select the step to execute.
Directory LocationThe full path name of the directory to scan, or you can browse using the button.Browse
File PatternA filter pattern string, using an asterisk (*) as a wild card if appropriate.
Include Files from SubdirectoriesIf the files in subdirectories are listed, select this option.
Click to test and load the data. You get a dialog that confirms that the data set can be Test and Keepread, and shows the first set of data.
Note: A large amount of data could take longer than you want; use the button to Cancelstop the operation.
XML Data SetLike other data sets in DevTest, the XML data set allows user-specified content to be added to distinct records. However, the XML data set specializes in handling XML content.

DevTest Solutions - 9.5
25-Jul-2016 131/448
XML Data Set window
At design-time, the first record of an XML Data Set populates the value for a property in test state by clicking . The property name is the same as the name of the data set. For example, if Test and Keepthe data set has the name , then the property that is populated in the test case is DataSet1"{{DataSet1}}". At run time, all of the records can be accessed sequentially to create a data-driven test case.

DevTest Solutions - 9.5
25-Jul-2016 132/448
Basic Settings TabNameThe name of this data set. This value is used as the name of the property in test step. For example, an XML Data Set with the name populates the property {{DataSet1}}.DataSet1
LocalDesignates whether the data set is global or local. Global is the default. Local data sets are created with one for each simulator. Global data sets are created once and shared by all simulators.
RandomWhether the record after the current record (sequential access) is read, or a random record is read. Sequential reading is the default.
Max Records to FetchThe upper bound on the number of records to fetch for random access. This text field is disabled if the check box is not selected.Random
At End Of DataSelect the action for the end of the data set. You can start over, reading values from the start of the data set, or you can select the step to execute.
Test and KeepAt design-time, populate the property that is associated with the data set in test state with the value of the first record.
Advanced Settings Tab
XML Data Set window - Advanced Settings tab
Directory pathThis read-only value represents the directory on the file system where records are saved. The mapping between a record and a file in the directory path is a one-to-one mapping. If an XML data set is created within a project, the directory path starts with "{{LISA_PROJ_ROOT}}/Data/datasets/xml/" or "{{LISA_RELATIVE_PROJ_ROOT}}/Data/datasets/xml/". If no project is used, the directory path starts with "{{LISA_HOME}}/datasets/xml/".

DevTest Solutions - 9.5
25-Jul-2016 133/448
Record Editing Panel
XML Data Set window - Record Editing panel
Action ButtonsFirstMove to the first record in the XML data set.
PreviousMove to the previous record.
NextMove to the next record.
LastMove to the last record.
NewCreate a record.

DevTest Solutions - 9.5
25-Jul-2016 134/448
CopyCreate a copy of the current record at the end of the data set and move to it.
DeleteDelete the current record.
SaveSave all pending changes.
RevertRevert all pending changes.
Record Number SelectorRecord X of XTo jump to a specific record, enter the record number.
Visual XML Tab
XML Data Set window - Visual XML tab

DevTest Solutions - 9.5
25-Jul-2016 135/448
Visual XML EditorMoving the mouse over the and columns displays a tooltip. The tooltip can help if the Node Valuevalue in the table is too long to be fully displayed.
Raw XML Tab
XML Data Set window - Raw XML tab
This tab contains a raw text view of the XML contained in a record.
Double-clicking the left border toggles the visibility of a top toolbar, line numbers bar, and bottom editing info bar in the editor.

DevTest Solutions - 9.5
25-Jul-2016 136/448
Event DescriptionsAn is a message about an action that has occurred.event
The following table describes the standard events.
EventName
Description Short Info Long Info
Abort This event ends a test in a "cannot finish" state. It is a failing type of end event.
Event Aborted
Assert evaluated
A non-embedded assertion will generate this event if it does not fire. These events are the assertions that did not get to execute their consequence.
The name of the assertion
Assertion fired
A non-embedded assertion will generate this event if it does fire. Firing means it is true and its consequence will be followed.
The name of the assertion
The log message of the assertion, or a DevTest-generated message if there is no log message set
Call made
Steps that perform object calls like web services or EJBs use this event to report each call that is made on the object.
The name of the step The call as a string, for example, void setName( java.lang.String name[Basic Checking] )
Call result
Steps that perform object calls like web services or EJBs use this event to report the response they get from calls.
The name of the step The call response as a string. If the response is an object, then an XML view of the object is shown.
Configure for load test
Configure for load test The test run has been configured as a load test. Selecting individual events has been disabled.
Coordinatorended
A coordinator has been removed. The name of the coordinator server
Coordinatorserver ended
The coordinator server was ended. The name of the coordinator server
Coordinatorserve
The coordinator server was created. The name of the coordinator server

DevTest Solutions - 9.5
25-Jul-2016 137/448
r started
Coordinatorstarted
A new coordinator was created. The name of the coordinator server
Cycle ended normally
The test execution completed in a successful state.
The name of the test case
Cycle ending
The instances have been instructed to stop testing.
Cycle failed
The test execution failed. That there are no exceptions in the test case, but either logic errors in the test case or in the system under test caused the test case not to complete as expected.
The name of the test case
Cycle history
Every model that runs will generate one of these events. It is the final trace of all the details of its run.
Cycle History
Cycle initialized
The test has been initialized (loaded). The name of the test case
Cycle runtime error
An abnormal DevTest error occurred. For example, the coordinator lost its connection to a simulator while running a test.
Varies but it is usually the name of the test element (step, data set, or filter) that has the error
Usually a message that explains the error
Cycle started
This test instance and cycle have just started. The name of the test case
Data set read
Data sets generate an event that makes it clear what values are about to be used.
Data set read
HTTP performance
This event is generated for every HTTP transaction that DevTest executes to capture the performance statistics.
HTTP performance statistics
Info message
Basic logging data. For example, the HTTP/HTML request step sends this message with the step name in the short field and the URL being sent to the server in the long field.
Usually the name of the step during which this message was generated
Usually a message that DevTest generated
Sent when a simulator instance has finished. The name of the simulator

DevTest Solutions - 9.5
25-Jul-2016 138/448
Instance ended
Instance started
Sent when a simulator creates an instance. The name of the simulator
Log message
Basic logging data. Can be turned off to minimize overhead when filtering events.
The message sent to the log
Metric alert
A metric has been collected and is reporting its value.
The short name of the metric, for example, DevTest: Avg Response Time
The value of the metric collected
Metric started
Metrics that are collected generate real-time events of their values.
Metric Started
Metric value
Metrics that are collected generate real-time events of their values.
Metric value
Model definition error
A test case error was discovered during execution of the test. For example, the name is constructed from a property that does not exist.
Varies but it is usually the name of the test element (step, data set, or filter) that has the error
Usually a message that explains the error
Pathfinder
The system being tested has DevTest integration enabled. This event contains the DevTest integration XML data that was captured.
The name of the step The XML representation of the DevTest Integration data captured
Property removed
A property was removed. The property key The word "<removed>"
Property set
A property was set. The property key The property value
Simulator ended
Sent when a simulator has ended. The name of the simulator
Simulator started
Sent when a simulator has started. The name of the simulator
The name of the step Actual number of bytes read/received

DevTest Solutions - 9.5
25-Jul-2016 139/448
Step bandwidthconsumed
Approximate amount of data sent and received from the system under test for the step execution.
Step error
An error has occurred in the system under test. For example, there was no response from a web server. This event is for a step. The EVENT_TESTFAILED refers to the complete test case.
The name of the step If available, a message to help determine the cause of the failure
Step history
Every step has a history event that fires of type in com.itko.lisa.test.NodeExecHistoryits long info.
Step history
Step request
Steps that support this event use it to report the actual request made to the system under test.
The name of the step The request data as a string
Step request bandwidth
Step response
A step was completed against the system under test.
The name of the step The response data as a string
Step response bandwidth
Step response time
The amount of time a step took to execute against the system under test.
The name of the step The number of milliseconds to execute the step
Step started
A step is being executed. The name of the step
Step target
Every step has a target, such as the URL for a web request or the JNDI name of an EJB.
Step warning
A warning was recorded. For example, a filter took the default value because it could not find the current value.
Step warning
Subprocess finished
A subprocess has finished executing.
Subprocess ran
A subprocess has started.

DevTest Solutions - 9.5
25-Jul-2016 140/448
Suite aborted
When a setup test (defined in a suite document) has failed, then the suite will not run the tests defined in the suite. This event indicates that this happened.
The name of the suite
Suite ended
All the tests running as part of a suite have finished.
The name of the suite
Suite history
Every suite that runs will generate one of these events. It is the final trace of all the details of its run.
Suite History
Suite setup/teardown
The suite has a setup or teardown test defined and that test has just started to run.
The name of the suite The name of the test, path to the test, and other information
Suite started
A suite is starting to run. The name of the suite
Suite test failed
A test running as part of a suite ended in failure.
The name of the suite
Suite test passed
A test running as part of a suite ended successfully.
The name of the suite
Suite test staged
A test is staged to run as part of a suite. The name of the suite The name of the test, path to the test, and other information
Test ended
Sent when the coordinator stops the test. The name of the test case
Test not active
A test in a suite is marked as inactive. Event Test Not Active
Test started
Sent when the coordinator starts the test. The name of the test case
VS log message
VSE internal logging VS log message
VS no transaction match
A virtual service did not match a transaction request to at least one recorded response.
VS transaction no match
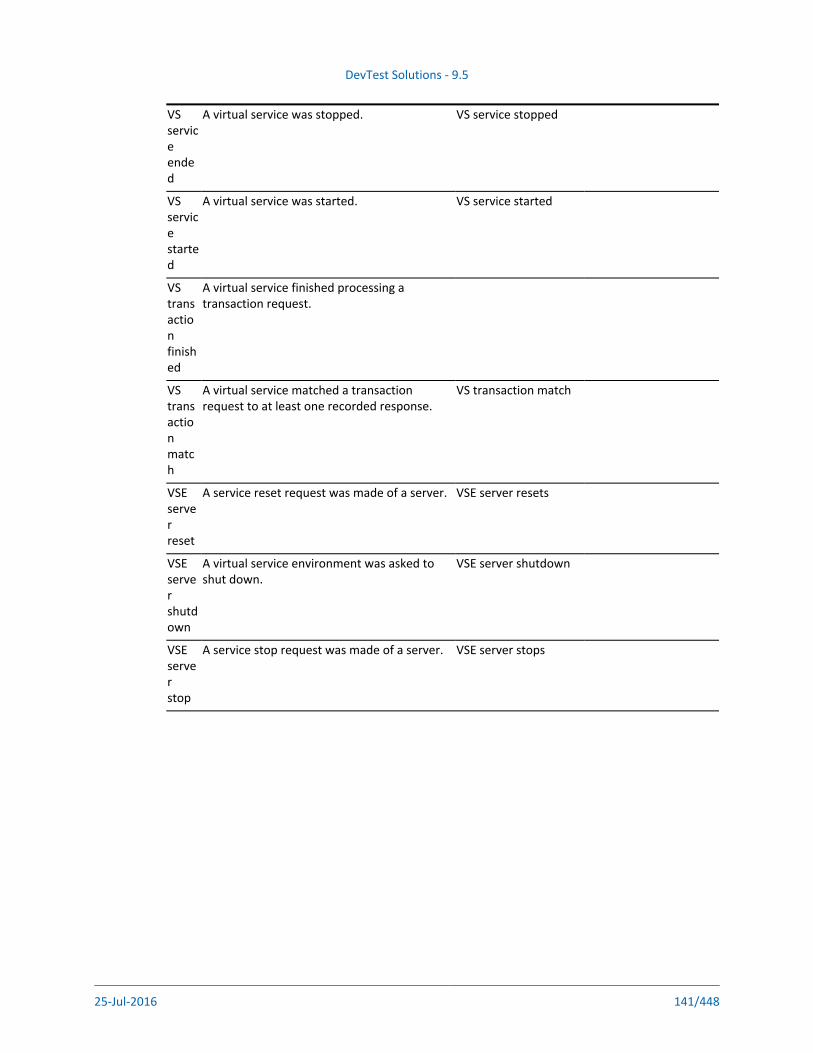
DevTest Solutions - 9.5
25-Jul-2016 141/448
VS service ended
A virtual service was stopped. VS service stopped
VS service started
A virtual service was started. VS service started
VS transaction finished
A virtual service finished processing a transaction request.
VS transaction match
A virtual service matched a transaction request to at least one recorded response.
VS transaction match
VSE server reset
A service reset request was made of a server. VSE server resets
VSE server shutdown
A virtual service environment was asked to shut down.
VSE server shutdown
VSE server stop
A service stop request was made of a server. VSE server stops

DevTest Solutions - 9.5
25-Jul-2016 142/448
Filter DescriptionsA is an element that runs before and after a step.filter
This section describes the following filters:Utility Filters (see page 142)Database Filters (see page 148)Messaging/ESB Filters (see page 154)HTTP/HTML Filters (see page 156)XML Filters (see page 171)JSON Filters (see page 176)Java Filters (see page 178)VSE Filters (see page 180)CAI Filters (see page 181)Copybook Filters (see page 182)
Regular expressions are used for comparisons in several filters. For more information about regular expressions, see .Regular Expressions (http://psoug.org/reference/regexp.html)
Utility FiltersThe following filters are available in the Utility Filters list for any test step:
Create Property Based on Surrounding Values (see page 142)Store Step Response (see page 145)Override Last Response Property (see page 145)Save Property Value to File (see page 146)Parse Property Value As Argument String (see page 146)Save Property from One Key to Another (see page 147)Time Stamp Filter (see page 148)
Create Property Based on Surrounding ValuesThe Create Property Based on Surrounding Values filter lets you read textual content and filter it for information to be stored in DevTest properties. The filter can be used on text, and on XML and HTML treated as text. The filter uses a "paint the screen" technique.
"Paint the screen" gives you great flexibility to define what in the HTML you want to parse as properties. Mark the text in one of the following ways:
Text that must appear in the response exactly as shown: a Must block.
Text that is not required to appear in the response, or can change: an Any block.

DevTest Solutions - 9.5
25-Jul-2016 143/448
Text that is stored in a property: a Property block.
The text is marked using the icons at the bottom of the editor.
Filter editor toolbar with icons identified
In the following example, the goal is to store the size of a specific file in a property.
The text is marked using the editor icons, by selecting the text, and then clicking the appropriate icon.
Yellow background indicates text that must appear as shown (indicated by the arrows from "Text
uses ........."). This is a Must block and is marked using the Must icon.
Red background identifies the text that is stored in the property that is entered in the dialog (indicated by a single arrow). This is a Property block and is marked using the Property icon.
Note: Property blocks must always be bounded by Must blocks.

DevTest Solutions - 9.5
25-Jul-2016 144/448
Create Property Based on Surrounding Values window
This screen shows the contents of the text buffer. The goal is to parse the file size of the _misc-reporting.jar file. The file size is the number that appears after ._misc-reporting.jar
The boundaries are set around the file size, and has been clicked. The actual file size text Mustinside the selected content was selected, and was clicked.Property
The property name was then entered into the dialog. The actual value of the file size has been replaced with the name of the property.
When this filter is run, the property is assigned the size of the _misc-reporting.jar file.filesize
You can repeat this process on this text buffer to define as many properties as necessary.
Handling Nonunique TokensIf you see the following error message, your selected token is not unique; the selection you made is repeated in the token before it.

DevTest Solutions - 9.5
25-Jul-2016 145/448
Parse Web Page for Properties error message
To solve this issue in most cases, simply create another token to make the prior token a Must token also. In other cases, when this technique does not work, a judicious placement of another Must block between the two duplicate tokens avoids the error.
This solution works because DevTest can distinguish between the two duplicate tokens, which are based on their relative location.
Store Step ResponseThe Store Step Response filter lets you save the last response as a property for future use.
Complete the following fields:
Filter inWhere to apply the filter. You cannot change this value for this filter.
PropertyThe name of the property to store the last response.
Filter Run Results
Displays the property and values that result from running the filter.
Run Filter
To run and execute the filter, click . The results appear in the section.Run Filter Filter Run Results
Override Last Response PropertyThe Override "Last Response" Property filter lets you replace the current value of the last response with the value of an existing property. For example, assume that you execute an EJB, but you eventually receive a value after making some method calls on the EJB. Using the result of a method call (instead of the EJB object) as the last response could improve the test case. You can use a filter to save the return value from that call as a property, and then use that property in this filter.
Complete the following fields:
Filter in

DevTest Solutions - 9.5
25-Jul-2016 146/448
Filter in
The name of the property to consider as the last response for the step. If the property is not in the pull-down menu, you can enter it. The property must exist.
Convert to XMLSelect this option if you want the response to be converted to valid XML.
Filter Run Results
Displays the property and values that result from running the filter.
Filter in
The name of the property to consider as the last response for the step. If the property is not in the pull-down menu, you can enter it. The property must exist.
Save Property Value to FileThe Save Property Value to File filter lets you save the value of an existing property to a file in your file system.
Complete the following fields:
Filter inThe name of the property whose value is written to the file.
LocationThe path name of the file to write the value to. You can browse to the file. You can use properties in the location.
Append ModeTo append the information to an existing file, select this check box.
Filter in
The name of the property to consider as the last response for the step. If the property is not in the pull-down menu, you can enter it. The property must exist.
Run Filter
To run and execute the filter, click . The results appear in the section.Run Filter Filter Run Results
Parse Property Value As Argument StringThe Parse Property Value As Argument String filter lets you store the text of a specific attribute in a property. This filter is useful as a second filter, where you parse a filtered value for information.
Complete the following fields:
Filter in

DevTest Solutions - 9.5
25-Jul-2016 147/448
Filter inThe name of the existing property to parse. For example, to parse the "lisa.deleteUser.cookies.rsp" property to return the value of the SESSIONID attribute, enter lisa.deleteUser.cookies.rsp.
IsURLSelect this check box if the property value is a URL.
AttributeThe attribute to retrieve. The example shows the JSESSIONID attribute.
PropertyThe name of the property to store the text of the attribute. The example shows sessionID.
Default (if not found)If the attribute is not found, the default value to use.
Filter Run Results
Displays the property and values that result from running the filter.
Run Filter
To run and execute the filter, click . The results appear in the section.Run Filter Filter Run Results
Save Property from One Key to AnotherThe Save Property from One Key to Another filter copies values from one key to another by reference where normal Java rules apply.
This filter simply optimizes BeanShell overhead for simple property copy.
Complete the following fields:
Filter inThis field accepts the property content of which is copied in some other property. This field is the input source property.
To PropertyThis field is the property name where input property content is copied.
Run FilterLets you test the filter immediately while developing test steps rather than waiting until the test case is completed.
Pre ProcessRun the filter before the step.
Post ProcessRun the filter after the step.

DevTest Solutions - 9.5
25-Jul-2016 148/448
Time Stamp FilterUse the Time Stamp filter to assign the current time and date to the property so that you can use it in the following steps.
Complete the following fields:
Filter inThe name of the existing step.
Date PatternSelect the date pattern to display.
OffsetUsed to offset the date to an appropriate (future or past) date that is based on the current date.
Pre ProcessWhen selected, generates a timestamp before the step runs.
Property for Pre ProcessThe property to store the preprocess timestamp.
Post ProcessWhen selected, generates a timestamp after the step runs.
Property for Post ProcessThe property to store the post timestamp.
Filter Run Results
Displays the property and values that result from running the filter
Run Filter
To run and execute the filter, click . The results appear in the section.Run Filter Filter Run Results
Database FiltersThe following filters are available in the Database Filters list for any test step:
Extract Value from JDBC Result Set (see page 149)Size of JDBC Result Set (see page 151)Set Size of a Result Set to a Property (see page 151)Get Value For Another Value in a Result Set Row (see page 152)

DevTest Solutions - 9.5
25-Jul-2016 149/448
1.
2.
Extract Value from JDBC Result SetThe Extract Value from JDBC Result Set filter lets you store the text of a specific JDBC result set value in a property. You can create this filter either manually from the filter list or by using the embedded filter commands on a result set response.
To create the filter manually:
Complete the following fields:
Filter in
The name of the property to consider as the last response for the step. If the property is not in the pull-down menu, you can enter it. The property must exist.
Column (1-based or name)The index or name of the column (field).
Row (0-based)The row to retrieve the value. This field is a zero-based index.
PropertyThe name of the property where the value in the cell at the row/column intersection is stored.
Filter Run Results
Displays the property and values that result from running the filter.
Run Filter
To run and execute the filter, click . The results appear in the section.Run Filter Filter Run Results
To create a filter from a result set response:
Follow these steps:
Display the step response that contains the result set.
From the result set, select the cell of the value to store in the filter.

DevTest Solutions - 9.5
25-Jul-2016 150/448
2.
3.
4.
5.
Creating a filter from a result set response example
Click , as the arrow in the previous graphic shows.Generate Filter
In the dialog, enter the property key:
Enter the property key dialog
Click .OK
The filter to store the value in the property is created.sbellum theLogin

DevTest Solutions - 9.5
25-Jul-2016 151/448
The filter to store the value in the property is created.sbellum theLogin
Size of JDBC Result SetThe Size of JDBC Result Set filter lets you check that the result set returned in each JDBC-based step matches the criteria that are specified. The filter is a simple filter to handle most common database errors automatically.
This filter does not affect non-JDBC steps, and is often used as a global filter in a test case.
Complete the following fields:
Result Set Has WarningsSome databases return warnings in the result set. If your database supports this feature and you want a warning to fire the step for this filter, select this check box.On error
Row Count >=The minimum number of rows in the result set. If the result set contains less than this value, the filter sets the next step to the value specified in step.On Error
Row Count <_=The maximum number of rows in the result set. If the result set contains more than this value, the filter sets the next step to the value specified in step.On Error
On ErrorThe step to execute if the conditions for this filter are not met.
Note: This filter can serve the purpose of a general global assertion because you can select a next step based on the presence of an error.
Set Size of a Result Set to a PropertyThe Set Size of a Result Set to a Property filter lets you store the count of a result set to a property provided.
Complete the following fields:
Filter in
The name of the property to consider as the last response for the step. If the property is not in the pull-down menu, you can enter it. The property must exist.
Property to Store Row CountUser-provided property name to store the row count. The default property name is PROP.
Filter Run Results
Displays the property and values that result from running the filter.
DevTest Solutions - 9.5
25-Jul-2016 152/448
1.
2.
Displays the property and values that result from running the filter.
Run Filter
To run and execute the filter, click . The results appear in the section.Run Filter Filter Run Results
Get Value For Another Value in a Result Set RowThe Get Value For Another Value in a Result Set Row filter lets you search a column (field) in a result set for a specific value. If the value is found the value in another column (field) and the same row is placed in a property.
You can create this filter either manually from the filter list or by using the embedded filter commands on a result set response.
To create the filter manually:
Complete the following fields:
Filter in
The name of the property to consider as the last response for the step. If the property is not in the pull-down menu, you can enter it. The property must exist.
Search Text (Regular Expression)The search string.
Search Column (1-based or Name)The index or name of the column to search.
Value Column (1-based or Name)The index or name of the column to extract the property value.
PropertyThe name of the property to store the value.
Filter Run Results
Displays the property and values that result from running the filter.
Run Filter
To run and execute the filter, click . The results appear in the section.Run Filter Filter Run Results
To create the filter from a result set response:
Display the step response that contains the result set.
From the result set select the two values in different columns, using the Ctrl key.

DevTest Solutions - 9.5
25-Jul-2016 153/448
2.
3.
4.
5.
Create the filter from a result set response
Select and then get another column value filter using the icon.Filter for a value Filter
In the the dialog, select or reassign the columns for the Generate Value for Value Filtersearch and the value, then enter the Property Key.
Generate Value for Value Filter dialog
Click .OK
DevTest Solutions - 9.5
25-Jul-2016 154/448
The filter that is created in this example is the same as the filter you created manually in the previous example.
In the example, is searched for, and if found, the value in the EMAIL column of that row is sbellumplaced in the property .theEmail
Messaging/ESB FiltersThe following filters are available in the Messaging/ESB Filters list for any test step:
Extract Payload and Properties from Messages (see page 154)Convert an MQ Message to a VSE Request (see page 155)Convert a JMS Message to a VSE Request (see page 155)
Extract Payload and Properties from MessagesDevTest auto extracts several internal properties of messages into properties in the test step using the Extract Payload and Properties from Messages filter. You can also select to auto extract the payload into a property. This method is a fast way to get data from a message.
Different messaging platforms impose various restrictions and can be seen as warnings at run time.
The property names can default to , or you can specify the prefix. You can lisa.stepName.messagespecify an exact name for the payload.
Complete the following fields:
Filter in
The name of the property to consider as the last response for the step. If the property is not in the pull-down menu, you can enter it. The property must exist.
Get PayloadSelect this option if you require a payload.
Property key to store the PayloadEnter or select the property key to use as the payload.
Prefix for extracted detailsEnter the prefix to be attached to the property name in the result.
Get Message IDSelect to get the message ID.
Get Correlation ID where appropriateSelect to get the correlation ID.
Additional extended propertiesSelect to get any additional extended properties.

DevTest Solutions - 9.5
25-Jul-2016 155/448
Run Filter
To run and execute the filter, click . The results appear in the section.Run Filter Filter Run Results
Convert an MQ Message to a VSE RequestThe Convert an MQ Message to a VSE Request filter is automatically added from the VSE Recorder. This filter serves the specific purpose that enables proper functioning with recordings. Use it carefully. If this filter is added to a step in a VSE model, do not remove or edit it.
Complete the following fields:
Filter in
The name of the property to consider as the last response for the step. If the property is not in the pull-down menu, you can enter it. The property must exist.
Object formSelect to get the Object Form.
Track Correlation IDSelect to track the correlation ID.
Track Message IDSelect to track the message ID.
Transaction Tracking TypeSelect the appropriate tracking type from - Sequential, Correlation ID, Message ID, or Message ID to Correlation ID.
Run Filter
To run and execute the filter, click . The results appear in the section.Run Filter Filter Run Results
Convert a JMS Message to a VSE RequestThe Convert a JMS Message to a VSE Request filter is automatically added from the VSE Recorder. This filter serves the specific purpose that enables proper functioning with recordings. Use it carefully. If this filter is added to a step in a VSE model, do not remove or edit it.
Complete the following fields:
Filter in
The name of the property to consider as the last response for the step. If the property is not in the pull-down menu, you can enter it. The property must exist.
Object formSelect to get the Object Form.
Track Correlation ID

DevTest Solutions - 9.5
25-Jul-2016 156/448
Track Correlation IDSelect to track the correlation ID.
Track Message IDSelect to track the message ID.
Transaction Tracking TypeSelect appropriate tracking type from: Sequential, Correlation ID, Message ID, or Message ID to Correlation ID.
Run Filter
To run and execute the filter, click . The results appear in the section.Run Filter Filter Run Results
HTTP/HTML FiltersThe following filters are available in the HTTP/HTML Filters list for any test step:
Create Resultset from HTML Table Rows (see page 156)Parse Web Page for Properties (see page 158)Parse HTML/XML Result for the Value of a Specific Tag or Attribute (see page 161)Parse HTML Result for Specific Value and Parse It (see page 163)Parse HTML Result for the Child Text of a Tag (see page 164)Parse HTML Result for HTTP Header Value (see page 165)Parse HTML Result for the Value of an Attribute (see page 165)Parse HTML Result for DevTest Tag (see page 166)Choose Random HTML Attribute (see page 166)Parse HTML into List of Attributes (see page 167)Parse HTTP Header Cookies (see page 168)Dynamic Form Filter (see page 168)Parse HTML Result by Searching Tag Attribute Values (see page 169)Inject HTTP Header (see page 170)
Create Resultset from HTML Table RowsThe Create Resultset from HTML Table Rows filter lets you create a result set (for example, a JDBC result set) from an HTML table that the response returns. You can select the columns and rows of an HTML table, then create a result set from them. You can then use the result set to generate assertions exactly as in a database step.
You can create this filter by selecting it from the filter list and defining the parameters. However, it is easier to create the filter directly from the HTTP/HTML Request step response using one of the filter commands for that step. This approach is used here. The parameters that are produced in the following procedure (the parameters you would calculate to create this filter manually) are shown later in this section.
To create a filter on a table:

DevTest Solutions - 9.5
25-Jul-2016 157/448
1.
2.
3.
4.
5.
To create a filter on a table:
Record a web page that contains the table.
Go to the appropriate HTML step, and view it from the DOM tree.
Select the values to place in the table, using the key to select multiple fields. Select one Ctrlexample value from each column in the table that you want to use in the result set.
Create HTML Table Results Filter from an HTML step
When it is highlighted, select .Create HTML Table Results Filter
Enter the property name in the window.
Enter property key name dialog

DevTest Solutions - 9.5
25-Jul-2016 158/448
5.
The property is now available in the test case.
The property is added to the current step. The following graphic shows the parameters that were calculated for this step. These parameters are required when you create this filter manually.
Create Resultset from HTML Table Rows filter parameters
To show the filter results, we added a step of type Save Property as Last Response and added the property that the filter creates. The result set panel displays the results.
Result set panel showing results of Create Resultset from HTML Table Rows filter
If you are editing a test case, you may need to replay the test case to generate the property from the filter using the command. To do so, use the Replay test case to a specific point Replay test case to a
command. The command is activated by clicking specific point Replay test case to a specific point
on the toolbar. You can now use the embedded filters and assertions that are available Replayat the bottom of the result set window of this step.
Parse Web Page for PropertiesThe Parse Web Page for Properties filter lets you view a rendered web page to create properties from the HTML content. This filter uses the "paint the screen" technique.
"Paint the screen" gives you great flexibility to define what in the HTML you want to parse as properties. Mark the text in one of the following ways:
Text that must appear in the response exactly as shown: a Must block.
Text that is not required to appear in the response, or can change: an Any block.
Text that is stored in a property: a Property block.

DevTest Solutions - 9.5
25-Jul-2016 159/448
1.
2.
The text is marked using the icons at the bottom of the editor.
In the following example, assume that the website title "LisaBank - Home" changes from user to user, and therefore must be stored as a property.
This window shows the HTML that is rendered in a browser in the top panel, and the actual HTML text in the bottom panel.
To create properties from fields on a website:
Navigate to the field identified in the HTML text in the bottom panel.

DevTest Solutions - 9.5
25-Jul-2016 160/448
2.
3.
4.
5.
Select the text and click .MustIn this example, the selected field is the website title. The yellow highlights indicate text that must appear exactly as shown.
Select the name text inside the highlighted content, and click .PropertyIn this example, the website name text, "LisaBank - Home," is selected.
Click .PropertyThe dialog is displayed.Select Property
Enter the property name into the dialog.In the HTML text in the bottom panel, the name of the property replaces the website name text. The red background identifies the text that is stored in the property that is entered into the dialog.
Note: All blocks must always be bounded by blocks.Property Must
Frequently you can do this action purely from the web page view by selecting the content in the web browser. It can be easier to click the web browser in the area that you want to select, and then make your selection in the HTML panel.
The property is assigned the current value that appears on the HTML page when the Website Titlefilter runs. The website title can change its location in the text buffer and it is still found and parsed for the property.
To define more properties, repeat this process on this text buffer.
Handling Nonunique Tokens
If you see the following error message, your selected token is not unique; the selection you made is repeated in the token before it.

DevTest Solutions - 9.5
25-Jul-2016 161/448
To solve this issue in most cases, simply create another token to make the prior token a Must token also. In other cases, when this technique does not work, a judicious placement of another Must block between the two duplicate tokens avoids the error.
This solution works because DevTest can distinguish between the two duplicate tokens, which are based on their relative location.
Parse HTML/XML Result for the Value of a Specific Tag or Attribute
The Parse HTML/XML Result for the value of a Specific Tag or Attribute filter lets you get specific attributes from an HTML tag.
You can create this filter either manually from the filter list or by using the embedded filter commands on a result set response.
To create the filter manually:
Complete the following fields:
Filter in
The name of the property to consider as the last response for the step. If the property is not in the pull-down menu, you can enter it. The property must exist.
TagThe name of the HTML tag. For an image tag, enter "IMG".
Tag CountThe occurrence of the tag from the top of response. For the first image tag, enter "1".
AttributeThe name of the attribute to filter. For the source attribute, enter "src".
PropertyThe property in which to store the value.
Default (if not found)The value to use if the attribute value is not found.

DevTest Solutions - 9.5
25-Jul-2016 162/448
1.
2.
3.
4.
URLEncodeWhen selected, property value is URLEncoded.
Filter Run Results
Displays the property and values that result from running the filter.
Run Filter
To run and execute the filter, click . The results appear in the section.Run Filter Filter Run Results
To create the filter from the HTTP/HTML request step response page:
Display the step response that contains the HTML response.
Step response that contains HTML
From the view, select the attribute whose value you want to store in a property.DOM Tree
When it is highlighted, select .Parse Value Filter
Enter the property name in the window.

DevTest Solutions - 9.5
25-Jul-2016 163/448
4.
HTML/XML Filter Info dialog
You can also add assertions here.
Parse HTML Result for Specific Value and Parse ItThe Parse HTML Result for the Value of a Specific Tag or Attribute Value and Parse It filter combines the following filters:
Parse HTML Result for the Value of an Attribute
Parse Property Value as Argument String
This filter is designed to find a specific attribute in a web page, and then further parse that attribute. If the attribute is a URL, and not only a name-value pair, there is a function for handling that information.
In this example, the filter finds the "href" attribute for the seventh anchor tag, which is a URL. The filter takes the "cmd" parameter and stores that value in the .cmdlistusers_KEY
Complete the following fields:
Filter in
The name of the property to consider as the last response for the step. If the property is not in the pull-down menu, you can enter it. The property must exist.
TagThe name of the HTML tag. For an anchor tag, enter "a".
Tag CountThe occurrence of the tag from the top of response. For the seventh anchor tag, enter "7".
AttributeThe name of the attribute to filter. For the href attribute, enter "href".
IsURLSelect the check box if the attribute value is a URL.
Argument to Parse

DevTest Solutions - 9.5
25-Jul-2016 164/448
Argument to ParseThe name of the argument to parse for its value; in this example, "cmd".
PropertyThe property in which to store the value.
In this example, "cmdlistusers_KEY".
URLEncodeWhen selected, property value is URLEncoded.
Default (if not found)The value to use if the attribute value is not found.
Filter Run Results
Displays the property and values that result from running the filter.
Run Filter
To run and execute the filter, click . The results appear in the section.Run Filter Filter Run Results
Parse HTML Result for the Child Text of a TagThe Parse HTML Result for the Child Text of a Tag filter lets you store the child text of a tag in a property.
Complete the following fields:
Filter in
The name of the property to consider as the last response for the step. If the property is not in the pull-down menu, you can enter it. The property must exist.
TagThe type of the tag. For example, for an h1 tag, enter "h1".
Tag CountThe occurrence of the tag. For the child text of the third h1 tag, enter "3".
PropertyThe property in which to store the value.
Filter Run Results
Displays the property and values that result from running the filter.
Run Filter
To run and execute the filter, click . The results appear in the section.Run Filter Filter Run Results

DevTest Solutions - 9.5
25-Jul-2016 165/448
Parse HTML Result for HTTP Header ValueThe Parse HTML Result to HTTP Header Value filter is commonly used to save the HTTP header Server in a property with the name .SERVER_NAME
Complete the following fields:
Filter in
The name of the property to consider as the last response for the step. If the property is not in the pull-down menu, you can enter it. The property must exist.
HTTP Header KeyThe name of the HTTP header; for example, "Server".
PropertyThe property in which to store the value.
Filter Run Results
Displays the property and values that result from running the filter.
Run Filter
To run and execute the filter, click . The results appear in the section.Run Filter Filter Run Results
Parse HTML Result for the Value of an AttributeThe Parse HTML Result for the Value of an Attribute filter lets you store the text of a specific attribute in a property. The attribute can occur anywhere in the result, including scripting code.
Complete the following fields:
Filter in
The name of the property to consider as the last response for the step. If the property is not in the pull-down menu, you can enter it. The property must exist.
AttributeThe type of attribute to retrieve. For example, for the URL of an anchor tag, enter "href".
CountThe occurrence of the tag. For example, for the URL of the third anchor tag on the page, enter "3".
In this example, "anchor3".
PropertyThe property in which to store the value.
Filter Run Results

DevTest Solutions - 9.5
25-Jul-2016 166/448
Displays the property and values that result from running the filter.
Run Filter
To run and execute the filter, click . The results appear in the section.Run Filter Filter Run Results
Parse HTML Result for DevTest TagThe Parse HTML Result for DevTest Tag filter provides a way for developers to test-enable their web applications. For an in-depth study on test-enabling, see Using the SDK (https://docops.ca.com/display
./DTS95/Using+the+SDK)
This filter lets you insert LISAPROP tags into your web page. The LISAPROP tag has two attributes: name and value. The LISAPROP tags do not show up in your web pages. They function only to provide valuable information about your web page to a tester. An example of a LISAPROP is:
<LISAPROP name="FIRST_USER" value="sbellum">.
If a tester has installed this type of filter, the property is automatically assigned the value FIRST_USER. This filter removes any need for the tester to parse for this value. This type of filter helps a sbellum
developer make the testing easier.
Frequently a web page does not contain the information that is necessary for proper validation, or that information is difficult to parse. Even when the information exists, subtle changes in the generated HTML can result in incorrect parsing. This filter can resolve many parsing issues for web testing.
No parameters are required.
Choose Random HTML AttributeThe Choose Random HTML Attribute filter lets you store the text of a random selection from a set in a property. The attribute can occur anywhere in the result, including scripting code.
Complete the following fields:
Filter in
The name of the property to consider as the last response for the step. If the property is not in the pull-down menu, you can enter it. The property must exist.
Outer TagThe outer element that contains the list from which to pick. For example, to select a drop-down list, enter the text "select".
Tag CountThe occurrence of the outer tag. For example, to select the second drop-down list, enter the text "2".

DevTest Solutions - 9.5
25-Jul-2016 167/448
Inner TagThe tag to pick the attribute from, randomly. To pick a random item in the drop-down list, enter the text "option".
Filter AttributeAn optional field to specify attribute names to exclude from the pick list.
Filter ValueAn optional field to specify attribute values to exclude from the pick list.
AttributeThe attribute from which to retrieve text. If this field is blank, the child text of the inner tag is returned.
Property KeyThe property to store the text of the attribute.
Filter Run Results
Displays the property and values that result from running the filter.
Run Filter
To run and execute the filter, click . The results appear in the section.Run Filter Filter Run Results
Parse HTML into List of AttributesThe Parse HTML into List of Attributes filter lets you store the text of a set of attributes as a list in a property.
Complete the following fields:
Filter in
The name of the property to consider as the last response for the step. If the property is not in the pull-down menu, you can enter it. The property must exist.
Outer TagThe outer element that contains the list of tags to parse. For example, to store all the links from all the anchor tags in a table, enter "table".
Outer Tag CountThe occurrence of the outer tag. For the second table, enter "2".
Inner TagThe tag to retrieve the values from. For example, for all the anchor tags in the table enter "a".
Filter AttributeAn optional field to specify attribute names that must not appear in the pick list.

DevTest Solutions - 9.5
25-Jul-2016 168/448
Filter ValueAn optional field to specify attribute values that must not appear in the pick list.
AttributeThe attribute of the inner tag to retrieve the text from. If this field is blank, the child text of the inner tag is returned. To store all the links from all of the anchor tags in a table, enter "href".
Property KeyThe name of the property to store the text of the attribute.
Filter Run Results
Displays the property and values that result from running the filter.
Run Filter
To run and execute the filter, click . The results appear in the section.Run Filter Filter Run Results
Parse HTTP Header CookiesThe Parse HTTP Header Cookies filter lets you parse the HTTP header and store cookie values in a property that starts with a specific prefix.
Complete the following fields:
Filter in
The name of the property to consider as the last response for the step. If the property is not in the pull-down menu, you can enter it. The property must exist.
Property PrefixA text string that is prefixed to the cookie name to provide the property name to use. The full names of these properties are therefore dependent on the names of the cookies that were returned. The cookie names can be identified in the tab of the Interactive Test Run (ITR).Property
Filter Run Results
Displays the property and values that result from running the filter.
Run Filter
To run and execute the filter, click . The results appear in the section.Run Filter Filter Run Results
Dynamic Form FilterThe Dynamic Form filter identifies dynamically generated forms in HTML responses and parses them into a set of properties. The property key that you enter becomes part of the property name for each form element in each form. This behavior is easier to understand by examining the example that follows.

DevTest Solutions - 9.5
25-Jul-2016 169/448
You could test an HTML page with two dynamically generated forms:
<form name="F001" action="index.jsp"> <input type="text" name="0001A" value="default" /> <input type="text" name="0001B" value="" /></form><form name="F002" action="orders.jsp"> <input type="text" name="0002A" value=Key"" /> <input type="text" name="0002B" value="" /></form>
Dynamic Form Filter window
Using a property key of FormTest in the filter panel creates the following key/value pairs:
Key Value
FormTest.Form1.text1.name 0001A
FormTest.Form1.text1.value default
FormTest.Form1.text2.name 0001B
FormTest.Form1.text2.value
FormTest.Form2.text1.name 0002A
FormTest.Form2.text1.value
FormTest.Form2.text2.name 0002B
FormTest.Form2.text2.value
Parse HTML Result by Searching Tag Attribute ValuesThe Parse HTML Result by Searching Tag/Attribute Values filter lets you filter an attribute value by searching the tag for the name and value of another attribute. If multiple tags fit the criteria, you can specify which tag to use.
Complete the following fields:
Filter in
The name of the property to consider as the last response for the step. If the property is not in the pull-down menu, you can enter it. The property must exist.
TagThe name of the tag to search.

DevTest Solutions - 9.5
25-Jul-2016 170/448
Search Criteria AttributeThe attribute to search for.
Search Criteria Value ExpressionThe attribute expression to search for.
Tag CountThe specific tag to use from those tags that satisfy the search criteria.
AttributeThe attribute whose value you want.
PropertyThe property in which to store the value.
Default (if not found)
The value to use if the attribute value is not found.
URLEncodeWhen selected, property value is URLEncoded.
Filter Run Results
Displays the property and values that result from running the filter.
Run Filter
To run and execute the filter, click . The results appear in the section.Run Filter Filter Run Results
Inject HTTP HeaderThe Inject HTTP Header filter lets you replace a header in an HTTP call with the header defined in the filter. If no such header exists, a new header is added.
Note: For an example that uses this filter, see Test Templates (https://docops.ca.com/display./DTS95/Test+Templates)
This filter is a global filter.
The following test steps are supported:
HTTP/HTML Request
REST
Web Service Execution (XML)

DevTest Solutions - 9.5
25-Jul-2016 171/448
Complete the following fields:
Header KeySpecifies the key of the header.
Header ValueSpecifies the value of the header.
Skip To StepSpecifies the last step to exclude from being updated. This step is optional. For example, assume that the test case has four steps: A, B, C, and D. If you set this field to B, then the filter applies only to steps C and D. If you set this field to C, then the filter applies only to step D.
The headers are case sensitive. For example, is different from .Authorization authorization
The following graphic shows an example of this filter. The field is set to . Header Key AuthorizationThe field is set to .Header Value {{token_type}}{{space}}{{access_token}}
Screen capture of Inject HTTP Header filter.
XML FiltersThe following filters are available in the XML Filters list for any test step:
Parse Text from XML (see page 171)Read Attribute from XML Tag (see page 173)Parse XML Result for DevTest Tag (see page 175)Choose Random XML Attribute (see page 175)XML XPath Filter (see page 175)
Parse Text from XMLThe Parse Text from XML filter stores the child text of a tag in a property. To define a Parse Text from XML filter, set the type of the filter and set the three attributes.
You can create this filter either manually from the filter list or by using the embedded filter commands on an XML response.
To create the filter manually:
Complete the following fields:

DevTest Solutions - 9.5
25-Jul-2016 172/448
1.
Filter in
The name of the property to consider as the last response for the step. If the property is not in the pull-down menu, you can enter it. The property must exist.
You can edit this value for this filter.
TagThe type of the tag. For example, if you want the child text of the multiRef tag, enter "multiRef". You can use a property in this field.
Tag CountThe occurrence of the tag. For example, if you want the child text of the first multiRef tag, set the count to "1". You cannot use a property in this field.
PropertyThe property in which to store the value.
Filter Run Results
Displays the property and values that result from running the filter.
Run Filter
To run and execute the filter, click . The results appear in the section.Run Filter Filter Run Results
To create the filter directly from the response page:
Response window, DOM Tree tab
From the view, select the attribute whose value you want to store in a property.DOM Tree

DevTest Solutions - 9.5
25-Jul-2016 173/448
2.
3.
After it is selected, select .Generate Filter for Attribute or Text
Enter the property name in the dialog.
HTML/XML Filter Info dialog
Assertions can also be added here.
Read Attribute from XML TagThe Read Attribute from XML Tag filter lets you store the text of a specific attribute in a property. The attribute can occur anywhere in the result.
You can create this filter either manually from the filter list, or by using the embedded filter commands on an XML response.
To create the filter manually:
Complete the following fields:
Filter in
The name of the property to consider as the last response for the step. If the property is not in the pull-down menu, you can enter it. The property must exist.
TagThe name of the XML tag; for example, "target".
Tag CountThe occurrence of the tag from the top of response; for the first tag enter "1".
AttributeThe name of the attribute to filter; for the href attribute enter "href".
PropertyThe property in which to store the value.
Default (if not found)The value to use if the attribute value is not found.
URLEncode

DevTest Solutions - 9.5
25-Jul-2016 174/448
1.
2.
3.
4.
URLEncodeWhen selected, property value is URLEncoded.
Filter Run Results
Displays the property and values that result from running the filter.
Run Filter
To run and execute the filter, click . The results appear in the section.Run Filter Filter Run Results
To create the filter from the response page:
Display the step response that contains the XML.
Step response
From the view, select the attribute whose value you want to store in a property.DOM Tree
When it is highlighted, select .Generate Filter for Attribute or Text
Enter the property name in the window.

DevTest Solutions - 9.5
25-Jul-2016 175/448
4.
HTML/XML Filter Info
You can also add an assertion here. A Property Value Expression Assertion can be added to this step.
Parse XML Result for DevTest TagThe Parse XML Result for DevTest Tag filter provides a way for developers to test-enable their XML applications. For an in-depth study on test-enabling, see Using the SDK (https://docops.ca.com/display
./DTS95/Using+the+SDK)
This filter lets you insert LISAPROP tags into your XML page. The LISAPROP tag has two attributes: name and value. The LISAPROP tags function only to provide valuable information about your XML to a tester. An example of a LISAPROP is:
<LISAPROP name="FIRST_USER" value="sbellum">.
If a tester has installed this type of filter, the property "FIRST_USER" is automatically assigned the value . This filter removes any need on behalf of the tester to parse for this value. This type of sbellumfilter helps a developer make the testing easier.
Sometimes the XML does not contain the information that is necessary to validate properly, or that information is difficult to parse. Even when the information exists, subtle changes in the generated XML can result in incorrect parsing. This LISAPROP filter can resolve many parsing issues.
No parameters are required.
Choose Random XML AttributeThe Choose Random XML Attribute filter lets you store the text of a random selection from a set in a property. The attribute can occur anywhere in the result. This filter works exactly like Choose
.Random HTML Attribute (see page 166)
XML XPath FilterThe XML XPath filter lets you use an XPath query that runs on a property or the last response and stores it in a property. When this filter is selected, the last response is loaded into the content panel.

DevTest Solutions - 9.5
25-Jul-2016 176/448
You can view the response as an XML document or as a DOM tree. However, the XPath selection can be made only from the DOM tree.
Construct the XPath query by using one of the following methods:
Manually enter the XPath expression in the text box.XPath Query
Select an element from the DOM tree and let DevTest construct the XPath expression.
Select an element from the DOM tree, and then edit the XPath that is constructed. For example, you can modify it to use a property, or a counter data set.
Complete the following fields:
Filter in
The name of the property to consider as the last response for the step. If the property is not in the pull-down menu, you can enter it. The property must exist.
Save To PropertyThe property in which to store the result of the XPath query.
Now construct the XPath query using one of the methods described earlier.
After an XPath query has been constructed, test it by clicking . The results of the query Run Filterappear in the pane.Filter Run Results
The property controls whether the XPath local-lisa.xml.xpath.computeXPath.alwaysUseLocalNamename() function is always used during the XPath generation. The default value is false, which means that the local-name() function is used only when necessary. To generate an XPath that works regardless of an XML node namespace, set the value to true.
Note: The DevTest XML XPath filter is based on the HTML DOM (http://www.w3.org/TR/1998 spec that maintains that all DOM element /REC-DOM-Level-1-19981001/level-one-html.html)
names must be upper case, while attribute names must be lower case.
JSON FiltersThe following filter is available in the JSON filters list for any test step:
JSON Path Filter (see page 176)
JSON Path FilterThe JSON Path filter lets you obtain a property value or length from a JSON result and save it to a property.

DevTest Solutions - 9.5
25-Jul-2016 177/448
The following graphic shows the editor:
Screen capture of JSON Path filter.
Note: Web sites are available to check the validity of the JSON path expression. One example is . Another resource is the editor for the https://jsonpath.curiousconcept.com/
assertion.Ensure Result Equals (see page 37)
Complete the following fields:
Filter inSpecifies the name of the property to filter for the step. If the property is not in the pull-down menu, you can enter it. The property must exist. You can edit this value for this filter.
JSON PathDesignates an expression that consists of a sequence of JSON properties in a JSON document. The
represents a path to a destination JSON property.JSON Path
The right portion of the filter editor can help you determine the value of the field. The JSON PathJSON document for the step response appears. When you select the icon for a node in Namecolumn, the field is populated.JSON PathAn array filter, denoted by a expression, can be applied to an array as a select criteria to select ?()
certain array elements. For example, can be used to select array members whose ?(@.age > 20)

DevTest Solutions - 9.5
25-Jul-2016 178/448
certain array elements. For example, can be used to select array members whose ?(@.age > 20)age is greater than 20. Another example is , which selects array ?(@.name in ('Mary', 'John'))members whose name is either Mary or John.The following table lists supported filter operators that are available for JSON data types.
Operator String Number Boolean
== (equal) supported supported supported
!= (not equal) supported supported supported
>= not supported supported not supported
<= not supported supported not supported
> not supported supported not supported
< not supported supported not supported
in supported supported not supported
not in supported supported not supported
Save Value to PropertyDesignates the name of the property where the property value of the JSON path is saved.
Save Length to PropertyDefines the name of the property where the number of components in the attribute value of the JSON path is saved. If the property value is an array, the number of components is the number of elements in the array. If the property value is a JSON object, the number of components is the number of properties in the JSON object. For simple data types such as String or Number, the number of components is 1.
Filter Run Results
Displays the property and values that result from running the filter.
Run Filter
To run and execute the filter, click . The results appear in the section.Run Filter Filter Run Results
Java FiltersThe following filters are available in the Java Filters list for any test step:
Java Override Last Response Property Filter (see page 179)Java Store Step Response Filter (see page 179)Java Save Property Value to File Filter (see page 180)

DevTest Solutions - 9.5
25-Jul-2016 179/448
Java Override Last Response Property FilterThe Last Response property contains the response from the previous step. For example, if the previous response was an HTTP step, the last response is the web page that was returned. To make the last response be something other than the default value, use the Override "Last Response" Property filter. This filter lets you replace the current value of the last response with the value of an existing property.
Complete the following fields:
Filter in
The name of the property to consider as the last response for the step. If the property is not in the pull-down menu, you can enter it. The property must exist.
Convert to XMLIf you want the response to be converted to valid XML, select this option.
Filter Run Results
Displays the property and values that result from running the filter.
Run Filter
To run and execute the filter, click . The results appear in the section.Run Filter Filter Run Results
For more information, see .Override Last Response Property (see page 145)
Java Store Step Response FilterThe Store Step Response filter lets you save the last response as a property for future use.
Complete the following fields:
Filter inEnter the response to which to apply the filter. The previous graphic shows , lisa.Add User.rspwhich means that the filter is applied to the response of Add User. You cannot change this value for this filter.
PropertyThe property in which to store the value.
Filter Run Results
Displays the property and values that result from running the filter.
Run Filter
To run and execute the filter, click . The results appear in the section.Run Filter Filter Run Results

DevTest Solutions - 9.5
25-Jul-2016 180/448
Java Save Property Value to File FilterThe Save Property Value to File filter lets you save the value of an existing property to a file in your file system.
Complete the following fields:
Filter inThe name of the property whose value you want written to the file.
LocationThe path name of the file to write the value to. You can browse to the file. You can use properties in the location.
Append ModeTo append the information to an existing file, select this check box.
Filter Run Results
Displays the property and values that result from running the filter.
Run Filter
To run and execute the filter, click . The results appear in the section.Run Filter Filter Run Results
VSE FiltersThe following filter is available in the VSE Filters list for any test step:
Data Protocol Filter (see page 180)
Data Protocol FilterThe Data Protocol filter is used on protocol-specific listen steps for virtual models. It provides the necessary wrapper for a data protocol to act as a filter, which is the appropriate functionallity for the VSE run-time side.
To open its editor, click the filter.
Complete the following fields:
Filter inEnter the response to which to apply the filter. The previous graphic shows , lisa.Get User.rspwhich means that the filter is applied to the response of Get User. You cannot change this value for this filter.
Data ProtocolSelect the appropriate data protocol to be used from the drop-down list.

DevTest Solutions - 9.5
25-Jul-2016 181/448
Process RequestsSelect to see the process request.
Process ResponsesSelect to see the process response.
Run Filter
To run and execute the filter, click . The results appear in the section.Run Filter Filter Run Results
CAI FiltersThe following filters are available in the CAI Filters list for any test step:
DevTest Integration Support for CA CAI (see page 181)DevTest Integration Support for webMethods Integration Server (see page 182)
DevTest Integration Support for CA CAIThe DevTest Integration Support for CA CAI filter is a common filter to enable CAI for all the technologies that DevTest supports. This filter collects extra information from a CAI application.
DevTest supports integration with web services, JMS, servlets, EJB, and Java objects.
Complete the following fields:
Error if Max Build Time (millis) ExceedsEnter build time in milliseconds. An error is generated if the build time exceeds the specified interval.
On Transaction Error StepSelect the step to redirect to on transaction error after filter is set to run.
On CAI Warnings StepSelect the step to redirect to on CAI warnings after filter is set to run.
Report Component ContentGenerate a report of the component content.
Force a Garbage Collection on the server at the start & end of the requestForces a garbage collection on the server at the start and end of the request.
Fail test if server-side exception is loggedFail the test case if an exception is thrown at the server side.
Log4J Level to capture in the test eventsSelect the log4j level that is captured in the test events.
Log4J Logger to temporarily change (blank is Root Logger)Enter the name of the logger.

DevTest Solutions - 9.5
25-Jul-2016 182/448
DevTest Integration Support for webMethods Integration Server
The DevTest Integration Support for webMethods Integration Server filter collects additional information from a CAI-enabled webMethods Integration Server.
Complete the following fields:
Error if Max Build Time (millis) ExceedsEnter build time in milliseconds. An error is generated if the build time exceeds the specified interval.
On Transaction Error StepSelect the step to redirect to on transaction error after filter is set to run.
On CAI Warnings StepSelect the step to redirect to on CAI warnings after filter is set to run.
Copybook FiltersThe following filter is available in the Copybook Filters list for any test step:
Copybook Filter (see page 182)
Copybook FilterThe Copybook Filter converts copybook payloads to XML at run time. You can review and maintain your data by displaying these payloads in XML.
To open its editor, click the filter.
Complete the following fields:
Filter inSpecifies the name of the property to filter for the step. If the property is not in the pull-down menu, you can enter it. The property must exist. You can edit this value for this filter.
Copybook definition fileDesignates the location where you store your copybook file definition.
EncodingSelect a valid Java charset. This value is used to try to convert the bytes in the payload into text for use in the output XML.
UTF-8Default:

DevTest Solutions - 9.5
25-Jul-2016 183/448
Copybook parser column startCopybooks frequently start each line with a line number. This parameter defines the column on which the parser starts when trying to parse a copybook file definition.
A zero-based inclusive index. However, you can think of it as a "normal" one-based Value:exclusive index.
6Default: If you set this value to 6, the parser skips the first six characters in a line and starts with Example:
the seventh character.
Copybook parser column endOccasionally, copybooks contain other reference data at the end of each line. When that happens, the parser must know on which column to stop. If there is no "extra" data at the end of the lines in the file, set this number to something greater than the length of the longest line in the file. If this number is greater than the length of a line, the parser stops at the end of the line.
A zero-based exclusive index. However, you can think of it as a "normal" one-based Value:inclusive index.
If you set this value to 72, the parser reads the 72nd character in the line and then it Example:stops.
Filter Run Results
Displays the property and values that result from running the filter.
Run Filter
To run and execute the filter, click . The results appear in the section.Run Filter Filter Run Results
For performance purposes, the Copybook filter caches the copybook definition in memory for 86400 seconds. When the time expires, DevTest removes the converted copybook definition from the cache. If the file is needed again, DevTest reads and reconverts it.

DevTest Solutions - 9.5
25-Jul-2016 184/448
Metrics DescriptionsMetrics let you apply quantitative methods and measurements to the performance and functional aspects of your tests, and the system under test.
This section describes the following metrics:
DevTest Whole Test Metrics (see page 184)
DevTest Test Event Metrics (see page 185)
SNMP Metrics (see page 186)
JMX Metrics (see page 187)
TIBCO Hawk Metrics (see page 190)
Windows Perfmon Metrics (see page 191)
UNIX Metrics Via SSH (see page 193)
DevTest Whole Test MetricsWhole Test Metrics collect all the basic information about the test case.
The following submetrics are collected:
Instances (the number of virtual users)
Avg Resp Time
Max Resp Time
Min Resp Time
Last Resp Time
Steps Per second
The response time metrics are reported in milliseconds.
Note: The number of virtual users (Instances), average response times (Avg Resp Time), and Steps Per Second sub metrics are added by default to the metric list in a staging document.

DevTest Solutions - 9.5
25-Jul-2016 185/448
DevTest Test Event MetricsTest Event Metrics provide metrics in regard to DevTest events. These metrics include counters and gauges.
Event metrics let you filter events of a specific type by including a regular expression to match the short description field of the event.
The Test Event Metrics category has the following submetrics:
Coordinator server started
Coordinator server ended
Coordinator started
Coordinator ended
Test started
Test ended
Instance started
Instance ended
To add test event metrics:
In addition to selecting the metric, you can specify:
Key Expression Match: Enter an expression to say to sample the chosen event only if it has this expression in its short description field. If you leave this field blank, or enter *, then every event of this type is reported.
Metric is a Counter: If this box is selected, the value counts over time are recorded. If the box is cleared, the absolute value is recorded (metric is functioning as a gauge).
Test Event metrics are meant to track the presence of specific events in the workflow engine. When the check box is selected, the metric collector tracks the number of times that the chosen Counterevent was observed. The count increases as the test runs; however, the graphs in DevTest Workstation and the reporting console shows the value that was collected during the sampling period. This is the default option for Test Event Metrics.
If the check box is not selected, the metric collector attempts to parse the long description Counterof the event as a number. During the sampling period the collector keeps a running total of these parsed values. When the metric is reported it is a simple average of the parsed numbers. The running total is reset for each sampling period. If there is not a number value that is contained in the long description of the event, the metric value is 0.
The default sampling period is 1 second and can be modified in the staging document.
Click to add this metric to the list of metrics.OK

DevTest Solutions - 9.5
25-Jul-2016 186/448
1.
Click to add this metric to the list of metrics.OK
SNMP MetricsThe SNMP metrics use the Simple Network Management Protocol (SNMP) to monitor the system performance.
Setting up SNMP Support
Configure SNMP before you can collect the SNMP metrics. For more details about setting up SNMP on UNIX and Windows, see Install and Configuring SNMP (https://docops.ca.com/display/DTS95/Install+and+Configure+SNMP).
To add SNMP Metrics:
Select from the dialog and click .SNMP Metric OKThe dialog opens.Add SNMP MetricThe tree displays all the SNMP metrics that come standard with DevTest MIB GroupsWorkstation.A MIB is a predefined database of a set of metrics on a specific domain.
HostThe field provides system information about a server hosting a coordinator server. HostSome host metrics include for CPU utilization and for hrProcessorLoad hrSystemUptime the amount of time after this host was last initialized.
Server O/SProvides information that is related to the system, like up time, date, and number of users.
BEA WebLogicProvides JDBC, JMS, JVM, socket, servlet, and web application information about a Server running BEA WebLogic. Some BEA WebLogic metrics include jvmRuntime-
for the current amount of free memory in the JVM heap in bytes, and HeapFreeCurrent for the current total number of webAppComponentRuntimeOpenSessionsCurrentCount
open sessions in this component.
RDBMSProvides information about a server running a generic relational database management system. Some RDBMS metrics include for the number of physical rdbmsSrvInfoPageReads page reads that were completed after the RDBMS was last restarted, and
for the number of single page writes that were completed after rdbmsSrvInfoPageWrites the RDBMS was last restarted.
OracleProvides information about a server running Oracle. Some Oracle metrics include
for the number of user commits, and for oraDbSysUserCommits oraDbSysUserRollbacks the number of times data has rolled back.

DevTest Solutions - 9.5
25-Jul-2016 187/448
1.
2.
3.
4.
5.
Microsoft SQL ServerProvides information about a server running Microsoft SQL Server. Some Microsoft SQL Server metrics include for the percentage of time that a mssqlSrvInfoCacheHitRatio requested data page was found in the data cache (instead of being read from disk), and
for the number of open user connections.mssqlSrvInfoUserConnections
To select metrics, browse through these choices.
Click the target metric in the left panel.The required parameters for this target metric are completed in the form in the MIB Objectright panel. A description of the metric is displayed in the text box. The other information can be ignored or accepted.
Enter the domain name or IP address of the host computer (Host) where you are collecting the metrics. To add this metric, click .OK
Repeat until you have added all the target SNMP metrics.To add SNMP metrics that are not in the tree, manually enter the data (OID) into MIB Groupthe form. An OID is the unique identifier of a specific metric, using a tree-MIB Objectstructured naming scheme. The domain root OID for ITKO is ".1.3.6.1.4.1.12841.1.1", so all SNMP metrics start from there.The button lets you browse the file system for MIBs.Load From MIBThe button lets you browse an SNMP tree.SNMP Walk
Note: All SNMP MIBs are supported. The set of MIBs displayed in the Add SNMP Metric dialog are only a sample of the MIBs that are supported. The dialog Add SNMP Metricmakes it easier to understand the Object IDs (OIDs) in those MIBs. However, any valid OID works, not only those OIDs that are displayed in the dialog. A set of all Add SNMP Metricthe standard MIBs from IETF and IANA are provided. Those MIBs are stored in the
and directories.LISA_HOME\snmp\ietf LISA_HOME\snmp\iana
JMX MetricsThe JMX metrics use the Java Management Extension (JMX) API to provide metrics.
These JMX connectors are provided for an easy setup:
Any JSR 160 RMI connection
JBoss 3.2-4.0
JSE 5 Connector
Oracle AS (OCJ4)
Tomcat 5.0.28
WebLogic 6.1-8.1

DevTest Solutions - 9.5
25-Jul-2016 188/448
1.
2.
3.
4.
5.
a.
b.
c.
6.
WebLogic 6.1-8.1
WebLogic 9.x
WebSphere 5.x
ITKO JMX Agents
Each of these applications requires slightly different connection parameters. The values that you require for your server are available from your server administrator. Each provider provides slightly different metrics. To use other JMX features, you can invoke them as RMI steps.
Only numerical attributes are supported.
The following example uses JBoss.
Follow these steps:
Select from the dialog.JMX Attribute Reader
Click .OKThe dialog opens.Select and Configure JMX Agent
Select from the list of JMX Connectors.JBoss
Enter the and for your installation.Server Naming URL Agent RMI name
The values that you enter in the remaining fields depend on whether your JBoss server requires authentication to access JMX data.
If your JBoss server does not require authentication for JMX access, use the default context factory "org.jnp.interfaces.NamingContextFactory".
If your JBoss server does require authentication:
Change the context factory to "org.jboss.security.jndi.JndiLoginInitialContextFactory".
Enter the username and password (principal and credentials) needed for the authentication.
Enter the JAAS login module that will authenticate these credentials.
Click .OKThe opens.JMX Object Attribute Viewer

DevTest Solutions - 9.5
25-Jul-2016 189/448
6.
7.
8.
9.
10.
11.
JMX Object Attribute Viewer
On the left is the JMX Domain hierarchy for JBoss. JMX metrics use an object-attribute model. In this model, domain objects are published by the specific application server (for example, "system"), and attributes are name/value pairs inside the object.When you select an object from this tree, then the base attributes of that object are also displayed in the tree. After you select a base attribute, the rest of the attribute name appears in the list in the top right panel.Object AttributeIn the previous example, we selected the domain object to be jboss.system, the base attribute to be ServerInfo, and the rest of the attribute name to be FreeMemory. The attributes for ServerInfo are displayed in the Object Attribute panel.
To select one of these attributes (metrics), select the metric, and click .Add This metric is added to the list of selected metrics in the panel Selected Attributes to Monitorat the bottom of the window.To remove an attribute from this panel, click .Delete
Repeat this process until all of your chosen metrics appear in your list (bottom panel).
Click to return to the main metrics panel.OKNotice that the JMX metrics are now on the list of metrics.Depending on the application server, vendor-specific JARs could be required to enable the JMX communication with that application server.
Similarly, you can also select the from the JMX Connector list.JSE 5 Connector
Click to connect to the JMX Agent.OK
Enable JMX Metrics for TomcatFollow these steps:

DevTest Solutions - 9.5
25-Jul-2016 190/448
1.
2.
3.
4.
5.
6.
7.
8.
9.
1.
2.
3.
Modify the file and add .catalina.bat CATALINA_OPTSYou can use the embedded Jakarta-Tomcat that is packaged with DevTest Solutions.
Connect to Tomcat through JConsole.
Start DevTest, open a staging document, and go to the tab.Metrics
Click .Add
Select and click .JMX Attribute Reader OK
Select .Tomcat 5.0.28All parameters other than user name and password are prepopulated.
Click and connect to the JMX console.OK
Select a few objects specific to Catalina and add them in the list.
Click .OKThese attributes appear in the metrics list.
TIBCO Hawk MetricsTIBCO Hawk is a tool for monitoring and managing distributed applications and operating systems. Unlike other monitoring solutions, TIBCO Hawk software uses TIBCO Messaging software for communicating and inherits many of its benefits. These benefits include a flexible architecture, enterprise-wide scalability, and location-transparent product components that are simple to configure.
DevTest has out-of-the-box integration with TIBCO Hawk for monitoring distributed applications and operating systems metrics in the context of testing. TIBCO Hawk provides in-container metrics for TIBCO BusinessWorks process archives. By using TIBCO Hawk, DevTest can monitor metrics of all activities in any TIBCO BusinessWorks process that is deployed. This integration facilitates peering inside of a process to understand where bottlenecks are occurring. Using DevTest with Prerequisites:this application requires that you make one or more files available to DevTest. For more information, see .Third-Party File Requirements (https://docops.ca.com/display/DTS95/Third-Party+File+Requirements)
Follow these steps:
Create a staging document.
On the tab of the staging document, click .Metrics Add
Select from the drop-down list.TIBCO HawkThe following parameters are available:
Transport: Select or .Rendezvous EMS
Hawk Domain: Enter the TIBCO Hawk domain.
Rendezvous Service

DevTest Solutions - 9.5
25-Jul-2016 191/448
3.
4.
5.
6.
7.
8.
9.
Rendezvous Service
Rendezvous Network
Rendezvous Daemon
EMS Url
EMS User
EMS Password
Click .OKThe opens.Hawk Object Attribute Viewer
Select the and expand beneath it.Process Archive
The method retrieves the process definitions that are defined in the GetProcessDefinitions Process Archive.
Use the Process Definition Name as parameter for the method.GetActivities TIBCO Hawk provides a number of metrics for Process Activities.
Provide a filter with the Process Definition Name and the Activity Name.
Select and click .Method Return Values OKActivity Metrics are now monitored for test cases staged with this staging document.
TIBCO Hawk can also be invoked in a test case, through TIBCO Hawk APIs.
Note: It takes a few minutes for TIBCO Hawk to initialize itself and achieve a ready state where it can report metrics. TIBCO notifies DevTest when this ready state is achieved. It is important to set to a fairly high value (at least 2-3 minutes) to avoid lisa.net.timeout.mstimeouts when using staging documents that collect the TIBCO Hawk metrics.
Windows Perfmon MetricsThe Perfmon Metrics use Microsoft Windows Perfmon to provide metrics to monitor the system performance on a Windows operating system. These metrics are similar to the SNMP metrics.
Before you can collect the Perfmon metrics, configure Perfmon on your Windows computer.
For information about setting up Perfmon, see Install Performance Monitor (Perfmon) (https://docops.ca.com/pages/viewpage.action?pageId=312698978).

DevTest Solutions - 9.5
25-Jul-2016 192/448
1.
2.
3.
4.
Note: If you are collecting Perfmon metrics for remote computers, ensure the Remote Registry service is running. This service does not run by default on Windows 7 or Windows 8. You must manually start the Remote Registry service from the Windows Services Manager.
Follow these steps:
Select from the Metrics dialog and click .Windows Perfmon Metrics OKThe dialog opens.Windows Perfmon Machine Name
Complete the following fields:
Machine NameEnter the Machine Name of your Windows installation. You can find your machine name by right-clicking , selecting , and going to the My Computer Properties Computer Nametab.
User NameEnter the user name of the remote computer.
PasswordEnter the password of the remote computer.
DomainEnter the domain name. A domain is optional.
Click to proceed.OKAfter you enter valid login credentials, a window appears showing all the available metric types. The window opens.Windows Perfmon MetricsThe window has three panels.Perfmon Metric
The left panel displays the .Selected Performance Category
The top right panel displays the description of the selected category in the Counter section.Description
The bottom right panel lists the metric that is selected in the left panel.
Select a metric from the list.Performance CategoryThis list shows all available categories that can be monitored:
.NET CLR Remoting/ LocksandThreads
.NET CLR Data/Networking
Job Objects/Job Object Details
Performance/RSVP Service
Memory/Print Queue
ICMP/Process

DevTest Solutions - 9.5
25-Jul-2016 193/448
4.
5.
6.
7.
ICMP/Process
Outlook/Logical disk
IP/Server/Cache
After you select the category, it is added to the left panel.
Double-click the target metric in the left panel to add it to the Selected Counters to Monitortable on the right panel.
Repeat until you have added all the target Perfmon metrics.
Click .OK
UNIX Metrics Via SSHUNIX Metrics Via SSH is used to collect command-line metrics. This metric gathers inputs such as authentication details, host name, and the selection of metrics to be collected.
The metric data is stored in an XML file that is located in the directory by LISA_HOME\umetricsdefault. You can define a new location by updating the key in the stats.unix.xml.folder local.
file.properties
Each XML file has a unique file name that is based on the operating system:
Linux.xml
osx.xml
Unix.xml
windows.xml
The XML file is used to feed the information about the command and metrics to be collected on a specific operating system. For example, to make the command and metrics known on a Linux operating system, a file must be in the folder.Linux.xml LISA_HOME umetrics\
The following graphic is an example of an OS X command parser for that collects CPU and disk0 iostat metrics.

DevTest Solutions - 9.5
25-Jul-2016 194/448
An OSX command parser for iostat that collects CPU and disk0 metrics
In the window, enter the operating system: Linux, OS X, or Solaris.Specify Remote Machine details
Enter the remote computer details:
Host
User
Select authentication type and enter information:
Password
Private Key
Encrypted Private Key
When you use a private key or an encrypted private key, the private key file must be in PEM format and in the folder under the project. Use to select the file.Data Browse
Each operating system has a slightly different set of metrics from which to select. To select the metrics you would like to collect, use the check box in the left column.

DevTest Solutions - 9.5
25-Jul-2016 195/448
Property DescriptionsThis section describes each property in the following files:
DevTest Property File (lisa.properties) (see page 195)Custom Property Files (see page 229)
Local Properties File (see page 229)Site Properties File (see page 248)logging.properties (see page 252)Enterprise Dashboard Properties (dradis.properties) (see page 258)
DevTest Property File (lisa.properties)The file stores initialization and configuration information.lisa.properties
Property files are stored in the DevTest install directory.
You can display the contents of this file in DevTest Workstation.
Note: Do not add your custom properties to this file. CA Technologies reserves the right to replace this file at any time.
To open the file, select , from the main menu.lisa.properties System Edit Properties
This section contains the following :pages
Enterprise Dashboard Properties (see page 196)Comma-Separated List of Paths for Javadoc and Source Code (see page 196)System Properties (see page 197)Server Properties (see page 197)OS X Properties (see page 198)Update Notifications (see page 198)Basic Defaults (see page 198)HTTP Header Keys Properties (see page 200)HTTP Field Editor Properties (see page 200)Test Case Execution Parameters (see page 201)TestEvent Handling Customizations (see page 202)Test Manager/Editor Properties (see page 203)J2EE Server Parameters (see page 204)Native Browser Information to Use for Internal Rendering (see page 205)Test Manager/Monitor Properties (see page 206)
DevTest Solutions - 9.5
25-Jul-2016 196/448
Built-In String-Generator Patterns (see page 206)JMX Information (see page 206)Test Manager/Interactive Test Run Properties (see page 208)External Command Shells (see page 208)Testing Parameters (see page 208)Properties for Use by StdSchedulerFactory to Create a Quartz Scheduler Instance (see page 208)VSE Properties (see page 210)Network Port Properties (see page 218)CA Continuous Application Insight Properties (see page 219)Database Properties (see page 223)Mainframe Properties (see page 225)Selenium Integration Properties (see page 226)VSEasy Properties (see page 227)Solr Properties (see page 228)CAI Stateful Baseline Parameterization (see page 228)CAI Shelve Frames (see page 228)CA Agile Central Integration Properties (see page 228)
Enterprise Dashboard Propertiesdevtest.enterprisedashboard.host=localhost
devtest.enterprisedashboard.port=1506The host and port to use for sending component, metric, and audit information to the DevTest Enterprise Dashboard.
lisa.activation.retry.count=3
Number of attempts a registry should make to perform activation with Enterprise Dashboard.
devtest.enterprisedashboard.https.enabled=falseSpecifies that Enterprise Dashboard runs with schema HTTP or HTTP/S.
Comma-Separated List of Paths for Javadoc and Source Code
These paths are used to show you class and parameter documentation. The docpath can take directories and URLs that are base paths to the Javadoc. Here is an example that includes JDK docs from a website, but websites are not recommended because of delays. lisa.java.docPath=LISA_HOME\examples\javadoc,[http://java.sun.com/j2se/1.3/docs/api/
lisa.java.docPath=LISA_HOME\examples\javadoc
lisa.java.sourcePath=LISA_HOME\examples\src
This sourcepath can take directories as base paths and JAR or zip files of source.

DevTest Solutions - 9.5
25-Jul-2016 197/448
lisa.axis.compiler.version=1.4
This is lisa.axis.compiler.version 1.4.
System Propertiesfile.encodingEncoding for files that DevTest reads or writes.
UTF-8Default:
lisa.supported.html.request.encodingsTo include the encodings to support in the HTTP/HTML Request step, change the comma-separated list. The underlying JVM must also support all encodings in this list. If a webpage uses an encoding that is not supported in the list, then the encoding is replaced with the DevTest default encoding (file.encoding key in ). Also, if an encoding is not selected when lisa.propertiescreating a HTTP/HTML Request step, then the DevTest default encoding is assumed.
ISO-8859-1, UTF-8, Shift_JIS, EUC-JPDefault:
lisa.supported.jresDefault: 1.7
org.jfree.report.LogLevelDefault: Error
javax.xml.parsers.DocumentBuilderFactoryDefault: org.apache.xerces.jaxp.DocumentBuilderFactoryImpl
javax.xml.parsers.SAXParserFactoryDefault: org.apache.xerces.jaxp.SAXParserFactoryImpl
javax.xml.transform.TransformerFactoryDefault: org.apache.xalan.processor.TransformerFactoryImpl
beanshell.script.default.importsDefines imports that should always be available in a BeanShell Java script.
Enter class and package names, delimited with commas.Format: Packages must end with ".*" to be recognized as packages.For example, in the following string, two classes and two packages would be imported:
beanshell.script.default.imports= .devtest.util.com.ca.sv (http://com.ca.sv)GenerateString,org.slf4j.*,com.itko.lisa.core.helpers.MobileHelper,com.itko.util.*
Server Propertieslisa.net.bindToAddressThe IP address that we listen on. By default, we listen on all our IP addresses. You can restrict this value to a specific IP address. To prevent other computers connecting but allow local connections, set the value to or .127.0.0.1 localhost
DevTest Solutions - 9.5
25-Jul-2016 198/448
OS X Propertiesapple.awt.brushMetalLookDefault: false
apple.awt.brushMetalRoundedDefault: false
apple.laf.useScreenMenuBarDefault: true
apple.awt.showGrowBoxDefault: true
com.apple.mrj.application.growbox.intrudesDefault: true
com.apple.macos.smallTabsDefault: true
com.apple.mrj.application.apple.menu.about.nameDefault: LISA
com.apple.mrj.application.live-resizeDefault: true
Update Notificationslisa.update.every=1
Controls how often DevTest checks to see whether a newer version is available to download. To disable checking, set the value to blank. The other valid values are:
0 (check at every startup)
1 (check once a day)
2 (check every two days), and so on.
lisa.update.URL=http://www.itko.com/download/ga/
Basic Defaultslisa.registryName=registry
Default name of the registry to attach to, and the default name of the registry when you start it without a name.
lisa.coordName=coordinator

DevTest Solutions - 9.5
25-Jul-2016 199/448
The coordinator server default name when started without an explicit name AND when the Test Runner needs one and you do not specify a coordinator server on the command line.
lisa.simulatorName=simulator
The default name of a simulator daemon if you do not provide one on the command line.
lisa.vseName=VSE
The virtual environment server default name when started without an explicit name.
lisa.defaultRegistry.pulseInterval=30
Status log interval for the registry. The default value is 30 seconds.
lisa.coordinator.pulseInterval=30
The status log interval for the coordinator. The default value is 30 seconds.
lisa.simulator.pulseInterval=30
The status log interval for the simulator. The default value is 30 seconds.
lisa.vse.pulseInterval=30
The status log interval for VSE. The default value is 30 seconds.
lisa.server.projectmap.refresh.pulseInterval=600
The time interval after which the DevTest servers (coordinator and simulator) refresh the map of project names to file paths.
lisa.defaultRegistryConnectionTimeoutSeconds=90
Timeout value in seconds that coordinators and simulators use when connecting to a DevTest registry. A value of 0 indicates an infinite timeout; that is, we wait forever trying to connect.
lisa.regex.helper.tutorial.url=http://download.oracle.com/javase/tutorial/essential/regex/
For the Regex helper window, the URL to show for the regular expression tutorial.
lisa.hooks=com.itko.lisa.files.SampleHook
To register hooks with DevTest; these values are comma-separated.
lisa.project.ignore=CVS|SCCS|RCS|rcs|\.DS_Store|\.svn|vssver\.scc|vssver2\.scc|\.sbas|\.IJI\..*|.*\.pyc|.*\.pyo|\.git|.*\.hprof|_svn|\.hg|.*\.lib|.*~|__pycache__|\.bundle|.*\.rbc
This property is a Java regular expression that lets you hide the types of files that you do not want to see in the Project tree. By default, various well-known control files for third-party products are hidden. To show files that are hidden by default, modify the regular expression.

DevTest Solutions - 9.5
25-Jul-2016 200/448
HTTP Header Keys PropertiesThe default values for header keys in the HTTP support are in the following list. To get the benefit of the change, remove or change them for all tests. To change them for a test, or even the execution of one HTTP transaction, use TestNode-specific header directives.
ice.browser.http.agentValues: compatible, MSIE 6.0, Windows NT 5.0
Mozilla/4.0Default:
lisa.http.header.0.keyDefault: Pragma
lisa.http.header.0.valueDefault: no-cache
lisa.http.header.1.keyDefault: Cache-Control
lisa.http.header.1.valueDefault: no-cache
lisa.http.header.0.keyDefault: Accept
lisa.http.header.0.valueDefault: image/gif, image/x-xbitmap, image/jpeg
lisa.http.header.1.keyDefault: Accept-Language
lisa.http.header.1.valueDefault: en
lisa.http.header.2.keyDefault: Accept-Charset
lisa.http.header.2.valueDefault: iso-8859-1,*,utf-8
lisa.http.header.3.keyDefault: User-Agent
lisa.http.header.3.valueDefault: Mozilla/4.0, MSIE 6.0; Windows NT 5.0
HTTP Field Editor PropertiesThe following list shows defaults for fields that appear in the HTTP Field editor. Do not include "Authentication" because the editor adds it automatically.
lisa.gui.http.fieldNames

DevTest Solutions - 9.5
25-Jul-2016 201/448
lisa.gui.http.fieldNamesValues: Accept,Accept-Language,User-Agent,Connection
lisa.webrecorder.textMIMEsValues: html,text,magnus-internal,application/pdf
lisa.webrecorder.notTextMIMEsValues: css,script
lisa.webrecorder.alwaysIgnoreValues: .gif,.jpg,.jpeg,.css,.js,.ico
lisa.web.ntlmEnables NTLM authentication in the Test Runner.
trueDefault:
Test Case Execution Parameterslisa.hotDeploy=C\Projects\Lisa\custom_classes
This setting tells the ClassLoader built into DevTest where to look for custom classes. The default is $LISA_HOME\hotDeploy.
lisa.overloadThreshold=1000
The TestNode attempts to determine if the simulator is thrashing by checking the actual amount of time slept in think time as opposed to the amount of think time it was supposed to take. This setting is the amount of additional "slip" in think time that is acceptable before sending a warning TestEvent that the simulator is overloaded. The default of 1000 means that if the simulator sleeps 1 second more than it was supposed to, (presumably because the computer is CPU starved), then raise the TestEvent.
lisa.webservices.encode.empty.xmlns=true
Some web service server stacks require empty xmlns strings in the SOAP request (for example, jbossWs). Others, such as Amazon, do not work with empty xmlns strings. Change this property to suit the stack you are calling.
lisa.webservices.encode.version=1.1
Set the encoding version to force for client stub generation. The default is 1.1.
lisa.tm.sys.min.millis=0
lisa.tm.sys.max.millis=0
The default think time for new system steps, in milliseconds. The system steps include subprocesses, continue, continue (quiet), fail and end.
lisa.numFilters.warning=100
lisa.numAsserts.warning=100

DevTest Solutions - 9.5
25-Jul-2016 202/448
Sometimes, filters and assertions are dynamically added to test steps. In a load test, there could be many thousands of asserts/filters. The preceding two numbers are the threshold before the log generates a WARN level message.
lisa.exception.on.num.exceeded=true
If the threshold is exceeded, should we raise a TestDefException (kills the test)?
lisa.urltrans.encode.queryparams=false
Setting this property to false ensures that the query parameters in an HTTP/HTML URL are not decoded/encoded when executing the step.
lisa.generic.url.decoder=true
Set this property to true when opening a test case in DevTest 7.1.1 or later that has an HTTP/HTML Request step that was created in 7.0.0 or earlier.
TestEvent Handling Customizationslisa.perfmon.snmp.port=1161
The StatKeeper can load a Perfmon integration class that wraps or implements a platform-specific monitor, like Windows Perfmon, JMX, SNMP, and others. DevTest comes with a Perfmon DLL class and an SNMP class to support producing our stats output to either the Windows Performance monitor OR (not both) as an SNMP agent. For more information, see the documentation on SNMP. The usual port for SNMP is 161, but you must be root to use 161.
lisa.perfmon.class=com.itko.lisa.stats.snmp.SnmpPerfmon
When we do have something that can pump native OS data into a performance monitor, implement a class that can push DevTest data into that tool and put that class name here.
lisa.perfmon.dll=/c:/Projects/Lisa/PerfmonJNI/LISAPerfmonJNI/Debug/LISAPerfmonJNI.dll
Windows Perfmon integration to the StatKeeper has a "DLL" setting for the Windows (native) implementation. Put the full path/file here. You only need this if you are using PerfmonStatKeeperWindows.
Simulators use a separate thread and queue to send TestEvents to the coordinator to cut down on the chattiness of RMI. These are the thresholds that cause the daemon thread to push events. We take the minimum of the size or the max-wait (if either we take too long or have too many, we post them).
lisa.eventPoolPoll=250
How often we check the queue size or we see if we have overrun our max wait (in milliseconds).
lisa.eventPoolSize=64
The maximum size that we let it get before sending.

DevTest Solutions - 9.5
25-Jul-2016 203/448
lisa.eventPoolMaxWait=1000
How long we are willing to go with an event being unforwarded.
Test Manager/Editor Propertiesgui.show.memory.statusDefault: false
lisa.screencap.delay.secondsDefault: 6
lisa.screencap.dirDefault: LISA_HOME\screens
lisa.screen.cap.prefixDefault: lisa-screencap-
lisa.earsubdir.endingnamepartDefault: -contents
lisa.model.editor.inspector.scaleThis property sets the "scale" (primarily, font size) for things in the model and step inspectors of the main model editor. 1.0 is 12 points, so determine a value for this property by dividing the size that you want in points by 12. For example, 11 points is 11/12 = 0.92, 10 points is 10/12 = 0.83 (the default), 14 points is 14/12 = 1.17.
0.83Default:
lisa.stats.decimalFormatSome built-in metrics (steps for each second) use a Java DecimalFormat to display floating-point values. To not use the decimal point, make this value "######" or select from a range of displays; see .http://download.oracle.com/javase/6/docs/api/java/text/DecimalFormat.html
###,###.#Default:
lisa.editor.custJavaNodeEditor.classesThis is the comma-separated list of all custom Java test nodes to include in your test case.
lisa.editor.combined.report.type
lisa.gui.log4jfmtThis property drives the formatting of messages to the window.System Messages
%-5p - %m%nDefault:
isa.editor.http.recorderPortlThe HTTP recorder binds to this port.
8010Default:
lisa.editor.proxy.webProxySupportDefault: on

DevTest Solutions - 9.5
25-Jul-2016 204/448
J2EE Server Parameterslisa.prefill.jndiNames= JBOSS=org.jnp.interfaces.NamingContextFactory
Weblogic=weblogic.jndi.WLInitialContextFactoryWebsphere=com.ibm.websphere.naming.WsnInitialContextFactoryBorland Enterprise Server=com.inprise.j2ee.jndi.CtxFactoryiPlanet/Sun AS=com.sun.jndi.cosnaming.CNCtxFactory
lisa.prefill.jndiUrlPrefix= JBOSS=jnp://Weblogic=t3://Websphere=iiop://Borland Enterprise Server=iiop://iPlanet/Sun AS=iiop://
lisa.prefill.jndiDefPort= JBOSS=1099Weblogic=7001Websphere=2809Borland Enterprise Server=1099iPlanet/Sun AS=1099
lisa.prefill.jndiNeedsClass= JBOSS=falseWeblogic=falseWebsphere=trueBorland Enterprise Server=trueiPlanet/Sun AS=true
lisa.prefill.jndiFactories= org.jnp.interfaces.NamingContextFactoryweblogic.jndi.WLInitialContextFactorycom.ibm.websphere.naming.WsnInitialContextFactorycom.webmethods.jms.naming.WmJmsNamingCtxFactorycom.tibco.tibjms.naming.TibjmsInitialContextFactorycom.inprise.j2ee.jndi.CtxFactorycom.sun.jndi.cosnaming.CNCtxFactoryfiorano.jms.runtime.naming.FioranoInitialContextFactory
lisa.prefill.jndiServerURLs= jnp://SERVER:1099&t3://SERVER:7001iiop://SERVER:PORTtibjmsnaming://SERVER:7222&iiop://SERVER:PORTiiop://localhost:9010&wmjmsnaming://Broker #1@SERVER:PORT/JmsAdminTest
lisa.editor.URLTransEditor.protos=
http,https
lisa.editor.URLTransEditor.hosts=
lisa.editor.URLTransEditor.ports=
80,443
lisa.editor.URLTransEditor.files=
lisa.prefill.jdbc.names= OracleSQL ServerWLS OracleJDataStore

DevTest Solutions - 9.5
25-Jul-2016 205/448
SybaseDB2MySQLDerby
lisa.prefill.jdbc.jdbcDrivers= oracle.jdbc.driver.OracleDrivercom.microsoft.sqlserver.jdbc.SQLServerDrivercom.microsoft.jdbc.sqlserver.SQLServerDriverweblogic.jdbc.oci.Drivercom.borland.datastore.jdbc.DataStoreDrivercom.sybase.jdbc.SybDrivercom.ibm.db2.jcc.DB2Driverorg.gjt.mm.mysql.Driverorg.apache.derby.jdbc.ClientDriver
lisa.prefill.jdbc.jdbcConnectionURLs=
jdbc:oracle:thin:@SERVER:1521:SIDNAMEjdbc:sqlserver://SERVER:PORT;databasename=DBNAMEjdbc:microsoft:sqlserver://SERVER:PORTjdbc:weblogic:oracle:TNSNAMEjdbc:borland:dslocal:DBNAMEjdbc:sybase:Tds:SERVER:PORT/DBNAMEjdbc:db2://SERVER:PORT/DBNAMEjdbc:mysql://SERVER:PORT/DBNAMEjdbc:derby://DBSERVER:DBPORT/DBNAME
Native Browser Information to Use for Internal Renderinglisa.internal.browser.on=yes
lisa.internal.browser.win=com.itko.lisa.web.ie.IEUtils
lisa.internal.browser.osx=com.itko.lisa.web.jxbrowser.JxBrowserUtils
lisa.internal.browser.linux=com.itko.lisa.web.jxbrowser.JxBrowserUtils
lisa.internal.browser.sol-sparc=null
lisa.internal.browser.imgs=false
lisa.internal.browser=msie
WR type: mozilla, safari, msie
lisa.internal.browser.swing.heavy=false
lisa.internal.browser.usejsinviews=yes
lisa.example.wsdls=http://localhost:8080/itko-examples/services/UserControlService?wsdl

DevTest Solutions - 9.5
25-Jul-2016 206/448
Test Manager/Monitor Propertiesmonitor.events.maxrowsThe maximum number of event rows that are kept in the Test Manager as a test is run. The number of objects that are kept is twice this number.
500Default:
lisa.tm.sysmess.sizeThe system messages window maximum size. The memory that is consumed is twice this value.
10240Default:
Built-In String-Generator Patternslisa.patterns.stringgenerator.types=&Phone=(DDD)DDD-DDDD, &SSN=DDD-DD-DDDD, &Date=Lll-DD-DDDD, &Zip=D*(5)
JMX Informationlisa.jmx.types com.itko.lisa.stats.jmx.JSE5Connection
com.itko.lisa.stats.jmx.TomcatConnectioncom.itko.lisa.stats.jmx.JBossConnectioncom.itko.lisa.stats.jmx.JSR160RMIConnectioncom.itko.lisa.stats.jmx.WeblogicConnectorcom.itko.lisa.stats.jmx.Weblogic9Connectorcom.itko.lisa.stats.jmx.WebsphereSOAPConnectioncom.itko.lisa.stats.jmx.ITKOAgentConnectioncom.itko.lisa.stats.jmx.OracleASConnector
lisa.jmx.typeprops com.itko.lisa.stats.jmx.JSE5Connection=LISA_JMX_JSE5com.itko.lisa.stats.jmx.TomcatConnection=LISA_JMX_TOMCAT5com.itko.lisa.stats.jmx.JBossConnection=LISA_JMX_JBOSS3240com.itko.lisa.stats.jmx.JSR160RMIConnection=LISA_JMX_JSR160RMIcom.itko.lisa.stats.jmx.Weblogic9Connector=LISA_JMX_WLS9com.itko.lisa.stats.jmx.WeblogicConnector=LISA_JMX_WLS6781com.itko.lisa.stats.jmx.OracleASConnector=LISA_JMX_OC4Jcom.itko.lisa.stats.jmx.WebsphereSOAPConnection=LISA_JMX_WASSOAP5Xcom.itko.lisa.stats.jmx.ITKOAgentConnection=LISA_JMX_ITKOAGENT
You do not generally need anything for these parameters.
LISA_JMX_JSR160RMIDefault: LISA_HOME/lib/mx4j.lib
LISA_JMX_ITKOAGENTDefault: LISA_HOME/lib/mx4j.lib

DevTest Solutions - 9.5
25-Jul-2016 207/448
LISA_JMX_JSE5If you are running JSE 5, you do not need to change this property. We ship a jbossall-client that includes what you need, assuming the version is right.
LISA_JMX_JBOSS3240Default: LISA_HOME/lib/mx4j.lib{{path.separator}}LISA_HOME/hotDeploy/jbossall-client.jar
LISA_JMX_TOMCAT5This parameter is for Tomcat.
LISA_HOME/lib/mx4j.lib{{path.separator}}LISA_HOME/hotDeploy/mx4j-tools.jarDefault:
LISA_JMX_WLS9Default: LISA_HOME/hotDeploy/weblogic.jar{{path.separator}}LISA_HOME/hotDeploy/wljmxclient.jar
LISA_JMX_WLS6781This parameter must change to the location of your weblogic.jar. No wlclient.jar will not work.Default: LISA_HOME/hotDeploy/weblogic.jar
Oracle AS
LISA_JMX_OC4JDefault: LISA_HOME/lib/oc4jclient.jar{{path.separator}}LISA_HOME/lib/adminclient.jar
IBM WebSphere
LISA_JMX_WASSOAP5XIt is easier to use your IBM/WAS CLASSPATH before you start DevTest and leave this blank.
LISA_HOME/lib/mx4j.libDefault:
lisa.alert.email.emailAddrIf you use performance monitoring alerts, this parameter is the "from" email address for those alerts.
lisa.alert.email.defHostsThis parameter is the email server that we try to route emails with (SMTP server).
localhostDefault:
lisa.rundoc.builtinsValues:
com.itko.lisa.files.1user1cycle.stgRun the test case once with one simulated user
com.itko.lisa.files.1user1cycle0think.stgRun the test case once with one simulated user and no think time
com.itko.lisa.files.1user1min.stgRun the test case with one simulated user for one minute, restarting the test as needed
DevTest Solutions - 9.5
25-Jul-2016 208/448
com.itko.lisa.files.1user5min.stgStage the test for 5 minutes, restarting as needed
com.itko.lisa.files.1usernonstop.stgExecute this test until manually stopped
com.itko.lisa.files.5user1min.stgExecute this test with 5 virtual users for 1 minute
lisa.auditdoc.builtinsDefault: com.itko.lisa.files.DefaultAudit.aud
Test Manager/Interactive Test Run Propertieslisa.tm.itr.max.delay.secondsDefault: 5
External Command Shellstest.cmde.win.shell=cmd /c
test.cmde.unix.shell=sh -c
test.cmde.Windows.NT.(unknown).shell=cmd /c
Testing Parameterslisa.props.blankOnMissing=true
Property to use if you want DevTest to replace key with an empty string if key is not in state.
lisa.test.custevents=&101="Custom Event 101"; &102="Custom Event 102"
Custom events: the first allowed event number is 101, so we have registered two as examples here.
lisa.SimpleWebFilter.responseCodeRegEx=[45] d d
lisa.fsss.dateformat=MM/dd/yyyy hh:mm:ss a
Properties for Use by StdSchedulerFactory to Create a Quartz Scheduler Instance
Configure Main Scheduler Properties

DevTest Solutions - 9.5
25-Jul-2016 209/448
org.quartz.jobStore.classDefault: org.quartz.simpl.RAMJobStore
org.quartz.threadPool.classDefault: org.quartz.simpl.SimpleThreadPool
org.quartz.threadPool.threadCountDefault: 5
lisa.meta-refresh.max.delayDefault: 5
Platform-Specific Parameters in the TM
lisa.tm.exec.unixDefault: xterm -e {0}
lisa.tm.exec.winDefault: cmd /c start {0}
lisa.tm.exec.osxDefault: open -a /Applications/Utilities/Terminal.app {0}
Properties Used by Swing Testing Support
lisa.swingtest.client.logging.properties.fileUncomment to use a custom Log4J logging properties file in SwingTestProgramStarter.
C:/Lisa/swingtestclient-logging.propertiesDefault:
License Settings
laf.requestDefault: laf/license.do
laf.default.urlDefault: https://license.itko.com
laf.displaysettingDefault: true
Reporting Properties
lisa.reporting.defaultPageSizeValues: A4 | letter
Reporting JPA Properties
rpt.eclipselink.ddl-generationDefault: create-tables
rpt.eclipselink.ddl-generation.output-modeDefault: database

DevTest Solutions - 9.5
25-Jul-2016 210/448
rpt.eclipselink.validateschemaDefault: false
perfmgr.rvwiz.whatrpt.autoExpireDefault: true
perfmgr.rvwiz.whatrpt.expireTimerTo check for expired reports, set autoExpire = true. Set the expiration period: an integer followed by (m=month,w=week,d=day,h=hour). The default expiration period is 30d (30 days).
30dDefault:
rpt.hibernate.validateschemaValidate the report database schema. By default, only the registry validates the schema.
falseDefault:
lisa.0.registry.local.autoshutdownDefault: true
lisa.8.registry.local.autoshutdownDefault: true
lisa.10.registry.local.autoshutdownThe default behavior is to not automatically shut down the local registry if it was started automatically. The exceptions are DevTest Workstation, VSE, and VSE Workstation.
trueDefault:
lisa.4.registry.local.autoshutdownDefault: false
lisa.5.registry.local.autoshutdownJUnit and TestRunner should never auto shutdown the registry.
falseDefault:
Property Used for the Eclipse Connector
lisa.eclipse.connector.portDefault: 8546
Property Used for Example Test Suites
EXAMPLES_HOMEDefault: LISA_HOME/examples
VSE Propertieslisa.magic.string.min.lengthDefines the minimum length of the argument value in a VSE transaction request that is required to consider that argument for constructing a magic string.
3Default:

DevTest Solutions - 9.5
25-Jul-2016 211/448
lisa.magic.string.word.boundary.typeDefines how searches in VSE for magic string content relate to word boundaries.Values:
none: The word boundaries do not matter
start: Magic string candidates must start on a word boundary
end: Magic string candidates must end on a word boundary
both: Magic string candidates must be found as whole words; that is, a word boundary on both ends
Default: both
lisa.magic.string.exclusionSpecifies whether to exclude specific strings from eligibility for magic stringing.
Yes, YES, yes, No, NO, no, true, True, TRUE, false, False, FALSE, __NULLValues: Yes, YES, yes, No, NO, no, true, True, TRUE, false, False, FALSE, __NULLDefault:
lisa.magic.string.xml.tagsSpecifies whether to change text in XML tags to magic strings.
falseDefault:
lisa.vse.server.dir.full.service.name=falseSpecifies whether multiple VSE instances run on different computers from the same installation directory. If they do, uncomment this property and set it to true.
falseDefault:
lisa.vse.response.xml.prettyprintSpecifies whether to format the XML in the service image if VSE records an XML response. The default, false, indicates DevTest does not prettyprint, format, or add line breaks to XML. If the XML arrives as one long string, DevTest displays it that way.
falseDefault:
lisa.vse.remember.execution.modeSpecifies whether VSE remembers the execution modes you set with the VSE Dashboard for virtual services. Comment out this property if you do not want VSE to remember the execution modes across shutdowns.
trueDefault:
lisa.vse.match.event.buffer.sizeSets the number of events for each VS model to define how many matching related events VSE buffers. The property sets the number of events for each VS model. For example, if two VS models are deployed with the default event buffer size of 100, then 200 events are buffered. These events are the source for the tab of the VS model inspection page in the VSE Matchdashboard.
100Default:
lisa.vse.request.event.set.buffer.sizeDefines the number of inbound VSE requests for which a full set of DevTest events is buffered. The property sets the number of events for each VS model. For example, if two VS models are
deployed with the default request buffer size (5), ten sets of events (grouped by inbound request)

DevTest Solutions - 9.5
25-Jul-2016 212/448
deployed with the default request buffer size (5), ten sets of events (grouped by inbound request) are buffered. These sets of events are the source for the tab of the VS model inspection Eventspage in the VSE dashboard.For performance reasons, VSE holds 50 events for processing. This limit can result in the removal of events from the processing queue and the absence of in the Inspection View. To prevent the truncation of events, you can increase the size of the event processing queue. However, this action can increase memory usage and can reduce performance.
5Default:
lisa.vse.si.text.editor.orderDefines the order in which registered VSE text response editors are queried when using autodetect. Only enough of the "right end" of the class name to make it unique is required.
XMLTextEditor, JSONTextEditorValues: The default text editorDefault:
lisa.tm.def.min.millisDefines (in milliseconds) the default minimum think time for new "regular" steps.
500Default:
lisa.tm.def.max.millisDefines (in milliseconds) the default maximum think time for new "regular" steps.
: 1000Default
lisa.vse.rest.max.optionalqueryparamsSpecifies the maximum number of optional query parameters to use per method in a WADL, Swagger, or RAML file. If there are more than optional lisa.vse.rest.max.optionalqueryparamsquery parameters specified in one of these files, only the first lisa.vse.rest.max.
are used to create transactions.optionalqueryparams: 5Default
Date-Checker Properties
The VSE date utilities use the following properties to determine which date patterns are considered valid for date sensitivity conversions. Each of the following entries represents a regular expression that VSE considers as a part of a date.
lisa.vse.datechecker.dayregex((\[12\]\\d)\|(3\[01\])\|(0?\[1-9\]))
isa.vse.datechecker.monthnumberregexl((1\[012\])\|(0 \\d)\|0\[1-9\]\|\[1-9\])
lisa.vse.datechecker.monthalpharegex(\\bJAN\\b\|\\bFEB\\b\|\\bMAR\\b\|\\bAPR\\b\|\\bMAY\\b\|\\bJUN\\b\|\\bJUL\\b\|\\bAUG\\b\|\\bSEP\\b\|\\bOCT\\b\|\\bNOV\\b\|\\bDEC \\b)
lisa.vse.datechecker.yearlongregex\\d\\d\\d\\d
lisa.vse.datechecker.yearshortregex\\d\\d

DevTest Solutions - 9.5
25-Jul-2016 213/448
lisa.vse.datechecker.timeregex(\\s?((\[012\]? \\d)\|(2\[0123\]))\:((\[012345\] \\d)\|(60))\:((\[012345\] \\d)\|(60)))
lisa.vse.datechecker.time.hhmmssregex((\[012\]? \\d)\|(2\[0123\]))\:((\[012345\] \\d)\|(60))\:((\[012345\] \\ d)\|(60))
lisa.vse.datechecker.time.millisregex((\[012\]?\\d)\|(2\[0123\]))\:((\[012345\]\\d)\|(60))\:((\[012345\]\\d)\|(60))\\.(( \\d \\d \\d)\|0)
lisa.vse.datechecker.time.millis.zoneregex((\[012\]?\\d)\|(2\[0123\]))\:((\[012345\] \\d)\|(60))\:((\[012345\] \\ d)\|(60)) \\.((\\d \\d \\d)\|0) \\s(\[A-Za-z\]\[A-Za-z\]\[A-Za-z\])
lisa.vse.datechecker.wstimestampregex\\d\\d\\d\\d-((1\[012\])\|(0\\d)\|0\[1-9\]\|\[1-9\])-((\[12\]-\\-d)\|(3\[01\])\|(0?\[1-9\]))T((\[012\]?-\\-d)\|(2\[0123\]))\:((\[012345\]-\\-d)\|(60))\:((\[012345\]-\\-d)\|(60))-\\-.-\\-d-\\-d-\\-d\[-+\]\\d\\d\\d \\d
lisa.vse.datechecker.ddmmmyyyyregex((\[12\]\\d)\|(3\[01\])\|(0?\[1-9\]))(JAN\|FEB\|MAR\|APR\|MAY\|JUN\|JUL\|AUG\|SEP\|OCT\|NOV\|DEC)\\d \\d \\d \\d
lisa.vse.datechecker.mmmddyyyyregex(JAN\|FEB\|MAR\|APR\|MAY\|JUN\|JUL\|AUG\|SEP\|OCT\|NOV\|DEC)((\[12\]\\d)\|(3\[01\])\|(0?\[1-9\]))\\d \\d \\d \\d
lisa.vse.datechecker.yyyyddmmmregex\\d\\d \\d \\d((\[12\] \\d)\|(3\[01\])\|(0?\[1-9\]))(JAN\|FEB\|MAR\|APR\|MAY\|JUN\|JUL\|AUG\|SEP\|OCT\|NOV\|DEC)
lisa.vse.datechecker.yyyymmmddregex\\d\\d\\d\\d(JAN\|FEB\|MAR\|APR\|MAY\|JUN\|JUL\|AUG\|SEP\|OCT\|NOV\|DEC)((\[12\] \\d)\|(3\[01\])\|(0?\[1-9\]))
lisa.vse.datechecker.ddmmmregex((\[12\]\\d)\|(3\[01\])\|(0?\[1-9\]))(JAN\|FEB\|MAR\|APR\|MAY\|JUN\|JUL\|AUG\|SEP\|OCT\|NOV\|DEC)
lisa.vse.datechecker.mmmddregex(JAN\|FEB\|MAR\|APR\|MAY\|JUN\|JUL\|AUG\|SEP\|OCT\|NOV\|DEC)((\[12\]\\d)\|(3\[01])|(0?\[1-9\]))
lisa.vse.datechecker.ddmmmyyregex((\[12\]\\d)\|(3\[01\])\|(0?\[1-9\]))(JAN\|FEB\|MAR\|APR\|MAY\|JUN\|JUL\|AUG\|SEP\|OCT\|NOV\|DEC)\\d\\d
In VSE, each of the following entries represents a valid pattern for part of date:
lisa.vse.datechecker.dayformat
Format: dd
lisa.vse.datechecker.monthnumberformat

DevTest Solutions - 9.5
25-Jul-2016 214/448
lisa.vse.datechecker.monthnumberformatFormat: MM
lisa.vse.datechecker.monthalphaformatFormat: MMM
lisa.vse.datechecker.yearlongformatFormat: yyyy
lisa.vse.datechecker.yearshortformatFormat: yy
lisa.vse.datechecker.timeformatFormat: HH:mm:ss
lisa.vse.datechecker.time.hhmmssformatFormat: HH:mm:ss
lisa.vse.datechecker.time.millisformatFormat: HH:mm:ss.SSS
lisa.vse.datechecker.time.millis.zoneformatFormat: HH:mm:ss.SSS z
lisa.vse.datechecker.wstimestampformatFormat: yyyy-MM-dd'T'HH:mm:ss.SSSZ
The following date patterns cannot be constructed by using a combination for the previous patterns that involve at least day, month, and year:
lisa.vse.datechecker.mmmddyyyy.separatorformat
Format: MMM*dd*yyyy
lisa.vse.datechecker.mmddyyyy.separatorformatFormat: MM*dd*yyyy
lisa.vse.datechecker.ddmmmyyyy.separatorformatFormat: dd*MMM*yyyy
lisa.vse.datechecker.ddmmyyyy.separatorformatFormat: dd*MM*yyyy
lisa.vse.datechecker.yyyymmmdd.separatorformatFormat: yyyy*MMM*dd
lisa.vse.datechecker.yyyymmdd.separatorformatFormat: yyyy*MM*dd
lisa.vse.datechecker.ddmmmyyyyformatFormat: ddMMMyyyy

DevTest Solutions - 9.5
25-Jul-2016 215/448
lisa.vse.datechecker.mmmddyyyyformatMMMddyyyy
lisa.vse.datechecker.yyyyddmmmformatFormat: yyyyddMMM
lisa.vse.datechecker.yyyymmmddformatFormat: yyyyMMMdd
lisa.vse.datechecker.ddmmmyyformatFormat: ddMMMyy
lisa.vse.datechecker.ddmmmformatFormat: ddMMM
lisa.vse.datechecker.mmmddformatFormat: MMMdd
lisa.vse.datechecker.separatorsDefines the valid separator characters to use in the date formats.
-/.Values: =/ sets ‘/’ as a separator as in 10/15/2011.Example: lisa.vse.datechecker.separators
lisa.vse.datechecker.top.priorityorder=lisa.vse.datechecker.wstimestampformatDefines the order in which to match the date pattern. The separator characters that lisa.vse.
defines replace the asterisks.datechecker.separators MM*dd*yy generates four date patterns: "MM-dd-yyyy", "MM dd yyyy", "MM/ddExample:
/yyyy", "MM.dd.yyyy".
lisa.vse.datechecker.date.priorityorder
lisa.vse.datechecker.mmmddyyyy.separatorformat&\lisa.vse.datechecker.mmddyyyy.separatorformat&\lisa.vse.datechecker.ddmmmyyyy.separatorformat&\lisa.vse.datechecker.ddmmyyyy.separatorformat&\lisa.vse.datechecker.yyyymmmdd.separatorformat&\lisa.vse.datechecker.yyyymmdd.separatorformat&\lisa.vse.datechecker.mmmddyyyyformat&\lisa.vse.datechecker.ddmmmyyyyformat&\lisa.vse.datechecker.yyyyddmmmformat&\lisa.vse.datechecker.yyyymmmddformat&\lisa.vse.datechecker.ddmmmyyformat
lisa.vse.datechecker.time.priorityorder
lisa.vse.datechecker.time.millis.zoneformat&\lisa.vse.datechecker.time.millisformat&\lisa.vse.datechecker.time.tenthsformat&\lisa.vse.datechecker.time.hhmmssformat
lisa.vse.datechecker.mmmddformat&\lisa.vse.datechecker.ddmmmformat
DevTest Solutions - 9.5
25-Jul-2016 216/448
lisa.vse.datechecker.months
Values: JAN, FEB, MAR, APR, MAY, JUN, JUL, AUG, SEP, OCT, NOV, DEC
lisa.vse.datechecker.coarse.year.regex
Format: (?ism).*((\\d[./-](19|20)[0-9]{2})|((JAN|FEB|MAR|APR|MAY|JUN|JUL|AUG|SEP|OCT|NOV|DEC)[. /-](19|20)[0-9]{2})|((19|20)[0-9]{2}[. /-][0-9]{2})).*
Defines a coarse level test to determine whether the payload contains anything that resembles a year. To avoid matching too much, it looks nearby for other identifying information such as month information and common date separators (for example, - or / or .).
When the year is difficult to distinguish from any other four-digit number, this pattern may not match. In that case, your magic dates are not found. Try one of the following solutions:
Tweak this RegEx
Try the more permissive form that follows
lisa.vse.datechecker.coarse.year.regex
Format: (?ism).*((\\d[./-]?(19|20)[0-9]{2})|((JAN|FEB|MAR|APR|MAY|JUN|JUL|AUG|SEP|OCT|NOV|DEC)[. /-]?(19|20)[0-9]{2})|((19|20)[0-9]{2}[. /-]?[0-9]{2})).*
Defines a more permissive coarse level test than the previous test to determine whether the payload contains anything that resembles a year. If the dates are not recognized, this Regex may allow them to be found. To avoid matching too much, it looks nearby for other identifying information such as month information and common date separators (for example, - or / or .).
However, this Regex can have some performance impact. If this Regex matches too many dates, the patterns above run in situations where they are not applicable. Running large numbers of Regex patterns against large payloads can be time consuming.
VSE JMS Messaging - Custom JMS Properties to Ignore
vse.jms.ignore.proplistSome JMS platforms include extra custom properties in the JMS messages they deliver. These properties can interfere with VSE creation. contains a list of properties to vse.jms.ignore.proplistignore when recording a JMS service with the VSE messaging recorder. The format is a comma-delimited list of regular expressions. By default, it excludes standard JMS extension properties (JMSX) and JBoss custom bookkeeping properties (JMS_.).
: JMSX.*, JMS_.*Default
VSE Recorder Conversation Batch Size
lisa.vse.recorder.conversation.batch.sizeDefines how many conversations we process before committing them to the database. If you have a few large conversations, make this number small. If you have many smaller conversations, make this number large. A batch size of <= 0 is the same as a batch size of 1.
: 10Default

DevTest Solutions - 9.5
25-Jul-2016 217/448
VSE Service Image Database Settings
eclipselink.ddl-generationDefault: create-tables
eclipselink.ddl-generation.output-mode=databaseDefines the database to use as the repository for service images. VSE uses the open source EclipseLink JPA provider. By default we use our reports database as the repository for service images.
: LISA reports databaseDefault
Validate the VSE Schema
lisa.eclipselink.query.warn.thresholdIf EclipseLink is configured to do query timings (the default), this value defines the maximum interval (in milliseconds) allowed for a database query before the com.itko.lisa.vse.stateful.
raises a WARN-level message. If you set the threshold on that logger to model.SqlTimer loggerDEBUG, timings return for all SELECT statements EclipseLink issues. This logging is the first step in debugging VSE performance issues. If the database is local and all the indexes are created, then you should not see anything over about 20 ms. However, a database on the network that is not under your control and possibly missing indexes could easily take 100ms or more to return a result. In that case, VSE can seem to be slow when in fact it is fast if correctly deployed. Most service images are small enough or have a working set sufficiently small enough to fit into the VSE entity cache. Therefore, the number of SELECTs that VSE issues should dwindle to zero, provided the VSE has a large enough heap. The cache maintains soft references by default.
: 100Default
VSE Delimited Content Detection Properties
lisa.vse.delimited.delimiter.check.maxcharsDefines the maximum number of characters to inspect to determine the content type.
1000Default:
lisa.vse.delimited.delimiter.check.maxpercentDefines the maximum percentage of characters to inspect to determine the content type. This property is used if it is higher than .lisa.vse.delimited.delimiter.check.maxchars
: 2Default
lisa.vse.delimited.delimiter.listDefines the characters that the Delimited Content Detector looks for as delimiters.
: :,\\,,;,|,\u00A6,\t,\nDefault
lisa.vse.delimited.delimiter.minimum.thresholdDefines the minimum number of delimiters that are counted for the Delimited Content Detector. The payload must have at least this many delimiters.
: 3Default
lisa.vse.delimited.namevalue.separator.listDefines the Name-Value separators that are used to detect the delimited name-value payload. These values must not be in the .lisa.vse.delimited.delimiter.list
REST Data Protocol Properties
lisa.protocol.rest.editor.observedtraffic.max

DevTest Solutions - 9.5
25-Jul-2016 218/448
lisa.protocol.rest.editor.observedtraffic.maxDefines the maximum number of items of matching traffic that are populated in the lower pane of the URI rules wizard. If the wizard takes a long time to populate the lower pane with matching traffic, try using a lower value in this field.
: 100Default
lisa.protocol.rest.editor.unmatchedtraffic.maxDefines the maximum number of items of unmatched traffic that display in the unmatched traffic dialog. If the wizard takes a long time to populate this wizard, try using a lower value in this field.
100Default:
lisa.protocol.rest.idPatternDefines for the REST data protocol a regular expression that detects the parts of an HTTP request that it can consider to be an identifier. The data protocol converts such identifiers to dynamic parameters. When you have dynamic parameters that you know follow a specific format, you can use this property to detect them.
[a-zA-Z]+[0-9]{5,}[a-zA-Z]*Default: The value can denote a stock item and the subsequent rule contains Example: id12345
{URLPARAM0}.
lisa.protocol.rest.maxChangesDefines the maximum number of changes that VSE allows for a token before the variability is considered significant enough to generate a rule.
1Default:
lisa.protocol.rest.parameterBaseNameDefines the prefix that the REST data protocol uses for the parameters in rules.
URLPARAMDefault:
lisa.protocol.rest.startPositionDefines the position in the URL at which the REST data protocol starts looking for variable tokens.
3Default: In the URI , is at position 0, is at position 1, and is at position 2.Example: GET /a/b/c/d GET a b
vse.log.trace.truncate.response.at=2048Limits the size of responses that DevTest writes to the vse.log. This property is only applied when trace-level logging is enabled: specifically, when =TRACE or com.itko.lisa.vse.http.Transactionwhen =TRACE.com.itko.lisa.vse.stateful.protocol.http.CoordinatorValues:
0: The entire response is logged.
>0: The logged response is truncated at the character specified.
Default: 2048
Network Port PropertiesThe network port properties take the form of .lisa.net.APPID.port
If you must change these defaults, override them in the file. Clients make site.propertiesassumptions about what port to connect to their server based on these values.

DevTest Solutions - 9.5
25-Jul-2016 219/448
lisa.net.0.portDevTest Workstation
2008Default:
lisa.net.2.portCoordinator
2011Default:
lisa.net.3.portRegistry
2010Default:
lisa.net.4.portJUnit exec
2012Default:
lisa.net.5.portTest Runner (command line)
2005Default:
lisa.net.6.portOthers
2007Default:
lisa.net.8.portVSE
2013Default:
lisa.net.9.portVSEManager
2004Default:
lisa.net.11.portServiceManager
2006Default:
lisa.net.1.portSimulator (we start here so it is easier to have many on the same computer).
2014Default:
CA Continuous Application Insight Propertieslisa.pathfinder.broker.hostDefault: 0.0.0.0
lisa.pathfinder.broker.portDefault: 2009
broker.webserver.portDefault: 1508
broker.webserver.host

DevTest Solutions - 9.5
25-Jul-2016 220/448
broker.webserver.hostDefault: 0.0.0.0
broker.webapps.directoryDefault: broker
The following properties are miscellaneous properties:
lisa.webserver.portOur embedded web server.
1505Default:
devtest.portDefault: 1507
lisa.enable.workstation.pathfinder.browser.uiDefault: true
lisa.portal.enable.pathfinder.browser.uiDefault: true
lisa.webserver.hostThe host of our embedded web server. binds to all local addresses.0.0.0.0
0.0.0.0Default:
lisa.webserver.acl.authmodule.baseurlDefault: /acl/
These properties set the values for all the portal app launchers from DevTest Workstation. Currently, the TR host name is used for the Host value so we get that value dynamically. The URL is launched externally in your system's browser.
lisa.portal.url.prefixDefault: http://* (http://\*)
lisa.portal.root.base.urlDefault: /index.html
lisa.portal.cvsdashboard.base.urlDefault: /index.html?lisaPortal=cvsdashboard
lisa.portal.pathfinder.console.base.urlDefault: /index.html?lisaPortal=pathfinder
lisa.portal.server.console.base.urlDefault: /index.html?lisaPortal=serverconsole
lisa.portal.model.execution.urlDefault: /index.html?lisaPortal=serverconsole
lisa.portal.reporting.contextDefault: reporting
lisa.portal.reporting.console.base.url

DevTest Solutions - 9.5
25-Jul-2016 221/448
lisa.portal.reporting.console.base.urlDefault: /index.html?lisaPortal=reporting
lisa.portal.defect.capture.urlDefault: /pathfinder/lisa_pathfinder_agent/defectcapture
lisa.portal.save.defect.data.urlDefault: /pathfinder/lisa_pathfinder_agent/saveDefectData
lisa.portal.invoke.base.urlDefault: /lisa-invoke
lisa.portal.invoke.report.urlDefault: /reports
lisa.portal.invoke.server.report.directoryDefault: lisa.tmpdirlisa.portal.invoke.report.url
devtest.portal.base.url.pathDefault: /devtest/#/main
devtest.portal.homepage.url.pathDefault: {{devtest.portal.base.url.path}}/dashboard
lisa.portal.pathfinder.explorer.base.urlDefault: {{devtest.portal.base.url.path}}/createartifacts
lisa.portal.pathfinder.management.base.urlDefault: {{devtest.portal.base.url.path}}/pathManageAgents
lisa.portal.invoke.test.rootDefault: LISA_HOME
Reporting Graph View Properties
rpt.lisa.graph.view.threshholdDefault: 100
rpt.lisa.graph.view.infomessageResults more than maximum threshold. Modify a filter to fetch the details.
rpt.lisa.graph.scatter.view.threshholdDefault: 10000
rpt.lisa.graph.scatter.view.infomessageResults more than maximum threshold. To fetch the details, modify a filter.
Async Reporting Support
lisa.reporting.useAsyncIf you run load tests and you find that the bottleneck in the test cases is writing the events to the reporting database, consider removing everything except metrics from the report generator. If you still see the reporting engine as the bottleneck, consider enabling this property. The property
uses JMS to send the reporting event and background threads in the simulators and coordinator

DevTest Solutions - 9.5
25-Jul-2016 222/448
uses JMS to send the reporting event and background threads in the simulators and coordinator write the events to the database asynchronously. This means that your load test finishes before all the events are written to the database, so the report does not appear for some time (how long depends on your test cases and how many events they generate). The simulator queue typically takes the longest to flush; you get a message at the INFO level in the simulator log showing the percentage complete.This feature is considered as "advanced usage" for now and is disabled by default. Feedback at
is welcome and encouraged.http://ca.com/support (http://www.ca.com/support) falseDefault:
lisa.reporting.step.max.propsused.buffersizeDefault: 100
lisa.reporting.step.max.propsset.buffersizeThese properties control the collection of statistics for a test step during the execution of a test case. The values specify the maximum number of occurrences that are recorded for the properties that are used and properties that are set. You should not need to change the default values.
100Default:
lisa.threadDump.generateDefault: true
lisa.threadDump.intervalDefault: 30
lisa.threadDump.loggerNameEnable periodic thread dumps. It is a good idea to leave this property enabled. It efficiently checks to see if the threadDumpLogger is at INFO or below and not do anything if it is set to WARN or higher. Properties are only read once at startup; the l file is checked every 10 ogging.propertiesseconds for changes. All that you must do is leave this property alone and set the log level of the threadDumpLogger to INFO and wait for at most 30 seconds to get periodic thread dumps of a running DevTest Server. These logs are invaluable when debugging performance issues. See the comments in for more information.logging.properties
threadDumpLoggerDefault:
These properties are used to control the metrics collection in VSE servers.
lisa.vse.metrics.collectMain property to turn on the overall metrics collection (true) or off (false).
trueDefault:
lisa.vse.metrics.txn.counts.levelThis property controls the level at which transaction counts are recorded. When the named transaction counts are summed, you get transactions for any time period.
none (or false), service, operation, argumentsValues:
Service: The name of the service names transaction counts
Operation: The service name plus the request operation names transaction counts
Arguments: The service name plus the request operation names transaction counts plus a list of request arguments

DevTest Solutions - 9.5
25-Jul-2016 223/448
Default: service
lisa.vse.metrics.sample.intervalThis property controls how often transaction rate and response times are sampled.
5mDefault:
lisa.vse.metrics.delete.cycleDefault: 1h
lisa.vse.metrics.delete.ageThese properties control how often old metric data is scanned for and deleted, and what is considered old.
30dDefault:
lisadb.internal.enabledIndicates whether to start the internal Derby database instance in the registry.
trueDefault:
lisadb.internal.hostThe network interface that the internal Derby database uses. The default value 0.0.0.0 indicates that all interfaces are used.
0.0.0.0Default:
lisadb.internal.portThe port number that the internal Derby database listens on.
1528Default:
lisa.acl.audit.logs.delete.frequencyDefault: 1d
lisa.acl.audit.logs.delete.ageThese properties control how often old ACL audit log data is scanned for and deleted, and what is considered old.
30dDefault:
Database PropertiesThe following components interact with a database: reporting, Agent broker, VSE, and ACL. Typically you would point them all to the same connection pool, but you can define a separate pool for each or mix and match. To define a new pool, set up properties like . The underlying lisa.db.pool.myPool.urlpool implementation is the open source c3p0 pool, and the various properties are passed down. For available settings, see http://www.mchange.com/projects/c3p0/index.html#configuration_properties.
lisadb.reporting.poolNameDefault: common
lisadb.acl.poolNameDefault: common
lisadb.broker.poolNameDefault: common

DevTest Solutions - 9.5
25-Jul-2016 224/448
lisadb.pool.common.driverClassDefault: org.apache.derby.jdbc.ClientDriver
lisadb.pool.common.urlDefault: jdbc:derby://localhost:1528/database/lisa.db;create=true
lisadb.pool.common.userDefault: rpt
lisadb.pool.common.password_encSet the password by removing the trailing _enc from the property name and adding
. The password is automatically encoded at startup.=MyPlaintextPassword 76f271db3661fd50082e68d4b953fbeeDefault:
The following pool properties keep the number of connections to a minimum when DevTest is idle.
lisadb.pool.common.minPoolSizeDefault: 0
lisadb.pool.common.minPoolSizeDefault: 0
lisadb.pool.common.maxPoolSizeDefault: 10
lisadb.pool.common.acquireIncrementDefault: 1
lisadb.pool.common.maxIdleTimeDefault: 45
lisadb.pool.common.idleConnectionTestPeriodDefault: 5
Other common database settings: copy and paste the relevant user, password, and pool size parameters from the common template.
lisadb.pool.POOLNAME.driverClassDefault: oracle.jdbc.OracleDriver
lisadb.pool.POOLNAME.urlDefault: jdbc:oracle:thin:@HOST:1521:SID
lisadb.pool.POOLNAME.driverClassDefault: com.ibm.db2.jcc.DB2Driver
lisadb.pool.POOLNAME.urlDefault: jdbc:db2://HOST:50000/DBNAME
lisadb.pool.POOLNAME.driverClassDefault: com.microsoft.sqlserver.jdbc.SQLServerDriver
lisadb.pool.POOLNAME.url

DevTest Solutions - 9.5
25-Jul-2016 225/448
lisadb.pool.POOLNAME.urlDefault: jdbc:sqlserver://durry;databaseName=LISA
lisadb.pool.POOLNAME.driverClassDefault: com.mysql.jdbc.Driver
lisadb.pool.POOLNAME.urlDefault: jdbc:mysql://HOST:3306/DBNAME
lisa.jdbc.asset.pool.sizeWhen defining a JDBC Connection asset, this property configures the connection pool size.
5Default:
Mainframe Propertieslisa.mainframe.bridge.enabledIndicates whether to enable the CICS mainframe bridge.
falseDefault:
lisa.mainframe.bridge.modeIndicates whether the mainframe bridge runs in client mode or server mode.
serverDefault:
lisa.mainframe.bridge.portWhen the mainframe bridge is running in server mode, this port is the well-known port that the mainframe bridge listens on.
61617Default:
lisa.mainframe.bridge.server.hostDefault: 127.0.0.1
lisa.mainframe.bridge.server.portWhen the mainframe bridge is running in client mode, these values are the IP address and the well-known port of the LPAR agent.
3997Default:
lisa.mainframe.bridge.connidTwo-character unique ID for each client.
AADefault:
WebSphere MQ Properties
lisa.mq.ccsid.default=819
You can use this property to override the default Coded Character Set Identifier (CCSID) for all IBM WebSphere MQ messages sent from DevTest. This value can also be overridden for each case in the Publisher Info's Message Properties of the step. For more IBM WebSphere MQ (see page 403)information, see For the complete list of CCSIDs, see Using CA Application Test. http://www-01.ibm.
. The default value for United States locales is com/software/globalization/ccsid/ccsid_registered.html819 (ASCII).
Localization Options

DevTest Solutions - 9.5
25-Jul-2016 226/448
lisa.locale.languages=en
You can use this property to indicate the languages to support in the UI. The valid values are and en ja, indicating English or Japanese.
If you specify both and here, you can switch the UI between English and Japanese by using the en ja, option off the menu.System Language Main
lisa.supported.html.request.encodings=Valid values are ISO-8859-1,UTF-8,Shift_JIS,EUC-JP,Windows-31J.
Selenium Integration Propertiesselenium.enable.waitfor=trueSpecifies whether to add an implicit waitForElementPresent step for each step in the test case that must locate a web element.
Values:
True: Adds the implicit step that executes before the real step to ensure that the element exists and that the page has loaded.
False: Does not add the implicit step. If you set this property to false, scenarios can occur where the script runs successfully in Selenium Builder but fails in DevTest because of delays in page loading. If you have already defined waitForElementPresent steps in Selenium Builder, you can set this property to false.
selenium.browser.typeDefines the type of browser for running a Selenium Integration test case. Use this property in a project configuration file.Values:
Chrome
IE
Firefox
Note: If this property is not specified, the test runs in Firefox by default.
selenium.ie.driver.pathDefines the full path to the Selenium driver on a local computer that is used to run a Selenium Integration test in a Microsoft Internet Explorer browser. Use this property in a project configuration file.
Example:
C:\lisa-se\IEDriverServer.exe
selenium.chrome.driver.path

DevTest Solutions - 9.5
25-Jul-2016 227/448
selenium.chrome.driver.pathDefines the full path to the Selenium driver on a local computer that is used to run a Selenium Integration test in a Chrome browser. Use this property in a project configuration file.
Example:
C:\lisa-se\ChromeDriverServer.exe
selenium.remote.urlDefines the URL of a remote Selenium Server hub to run Selenium Integration test cases on a remote browser. Use this property in a project configuration file.
Example:
http://your_remote_hostname:4444/wd/hub
Note: You can define and in the selenium.chrome.driver.path selenium.ie.driver.pathsame project configuration file. A configuration file that contains selenium.chrome.driver.
or cannot also contain .path selenium.ie.driver.path selenium.remote.url
selenium.WebDriver.DesiredCapabilities.filePathSpecifies the location of the parameter file that is used to set advanced options in the Selenium web driver.
VSEasy PropertiesThe port properties control the dynamic assignment of ports when using auto configuration with the HTTP protocol in .VSEasy (https://docops.ca.com/pages/viewpage.action?pageId=312699993)
If the minimum port is less than 1024, the value is set to 1024.
If the maximum port is greater than 65535, the value is set to 65535.
If the maximum port is less than or equal to the minimum port, both values are reverted to the defaults.
lisa.vseasy.http.min.dynamic.portDefault: 8000
lisa.vseasy.http.max.dynamic.portDefault: 65535
lisa.vseasy.default.group.tagSpecifies the name of the default virtual service group.
VSEasyDefault:

DevTest Solutions - 9.5
25-Jul-2016 228/448
Solr PropertiesCAI uses Apache Solr for its search functionality.
lisa.pathfinder.solr.syncUpHourSpecifies when Apache Solr synchronizes with the database. The value represents the hour. For example, the default value indicates 2 o'clock in the morning.
2Default:
lisa.pathfinder.solr.batchSizeSpecifies how many rows to retrieve from the database at a time. We recommended that you leave the value blank, as JDBC uses its default value. For most JDBC drivers, the default value is 500.
CAI Stateful Baseline ParameterizationThe following properties control the use of parameterization in stateful baselines:
lisa.pathfinder.stateful.baseline.parameter.string.min.lengthDefines the minimum length of a value in a CAI transaction request/response that is required to consider that key/value for generating a parameter or filter.
3Default:
lisa.pathfinder.stateful.baseline.parameter.string.exclusionAllows you to exclude certain strings from being eligible for generating a parameter or filter.
Yes, YES, yes, No, NO, no, true, True, TRUE, false, False, FALSE, __NULLDefault:
CAI Shelve Frameslisa.pfinvoke3.qshelveframes.trans.maxSpecifies the maximum number of transactions to process when the user tries to shelve frames by category. If you set the value to -1, all of the transactions are processed.
500Default:
CA Agile Central Integration Propertiesrally.api.keySpecifies the CA Agile Central integration (https://docops.ca.com/display/DTS95
API key./Configure+CA+Agile+Central)
rally.api.url=https:/rally1.rallydev.com/slm/webservice/v2.0/The URL to the CA Agile Central API for the instance of CA Agile Central used. Change only if you are not using the cloud-based service.

DevTest Solutions - 9.5
25-Jul-2016 229/448
1.
2.
3.
Custom Property FilesYou can use two other property files for your custom properties:
local.properties
site.properties
Site properties can be stored at the test server, which automatically pushes the file to site.propertiesall workstations that connect to it.
Properties files are evaluated in the following precedence: Command line and vmoptions files always take precedence over properties files. Then, take precedence over , local.properties site.propertieswhich takes precedence over .lisa.properties
Note: When DevTest Workstation is started, you are prompted to connect to a registry. After the registry is connected, a site.properties is sent to the workstation. If you switch the registry and change from Registry1 to Registry2, the from Registry2 is sent site.propertiesto the workstation.
To use a custom property file:
Go to the LISA_HOME directory.
Copy the or file and paste it in the same directory._site.properties _local.properties
Change the name of the file that you pasted to or (without site.properties local.propertiesthe leading underscore).
More Information:
Local Properties File (see page 229)
Site Properties File (see page 248)
logging.properties (see page 252)
Enterprise Dashboard Properties (see page 258)
Local Properties FileThe properties in the file take precedence over the and local.properties lisa.properties site.
files.propertiesAutoconnection Properties (see page 230)

DevTest Solutions - 9.5
25-Jul-2016 230/448
Autoconnection Properties (see page 230)License Properties (see page 230)VSE Properties (see page 231)Enterprise Dashboard Properties (see page 236)Interconnectivity Properties (see page 236)License Properties if Using an HTTP Proxy Server (see page 237)SDK Properties (see page 238)SSL Properties (see page 238)HTTP Authorization Properties (see page 239)Kerberos Authentication Properties (see page 240)HTTP Proxy Server Properties (see page 240)XML Serialization Settings (see page 241)Workstation Management Properties (see page 241)IP Spoofing (see page 242)Quick Start Recent Items Properties (see page 242)lisa-invoke Properties (see page 242)Server Host Name Properties (see page 243)DevTest to DevTest Communication Encryption Properties (see page 243)IBM WebSphere MQ Properties (see page 244)JMS Properties (see page 244)Miscellaneous Properties (see page 244)User Session Lifetime Properties (see page 247)Mobile Properties (see page 248)
Autoconnection PropertieslisaAutoConnectTo load site-wide properties automatically from a DevTest registry, uncomment this property and make it the right URL to your DevTest registry. The property usually hostname/lisa.TestRegistryworks. Your properties in this file override any properties that are defined at the site level.To load site-wide properties from a DevTest registry automatically, uncomment this property and make it the right URL to your DevTest registry. The works. hostname/lisa.TestRegistry usually Your properties in this file override any properties that are defined at the site level for non-GUI components.DevTest Workstation does not use this property. You can select the registry that you want to connect to with the dialog or by the button in the workstation. If Select Registry Change Registryyou disable the "prompt on startup" check box in the dialog, then DevTest Select RegistryWorkstation connects to the last registry that it was using.
tcp://somehost/RegistryFormat:
License Propertieslaf.server.urlFormat: https://license.itko.com
laf.domainFormat: iTKO/LISA/YOURCO

DevTest Solutions - 9.5
25-Jul-2016 231/448
laf.usernameFormat: YOURUSERNAME
laf.passwordFormat: YOURPASSWORD
VSE Propertieslisa.vse.deploy.dirLets you override the directory where run-time files are managed. Set this property to an absolute directory path. If you do not start the path with a drive specification, it becomes relative to LISA_HOME. If you are specifying a multilevel directory, specify in this format: C:\\Temp\\myVSE.
Note: In properties files, you MUST double backslashes for them to be recognized.
lisa.vse.si.editor.prefer.xmlThe valid values are the list of VSE SI text editor class names that are found in typemap.propertiesassigned to the name. If you write a custom text editor and make it available vseTextBodyEditors through standard SDK methods, that class name can also be a value for this property.
The following properties let VSE use old-style socket I/O rather than new I/O ("NIO"). Be aware of the following restrictions when using old style socket support:
The ability of VSE to handle being a proxy in front of SSL automatically cannot be supported. The solution is to create a VSM that is in Live System mode and points to the actual virtual service, with SSL turned on.
The ability of VSE to handle plain text traffic, even when the listen step has been configured to use SSL, cannot be supported. The solution is to provide two virtual services, one with SSL configured and one without SSL configured.
Using old style socket support does not scale as efficiently as the default socket support VSE uses.
lisa.vse.tcp.uses.nioSetting this property to false causes both plain and SSL sockets to use old-style I/O.
trueDefault:
lisa.vse.plain.tcp.uses.nioThis property controls only plain sockets.
sa.vse.tcp.uses.nioDefault:
lisa.vse.ssl.tcp.uses.nioThis property controls only SSL sockets.
isa.vse.tcp.uses.nioDefault:
lisa.vse.execution.mode
EFFICIENT uses the most efficient path through a VS model.
TRACK records VSE activity at the VS level.

DevTest Solutions - 9.5
25-Jul-2016 232/448
TRACK records VSE activity at the VS level.
LIVE routes requests received by a VS model to a live system (somewhat like a pass through mode).
VALIDATION uses both VSE and the live system to determine a response. Both are recorded as tracking information and feed the model healing process. The live response becomes the response of the virtual service.
DYNAMIC invokes a script or subprocess for every request that must resolve to one of the other four modes. This approach is useful for tracking requests that only the virtual service model sees.
LEARNING automatically "heals" or corrects the virtual service to have the new or updated response from the live system.
STAND_IN first routes a request to the virtual service (the same as Most Efficient mode). However, if the virtual service does not have a response, the request is then automatically routed to the live system.
FAILOVER first routes a request to the live system (the same as Live System mode). However, if the live system does not have a response, the request is then automatically routed to the virtual service.
Default: EFFICIENT
lisa.vse.body.cache.weightDefines the size in bytes of cache values that are allowed to persist in specific caches.
1024 * 1024 * 2 (2 MB)Default:
lisa.vse.metric.collectWhen set to false, DevTest stops the collection of periodic samples that calculate Response Time, Forced Delay, and Transactions per Second. The remainder of the metrics data that is tracked in the VSE_METRICS_TXN_COUNTS table is still captured to produce the charts for the following items:
Server Charts
Total Lifetime Transactions
Daily Transaction Counts
Server Availability
Service Charts
Total Transactions per Day.
When set to false, these items do not show any data:
Service Charts
Transaction Throughput

DevTest Solutions - 9.5
25-Jul-2016 233/448
Transaction Hits and Misses
Response Time
Forced Delay
Transactions per second.
Default: true
lisa.vse.max.hard.errorsLets you configure the number of errors that cause a VSE service to stop.To designate the number of errors that cause the service to stop, enter a valid number, 0 or greater. A value of 0 means that no errors are allowed; the service shuts down after the first error.To designate an unlimited number of errors, enter any negative number.If you enter an invalid value or no value, the default number of 3 errors is used.
3Default:
Note: Depending on the type of error and model, the final error count can be greater than the value set in . Shutting down the virtual service can take some lisa.vse.max.hard.errorstime. While the shutdown is in process, some types of errors can continue to increase.
lisa.tcp.tcprecorder.close.immediatelySpecifies if sockets are closed immediately at the end (or termination) of a TCP recording.Both local (listen port) and remote sockets are affected.If a socket read or write is in progress (if there is a long delay by server or client) and recording is terminated, then this property specifies whether to close or to let the communication complete.For long running conversations (for example, large file downloads) this property specifies whether to terminate the conversation or let it run until the end.
blank, true, and false. If the value is blank, the value defaults to true.Values: trueDefault:
lisa.vse.body.cache.size
Specifies the amount of memory that is set aside to cache the uncompressed body for VSE request and response objects. Units are in MB.
10Default:
lisa.vse.body.cache.timeoutSpecifies the length of time cached uncompressed bodies of VSE requests and responses remain in the cache. Units are in seconds.
60Default:
lisa.vse.argument.match.allow.whitespaceThis property tells VSE to allow leading or trailing whitespace, or both, on incoming request arguments when matching to a service image. The default value is , which causes VSE to strip falseoff leading and trailing whitespace on incoming request arguments before matching the request to a service image.
falseDefault:

DevTest Solutions - 9.5
25-Jul-2016 234/448
These properties define the IMS Connect message parameters for the protocol to use for recording and playback purposes.
lisa.vse.protocol.ims.encodingDefault: EBCDIC
lisa.vse.protocol.ims.header.lengthDefault: 80
lisa.vse.session.timeout.msIf an existing session cannot be found, VSE attempts to match the request against the starter transactions of each conversation in the image. If a match is found, a new session is created and the relevant response is returned. The session is maintained until 2 minutes after it has last been "seen" by VSE. You can change this behavior by setting . If no lisa.vse.session.timeout.msconversation starters match, no session is created and the list of stateless transactions is consulted in the order they are defined. If there is a match, the appropriate response is returned. If there is still no match, the "unknown request" response is sent.
120000Default:
lisa.vse.tcp.oldio.read.timeoutControls the period that we wait for a TCP read to be satisfied before timing out and running retry logic. Its default setting of 500 milliseconds is sufficient for "normal" or well-tuned networks where network latency is not an issue. For networks experiencing delays longer than 1/2 a second, you can set this property to allow the code to wait for a longer time before retrying. The retry logic should be sufficient for communications on the TCP socket to be maintained at the loss of some throughput (a lower number of transactions per second).NIO must be turned off for the property to work. Set lisa.vse.tcp.oldio.read.timeout lisa.vse.ssl.
=false.tcp.uses.nio 500Default:
lisa.vse.conversational.back.navigation.allowedVSE supports unrecorded back navigation during playback in a conversational transaction. Set this property to to enable back navigation for all services. The conversational session then tracks true received requests and allows any next request to be one of the previous ones.
falseDefault:
lisa.vse.tracking.delete.data.ageDefines how long to keep session tracking information, in hours.
8Default:
lisa.vse.protocol.ims.response.includes.llllIndicates the existence of the 4-byte IMS Connect LLLL length field in the request payload. A value of true includes the LLLL field. A value of false excludes it.
falseDefault:
lisa.vse.ims.connect.llzz.requestIndicates the existence of the 4-byte IMS Connect LLZZ length field in the request payload. A value of includes the LLZZ field. A value of excludes it.true false
falseDefault:

DevTest Solutions - 9.5
25-Jul-2016 235/448
lisa.vse.ims.connect.llzz.responseInstructs the protocol to generate the 4-byte IMS Connect LLZZ length field in the response messages. A value of creates the LLZZ field. A value of does not create it.true false
trueDefault:
lisa.vse.http.server.lookup.client.namesControls whether we do reverse DNS lookup on our clients.
true, falseValues:: falseDefault
lisa.vse.performance.enabledSpecifies whether to enable CA Service Virtualization performance mode (https://docops.ca.com
./display/DTS95/Using+CA+Service+Virtualization) true, falseValues: falseDefault:
lisa.vse.http.response.allowNonStandardResponseCodeAllows for non-standard response codes when using the HTTP virtual service.
: true, falseValues: falseDefault
lisa.baseline.cache.timeout.seconds
After baselines are created, they are maintained in cache for a short period to allow time for our web-based applications to retrieve them. The length of time they remain in cache is managed with this property,
Default: 60 seconds
lisa.baseline.cache.maximum.entries
Determines which baselines to evict when the cache size becomes larger than desired. This property does not guarantee a maximum size, it only provides a suggested size limit to the cache manager. When this size limit is reached, the cache manager considers the least-recently accessed baseline for eviction.
Default: 100
lisa.baseline.conversationThread.maximumTransactions
Baselines of virtual services support the concept of "conversation threads." Every stateful conversation in a service image starts with a single transaction that defines a "start node". This start node has branches to other transactions, those transactions lead to others, and so on, yielding a hierarchy of transactions.
Each path from a start node to a leaf node constitutes a "conversation thread". Each conversation thread yields one baseline test case. Usually, these conversation threads are not long and contain only a handful of transactions. Inevitably, pathological cases arise, and these pathological cases have the potential of introducing runtime errors such as Out Of Memory exceptions and Stack Overflow exceptions. To mitigate these problems, this property can be set to limit the number of transactions that are allowed in a single conversation thread.
With the default, the first 100 transactions in a conversation thread are included in the baseline

DevTest Solutions - 9.5
25-Jul-2016 236/448
With the default, the first 100 transactions in a conversation thread are included in the baseline test, and the remaining transactions along that thread are ignored.
: 100Default
com.itko.lisa.vse.sio.loggerNameEnables NIO session logic to log higher levels of state information during playback. This logging is at the TRACE log level instead of the INFO level of the current logging. In order to turn on NIO traces, make this property value To see the higher level traces, add NIOSession. log4j.
to the file.logger=NIOSession logging.properties
Enterprise Dashboard PropertiesThe Enterprise Dashboard database is used for the Solutions Usage Audit Report data, registry status and component information, historical event logs, and historical component metrics.
The Enterprise Dashboard database is not able to reside in the same database schema as a registry database. We recommend that the database have at least 50 GB of storage.
Derby is not supported in a distributed environment.
A custom Enterprise Dashboard database must be configured in the file.dradis.properties
lisa.activation.retry.countDefines the number of times (count) that DevTest retries the initial communication with Enterprise Dashboard.
3Default:
The default connection is to the internal Derby database. For information about connecting to external databases, see External Database Configuration (https://docops.ca.com/display/DTS95
./External+Registry+Database+Configuration)
Interconnectivity Propertieslisa.default.keystoreDefault: {{LISA_HOME}}webreckeys.ks
lisa.default.keystore.passDefault: passphrase
DevTest to DevTest communication encryption. Normally the network traffic is not encrypted. To use encryption, we support SSL out of the box. Instead of naming your server endpoints with "tcp," name them with "ssl" - for example: ssl://hostname:2010/Registry. You do not have to set any of the following properties; simply naming the endpoints (and the server name) with SSL is enough. For example, you can start a new simulator:
Simulator -name ssl://thishost:2014/Simulator -labName ssl://regHost:2010/Registry
We provide a default internal self-signed certificate (in ). For a stronger LISA_HOME\webreckeys.kscertificate, specify the property and the plaintext password in lisa.net.keyStore lisa.net.keyStore.
.password
The next time DevTest starts, an encrypted string ( ) replaces the lisa.net.keyStore.password_encplaintext password.
lisa.net.keyStore

DevTest Solutions - 9.5
25-Jul-2016 237/448
lisa.net.keyStoreDefault: {{LISA_HOME}}lisa.ks
lisa.net.keyStore.password
This is where we keep our identification certificate. If we are a server installation, this is the certificate that clients need to add to their list of trusted servers. If we are a client installation and we are doing mutual (client) authentication, this is the certificate that needs to be added to the truststore on the server side. If we are a client installation that is not using mutual authentication, then you do not need to specify this.
lisa.net.trustStoreDefault: {{LISA_HOME}}lisa.ts
lisa.net.trustStore.password_encDefault: 079f6a3d304a978146e547802ed3f3a4
This is where we keep trusted certificates. If we are primarily a client installation, this holds a list of trusted servers. If we are a server installation and we are doing mutual (client) authentication, this is where we put trusted client certificates.
lisa.net.clientAuthIndicates whether to use mutual authentication.
falseDefault:
lisa.net.default.protocolValues: SSL or TCP
SSLDefault: sslDefault:
License Properties if Using an HTTP Proxy Serverlaf.usehttpproxy.serverDefault: true
laf.httpproxy.serverDefines the proxy server, in the format .my_proxyserver.com
laf.httpproxy.portIf your proxy server requires credentials, leave blank to use the native NTLM authentication.
3128Default:
laf.httpproxy.domainDefines the proxy domain, if needed for NTLM.
laf.httpproxy.usernameOptional
laf.httpproxy.passwordOptional

DevTest Solutions - 9.5
25-Jul-2016 238/448
laf.email.alertIf there is a license error, send an email. Refer to the following example. Replace with mailhostthe hostname of your mail host. Replace with the target email [email protected]. Replace with the email address from which the email is [email protected]:mailhost,[email protected],[email protected]
SDK PropertiesThe DevTest SDK examples require:
assertsFormat: com.mycompany.lisa.AssertFileStartsWith
com.mycompany.lisa.AssertFileStartsWithFormat: com.itko.lisa.editor.DefaultAssertController,com.itko.lisa.editor.DefaultAssertEditor
filtersFormat: com.mycompany.lisa.FilterFileFirstLine
com.mycompany.lisa.FilterFileFirstLineFormat: com.itko.lisa.editor.FilterController,com.itko.lisa.editor.DefaultFilterEditor
nodesFormat: com.mycompany.lisa.node.FTPTestNode
com.mycompany.lisa.node.FTPTestNodeFormat: com.mycompany.lisa.node.FTPTestNodeController,com.mycompany.lisa.node.FTPTestNodeEditor
SSL PropertiesChange the default behavior for validating the SSL certificates.
ssl.checkexpiryA value of "true" says to validate the validity dates for the certificate.
falseDefault:
ssl.checkcrlA value of "true" says to validate the cert revocation list that is specified in the certificate.
falseDefault:
Enable a client cert and password for SSL (used by HTTP step; also used by Web Service step if not overridden).
ssl.client.cert.pathA full path to the keystore.
ssl.client.cert.passThe password for the keystore. This password is automatically encrypted when DevTest runs.

DevTest Solutions - 9.5
25-Jul-2016 239/448
ssl.client.key.passAn optional password for the key entry if using a JKS keystore and key has a different password from keystore. This password is automatically encrypted when DevTest runs.
Override the client certificate and password for SSL (ssl.client.cert.path and ssl.client.cert.pass) for Web Service step.
ws.ssl.client.cert.path
A full path to the keystore.
ws.ssl.client.cert.passThe password for the keystore. This password is automatically encrypted when DevTest runs.
ws.ssl.client.key.passAn optional password for the key entry if using a JKS keystore and key has a different password from keystore. This password is automatically encrypted when DevTest runs.
Use a custom keystore when acting as the SSL server during VSE recording and playback (Listen Step).
ssl.server.cert.pathA full path to the SSL server keystore file.
ssl.server.cert.passThe password for the SSL server keystore. When DevTest runs, this password is automatically encrypted as a new property named ssl.server.cert.pass.encrypted.
lisa.ssl.reuse.session
If you are reusing the same socket (for example, within the same test it reuses sockets) DevTest creates a new session.
: falseDefault
HTTP Authorization PropertiesThese credentials are automatically encrypted when DevTest runs. To reset the values, use the unencrypted property names. To use the native NTLM authorization (Windows only), leave these settings commented out.
lisa.http.domainThe domain name; use this option for NTLM.
lisa.http.userUsername
lisa.http.passPassword
lisa.http.preemptiveAuthenticationTypePreemptively send the authorization information rather than waiting for a challenge.
basic, ntlm, negotiateValues: ntlmDefault:

DevTest Solutions - 9.5
25-Jul-2016 240/448
lisa.http.forceNTLMv1NTLMv2 is used by default but by setting this property to it can be forced to use NTLMv1 true when not using native integrated Windows authentication.
trueDefault:
Kerberos Authentication Propertieslisa.java.security.auth.login.configThe location of the login configuration file.
lisa.java.security.krb5.conf The location of the Kerberos configuration file that would be used to override any preset locations.
lisa.http.kerberos.principalThe name of the principal to be used for the login when using DevTest support for principal and password authentication. This parameter is encrypted when DevTest Workstation is started.
lisa.http.kerberos.passThe password to be used for the login when using DevTest support for principal and password authentication. This parameter is encrypted when DevTest Workstation is started.
HTTP Proxy Server Propertieslisa.http.webProxy.hostThe machine name or IP address.
lisa.http.webProxy.nonProxyHostsThe machine name or IP address to exclude from proxy authentication. To enter multiple values, delimit values with pipes ( | ). Use * as a wildcard.
127.0.0.1Default:
lisa.http.webProxy.port
lisa.http.webProxy.ssl.hostThe machine name or IP address.
lisa.http.webProxy.ssl.nonProxyHostsThe machine name or IP address to exclude from SSL proxy authentication. To enter multiple values, delimit values with pipes ( | ). Use * as a wildcard.
127.0.0.1Default:
lisa.http.webProxy.ssl.portLeave blank to use integrated NTLM authentication.
lisa.http.webProxy.host.domainUsed for NTLM authentication.
lisa.http.webProxy.host.account
lisa.http.webProxy.host.credential

DevTest Solutions - 9.5
25-Jul-2016 241/448
lisa.http.webProxy.nonProxyHosts.excludeSimpleExclude simple host names from proxy use.
trueDefault:
lisa.http.webProxy.preemptiveAuthenticationTypePreemptively send authorization information rather than waiting for a challenge.
basic, ntlmValues: ntlmDefault:
lisa.http.timeout.connectionHTTP Timeout (in milliseconds) - To extend the timeout to wait indefinitely, set the values to zero.
15000Default:
lisa.http.timeout.socketHTTP Timeout (in milliseconds). To extend the timeout to wait indefinitely, set the value to zero.
180000Default:
XML Serialization Settingslisa.toxml.serialize.mode=NOREFERENCES
NOREFERENCES means a simple tree is rendered. Circular references are not allowed. XPATHREFERENCES means the XPATH notation is used for references. Circular references can be used. If there is a circular reference, we fall back to XPATHREFERENCES. However, any serialization before version 3.6 that is re-read fails and could require you to set a default of XPATHREFERENCES.
Workstation Management Propertieslisa.ui.admin.tr.control=no
lisa.ws.jms.SoapAction.quoted=false
SOAP over JMS with TIBCO BusinessWorks/Active Matrix: BW/AM requires that the SOAPAction header is quoted.
When DevTest serializes a date, time, or dateTime, it uses the following formats by default. To change the default formats/time zone, use these properties. You can also dynamically set them during the test case. You can set the format to one that does not comply with the XML schema specification. However, doing so is not recommended (except for a negative test case).
lisa.ws.ser.dateFormat=yyyy-MM-dd
lisa.ws.ser.timeFormat=HH:mm:ss.SSS'Z'
lisa.ws.ser.timeFormat.timeZone=GMT
lisa.ws.ser.dateTimeFormat=yyyy-MM-dd'T'HH:mm:ss.SSS'Z'
lisa.ws.ser.dateTimeFormat.timeZone=GMT
ws.raw.format=true
To format the SOAP response for RAW Soap Steps, set this property to his formatting can also true. T

DevTest Solutions - 9.5
25-Jul-2016 242/448
To format the SOAP response for RAW Soap Steps, set this property to his formatting can also true. Tbe done dynamically at run time.
lisa.ws.endpoint.fullautoprop=false
The entire WS Endpoint URL is automatically converted into a single DevTest property. To convert the URL to use the WSSERVER and the WSPORT properties, set this property to .false
stats.unix.xml.folder={ {LISA_HOME } }/umetrics
IP Spoofinglisa.ipspoofing.interfaces=2-34-56-78-90-AB, eth0, Realtek PCIe GBE Family Controller
Interfaces: a comma-separated list of interfaces that is used for the IP spoofing. These interfaces can be named using the MAC address (JDK 1.6+), interface name, or interface display name.
lisa.ui.useNativeFileDialog=true
Force the use of a native file dialog.
Quick Start Recent Items Propertieslisa.prefill.recentSpecify the maximum number of recent items to show in the Prefill combo boxes (no less than 10).
10Default:
lisa.quickstart.recentSpecify the maximum number of recent items to show in the tab (no Open Recent Quick Startless than 5).
5Default:
lisa-invoke Propertieslisa.portal.invoke.base.urlDefault: /lisa-invoke
lisa.portal.invoke.report.urlDefault: /reports
lisa.portal.invoke.server.report.directoryDefault: lisa.tmpdirlisa.portal.invoke.report.url
lisa.portal.invoke.test.rootDefault: d:/lisatests/

DevTest Solutions - 9.5
25-Jul-2016 243/448
Server Host Name Propertieslisa.net.externalIPThis value must be the external IP address or DNS name for the registry to be accessible remotely. This parameter is referenced in the relevant connection properties. If the value is left at "localhost," it is automatically overridden in the external IP address of the registry server when sent to connecting applications.
localhostDefault:
DevTest to DevTest Communication Encryption PropertiesNormally the network traffic is not encrypted. SSL encryption is supported out of the box. Instead of naming your server endpoints with "tcp," name them with "ssl": for example, ssl://hostname:2010
. You do not have to set any of the following properties: naming the endpoints (and the /Registryserver name) with ssl is enough. For example, to start a new simulator: Simulator -name
.ssl://thishost:2014/Simulator -labName ssl://regHost:2010/Registry
LISA_HOME\webreckeys.ks is a default internal self-signed certificate. For a stronger certificate, specify the property and the plaintext password in . lisa.net.keyStore lisa.net.keyStore.passwordThe next time DevTest starts, an encrypted string replaces the lisa.net.keyStore.password_enc plain text password.
lisa.default.keystore={{LISA_HOME}}webreckeys.ks
lisa.default.keystore.pass=passphrase
Where the identification certificate is kept. For a server installation, this value is the certificate to add to the list of trusted servers. For a client installation doing mutual (client) authentication, this value is the certificate to add to the truststore on the server side. For a client installation that is not using mutual authentication, you do not need to specify this parameter.
lisa.net.keyStore={{LISA_HOME}}lisa.ks
lisa.net.keyStore.password=PlainTextPasswordWilBeConvertedToEncrypted
Where trusted certificates are kept. For a primarily client installation, this field holds a list of trusted servers. For a server installation doing mutual (client) authentication, this field is where to put trusted client certificates.
lisa.net.trustStore={{LISA_HOME}}lisa.ts
lisa.net.trustStore.password_enc=079f6a3d304a978146e547802ed3f3a4
Whether or not to use mutual authentication.
lisa.net.clientAuth=false
Defines the default protocol for ActiveMQ connections. The default is .tcp
lisa.net.default.protocol=tcp

DevTest Solutions - 9.5
25-Jul-2016 244/448
IBM WebSphere MQ PropertiesThe string-value is supplied by a data set such as the Unique Code Generator.
lisa.mq.correlation.idA run-time value that sets the correlation ID for an outgoing MQ message.
string-valueDefault:
lisa.mq.correlation.id.bytesA run-time value that sets the correlation ID as a byte[] for nonprintable values.
byte[]Default:
lisa.mq.message.idA run-time value that sets the message ID for an outgoing MQ message.
string-valueDefault:
lisa.mq.message.id.bytesA run-time value that sets the message ID as a byte[] for nonprintable values.
byte[]Default:
JMS PropertiesThe string-value is often supplied by a data set such as the Unique Code Generator.
lisa.jms.correlation.idA run-time value that sets the JMSCorrelationID for an outgoing JMS message.
string-valueValue:
lisa.jms.ttl.millisecondsA run-time value that sets the time-to-live for an outgoing JMS message.
num-valueValue:
jms.always.close.jndiA value of true auses the JMS step to always close the JNDI context at the end of its execution.
true, falseValues:
Miscellaneous Propertieslisa.coord.failure.list.sizeIf too many errors are reported in a test, the coordinator uses up all its available heap space. When the heap space is used up, DevTest Server must be restarted. This situation is bad if multiple tests are running, and one test gets staged and throws nothing but errors. This property limits the size of the coordinator failure list.
15Default:
testexec.lite.longMsgLenTo view the full text of long responses, set this property to the length of your longest response. Run your test, capture what you need, verify that the correct response is indeed being sent back, and then comment out the added line in the local.properties file to revert to the default length.
1024Default:

DevTest Solutions - 9.5
25-Jul-2016 245/448
java.rmi.server.hostnameForces the communication through a specific NIC on the computer.
IP address of selected NICValue:
lisa.xml.xpath.computeXPath.alwaysUseLocalNameThis property configures whether the XPath local-name() function is always used during XPath generation. The default value is false, meaning that the local-name() is only used when necessary. To generate an XPath that works regardless of the namespace of an XML node, set the value of this property to true.
falseDefault:
lisa.commtrans.ctstatsTo capture the information that is necessary to populate the Cumulative HTTP Traffic Summary report, enter this property into one of the custom property files.
trueDefault:
gui.viewxml.maxResponseSizeThe property to designate the size at which the view of an XML response in an editor or in the ITR is plain and no DOM view is provided.
5 MBDefault:
rpt.cleaner.initDelayMinDefault: 10
rpt.cleaner.pulseMinThese properties were added to make the report cleanup thread run more often. The first is the initial delay, in minutes, before the cleaner starts. The second is the time between runs, in minutes.
60Default:
lisa.LoadHistoryWriteSupport.max.errorsSet to limit the number of errors that are reported to prevent the report generator from backing up.
50Default:
lisa.metric.initialization.timeoutInitialization of the Metric Collector occurs during the staging of the test/suite and the test/suite does not start until the collectors are initialized. The default value of 90000 means that initialization times out after 90 seconds (for each collector).
90000Default:
lisa.graphical.xml.diff.report.numberofextralinesWhen the graphical XML diff displays an error, this property controls how many lines before and after the differing lines are displayed. The default is two lines before and two lines after.
0, 1, and 2.Values: 2Default:
lisa.gui.dashboard.sleep.msThere is a small sleep() just before the dashboard refreshes at end-of-test. The sleep() allows a timeslice for the metric collectors to wrap up their work. Adjust the timeslice with this property.
millisecondsFormat:
lisa.scripting.default.language

DevTest Solutions - 9.5
25-Jul-2016 246/448
1.
2.
3.
4.
lisa.scripting.default.languageDesignates the default scripting language to use.Values:
applescript (for OS X)
beanshell
freemarker
groovy
javascript
velocity
Default: beanshell
lisa.serverSocket.bind.backlogSpecifies the backlog argument while binding Server Socket. Backlog is the requested maximum number of pending connections on the server socket. Its exact semantics are implementation specific. In particular, an implementation may impose a maximum length or may choose to ignore the parameter altogether.
numeric, greater than 0.Values: 100Default:
qc.pulseIntervalSpecifies the interval, in seconds, that HP ALM Quality Center tries to ping the registry,
300Default:
lisa.server.https.cipher.suites
Allows you to configure Server cipher suites. Following are the rules:
One or more ciphers can be configured by setting a comma-separated list of cipher names.
If this property is not present in the properties file or if the property is present with an empty value, then the default JVM supported ciphers are enabled.
If all the cipher names that are specified by this property are not supported by the JVM, then the default JVM-supported ciphers are enabled.
If there is at least one cipher name specified in the property that is supported by the JVM, then those ciphers alone are enabled.
FileNode.cache.max.size.mbFor the Read a File (Disk, URL or Classpath) step, specifies when the cache file should be flushed, by size.
: 20 MBDefault

DevTest Solutions - 9.5
25-Jul-2016 247/448
FileNode.cache.duration.minsFor the Read a File (Disk, URL or Classpath) step, specifies when the cache file should be flushed, by time.
: 30 minutesDefault
lisa.portal.url.prefixPrefix for the URL of DevTest Portal.
: http://Default
devtest.hostnameThe hostname for DevTest Portal.
the registry serverDefault:
User Session Lifetime PropertiesAll the user session lifetimes in different DevTest modules are configurable with properties.
The ACL session-related properties and their default values are:
registry.max.user.lifetime.seconds
The property is the main session lifetime property that registry.max.user.lifetime.secondsdetermines how long a user session is valid after the last activity done by a user in a session.
Specifies how many seconds the SSO security token is kept in memory for DevTest Workstation to bypass authentication for the DevTest Portal and DevTest Workstation.
When you click a button to access a UI, DevTest bypasses ACL authentication by using an SSO security token. That SSO security token is stored in memory for reuse. However, if DevTest Workstation is idle for 20 minutes (or the number of seconds specified for this property) that SSO security token becomes expired. It then requires reauthentication. If you start DevTest Workstation, you can click these buttons and go directly to the UI without entering a userid and password. But after DevTest Workstation is idle (no activity) for 20 minutes, if you click these buttons, DevTest Workstation will prompt for a userid and password to proceed so that a new security token is kept in memory again.
Default: 1200
The following modules have a user session lifetime, but they always communicate with the registry to decide if the session is still alive.
vse.max.user.lifetime.seconds=1200
console.max.user.lifetime.seconds=1200
coordinator.max.user.lifetime.seconds=1200
simulator.max.user.lifetime.seconds=30
The console refresh interval can be configured with the following property.
lisa.portal.server.console.polling.interval.seconds=5
The interval at which the DevTest Console checks whether the current session is valid and is not

DevTest Solutions - 9.5
25-Jul-2016 248/448
The interval at which the DevTest Console checks whether the current session is valid and is not expired.
Mobile Propertieslisa.mobile.custom.argumentsIf set, then the string value of the property is added to the command line of the Appium process. It can be anything meaningful to Appium. A full list of Appium arguments can be found here (https://github.com/appium/dmg-template/blob/master/Appium.app/Contents/Resources/node_modules
./appium/docs/server-args.md)For example: lisa.mobile.custom.arguments=--no-resetThis can be used with applications that require setup configuration or exhibit distinct behavior on the first run. The no-reset assures that the application would not require setup on every test run.
lisa.mobile.remote.userWhen running remote tests through a headless app like TestRunner, this property is required if you want to prompt for a User name for the remote host during a playback of a recording.
lisa.mobile.remote.passwordWhen running remote tests through a headless app like TestRunner, this property is required if you want to prompt for a Password for the remote host during a playback of a recording.Make sure you encrypt this password by clicking the check box for the lock icon in DevTest Workstation.
lisa.mobile.saucelabs.appium.versionThis property lets you specify the specific version of Appium to use for a device you have defined on SauceLabs.For example: always uses Appium 4.3 for these tests. lisa.mobile.saucelabs.appium.version=4.3
lisa.mobile.remote.deviceThe iOS device name that is used for remote recording and playback. The default value is "iPhone 6".
lisa.mobile.remote.device.versionThe iOS device version that is used for remote recording and playback. The default is "9.3".
Site Properties FileThe properties in the file are sent from the registry to any DevTest application or site.propertiesservice that connects to it. These properties take precedence over any properties that are defined locally in . However, these properties do not take precedence over the properties that lisa.propertiesare defined in or defined on the command line using -D command-line option.local.properties
DevTest Enterprise Dashboard Properties (see page 249)Database Properties (see page 249)Oracle Properties (see page 250)MS SQL Server Properties (see page 250)DB2 Properties (see page 251)MySQL Properties (see page 251)Derby Properties (see page 251)DCM Settings (see page 252)

DevTest Solutions - 9.5
25-Jul-2016 249/448
DCM Settings (see page 252)
DevTest Enterprise Dashboard Propertiesdevtest.enterprisedashboard.host=somehost
devtest.enterprisedashboard.port=1506
Important! The Enterprise Dashboard database is not able to reside in the same database schema as a registry database. Because the site.properties is handled solely by a registry process, a custom Enterprise Dashboard database will need to be configured in the dradis.properties file. For more details on configuration of the Enterprise Dashboard database, look at the _dradis.properties template in the home directory of your DevTest installation.
devtest.enterprisedashboard.https.enabled=falseSpecifies that Enterprise Dashboard runs with schema HTTP or HTTP/S.
Database PropertiesThese are the default properties used by DevTest to connect to the registry database.
Derby is not supported in a distributed environment. You must use an enterprise database in a distributed environment.
The following components interact with a database: reporting, VSE, ACL, and the broker. By default, these components use the common connection pool. However, you can define a separate pool for each or mix and match. To define a new connection pool, add properties such as lisadb.pool.
. The underlying pool implementation is the open source c3p0 pool. DevTest passes the newpool.urlvarious properties down. For information about the c3p0 settings that you can select from, see
.http://www.mchange.com/projects/c3p0/index.html#configuration_properties
lisadb.reporting.poolNameDefault: common
lisadb.acl.poolNameDefault: common
lisadb.broker.poolNameDefault: common
lisadb.pool.common.driverClassDefault: org.apache.derby.jdbc.ClientDriver
lisadb.pool.common.urlDefault: jdbc:derby://localhost:1528/database/lisa.db;create=true
lisadb.pool.common.userDefault: rpt

DevTest Solutions - 9.5
25-Jul-2016 250/448
lisadb.pool.common.password_encDefault: 76f271db3661fd50082e68d4b953fbee
The following pool properties keep the number of connections to a minimum when DevTest is idle.
lisadb.pool.common.minPoolSizeDefault: 0
lisadb.pool.common.initialPoolSizeDefault: 0
lisadb.pool.common.maxPoolSizeDefault: 10
lisadb.pool.common.acquireIncrementDefault: 1
lisadb.pool.common.maxIdleTimeDefault: 45
lisadb.pool.common.idleConnectionTestPeriodDefault: 5
Should the internal Derby database instance in the registry be started?
lisadb.internal.enabledControls whether the registry starts an internal Derby database.
trueDefault:
Oracle Propertieslisadb.pool.common.driverClass
Default: oracle.jdbc.driver.OracleDriver
lisadb.pool.common.url
Default: jdbc:oracle:thin:@[HOST]:1521:[SID]
lisadb.pool.common.user
Default: none
lisadb.pool.common.password
Default: none
MS SQL Server Propertieslisadb.pool.common.driverClass
Default: com.microsoft.sqlserver.jdbc.SQLServerDriver

DevTest Solutions - 9.5
25-Jul-2016 251/448
lisadb.pool.common.url
Default: jdbc:sqlserver://[SERVER]:[PORT];databaseName=[DATABASENAME]
lisadb.pool.common.user
Default: none
lisadb.pool.common.password
Default: none
DB2 Propertieslisadb.pool.common.driverClass
Default: com.ibm.db2.jcc.DB2Driver
lisadb.pool.common.url
Default: jdbc:db2://[HOSTNAME]:[PORT]/[DATABASENAME]
lisab.pool.common.user
Default: none
lisadb.pool.common.password
Default: none
MySQL Propertieslisadb.pool.common.driverClass
Default: com.mysql.jdbc.Driver
lisadb.pool.common.url
Default: jdbc:mysql://[DBHOST]:[DBPORT]/[DBNAME]
lisadb.pool.common.user
Default: none
lisadb.pool.common.password
Default: none
Derby Propertieslisadb.pool.common.driverClass
Default: org.apache.derby.jdbc.ClientDriver

DevTest Solutions - 9.5
25-Jul-2016 252/448
Default: org.apache.derby.jdbc.ClientDriver
lisadb.pool.common.url
Default: jdbc:derby://[SERVER]:[PORT]/[DATABASE];create=true
lisadb.pool.common.user
Default: none
lisadb.pool.common.password
Default: none
DCM Settingslisa.dcm.labstartup.min=6
lisa.dcm.lisastartup.min=4
lisa.dcm.lisashutdown.min=2
lisa.dcm.lab.cache.sec=<180 default>
lisa.dcm.lab.factories=com.itko.lisa.cloud.serviceMesh.ServiceMeshCloudSupport;com.itko.lisa.cloud.vCloud.vCloudDirectorCloudSupport;;
lisa.dcm.SERVICEMESH.baseUri=<url>
lisa.dcm.SERVICEMESH.userId=<userId>
lisa.dcm.SERVICEMESH.password=<password>
lisa.dcm.vCLOUD.baseUri=<https://<fqdn>/api/versions>
lisa.dcm.vCLOUD.userId=<userId>
lisa.dcm.vCLOUD.password=<password>
lisa.net.timeout.ms=60000
logging.propertiesThe file lets you set properties that control logging levels within DevTest and third-logging.propertiesparty software.
log4j.rootCategoryDefault: INFO,A1
To provide centralized logging for cloud runs, add the appender and uncomment the registry registry appender properties in the logging.properties file. For example:
log4j.rootCategory=INFO,A1,registry

DevTest Solutions - 9.5
25-Jul-2016 253/448
log4j.rootCategory=INFO,A1,registry
The following lines adjust the log levels of third-party libraries that are used by DevTest. Specifying log levels means that they do not clutter the logs with messages unrelated to DevTest.
log4j.logger.com.teamdevDefault: WARN
log4j.logger.EventLoggerDefault: WARN
log4j.logger.org.apacheDefault: ERROR
log4j.logger.com.smardecDefault: ERROR
log4j.logger.org.apache.httpDefault: ERROR
log4j.logger.org.apache.http.headerDefault: ERROR
log4j.logger.org.apache.http.wireDefault: ERROR
log4j.logger.com.mchange.v2Default: ERROR
log4j.logger.org.hibernateDefault: WARN
log4j.logger.org.jfreeDefault: ERROR
log4j.logger.com.jniwrapperDefault: ERROR
log4j.logger.sun.rmiDefault: INFO
log4j.logger.com.itko.util.ThreadDumperDefault: INFO
log4j.logger.profilerSet this property to if you want your profile events to be logged:INFO
OFFDefault:
log4j.appender.A1Default: com.itko.util.log4j.TimedRollingFileAppender
log4j.appender.A1.FileDefault: ${lisa.tmpdir}/${LISA_LOG}
log4j.appender.A1.MaxFileSize

DevTest Solutions - 9.5
25-Jul-2016 254/448
log4j.appender.A1.MaxFileSizeDefault: 10MB
log4j.appender.A1.MaxBackupIndexDefault: 5
log4j.appender.A1.layoutDefault: org.apache.log4j.EnhancedPatternLayout
log4j.appender.A1.layout.ConversionPatternDefault: %d{ISO8601}{UTC}Z (%d{HH:mm}) [%t] %-5p %-30c - %m%n
log4j.logger.VSEKeep a separate log for VSE transaction match/no-match events, Having a separate log makes debugging much easier.Change INFO to WARN for production systems. The logging can slow down systems with high transaction rates. Do not simply comment out the following line. Explicitly set the log level to OFF or WARN instead of INFO.
INFO, VSEAPPDefault:
log4j.additivity.VSETo add VSE logging to other log destinations, comment out this line.
falseDefault:
log4j.appender.VSEAPPDefault: com.itko.util.log4j.TimedRollingFileAppender
log4j.appender.VSEAPP.FileDefault: ${lisa.tmpdir}/vse_matches.log
log4j.appender.VSEAPP.MaxFileSizeDefault: 10MB
log4j.appender.VSEAPP.MaxBackupIndexDefault: 20
log4j.appender.VSEAPP.layoutDefault: org.apache.log4j.EnhancedPatternLayout
log4j.appender.VSEAPP.layout.ConversionPatternDefault: %d{ISO8601}{UTC}Z (%d{HH:mm})[%t] %-5p - %m%nKeep a separate log for advisory events. This logger warns of potential configuration issues such as potential memory leaks. The log is deliberately kept separate from the application log to minimize noise.
log4j.logger.ADVICEDefault: INFO, ADVICE_APP
log4j.additivity.ADVICEDefault: false
log4j.appender.ADVICE_APPDefault: org.apache.log4j.RollingFileAppender

DevTest Solutions - 9.5
25-Jul-2016 255/448
log4j.appender.ADVICE_APP.FileDefault: ${lisa.tmpdir}/advice.log
log4j.appender.ADVICE_APP.MaxFileSizeDefault: 10MB
log4j.appender.ADVICE_APP.MaxBackupIndexDefault: 20
log4j.appender.ADVICE_APP.layoutDefault: org.apache.log4j.EnhancedPatternLayout
log4j.appender.ADVICE_APP.layout.ConversionPatternDefault: %d{ISO8601}{UTC}Z (%d{HH:mm}) %-5p - %m%n
log4j.logger=NIOSessionEnables NIO session logic to log higher levels of state information during playback. This logging is at the TRACE log level instead of the INFO level of the current logging. In order to turn on NIO traces, make = in local.properties.com.itko.lisa.vse.sio.loggerName NIOSession
If enabled, periodic thread dumps are sent here. DevTest writes logs at the INFO level. Therefore, to get the thread dumps, change WARN in the next line to INFO, even with DevTest servers or DevTest Workstation running. This action results in a thread dump in the named file in 30 seconds. For more information, search for "threadDump" in . This action also simplifies getting thread lisa.propertiesdumps to debug performance issues. Change WARN in the next line to INFO, wait for 1 minute or 2 minutes, then revert the setting to WARN.
You can also generate a point-in-time thread dump with the LISA_HOME/bin/ServiceManager application. For example, use standard Java tools such as jstack, or issue the following command:
ServiceManager -threadDump tcp://hostname:2014/Simulator
log4j.logger.threadDumpLoggerDefault: WARN, THREAD_DUMPS
log4j.additivity.threadDumpLoggerDefault: false
log4j.appender.THREAD_DUMPSDefault: org.apache.log4j.RollingFileAppender
log4j.appender.THREAD_DUMPS.FileDefault: ${lisa.tmpdir}/threadDumps/TD_${LISA_LOG}
log4j.appender.THREAD_DUMPS.MaxFileSizeDefault: 10MB
log4j.appender.THREAD_DUMPS.MaxBackupIndexDefault: 20
log4j.appender.THREAD_DUMPS.layoutDefault: org.apache.log4j.EnhancedPatternLayout

DevTest Solutions - 9.5
25-Jul-2016 256/448
log4j.appender.THREAD_DUMPS.layout.ConversionPatternDefault: %d{ISO8601}{UTC}Z (%d{HH:mm}) [%t] %-5p - %m%n
log4j.appender.registryMirrors DevTest logging to the (remote) registry.
com.itko.lisa.net.LoggingToRegistryAppenderDefault:
log4j.appender.registry.layoutDefault: org.apache.log4j.EnhancedPatternLayout
log4j.appender.registry.layout.ConversionPatternDefault: %d{ISO8601}{UTC}Z [%t] %-5p - %m%n
The following properties display the requests and responses for HTTP-based traffic in the vse.log. This information is useful for debugging a virtual service that returns a "no match found" response. Such a result can indicate that the VS did not receive the expected request.
These log messages reveal the same requests and response that TCPMON shows. The requests and responses display in the vse.log, without having to inject TCPMON between the virtual service and its client application. These options only log HTTP requests and responses. These options can help to debug virtual services, especially when a virtual service responds with an unexpected message and you want to match a raw request with the raw response.
log4j.logger.com.itko.lisa.vse.http.TransactionPrints the requests that travel through this class in the vse.log. These log messages begin with "Raw playback response."
TRACE, nullValues: nullDEFAULT:
log4j.logger.com.itko.lisa.vse.stateful.protocol.http.CoordinatorPrints the requests that travel through this class in the vse.log. These log messages begin with "Raw request start."
TRACE, nullValues: nullDEFAULT:
log4j.logger.com.itko.lisa.vse.stateful.protocol.http.HttpListenStepPrints the requests that travel through this class in the vse.log. These log messages begin with "Raw request start."
TRACE, nullValues: nullDEFAULT:
The following lines adjust the log levels of third-party libraries used by DevTest so that they do not clutter the logs with messages unrelated to DevTest. If not specified, the default value is the value specified in the property.log4j.rootCategory
log4j.logger.com.teamdevValues: INFO, WARN, ERROR, FATAL
log4j.logger.EventLoggerValues: INFO, WARN, ERROR, FATAL

DevTest Solutions - 9.5
25-Jul-2016 257/448
log4j.logger.org.apacheValues: INFO, WARN, ERROR, FATAL
log4j.logger.com.smardecValues: INFO, WARN, ERROR, FATAL
log4j.logger.org.apache.http INFO, WARN, ERROR, FATALValues:
log4j.logger.org.apache.http.headerValues: INFO, WARN, ERROR, FATAL
log4j.logger.org.apache.http.wire INFO, WARN, ERROR, FATALValues:
log4j.logger.com.mchange.v2Values: INFO, WARN, ERROR, FATAL
log4j.logger.org.hibernateValues: INFO, WARN, ERROR, FATAL
log4j.logger.org.jfreeValues: INFO, WARN, ERROR, FATAL
log4j.logger.com.jniwrapperValues: INFO, WARN, ERROR, FATAL
log4j.logger.sun.rmiValues: INFO, WARN, ERROR, FATAL
log4j.logger.com.itko.util.ThreadDumperValues: INFO, WARN, ERROR, FATAL
log4j.logger.org.eclipseValues: INFO, WARN, ERROR, FATAL
log4j.logger.org.codehausValues: INFO, WARN, ERROR, FATAL
log4j.logger.org.grailsValues: INFO, WARN, ERROR, FATAL
log4j.logger.grailsValues: INFO, WARN, ERROR, FATAL
log4j.logger.org.springframeworkValues: INFO, WARN, ERROR, FATAL
log4j.logger.jndiValues: INFO, WARN, ERROR, FATAL

DevTest Solutions - 9.5
25-Jul-2016 258/448
log4j.logger.org.flywaydbValues: INFO, WARN, ERROR, FATAL
log4j.logger.com.jaywayValues: INFO, WARN, ERROR, FATAL
log4j.logger.net.sfValues: INFO, WARN, ERROR, FATAL
log4j.logger.org.quartz INFO, WARN, ERROR, FATALValues:
Enterprise Dashboard Properties (dradis.properties)The file contains default values for properties that are used by Enterprise dradis.propertiesDashboard.
dradis.webserver.port=1506Our embedded web server
dradis.webserver.host=0.0.0.0The host of our embedded web server. '0.0.0.0' binds to all local addresses.
dradis.db.internal.enabled=falseShould we start the internal Derby database instance in the Enterprise Dashboard?
dradis.db.internal.host=0.0.0.0Internal Derby DB network interface to use (0.0.0.0 = all network interfaces)
dradis.db.internal.port=1530Internal Derby DB port number to use
dradis.db.internal.start.retries=3
dradis.db.internal.start.delay=5000
Alternative database connection string templates
Oracle Template
dradis.db.driverClass=oracle.jdbc.driver.OracleDriver
dradis.db.url=jdbc:oracle:thin:@[HOST]:1521:[SID]
dradis.db.user=[USER]
dradis.db.password=[PASSWORD]

DevTest Solutions - 9.5
25-Jul-2016 259/448
MS SQL Server Template
dradis.db.driverClass=com.microsoft.sqlserver.jdbc.SQLServerDriver
dradis.db.url=jdbc:sqlserver://[SERVER]:[PORT];databaseName=[DATABASENAME]
dradis.db.user=[USER]
dradis.db.password=[PASSWORD]
DB2 Template
dradis.db.driverClass=com.ibm.db2.jcc.DB2Driver
dradis.db.url=jdbc:db2://[HOSTNAME]:[PORT]/[DATABASENAME]
dradis.db.user=[USER]
dradis.db.password=[PASSWORD]
MySQL Template
dradis.db.driverClass=com.mysql.jdbc.Driver
dradis.db.url=jdbc:mysql://[DBHOST]:[DBPORT]/[DBNAME]
dradis.db.user=[USER]
dradis.db.password=[PASSWORD]
Derby Template
dradis.db.driverClass=org.apache.derby.jdbc.ClientDriver
dradis.db.url=jdbc:derby://[SERVER]:[PORT]/[DATABASE];create=true
dradis.db.user=[USER]
dradis.db.password=[PASSWORD]
Enable HTTP/S and Set Up the Web Server SSL Keystoredradis.webserver.https.enabled=true
dradis.webserver.ssl.keystore.location={{DRADIS_HOME}}webserver.ks
dradis.webserver.ssl.keystore.password=yourpassword
dradis.webserver.ssl.keymanager.password=yourpassword

DevTest Solutions - 9.5
25-Jul-2016 260/448
1.
2.
REST Invoke APIThe REST Invoke API lets you use the REST architectural style to perform DevTest tasks.
The APIs are divided into the following categories:
Coordinator servers
Simulator servers
Labs
VSE servers
The full API documentation is available here (https://support.ca.com/cadocs/0/CA%20DevTest%. The API documentation provides details 20Solutions%208%200-ENU/Bookshelf_Files/Invoke/index.html)
on how to interact with the various RESTful services.
You can also view a set of examples .here (http://github.com/ianakelly/invoke)
Note: You must use Google Chrome or Mozilla Firefox to access the API documentation.
Explore the REST Invoke API from the Web Interface
DevTest Solutions includes a simple web interface that you can use to explore the REST Invoke API.
Note: You must use Google Chrome, Internet Explorer, or Mozilla Firefox to access the web interface.
By default, the web interface uses in the URL. To access the web interface from other than localhost, set the following property in the file:localhost local.properties
lisa.invoke2.swagger.basepath=http://<public_hostname_or_ip_address>:1505/api/Dcm
Follow these steps:
Ensure that the registry is running.

DevTest Solutions - 9.5
25-Jul-2016 261/448
2.
3.
4.
5.
6.
7.
Enter in a supported browser. If the registry is on a http://localhost:1505/api/swagger/remote computer, replace with the name or IP address of the computer.localhostThe web interface appears.
Click for a category.Show/Hide
Click one of the API paths.
Use the field to specify whether the response is in XML or JSON Response Content Typeformat.
If the section appears, enter the required value for each parameter.Parameters
Click .Try it out!The request URL and the response are displayed.
Change the Execution Mode Using the REST Invoke API
The REST Invoke API lets you change the execution mode of a virtual service.
The following instructions assume that you are using the Postman REST client.
First, use the API to retrieve information about the GET /VSEs/{serviceName}/{virtualServiceName}virtual service that you want to change. This API does not require a body.
In the following example, the service name is and the virtual service name is .VSE proxy
GET http://localhost:1505/api/Dcm/VSEs/VSE/proxy
The response includes the current value of the execution mode.
<?xml version="1.0" encoding="UTF-8" standalone="yes"?><VirtualService xmlns="http://www.ca.com/lisa/invoke/v2.0" name="proxy" xmlns:xsi="http://www.w3.org/2001/XMLSchema-instance" xsi:schemaLocation="http://www.ca.com/lisa/invoke/v2.0 VirtualService.xsd" href="http://localhost:1505/api/Dcm/VSEs/VSE/magical" type="application/vnd.ca.lisaInvoke.virtualService+xml"> ... <ExecutionMode>Most Efficient</ExecutionMode> ...</VirtualService>
Change the HTTP method to .PUT
Ensure that the request has the header with the following value:Content-Type
application/vnd.ca.lisaInvoke.virtualService+xml
For the body of the request, use the XML headers from the preceding response. Add the execution mode element with the new value.
<?xml version="1.0" encoding="UTF-8" standalone="yes"?><VirtualService
xmlns="http://www.ca.com/lisa/invoke/v2.0" name="magical"

DevTest Solutions - 9.5
25-Jul-2016 262/448
xmlns="http://www.ca.com/lisa/invoke/v2.0" name="magical" xmlns:xsi="http://www.w3.org/2001/XMLSchema-instance" xsi:schemaLocation="http://www.ca.com/lisa/invoke/v2.0 VirtualService.xsd" href="http://localhost:1505/api/Dcm/VSEs/VSE/magical" type="application/vnd.ca.lisaInvoke.virtualService+xml"> <ExecutionMode>Transaction Tracking</ExecutionMode></VirtualService>
When you submit the request, the response includes the new value of the execution mode.
<?xml version="1.0" encoding="UTF-8" standalone="yes"?><VirtualService xmlns="http://www.ca.com/lisa/invoke/v2.0" name="proxy" xmlns:xsi="http://www.w3.org/2001/XMLSchema-instance" xsi:schemaLocation="http://www.ca.com/lisa/invoke/v2.0 VirtualService.xsd" href="http://localhost:1505/api/Dcm/VSEs/VSE/magical" type="application/vnd.ca.lisaInvoke.virtualService+xml"> ... <ExecutionMode>Transaction Tracking</ExecutionMode> ...</VirtualService>
Create a Virtual Service from R/R Pairs Using the REST Invoke API
The REST Invoke API lets you create a virtual service that is based on an input ZIP file of request/response pairs.
Here is the endpoint for the call:createService
POST http://[host]:[port]/api/Dcm/VSEs/[serviceName]/actions/createService
Refer to the documentation on the createService call (https://support.ca.com/cadocs/0/CA%20DevTest% to learn about the path and 20Solutions%208%200-ENU/Bookshelf_Files/Invoke/index.html#-1841137770)
form parameters that are expected.
Request/Response PairsThe ZIP file that is used to create the virtual service must contain one or more request/response pairs (also known as R/R pairs). These R/R pairs can be located either located in the root of the ZIP file or in a subdirectory.
Files for request/response pairs must be named with a unique identifier, followed by a "-req" on the request side and a "-rsp" on the response side, with an or extension. For example, .xml .txt
and .addUserObject-req.xml addUserObject-rsp.xml
Note: A request can have multiple responses. The following set of files would create one request with three responses.
addUserObject-req.xml
addUserObject-rsp1.xml
addUserObject-rsp2.xml

DevTest Solutions - 9.5
25-Jul-2016 263/448
addUserObject-rsp2.xml
addUserObject-rsp3.xml
Configuring How the Virtual Service Is Created and DeployedWhen creating a virtual service from request/response pairs, the following assumptions are made:
The name for the virtual service is a generated name with the "AutoGenService-" prefix, followed by a GUID.
The virtual service is created using the HTTP protocol handler to import the request/response pairs
Each request/response pair is treated as text.
The virtual service listens on a randomly available port that the VSE server assigns
The base path of the service is set to "/"
Using a serviceProperties.xml FileIn order to configure how the virtual service is created from the request/response pairs, a
file can be used to define the name of the virtual service, and configure the serviceProperties.xmlprotocol handler that will be importing the request/response pairs. The file serviceProperties.xmlmust be located in the root of the ZIP file.
Here is an example of a file that will create an HTTP virtual service named serviceProperties.xml"TestServiceFromRRPairs" that listens on port 10999 with its base path set to "/".
<?xml version="1.0" ?><recording> <name>TestServiceFromRRPairs</name> <binary>false</binary> <group></group> <protocol> <class>com.itko.lisa.vse.stateful.protocol.http.HttpProtocolHandler</class> <config> <listenPort>10999</listenPort> <ssl toClient="false"></ssl> <keystoreFile></keystoreFile> <keystorePW></keystorePW> <basePath>/</basePath> <needSeparateBind>false</needSeparateBind> </config> </protocol></recording>
Structure of serviceProperties.xmlrecordingThe root element of the fileserviceProperties.xml

DevTest Solutions - 9.5
25-Jul-2016 264/448
nameThe name of the virtual service to create. Defaults to a generated name with the "AutoGenService-" prefix, followed by a GUID. If there is already a virtual service with the same name, the newly created service replaces it.
binaryWhether the R/R pair import should treat the transactions as containing binary data.
falseDefault:
groupThe group tag that the created service is labeled with.
no group tagDefault:
protocolDefines what protocol is used
classThe fully qualified class to use as the transport protocol handler when importing request/response pairs.
com.itko.lisa.vse.stateful.protocol.http.HttpProtocolHandlerDefault:
configDefines how the transport protocol handler should be configured.
listenPortThe port that the virtual service listens on.Default: a randomly available port that the VSEserver assigns
sslWhether or not the virtual service should listen using SSL. To use SSL, set the toClientattribute on this element to .true
keystoreFileThe keystore file the virtual service uses to provide its certificate when SSL is enabledIf SSL is not enabled, this value is ignored.If SSL is enabled and this element is not specified, the VSE uses the ssl.server.cert.pathproperty to locate the keystore file to use.
keystorePWThe password of the keystore file the virtual service uses when SSL is enabledIf SSL is not enabled, this value is ignoredIf SSL is enabled and this element is not specified, the VSEuses the ssl.server.cert.passproperty to locate the password to use with keystore file.
basePathThe base path to deploy the created service to.
/Default:
needSeparateBindWhether not a separate binding phase is needed.
falseDefault:

DevTest Solutions - 9.5
25-Jul-2016 265/448
Sample serviceProperties.xml File for Creating HTTP Virtual Service (Without SSL)The following is an example of a file that creates an HTTP virtual service serviceProperties.xmlnamed "TestServiceFromRRPairs" that listens on port 10999 with its base path set to "/". Notice how other elements have been omitted in favor of using their defaults.
<?xml version="1.0" ?><recording> <name>TestServiceFromRRPairs</name> <protocol> <config> <listenPort>10999</listenPort> <basePath>/</basePath> </config> </protocol></recording>
Virtual Recording Session (VRS) FileIn addition to the configuration, a Virtual Recording Session (VRS) file can be serviceProperties.xmlincluded to configure the protocol handler to use when importing request/response pairs. This file
must have a .vrs extension.
If the file contains a element, it is used and the VRS file is ignored. If serviceProperties.xml <protocol>it does not contain a element, then the VRS file is used to configure the protocol handler;<protocol>

DevTest Solutions - 9.5
25-Jul-2016 266/448
1.
2.
Test Step DescriptionsA is an element in the test case workflow that represents a single test action to be test stepperformed.
This section describes the following test steps:Standard Options in Test Steps (see page 266)Web-Web Services Steps (see page 267)Java-J2EE Steps (see page 321)Other Transaction Steps (see page 332)Utilities Steps (see page 338)External-Subprocess Steps (see page 350)JMS Messaging Steps (see page 357)BEA Steps (see page 375)Sun JCAPS Steps (see page 381)Oracle Steps (see page 385)TIBCO Steps (see page 386)Sonic Steps (see page 392)webMethods Steps (see page 393)IBM Steps (see page 403)RabbitMQ Steps (see page 412)SAP Steps (see page 416)Selenium Integration Steps (see page 421)Virtual Service Environment Steps (see page 429)CAI Steps (see page 429)Mobile Steps (see page 432)Custom Extension Steps (see page 443)
Standard Options in Test StepsThe following options let you control the flow of a test case:
Abort the TestFollow these steps:
Right-click the test step after which you want to abort the test case.
Select .For Next Step, Abort the TestThe Abort the Test step quits the test case and marks the step as having aborted.

DevTest Solutions - 9.5
25-Jul-2016 267/448
1.
2.
1.
2.
End the TestFollow these steps:
Right-click the test step after which you want to end the test case.
Select .For Next Step, End the TestThe step completes the test and marks the test as having ended successfully.
Fail the TestFollow these steps:
Right-click the test step after which you want to fail the test case.
Select .For Next Step, Fail the TestThe Fail the Test step fails the test case and marks the test as having failed.
Web-Web Services StepsThe following steps are available in the category:Web/Web Services
HTTP-HTML Request Step (see page 267)REST Step (see page 275)Web Service Execution (XML) Step (see page 276)WSDL Validation (see page 313)Base64 Encoder (see page 314)Multipart MIME Step (see page 315)SAML Assertion Query (see page 316)
HTTP-HTML Request StepThe HTTP/HTML Request step is used while testing a traditional web application to send and receive HTTP(S) requests. Requests can include GET parameters and POST parameters and optionally, embedded images as a response. You can also record the HTTP steps using the Website Proxy Recorder.
The HTTP/HTML Request step has a default name using this convention: HTTP(s) ("GET" or "POST") An example is . You can change step names at any time.(leaf of URL). HTTP GET rejectCard.jsp
You can manually execute the HTTP/HTML step at design time. When you select , Actions Replay , DevTest saves the step responses so the step editors can display the response values.through here
When you add this step to a test case, the step editor includes the following tabs:
URL Transaction Info Tab (see page 268)

DevTest Solutions - 9.5
25-Jul-2016 268/448
HTTP Headers Tab (see page 271)
Response Tab (see page 271)
SSL Tab (see page 271)
URL Transaction Info TabSpecify the information that is used to construct the URL.
You can set up the URL transaction information with either of the following options:
Specify URL in parts
Use property
Specify URL in Parts
Select this option to specify the URL in its essential pieces.
ProtocolThe protocol that is used to communicate with the web server. The default is .http
Host NameThe host name of the web server. Use the property SERVER or enter hostname or IP address of your application server. The host name can be a domain name, such as , www.mycompany.comor an IP address, such as . For a local web server, use the host name or the IP 123.4.5.6 localhost address .127.0.0.1
Port(Optional) If necessary, use the PORT property or the port on the web server that is used to access the web server. For example, the port that is required to access the Apache Tomcat web server by default is 8080.
PathThe path to the file to access. For example, if the URL to access is http://localhost:8080/mysite
, enter ./index.jsp mysite/index.jsp
UserEnter if a user ID is required for the application server.
PasswordEnter if a password is required for the application server.
Encoding
The list of available values is controlled by the property. lisa.supported.html.request.encodingsYou can change the comma-separated list to include the encodings to support. The underlying JVM must also support all encodings in this list. If a web page uses an encoding that is not supported in the list, the drop-down entry is blank. If you save in that situation, DevTest replaces the encoding with the DevTest default (file.encoding key in lisa.properties). Also, if you do not select an encoding when creating a HTTP/HTML Request step, the DevTest default encoding is assumed.

DevTest Solutions - 9.5
25-Jul-2016 269/448
URL ParametersGET (or URL) Request Parameters: These request parameters are passed as part of the URL. They are exposed to the user in the address bar of the web browser.
POST ParametersPOST Request Parameters. These request parameters are passed as part of the body of the page request. They are not exposed to the user in the address bar of the web browser.
Form EncodingDuring a step execution, parameters are URL encoded as they are sent. The MIME type is
.application/x-www-form-urlencoded
All Known StateAll known properties, such as test case properties, data sets, and filters, are listed.
Download files referenced ( )img, link, script, embedIf this check box is selected, the step downloads web page images into the test environment. If you do not select this check box, no images are downloaded.
The following table describes other functions that are part of the toolbar that is available on the URL and sections.Parameters POST Parameters
Field Icon Description
Add Add icon
Add a parameter
Up Up icon
Move a parameter up in the list of parameters
Down Down icon
Move a parameter down in the list of parameters
Delete ground--ICO
Delete a parameter
Find: Find text
Auto Generate a Filter from the referring Step to make this parameter dynamic.
Auto Generate a
Filter icon
Create a new filter to auto-populate this property at run time. For more information on filters, see the Filters section.
Apply selected All Known State property to current parameter
Apply selected All
Known State
property filter
Apply state to the parameter. For more information on applying state, see the All Known State section that follows.

DevTest Solutions - 9.5
25-Jul-2016 270/448
1.
2.
3.
4.
Auto Apply all All Known State properties to all properties by patterns
Auto Apply all
Known State
properties icon
Apply all state to all properties possible by patterns. For more information on applying state, see the All Known State section.
All Known State
All known properties, such as test case properties, data sets, and filters, are displayed in the All panel.Known State
All Known State panel
You can assign the values of properties to URL request parameters.
For example, to assign the value of the data set key to the parameter in LISA_USER u_login requestthe previous example:
Select the key in the pane.u_login URL Parameters
Select the key in the panel.LISA_USER All Known State
Click .Apply selected All Known State property to current parameterA warning message opens asking you to confirm the impending change.
Click .OKThe new property is displayed in the pane.URL ParametersIf all the names of the URL Parameter keys equal the names of the keys, you All Known Statecan click to assign all the properties to the associated parameters quickly.Apply to All
Use Property
If this option is selected, you can specify the following parameters:
Property KeySpecify a property that contains the connection information.

DevTest Solutions - 9.5
25-Jul-2016 271/448
Download images referenced (img, link, script, embed)If this check box is selected, the step downloads web page images into the test environment. If you do not select this check box, no images are downloaded.
HTTP Headers TabOn the tab, create any custom HTTP headers.HTTP Headers
The section is for headers that are only sent to the server for Custom HTTP Headers (Current Only)this request.
The section is for headers that are sent on this transaction and every Custom HTTP Headers (Persist)other transaction in the test.
To create a request parameter in either section, click and change the key and value to the Addtarget values.
Response TabOn the tab, view the HTTP response that the server returns when this test was recorded. ResponseYou can view:
The source of the response
The DOM tree of the response
SSL TabThe SSL tab lets you enter information for either single or multiple SSL certificates.
Using a Single SSL Certificate
Enter the following information:
SSL Keystore FileThe name of the keystore file where the client identity certificate is stored. The file can be in JKS or PKCS format.
SSL Keystore passwordPassword for the keystore file.
SSL Key aliasThe keystore attribute that defines the alias that is used to store and retrieve the private key for the server.
SSL Key passwordAn optional password for the key entry if using a JKS keystore, and key has a different password from keystore.

DevTest Solutions - 9.5
25-Jul-2016 272/448
Using Multiple SSL Certificates
To use multiple certificates on one step, store your SSL information in a data set. The following example shows how you can use a data sheet to store information about multiple certificates.
In this example, the demo server is running in the background and it has been configured to require client-side authentication. The demo server accepts five certificates. The keystore files for those certificates are in the project structure in a with the name . These keystore files are Data certificatespkcs12 keystores.
Using Multiple SSL Certificates window
Next, an HTTPS Request step is added and https is specified as the protocol and the port and path are entered.

DevTest Solutions - 9.5
25-Jul-2016 273/448
HTTPS Request step is added and https is specified as the protocol and the port and path are entered
To ensure this process works with all the certificates and only run the test once, a data set is created for this test step. Use the Create your own Data Sheet data set to create the data set. The data set has the name and it is configured to run through the data set rows once, and Certificate Informationthen exit. Each certificate has five certificates and four parameters. When all the information is complete, use the button to open the editor.Create Data Sheet Skeleton

DevTest Solutions - 9.5
25-Jul-2016 274/448
Create Data Sheet editor
For keystoreFile, we use the short file name of the keystore so that relative paths can be used later. To encrypt the password columns, right-click the column label and select .Encrypt
Create Data Sheet editor certificate information
Return to the HTTP step and select the tab. Use property substitution for the variables. For the SSLpassword fields, enter and .{{keystorePassword}} {{keyPassword}}

DevTest Solutions - 9.5
25-Jul-2016 275/448
HTTP/HTML Request step SSL information dialog
The test is staged with , and you can see that all of the tests completed Stage a Quick Testsuccessfully. All five certificates were tested against the demo server and client authentication was successful for all of them.
Test staged with Quick Stage Test
REST StepThe REST step is used when testing REST applications to send and receive HTTP(S) requests, including GET and POST parameters.
To view parameters, click on the right vertical bar. The area slides open. You can Test State Test Statedock, pin, and hide the list.
To view the HTTP response, click .Response
If the response is a JSON string, the string is formatted automatically. To view the string in its original

DevTest Solutions - 9.5
25-Jul-2016 276/448
If the response is a JSON string, the string is formatted automatically. To view the string in its original format, right-click and select . To view the formatted string again, reopen the Remove whitespace
panel.Response
At the bottom of the panel is a selection of filters and an assertion that you can add to the Responseresponse.
The demo server contains an example of invoking a JSON service to retrieve information from the LISA Bank user database. The URL is .http://localhost:8080/rest-example/
The test case in the examples project demonstrates how to use this step.rest-example
JSON ContentIf you select the JSON type in the tab, the following tabs are displayed:Content
Visual JSONShows the content in a tree structure. Columns are provided for editing the names, types, and values.
Raw JSONShows the content as text. To apply formatting, right-click and select . To go to a specific Formatline, right-click and select , .Navigate Line
Changes that you make in one tab are reflected in the other tab.
The following graphic shows the tab.Visual JSON
Screen capture of Visual JSON tab.
Web Service Execution (XML) StepThe Web Service Execution (XML) step lets you execute an operation on a SOAP-based Web Service using an HTTP POST or JMS message.
Access to a WSDL is not required; rather, it is a recommended but optional piece of configuration information. If a WSDL is configured, it helps in the process of building a SOAP message to be sent to the service. This step lets you manipulate the raw SOAP message (XML) directly. This feature provides flexibility and power, but does expose you to the details of how web services work.
In general, the top portion of the editor is dedicated to how and where to send the SOAP message.
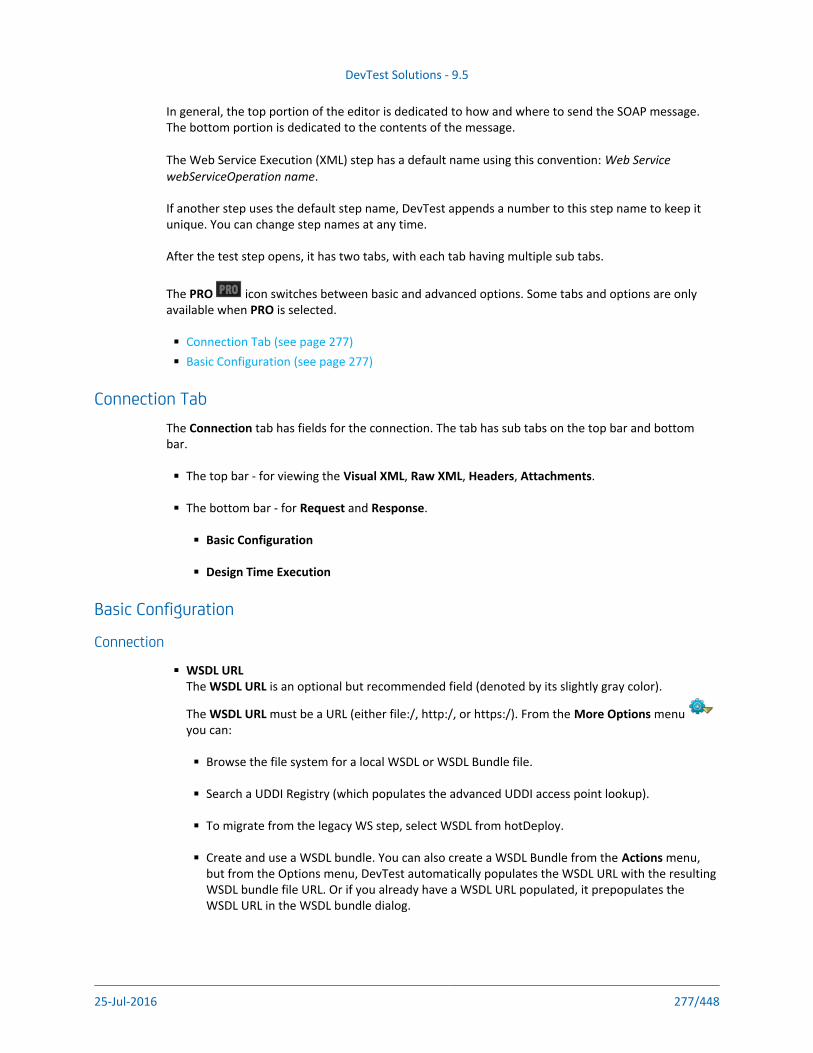
DevTest Solutions - 9.5
25-Jul-2016 277/448
In general, the top portion of the editor is dedicated to how and where to send the SOAP message. The bottom portion is dedicated to the contents of the message.
The Web Service Execution (XML) step has a default name using this convention: Web Service .webServiceOperation name
If another step uses the default step name, DevTest appends a number to this step name to keep it unique. You can change step names at any time.
After the test step opens, it has two tabs, with each tab having multiple sub tabs.
The icon switches between basic and advanced options. Some tabs and options are only PROavailable when is selected.PRO
Connection Tab (see page 277)Basic Configuration (see page 277)
Connection TabThe tab has fields for the connection. The tab has sub tabs on the top bar and bottom Connectionbar.
The top bar - for viewing the , , , .Visual XML Raw XML Headers Attachments
The bottom bar - for and .Request Response
Basic Configuration
Design Time Execution
Basic Configuration
Connection
WSDL URLThe is an optional but recommended field (denoted by its slightly gray color).WSDL URL
The must be a URL (either file:/, http:/, or https:/). From the menu WSDL URL More Optionsyou can:
Browse the file system for a local WSDL or WSDL Bundle file.
Search a UDDI Registry (which populates the advanced UDDI access point lookup).
To migrate from the legacy WS step, select WSDL from hotDeploy.
Create and use a WSDL bundle. You can also create a WSDL Bundle from the menu, Actionsbut from the Options menu, DevTest automatically populates the WSDL URL with the resulting WSDL bundle file URL. Or if you already have a WSDL URL populated, it prepopulates the WSDL URL in the WSDL bundle dialog.

DevTest Solutions - 9.5
25-Jul-2016 278/448
When you enter a WSDL URL that is not already a WSDL bundle, DevTest creates a WSDL bundle and stores it locally in the Data/wsdls directory for the project. This action caches the WSDL locally for quicker access. DevTest parses the WSDL and uses its schema is used to build sample SOAP messages. The Visual XML editor also uses the WSDL to help you manually edit the SOAP message. DevTest first tries to load a cached WSDL bundle whenever processing the WSDL. If the external WSDL has changed and you want to force the local WSDL cache to update, use the
button. You can manually drop a WSDL bundle into the Data/wsdls any Refresh WSDL Cachetime. When the step tries to process the "live" WSDL URL, it uses the cached bundle instead.
, , Service Port OperationIf the is populated, the WSDL is processed and the , , and WSDL URL Service Port Operationselections are populated. These optional but recommended fields can be used to build a sample SOAP request message. Selecting a port also updates the to match the definition in Endpoint URLthe WSDL. Changing the causes these items to be refreshed. If the and WSDL URL Endpoint URL
are unchanged, they update also to correspond to the new WSDL, service, port, SOAP Messageand operation that are selected.If the endpoint was changed and no longer matches the endpoint in the WSDL, a button Warningappears next to the field. A tooltip on the button indicates the differences between the entered value and the WSDL definition. Clicking the button updates the field to match the WSDL definition.If the no longer matches the default, it is not updated automatically. You SOAP Request Message
can force the to be updated by using the button SOAP Request Message Build Messagenext to the field.Operation
OperationAny of the following options can be used here:
Build empty SOAP request message.
Build full SOAP request message.
PortThis field indicates the server port on which the service is available.
On ErrorThis field indicates what action to be taken when some error occurs during execution.
EndpointThe URL to the SAML Query API of the Identity Provider.
Build OptionsWhen building sample SOAP messages, various build options are used to determine what to do in various situations.
Use String Pattern for Value: When selected, it populates element values using DevTest string patterns as opposed to using a hard-coded literal value.
Default Literal Value: When not using string patterns, use this literal value for all string values.

DevTest Solutions - 9.5
25-Jul-2016 279/448
Build All Choices: By default, only the first element in an XML schema choice is generated. To build all possible choice elements, select this option.
The SOAP request is not valid if you include multiple choice elements. However, it Note:provides a sample for each possible choice, which makes it easier to build a message when you do not use the first choice.
Maximum Elements: Defines the maximum number of elements to include when building the sample message.
Maximum Type: Defines the maximum number of complex schema types to include when building the sample message.
Insert Comments: By default, comments that are related to the schema are generated. For example, when an element is optional, alternative choices, nillable elements, are generated. You do not see these comments in the Visual XML Editor, but they are visible in the Raw Editor.
Web Service Execution TabThe Web Service Execution (XML) step provides a graphical editor and a text-based editor. You can also insert headers and edit attachment data.
Visual XML Tab (see page 279)Raw XML Tab (see page 282)Headers Tab (see page 283)Attachments Tab (see page 285)
Visual XML Tab
The Visual XML Editor (or VXE) is a graphical editor for any XML document. A SOAP message is an XML document that conforms to the SOAP specification (SOAP schema). You can use the editor to build and edit the SOAP message.

DevTest Solutions - 9.5
25-Jul-2016 280/448
Visual XML Editor
The table shows the XML document, including the SOAP Envelope and Body elements.
TypeShows the type for each element.
OccursIndicates how many elements are expected. The first number indicates the minimum number of times the element can occur. Zero means that it is optional and can be removed. The second number indicates the maximum number of times the element can occur. Infinity means that there can be an unlimited number of elements of that name.
NilLets you set the element value as or . Selecting the check box removes any element nil un-nilchildren or values but leaves all attributes alone. Clearing the check box populates all expected children and attributes as defined in the WSDL schema.
NillableIndicates whether the element can be nil. A red icon indicates that the element is non-nillable, but is set to . A green icon indicates that the element is non-nillable and is not set to .nil nil
ValueYou can type the element values directly into the column. If the element type is a known Valuetype, specialized edit buttons appear.
To select the columns to display or hide, right-click the column heads.

DevTest Solutions - 9.5
25-Jul-2016 281/448
To select the columns to display or hide, right-click the column heads.
When you right-click the editor, a context-sensitive menu provides options for manipulating the document. This menu contains the following options:
Add Schema Attribute/ElementLets you select from a list of valid attributes or elements. If a schema is present and an element or attribute is selected in the editor, child elements and attributes can be selected to be added. If more than 20 schema objects are available, a dialog can be used to select the schema object. This dialog contains a search text field, which makes it easier to find a specific schema object when there are dozens of them.
Add ElementAdd an element to the document.
Add AttributeAdd an attribute to the document.
Add Text
Remove Element/AttributeRemove the selected element or attribute.
Move Up/DownMove the selected node up or down.
Convert to AttachmentA shortcut method for creating a standard referenced attachment. For more information, see
.Attachments Tab (see page 285)
Convert to XOP AttachmentA shortcut method for creating a standard referenced XOP Include attachment. For more information, see .Attachments Tab (see page 285)
Create XML Data SetA shortcut method for generating an XML Data Set. A typical use case is to build a full SOAP message. Then select the section of the XML document that you want as the first record of the data set. Creating an XML Data Set automatically populates the first record with the selected XML element tree. The new data set property is set as the value in the editor.
Hide Text NodesBy default, DevTest hides text nodes that are typically redundant (such as white space). However, it is occasionally useful to view them, including when the XML element is a mixed type element that supports intermixed elements and text.
Hide Namespace NodesBy default, DevTest hides namespace declarations and namespace prefix declarations. You can show them to confirm a prefix value or to change prefixes or namespace scoping.
ValidateValidates the XML and displays the results in the pane at the bottom of the Validation Resultswindow.
To switch between displaying and hiding the results of the XML validation, click .Validation Results

DevTest Solutions - 9.5
25-Jul-2016 282/448
To switch between displaying and hiding the results of the XML validation, click .Validation Results
You can also use keyboard shortcuts for some tasks:
To remove the selected element or attribute on Windows, press Ctrl+Backspace.
To move the selected node up on Windows, press Ctrl+up arrow.
To move the selected node down on Windows, press Ctrl+down arrow.
Right-clicking an attribute displays a menu with some of the functionality of the general right-click menu.
Editing the Type Field
The column shows the XML schema type (local name) and has a tool tip to show the fully Typequalified name (qName) with namespace. This column can be edited for derived XSD types. Only base types with derived types can be edited.
When the column is available for editing, a list of available derived types and the base types are presented in a combo box. You can select a type, and the associated element is now associated with the selected type.
Changing the type removes all child elements and attributes from an element and sets the nil attribute on the element to nil=true.
Raw XML Tab
The Raw XML Editor is a text-based editor that is XML aware and lets you manually edit the raw XML SOAP message. Any changes that are made are seen when you switch back to the Visual XML Editor
(and conversely).(see page 279)

DevTest Solutions - 9.5
25-Jul-2016 283/448
Raw XML Editor
The Raw XML Editor has a right-click menu for formatting the raw XML.
Note: The option trims whitespace and all ASCII control characters Remove whitespacefrom the beginning and end of each line in the document.
If you edit the document to make it invalid XML, the Visual XML Editor could show an error message.
Fix your changes in the Raw XML Editor, and the Visual XML Editor begins working again.
Headers Tab
The tab lets you insert headers that are transmitted with the SOAP message (for example, HeadersHTTP Headers or JMS properties).

DevTest Solutions - 9.5
25-Jul-2016 284/448
Headers Tab
To add a header row and select a header from the drop-down list, click the plus sign.
Accept
The field can be used to specify specific media types that are acceptable for Accept request-headerthe response. Use accept headers to indicate that the request is specifically limited to a small set of types. For example, in the case of a request for an in-line image.
This field contains a semicolon-separated list of representation schemes that are accepted in the response to this request.
Accept = "Accept" ":" #( media-range [ accept-params ] )
Accept - Language
The header field is similar to , but lists the language values that are Accept - Language Acceptpreferable in the response. A response in an unspecified language is not illegal.
Accept-Language = "Accept-Language" ":" 1#( language-range [ ";" "q" "=" qvalue ] ) language-range = ( ( 1*8ALPHA *( "-" 1*8ALPHA ) ) | "*" )

DevTest Solutions - 9.5
25-Jul-2016 285/448
User - Agent
The request-header field contains information about the user agent originating the User-Agentrequest.
The headers tab is for statistics, tracing protocol violations, and automated recognition of user agents for the sake of tailoring responses to avoid specific user agent limitations. User agents should include this field with requests.
By convention, the product tokens are listed in order of their significance for identifying the application.
User-Agent = "User-Agent" ":" 1*( product | comment
The general-header field lets the sender specify options that are appropriate for the Connectionspecific connection. Proxies and communicate the field over further connections.must not
Connection = "Connection" ":" 1#(connection-token)connection-token = token
Authorization
To authenticate itself with a server, a user agent (usually, but not necessarily, after receiving a 401 response) includes an request-header field with the request. The field Authorization Authorizationvalue consists of credentials containing the authentication information of the user agent for the realm of the resource being requested.
Authorization = "Authorization" ":" credential
DevTest does not support using properties in the tab. The UI takes a user name and Headerspassword during design and calculates the value of the authorization header. To use properties, set the and properties either in local.properties or in config files and DevTest lisa.http.user lisa.http.passuses those properties during run time.
Attachments Tab
The tab lets you edit attachment data.Attachments

DevTest Solutions - 9.5
25-Jul-2016 286/448
Attachments Editor
Referenced Attachments
Referenced attachments are referenced in the SOAP message. To use referenced attachments, in the VXE, right-click the element that you want to be the referenced attachment and select the appropriate action:
Convert to Attachment (for MIME and DIME)
Convert to XOP Attachment (for MTOM/XOP Include style)
This action automatically creates the necessary elements and attributes and configures the content ID that is used to match up the element with the attachment. The action then completes the following actions:
Switches to the tabAttachments
Prepopulates a new attachment with the content ID
Selects a default content type and attachment type
Populates the value with any existing element data from the VXE

DevTest Solutions - 9.5
25-Jul-2016 287/448
Unreferenced Attachments
If you plan to use unreferenced (anonymous) attachments, use the tab to add an Attachmentsattachment manually.
Use the , , , and icons to add, remove, or rearrange the attachments in the table.Add Up Down Delete
MIME DIME XOP MTOMThis field controls how the attachments are sent, using MIME, DIME, XOP, or MTOM standards. XOP sends different content headers that are based on the SOAP version.When is selected, any base64binary schema types are automatically optimized using the MTOMXOP standard. Adding attachments manually is not necessary. If an element is already configured as an attachment, it is left alone. Any extra attachments added manually are also sent.If you select (even if the document contains no base64binary elements) the document is Forceformatted and sent as an attachment (Microsoft MTOM method).The limitation of automatically optimizing elements is that the VXE must understand the element as a base64binary schema type (or extension/restriction thereof). If you use a data set or property, the expanded property or first data set entry must contain all possible elements to optimize. If the VXE does not display the element that must be optimized, the element is not optimized.
cidThe Content ID that can be used in an attribute in the SOAP message to link the element to href the attachment data.
content typeThe mime encoding type that is used to assist the server in how to process the attachment data.
type valueThe DevTest attachment type determines how to edit and interpret the value data. Each type has its own editor.
Type Editors
XMLAn XML-aware text editor to edit the attachment value.
TextA text-based editor to edit the attachment value.
Base64 EncodedA text-based editor to edit the attachment value and a bytes viewer to view the decoded binary data.
Hex EncodedA text-based editor to edit the attachment value and a bytes viewer to view the decoded binary data.
URL/TextA URL field to edit the attachment value and a text data viewer to view the results of loading the data from the URL.

DevTest Solutions - 9.5
25-Jul-2016 288/448
URL/XMLA URL field to edit the attachment value and a XML-aware text data viewer to view the results of loading the data from the URL.
URL/BinaryA URL field to edit the attachment value and a binary data viewer to view the results of loading the data from the URL.
PropertyA property field to edit the attachment value. If the resulting property is a string, it sends the attachment as text; otherwise it sends it as binary data.
Property/URLA property field to edit the attachment value. The property value is assumed to be a URL. The URL content is loaded and sent as the attachment data.
Design Time ExecutionAfter you configure the connection information and build the SOAP Request Message, you can run the Web Service Execution (XML) step at design time to test it.
Execute the Web Service operation by clicking in the upper right corner. After it has Executeexecuted, the and tabs are populated and it will switch to the tab Request Response Responseautomatically.
Request Tab (see page 288)Response Tab (see page 292)
Request Tab
The tab shows the resulting request data that was sent after any post processing (for Requestexample, substituting DevTest properties). If the message contained any attachment, it does not show the raw MIME or DIME encoded message, but rather the processed message and attachments. To see the raw message, use a tool like TCPMon.

DevTest Solutions - 9.5
25-Jul-2016 289/448
Web Service Execution (XML) step Request tab
Header Tab
The tab shows the Transport Headers that were sent for the request.Header

DevTest Solutions - 9.5
25-Jul-2016 290/448
Web Service Execution (XML) step Request tab Header tab
XML Tab
The tab shows the raw SOAP message that was sent after any advanced processing.XML
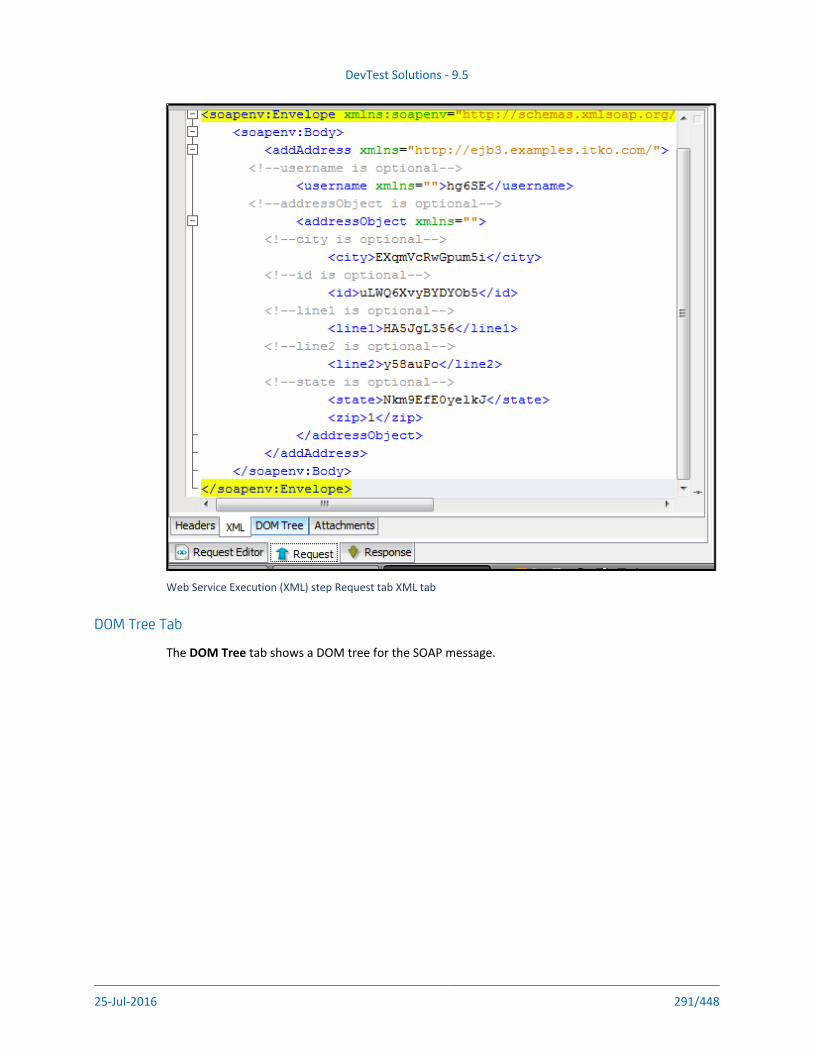
DevTest Solutions - 9.5
25-Jul-2016 291/448
Web Service Execution (XML) step Request tab XML tab
DOM Tree Tab
The tab shows a DOM tree for the SOAP message.DOM Tree

DevTest Solutions - 9.5
25-Jul-2016 292/448
Web Service Execution (XML) step Request tab DOM Tree tab
Attachments Tab
The tab shows any attachments that were sent.Attachments
Response Tab
The tab shows the resulting response data that was received. If the message contained any Responseattachment, it does not show the raw MIME or DIME encoded message, but rather the processed message and attachments. To see the raw message, use a tool like TCPMon. If any advanced post-processing options are set (see the following window), the SOAP response message is shown post-processed.

DevTest Solutions - 9.5
25-Jul-2016 293/448
Web Service Execution (XML) step Response tab
Header Tab
The tab shows the Transport Headers that were received from the response.Header

DevTest Solutions - 9.5
25-Jul-2016 294/448
Web Service Execution (XML) step Response tab Header tab
XML Tab
The tab shows the raw SOAP message that was received after any advanced processing.XML

DevTest Solutions - 9.5
25-Jul-2016 295/448
Web Service Execution (XML) step Response tab XML tab
DOM Tree Tab
The tab shows a DOM tree for the SOAP message. From this tab, you can quickly add DOM Treefilters and assertions on the resulting SOAP message.

DevTest Solutions - 9.5
25-Jul-2016 296/448
Web Service Execution (XML) step Response tab DOM Tree tab
Attachments Tab
The tab shows any attachments that were received. You can access the received Attachmentsattachments using automatically generated DevTest properties (for use in later steps, filters, or assertions). For each attachment, the following properties are set.
lisa.<step name>.rsp.attachment.<cid>Attachment value, byte, or String
lisa.<step name>.rsp.attachment.contenttype.<cid>Content type (mime type, for example, text/plain)
lisa.<step name>.rsp.attachment.<index>Attachment value, byte, or String
lisa.<step name>.rsp.attachment.contenttype.<index>Content type (mime type, for example, text/plain)
lisa.<step name>.rsp.attachment.contentid.<index>Content Id (cid)
The parameter is the DevTest step name that is being executed.step name
DevTest Solutions - 9.5
25-Jul-2016 297/448
The parameter is the Content ID that is usually referenced in the SOAP message.cid
The parameter starts at 0 and is increased for each attachment in the response attachments index list.
Advanced SettingsThe Web Service Execution (XML) step includes advanced settings.
To open the tabs, click . Five new tabs open in the top of the panel, and Advanced settings PROtwo new tabs open at the bottom level.

DevTest Solutions - 9.5
25-Jul-2016 298/448
Web Service Execution (XML) step Advanced Settings tabs
Transport Tab (see page 299)SSL Tab (see page 299)UDDI Tab (see page 301)WS-I Tab (see page 301)Advanced Tab (see page 302)Request Editor Tabs (see page 303)

DevTest Solutions - 9.5
25-Jul-2016 299/448
Transport Tab
Web Service Execution (XML) step Transport tab
HTTP VersionThis parameter controls which HTTP protocol is used when sending the operation request. The default is 1.1.
SOAP VersionThe SOAP version is auto-populated based on the WSDL definition. controls the SOAP Versiongeneration of a number of transport headers (for example, SOAPAction and contentType).
Call Timeout (ms)This parameter defines how to wait while trying to execute the operation. After the timeout is hit, an exception will be thrown and the On Error handling will occur.
SSL Tab
Web Service Execution (XML) step SSL tab
SSL Keystore FileThe name of the keystore file where the client identity certificate is stored. The file can be in JKS or PKCS format.
SSL Keystore passwordPassword for the keystore file.
SSL Key aliasThe keystore attribute that defines the alias that is used to store and retrieve the private key for the server.
SSL Key passwordAn optional password for the key entry if using a JKS keystore, and key has a different password from keystore.

DevTest Solutions - 9.5
25-Jul-2016 300/448
For an example of using multiple SSL certificates, see .HTTP_HTML Request Step (see page 267)
Specify global certificates properties for SSL in your file.local.properties
For global certificates (web server and web service steps):
ssl.client.cert.pathA full path to the keystore.
ssl.client.cert.passPassword for the keystore (this password is automatically encrypted when DevTest runs).
ssl.client.key.passAn optional password for the key entry if you are using the JKS keystore and the key has different password from the keystore. This password is automatically encrypted using AES (Advanced Encryption Standard) when DevTest runs.
Note: This option is not available for the WS Test step. To set this option, use the local. file.properties
For web service steps only certificates (not raw SOAP steps):
ws.ssl.client.cert.pathA full path to the keystore.
ws.ssl.client.cert.passPassword for the keystore. This password is automatically encrypted when DevTest runs.
ws.ssl.client.key.passAn optional password for the key entry if you are using the JKS keystore and the key has different password from the keystore. This password is automatically encrypted using AES (Advanced Encryption Standard) when DevTest runs.
The SSL configuration in this step is only used for execution. If the WSDL access requires SSL authentication, set the properties in . The ssl.client.* local.properties ws.ssl.client.*properties, as well as the SSL tab in the UI, assigns the SSL configuration to be used only during the execution of the WS step. The SSL configuration for WSDL access may not necessarily be the same as the SSL configuration for the service.
Note: This option is not available for the WS Test step. To set this option, use the local. file.properties
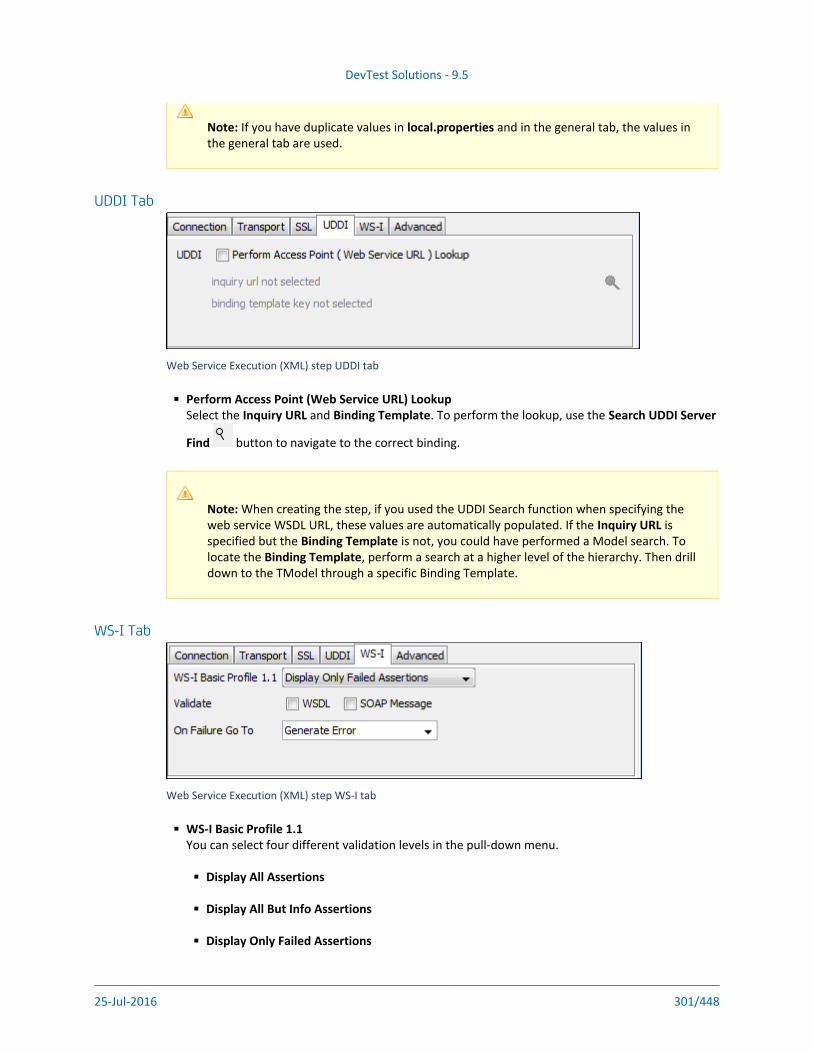
DevTest Solutions - 9.5
25-Jul-2016 301/448
Note: If you have duplicate values in and in the general tab, the values in local.propertiesthe general tab are used.
UDDI Tab
Web Service Execution (XML) step UDDI tab
Perform Access Point (Web Service URL) LookupSelect the and . To perform the lookup, use the Inquiry URL Binding Template Search UDDI Server
button to navigate to the correct binding.Find
Note: When creating the step, if you used the UDDI Search function when specifying the web service WSDL URL, these values are automatically populated. If the is Inquiry URLspecified but the is not, you could have performed a Model search. To Binding Templatelocate the , perform a search at a higher level of the hierarchy. Then drill Binding Templatedown to the TModel through a specific Binding Template.
WS-I Tab
Web Service Execution (XML) step WS-I tab
WS-I Basic Profile 1.1You can select four different validation levels in the pull-down menu.
Display All Assertions
Display All But Info Assertions
Display Only Failed Assertions
Display Only Not Passed Assertions

DevTest Solutions - 9.5
25-Jul-2016 302/448
Display Only Not Passed Assertions
ValidateSelect to validate the WSDL, the SOAP message, or both.
On Failure Go ToSelect the step to redirect to on error.
Note: Validation failures are common, but usually do not affect the outcome of the test. A good practice is to set the next step to continue so that you can complete the test.
Advanced Tab
Web Service Execution (XML) step Advanced tab
SOAP ActionThis field is auto-populated based on the WSDL operation definition. The field is used as the value of the SOAPAction transport header for SOAP 1.1 request message. Change this field manually only in rare cases.
StyleThis field is auto-populated based on the WSDL operation definition. The field is used to determine how a sample SOAP message is generated. Change this field manually only in rare cases.
UseThis field is auto-populated based on the WSDL operation definition. The field is used to determine how a sample SOAP message is generated. If is selected, you can also edit the Encoded
in the field next to the choice. Change these fields manually only in rare cases.Encoded URI
SOAP Fault is ErrorIf a SOAP fault is returned, perform On Error handling.
Do Not Send RequestWhen selected, the step execution performs all of the normal SOAP message processing, but it does not send the generated SOAP message. Instead it sets the response to be the request message that would have been sent.This method is recommended to use transports other than HTTP/S to send SOAP requests. For example, when using a JMS client, you can configure the WS step to only create the request and not send it. Then you can append a Generic JMS step to actually send the request and receive the response.
Maintain Session

DevTest Solutions - 9.5
25-Jul-2016 303/448
Maintain SessionSelect to maintain cookies across invocations.
Clear SessionSelect to clear cookies across invocations. Clearing the session cookies acts like a new session was created. Old session cookies are not used and any new cookies in the response are not set on the session. However, because the session is not cleared, future steps can still use it.
Request Editor Tabs
Addressing Tab
You can send a WS-Addressing header with your request. The WSDL does not specify if WS-Addressing information is required so you must configure it.
Web Service Execution (XML) step Addressing tab
Click the tab, and then specify:Addressing
Use WS-AddressingClick to use WS-Addressing.
VersionSelect appropriate version. Several versions of the WS-Addressing specification are listed as options because some web services platforms (for example, .NET) still use the older Draft specifications. Determine which your web service platform is using.
DevTest populates as many values as possible. Then you can select to use the default value or override it. You can select not to send some of the default elements by clearing the check Defaultbox for that element.
To assure that the web service can understand the WSAddressing header, select the Must check box.Understand

DevTest Solutions - 9.5
25-Jul-2016 304/448
Security Tab
Web Service Execution (XML) step Security tab
Click the tab and click .Security Send
Must UnderstandSelect to ensure that the server processes the WS-Security header.
Actor/RoleEnter the name if needed: most web services do not use multiple Actors/Roles.
Click and select the security action type to add. You are presented with the configuration Addpanel for that security action type.
Adding the security verification to the Response is similar:
Click the tab. Click , and select .Security Add Receive
Enter the name (if needed)Actor/Role
Click and select the security action type. The configuration panel for that security action Addtype opens.
DevTest Solutions - 9.5
25-Jul-2016 305/448
Note: You can add as many security types as are necessary to execute your web service.
When you use a keystore in a security action type configuration, you can verify in the keystore settings that you are using the correct format, password, alias, and alias password. Clicking the Verifybutton on the editors for , , and invokes the Signature Encryption/Decryption SAML Assertion TokenKeystore Verifier, which produces a verification report.
If you do not know the expected alias name for a WS-Security setting, use the to list Keystore Verifierall of the aliases in the keystore. Leave the and boxes empty and click Keystore Alias Alias Password
. The is described at the end of this section on WS-Security.Verify Keystore Verifier
Note: You can load and save the security configuration information from and to a .wss file,
using the and icons. This capability allows for quick and easy creation of Load Savenew steps connecting to the same service.
Security ExampleThis page describes the parameters that are necessary to run the WS-security example.

DevTest Solutions - 9.5
25-Jul-2016 306/448
XML Encryption-Decryption (see page 306)XML Signature Token-Signature Verification (see page 308)Timestamp-Timestamp Receipt (see page 309)Username Token-Username Token Verifier (see page 310)SAML Assertion Token-SAML Assertion Receipt (see page 311)
XML Encryption-Decryption
Encryption
Select the check box.Use Encryption
Keystore File
The location of the keystore file.

DevTest Solutions - 9.5
25-Jul-2016 307/448
Keystore Password
Enter the password for the keystore.
Keystore AliasEnter an alias for a public key.
Alias Password
Leave empty or make the same as Keystore Password for PKCS #12 files.
Key ID TypeSelect the appropriate key ID type from the pull-down menu.
AlgorithmSelect Triple DES, AES 128, AED 192, or AES 256.
TransportSelect PKCS#1: RSA Encryption Standard v1.5 or Optimal Asymmetric Encryption Padding with RSA Encryption.
The default behavior is to encrypt only the SOAP Body contents.
Encrypt Only PartsTo specify different parts to encrypt, click to identify the parts to be encrypted.Select
TypeValues:
Element: Encrypt the element and the content.
Content: Encrypt only the content.
Namespace URL
Enter the value for the element.
Element
Enter the name of the element.
Click to repeat the process.Add
To include the Body element, manually add it. To include the Binary Security Token as a part, use the Element name .Token
Decryption
Keystore File
The location of the keystore file.
Keystore Password

DevTest Solutions - 9.5
25-Jul-2016 308/448
Enter the password for the keystore.
Keystore AliasEnter an alias for a public key.
Alias Password
Leave empty or make the same as Keystore Password for PKCS #12 files.
XML Signature Token-Signature Verification
Signature Token
Select the check box.Add Signature
Keystore File
The location of the keystore file.
Keystore Password
Enter the password for the keystore.
Keystore AliasEnter an alias for a private key.
Alias Password
Leave empty or make the same as Keystore Password for PKCS #12 files.
Key ID TypeSelect the appropriate key ID type from the pull-down menu.
AlgorithmSelect DSA with SHA-1.
Digest AlgorithmValues: SHA-1, SHA-256, SHA-384, SHA-512, RIPEMD-160, or MD5 (not recommended).
The default behavior is to sign only the SOAP Body contents.
Sign Only PartsTo specify different parts to sign, click to identify the parts to be signed.Select
TypeValues:
Element: Encrypt the element and the content.
Content: Encrypt only the content.
Namespace URL
Enter the value for the element.

DevTest Solutions - 9.5
25-Jul-2016 309/448
Enter the value for the element.
Element
Enter the name of the element.
Click to repeat this process.Add
To include the Body element, add it manually. To include the Binary Security Token as a part, use the Element name .Token
Signature Verification
The parameters that are required to configure the signature verification are a subset of the parameters that are required for signing.
Keystore File
The location of the keystore file.
Keystore Password
Enter the password for the keystore.
Keystore AliasEnter an alias for a public key.
Alias Password
Leave empty or make the same as Keystore Password for PKCS #12 files.
Timestamp-Timestamp Receipt
Timestamp
Select the check box.Add Timestamp
Time-To-Live (sec)Enter the lifetime of the message in seconds. Enter 0 to exclude an Expires element.
Note: Some Web services, particularly .NET 1.x/2.0 with WSE 2.0, are not compliant with standard timestamp date formatting, and do not allow milliseconds. For these web services, clear the check box.Use Millisecond Precision in Timestamp
Timestamp Receipt
The parameters that are required for Timestamp Receipt are a super set of those parameters that are required for Timestamp. The additional parameter is:

DevTest Solutions - 9.5
25-Jul-2016 310/448
Don't allow expiredSelect this parameter if you do not want to allow expired timestamps.
Username Token-Username Token Verifier
Username Token
Select the check box.Add Username Token
User NameEnter the user name.
PasswordEnter the appropriate password.
Password TypeSelect the password type from the drop-down list (Text, Digest, None). None is typically used with the Add Signature option.
Add NonceSpecifies whether a nonce is required to protect against replay attacks.
Add CreatedSelect if a timestamp is required.
Use Millisecond Precision in TimestampTo use millisecond precision, select the check box. Some Web services, particularly .NET 1.x/2.0 with WSE 2.0, are not compliant with standard timestamp formatting and do not allow the use of milliseconds.
Add SignatureSelect to add a signature that is built using a combination of the username and password as the key.
Sign Only PartsTo specify different parts to sign, click to identify the parts to be signed.Select
TypeValues:
Element: Encrypt the element and the content.
Content: Encrypt only the content.
Namespace URL
Enter the value for the element.
Element
Enter the name of the element.
Click to repeat for as many elements as you want.Add

DevTest Solutions - 9.5
25-Jul-2016 311/448
Click to repeat for as many elements as you want.Add
To include the Body element, manually add it. To include the Binary Security Token as a part, use the Element name .Token
UserName Token Verifier
Select the check box.Verify Username Token
User NameEnter the user name.
PasswordEnter the appropriate password.
Use Millisecond Precision in TimestampTo use millisecond precision, select the check box. Some Web services, particularly .NET 1.x/2.0 with WSE 2.0, are not compliant with standard timestamp formatting and do not allow the use of milliseconds.
Verify SignatureSelect the check box if signature verification is required.
SAML Assertion Token-SAML Assertion Receipt
SAML Assertion Token
Select the check box.Add SAML Token
Perform one of the following options:
Select the check box. Select the step whose result is an XML SAML Assertion From Step Results(like a SAML Query Step or a Parse Text Step with XML manually entered)
Select the check box and enter the property that contains the XML SAML From PropertyAssertion.
Click to have DevTest parse the SAML Assertion XML and build the SAML Assertion object as it Verifywould when sending the SOAP request. Verifying is useful to confirm that the SAML Assertion that could have been created manually is a valid SAML Assertion. Verifying also attempts to verify any signatures that are associated with the assertion. However, it is likely that DevTest cannot verify the assertion without configuring a public certificate with which to verify.
Select the check box if the sender must sign the assertion (the sender instead Signed Sender Vouchesof the bearer/creator of theassertion vouches for its authenticity). When selected, the following information is required:
Keystore File
The location of the keystore file.
Keystore Password
Enter the password for the keystore.

DevTest Solutions - 9.5
25-Jul-2016 312/448
Enter the password for the keystore.
Keystore AliasEnter an alias for a private key.
Alias Password
Leave empty or make the same as Keystore Password for PKCS #12 files.
Key ID TypeSelect the appropriate key ID type from the pull-down menu.
AlgorithmSelect DSA with SHA-1.
Digest AlgorithmValues: SHA-1, SHA-256, SHA-384, SHA-512, RIPEMD-160, or MD5 (not recommended).
The default behavior is to sign only the SOAP Body contents.
Sign Only PartsTo specify different parts to sign, click to identify the parts to be signed.Select
TypeValues:
Element: Encrypt the element and the content.
Content: Encrypt only the content.
Namespace URL
Enter the value for the element.
Element
Enter the name of the element.
To repeat this process, click . To include the Body element, add it manually.Add
To include the Binary Security Token as a part, use the Element name .Token
SAML Assertion ReceiptTo scan the response for a SAML Assertion Receipt header in the response, select the Process
check box. If you select this option and there is no SAML Assertion Receipt SAML Assertionheader, an exception occurs.
Signature ConfirmationTo scan the response for a signature confirmation header in the response, select the Signature
check box. If you select this option and there is no confirmation header, an confirmationexception occurs.

DevTest Solutions - 9.5
25-Jul-2016 313/448
Using the Keystore VerifierYou can verify your keystore settings to ensure that you are using the correct format, password, alias, and alias password. To produce verification reports, click on the editors for SSL, VerifySignature, Encryption/Decryption, and SAML settings.SSL verification validates the Keystore password only. The SSL verification also confirms at least one of the keys in the keystore can be loaded using the keystore password.WS-Security verification validates the Keystore password, the alias, and the alias password. A correct validation is indicated with a green entry. Any validation errors that are found are shown in red. Warnings are shown in orange.
Note: This verification only verifies the keystore parameters. There could still be issues with the web service, such as a mismatch in certificate sets or an incorrect choice of algorithm. These issues must be validated independently.
Alias SearchIf you do not know the expected alias name for a WS-Security setting, use the keystore verifier. The keystore verifier lists all of the aliases in the keystore. Leave the and Keystore Alias Alias
boxes empty and click .Password VerifyAliases have a blue background.Verification fails because the and boxes were left blank.Keystore Alias Alias Password
WS-I ReportWhen you click on the window, the validation runs. A report is generated Execute Object Editorand saved (in the reports directory in the DevTest install directory). You can view the report by pressing the tab at the bottom of the window.WS-I Report
Note: The format of this report is standard, and the Web-Services-Interoperability Organization (WS-I) dictates the format.
WSDL ValidationThe WSDL Validation step lets you load a WSDL and add one or more assertions to validate the WSDL. This step is a little different in that it lets you load the static WSDL file and perform assertions on it. In most steps, the assertions are made on the response.
The following list describes the most useful assertions:
XML Diff Assertion: Checks that the WSDL has not been changed by comparing it to a control copy of the original WSDL.
XML Validator: Checks for valid XML using Schema or DTD.
WS-I Basic Profile 1.1 Assertion: Checks for compliance with the WS-I Basic Profile.
These assertions are described in .Assertion Descriptions (see page 17)

DevTest Solutions - 9.5
25-Jul-2016 314/448
Prerequisites: Familiarity with the three assertions that were named previously.
Parameter Requirements: Location of the WSDL to validate.
To configure the WSDL Validation step, enter a WSDL in the field and click .WSDL URL Load
The WSDL appears in the editor. You can view it in XML or DOM View.
You are now ready to add the assertions.
Base64 EncoderThe Base64 Encoder step is used to encode a file using the Base-64 encoding algorithm. The result can be stored into a property for use elsewhere in the test case.
The Base64 Encoder step accepts a file as input and encodes the file using Base64 encoding. You can store the encoded file in a property. To encode a file, click . The Base64 encoded text that is Loaddisplayed in the editor is read-only.
Complete the following fields:
FileEnter the full path and path name, or browse to the file to be encoded.
Property Key [opt]The name of the property in which to store the encoded file.
LoadClick to load and test the encoding of the file. Optionally, store it in the specified property.
If environment errorAction to take if an environment error occurs.
After the file is encoded, you can add filters and assertions. The valid options are:
Random Selection Filter
Parse Value Filter
XML Xpath Filter
Create HTML Table ResultSet Filter
Make Assert on Selection
When you have added filters and assertions, click to load the file or to save the editor Load Savecontents in a new file.

DevTest Solutions - 9.5
25-Jul-2016 315/448
Multipart MIME StepThe Multipart MIME (Multipurpose Internet Mail Extensions) step lets DevTest load data from a file, encode it, and store it in a property for use as a post parameter on an HTTP request. The encoded document is stored in the property that has been defined previously in an HTTP/HTML Request step.
When a multipart MIME form submit request is recorded, the contents of the file that was uploaded are recorded. Subsequent playback results in the same content being submitted with "file upload" portion of the form again. The multipart MIME step can be used to change what file is uploaded when the test case is played back.
Prerequisite: The HTTP/HTML Request step containing the HTTP parameter must exist, and it must be before the Multipart MIME step.
Complete the following fields:
StepSelect the name of the HTTP/HTML Request step, or select from the pull-down menu, the step that receives the property containing the encoded document.
ParameterSelect the name of the property listed in the step named in the field from the pull-down Stepmenu.
FileEnter the pathname or browse to the document to be encoded.
MIME TypeEnter the MIME type that the server expects.
Click to encode the file.Load

DevTest Solutions - 9.5
25-Jul-2016 316/448
Multipart MIME step encoded
To save the contents of the editor to a file, click Save .
In the example in the previous graphic, the Account Activity step has a post-parameter user ID that contains the encoded version of the file .DataSet1.Ids
SAML Assertion QueryThe SAML Assertion Query step lets you obtain a SAML assertion from an identity provider for use in a Web Service Execution step that uses a WS-Security SAML 1.x Assertion Token.
Prerequisites: A cursory understanding of what type of SAML Assertion Query that you must perform. Obtain this information from either the developer of the system that uses SAML Assertions as the form of identity security or from the identity provider administrator.
Parameter Requirements: At a minimum, know:
The URL to the SAML Query interface (endpoint) for the identify provider.
The Subject information (who/what you want to obtain a SAML Assertion for).
The type of query you want to perform.
Some extra information depending on the type of query.

DevTest Solutions - 9.5
25-Jul-2016 317/448
SAML Assertion Query step
The SAML Assertion Query Editor has four tabs. The tab lets you configure the query Editorinformation. After you configure the query, you can test the query using the button in the Test Querysection of the editor. After you test the query, you can view the raw request that was sent in the Last
tab. You can view the raw SOAP response in the tab. For example, if the Request Raw Query Resultquery returned multiple assertions, you can see the assertions in the tab. You can Raw Query Resultview the step response in the tab. The tab shows, for example, what is Last Response Last Responseused in the Web Service WS-Security token.
The button lets you enter more information.Advanced

DevTest Solutions - 9.5
25-Jul-2016 318/448
SAML Assertion Query step Advanced Settings
Select the check box.Add Signature
Keystore FileThe location of the keystore file.
Keystore PasswordEnter the password for the keystore.
Keystore AliasEnter an alias for a private key.
Alias PasswordLeave empty or make the same as Keystore Password for PKCS #12 files.
Signature AlgorithmSelect DSA with SHA-1.
Digest AlgorithmValues: SHA-1, SHA-256, SHA-384, SHA-512, RIPEMD-160, or MD5 (not recommended).
Connection (see page 318)Subject (see page 319)Response (deprecated) (see page 319)Query (see page 320)
ConnectionThis information describes where the SAML Query API server is and how to connect to it.

DevTest Solutions - 9.5
25-Jul-2016 319/448
EndpointThe URL to the SAML Query API of the identity provider.
SSL KeystoreTo use client-side identification certificates to connect to the endpoint, select the keystore file using the button. Or, select a previously entered item from the pull-down list or enter one Selectmanually.
SSL Keystore PasswordThe password for the SSL Keystore if used.
SAML VersionThe SAML version to use to query the identity provider.
SubjectThis information describes the recipient of a SAML assertion. The subject could be a user, user group, or other entity for which you want to provide an assertion about the current authorization/privileges.
NameThe name of the entity (for example, username).
Name QualifierA group or categorization that is used to qualify the (for example, domain).Name
FormatThis field describes what format the name is being sent (for example, Full Name as opposed to Username).
Confirmation MethodsSelect which confirmation method types you want to include in the query. The query only returns assertions that contain at least one of the specified types. If you leave all types cleared, the query returns any assertion regardless of the confirmation method.
Response (deprecated)This information describes which assertion statements you want to be returned as part of the SAML Assertion. is deprecated as of SAML 1.1.Response
Local PartThe element name (for example, AuthenticationStatement, AuthorizationDecisionStatement, and AttributeStatement).
NamespaceThe element namespace (for example, urn:oasis:names:tc:SAML:1.0:assertion).
Click to add more XML elements to the set to be returned.Add
Click Delete to remove any elements you have already added.

DevTest Solutions - 9.5
25-Jul-2016 320/448
QueryA description of which type of query to perform. The query types are:
Attribute
Authorization
Authorization Decision
AttributeAn attribute query responds with a set of attribute statements. For example, it could tell you which groups a subject is a member of.
ResourceTo limit your query to a specific resource (for example, a specific web service, domain, file) specify the resource name.
Attribute DesignatorsA name and namespace (like XML elements) identifies each attribute. You can filter the set of attribute statements that are returned by specifying each attribute type to be returned.Example:
Name = urn:mace:dir:attribute-def:eduPersonScopedAffiliation, Namespace = urn:mace:shibboleth:1.0:attributeNamespace:uri)
AuthorizationUsed to request authentication statements that are related to a specific Subject SAML Assertions.
Authorization MethodThis parameter limits your query to returning Authorization Statements that are for a specific authorization method.Example:
urn:oasis:names:tc:SAML:1.0:am:X509-PKI, urn:oasis:names:tc:SAML:1.0:am:PGP, urn:oasis:names:tc:SAML:1.0:am:password
A set of predefined authorization methods is available from the pull-down list.
Authorization DecisionUsed to request SAML Assertions for specific actions that a subject wants to perform, given the evidence.
ResourceTo limit your query to a specific resource (for example, a specific web service, domain, or file), specify the resource name.
ActionsSpecify at least one action for which to request authorization to perform (for example: login, view, edit) specified with a name (Data) and Namespace (like an XML element).

DevTest Solutions - 9.5
25-Jul-2016 321/448
1.
Evidence (Assertions)(Optionally) Specify one or more SAML Assertions to include with the Authorization Decision Query as advice to the Identity Provider. Specify the property that holds the SAML Assertion XML. To use the response from a previous step (for example, another SAML Assertion Query or Parse Text step) use .lisa.<stepname>.rsp
Evidence (Reference IDs)Optionally specify assertion reference IDs.
Java-J2EE StepsThe following steps are available in the category:Java/J2EE
Dynamic Java Execution (see page 321)RMI Server Execution (see page 324)Enterprise JavaBean Execution (see page 328)
Dynamic Java ExecutionThe Dynamic Java Execution step lets you instantiate and manipulate a Java object. All Java classes on the DevTest classpath are available, including the classes in the JRE classpath. Any user classes can be placed on the classpath by copying them into the hotDeploy directory. The class under test is loaded into the Complex Object Editor where it can be manipulated without having to write any Java code.
This example uses a Java date instance of class .java.util.Date
Enter the following parameters in the Dynamic Java Execution editor:
Use JVMSelect .Local
Note: You can use In-Container Testing (ICT) to execute a Java object remotely by clicking the option button. However, this mode requires some extra setup Remotebefore it can be used. For more information, see the Using the SDK.
Local JVM SettingsSelect one of the following options:
Make New Object of Class: Select this option button and enter, select, or browse to the Java class to instantiate. This value must be the fully qualified class name including the package of the Java class; for example, .com.example.MyClass
Load from Property: Click the option button and enter the name of the property that has the serialized object as its value.
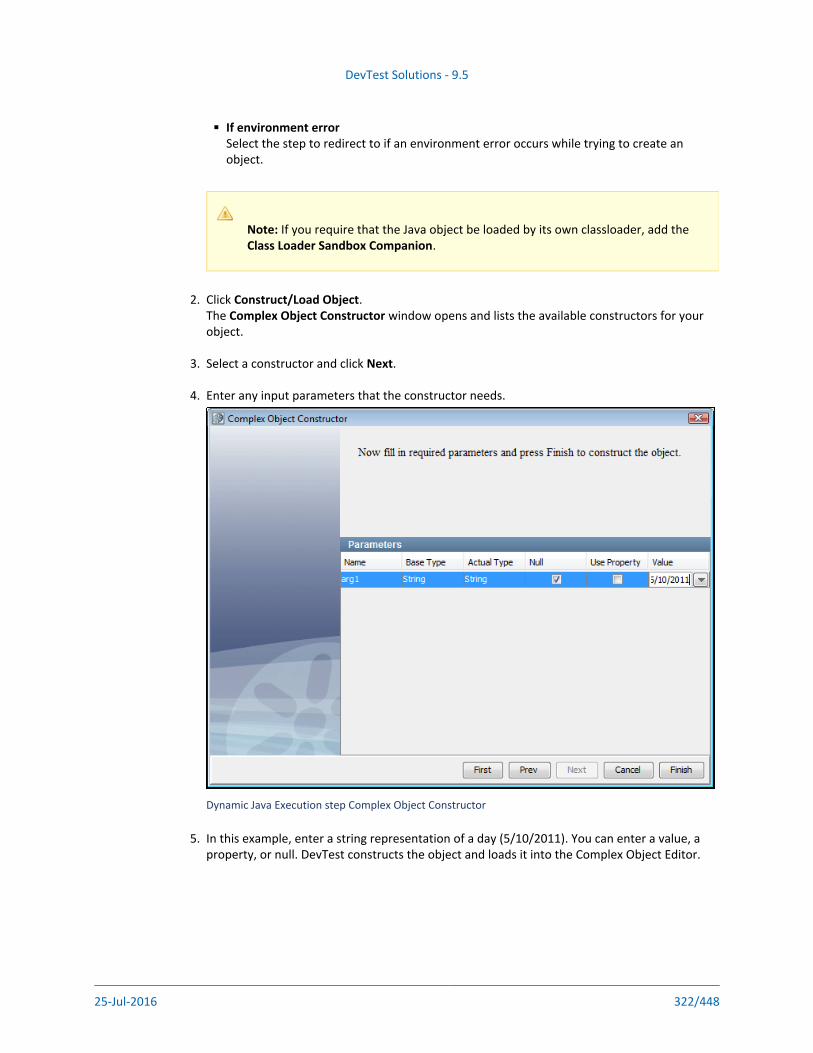
DevTest Solutions - 9.5
25-Jul-2016 322/448
1.
2.
3.
4.
5.
If environment errorSelect the step to redirect to if an environment error occurs while trying to create an object.
Note: If you require that the Java object be loaded by its own classloader, add the .Class Loader Sandbox Companion
Click .Construct/Load ObjectThe window opens and lists the available constructors for your Complex Object Constructorobject.
Select a constructor and click .Next
Enter any input parameters that the constructor needs.
Dynamic Java Execution step Complex Object Constructor
In this example, enter a string representation of a day (5/10/2011). You can enter a value, a property, or null. DevTest constructs the object and loads it into the Complex Object Editor.

DevTest Solutions - 9.5
25-Jul-2016 323/448
5.
6.
7.
Dynamic Java Execution step Complex Object Editor
You can now manipulate the object, and execute methods, using the Complex Object Editor.For more information about how to use the Complex Object Editor, see Complex Object Editor (COE) (https://docops.ca.com/pages/viewpage.action?pageId=312699485).
You can use either of the following methods to add filters and assertions:
Use the inline filter/assertion form (part of the Complex Object Editor)
Manually, by selecting filter under your test step in the test case tree
For example, the following graphic is a window before we execute the before method on the Date class.

DevTest Solutions - 9.5
25-Jul-2016 324/448
7.
COE before we execute the before method on the Date class
In the section, you can add an inline filter in the text Status/Result Save Results in Propertybox. You can also add an inline assertion in the text box.Comparison on Result LikeThe Dynamic Java Execution step has a default name using this convention: Dynamic Java Execution. You can change step names at any time.
RMI Server ExecutionThe RMI Server Execution step lets you acquire a reference to a remote Java object through Remote Method Invocation (RMI) and call the Java object.
Prerequisites: Knowledge of the Complex Object Editor is assumed. You must also copy the interface and stub classes for the remote object into the hot deploy directory. These actions are required to contact and interact with the remote object. Get these classes from the remote object developer.
Parameter Requirement: You must know how to connect to the RMI Server (usually a host name and port) and you must know the RMI name of the object you want to invoke.
The RMI Server step editor lets you enter the following parameters:
RMI NameComplete one of the following actions:
Enter or select the full RMI name of the object (as shown previously)
Enter the RMI Server name and click to open a list of available objects.Apply
DevTest constructs the object and loads it into the Complex Object Editor.

DevTest Solutions - 9.5
25-Jul-2016 325/448
COE with getName method selected
You can now manipulate the object, and execute methods, using the Complex Object Editor.
In the previous graphic, the getName method was selected. If you double-click it, it gets added in the Object Call Tree. You can then click in the dialog, to execute it with any required method Executearguments and information about how to process the result.

DevTest Solutions - 9.5
25-Jul-2016 326/448
RMI Server Execution step before method is executed
The previous graphic shows null as the return value because the method is not yet executed. After you click , it gets executed and the correct return type is shown. The following graphic shows Executehow the tracks the results of execution of several methods.Object Call Tree

DevTest Solutions - 9.5
25-Jul-2016 327/448
RMI Server Execution step after method is executed
You can also use either of the following methods to add filters and assertions:
Use the inline filter/assertion form
Manually by selecting filter under your test step in the test case tree
You can see the section where you can add an inline filter in the Status/Result Save Results in text box. You can see an inline assertion in the text box.Property Comparison on Result Like
Note: If you have multiple network cards, using localhost in the RMI name can cause errors. You may need to use the IP address, or the host name that corresponds to the IP address.
The RMI Server Execution step has a default name using this convention: RMI Server Execution - .operation name

DevTest Solutions - 9.5
25-Jul-2016 328/448
1.
If another step uses the default step name, DevTest appends a number to this step name to keep it unique. You can change step names at any time.
Enterprise JavaBean ExecutionThe Enterprise JavaBean Execution step lets you acquire a reference to and make calls on an Enterprise JavaBean (EJB) running in a J2EE application server.
Testing an EJB is similar to testing a Java object. DevTest dynamically connects to the EJB using the Home EJB interface, and then from it creates an instance of an EJB object. This process is a little different for EJBs, as they do not require a home interface. The EJB under test is loaded into the Complex Object Editor, where it can be manipulated without having to write any Java code.
The EJB step has a default name using this convention: . EJB javaMethod dynamic java executionBefore the step is saved, the default step name is . If another step also uses the default step EJBname, a number is appended to it. You can change step names at any time.
Prerequisites:
Knowledge of the Complex Object Editor (https://docops.ca.com/pages/viewpage.action? is assumed.pageId=312699485)
Copy the application JAR files for the EJB under test and the client EJB JAR file to the directory. The directory contains the file for LISA_HOME\hotDeploy hotDeploy jbossall-client.jar
the JBoss application server and the examples JAR file so you can run the EJB examples immediately. For more information about JBoss requirements, see Generate an EJB Baseline (
.https://docops.ca.com/display/DTS95/Generate+an+EJB+Baseline)
Parameter Requirements:
Server connection information (JNDI connection) and user ID and password (if necessary).
The global JNDI lookup name of your EJB home interface.
The EJB deployer should provide this information.
Example (see page 328)Connecting to WebSphere with DevTest Solutions using SIBC (see page 331)
ExampleThis example is based on the demo server, which uses JBoss 4.2.3. To use your local demo server, enter as the host name.localhost
Select the application server from the list and enter the following parameters:
Host Name or IP AddressEnter the hostname or IP address of your application server.
Port Number

DevTest Solutions - 9.5
25-Jul-2016 329/448
1.
2.
3.
Port NumberEnter the port number.
UserEnter if a user ID is required for the application server.
PasswordEnter if a password is required for the application server.
If your application server is not on the list, you select the option and Other / You Specifyenter the following parameters:
JNDI FactoryEnter or select the fully qualified JNDI factory class name for your application server.
JNDI Server URLEnter or select the JNDI server name.
UserEnter if a user ID is required for the application server.
PasswordEnter if a password is required for the application server.
Click .NextThe window lists the JNDI names that are registered with the application New EJB Setupserver.
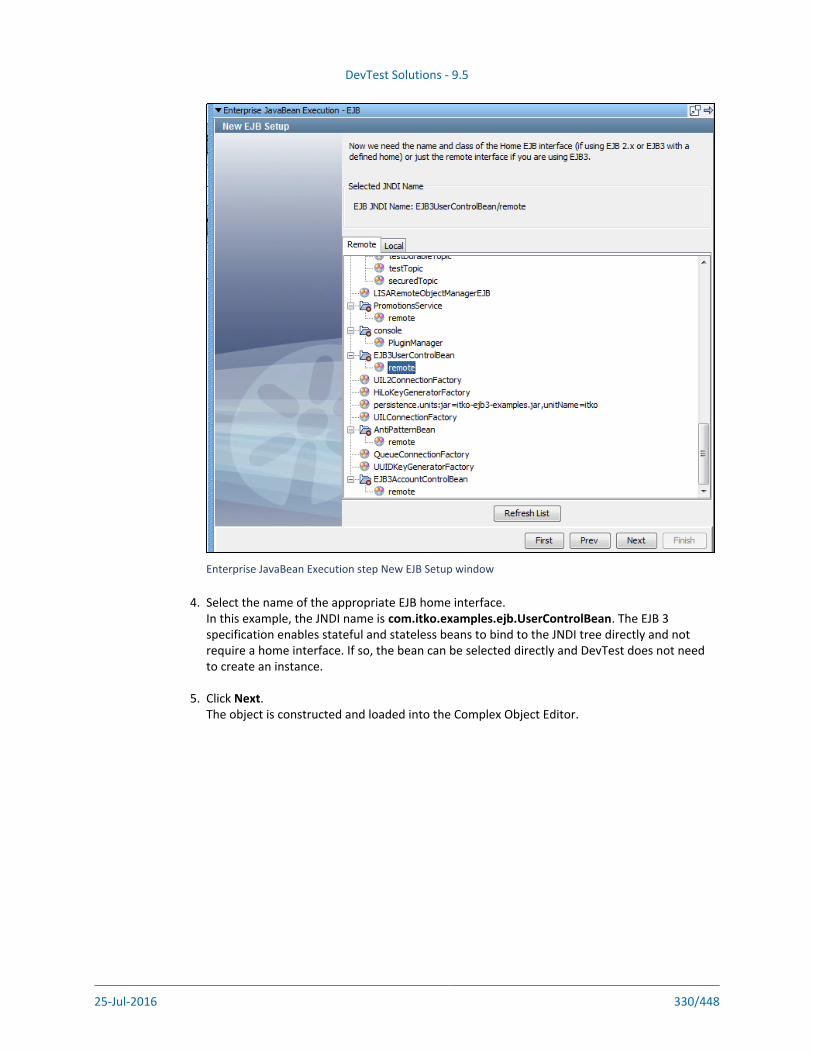
DevTest Solutions - 9.5
25-Jul-2016 330/448
3.
4.
5.
Enterprise JavaBean Execution step New EJB Setup window
Select the name of the appropriate EJB home interface.In this example, the JNDI name is . The EJB 3 com.itko.examples.ejb.UserControlBeanspecification enables stateful and stateless beans to bind to the JNDI tree directly and not require a home interface. If so, the bean can be selected directly and DevTest does not need to create an instance.
Click .NextThe object is constructed and loaded into the Complex Object Editor.

DevTest Solutions - 9.5
25-Jul-2016 331/448
5.
6.
1.
2.
3.
Enterprise JavaBean Execution step in COE
In the area, the current EJB information is displayed. If you plan to reuse this Execution InfoEJB, you can keep the references to the EJB object and the EJB Home by selecting the Keep
and check boxes. If the bean is an EJB 3 bean EJB Home Reference Keep EJB Object Reference without a home interface, the check box is disabled.Keep EJB Home Reference
You can now manipulate the object, and execute methods, using the Complex Object Editor.The usage is the same as in the step.RMI Server Execution (see page 324)
Connecting to WebSphere with DevTest Solutions using SIBCIBM has an EJB and JMS client that you can download and use with the Sun JVM.
Follow these steps:
Download this file; then run their installer.
Issue the following command:
java -jar sibc_install-o0902.06.jar jms_jndi_sun <output_directory>
Get the following files from your <output_directory>:
lib\sibc.jms.jar

DevTest Solutions - 9.5
25-Jul-2016 332/448
3.
4.
5.
6.
lib\sibc.jms.jar
lib\sibc.jndi.jar
lib\sibc.orb.jar
To reference the previous three JAR files, Create a environment LISA_PRE_CLASSPATHvariable.For example: LISA_PRE_CLASSPATH=C:\sibc.jms.jar;C:\sibc.jndi.jar;C:\sibc.orb.jar;
Edit and add the following line:local.properties
com.ibm.CORBA.ORBInit=com.ibm.ws.sib.client.ORB
On the JMS step, use the following settings:
JNDI factory class: com.ibm.websphere.naming.WsnInitialContextFactory
JNDI URL: iiop://SERVER:PORT
Other Transaction StepsThe following steps are available in the category:Other
SQL Database Execution (JDBC) (see page 332)SQL Database Execution (JDBC with Asset) (see page 335)CORBA Execution (see page 338)
SQL Database Execution (JDBC)The SQL Database Execution step lets you connect to a database using JDBC (Java Database Connectivity) and make SQL queries on the database.
Full SQL syntax is supported, but your SQL is not validated. The SQL is passed through to the database where it is validated. If you get an SQL error, it is captured in the response. You can assert on the error. Verify that the SQL is valid for the database manager you are using.
Prerequisites: The JDBC driver appropriate for your database must be on the DevTest classpath. You can place the driver JAR file in the hot deploy directory. The DevTest classpath includes the Derby client driver, so you do not need to re-add it.
Parameter Requirements: Have the name of the JDBC driver class, the JDBC URL for your database, and a user ID and password for the database. You also must know the schemas for the tables in the database to construct your SQL queries.

DevTest Solutions - 9.5
25-Jul-2016 333/448
1.
SQL Database Execution (JDBC) Step
Enter the following parameters in the SQL Database step editor:Connection Info:
JDBC DriverEnter or select the full package name of the appropriate driver class. Standard driver classes are available in the drop-down list. You can also use the button to browse Browsethe DevTest class path for the driver class.
Connect StringThe connect string is the standard JDBC URL for your database. Enter or select the URL. The JDBC URL templates for common database managers are available in the drop-down list.

DevTest Solutions - 9.5
25-Jul-2016 334/448
1.
2.
3.
Max Rows to FetchEnter the maximum number of rows you want returned in the result set. This field is required. Enter -1 for unlimited rows.
Execution Info:
User IDEnter a user ID (if the database requires it).
PasswordEnter a password (if the database requires it).
Keep Connection OpenIf this option is selected, the database connection that is opened the first time that the step executes is cached. That database connection is then closed when garbage collection happens for the step. If is not selected, the connection is closed Keep Connection Openeach time that the step executes.
Returns Result SetSelect this check box if your query results in a Result Set being returned; that is, a SELECT type query. Leave cleared for an UPDATE, INSERT, or DELETE. If this check box is set incorrectly, your query causes an error.
If SQL errorSelect the step to redirect to if an error occurs.
To communicate with the local demo server, use:
JDBC Driverorg.apache.derby.jdbc.ClientDriver
Connect Stringjdbc:derby://localhost:1527/reports/lisa-reports.db
User IDsa
Passwordsa
After you have entered the database connection information, including the user ID and password (if necessary), click to test your connection.Test ConnectionIf the information is correct, a success message in a window appears. Otherwise an error message appears.
You are now ready to enter your SQL statement in the lower window.Properties can be used in your SQL. DevTest substitutes the parameter before passing the SQL string to the database.The JDBC step supports stored procedure calls. Basic data types (strings, numbers, dates, Boolean) are supported as arguments that a stored procedure uses as input and returns. Click
to add a parameter. You cannot edit the numbers in the column. As you Add Parameteradd, delete, and move rows, the numbers in the column are automatically Parameter
renumbered.

DevTest Solutions - 9.5
25-Jul-2016 335/448
3.
4.
5.
6.
renumbered.The JDBC step can also use JDBC prepared statements. You can use question marks in a SQL statement and can add named {{properties}}. This ability allows you to avoid being concerned about the type of the argument or escaping single quotation marks in parameter values. A statement "insert into MYTABLE(COL1,COL2) values (?, ?)" with a reference to {{col1}} and {{col2}} is easier to understand. The type and escape characters are automatically converted.To include a null in your statement, use this syntax: .{{<<NULL>>}}
After you have created the SQL query, click to execute the query.Test/Execute SQLA message indicates the result status.
Click .OKYour results display in the tab.Result Set
You are now ready to create filters and assertions on the result set.The icons on the bottom of the tab provide easy access to the following filters and Result Setassertions:
Get value for another value in a Result Set RowYou select a search field cell, a value field filter, and enter a property name. If the cell value in the search field is found, the value in the field in that row is set as the value Valueof the property that is entered.
Parse Result for Value filterThe value in the selected cell is set as the value of the property that is entered.
Result Set Contents AssertionThe value in the chosen field (column) is compared to the regular expression that is entered.
For more information about these and other filters and assertions appropriate for result sets, see and .Filter Descriptions (see page 142) Assertion Descriptions (see page 17)
The SQL Database Execution step has a default name using this convention: JDBC SQLfunction . The supported functions in step name defaults are , , , , and tablename select insert delete update
. You can change step names at any time.perform
SQL Database Execution (JDBC with Asset)The SQL Database Execution step lets you connect to a database using JDBC (Java Database Connectivity) and make SQL queries on the database. Use this step when you have a JDBC connection
defined.asset (see page 65)
Note: If you have a legacy SQL Database Execution (JDBC) step, you can export the connection information from the existing step instead of creating it manually. For more information see Create Assets from Test Steps (https://docops.ca.com/display/DTS95
./Create+Assets+from+Test+Steps)
Full SQL syntax is supported, but your SQL is not validated. The SQL is passed through to the database
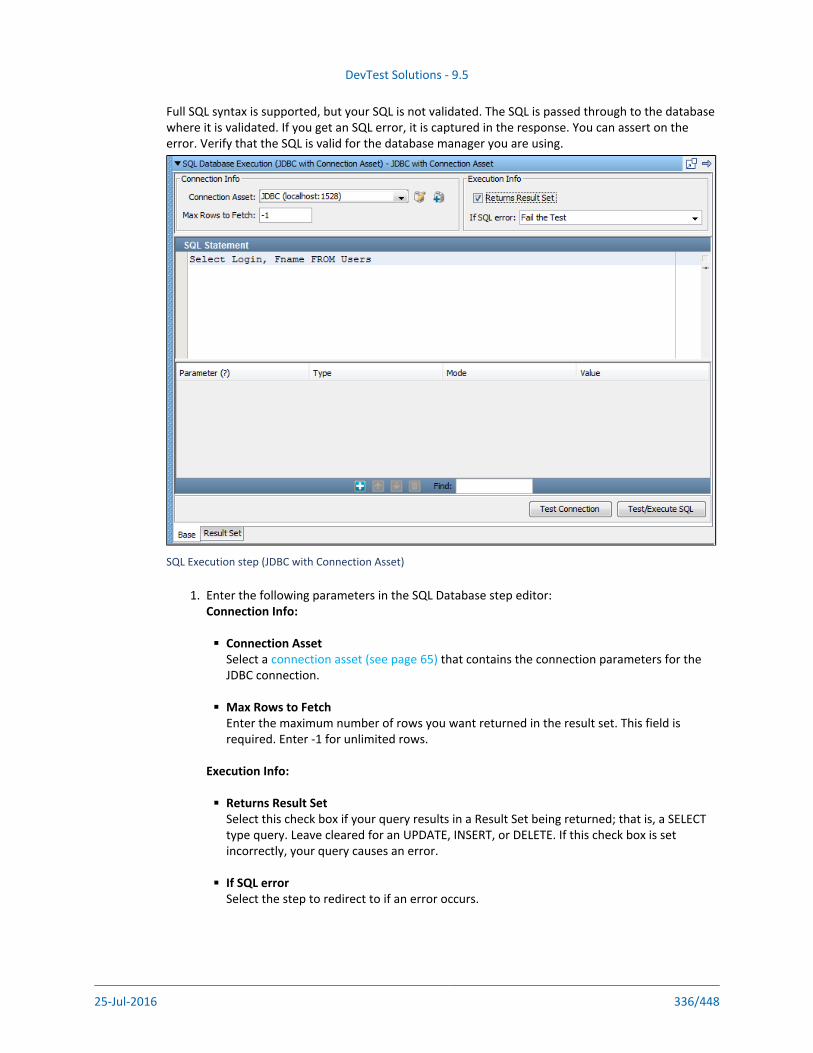
DevTest Solutions - 9.5
25-Jul-2016 336/448
1.
2.
Full SQL syntax is supported, but your SQL is not validated. The SQL is passed through to the database where it is validated. If you get an SQL error, it is captured in the response. You can assert on the error. Verify that the SQL is valid for the database manager you are using.
SQL Execution step (JDBC with Connection Asset)
Enter the following parameters in the SQL Database step editor:Connection Info:
Connection AssetSelect a that contains the connection parameters for the connection asset (see page 65)JDBC connection.
Max Rows to FetchEnter the maximum number of rows you want returned in the result set. This field is required. Enter -1 for unlimited rows.
Execution Info:
Returns Result SetSelect this check box if your query results in a Result Set being returned; that is, a SELECT type query. Leave cleared for an UPDATE, INSERT, or DELETE. If this check box is set incorrectly, your query causes an error.
If SQL errorSelect the step to redirect to if an error occurs.

DevTest Solutions - 9.5
25-Jul-2016 337/448
2.
3.
4.
5.
6.
After you have entered the database connection information, including the user ID and password (if necessary), click to test your connection.Test ConnectionIf the information is correct, a success message in a window appears. Otherwise an error message appears.
You are now ready to enter your SQL statement in the lower window.Properties can be used in your SQL. DevTest substitutes the parameter before passing the SQL string to the database.The JDBC step supports stored procedure calls. Basic data types (strings, numbers, dates, Boolean) are supported as arguments that a stored procedure uses as input and returns. Click
to add a parameter. You cannot edit the numbers in the column. As you Add Parameteradd, delete, and move rows, the numbers in the column are automatically Parameterrenumbered.The JDBC step can also use JDBC prepared statements. You can use question marks in a SQL statement and can add named {{properties}}. This ability allows you to avoid being concerned about the type of the argument or escaping single quotation marks in parameter values. A statement "insert into MYTABLE(COL1,COL2) values (?, ?)" with a reference to {{col1}} and {{col2}} is easier to understand. The type and escape characters are automatically converted.To include a null in your statement, use this syntax: .{{<<NULL>>}}
After you have created the SQL query, click to execute the query.Test/Execute SQLA message indicates the result status.
Click .OKYour results display in the tab.Result Set
You are now ready to create filters and assertions on the result set.The three icons on the bottom of the tab provide easy access to the following Result Setfilters and assertions:
Get value for another value in a Result Set RowYou select a search field cell, a value field filter, and enter a property name. If the cell value in the search field is found, the value in the field in that row is set as the value Valueof the property that is entered.
Parse Result for Value filterThe value in the selected cell is set as the value of the property that is entered.
Result Set Contents AssertionThe value in the selected field (column) is compared to the regular expression that is entered.
For more information about these and other filters and assertions appropriate for result sets, see and .Filter Descriptions (see page 142) Assertion Descriptions (see page 17)
The SQL Database Execution step has a default name using this convention: JDBC with Connection . The supported functions in step name defaults are , , Asset SQLfunction tablename select insert delete
, , and . You can change step names at any time.update perform

DevTest Solutions - 9.5
25-Jul-2016 338/448
1.
2.
3.
4.
5.
CORBA ExecutionThe CORBA Execution step is used to make CORBA calls using the Java RMI-IIOP library. You are required to provide appropriate skeleton classes.
Follow these steps:
Copy the file to the DevTest lib directory before starting execution. This JAR is corbaserver.jaravailable in the CORBA server lib directory.
To open the step editor, select the CORBA step.
Complete the fields.
Object IORThis field contains the raw IOR string for the object or the name service. This string can be taken from the output (generated IOR) of running batch file.nameserver.sh
Note: Copying and pasting from nameserver printed output to the Object IOR field can introduce spaces. The string must not contain spaces.
Class NameIOR references this object class.
You can also use the IOR construction dialog. When open, it parses any IOR string that is entered and fills in the individual parts. Ignore the strange looking key. IORs store the key in a byte format so not every byte can be displayed properly. To use the parsed version of a raw IOR, do not edit the field.
Click .Construct/Load ObjectThe dynamic object editor shows the call sheet for the object.
Select the method to call and execute it.
The default CORBA Execution step uses the following convention: . You can change CORBA classnamestep names at any time.
Utilities StepsThe following steps are available in the category:Utilities
Save Property as Last Response (see page 339)Output Log Message (see page 339)Write to Delimited File (see page 339)Read Properties from a File (see page 341)Do-Nothing Step (see page 342)
Parse Text as Response (see page 342)
DevTest Solutions - 9.5
25-Jul-2016 339/448
Parse Text as Response (see page 342)Audit Step (see page 342)Base64 Encoder Step (see page 343)Checksum Step (see page 344)Convert XML to Element Object (see page 344)Compare Strings for Response Lookup (see page 346)Compare Strings for Next Step Lookup (see page 348)Send Email (see page 349)
Save Property as Last ResponseThe Save Property as Last Response step lets you save the value of a property as the last response.
Enter the property name of an existing property or select it from the pull-down menu. The value of the property is loaded as the last response (and the step response). The value can then be accessed immediately as the last response, or later in the test case using the property , lisa.thisStepname.rspwhere is the name of the current step.thisStepName
Each step in a test case has a response that is associated with it. When that step runs, the response is automatically saved in two properties: and . Use this step so LASTRESPONSE lisa.thisStepName.rspyou can have filters and assertions apply to a property value instead of the real response of the step.
Output Log MessageThe Output Log Message step lets you write a text message to the log. This step is useful for tracking and logging test cases as they execute. Your log message is usually a combination of text and properties.
Enter your log message in the editor. This log message appears when this step executes in the Interactive Test Run (ITR), and the message is logged during a test run.
Write to Delimited FileThe Write to Delimited File step lets you save the current value of some properties in a CSV file. This step is commonly used when properties are shared among multiple test cases, or for debugging purposes when a test has failed. The properties can be existing properties or new properties. You can save existing properties under a different property name.
Complete the following fields:
File NameEnter the path name of the file, or use the button to browse to the file.Browse
EncodingAccept the default encoding of UTF-8 or select an alternate encoding from the drop-down list.

DevTest Solutions - 9.5
25-Jul-2016 340/448
Include BOMIf the encoding you select includes a Byte Order Mark, you can select this check box to include that BOM at the beginning of the file.
DelimiterEnter the delimiter character to use for your file.
Line endSelect from the drop-down list the correct line end character for your file.
Properties to writeClick to add a row. Then enter the properties (Header) and corresponding values (Value) Addto save. Your list of properties can contain existing or new properties. When specifying existing properties (Header), you can override their current value by specifying a new value, or you can use their existing value.
In the previous example:
The first two properties are being stored without change
The third property was stored under a new name (Header), Date
The fourth property is using Reg Expression as its value
The properties are stored in a CSV file where the first line in the file is the set of property names being saved. The second line contains the values corresponding to each of the properties.
Note: This step is used to pass data between test cases. For example, assume Test1 adds customers to the bank and then returns a list of new account numbers. Those accounts could be written out to a file. A second test could get the accounts and could make deposits. The second test would use a data set to read in the file that was created in the first test.Be aware of the following warning when writing to a delimited file. The Data directory can be used as the location of the CSV file only if both tests support rerun. The first test must be run again to create the CSV in the folder so the second test can run. The lads lads directory stores files temporarily while a test case or suite is running.To let the second test run without the first, you must put the data set in a common location outside the project or MAR.
The Write to Delimited File step writes out one (and only one) data row for each execution. The only exception is on the first execution when (presumably) the target file does not exist. If the file does not exist, if indicated, a byte order mark for the selected encoding is written, followed by a row containing the keys.
The default name for the Write to Delimited File step is .Write Properties to File <file>
If another step uses the default step name, DevTest appends a number to this step name to keep it unique. You can change step names at any time.

DevTest Solutions - 9.5
25-Jul-2016 341/448
Read Properties from a FileThe Read Properties from a File step is used to read the properties from an external file.
You can read the properties in two ways:
In name/value pairs
In XML tags
Complete the following fields:
File NameEnter the path name of the file, or use the button to browse to the file.Browse
File EncodingAccept the default encoding of UTF-8 or select an alternate encoding from the drop-down list. You can also select and click to have DevTest select an encoding type for you.Auto-detect Detect
Type of FileSelect the type of a file; either or .Name-Value-Pairs XML Tags
Notepad file as input to Read Properties from File step
The previous graphic shows the Name/Value pair type of properties file, where is a property name and is a value of the name property.Mary
XML file as input to Read Properties from File step
The previous graphic shows the XML Tags type of properties file, where is a property and fname Sam is a value of the fname property.

DevTest Solutions - 9.5
25-Jul-2016 342/448
The Read Properties from a File step has a default name using this convention: Properties Reader where is the leaf name of the entered or selected file.from <filename> filename
If another step uses the default step name, DevTest appends a number to this step name to keep it unique. You can change step names at any time.
Do-Nothing StepThe Do-Nothing step does not take any parameters, nor does it perform any actions. However, the step is useful in certain situations, as you can add assertions to the step. For example, you can use the scripted assertion to add a quick custom assertion, to compare numbers or dates, or some numerical comparison test.
Parse Text as ResponseThe Parse Text as Response step lets you enter textual content from a file that can be saved as the last response. The content can be stored in a property. You can type or paste the text into the editor, or you can load it from a file.
Complete the following fields:
Property KeyThe name of the property to store the content (optional).
Load From FileClick to browse to the file. Otherwise, type or paste the text into the editor.
The content is now available for you to parameterize, filter, and add assertions.
Click to show the resulting text.Test
Audit StepThe Audit step lets you apply an audit document (https://docops.ca.com/display/DTS95
to a current test step, remote test, or virtual service./Building+Audit+Documents)
This step allows a model to be verified in terms of the events it produces during execution.
To open its editor, click the step.
ModeThis step has two modes:
Start Monitoring
Apply Audit Document.

DevTest Solutions - 9.5
25-Jul-2016 343/448
Start Monitoring ModeIf you select the Mode:Start Monitoring
Audit DocumentEnter or browse for the audit document.
TargetSelect the target for the audit document:
This Model: Applies to the current model.
Test Run: Applies to the test run.
Virtual Model: Applies to the virtual model.
If Environment Error
Specifies the action to take or the step to go to if the test fails because of an environment error.
Default: Abort the test.
Apply Audit Document ModeIf you select the mode:Apply Audit Document
If Audit FailsSelect the step to run if the audit fails.
If Environment Error
Specifies the action to take or the step to go to if the test fails because of an environment error.
Default: Abort the test.
Base64 Encoder StepThe Base64 Encoder step is used to encode a file using Base 64 encoding algorithm.
The result can be stored in a property file to be used anywhere in the test run.
To open its editor, click the step.
Complete the following fields:
FileEnter the name of file to be encoded or browse to the target location.
Property KeyThe name of the property to store the encoded file. This field is optional.

DevTest Solutions - 9.5
25-Jul-2016 344/448
If Environment Error
Specifies the action to take or the step to go to if the test fails because of an environment error.
Default: Abort the test.
Click to load the file in the editor.Load
Here you can apply filters or assertions, or both, if necessary, from the menu at the Commandbottom.
Checksum StepThe Checksum step calculates the checksum of a file and can save that value in a property.
Complete the following fields:
FileEnter the pathname or browse to the file on which you want the checksum to be calculated.
Property keyEnter the name of the property that stores the checksum value.
Click .Load
The checksum is displayed as the response, and if a property name was entered the value is in that property.
The checksum value is now available for you to filter and add assertions.
Convert XML to Element ObjectThe Convert XML to Element Object step converts raw XML into an object of one of the following types:
Message Element Array
Message Element
DOM Element
This step is useful when you have a web service API that takes any type using strict processing. This type of WSDL element requires a Message Element Array as an input parameter. You can capture the raw XML from a previous step (such as Read from File or Parse Text as Response) and store it in a property. That property becomes an input parameter for this step.
Prerequisites: The XML must be already stored in a property.
Complete the following fields:
Load XML from Property

DevTest Solutions - 9.5
25-Jul-2016 345/448
Load XML from PropertyEnter the property that contains the XML. This property can be a user-defined property or a built-in DevTest property.
Treat as just TextSelect this check box if you must use plain text as your input instead of XML. This selection results in a message element that contains plain text.
Select the type of object you want from the available types by clicking the respective option button.
Click to do the conversion.Test
If you select the check box, you see the results as seen in the following graphic. The Treat as Just Text, , and options are Create Message Element Create DOM Element Deserialize a WS Object of Type
dimmed.
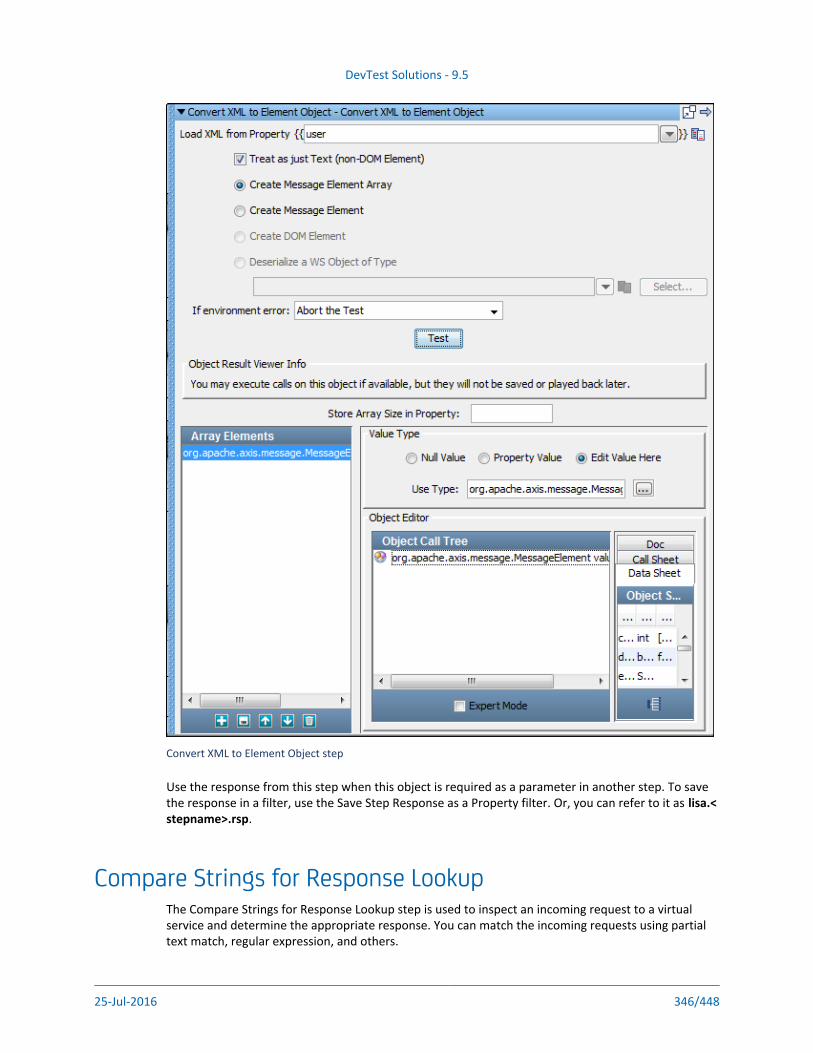
DevTest Solutions - 9.5
25-Jul-2016 346/448
Convert XML to Element Object step
Use the response from this step when this object is required as a parameter in another step. To save the response in a filter, use the Save Step Response as a Property filter. Or, you can refer to it as lisa.<
.stepname>.rsp
Compare Strings for Response LookupThe Compare Strings for Response Lookup step is used to inspect an incoming request to a virtual service and determine the appropriate response. You can match the incoming requests using partial text match, regular expression, and others.

DevTest Solutions - 9.5
25-Jul-2016 347/448
This step is automatically filled out and added to a virtual service when using the Virtual Web Service HTTP Recorder.
To open a step editor, click the step.
Complete the following fields:
Text to matchEnter the text against which criteria is matched. This value is typically a property reference, such as LASTRESPONSE.
Range to matchEnter the and of the range.Start End
If no match foundSelect the step to be executed, if no match is found.
If Environment Error
Specifies the action to take or the step to go to if the test fails because of an environment error.
Default: Abort the test.
Store responses in a compressed form in the test case fileSelected by default. This option compresses the responses in the test case file.
Case Response EntriesIn this table you can add, move, and delete entries by clicking , , and . The Add Move Deletecolumns in the table are as follows:
EnabledSelected by default when you add an entry. Clear to ignore an entry.
NameEnter a unique name for the case response entry.
Delay SpecEnter the delay specification range. The default is 1000-10000, which indicates to use a randomly selected delay time from 1000 through 10000 milliseconds. (The syntax is the same format as Think Time specifications.)
CriteriaThis area provides the response of this step if the entry matches the field. To Text to matchedit the criteria, in the area select the appropriate row, and enter a different Criteria Columnsetting in the criteria list. Click to update it in the subsequent row.Enter
Compare TypeSelect an option for the Compare type from the list:
Find in string (default)
Regular expression
Starts with

DevTest Solutions - 9.5
25-Jul-2016 348/448
Starts with
Ends with
Exactly equals
ResponseAllows for the update of the step response for an entry.
CriteriaUpdates the criteria string for an entry.
ResponseThis area provides the response of this step if the entry matches the field. To edit Text to matchthe response, in the area select the appropriate row, and enter a different Case Response Entriessetting in the list. To get it updated in the previous row, click .Response Enter
Compare Strings for Next Step LookupThe Compare Strings for Next Step Lookup step is used to inspect an incoming request and determine the appropriate next step. You can match incoming requests using partial text match, regular expression, and others. Each matching criterion specifies the name of the step to which to transfer if the match succeeds.
This step is automatically filled out and matches to a Virtual Service when using the JDBC Database Traffic Recorder.
To open a step editor, click the step.
Enter the following parameters:
Text to matchEnter the text against which criteria is matched. This value is typically a property reference, such as LASTRESPONSE.
Range to matchEnter the and of the range.Start End
If no match foundSelect the step to be executed, if no match is found.
If Environment Error
Specifies the action to take or the step to go to if the test fails because of an environment error.
Default: Abort the test.
Next Step EntriesClick to add an entry. Use and to move or delete an entry. Enter text in the Add Move Delete Findfield to find an entry.The columns in the are:Next Step Entry
Enabled

DevTest Solutions - 9.5
25-Jul-2016 349/448
EnabledSelected by default when you add an entry. Clear to ignore an entry.
NameEnter a unique name for the next step entry.
Delay SpecEnter the delay specification range. The default is 1000-10000, which indicates to use a randomly selected delay time from 1000 through 10000 milliseconds. The syntax is the same format as Think Time specifications.
CriteriaThis area defines the criteria to compare to the field.Text to match
Compare TypeSelect from five options:
Find in string (default)
Regular expression
Starts with
Ends with
Exactly equals
Next StepThe step name.
CriteriaUpdates the criteria string for an entry.
Send EmailThe Send Email step lets you send an email notification from a test case.
Complete the following fields:
ConnectionSpecifies the that contains the connection parameters to the SMTP mail asset (see page 62)server. Select a connection from the drop-down list. To add an asset, click .Add New Asset
FromIdentifies the email sender. Enter an email address or a property.
ToIdentifies the email recipient. To send to multiple recipients, use a comma between email addresses. You can also use a property or list of properties.Example:
{{Ops_email}},{{QA_email}},[email protected]

DevTest Solutions - 9.5
25-Jul-2016 350/448
CcIdentifies the secondary email recipient. To send to multiple recipients, use a comma between email addresses. You can also use a property or list of properties.
BccIdentifies the tertiary email recipient. To send to multiple recipients, use a comma between email addresses. The tertiary recipients are not identified to other recipients. You can also use a property or list of properties.
SubjectSpecifies the subject of the email. You can use a property or multiple properties in the Subjectfield.
MessageSpecifies the body of the e-mail with HTML support. If you use a buffered image as a property in the email body, the image is embedded in the message. You can use a property or multiple properties in the field. For the Selenium Integration step, you can use the Message selenium.last.
property to embed a screenshot from the Selenium Integration step in the email screenshotmessage.
AttachmentsLists the attachments to the email. Click , then to locate the path and file name of Add Browsethe file to be attached to the email.
If Environment Error
Specifies the action to take or the step to go to if the test fails because of an environment error.
Default: Abort the test
To test the email connection, click .Send Test Email
The Send Email step has a default name using this convention: .Send Email StepIf another step uses the default step name, DevTest appends a number to this step name to keep it unique. You can change step names at any time.
External-Subprocess StepsThe following steps are available in the category:External/Subprocess
Execute External Command (see page 351)File System Snapshot (see page 353)Execute Subprocess (see page 353)Execute JUnit Test Case-Suite (see page 354)Read a File (Disk URL or Classpath) (see page 355)External - FTP Step (see page 356)

DevTest Solutions - 9.5
25-Jul-2016 351/448
Execute External CommandThe Execute External Command step lets you run an external program (such as an operating system script, an operating system command, or an executable) and capture its contents for filtering or making assertions.
The syntax of the external program depends on your operating system.
Enter the following parameters:
Execute from directoryThe directory that is considered current when the external command is run. DevTest creates the directory (subject to file system permissions) if it does not exist on the system that is running the test. If the directory does not exist and cannot be created, the step fails.
Time Out (Seconds)How long to wait before transferring to the step defined by .On Time Out Execute
If timeoutThe step to run if the external command does not complete execution before the timeout value.
If Environment Error
Specifies the action to take or the step to go to if the test fails because of an environment error.
Default: Abort the test.
Output EncodingAccept the default encoding of UTF-8 or select an alternate encoding from the drop-down list. You can also select to have an encoding type be selected for you.Auto-detect
Allow PropertiesThis check box determines whether properties are allowed for the next four parameters. This option changes the look of the command editor interface.With the check box cleared, five check boxes are available. Here the only choice Allow Propertiesis to select the parameter or not.
Wait for CompletionIf you select this check box, the step waits until the execution finishes to filter or assert on the results. If this check box is cleared, filters and assertions execute; however execution does not wait for the result of the command being run.
Kill at Test EndIf the check box is cleared, select this check box to kill the process after the Wait for Completiontest case finishes. This parameter lets a process run while a test case runs, then shuts down the process. A property contains the process ID of the started command.
Spawn ProcessCreates a process in the operating system in which to run the command. This parameter is helpful in the following cases:
You want a long-running background process

DevTest Solutions - 9.5
25-Jul-2016 352/448
You want a long-running background process
You must ensure that a new set of environment variables is set and your environment contains nothing that DevTest set
Exec ShellLets you run the contents of the command line in a system shell. This option is required if you must use shell process features such as redirecting (pipe) output streams to files or other commands. Depending upon your system, this option may be required for you to run system commands such as dir or ls. This check box must be selected for a Windows operating system.
Append to EnvironmentWhen the step defines environment variables, DevTest appends them to the existing environment, instead of creating an environment that defines only these variables.
With the check box selected, there are pull-down menus that have the same Allow propertiesfunctionality as shown previously, but each parameter can now be a property.
Execute External Command step
Command LineThe external command is typically only one command that is written as a shell script or batch file. You can run multiple commands when the option is also selected. The command string Exec Shellmust be valid for the operating system that you are running.
Environment VariablesAllows existing environment variables to be overridden with new environment variables. If nothing is entered, the existing environment variables are used for the command. If you define an environment variable, the new variable sets are used instead of the environment variables that were used to start DevTest.
Exit CodesLets you base the outcome of the test on the exit code of the completed process. Enter a comma-delimited string of exit codes with a corresponding step to run when the process exits with this code.
To test your command, click .Execute
The content is now available for you to filter and add assertions.
The Execute External Command step has a default name using this convention: Command

DevTest Solutions - 9.5
25-Jul-2016 353/448
The Execute External Command step has a default name using this convention: Command .commandfirstword
If another step uses the default step name, DevTest appends a number to this step name to keep it unique. You can change step names at any time.
File System SnapshotThe File System Snapshot step lets you list the files in a directory in a format that is operating system independent.
You can list a single file, all the files in a directory, or all the files in a directory tree.
To open a step editor, click the step.
Enter the following parameters:
Execute from directoryEnter the path name or browse to the file or directory.
Recurse SubdirectoriesSelect if you want the complete directory tree including sub directories.
Include File SizeSelect if you want the file sizes to be listed.
Include Date/TimeSelect if you want the last modified date to be listed.
If Environment Error
Specifies the action to take or the step to go to if the test fails because of an environment error.
Default: Abort the test.
Click to run and start scanning the file system.Execute Now
The content is now available for you to filter and add assertions.
Execute SubprocessThe Execute Subprocess step lets you call a subprocess test case as a single step.
This step is used to call a subprocess and receive the outputs. This step is commonly used when a specific function is performed in numerous test cases. For example, if a specific validation always works the same way, you can create a validation subprocess and can add it to different test cases.
For more information, see Building Subprocesses (https://docops.ca.com/display/DTS95./Building+Subprocesses)

DevTest Solutions - 9.5
25-Jul-2016 354/448
Complete the following fields:
SubprocessSelect the subprocess from the pull-down menu.
Fully Expand PropsWhen the parameters have nested properties, fully expand the properties before sending to the subprocess.
Send HTTP CookiesSelect to forward cookies to the subprocess.
Get HTTP CookiesGet the HTTP cookies from the subprocess.
If Environment Error
Specifies the action to take or the step to go to if the test fails because of an environment error.
Default: Abort the test.
The documentation that was entered into the area of the subprocess is displayed.Documentation
The panel contains a list of the parameters that the subprocess requires. Parameters to SubprocessThese keys and values must be present in your current test case. Edit the column as necessary Valueto supply the correct values.
The panel lists all the properties that are produced in the subprocess. Select the Result Propertiesproperties to be returned from the subprocess. These properties are used in your test case. You are not limited to a single return value.
When this step runs, it appears to run as a single step. The Interactive Test Run (ITR) utility shows the events that fired while the step ran. The short name of the events combines the name of the current step and the name of the subprocess step where the event was fired..
If an assertion is triggered in the subprocess, then the appropriate event appears in the Test Eventstab of the Interactive Test Run (ITR) utility.
The default Execute Subprocess step uses the following convention: . You Subprocess subprocessnamecan change step names at any time.
Execute JUnit Test Case-SuiteThe Execute JUnit Test Case/Suite step lets you run a JUnit test case or a JUnit test suite in a DevTest step. If the JUnit test passes, then so does the test step. After a failure, you can redirect to another test step.
Prerequisite: Your JUnit test must be on the classpath. Drop it into the hot deploy directory.
Complete the following fields:
Test Class

DevTest Solutions - 9.5
25-Jul-2016 355/448
Test ClassEnter the package name of the JUnit test class or test suite class. You can browse the classpath using the button. This technique also confirms that your class is on your classpath.Browse
If environment errorSelect the step to redirect to if the JUnit test fails.
Click to load the class files. The class tree is displayed in the left panel.Load
Click to run the JUnit test. The standard JUnit results are displayed in the right panel.Execute
The JUnit Test Case/Suite step has a default name using this convention: Junit Test Case Suite .testclassname
If another step uses the default step name, DevTest appends a number to this step name to keep it unique. You can change step names at any time.
Read a File (Disk URL or Classpath)The Read a File (Disk, URL, or Classpath) step reads a file from your file system, a URL, or the classpath.
Files are used as a source of data for testing. This step can be paired with the Load a set of File Names data set to provide source data for testing.
You can read a text file or a binary file. The contents of the file can optionally be stored in a property.
Complete the following fields:
FileEnter the path name, a URL, or a classpath, or browse to the file using the button.Browse
File EncodingAccept the default encoding of UTF-8 or select an alternate encoding from the drop-down list. You can also select and click to have <ldtF> select an encoding type for you.Auto-detect Detect
Property KeyEnter the name of the property in which to store the file contents (optional).
Load as Byte []To load contents as a byte array, select this check box. This capability is useful when loading a file to be used as a binaryData type in a web service execution parameter.
Cache file in memoryTo avoid memory leaks, adjust the size and time duration to specify when the cache is flushed.The maximum file size has a default of 20 MB, but you can adjust the size with the FileNode.
property.cache.max.size.mbIf a cached entry is inactive for 30 minutes, that entry is removed from cache. The default is 30 minutes but you can adjust the to change the time.FileNode.cache.duration.mins

DevTest Solutions - 9.5
25-Jul-2016 356/448
If environment errorSelect the step to redirect to if the Read a File test fails.
Display as charactersThe contents are displayed as hexadecimal encoded bytes unless you select this check box. This check box is only visible if the box is selected.Load as Byte []
Click to load and display the file. The content is now ready for you to filter and add assertions.Load
Note: If a binary file is loaded but you do not select to load as byte, DevTest converts the data to characters (many of which are unreadable) and the step response is a string.
The Read a File step has a default name using this convention: .Read file [set the File Name variable]
If another step uses the default step name, DevTest appends a number to this step name to keep it unique. You can change step names at any time.
External - FTP StepThe FTP step lets you send or receive a file using the FTP protocol. After entering the FTP information, user name, and user password, you can either upload a file or download a file.
You can drag the FTP step editor window to the left to display the button.Execute Now
Complete the following fields:
HostEnter the host name of the FTP server (without the protocol).
PortEnter the port for FTP server access. A port is optional; the default port is 21.
UserEnter the user ID for FTP server access.
PasswordEnter the password for FTP server access.
DirectionIndicate if the data flow is an upload or a download.
ModeSpecify passive or active FTP, or enter a property that indicates passive or active.
Transfer TypeSelect the file transfer type; Binary or ASCII, or enter a property that indicates binary or ASCII.
DevTest Solutions - 9.5
25-Jul-2016 357/448
Host PathEnter the path to the source file (either on the FTP server or local computer).
Local PathEnter the path for the destination file (either on the FTP server or local computer).
Note: is the path of the file on the remote computer. is always the Host Path Local Pathpath to the file on the local computer that is running DevTest. When you upload a file, you are uploading the file from the to the . When you download a file, Local Path Host Pathyou are downloading the file from the to the .Host Path Local Path
If Environment Error
Specifies the action to take or the step to go to if the test fails because of an environment error.
Default: Abort the test.
Click to initiate the send/receive action.Execute Now
The response from a download is the file itself. The response from a successful upload is the string success.
Note: If a file by the same name exists, it is overwritten without a warning message.
The FTP step has a default name using this convention: ; for FTP action (put or get) hostnameexample, . You can change step names at any time.FTP get ftp.download.com
JMS Messaging StepsThe following steps and tutorial are available in the category:JMS Messaging
JMS Messaging (JNDI) (see page 357)JMS Messaging - Message Consumer (see page 365)JMS Send Receive Step (see page 369)Tutorial - Send and Receive a JMS Message (see page 373)
JMS Messaging (JNDI)
The JMS Messaging (JNDI) step is scheduled to be deprecated. Use the JMS Send Receive step instead.(see page 369)

DevTest Solutions - 9.5
25-Jul-2016 358/448
The JMS Messaging (JNDI) step lets you send messages to, and receive messages from, topics and queues. You can also receive, change, and forward an existing message. The list of possible queues and topics can be browsed using JNDI. Provide client libraries where DevTest can read them.
All the common message types including Empty, Text, Object, Bytes, Message, and Mapped (Extended) are supported.
The JMS Messaging (JNDI) step is configured using a single editor regardless of the messaging requirements. The input options vary on the messaging requirements. The editor only allows valid configurations, so when you enable some features, others could become inactive.
The JMS Messaging (JNDI) step has a default name using this convention: JMS publish-queuename . If there is not a publish queue name, the default step name is publish JMS subscribe-queuename
.subscribe
If another step uses the default step name, DevTest appends a number to this step name to keep it unique. You can change step names at any time. Using DevTest with this application Prerequisites:requires that you make one or more files available to DevTest. For more information, see Third-Party
.File Requirements (https://docops.ca.com/display/DTS95/Third-Party+File+Requirements)
Parameter Requirements: This step requires the connection parameters and the queue or topic names that are used in the application under test. Other parameters could be required, depending on your environment. Get these parameters from the application developers. In most cases, you can browse for server resources to get some of these required parameters.
The test case in the examples project shows the step that this section describes.jms.tst
The test case uses a publish/subscribe JMS step to send a message and listen on a temporary jms.tstqueue. A Message Driven Bean (MDB) on the server handles the message and drops the message onto the temporary queue. The message type is text. The message is an XML payload that is created by inserting properties dynamically into the XML elements. The properties are read from the
data set. After the response message is received, the XML from the JMS message is put order_datainto a property. The next step does an assertion validating the order ID. After this check asserts true, the existing message object is changed, and the message is sent to another JMS destination.
The test case shows how to listen for and intercept messages as they move through a jms.tstmultipoint messaging service backbone. You can run this test case against the demo server on your computer. The application backend is available there.
The editor for the JMS Messaging (JNDI) step contains the following tabs:
The tab is where you define the connection and messaging parameters.Base
The tab lets you specify a selector query to be run when listening for a message Selector Queryon a queue.
The tab is where you create the message content.Send Message Data
The tab is where the response messages are posted.Response Message
Base Tab (see page 359)Selector Query Tab (see page 363)
Send Message Data Tab (see page 364)
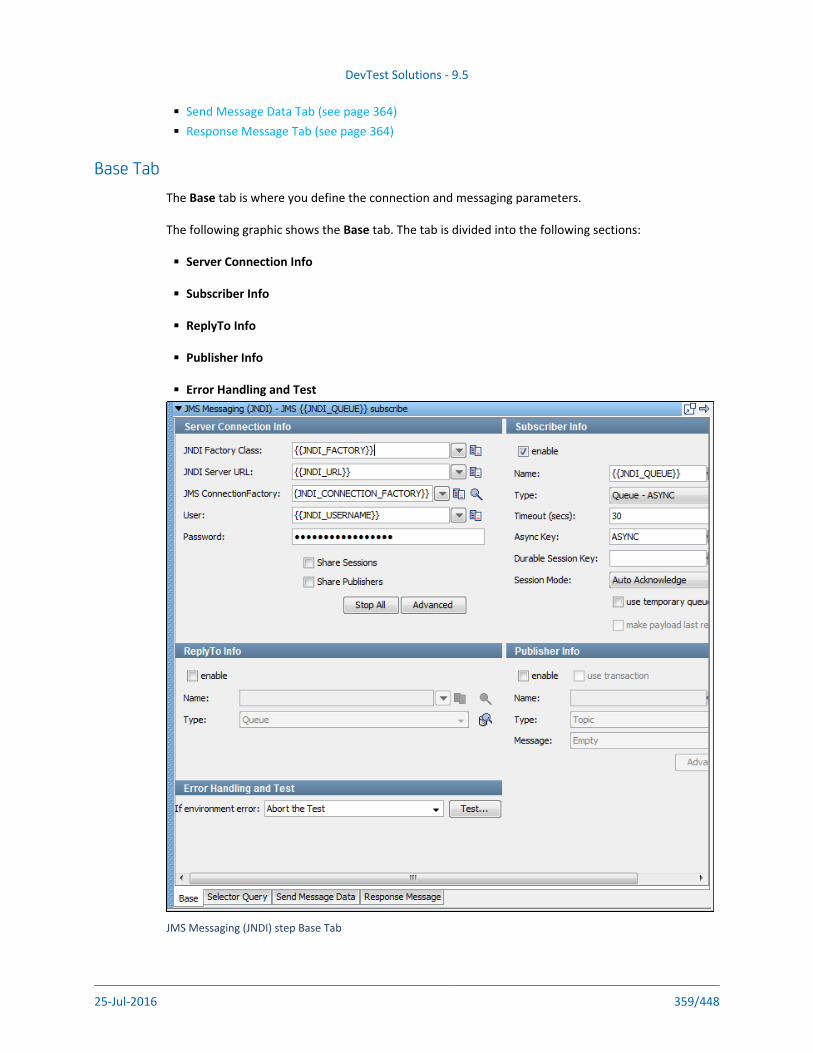
DevTest Solutions - 9.5
25-Jul-2016 359/448
Send Message Data Tab (see page 364)Response Message Tab (see page 364)
Base TabThe tab is where you define the connection and messaging parameters.Base
The following graphic shows the tab. The tab is divided into the following sections:Base
Server Connection Info
Subscriber Info
ReplyTo Info
Publisher Info
Error Handling and Test
JMS Messaging (JNDI) step Base Tab
To enable and disable the , , and Info, use the enable check box Subscriber Info Publisher Info ReplyTo

DevTest Solutions - 9.5
25-Jul-2016 360/448
To enable and disable the , , and Info, use the enable check box Subscriber Info Publisher Info ReplyToin the top left corner of each section. This option allows you to configure the step to be a publish step, a subscribe step, or both. You can also select to include a JMS reply to component in the step.
When you finish configuring the test step, click in the section to test the Test Error Handling and Testconfiguration settings.
Server Connection Info
Enter the JNDI information in the section of the tab.Server Connection Info Base
To simplify changing the application under test, parameterize these values with properties that are in your configuration. The previous graphic shows an example of this approach.
The following parameters are available to you for the system under test:
JNDI Factory ClassThe fully qualified class name of the context factory for the JNDI provider.
JNDI Server URLThe URL for connecting to the JNDI server. The format of the URL depends on the specific JNDI provider being used.
JMS Connection Factory
Use to browse available resources on the server. Select or enter a connection factory Searchto use for this step execution according to the JMS specification.
The pull-down menus contain common examples or templates for these values.
The user and password could be optional.
UserThe user name for connecting to the JNDI provider and getting a handle to the connection factory.
PasswordThe password for connecting to the JNDI provider and getting a handle to the connection factory.
and Share Sessions Share Publishers
To share JMS sessions and publishers throughout the test case, use these check boxes. This approach can lower overhead, but does not always provide a realistic simulation because typically JMS clients want to release resources. If you select the check box, the Share Publishers Share
check box is also selected. You cannot share publishers without sharing sessions. For Sessionsmore detailed information about these parameters, see the Deliberate Delays in VSE (
https://support.ca.com/irj/portal/kbtech?docid=603964&searchID=TEC603964&fromKBResultsScreen=T)knowledge base article.
Stop All
Lets you stop any listeners at design time now. Some listeners can get orphaned, but still consume messages. When they do, it is difficult to create test cases.
Advanced

DevTest Solutions - 9.5
25-Jul-2016 361/448
AdvancedDisplays a panel where you can add custom properties that are sent with the connection information and you can configure the second-level authentication.
Note: The user and password fields are for connecting to the JNDI Server Connection Infoprovider and getting a handle to the connection factory. The user and password fields in the tab are for getting a handle to the actual JMS connection.Second Level Authentication
Publisher Info
To set up the ability to send messages, select the check box.enable
To execute a commit when the message is sent, select the check box.use transaction
Enter the following parameters:
Name
The name of the topic or queue. Use to browse the JNDI server for the topic or queue Searchname.
Type
Select whether you are using a topic or queue. To see what messages are waiting to be consumed
from a queue (only), use to the right of this field.Browse
MessageSelect the type of message you are sending. The supported types are Empty, Text, Object, Bytes, Message, and Mapped (Extended).
AdvancedDisplays a panel where you can edit the message headers and can add message properties.
Subscriber Info
To set up the ability to receive messages, select the check box.enable
Enter the following parameters:
Name
The name of the topic or queue. Use to browse the JNDI server for the topic or queue Searchname.

DevTest Solutions - 9.5
25-Jul-2016 362/448
TypeSelect whether you are using a topic or queue, and whether to listen in synchronous or asynchronous mode. For asynchronous mode, you also must have an entry in the field. Async Key
To see what messages are waiting to be consumed from a queue, click to the right Browseof this field.
Timeout (secs)The period to wait before there is an interrupt waiting for a message. Use 0 for no timeout.
Async KeyThe value that is necessary for identifying asynchronous messages. This field is necessary only in asynchronous mode. The field is used in a subsequent Message Consumer step to retrieve asynchronous messages.
Durable Session KeyBy entering a name here, you are requesting a durable session. You are also providing a key for that session. A durable session lets you receive all of your messages from a topic even if you log out and then you log in again.
Session ModeThe options available are:
Auto Acknowledge: The JMS client libraries acknowledge the JMS Messages as soon as they are received.
Client Acknowledge: The JMS client must explicitly acknowledge the JMS Messages.
Use Transaction: The JMS Session operates under a transaction. The acknowledge mode is ignored.
Auto (Duplicates Okay): The JMS client library automatically acknowledges at unknown intervals. As a result, duplicate messages could be received if the automatic acknowledgment does not arrive before the JMS Provider retries the delivery.
Auto Acknowledge and and have no practical Client Acknowledge Auto (Duplicates Only)differences. With , each received message is acknowledged immediately upon Client Acknowledgereceipt. The only difference is that the acknowledge call is made explicitly instead of letting the JMS client library do it. With , the behavior is the same as Auto (Duplicates Only) Auto Acknowledgeexcept under high loads.
The option is not strictly an acknowledgment mode setting. The option is included in Use Transactionthe list for two reasons:
If the JMS Session is operating under a transaction, then the acknowledgment modes are ignored. Messages are acknowledged by committing the session transaction.
The mode is still a way of controlling guaranteed delivery of messages from JMS. Use TransactionIf a message is received and the session transaction is not committed, the message is resent, as if it was not acknowledged.

DevTest Solutions - 9.5
25-Jul-2016 363/448
Use temporary queue/topicIf you want the JMS provider to set up a temporary queue/topic on your behalf, select this check box. When a temporary queue/topic is used, DevTest automatically sets the JMS
parameter of the message you send to the temporary queue/topic. The temporary ReplyTo queue/topic feature must always be used with a publisher so that a reply can be sent. If you use a temporary queue/topic, the section is disabled.ReplyTo
Make payload last responseTo make the payload response the last response, select this check box.
ReplyTo Info
To set up a destination queue/topic, select the check box.enable
If your application requires a destination, it is set up in this section.
Enter the following parameters:
Name
The name of the topic or queue. Use to browse the JNDI server for the topic or queue Searchname.
Type
Select whether you are using a topic or queue. To see what messages are waiting to be consumed
from a queue (only), use to the right of this field.Browse
Error Handling and Test
If an error occurs, the section lets you redirect to a step.Error Handling and Test
If Environment Error
Specifies the action to take or the step to go to if the test fails because of an environment error.
Default: Abort the test.
Click to test your step configuration settings.Test
Selector Query TabYou can enter a JMS selector query in the tab. The syntax closely follows SQL. The Selector Queryquery is a subset of SQL92.
A JMS selector query can be specified when listening for a message on a queue that is a response to a published message.
The following graphic shows a query looking for a that matches the JMSCorrelationID lisa.jms. property as sent with the original message.correlation.id

DevTest Solutions - 9.5
25-Jul-2016 364/448
JMS Messaging (JNDI) step Selector Query Tab
Send Message Data TabIf your step is configured to publish, you compose the message in the tab.Send Message Data
You can type the text, or you can click to read from a file. You can also store Read Message from Filetext in a property, in which case you would place the property in the editor, for example,
.{{property_name}}
The following graphic shows an XML fragment with properties. Using the properties allows the message to be created dynamically during the test run.
JMS Messaging (JNDI) step Send Message Data Tab
Response Message TabIf your step is configured to subscribe, the response appears in the Response Message tab after you click in the Base tab.Test
The tab shows the Complex Object Editor (https://docops.ca.com/pages/viewpage.action? for the returned object. The returned object varies with the type of application pageId=312699485)
server. You have access to all the JMS parameters returned in addition to the message itself. The object is loaded into the Complex Object Editor, where it can be manipulated like any other Java object.
The following graphic shows a text response from a JBoss object.

DevTest Solutions - 9.5
25-Jul-2016 365/448
JMS Messaging (JNDI) step Response Message Tab
JMS Messaging - Message Consumer
The JMS Messaging - Message Consumer step is scheduled to be deprecated. Use the JMS step instead.Send Receive (see page 369)
The Message Consumer step lets you consume asynchronous messages in a test case. This step can attach to a known queue or topic and can get messages posted for this subscriber. You identify yourself with a unique key. You must have already subscribed to the queue or topic and the messages were pushed to that destination.
Prerequisite: You must have the demo server running before you execute the example test case.
Parameter Requirements: Knowledge of the queue or topic being used in the application under test.
The Message Consumer step has a default name using this convention: Listen on subscribe-

DevTest Solutions - 9.5
25-Jul-2016 366/448
The Message Consumer step has a default name using this convention: Listen on subscribe-. Before the queuename is entered, the default step name is Async JMS.queuename
If another step uses the default step name, DevTest appends a number to this step name to keep it unique. You can change step names at any time.
Review the test case in the examples project to see what is being described async-consumer-jms.tst in this section. The following graphic shows the test case.async-consumer-jms.tst
async-consumer-jms.tst test case
The step subscribes to asynchronous message (topic/testTopic) using the Async Key create-consumer(EXAMPLE-ASYNC-WRAPPER). The step publishes message to a queue (queue/C). The send-messagenumber of messages to be published is controlled using a data set (counterA). The message consumer step has an Async queue (EXAMPLE-ASYNC-WRAPPER) using which message subscribed by the create-consumer step is consumed. The number of messages to be consumed is controlled using the data set (DataSetB).
Note: The specified in create-consumer and consumer steps must match.Async Key
The following graphic shows an example of the subscriber section of a step.
JMS Messaging - Message Consumer step Subscriber Info
To set up and enable the ability to listen to (subscribe to) messages, select the check box.enable

DevTest Solutions - 9.5
25-Jul-2016 367/448
Notice that an asynchronous topic is specified in the field, and an parameter is Type Async Keydefined. This key is necessary as an input in the current step.
The following graphic shows an example of the publisher section of a step.
JMS Messaging - Message Consumer step Publisher Info
To set up the ability to send (publish) messages, select the check box. To execute a commit enable when the message is sent, select the check box.use transaction
Enter the following parameters:
Name
The name of the topic or queue. Use to browse the JNDI server for the topic or Searchqueue name.
Type
Select whether you are using a topic or queue. To see what messages are waiting to be consumed
from a queue (only), use to the right of this field.Browse
MessageSelect the type of message you are sending. The supported types are Empty, Text, Object, Bytes, Message, and Mapped (Extended).
AdvancedDisplays a panel where you can edit the message headers and can add message properties.

DevTest Solutions - 9.5
25-Jul-2016 368/448
JMS Messaging - Message Consumer step
Enter the following parameters:
Async QueueEnter or select the parameter that was named in a preceding subscriber step Async Key(EXAMPLE-ASYNC-WRAPPER). These names must match.
Wait Timeout (Seconds)Enter the interval, in seconds, to wait for the next message.
If Environment Error
Specifies the action to take or the step to go to if the test fails because of an environment error.
Default: Abort the test.
Wrapper StatusThe wrapper status contains two output status values:
Current Wrapper Depth: Number of messages that are left to be read in the current wrapper.
Total Wrappers: Number of wrappers (destinations).
Make payload last response
To make the payload as the last response in the step, select the option.
If some messages are waiting, they can be read by clicking . The Complex Object Editor Next Messagedisplays the message.
You are now ready to manipulate this object.
A wrapper is a FIFO list for holding responses from asynchronous topics and queues. A wrapper provides a place for the application to put responses for consumption later. Messages wait in this list for subsequent processing (in this Message Consumer step).

DevTest Solutions - 9.5
25-Jul-2016 369/448
JMS Send Receive StepThe step lets you connect to any JMS-compatible message server and do the JMS Send Receivefollowing actions:
Send a request message
Receive a response message
The step editor has basic and advanced parameters. To display the advanced parameters, click PROat the top of the editor.
The following graphic shows the step editor. The advanced parameters are not shown.
Screen capture of send receive step.
Each parameter has a tooltip that describes the purpose of the parameter.
Some parameters include the value as an option. This value indicates that the actual Automaticsetting is taken from another parameter. If you click the drop-down arrow and you place the mouse pointer over the value , a tooltip displays the name of the other parameter.Automatic
In the following graphic, the tooltip indicates that the value of the parameter is Destinationautomatically populated from the parameter.Send Destination

DevTest Solutions - 9.5
25-Jul-2016 370/448
Screen capture of Automatic tooltip.
Some parameters let you change the editor so that you can enter a property as the value.
Some parameters that provide a discrete set of values let you change the editor so that you can enter the value directly. For example, the parameter has the following values: JMS Delivery Mode
and . In the JMS API, these values map to the numbers 2 and 1, Persistent Non-persistentrespectively. To enter the value directly, switch to the direct editor. The direct editor also lets you specify a value that is not in the official enumeration of values.
Send and Receive (see page 370)JMS Message (see page 370)Test the JMS Send Receive Step (see page 371)Monitor and Close Cached Asset Instances (see page 372)
Send and ReceiveThe step has separate areas for configuring the JMS send operation and the JMS JMS Send Receivereceive operation.
Specify two in the step editor: one for the send operation, and one for destinations (see page 68)the receive operation. The destinations can be the same or different. The lists are populated with the JMS destination assets from the active configuration.
To send a message without receiving a response, disable the JMS receive operation. To wait for a message without having to send one first, disable the JMS send operation.
If you disable both operations, the step does nothing.
By default, the receive operation uses a synchronous . The advanced consumer (see page 68)parameters include a check box for specifying an asynchronous consumer.
To make sure that the response goes to the correct client, enable the correlation scheme (see page .109)
Each asset has a . The runtime scope (https://docops.ca.com/display/DTS95/Runtime+Scope) JMS Send step lets you specify a minimum runtime scope for the send and receive operations. The Receive
scope parameters are advanced parameters.
JMS MessageThe step lets you configure the message that is sent or received.JMS Send Receive
The following message types are supported:

DevTest Solutions - 9.5
25-Jul-2016 371/448
Text
Bytes
Stream
Map
Empty
You configure the payload of the message in the area.Content
The available editors in the area depend on the message type.Content
Text messages have the following editors:
Plain text
JSON
EDI
XML
Bytes messages have the following editors:
Binary
Graphic image
Stream messages have an editor that lets you add objects.
Map messages have an editor that lets you add key/value pairs.
Empty messages do not have an editor.
If you change the message type, the step checks whether the existing payload can be converted. If the conversion is not possible, the step discards the existing payload.
In JMS, a message includes a set of headers and an optional set of custom properties. You can configure these headers and properties in the step editor.
Test the JMS Send Receive StepYou can verify the functionality of the step in the editor.JMS Send Receive
The execution log provides a high-level view of the activity that happens behind the scenes. For example, the following lines in the execution log show the creation of various JMS client assets (see
:page 68)
Creating JMS ConnectionStarting JMS ConnectionCreating JMS SessionPerforming JNDI lookup with name: queue/B
Creating JMS Consumer on Queue B

DevTest Solutions - 9.5
25-Jul-2016 372/448
1.
2.
3.
4.
5.
1.
2.
3.
4.
Creating JMS Consumer on Queue BPerforming JNDI lookup with name: queue/ACreating JMS Producer
Follow these steps:
Click the green button in the step editor.Execute
To cancel the step while it is executing, click .CancelThe tab shows the response that was received when the operation finishes.Response
To view the step activity, click .Execution Log
To monitor the asset instances, click .Runtime Monitor
To view the request that was sent, click the tab.Request
Monitor and Close Cached Asset InstancesWhen you test the step, a runtime monitor in the tab lets you monitor JMS Send Receive Responseasset instances. You can also manually close the assets.
The following graphic shows an example of the runtime monitor.
Screen capture of runtime monitor.
By default, the runtime monitor automatically removes assets that are closed. In the following procedure, you disable this behavior.
Follow these steps:
In the tab, click .Response Runtime Monitor
Clear the check box that appears inside the button.Clear
Execute the step again.The runtime monitor displays the assets that were created during the execution of the step.
View the following information:
Name: The name of the asset.
Type: The type of asset.

DevTest Solutions - 9.5
25-Jul-2016 373/448
4.
5.
6.
7.
1.
2.
3.
4.
5.
6.
7.
8.
Scope: The name of the test step, test case instance, test case, or DevTest component that corresponds to the runtime scope of the asset. The value has a tooltip that shows the scope.
Status: The color green indicates that the asset is active. The color yellow indicates that the asset is idle. The color gray indicates that the asset is closed.
To display more information about an asset, click the status icon.
To close an asset immediately, click the status icon and select or .Close Force Close
To close a set of assets, click .Force Close
Tutorial - Send and Receive a JMS MessageThis tutorial provides an introduction to using the test step.JMS Send Receive
Prerequisites
The registry is running.
The demo server is running.
Step 1 - Create JMS and JNDI AssetsIn this procedure, you create JMS and JNDI assets from test steps in an example test case.
Follow these steps:
Go to DevTest Workstation and open the examples project.
In the folder, open the test case.Tests jms.tst
Select the first step. This step has the name .JMS Messaging (JNDI) jms-1
Click in the model toolbar.Generate assets from the selected steps
Select the second step. This step has the name .JMS Messaging (JNDI) send-msg-post-update
Click in the model toolbar.Generate assets from the selected steps
In the folder, open the project configuration.Configs
Confirm that the JMS and JNDI assets were generated. In the next procedure, you select two of the JMS destination assets.
Step 2 - Configure the JMS Send Receive StepIn this procedure, you perform the following actions:
Add the step to a new test case.JMS Send Receive

DevTest Solutions - 9.5
25-Jul-2016 374/448
1.
2.
3.
4.
5.
6.
1.
2.
Add the step to a new test case.JMS Send Receive
Configure the step to send a JMS text message to a queue and receive the response from a different queue.
The following graphic shows a portion of the step editor. The fields that you change are highlighted.
Screenshot of step editor with fields highlighted.
The field specifies the queue to which the message is sent.Send Destination
The field specifies the queue from which the response is received.Receive Destination
The area specifies the text of the message.Content
Follow these steps:
Create a test case in the examples project.
Add a step.JMS Send ReceiveThe step editor appears.
In the list, select .Send Destination queue/A
In the list, select .Receive Destination queue/B
In the area, type a sentence.Content
Save the test case.
Step 3 - Examine JMS and JNDI AssetsIn this procedure, you examine one of the JMS destination assets that the step JMS Send Receiveuses. You also examine the JNDI context asset that the JMS destination asset uses.
Follow these steps:
Click the icon that appears to the right of the list.Edit Selected Asset Send DestinationThe editor for the JMS destination asset appears.
Review the parameters, but do not change them. You can place the mouse pointer over the parameter names to display tooltips.

DevTest Solutions - 9.5
25-Jul-2016 375/448
3.
4.
5.
6.
1.
2.
3.
Click the icon that appears to the right of the list.Edit Selected Asset JNDI ContextThe editor for the JNDI context asset appears.
Review the parameters, but do not change them.
Click to return to the editor for the JMS destination asset.Cancel
Click to return to the step editor.Cancel
Step 4 - Test the JMS Send Receive StepIn this procedure, you verify that the step is configured correctly.JMS Send Receive
Follow these steps:
Click the green button in the step editor.Execute
Confirm that the tab and the tab contain the same sentence.Request Response
Close the step editor.
BEA StepsThe following steps are available in the category:BEA
Message Consumer (see page 375)Read a File (see page 375)Web Service Execution (XML) (see page 375)FTP Step (see page 376)WebLogic JMS (JNDI) (see page 376)
Message ConsumerFor detailed information about this step, see .JMS Messaging - Message Consumer (see page 365)
Read a FileFor detailed information about this step, see .Read a File (Disk, URL or Class Path) (see page 355)
Web Service Execution (XML)For detailed information about this step, see .Web Service Execution (XML) Step (see page 276)

DevTest Solutions - 9.5
25-Jul-2016 376/448
FTP StepFor detailed information about this step, see .External - FTP Step (see page 356)
WebLogic JMS (JNDI)Base Tab (see page 377)Selector Query Tab (see page 380)Send Message Data Tab (see page 381)Response Message Tab (see page 381)
The WebLogic JMS (JNDI) step lets you send messages to, and receive messages from, topics and queues. You can also receive, change, and forward an existing message.
WebLogic JMS (JNDI) supports all the common message types including Empty, Text, Object, Bytes, Message, and Mapped (Extended).
The WebLogic JMS (JNDI) step is configured using a single editor, regardless of the messaging requirements. The input options vary on the messaging requirements. The editor only allows valid configurations. When you enable some features, others can become inactive. Using Prerequisites:DevTest with this application requires that you make one or more files available to DevTest. For more information, see Third-Party File Requirements (https://docops.ca.com/display/DTS95/Third-
.Party+File+Requirements)
Parameter Requirements: This step requires the connection parameters and the subject names that are used in the application under test. The following sections describe the necessary parameters. There can be other parameters that are required, depending on your environment. Get these parameters from the developers of the application.

DevTest Solutions - 9.5
25-Jul-2016 377/448
The editor for the WebLogic JMS (JNDI) step contains the following tabs:
The tab is where you define the connection and messaging parameters.Base
The tab lets you specify a selector query to be run when listening for a message on a Selector Queryqueue.
The tab is where you create the message content.Send Message Data
The tab is where the response messages are posted.Response Message
Base TabThe tab is divided into the following sections:Base
Server Connection Info
Subscriber Info
Publisher Info
ReplyTo Info
Error Handling and Test
To enable and disable the , , and sections, use the Subscriber Info Publisher Info ReplyTo Info enable

DevTest Solutions - 9.5
25-Jul-2016 378/448
To enable and disable the , , and sections, use the Subscriber Info Publisher Info ReplyTo Info enable check box in each section. Using these check boxes, you can configure the step to be a publish step, a subscribe step, or both. You can also include a JMS reply to component in the step.
When you finish configuring the test step, click in the section to test the Test Error Handling and Testconfiguration settings.
Server Connection Info
Enter the JNDI information.
These values are parameterized with properties from your configuration. These propertiessimplify changing the application under test. By default, the WLS_SERVER property in the is JNDI Server URLused. This property must be added to your configuration if you plan to use it.
The five parameters are available to you for the system under test. The pull-down menus contain common examples or templates for these values.
JNDI Factory ClassThe fully qualified class name of the context factory for the JNDI provider.
JNDI Server URLThe URL for connecting to the JNDI server. The format of the URL depends on the specific JNDI provider being used.
JMS Connection Factory
Use to browse available resources on the server. Select or enter a connection factory Searchto use for this step execution according to the JMS specification.
UserThe user name for connecting to the JNDI provider and getting a handle to the connection factory.
PasswordThe password for connecting to the JNDI provider and getting a handle to the connection factory.
and Share Sessions Share Publishers
To share JMS sessions and publishers throughout the test case, use these check boxes. This approach can lower overhead, but does not always provide a realistic simulation because typically JMS clients want to release resources. If you select the check box, the Share Publishers Share
check box is also selected. You cannot share publishers without sharing sessions. For Sessionsmore detailed information about these parameters, see the Deliberate Delays in VSE (
https://support.ca.com/irj/portal/kbtech?docid=603964&searchID=TEC603964&fromKBResultsScreen=T)knowledge base article.
Stop AllLets you stop any listeners at design time now. Some listeners can get orphaned, but still consume messages. When they do, it is difficult to create test cases.
AdvancedDisplays a panel where you can add custom properties that are sent with the connection information and you can configure the second-level authentication.

DevTest Solutions - 9.5
25-Jul-2016 379/448
Publisher Info
To set up the ability to send (publish) messages, select the check box. To execute a commit enable when the message is sent, select the check box.use transaction
Enter the following parameters:
Name
The name of the topic or queue. Use to browse the JNDI server for the topic or queue Searchname.
TypeSelect whether you are using a topic or queue. To see what messages are waiting to be consumed
from a queue (only), use to the right of this field.Browse
MessageSelect the type of message you are sending. The supported types are Empty, Text, Object, Bytes, Message, and Mapped (Extended).
AdvancedDisplays a panel where you can edit the message headers and can add message properties.
Subscriber Info
Select the check box to set up to enable the ability to receive (subscribe to) messages.enable
Enter the following parameters:
Name
The name of the topic or queue. Use to browse the JNDI server for the topic or queue Searchname.
TypeSelect whether you are using a topic or queue, and whether to listen in synchronous or asynchronous mode. For the asynchronous mode, you must also have an entry in the Async Key
field. Use to the right of this field to see what messages are waiting to be Browseconsumed from a queue (only).
Timeout (secs)The period to wait before the application interrupts waiting for a message (this field can be left blank for no timeout).
Async KeyThe value that identifies asynchronous messages. This value is only necessary in asynchronous mode. This value is used in a subsequent Message Consumer step to retrieve asynchronous messages.

DevTest Solutions - 9.5
25-Jul-2016 380/448
Durable Session KeyBy entering a name here you are requesting a durable session. You are also providing a key for that session. A durable session lets you receive all of your messages from a topic, even if you log out and then you log back in.
use transactionTo execute a Commit when a message is received, select the check box.use transaction
use temporary queue/topicTo have the JMS.provider set up a temporary queue/topic on your behalf, select the use
check box. When a temporary queue/topic is used, the JMS temporary queue/topic ReplyToparameter of the message you send to the temporary queue/topic is automatically set. The temporary queue/topic feature must always be used with a publisher so that a reply can be sent. If you use a temporary queue/topic, the section is disabled.ReplyTo
make payload last responseTo make the payload the response of this step, select the check box.make payload last response
ReplyTo Info
To set up a destination queue or topic, select the check box.enable
If your application requires a destination, it is set up in this section.
Enter the following parameters:
Name
The name of the topic or queue. Use to browse the JNDI server for the topic or queue Searchname.
TypeSelect whether you are using a topic or queue. To see what messages are waiting to be consumed
from a queue (only), use to the right of this field.Browse
Error Handling and Test
If an exception occurs, the section lets you redirect to a step.Error Handling and Test
If Environment ErrorSpecifies the action to take or the step to go to if the test fails because of an environment error.
Abort the test.Default:
Click to test your step configuration settings.Test
Selector Query TabYou can enter a JMS selector query in this editor. The syntax closely follows SQL and is a subset of SQL92. A JMS selector query can be specified when listening for a message on a queue that is a response to a published message. The previous graphic shows a specific query for a JMSCorrelationID that matches one set in a property as sent with the original message.

DevTest Solutions - 9.5
25-Jul-2016 381/448
A built-in mechanism allows a test creator to set the for a message before sending JMSCorrelationID it. Before the message is sent, you can set the correlation ID by setting the lisa.jms.correlation.id (
property.http://lisa.jms.correlation.id)
A non-zero value is detected, and the message property is set before the message JMSCorrelationID is sent.
Send Message Data TabIf your step is configured to publish, this tab lets you compose your message. The Send Message Datatab view in the following example shows a text message.
This example shows an XML fragment with properties being used. You can type the text, click Read to read from a file, or you can store the fragment in a property. If you store the Message from File
text in a property, simply place the property in the editor: for example, .LISA_PROP
Notice that properties are used in the message XML allowing the message to be created dynamically during the test run.
Response Message TabIf your step is configured to subscribe, your response is shown here. For more information, see JMS
.Messaging (JNDI) (see page 357)
Sun JCAPS StepsThe following steps are available in the category:Sun JCAPS
JCAPS Messaging (Native) (see page 382)JCAPS Messaging (JNDI) (see page 384)
More Information:
Web Service Execution (XML) Step (see page 276)
SQL Database Execution (JDBC) (see page 332)

DevTest Solutions - 9.5
25-Jul-2016 382/448
Read a File (Disk URL or Classpath) (see page 355)
External - FTP Step (see page 356)
Message Consumer (see page 375)
JCAPS Messaging (Native)The JCAPS Messaging (Native) step lets you send and receive messages from topics and queues. You can also receive, change, and forward an existing message.
JCAPS Messaging (Native) supports all the common message types including Empty, Text, Object, Bytes, Message, and Mapped (Extended).
The JCAPS Messaging (Native) step is configured using a single editor regardless of the messaging requirements. The input options vary on the messaging requirements. The editor only allows valid configurations, so when you enable some features others can become inactive.
The default JCAPS Messaging (Native) step has a name uses the following convention: JCAPS . If there is not a publish queue name, the default step name is queuename publish JCAPS queuename
. If another step uses the default step name, DevTest appends a number to this step name subscribeto keep it unique. You can change step names at any time. Using DevTest with this Prerequisites:application requires that you make one or more files available to DevTest. For more information, see
.Third-Party File Requirements (https://docops.ca.com/display/DTS95/Third-Party+File+Requirements)
Parameter Requirements: This step requires the connection parameters and the subject names that are used in the application under test. The following sections describe the parameters that you require. There can be other required parameters, depending on your environment. Get these parameters from the developers of the application.
The messaging step editor for JCAPS Messaging (Native) is used to configure this step.
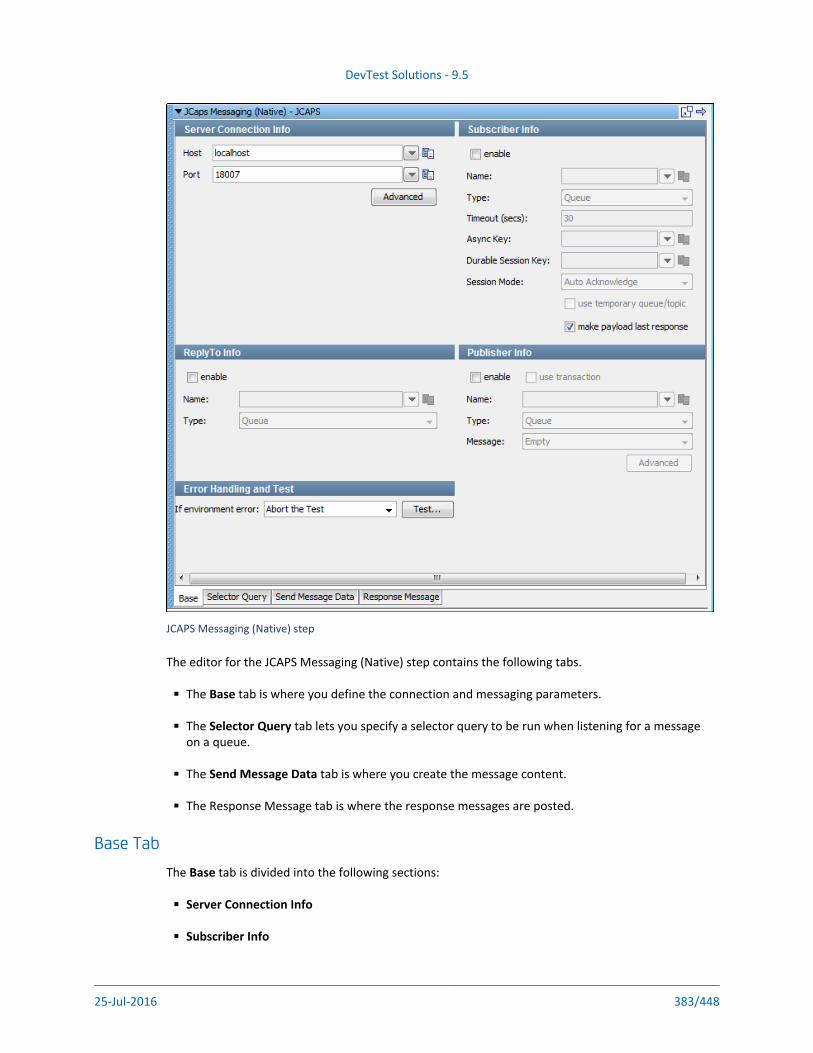
DevTest Solutions - 9.5
25-Jul-2016 383/448
JCAPS Messaging (Native) step
The editor for the JCAPS Messaging (Native) step contains the following tabs.
The tab is where you define the connection and messaging parameters.Base
The tab lets you specify a selector query to be run when listening for a message Selector Queryon a queue.
The tab is where you create the message content.Send Message Data
The Response Message tab is where the response messages are posted.
Base TabThe tab is divided into the following sections:Base
Server Connection Info
Subscriber Info
ReplyTo Info

DevTest Solutions - 9.5
25-Jul-2016 384/448
ReplyTo Info
Publisher Info
Error Handling and Test
To enable and disable the , , and sections, use the Subscriber Info Publisher Info ReplyTo Info enable check box in the top left corner of each section. Using these check boxes, you can configure the step to be a publish step, a subscribe step, or both. You can also select to include a JMS reply to component in the step.
When you finish configuring the test step, click in the section to test the Test Error Handling and Testconfiguration settings.
Server Connection Info
The section displays two parameters available to you for the system under Server Connection Infotest.
HostThe name of the JMS server.
PortThe port number the JMS server is running on.
The button displays a panel where you can add custom properties that are sent with the Advancedconnection information.
All other tabs are defined in detail in .JMS Messaging (JNDI) (see page 357)
JCAPS Messaging (JNDI)The JCAPS Messaging (JNDI) step lets you send and receive messages from topics and queues. You can also receive, change, and forward an existing message.
JCAPS Messaging (JNDI) supports all the common message types including Empty, Text, Object, Bytes, Message, and Mapped (Extended).
The JCAPS Messaging (JNDI) step is configured using a single DevTest editor regardless of the messaging requirements. The input options vary on the messaging requirements. The editor only allows valid configurations, so when you enable some features others can become inactive.
Using DevTest with this application requires that you make one or more files available Prerequisites:to DevTest. For more information, see Third-Party File Requirements (https://docops.ca.com/display
./DTS95/Third-Party+File+Requirements)
Parameter Requirements: This step requires the connection parameters and the subject names that are used in the application under test. Other parameters may be required, depending on your environment. Get these parameters from the developers of the application.
Detailed information about parameters and fields for JCAPS Messaging can be found in JMS .Messaging (JNDI) (see page 357)
Default Step Names: The default JCAPS Messaging (JNDI) step name uses the following convention:

DevTest Solutions - 9.5
25-Jul-2016 385/448
Default Step Names: The default JCAPS Messaging (JNDI) step name uses the following convention: . If there is not a publish queue name, the default step name is JCAPS queuename publish JCAPS
.queuename subscribe
If another step uses the default step name, DevTest appends a number to this step name to keep it unique. You can change step names at any time.
Oracle StepsThe following step is available in the category:Oracle
Oracle OC4J (JNDI) (see page 385)
More Information:
Web Service Execution (XML) Step (see page 276)
SQL Database Execution (JDBC) (see page 332)
Read a File (Disk URL or Classpath) (see page 355)
External - FTP Step (see page 356)
Message Consumer (see page 375)
Oracle OC4J (JNDI)The Oracle OC4J (JNDI) step lets you send messages to, and receive messages from, topics and queues. You can also receive, modify, and forward an existing message. Oracle OC4J (JNDI) supports all the common message types including Empty, Text, Object, Bytes, Message, and Mapped (Extended).
The Oracle OC4J (JNDI) step is configured using a single editor regardless of the messaging requirements. The input options on the messaging requirements vary. The editor only allows valid configurations, so when you enable some features others could become inactive.
Prerequisites: Using DevTest with this application requires that you make one or more files available to DevTest. For more information, see Third-Party File Requirements (https://docops.ca.com/display
./DTS95/Third-Party+File+Requirements)
Parameter Requirements: You need the connection parameters and the subject names that are used in the application under test. There may be other parameters that are required, depending on your environment. Get these parameters from the developers of the application.
DevTest, by default uses the OC4J_SERVER property in the JNDI Server URL. This property must be added to your configuration if you plan to use it.

DevTest Solutions - 9.5
25-Jul-2016 386/448
Detailed information about the parameters and fields for this step can be found in JMS Messaging .(JNDI) (see page 357)
TIBCO StepsThe following steps are available in the category:TIBCO
TIBCO Rendezvous Messaging (see page 386)TIBCO EMS Messaging (see page 391)TIBCO Direct JMS (see page 391)
More Information:
Web Service Execution (XML) Step (see page 276)
SQL Database Execution (JDBC) (see page 332)
Read a File (Disk URL or Classpath) (see page 355)
External - FTP Step (see page 356)
Message Consumer (see page 375)
TIBCO Rendezvous MessagingThe TIBCO Rendezvous Messaging step lets you send and receive messages from Rendezvous "Subjects" using Native Rendezvous protocol. You can also receive, change, and forward an existing message.
The TIBCO Rendezvous Messaging step is configured using a single editor regardless of the messaging requirements. The input options vary on the messaging requirements. The editor only allows valid configurations, so when you enable some features others could become inactive.
The default TIBCO Rendezvous Messaging step uses the following convention: RV queuename publish. If there is not a publish queue name, the default step name is . If another RV queuename subscribestep also uses the default step name, a number is appended to the step name. You can change step names at any time. Using DevTest with this application requires that you make one or Prerequisites:more files available to DevTest. For more information, see Third-Party File Requirements (
.https://docops.ca.com/display/DTS95/Third-Party+File+Requirements)
Parameter Requirements: This step requires the connection parameters and the subject names that are used in the application under test. The following sections describe the parameters that you require. There could be other required parameters, depending on your environment. Get these parameters from the developers of the application.

DevTest Solutions - 9.5
25-Jul-2016 387/448
TIBCO Rendezvous Messaging step
The editor for the TIBCO Rendezvous Messaging step contains the following tabs:
The tab is where you define the connection and messaging parameters.Base
The tab is where you create the message content.Send Message Data
The tab is where the response messages are posted.Response Message
Base TabThe tab is divided into the following sections:Base
Server Connection Info
Subscriber Info
Certified Transport Info
Publisher Info

DevTest Solutions - 9.5
25-Jul-2016 388/448
ReplyTo Info
Error Handling and Test
To enable and disable the Subscriber Info, Publisher Info, and ReplyTo Info sections, use the enable check box in the top left corner of each section. To configure the step to be a publish step, a subscribe step, or both, use these check boxes. You can also select to include a JMS reply to component in the step.
When you finish configuring the test step, click in the section to test the Test Error Handling and Testconfiguration settings.
Server Connection Info
Enter the connection information specific to Rendezvous information in the Server Connection Infoarea.
The following parameters are available for the system under test:
Service, Network, and DaemonThese parameters enable connection to the RV network that you want to communicate on.
Client ModeSelect either the Rendezvous Native client or Java Client mode. Usually you use the more versatile client mode.
To simplify changing the system under test, parameterize these values with properties from your configuration.
Publisher Info
To set up the ability to send messages, select the check box.enable
Complete the following fields:
SubjectThe name of the subject to use. You can define your own subjects. A valid subject name is: queue.
. An invalid subject name is: (null element) or (three sample queue…..My_Samples .My.Queue..null elements).
MessageSelect the type of message you are sending. The supported types are Empty, Text, Object, Bytes, Message, and Mapped (Extended).
Send FieldRV messages are actually maps of fields and values. This field is used to enable quick single field messages. When you enter a value here, the Send Message data is put into the value of a field with this name. This value is overridden with Mapped (Extended) type messages as they let you do multiple fields and values in a single message.
Enable Inbox TypeTo enable the and fields, select this check box.Inbox Timeout Enable sendReply
Enable sendReply

DevTest Solutions - 9.5
25-Jul-2016 389/448
Enable sendReplyTo specify an or to enable sendReply functionality for the publisher, select the Inbox Timeout
.Enable Inbox Type
Certified Transport Info
To provide transport information, select the check box.enable
Sender NameThe name that is the correspondent name of the CM transport.
Advisory SubjectRendezvous software constructs the subject names of system advisory messages using this template: . Rendezvous certified message delivery software constructs _RV.class.SYSTEM.namethe subject names of advisory messages using these templates: _RV.class.RVCM.category.
and . Distributed queue software condition.subject _RV.class.RVCM.category.condition.nameconstructs the subject names of advisory messages using this template: _RV.class.RVCM.category.
. Rendezvous fault tolerance software constructs the subject names of role.condition.nameadvisory messages using this template: ._RV.class.RVFT.name.group
Time LimitThe time limit in which a message exists.
Subscriber Info
Selecting the box turns on the subscriber function and lets you set up the ability to receive enable messages.
Complete the following fields:
SubjectThe name of the subject to use. You can define your own subjects.
Timeout (secs)Indicates the number of seconds before DevTest interrupts waiting for a message. For no timeout, leave this field blank.
Async KeyEnter the value that is necessary to identify asynchronous messages. This value is only required in asynchronous mode. This value is used in a subsequent Message Consumer step to retrieve asynchronous messages.
ReplyTo Info
To set up a destination subject, select the check box.enable
If your application requires a destination, it is set up in this section.
Enter the following parameter:
SubjectThe name of the subject to use.

DevTest Solutions - 9.5
25-Jul-2016 390/448
Error Handling and Test
If an error occurs, the Error Handling and Test section lets you redirect to a step.
If Environment Error
Specifies the action to take or the step to go to if the test fails because of an environment error.
Default: Abort the test.
Click to test your step configuration settings.Test
Send Message DataIf your step is configured to publish, compose the message on this tab. The tab Send Message Dataview in the following example shows a text message.
TIBCO Rendezvous Messaging step Send Message Data tab
This example shows an XML fragment with properties being used. You can type the text, or you can click to read from a file. The text can also be stored in a property, in which Read Message From Filecase you would place the property in the editor: for example, LISA_PROP.
Notice that properties are used in the message XML allowing the message to be created dynamically during the test run.
Response Message TabIf your step is configured to subscribe, the response is shown. For more information, see JMS
.Messaging (JNDI) (see page 357)

DevTest Solutions - 9.5
25-Jul-2016 391/448
TIBCO EMS MessagingThe TIBCO EMS Messaging step lets you send and receive messages from topics and queues. You can also receive, change, and forward an existing message.
All the common message types including Empty, Text, Object, Bytes, Message, and Mapped (Extended) are supported.
The default TIBCO EMS Messaging step names uses the following convention: EMS queuename . If there is not a publish queue name, the default step name is .publish EMS queuename subscribe
If another step uses the default step name, DevTest appends a number to this step name to keep it unique. You can change step names at any time. Using DevTest with this application Prerequisites:requires that you make one or more files available to DevTest. For more information, see Third-Party
.File Requirements (https://docops.ca.com/display/DTS95/Third-Party+File+Requirements)
Parameter Requirements: This step requires the connection parameters and the subject names that are used in the application under test. The default is the TIBCO_SERVER property in the JNDI Server URL. This property must be added to your configuration if you plan to use it. Your environment may require other parameters. Get these from the application developers.
For more detailed information about parameters and fields, see JMS Messaging (JNDI) (see page 357).
TIBCO Direct JMSThe TIBCO Direct JMS step lets you send messages and receive messages from topics and queues without using the JNDI libraries. You can also receive, change, and forward an existing message.
All the common message types including Empty, Text, Object, Bytes, Message, and Mapped (Extended) are supported.
The TIBCO Direct JMS step is configured using a single editor regardless of the messaging requirements. Input options vary on the messaging requirements. The editor only allows valid configurations. Enabling some features can make other unavailable.
The default TIBCO Direct JMS step name uses the following convention: . If EMS queuename publishthere is not a publish queue name, the default step name is . If another EMS queuename subscribestep also uses the default step name, DevTest appends a number to the step name. You can change step names at any time.
Prerequisites: Using DevTest with this application requires that you make one or more files available to DevTest. For more information, see Third-Party File Requirements (https://docops.ca.com/display
./DTS95/Third-Party+File+Requirements)
Parameter Requirements: This step requires the connection parameters and the subject names that are used in the application under test. DevTest, by default, uses the TIBCO_SERVER property in the JNDI Server URL. This property must be added to your configuration if you plan to use it. Your environment may require other parameters. Get these from the application developers.
For more detailed information about parameters and fields, see JMS Messaging (JNDI) (see page 357)

DevTest Solutions - 9.5
25-Jul-2016 392/448
For more detailed information about parameters and fields, see JMS Messaging (JNDI) (see page 357).
Sonic StepsThe following steps are available in the category:Sonic
SonicMQ Messaging (Native) (see page 392)SonicMQ Messaging (JNDI) (see page 393)
More Information:
Web Service Execution (XML) Step (see page 276)
SQL Database Execution (JDBC) (see page 332)
Read a File (Disk URL or Classpath) (see page 355)
External - FTP Step (see page 356)
Message Consumer (see page 375)
SonicMQ Messaging (Native)The SonicMQ Messaging (Native) step lets you send and receive messages from topics and queues using native Sonic protocol. You can also receive, change, and forward an existing message.
SonicMQ Messaging (Native) supports all the common message types including Empty, Text, Object, Bytes, Message, and Mapped (Extended).
The SonicMQ Messaging (Native) step is configured using a single editor regardless of the messaging requirements. The input options vary on the messaging requirements. The editor only allows valid configurations, so when you enable some features others could become inactive. Using Prerequisites:DevTest with this application requires that you make one or more files available to DevTest. For more information, see Third-Party File Requirements (https://docops.ca.com/display/DTS95/Third-
.Party+File+Requirements)
Parameter Requirements: This step requires the connection parameters and the subject names that are used in the application under test.
The following parameters are required for the system under test.
Broker Host
Broker Port
User

DevTest Solutions - 9.5
25-Jul-2016 393/448
Password
There could be other parameters that are required, depending on your environment. Get these parameters from the developers of the application.
Default Step Names: The default SonicMQ Messaging (Native) step name uses the following convention: . If there is not a publish queue name, the default step name is Sonic queuename publish
.Sonic queuename subscribe
If another step uses the default step name, DevTest appends a number to this step name to keep it unique. You can change step names at any time.
For more detailed information about parameters and fields, see JMS Messaging (JNDI) (see page 357).
SonicMQ Messaging (JNDI)The SonicMQ Messaging (JNDI) step lets you send and receive messages from topics and queues. You can also receive, modify, and forward an existing message.
SonicMQ Messaging (JNDI) supports all the common message types including Empty, Text, Object, Bytes, Message, and Mapped (Extended).
The SonicMQ Messaging (JNDI) step is configured using a single DevTest editor regardless of the messaging requirements. The input options vary on the messaging requirements. The editor only allows valid configurations, so when you enable some features others could become inactive.
Using DevTest with this application requires that you make one or more files available Prerequisites:to DevTest. For more information, see Third-Party File Requirements (https://docops.ca.com/display
./DTS95/Third-Party+File+Requirements)
Parameter Requirements: You need the connection parameters and the subject names that are used in the application under test. DevTest, by default, uses the SONICMQ_SERVER property in the JNDI Server URL. This property must be added to your configuration if you plan to use it. There could be other parameters that are required, depending on your environment. Get these parameters from the developers of the application.
Default Step Names: The SonicMQ Messaging (JNDI) step has a default name using the following convention: . If there is not a publish queue name, the default step name is Sonic queuename publish
.Sonic queuename subscribe
If another step uses the default step name, DevTest appends a number to this step name to keep it unique. You can change step names at any time.
For more detailed information about parameters and fields, see JMS Messaging (JNDI) (see page 357).
webMethods StepsThe following steps are available in the category:webMethods

DevTest Solutions - 9.5
25-Jul-2016 394/448
webMethods Broker (see page 394)webMethods Integration Server Services (see page 398)
webMethods BrokerThe webMethods Broker step lets you send and receive messages from the Broker. You can also receive, change, and forward existing Broker Events/ Messages.
webMethods Broker supports Mapped (Extended) messages that create Broker Events.
The webMethods Broker step is configured using a single editor, regardless of the messaging requirements. The input options vary on the messaging requirements. The step editor only allows valid configurations, so when you enable some features others can become inactive. Prerequisites:Using DevTest with this application requires that you make one or more files available to DevTest. For more information, see Third-Party File Requirements (https://docops.ca.com/display/DTS95/Third-
.Party+File+Requirements)
Parameter Requirements: This step requires the connection parameters and the subject names that are used in the application under test. The following sections describe the parameters that you require. Other parameters could be required, depending on your environment. Get these parameters from the developers of the application.

DevTest Solutions - 9.5
25-Jul-2016 395/448
webMethods Broker step
The messaging step editor for webMethods Broker includes three tabs at the bottom of the page:
The tab is where you define your connection and messaging parameters.Base
The tab is where you create your message content.Send Message Data
The tab is where your response messages are posted.Response Message
Base TabThe tab view that the previous graphic shows is divided into the following sections:Base
Server Connection Info
Subscriber Info
Publisher Info
ReplyTo Info

DevTest Solutions - 9.5
25-Jul-2016 396/448
Error Handling and Test
The and sections are always active. To enable or Server Connection Info Error Handling and Testdisable the , , and sections, use the check box in Subscriber Info Publisher Info ReplyTo Info enable the top left corner of each section. Using these check boxes, you can configure the step to be a publish step, a subscribe step, or both. You can also include a component in the step.replyto
When you have configured your test step, click in the section to test Test Error Handling and Testyour configuration settings.
Server Connection Info
In the section, enter the connection information specific to webMethods Server Connection InfoBroker.
The four parameters must be available to you for the system under test.
Broker Host
Host Port
Broker Name
Client ID
Client GroupThis value is the Client group that is able to see the Broker destinations to use.
App NameSpecify the application using the Broker here. This parameter is optional and mostly used in server logs for debugging. The default is "DevTest". Using this parameter is a good practice, but if you must use something else for application logic you can.
To simplify changing the system under test, parameterize these values with properties from your configuration.
Publisher Info
To set up the ability to send (publish) messages, select the check box.enable
Enter the following parameters:
docTypeEnter the name of the docType to use.
MessageSelect the type of message you are sending from the pull-down menu. The supported messages are: webMethods Broker, Object, Message, and Mapped (Extended).

DevTest Solutions - 9.5
25-Jul-2016 397/448
Force Document Pre-fillThe selected docType is inspected and the message with the required fields is preloaded. This check box lets you change fields and decide whether to re-add any missing fields. DevTest does not write over existing fields with the same name. This property is only a design time effect and does nothing at test run time.
Deliver EnabledSelect to enable the field.Deliver Client ID
Deliver Client IDThe broker Client Identification for the connection. If the value is null, the broker generates an identifier automatically. An error can be returned if the value is already in use by another connection.
Envelope TagThis parameter lets you set the env.tag property on a broker event message.
Subscriber Info
To set up to enable the ability to receive (subscribe to) messages, select the check box.enable
Enter the following parameters:
docTypeEnter the name of the docType to use.
Timeout (secs)Indicates the number of seconds before DevTest interrupts waiting for a message. For no timeout, leave this field blank.
Async KeyEnter the value that is necessary to identify asynchronous messages. This value is only required in asynchronous mode. This value is used in a subsequent Message Consumer step to retrieve asynchronous messages.
Auto convert toTo return a string representation of the payload, enter a string that calls the toString() function on the payload object; xml returns the payload in XML format.
ReplyTo Info
To set up a destination queue/topic, select the check box.enable
If your application requires a destination, it is set up in this section.
Enter the following parameters:
Name
The name of the topic or queue. Use to browse the JNDI server for the topic or Searchqueue name.

DevTest Solutions - 9.5
25-Jul-2016 398/448
Error Handling and Test
If an error occurs, the option lets you redirect to a step.Error Handling and Test
If Environment Error
Specifies the action to take or the step to go to if the test fails because of an environment error.
Default: Abort the test.
Click to test your step configuration settings.Test
Send Message Data TabThis tab is where you compose your message, if your step is configured to publish.
Response Message TabIf your step is configured to subscribe, your response is shown here. For more information, see JMS
.Messaging (JNDI) (see page 357)
Default Step NamesThe default webMethods Broker step name uses the following convention: webM queuename publish. If there is not a publish queue name, the default step name is .webM queuename subscribe
If another step uses the default step name, DevTest appends a number to this step name to keep it unique. You can change step names at any time.
webMethods Integration Server ServicesThe webMethods Integration Server Services step lets you execute Integration Server services through the native Java APIs. This is done using IData objects so it works with services not exposed through HTTP transports. Using DevTest with this application requires that you make Prerequisites:one or more files available to DevTest. For more information, see Third-Party File Requirements (
.https://docops.ca.com/display/DTS95/Third-Party+File+Requirements)
Parameter Requirements: This step requires the connection parameters and the subject names that are used in the application under test. The following sections describe the parameters that you need. Other parameters could be required, depending on your environment. Get these parameters from the application developers.
Base Tab Server Connection InfoEnter the following parameters:
HostThe host name.

DevTest Solutions - 9.5
25-Jul-2016 399/448
UserThe userid.
PasswordThe password.
PackageThe package in which the service is located.
ServiceThe name of the actual service that you want to call.
Input TypeSelect the input type from , , or .Property IData Object Force IData Pre-fill
Output TypeSelect the output type from or .XML IData Object
If Environment Error
Specifies the action to take or the step to go to if the test fails because of an environment error.
Default: Abort the test.
Click to connect. You see an object response. To pull the payload or other properties from Executethe response, which is itself an IData object, export it to a Java Execution step. To complete this task, create a Java Step in DevTest and load from a property, specifying the step name pattern for a last response. Use the lisa.<stepName>.rsp property.

DevTest Solutions - 9.5
25-Jul-2016 400/448
webMethods Integration Server step

DevTest Solutions - 9.5
25-Jul-2016 401/448
Pipeline Input Tab
webMethods Integration Server step Pipeline Input tab

DevTest Solutions - 9.5
25-Jul-2016 402/448
Pipeline Output Tab
webMethods Integration Server step Pipeline Output tab
Default Step NamesThe default webMethods Integration Server Services step name uses the following convention:
.IntegrationServerInvoker ServiceName@HostName
If another step uses the default step name, DevTest appends a number to this step name to keep it unique. You can change step names at any time.
DevTest Solutions - 9.5
25-Jul-2016 403/448
IBM StepsThe following steps are available in the category:IBM
IBM WebSphere MQ Step (see page 403)IBM MQ Native Send Receive Step (see page 408)
More Information:
Message Consumer (see page 375)
IBM WebSphere MQ StepThe IBM WebSphere MQ step lets you send messages to, and receive messages from, topics and queues. You can also receive, modify, and forward an existing message.
All the common message types including Empty, Text, Object, Bytes, Message, and Mapped (Extended) are supported.
The IBM WebSphere MQ step is configured using a single editor regardless of the messaging requirements. The input options vary on the messaging requirements. The editor only allows valid configurations, so when you enable some features, others could become inactive.
The default IBM WebSphere MQ step name uses the following convention: . MQ queuename publishIf there is not a publish queue name, the default step name is . If another MQ queuename subscribestep uses the default step name, DevTest appends a number to this step name to keep it unique. You can change step names at any time Using DevTest with this application requires that Prerequisites:you make one or more files available to DevTest. For more information, see Third-Party File
.Requirements (https://docops.ca.com/display/DTS95/Third-Party+File+Requirements)
Parameter Requirements: You must have the connection parameters for your system under test. The following sections describe the required parameters.
The editor for the IBM WebSphere MQ step contains the following tabs:
The tab is where you define the connection and messaging parameters.Base
The tab lets you specify a selector query to be run when listening for a message Selector Queryon a queue.
The tab is where you create the message content.Send Message Data
The tab is where the response messages are posted.Response Message
Note: This describes the tab. For information about the other tabs, see page Base JMS .Messaging (JNDI) (see page 357)

DevTest Solutions - 9.5
25-Jul-2016 404/448
IBM WebSphere MQ Base TabThe following graphic shows the tab. The tab is divided into the following sections:Base
Server Connection Info
Subscriber Info
ReplyTo Info
Publisher Info
Error Handling and Test
IBM Websphere MQ Server Connection Info
To enable and disable the , , and Info sections, use the Subscriber Info Publisher Info ReplyTo enable check box in the top left corner of each section. Using these check boxes, you can configure the step to be a publish step, a subscribe step, or both. You can also include a reply to component in the step.

DevTest Solutions - 9.5
25-Jul-2016 405/448
When you finish configuring the test step, click in the section to test the Test Error Handling and Testconfiguration settings.
Server Connection Info
To connect to WebSphere MQ, enter the following information:
Host NameThe name of the host.
TCP/IP PortThe port for a client connection.
ChannelA connection property that is used for routing and management in the message bus.
Queue ManagerA connection property that is used for routing and management.
CCIDOptional for connections and only applies if character transformation must occur between the client (DevTest) and server.
User NameThe login user name, if applicable.
PasswordThe login password, if applicable.
Client ModeLets you select how you want to interact with the WebSphere MQ server.
JMS: A pure Java implementation that is based on the JMS specification. We recommend that you use the JMS Transport Protocol instead of MQ for this implementation.
Native Client: A pure Java implementation using IBM-specific APIs.
Bindings: Requires access to the native libraries from a WebSphere MQ client installation. Verify that these libraries are accessible by the DevTest application run time. In most cases, having these libraries available in the PATH environment works.
Share SessionsSelect to specify sharing everything in MQ Native Mode, including the connection.
Publisher Info
To set up the ability to send (publish) messages, select the check box.enable
To execute a commit when the message is sent, select the check box.use transaction
Enter the following parameters:
Name

DevTest Solutions - 9.5
25-Jul-2016 406/448
The name of the topic or queue. Use to browse the JNDI server for the topic or Searchqueue name.
Type
Select whether you are using a topic or queue. To see what messages are waiting to be consumed
from a queue (only), use to the right of this field.Browse
MessageSelect the type of message you are sending. The supported types are Empty, Text, Object, Bytes, Message, and Mapped (Extended).
Alt QManagerThe queue manager that hosts the publish queue, if it is different from the queue manager to which you are connecting.
Message PropertiesLets you set publish properties on the message. The list of properties changes depending on the client mode. For more information, see the WebSphere MQ documentation and the JMS and MQ
knowledge base article. If the client mode is JMS, then you can add custom Message Propertiesmessage properties.
Subscriber Info
To set up to enable the ability to receive (subscribe to) messages, select the check box.enable
Enter the following parameters:
Name
The name of the topic or queue. Use to browse the JNDI server for the topic or Searchqueue name.
TypeSelect whether you are using a topic or queue, and whether to listen in synchronous or asynchronous mode. For asynchronous mode, you also must have an entry in the Async key field. To see what messages are waiting to be consumed from a queue (only), click , to the right Browseof this field.
Timeout (secs)Indicates the number of seconds before DevTest interrupts waiting for a message. For no timeout, leave this field blank.
Queue ModelMQ requires this value to create temporary destinations. The queue model is configured on the MQ server, and it is only active when use temporary queue/topic is checked. In this case, the
Info section is disabled.ReplyTo

DevTest Solutions - 9.5
25-Jul-2016 407/448
Async KeyEnter the value that is necessary to identify asynchronous messages. This value is only required in asynchronous mode. This value is used in a subsequent Message Consumer step to retrieve asynchronous messages.
Durable Session KeyBy entering a name here you are requesting a durable session. You are also providing a key for that session. A durable session lets you receive all of your messages from a topic even if you log out, and then you log in again.
Session ModeSelect the appropriate mode from the available options by clicking the drop-down list. Options are: Auto Acknowledge, Client Acknowledge, Use Transaction, Auto (Duplicates Okay).
Auto Acknowledge: The session automatically acknowledges the receipt of a message by a client.
Client Acknowledge: This option instructs the client to acknowledge messages programmatically.
Use Transaction: To execute a commit when a message is received.
Auto (Duplicates Okay): This option instructs the session to acknowledge the delivery of messages.
Use temporary queue/topicIf you want JMS.provider to set up a temporary queue/topic on your behalf, select the use temporary queue/topic check box. When a temporary queue/topic is used, the JMS ReplyTo parameter of the message you send to the temporary queue/topic is automatically set. The temporary queue/topic feature must always be used with a publisher so that a reply can be sent. If you use a temporary queue/topic, the ReplyTo section is disabled.
Make payload last responseTo make the payload as the last response, select this option.
Use correlation ID for subscribeEnables filtering of incoming messages using the values in .Subscribe Properties
Subscribe PropertiesLets you set subscribe properties on the message. For more information, see the WebSphere MQ documentation and the JMS and MQ Message Properties knowledge base article (https://support.
.ca.com/irj/portal/kbtech?docid=603872&searchID=TEC603872&fromKBResultsScreen=T)
ReplyTo Info
To set up a destination queue/topic, select the check box.enable
If your application requires a destination, it is set up in this section.
Enter the following parameters:
Name

DevTest Solutions - 9.5
25-Jul-2016 408/448
The name of the topic or queue. Use to browse the JNDI server for the topic or Searchqueue name.
Type
Select whether you are using a topic or queue. To see what messages are waiting to be consumed
from a queue (only), use to the right of this field.Browse
Queue ManagerAllows the ReplyTo to be on a different Queue Manager than the Publisher (in this step).
Error Handling and Test
If an error occurs, the section lets you redirect to a step.Error Handling and Test
If Environment Error
Specifies the action to take or the step to go to if the test fails because of an environment error.
Default: Abort the test.
Click to test your step configuration settings.Test
IBM MQ Native Send Receive StepThe step lets you connect to a WebSphere MQ queue manager and do IBM MQ Native Send Receivethe following actions:
Send a request message
Receive a response message
Note: This step is for WebSphere MQ in native mode. If you are using WebSphere MQ in JMS mode, we recommend that you use the step and the JMS Send Receive IBM MQ JMSassets.
The step editor has basic and advanced parameters. To display the advanced parameters, click PROat the top of the editor.
The following graphic shows the step editor. The advanced parameters are not shown.

DevTest Solutions - 9.5
25-Jul-2016 409/448
Screen capture of send receive step.
Each parameter has a tooltip that describes the purpose of the parameter.
Some parameters include the value as an option. This value indicates that the actual Automaticsetting is taken from another parameter. If you click the drop-down arrow and you place the mouse pointer over the value , a tooltip displays the name of the other parameter.Automatic
Some parameters let you change the editor so that you can enter a property as the value.
Some parameters that provide a discrete set of values let you change the editor so that you can enter the value directly. For example, the parameter corresponds to an integer value in the Get OptionsWebSphere MQ API. Instead of opening the dialog, you can switch to the direct editor Get Optionsand enter the value. The direct editor also lets you specify a value that is not in the official enumeration of values.
IBM MQ Native Put and Get (see page 409)IBM MQ Native RFH2 Header (see page 410)Test the IBM MQ Native Send Receive Step (see page 410)Monitor and Close Cached Asset Instances (see page 411)
IBM MQ Native Put and GetThe step has separate areas for configuring the put operation and the IBM MQ Send ReceiveNative get operation.
Specify two in the step editor: one for the put operation, and one for the get queues (see page 64)

DevTest Solutions - 9.5
25-Jul-2016 410/448
1.
2.
3.
Specify two in the step editor: one for the put operation, and one for the get queues (see page 64)operation. The lists are populated with the IBM MQ Native queue assets from the active configuration.
To send a message without receiving a response, disable the get operation. To wait for a message without having to send one first, disable the put operation.
If you disable both operations, the step does nothing.
To make sure that the response goes to the correct client, enable the correlation scheme (see page .109)
Each asset has a . The runtime scope (https://docops.ca.com/display/DTS95/Runtime+Scope) IBM MQ step lets you specify a minimum runtime scope for the put and get operations. Send ReceiveNative
The scope parameters are advanced parameters.
You can configure the properties of the WebSphere MQ message descriptor (MQMD). For example, you can configure the following properties:
Message Type
Expiry
Format
Priority
When the advanced parameters are displayed, click to the right of the Open Editor Header Propertieslabel and click the plus sign to select the properties.
IBM MQ Native RFH2 HeaderThe area of the step editor lets you configure the message payload. You can include an ContentsRFH2 header by setting the payload type to .IBM RFH2 Header
To edit the properties in the fixed portion of the RFH2 header, click to the right of the Open Editor label and click the plus sign to select the properties.RFH Header Properties
To add a folder to the RFH2 header, perform the following steps:
Display the advanced parameters.
Click the plus sign in the area.RFH2 Folders
Select the folder type.
You can now click to the right of the folder name to configure the properties in the Open Editorfolder.
Test the IBM MQ Native Send Receive StepYou can verify the functionality of the step in the editor.IBM MQ Native Send Receive
The execution log provides a high-level view of the activity that happens behind the scenes.

DevTest Solutions - 9.5
25-Jul-2016 411/448
1.
2.
3.
4.
5.
1.
2.
3.
4.
The execution log provides a high-level view of the activity that happens behind the scenes.
Follow these steps:
Click the green button in the step editor.Execute
To cancel the step while it is executing, click .CancelThe tab shows the response that was received when the operation finishes.Response
To view the step activity, click .Execution Log
To monitor the asset instances, click .Runtime Monitor
To view the request that was sent, click the tab.Request
Monitor and Close Cached Asset InstancesWhen you test the step, a runtime monitor in the tab lets IBM MQ Native Send Receive Responseyou monitor asset instances. You can also manually close the assets.
The following graphic shows an example of the runtime monitor.
Screen capture of runtime monitor.
By default, the runtime monitor automatically removes assets that are closed. In the following procedure, you disable this behavior.
Follow these steps:
In the tab, click .Response Runtime Monitor
Clear the check box that appears inside the button.Clear
Execute the step again.The runtime monitor displays the assets that were created during the execution of the step.
View the following information:
Name: The name of the asset.
Type: The type of asset.
Scope: The name of the test step, test case instance, test case, or DevTest component that corresponds to the runtime scope of the asset. The value has a tooltip that shows the scope.

DevTest Solutions - 9.5
25-Jul-2016 412/448
4.
5.
6.
7.
Status: The color green indicates that the asset is active. The color yellow indicates that the asset is idle. The color gray indicates that the asset is closed.
To display more information about an asset, click the status icon.
To close an asset immediately, click the status icon and select or .Close Force Close
To close a set of assets, click .Force Close
RabbitMQ StepsThe following step is available in the category:RabbitMQ
RabbitMQ Send Receive Step (see page 412)
RabbitMQ Send Receive StepThis step lets you send and receive messages over RabbitMQ.
The following graphic shows the step editor. The advanced parameters are not shown.
Screen capture of RabbitMQ Send Receive step.
Each parameter has a tooltip that describes the purpose of the parameter.
Some parameters include the value as an option. This value indicates that the actual Automatic

DevTest Solutions - 9.5
25-Jul-2016 413/448
Some parameters include the value as an option. This value indicates that the actual Automaticsetting is taken from another parameter. If you click the drop-down arrow and you place the mouse pointer over the value , a tooltip displays the name of the other parameter.Automatic
For more conceptual information about RabbitMQ and the corresponding assets, see RabbitMQ .Assets (see page 73)
Prerequisites: Using DevTest with this application requires that you make one or more files available to DevTest. For more information, see Third-Party File Requirements (https://docops.ca.com/display
./DTS95/Third-Party+File+Requirements)
Send and Receive (see page 413)Message Properties (see page 413)Message Contents (see page 414)Correlation Schemes (see page 414)Test the RabbitMQ Send Receive Step (see page 415)Monitor and Close Cached Asset Instances (see page 415)
Send and ReceiveThe step has separate areas for configuring the send operation and the RabbitMQ Send Receivereceive operation.
Specify two in the step editor: one for the send operation, and one for the queues (see page 73)receive operation. The lists are populated with the RabbitMQ queue and temp queue assets from the active configuration.
Each asset has a . The runtime scope (https://docops.ca.com/display/DTS95/Runtime+Scope) RabbitMQ step lets you specify a minimum runtime scope for the send and receive operations. Send Receive
The scope parameters are advanced parameters.
Message PropertiesRabbitMQ has messages, which consist of header data and a payload.
Like JMS, you can add custom properties to the header data.
Like WebSphere MQ, the payload is text or binary. Internally, the payload is stored as binary.
Like JMS and WebSphere MQ, header fields are available for Message ID, Correlation ID, and ReplyTo.
Unlike JMS and WebSphere MQ, RabbitMQ does not specify anything about the Message ID, Correlation ID, and ReplyTo fields. These fields are provided as a convenience. RabbitMQ itself does not care how, or if, the fields are used.
With Message ID, this means that a message is not assigned a Message ID automatically. The application must fill in this field before sending the message, if it wants to. The application also determines the uniqueness of the Message ID.
With ReplyTo, it is again up to the application to determine how this this field is populated on the client side and interpreted on the service side. The field might contain the name of a response queue, or a routing key, or something completely different.

DevTest Solutions - 9.5
25-Jul-2016 414/448
Message ContentsThe step lets you specify the message content. The following types are RabbitMQ Send Receivesupported:
XML document
DevTest property reference
Text
Graphic image
Binary
IBM RFH2 header
IBM MQMD header
JSON document
EDI document
Correlation SchemesThe following correlation schemes are available:
Default ReplyTo
RabbitMQ Direct
RabbitMQ Topic
RabbitMQ Headers
RabbitMQ Payload
Default ReplyTo
The simplest correlation scheme is not technically called that. It is the default behavior of the step.RabbitMQ Send Receive
The ReplyTo field of the request message is filled in with the name of the response queue, whether it is a temp queue or not, and it is assumed that the service will use the default exchange to send a response directly back to that queue. This corresponds to the typical ReplyTo scheme in other messaging providers.
RabbitMQ Direct and RabbitMQ Topic
In this correlation scheme, the request message's ReplyTo field contains the exact routing key that was used to bind the response queue to some direct or topic exchange. It is assumed that the service will copy the routing key used for its response from the ReplyTo field of the request. It is also assumed that the service knows which direct or topic exchange to use when sending the response.

DevTest Solutions - 9.5
25-Jul-2016 415/448
1.
2.
3.
4.
5.
For the purposes of RPC, we assume that direct and topic exchanges work basically the same. That is, the routing key is matched exactly between the response queue's binding and the response message.
If no explicit exchange is provided on the response queue, it will use or by amq.direct amq.topicdefault. It also can generate a routing key, and will set up the message and queue binding parameters automatically. This overrides the default ReplyTo behavior because it uses the same ReplyTo field on the request message.
Direct and Topic are two separate correlation schemes in the step, but that RabbitMQ Send Receiveis just to avoid confusion. The schemes are almost identical, with the exception of the default exchange name.
RabbitMQ Headers
In this correlation scheme, the request message contains one property used for correlation. It is assumed that the service will copy the property value verbatim to the response message. It is also assumed that the service knows which headers exchange to use when sending the response.
If no explicit exchange is provided on the response queue, it will use by default. It also amq.headerscan generate a value, and will set up the message and queue binding parameters automatically. This overrides the default ReplyTo behavior because headers exchanges do not use routing keys.
You only need to provide the name of the property, and the name of the property on the response message if different from the request.
RabbitMQ Payload
Like JMS and MQ, we have with RabbitMQ. This scheme payload-based correlation (see page 109)works exactly like it does with the other providers.
Test the RabbitMQ Send Receive StepYou can verify the functionality of the step in the editor.RabbitMQ Send Receive
The execution log provides a high-level view of the activity that happens behind the scenes.
Follow these steps:
Click the green button in the step editor.Execute
To cancel the step while it is executing, click .CancelThe tab shows the response that was received when the operation finishes.Response
To view the step activity, click .Execution Log
To monitor the asset instances, click .Runtime Monitor
To view the request that was sent, click the tab.Request
Monitor and Close Cached Asset InstancesWhen you test the step, a runtime monitor in the tab lets you RabbitMQ Send Receive Responsemonitor asset instances. You can also manually close the assets.

DevTest Solutions - 9.5
25-Jul-2016 416/448
1.
2.
3.
4.
5.
6.
7.
1.
By default, the runtime monitor automatically removes assets that are closed. In the following procedure, you disable this behavior.
Follow these steps:
In the tab, click .Response Runtime Monitor
Clear the check box that appears inside the button.Clear
Execute the step again.The runtime monitor displays the assets that were created during the execution of the step.
View the following information:
Name: The name of the asset.
Type: The type of asset.
Scope: The name of the test step, test case instance, test case, or DevTest component that corresponds to the runtime scope of the asset. The value has a tooltip that shows the scope.
Status: The color green indicates that the asset is active. The color yellow indicates that the asset is idle. The color gray indicates that the asset is closed.
To display more information about an asset, click the status icon.
To close an asset immediately, click the status icon and select or .Close Force Close
To close a set of assets, click .Force Close
SAP StepsThe following steps are available in the category:SAP
SAP RFC Execution (see page 416)SAP IDoc Sender (see page 419)SAP IDoc Status Retriever (see page 419)
SAP RFC ExecutionThe SAP RFC Execution step lets you connect to an SAP system to execute an RFC (Remote Function Call). Using DevTest with this application requires that you make one or more files Prerequisites:available to DevTest. For more information, see Third-Party File Requirements (https://docops.ca.com
./display/DTS95/Third-Party+File+Requirements)
To create an SAP RFC Execution step:

DevTest Solutions - 9.5
25-Jul-2016 417/448
1.
2.
3.
Select a that includes the connection information for either Destination asset (see page 78)an application server or a message server.
If you are using a message server:In Windows, add the following line to the end of the C:\Windows\System32\drivers\etc\services file: sapmsCR2 3600/tcp.In Linux, add the following line to the end of /etc/services: .sapmsCR2 3600/tcp
SAP RFC Execution step connection screen
Enter the following parameters in the SAP RFC Execution step editor. You can use properties for RFC input parameters.

DevTest Solutions - 9.5
25-Jul-2016 418/448
3.
4.
RFC name filterTo filter the RFC function names, enter a filter value, which can include a wildcard character of *. When you click the field drop-down arrow, DevTest requests the RFC nameSAP system to retrieve the RFC names that the filter qualified, then populates the field.After you select or enter an RFC function name, DevTest sends a request to the SAP system to retrieve the RFC function input parameters. Both and of each Key Descriptionparameter are returned from the SAP system. Although the description is available for most parameters, not all of them have it. You can enter the parameter values before executing the RFC function.
RFC name
Import Parameters
NameThe name of a parameter
DescriptionThe description of a parameter
ValueThe value of a parameterEach table cell in the value column is a drop-down list of the available properties.
Table Parameters
NameThe name of a parameter
DescriptionThe description of a parameter
ValueThe value of a parameterEach table cell in the value column is a drop-down with the available properties to select from.
If Environment Error
Specifies the action to take or the step to go to if the test fails because of an environment error.
Default: Abort the test.
Click to populate the tab, which contains subtabs for the output for XML and Test ResponseDOM Tree.

DevTest Solutions - 9.5
25-Jul-2016 419/448
1.
2.
3.
4.
5.
1.
2.
SAP IDoc SenderThe SAP IDoc Sender step lets you connect to an SAP system to send SAP IDocs. Using Prerequisites:DevTest with this application requires that you make one or more files available to DevTest. For more information, see Third-Party File Requirements (https://docops.ca.com/display/DTS95/Third-
.Party+File+Requirements)
To create an SAP IDoc Sender step:
Select a that includes the connection information for either Destination asset (see page 78)an application server or a message server.
If you are using a message server:In Windows, add the following line to the end of the C:\Windows\System32\drivers\etc\services file: sapmsCR2 3600/tcp.In Linux, add the following line to the end of /etc/services: .sapmsCR2 3600/tcp
Enter the following parameter in the SAP IDoc Sender step editor.
If Environment Error
Specifies the action to take or the step to go to if the test fails because of an environment error.
Default: Abort the test.
To test the connection to the SAP server, click .Test Connection
To display the file locator, click . Navigate to the location of your IDoc and Read IDoc From Fileselect it.SAP IDocs are supported in XML and raw text formats.
SAP IDoc Status RetrieverThe SAP IDoc Status Retriever step lets you connect to an SAP system and poll SAP IDocs status periodically until it completes or a specified interval ends. Using DevTest with this Prerequisites:application requires that you make one or more files available to DevTest. For more information, see
.Third-Party File Requirements (https://docops.ca.com/display/DTS95/Third-Party+File+Requirements)
To create an SAP IDoc Status Retriever step:
Select a that includes the connection information for either Destination asset (see page 78)an application server or a message server.
If you are using a message server:In Windows, add the following line to the end of the C:\Windows\System32\drivers\etc\services file: sapmsCR2 3600/tcp.In Linux, add the following line to the end of /etc/services: .sapmsCR2 3600/tcp

DevTest Solutions - 9.5
25-Jul-2016 420/448
2.
3.
SAP IDoc Status Retriever step base tab
Enter the following parameters in the SAP IDoc Status Retriever step editor. You can use properties for SAP input parameters.
Timeout (secs)The duration of polling operation for SAP IDoc status

DevTest Solutions - 9.5
25-Jul-2016 421/448
3.
4.
Polling Interval (secs)The frequency of polling operation for SAP IDoc statusFor example, with the default values, the SAP IDoc Status Retriever step polls the IDoc status every 30 seconds for a total duration of 10 minutes. If the IDoc is completed any time in the duration, the SAP IDoc Status Retriever step stops immediately, without waiting for the entire 10 minutes.
SAP Transaction IDAn alphanumeric transaction ID or a DevTest property. If an SAP IDoc Sender step is used before this IDoc Status Retriever step, use the default property {{lisa.SAP_TRANSACTION_ID}}.
If Environment Error
Specifies the action to take or the step to go to if the test fails because of an environment error.
Default: Abort the test.
If timeoutSelect the step to be executed or action to take if there is a timeout.
To validate the connection to the SAP server, click .Test Connection
Selenium Integration StepsThe Selenium steps let you import test scripts for web-based user interfaces from Selenium Builder into CA Application Test. You can use the exported JSON test script to build test steps for testing a user interface.
To create a Selenium step, complete the following tasks:
Create and Export a Selenium Builder Recording (see page 422)
Import the Selenium Builder JSON into CA Application Test (see page 423)
Note: Browser support for recording Selenium Integration tests is limited to Firefox. After you import these steps to CA Application Test, you can run the test cases on Google Chrome, Mozilla Firefox 24 or later, or Internet Explorer 8.0 or later.
You can also export a CA Application Test Selenium test case to a JSON script. For more information, see:
Export a Selenium Test Case to a JSON Script (see page 428)

DevTest Solutions - 9.5
25-Jul-2016 422/448
1.
2.
3.
1.
2.
3.
4.
5.
6.
Create and Export a Selenium Builder RecordingThe first step in creating a Selenium test step in CA Application Test is to create a Selenium Builder test script. Selenium Builder is a Firefox add-on that lets you record actions in a web-based user interface and create Selenium tests.
The following video is an introduction to Integrating CA Application Test with Selenium Builder.
If Selenium Builder is not installed, download and install it from the following URL: .http://seleniumbuilder.github.io/se-builder/
Note: We recommend that you turn off the automatic upgrade option:
Click , on the main Firefox menu.Firefox Add-onsThe Add-ons Manager opens.
Click and double-click .Extensions Selenium Builder
Select the Off option for Automatic Updates.
Follow these steps:
Open your Firefox browser.
Click , , on the main Firefox menu.Firefox Web Developer Launch Selenium BuilderThe Selenium Builder page opens.
Note: If you have the Add-on Bar enabled, you can click Launch Selenium Builder
in the bottom right corner of the Firefox browser window.
Enter the URL of the web application you want to test in the field.Start recording at
Click .Selenium 2
Note: does not support the required ability to export to JSON.Selenium 1
Navigate to the web application and perform the actions you want to test.
When you are done, return to the Selenium Builder page and click .Stop Recording

DevTest Solutions - 9.5
25-Jul-2016 423/448
6.
7.
8.
9.
10.
1.
2.
3.
4.
5.
Note: For more information about creating Selenium Builder tests, see the Selenium Builder documentation at .http://seleniumbuilder.github.io/se-builder/
Click , .File ExportThe dialog opens.Choose Export Format
Click .Save as JSON
Browse to the directory where you want to save the JSON file.
Enter a name for the JSON file and click .Save
Import a Selenium Builder JSON into CA Application TestUse the Selenium Integration test steps to import a JSON test script that you created (see page 422)in Selenium Builder to create a test step or script that is based on that JSON file.
Follow these steps:
Open an existing or create a new test case.
Perform one of the following actions:
Click .Selenium
Click , , .Add Step Selenium Selenium Import/Export
The tab of the Selenium Integration page opens.Import
Click Browse next to the field and browse to the location of the JSON test Input JSON Scriptscript you want to import.
Select one of the following output options:
Selenium Script Imports the complete JSON test script in one test step. This option also supports Selenium Builder suites.
Selenium StepDivides the JSON script to create a separate test step for each action in the script. This option does not support Selenium Builder suites.
Click .BuildA new step (Selenium Step) or new steps (Selenium Script) appear in your test case.The Selenium Integration Import dialog opens. This page notifies you of any warnings or errors that occurred during the import. The page also shows you the number of steps that the import process generated.
DevTest Solutions - 9.5
25-Jul-2016 424/448
6.
7.
8.
Click .Close
Double-click each step to view the JSON script in the Selenium Script or Selenium Step tab of the Elements tree in the right panel.
Complete the following fields for each step:
(Optional)Alert BehaviorThe Selenium step can provide "inline" alert handling. The fields in the area Alert Behaviorwork in parallel with the value of the parameter, which is unexpectedAlertBehaviourdefined in the file that is named by the selenium.WebDriver.DesiredCapabilities.filePathproperty.These fields let you specify how the test step should react to a modal alert dialog displayed in the web app.
(Optional)Alert ActionDefines the action to take in response to a modal alert dialog.
Accept, Dismiss, AnswerValues:
(Optional)Input TextDefines text to input when the is Answer. The step inputs the text that you Alert Actionput into this text box, then clicks .OK
On Step FailDefines the action to take if a specific step in the test case fails. Select the step to execute (Go to:) or the action to take if the step fails. For more information, see Configure Next
and Step (https://docops.ca.com/display/DTS95/Configure+Next+Step) Generate Warnings and .Errors (https://docops.ca.com/display/DTS95/Generate+Warnings+and+Errors)
Note: The JSON script supports variable substitution by property for any value that you input. You can also use properties with encrypted values, such as {{password_enc}}, to avoid exposing sensitive data.
The following Selenium Builder steps are mapped to your test case as described:
StoreThe name/value pair becomes a standard property in your test case. The name is prefixed with "selenium" to distinguish it from other properties. For example, the following JSON definition becomes a new property with the name . The value is selenium.window_titlepopulated after the step runs.
{ "type": "storeTitle", "variable": "window_title" },
VerifyThe verify step in Selenium Builder is used to validate user interface elements. If the validation fails, the state of the step is set to ERROR, but the test case execution flow continues to the next step. An associated DevTest error event (in red) is created for the failure.
DevTest Solutions - 9.5
25-Jul-2016 425/448
8.
1.
2.
3.
a.
AssertionThe assertion step in Selenium Builder validates user interface elements. If the validation fails, the state of the step is set to FAIL, and the test case execution flow stops. An associated DevTest error event (in red) is created for the failure.
saveScreenshotIf a saveScreenshot step in your script does not include a full path for saving the screen shot, DevTest tries to create the file under a $LISA_HOME\tmp\selenium directory. You can also use variables for the supplied file name. For example:c:\testcase1\snapshot1-{{LISA_TEST_RUN_ID}}.pngorc:\{{testCase}}\{{LISA_TEST_RUN_ID}}\snapshot1.pngIf any part of the parent directory for the target file does not exist, that portion of the directory is automatically created. If the target file already exists, it is deleted before writing new data.
Install the CA Application Test for Selenium Builder 1.0 PluginThe CA Application Test for Selenium Builder 1.0 plugin is required to do the following actions within
Workstation:DevTest
Edit a Selenium test case in the test step editor
Export a Selenium test case
Prerequisites
Prerequisites for using the CA Application Test for Selenium Builder 1.0 plugin include:
Firefox version 43 or higher
If you have a version of Selenium Builder installed prior to 3.0.5, you must uninstall it.:Follow these steps
1. From the Tools menu in Firefox, click Add-ons.2. Select Selenium Builder, then click Remove.3. Restart Firefox.
Install the Selenium Builder add-on for Firefox (https://addons.mozilla.org/en-US/firefox/addon (in the Firefox browser). Make sure that you run the add-on at least once /selenium-builder/)
before installing the CA Application Test for Selenium Builder 1.0 Plugin. From the Firefox menu, select .Developer, Launch Selenium Builder
Installation
Follow these steps:
Go to the [DEVTEST_HOME]\addons\sebuilder-plugin directory.
Copy the entire directory, and its contents, from [DEVTEST_HOME]\addons\sebuilder-lisaplugin.
Go to your [Firefox profile]\SeBuilder3\plugins directory. To find your Firefox profile:
For Firefox 3.6 and later, from Firefox, select Help, Troubleshooting information.

DevTest Solutions - 9.5
25-Jul-2016 426/448
3.
a.
b.
4.
5.
1.
2.
3.
For Firefox 3.6 and later, from Firefox, select Help, Troubleshooting information.
Under Application Basics:
On Windows and Linux, depending on the Firefox version, click Show Folder (Windows), Open Directory (Linux), or Open Containing Folder.
On OS x, click Show in Finder.
Note: The Firefox menu bar contains the File, Edit, View, History, Bookmarks, Tools, and Help menu items. On Windows, the menu bar may be hidden. To show a hidden menu bar temporarily, click the Alt key.
Paste the directory to the [Firefox profile]\SeBuilder3\plugins directory.lisa
Verify that the plugin was successfully installed. From the Firefox menu, select Developer, to view the Plugins directory.Launch Selenium Builder
Edit Selenium Test Steps Within CA Application TestOnce you install the CA Application Test for Selenium Builder 1.0 plugin, extra functionality is available for editing a Selenium recording. DevTest Workstation lets you edit the Selenium test once screenshots and screen JSON data are captured. Without this plugin, editing is best done via Selenium Builder (via exporting and re-importing the Selenium script).
Follow these steps:
Make sure that the is CA Application Test for Selenium Builder 1.0 plugin (see page 425)installed.
Once a test is imported and displays in the Test Editor, hover over a test step to see the screen shot for the step.

DevTest Solutions - 9.5
25-Jul-2016 427/448
3.
4.
a.
Click the test step, then click the tab in the right panel.Selenium StepThe details for the step open, including the JSON script (for reference), its action (or gesture), and image. More fields display depending on the action type.Actions include:
Get
Loads the webpage into the browser.
GoBack
Simulates the user clicking the Back button on their browser.
ClickElement
Clicks in the middle of the given element.
DoubleClickElement
Performs a double-click at the middle of the given element.
SendKeys
Lets you send keystrokes to the active window just as if you had manually typed them on the keyboard.
SetValue
Ensures focus on an input field and sets its value.
ElementPresent
Verifies that the specified element is somewhere on the page.
ElementValue
Verifies the value of the element, such as text in an input field, or true/false for a check box.
Switch to Frame
Retargets script execution to the specified iFrame.Switch to WindowRetargets script execution to the specified browser window
Some actions enable editing for XPath expressions. Click the link to open the Locator XPath .editor (see page 435)
The left side of the dialog displays a tree that shows the UI hierarchy in the current test step. The middle tree displays the attributes of the currently selected element or, for a multiple selection, attributes that are common to all selected elements. These attributes are informational only. The right side displays a screenshot of the current step.
Click an element in the left-side tree or right-side image.

DevTest Solutions - 9.5
25-Jul-2016 428/448
4.
a.
b.
c.
5.
1.
2.
3.
Click an element in the left-side tree or right-side image.
Edit the XPath expression in the field for the selected element.Expression
The XPath expression is validated while typing. If the XPath expression is empty or invalid, an error message displays.
Click if you edited the XPath expression.Apply
The tree and screenshot are updated with the new expression.
To add a new action, right-click a screen element and select an option from the menu. You can drag-and-drop the actions to change the order.
As you edit the test step, the JSON object script expands to accommodate your updates.
Export a Test Case with Selenium Test Steps to a JSON Script
You can export a test case with Selenium steps to a JSON script that can be stored on the file system.
Before you export a Selenium test case, you must install the CA Application Test for Selenium Builder in the Firefox Selenium Builder plugins directory.1.0 plugin (see page 425)
After you export a test case, you can use Selenium Builder to rerecord web applications. You can then reimport the newly generated JSON from Selenium Builder to DevTest Workstation and merge the changes into an existing test case.
Load exported JSON scripts into Selenium Builder using the Open a script exported by CA Application menu item. This menu item is only available after you install the DevTest plugin.Test
After you load the JSON script into Selenium Builder, you can make updates using regular Selenium Builder functionalities, such as:
Edit step
Add step
Delete step
Change the execution order of steps
To export a Selenium test case:
Make sure the CA Application Test for Selenium Builder 1.0 plugin is installed.
Open an existing test case.
Perform one of the following actions:

DevTest Solutions - 9.5
25-Jul-2016 429/448
3.
4.
5.
6.
Click .Selenium
Click , , .Add Step Selenium Selenium Import/Export
The page opens.Selenium Integration
Click the tab.Export
Click next to the field and browse to the location of the JSON test Browse Output JSON Scriptscript you want to export, or enter a path and file name.
Click .Save
Virtual Service Environment StepsThe CA Service Virtualization test steps are described in Editing a VSM (https://docops.ca.com/display/DTS95/Editing+a+VSM).
CAI StepsThe following step is available in the category:CAI
Execute Transaction Frame (see page 429)
Execute Transaction FrameThe Execute Transaction Frame step lets you run a transaction frame (https://docops.ca.com/display
on a DevTest Java Agent./DTS95/Business+Transactions+and+Transaction+Frames)
This step is useful when you want to verify the functionality in a system under test, but you do not have a public access point. In addition, this step can be automatically included in baselines (
.https://docops.ca.com/display/DTS95/Creating+Baselines)
This step can be used on any type of transaction frame that the agent can capture.
If you manually add the step to a test case, do either of the following:
Import a transaction
Specify the property in which to find the frame
If you do both, DevTest examines the property first and uses the imported transaction only if the property does not refer to a frame, either as an actual frame or as an XML representation of it. The frame can be imported from an XML file or from a zip file. You can obtain frames by exporting (
from the DevTest Portal.https://docops.ca.com/display/DTS95/Export+and+Import+Paths)

DevTest Solutions - 9.5
25-Jul-2016 430/448
The following graphic shows the initial view of the step. To specify the frame, click . To have Importthe import process create an assertion on the response for the imported frame and add it to the step automatically, select the check box before you click .Assert Import
Execute Transaction Frame step
After a successful import, three tabs are added:
State
Request
Response
You can now configure and invoke the frame.
The following graphic shows the step, after a frame was imported.

DevTest Solutions - 9.5
25-Jul-2016 431/448
Execute Transaction Frame step after a transaction has been imported
The upper portion contains the following items:
Executing agentThe agent that runs the frame. The color of the agent in the drop-down list indicates whether it is active. Execution from this editor works only if the agent is active. To refresh the contents, click
to the right of the drop-down list. A property can also be specified.Refresh
Frame propertyThe property from which the frame to execute is obtained when the step is run. This field is automatically filled in for consolidated baseline tests that the DevTest Portal creates.
Class nameThe name of the class of the method.
Method nameThe name of the method that the agent intercepted.
The tab contains metadata that the underlying protocol requires. For example, the state for an StateEJB frame includes the JNDI lookup information. You can change the state before execution.
The tab contains the input to the method for the frame. You can change the request before Requestexecution.
In the and tabs, the heading bar indicates the type of payload that is being shown. You State Requestcan change the payload type by clicking the icon in the right portion of the heading bar and selecting the appropriate type.
The tab compares the expected response from invoking the frame with the actual Response

DevTest Solutions - 9.5
25-Jul-2016 432/448
1.
2.
a.
The tab compares the expected response from invoking the frame with the actual Responseresponse. The format is the same as the Graphical XML Side-by-Side Comparison (see page 29)assertion.
The lower portion contains the following items:
If Environment Error
Specifies the action to take or the step to go to if the test fails because of an environment error.
Default: Abort the test.
ExecuteInvoke the frame on the currently selected agent. You can use this button to test the step "in place" in the editor.
ImportImport a frame.
AssertAdd an assertion to the step that verifies the response. The assertion is when you import a frame.
ClearRemove the imported frame.
Mobile StepsMobile test steps are automatically created when you record a mobile test case (https://docops.ca.com
. The test steps represent the mobile actions or gestures /display/DTS95/Record+a+Mobile+Test+Case)that are captured during the recording. Each test step represents the actions that you performed on a specific screen in the application.
When the recorded test case is complete, you can modify the test case in a variety of ways by manually reordering the actions, inserting additional actions, or adding assertions (https://docops.ca.
.com/display/DTS95/Add+an+Assertion+to+a+Mobile+Test+Step)
The following step is available:Modify Mobile Test Steps (see page 432)
Modify Mobile Test StepsThe changes that you can make to a mobile test step include adding and rearranging actions.
Follow these steps:
Open the mobile test case that you want to update.
To view the details of each step:
Click the test step that you want to review.

DevTest Solutions - 9.5
25-Jul-2016 433/448
2.
a.
b.
c.
3.
a.
b.
c.
4.
5.
6.
Click the test step that you want to review.
Click in the element tree on the right to expand the details for the Mobile testing stepstep.The Mobile Testing Step tab opens and shows a screenshot of the test application. Each individual action displays in a separate dialog. You can expand or collapse each action to provide more space for the screenshot.
To view or edit the the details of the screen element, click the hyperlink.LocatorThe Select Element window opens. Click the desired element in the screenshot to select it, and click .Apply
To manually add a new action, right-click in the action area of the tab and click .Add
Select the desired action.
For actions that require a specific screen element, click .Click to SetThe Select Element window opens. Click the desired element in the screenshot to select it, and click .Apply
Complete any other fields required for your new action.
To rearrange the order of the actions, drag and drop the action to the desired location.
To delete an action, right-click the action and click .Delete
You can also add the following element or screen actions by right-clicking the screenshot for a recorded action:
Change all assets to...Select an asset in the drop-down menu and all assets in the test are changed to that one. (This option is only available for tests created before version DevTest Solutions 8.4.)
BackInserts a Back command to return to the previous screen in the application. Android only.
Get elementPerforms a Get on the selected element. The name of the selected element appears next to the Get element option.
Tap element Performs a Tap action on the selected element. The name of the selected element appears next to the Tap element option.
Send keysBrings up the keyboard and simulates pressing the specified keys to set the value of the text element.
Note: In some instances, the application does not display the typed values. For example, a password field might not display the entered values.
Set value

DevTest Solutions - 9.5
25-Jul-2016 434/448
6.
Set valueSets the value for the selected element. The name of the selected element appears next to the Set value option.
Note: You can also use this action to set the value for a slider. For example, setting a value of 0.8 moves the slider 80% to the right. Use increments of 0.1 when setting the value for a slider. Setting a value of 0.25 is unrecognized and does not move the slider.
Long Tap screenPerforms a long tap on the screen, as opposed to a specific element.
Long Tap elementPerforms a long tap on the selected element. The name of the selected element appears next to the Long Tap element option.
WaitInserts a pause in the test. You can express the wait like ThinkTime at the step level. For example, inserts a random pause between 1 and 10 seconds. inserts a pause 1s-10s 100zof 100 milliseconds.
CommentLets you insert a comment for a specific action. The comment performs no action, it is for documentation only.
ScriptLets you insert an arbitrary beanshell script. Typically, this script does not interact with the device or simulator. This action provides the means of inserting a custom assertion.
Change OrientationChanges the orientation of the device.
ShakePerforms a shake gesture on the device.
Go to backgroundPerforms the action of pressing the home button. This action forces the application to the background for 10 seconds and then brings it back. This action is useful for testing because it typically forces the application to release memory and stop any CPU-intensive work. iOS only.
AssertionFor more information, see Add an Assertion to a Mobile Test Step (https://docops.ca.com
./display/DTS95/Add+an+Assertion+to+a+Mobile+Test+Step)
Execute ScriptLets you write and run a script to perform a customized function or procedure. Right-click a step in the test pane and select Add step after..., Custom Extensions, Execute script (JSR-223). See for more information.Execute Script (JSR-223) Step (see page 445)

DevTest Solutions - 9.5
25-Jul-2016 435/448
6.
7.
1.
2.
3.
4.
5.
6.
Note: When scripting with Appium, use the _webDriver variable. This variable is a reference to the RemoteWebDriver (https://selenium.googlecode.com/svn/trunk/docs
(public interface) /api/java/org/openqa/selenium/remote/RemoteWebDriver.html)object that is associated with the test when it is active in a running session (that is being recorded) or when it is played back. Because of this, the Test button at the bottom of the dialog results in an error when clicked.
TableLets you scroll a scroll through a table from a specified point to either the top or the bottom of the table. You can also stop the scroll when a specified item is found in the table. For more information, see .Swipe Table Gesture (see page 441)
Click .Save
Edit XPath Expressions in Mobile TestsMost mobile actions receive an XPath expression in the form of a parameter. This XPath parameter is then used for identifying the UI element for a particular action that you performed in the test step. You can modify the XPath expression by clicking in the column of the table (under the Value Action
tab) and typing the expression. However, this requires understanding of the Mobile testing stepXPath syntax and knowledge of how to select various elements in the current step by ID or by index.
Mobile Testing offers an XPath editor as a simpler way to enter an XPath expression where you can directly select the UI element(s) to edit them. The XPath editor is available when editing a Selenium
, when editing the assertion, and when test (see page 426) Mobile Target Predicate (see page 60)editing mobile test steps (as described below).
Follow these steps:
Open the mobile test case that you want to update.
Click the test step that you want to modify.
Click in the element tree on the right to expand the details for the step.Mobile testing stepThe Mobile Testing Step tab opens and displays a screenshot of the test application. The
section at the top of the tab shows the individual actions that are performed in the Actionstest step.
Right-click an action in the column of the table, then click ...Key Actions Edit XPathThe dialog opens.Edit XPathThe left side of the dialog displays a tree that shows the UI hierarchy in the current test step. The middle tree displays the attributes of the currently selected element or, for a multiple selection, attributes that are common to all selected elements. These attributes are informational only. The right side displays a screenshot of the current step.
Click an element in the left-side tree or right-side image. You can select more than one element by pressing the Shift or Control keys (on Windows) or the Command key (on Mac) while clicking elements.The XPath expression automatically updates when you select one or more elements.

DevTest Solutions - 9.5
25-Jul-2016 436/448
6.
7.
8.
9.
Edit the XPath expression in the field for the selected element.ExpressionThe XPath expression is validated while typing. If the XPath expression is empty or invalid, an error message displays.
To search for an element or elements on a page, enter text in the in the type search filterSearch text field.The tree and the screenshot are updated with the result of the search. The XPath expression is also updated.
To update the tree in the dialog, you can use the toolbar to the right of the Search field.Actions include:
Collapse AllCollapses the tree.
Show AttributesAdds or removes element attributes in the tree. By default, the tree does not contain attributes and clicking in the center table does not update the XPath expression with the attribute name. If you want to select attributes, turn on. The tree is Show Attributesupdated and all attributes are also part of the tree. You can select attributes in the tree and also search by attribute names.
Show InvisibleBy default, all elements that are invisible (and all of their descendants) are hidden from the tree. Toggling adds all invisible elements and their descendants to the Show Invisibletree.
Show DisabledBy default, all elements that are disabled (and all their descendants) are hidden from the tree. Toggling adds all disabled elements and their descendants to the Show Disabledtree.
Find ListsAutomates the selection of list elements. If Find List is selected, clicking on one element that is part of a list results in selecting all the elements in that list. The XPath expression is then updated for all list elements.
When selecting elements in the tree, the field provides variants of the current ExpressionXPath expression that uniquely identify the selected element. To select another XPath variant, expand the combo and select one of the variants.Expression

DevTest Solutions - 9.5
25-Jul-2016 437/448
9.
10.
1.
Click if you edited the XPath expression.ApplyThe tree and screenshot are updated with the new expression.
When selecting elements in the tree, the Expression field provides variants of the current XPath expression that uniquely identify the selected element. To select another XPath variant, expand the Expression combo and select one of the variants.
Filters and Assertions in Mobile TestsAdding a combination of a filter and an assertion to a mobile test is a useful way to include specific conditions in your test step that can specify a desired behavior.
The following example describes how to add a filter and assertion to a mobile step that creates a loop that is based on the state of a license agreement. The assertion ensures that the license agreement has been fully scrolled, and moves the test to a point where the user can tap the button.I Agree
Follow these steps:
Open an existing test case or create a new one.In this example, the test case includes a step named Swipe Screen.

DevTest Solutions - 9.5
25-Jul-2016 438/448
1.
2.
a.
b.
c.
d.
e.
f.
g.
h.
3.
a.
b.
c.
Add a filter to the Swipe Screen test step.
In the model editor, select .Swipe Screen
Open the tab. Filters
Click .Add
From the XML submenu, select .XML XPath Filter
The filter editor opens.
In the field, enter:Filter in
pageSource.xml
In the field, enter:Save To Property
is.agree.enabled
In the field, enter:XPath Query
//android.widget.Button[@text='I Agree']/@enabled
Click .Save
Add an assertion to the Swipe Screen test step.
In the model editor, select .Swipe Screen
Open the tab.Assertions

DevTest Solutions - 9.5
25-Jul-2016 439/448
3.
c.
d.
e.
f.
g.
h.
i.
j.
1.
2.
1.
Click .Add
From the submenu, select .Other Ensure Property Matches ExpressionThe new assertion that is applied to Swipe Screen is added to the Assertions tab.The assertion editor opens.
In the list, select .If False
In the list, select .then Go to Swipe Screen
In the field, use the default setting.Log
In the field, use from the previous step.Property Key is.agree.enabled
In the field, enter .RegExpression true
Click .Save
Image Options in Mobile TestsIf you include a test step that uses the device’s camera, you can capture a preloaded image to avoid calling the camera app during the actual test.
First, the application in the test must be compiled with the AppTestSDK and be running under Appium.
Follow these steps:
Add the AppTestSDK.framework to the project.
In the UIApplicaticationDelegate class add the following line of code:
- (BOOL)application:(UIApplication *)application didFinishLaunchingWithOptions:
(NSDictionary *)launchOptions
{
[AppTestSDK initializeForTest];
// Override point for customization after application launch.
[self.window makeKeyAndVisible];
return YES;
}
Once the application in the test is compiled, you can capture a preloaded image.
Follow these steps:
Copy the .jpg or .png file to use in the test to your DevTest Workstation directory.

DevTest Solutions - 9.5
25-Jul-2016 440/448
1.
2.
1.
2.
3.
4.
1.
2.
Copy the .jpg or .png file to use in the test to your DevTest Workstation directory.
Click your project’s config file to open the Properties editor, and add the following property:=lisa.mobile.sdk.camera.image path of the .jpg or .png file
During the test, when the app under test makes use of the camera, that preloaded image appears in the camera preview and is processed by the app in place of an actual captured image or video.
You can also set the image directly with a . This script is added after JSR-223 script (see page 445)recording to make the test more flexible, and lets you configure more than one image to use during a single test.
Follow these steps:
Right-click a step in the test pane that includes the tap for the camera capture.
Select .Add step after..., Custom Extensions, Execute script (JSR-223)
Add the following:
import com.itko.lisa.mobile.sdk.AppTest;
AppTest.setCameraImage(_mobileSession, new File(LISA_PROJ_ROOT + “/Data/images/MyImage.png”));
Click .Test
This script lets you reconfigure the image at any point during the test.
Validate External Links in Mobile TestsWhen an application is compiled with the AppTestSDK and running under Appium, Mobile Testing lets you test external links. Emails, URLs, phone numbers, and SMS messages can all be validated without opening an external program during playback. This functionality can prove useful if you want to validate that these recorded links are correct without exiting the application under test.
First, the application in the test must be compiled with the AppTestSDK and be running under Appium.
Follow these steps:
Add the AppTestSDK.framework to the project.
In the UIApplicaticationDelegate class add the following line of code:
- (BOOL)application:(UIApplication *)application didFinishLaunchingWithOptions:
(NSDictionary *)launchOptions
{
[AppTestSDK initializeForTest];
// Override point for customization after application launch.
[self.window makeKeyAndVisible];
return YES;

DevTest Solutions - 9.5
25-Jul-2016 441/448
2.
1.
2.
3.
4.
5.
6.
7.
1.
2.
}
Once the application in the test is compiled, you can write and run a script to perform these validations using the Execute Script functionality.
Follow these steps:
Right-click a step in the test pane that includes a recorded event that you want to inspect.
Select , , .Add step after... Custom Extensions Execute script (JSR-223)
Create a script to validate the recorded event using a JSR-223 step and an AppTest method.For example, if you want to edit an external web URL, the events are in JSON format and include the URL of the selected link.
import com.itko.lisa.mobile.sdk.AppTest;
String lastEvent = AppTest.getLastAppEvent(_mobileSession);
testExec.setStateValue("last.mobile.event", lastEvent);
Run the test.
Select , from the main menu to run the Actions Start Interactive Test Run Interactive Test Run .(ITR) utility (https://docops.ca.com/display/DTS95/Interactive+Test+Run+%28ITR%29+Utility)
Select the step in the list.Execution History
Click , and select the URL property that you want to test.PropertiesThe returned external link displays in the pop-out window, where you can confirm that the correct URL was returned.
For example:
{"event":"openURL","value":"tel:(831)555-7449"}
Swipe Table GestureThe Swipe Table gesture lets you scroll through a table from a specified point to either the top or the bottom of the table. This gesture swipes repeatedly until the table no longer changes, indicating the end of the table. The following table types are supported:
ListView in Android
UITableView in iOS
If you right-click in one of the supported table types, the Table option appears in the right-click menu.
To insert a swipe table gesture:
Open or create a new test step.
Start recording your mobile test case (https://docops.ca.com/display/DTS95/Record+a+Mobile+Test+Case).

DevTest Solutions - 9.5
25-Jul-2016 442/448
3.
4.
a.
b.
c.
Right-click at the desired location in the recorder window, click , and click one of the Tablefollowing swipe options.
Swipe to TopSwipes the table from the position of the right-click to the top of the table.
Swipe to...Opens the Swipe Table dialog that lets you specify more detailed parameters for the swipe.
Swipe to BottomSwipes the table from the position of the right-click to the bottom of the table.
If you clicked , define the parameters for your swipe.Swipe to...
Define the following parameters on the Swipe tab:
Swipe toSelect the direction of the swipe from the position of the right-click: or Top Bottom.
DurationDetermines how fast the table is scrolled each time by defining the duration of each swipe, in seconds.
WaitDefines an optional wait time after each swipe to accomodate a table that is refreshing slowly.
DistanceDefines the distance for a single swipe. Move the slider all the way to the left for a single swipe of a few pixels. Move the slider all the way to the right for a swipe that is the entire height of the table. Larger swipes can skip some of the rows in the table. Use smaller swipes if you want to interrupt the swipe when a condition is met for one of the rows in the table.
Confirm the following parameter on the Paths tab:
TableThe XPath expression that selects the current table. This field is automatically populated by default. Click to select a different table.Edit
Define any conditions for interrupting a swipe on the Conditions tab:
Stop swiping whenIndicates whether one or all defined conditions must be met to interrupt the swipe. Select or .All of the following are met Any of the following are met
The conditions table lets you add or remove conditions for a swipe.
Click the plus sign to add a condition.
Click any field in the condition table to edit that field.

DevTest Solutions - 9.5
25-Jul-2016 443/448
4.
c.
d.
5.
6.
Click the minus sign to delete highlighted condition.
Each condition includes an XPath expression, an operator (Is or Is Not), and a value. You can use any valid XPath expression that returns a string value, including expressions that select elements that are outside the table being swiped. The XPath expression can contain any of the following variables:
Variable Description
$table NodeList The current table
$size Integer The table size
$index Integer The current index for looping through table rows (zero-based)
$position Integer The current index for looping through table rows (1-based)
To loop through each row in the table, you must include an $index or $position variable in the XPath expression. If either of these variables is found, the defined conditions are evaluated for each row in the table. For example:
In Android ListView:
$table/*[$position]/@text
In iOS:
$table/*[$position]/*[1]/@text
Click .OK
Note: A progress dialog opens during swiping. Click to interrupt long-Cancelrunning swipe actions.
Complete any additional actions for your recording.
Click when you have captured all of the actions for the test. Stop RecordingThe recorder window and the mobile simulator close. The new test case is populated with test steps that represent the mobile actions that are captured while recording.
Custom Extension StepsThe following steps are available in the category:Custom Extensions
Custom Test Step Execution (see page 444)Java Script Step (deprecated) (see page 444)Execute Script (JSR-223) Step (see page 445)Opaque Data Listener Step (see page 447)

DevTest Solutions - 9.5
25-Jul-2016 444/448
Custom Test Step ExecutionThe Custom Test Step Execution step runs a test step that is written by your team using the Software Developer Kit (SDK). This step is documented in Using the SDK (https://docops.ca.com/display/DTS95/Using+the+SDK).
Java Script Step (deprecated)
Note: The Java Script step has been deprecated. Use the Execute Script (JSR-223) (see page step instead.445)
The Java Script step gives you the flexibility of writing and executing a Java script to perform some function or procedure. Your script is executed using the BeanShell interpreter. You have access to all the properties in the test case, including built-in objects.
Prerequisites: Some knowledge of BeanShell. For more information about BeanShell, see http://www..beanshell.org/
The step includes a script editor. Double-clicking an item in the list pastes that Available Objectsvariable name into the editor.
The last value that is exposed in the script is saved as the response of this step.
The following graphic shows the script editor. The script contains the following statements:
A new Date object is created, initialized to the current date and time.
This object is stored in a new property, , using one of the DevTest exposed objects, newProptestExec. For more information, see Using the SDK.
The value of the Date object is set as the response of the step.toString()
The button lets you test the script. You see the result from executing the script, or an error Testmessage describing the error that occurred.
DevTest property name syntax is flexible and can include spaces. The property names that are not valid Java identifiers are converted for use in this step. An underscore (_) replaces any invalid characters.
If you use properties in a script, DevTest substitutes the properties for the actual {{exampleprop}} property values at run time before it runs the script.
Properties with "." in their names are imported into the script environment with "." replacing "_". So in a script is the same as .{{foo.bar}} foo_bar

DevTest Solutions - 9.5
25-Jul-2016 445/448
You can produce a log event inside a script step or assertion. A object is useful. To produce a testExec log event, code the following instead of using the log4j logger. The object causes an testExec.log() actual event to be raised and you can see it in the ITR.
testExec.log("Got here");
A test case run has only one scripting instance. If there are multiple Java scripting steps, whether in the same test case or in subprocesses, DevTest uses the same instance to run the entire test case.
By default, variables are global to the instance. This behavior extends to subprocesses.
If you want the scope of a variable to be local, place the code inside an opening curly brace and a closing curly brace. For example:
{ String var= "local"; return var;}
Parameter names for subprocesses are treated as global variables.
Execute Script (JSR-223) StepThe Execute Script (JSR-223) step lets you write and run a script to perform some function or procedure. You can select from:
Applescript (for OS X)
Beanshell
Freemarker
Groovy
JavaScript
Velocity
To use additional scripting languages, see Enabling Additional Scripting Languages (https://docops.ca..com/display/DTS95/Enabling+Additional+Scripting+Languages)
You have access to all the properties in the test case, including built-in objects.
Complete the following fields:
If Environment Error
Specifies the action to take or the step to go to if the test fails because of an environment error.
Default: Abort the test.

DevTest Solutions - 9.5
25-Jul-2016 446/448
Script LanguageDesignates the scripting language to use.Values:
Applescript (for OS X)
Beanshell
Freemarker
Groovy
JavaScript
Velocity
Default: Beanshell
Copy properties into scopeAllows you to specify which properties to download for use in the step.Values:
Test state and system properties: all properties for the test case and system
Test state properties: properties that provide information about the test case
TestExec and logger only: only the TestExec and logger properties
Default: Test state properties
Click to open a window with the result of the script execution or a description of the errors that Testoccurred.
Anywhere you use {{expressions}}, you can specify a scripting language by using this syntax:
{{=%language%}}
Examples are in the test case in the scripting Examples (https://docops.ca.com/display/DTS95 project./Examples+Project)
Set the default scripting language by using the property.lisa.scripting.default.language (see page 229)
Note: Instances of TestExec object are not allowed to be added to the state map (using TestExec.setStateValue method in the script).

DevTest Solutions - 9.5
25-Jul-2016 447/448
Opaque Data Listener StepUse the Opaque Data Listener step to simulate TCP/IP connections to a server application. This step is an extension of the Virtual TCP/IP Listener step. The step listens for incoming TCP/IP traffic and converts it to a request format that the ODP algorithm understands to determine the response at playback time.
Complete the following fields:
Listen portEnter the port on which DevTest listens for the Opaque Data traffic.
Bind addressEnter the local IP address on which connections can come in. With no bind address specified, the listen step accepts connections on the specified port regardless of the NIC (or the IP address) on which it comes in.
Use SSL to clientSpecifies whether DevTestuses a custom keystore when acting as an SSL server during recording and playback.
If you select an HTTPS connection is used between the client and virtual Use SSL to client,service. You can also specify a custom server-side keystore file and password that is associated with it.
If you do not select , an HTTP connection is used between the client and Use SSL to clientvirtual service.
SSL keystore file
Specifies the name of the server-side keystore file. DevTestuses this keystore when handling HTTPS connections from the client.
By default, the property is used for the server-side keystore file. This property ssl.server.cert.path can also be selected from the section of the drop-down list.Defaults
Keystore password
Specifies the password that is associated with the specified server-side keystore file.
You can specify the password directly using the Password Editor option, or you can use the DevTestProperty Reference Editor option to specify a property expression that will be evaluated to provide the password.
By default, the property expression is used for the server-side keystore {{ssl.server.cert.pass}} password. This property expression can be selected from the section of the drop-down Defaultslist.
Treat request as textSpecifies whether the request is treated as text. For more information, see Virtualize TCP (
.https://docops.ca.com/display/DTS95/Virtualize+TCP)

DevTest Solutions - 9.5
25-Jul-2016 448/448
Request EncodingLists the available request encodings on the machine where DevTest Workstation is running. The default is UTF-8.
Request DelimiterSelect the request delimiter that you want to use. Some delimiters require you to enter additional information. For example, if you select , you must also Regular expression matches the recordspecify the regular expression to match.
Format step response as XML
The VSE framework expects Response steps to accept one of the following:
A response object
A list of response objects
An XML document that represents either
If this check box is cleared, the step produces a list of response objects. The step produces the list, even if it contains only one response.
Default: The step response is formatted as XML.
If Environment Error
Specifies the action to take or the step to go to if the test fails because of an environment error.
Default: Abort the test.