devo f18 remote controller quick start guide v1 · devo f18 remote controller quick start guide ......
TRANSCRIPT

www.walkera.com
DEVO F18 Remote Controller
QUICK START GUIDE8th-DEC-2016
V1.0

-2-
4
3
7
7-8
8
9-10
6
10
11
18
21
10
11
5
6
6
1.0 Get to know your aircraft
2.0 Get to know your Remote Controller
3.0 Specifications
4.0 Attention Before Flight
5.0 Check Battery Levels
6.0 Charge the Batteries
7.0 Download and install the software(Walkera Drone)
8.0 APP Main Screen Instructions
9.0 Prepare the Remote Controller
10.0 Prepare the VOYAGER 4
11.0 Ready to fly
12-17
17
10
18
18
19
20
20
11.1 Starting the aircraft / Get binding
11.2 Connect to APP Software
11.3 GPS indicator light
11.4 Motor Unlock / Lock
12.0 Operation Instruction
13.0 End flight
14.0 Additional remarks
14.1 Introduction for FCS-V4 Main Flight Controller
14.2 Compass Calibration
14.3 Remote Controller stick mode switch and stick calibration
14.4 Introduction for DEVO-RX715 receiver
14.5 Brushless ESC and Brushless Motor connection diagram
15.0 Intelligent Flight Battery Safety Guidelines
Contents

-3-
Modular design for electronic parts enable convenient connections and easy assembles.
Newly designing of new generation flight controller system ensure stabilized and reliable flight performance.
GPS and GLONASS dual navigation system ensure more accurate and safer flight experience.
Adopting new 4G communication image transmission technology.
Adopting 18X optical zoom/ 4K HD camera to obtain much clearer image and easier operating experience.
1.0 Get to know your aircraft
Travel Mode
Flight Mode
Landing Gear DownLanding Gear Up
Landing Mode
1. Gimbal and Camera
2. Landing Gear
3. Front LEDS ( Blue )
4. Rear LEDS ( Red )
5. CW motor
6. CCW motor
7. CW propeller( )
8. CCW propeller( )
9. Aircraft Status Indicators
10. Power Button
11. Battery Level Indicators
12. 4G SIM card port
13. Idle port
14. USB upgrade slot
15. 4G communication antenna
16. Camera memory card port
* 1) 4G communication cards for aircraft and mobile devices are purchased and installed by buyers.
2) The Maximum flight time of 20 minutes was obtained under test environment.
3) To avoid property loss and personal injury caused by wrong operation, please read the manual carefully and
watch the tutorial videos at www.walkera.com before flight.
Quick Start Guide

-4-
2.0 Get to know your Remote ControllerDEVO-F18 with the built-in Bluetooth Module. Equipped with function like manual mode / GPS hold mode / Return To Home, camera & Gimbal controlling, the VOYAGER 4 is easier to control. (You can select the suitable flight mode according to your flying skill.)
14. Battery Level LEDs
15. Charging Indicator
16. Bluetooth blue LED
17. Charger socket
18. Power Button
19. Return To Home
20. AUX3
21. AUX2
22. Motion Mode(Common)
23. Beginner Mode
24. Antenna
25. Data transfer port
26. Upgrade port
27. Left Gimbal Dial
28. Right Gimbal Dial
29. Stop button
30. Skid landing comtrol button
31. Photo button
32. Video button
33. Training port
34. Enter key
1. Mobile Device Holder
2. AUTO Landing
3. AUTO Takeoff
4. Manual Mode
5. GPS Mode
6. Left stick
7. Right stick
8. Follow me mode
9. Circle flight
10. IOC
11. AUX4
12. Gimbal control stick
13. Status LED
Folded
The default setting is Mode 2. The left stick controls the aircraft's altitude and heading, while the right stick
controls its forward, backward, left and right movements.
Left Stick
Up
Down
Turn Left
Turn Right
Right Stick
Forward
Backward
Left Right
* Maximum transmission distance about 1.5km as measured under the experimental environment, for reference purpose only.
Quick Start Guide

-5-
3.0 SpecificationsAircraft
Gimbal
Camera
382mm
465 x 465 x 352mm
3250g(Battery included)
DEVO F18
FCS-V4
DEVO-RX715
WK-WS-42-002A
Voyager 4 (R/B)
22.2V 4500mAh 10C(6S) LiPo
About 20mins
-10℃~ +40℃
Main Rotor Dia.:
Overall (L x W x H):
Weight:
Remote Controller:
Main Controller:
Receiver:
Brushless Motor:
Brushless ESC:
Battery:
Flight Time:
Working Temperature:
Control accuracy:
Control range:
Remote Controller
Overall (L x W x H):
Working frequency:
Signal range:
Built-in battery:
165 x 174 x 62mm
2.4G
About 1.5KM (open without shelter, no electromagnetic interference)
7.4V 3000mAh Li-po 2S
Static: ±0.008°; Motion: ±0.08°; Shake-proof: ±0.008°
Pitch rotation -90°~ +45°; Horizontal ±150°
Sensor:
ISO Range:
Video Resolution:
Photo Resolution:
Focal Length:
Zoom Ratio:
Zoom Speed:
Horizontal View:
Close-shot Distance:
Video Storage Maximum:
Compress Standard:
Files Format:
Support Micro-SD:
1/2.3 SONY IMX117 CMOS
100-3200(Video) / 100-1600(Image)
4K 30fps
4608 x 3456
6.7-134.5mm
18x optical zoom
About 2.0s
59.8°- 3.0°(Wide Angle-Telescopic)
10 - 1500mm(Wide Angle-Telescopic)
32Kbps - 16Mbps
H.264 / H.265
JPG/MP4
SD/SDHC Card(MAX128G)
Quick Start Guide

-6-
AAB
B
1) This product is suitable for people who has flight experience of hobby model and ages 14 .2) Do not fly in bad weather, such as windy, snowy, foggy etc..3) Select the open, no-tall-buildings area. Extensive steel-used buildings will affect the compass, blocking the GPS signal, causing worse on the aircraft positioning or even not able to locate.4) Please keep away from highly spining parts(such as propellers and motors).5) Please keep away from obstacles, people, water and so on.6) Do not fly it in where there is high-voltage lines, communication base stations or radio towers, in order to avoid signal interference.7) Don’t fly in no-fly zone according to the local laws and regulations.8) Flight performance will be effected with environment when flying above 4500m of sea levels, as the battery and gravity system will be influenced.
4.0 Attention Before Flight
5.0 Check Battery LevelsTurn on the remote controller and intelligent flight Battery to check the battery level. Be sure the battery was fully charged at the first use.1) Long press the power button for 2~3 seconds to turn on the remote controller.2) Long press the power button for 3~5 seconds to turn on Intelligent Flight Battery. (Repeat above operation to turn off the intelligent flight battery and remote controller)
Low High
Low
High
1) Connect the charger to the AC power (100 ~ 240v 50/60hz).2) Only use the walkera charger for your Intelligent Flight Battery and remote controller. Please turn off the intelligent flight battery and remote controller before charging.3) The Level indicator of intelligent flight battery light off means charging finished completely; The charging indicator of remote controller turns green means remote controller charging finished completely.
6.0 Charge the Batteries
Power Outlet100~240V
Quick Start Guide
+

-7-
7.0 Download and install the software(Walkera Drone)
We recommend you to use this software on tablet devices to get the best experience. Software supports IOS 9.0 and Android 5.0 version or above.
Android System: Search the “Walkera Drone” at www.walkera.com or Google Play and install it in your mobile.
Apple IOS system: Search “Walkera Drone” at Apple Store and install it in your mobile.
8.0 APP Main Screen InstructionsIn the interface, HD video and photographs can be real-time previewed, as well as the dynamic setting parameters, such as aircraft, remote controller, Gimbal and battery.
ConnectedPos-HoldGPS
GPS Available
4. Equipment connection status: Connected or Disconnected.
3. Return [ ]: Return to last step.
6. The aircraft model: Display aircraft flight mode.
5. The flight time [ ] : Aircraft flight time.
7. Number of aircraft satellite [ ]: Displays the received satellites of aircraft.
9. The remote controller signal strength [ ]: Displays the signal level between remote controller and aircraft.
10. Camera signal [ ]
11. Battery Levels [ ]: Real-time display the current Flight Battery remaining levels.
1. Auto Takeoff [ ]: Click the button, the aircraft take off automatically.
2. Battery Levels return [ ]: The remaining battery power of intelligent flight reaches this point , the aircraft will automatically return.
8. 4G signal [ ]: Displays the 4G communication signal strength.
Quick Start Guide

-8-
12. Setting [ ]: Click the icon to open the Setting menu, Normal setting, aircraft, remote controller, gimbal and battery can be charged.
18. Return to Home[ ]: Click the button, the aircraft stop waypoint flying, and return back automatically.
19. A thumbnail map icon: Click on the thumbnail icon quickly switch to the map interface.
15. The camera zoom control: divided into wide Angle (W) and telescopic (T).
14. Photography and video switch [ ] : Photo: photo button is used to trigger the camera take pictures. While this function also supported in the remote controller. Video: video button to start/stop video. It can also press the video button on the remote controller for video.
17. Flight status parameters: Distance: aircraft with returning point horizontal distance. Height: aircraft with returning point vertical distance. Horizontal velocity: the speed of vehicle in a horizontal direction. Vertical speed: speed of aircraft in the vertical direction.
13. Camera Settings [ ]: Touch icons it has preview settings, recording settings and so on. Under identical Video Size, the larger the stream Rate, the better the picture quality, anyway, the video transmission distance is shortened accordingly.
16. GPS positing: GPS connected successfully displays “GPS Available”, GPS didn’t connect displays “GPS Unavailable”.
Map lock Map switch
Waypoint
Circle Fly
Waypoints
ConnectedPos-HoldGPS
GPS Available
Unfold
Press the button to release the clamp.
Place your mobile device and adjust the clamp to secure.
Phone block
When you install the phone, just open the phone block, other operations the same as 2, 3.
9.0 Prepare the Remote Controller
Strong
* Ensure that the aircraft is flying within the optimal transmission zone. To achieve the best transmission performance, maintain the appropriate relationship between the operator and the aircraft.
Weak
Quick Start Guide

-9-
10.0 Prepare the VOYAGER 4The factory default of the aircraft is Travel Mode. Before flying, connect to power, transform the aircraft to Landing Mode, please don't use the outside force.
Travel Mode
Landing Mode
Transform the aircraft to landing mode, please hold the aircraft so as not to damage the Landing Gear.If the red and blue lights are flashing alternately, it indicates the aircraft is not normal, see the APP indications.
TransformIf the redsee the A
Attention:
Gimbal Lock
Positioning Column
Gimbal Console
Lock
Location Hole
Screw Hole Position
Rotate the Gimbal Lock to the locked position following to the direction of the arrow.
Tighten M3x3 screws to fix the Gimbal.
Install Gimbal and Camera
Remove gimbal cover.
Aim the gimbal positioning column to upper location hole , and rotate the white line of Gimbal lock to unlocked position, align the white lines and insert the gimbal.
Insert the battery.Power on the remote controller and the aircraft.The red LED light flashes until goes out, indicating thatIMU preheating is complete and the code binding is successful. (Automatically transform the aircraft to Landing Mode.)Please turn off the remote controller and aircraft after finishing.
Quick Start Guide

-10-
Install propellers
Fix the CW propeller( ) onto the CW motor according to the direction of blue arrow, and fix the CCW propeller( ) onto the CCW motor according to the direction of orange arrow. Tighten the propellers manually and make sure the propeller is installed in proper way and fastened.
CW propeller ( )
CW propeller ( )
Front CCW propeller ( )
CCW propeller ( )
11.0 Ready to flyPlace the aircraft in a wide open space, with the rear facing you. (This position is known as “TAIL IN”)
11.1 Starting the aircraft / Get binding
Power on the remote controller.Put the aircraft to the horizontal place and power on the aircraft.The red LED light flashes until goes out, indicating that IMU preheating is complete and the code binding is successful. (If the red and blue lights are flashing alternately, it indicates the aircraft is not normal, see the APP indications.)Open Bluetooth and Cellular Data for mobile device.
11.2 Connect to APP Software
1. Click the icon on mobile device
Walkera Drone
2. Click “Select Model”, select “Voyager 4-4G-4K”, and then click “Go to Connect”.
3. Select remote controller(RC) , click “Connect”.
4. Remote control serial number will pop up automatically, click "serial number and connect”.
5. Select the aircraft serial number item, click “Setting”.
6. Click "Add", it will pop up the input box.
7. Enter the serial number of the aircraft, and note the name, click "OK."
8. Click "Connect" to enter the main interface.
Quick Start Guide

-11-
11.3 GPS indicator light
When the blue LED light (GPS) begin to flash, you can work GPS function.
Method 2: Push the left stick and right stick down and move outward and hold for more than 2 seconds. You will see the red LED light turns off, indicating that motors are locked.
Method 1: When the aircraft has landed, push and hold the throttle stick down. The motors will stop after 5 seconds.
There are two methods to lock the motors.
Motor Lock
Method 1 Method 2
Motor Unlock
Attention:
11.4 Motor Unlock / Lock
Attention:When it has GPS signal, you can unlock under the GPS mode (GPS) or Manual mode or Motion mode.Without the GPS signal, you can only unlock motors under Manual Mode.After unlock the motor, if the flight does not start after 5 seconds, the motor will automatically enter the locked state.
Push the switch to GPS mode or Manual mode or Motion mode, and push the left stick and right stick down and move outward and hold for more than 2 seconds. You will see the red LED light keeps on, indicating that motors are unlocked. Motors will start rotating after unlocked, please release the stick.
Blue LED light
Quick Start Guide
-12-
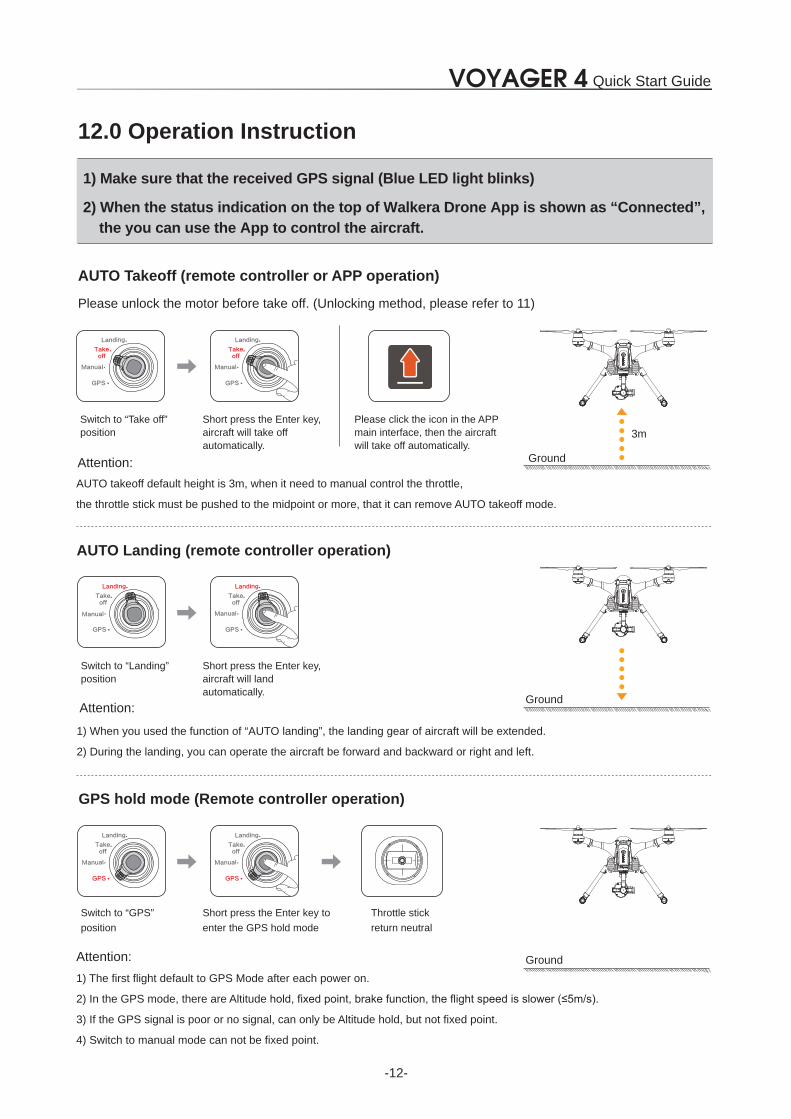
12.0 Operation Instruction
2) When the status indication on the top of Walkera Drone App is shown as “Connected”, the you can use the App to control the aircraft.
1) Make sure that the received GPS signal (Blue LED light blinks)
AUTO Takeoff (remote controller or APP operation)
Please unlock the motor before take off. (Unlocking method, please refer to 11)
Attention:AUTO takeoff default height is 3m, when it need to manual control the throttle,
the throttle stick must be pushed to the midpoint or more, that it can remove AUTO takeoff mode.
Please click the icon in the APP main interface, then the aircraft will take off automatically.
Switch to “Take off” position
Short press the Enter key, aircraft will take off automatically.
AUTO Landing (remote controller operation)
Ground
3m
Ground
Ground
Switch to “Landing” position
Short press the Enter key, aircraft will landautomatically.
1) When you used the function of “AUTO landing”, the landing gear of aircraft will be extended.
2) During the landing, you can operate the aircraft be forward and backward or right and left.
Attention:
GPS hold mode (Remote controller operation)
Switch to “GPS” position
Short press the Enter key to enter the GPS hold mode
Throttle stick return neutral
Attention:1) The first flight default to GPS Mode after each power on.
2) In the GPS mode, there are Altitude
3) If the GPS signal is poor or no signal, can only be Altitude hold, but not fixed point.
4) Switch to manual mode can not be fixed point.
Quick Start Guide

-13-
Ground
Motion mode (Remote controller operation)
Switch to “Common” position
Short press the Enter key to enter the Motion mode
Attention:
Attention:
1) In the Motion mode, there are Altitude hold, fixed point, brake function, the flight speed is faster ( 8m/s).2) If the GPS signal is poor or no signal, can only be Altitude hold, but not fixed point.3) Switch to manual mode can not be fixed point.
Circle flight (remote controller or APP operation)
Aircraft in GPS hold mode
Switch to “Circle flight” position
Short press the Enter key to enter the circle flight mode
Please click the icon in the APP interface, then the aircraft enter circle flight mode.
1) The aircraft is under quiescent state when it enters auto-circling. The circling function can only work after you set circle speed and direction by toggling aileron stick left or right (-5m/s to +5m/s speed changeable, Default is 0m/s).
Dial to the left, Clockwise circles
Dial to the right, Counterclockwise circles.
Speed: The larger volatility toggling and longer holding time, the faster circling. The slower the contrary.
2) Dial elevator stick up or down to change circle radius (5m-50m radius changeable, Default is 5m)
Dial up, Circle radius turns small
Dial down, Circle radius turns large
Quick Start Guide

-14-
25m
Long press this key(3-5 seconds) on the remote controller and the aircraft will return automatically
Click this key in the APP interface and the aircraft will return automatically
RETUR TO OME (Remote controller or APP operation)
Aircraft with Home point horizontal distance 30m
a. If the flight altitude is higher than 25m, the aircraft will keep the current altitude and return above the Home Point then descend vertically.
b. When the flight altitude is lower than 25m, the aircraft will elevate automatically to 25m high then fly back above the Home Point and land vertically.
Aircraft with Home point horizontal distance 30m
a. If the flight altitude is higher than 25m, the aircraft will keep the current altitude and return above the Home Point then descend vertically.
b. If the flight altitude is lower than 25m, the aircraft will keep the current altitude and return above the Home Point then descend vertically.
Attention:
1) To enter a key return, please don t move the other switches and buttons. 2) When the aircraft lost the remote controller signal, it will automatically enter Failsafe RTH.3) When the aircraft battery voltage is too low, and aircraft with Home point horizontal distance is greater than 30m, aircraft will automatically turn back. If the aircraft with the Home point horizontal distance less than 30m, aircraft will decrease automatically from the current position and land.4) GPS signal is not normal or GPS does not work, can not achieve the auto return, but will land automatically.
Height over HP>25m
Height over HP>25m
Height over HP<25m
Height over HP<25m
Elevate to 25m
Home Point
Home Point
Quick Start Guide

-15-
OME
yper IOC ModeIOC or Intelligent Orientation Control mode means that the aircraft’s flight direction is only relative to the orignal take-off point (where you armed the motors). REGARDLESS of the actual aircraft headding, in this mode you can fly past something and pan the aircraft to frame your shot, without having to worry what direction the aircraft is facing.
1) During flying, the drone will enter hyper IOC mode when the distance between the flight position of drone and the initial position where the GPS signal has been received is more than 10m.2) When under hyper IOC mode, you can make the drone return to the initial position only by holding the stick backwards.
Attention:
Start
Exit
Add
Clear
Start
Exit
Add
Waypoints light (APP operation)
Waypoint light (APP operation)
Click the icon to enter the Waypoint Flight interface.
Click the icon to enter the Waypoints Flight interface.
Switch to “IOC” position
Short press the Enter key to enter the Hyper IOC mode
Mode2 (Throttle stick on the left)
Quick Start Guide

-16-
Three-axis stabilization gimbal makes the camera steady so that it can shoot stable photos even fly with hight altitude. And you can control pitch and horizontal angle of the gimbal by Gimbal stick on Remote Controller or APP Software.
Control the gimbal (remote controller or APP operation)
Angle of Pitch
Angle of hori ontal
Gimbal Stickup or down.
In APP image interface swipe up or down.
Gimbal StickLeft or Right.
In APP image interface swipe left or right.
Lock modeGimbal pointing stayunchanged whenaircraft nose move
Attention:1) You must select the mode first and then adjust the angle. In follow me mode, the horizontal angle (YAW) is not adjustable.
2) Gimbal stick position determines the rate of change of the gimbal: when the stick located at the midpoint the velocity is zero, the greater the offset of the stick gimbal changes faster, whereas the slower.
ollow me modeGimbal pointing move with aircraft nose direction
Switch to GREEN ARROW to Lock mode.
Switch to PURPLE ARROW to Follow me mode.
ConnectedPos-HoldGPS
ConnectedPos-HoldGPS
DownCenter
Quick Start Guide

-17-
Remote Controller Operation
Take photo by short pressing the button of Remote Controller
Video by short pressing the button of Remote Controller
Quick Start Guide
Attention:
Landing gear E tended and Retracted (remote controller operation)
Extend landing gear Retract landing gear
1) Make sure the landing gear retracted after the aircraft takes off.
2) When the aircraft lands manually, extend the landing gear.
3) In the “RETURN TO HOME” Mode, the landing gear will extend automatically till the flight end.
Retract or Extend the landing gear by short pressing the button of Remote Controller.
Video and photo (remote controller or APP operation)
APP Operation
Slide downward: adjust the telescope of zoom camera
Slide upward: adjust the panorama of zoom camera
1) Choose working mode: photo or video
2) Touch the Photo or video icon to take photo or video
Photo or video icon
Working mode
T end: adjust the telescope of zoom camera
1 .0 End flightManual landing or return to home function landing.
First, Power off the aircraft, then turn off the Remote Controller.
Finally, remove the battery from the aircraft.
W end: adjust the wide Angle of zoom camera
Left Gimbal Dial
Camera Settings
-18-
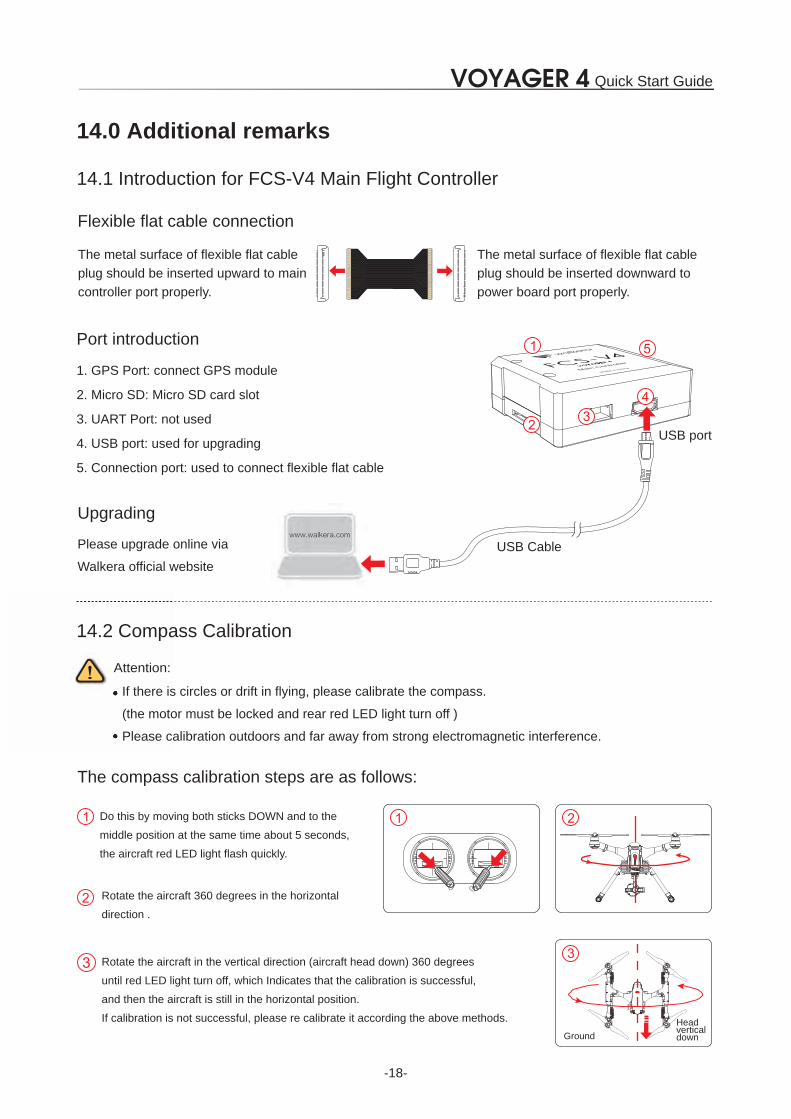
If there is circles or drift in flying, please calibrate the compass.(the motor must be locked and rear red LED light turn off )Please calibration outdoors and far away from strong electromagnetic interference.
If there is(the motoPlease ca
Attention:
14.2 Compass Calibration
The compass calibration steps are as follows:
Do this by moving both sticks DOWN and to the middle position at the same time about 5 seconds, the aircraft red LED light flash quickly.
Rotate the aircraft 360 degrees in the horizontal direction .
Rotate the aircraft in the vertical direction (aircraft head down) 360 degrees until red LED light turn off, which Indicates that the calibration is successful, and then the aircraft is still in the horizontal position.If calibration is not successful, please re calibrate it according the above methods.
GroundHead vertical down
14.0 Additional remarks
14.1 Introduction for FCS-V4 Main Flight Controller
Flexible flat cable connection
The metal surface of flexible flat cable plug should be inserted upward to main controller port properly.
The metal surface of flexible flat cable plug should be inserted downward to power board port properly.
1. GPS Port: connect GPS module
2. Micro SD: Micro SD card slot
3. UART Port: not used
4. USB port: used for upgrading
5. Connection port: used to connect flexible flat cable
Port introduction
UpgradingPlease upgrade online via Walkera official website
USB Cable
USB port
Quick Start Guide

-19-
M O D E 1 M O D E 2 M O D E 3 M O D E 4
Stick Mode Switch:
Stick Calibration:
Attention:
Long press " " button for 3 to 5 seconds, four lights flash alternately to enter stick calibration.
Operate the stick several times within mechanical tuning range and then back in the middle. Long press
the " " button for 3 to 5 seconds again, four indicator lights turn on, then exit stick calibration.
When you exit if vibrate alert, then the calibration fails, please recalibrate.
The indicator react according to the stick mode
M O D E 1
M O D E 2 M O D E 4
M O D E 3
MODE2 and MODE4 are left-hand throttle
Throttle
Throttle Throttle
ThrottleElevator
Elevator Elevator
Elevator
Rudder
Rudder Rudder
RudderAileron
Aileron Aileron
Aileron
MODE1 and MODE3 are right-hand throttle
Tip:
14.3 Remote Controller stick mode switch and stick calibration
DEVO F18 stick mode and stick calibration has been set up before out of factory, if you need to switch and calibration, please refer to the following methods.It must be operated under power off or motors are locked well.
※ ustomi ation also supported in APP software.
Stop Stop
Stop
Long press “ ” buttom for 3-5 seconds, enter the stick mode change, short press “ ” buttom,
choose mode 1, mode 2, mode 3, mode 4 and then long press “ ” buttom for 3-5 seconds again,
comfirm and exit the change mode.
Landing gear
Landing gear
Quick Start Guide
-20-
W
V
U
W
V
U
W
V
U
W
V
U
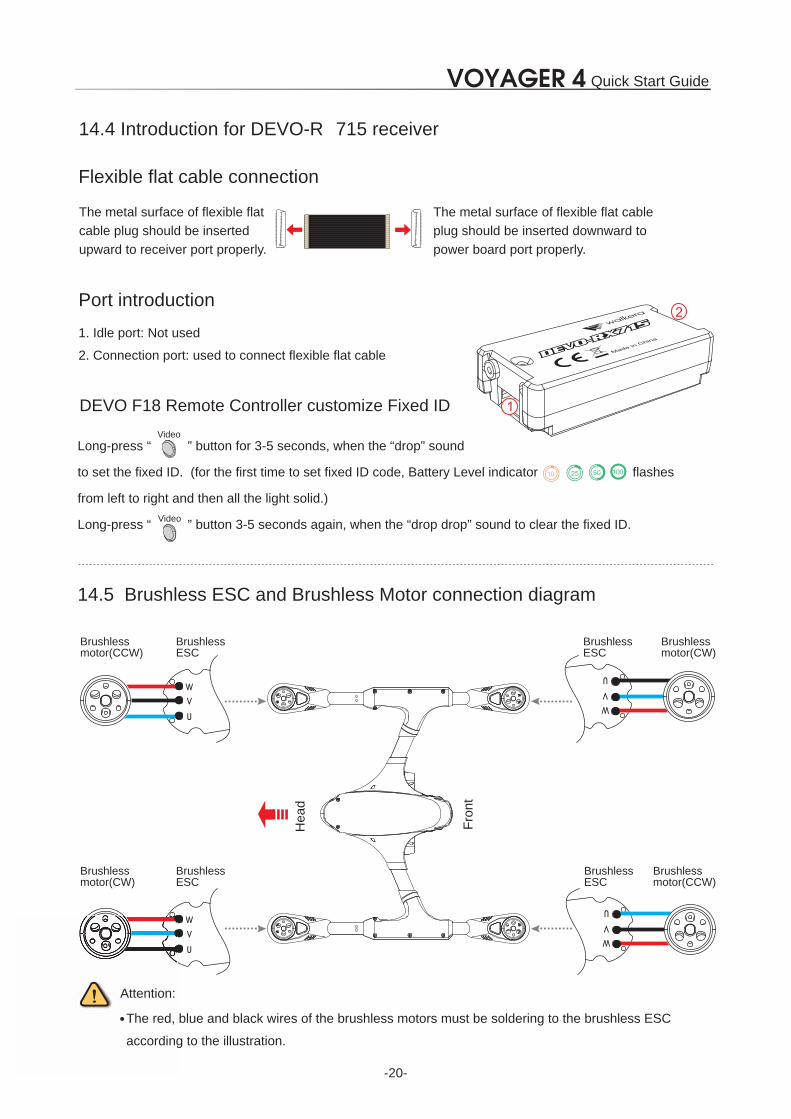
14.5 Brushless ESC and Brushless Motor connection diagram
Brushless ESC
Brushless motor(CCW)
Brushless motor(CCW)
Brushless ESC
Brushless ESC
Brushless ESC
Brushless motor(CW)
Brushless motor(CW)
Hea
d
Fron
t
Attention:
The red, blue and black wires of the brushless motors must be soldering to the brushless ESC according to the illustration.
14.4 Introduction for DEVO-R 715 receiver
Video
Video
DEVO F18 Remote Controller customize Fixed ID
Long-press “ ” button for 3-5 seconds, when the “drop” sound
to set the fixed ID. (for the first time to set fixed ID code, Battery Level indicator flashes
from left to right and then all the light solid.)
Long-press “ ” button 3-5 seconds again, when the “drop drop” sound to clear the fixed ID.
Flexible flat cable connectionThe metal surface of flexible flat cable plug should be inserted upward to receiver port properly.
The metal surface of flexible flat cable plug should be inserted downward to power board port properly.
Port introduction1. Idle port: Not used2. Connection port: used to connect flexible flat cable
Quick Start Guide

-21-
15.0 Intelligent light Battery Safety Guidelines
15.1 Battery Use
15.2 Battery Maintenance
Attention: Store Intelligent Flight Batteries in a ventilated location.To avoid fire, serious injury, and property damage, observe the following safety guidelines when using, charging, or storing your batteries.
1) DO NOT allow the batteries to come into any kind of liquid. DO NOT leave batteries out in the rain or near a source of moisture. DO NOT drop the battery into water. If the inside of the battery comes into water, chemical decomposition may occur, potentially resulting in the battery catching on fire, and may even lead to an explosion.
2) Never use non-walkera batteries. Go to www. walkera.com to purchase new batteries. Walkera takes no responsibility for any damage caused by non-walkera batteries.
3) Never use or charge swollen, leaky, or damaged batteries. If your batteries are abnormal, contact Walkera or a walkera authorized dealer for further assistance.
4) Never install or remove the battery from the aircraft when it is turned on. DO NOT insert or remove batteries if the plastic cover has been torn or compromised in any way.
5) The battery should be used in temperatures from -10℃ to 40℃. Use of the battery in environments above 50℃ can lead to a fire or explosion. Use of battery below -10℃ the life cycle of battery will be damaged.
6) DO NOT use the battery in strong electrostatic or electromagnetic environments. Otherwise, the battery control board may malfunction and cause a serious accident during flight.
7) Never disassemble or pierce the battery in any way or the battery may leak, catch fire, or explode.
8) Electrolytes in the battery is highly corrosive. If any electrolytes contacts with your skin or eyes, wash the affected area with fresh running water at least 15 minutes, and then see a doctor immediately.
9) DO NOT use the battery if it was involved in a crash or heavy impact.
10) If the battery falls into water with the aircraft during flight, take it out immediately and put it in a safe and open area. Maintain a safe distance from the battery until it is completely dry. Never use the battery again and dispose it properly.
11) DO NOT put batteries in a microwave oven or in a pressurized container.
12) DO NOT place loose battery cells on any conductive surface, such as a metal table.
13) DO NOT put the loose cells in a pocket, bag or drawer where they may short-circuit against other items or where the battery terminals could be pressed against each other.
14) DO NOT drop or strike batteries. DO NOT place heavy objects on the batteries or charger. Avoid dropping batteries.
15) Clean battery terminals with a clean, dry cloth.
1) Never over-discharge, as this may lead to battery cell damage.2) Never use the battery when the temperature is too high or too low.3) Battery life may be reduced if not used for a long time.
Quick Start Guide

User manual is subject to change without prior notice.
Please go to Walkera official website to get the latest version.
Tel: 400-9318-878