developing db2 schema using ibm explorer in vs...developing db2 schema using ibm explorer in vs.net...
TRANSCRIPT

Developing DB2 schema using IBMExplorer in VS.NET
Presented by the DB2 Developer Domain
http://www7b.software.ibm.com/dmdd/
Table of contentsIf you're viewing this document online, you can click any of the topics below to link directly to thatsection.
1. Before you start ................................................................................... 22. Getting started..................................................................................... 53. Creating the database schema............................................................ 94. Creating the database logic............................................................... 205. Loading the test data......................................................................... 296. Testing the application....................................................................... 307. Summary and resources ................................................................... 328. Feedback........................................................................................... 34
Developing DB2 schema using IBM Explorer in VS.NET Page 1 of 34
Section 1. Before you start
About this tutorial
This tutorial demonstrates the development of DB2 server-side objects such astables, views, indexes, triggers, procedures, and functions using the IBMExplorer component of the DB2 "Stinger" Development Add-In for Visual StudioTechnical Preview. To show the ease of building these objects, this tutorialguides you through the steps required to develop a sample items inventorymanagement application for a small company using the DB2 "Stinger"Development Add-In for Visual Studio Technical Preview.
You will learn how to:
° Create a local DB2 database.° Discover local and remote DB2 data connections.° Develop DB2 CLR methods using ADO.NET and the DB2 managed
provider.° Create DB2 tables with advanced column value options and check
constraints using wizards.° Create DB2 views, scalar SQL functions, table SQL functions, and SQL
procedures using wizards.° Create DB2 triggers for tracking changes from a table in a history table using
wizards.° Import table column definitions into other new schema objects.° View details for tables (columns, triggers, and indexes) and views (columns
and triggers).° Retrieve and update data for tables and views.° Run procedures and functions.
Should I take this tutorial?
You should take this tutorial if you want to:
° Use wizards to create tables, views, indexes, triggers, procedures, orfunctions directly from the IBM Explorer.
° Test run your procedures and functions.° Preview and alter your tables and views data.° Learn more about the advanced features of the DB2 Development Add-In for
Visual Studio .NET
http://www7b.software.ibm.com/dmdd/ Presented by the DB2 Developer Domain
Page 2 of 34 Developing DB2 schema using IBM Explorer in VS.NET

Prerequisites
To complete the steps in this tutorial you'll need:
° IBM DB2 V8.1.2 Application Development Client° DB2 "Stinger" Technical Preview° IBM DB2 V8.1 Server° IBM DB2 SAMPLE database° Microsoft Windows 2000, 2003, or XP with the Microsoft .NET framework
V1.1° Microsoft Visual Studio .NET 2003
About the author
Abdul Al-Azzawe is the DB2 Tools architect for Visual Studio .NET. He joinedIBM in 1990 and worked in the Toronto lab for ten years as part of the DB2engine development team with special focus on the Windows platform. In Marchof 2000, Abdul joined the IBM Silicon valley lab to architect the release of theDB2 integrated SQL debugger, the DB2 Development Center, and the DB2Development Add-Ins for Visual Studio 6.0. In May of 2002, Abdul joined theIBM San Francisco team to architect the integration with Visual Studio .NET,one of his proudest achievements in his career at IBM.
Abdul has written numerous technical articles and tutorials for the DB2Developer Domain covering a variety of DB2 application development topics.Abdul appreciates hearing feedback from actual developers about DB2 tools,and welcomes any suggestions for ways to improve these products. Abdul canbe reached at [email protected].
Presented by the DB2 Developer Domain http://www7b.software.ibm.com/dmdd/
Developing DB2 schema using IBM Explorer in VS.NET Page 3 of 34

Trademarks
IBM, DB2, and DB2 Universal Database are registered trademarks of the IBMCorporation in the United States and/or other countries.
Microsoft, Windows, Visual Studio, and CLR are registered trademarks ofMicrosoft Corporation in the United States, other countries, or both.
Other company, product and service names may be trademarks or servicemarks of others.
http://www7b.software.ibm.com/dmdd/ Presented by the DB2 Developer Domain
Page 4 of 34 Developing DB2 schema using IBM Explorer in VS.NET

Section 2. Getting started
Application overview
This tutorial walks you through the steps required to develop the databaseschema and logic for a sample items inventory application. The databaseobjects are created in an ad-hoc manner directly against the database using theIBM Explorer as opposed to using the DB2 database project.
The application consists of the following database objects:
° Inventory table. This table is used to maintain the list of inventory items. Itdefines their ID, name, warehouse location code, current quantity, lowquantity threshold, and high quantity thresholds.
° InventoryHistory table. This table has a log of all historical updates to thequantity column of the Inventory table. It tracks such things as the updateduser ID and timestamp.
° InventoryName index.This index allows for more efficient lookup of inventoryitems by name from the Inventory table.
° LowInventory view. This view lists all of the inventory item entries in theInventory table where the current quantity is less than the low quantitythreshold.
° InventoryTracker trigger. This trigger is activated after every update to thequantity column of the Inventory table. It inserts a log entry for each updatemade to the InventoryHistory table capturing the updater user ID and updatetimestamp.
° InventoryIndicator scalar function. This SQL scalar function returns aquantity level indicator of Low, Medium, and High, given current quantity, lowquantity threshold, and high quantity thresholds for an inventory item.
° InventoryWarehouse table function. This SQL table function returns allinventory items from the Inventory table having a specific warehouselocation code. This table function takes the desired warehouse location codeas an input parameter.
° InventoryAnalyzer procedure. This SQL procedure will analyze the Inventorytable and return the inventory items ID, name, and stock level indicator for allinventory items for a specific warehouse location. This procedure takes thedesired warehouse location code as an input parameter.
Although this tutorial shows you how to create these database objects directlyfrom the IBM Explorer, you can certainly adopt the same method to create themusing generated DB2 script files in a DB2 database project. The advantage ofusing the database project approach is that you can adopt a more iterativedevelopment approach.
Registering the DB2 add-in
Presented by the DB2 Developer Domain http://www7b.software.ibm.com/dmdd/
Developing DB2 schema using IBM Explorer in VS.NET Page 5 of 34

The DB2 "Stinger" Development Add-In for Visual Studio Technical Preview isautomatically installed and registered when you install DB2; however, if youinstalled Visual Studio .NET after installing the DB2 application developmentclient, then you will need to manually register the DB2 managed provider andthe Add-Ins. This can be done using the following short-cut: Start => Programs=> IBM DB2 => Set-up Tools => Register Visual Studio Add-Ins. Thisshort-cut will attempt to register both the Visual Studio 6.0 and Visual Studio.NET Add-Ins.
To register the DB2 managed provider and development add-in from thecommand line, run db2nmpreg. To un-register them, run db2nmpreg -u.
Starting Visual Studio .NET
Launch Visual Studio .NET from the Start menu using the following short-cut:Start => Programs => Microsoft Visual Studio .NET 2003 => MicrosoftVisual Studio .NET 2003.
This short-cut should launch the IDE and automatically load the DB2Development Add-In. To verify that the DB2 Development Add-In is loaded, youshould see the IBM Explorer entry under the Visual Studio .NET View menu.
Creating the DB2 database
The steps in this tutorial were designed to work with any DB2 database. Theydo not require that any database schema be made available in advance. Youmust, however, have the proper permission to create tables, views, triggers,functions, and procedures.
You can work with an existing remote or local DB2 database, or create a newlocal database. To create a new local database:
1. Right-click the Data Connection's folder of your IBM Explorer and selectCreate New DB2 Database....
2. In the Create DB2 Database window, specify the name of the new databaseto be created.
3. Click OK.
The local database creation process could take a while and depends on thespeed of your system. You should see a successful message displayed in theIBM DB2 Output pane once the database is created.
http://www7b.software.ibm.com/dmdd/ Presented by the DB2 Developer Domain
Page 6 of 34 Developing DB2 schema using IBM Explorer in VS.NET
Adding the DB2 data connection
To access DB2 server catalogs and new DB2 objects, add the target DB2server connection to the data connection's folder of the IBM Explorer.
To add a local DB2 database connection:
1. Launch the IBM Explorer using View => IBM Explorer.2. Select the Data Connection's folder of the IBM Explorer, and click Add
Connection. This will launch the Add Database Connection window. Notethat by default, the value localhost is shown in the Server field. Thisallows you to access locally created or locally cataloged databases.
3. Select the desired database from the Database drop-down list.4. Specify the user name and password to use for the database. You can leave
these fields blank if you want to use the Windows integrated security, whichis your current log-on user name and password.
5. Optional: Specify the Default owner to be used as the pre-filled schemaname.
6. Click Test Connection to ensure that you have proper connectivity.7. Click OK to add the connection.
Alternately, you can add a data connection for a remote database on a remoteDB2 server.
If you have properly configured DB2 administration servers on your network,follow these steps:
1. Launch the IBM Explorer using View => IBM Explorer.2. Right-click the Data Connection's folder of the IBM Explorer, and select Add
Connection. This will launch the Add Database Connection window.3. Note that by default, the value localhost is shown in the Server field. This
allows you to access locally created or locally cataloged databases. To getthe list of remote DB2 servers, click the server's Discover... button. Oncethe list is retrieved, you will see the timestamp of the successful serversrefresh.
4. Choose the desired server from the drop-down list.5. To get the list of DB2 database available on the remote DB2 server, click the
database Discover... button. Once the list is retrieved, you will see thetimestamp of the successful databases refresh.
6. Select the desired database from the Database drop-down list.7. Specify the user name and password to use for the remote database
connection.8. Optional: Specify the Default owner to be used as the pre-filled schema
name in all the wizards.9. Click the Test Connection button to ensure that you have proper
connectivity.10.Click OK to add the connection.
Presented by the DB2 Developer Domain http://www7b.software.ibm.com/dmdd/
Developing DB2 schema using IBM Explorer in VS.NET Page 7 of 34

If you would like to establish a direct connection to a DB2 server where youknow the remote server host name or IP address, port number, and databasename, then you can bypass the discovery feature and directly specify thesevalues as follows:
1. Launch the IBM Explorer using View => IBM Explorer.2. Right-click the Data Connections folder of the IBM Explorer and select Add
Connection. This will launch the Add Database Connection window.3. In the Server field, type the remote server host name or IP address followed
by a colon and the port number. For example, typeazzawe2.svl.ibm.com:446.
4. In the Database field, type the name of the remote database. For example,type RemoteDB.
5. Specify the user name and password to use for the remote databaseconnection.
6. Optional: Specify the Default owner to be used as the pre-filled schemaname in all the wizards.
7. Click the Test Connection button to ensure that you have properconnectivity.
8. Click OK to add the connection.
Once the data connection is created, the server catalog information will beretrieved in an asynchronous fashion to populate the Tables, Views,Procedures, and Functions folders.
http://www7b.software.ibm.com/dmdd/ Presented by the DB2 Developer Domain
Page 8 of 34 Developing DB2 schema using IBM Explorer in VS.NET

Section 3. Creating the database schema
Overview
This section describes the steps required to create the following databaseschema objects:
° The Inventory, and the InventoryHistory tables° The InventoryName index° The LowInventory view
Using double quotes for SQL identifier
Throughout this section, use double quotes for various SQL identifiers, such astable names, column names, view names, ...etc. Double quotes preserve thelower/upper case mixing in these identifiers, and support blanks when andwhere required. If you don't use quotes, SQL identifiers will automatically beuppercase.
Using the DB2 database project:
Note that the DB2 Project Selection step is not included in most of the wizardsused in the tutorial. This step allows you to specify a target DB2 databaseproject for which to add the script files the get generated to create the variousDB2 objects. I would strongly recommend that you use this option, as you beable to save your script files for further editing and re-deployment to otherdatabase servers.
Creating the Inventory table
The Inventory table is a simple table that allows for managing the in-stockquantities of various inventory items, as well as their warehouse location. Theminimum and maximum quantity threshold values are also included in this table.Check constraints are used to ensure two simple rules: The minimum quantitythreshold has to be greater than zero, and that the high quantity threshold cannot be smaller than the minimum quantity threshold.
To create the table:
1. Right-click the Tables folder of your data connection and select New =>Table.... This will launch the DB2 Create Table Wizard.
2. Click Next to go to the Identification page, and then do the following:° Specify your user id in the Table schema name field.° Specify "Inventory" in the Table name field.° Leave the Table space field blank.° Specify Items inventory in the Comment field.
Presented by the DB2 Developer Domain http://www7b.software.ibm.com/dmdd/
Developing DB2 schema using IBM Explorer in VS.NET Page 9 of 34

3. Click Next to go to the Column Definitions page, and then do the following:° Click Add to create column #1, set Name = ID, Allow null = unchecked,
and Type = CHARACTER, Length = 4.° Click Add to create column #2, set Name = "Name", Allow null =
unchecked, and Type = VARCHAR, Length = 32.° Click Add to create column #3, set Name = "LocationCode", Allow null
= unchecked, and Type = CHARACTER, Length = 5.° Click Add to create column #4, set Name = "CurQuantity", Allow null =
unchecked, and Type = INTEGER.° Click Add to create column #5, set Name = "MaxQuantity", Allow null =
unchecked, and Type = INTEGER.° Click Add to create column #6, set Name = "MinQuantity", Allow null =
unchecked, and Type = INTEGER.° The Column Definitions page should now look like:
4. Click Next to go to the Primary Key page, and then do the following:° Select the Include primary key option, and keep the "Inventory_PK"
primary key name.° Select the ID entry from the list of Available columns and click the [>]
button to move it to the Selected columns list.° The Primary Key page should now look like:
http://www7b.software.ibm.com/dmdd/ Presented by the DB2 Developer Domain
Page 10 of 34 Developing DB2 schema using IBM Explorer in VS.NET

5. Click Next to go to the Unique Keys page, do nothing.6. Click Next to go to the Foreign Keys page, do nothing.7. Click Next to go to the Script Options page, and click the Add check
constraints... button. In the Add Check Constraints window, do the following:° Click Add to create constraint #1, set Name = "Inventory_MinQ",
Check condition = "MinQuantity" > 0.° Click Add to create constraint #2, set Name = "Inventory_MaxQ",
Check condition = "MaxQuantity" > "MinQuantity".
Presented by the DB2 Developer Domain http://www7b.software.ibm.com/dmdd/
Developing DB2 schema using IBM Explorer in VS.NET Page 11 of 34
° Click OK to dismiss the window.
8. Click Finish to create the table.
If you have typed everything correctly, the table is created successfully and youwill see the new table added to your data connection tables folder.
Note: If you skip to the Summary page of the wizard and click Show generatedcode..., you will see the following script (replace ABDULH with your user id):
-- <ScriptOptions statementSeparator="@"/>@CREATE TABLE ABDULH."Inventory" (
ID CHARACTER ( 4 ) NOT NULL ,"Name" VARCHAR ( 32 ) NOT NULL ,"LocationCode" CHARACTER ( 5 ) NOT NULL ,"CurQuantity" INTEGER NOT NULL ,"MaxQuantity" INTEGER NOT NULL ,"MinQuantity" INTEGER NOT NULL ,CONSTRAINT "Inventory_PK" PRIMARY KEY (ID),CONSTRAINT "Inventory_MinQ" CHECK ("MinQuantity" > 0),CONSTRAINT "Inventory_MaxQ" CHECK ("MaxQuantity" > "MinQuantity"))
@GRANT ALL ON TABLE ABDULH."Inventory" TO PUBLIC@COMMENT ON TABLE ABDULH."Inventory" IS 'Items inventory'@
Creating the History table
http://www7b.software.ibm.com/dmdd/ Presented by the DB2 Developer Domain
Page 12 of 34 Developing DB2 schema using IBM Explorer in VS.NET

The Inventory History table is a tracking table that maintains a historical log ofupdates to the quantities of existing inventory items. It maintains suchinformation as the updated item ID, updater name and update timestamp. It canbe easily expanded to include the old and new value of the quantity column.
To create the table, follow these steps:
1. Right-click on the Tables folder of your data connection and select New =>Table.... This will launch the DB2 Create Table Wizard.
2. Click Next to go to the Identification page, and then do the following:° Specify your user id in the Table schema name field.° Specify "InventoryHistory" in the Table name field.° Leave the Table space field blank.° Specify History of inventory items updates in the Comment
field.
3. Click Next to go to the Column Definitions page, and then do the following:° Click Add to create column #1, set Name = "EntryID", Allow null =
unchecked, and Type = INTEGER.° Click the Value options... button. In the Value Options window, select
the Identity column option, set Initial value = 1, Increment = 1, ClickOK.
Presented by the DB2 Developer Domain http://www7b.software.ibm.com/dmdd/
Developing DB2 schema using IBM Explorer in VS.NET Page 13 of 34

° Click Add to create column #2, set Name = "UpdateTS", Allow null =unchecked, and Type = TIMESTAMP.
° Click the Value options... button. In the Value Options window, selectthe Default value option, set it to CURRENT TIMESTAMP, Click OK.
° Click Add to create column #3, set Name = "UpdateID", Allow null =unchecked, and Type = VARCHAR(32).
° Click Value options.... In the Value Options window, select the Defaultvalue option, set it to USER, Click OK.
° Click Import to copy over the Inventory ID column from the Inventorytable.
° In the Import window, select your user id from the schema drop-down.
http://www7b.software.ibm.com/dmdd/ Presented by the DB2 Developer Domain
Page 14 of 34 Developing DB2 schema using IBM Explorer in VS.NET

From the available Inventory table, select the ID column and click the [>]button.
° Click OK to close the Import window. You should see the ID columnadded. Rename as "InventoryID".
4. Click Next to go to the Primary Key page, and then do the following:° Select the Include primary key option, and set the Primary key name to
"InventoryH_PK"
° Select the "EntryID" entry from the list of Available columns and click the[>] button to move it to the Selected columns list.
5. Click Next to go to the Unique Keys page, do nothing.6. Click Next to go to the Foreign Keys page, do the following:
° Click the Add button to add a new foreign key. Set the Foreign keysvalue to "InventoryH_FK1".
° In the Foreign key table mapping details, select your user id as theschema, and "Inventory" as the table. Note that the primary keycolumns are automatically looked up from the "Inventory" table.
° Map the ID primary key column to the "InventoryID" column.
Presented by the DB2 Developer Domain http://www7b.software.ibm.com/dmdd/
Developing DB2 schema using IBM Explorer in VS.NET Page 15 of 34
7. Click Finish to create the table.
If you have typed everything correctly, the table is created and you should seethe new table added to your data connection's tables folder.
Note: If you skip the Summary page of the wizard and click Show generatedcode..., you will see the following script (replace ABDULH with your user id):
-- <ScriptOptions statementSeparator="@"/>@CREATE TABLE ABDULH."InventoryHistory" (
"EntryID" INTEGER NOT NULL GENERATED ALWAYS AS IDENTITY (START WITH 1, INCREMENT BY 1),"UpdateTS" TIMESTAMP NOT NULL WITH DEFAULT CURRENT TIMESTAMP,"UpdateID" CHARACTER ( 32 ) NOT NULL WITH DEFAULT USER,"InventoryID" CHARACTER ( 4 ) NOT NULL ,CONSTRAINT "InventoryH_PK" PRIMARY KEY ("EntryID"),CONSTRAINT "InventoryH_FK1" FOREIGN KEY ("InventoryID")
REFERENCES ABDULH."Inventory" (ID)ON DELETE NO ACTIONON UPDATE NO ACTION)
@GRANT ALL ON TABLE ABDULH."InventoryHistory" TO PUBLIC@COMMENT ON TABLE ABDULH."InventoryHistory" IS 'History of inventory items updates'@
Creating the Inventory Name index
http://www7b.software.ibm.com/dmdd/ Presented by the DB2 Developer Domain
Page 16 of 34 Developing DB2 schema using IBM Explorer in VS.NET

The Inventory Name index will be used to optimize lookup of inventory itemsfrom the Inventory table by item name.
To create the index, follow these steps:
1. Expand the Tables folder of your data connection, locate the Inventory table.Right click on the table and select New => Index.... This will launch the DB2Create Index Wizard.
2. Click Next to go to the Identification page, and then do the following:° Keep the selected Index schema name as is.° Specify "InventoryName" in the Index name field.° Keep the selected Table schema name as is.° Keep the selected name "Inventory" in the Table name field.° Specify Inventory items by name index in the Comment field.
3. Click Next to go to the Columns page, and then move the "Name" columnfrom the Available to the Selected list.
4. Click Finish.
If you have typed everything correctly, the index is created successfully. Youshould see the new index in the Indexes tab of the table details for the"Inventory" table accessible from the Details => Indexes... menu option.
Note: If you skip to the Summary page of the wizard and click Show generatedcode..., you will see the following script (replace ABDULH with your user id):
Presented by the DB2 Developer Domain http://www7b.software.ibm.com/dmdd/
Developing DB2 schema using IBM Explorer in VS.NET Page 17 of 34
-- <ScriptOptions statementSeparator="@"/>@CREATE INDEX ABDULH."InventoryName" ON ABDULH."Inventory"(
"Name" ASC)@COMMENT ON INDEX ABDULH."InventoryName" IS 'Inventory items by name index'@GRANT CONTROL ON INDEX ABDULH."InventoryName" TO PUBLIC@
Creating the Low Inventory view
The Low Inventory view lists all of the inventory item entries in the Inventorytable where the current quantity is less than the low quantity threshold.
To create the view, follow these steps:
5. Right-click on the Views folder of your data connection and select New =>View.... This will launch the DB2 Create View Wizard.
6. Click Next to go to the Identification page, and then do the following:° Specify your user id in the Schema name field.° Specify "LowInventory" in the View name field.° Specify Low inventory items in the Comment field.° Keep the default conformance check value of None.
7. Click Next to go to the Content page and type the query: SELECT * FROMABDULH."Inventory" WHERE ABDULH."Inventory"."CurQuantity" <ABDULH."Inventory"."MinQuantity".
You should replace ABDULH with your user id.
http://www7b.software.ibm.com/dmdd/ Presented by the DB2 Developer Domain
Page 18 of 34 Developing DB2 schema using IBM Explorer in VS.NET
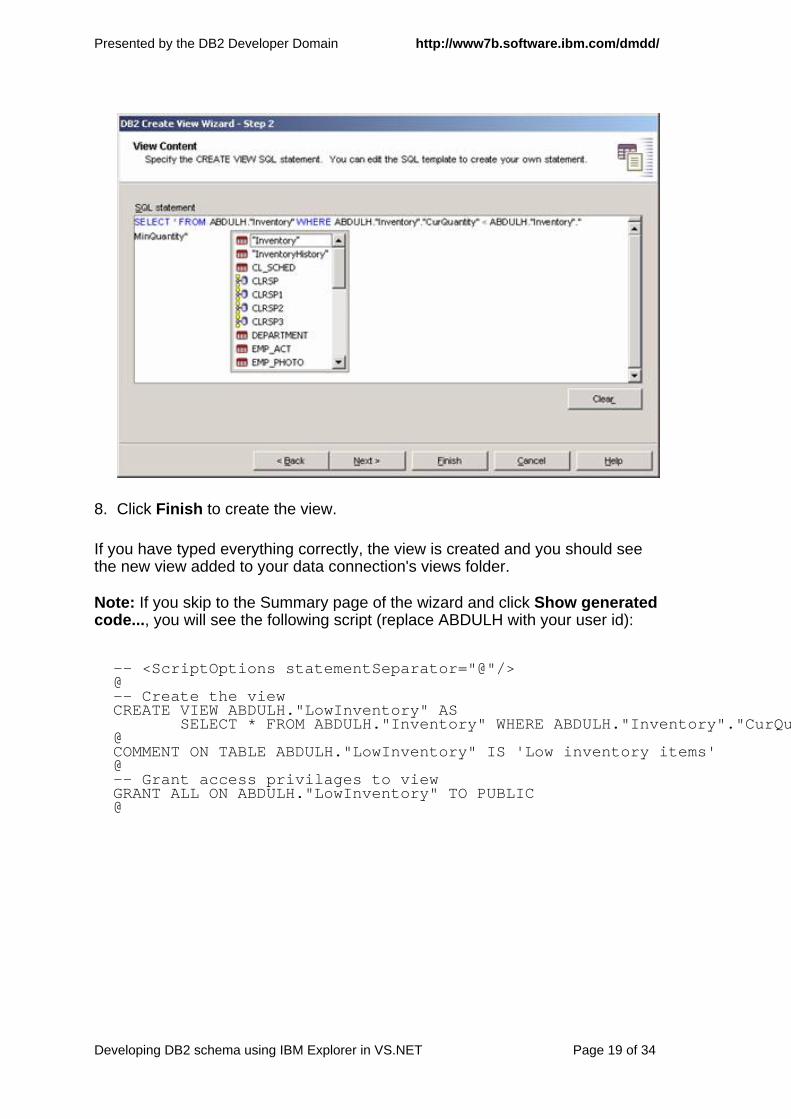
8. Click Finish to create the view.
If you have typed everything correctly, the view is created and you should seethe new view added to your data connection's views folder.
Note: If you skip to the Summary page of the wizard and click Show generatedcode..., you will see the following script (replace ABDULH with your user id):
-- <ScriptOptions statementSeparator="@"/>@-- Create the viewCREATE VIEW ABDULH."LowInventory" AS
SELECT * FROM ABDULH."Inventory" WHERE ABDULH."Inventory"."CurQuantity" < ABDULH."Inventory"."MinQuantity"@COMMENT ON TABLE ABDULH."LowInventory" IS 'Low inventory items'@-- Grant access privilages to viewGRANT ALL ON ABDULH."LowInventory" TO PUBLIC@
Presented by the DB2 Developer Domain http://www7b.software.ibm.com/dmdd/
Developing DB2 schema using IBM Explorer in VS.NET Page 19 of 34
Section 4. Creating the database logic
Overview
This section describes the steps required to create the following databaseschema objects:
° The Inventory and the InventoryHistory tables° The InventoryName index° The LowInventory view
Creating the Inventory Tracker trigger
The Inventory Tracker trigger is activated after every update to the quantitycolumn of the Inventory table. It inserts a log entry for each update made to theInventoryHistory table capturing the updater user ID and update timestamp.
To create the trigger:
1. Expand the Tables folder of your data connection, locate the Inventory table.Right click on the table and select New => Trigger.... This will launch theDB2 Create Trigger Wizard.
2. Click Next to go to the Identification page, and then do the following:° Keep the selected Trigger schema name as is.° Specify "InventoryTracker" in the Trigger name field.° Specify Inventory items update tracker in the Comment field.° Keep the selected Source schema name as is.° Keep the selected name "Inventory" in the Source table or view name
field.
3. Click Next to go to the Execution condition page, and then do the following:° From the Time to trigger action drop-down list, select the After the
change option.° From the Frequency to trigger action drop-down list, select the For each
statement option.° From the Event to trigger action drop-down list, select the Update option.° From the List of update columns, check the "CurQuantity" column.° The wizard step should look like the following:
http://www7b.software.ibm.com/dmdd/ Presented by the DB2 Developer Domain
Page 20 of 34 Developing DB2 schema using IBM Explorer in VS.NET

4. Click Next to go to the SQL condition page, and then click Clear to blank outthe SQL.
5. Click Next to go to the Trigger action page, and enter the following SQL:INSERT INTO "InventoryHistory" ("InventoryHistory"."InventoryID" ) (SELECT NEW_TABLE.IDFROM NEW_TABLE)
Presented by the DB2 Developer Domain http://www7b.software.ibm.com/dmdd/
Developing DB2 schema using IBM Explorer in VS.NET Page 21 of 34

6. Click Finish.
If you have typed everything correctly, the trigger is created successfully. Youshould see the new trigger in the Triggers tab of the table details for the"Inventory" table accessible via the Details => Triggers... menu option.
Note: If you skip to the Summary page of the wizard and click Show generatedcode..., you will see the following script (replace ABDULH with your user id):
-- <ScriptOptions statementSeparator="@"/>@--Create TriggerCREATE TRIGGER ABDULH."InventoryTracker" AFTER UpdateOF "CurQuantity" ON ABDULH."Inventory"REFERENCING OLD_TABLE AS OLD_TABLE NEW_TABLE AS NEW_TABLEFOR EACH STATEMENT MODE DB2SQL
INSERT INTO "InventoryHistory" ( "InventoryHistory"."InventoryID" )(SELECT NEW_TABLE.ID FROM NEW_TABLE)
@COMMENT ON TRIGGER ABDULH."InventoryTracker" IS
'Inventory items update tracker'@
Creating the Indicator scalar function
http://www7b.software.ibm.com/dmdd/ Presented by the DB2 Developer Domain
Page 22 of 34 Developing DB2 schema using IBM Explorer in VS.NET

The Inventory Indicator scalar function returns a quantity level indicator of Low,Medium, and High, given current quantity, low quantity threshold, and highquantity thresholds for an inventory item.
To create the scalar function, follow these steps:
1. Right-click on the Functions folder of your data connection and select NewSQL Function.... This will launch the DB2 SQL Function Wizard.
2. Click Next to go to the Identification page, and then do the following:° Specify your user id in the Schema name field.° Specify "InventoryIndicator" in the Function name field.° Specify "InventoryInd" in the Specific name field.° Specify Inventory level indicator in the Comment field.° Keep the default Output type value as Scalar.
3. Click Next to go to the SQL Statements page, and enter" VALUES (CASEWHEN :QUANTITY < :MINQUANTITY THEN 'Low' WHEN :QUANTITY> :MAXQUANTITY THEN 'High' ELSE 'Median' END)
4. Click Next to go to the Return Data Type page. Select a return data type ofVARCHAR(10).
5. Click Next to go to the Parameters page. You should see three parameters(QUANTITY, MINQUANTITY, and MAXQUANTITY) all of type INTEGER.
Presented by the DB2 Developer Domain http://www7b.software.ibm.com/dmdd/
Developing DB2 schema using IBM Explorer in VS.NET Page 23 of 34

6. Click Finish.
If you entered everything correctly, the scalar function is created successfullyand you should see the new function added to your data connection's functionsfolder.
Note: If you skip over to the Summary page of the wizard and click Showgenerated code..., you will see the following script (replace ABDULH with youruser id):
-- <ScriptOptions statementSeparator="@"/>@--Create user defined functionCREATE FUNCTION ABDULH."InventoryIndicator"(
QUANTITY INTEGER,MINQUANTITY INTEGER,MAXQUANTITY INTEGER)
RETURNS VARCHAR(10)SPECIFIC ABDULH."InventoryInd"
---------------------------------------------------------------------------- Inventory level indicator--------------------------------------------------------------------------
F1: BEGIN ATOMIC--RETURN VALUES (CASE WHEN QUANTITY < MINQUANTITY
THEN 'Low'WHEN QUANTITY > MAXQUANTITY
THEN 'High'ELSE 'Median' END);
END@
http://www7b.software.ibm.com/dmdd/ Presented by the DB2 Developer Domain
Page 24 of 34 Developing DB2 schema using IBM Explorer in VS.NET
COMMENT ON SPECIFIC FUNCTION ABDULH."InventoryInd"IS 'Inventory level indicator'
@-- Grant access privilages to functionGRANT EXECUTE ON SPECIFIC FUNCTION ABDULH."InventoryInd" TO PUBLIC@
Creating the Warehouse table function
The Inventory Warehouse table function returns all inventory items from theInventory table having a specific warehouse location code. This table functiontakes the desired warehouse location code as an input parameter.
Note: Table functions are only supported on DB2 for LINUX, UNIX, andWindows. Skip this step if your DB2 database server is DB2 for z/OS (OS/390)or iSeries (AS/400).
To create the table function:
1. Right-click the Functions folder of your data connection and select New SQLFunction.... This will launch the DB2 SQL Function Wizard.
2. Click Next to go to the Identification page, and then do the following:° Specify your user id in the Schema name field.° Specify "InventoryWarehouse" in the Function name field.° Specify "InventoryWH" in the Specific name field.° Specify Inventory items warehouse in the Comment field.° Change the Output type value to Table.
3. Click Next to go to the SQL Statements page, and enter (replace ABDULHwith your user ID): SELECT * FROM ABDULH."Inventory" WHEREABDULH."Inventory"."LocationCode" = :LC
4. Click Next to go to the Return Data Types page. Ensure that the list ofcolumns and their types is same as the Inventory table columns defined inthe previous section.
5. Click Next to go to the Parameters page. Ensure that the LC parameter islisted and its type is CHARACTER(5).
6. Click Finish to create the table function.
If you have typed everything correctly, the table function is created and youshould see the new function added to your data connection's functions folder.
Note: If you skip to the Summary page of the wizard and click Show generatedcode..., you will see the following script (replace ABDULH with your user id):
-- <ScriptOptions statementSeparator="@"/>@--Create user defined functionCREATE FUNCTION ABDULH."InventoryWarehouse"(
Presented by the DB2 Developer Domain http://www7b.software.ibm.com/dmdd/
Developing DB2 schema using IBM Explorer in VS.NET Page 25 of 34
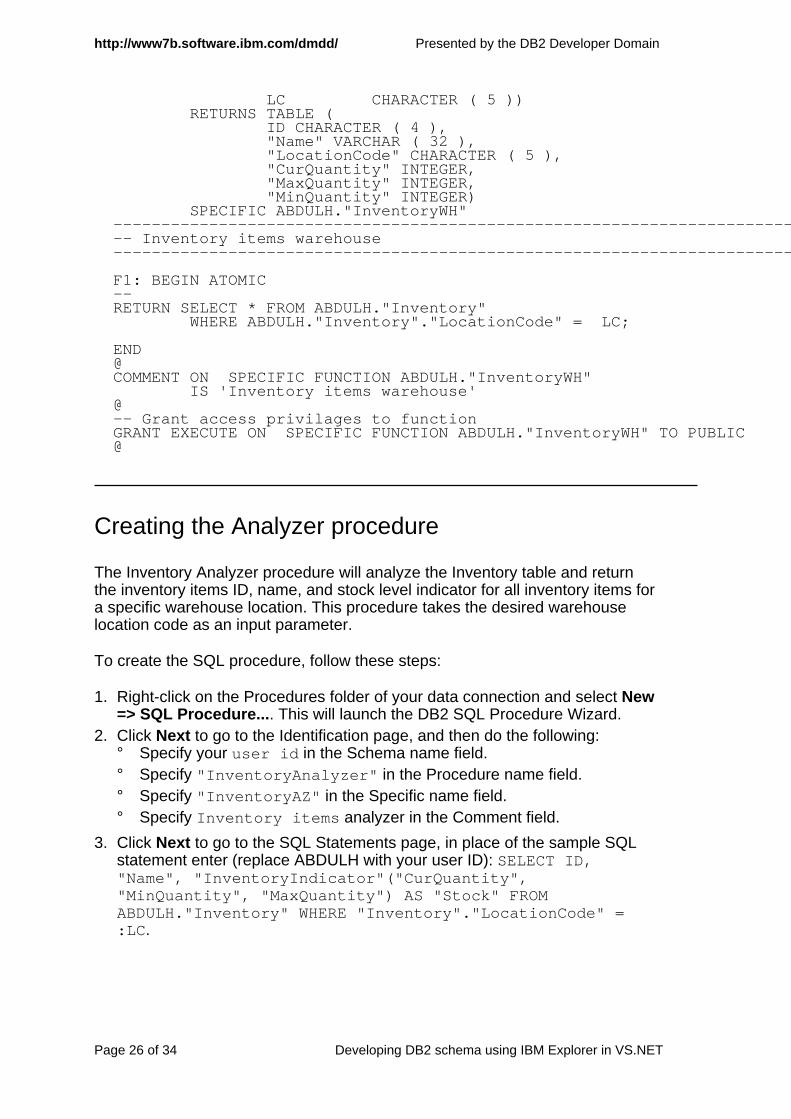
LC CHARACTER ( 5 ))RETURNS TABLE (
ID CHARACTER ( 4 ),"Name" VARCHAR ( 32 ),"LocationCode" CHARACTER ( 5 ),"CurQuantity" INTEGER,"MaxQuantity" INTEGER,"MinQuantity" INTEGER)
SPECIFIC ABDULH."InventoryWH"---------------------------------------------------------------------------- Inventory items warehouse--------------------------------------------------------------------------
F1: BEGIN ATOMIC--RETURN SELECT * FROM ABDULH."Inventory"
WHERE ABDULH."Inventory"."LocationCode" = LC;
END@COMMENT ON SPECIFIC FUNCTION ABDULH."InventoryWH"
IS 'Inventory items warehouse'@-- Grant access privilages to functionGRANT EXECUTE ON SPECIFIC FUNCTION ABDULH."InventoryWH" TO PUBLIC@
Creating the Analyzer procedure
The Inventory Analyzer procedure will analyze the Inventory table and returnthe inventory items ID, name, and stock level indicator for all inventory items fora specific warehouse location. This procedure takes the desired warehouselocation code as an input parameter.
To create the SQL procedure, follow these steps:
1. Right-click on the Procedures folder of your data connection and select New=> SQL Procedure.... This will launch the DB2 SQL Procedure Wizard.
2. Click Next to go to the Identification page, and then do the following:° Specify your user id in the Schema name field.° Specify "InventoryAnalyzer" in the Procedure name field.° Specify "InventoryAZ" in the Specific name field.° Specify Inventory items analyzer in the Comment field.
3. Click Next to go to the SQL Statements page, in place of the sample SQLstatement enter (replace ABDULH with your user ID): SELECT ID,"Name", "InventoryIndicator"("CurQuantity","MinQuantity", "MaxQuantity") AS "Stock" FROMABDULH."Inventory" WHERE "Inventory"."LocationCode" =:LC.
http://www7b.software.ibm.com/dmdd/ Presented by the DB2 Developer Domain
Page 26 of 34 Developing DB2 schema using IBM Explorer in VS.NET

4. Click Next to go to the Parameters page. Ensure that the LC parameter islisted and its type is CHARACTER(5).
5. Click Finish.
If you have typed everything correctly, the procedure task is created and youshould see the new procedure added to your data connection's proceduresfolder.
Note: If you skip to the Summary page of the wizard and click Show generatedcode..., you will see the following script (replace ABDULH with your user id):
-- <ScriptOptions statementSeparator="@"/>@-- Create procedureCREATE PROCEDURE ABDULH."InventoryAnalyzer"(
IN LC CHARACTER ( 5 ))SPECIFIC ABDULH."InventoryAZ"DYNAMIC RESULT SETS 1
---------------------------------------------------------------------------- Inventory items analyzer--------------------------------------------------------------------------
P1: BEGIN
-- Declare variables
-- Declare cursorsDECLARE DB2_SP_SQL1 CURSOR WITH RETURN FOR
SELECT ID, "Name",
Presented by the DB2 Developer Domain http://www7b.software.ibm.com/dmdd/
Developing DB2 schema using IBM Explorer in VS.NET Page 27 of 34

"InventoryIndicator"("CurQuantity", "MinQuantity", "MaxQuantity") AS "Stock"FROM ABDULH."Inventory"WHERE "Inventory"."LocationCode" = LC;
--
-- Cursor left open for client application.OPEN DB2_SP_SQL1;
--
END P1@COMMENT ON SPECIFIC PROCEDURE ABDULH."InventoryAZ"
IS 'Inventory items analyzer'@-- Grant access privilages to procedureGRANT EXECUTE ON SPECIFIC PROCEDURE ABDULH."InventoryAZ" TO PUBLIC@
http://www7b.software.ibm.com/dmdd/ Presented by the DB2 Developer Domain
Page 28 of 34 Developing DB2 schema using IBM Explorer in VS.NET

Section 5. Loading the test data
Inserting records using Preview Data
To quickly insert test data into our Inventory table using the Preview Datafeature of the IBM Explorer:
1. Expand the Tables folder of your data connection.2. Right click on the Inventory table and select Retrieve Data.... This will show
the Inventory[Data] designer with the table data displayed in a read/writedata grid.
3. Insert the following data record:
4. Click Update. This will propagate the new records insertions to the DB2server.
5. Click Refresh to ensure that your updates have been propagated to theserver correctly.
6. Close the designer to close this window.
Alternately, you can execute this statement:
INSERT INTO ABDULH."Inventory" VALUES('0001', 'Cups', 'WH001', 50, 100, 20),('0002', 'Plates', 'WH001', 5, 20, 10),('0003', 'Forks', 'WH002', 70, 50, 25),('0004', 'Spoons', 'WH002', 45, 40, 15),('0005', 'Knives', 'WH002', 23, 60, 30)
If you want to verify the records insertions, re-issue the Retrieve Data menuaction and check to see that the data rows are listed.
Presented by the DB2 Developer Domain http://www7b.software.ibm.com/dmdd/
Developing DB2 schema using IBM Explorer in VS.NET Page 29 of 34

Section 6. Testing the application
Retrieving list of low inventory items
Using the Low Inventory view, you can retrieve the list of low inventory itemsfrom the Inventory table.
To retrieve the list of low inventory items, follow these steps:
1. Expand the Views folder of your data connection.2. Right click on the LowInventory view and select Retrieve Data.... This will
show the LowInventory[Data] designer with the table data displayed in aread/write data grid.
You should now see the list of inventory items with current quantity less thanthe minimum quantity threshold.
Modifying and tracking inventory updates
Using the Inventory Tracker trigger and the Inventory History table, track anyquantity updated made to the Inventory table.
To test this feature, first perform some quantity updates as follows:
1. Expand the Tables folder of your data connection.2. Right click the Inventory table and select Retrieve Data.... This will show the
Inventory[Data] designer with the table data displayed in a read/write datagrid.
3. Modify the quantity column of some of the records by increasing ordecreasing those values.
4. Click Update. This will propagate the new records insertions to the DB2server.
5. Click Refresh to ensure that your updates have been propagated to theserver correctly.
6. Close the designer to close this window.
Now that you have applied some updates, check and see if the updates havebeen captured by our Inventory Tracker trigger and logged into the InventoryHistory table. Follow these steps:
1. Expand the Tables folder of your data connection.2. Right click on the InventoryHistory table and select Retrieve Data.... This
will show the InventoryHistory[Data] designer with the table data displayedin a read/write data grid.
http://www7b.software.ibm.com/dmdd/ Presented by the DB2 Developer Domain
Page 30 of 34 Developing DB2 schema using IBM Explorer in VS.NET

You should see the list of items you have updated logged in this table byInventoryID.
Querying a warehouse inventory
Using the Inventory Warehouse table function, you can retrieve the list ofinventory items with a specific location code from the Inventory table.
To retrieve the list of inventory items for a specific warehouse:
1. Expand the Functions folder of your data connection.2. Right click on the InventoryWarehouse function and select Run.... This will
launch the Parameter Values window.3. Uncheck the Null option and specify a value of WH001 or WH002.4. Click OK.
You should now see the list of inventory items, with a location code matchingyour input value, displayed in a data grid.
Analyzing a warehouse inventory
Using the Inventory Analyzer procedure, you can retrieve the list of inventoryitems specific location code from the Inventory table. This procedure will alsoanalyze the item quantities and display a stock indicator of low, median, or high,using the Inventory Indicator scalar function.
To retrieve the list of analyzed inventory items for a specific warehouse:
1. Expand the Procedures folder of your data connection.2. Right click on the InventoryAnalyzer function and select Run.... This will
launch the Parameter Values window.3. Uncheck the Null option and specify a value of WH001 or WH002.4. Click OK.
You should now see the list of analyzed inventory items, with a location codematching your input value, displayed in a data grid.
Presented by the DB2 Developer Domain http://www7b.software.ibm.com/dmdd/
Developing DB2 schema using IBM Explorer in VS.NET Page 31 of 34

Section 7. Summary and resources
Summary
This tutorial demonstrated the ease of creating and testing database schemaand logic objects using DB2 "Stinger" Development Add-In for Visual StudioTechnical Preview. Many new functionally rich wizards have been added toallow you to create tables, views, indexes, triggers, procedures, and functions inan ad-hoc fashion using DB2 data connections.
Using the easy to follow instructions for building the sample inventoryapplication, you have learned how to do the following from the IBM Explore:
° Create a local DB2 database.° Discover local and remote DB2 data connections.° Develop DB2 CLR methods using ADO.NET and the DB2 managed
provider.° Create DB2 tables with some advanced column value options and check
constraints using wizards.° Create DB2 views, scalar SQL functions, table SQL functions, and SQL
procedures using wizards.° Create DB2 triggers for tracking changes from a table in a history table using
wizards.° Import table column definitions into other new schema objects.° View details for tables (columns, triggers, and indexes) and views (columns
and triggers).° Retrieve and update data for tables and views.° Run procedures and functions.
All of the tasks required to build this application were done from within the IDEitself, demonstrating the tight integration of the DB2 application developmenttooling in this environment.
IBM DB2 resources
The following IBM resources should prove useful for you:
° DB2 Development Add-Ins Technical Preview - An Overview° DB2 Application Development Technical Preview° DB2 Universal Database Version 8.1
(http://www-3.ibm.com/software/data/db2/udb/v8/)° DB2 Developer Domain for additional technical articles and tutorials
(http://www.ibm.com/software/data/developer)
http://www7b.software.ibm.com/dmdd/ Presented by the DB2 Developer Domain
Page 32 of 34 Developing DB2 schema using IBM Explorer in VS.NET

The following Microsoft resources should also prove useful for you:
° Microsoft Visual Studio .NET Resources (http://msdn.microsoft.com/vstudio/)° Microsoft .NET Framework Community (http://www.gotdotnet.com/)
Presented by the DB2 Developer Domain http://www7b.software.ibm.com/dmdd/
Developing DB2 schema using IBM Explorer in VS.NET Page 33 of 34

Section 8. Feedback
Your feedback
Colophon
This tutorial was written entirely in XML, using the developerWorks Toot-O-Matic tutorialgenerator. The open source Toot-O-Matic tool is an XSLT stylesheet and several XSLTextension functions that convert an XML file into a number of HTML pages, a zip file, JPEGheading graphics, and two PDF files. Our ability to generate multiple text and binary formatsfrom a single source file illustrates the power and flexibility of XML. (It also saves ourproduction team a great deal of time and effort.)
For more information about the Toot-O-Matic, visithttp://www-106.ibm.com/developerworks/edu/x-dw-toottut-i.html .
http://www7b.software.ibm.com/dmdd/ Presented by the DB2 Developer Domain
Page 34 of 34 Developing DB2 schema using IBM Explorer in VS.NET