developing backbone.js applications - the eye various/developing...developing backbone.js...
TRANSCRIPT


Developing Backbone.jsApplications
Addy Osmani
Beijing • Cambridge • Farnham • Köln • Sebastopol • Tokyo
www.it-ebooks.info

Developing Backbone.js Applicationsby Addy Osmani
Revision History for the :2012-04-19 Early release revision 1
See http://oreilly.com/catalog/errata.csp?isbn=9781449328252 for release details.
ISBN: 978-1-449-32825-21335306849
www.it-ebooks.info

Table of Contents
Prelude . . . . . . . . . . . . . . . . . . . . . . . . . . . . . . . . . . . . . . . . . . . . . . . . . . . . . . . . . . . . . . . . . . . . vii
1. Introduction . . . . . . . . . . . . . . . . . . . . . . . . . . . . . . . . . . . . . . . . . . . . . . . . . . . . . . . . . . . 1Fundamentals 2
MVC, MVP & Backbone.js 2MVC 2
Smalltalk-80 MVC 2MVC As We Know It 3
Models 4Views 5Controllers 8Controllers in Spine.js vs Backbone.js 8
What does MVC give us? 10Delving deeper 10Summary 11
MVP 11Models, Views & Presenters 11
MVP or MVC? 12MVC, MVP and Backbone.js 13Fast facts 15
Backbone.js 15
2. The Basics . . . . . . . . . . . . . . . . . . . . . . . . . . . . . . . . . . . . . . . . . . . . . . . . . . . . . . . . . . . . 17What is Backbone? 17Why should you consider using it? 17The Basics 17
Models 18Views 21
Creating new views 21What is el? 22
Collections 23
iii
www.it-ebooks.info

Underscore utility functions 25Routers 25
Backbone.history 27Namespacing 27
What is namespacing? 28Additional Tips 31
Automated Backbone Scaffolding 31Is there a limit to the number of routers I should be using? 32Is Backbone too small for my application’s needs? 32
3. RESTful Applications . . . . . . . . . . . . . . . . . . . . . . . . . . . . . . . . . . . . . . . . . . . . . . . . . . . . 33Building RESTful applications with Backbone 33Stack 1: Building A Backbone App With Node.js, Express, Mongoose andMongoDB 33
Reviewing the stack 33Practical 34Practical Setup 40
Building Backbone.js Apps With Ruby, Sinatra, MongoDB and Haml 42Introduction 42What Is Sinatra? 42Getting Started With Sinatra 43Templating And HAML 45
MongoDB Ruby Driver 47Getting started 47
Practical 48Installing The Prerequisites 48Tutorial 50Conclusions 57
4. Advanced . . . . . . . . . . . . . . . . . . . . . . . . . . . . . . . . . . . . . . . . . . . . . . . . . . . . . . . . . . . . . 59Modular JavaScript 59Organizing modules with RequireJS and AMD 59
Writing AMD modules with RequireJS 60Keeping Your Templates External Using RequireJS And The Text Plugin 63Optimizing Backbone apps for production with the RequireJS Optimizer 65Practical: Building a modular Backbone app with AMD & RequireJS 67
Overview 67Markup 68Configuration options 69Modularizing our models, views and collections 70
Decoupling Backbone with the Mediator and Facade patterns 75Summary 75Practical 76
iv | Table of Contents
www.it-ebooks.info

Paginating Backbone.js Requests & Collections 82Paginator’s pieces 83Downloads And Source Code 83Live Examples 84Paginator.requestPager 86
1. Create a new Paginated collection 862: Set the model and base URL for the collection as normal 863. Map the attributes supported by your API (URL) 874. Configure the default pagination, query and sort details for the pag-inator 875. Finally, configure Collection.parse() and we’re done 88Convenience methods: 89
Paginator.clientPager 891. Create a new paginated collection with a model and URL 892. Map the attributes supported by your API (URL) 903. Configure how to paginate data at a UI-level 904. Configure the rest of the request parameter default values 905. Finally, configure Collection.parse() and we’re done 91Convenience methods: 91
Views/Templates 91Backbone & jQuery Mobile 94
Resolving the routing conflicts 94Practical: A Backbone, RequireJS/AMD app with jQuery Mobile 95Getting started 95jQuery Mobile: Going beyond mobile application development 96
5. Unit Testing . . . . . . . . . . . . . . . . . . . . . . . . . . . . . . . . . . . . . . . . . . . . . . . . . . . . . . . . . . . 99Unit Testing Backbone Applications With Jasmine 99
Introduction 99Jasmine 99Suites, Specs & Spies 101beforeEach and afterEach() 104Shared scope 104Getting setup 105TDD With Backbone 105Models 105Collections 108Views 110Initial setup 111View rendering 113Rendering with a templating system 116Conclusions 118Exercise 118
Table of Contents | v
www.it-ebooks.info

Further reading 118Unit Testing Backbone Applications With QUnit And SinonJS 119
Introduction 119QUnit 119
Getting Setup 119Assertions 120Adding structure to assertions 124Assertion examples 125Fixtures 127Asynchronous code 129
SinonJS 130What is SinonJS? 130Stubs and mocks 133
Practical 135Models 135Collections 137Views 138Events 139App 141Further Reading & Resources 142
6. Resources . . . . . . . . . . . . . . . . . . . . . . . . . . . . . . . . . . . . . . . . . . . . . . . . . . . . . . . . . . . 143
7. Conclusions . . . . . . . . . . . . . . . . . . . . . . . . . . . . . . . . . . . . . . . . . . . . . . . . . . . . . . . . . . 145
vi | Table of Contents
www.it-ebooks.info

Prelude
Welcome to my (in-progress) book about the Backbone.js framework for structuringJavaScript applications. It’s released under a Creative Commons Attribution-Non-Commercial-ShareAlike 3.0 Unported license meaning you can both grab a copy of thebook for free or help to further improve it.
I’m very pleased to announce that this book will be out in physical form in a few monthstime via O’Reilly Media. Readers will have the option of purchasing the latest versionin either print or a number of digital formats then or can grab a recent version from thisrepository.
Corrections to existing material are always welcome and I hope that together we canprovide the community with an up-to-date resource that is of help. My extended thanksgo out to Jeremy Ashkenas for creating Backbone.js and these members of the com-munity for their assistance tweaking this project.
I hope you find this book helpful!
vii
www.it-ebooks.info


CHAPTER 1
Introduction
As JavaScript developers, we are at an interesting point in time where not only do wehave mature solutions to help organize the JavaScript powering our applications basedon a separation of concerns, but developers looking to build non-trivial projects arealmost spoiled for choice for frameworks that can help structure their applications.
Maturity in software (framework) development isn’t simply about how long a frame-work has been around. It’s about how solid the framework is and more importantlyhow well it’s evolved to fill its role. Has it become more effective at solving commonproblems? Does it continue to improve as developers build larger and more complexapplications with it?
In this book, I will be covering the popular Backbone.js, which I consider the best ofthe current family of JavaScript architectural frameworks.
Topics will include MVC theory and how to build applications using Backbone’s mod-els, views, collections and routers. I’ll also be taking you through advanced topics likemodular development with Backbone.js and AMD (via RequireJS), how to build ap-plications using modern software stacks (like Node and Express), how to solve therouting problems with Backbone and jQuery Mobile, tips about scaffolding tools, anda lot more.
If this is your first time looking at Backbone.js and you’re still unsure whether or notto give it a try, why not take a look at how a Todo application can be implemented inBackbone and several other popular Javascript frameworks before reading further?
The goal of this book is to create an authoritative and centralized repository of infor-mation that can help those developing real-world apps with Backbone. If you comeacross a section or topic which you think could be improved or expanded on, pleasefeel free to submit a pull-request. It won’t take long and you’ll be helping other devel-opers avoid problems you’ve run into before.
1
www.it-ebooks.info
FundamentalsIn this section we are going to cover the context into which a framework like Back-bone.js fits. Let’s begin our journey into understanding Backbone better with a look atcode architecture.
MVC, MVP & Backbone.jsBefore exploring any JavaScript frameworks that assist in structuring applications, itcan be useful to gain a basic understanding of architectural design patterns. Designpatterns are proven solutions to common development problems and can suggeststructural approaches to help guide developers in adding some organization to theirapplications.
Patterns are useful because they’re a set of practices that build upon the collectiveexperience of skilled developers who have repeatedly solved similar problems. Al-though developers 10 or 20 years ago may not have been using the same programminglanguages when implementing patterns in their projects, there are many lessons we canlearn from their efforts.
In this section, we’re going to review two popular patterns - MVC and MVP. We’ll beexploring in greater detail how Backbone.js implements these patterns shortly to betterappreciate where it fits in.
MVCMVC (Model-View-Controller) is an architectural design pattern that encourages im-proved application organization through a separation of concerns. It enforces the iso-lation of business data (Models) from user interfaces (Views), with a third component(Controllers) traditionally present to manage logic, user-input and the coordination ofmodels and views. The pattern was originally designed by Trygve Reenskaug whileworking on Smalltalk-80 (1979), where it was initially called Model-View-Controller-Editor. MVC was described in depth in “Design Patterns: Elements of Reusable Object-Oriented Software” (The “GoF” or “Gang of Four” book) in 1994, which played a rolein popularizing its use.
Smalltalk-80 MVCIt’s important to understand what the original MVC pattern was aiming to solve as ithas changed quite heavily since the days of its origin. Back in the 70’s, graphical user-interfaces were far and few between. An approach known as Separated Presentationbegan to be used as a means to make a clear division between domain objects whichmodeled concepts in the real world (e.g a photo, a person) and the presentation objectswhich were rendered to the user’s screen.
2 | Chapter 1: Introduction
www.it-ebooks.info

The Smalltalk-80 implementation of MVC took this concept further and had an ob-jective of separating out the application logic from the user interface. The idea was thatdecoupling these parts of the application would also allow the reuse of models for otherinterfaces in the application. There are some interesting points worth noting aboutSmalltalk-80’s MVC architecture:
• A Domain element was known as a Model and were ignorant of the user-interface(Views and Controllers)
• Presentation was taken care of by the View and the Controller, but there wasn’tjust a single view and controller. A View-Controller pair was required for eachelement being displayed on the screen and so there was no true separation betweenthem
• The Controller’s role in this pair was handling user input (such as key-presses andclick events), doing something sensible with them.
• The Observer pattern was relied upon for updating the View whenever the Modelchanged
Developers are sometimes surprised when they learn that the Observer pattern (nowa-days commonly implemented as a Publish/Subscribe system) was included as a part ofMVC’s architecture decades ago. In Smalltalk-80’s MVC, the View and Controller bothobserve the Model: anytime the Model changes, the Views react. A simple example ofthis is an application backed by stock market data - for the application to show real-time information, any change to the data in its Models should result in the View beingrefreshed instantly.
Martin Fowler has done an excellent job of writing about the origins of MVC over theyears and if you are interested in further historical information about Smalltalk-80’sMVC, I recommend reading his work.
MVC As We Know ItWe’ve reviewed the 70’s, but let us now return to the here and now. The MVC patternhas been applied to a diverse range of programming languages. For example, the pop-ular Ruby on Rails is an implementation of a web application framework based onMVC for the Ruby language. JavaScript now has a number of MVC frameworks, in-cluding Ember.js, JavaScriptMVC, and of course Backbone.js. Given the importanceof avoiding “spaghetti” code, a term which describes code that is very difficult to reador maintain due to its lack of structure, let’s look at what the MVC pattern enables theJavascript developer to do.
MVC is composed of three core components:
MVC As We Know It | 3
www.it-ebooks.info

ModelsModels manage the data for an application. They are concerned with neither the user-interface nor presentation layers, but instead represent structured data that an appli-cation may require. When a model changes (e.g when it is updated), it will typicallynotify its observers (e.g views, a concept we will cover shortly) that a change has oc-curred so that they may react accordingly.
To understand models better, let us imagine we have a JavaScript photo gallery appli-cation. In a photo gallery, a photo would merit its own model, as it represents a uniquekind of domain-specific data. The Photo model may represent attributes such as acaption, image source and additional meta-data. A specific photo would be stored inan instance of a model. Here’s an example of a simple Photo model implemented withBackbone.js:
var Photo = Backbone.Model.extend({
// Default attributes for the photo defaults: { // Ensure that each photo created has an `src`. src: "placeholder.jpg", caption: "A default image", viewed: false },
initialize: function() { }
});
The built-in capabilities of models vary across frameworks, however it’s common forthem to support validation of attributes, where attributes represent the properties ofthe model, such as a model identifier. When using models in real-world applicationswe generally also need a way of persisting models. Persistence allows us to edit andupdate models with the knowledge that their most recent states will be saved some-where, for example in a web browser’s localStorage data-store or synchronized with adatabase.
A model may also have multiple views observing it. Imagine our Photo model containedmeta-data such as the longitude and latitude where the photo was taken, a list of peoplepresent in the photo, and a list of tags. A developer could create a single view thatdisplayed all these attributes, or might create three separate views to display each at-tribute. The important detail is that the Photo model doesn’t care how these views areorganized, it simply announces updates to its data as necessary. We’ll come back toViews in more detail later.
It is not uncommon for modern MVC/MV* frameworks to provide a means to groupmodels together. In Backbone, these groups are called “Collections”. Managing modelsin groups allows us to write application logic based on notifications from the group,
4 | Chapter 1: Introduction
www.it-ebooks.info

should any model it contains change. This avoids the need to manually observe indi-vidual model instances.
Here’s how we might group Photo models into a simplified Backbone Collection:
var PhotoGallery = Backbone.Collection.extend({
// Reference to this collection's model. model: Photo,
// Filter down the list of all photos that have been viewed viewed: function() { return this.filter(function(photo){ return photo.get('viewed'); }); },
// Filter down the list to only photos that have not yet been viewed unviewed: function() { return this.without.apply(this, this.viewed()); }
});
If you read older texts on MVC, you may come across a description of models as alsomanaging application “state”. In JavaScript applications “state” has a specific meaning,typically referring to the current “state” of a view or sub-view on a user’s screen at afixed time. State is a topic which is regularly discussed when looking at Single-pageapplications, where the concept of state needs to be simulated.
ViewsViews are a visual representation of models that present a filtered view of their currentstate. A view typically observes a model and is notified when the model changes, al-lowing the view to update itself accordingly. Design pattern literature commonly refersto views as “dumb”, given that their knowledge of models and controllers in an appli-cation is limited.
Users interact with views, which usually means reading and editing model data. Forexample, in our photo gallery application example, model viewing might happen in auser interface with a big image, a caption, and a list of tags. Model editing could bedone through an “edit” view where a user who has selected a specific photo could editits caption, tags, or other metadata in a form.
In MVC, the actual task of updating the Model falls to Controllers, which we’ll becovering shortly.
Let’s explore Views a little further using a simple JavaScript example. Below we can seea function that creates a single Photo view, consuming both a model instance and acontroller instance.
MVC As We Know It | 5
www.it-ebooks.info

We define a render() utility within our view which is responsible for rendering thecontents of the photoModel using a JavaScript templating engine (Underscore templat-ing) and updating the contents of our view, referenced by photoEl.
The photoModel then adds our render() callback as one of its subscribers, so thatthrough the Observer pattern it can trigger the view to update when the model changes.
You may wonder where user interaction comes into play here. When users click on anyelements within the view, it’s not the view’s responsibility to know what to do next. AController makes this decision. In our sample implementation, this is achieved byadding an event listener to photoEl which will delegate handling the click behavior backto the controller, passing the model information along with it in case it’s needed.
The benefit of this architecture is that each component plays its own separate role inmaking the application function as needed.
var buildPhotoView = function( photoModel, photoController ){
var base = document.createElement('div'), photoEl = document.createElement('div');
base.appendChild(photoEl);
var render= function(){ // We use a templating library such as Underscore // templating which generates the HTML for our // photo entry photoEl.innerHTML = _.template('photoTemplate', {src: photoModel.getSrc()}); }
photoModel.addSubscriber( render );
photoEl.addEventListener('click', function(){ photoController.handleEvent('click', photoModel ); });
var show = function(){ photoEl.style.display = ''; }
var hide = function(){ photoEl.style.display = 'none'; }
return{ showView: show, hideView: hide }
}
Templating
6 | Chapter 1: Introduction
www.it-ebooks.info

In the context of JavaScript frameworks that support MVC/MV*, it is worth lookingmore closely at JavaScript templating and its relationship to Views.
It has long been considered bad practice (and computationally expensive) to manuallycreate large blocks of HTML markup in-memory through string concatenation. De-velopers using this technique often find themselves iterating through their data, wrap-ping it in nested divs and using outdated techniques such as document.write to injectthe “template” into the DOM. This approach often means keeping scripted markupinline with standard markup, which can quickly become difficult to read and maintain,especially when building large applications.
JavaScript templating libraries (such as Handlebars.js or Mustache) are often used todefine templates for views as HTML markup containing template variables. Thesetemplate blocks can be either stored externally or within script tags with a custom type(e.g “text/template”). Variables are delimited using a variable syntax (e.g {{name}}).Javascript template libraries typically accept data in JSON, and the grunt work of pop-ulating templates with data is taken care of by the framework itself. This has a severalbenefits, particularly when opting to store templates externally as this can let applica-tions load templates dynamically on an as-needed basis.
Let’s compare two examples of HTML templates. One is implemented using the pop-ular Handlebars.js library, and the other uses Underscore’s “microtemplates”.
Handlebars.js:
<li class="photo"> <h2>{{caption}}</h2> <img class="source" src="{{src}}"/> <div class="meta-data"> {{metadata}} </div></li>
Underscore.js Microtemplates:
<li class="photo"> <h2><%= caption %></h2> <img class="source" src="<%= src %>"/> <div class="meta-data"> <%= metadata %> </div></li>
You may also use double curly brackets (i.e {{}}) (or any other tag you feel comfortablewith) in Microtemplates. In the case of curly brackets, this can be done by setting theUnderscore templateSettings attribute as follows:
_.templateSettings = { interpolate : /\{\{(.+?)\}\}/g };
A note on navigation and state
It is also worth noting that in classical web development, navigating between inde-pendent views required the use of a page refresh. In single-page JavaScript applications,
MVC As We Know It | 7
www.it-ebooks.info

however, once data is fetched from a server via Ajax, it can be dynamically rendered ina new view within the same page. Since this doesn’t automatically update the URL, therole of navigation thus falls to a “router”, which assists in managing application state(e.g allowing users to bookmark a particular view they have navigated to). As routersare however neither a part of MVC nor present in every MVC-like framework, I willnot be going into them in greater detail in this section.
ControllersControllers are an intermediary between models and views which are classically re-sponsible for two tasks: they both update the view when the model changes and updatethe model when the user manipulates the view.
In our photo gallery application, a controller would be responsible for handling changesthe user made to the edit view for a particular photo, updating a specific photo modelwhen a user has finished editing.
It’s with controllers that most JavaScript MVC frameworks depart from this interpre-tation of the MVC pattern. The reasons for this vary, but in my opinion, Javascriptframework authors likely initially looked at server-side interpretations of MVC (suchas Ruby on Rails), realized that that approach didn’t translate 1:1 on the client-side,and so re-interpreted the C in MVC to solve their state management problem. This wasa clever approach, but it can make it hard for developers coming to MVC for the firsttime to understand both the classical MVC pattern and the “proper” role of controllersin other non-Javascript frameworks.
So does Backbone.js have Controllers? Not really. Backbone’s Views typically contain“controller” logic, and Routers (discussed below) are used to help manage applicationstate, but neither are true Controllers according to classical MVC.
In this respect, contrary to what might be mentioned in the official documentation orin blog posts, Backbone is neither a truly MVC/MVP nor MVVM framework. It’s infact better to see it a member of the MV* family which approaches architecture in itsown way. There is of course nothing wrong with this, but it is important to distinguishbetween classical MVC and MV* should you be relying on discussions of MVC to helpwith your Backbone projects.
Controllers in Spine.js vs Backbone.jsSpine.js
We now know that controllers are traditionally responsible for updating the view whenthe model changes (and similarly the model when the user updates the view). SinceBackbone doesn’t have its own explicit controllers, it’s useful to review the controllerfrom another MVC framework to appreciate the difference in implementations. Let’stake a look at Spine.js:
8 | Chapter 1: Introduction
www.it-ebooks.info

In this example, we’re going to have a controller called PhotosController which will bein charge of individual photos in the application. It will ensure that when the viewupdates (e.g a user edited the photo meta-data) the corresponding model does too.
(Note: We won’t be delving heavily into Spine.js beyond this example, but it’s worthlooking at it to learn more about Javascript frameworks in general.)
// Controllers in Spine are created by inheriting from Spine.Controller
var PhotosController = Spine.Controller.sub({ init: function(){ this.item.bind("update", this.proxy(this.render)); this.item.bind("destroy", this.proxy(this.remove)); },
render: function(){ // Handle templating this.replace($("#photoTemplate").tmpl(this.item)); return this; },
remove: function(){ this.$el.remove(); this.release(); }});
In Spine, controllers are considered the glue for an application, adding and respondingto DOM events, rendering templates and ensuring that views and models are kept insync (which makes sense in the context of what we know to be a controller).
What we’re doing in the above example is setting up listeners in the update anddestroy events using render() and remove(). When a photo entry gets updated, we re-render the view to reflect the changes to the meta-data. Similarly, if the photo getsdeleted from the gallery, we remove it from the view. In case you were wondering aboutthe tmpl() function in the code snippet: in the render() function, we’re using this torender a JavaScript template called #photoTemplate which simply returns a HTMLstring used to replace the controller’s current element.
What this provides us with is a very lightweight, simple way to manage changes betweenthe model and the view.
Backbone.js
Later on in this section we’re going to revisit the differences between Backbone andtraditional MVC, but for now let’s focus on controllers.
In Backbone, controller logic is shared between Backbone.View and Backbone.Router.Earlier releases of Backbone contained something called Backbone.Controller, but itwas renamed to Router to clarify its role.
A Router’s main purpose is to translate URL requests into application states. When auser browses to the URL www.example.com/photos/42, a Router could be used to
MVC As We Know It | 9
www.it-ebooks.info

show the photo with that ID, and to define what application behavior should be runin response to that request. Routers can contain traditional controller responsibilities,such as binding the events between models and views, or rendering parts of the page.However, Backbone contributor Tim Branyen has pointed out that it’s possible to getaway without needing Backbone.Router at all for this, so a way to think about it usingthe Router paradigm is probably:
var PhotoRouter = Backbone.Router.extend({ routes: { "photos/:id": "route" },
route: function(id) { var item = photoCollection.get(id); var view = new PhotoView({ model: item });
something.html( view.render().el ); }}):
What does MVC give us?To summarize, the separation of concerns in MVC facilitates modularization of anapplication’s functionality and enables:
• Easier overall maintenance. When updates need to be made to the application itis clear whether the changes are data-centric, meaning changes to models and pos-sibly controllers, or merely visual, meaning changes to views.
• Decoupling models and views means that it’s straight-forward to write unit testsfor business logic
• Duplication of low-level model and controller code is eliminated across the appli-cation
• Depending on the size of the application and separation of roles, this modularityallows developers responsible for core logic and developers working on the user-interfaces to work simultaneously
Delving deeperRight now, you likely have a basic understanding of what the MVC pattern provides,but for the curious, we’ll explore it a little further.
The GoF (Gang of Four) do not refer to MVC as a design pattern, but rather considerit a “set of classes to build a user interface”. In their view, it’s actually a variation ofthree other classical design patterns: the Observer (Pub/Sub), Strategy and Compositepatterns. Depending on how MVC has been implemented in a framework, it may alsouse the Factory and Decorator patterns. I’ve covered some of these patterns in my otherfree book, JavaScript Design Patterns For Beginners if you would like to read into themfurther.
10 | Chapter 1: Introduction
www.it-ebooks.info

As we’ve discussed, models represent application data, while views handle what theuser is presented on screen. As such, MVC relies on Pub/Sub for some of its core com-munication (something that surprisingly isn’t covered in many articles about the MVCpattern). When a model is changed it “publishes” to the rest of the application that ithas been updated. The “subscriber”–generally a Controller–then updates the view ac-cordingly. The observer-viewer nature of this relationship is what facilitates multipleviews being attached to the same model.
For developers interested in knowing more about the decoupled nature of MVC (onceagain, depending on the implementation), one of the goals of the pattern is to helpdefine one-to-many relationships between a topic and its observers. When a topicchanges, its observers are updated. Views and controllers have a slightly different re-lationship. Controllers facilitate views to respond to different user input and are anexample of the Strategy pattern.
SummaryHaving reviewed the classical MVC pattern, your should now understand how it allowsdevelopers to cleanly separate concerns in an application. You should also now appre-ciate how JavaScript MVC frameworks may differ in their interpretation of MVC, andhow they share some of the fundamental concepts of the original pattern.
When reviewing a new JavaScript MVC/MV* framework, remember - it can be usefulto step back and consider how it’s opted to approach Models, Views, Controllers orother alternatives, as this can better help you grok how the framework expects to beused.
MVPModel-view-presenter (MVP) is a derivative of the MVC design pattern which focuseson improving presentation logic. It originated at a company named Taligent in the early1990s while they were working on a model for a C++ CommonPoint environment.Whilst both MVC and MVP target the separation of concerns across multiple compo-nents, there are some fundamental differences between them.
For the purposes of this summary we will focus on the version of MVP most suitablefor web-based architectures.
Models, Views & PresentersThe P in MVP stands for presenter. It’s a component which contains the user-interfacebusiness logic for the view. Unlike MVC, invocations from the view are delegated tothe presenter, which are decoupled from the view and instead talk to it through aninterface. This allows for all kinds of useful things such as being able to mock views inunit tests.
MVP | 11
www.it-ebooks.info

The most common implementation of MVP is one which uses a Passive View (a viewwhich is for all intents and purposes “dumb”), containing little to no logic. MVP modelsare almost identical to MVC models and handle application data. The presenter actsas a mediator which talks to both the view and model, however both of these are isolatedfrom each other. They effectively bind models to views, a responsibility held by Con-trollers in MVC. Presenters are at the heart of the MVP pattern and as you can guess,incorporate the presentation logic behind views.
Solicited by a view, presenters perform any work to do with user requests and pass databack to them. In this respect, they retrieve data, manipulate it and determine how thedata should be displayed in the view. In some implementations, the presenter alsointeracts with a service layer to persist data (models). Models may trigger events butit’s the presenter’s role to subscribe to them so that it can update the view. In this passivearchitecture, we have no concept of direct data binding. Views expose setters whichpresenters can use to set data.
The benefit of this change from MVC is that it increases the testability of your appli-cation and provides a more clean separation between the view and the model. This isn’thowever without its costs as the lack of data binding support in the pattern can oftenmean having to take care of this task separately.
Although a common implementation of a Passive View is for the view to implement aninterface, there are variations on it, including the use of events which can decouple theView from the Presenter a little more. As we don’t have the interface construct in Java-Script, we’re using it more as more a protocol than an explicit interface here. It’s tech-nically still an API and it’s probably fair for us to refer to it as an interface from thatperspective.
There is also a Supervising Controller variation of MVP, which is closer to the MVCand MVVM patterns as it provides data-binding from the Model directly from the View.Key-value observing (KVO) plugins (such as Derick Bailey’s Backbone.ModelBindingplugin) introduce this idea of a Supervising Controller to Backbone.
MVP or MVC?MVP is generally used most often in enterprise-level applications where it’s necessaryto reuse as much presentation logic as possible. Applications with very complex viewsand a great deal of user interaction may find that MVC doesn’t quite fit the bill here assolving this problem may mean heavily relying on multiple controllers. In MVP, all ofthis complex logic can be encapsulated in a presenter, which can simplify maintenancegreatly.
As MVP views are defined through an interface and the interface is technically the onlypoint of contact between the system and the view (other than a presenter), this patternalso allows developers to write presentation logic without needing to wait for designersto produce layouts and graphics for the application.
12 | Chapter 1: Introduction
www.it-ebooks.info

Depending on the implementation, MVP may be more easy to automatically unit testthan MVC. The reason often cited for this is that the presenter can be used as a completemock of the user-interface and so it can be unit tested independent of other compo-nents. In my experience this really depends on the languages you are implementingMVP in (there’s quite a difference between opting for MVP for a JavaScript project overone for say, ASP.net).
At the end of the day, the underlying concerns you may have with MVC will likely holdtrue for MVP given that the differences between them are mainly semantic. As long asyou are cleanly separating concerns into models, views and controllers (or presenters)you should be achieving most of the same benefits regardless of the pattern you opt for.
MVC, MVP and Backbone.jsThere are very few, if any architectural JavaScript frameworks that claim to implementthe MVC or MVP patterns in their classical form as many JavaScript developers don’tview MVC and MVP as being mutually exclusive (we are actually more likely to seeMVP strictly implemented when looking at web frameworks such as ASP.net or GWT).This is because it’s possible to have additional presenter/view logic in your applicationand yet still consider it a flavor of MVC.
Backbone contributor Irene Ros subscribes to this way of thinking as when she sepa-rates Backbone views out into their own distinct components, she needs something toactually assemble them for her. This could either be a controller route (such as a Backbone.Router, covered later in the book) or a callback in response to data being fetched.
That said, some developers do however feel that Backbone.js better fits the descriptionof MVP than it does MVC . Their view is that:
• The presenter in MVP better describes the Backbone.View (the layer between Viewtemplates and the data bound to it) than a controller does
• The model fits Backbone.Model (it isn’t that different from the classical MVC“Model”)
• The views best represent templates (e.g Handlebars/Mustache markup templates)
A response to this could be that the view can also just be a View (as per MVC) becauseBackbone is flexible enough to let it be used for multiple purposes. The V in MVC andthe P in MVP can both be accomplished by Backbone.View because they’re able to ach-ieve two purposes: both rendering atomic components and assembling those compo-nents rendered by other views.
We’ve also seen that in Backbone the responsibility of a controller is shared with boththe Backbone.View and Backbone.Router and in the following example we can actuallysee that aspects of that are certainly true.
MVC, MVP and Backbone.js | 13
www.it-ebooks.info
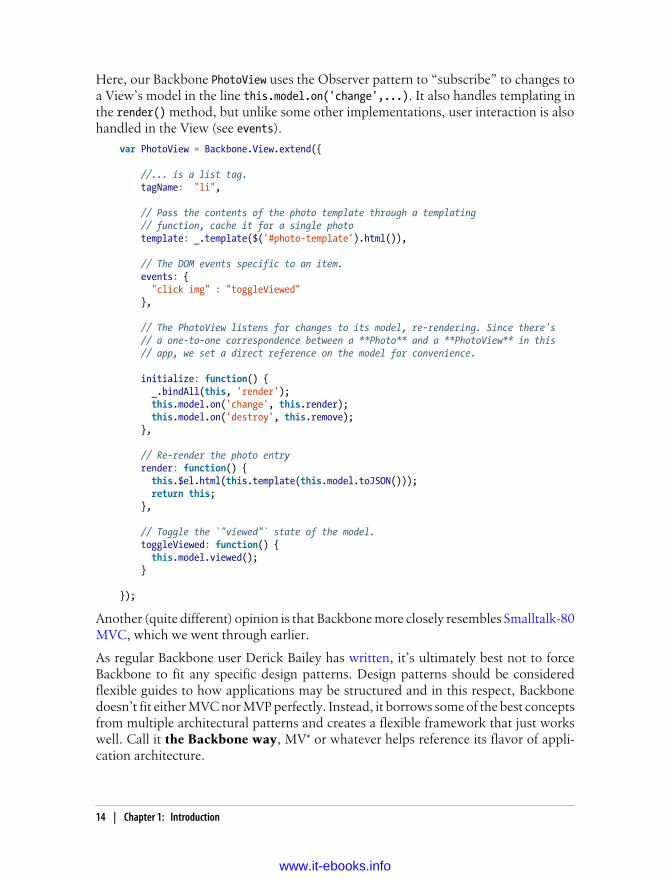
Here, our Backbone PhotoView uses the Observer pattern to “subscribe” to changes toa View’s model in the line this.model.on('change',...). It also handles templating inthe render() method, but unlike some other implementations, user interaction is alsohandled in the View (see events).
var PhotoView = Backbone.View.extend({
//... is a list tag. tagName: "li",
// Pass the contents of the photo template through a templating // function, cache it for a single photo template: _.template($('#photo-template').html()),
// The DOM events specific to an item. events: { "click img" : "toggleViewed" },
// The PhotoView listens for changes to its model, re-rendering. Since there's // a one-to-one correspondence between a **Photo** and a **PhotoView** in this // app, we set a direct reference on the model for convenience.
initialize: function() { _.bindAll(this, 'render'); this.model.on('change', this.render); this.model.on('destroy', this.remove); },
// Re-render the photo entry render: function() { this.$el.html(this.template(this.model.toJSON())); return this; },
// Toggle the `"viewed"` state of the model. toggleViewed: function() { this.model.viewed(); }
});
Another (quite different) opinion is that Backbone more closely resembles Smalltalk-80MVC, which we went through earlier.
As regular Backbone user Derick Bailey has written, it’s ultimately best not to forceBackbone to fit any specific design patterns. Design patterns should be consideredflexible guides to how applications may be structured and in this respect, Backbonedoesn’t fit either MVC nor MVP perfectly. Instead, it borrows some of the best conceptsfrom multiple architectural patterns and creates a flexible framework that just workswell. Call it the Backbone way, MV* or whatever helps reference its flavor of appli-cation architecture.
14 | Chapter 1: Introduction
www.it-ebooks.info

It is however worth understanding where and why these concepts originated, so I hopethat my explanations of MVC and MVP have been of help. Most structural JavaScriptframeworks will adopt their own take on classical patterns, either intentionally or byaccident, but the important thing is that they help us develop applications which areorganized, clean and can be easily maintained.
Fast facts
Backbone.js• Core components: Model, View, Collection, Router. Enforces its own flavor of
MV*
• Good documentation, with more improvements on the way
• Used by large companies such as SoundCloud and Foursquare to build non-trivialapplications
• Event-driven communication between views and models. As we’ll see, it’s relativelystraight-forward to add event listeners to any attribute in a model, giving developersfine-grained control over what changes in the view
• Supports data bindings through manual events or a separate Key-value observing(KVO) library
• Great support for RESTful interfaces out of the box, so models can be easily tiedto a backend
• Extensive eventing system. It’s trivial to add support for pub/sub in Backbone
• Prototypes are instantiated with the new keyword, which some developers prefer
• Agnostic about templating frameworks, however Underscore’s micro-templatingis available by default. Backbone works well with libraries like Handlebars
• Doesn’t support deeply nested models, though there are Backbone plugins such asthis which can help
• Clear and flexible conventions for structuring applications. Backbone doesn’t forceusage of all of its components and can work with only those needed.
Fast facts | 15
www.it-ebooks.info


CHAPTER 2
The Basics
What is Backbone?Backbone.js is one of a number of JavaScript frameworks for creating MVC-like webapplications. On the front-end, it’s my architectural framework of choice as it’s bothmature, relatively lightweight and can be easily tested using third-party toolkits suchas Jasmine or QUnit. Other MVC frameworks you may be familiar with include Em-ber.js (SproutCore 2.0), Spine, YUILibrary and JavaScriptMVC.
Backbone is maintained by a number of contributors, most notably: Jeremy Ashkenas,creator of CoffeeScript, Docco and Underscore.js. As Jeremy is a believer in detaileddocumentation, there’s a level of comfort in knowing you’re unlikely to run into issueswhich are either not explained in the official docs or which can’t be nailed down withsome assistance from the #documentcloud IRC channel. I strongly recommend usingthe latter if you find yourself getting stuck.
Why should you consider using it?Backbone’s main benefits, regardless of your target platform or device, include helping:
• Organize the structure to your application
• Simplify server-side persistence
• Decouple the DOM from your page’s data
• Model data, views and routers in a succinct manner
• Provide DOM, model and collection synchronization
The BasicsIn this section, you’ll learn the essentials of Backbone’s models, views, collections androuters, as well as about using namespacing to organize your code. This isn’t meant as
17
www.it-ebooks.info

a replacement for the official documentation, but it will help you understand many ofthe core concepts behind Backbone before you start building applications with it.
• Models
• Collections
• Routers
• Views
• Namespacing
ModelsBackbone models contain interactive data for an application as well as the logic aroundthis data. For example, we can use a model to represent the concept of a photo objectincluding its attributes like tags, titles and a location.
Models can be created by extending Backbone.Model as follows:
var Photo = Backbone.Model.extend({ defaults: { src: 'placeholder.jpg', title: 'an image placeholder', coordinates: [0,0] }, initialize: function(){ this.on("change:src", function(){ var src = this.get("src"); console.log('Image source updated to ' + src); }); }, changeSrc: function( source ){ this.set({ src: source }); }});
var somePhoto = new Photo({ src: "test.jpg", title:"testing"});somePhoto.changeSrc("magic.jpg"); // which triggers "change:src" and logs an update message to the console.
Initialization
The initialize() method is called when a new instance of a model is created. Its useis optional, however you’ll see why it’s good practice to use it below.
var Photo = Backbone.Model.extend({ initialize: function(){ console.log('this model has been initialized'); }});
// We can then create our own instance of a photo as follows:var myPhoto = new Photo();
18 | Chapter 2: The Basics
www.it-ebooks.info

Getters & Setters
Model.get()
Model.get() provides easy access to a model’s attributes. Attributes which are passedthrough to the model on instantiation are instantly available for retrieval.
var myPhoto = new Photo({ title: "My awesome photo", src:"boston.jpg", location: "Boston", tags:['the big game', 'vacation']}),
title = myPhoto.get("title"), //My awesome photo location = myPhoto.get("location"), //Boston tags = myPhoto.get("tags"), // ['the big game','vacation'] photoSrc = myPhoto.get("src"); //boston.jpg
Alternatively, if you wish to directly access all of the attributes in a model’s instancedirectly, you can achieve this as follows:
var myAttributes = myPhoto.attributes;console.log(myAttributes);
It is best practice to use Model.set() or direct instantiation to set the values of a model’sattributes.
Accessing Model.attributes directly is generally discouraged. Instead, should you needto read or clone data, Model.toJSON() is recommended for this purpose. If you wouldlike to access or copy a model’s attributes for purposes such as JSON stringification(e.g. for serialization prior to being passed to a view), this can be achieved usingModel.toJSON():
var myAttributes = myPhoto.toJSON();console.log(myAttributes);/* this returns { title: "My awesome photo", src:"boston.jpg", location: "Boston", tags:['the big game', 'vacation']}*/
Model.set()
Model.set() allows us to pass attributes into an instance of our model. Attributes caneither be set during initialization or at any time afterwards. It’s important to avoid tryingto set a Model’s attributes directly (for example Model.caption = “A new caption”).Backbone uses Model.set() to know when to broadcast that a model’s data has changed.
var Photo = Backbone.Model.extend({ initialize: function(){ console.log('this model has been initialized'); }});
// Setting the value of attributes via instantiationvar myPhoto = new Photo({ title: 'My awesome photo', location: 'Boston' });
The Basics | 19
www.it-ebooks.info

var myPhoto2 = new Photo();
// Setting the value of attributes through Model.set()myPhoto2.set({ title:'Vacation in Florida', location: 'Florida' });
Default values
There are times when you want your model to have a set of default values (e.g. in ascenario where a complete set of data isn’t provided by the user). This can be set usinga property called defaults in your model.
var Photo = Backbone.Model.extend({ defaults:{ title: 'Another photo!', tags: ['untagged'], location: 'home', src: 'placeholder.jpg' }, initialize: function(){ }});
var myPhoto = new Photo({ location: "Boston", tags:['the big game', 'vacation']}), title = myPhoto.get("title"), //Another photo! location = myPhoto.get("location"), //Boston tags = myPhoto.get("tags"), // ['the big game','vacation'] photoSrc = myPhoto.get("src"); //placeholder.jpg
Listening for changes to your model
Any and all of the attributes in a Backbone model can have listeners bound to themwhich detect when their values change. Listeners can be added to the initialize()function:
this.on('change', function(){ console.log('values for this model have changed');});
In the following example, we log a message whenever a specific attribute (the title ofour Photo model) is altered.
var Photo = Backbone.Model.extend({ defaults:{ title: 'Another photo!', tags: ['untagged'], location: 'home', src: 'placeholder.jpg' }, initialize: function(){ console.log('this model has been initialized'); this.on("change:title", function(){ var title = this.get("title"); console.log("My title has been changed to.. " + title); }); },
20 | Chapter 2: The Basics
www.it-ebooks.info

setTitle: function(newTitle){ this.set({ title: newTitle }); }});
var myPhoto = new Photo({ title:"Fishing at the lake", src:"fishing.jpg"});myPhoto.setTitle('Fishing at sea'); //logs 'My title has been changed to.. Fishing at sea'
Validation
Backbone supports model validation through Model.validate(), which allows checkingthe attribute values for a model prior to them being set.
Validation functions can be as simple or complex as necessary. If the attributes providedare valid, nothing should be returned from .validate(). If they are invalid, a customerror can be returned instead.
A basic example for validation can be seen below:
var Photo = Backbone.Model.extend({ validate: function(attribs){ if(attribs.src === undefined){ return "Remember to set a source for your image!"; } },
initialize: function(){ console.log('this model has been initialized'); this.on("error", function(model, error){ console.log(error); }); }});
var myPhoto = new Photo();myPhoto.set({ title: "On the beach" });//logs Remember to set a source for your image!
ViewsViews in Backbone don’t contain the markup for your application, but rather they arethere to support models by defining the logic for how they should be represented tothe user. This is usually achieved using JavaScript templating (e.g. Mustache, jQuery-tmpl, etc.). A view’s render() function can be bound to a model’s change() event, al-lowing the view to always be up to date without requiring a full page refresh.
Creating new viewsSimilar to the previous sections, creating a new view is relatively straight-forward. Tocreate a new View, simply extend Backbone.View. I’ll explain this code in detail below:
Views | 21
www.it-ebooks.info

var PhotoSearch = Backbone.View.extend({ el: $('#results'), render: function( event ){ var compiled_template = _.template( $("#results-template").html() ); this.$el.html( compiled_template(this.model.toJSON()) ); return this; //recommended as this enables calls to be chained. }, events: { "submit #searchForm": "search", "click .reset": "reset", "click .advanced": "switchContext" }, search: function( event ){ //executed when a form '#searchForm' has been submitted }, reset: function( event ){ //executed when an element with class "reset" has been clicked. }, switchContext: function( event ){ //executed when an element with class "advanced" has been clicked. }});
What is el?el is basically a reference to a DOM element and all views must have one. It allows forall of the contents of a view to be inserted into the DOM at once, which makes for fasterrendering as browser performs the minimum required reflows and repaints.
There are two ways to attach a DOM element to a view: the element already exists inthe page or a new element is created for the view and added manually by the developer.If the element already exists in the page, you can set el as either a CSS selector thatmatches the element or a simple reference to the DOM element.
el: '#footer', // ORel: document.getElementById( 'footer' )
If you want to create a new element for your view, set any combination of the followingview’s properties: tagName, id and className. A new element will be created for you bythe framework and a reference to it will be available at the el property.
tagName: 'p', // required, but defaults to 'div' if not setclassName: 'container', // optional, you can assign multiple classes to this property like so 'container homepage'id: 'header', // optional
The above code creates the DOMElement below but doesn’t append it to the DOM.
<p id="header" class="container"></p>
Understanding render()
22 | Chapter 2: The Basics
www.it-ebooks.info

render() is an optional function that defines the logic for rendering a template. We’lluse Underscore’s micro-templating in these examples, but remember you can use othertemplating frameworks if you prefer.
The _.template method in Underscore compiles JavaScript templates into functionswhich can be evaluated for rendering. In the above view, I’m passing the markup froma template with id results-template to _.template() to be compiled. Next, I set thehtml of the el DOM element to the output of processing a JSON version of the modelassociated with the view through the compiled template.
Presto! This populates the template, giving you a data-complete set of markup in justa few short lines of code.
The events attribute
The Backbone events attribute allows us to attach event listeners to either customselectors, or directly to el if no selector is provided. An event takes the form {"eventNameselector": "callbackFunction"} and a number of event-types are supported, includingclick, submit, mouseover, dblclick and more.
What isn’t instantly obvious is that under the bonnet, Backbone uses jQuery’s .delegate() to provide instant support for event delegation but goes a little further, extendingit so that this always refers to the current view object. The only thing to really keep inmind is that any string callback supplied to the events attribute must have a corre-sponding function with the same name within the scope of your view.
CollectionsCollections are sets of Models and are created by extending Backbone.Collection.
Normally, when creating a collection you’ll also want to pass through a property spec-ifying the model that your collection will contain, as well as any instance propertiesrequired.
In the following example, we create a PhotoCollection that will contain our Photomodels:
var PhotoCollection = Backbone.Collection.extend({ model: Photo});
Getters and Setters
There are a few different ways to retrieve a model from a collection. The most straight-forward is to use Collection.get() which accepts a single id as follows:
var skiingEpicness = PhotoCollection.get(2);
Sometimes you may also want to get a model based on its client id. The client id is aproperty that Backbone automatically assigns models that have not yet been saved. Youcan get a model’s client id from its .cid property.
Collections | 23
www.it-ebooks.info

var mySkiingCrash = PhotoCollection.getByCid(456);
Backbone Collections don’t have setters as such, but do support adding new modelsvia .add() and removing models via .remove().
var a = new Backbone.Model({ title: 'my vacation'}), b = new Backbone.Model({ title: 'my holiday'});
var photoCollection = new PhotoCollection([a,b]);photoCollection.remove([a,b]);
Listening for events
As collections represent a group of items, we’re also able to listen for add and removeevents for when new models are added or removed from the collection. Here’s an ex-ample:
var PhotoCollection = new Backbone.Collection();PhotoCollection.on("add", function(photo) { console.log("I liked " + photo.get("title") + ' its this one, right? ' + photo.get("src"));});
PhotoCollection.add([ {title: "My trip to Bali", src: "bali-trip.jpg"}, {title: "The flight home", src: "long-flight-oofta.jpg"}, {title: "Uploading pix", src: "too-many-pics.jpg"}]);
In addition, we’re able to bind a change event to listen for changes to models in thecollection.
PhotoCollection.on("change:title", function(){ console.log('there have been updates made to this collections titles'); });
Fetching models from the server
Collections.fetch() retrieves a default set of models from the server in the form of aJSON array. When this data returns, the current collection’s contents will be replacedwith the contents of the array.
var PhotoCollection = new Backbone.Collection;PhotoCollection.url = '/photos';PhotoCollection.fetch();
Under the covers, Backbone.sync is the function called every time Backbone tries to reador save models to the server. It uses jQuery or Zepto’s ajax implementations to makethese RESTful requests, however this can be overridden as per your needs.
In the above example if we wanted to log an event when .sync() was called, we coulddo this:
Backbone.sync = function(method, model) { console.log("I've been passed " + method + " with " + JSON.stringify(model));};
24 | Chapter 2: The Basics
www.it-ebooks.info

Resetting/Refreshing Collections
Rather than adding or removing models individually, you might occasionally wish toupdate an entire collection at once. Collection.reset() allows us to replace an entirecollection with new models as follows:
javascript PhotoCollection.reset([ {title: "My trip to Scotland", src: "scotland-trip.jpg"}, {title: "The flight from Scotland", src: "long-flight.jpg"},{title: "Latest snap of lock-ness", src: "lockness.jpg"}]); Note that using Collection.reset() doesn’t fire any add or remove events. A reset event is fired instead.
Underscore utility functionsAs Backbone requires Underscore as a hard dependency, we’re able to use many of theutilities it has to offer to aid with our application development. Here’s an example ofhow Underscore’s sortBy() method can be used to sort a collection of photos basedon a particular attribute.
var sortedByAlphabet = PhotoCollection.sortBy(function (photo) { return photo.get("title").toLowerCase();});
The complete list of what Underscore can do is beyond the scope of this guide, but canbe found in its official docs.
RoutersIn Backbone, routers are used to help manage application state and for connectingURLs to application events. This is achieved using hash-tags with URL fragments, orusing the browser’s pushState and History API. Some examples of routes may be seenbelow:
http://unicorns.com/#whatsuphttp://unicorns.com/#search/seasonal-horns/page2
Note: An application will usually have at least one route mapping a URL route to afunction that determines what happens when a user reaches that particular route. Thisrelationship is defined as follows:
"route" : "mappedFunction"
Let us now define our first controller by extending Backbone.Router. For the purposesof this guide, we’re going to continue pretending we’re creating a photo gallery appli-cation that requires a GalleryRouter.
Note the inline comments in the code example below as they continue the rest of thelesson on routers.
var GalleryRouter = Backbone.Router.extend({ /* define the route and function maps for this router */
Routers | 25
www.it-ebooks.info

routes: { "about" : "showAbout", /*Sample usage: http://unicorns.com/#about*/
"photos/:id" : "getPhoto", /*This is an example of using a ":param" variable which allows us to match any of the components between two URL slashes*/ /*Sample usage: http://unicorns.com/#photos/5*/
"search/:query" : "searchPhotos", /*We can also define multiple routes that are bound to the same map function, in this case searchPhotos(). Note below how we're optionally passing in a reference to a page number if one is supplied*/ /*Sample usage: http://unicorns.com/#search/lolcats*/
"search/:query/p:page" : "searchPhotos", /*As we can see, URLs may contain as many ":param"s as we wish*/ /*Sample usage: http://unicorns.com/#search/lolcats/p1*/
"photos/:id/download/*imagePath" : "downloadPhoto", /*This is an example of using a *splat. splats are able to match any number of URL components and can be combined with ":param"s*/ /*Sample usage: http://unicorns.com/#photos/5/download/files/lolcat-car.jpg*/
/*If you wish to use splats for anything beyond default routing, it's probably a good idea to leave them at the end of a URL otherwise you may need to apply regular expression parsing on your fragment*/
"*other" : "defaultRoute" /*This is a default route that also uses a *splat. Consider the default route a wildcard for URLs that are either not matched or where the user has incorrectly typed in a route path manually*/ /*Sample usage: http://unicorns.com/#anything*/
},
showAbout: function(){ },
getPhoto: function(id){ /* Note that the id matched in the above route will be passed to this function */ console.log("You are trying to reach photo " + id); },
searchPhotos: function(query, page){ var page_number = page || 1; console.log("Page number: " + page_number + " of the results for " + query); },
downloadPhoto: function(id, path){ },
defaultRoute: function(other){
26 | Chapter 2: The Basics
www.it-ebooks.info

console.log("Invalid. You attempted to reach:" + other); }});
/* Now that we have a router setup, remember to instantiate it*/
var myGalleryRouter = new GalleryRouter();
As of Backbone 0.5+, it’s possible to opt-in for HTML5 pushState support via window.history.pushState. This permits you to define routes such as http://www.script-junkie.com/just/an/example. This will be supported with automatic degradation whena user’s browser doesn’t support pushState. For the purposes of this tutorial, we’ll usethe hashtag method.
Backbone.historyNext, we need to initialize Backbone.history as it handles hashchange events in ourapplication. This will automatically handle routes that have been defined and triggercallbacks when they’ve been accessed.
The Backbone.history.start() method will simply tell Backbone that it’s OK to beginmonitoring all hashchange events as follows:
Backbone.history.start();Router.navigate();
As an aside, if you would like to save application state to the URL at a particular pointyou can use the .navigate() method to achieve this. It simply updates your URL frag-ment without the need to trigger the hashchange event:
/*Lets imagine we would like a specific fragment for when a user zooms into a photo*/zoomPhoto: function(factor){ this.zoom(factor); //imagine this zooms into the image this.navigate("zoom/" + factor); //updates the fragment for us, but doesn't trigger the route}
It is also possible for Router.navigate() to trigger the route as well as updating the URLfragment.
zoomPhoto: function(factor){ this.zoom(factor); //imagine this zooms into the image this.navigate("zoom/" + factor, true); //updates the fragment for us and triggers the route}
NamespacingWhen learning how to use Backbone, an important and commonly overlooked area bytutorials is namespacing. If you already have experience with namespacing in Java-Script, the following section will provide some advice on how to specifically applyconcepts you know to Backbone, however I will also be covering explanations for be-ginners to ensure everyone is on the same page.
Namespacing | 27
www.it-ebooks.info

What is namespacing?The basic idea around namespacing is to avoid collisions with other objects or variablesin the global namespace. They’re important as it’s best to safeguard your code frombreaking in the event of another script on the page using the same variable names asyou are. As a good “citizen” of the global namespace, it’s also imperative that you doyour best to similarly not prevent other developer’s scripts executing due to the sameissues.
JavaScript doesn’t really have built-in support for namespaces like other languages,however it does have closures which can be used to achieve a similar effect.
In this section we’ll be taking a look shortly at some examples of how you can name-space your models, views, routers and other components specifically. The patterns we’llbe examining are:
• Single global variables
• Object Literals
• Nested namespacing
Single global variables
One popular pattern for namespacing in JavaScript is opting for a single global variableas your primary object of reference. A skeleton implementation of this where we returnan object with functions and properties can be found below:
var myApplication = (function(){ function(){ // ... }, return { // ... }})();
You’ve probably seen this technique before. A Backbone-specific example might looklike this:
var myViews = (function(){ return { PhotoView: Backbone.View.extend({ .. }), GalleryView: Backbone.View.extend({ .. }), AboutView: Backbone.View.extend({ .. }); //etc. };})();
Here we can return a set of views, but the same technique could return an entire col-lection of models, views and routers depending on how you decide to structure yourapplication. Although this works for certain situations, the biggest challenge with thesingle global variable pattern is ensuring that no one else has used the same globalvariable name as you have in the page.
28 | Chapter 2: The Basics
www.it-ebooks.info

One solution to this problem, as mentioned by Peter Michaux, is to use prefix name-spacing. It’s a simple concept at heart, but the idea is you select a common prefix name(in this example, myApplication_) and then define any methods, variables or other ob-jects after the prefix.
var myApplication_photoView = Backbone.View.extend({}),myApplication_galleryView = Backbone.View.extend({});
This is effective from the perspective of trying to lower the chances of a particularvariable existing in the global scope, but remember that a uniquely named object canhave the same effect. This aside, the biggest issue with the pattern is that it can resultin a large number of global objects once your application starts to grow.
For more on Peter’s views about the single global variable pattern, read his excellentpost on them.
Note: There are several other variations on the single global variable pattern out in thewild, however having reviewed quite a few, I felt the prefixing approach applied bestto Backbone.
Object Literals
Object Literals have the advantage of not polluting the global namespace but assist inorganizing code and parameters logically. They’re beneficial if you wish to create easilyreadable structures that can be expanded to support deep nesting. Unlike simple globalvariables, Object Literals often also take into account tests for the existence of a variableby the same name, which helps reduce the chances of collision.
This example demonstrates two ways you can check to see if a namespace already existsbefore defining it. I commonly use Option 2.
/*Doesn't check for existence of myApplication*/var myApplication = {};
/*Does check for existence. If already defined, we use that instance.Option 1: if(!myApplication) myApplication = {};Option 2: var myApplication = myApplication || {};We can then populate our object literal to support models, views and collections (or any data, really):*/
var myApplication = { models : {}, views : { pages : {} }, collections : {}};
One can also opt for adding properties directly to the namespace (such as your views,in the following example):
Namespacing | 29
www.it-ebooks.info

var myGalleryViews = myGalleryViews || {};myGalleryViews.photoView = Backbone.View.extend({});myGalleryViews.galleryView = Backbone.View.extend({});
The benefit of this pattern is that you’re able to easily encapsulate all of your models,views, routers etc. in a way that clearly separates them and provides a solid foundationfor extending your code.
This pattern has a number of benefits. It’s often a good idea to decouple the defaultconfiguration for your application into a single area that can be easily modified withoutthe need to search through your entire codebase just to alter it. Here’s an example of ahypothetical object literal that stores application configuration settings:
var myConfig = { language: 'english', defaults: { enableGeolocation: true, enableSharing: false, maxPhotos: 20 }, theme: { skin: 'a', toolbars: { index: 'ui-navigation-toolbar', pages: 'ui-custom-toolbar' } }}
Note that there are really only minor syntactical differences between the Object Literalpattern and a standard JSON data set. If for any reason you wish to use JSON for storingyour configurations instead (e.g. for simpler storage when sending to the back-end),feel free to.
For more on the Object Literal pattern, I recommend reading Rebecca Murphey’sexcellent article on the topic.
Nested namespacing
An extension of the Object Literal pattern is nested namespacing. It’s another commonpattern used that offers a lower risk of collision due to the fact that even if a top-levelnamespace already exists, it’s unlikely the same nested children do. For example, Ya-hoo’s YUI uses the nested object namespacing pattern extensively:
YAHOO.util.Dom.getElementsByClassName('test');
Yahoo’s YUI uses the nested object namespacing pattern regularly and even Docu-mentCloud (the creators of Backbone) use the nested namespacing pattern in their mainapplications. A sample implementation of nested namespacing with Backbone maylook like this:
var galleryApp = galleryApp || {};
// perform similar check for nested children
30 | Chapter 2: The Basics
www.it-ebooks.info

galleryApp.routers = galleryApp.routers || {};galleryApp.model = galleryApp.model || {};galleryApp.model.special = galleryApp.model.special || {};
// routersgalleryApp.routers.Workspace = Backbone.Router.extend({}); galleryApp.routers.PhotoSearch = Backbone.Router.extend({});
// modelsgalleryApp.model.Photo = Backbone.Model.extend({});galleryApp.model.Comment = Backbone.Model.extend({});
// special modelsgalleryApp.model.special.Admin = Backbone.Model.extend({});
This is readable, clearly organized, and is a relatively safe way of namespacing yourBackbone application. The only real caveat however is that it requires your browser’sJavaScript engine to first locate the galleryApp object, then dig down until it gets to thefunction you’re calling. However, developers such as Juriy Zaytsev (kangax) have testedand found the performance differences between single object namespacing vs the “nes-ted” approach to be quite negligible.
Recommendation
Reviewing the namespace patterns above, the option that I prefer when writing Back-bone applications is nested object namespacing with the object literal pattern.
Single global variables may work fine for applications that are relatively trivial. How-ever, larger codebases requiring both namespaces and deep sub-namespaces require asuccinct solution that’s both readable and scalable. I feel this pattern achieves both ofthese objectives and is a good choice for most Backbone development.
Additional Tips
Automated Backbone ScaffoldingScaffolding can assist in expediting how quickly you can begin a new application bycreating the basic files required for a project automatically. If you enjoy the idea ofautomated MVC scaffolding using Backbone, I’m happy to recommend checking outa tool called Brunch.
It works very well with Backbone, Underscore, jQuery and CoffeeScript and is evenused by companies such as Red Bull and Jim Beam. You may have to update any thirdparty dependencies (e.g. latest jQuery or Zepto) when using it, but other than that itshould be fairly stable to use right out of the box.
Brunch can be installed via the nodejs package manager and is easy to get started with.If you happen to use Vim or Textmate as your editor of choice, you’ll be happy to knowthat there are Brunch bundles available for both.
Additional Tips | 31
www.it-ebooks.info

Is there a limit to the number of routers I should be using?Andrew de Andrade has pointed out that DocumentCloud themselves usually only usea single router in most of their applications. You’re very likely to not require more thanone or two routers in your own projects as the majority of your application routing canbe kept organized in a single controller without it getting unwieldy.
Is Backbone too small for my application’s needs?If you find yourself unsure of whether or not your application is too large to use Back-bone, I recommend reading my post on building large-scale jQuery & JavaScript ap-plications or reviewing my slides on client-side MVC architecture options. In both, Icover alternative solutions and my thoughts on the suitability of current MVC solutionsfor scaled application development.
Backbone can be used for building both trivial and complex applications as demon-strated by the many examples Ashkenas has been referencing in the Backbone docu-mentation. As with any MVC framework however, it’s important to dedicate time to-wards planning out what models and views your application really needs. Divingstraight into development without doing this can result in either spaghetti code or alarge refactor later on and it’s best to avoid this where possible.
At the end of the day, the key to building large applications is not to build large appli-cations in the first place. If you however find Backbone doesn’t cut it for your require-ments I strongly recommend checking out JavaScriptMVC or SproutCore as these bothoffer a little more than Backbone out of the box. Dojo and Dojo Mobile may also be ofinterest as these have also been used to build significantly complex apps by other de-velopers.
32 | Chapter 2: The Basics
www.it-ebooks.info

CHAPTER 3
RESTful Applications
Building RESTful applications with BackboneIn this section of the book, we’re going to take a look at developing RESTful applica-tions using Backbone.js and modern technology stacks. When the data for your back-end is exposed through a purely RESTful API, tasks such as retrieving (GET), creating(POST), updating (PUT) and deleting (DELETE) models are made easy through Back-bone’s Model API. This API is so intuitive in fact that switching from storing recordsin a local data-store (e.g localStorage) to a database/noSQL data-store is a lot simplerthan you may think.
Stack 1: Building A Backbone App With Node.js, Express,Mongoose and MongoDBThe first stack we’ll be looking at is:
• Node.js
• Express
• Mongoose
• and MongoDB
with Jade used optionally as a view/templating engine.
Reviewing the stackAs you may know, node.js is an event-driven platform (built on the V8 runtime), de-signed for writing fast, scalable network applications. It’s reasonably lightweight, effi-cient and great for real-time applications that are data-intensive.
33
www.it-ebooks.info

Express is a small web-development framework written with node.js, based on Sina-tra. It supports a number of useful features such as intuitive views, robust routing anda focus on high performance.
Next on the list are MongoDB and Mongoose. MongoDB is an open-source, document-oriented database store designed with scalability and agility in mind. As a noSQL da-tabase, rather than storing data in tables and rows (something we’re very used to doingwith relational databases), with MongoDB we instead store JSON-like documents us-ing dynamic schemas. One of the goals of Mongo is to try bridging the gap betweenkey-value stores (speed, scalability) and relational databases (rich functionality).
Mongoose is a JavaScript library that simplifies how we interact with Mongo. LikeExpress, it’s designed to work within the node.js environment and tries to solve someof the complexities with asynchronous data storage by offering a more user-friendlyAPI. It also adds chaining features into the mix, allowing for a slightly more expressiveway of dealing with our data.
Jade is a template engine influenced by Haml (which we’ll be looking at later). It’simplemented with JavaScript (and also runs under node). In addition to supportingExpress out of the box, it boasts a number of useful features including support formixins, includes, caching, template inheritance and much more. Whilst abstractionslike Jade certainly aren’t for everyone, our practical will cover working both with andwithout it.
PracticalFor this practical, we’re going to once again look at extending the popular BackboneTodo application. Rather than relying on localStorage for data persistence, we’re goingto switch to storing Todos in a MongoDB document-store instead. The code for thispractical can be found in practicals\stacks\option2
app.js
(See here for the source)
We must first include the node dependencies required by our application. These areExpress, Mongoose and Path (a module containing utilities for dealing with file paths.
var application_root = __dirname, express = require("express"), path = require("path"), mongoose = require('mongoose');
Next, create a new Express server. express.createServer() is a simple way of creatingan instance of express.HTTPServer, which we’ll be using to pass in our routes.
var app = express.createServer();
After this, connect Mongoose up to a database (in our case, localhost should suffice).Should you require the ability to pass in authentication information, here’s a sample
34 | Chapter 3: RESTful Applications
www.it-ebooks.info

containing all of the supported URL parameters: mongodb://[username:password@]host1[:port1][,host2[:port2],...[,hostN[:portN]]][/[database][?options]]
mongoose.connect('mongodb://localhost/my_database');
A Mongoose model for any Todo item can now be easily defined by passing a schemainstance to mongoose.model. In our case the schema covers a Todo item’s text content,its done state and order position in the overall Todo list.
var Todo = mongoose.model('Todo', new mongoose.Schema({ text: String, done: Boolean, order: Number}));
The configure() methods allows us to setup what we need for the current environmentwith our Express server. Note that lower down in the configuration are two view/viewrelated lines. The last one explicitly sets the viewing/templating engine to be used asJade app.set('view engine', 'jade'). We can avoid these if we wish to use plainHTML/JS for our templates instead.
app.configure(function(){ // the bodyParser middleware parses JSON request bodies app.use(express.bodyParser()); app.use(express.methodOverride()); app.use(app.router); app.use(express.static(path.join(application_root, "public"))); app.use(express.errorHandler({ dumpExceptions: true, showStack: true })); app.set('views', path.join(application_root, "views")); app.set('view engine', 'jade')});
Should you prefer to switch out Jade for an alternative view engine, this can be donefairly trivially. See the section under “Templating” here: https://github.com/joyent/node/wiki/modules. For example, to switch to EJS, you would simply writeapp.set('view engine', 'ejs')
Express makes use of common HTTP verbs (get, put, post etc.) to provide easy to use,expressive routing API based on CRUD (Create, Read, Update and Delete). Below forexample, we can define what happens when the browser requests the root “/”. As atrivial route in this application, it doesn’t do anything particularly exciting, howevergetters typically read or retrieve data.
app.get('/', function(req, res){ res.send('Hello World');});
Onto something a little more useful and in our next route, navigating to “/todo” willactually render our Jade view “todo.jade”, as seen in the callback. Additional config-uration values can be passed as the second parameter, such as the custom title specifiedbelow.
Stack 1: Building A Backbone App With Node.js, Express, Mongoose and MongoDB | 35
www.it-ebooks.info

app.get('/todo', function(req, res){ res.render('todo', {title: "Our sample application"});});
Next, we can see the first of our “/api/” routes.
app.get('/api/todos', function(req, res){ return Todo.find(function(err, todos) { return res.send(todos); });});
The callback to our next route supports querying for todos based on a specific ID. Theroute string itself (once compiled) will be converted from “/api/todos/:id” to a regularexpression. As you might have guessed, this is a hint that routes can also be regularexpression literals if we wished to do something more complex.
app.get('/api/todos/:id', function(req, res){ return Todo.findById(req.params.id, function(err, todo) { if (!err) { return res.send(todo); } });});
Similarly, we want to support updating todos based on a specific ID as well. The fol-lowing allows us to query a todo by ID and then update the values of it’s three attributes(text, done, order) easily.
app.put('/api/todos/:id', function(req, res){ return Todo.findById(req.params.id, function(err, todo) { todo.text = req.body.text; todo.done = req.body.done; todo.order = req.body.order; return todo.save(function(err) { if (!err) { console.log("updated"); } return res.send(todo); }); });});
We’ve so far covered requesting todos and updating them, but a core part of the ap-plication requires us to insert (or add) new todos to our data-store. Below we can createnew Todo models and simply save them.
app.post('/api/todos', function(req, res){ var todo; todo = new Todo({ text: req.body.text, done: req.body.done, order: req.body.order }); todo.save(function(err) { if (!err) {
36 | Chapter 3: RESTful Applications
www.it-ebooks.info

return console.log("created"); } }); return res.send(todo);});
We of course also want to support deleting todos (e.g if a todo has been “cleared”, itshould be deleted). This also works based on a specific todo ID.
app.delete('/api/todos/:id', function(req, res){ return Todo.findById(req.params.id, function(err, todo) { return todo.remove(function(err) { if (!err) { console.log("removed"); return res.send('') } }); });});
Finally, this last line is to ensure we’re only listening on the port app.js is running.
app.listen(3000);
script.js - updating our Backbone.js app
In the /public/js folder of options 1 (HTML templates) and 2 (Jade) for the practical,you’ll find a version of the Backbone Todo app originally by Jerome Gravel-Niquet.Let’s pay attention to script.js. In order to change the application to work with our newback-end, we’ll need to make some very minor changes to this.
Reviewing window.TodoList (a Backbone Collection), you’ll notice that it has a propertycalled localStorage, which uses the Backbone localStorage adapter in order to facilitatestoring data using the browser’s localStorage features.
window.TodoList = Backbone.Collection.extend({
// Reference to this collection's model. model: Todo,
// Save all of the todo items under the `"todos"` namespace. // Typically, this should be a unique name within your application localStorage: new Store("todos"),
In order to switch it over to our RESTful backend, we’re going to make use of the urlproperty or function on a collection to reference its location on the server. Models insideof a collection then use url to construct URLs of their own. As all of the CRUD for ourRESTful API works on the base route “/api/todos”, this is the value we set url to.
// localStorage: new Store("todos"), url: '/api/todos',
This is the only change necessary to our existing Backbone application in order to getthings working. Pretty easy, right?
todo.jade
Stack 1: Building A Backbone App With Node.js, Express, Mongoose and MongoDB | 37
www.it-ebooks.info

The Jade templates for our application cover declarative markup for both the index(layout.jade) of the application and the main Todo container (todo.jade). It also coversthe script-tag templates used for rendering each new Todo item that’s added.
// Todo App Interface
#todoapp .title h1 Todos .content #create-todo input#new-todo(placeholder="What needs to be done?", type="text") span.ui-tooltip-top(style="display:none;") Press Enter to save this task #todos ul#todo-list #todo-stats
// Templatesscript#item-template(type="text/template") <div class="todo <%= done ? 'done' : '' %>"> .display <input class="check" type="checkbox" <%= done ? 'checked="checked"' : '' %> /> .todo-text span#todo-destroy .edit input.todo-input(type="text", "value"="") </div>
script#stats-template(type="text/template") <% if (total) { %> span.todo-count span.number <%= remaining %> span.word <%= remaining == 1 ? 'item' : 'items' %> | left. <% } %> <% if (done) { %> span.todo-clear a(href="#") | Clear span.number-done <%= done %> | completed span.word-done <%= done == 1 ? 'item' : 'items' %> <% } %>
layout.jade
!!! 5//if lt IE 6 <html class="no-js ie6 oldie" lang="en"> //if IE 7 <html class="no-js ie7 oldie" lang="en">//if IE 8 <html class="no-js ie8 oldie" lang="en">//if gt IE 8 <!--> <html class="no-js" lang="en"> <!--
38 | Chapter 3: RESTful Applications
www.it-ebooks.info

head meta(charset="utf-8") meta(http-equiv="X-UA-Compatible", content="IE=edge,chrome=1")
title=title meta(name="description", content="") meta(name="author", content="") meta(name="viewport", content="width=device-width,initial-scale=1")
// CSS concatenated and minified via ant build script link(rel="stylesheet", href="css/style.css") // end CSS
script(src="js/libs/modernizr-2.0.6.min.js")body
#container header #main(role="main")!=body footer //! end of #container
script(src="//ajax.googleapis.com/ajax/libs/jquery/1.6.2/jquery.min.js") script window.jQuery || document.write('<script src="js/libs/jquery-1.6.2.min.js"><\\/script>')
// scripts concatenated and minified via ant build script script(src="js/mylibs/underscore.js") script(src="js/mylibs/backbone.js") script(defer, src="js/plugins.js") script(defer, src="js/script.js") // end scripts
// Change UA-XXXXX-X to be your site's ID script window._gaq = [['_setAccount','UAXXXXXXXX1'],['_trackPageview'],['_trackPageLoadTime']]; Modernizr.load({load: ('https:' == location.protocol ? '//ssl' : '//www') + '.google-analytics.com/ga.js'});
//if lt IE 7 script(src="//ajax.googleapis.com/ajax/libs/chrome-frame/1.0.3/CFInstall.min.js") script window.attachEvent('onload',function(){CFInstall.check({mode:'overlay'})})</html>
static.html
Alternatively, a static version of our index which doesn’t rely on Jade can be put togetheras follows. See here for the complete file or below for a sample.
<div id="container"> <div id="main" role="main">
<!-- Todo App Interface-->
<div id="todoapp"> <div class="title">
Stack 1: Building A Backbone App With Node.js, Express, Mongoose and MongoDB | 39
www.it-ebooks.info

<h1>Todos</h1> </div>
<div class="content"> <div id="create-todo"> <input id="new-todo" placeholder="What needs to be done?" type= "text" /><span style="display:none;" class="ui-tooltip-top">Press Enter to save this task</span> </div>
<div id="todos"> <ul id="todo-list"></ul> </div>
<div id="todo-stats"></div> </div> </div>
<!-- Templates-->
<script id="item-template" type="text/template"> <div class="todo <%= done ? 'done' : '' %>"> <div class="display"><input class="check" type="checkbox" <%= done ? 'checked="checked"' : '' %> /> <div class="todo-text"></div><span id="todo-destroy"></span></div><div class="edit"><input type="text" value="" class="todo-input"/></div></div> </script>
<script id="stats-template" type="text/template"> <% if (total) { %> <span class="todo-count"><span class="number"><%= remaining %> </span><span class="word"><%= remaining == 1 ? 'item' : 'items' %></span> left. </span><% } %> <% if (done) { %> <span class="todo-clear"><a href="#"> Clear <span class="number-done"><%= done %></span> completed <span class="word-done"><%= done == 1 ? 'item' : 'items' %></span></a></span><% } %> </script>
</div> </div>
<!--! end of #container-->
Practical SetupWe’ve now gone through the major points of developing a RESTful backend usingNode.js, Express and Mongoose. Next, let’s make sure you can get your environmentsetup to run the updated Todo app.
MongoDB
Once you’ve downloaded MongoDB, you’ll need to complete two steps to get it up andrunning.
40 | Chapter 3: RESTful Applications
www.it-ebooks.info

Data directories
MongoDB stores data in the bin/data/db folder but won’t actually create this directoryfor you. Navigate to where you’ve downloaded and extracted MongoDB and run thefollowing from terminal:
sudo mkdir -p /data/db/sudo chown `id -u` /data/db
Running and connecting to your server
Once this is done, open up two terminal windows.
In the first, cd to your MongoDB bin directory or type in the complete path to it. You’llneed to start <cpde>mongod`.
$ ./bin/mongod
Next, in the second terminal, start the `mongo</code shell which will connect up tolocalhost by default.
$ ./bin/mongo
That’s it!.
Express and Mongoose
Option 1 (HTML) and Option 2 (Jade) of the practical download both come with aninstall.sh bash script. This allows you to easily install Express, Mongoose, Jade (andoptionally MongoDB if you prefer to) through npm (the node package manager).
• Make sure you have Node.js installed. If not, you can grab it here
• Next run $ ./install.sh at the terminal to install the rest of our dependencies. Tosee the exact contents of the install.sh file, see below:
install.sh
#!/bin/bashnpm install expressnpm install mongodb --mongodb:nativenpm install mongoosenpm install jade
• After you’ve installed all of the dependencies for the stack, we can get to cloningthe repo containing our practicals and running them. Start by running the belowlines:
git clone git://github.com/addyosmani/backbone-boilerplates.gitcd option2node app.js
For option1 (without Jade), simply cd into option1 and run node app.js from there.
Finally, either of the example apps can now be accessed by navigating to:
• Option 1: http://localhost:3000/static.html
Stack 1: Building A Backbone App With Node.js, Express, Mongoose and MongoDB | 41
www.it-ebooks.info

• Option 2: http://localhost:3000/todo
That’s it! Whilst there’s a lot more than can be done to expand on the concepts coveredso far, the base we’re reviewed should be enough to get you up and running with thisstack if you wish to use it with Backbone.
Building Backbone.js Apps With Ruby, Sinatra, MongoDB andHaml
IntroductionIn this chapter we’re going to explore writing Backbone.js applications with a Rubyback-end. To assist with this, we’re going to use Sinatra - a DSL (domain specific lan-guage) for rapidly creating web applications in Ruby. Similar to the section on writingan application with Node.js, our server-side language (Ruby) will be used to power anAPI whilst Backbone.js will be the client consuming it.
What Is Sinatra?In the past, you’ve likely come across or used Ruby on Rails (RoR) - a popular webapplication framework for the Ruby programming language that helps organize appli-cations using the MVC pattern. Sinatra is a much smaller, more light-weight alternativeto it.
Whilst a very basic Rails application may require a more strict project structure (suchas requiring the use of controllers, views and routing etc.), Sinatra doesn’t require asmany of these dependencies, sacrificing the helpers needed to connect to databases,tools to create forms or any of the other utilities Rails comes with out of the box.
What Sinatra does have is a minimal set of features most useful for tying specific URLsand RESTful HTTP actions to blocks of Ruby code and returning this code’s output asa response. Sinatra is particularly useful for getting projects up and running quicklywhere we don’t have a need for the extra pieces RoR provides.
For those who are familiar with more Rails, you probably know that it requires a sep-arate routes file to define how an application should be responding to requests. Theseare then piped into the relevant models and controllers as needed.
Sinatra takes a more straight-forward approach, providing us with the most simple pathto handling routing. By declaring get,post, put or delete actions, we can inform Sinatrato add a new route, which we can then have respond to requests.
The framework is particularly useful for writing APIs, widgets and small-scale appli-cations that can power the backend of a client-heavy application. As mentioned, wewill be using it to power our API.
42 | Chapter 3: RESTful Applications
www.it-ebooks.info

Getting Started With SinatraLet’s review how to write and run a very basic Sinatra application. As most program-ming languages and frameworks typically start with some variation of “Hello World”,we’ll start with a similar example.
Note: Before beginning this section, I recommend installing Sinatra on your system. Aguide to doing this can be found in the prerequisites section lower down in the article.
Routes
As mentioned, Sinatra allows us to define new routes using HTTP actions. Semanti-cally, a route follows quite a simple structure:
<a HTTP action> <the desired route> do # some behaviourend
A tiny route that outputs a “Hello World”-like message when we attempt to “get” theroot could thus be written as follows:
require 'sinatra'
get '/' do "Hello World! Is it me you're looking for?"end
To run this snippet, we can can simply save it to a local ’.rb’ file and execute it as follows:
ruby -rubygems example.rb
If we now navigated to http://localhost:4567 in our browser we could now see theapplication running successfully.
The HTTP verbs we commonly work with when writing RESTful web services are: get,post, delete and put. As we now know, all Sinatra routes are basically HTTP actions(`get etc.) that are paired with a URL-matching pattern. We associate a pair of an actionand route with code we would like sent back to the browser (executed)if the route isreached. Sinatra doesn’t enforce much in the way of architectural structure, insteadrelying on simplicity to supporting writing powerful APIs.
Here’s an example of a skeleton service we could put together supporting four commonHTTP actions: ruby ``` get “/items” do # list all items available end
get “/item/:id” do # get a single item end
post “/item” do # create a new item end
put “/item/:id” do # update an existing item end
delete “/item/:id” do # delete an item end ```
Sinatra’s routing is both easy for beginners to get started with but is also flexible enoughfor those wishing to define more complex routes. As you probably noticed in the above
Building Backbone.js Apps With Ruby, Sinatra, MongoDB and Haml | 43
www.it-ebooks.info

example, routes can include named parameters (e.g /item/:id). We can actually accessthe content of these routes using the params hash as follows:
get '/item/:id' do # this matches "GET /item/10" and "GET /item/11" # params[:id] is "10" or "11" "You reached #{params[:id]}"end
Sinatra also supports route matching via splats, wildcards and regular expressions. Formore information on this I recommend reading the official docs. Let’s now take a lookat handlers.
Sinatra includes convenient handler methods for tasks such as redirection, halting andpassing.
A simple route supporting redirection which returns a 302 response can bewritten as follows:
get '/items' do redirect '/items/welcome'end
And if we wish to pass additional parameters such as arguments we can do so like this:redirect “http://site.com/”, “Oops! I think we have a problem!”
To immediately stop a request (halting) we can use “halt”. Heres an exampleof halting a request where we specify the message body:
halt "who goes there!?"
“Passing” is the concept of deferring processing of a block to the next matchingroute. We do this using pass. In the following example if a parameter isnt the usernamewe expect (rick-astley) we simply pass it on:
get '/members/:username' do pass unless params[:username] == 'rick-astley' 'Never gonna give you up, never gonna let you down'end
get '/member/*' do 'Welcome!'end
There are also handler methods that can assist with sessions (specifically, cookie-basedsession handling). To use Sinatra’s session handling, first enable it in your applicationwith:
enable :sessions
You can then use the session handling capabilities as follows:
get '/items' do session['visitCounter'] ||= 0; session['visitCounter'] += 1;
Redirection.
Halting.
Passing.
44 | Chapter 3: RESTful Applications
www.it-ebooks.info

"This page has been accessed #{session['visitCounter']} times"end
Note: By default enable:sessions will store all data in cookies. If this is not desired, youcan not call this and instead use some Rack middleware instead. For more on this seehere.
This only touches the surface of what can be done using routes and handlers, but issufficient for us to write the Sinatra-powered API service we require in the practicalsection of this chapter.
Templating And HAMLLet’s now discuss templating.Out of the box, we can begin using templates in ourSinatra applications with ERB. ERB is included with Ruby and allows Ruby code to beadded to any plain text document for the purpose of generating information or flowcontrol. In the following example using an ERB template, note that views are by defaultlocated in the views directory of our application.
get '/items' do erb :default # renders views/default.erbend
A useful Sinatra convention worth noting is how layouts are handled. Layouts auto-matically search for a views/layout template which is rendered before any other viewsare loaded. With ERB, our views/layout.erb file could look as follows:
<html> <head></head> <body> <%= data %> </body></html>
Haml is a popular alternative to ERB which offers an abstract syntax for writing appli-cation templates. It has been said to be:
• Straight-forward to learn
• Very easy to read and use for visually expressing a hierarchy of DOM elements
• Popular with web designers as it builds on top of CSS syntax
• Well documented with a large community backing it
• Almost as fast as ERB
For the purpose of comparison, below we can see an ERB template compared to it’sHaml equivalent.
Building Backbone.js Apps With Ruby, Sinatra, MongoDB and Haml | 45
www.it-ebooks.info

ERB<div class="todo" id="content"> <h2 class="entry_title"><%= h @todo.title %></h2> <div class="entry_link"><%= link_to('link', @todo.link) %></div></div>
Haml.todo#content %h2.entry_title= @todo.title .entry_link= link_to('link', @todo.link)
One of the first things we notice is that the Haml snippet looks significantly more likeCSS than it does traditional markup. It’s much easier to read and we no longer need tobe concerned with divs, spans, closing tags or other semantic rules that usually meanmore keystrokes. The approach taken to making whitespace a part of the syntax alsomeans it can be much easier to compare changes between multiple documents (espe-cially if you’re doing a diff).
In the list of Haml features, we briefly mentioned web designers. As developers, weregularly need to communicate and work with designers, but we always have to re-member that at the end of the day, they are not programmers. They’re usually moreconcerned with the look and the feel of an application, but if we want them to writemark-up as a part of the templates or skins they create, Haml is a simpler option thathas worked well for teams at a number of companies.
%h1 This is some h1 text%h2 This is some h2 text.
%p Now we have a line containing a single instance variable: @content%p= @content
%p Embedding Ruby code in the middle of a line can be done using ==.%p== Here is an example: #{@foobar}
%p We can also add attributes using {}%p{:style => "color:green"} We just made this paragraph green!
%p You'll want to apply classes and ids to your DOM, too.%p.foo This has the foo class%p.bar This has the bar class%p#foobar This has the foobar id%p.foo#foobar Or you can combine them!
%p Nesting can be done like this%p Or even like this
Note: Haml is whitespace sensitive and will not correctly work if it isn’t indented byan even number of spaces. This is due to whitespace being used for nesting in place ofthe classic HTML markup approach of closing tags.
46 | Chapter 3: RESTful Applications
www.it-ebooks.info

MongoDB Ruby Driver
Getting startedOnce the MongoDB Ruby driver is installed, we can begin to use it to connect to aMongo database. To create a connection using localhost, we simply specify the driveras a dependency. Assuming we’re using the default port we can then connect as follows:
require 'mongo'
# where 'learning-mongo' is the name of our database:db = Connection.new.db('learning-mongo');
We probably also want to place some data into “learning-mongo”. It could be as simpleas a note, so why don’t we go ahead and begin a notes collection?:
ruby notes = db.collection('notes') Something interesting worth noting is that atthis point, we haven’t actually created the database nor the collection we’re referencingabove.
Neither of these items exist in Mongo (just yet) but as we’re working with a new da-tabase but they will once we insert some real data.
A new note could be defined using key/value pairs as follows and then inserted into“learning-mongo” using collection.insert():
our_note = { :text => 'Remember the milk', :remindInterval => 'weekly'}note_id = notes.insert(our_note)
What is returned from inserting a note into the notes collection is an ObjectId referencefor the note from Mongo. This is useful as we can re-use it to locate the same documentin our database.
note = notes.find( :id => note_id ).first
This can also be used in conjunction with Mongo’s collection.update() method andquery operators (i.e $set) to replace fields in an existing document.
We might update an entire document as follows:
note = notes.find( :id => note_id ).firstnote[:text] = 'Remember the bread'notes.update({ :_id => note_id }, note)
or using $set, update an existing document without overwriting the entire object aslike this:
notes.update({ :_id => note_id }, '$set' => { :text = > 'Remember the bread' })
Useful to know: Almost each MongoDB document has an _id field as it’s first attribute.This can normally be of any type, however a special BSON datatype is provided forobject ids. It’s a 12-byte binary value that has a high probability of being unique whenallocated.
MongoDB Ruby Driver | 47
www.it-ebooks.info

Note: Whilst we opted for the MongoDB Ruby Driver for this stack, you may also beinterested in DataMapper - a solution which allows us to use the same API to talk toa number of different datastores. This works well for both relational and non-relationaldatabases and more information is available on the official project page. Sinatra: TheBook also contains a brief tutorial on DataMapper for anyone interested in exploringit further.
PracticalWe’re going to use Sinatra in a similar manner to how we used Express in the lastchapter. It will power a RESTful API supporting CRUD operations. Together with aMongoDB data store, this will allow us to easily persist data (todo items) whilst ensuringthey are stored in a database. If you’ve read the previous chapter or have gone throughany of the Todo examples covered so far, you will find this surprisingly straight-for-ward.
Remember that the default Todo example included with Backbone.js already persistsdata, although it does this via a localStorage adapter. Luckily there aren’t a great dealof changes needed to switch over to using our Sinatra-based API. Let’s briefly reviewthe code that will be powering the CRUD operations for this sections practical, as wego course won’t be starting off with a near-complete base for most of our real worldapplications.
Installing The Prerequisites
Ruby
If using OSX or Linux, Ruby may be one of a number of open-source packages thatcome pre-installed and you can skip over to the next paragraph. In case you would liketo check if check if you have Ruby installed, open up the terminal prompt and type:
$ ruby -v
The output of this will either be the version of Ruby installed or an error complainingthat Ruby wasn’t found.
Should you need to install Ruby manually (e.g for an operating system such as Win-dows), you can do so by downloading the latest version from http://www.ruby-lang.org/en/downloads/. Alternatively, (RVM)[http://beginrescueend.com/rvm/in-stall/] (Ruby Version Manager) is a command-line tool that allows you to easily installand manage multiple ruby environments with ease.
48 | Chapter 3: RESTful Applications
www.it-ebooks.info
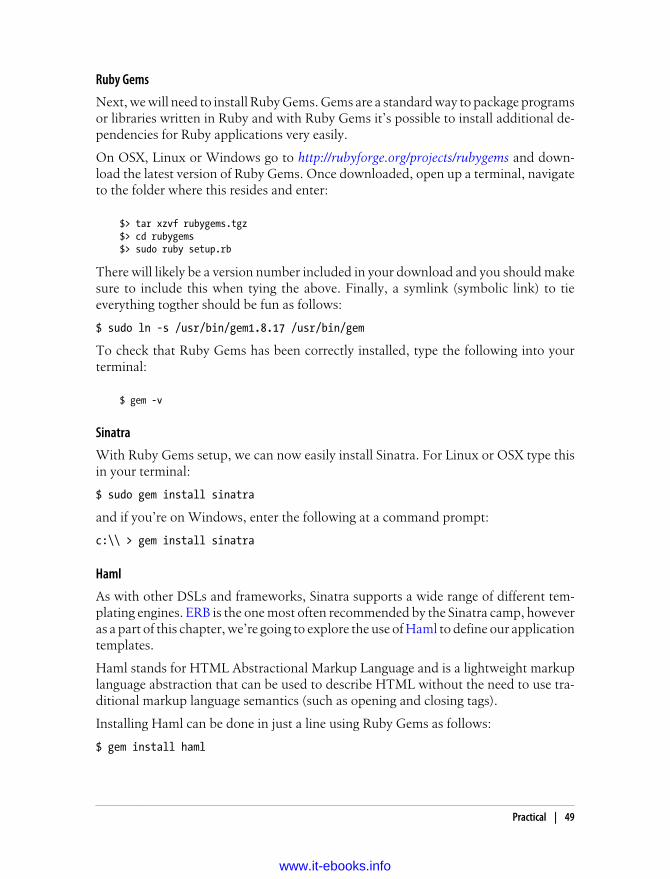
Ruby Gems
Next, we will need to install Ruby Gems. Gems are a standard way to package programsor libraries written in Ruby and with Ruby Gems it’s possible to install additional de-pendencies for Ruby applications very easily.
On OSX, Linux or Windows go to http://rubyforge.org/projects/rubygems and down-load the latest version of Ruby Gems. Once downloaded, open up a terminal, navigateto the folder where this resides and enter:
$> tar xzvf rubygems.tgz$> cd rubygems$> sudo ruby setup.rb
There will likely be a version number included in your download and you should makesure to include this when tying the above. Finally, a symlink (symbolic link) to tieeverything togther should be fun as follows:
$ sudo ln -s /usr/bin/gem1.8.17 /usr/bin/gem
To check that Ruby Gems has been correctly installed, type the following into yourterminal:
$ gem -v
Sinatra
With Ruby Gems setup, we can now easily install Sinatra. For Linux or OSX type thisin your terminal:
$ sudo gem install sinatra
and if you’re on Windows, enter the following at a command prompt:
c:\\ > gem install sinatra
Haml
As with other DSLs and frameworks, Sinatra supports a wide range of different tem-plating engines. ERB is the one most often recommended by the Sinatra camp, howeveras a part of this chapter, we’re going to explore the use of Haml to define our applicationtemplates.
Haml stands for HTML Abstractional Markup Language and is a lightweight markuplanguage abstraction that can be used to describe HTML without the need to use tra-ditional markup language semantics (such as opening and closing tags).
Installing Haml can be done in just a line using Ruby Gems as follows:
$ gem install haml
Practical | 49
www.it-ebooks.info

MongoDB
If you haven’t already downloaded and installed MongoDB from an earlier chapter,please do so now. With Ruby Gems, Mongo can be installed in just one line:
$ gem install mongodb
We now require two further steps to get everything up and running.
MongoDB stores data in the bin/data/db folder but won’t actually cre-ate this directory for you. Navigate to where you’ve downloaded and extracted Mongoand run the following from terminal:
sudo mkdir -p /data/db/sudo chown `id -u` /data/db
Once this is done, open up two terminal windows.
In the first, cd to your MongoDB bin directory or type in the complete path to it. You’llneed to start mongod.
$ ./bin/mongod
Finally, in the second terminal, start the mongo shell which will connect up to localhostby default.
$ ./bin/mongo
MongoDB Ruby Driver
As we’ll be using the MongoDB Ruby Driver, we’ll also require the following gems:
The gem for the driver itself:
$ gem install mongo
and the driver’s other prerequisite, bson:
$ gem install bson_ext
This is basically a collection of extensions used to increase serialization speed.
That’s it for our prerequisites!.
TutorialTo get started, let’s get a local copy of the practical application working on our system.
1.Data directories.
2.Running and connecting to your server.
50 | Chapter 3: RESTful Applications
www.it-ebooks.info

Application Files
Clone this repository and navigate to /practicals/stacks/option3. Now run the fol-lowing lines at the terminal:
ruby app.rb
Finally, navigate to http://localhost:4567/todo to see the application running suc-cessfully.
Note: The Haml layout files for Option 3 can be found in the /views folder.
The directory structure for our practical application is as follows:
--public----css----img----js-----script.js----test--viewsapp.rb
The public directory contains the scripts and stylesheets for our application and usesHTML5 Boilerplate as a base. You can find the Models, Views and Collections for thissection within public/js/scripts.js (however, this can of course be expanded intosub-directories for each component if desired).
scripts.js contains the following Backbone component definitions:
--Models----Todo
--Collections----TodoList
--Views---TodoView---AppView
app.rb is the small Sinatra application that powers our backend API.
Lastly, the views directory hosts the Haml source files for our application’s index andtemplates, both of which are compiled to standard HTML markup at runtime.
These can be viewed along with other note-worthy snippets of code from the applica-tion below.
Backbone
In our main application view (AppView), we want to load any previously storedTodo items in our Mongo database when the view initializes. This is done below withViews.
Practical | 51
www.it-ebooks.info
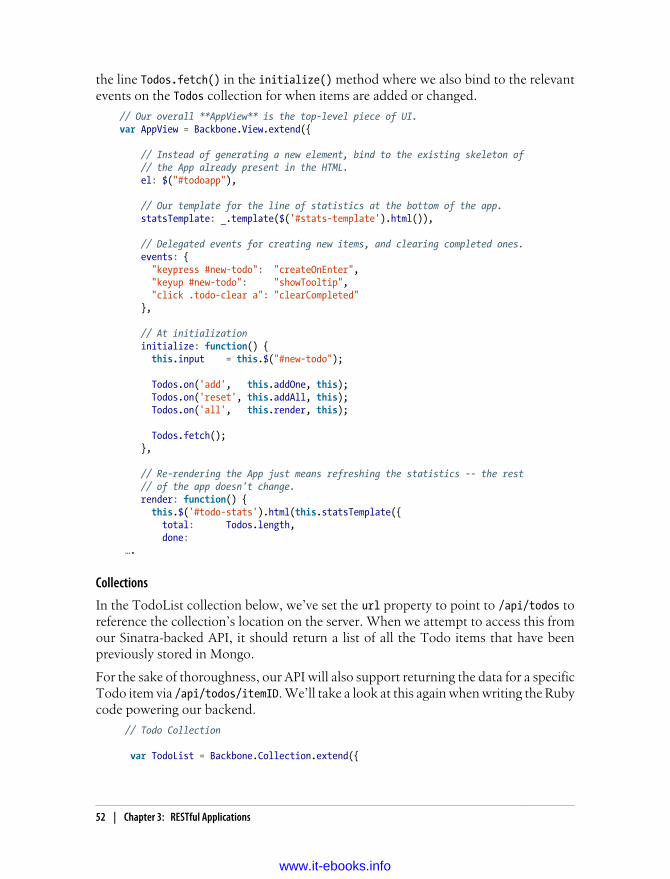
the line Todos.fetch() in the initialize() method where we also bind to the relevantevents on the Todos collection for when items are added or changed.
// Our overall **AppView** is the top-level piece of UI.var AppView = Backbone.View.extend({
// Instead of generating a new element, bind to the existing skeleton of // the App already present in the HTML. el: $("#todoapp"),
// Our template for the line of statistics at the bottom of the app. statsTemplate: _.template($('#stats-template').html()),
// Delegated events for creating new items, and clearing completed ones. events: { "keypress #new-todo": "createOnEnter", "keyup #new-todo": "showTooltip", "click .todo-clear a": "clearCompleted" },
// At initialization initialize: function() { this.input = this.$("#new-todo");
Todos.on('add', this.addOne, this); Todos.on('reset', this.addAll, this); Todos.on('all', this.render, this);
Todos.fetch(); },
// Re-rendering the App just means refreshing the statistics -- the rest // of the app doesn't change. render: function() { this.$('#todo-stats').html(this.statsTemplate({ total: Todos.length, done: ….
Collections
In the TodoList collection below, we’ve set the url property to point to /api/todos toreference the collection’s location on the server. When we attempt to access this fromour Sinatra-backed API, it should return a list of all the Todo items that have beenpreviously stored in Mongo.
For the sake of thoroughness, our API will also support returning the data for a specificTodo item via /api/todos/itemID. We’ll take a look at this again when writing the Rubycode powering our backend.
// Todo Collection
var TodoList = Backbone.Collection.extend({
52 | Chapter 3: RESTful Applications
www.it-ebooks.info

// Reference to this collection's model. model: Todo,
// Save all of the todo items under the `"todos"` namespace. // localStorage: new Store("todos"), url: '/api/todos',
// Filter down the list of all todo items that are finished. done: function() { return this.filter(function(todo){ return todo.get('done'); }); },
// Filter down the list to only todo items that are still not finished. remaining: function() { return this.without.apply(this, this.done()); },
// We keep the Todos in sequential order, despite being saved by unordered // GUID in the database. This generates the next order number for new items. nextOrder: function() { if (!this.length) return 1; return this.last().get('order') + 1; },
// Todos are sorted by their original insertion order. comparator: function(todo) { return todo.get('order'); }
});
Model
The model for our Todo application remains largely unchanged from the versions pre-viously covered in this book. It is however worth noting that calling the functionmodel.url() within the below would return the relative URL where a specific Todo itemcould be located on the server.
// Our basic **Todo** model has `text`, `order`, and `done` attributes. var Todo = Backbone.Model.extend({ idAttribute: "_id",
// Default attributes for a todo item. defaults: function() { return { done: false, order: Todos.nextOrder() }; },
// Toggle the `done` state of this todo item. toggle: function() { this.save({done: !this.get("done")}); } });
Practical | 53
www.it-ebooks.info

Ruby/Sinatra
Now that we’ve defined our main models, views and collections let’s get the CRUDoperations required by our Backbone application supported in our Sinatra API.
We want to make sure that for any operations changing underlying data (create, update,delete) that our Mongo data store correctly reflects these.
app.rb
For app.rb, we first define the dependencies required by our application. These includeSinatra, Ruby Gems, the MongoDB Ruby driver and the JSON gem.
require 'rubygems'require 'sinatra'require 'mongo'require 'json'
Next, we create a new connection to Mongo, specifying any custom configuration de-sired. If running a multi-threaded application, setting the “pool_size” allows us tospecify a maximum pool size and “timeout” a maximum timeout for waiting for oldconnections to be released to the pool.
DB = Mongo::Connection.new.db("mydb", :pool_size => 5, :timeout => 5)
Finally we define the routes to be supported by our API. Note that in the first two blocks- one for our application root (/) and the other for our todo items route /todo - we’reusing Haml for template rendering.
class TodoApp < Sinatra::Base
get '/' do haml :index, :attr_wrapper => '"', :locals => {:title => 'hello'} end
get '/todo' do haml :todo, :attr_wrapper => '"', :locals => {:title => 'Our Sinatra Todo app'} end
haml :index instructs Sinatra to use the views/index.haml for the application index,whilst `attr_wrapper is simply defining the values to be used for any local variablesdefined inside the template. This similarly applies Todo items with the template ̀ views/todo.haml’.
The rest of our routes make use of the params hash and a number of useful helpermethods included with the MongoDB Ruby driver. For more details on these, pleaseread the comments I’ve made inline below:
get '/api/:thing' do # query a collection :thing, convert the output to an array, map the _id # to a string representation of the object's _id and finally output to JSON DB.collection(params[:thing]).find.to_a.map{|t| from_bson_id(t)}.to_jsonend
54 | Chapter 3: RESTful Applications
www.it-ebooks.info

get '/api/:thing/:id' do # get the first document with the id :id in the collection :thing as a single document (rather # than a Cursor, the standard output) using find_one(). Our bson utilities assist with # ID conversion and the final output returned is also JSON from_bson_id(DB.collection(params[:thing]).find_one(to_bson_id(params[:id]))).to_jsonend
post '/api/:thing' do # parse the post body of the content being posted, convert to a string, insert into # the collection #thing and return the ObjectId as a string for reference oid = DB.collection(params[:thing]).insert(JSON.parse(request.body.read.to_s)) "{\"_id\": \"#{oid.to_s}\"}"end
delete '/api/:thing/:id' do # remove the item with id :id from the collection :thing, based on the bson # representation of the object id DB.collection(params[:thing]).remove('_id' => to_bson_id(params[:id]))end
put '/api/:thing/:id' do # collection.update() when used with $set (as covered earlier) allows us to set single values # in this case, the put request body is converted to a string, rejecting keys with the name '_id' for security purposes DB.collection(params[:thing]).update({'_id' => to_bson_id(params[:id])}, {'$set' => JSON.parse(request.body.read.to_s).reject{|k,v| k == '_id'}})end
# utilities for generating/converting MongoDB ObjectIdsdef to_bson_id(id) BSON::ObjectId.from_string(id) enddef from_bson_id(obj) obj.merge({'_id' => obj['_id'].to_s}) end
end
That’s it. The above is extremely lean for an entire API, but does allow us to read andwrite data to support the functionality required by our client-side application.
For more on what MongoDB and the MongoDB Ruby driver are capable of, please dofeel free to read their documentation for more information.
If you’re a developer wishing to take this example further, why not try to add someadditional capabilities to the service:
• Validation: improved validation of data in the API. What more could be done toensure data sanitization?
• Search: search or filter down Todo items based on a set of keywords or within acertain date range
• Pagination: only return the Nth number of Todo items or items from a start andend-point
Haml/Templates
Finally, we move on to the Haml files that define our application index (layout.haml)and the template for a specific Todo item (todo.haml). Both of these are largely self-
Practical | 55
www.it-ebooks.info

explanatory, but it’s useful to see the differences between the Jade approach we re-viewed in the last chapter vs. using Haml for this implementation.
Note: In our Haml snippets below, the forward slash character is used to indicate acomment. When this character is placed at the beginning of a line, it wraps all of thetext after it into a HTML comment. e.g
/ These are templates
compiles to:
<!-- These are templates -->
index.haml%head %meta{'charset' => 'utf-8'}/ %title=title %meta{'name' => 'description', 'content' => ''}/ %meta{'name' => 'author', 'content' => ''}/ %meta{'name' => 'viewport', 'content' => 'width=device-width,initial-scale=1'}/
/ CSS concatenated and minified via ant build script %link{'rel' => 'stylesheet', 'href' => 'css/style.css'}/ / end CSS
%script{'src' => 'js/libs/modernizr.min.js'}%body %div#container %header %div#main = yield %footer /! end of #container
%script{'src' => 'http://ajax.googleapis.com/ajax/libs/jquery/1.7.1/jquery.min.js'}
/ scripts concatenated and minified via ant build script %script{'src' => 'js/mylibs/underscore.js'} %script{'src' => 'js/mylibs/backbone.js'} %script{'defer' => true, 'src' => 'js/plugins.js'} %script{'defer' => true, 'src' => 'js/script.js'} / end scripts
todo.haml%div#todoapp %div.title %h1 Todos %div.content %div#create-todo %input#new-todo{"placeholder" => "What needs to be done?", "type" => "text"}/ %span.ui-tooltip-top{"style" => "display:none;"} Press Enter to save this task %div#todos
56 | Chapter 3: RESTful Applications
www.it-ebooks.info

%ul#todo-list %div#todo-stats
/ Templates
%script#item-template{"type" => "text/template"} <div class="todo <%= done ? 'done' : '' %>"> %div.display <input class="check" type="checkbox" <%= done ? 'checked="checked"' : '' %> /> %div.todo-text %span#todo-destroy %div.edit %input.todo-input{"type" => "text", "value" =>""}/ </div>
%script#stats-template{"type" => "text/template"} <% if (total) { %> %span.todo-count %span.number <%= remaining %> %span.word <%= remaining == 1 ? 'item' : 'items' %> left. <% } %> <% if (done) { %> %span.todo-clear %a{"href" => "#"} Clear %span.number-done <%= done %> completed %span.word-done <%= done == 1 ? 'item' : 'items' %> <% } %>
ConclusionsIn this chapter, we looked at creating a Backbone application backed by an API poweredby Ruby, Sinatra, Haml, MongoDB and the MongoDB driver. I personally found de-veloping APIs with Sinatra a relatively painless experience and one which I felt was on-par with the effort required for the Node/Express implementation of the same appli-cation.
This section is by no means the most comprehensive guide on building complex appsusing all of the items in this particular stack. I do however hope it was an introductionsufficient enough to help you decide on what stack to try out for your next project.
Practical | 57
www.it-ebooks.info


CHAPTER 4
Advanced
Modular JavaScriptWhen we say an application is modular, we generally mean it’s composed of a set ofhighly decoupled, distinct pieces of functionality stored in modules. As you probablyknow, loose coupling facilitates easier maintainability of apps by removing dependen-cies where possible. When this is implemented efficiently, its quite easy to see howchanges to one part of a system may affect another.
Unlike some more traditional programming languages however, the current iterationof JavaScript (ECMA-262) doesn’t provide developers with the means to import suchmodules of code in a clean, organized manner. It’s one of the concerns with specifica-tions that haven’t required great thought until more recent years where the need formore organized JavaScript applications became apparent.
Instead, developers at present are left to fall back on variations of the module or objectliteral patterns. With many of these, module scripts are strung together in the DOMwith namespaces being described by a single global object where it’s still possible toincur naming collisions in your architecture. There’s also no clean way to handle de-pendency management without some manual effort or third party tools.
Whilst native solutions to these problems will be arriving in ES Harmony, the goodnews is that writing modular JavaScript has never been easier and you can start doingit today.
In this next part of the book, we’re going to look at how to use AMD modules andRequireJS for cleanly wrapping units of code in your application into manageablemodules.
Organizing modules with RequireJS and AMDIn case you haven’t used it before, RequireJS is a popular script loader written by JamesBurke - a developer who has been quite instrumental in helping shape the AMD module
59
www.it-ebooks.info

format, which we’ll discuss more shortly. Some of RequireJS’s capabilities includehelping to load multiple script files, helping define modules with or without depen-dencies and loading in non-script dependencies such as text files.
So, why use RequireJS with Backbone? Although Backbone is excellent when it comesto providing a sanitary structure to your applications, there are a few key areas wheresome additional help could be used:
1. Backbone doesn’t endorse a particular approach to modular-development. Al-though this means it’s quite open-ended for developers to opt for classical patternslike the module-pattern or Object Literals for structuring their apps (which bothwork fine), it also means developers aren’t sure of what works best when otherconcerns come into play, such as dependency management.
RequireJS is compatible with the AMD (Asynchronous Module Definition) format, aformat which was born from a desire to write something better than the “write lots ofscript tags with implicit dependencies and manage them manually” approach to de-velopment. In addition to allowing you to clearly declare dependencies, AMD workswell in the browser, supports string IDs for dependencies, declaring multiple modulesin the same file and gives you easy-to-use tools to avoid polluting the global namespace.
2. Let’s discuss dependency management a little more as it can actually be quite chal-lenging to get right if you’re doing it by hand. When we write modules in JavaScript,we ideally want to be able to handle the reuse of code units intelligently and some-times this will mean pulling in other modules at run-time whilst at other times youmay want to do this dynamically to avoid a large pay-load when the user first hitsyour application.
Think about the GMail web-client for a moment. When users initially load up the pageon their first visit, Google can simply hide widgets such as the chat module until a userhas indicated (by clicking “expand”) that they wish to use it. Through dynamic de-pendency loading, Google could load up the chat module only then, rather than forcingall users to load it when the page first initializes. This can improve performance andload times and can definitely prove useful when building larger applications.
I’ve previously written a detailed article covering both AMD and other module formatsand script loaders in case you’d like to explore this topic further. The takeaway is thatalthough it’s perfectly fine to develop applications without a script loader or cleanmodule format in place, it can be of significant benefit to consider using these tools inyour application development.
Writing AMD modules with RequireJSAs discussed above, the overall goal for the AMD format is to provide a solution formodular JavaScript that developers can use today. The two key concepts you need tobe aware of when using it with a script-loader are a define() method for facilitatingmodule definition and a require() method for handling dependency loading.
60 | Chapter 4: Advanced
www.it-ebooks.info

define() is used to define named or unnamed modules based on the proposal usingthe following signature:
define( module_id /*optional*/, [dependencies] /*optional*/, definition function /*function for instantiating the module or object*/);
As you can tell by the inline comments, the module_id is an optional argument whichis typically only required when non-AMD concatenation tools are being used (theremay be some other edge cases where it’s useful too). When this argument is left out,we call the module “anonymous”. When working with anonymous modules, the ideaof a module’s identity is DRY, making it trivial to avoid duplication of filenames andcode.
Back to the define signature, the dependencies argument represents an array of depen-dencies which are required by the module you are defining and the third argument(“definition function”) is a function that’s executed to instantiate your module. Abarebone module (compatible with RequireJS) could be defined using define() as fol-lows:
// A module ID has been omitted here to make the module anonymous
define(['foo', 'bar'], // module definition function // dependencies (foo and bar) are mapped to function parameters function ( foo, bar ) { // return a value that defines the module export // (i.e the functionality we want to expose for consumption)
// create your module here var myModule = { doStuff:function(){ console.log('Yay! Stuff'); } }
return myModule;});
Alternate syntax
There is also a sugared version of define() available that allows you to declare yourdependencies as local variables using require(). This will feel familiar to anyone who’sused node, and can be easier to add or remove dependencies. Here is the previoussnippet using the alternate syntax:
// A module ID has been omitted here to make the module anonymous
define(function(require){ // module definition function // dependencies (foo and bar) are defined as local vars
Organizing modules with RequireJS and AMD | 61
www.it-ebooks.info

var foo = require('foo'), bar = require('bar');
// return a value that defines the module export // (i.e the functionality we want to expose for consumption)
// create your module here var myModule = { doStuff:function(){ console.log('Yay! Stuff'); } }
return myModule;});
The require() method is typically used to load code in a top-level JavaScript file orwithin a module should you wish to dynamically fetch dependencies. An example ofits usage is:
// Consider 'foo' and 'bar' are two external modules// In this example, the 'exports' from the two modules loaded are passed as// function arguments to the callback (foo and bar)// so that they can similarly be accessed
require(['foo', 'bar'], function ( foo, bar ) { // rest of your code here foo.doSomething();});
Wrapping modules, views and other components with AMD
Now that we’ve taken a look at how to define AMD modules, let’s review how to goabout wrapping components like views and collections so that they can also be easilyloaded as dependencies for any parts of your application that require them. At it’ssimplest, a Backbone model may just require Backbone and Underscore.js. These areconsidered it’s dependencies and so, to write an AMD model module, we would simplydo this:
define(['underscore', 'backbone'], function(_, Backbone) { var myModel = Backbone.Model.extend({
// Default attributes defaults: { content: "hello world", },
// A dummy initialization method initialize: function() { },
clear: function() { this.destroy(); this.view.remove(); }
62 | Chapter 4: Advanced
www.it-ebooks.info

}); return myModel;});
Note how we alias Underscore.js’s instance to _ and Backbone to just Backbone, makingit very trivial to convert non-AMD code over to using this module format. For a viewwhich might require other dependencies such as jQuery, this can similarly be done asfollows:
define([ 'jquery', 'underscore', 'backbone', 'collections/mycollection', 'views/myview' ], function($, _, Backbone, myCollection, myView){
var AppView = Backbone.View.extend({ ...
Aliasing to the dollar-sign ($), once again makes it very easy to encapsulate any part ofan application you wish using AMD.
Keeping Your Templates External Using RequireJS And The TextPluginMoving your [Underscore/Mustache/Handlebars] templates to external files is actuallyquite straight-forward. As this application makes use of RequireJS, I’ll discuss how toimplement external templates using this specific script loader.
RequireJS has a special plugin called text.js which is used to load in text file depen-dencies. To use the text plugin, simply follow these simple steps:
1. Download the plugin from http://requirejs.org/docs/download.html#text andplace it in either the same directory as your application’s main JS file or a suitablesub-directory.
2. Next, include the text.js plugin in your initial RequireJS configuration options. Inthe code snippet below, we assume that RequireJS is being included in our pageprior to this code snippet being executed. Any of the other scripts being loaded arejust there for the sake of example.
require.config( { paths: { 'backbone': 'libs/AMDbackbone-0.5.3', 'underscore': 'libs/underscore-1.2.2', 'text': 'libs/require/text', 'jquery': 'libs/jQuery-1.7.1', 'json2': 'libs/json2', 'datepicker': 'libs/jQuery.ui.datepicker',
Keeping Your Templates External Using RequireJS And The Text Plugin | 63
www.it-ebooks.info

'datepickermobile': 'libs/jquery.ui.datepicker.mobile', 'jquerymobile': 'libs/jquery.mobile-1.0' }, baseUrl: 'app'} );
3. When the text! prefix is used for a dependency, RequireJS will automatically loadthe text plugin and treat the dependency as a text resource. A typical example ofthis in action may look like..
require(['js/app', 'text!templates/mainView.html'], function(app, mainView){ // the contents of the mainView file will be // loaded into mainView for usage. });
4. Finally we can use the text resource that’s been loaded for templating purposes.You’re probably used to storing your HTML templates inline using a script with aspecific identifier.
With Underscore.js’s micro-templating (and jQuery) this would typically be:
HTML:
<script type="text/template" id="mainViewTemplate"> <% _.each( person, function( person_item ){ %> <li><%= person_item.get("name") %></li> <% }); %></script>
JS:
var compiled_template = _.template( $('#mainViewTemplate').html() );
With RequireJS and the text plugin however, it’s as simple as saving your template intoan external text file (say, mainView.html) and doing the following:
require(['js/app', 'text!templates/mainView.html'], function(app, mainView){
var compiled_template = _.template( mainView ); });
That’s it!. You can then go applying your template to a view in Backbone doing some-thing like:
collection.someview.$el.html( compiled_template( { results: collection.models } ) );
All templating solutions will have their own custom methods for handling templatecompilation, but if you understand the above, substituting Underscore’s micro-tem-plating for any other solution should be fairly trivial.
64 | Chapter 4: Advanced
www.it-ebooks.info

Note: You may also be interested in looking at Require.js tpl. It’s an AMD-compatibleversion of the Underscore templating system that also includes support for optimization(pre-compiled templates) which can lead to better performance and no evals. I have yetto use it myself, but it comes as a recommended resource.
Optimizing Backbone apps for production with the RequireJSOptimizerAs experienced developers may know, an essential final step when writing both smalland large JavaScript web applications is the build process. The majority of non-trivialapps are likely to consist of more than one or two scripts and so optimizing, minimizingand concatenating your scripts prior to pushing them to production will require yourusers to download a reduced number (if not just one) script file.
Note: If you haven’t looked at build processes before and this is your first time hearingabout them, you might find my post and screencast on this topic useful.
With some other structural JavaScript frameworks, my recommendation would nor-mally be to implicitly use YUI Compressor or Google’s closure compiler tools, but wehave a slightly more elegant method available, when it comes to Backbone if you’reusing RequireJS. RequireJS has a command line optimization tool called r.js which hasa number of capabilities, including:
• Concatenating specific scripts and minifying them using external tools such asUglifyJS (which is used by default) or Google’s Closure Compiler for optimalbrowser delivery, whilst preserving the ability to dynamically load modules
• Optimizing CSS and stylesheets by inlining CSS files imported using @import,stripping out comments etc.
• The ability to run AMD projects in both Node and Rhino (more on this later)
You’ll notice that I mentioned the word “specific” in the first bullet point. The Re-quireJS optimizer only concatenates module scripts that have been specified in arraysof string literals passed to top-level (i.e non-local) require and define calls. As clarifiedby the optimizer docs this means that Backbone modules defined like this:
define(['jquery','backbone','underscore', 'collections/sample','views/test'], function($,Backbone, _, Sample, Test){ //... });
will combine fine, however inline dependencies such as:
var models = someCondition ? ['models/ab','models/ac'] : ['models/ba','models/bc'];
will be ignored. This is by design as it ensures that dynamic dependency/module load-ing can still take place even after optimization.
Optimizing Backbone apps for production with the RequireJS Optimizer | 65
www.it-ebooks.info

Although the RequireJS optimizer works fine in both Node and Java environments, it’sstrongly recommended to run it under Node as it executes significantly faster there. Inmy experience, it’s a piece of cake to get setup with either environment, so go forwhichever you feel most comfortable with.
To get started with r.js, grab it from the RequireJS download page or through NPM.Now, the RequireJS optimizer works absolutely fine for single script and CSS files, butfor most cases you’ll want to actually optimize an entire Backbone project. You coulddo this completely from the command-line, but a cleaner option is using build profiles.
Below is an example of a build file taken from the modular jQuery Mobile app refer-enced later in this book. A build profile (commonly named app.build.js) informsRequireJS to copy all of the content of appDir to a directory defined by dir (in thiscase ../release). This will apply all of the necessary optimizations inside the releasefolder. The baseUrl is used to resolve the paths for your modules. It should ideally berelative to appDir.
Near the bottom of this sample file, you’ll see an array called modules. This is whereyou specify the module names you wish to have optimized. In this case we’re optimizingthe main application called “app”, which maps to appDir/app.js. If we had set thebaseUrl to “scripts”, it would be mapped to appDir/scripts/app.js.
({ appDir: "./", baseUrl: "./", dir: "../release", paths: { 'backbone': 'libs/AMDbackbone-0.5.3', 'underscore': 'libs/underscore-1.2.2', 'jquery': 'libs/jQuery-1.7.1', 'json2': 'libs/json2', 'datepicker': 'libs/jQuery.ui.datepicker', 'datepickermobile': 'libs/jquery.ui.datepicker.mobile', 'jquerymobile': 'libs/jquery.mobile-1.0' }, optimize: "uglify", modules: [ { name: "app", exclude: [ // If you prefer not to include certain libs exclude them here ] } ]})
The way the build system in r.js works is that it traverses app.js (whatever modulesyou’ve passed) and resolved dependencies, concatenating them into the finalrelease(dir) folder. CSS is treated the same way.
66 | Chapter 4: Advanced
www.it-ebooks.info

The build profile is usually placed inside the “scripts” or “js” directory of your project.As per the docs, this file can however exist anywhere you wish, but you’ll need to editthe contents of your build profile accordingly.
Finally, to run the build, execute the following command once inside your appDir orappDir/scripts directory:
node ../../r.js -o app.build.js
That’s it. As long as you have UglifyJS/Closure tools setup correctly, r.js should be ableto easily optimize your entire Backbone project in just a few key-strokes. If you wouldlike to learn more about build profiles, James Burke has a heavily commented samplefile with all the possible options available.
Practical: Building a modular Backbone app with AMD &RequireJSIn this chapter, we’ll look at our first practical Backbone & RequireJS project - how tobuild a modular Todo application. The application will allow us to add new todos, editnew todos and clear todo items that have been marked as completed. For a more ad-vanced practical, see the section on mobile Backbone development.
The complete code for the application can can be found in the practicals/modular-todo-app folder of this repo (thanks to Thomas Davis and Jérôme Gravel-Niquet). Al-ternatively grab a copy of my side-project TodoMVC which contains the sources toboth AMD and non-AMD versions.
Note: Thomas may be covering a practical on this exercise in more detail on backbo-netutorials.com at some point soon, but for this section I’ll be covering what I considerthe core concepts.
OverviewWriting a “modular” Backbone application can be a straight-forward process. Thereare however, some key conceptual differences to be aware of if opting to use AMD asyour module format of choice:
• As AMD isn’t a standard native to JavaScript or the browser, it’s necessary to usea script loader (such as RequireJS or curl.js) in order to support defining compo-nents and modules using this module format. As we’ve already reviewed, there area number of advantages to using the AMD as well as RequireJS to assist here.
• Models, views, controllers and routers need to be encapsulated using the AMD-format. This allows each component of our Backbone application to cleanly man-age dependencies (e.g collections required by a view) in the same way that AMDallows non-Backbone modules to.
Practical: Building a modular Backbone app with AMD & RequireJS | 67
www.it-ebooks.info

• Non-Backbone components/modules (such as utilities or application helpers) canalso be encapsulated using AMD. I encourage you to try developing these modulesin such a way that they can both be used and tested independent of your Backbonecode as this will increase their ability to be re-used elsewhere.
Now that we’ve reviewed the basics, let’s take a look at developing our application. Forreference, the structure of our app is as follows:
index.html...js/ main.js .../models todo.js .../views app.js todos.js .../collections todos.js .../templates stats.html todos.html ../libs .../backbone .../jquery .../underscore .../require require.js text.js...css/
MarkupThe markup for the application is relatively simple and consists of three primary parts:an input section for entering new todo items (create-todo), a list section to displayexisting items (which can also be edited in-place) (todo-list) and finally a sectionsummarizing how many items are left to be completed (todo-stats).
<div id="todoapp">
<div class="content">
<div id="create-todo"> <input id="new-todo" placeholder="What needs to be done?" type="text" /> <span class="ui-tooltip-top">Press Enter to save this task</span> </div>
<div id="todos"> <ul id="todo-list"></ul> </div>
<div id="todo-stats"></div>
68 | Chapter 4: Advanced
www.it-ebooks.info

</div>
</div>
The rest of the tutorial will now focus on the JavaScript side of the practical.
Configuration optionsIf you’ve read the earlier chapter on AMD, you may have noticed that explicitly needingto define each dependency a Backbone module (view, collection or other module) mayrequire with it can get a little tedious. This can however be improved.
In order to simplify referencing common paths the modules in our application may use,we use a RequireJS configuration object, which is typically defined as a top-level scriptfile. Configuration objects have a number of useful capabilities, the most useful beingmode name-mapping. Name-maps are basically a key:value pair, where the key definesthe alias you wish to use for a path and the value represents the true location of the path.
In the code-sample below, you can see some typical examples of common name-mapswhich include: backbone, underscore, jquery and depending on your choice, the Re-quireJS text plugin, which assists with loading text assets like templates.
main.js
require.config({ baseUrl:'../', paths: { jquery: 'libs/jquery/jquery-min', underscore: 'libs/underscore/underscore-min', backbone: 'libs/backbone/backbone-optamd3-min', text: 'libs/require/text' }});
require(['views/app'], function(AppView){ var app_view = new AppView;});
The require() at the end of our main.js file is simply there so we can load and instan-tiation the primary view for our application (views/app.js). You’ll commonly see boththis and the configuration object included the most top-level script file for a project.
In addition to offering name-mapping, the configuration object can be used to defineadditional properties such as waitSeconds - the number of seconds to wait before scriptloading times out and locale, should you wish to load up i18n bundles for customlanguages. The baseUrl is simply the path to use for module lookups.
For more information on configuration objects, please feel free to check out the excel-lent guide to them in the RequireJS docs.
Practical: Building a modular Backbone app with AMD & RequireJS | 69
www.it-ebooks.info

Modularizing our models, views and collectionsBefore we dive into AMD-wrapped versions of our Backbone components, let’s reviewa sample of a non-AMD view. The following view listens for changes to its model (aTodo item) and re-renders if a user edits the value of the item.
var TodoView = Backbone.View.extend({
//... is a list tag. tagName: "li",
// Cache the template function for a single item. template: _.template($('#item-template').html()),
// The DOM events specific to an item. events: { "click .check" : "toggleDone", "dblclick div.todo-content" : "edit", "click span.todo-destroy" : "clear", "keypress .todo-input" : "updateOnEnter" },
// The TodoView listens for changes to its model, re-rendering. Since there's // a one-to-one correspondence between a **Todo** and a **TodoView** in this // app, we set a direct reference on the model for convenience. initialize: function() { this.model.on('change', this.render, this); this.model.view = this; }, ...
Note how for templating the common practice of referencing a script by an ID (or otherselector) and obtaining its value is used. This of course requires that the template beingaccessed is implicitly defined in our markup. The following is the “embedded” versionof our template being referenced above:
<script type="text/template" id="item-template"> <div class="todo <%= done ? 'done' : '' %>"> <div class="display"> <input class="check" type="checkbox" <%= done ? 'checked="checked"' : '' %> /> <div class="todo-content"></div> <span class="todo-destroy"></span> </div> <div class="edit"> <input class="todo-input" type="text" value="" /> </div> </div></script>
Whilst there is nothing wrong with the template itself, once we begin to develop largerapplications requiring multiple templates, including them all in our markup on page-load can quickly become both unmanageable and come with performance costs. We’lllook at solving this problem in a minute.
70 | Chapter 4: Advanced
www.it-ebooks.info

Let’s now take a look at the AMD-version of our view. As discussed earlier, the “mod-ule” is wrapped using AMD’s define() which allows us to specify the dependenciesour view requires. Using the mapped paths to “jquery” etc. simplifies referencing com-mon dependencies and instances of dependencies are themselves mapped to local vari-ables that we can access (e.g “jquery” is mapped to $).
views/todos.js
define([ 'jquery', 'underscore', 'backbone', 'text!templates/todos.html' ], function($, _, Backbone, todosTemplate){ var TodoView = Backbone.View.extend({
//... is a list tag. tagName: "li",
// Cache the template function for a single item. template: _.template(todosTemplate),
// The DOM events specific to an item. events: { "click .check" : "toggleDone", "dblclick div.todo-content" : "edit", "click span.todo-destroy" : "clear", "keypress .todo-input" : "updateOnEnter" },
// The TodoView listens for changes to its model, re-rendering. Since there's // a one-to-one correspondence between a **Todo** and a **TodoView** in this // app, we set a direct reference on the model for convenience. initialize: function() { this.model.on('change', this.render, this); this.model.view = this; },
// Re-render the contents of the todo item. render: function() { this.$el.html(this.template(this.model.toJSON())); this.setContent(); return this; },
// Use `jQuery.text` to set the contents of the todo item. setContent: function() { var content = this.model.get('content'); this.$('.todo-content').text(content); this.input = this.$('.todo-input'); this.input.on('blur', this.close); this.input.val(content); }, ...
Practical: Building a modular Backbone app with AMD & RequireJS | 71
www.it-ebooks.info

From a maintenance perspective, there’s nothing logically different in this version ofour view, except for how we approach templating.
Using the RequireJS text plugin (the dependency marked text), we can actually storeall of the contents for the template we looked at earlier in an external file (todos.html).
templates/todos.html
<div class="todo <%= done ? 'done' : '' %>"> <div class="display"> <input class="check" type="checkbox" <%= done ? 'checked="checked"' : '' %> /> <div class="todo-content"></div> <span class="todo-destroy"></span> </div> <div class="edit"> <input class="todo-input" type="text" value="" /> </div></div>
There’s no longer a need to be concerned with IDs for the template as we can map it’scontents to a local variable (in this case todosTemplate). We then simply pass this tothe Underscore.js templating function _.template() the same way we normally wouldhave the value of our template script.
Next, let’s look at how to define models as dependencies which can be pulled intocollections. Here’s an AMD-compatible model module, which has two default values:a content attribute for the content of a Todo item and a boolean done state, allowingus to trigger whether the item has been completed or not.
models/todo.js
define(['underscore', 'backbone'], function(_, Backbone) { var TodoModel = Backbone.Model.extend({
// Default attributes for the todo. defaults: { // Ensure that each todo created has `content`. content: "empty todo...", done: false },
initialize: function() { },
// Toggle the `done` state of this todo item. toggle: function() { this.save({done: !this.get("done")}); },
// Remove this Todo from *localStorage* and delete its view. clear: function() { this.destroy(); this.view.remove(); }
72 | Chapter 4: Advanced
www.it-ebooks.info

}); return TodoModel;});
As per other types of dependencies, we can easily map our model module to a localvariable (in this case Todo) so it can be referenced as the model to use for our TodosCollection. This collection also supports a simple done() filter for narrowing down Todoitems that have been completed and a remaining() filter for those that are still out-standing.
collections/todos.js
define([ 'underscore', 'backbone', 'libs/backbone/localstorage', 'models/todo' ], function(_, Backbone, Store, Todo){
var TodosCollection = Backbone.Collection.extend({
// Reference to this collection's model. model: Todo,
// Save all of the todo items under the `"todos"` namespace. localStorage: new Store("todos"),
// Filter down the list of all todo items that are finished. done: function() { return this.filter(function(todo){ return todo.get('done'); }); },
// Filter down the list to only todo items that are still not finished. remaining: function() { return this.without.apply(this, this.done()); }, ...
In addition to allowing users to add new Todo items from views (which we then insertas models in a collection), we ideally also want to be able to display how many itemshave been completed and how many are remaining. We’ve already defined filters thatcan provide us this information in the above collection, so let’s use them in our mainapplication view.
views/app.js
define([ 'jquery', 'underscore', 'backbone', 'collections/todos', 'views/todos', 'text!templates/stats.html' ], function($, _, Backbone, Todos, TodoView, statsTemplate){
Practical: Building a modular Backbone app with AMD & RequireJS | 73
www.it-ebooks.info

var AppView = Backbone.View.extend({
// Instead of generating a new element, bind to the existing skeleton of // the App already present in the HTML. el: $("#todoapp"),
// Our template for the line of statistics at the bottom of the app. statsTemplate: _.template(statsTemplate),
// ...events, initialize() etc. can be seen in the complete file
// Re-rendering the App just means refreshing the statistics -- the rest // of the app doesn't change. render: function() { var done = Todos.done().length; this.$('#todo-stats').html(this.statsTemplate({ total: Todos.length, done: Todos.done().length, remaining: Todos.remaining().length })); }, ...
Above, we map the second template for this project, templates/stats.html to statsTemplate which is used for rendering the overall done and remaining states. This works bysimply passing our template the length of our overall Todos collection (Todos.length -the number of Todo items created so far) and similarly the length (counts) for itemsthat have been completed (Todos.done().length) or are remaining (Todos.remaining().length).
The contents of our statsTemplate can be seen below. It’s nothing too complicated,but does use ternary conditions to evaluate whether we should state there’s “1 item”or “2 items” in a particular state.
<% if (total) { %> <span class="todo-count"> <span class="number"><%= remaining %></span> <span class="word"><%= remaining == 1 ? 'item' : 'items' %></span> left. </span> <% } %> <% if (done) { %> <span class="todo-clear"> <a href="#"> Clear <span class="number-done"><%= done %></span> completed <span class="word-done"><%= done == 1 ? 'item' : 'items' %></span> </a> </span> <% } %>
The rest of the source for the Todo app mainly consists of code for handling user andapplication events, but that rounds up most of the core concepts for this practical.
74 | Chapter 4: Advanced
www.it-ebooks.info

To see how everything ties together, feel free to grab the source by cloning this repo orbrowse it online to learn more. I hope you find it helpful!.
Note: While this first practical doesn’t use a build profile as outlined in the chapter onusing the RequireJS optimizer, we will be using one in the section on building mobileBackbone applications.
Decoupling Backbone with the Mediator and Facade patternsIn this section we’ll discuss applying some of the concepts I cover in my article onLarge-scale JavaScript Application development to Backbone.
SummaryAt a high-level, one architecture that works for such applications is something which is:
• Highly decoupled: encouraging modules to only publish and subscribe to eventsof interest rather than directly communicating with each other. This helps us tobuild applications who’s units of code aren’t highly tied (coupled) together andcan thus be reused more easily.
• Supports module-level security: whereby modules are only able to execute be-havior they’ve been permitted to. Application security is an area which is oftenoverlooked in JavaScript applications, but can be quite easily implemented in aflexible manner.
• Supports failover: allowing an application continuing to function even if partic-ular modules fail. The typical example I give of this is the GMail chat widget.Imagine being able to build applications in a way that if one widget on the pagefails (e.g chat), the rest of your application (mail) can continue to function withoutbeing affected.
This is an architecture which has been implemented by a number of different companiesin the past, including Yahoo! (for their modularized homepage - which Nicholas Zakashas spoken about) and AOL for some of our upcoming projects.
The three design patterns that make this architecture possible are the:
• Module pattern: used for encapsulating unique blocks of code, where functionsand variables can be kept either public or private. (“private” in the simulation ofprivacy sense, as of course don’t have true privacy in JavaScript)
• Mediator pattern: used when the communication between modules may be com-plex, but is still well defined. If it appears a system may have too many relationshipsbetween modules in your code, it may be time to have a central point of control,which is where the pattern fits in.
• Facade pattern: used for providing a convenient higher-level interface to a largerbody of code, hiding its true underlying complexity
Decoupling Backbone with the Mediator and Facade patterns | 75
www.it-ebooks.info

Their specific roles in this architecture can be found below.
• Modules: There are almost two concepts of what defines a module. As AMD isbeing used as a module wrapper, technically each model, view and collection canbe considered a module. We then have the concept of modules being distinct blocksof code outside of just MVC/MV*. For the latter, these types of “modules” areprimarily concerned with broadcasting and subscribing to events of interest ratherthan directly communicating with each other.They are made possible through theMediator pattern.
• Mediator: The mediator has a varying role depending on just how you wish toimplement it. In my article, I mention using it as a module manager with the abilityto start and stop modules at will, however when it comes to Backbone, I feel thatsimplifying it down to the role of a central “controller” that provides pub/subcapabilities should suffice. One can of course go all out in terms of building amodule system that supports module starting, stopping, pausing etc, however thescope of this is outside of this chapter.
• Facade: This acts as a secure middle-layer that both abstracts an application core(Mediator) and relays messages from the modules back to the Mediator so theydon’t touch it directly. The Facade also performs the duty of application securityguard; it checks event notifications from modules against a configuration (permis-sions.js, which we will look at later) to ensure requests from modules are onlyprocessed if they are permitted to execute the behavior passed.
For ease of reference, I sometimes refer to these three patterns grouped together as Aura(a word that means subtle, luminous light).
PracticalFor the practical section of this chapter, we’ll be extending the well-known BackboneTodo application using the three patterns mentioned above. The complete code for thissection can be found here: https://github.com/addyosmani/backbone-aura and shouldideally be run on at minimum, a local HTTP server.
The application is broken down into AMD modules that cover everything from Back-bone models through to application-level modules. The views publish events of interestto the rest of the application and modules can then subscribe to these event notifica-tions.
All subscriptions from modules go through a facade (or sandbox). What this does ischeck against the subscriber name and the “channel/notification” it’s attempting tosubscribe to. If a channel doesn’t have permissions to be subscribed to (somethingestablished through permissions.js), the subscription isn’t permitted.
Mediator
Found in aura/mediator.js
76 | Chapter 4: Advanced
www.it-ebooks.info

Below is a very simple AMD-wrapped implementation of the mediator pattern, basedon prior work by Ryan Florence. It accepts as it’s input an object, to which it attachespublish() and subscribe() methods. In a larger application, the mediator can containadditional utilities, such as handlers for initializing, starting and stopping modules, butfor demonstration purposes, these two methods should work fine for our needs.
define([], function(obj){
var channels = {}; if (!obj) obj = {};
obj.subscribe = function (channel, subscription) { if (!channels[channel]) channels[channel] = []; channels[channel].push(subscription); };
obj.publish = function (channel) { if (!channels[channel]) return; var args = [].slice.call(arguments, 1); for (var i = 0, l = channels[channel].length; i < l; i++) { channels[channel][i].apply(this, args); } };
return obj;
});
Facade
Found in aura/facade.js
Next, we have an implementation of the facade pattern. Now the classical facade pat-tern applied to JavaScript would probably look a little like this:
var module = (function() { var _private = { i:5, get : function() { console.log('current value:' + this.i); }, set : function( val ) { this.i = val; }, run : function() { console.log('running'); }, jump: function(){ console.log('jumping'); } }; return { facade : function( args ) { _private.set(args.val); _private.get();
Decoupling Backbone with the Mediator and Facade patterns | 77
www.it-ebooks.info

if ( args.run ) { _private.run(); } } }}());
module.facade({run: true, val:10});//outputs current value: 10, running
It’s effectively a variation of the module pattern, where instead of simply returning aninterface of supported methods, your API can completely hide the true implementationpowering it, returning something simpler. This allows the logic being performed in thebackground to be as complex as necessary, whilst all the end-user experiences is asimplified API they pass options to (note how in our case, a single method abstractionis exposed). This is a beautiful way of providing APIs that can be easily consumed.
That said, to keep things simple, our implementation of an AMD-compatible facadewill act a little more like a proxy. Modules will communicate directly through the facadeto access the mediator’s publish() and subscribe() methods, however, they won’t assuch touch the mediator directly.This enables the facade to provide application-levelvalidation of any subscriptions and publications made.
It also allows us to implement a simple, but flexible, permissions checker (as seenbelow) which will validate subscriptions made against a permissions configuration tosee whether it’s permitted or not.
define([ "../aura/mediator" , "../aura/permissions" ], function (mediator, permissions) {
var facade = facade || {};
facade.subscribe = function(subscriber, channel, callback){
// Note: Handling permissions/security is optional here // The permissions check can be removed // to just use the mediator directly.
if(permissions.validate(subscriber, channel)){ mediator.subscribe( channel, callback ); } }
facade.publish = function(channel){ mediator.publish( channel ); } return facade;
});
Permissions
Found in aura/permissions.js
78 | Chapter 4: Advanced
www.it-ebooks.info

In our simple permissions configuration, we support checking against subscriptionrequests to establish whether they are allowed to clear. This enforces a flexible securitylayer for the application.
To visually see how this works, consider changing say, permissions -> renderDone ->todoCounter to be false. This will completely disable the application from from ren-dering or displaying the counts component for Todo items left (because they aren’tallowed to subscribe to that event notification). The rest of the Todo app can stillhowever be used without issue.
It’s a very dumbed down example of the potential for application security, but imaginehow powerful this might be in a large app with a significant number of visual widgets.
define([], function () {
// Permissions
// A permissions structure can support checking // against subscriptions prior to allowing them // to clear. This enforces a flexible security // layer for your application.
var permissions = {
newContentAvailable: { contentUpdater:true },
endContentEditing:{ todoSaver:true },
beginContentEditing:{ editFocus:true },
addingNewTodo:{ todoTooltip:true },
clearContent:{ garbageCollector:true },
renderDone:{ todoCounter:true //switch to false to see what happens :) },
destroyContent:{ todoRemover:true },
createWhenEntered:{ keyboardManager:true
Decoupling Backbone with the Mediator and Facade patterns | 79
www.it-ebooks.info

}
};
permissions.validate = function(subscriber, channel){ var test = permissions[channel][subscriber]; return test===undefined? false: test; };
return permissions;
});
Subscribers
Found in subscribers.js
Subscriber “modules” communicate through the facade back to the mediator and per-form actions when a notification event of a particular name is published.
For example, when a user enters in a new piece of text for a Todo item and hits “enter”the application publishes a notification saying two things: a) a new Todo item is avail-able and b) the text content of the new item is X. It’s then left up to the rest of theapplication to do with this information whatever it wishes.
In order to update your Backbone application to primarily use pub/sub, a lot of thework you may end up doing will be moving logic coupled inside of specific views tomodules outside of it which are reactionary.
Take the todoSaver for example - it’s responsibility is saving new Todo items to modelsonce the a notificationName called “newContentAvailable” has fired. If you take a lookat the permissions structure in the last code sample, you’ll notice that “newContentA-vailable” is present there. If I wanted to prevent subscribers from being able to subscribeto this notification, I simply set it to a boolean value of false.
Again, this is a massive oversimplification of how advanced your permissions structurescould get, but it’s certainly one way of controlling what parts of your application canor can’t be accessed by specific modules at any time.
define(["jquery", "underscore", "aura/facade"], function ($, _, facade) {
// Subscription 'modules' for our views. These take the // the form facade.subscribe( subscriberName, notificationName , callBack )
// Update view with latest todo content // Subscribes to: newContentAvailable
facade.subscribe('contentUpdater', 'newContentAvailable', function (context) { var content = context.model.get('content'); context.$('.todo-content').text(content); context.input = context.$('.todo-input'); context.input.bind('blur', context.close); context.input.val(content);
80 | Chapter 4: Advanced
www.it-ebooks.info

});
// Save models when a user has finishes editing // Subscribes to: endContentEditing facade.subscribe('todoSaver','endContentEditing', function (context) { try { context.model.save({ content: context.input.val() }); context.$el.removeClass("editing"); } catch (e) { //console.log(e); } });
// Delete a todo when the user no longer needs it // Subscribes to: destroyContent facade.subscribe('todoRemover','destroyContent', function (context) { try { context.model.clear(); } catch (e) { //console.log(e); } });
// When a user is adding a new entry, display a tooltip // Subscribes to: addingNewTodo facade.subscribe('todoTooltip','addingNewTodo', function (context, todo) { var tooltip = context.$(".ui-tooltip-top"); var val = context.input.val(); tooltip.fadeOut(); if (context.tooltipTimeout) clearTimeout(context.tooltipTimeout); if (val == '' || val == context.input.attr('placeholder')) return; var show = function () { tooltip.show().fadeIn(); }; context.tooltipTimeout = _.delay(show, 1000); });
// Update editing UI on switching mode to editing content // Subscribes to: beginContentEditing facade.subscribe('editFocus','beginContentEditing', function (context) { context.$el.addClass("editing"); context.input.focus(); });
// Create a new todo entry // Subscribes to: createWhenEntered facade.subscribe('keyboardManager','createWhenEntered', function (context, e, todos) { if (e.keyCode != 13) return;
Decoupling Backbone with the Mediator and Facade patterns | 81
www.it-ebooks.info

todos.create(context.newAttributes()); context.input.val(''); });
// A Todo and remaining entry counter // Subscribes to: renderDone facade.subscribe('todoCounter','renderDone', function (context, Todos) { var done = Todos.done().length; context.$('#todo-stats').html(context.statsTemplate({ total: Todos.length, done: Todos.done().length, remaining: Todos.remaining().length })); });
// Clear all completed todos when clearContent is dispatched // Subscribes to: clearContent facade.subscribe('garbageCollector','clearContent', function (Todos) { _.each(Todos.done(), function (todo) { todo.clear(); }); });
});
That’s it for this section. If you’ve been intrigued by some of the concepts covered, Iencourage you to consider taking a look at my slides on Large-scale JS from the jQuerySummit or my longer post on the topic here for more information.
Paginating Backbone.js Requests & CollectionsPagination is a ubiquitous problem we often find ourselves needing to solve on the web.Perhaps most predominantly when working with back-end APIs and JavaScript-heavyclients which consume them.
On this topic, we’re going to go through a set of **pagination components ** I wrotefor Backbone.js, which should hopefully come in useful if you’re working on applica-tions which need to tackle this problem. They’re part of an extension called Back-bone.Paginator.
When working with a structural framework like Backbone.js, the three types of pagi-nation we are most likely to run into are:
**Requests to a service layer (API) **- e.g query for results containing the term “Brendan”- if 5,000 results are available only display 20 results per page (leaving us with 250possible result pages that can be navigated to).
82 | Chapter 4: Advanced
www.it-ebooks.info

This problem actually has quite a great deal more to it, such as maintaining persistenceof other URL parameters (e.g sort, query, order) which can change based on a user’ssearch configuration in a UI. One also had to think of a clean way of hooking views upto this pagination so you can easily navigate between pages (e.g First, Last, Next, Pre-vious, 1,2,3), manage the number of results displayed per page and so on.
Further client-side pagination of data returned - e.g we’ve been returned a JSONesponse containing 100 results. Rather than displaying all 100 to the user, we onlydisplay 20 of these results within a navigatable UI in the browser.
Similar to the request problem, client-pagination has its own challenges like navigationonce again (Next, Previous, 1,2,3), sorting, order, switching the number of results todisplay per page and so on.
Infinite results - with services such as Facebook, the concept of numeric paginationis instead replaced with a “Load More” or “View More” button. Triggering this nor-mally fetches the next “page” of N results but rather than replacing the previous set ofresults loaded entirely, we simply append to them instead.
A request pager which simply appends results in a view rather than replacing on eachnew fetch is effectively an “infinite” pager.
Let’s now take a look at exactly what we’re getting out of the box:
Backbone.Paginator is a set of opinionated components for paginating collections of datausing Backbone.js. It aims to provide both solutions for assisting with pagination of re-quests to a server (e.g an API) as well as pagination of single-loads of data, where we maywish to further paginate a collection of N results into M pages within a view.
Paginator’s piecesBackbone.Paginator supports two main pagination components:
• Backbone.Paginator.requestPager: For pagination of requests between a clientand a server-side API
• Backbone.Paginator.clientPager: For pagination of data returned from a serverwhich you would like to further paginate within the UI (e.g 60 results are returned,paginate into 3 pages of 20)
Downloads And Source CodeYou can either download the raw source code for the project, fork the repository or useone of these links:
• Production: production
• Development: development version
Downloads And Source Code | 83
www.it-ebooks.info

• Examples + Source : zipball
• Repositoryhttp://github.com/addyosmani/backbone.paginator)
Live ExamplesLive previews of both pagination components using the Netflix API can be found below.Download the tarball or fork the repository to experiment with these examples further.
Demo 1: Backbone.Paginator.requestPager()
Demo 2: Backbone.Paginator.clientPager()
84 | Chapter 4: Advanced
www.it-ebooks.info

Demo 3: Infinite Pagination (Backbone.Paginator.requestPager())
Live Examples | 85
www.it-ebooks.info

Paginator.requestPagerIn this section we’re going to walkthrough actually using the requestPager.
1. Create a new Paginated collectionFirst, we define a new Paginated collection using Backbone.Paginator.requestPager()as follows:
var PaginatedCollection = Backbone.Paginator.requestPager.extend({
2: Set the model and base URL for the collection as normalWithin our collection, we then (as normal) specify the model to be used with thiscollection followed by the URL (or base URL) for the service providing our data (e.gthe Netflix API).
model: model, url: 'http://odata.netflix.com/v2/Catalog/Titles?&',
86 | Chapter 4: Advanced
www.it-ebooks.info

3. Map the attributes supported by your API (URL)Next, we’re going to map the request (URL) parameters supported by your API orbackend data service back to attributes that are internally used by Backbone.Paginator.
For example: the NetFlix API refers to it’s parameter for stating how many results toskip ahead by as $skip and it’s number of items to return per page as $top (amongstothers). We determine these by looking at a sample URL pointing at the service:
http://odata.netflix.com/v2/Catalog/Titles?&callback=callback&$top=30&$skip=30&orderBy=ReleaseYear&$inlinecount=allpages&$format=json&$callback=callback&$filter=substringof%28%27the%27,%20Name%29%20eq%20true&_=1332702202090
We then simply map these parameters to the relevant Paginator equivalents shown onthe left hand side of the next snippets to get everything working:
// @param-name for the query field in the // request (e.g query/keywords/search) queryAttribute: '$filter',
// @param-name for number of items to return per request/page perPageAttribute: '$top',
// @param-name for how many results the request should skip ahead to skipAttribute: '$skip',
// @param-name for the direction to sort in sortAttribute: '$sort',
// @param-name for field to sort by orderAttribute: '$orderBy',
// @param-name for the format of the request formatAttribute: '$format',
// @param-name for a custom attribute customAttribute1: '$inlinecount',
// @param-name for another custom attribute customAttribute2: '$callback',
Note: you can define support for new custom attributes in Backbone.Paginator ifneeded (e.g customAttribute1) for those that may be unique to your service.
4. Configure the default pagination, query and sort details for the paginatorNow, let’s configure the default values in our collection for these parameters so that asa user navigates through the paginated UI, requests are able to continue querying withthe correct field to sort on, the right number of items to return per request etc.
e.g: If we want to request the:
• 1st page of results
• for the search query “superman”
Paginator.requestPager | 87
www.it-ebooks.info

• in JSON format
• sorted by release year
• in ascending order
• where only 30 results are returned per request
This would look as follows:
// current page to query from the service page: 5,
// The lowest page index your API allows to be accessed firstPage: 0, //some begin with 1
// how many results to query from the service (i.e how many to return // per request) perPage: 30,
// maximum number of pages that can be queried from // the server (only here as a default in case your // service doesn't return the total pages available) totalPages: 10,
// what field should the results be sorted on? sortField: 'ReleaseYear',
// what direction should the results be sorted in? sortDirection: 'asc',
// what would you like to query (search) from the service? // as Netflix reqires additional parameters around the query // we simply fill these around our search term query: "substringof('" + escape('the') + "',Name)",
// what format would you like to request results in? format: 'json',
// what other custom parameters for the request do // you require // for your application? customParam1: 'allpages',
customParam2: 'callback',
As the particular API we’re using requires callback and allpages parameters to also bepassed, we simply define the values for these as custom parameters which can be map-ped back to requestPager as needed.
5. Finally, configure Collection.parse() and we’re doneThe last thing we need to do is configure our collection’s parse() method. We want toensure we’re returning the correct part of our JSON response containing the data our
88 | Chapter 4: Advanced
www.it-ebooks.info

collection will be populated with, which below is response.d.results (for the NetflixAPI).
You might also notice that we’re setting this.totalPages to the total page count re-turned by the API. This allows us to define the maximum number of (result) pagesavailable for the current/last request so that we can clearly display this in the UI. It alsoallows us to infuence whether clicking say, a “next” button should proceed with arequest or not.
parse: function (response) { // Be sure to change this based on how your results // are structured (e.g d.results is Netflix specific) var tags = response.d.results; //Normally this.totalPages would equal response.d.__count //but as this particular NetFlix request only returns a //total count of items for the search, we divide. this.totalPages = Math.floor(response.d.__count / this.perPage); return tags; } });
});
Convenience methods:For your convenience, the following methods are made available for use in your viewsto interact with the requestPager:
• Collection.goTo(n) - go to a specific page
• Collection.requestNextPage() - go to the next page
• Collection.requestPreviousPage() - go to the previous page
• Collection.howManyPer(n) - set the number of items to display per page
Paginator.clientPagerThe clientPager works similar to the requestPager, except that our configuration val-ues influence the pagination of data already returned at a UI-level. Whilst not shown(yet) there is also a lot more UI logic that ties in with the clientPager. An example ofthis can be seen in ‘views/clientPagination.js.
1. Create a new paginated collection with a model and URLAs with requestPager, let’s first create a new Paginated Backbone.Paginator.clientPager collection, with a model and base URL:
var PaginatedCollection = Backbone.Paginator.clientPager.extend({
model: model,
Paginator.clientPager | 89
www.it-ebooks.info

url: 'http://odata.netflix.com/v2/Catalog/Titles?&',
2. Map the attributes supported by your API (URL)We’re similarly going to map request parameter names for your API to those supportedin the paginator:
perPageAttribute: '$top',
skipAttribute: '$skip',
orderAttribute: '$orderBy',
customAttribute1: '$inlinecount',
queryAttribute: '$filter',
formatAttribute: '$format',
customAttribute2: '$callback',
3. Configure how to paginate data at a UI-levelWe then get to configuration for the paginated data in the UI. perPage specifies howmany results to return from the server whilst displayPerPage configures how many ofthe items in returned results to display per “page” in the UI. e.g If we request 100 resultsand only display 20 per page, we have 5 sub-pages of results that can be navigatedthrough in the UI.
// M: how many results to query from the service perPage: 40,
// N: how many results to display per 'page' within the UI // Effectively M/N = the number of pages the data will be split into. displayPerPage: 20,
4. Configure the rest of the request parameter default valuesWe can then configure default values for the rest of our request parameters:
// current page to query from the service page: 1,
// a default. This should be overridden in the collection's parse() // sort direction sortDirection: 'asc',
// sort field sortField: 'ReleaseYear', //or year(Instant/AvailableFrom)
90 | Chapter 4: Advanced
www.it-ebooks.info

// query query: "substringof('" + escape('the') + "',Name)",
// request format format: 'json',
// custom parameters for the request that may be specific to your // application customParam1: 'allpages',
customParam2: 'callback',
5. Finally, configure Collection.parse() and we’re doneAnd finally we have our parse() method, which in this case isn’t concerned with thetotal number of result pages available on the server as we have our own total count ofpages for the paginated data in the UI.
parse: function (response) { var tags = response.d.results; return tags; }
});
Convenience methods:As mentioned, your views can hook into a number of convenience methods to navigatearound UI-paginated data. For clientPager these include:
• Collection.goTo(n) - go to a specific page
• Collection.previousPage() - go to the previous page
• Collection.nextPage() - go to the next page
• Collection.howManyPer(n) - set how many items to display per page
• Collection.pager(sortBy, sortDirection) - update sort on the current view
Views/TemplatesAlthough the collection layer is perhaps the most important part of Backbone.Pagina-tor, it would be of little use without views interacting with it. The project zipball comeswith three complete examples of using the components with the Netflix API, but here’sa sample view and template from the requestPager() example for those interested inlearning more:
First, we have a view for a pagination bar in our UI that allows us to navigate aroundour paginated collection:
Views/Templates | 91
www.it-ebooks.info

(function ( views ) {
views.PaginatedView = Backbone.View.extend({
events: { 'click a.servernext': 'nextResultPage', 'click a.serverprevious': 'previousResultPage', 'click a.orderUpdate': 'updateSortBy', 'click a.serverlast': 'gotoLast', 'click a.page': 'gotoPage', 'click a.serverfirst': 'gotoFirst', 'click a.serverpage': 'gotoPage', 'click .serverhowmany a': 'changeCount'
},
tagName: 'aside',
template: _.template($('#tmpServerPagination').html()),
initialize: function () {
this.collection.on('reset', this.render, this); this.collection.on('change', this.render, this); this.$el.appendTo('#pagination');
},
render: function () { var html = this.template(this.collection.info()); this.$el.html(html); },
updateSortBy: function (e) { e.preventDefault(); var currentSort = $('#sortByField').val(); this.collection.updateOrder(currentSort); },
nextResultPage: function (e) { e.preventDefault(); this.collection.requestNextPage(); },
previousResultPage: function (e) { e.preventDefault(); this.collection.requestPreviousPage(); },
gotoFirst: function (e) { e.preventDefault(); this.collection.goTo(this.collection.information.firstPage); },
gotoLast: function (e) {
92 | Chapter 4: Advanced
www.it-ebooks.info
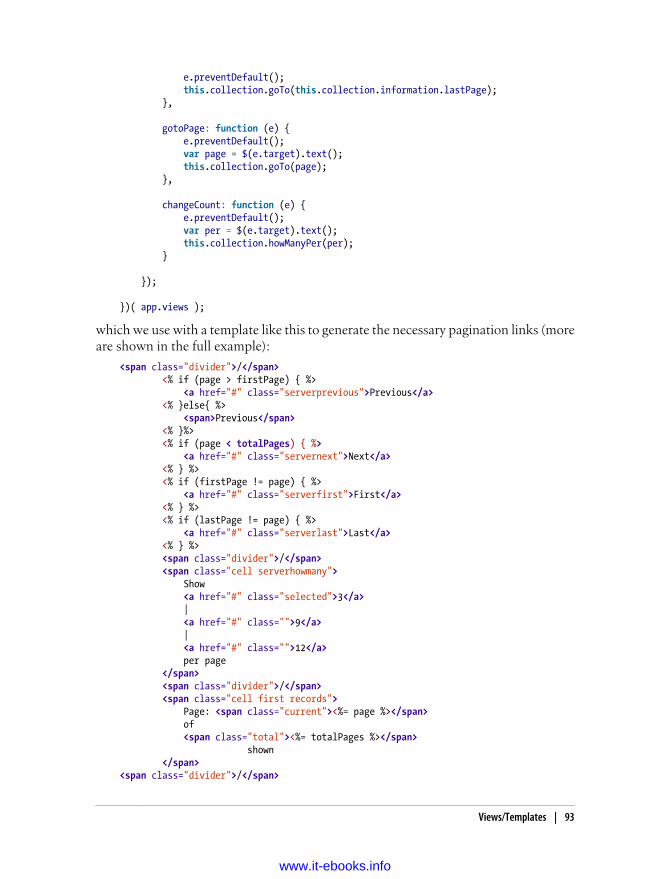
e.preventDefault(); this.collection.goTo(this.collection.information.lastPage); },
gotoPage: function (e) { e.preventDefault(); var page = $(e.target).text(); this.collection.goTo(page); },
changeCount: function (e) { e.preventDefault(); var per = $(e.target).text(); this.collection.howManyPer(per); }
});
})( app.views );
which we use with a template like this to generate the necessary pagination links (moreare shown in the full example):
<span class="divider">/</span> <% if (page > firstPage) { %> <a href="#" class="serverprevious">Previous</a> <% }else{ %> <span>Previous</span> <% }%> <% if (page < totalPages) { %> <a href="#" class="servernext">Next</a> <% } %> <% if (firstPage != page) { %> <a href="#" class="serverfirst">First</a> <% } %> <% if (lastPage != page) { %> <a href="#" class="serverlast">Last</a> <% } %> <span class="divider">/</span> <span class="cell serverhowmany"> Show <a href="#" class="selected">3</a> | <a href="#" class="">9</a> | <a href="#" class="">12</a> per page </span> <span class="divider">/</span> <span class="cell first records"> Page: <span class="current"><%= page %></span> of <span class="total"><%= totalPages %></span> shown </span> <span class="divider">/</span>
Views/Templates | 93
www.it-ebooks.info

<span class="cell sort"> <a href="#" class="orderUpdate btn small">Sort by:</a> </span> <select id="sortByField"> <option value="cid">Select a field to sort on</option> <option value="ReleaseYear">Release year</option> <option value="ShortName">Alphabetical</option> </select> </span>
Backbone & jQuery Mobile
Resolving the routing conflictsThe first major hurdle developers typically run into when building Backbone applica-tions with jQuery Mobile is that both frameworks have their own opinions about howto handle application navigation.
Backbone’s routers offer an explicit way to define custom navigation routes throughBackbone.Router, whilst jQuery Mobile encourages the use of URL hash fragments toreference separate “pages” or views in the same document. jQuery Mobile also supportsautomatically pulling in external content for links through XHR calls meaning thatthere can be quite a lot of inter-framework confusion about what a link pointing at“#photo/id” should actually be doing.
Some of the solutions that have been previously proposed to work-around this problemincluded manually patching Backbone or jQuery Mobile. I discourage opting for thesetechniques as it becomes necessary to manually patch your framework builds whennew releases get made upstream.
There’s also jQueryMobile router, which tries to solve this problem differently, how-ever I think my proposed solution is both simpler and allows both frameworks to co-habit quite peacefully without the need to extend either. What we’re after is a way toprevent one framework from listening to hash changes so that we can fully rely on theother (e.g. Backbone.Router) to handle this for us exclusively.
Using jQuery Mobile this can be done by setting:
$.mobile.hashListeningEnabled = false;
prior to initializing any of your other code.
I discovered this method looking through some jQuery Mobile commits that didn’tmake their way into the official docs, but am happy to see that they are now coveredhere http://jquerymobile.com/test/docs/api/globalconfig.html in more detail.
The next question that arises is, if we’re preventing jQuery Mobile from listening toURL hash changes, how can we still get the benefit of being able to navigate to other
94 | Chapter 4: Advanced
www.it-ebooks.info

sections in a document using the built-in transitions and effects supported? Goodquestion. This can now be solve by simply calling $.mobile.changePage() as follows:
var url = '#about', effect = 'slideup', reverse = false, changeHash = false;
$.mobile.changePage( url , { transition: effect}, reverse, changeHash );
In the above sample, url can refer to a URL or a hash identifier to navigate to, effectis simply the transition effect to animate the page in with and the final two parametersdecide the direction for the transition (reverse) and whether or not the hash in theaddress bar should be updated (changeHash). With respect to the latter, I typically setthis to false to avoid managing two sources for hash updates, but feel free to set this totrue if you’re comfortable doing so.
Note: For some parallel work being done to explore how well the jQuery Mobile Routerplugin works with Backbone, you may be interested in checking out https://git-hub.com/Filirom1/jquery-mobile-backbone-requirejs.
Practical: A Backbone, RequireJS/AMD app with jQuery MobileNote: The code for this practical can be found in practicals/modular-mobile-app.
Getting startedOnce you feel comfortable with the Backbone fundamentals and you’ve put togethera rough wireframe of the app you may wish to build, start to think about your appli-cation architecture. Ideally, you’ll want to logically separate concerns so that it’s as easyas possible to maintain the app in the future.
Namespacing
For this application, I opted for the nested namespacing pattern. Implemented cor-rectly, this enables you to clearly identify if items being referenced in your app are views,other modules and so on. This initial structure is a sane place to also include applicationdefaults (unless you prefer maintaining those in a separate file).
window.mobileSearch = window.mobileSearch || { views: { appview: new AppView }, routers:{ workspace:new Workspace() }, utils: utils, defaults:{ resultsPerPage: 16, safeSearch: 2, maxDate:'',
Backbone & jQuery Mobile | 95
www.it-ebooks.info

minDate:'01/01/1970' }}
Models
In the Flickly application, there are at least two unique types of data that need to bemodeled - search results and individual photos, both of which contain additional meta-data like photo titles. If you simplify this down, search results are actually groups ofphotos in their own right, so the application only requires:
• A single model (a photo or “result” entry)
• A result collection (containing a group of result entries) for search results
• A photo collection (containing one or more result entries) for individual photos orphotos with more than one image
Views
The views we’ll need include an application view, a search results view and a photoview. Static views or pages of the single-page application which do not require a dy-namic element to them (e.g an “about” page) can be easily coded up in your document’smarkup, independent of Backbone.
Routers
A number of possible routes need to be taken into consideration:
• Basic search queries #search/kiwis
• Search queries with additional parameters (e.g sort, pagination) #search/kiwis/srelevance/p7
• Queries for specific photos #photo/93839
• A default route (no parameters passed)
This tutorial will be expanded shortly to fully cover the demo application. In the meantime, please see the practicals folder for the completed application that demonstratesthe router resolution discussed earlier between Backbone and jQuery Mobile.
jQuery Mobile: Going beyond mobile application developmentThe majority of jQM apps I’ve seen in production have been developed for the purposeof providing an optimal experience to users on mobile devices. Given that the frame-work was developed for this purpose, there’s nothing fundamentally wrong with this,but many developers forget that jQM is a UI framework not dissimilar to jQuery UI.It’s using the widget factory and is capable of being used for a lot more than we give itcredit for.
If you open up Flickly in a desktop browser, you’ll get an image search UI that’s modeledon Google.com, however, review the components (buttons, text inputs, tabs) on the
96 | Chapter 4: Advanced
www.it-ebooks.info

page for a moment. The desktop UI doesn’t look anything like a mobile application yetI’m still using jQM for theming mobile components; the tabs, date-picker, sliders -everything in the desktop UI is re-using what jQM would be providing users on mobiledevices. Thanks to some media queries, the desktop UI can make optimal use of white-space, expanding component blocks out and providing alternative layouts whilst stillmaking use of jQM as a component framework.
The benefit of this is that I don’t need to go pulling in jQuery UI separately to be ableto take advantage of these features. Thanks to the recent ThemeRoller my componentscan look pretty much exactly how I would like them to and users of the app can get ajQM UI for lower-resolutions and a jQM-ish UI for everything else.
The takeaway here is just to remember that if you’re not (already) going through thehassle of conditional script/style loading based on screen-resolution (using matchMe-dia.js etc), there are simpler approaches that can be taken to cross-device componenttheming.
Backbone & jQuery Mobile | 97
www.it-ebooks.info


CHAPTER 5
Unit Testing
Unit Testing Backbone Applications With Jasmine
IntroductionOne definition of unit testing is the process of taking the smallest piece of testable codein an application, isolating it from the remainder of your codebase and determining ifit behaves exactly as expected. In this section, we’ll be taking a look at how to unit testBackbone applications using a popular JavaScript testing framework called Jasminefrom Pivotal Labs.
For an application to be considered “well”-tested, distinct functionality should ideallyhave its own separate unit tests where it’s tested against the different conditions youexpect it to work under. All tests must pass before functionality is considered “com-plete”. This allows developers to both modify a unit of code and it’s dependencies witha level of confidence about whether these changes have caused any breakage.
As a basic example of unit testing is where a developer may wish to assert whetherpassing specific values through to a sum function results in the correct output beingreturned. For an example more relevant to this book, we may wish to assert whether auser adding a new Todo item to a list correctly adds a Model of a specific type to aTodos Collection.
When building modern web-applications, it’s typically considered best-practice to in-clude automated unit testing as a part of your development process. Whilst we’ll befocusing on Jasmine as a solution for this, there are a number of other alternatives worthconsidering, including QUnit.
JasmineJasmine describes itself as a behavior-driven development (BDD) framework for testingJavaScript code. Before we jump into how the framework works, it’s useful to under-stand exactly what BDD is.
99
www.it-ebooks.info

BDD is a second-generation testing approach first described by Dan North (the au-thority on BDD) which attempts to test the behavior of software. It’s considered second-generation as it came out of merging ideas from Domain driven design (DDD) and leansoftware development, helping teams to deliver high quality software by answeringmany of the more confusing questions early on in the agile process. Such questionscommonly include those concerning documentation and testing.
If you were to read a book on BDD, it’s likely to also be described as being “outside-inand pull-based”. The reason for this is that it borrows the idea of of pulling featuresfrom Lean manufacturing which effectively ensures that the right software solutionsare being written by a) focusing on expected outputs of the system and b) ensuringthese outputs are achieved.
BDD recognizes that there are usually multiple stakeholders in a project and not a singleamorphous user of the system. These different groups will be affected by the softwarebeing written in differing ways and will have a varying opinion of what quality in thesystem means to them. It’s for this reason that it’s important to understand who thesoftware will be bringing value you and exactly what in it will be valuable to them.
Finally, BDD relies on automation. Once you’ve defined the quality expected, yourteam will likely want to check on the functionality of the solution being built regularlyand compare it to the results they expect. In order to facilitate this efficiently, the processhas to be automated. BDD relies heavily on the automation of specification-testing andJasmine is a tool which can assist with this.
BDD helps both developers and non-technical stakeholders:
• Better understand and represent the models of the problems being solved
• Explain supported tests cases in a language that non-developers can read
• Focus on minimizing translation of the technical code being written and the do-main language spoken by the business
What this means is that developers should be able to show Jasmine unit tests to a projectstakeholder and (at a high level, thanks to a common vocabulary being used) they’llideally be able to understand what the code supports.
Developers often implement BDD in unison with another testing paradigm known asTDD (test-driven development). The main idea behind TDD is:
• Write unit tests which describe the functionality you would like your code to sup-port
• Watch these tests fail (as the code to support them hasn’t yet been written)
• Write code to make the tests pass
• Rinse, repeat and refactor
In this chapter we’re going to use both BDD (with TDD) to write unit tests for a Back-bone application.
100 | Chapter 5: Unit Testing
www.it-ebooks.info

Note: I’ve seen a lot of developers also opt for writing tests to validate behavior of theircode after having written it. While this is fine, note that it can come with pitfalls suchas only testing for behavior your code currently supports, rather than behavior theproblem needs to be supported.
Suites, Specs & SpiesWhen using Jasmine, you’ll be writing suites and specifications (specs). Suites basicallydescribe scenarios whilst specs describe what can be done in these scenarios.
Each spec is a JavaScript function, described with a call to `it() using a descriptionstring and a function. The description should describe the behaviour the particular unitof code should exhibit and keeping in mind BDD, it should ideally be meaningful.Here’s an example of a basic spec:
it('should be incrementing in value', function(){ var counter = 0; counter++; });
On it’s own, a spec isn’t particularly useful until expectations are set about the behaviorof the code. Expectations in specs are defined using the expect() function and anexpectation matcher (e.g toEqual(), toBeTruthy(), toContain()). A revised example us-ing an expectation matcher would look like:
it('should be incrementing in value', function(){ var counter = 0; counter++; expect(counter).toEqual(1);});
The above code passes our behavioral expectation as `counter equals 1. Notice howeasy this was to read the expectation on the last line (you probably grokked it withoutany explanation).
Specs are grouped into suites which we describe using Jasmine’s describe() function,again passing a string as a description and a function. The name/description for yoursuite is typically that of the component or module you’re testing.
Jasmine will use it as the group name when it reports the results of the specs you’veasked it to run. A simple suite containing our sample spec could look like:
describe('Stats', function(){ it('can increment a number', function(){ ... });
it('can subtract a number', function(){ ... });});
Unit Testing Backbone Applications With Jasmine | 101
www.it-ebooks.info

Suites also share a functional scope and so it’s possible to declare variables and func-tions inside a describe block which are accessible within specs:
describe('Stats', function(){ var counter = 1;
it('can increment a number', function(){ // the counter was = 1 counter = counter + 1; expect(counter).toEqual(2); });
it('can subtract a number', function(){ // the counter was = 2 counter = counter - 1; expect(counter).toEqual(1); });});
Note: Suites are executed in the order in which they are described, which can be usefulto know if you would prefer to see test results for specific parts of your applicationreported first.
Jasmine also supports spies - a way to mock, spy and fake behavior in our unit tests.Spies replace the function they’re spying on, allowing us to simulate behavior we wouldlike to mock (i.e test free of the actual implementation).
In the below example, we’re spying on the setComplete method of a dummy Todofunction to test that arguments can be passed to it as expected.
var Todo = function(){};
Todo.prototype.setComplete = function (arg){ return arg;}
describe('a simple spy', function(){ it('should spy on an instance method of a Todo', function(){ var myTodo = new Todo(); spyOn(myTodo, 'setComplete'); myTodo.setComplete('foo bar');
expect(myTodo.setComplete).toHaveBeenCalledWith('foo bar');
var myTodo2 = new Todo(); spyOn(myTodo2, 'setComplete');
expect(myTodo2.setComplete).not.toHaveBeenCalled();
});});
What you’re more likely to use spies for is testing asynchronous behavior in your ap-plication such as AJAX requests. Jasmine supports:
102 | Chapter 5: Unit Testing
www.it-ebooks.info

• Writing tests which can mock AJAX requests using spies. This allows us to testcode which runs before an AJAX request and right after. It’s also possible to mock/fake responses the server can return and the benefit of this type of testing is thatit’s faster as no real calls are being made to a server
• Asynchronous tests which don’t rely on spies
For the first kind of test, it’s possible to both fake an AJAX request and verify that therequest was both calling the correct URL and executed a callback where one was pro-vided.
it("the callback should be executed on success", function () { spyOn($, "ajax").andCallFake(function(options) { options.success(); });
var callback = jasmine.createSpy(); getTodo(15, callback);
expect($.ajax.mostRecentCall.args[0]["url"]).toEqual("/todos/15"); expect(callback).toHaveBeenCalled();});
function getTodo(id, callback) { $.ajax({ type: "GET", url: "/todos/" + id, dataType: "json", success: callback });}
If you feel lost having seen matchers like andCallFake() and toHaveBeenCalled(), don’tworry. All of these are Spy-specific matchers and are documented on the Jasmine wiki.
For the second type of test (asynchronous tests), we can take the above further by takingadvantage of three other methods Jasmine supports:
• runs(function) - a block which runs as if it was directly called
• waits(timeout) - a native timeout before the next block is run
• waitsFor(function, optional message, optional timeout) - a way to pause specs untilsome other work has completed. Jasmine waits until the supplied function returnstrue here before it moves on to the next block.
it("should make an actual AJAX request to a server", function () {
var callback = jasmine.createSpy(); getTodo(16, callback);
waitsFor(function() { return callback.callCount > 0; });
Unit Testing Backbone Applications With Jasmine | 103
www.it-ebooks.info
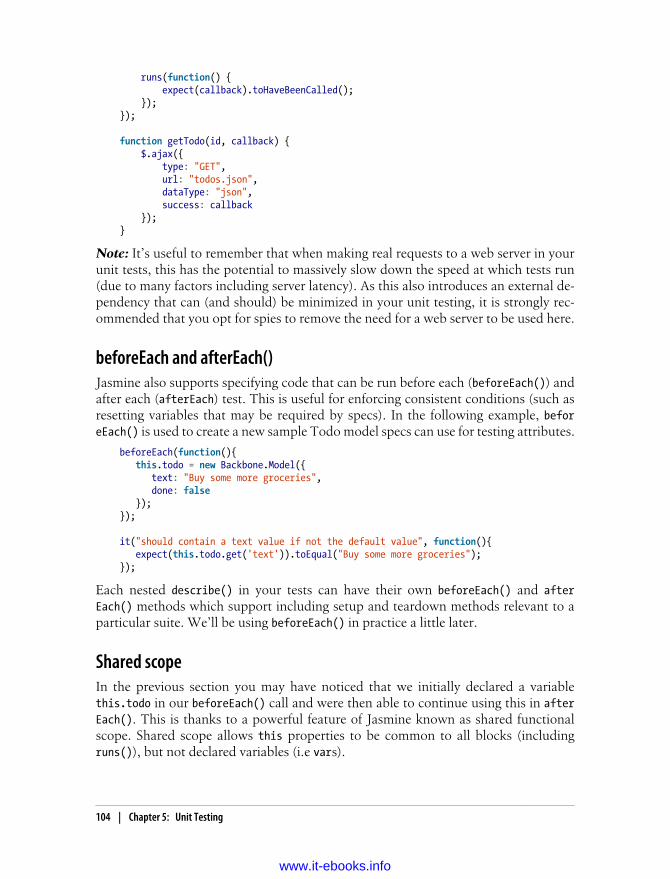
runs(function() { expect(callback).toHaveBeenCalled(); });});
function getTodo(id, callback) { $.ajax({ type: "GET", url: "todos.json", dataType: "json", success: callback });}
Note: It’s useful to remember that when making real requests to a web server in yourunit tests, this has the potential to massively slow down the speed at which tests run(due to many factors including server latency). As this also introduces an external de-pendency that can (and should) be minimized in your unit testing, it is strongly rec-ommended that you opt for spies to remove the need for a web server to be used here.
beforeEach and afterEach()Jasmine also supports specifying code that can be run before each (beforeEach()) andafter each (afterEach) test. This is useful for enforcing consistent conditions (such asresetting variables that may be required by specs). In the following example, beforeEach() is used to create a new sample Todo model specs can use for testing attributes.
beforeEach(function(){ this.todo = new Backbone.Model({ text: "Buy some more groceries", done: false });});
it("should contain a text value if not the default value", function(){ expect(this.todo.get('text')).toEqual("Buy some more groceries"); });
Each nested describe() in your tests can have their own beforeEach() and afterEach() methods which support including setup and teardown methods relevant to aparticular suite. We’ll be using beforeEach() in practice a little later.
Shared scopeIn the previous section you may have noticed that we initially declared a variablethis.todo in our beforeEach() call and were then able to continue using this in afterEach(). This is thanks to a powerful feature of Jasmine known as shared functionalscope. Shared scope allows this properties to be common to all blocks (includingruns()), but not declared variables (i.e vars).
104 | Chapter 5: Unit Testing
www.it-ebooks.info

Getting setupNow that we’ve reviewed some fundamentals, let’s go through downloading Jasmineand getting everything setup to write tests.
A standalone release of Jasmine can be downloaded from the official release page.
You’ll need a file called SpecRunner.html in addition to the release. It can be down-loaded from https://github.com/pivotal/jasmine/tree/master/lib/jasmine-core/exam-ple or as part of a download of the complete Jasmine repo.Alternatively, you can gitclone the main Jasmine repository from https://github.com/pivotal/jasmine.git.
Let’s review SpecRunner.html:
It first includes both Jasmine and the necessary CSS required for reporting:
<link rel="stylesheet" type="text/css" href="lib/jasmine-1.1.0.rc1/jasmine.css"/><script type="text/javascript" src="lib/jasmine-1.1.0.rc1/jasmine.js"></script><script type="text/javascript" src="lib/jasmine-1.1.0.rc1/jasmine-html.js"></script>
Next, some sample tests are included:
<script type="text/javascript" src="spec/SpecHelper.js"></script><script type="text/javascript" src="spec/PlayerSpec.js"></script>
And finally the sources being tested:
<script type="text/javascript" src="src/Player.js"></script><script type="text/javascript" src="src/Song.js"></script>
Note: Below this section of SpecRunner is code responsible for running the actual tests.Given that we won’t be covering modifying this code, I’m going to skip reviewing it. Ido however encourage you to take a look through PlayerSpec.js and SpecHelper.js.They’re a useful basic example to go through how a minimal set of tests might work.
TDD With BackboneWhen developing applications with Backbone, it can be necessary to test both indi-vidual modules of code as well as modules, views, collections and routers. Taking aTDD approach to testing, let’s review some specs for testing these Backbone compo-nents using the popular Backbone Todo application. For this section we will be usinga modified version of Larry Myers Backbone Koans project, which can be found in thepracticals\jasmine-koans folder.
ModelsThe complexity of Backbone models can vary greatly depending on what your appli-cation is trying to achieve. In the following example, we’re going to test default values,attributes, state changes and validation rules.
Unit Testing Backbone Applications With Jasmine | 105
www.it-ebooks.info

First, we begin our suite for model testing using describe():
describe('Tests for Todo', function() {
Models should ideally have default values for attributes. This helps ensure that whencreating instances without a value set for any specific attribute, a default one (e.g “”)is used instead. The idea here is to allow your application to interact with modelswithout any unexpected behavior.
In the following spec, we create a new Todo without any attributes passed then checkto find out what the value of the text attribute is. As no value has been set, we expecta default value of `"" to be returned.
it('Can be created with default values for its attributes.', function() { var todo = new Todo(); expect(todo.get('text')).toBe("");});
If testing this spec before your models have been written, you’ll incur a failing test, asexpected. What’s required for the spec to pass is a default value for the attribute text.We can implement this default value with some other useful defaults (which we’ll beusing shortly) in our Todo model as follows:
window.Todo = Backbone.Model.extend({
defaults: function() { return { text: "", done: false, order: 0 }; }
Next, we want to test that our model will pass attributes that are set such that retrievingthe value of these attributes after initialization will be what we expect. Notice that here,in addition to testing for an expected value for text, we’re also testing the other defaultvalues are what we expect them to be.
it('Will set passed attributes on the model instance when created.', function() { var todo = new Todo({ text: 'Get oil change for car.' });
// what are the values expected here for each of the // attributes in our Todo?
expect(todo.get('text')).toBe("Get oil change for car."); expect(todo.get('done')).toBe(false); expect(todo.get('order')).toBe(0);});
Backbone models support a model.change() event which is triggered when the state ofa model changes. In the following example, by “state” I’m referring to the value of aTodo model’s attributes. The reason changes of state are important to test are that there
106 | Chapter 5: Unit Testing
www.it-ebooks.info

may be state-dependent events in your application e.g you may wish to display a con-firmation view once a Todo model has been updated.
it('Fires a custom event when the state changes.', function() {
var spy = jasmine.createSpy('-change event callback-');
var todo = new Todo();
// how do we monitor changes of state? todo.on('change', spy);
// what would you need to do to force a change of state? todo.set({ text: 'Get oil change for car.' });
expect(spy).toHaveBeenCalled();});
It’s common to include validation logic in your models to ensure both the input passedfrom users (and other modules) in the application are “valid”. A Todo app may wishto validate the text input supplied in case it contains rude words. Similarly if we’restoring the done state of a Todo item using booleans, we need to validate that truthy/falsy values are passed and not just any arbitrary string.
In the following spec, we take advantage of the fact that validations which failmodel.validate() trigger an “error” event. This allows us to test if validations are cor-rectly failing when invalid input is supplied.
We create an errorCallback spy using Jasmine’s built in createSpy() method whichallows us to spy on the error event as follows:
it('Can contain custom validation rules, and will trigger an error event on failed validation.', function() {
var errorCallback = jasmine.createSpy('-error event callback-');
var todo = new Todo();
todo.on('error', errorCallback);
// What would you need to set on the todo properties to // cause validation to fail?
todo.set({done:'a non-integer value'});
var errorArgs = errorCallback.mostRecentCall.args;
expect(errorArgs).toBeDefined(); expect(errorArgs[0]).toBe(todo); expect(errorArgs[1]).toBe('Todo.done must be a boolean value.');});
The code to make the above failing test support validation is relatively simple. In ourmodel, we override the validate() method (as recommended in the Backbone docs),
Unit Testing Backbone Applications With Jasmine | 107
www.it-ebooks.info

checking to make sure a model both has a “done” property and is a valid boolean beforeallowing it to pass.
validate: function(attrs) { if (attrs.hasOwnProperty('done') && !_.isBoolean(attrs.done)) { return 'Todo.done must be a boolean value.'; }}
If you would like to review the final code for our Todo model, you can find it below:
var NAUGHTY_WORDS = /crap|poop|hell|frogs/gi;
function sanitize(str) { return str.replace(NAUGHTY_WORDS, 'rainbows');}
window.Todo = Backbone.Model.extend({
defaults: function() { return { text: '', done: false, order: 0 }; },
initialize: function() { this.set({text: sanitize(this.get('text'))}, {silent: true}); },
validate: function(attrs) { if (attrs.hasOwnProperty('done') && !_.isBoolean(attrs.done)) { return 'Todo.done must be a boolean value.'; } },
toggle: function() { this.save({done: !this.get("done")}); }
});
CollectionsWe now need to define specs to tests a Backbone collection of Todo models (a Todo-List). Collections are responsible for a number of list tasks including managing orderand filtering.
A few specific specs that come to mind when working with collections are:
• Making sure we can add new Todo models as both objects and arrays
• Attribute testing to make sure attributes such as the base URL of the collection arevalues we expect
108 | Chapter 5: Unit Testing
www.it-ebooks.info

• Purposefully adding items with a status of done:true and checking against howmany items the collection thinks have been completed vs. those that are remaining
In this section we’re going to cover the first two of these with the third left as an extendedexercise I recommend trying out.
Testing Todo models can be added to a collection as objects or arrays is relatively trivial.First, we initialize a new TodoList collection and check to make sure it’s length (i.e thenumber of Todo models it contains) is 0. Next, we add new Todos, both as objects andarrays, checking the length property of the collection at each stage to ensure the overallcount is what we expect:
describe('Tests for TodoList', function() {
it('Can add Model instances as objects and arrays.', function() { var todos = new TodoList();
expect(todos.length).toBe(0);
todos.add({ text: 'Clean the kitchen' });
// how many todos have been added so far? expect(todos.length).toBe(1);
todos.add([ { text: 'Do the laundry', done: true }, { text: 'Go to the gym'} ]);
// how many are there in total now? expect(todos.length).toBe(3); });...
Similar to model attributes, it’s also quite straight-forward to test attributes in collec-tions. Here we have a spec that ensures the collection.url (i.e the url reference to thecollection’s location on the server) is what we expect it to be:
it('Can have a url property to define the basic url structure for all contained models.', function() { var todos = new TodoList();
// what has been specified as the url base in our model? expect(todos.url).toBe('/todos/');});
For the third spec, it’s useful to remember that the implementation for our collectionwill have methods for filtering how many Todo items are done and how many areremaining - we can call these done() and remaining(). Consider writing a spec whichcreates a new collection and adds one new model that has a preset done state of trueand two others that have the default done state of false. Testing the length of what’sreturned using done() and remaining() should allow us to know whether the statemanagement in our application is working or needs a little tweaking.
Unit Testing Backbone Applications With Jasmine | 109
www.it-ebooks.info
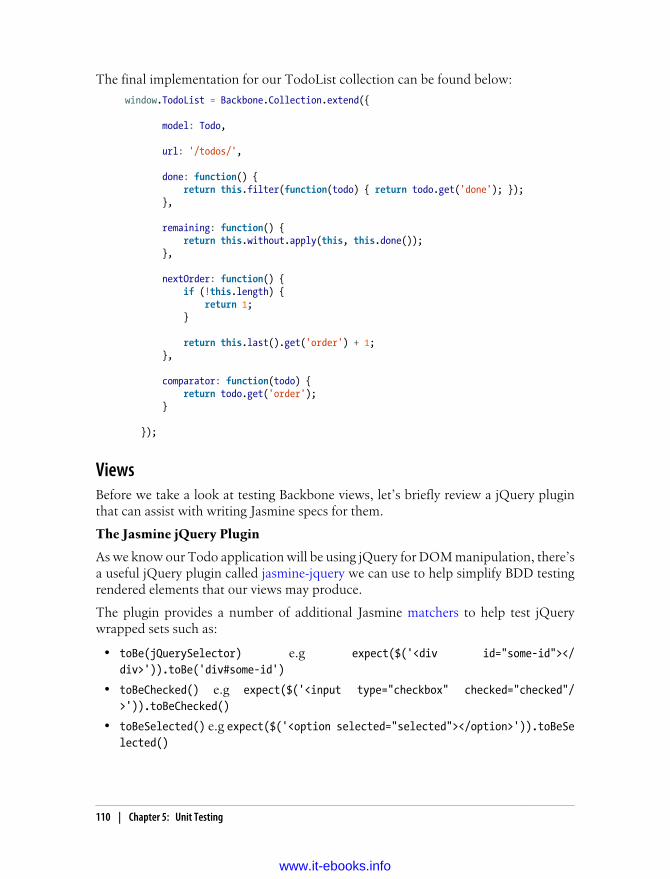
The final implementation for our TodoList collection can be found below:
window.TodoList = Backbone.Collection.extend({
model: Todo,
url: '/todos/',
done: function() { return this.filter(function(todo) { return todo.get('done'); }); },
remaining: function() { return this.without.apply(this, this.done()); },
nextOrder: function() { if (!this.length) { return 1; }
return this.last().get('order') + 1; },
comparator: function(todo) { return todo.get('order'); }
});
ViewsBefore we take a look at testing Backbone views, let’s briefly review a jQuery pluginthat can assist with writing Jasmine specs for them.
The Jasmine jQuery Plugin
As we know our Todo application will be using jQuery for DOM manipulation, there’sa useful jQuery plugin called jasmine-jquery we can use to help simplify BDD testingrendered elements that our views may produce.
The plugin provides a number of additional Jasmine matchers to help test jQuerywrapped sets such as:
• toBe(jQuerySelector) e.g expect($('<div id="some-id"></div>')).toBe('div#some-id')
• toBeChecked() e.g expect($('<input type="checkbox" checked="checked"/>')).toBeChecked()
• toBeSelected() e.g expect($('<option selected="selected"></option>')).toBeSelected()
110 | Chapter 5: Unit Testing
www.it-ebooks.info

and many others. The complete list of matchers supported can be found on the projecthomepage. It’s useful to know that similar to the standard Jasmine matchers, the cus-tom matchers above can be inverted using the .not prefix (i.e expect(x).not.toBe(y)):
expect($('<div>I am an example</div>')).not.toHaveText(/other/)
jasmine-jquery also includes a fixtures model, allowing us to load in arbitrary HTMLcontent we may wish to use in our tests. Fixtures can be used as follows:
Include some HTML in an external fixtures file:
some.fixture.html: <div id="sample-fixture">some HTML content</div>
Next, inside our actual test we would load it as follows:
loadFixtures('some.fixture.html')$('some-fixture').myTestedPlugin();expect($('#some-fixture')).to<the rest of your matcher would go here>
The jasmine-jquery plugin is by default setup to load fixtures from a specific directory:spec/javascripts/fixtures. If you wish to configure this path you can do so by initiallysetting jasmine.getFixtures().fixturesPath = 'your custom path'.
Finally, jasmine-jquery includes support for spying on jQuery events without the needfor any extra plumbing work. This can be done using the spyOnEvent() and assert(eventName).toHaveBeenTriggered(selector) functions. An example of usage may look asfollows:
spyOnEvent($('#el'), 'click');$('#el').click();expect('click').toHaveBeenTriggeredOn($('#el'));
View testing
In this section we will review three dimensions to writing specs for Backbone Views:initial setup, view rendering and finally templating. The latter two of these are the mostcommonly tested, however we’ll review shortly why writing specs for the initializationof your views can also be of benefit.
Initial setupAt their most basic, specs for Backbone views should validate that they are being cor-rectly tied to specific DOM elements and are backed by valid data models. The reasonto consider doing this is that failures to such specs can trip up more complex tests lateron and they’re fairly simple to write, given the overall value offered.
To help ensure a consistent testing setup for our specs, we use beforeEach() to appendboth an empty UL (#todoList) to the DOM and initialize a new instance of a TodoViewusing an empty Todo model. afterEach() is used to remove the previous #todoListUL as well as the previous instance of the view.
describe('Tests for TodoView', function() {
Unit Testing Backbone Applications With Jasmine | 111
www.it-ebooks.info

beforeEach(function() { $('body').append('<ul id="todoList"></ul>'); this.todoView = new TodoView({ model: new Todo() }); });
afterEach(function() { this.todoView.remove(); $('#todoList').remove(); });
...
The first spec useful to write is a check that the TodoView we’ve created is using thecorrect tagName (element or className). The purpose of this test is to make sure it’sbeen correctly tied to a DOM element when it was created.
Backbone views typically create empty DOM elements once initialized, however theseelements are not attached to the visible DOM in order to allow them to be constructedwithout an impact on the performance of rendering.
it('Should be tied to a DOM element when created, based off the property provided.', function() { //what html element tag name represents this view? expect(todoView.el.tagName.toLowerCase()).toBe('li');});
Once again, if the TodoView has not already been written, we will experience failingspecs. Thankfully, solving this is as simple as creating a new Backbone.View with aspecific tagName.
var todoView = Backbone.View.extend({ tagName: "li"});
If instead of testing against the tagName you would prefer to use a className instead,we can take advantage of jasmine-jquery’s toHaveClass() matcher to cater for this.
it('Should have a class of "todos"'), function(){ expect(this.view.$el).toHaveClass('todos');});
The toHaveClass() matcher operates on jQuery objects and if the plugin hadn’t beenused, an exception would have been incurred (it is of course also possible to test forthe className by accessing el.className if not opting to use jasmine-jquery).
You may have noticed that in beforeEach(), we passed our view an initial (albeit un-filled) Todo model. Views should be backed by a model instance which provides data.As this is quite important to our view’s ability to function, we can write a spec to ensurea model is both defined (using the toBeDefined() matcher) and then test attributes ofthe model to ensure defaults both exist and are the value we expect them to be.
it('Is backed by a model instance, which provides the data.', function() {
112 | Chapter 5: Unit Testing
www.it-ebooks.info

expect(todoView.model).toBeDefined();
// what's the value for Todo.get('done') here? expect(todoView.model.get('done')).toBe(false); //or toBeFalsy()});
View renderingNext we’re going to take a look at writing specs for view rendering. Specifically, wewant to test that our TodoView elements are actually rendering as expected.
In smaller applications, those new to BDD might argue that visual confirmation of viewrendering could replace unit testing of views. The reality is that when dealing withapplications that might grow to multiple-views, it often makes sense to automate thisprocess as much as possible from the get-go. There are also aspects of rendering thatrequire verification beyond what is visually presented on-screen (which we’ll see veryshortly).
We’re going to begin testing views by writing two specs. The first spec will check thatthe view’s render() method is correctly returning the view instance, which is necessaryfor chaining. Our second spec will check that the HTML produced is exactly what weexpect based on the properties of the model instance that’s been associated with ourTodoView.
Unlike some of the previous specs we’ve covered, this section will make greater use ofbeforeEach() to both demonstrate how to use nested suites and also ensure a consistentset of conditions for our specs. In our first view spec for TodoView, we’re simply goingto create a sample model (based on Todo) and instantiate a TodoView which associatesit with the model.
describe("TodoView", function() {
beforeEach(function() { this.model = new Backbone.Model({ text: "My Todo", order: 1, done: false }); this.view = new TodoView({model:this.model}); });
describe("Rendering", function() {
it("returns the view object", function() { expect(this.view.render()).toEqual(this.view); });
it("produces the correct HTML", function() { this.view.render();
//let's use jasmine-jquery's toContain() to avoid //testing for the complete content of a todo's markup
Unit Testing Backbone Applications With Jasmine | 113
www.it-ebooks.info

expect(this.view.el.innerHTML) .toContain('<label class="todo-content">My Todo</label>'); });
});
});
Once these specs are run, only the second one (“produces the correct HTML”) fails.Our first spec (“returns the view object”), which is testing that the TodoView instanceis returned from render(), only passed as this is Backbone’s default behavior. We ha-ven’t yet overwritten the render() method with our own version.
Note: For the purposes of maintaining readability, all template examples in this sectionwill use a minimal version of the following Todo view template. As it’s relatively trivialto expand this, please feel free to refer to this sample if needed:
<div class="todo <%= done ? 'done' : '' %>"> <div class="display"> <input class="check" type="checkbox" <%= done ? 'checked="checked"' : '' %> /> <label class="todo-content"><%= text %></label> <span class="todo-destroy"></span> </div> <div class="edit"> <input class="todo-input" type="text" value="<%= content %>" /> </div></div>
The second spec fails with the following message:
Expected ’’ to contain '<label class="todo-content">My Todo</label>'.
The reason for this is the default behavior for render() doesn’t create any markup. Let’swrite a replacement for render() which fixes this:
render: function() { var template = '<label class="todo-content"><%= text %></label>'; var output = template .replace("<%= text %>", this.model.get('text')); this.$el.html(output); return this;}
The above specifies an inline string template and replaces fields found in the templatewithin the “<% %>” blocks with their corresponding values from the associated model.As we’re now also returning the TodoView instance from the method, the first specwill also pass. It’s worth noting that there are serious drawbacks to using HTML stringsin your specs to test against like this. Even minor changes to your template (a simpletab or whitespace) would cause your spec to fail, despite the rendered output being thesame. It’s also more time consuming to maintain as most templates in real-world ap-plications are significantly more complex. A better option for testing rendered outputis using jQuery to both select and inspect values.
114 | Chapter 5: Unit Testing
www.it-ebooks.info

With this in mind, let’s re-write the specs, this time using some of the custom matchersoffered by jasmine-jquery:
describe("Template", function() {
beforeEach(function() { this.view.render(); });
it("has the correct text content", function() { expect(this.view.$('.todo-content')) .toHaveText('My Todo'); });
});
It would be impossible to discuss unit testing without mentioning fixtures. Fixturestypically contain test data (e.g HTML) that is loaded in when needed (either locally orfrom an external file) for unit testing. So far we’ve been establishing jQuery expectationsbased on the view’s el property. This works for a number of cases, however, there areinstances where it may be necessary to render markup into the document. The mostoptimal way to handle this within specs is through using fixtures (another featurebrought to us by the jasmine-jquery plugin).
Re-writing the last spec to use fixtures would look as follows:
describe("TodoView", function() {
beforeEach(function() { ... setFixtures('<ul class="todos"></ul>'); });
...
describe("Template", function() {
beforeEach(function() { $('.todos').append(this.view.render().el); });
it("has the correct text content", function() { expect($('.todos').find('.todo-content')) .toHaveText('My Todo'); });
});
});
What we’re now doing in the above spec is appending the rendered todo item into thefixture. We then set expectations against the fixture, which may be something desirablewhen a view is setup against an element which already exists in the DOM. It would be
Unit Testing Backbone Applications With Jasmine | 115
www.it-ebooks.info

necessary to provide both the fixture and test the el property correctly picking up theelement expected when the view is instantiated.
Rendering with a templating systemJavaScript templating systems (such as Handlebars, Mustache and even Underscore’sown Micro-templating) support conditional logic in template strings. What this effec-tively means is that we can add if/else/ternery expressions inline which can then beevaluated as needed, allowing us to build even more powerful templates.
In our case, when a user sets a Todo item to be complete (done), we may wish to providethem with visual feedback (such as a striked line through the text) to differentiate theitem from those that are remaining. This can be done by attaching a new class to theitem. Let’s begin by writing a test we would ideally like to work:
describe("When a todo is done", function() {
beforeEach(function() { this.model.set({done: true}, {silent: true}); $('.todos').append(this.view.render().el); });
it("has a done class", function() { expect($('.todos .todo-content:first-child')) .toHaveClass("done"); });
});
This will fail with the following message:
Expected “Expected '<label class="todo-content">My Todo</label>' to have class'done'.”.
which can be fixed in the existing render() method as follows:
render: function() { var template = '<label class="todo-content">' + '<%= text %></label>'; var output = template .replace("<%= text %>", this.model.get('text')); this.$el.html(output); if (this.model.get('done')) { this.$(".todo-content").addClass("done"); } return this;}
This can however get unwieldily fairly quickly. As the logic in our templates increases,so does the complexity involved. This is where templates libraries can help. As men-tioned earlier, there are a number of popular options available, but for the purposes ofthis chapter we’re going to stick to using Underscore’s built-in Microtemplating. Whilstthere are more advanced options you’re free to explore, the benefit of this is that no
116 | Chapter 5: Unit Testing
www.it-ebooks.info

additional files are required and we can easily change the existing Jasmine specs withouttoo much adjustment.
The TodoView object modified to use Underscore templating would look as follows:
var TodoView = Backbone.View.extend({
tagName: "li",
initialize: function(options) { this.template = _.template(options.template || ""); },
render: function() { this.$el.html(this.template(this.model.toJSON())); return this; },
...
});
Above, the initialize() method compiles a supplied Underscore template (using the_.template() function) in the instantiation. A more common way of referencing tem-plates is placing them in a script tag using a custom script type (e.g type=“text/tem-plate”). As this isn’t a script type any browser understands, it’s simply ignored, howeverreferencing the script by an id attribute allows the template to be kept separate to otherparts of the page which wish to use it. In real world applications, it’s preferable to eitherdo this or load in templates stored in external files for testing.
For testing purposes, we’re going to continue using the string injection approach tokeep things simple. There is however a useful trick that can be applied to automaticallycreate or extend templates in the Jasmine scope for each test. By creating a new directory(say, “templates”) in the “spec” folder and adding a new script file with the followingcontents, to jasmine.yml or SpecRunner.html, we can add a todo property which con-tains the Underscore template we wish to use:
beforeEach(function() { this.templates = _.extend(this.templates || {}, { todo: '<label class="todo-content">' + '<%= text %>' + '</label>' });});
To finish this off, we simply update our existing spec to reference the template wheninstantiating the TodoView object:
describe("TodoView", function() {
beforeEach(function() { ... this.view = new TodoView({ model: this.model,
Unit Testing Backbone Applications With Jasmine | 117
www.it-ebooks.info

template: this.templates.todo }); });
...
});
The existing specs we’ve looked at would continue to pass using this approach, leavingus free to adjust the template with some additional conditional logic for Todos with astatus of “done”:
beforeEach(function() { this.templates = _.extend(this.templates || {}, { todo: '<label class="todo-content <%= done ? 'done' : '' %>"' + '<%= text %>' + '</label>' });});
This will now also pass without any issues. Remember that jasmine-jquery also sup-ports loading external fixtures into your specs easily using it’s build in loadFixtures() and readFixtures() methods. For more information, consider reading the of-ficial jasmine-jquery docs.
ConclusionsWe have now covered how to write Jasmine tests for models, views and collectionswith Backbone.js. Whilst testing routing can at times be desirable, some developersfeel it can be more optimal to leave this to third-party tools such as Selenium, so dokeep this in mind.
James Newbery was kind enough to help me with writing the Views section above andhis articles on Testing Backbone Apps With SinonJS were of great inspiration (you’llactually find some Handlebars examples of the view specs in part 3 of his article). Ifyou would like to learn more about writing spies and mocks for Backbone using Si-nonJS as well as how to test Backbone routers, do consider reading his series.
ExerciseAs an exercise, I recommend now trying the Jasmine Koans in practicals\jasmine-joans and trying to fix some of the purposefully failing tests it has to offer. This is anexcellent way of not just learning how Jasmine specs and suites work, but workingthrough the examples (without peaking back) will also put your Backbone skills to testtoo.
Further reading• Jasmine + Backbone Revisited
118 | Chapter 5: Unit Testing
www.it-ebooks.info

• Backbone, PhantomJS and Jasmine
Unit Testing Backbone Applications With QUnit And SinonJS
IntroductionQUnit is a powerful JavaScript test suite written by jQuery team member Jörn Zaef-ferer and used by many large open-source projects (such as jQuery and Backbone.js)to test their code. It’s both capable of testing standard JavaScript code in the browseras well as code on the server-side (where environments supported include Rhino, V8and SpiderMonkey). This makes it a robust solution for a large number of use-cases.
Quite a few Backbone.js contributors feel that QUnit is a better introductory frameworkfor testing if you don’t wish to start off with Jasmine and BDD right away. As we’ll seelater on in this chapter, QUnit can also be combined with third-party solutions suchas SinonJS to produce an even more powerful testing solution supporting spies andmocks, which some say is preferable over Jasmine.
My personal recommendation is that it’s worth comparing both frameworks and optingfor the solution that you feel the most comfortable with.
QUnit
Getting SetupLuckily, getting QUnit setup is a fairly straight-forward process that will take less than5 minutes.
We first setup a testing environment composed of three files:
• A HTML structure for displaying test results,
• The qunit.js file composing the testing framework and,
• The qunit.css file for styling test results.
The latter two of these can be downloaded from the QUnit website.
If you would prefer, you can use a hosted version of the QUnit source files for testingpurposes. The hosted URLs can be found at [http://github.com/jquery/qunit/raw/master/qunit/].
Sample HTML with QUnit-compatible markup:<!DOCTYPE html> <html> <head> <title>QUnit Test Suite</title>
QUnit | 119
www.it-ebooks.info

<link rel="stylesheet" href="qunit.css"> <script src="qunit.js"></script>
<!-- Your application --> <script src="app.js"></script>
<!-- Your tests --> <script src="tests.js"></script> </head> <body> <h1 id="qunit-header">QUnit Test Suite</h1> <h2 id="qunit-banner"></h2> <div id="qunit-testrunner-toolbar"></div> <h2 id="qunit-userAgent"></h2> <ol id="qunit-tests">test markup, hidden.</ol> </body> </html>
Let’s go through the elements above with qunit mentioned in their ID. When QUnit isrunning:
• qunit-header shows the name of the test suite
• qunit-banner shows up as red if a test fails and green if all tests pass
• qunit-testrunner-toolbar contains additional options for configuring the displayof tests
• qunit-userAgent displays the navigator.userAgent property
• qunit-tests is a container for our test results
When running correctly, the above test runner looks as follows:
The numbers of the form (a, b, c) after each test name correspond to a) failed asserts,b) passed asserts and c) total asserts. Clicking on a test name expands it to display allof the assertions for that test case. Assertions in green have successfully passed.
If however any tests fail, the test gets highlighted (and the qunit-banner at the topswitches to red):
AssertionsQUnit supports a number of basic assertions, which are used in testing to verify thatthe result being returned by our code is what we expect. If an assertion fails, we knowthat a bug exists.Similar to Jasmine, QUnit can be used to easily test for regressions.Specifically, when a bug is found one can write an assertion to test the existence of thebug, write a patch and then commit both. If subsequent changes to the code break thetest you’ll know what was responsible and be able to address it more easily.
Some of the supported QUnit assertions we’re going to look at first are:
120 | Chapter 5: Unit Testing
www.it-ebooks.info

• ok ( state, message ) - passes if the first argument is truthy
• equal ( actual, expected, message ) - a simple comparison assertion with typecoercion
• notEqual ( actual, expected, message ) - the opposite of the above
• expect( amount ) - the number of assertions expected to run within each test
• strictEqual( actual, expected, message) - offers a much stricter comparison thanequal() and is considered the preferred method of checking equality as it avoidsstumbling on subtle coercion bugs
• deepEqual( actual, expected, message ) - similar to strictEqual, comparing thecontents (with ===) of the given objects, arrays and primitives.
Creating new test cases with QUnit is relatively straight-forward and can be done usingtest(), which constructs a test where the first argument is the name of the test to bedisplayed in our results and the second is a callback function containing all of ourassertions. This is called as soon as QUnit is running.
Basic test case using test( name, callback ):var myString = 'Hello Backbone.js';
test( 'Our first QUnit test - asserting results', function(){
Figure 5-1. screenshot 1
QUnit | 121
www.it-ebooks.info

// ok( boolean, message ) ok( true, 'the test succeeds'); ok( false, 'the test fails');
// equal( actualValue, expectedValue, message ) equal( myString, 'Hello Backbone.js', 'The value expected is Hello Backbone.js!');});
What we’re doing in the above is defining a variable with a specific value and thentesting to ensure the value was what we expected it to be. This was done using thecomparison assertion, equal(), which expects its first argument to be a value beingtested and the second argument to be the expected value. We also used ok(), whichallows us to easily test against functions or variables that evaluate to booleans.
Note: Optionally in our test case, we could have passed an “expected” value totest() defining the number of assertions we expect to run. This takes the form:test( name, [expected], test ); or by manually settings the expectation at the top of
Figure 5-2. screenshot 2
122 | Chapter 5: Unit Testing
www.it-ebooks.info

the test function, like so: expect( 1 ). I recommend you to make it a habit and alwaysdefine how many assertions you expect. More on this later.
As testing a simple static variable is fairly trivial, we can take this further to test actualfunctions. In the following example we test the output of a function that reverses astring to ensure that the output is correct using equal() and notEqual():
Comparing the actual output of a function against the expected output:function reverseString( str ){ return str.split("").reverse().join("");}
test( 'reverseString()', function() { expect( 5 ); equal( reverseString('hello'), 'olleh', 'The value expected was olleh' ); equal( reverseString('foobar'), 'raboof', 'The value expected was raboof' ); equal( reverseString('world'), 'dlrow', 'The value expected was dlrow' ); notEqual( reverseString('world'), 'dlroo', 'The value was expected to not be dlroo' ); equal( reverseString('bubble'), 'double', 'The value expected was elbbub' ); })
Figure 5-3. screenshot 3
QUnit | 123
www.it-ebooks.info

Running these tests in the QUnit test runner (which you would see when your HTMLtest page was loaded) we would find that four of the assertions pass whilst the last onedoes not. The reason the test against 'double' fails is because it was purposefully writtenincorrectly. In your own projects if a test fails to pass and your assertions are correct,you’ve probably just found a bug!
Adding structure to assertionsHousing all of our assertions in one test case can quickly become difficult to maintain,but luckily QUnit supports structuring blocks of assertions more cleanly. This can bedone using module() - a method that allows us to easily group tests together. A typicalapproach to grouping might be keeping multiple tests testing a specific method as partof the same group (module).
Basic QUnit Modules:module( 'Module One' ); test( 'first test', function() {} ); test( 'another test', function() {} );
module( 'Module Two' ); test( 'second test', function() {} ); test( 'another test', function() {} );
module( 'Module Three' ); test( 'third test', function() {} ); test( 'another test', function() {} );
We can take this further by introducing setup() and teardown() callbacks to our mod-ules, where setup() is run before each test whilst teardown() is run after each test.
Using setup() and teardown() :module( "Module One", { setup: function() { // run before }, teardown: function() { // run after }});
test("first test", function() { // run the first test});
These callbacks can be used to define (or clear) any components we wish to instantiatefor use in one or more of our tests. As we’ll see shortly, this is ideal for defining newinstances of views, collections, models or routers from a project that we can then ref-erence across multiple tests.
124 | Chapter 5: Unit Testing
www.it-ebooks.info

Using setup() and teardown() for instantiation and clean-up:// Define a simple model and collection modeling a store and// list of stores
var Store = Backbone.Model.extend({});
var StoreList = Backbone.Collection.extend({ model: store, comparator: function( store ) { return store.get('name') }});
// Define a group for our testsmodule( "StoreList sanity check", { setup: function() { this.list = new StoreList; this.list.add(new Store({ name: "Costcutter" })); this.list.add(new Store({ name: "Target" })); this.list.add(new Store({ name: "Walmart" })); this.list.add(new Store({ name: "Barnes & Noble" }); }, teardown: function() { window.errors = null; }});
// Test the order of items addedtest( "test ordering", function() { expect( 1 ); var expected = ["Barnes & Noble", "Costcutter", "Target", "Walmart"]; var actual = this.list.pluck("name"); deepEqual( actual, expected, "is maintained by comparator" );});
Here, a list of stores is created and stored on setup(). A teardown() callback is used tosimply clear our a list of errors we might be storing within the window scope, but isotherwise not needed.
Assertion examplesBefore we continue any further, let’s review some more examples of how QUnits var-ious assertions can be correctly used when writing tests:
equal - a comparison assertion. It passes if actual == expectedtest( "equal", 2, function() { var actual = 6 - 5; equal( actual, true, "passes as 1 == true" ); equal( actual, 1, "passes as 1 == 1" );});
QUnit | 125
www.it-ebooks.info

notEqual - a comparison assertion. It passes if actual != expectedtest( "notEqual", 2, function() { var actual = 6 - 5; notEqual( actual, false, "passes as 1 != false" ); notEqual( actual, 0, "passes as 1 != 0" );});
strictEqual - a comparison assertion. It passes if actual === expected.test( "strictEqual", 2, function() { var actual = 6 - 5; strictEqual( actual, true, "fails as 1 !== true" ); strictEqual( actual, 1, "passes as 1 === 1" );});
notStrictEqual - a comparison assertion. It passes if actual !== expected.test("notStrictEqual", 2, function() { var actual = 6 - 5; notStrictEqual( actual, true, "passes as 1 !== true" ); notStrictEqual( actual, 1, "fails as 1 === 1" );});
deepEqual - a recursive comparison assertion. Unlike strictEqual(), it works on objects, arrays andprimitives.
test("deepEqual", 4, function() { var actual = {q: 'foo', t: 'bar'}; var el = $('div'); var children = $('div').children();
equal( actual, {q: 'foo', t: 'bar'}, "fails - objects are not equal using equal()" ); deepEqual( actual, {q: 'foo', t: 'bar'}, "passes - objects are equal" ); equal( el, children, "fails - jQuery objects are not the same" ); deepEqual(el, children, "fails - objects not equivalent" );
});
notDeepEqual - a comparison assertion. This returns the opposite of deepEqualtest("notDeepEqual", 2, function() { var actual = {q: 'foo', t: 'bar'}; notEqual( actual, {q: 'foo', t: 'bar'}, "passes - objects are not equal" ); notDeepEqual( actual, {q: 'foo', t: 'bar'}, "fails - objects are equivalent" );});
raises - an assertion which tests if a callback throws any exceptionstest("raises", 1, function() { raises(function() { throw new Error( "Oh no! It's an error!" ); }, "passes - an error was thrown inside our callback");});
126 | Chapter 5: Unit Testing
www.it-ebooks.info
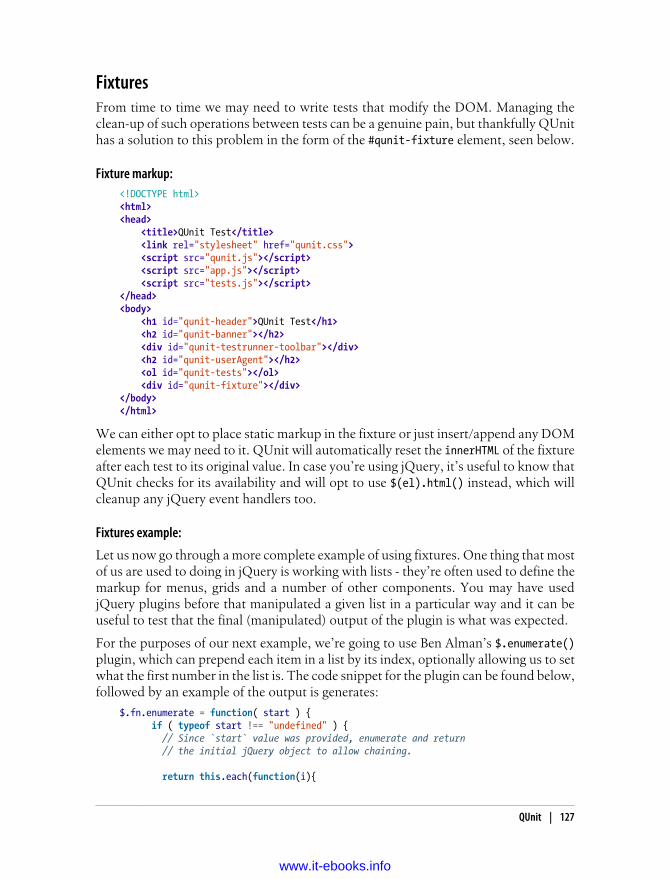
FixturesFrom time to time we may need to write tests that modify the DOM. Managing theclean-up of such operations between tests can be a genuine pain, but thankfully QUnithas a solution to this problem in the form of the #qunit-fixture element, seen below.
Fixture markup:<!DOCTYPE html><html><head> <title>QUnit Test</title> <link rel="stylesheet" href="qunit.css"> <script src="qunit.js"></script> <script src="app.js"></script> <script src="tests.js"></script></head><body> <h1 id="qunit-header">QUnit Test</h1> <h2 id="qunit-banner"></h2> <div id="qunit-testrunner-toolbar"></div> <h2 id="qunit-userAgent"></h2> <ol id="qunit-tests"></ol> <div id="qunit-fixture"></div></body></html>
We can either opt to place static markup in the fixture or just insert/append any DOMelements we may need to it. QUnit will automatically reset the innerHTML of the fixtureafter each test to its original value. In case you’re using jQuery, it’s useful to know thatQUnit checks for its availability and will opt to use $(el).html() instead, which willcleanup any jQuery event handlers too.
Fixtures example:
Let us now go through a more complete example of using fixtures. One thing that mostof us are used to doing in jQuery is working with lists - they’re often used to define themarkup for menus, grids and a number of other components. You may have usedjQuery plugins before that manipulated a given list in a particular way and it can beuseful to test that the final (manipulated) output of the plugin is what was expected.
For the purposes of our next example, we’re going to use Ben Alman’s $.enumerate()plugin, which can prepend each item in a list by its index, optionally allowing us to setwhat the first number in the list is. The code snippet for the plugin can be found below,followed by an example of the output is generates:
$.fn.enumerate = function( start ) { if ( typeof start !== "undefined" ) { // Since `start` value was provided, enumerate and return // the initial jQuery object to allow chaining.
return this.each(function(i){
QUnit | 127
www.it-ebooks.info

$(this).prepend( "<b>" + ( i + start ) + "</b> " ); });
} else { // Since no `start` value was provided, function as a // getter, returing the appropriate value from the first // selected element.
var val = this.eq( 0 ).children( "b" ).eq( 0 ).text(); return Number( val ); } };
/* <ul> <li>1. hello</li> <li>2. world</li> <li>3. i</li> <li>4. am</li> <li>5. foo</li> </ul>*/
Let’s now write some specs for the plugin. First, we define the markup for a list con-taining some sample items inside our qunit-fixture element:
<div id="qunit-fixture"> <ul> <li>hello</li> <li>world</li> <li>i</li> <li>am</li> <li>foo</li> </ul> </div>
Next, we need to think about what should be tested. $.enumerate() supports a fewdifferent use cases, including:
• No arguments passed - i.e $(el).enumerate()
• 0 passed as an argument - i.e $(el).enumerate(0)
• 1 passed as an argument - i.e $(el).enumerate(1)
As the text value for each list item is of the form “n. item-text” and we only require thisto test against the expected output, we can simply access the content using $(el).eq(index).text() (for more information on .eq() see here).
and finally, here are our test cases:
module("jQuery#enumerate");
test( "No arguments passed", 5, function() { var items = $("#qunit-fixture li").enumerate(); equal( items.eq(0).text(), "1. hello", "first item should have index 1" ); equal( items.eq(1).text(), "2. world", "second item should have index 2" );
128 | Chapter 5: Unit Testing
www.it-ebooks.info

equal( items.eq(2).text(), "3. i", "third item should have index 3" ); equal( items.eq(3).text(), "4. am", "fourth item should have index 4" ); equal( items.eq(4).text(), "5. foo", "fifth item should have index 5" );});
test( "0 passed as an argument", 5, function() { var items = $("#qunit-fixture li").enumerate( 0 ); equal( items.eq(0).text(), "0. hello", "first item should have index 0" ); equal( items.eq(1).text(), "1. world", "second item should have index 1" ); equal( items.eq(2).text(), "2. i", "third item should have index 2" ); equal( items.eq(3).text(), "3. am", "fourth item should have index 3" ); equal( items.eq(4).text(), "4. foo", "fifth item should have index 4" );});
test( "1 passed as an argument", 3, function() { var items = $("#qunit-fixture li").enumerate( 1 ); equal( items.eq(0).text(), "1. hello", "first item should have index 1" ); equal( items.eq(1).text(), "2. world", "second item should have index 2" ); equal( items.eq(2).text(), "3. i", "third item should have index 3" ); equal( items.eq(3).text(), "4. am", "fourth item should have index 4" ); equal( items.eq(4).text(), "5. foo", "fifth item should have index 5" );});
Asynchronous codeAs with Jasmine, the effort required to run synchronous tests with QUnit is fairlystraight-forward. That said, what about tests that require asynchronous callbacks (suchas expensive processes, Ajax requests and so on)? When we’re dealing with asynchro-nous code, rather than letting QUnit control when the next test runs, we can informthat we need it to stop running and wait until it’s okay to continue once again.
Remember: running asynchronous code without any special considerations can causeincorrect assertions to appear in other tests, so we want to make sure we get it right.
Writing QUnit tests for asynchronous code is made possible using the start() and`stop() methods, which programmatically set the start and stop points during suchtests. Here’s a simple example:
test("An async test", function(){ stop(); expect( 1 ); $.ajax({ url: "/test", dataType: 'json', success: function( data ){ deepEqual(data, { topic: "hello", message: "hi there!" }); start(); } }); });
QUnit | 129
www.it-ebooks.info

A jQuery $.ajax() request is used to connect to a test resource and assert that the datareturned is correct. deepEqual() is used here as it allows us to compare different datatypes (e.g objects, arrays) and ensures that what is returned is exactly what we’re ex-pecting. We know that our Ajax request is asynchronous and so we first call stop(),run the code making the request and finally at the very end of our callback, informQUnit that it is okay to continue running other tests.
Note: rather than including stop(), we can simply exclude it and substitute test() withasyncTest() if we prefer. This improves readability when dealing with a mixture ofasynchronous and synchronous tests in your suite. Whilst this setup should work finefor many use-cases, there is no guarantee that the callback in our $.ajax() request willactually get called. To factor this into our tests, we can use expect() once again to definehow many assertions we expect to see within our test. This is a healthy safety blanketas it ensures that if a test completes with an insufficient number of assertions, we knowsomething went wrong and fix it.
SinonJSSimilar to the section on testing Backbone.js apps using the Jasmine BDD framework,we’re nearly ready to take what we’ve learned and write a number of QUnit tests forour Todo application.
Before we start though, you may have noticed that QUnit doesn’t support test spies.Test spies are functions which record arguments, exceptions and return values for anyof their calls. They’re typically used to test callbacks and how functions may be usedin the application being tested. In testing frameworks, spies can usually be eitheranonymous functions or wrap functions which already exist.
What is SinonJS?In order for us to substitute support for spies in QUnit, we will be taking advantage ofa mocking framework called SinonJS by Christian Johansen. We will also be using theSinonJS-QUnit adapter which provides seamless integration with QUnit (meaningsetup is minimal). Sinon.JS is completely test-framework agnostic and should be easyto use with any testing framework, so it’s ideal for our needs.
The framework supports three features we’ll be taking advantage of for unit testing ourapplication:
• Anonymous spies
• Spying on existing methods
• A rich inspection interface
130 | Chapter 5: Unit Testing
www.it-ebooks.info

Using this.spy() without any arguments creates an anonymous spy. This is compa-rable to jasmine.createSpy() and we can observe basic usage of a SinonJS spy in thefollowing example:
Basic Spies:test("should call all subscribers for a message exactly once", function () { var message = getUniqueString(); var spy = this.spy();
PubSub.subscribe( message, spy ); PubSub.publishSync( message, "Hello World" );
ok( spy1.calledOnce, "the subscriber was called once" );});
We can also use this.spy() to spy on existing functions (like jQuery’s $.ajax) in theexample below. When spying on a function which already exists, the function behavesnormally but we get access to data about its calls which can be very useful for testingpurposes.
Spying On Existing Functions:test( "should inspect jQuery.getJSON's usage of jQuery.ajax", function () { this.spy( jQuery, "ajax" );
jQuery.getJSON( "/todos/completed" );
ok( jQuery.ajax.calledOnce ); equals( jQuery.ajax.getCall(0).args[0].url, "/todos/completed" ); equals( jQuery.ajax.getCall(0).args[0].dataType, "json" );});
SinonJS comes with a rich spy interface which allows us to test whether a spy was calledwith a specific argument, if it was called a specific number of times and test against thevalues of arguments. A complete list of features supported in the interface can be foundhere (http://sinonjs.org/docs/), but let’s take a look at some examples demonstratingsome of the most commonly used ones:
Matching arguments: test a spy was called with a specific set of arguments:test( "Should call a subscriber with standard matching": function () { var spy = sinon.spy();
PubSub.subscribe( "message", spy ); PubSub.publishSync( "message", { id: 45 } );
assertTrue( spy.calledWith( { id: 45 } ) );});
SinonJS | 131
www.it-ebooks.info

Stricter argument matching: test a spy was called at least once with specific arguments and no others:test( "Should call a subscriber with strict matching": function () { var spy = sinon.spy();
PubSub.subscribe( "message", spy ); PubSub.publishSync( "message", "many", "arguments" ); PubSub.publishSync( "message", 12, 34 );
// This passes assertTrue( spy.calledWith("many") );
// This however, fails assertTrue( spy.calledWithExactly( "many" ) ); });
Testing call order: testing if a spy was called before or after another spy:test( "Should call a subscriber and maintain call order": function () { var a = sinon.spy(); var b = sinon.spy();
PubSub.subscribe( "message", a ); PubSub.subscribe( "event", b );
PubSub.publishSync( "message", { id: 45 } ); PubSub.publishSync( "event", [1, 2, 3] );
assertTrue( a.calledBefore(b) ); assertTrue( b.calledAfter(a) );});
Match execution counts: test a spy was called a specific number of times:test( "Should call a subscriber and check call counts", function () { var message = getUniqueString(); var spy = this.spy();
PubSub.subscribe( message, spy ); PubSub.publishSync( message, "some payload" );
// Passes if spy was called once and only once. ok( spy.calledOnce ); // calledTwice and calledThrice are also supported
// The number of recorded calls. equal( spy.callCount, 1 );
// Directly checking the arguments of the call equals( spy.getCall(0).args[0], message );});
132 | Chapter 5: Unit Testing
www.it-ebooks.info

Stubs and mocksSinonJS also supports two other powerful features which are useful to be aware of:stubs and mocks. Both stubs and mocks implement all of the features of the spy API,but have some added functionality.
Stubs
A stub allows us to replace any existing behaviour for a specific method with somethingelse. They can be very useful for simulating exceptions and are most often used to writetest cases when certain dependencies of your code-base may not yet be written.
Let us briefly re-explore our Backbone Todo application, which contained a Todomodel and a TodoList collection. For the purpose of this walkthrough, we want toisolate our TodoList collection and fake the Todo model to test how adding new modelsmight behave.
We can pretend that the models have yet to be written just to demonstrate how stubbingmight be carried out. A shell collection just containing a reference to the model to beused might look like this:
var TodoList = Backbone.Collection.extend({ model: Todo});
// Let's assume our instance of this collection isthis.todoList;
Assuming our collection is instantiating new models itself, it’s necessary for us to stubthe models constructor function for the the test. This can be done by creating a simplestub as follows:
this.todoStub = sinon.stub( window, "Todo" );
The above creates a stub of the Todo method on the window object. When stubbinga persistent object, it’s necessary to restore it to its original state. This can be done ina teardown() as follows:
this.todoStub.restore();
After this, we need to alter what the constructor returns, which can be efficiently doneusing a plain Backbone.Model constructor. Whilst this isn’t a Todo model, it does stillprovide us an actual Backbone model.
teardown: function() { this.todoStub = sinon.stub( window, "Todo" ); this.model = new Backbone.Model({ id: 2, title: "Hello world" }); this.todoStub.returns( this.model );});
SinonJS | 133
www.it-ebooks.info

The expectation here might be that this snippet would ensure our TodoList collectionalways instantiates a stubbed Todo model, but because a reference to the model in thecollection is already present, we need to reset the model property of our collection asfollows:
this.todoList.model = Todo;
The result of this is that when our TodoList collection instantiates new Todo models,it will return our plain Backbone model instance as desired. This allows us to write aspec for testing the addition of new model literals as follows:
module( "Should function when instantiated with model literals", {
setup:function() {
this.todoStub = sinon.stub(window, "Todo"); this.model = new Backbone.Model({ id: 2, title: "Hello world" });
this.todoStub.returns(this.model); this.todos = new TodoList();
// Let's reset the relationship to use a stub this.todos.model = Todo; this.todos.add({ id: 2, title: "Hello world" }); },
teardown: function() { this.todoStub.restore(); }
});
test("should add a model", function() { equal( this.todos.length, 1 );});
test("should find a model by id", function() { equal( this.todos.get(5).get("id"), 5 ); });});
Mocks
Mocks are effectively the same as stubs, however they mock a complete API out andhave some built-in expectations for how they should be used. The difference betweena mock and a spy is that as the expectations for their use are pre-defined, it will fail ifany of these are not met.
134 | Chapter 5: Unit Testing
www.it-ebooks.info

Here’s a snippet with sample usage of a mock based on PubSubJS. Here, we have aclearTodo() method as a callback and use mocks to verify its behavior.
test("should call all subscribers when exceptions", function () { var myAPI = { clearTodo: function () {} };
var spy = this.spy(); var mock = this.mock( myAPI ); mock.expects( "clearTodo" ).once().throws();
PubSub.subscribe( "message", myAPI.clearTodo ); PubSub.subscribe( "message", spy ); PubSub.publishSync( "message", undefined );
mock.verify(); ok( spy.calledOnce );});
PracticalWe can now begin writing test specs for our Todo application, which are listed andseparated by component (e.g Models, Collections etc.). It’s useful to pay attention tothe name of the test, the logic being tested and most importantly the assertions beingmade as this will give you some insight into how what we’ve learned can be applied toa complete application.
To get the most out of this section, I recommend looking at the QUnit Koans includedin the practicals\qunit-koans folder - this is a port of the Backbone.js Jasmine Koansover to QUnit that I converted for this post.
In case you haven’t had a chance to try out one of the Koans kits as yet, they are a set ofunit tests using a specific testing framework that both demonstrate how a set of specs foran application may be written, but also leave some tests unfilled so that you can completethem as an exercise.
ModelsFor our models we want to at minimum test that:
• New instances can be created with the expected default values
• Attributes can be set and retrieved correctly
• Changes to state correctly fire off custom events where needed
• Validation rules are correctly enforced
module( 'About Backbone.Model');
test('Can be created with default values for its attributes.', function() { expect( 1 );
Practical | 135
www.it-ebooks.info

var todo = new Todo();
equal( todo.get('text'), "" );});
test('Will set attributes on the model instance when created.', function() { expect( 3 );
var todo = new Todo( { text: 'Get oil change for car.' } );
equal( todo.get('text'), "Get oil change for car." ); equal( todo.get('done'), false ); equal( todo.get('order'), 0 );});
test('Will call a custom initialize function on the model instance when created.', function() { expect( 1 );
var toot = new Todo({ text: 'Stop monkeys from throwing their own crap!' }); equal( toot.get('text'), 'Stop monkeys from throwing their own rainbows!' );});
test('Fires a custom event when the state changes.', function() { expect( 1 );
var spy = this.spy(); var todo = new Todo();
todo.on( 'change', spy ); // How would you update a property on the todo here? // Hint: http://documentcloud.github.com/backbone/#Model-set todo.set( { text: "new text" } );
ok( spy.calledOnce, "A change event callback was correctly triggered" );});
test('Can contain custom validation rules, and will trigger an error event on failed validation.', function() { expect( 3 );
var errorCallback = this.spy(); var todo = new Todo();
todo.on('error', errorCallback); // What would you need to set on the todo properties to cause validation to fail? todo.set( { done: "not a boolean" } );
ok( errorCallback.called, 'A failed validation correctly triggered an error' ); notEqual( errorCallback.getCall(0), undefined ); equal( errorCallback.getCall(0).args[1], 'Todo.done must be a boolean value.' );
});
136 | Chapter 5: Unit Testing
www.it-ebooks.info

CollectionsFor our collection we’ll want to test that:
• New model instances can be added as both objects and arrays
• Changes to models result in any necessary custom events being fired
• A url property for defining the URL structure for models is correctly defined
module( 'About Backbone.Collection');
test( 'Can add Model instances as objects and arrays.', function() { expect( 3 );
var todos = new TodoList(); equal( todos.length, 0 );
todos.add( { text: 'Clean the kitchen' } ); equal( todos.length, 1 );
todos.add([ { text: 'Do the laundry', done: true }, { text: 'Go to the gym' } ]);
equal( todos.length, 3 );});
test( 'Can have a url property to define the basic url structure for all contained models.', function() { expect( 1 ); var todos = new TodoList(); equal( todos.url, '/todos/' );});
test('Fires custom named events when the models change.', function() { expect(2);
var todos = new TodoList(); var addModelCallback = this.spy(); var removeModelCallback = this.spy();
todos.on( 'add', addModelCallback ); todos.on( 'remove', removeModelCallback );
// How would you get the 'add' event to trigger? todos.add( {text:"New todo"} );
ok( addModelCallback.called );
// How would you get the 'remove' callback to trigger? todos.remove( todos.last() );
ok( removeModelCallback.called );});
Practical | 137
www.it-ebooks.info

ViewsFor our views we want to ensure:
• They are being correctly tied to a DOM element when created
• They can render, after which the DOM representation of the view should be visible
• They support wiring up view methods to DOM elements
One could also take this further and test that user interactions with the view correctlyresult in any models that need to be changed being updated correctly.
module( 'About Backbone.View', { setup: function() { $('body').append('<ul id="todoList"></ul>'); this.todoView = new TodoView({ model: new Todo() }); }, teardown: function() { this.todoView.remove(); $('#todoList').remove(); }});
test('Should be tied to a DOM element when created, based off the property provided.', function() { expect( 1 ); equal( this.todoView.el.tagName.toLowerCase(), 'li' );});
test('Is backed by a model instance, which provides the data.', function() { expect( 2 ); notEqual( this.todoView.model, undefined ); equal( this.todoView.model.get('done'), false );});
test('Can render, after which the DOM representation of the view will be visible.', function() { this.todoView.render();
// Hint: render() just builds the DOM representation of the view, but doesn't insert it into the DOM. // How would you append it to the ul#todoList? // How do you access the view's DOM representation? // // Hint: http://documentcloud.github.com/backbone/#View-el
$('ul#todoList').append(this.todoView.el); equal($('#todoList').find('li').length, 1);});
asyncTest('Can wire up view methods to DOM elements.', function() { expect( 2 ); var viewElt;
$('#todoList').append( this.todoView.render().el );
setTimeout(function() { viewElt = $('#todoList li input.check').filter(':first');
138 | Chapter 5: Unit Testing
www.it-ebooks.info

equal(viewElt.length > 0, true);
// Make sure that QUnit knows we can continue start(); }, 1000, 'Expected DOM Elt to exist');
// Hint: How would you trigger the view, via a DOM Event, to toggle the 'done' status. // (See todos.js line 70, where the events hash is defined.) // // Hint: http://api.jquery.com/click
$('#todoList li input.check').click(); expect( this.todoView.model.get('done'), true );});
EventsFor events, we may want to test a few different use cases:
• Extending plain objects to support custom events
• Binding and triggering custom events on objects
• Passing along arguments to callbacks when events are triggered
• Binding a passed context to an event callback
• Removing custom events
and a few others that will be detailed in our module below:
module( 'About Backbone.Events', { setup: function() { this.obj = {}; _.extend( this.obj, Backbone.Events ); this.obj.off(); // remove all custom events before each spec is run. }});
test('Can extend JavaScript objects to support custom events.', function() { expect(3);
var basicObject = {};
// How would you give basicObject these functions? // Hint: http://documentcloud.github.com/backbone/#Events _.extend( basicObject, Backbone.Events );
equal( typeof basicObject.on, 'function' ); equal( typeof basicObject.off, 'function' ); equal( typeof basicObject.trigger, 'function' );});
test('Allows us to bind and trigger custom named events on an object.', function() { expect( 1 );
Practical | 139
www.it-ebooks.info

var callback = this.spy();
this.obj.on( 'basic event', callback ); this.obj.trigger( 'basic event' );
// How would you cause the callback for this custom event to be called? ok( callback.called );});
test('Also passes along any arguments to the callback when an event is triggered.', function() { expect( 1 );
var passedArgs = [];
this.obj.on('some event', function() { for (var i = 0; i < arguments.length; i++) { passedArgs.push( arguments[i] ); } });
this.obj.trigger( 'some event', 'arg1', 'arg2' );
deepEqual( passedArgs, ['arg1', 'arg2'] );});
test('Can also bind the passed context to the event callback.', function() { expect( 1 );
var foo = { color: 'blue' }; var changeColor = function() { this.color = 'red'; };
// How would you get 'this.color' to refer to 'foo' in the changeColor function? this.obj.on( 'an event', changeColor, foo ); this.obj.trigger( 'an event' );
equal( foo.color, 'red' );});
test( "Uses 'all' as a special event name to capture all events bound to the object." , function() { expect( 2 );
var callback = this.spy();
this.obj.on( 'all', callback ); this.obj.trigger( "custom event 1" ); this.obj.trigger( "custom event 2" );
equal( callback.callCount, 2 ); equal( callback.getCall(0).args[0], 'custom event 1' );});
140 | Chapter 5: Unit Testing
www.it-ebooks.info

test('Also can remove custom events from objects.', function() { expect( 5 );
var spy1 = this.spy(); var spy2 = this.spy(); var spy3 = this.spy();
this.obj.on( 'foo', spy1 ); this.obj.on( 'bar', spy1 ); this.obj.on( 'foo', spy2 ); this.obj.on( 'foo', spy3 );
// How do you unbind just a single callback for the event? this.obj.off( 'foo', spy1 ); this.obj.trigger( 'foo' );
ok( spy2.called );
// How do you unbind all callbacks tied to the event with a single method this.obj.off( 'foo' ); this.obj.trigger( 'foo' );
ok( spy2.callCount, 1 ); ok( spy2.calledOnce, "Spy 2 called once" ); ok( spy3.calledOnce, "Spy 3 called once" );
// How do you unbind all callbacks and events tied to the object with a single method? this.obj.off( 'bar' ); this.obj.trigger( 'bar' );
equal( spy1.callCount, 0 );});
AppIt can also be useful to write specs for any application bootstrap you may have in place.For the following module, our setup initiates and appends a TodoApp view and we cantest anything from local instances of views being correctly defined to application in-teractions correctly resulting in changes to instances of local collections.
module( 'About Backbone Applications' , { setup: function() { Backbone.localStorageDB = new Store('testTodos'); $('#qunit-fixture').append('<div id="app"></div>'); this.App = new TodoApp({ appendTo: $('#app') }); },
teardown: function() { this.App.todos.reset(); $('#app').remove(); }});
test('Should bootstrap the application by initializing the Collection.', function() {
Practical | 141
www.it-ebooks.info

expect( 2 );
notEqual( this.App.todos, undefined ); equal( this.App.todos.length, 0 );});
test( 'Should bind Collection events to View creation.' , function() { $('#new-todo').val( 'Foo' ); $('#new-todo').trigger(new $.Event( 'keypress', { keyCode: 13 } ));
equal( this.App.todos.length, 1 ); });
Further Reading & ResourcesThat’s it for this section on testing applications with QUnit and SinonJS. I encourageyou to try out the QUnit Backbone.js Koans and see if you can extend some of theexamples. For further reading consider looking at some of the additional resourcesbelow:
• Test-driven JavaScript Development (book)
• SinonJS/QUnit Adapter
• SinonJS and QUnit
• Automating JavaScript Testing With QUnit
• Ben Alman’s Unit Testing With QUnit
• Another QUnit/Backbone.js demo project
• SinonJS helpers for Backbone
142 | Chapter 5: Unit Testing
www.it-ebooks.info
CHAPTER 6
Resources
Whilst we get with Backbone out of the box can be terribly useful, there are someequally beneficial add-ons that can help simplify our development process. These in-clude:
• Backbone Layout Manager
• Backbone Boilerplate
• Backbone Model Binding
• Backbone Relational - for model relationships
• View and model inheritance
• Backbone Marionette
• Backbone CouchDB
• Backbone Validations - HTML5 inspired validations
In time, there will be tutorials in the book covering some of these resources but untilthen, please feel free to check them out.
143
www.it-ebooks.info

CHAPTER 7
Conclusions
That’s it for “Developing Backbone.js Applications”. I hope you found this book bothuseful, enlightening and a good start for your journey into exploring Backbone.js.
Remember, If there are other topics or areas of this book you feel could be expandedfurther, please feel free to let me know, or better yet, send a pull request upstream. I’malways interested in making this title as comprehensive as possible.
Until next time, the very best of luck with the rest of your journey!
Copyright Addy Osmani, 2012.
145
www.it-ebooks.info
