designing a wine label in coreldraw - corel … · designing a wine label in coreldraw® labels...
TRANSCRIPT

®Designing a Wine Label in CorelDRAW
Labels have long been used as an industry standard for product identification. In marketing, labels are used to make a product known and most especially encourage potential
®buyers to purchase a product. CorelDRAW 's versatility offers its users the flexibility to create their own labels for every practical use.
What you will Learn Apply coloring techniques using the Interactive Fill tool Create a soft bevel effect using the Drop Shadow tool Generate a sensational text design using an OpenType Stylistic set

Preparing The Document
1. To begin, create a document that measures 5” wide and 4” tall. Next, set the Primary color mode to RGB and leave the rendering resolution to 300dpi. Click on OK.
2. For this tutorial, you will create a wine label using a humming bird vector image; this image can be downloaded from this link:
http://www.vectorportal.com/subcategory/205/HUMMINGBIRD-FREE-VECTOR.eps/ile/6571/detailtest.asp
a. In the Import EPS dialog box, import the vector le as curves and click on OK.
b. Once the vector le is imported, Press P on your keyboard to position it at the center of the page.
c. Ungroup the image and then simply delete the ower.
3. Ensure that Lock ratio is selected on the Interactive property bar and resize the humming bird image to 3.5” in height.
Page 2 of 10

Using Interactive Fill Tool
1. Select the Interactive Fill Tool and drag it horizontally from the tips of the beak to the tips of the wing.
Page 3 of 10
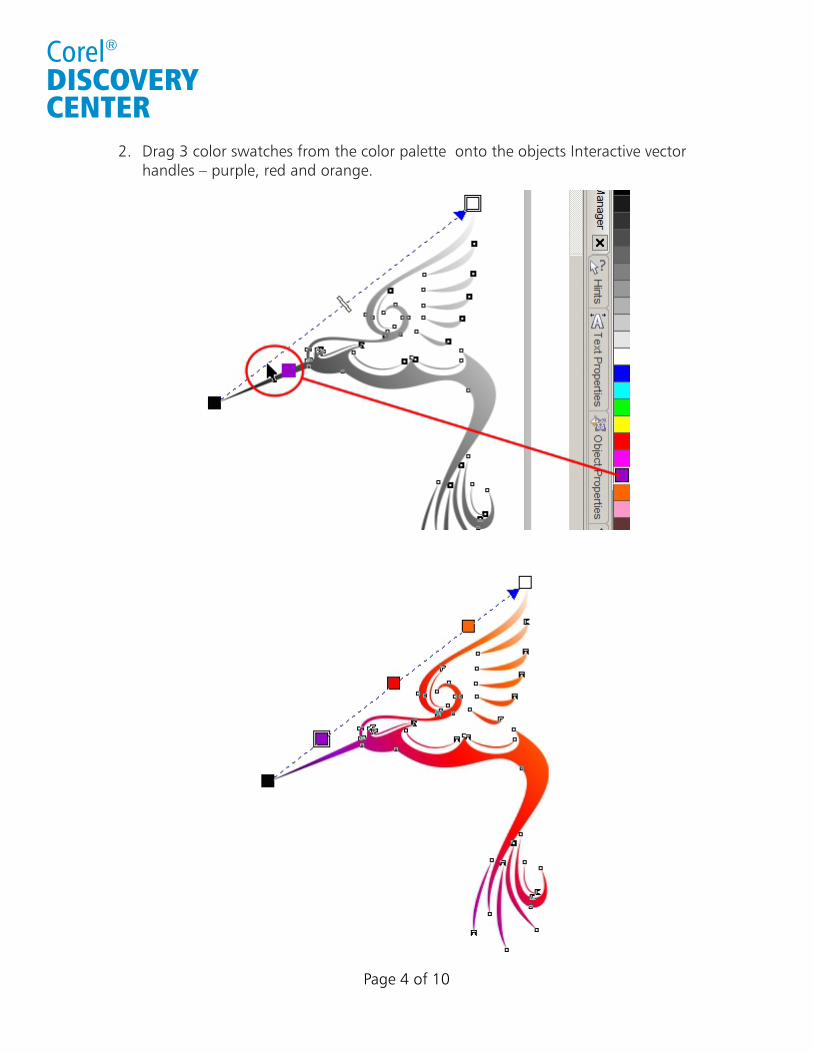
2. Drag 3 color swatches from the color palette onto the objects Interactive vector handles – purple, red and orange.
Page 4 of 10

Using Drop Shadow Tool
1. Select the Interactive Drop Shadow Tool and create a drop shadow. Once the shadow has been created, input the following settings on the Interactive Property bar:
a. X&Y Drop shadow offset: 0:0
b. Drop shadow opacity: 95
c. Shadow feathering: 5
d. Feathering direction : Inside
e. Transparency operation : Normal
f. Shadow color : White
2. Tap the spacebar to return to the Pick Tool then press CTRL + K to break the Drop Shadow group apart. Click on an empty area within the document to deselect all objects (or press Esc key). In the Object Manager, click and move the Rectangle just above the curve (or click on a white area within the body to select the lens and then use Ctrl + Home key to bring it to the front.); this will create the soft bevel effect on the hummingbird.
Page 5 of 10

Positioning The Object
1. Double-click the Pick Tool to select both objects and then group them together by pressing CTRL+G.
2. With these objects still selected, in the Interactive Property bar, set Object position to X = 3.45”, Y = 2.09” and then press enter.
3. Press the plus key (+) on your numeric keypad to duplicate the selected object (if you are using a laptop, you would need to use Ctrl + D to duplicate the object).
4. With the duplicate object still selected, set the object position to X = 1.55”, Y = 2.09” and then press enter.
5. On the Interactive property toolbar, click on the Mirror Horizontally icon.
6. Double-click the Pick Tool to select both objects and then group them together by pressing CTRL+G.
7. Double-click on the Rectangle tool to add a frame to the page. Give this frame a Black ll and then change the outline to 8 points and the color to light purple.
Page 6 of 10

Creating The Text
1. Click on the Text tool then click off the page and type KarWay Wines. For this tutorial, use the Gabriola font and set the size to 28 points. Change the color to White and move it onto the page.
2. Highlight the text, click on the Indicator arrow below the text and select Stylistic Set 7 (this option is only available in X6; for other versions just leave ®
CorelDRAWthe text as is).
Page 7 of 10

3. With the text still selected, right-click on the White color swatch to apply a white outline. Position the text above the heads of the hummingbirds and between the wings.
4. Click on the Text tool and type Celebration Chardonnay off the page. Use the Gabriola font and set the size to 28 points. Change the color to white and move it onto the label. Place the text just below the beaks of the birds so that it is between them.
5. Next, create a paragraph text frame and type a short description for your wine or anything you wish to add. For this tutorial, use the paragraph below:
th“Thank you for being a part of our 10 anniversary celebration
and for sharing the art of wine making in your community.
The Management & Staff
at
KarWay Wines”
Page 8 of 10

6. Click on the Pick tool and on the Interactive Property toolbar, use the Gabriola font, set the font size to 10 points and the horizontal alignment to Center.
7. In the Object Properties, under Paragraph, change the value of the “Before paragraph spacing” to 60% and then set the color to white.
8. Place the paragraph below the text Celebration Chardonnay. With the paragraph text still selected, hold down the Shift key and select the other pieces of text and then lastly select the grouped humming birds. Next, press the letter “C” on the keyboard. This will center all the text on the label in relation to the last object selected.
9. Click on the Text tool, type 750ml, set the font to Gabriola, font size to 12 points, and set the color to white.
10. Using the Pick tool, place the text on the bottom-left corner of the label.
11. Press the plus key (+) on your numeric keypad to duplicate the selected text.
12. Drag the duplicated text to the bottom-right corner of the label.
13. Double-click on it, highlight the text and type 12.5%.
Page 9 of 10

Saving and Exporting Your Project
1. Save your project as CDR le and now you are ready to export it into a format that you would like to use.
a. You can print directly to label stock (available at most ofce supply stores) using the Imposition feature within the Print Preview window. If sending to an output center such as a Kinko's or UPS store, we recommend that you use Tiff format when exporting your project.
b. For web sharing, you may want to export your project in JPEG format.
And there you have it. You have now created a wine label using .®CorelDRAW
If you enjoyed this tutorial, be sure to check out the other tutorials that are available in the Discovery Center. If you have any ideas for additional tutorials or projects that you would like to see in the future, e-mail [email protected].
Page 10 of 10