design of electronics for a high-energy photon tagger for the
TRANSCRIPT

University of ConnecticutDigitalCommons@UConn
Honors Scholar Theses Honors Scholar Program
Spring 5-2010
Design of Electronics for a High-Energy PhotonTagger for the GlueX ExperimentMitchell "Woody" UnderwoodUniversity of Connecticut - Storrs, [email protected]
Follow this and additional works at: http://digitalcommons.uconn.edu/srhonors_theses
Part of the Atomic, Molecular and Optical Physics Commons
Recommended CitationUnderwood, Mitchell "Woody", "Design of Electronics for a High-Energy Photon Tagger for the GlueX Experiment" (2010). HonorsScholar Theses. 163.http://digitalcommons.uconn.edu/srhonors_theses/163

Design of Electronics for a
High-Energy Photon Tagger for the
GlueX Experiment
Mitchell “Woody” Underwood
University of Connecticut
Storrs, CT 06269

2
Abstract
In quantum chromodynamics (QCD), quarks and antiquarks are held together
inside hadrons by the nuclear strong force, which is mediated by exchange particles
known as gluons. The simplest type of hadron, the meson, consists of a single quark and
a single antiquark bound by a gluonic field. The flux-tube model of QCD says that this
gluonic field forms a tube of color-electric field lines between the quark and the
antiquark which can under the right conditions be made to vibrate. Such mesons with
excited glue are called hybrid mesons.
GlueX is a high-energy nuclear physics experiment which will study hybrid
mesons and map their spectrum. To produce hybrid mesons, GlueX will make use of
Thomas Jefferson National Accelerator Facility’s 12 GeV electron accelerator. Electrons
from the accelerator will pass through a diamond crystal, where they will radiate high-
energy gamma rays through a process known as bremsstrahlung radiation. These
gamma rays, in turn, interact with protons in a liquid hydrogen target, and their energy
is converted into mass in the form of new particles, mostly hadrons. This process is
known as photoproduction. Among the hadrons produced by this process, GlueX
experimenters expect to find hybrid mesons. In order to identify the hybrid mesons
among the other particles produced in the target, it is essential to know the energy and
the precise time at which each gamma ray interacts with a proton in the target. A device
called the photon tagger is responsible for detecting electrons after they leave the
diamond radiator and measuring how much energy they radiated in the bremsstrahlung
process. The design of electronics for the photon tagger is the focus of this thesis.

3
Table of Contents
1 Introduction ...................................................................................................... 7
2 Nuclear Physics Background ............................................................................. 9
2.1 Particle Physics .......................................................................................... 9
2.2 GlueX ....................................................................................................... 17
3 Functional Description of the Photon Tagger ................................................ 20
4 Design of the Tagger Electronics .................................................................... 26
4.1 Digital Control Board ............................................................................... 26
4.1.1 Component Selection ........................................................................ 26
4.1.2 PCB Layer Selection ........................................................................... 29
4.1.3 Wiring the DAC .................................................................................. 32
4.1.4 Wiring the ADC .................................................................................. 37
4.1.5 Wiring the Ethernet Controller ......................................................... 39
4.1.6 Wiring the FPGA ................................................................................ 42
4.2 Amplifier Board ....................................................................................... 48
4.2.1 Hierarchy ........................................................................................... 49
4.2.2 PCB Layer Selection ........................................................................... 50
4.2.3 Amplifiers .......................................................................................... 51
4.2.4 Summing Circuit ................................................................................ 56
4.3 Backplane ................................................................................................ 58
4.3.1 PCB Layer Selection ........................................................................... 59
4.3.2 Eurocard Connectors ......................................................................... 61
4.3.3 Location ID Header ............................................................................ 62
4.3.4 Ground Coupling Jumpers ................................................................. 63
4.3.5 Power Connector and Fuses ............................................................. 64
4.3.6 LEMO Connectors .............................................................................. 67
5 Debugging the Tagger Electronics .................................................................. 69
5.1 Digital Control Board ............................................................................... 69
5.2 Amplifier Board ....................................................................................... 78
5.3 Backplane ................................................................................................ 82
6 Conclusion and Outlook ................................................................................. 84

4
List of Figures
Figure 1: The plum pudding model of the atom, where electrons (yellow) are contained
within a sea of positive charge (pink)................................................................. 9
Figure 2: Rutherford's concept of the atom. Positive charge is concentrated in the
center, surrounded by empty space and orbiting electrons. ........................... 10
Figure 3: The modern concept of the atom, in particular, helium. Inset: The helium
nucleus, showing two protons and two neutrons ........................................... 11
Figure 4: Table of the quarks, leptons, and bosons - the particles of the standard model
.......................................................................................................................... 12
Figure 5: Quark color combinations that form color-neutral hadrons. From left to right: a
red-green-blue baryon, a red-antired meson, a blue-antiblue meson, a green-
antigreen meson, and an antired-antigreen-antiblue antibaryon ................... 16
Figure 6: Illustrated overview of the GlueX experiment. Upper-left shows an overview of
JLab's accelerator, including the new Hall D where GlueX will be located ...... 19
Figure 7: Vector diagram showing how electrons are deflected by the tagger magnet .. 23
Figure 8: Functional drawing of the photon tagging detector, showing three groups of
twenty-five scintillating fibers, a few representative waveguides, and the
tagger electronics array .................................................................................... 25
Figure 9: Drawing of the digital control board layer stackup ........................................... 32
Figure 10: CAD drawing of the bottom of the digital control board, showing the DAC (U3)
and its many connections to the Eurocard connector (P2) ............................. 33
Figure 11: Close-up CAD drawing of the DAC (U3) and its power supply circuitry .......... 34
Figure 12: Current/voltage relationship for the DAC to ADC voltage divider, with curves
showing data for different tolerances in the accuracy of the ADC readout:
diamonds = ±0.2V, squares = ±0.04V, triangles = ±.4V, X’s = ±2V.................... 37
Figure 13: Schematic of the ADC wiring ........................................................................... 38
Figure 14: CAD drawing of the top of the digital control board showing the Ethernet
controller (U2) and the Ethernet jack (J1) ........................................................ 40
Figure 15: Schematic of the Ethernet controller and Ethernet jack ................................. 41

5
Figure 16: Close-up CAD drawing of the FPGA, showing front (red) and back (blue) layer
traces ................................................................................................................ 42
Figure 17: Close-up CAD drawing detailing the CMOS clock connection to FPGA and
Ethernet controller (cross-hatched traces) ...................................................... 44
Figure 18: Close-up CAD drawing of the EEPROM (U5) and the FPGA ............................. 45
Figure 19: Close-up CAD drawing of the JTAG header on the control board ................... 47
Figure 20: Close-up CAD drawing of the bottom left of the FPGA on the control board,
specifically the region of the location ID pins .................................................. 48
Figure 21: CAD drawing of the amplifier board ................................................................ 49
Figure 22: Hierarchy of the amplifier board circuitry ....................................................... 50
Figure 23: Amplifier board PCB layer stack-up ................................................................. 51
Figure 24: Schematic of the AMP_0604 circuit, upon which the amplifier circuit was
based ................................................................................................................ 53
Figure 25: Schematic of the amplifier circuit .................................................................... 54
Figure 26: Close-up CAD drawing of amplifier circuitry and component key .................. 55
Figure 27: Schematic of the amplifier board's summing circuit ....................................... 57
Figure 28: Close-up CAD drawing of summing circuit SUMMER1 on the amplifier board58
Figure 29: CAD drawing of the backplane ........................................................................ 58
Figure 30: Drawing of the backplane’s layer stackup ....................................................... 59
Figure 31: CAD drawing of a typical via heat relief ........................................................... 61
Figure 32: Close-Up CAD drawing of the Eurocard receptacle routing on the backplane 62
Figure 33: Close-Up CAD drawing of the location ID bus on the backplane .................... 63
Figure 34: Close-up CAD drawing of the ground coupling jumpers on the backplane .... 64
Figure 35: Photograph of the Molex KK® 6373 6-pin power connector, used on the
backplane ......................................................................................................... 65
Figure 36: Close-up CAD drawing of backplane showing the power connector (P4) and
power supply fuses. F1=-5V, F2=VCC, F3=+60V, F4=+5V ................................. 67
Figure 37: Close-up CAD drawing of the LEMO connectors ............................................. 68
Figure 38: LEMO EPA.250.00.NTN dimensions and drawing ............................................ 68

6
Figure 39: Photograph of the +1.2V voltage regulator (VR3) on the digital control board,
showing the solder bridge used to connect the floating power input pin ...... 70
Figure 40: Photograph of the temperature sensor (U1) and ADC (U4) on the digital
control board after rewiring the SPI bus .......................................................... 71
Figure 41: Photograph of the CMOS clock (immediately below label C17) used to replace
the crystal oscillator on the digital control board ............................................ 73
Figure 42: Close-up CAD drawings of the footprint of the FPGA's JTAG configuration
header and surrounding traces before (left) and after (right) the incorrect 100
mil header was replaced .................................................................................. 74
Figure 43: Photograph of one of the digital control boards during testing, including the
diagnostic signal output header at the top left................................................ 75
Figure 44: Photograph of the completed digital control board ....................................... 77
Figure 45: Photograph of the power regulating circuitry on the amplifier board, showing
the resoldering of the two voltage regulators to resolve a footprint mismatch
.......................................................................................................................... 79
Figure 46: Drawings and pin assignments of the BF1108 and BF1108R MOSFETs taken
directly from the manufacturer’s datasheet, showing their mirror image
pinouts .............................................................................................................. 81
Figure 47: Photograph of the summing circuit on the amplifier board, showing the
BF1108R attached to the BF1108 footprint (M1) ............................................ 81
Figure 48: Photograph of the completed amplifier board ............................................... 82
Figure 49: Photograph of the completed backplane, with the control board and power
connector attached .......................................................................................... 84

7
1 Introduction
GlueX is a nuclear physics experiment which aims to discover how quarks and
gluons are confined within hadrons. Quarks and gluons are elementary particles that are
the building blocks of heavier particles like protons and neutrons. Protons and neutrons
are the lightest members of a large family of composite particles called hadrons that
make up the atomic nucleus. According to the physical theory that governs hadrons,
quantum chromodynamics (QCD), hadrons can be grouped in a hierarchical table that is
analogous to the periodic table of the elements. The hadron that plays the role of
hydrogen in this table is known as a meson, which consists of a quark and an anti-quark
bound by a strong attractive force that arises from the gluonic field. Within the “flux-
tube” model of QCD, this attractive force is represented by a string of gluonic flux,
whose tension produces the attractive force between the quarks. According to the flux-
tube model, this string should be able to vibrate, giving rise to a new family of mesons in
the table of hadrons. Mesons with vibrating glue are referred to as hybrid mesons.
Experimental evidence is now mounting for the physical existence of hybrid mesons.
The goal of the GlueX experiment is to produce hybrid mesons in large numbers in order
to unambiguously identify them, map their spectrum, and measure their properties.
The GlueX experiment will produce mesons by colliding high-energy gamma rays
(photons) with a liquid hydrogen target. At the U.S. Department of Energy’s Thomas
Jefferson National Accelerator Facility, high-energy electrons from the accelerator are
directed onto a piece of diamond crystal, known as a radiator. As the electrons pass
through this diamond radiator, they lose some energy by radiating high-energy photons

8
in a process known as bremsstrahlung. If the diamond radiator is oriented such that the
electrons travel nearly parallel to the planes of atoms in the crystal, then the photons
produced are polarized in the direction perpendicular to the planes, and the process is
called coherent bremsstrahlung. The bremsstrahlung photons produced in the diamond
radiator ultimately collide with protons in a liquid hydrogen target, producing a variety
of hadrons. Among these hadrons, GlueX hopes to find evidence of hybrid mesons.
To be able to identify hybrid mesons among the other radiation produced in the
target, it is essential to know the energy and creation time of each photon in the beam.
The “photon tagger” accomplishes this by measuring the energy of each radiating
electron after it exits the diamond. Electrons coming out of the back of the diamond
radiator are deflected by a magnetic field into an array of optical fibers that glow
(scintillate) when high-energy electrons pass through them. The scintillation produced
by these electrons is then carried by waveguides to solid state light detectors called
silicon photomultipliers (SiPMs).
The goal of this research project is to design and prototype electronics for the
readout of signals from the SiPMs. The primary function of the readout electronics is to
amplify the electrical signals from the SiPMs and buffer them for subsequent
digitization. Their second function is to provide the bias voltage that is necessary for
each SiPM’s operation and to monitor critical environmental parameters. The project
entails the design and layout of circuit boards to accomplish the above functions, and
the production and testing of prototypes.

9
2 Nuclear Physics Background
2.1 Particle Physics
Matter is made up of tiny particles called atoms. For quite some time, it was
believed that atoms were fundamental, indivisible particles. However, J.J. Thompson’s
experiments with cathode rays in the 1890s led to the conclusion that electrons, small
negatively charged particles, were a component of all atoms [1]. He proposed that the
electrons existed inside a sea of uniform positive charge. This model, shown in Figure 1,
became known as the “Plum Pudding” Model, because the electrons, “plums,” were
suspended inside a positive charge “pudding.”
Figure 1: The plum pudding model of the atom, where electrons (yellow) are contained within a sea of positive charge (pink)
Rutherford’s 1909 Gold Foil experiment called the plum pudding model into
question, however, when he explained the deflection of alpha particles passing through
a sheet of gold foil by predicting the presence of concentrated positive charge at the

10
center of the nucleus. He proposed that this positive charge is surrounded by mostly
empty space, and an appropriate number of orbiting electrons to balance the positive
charge [1]. Figure 2 shows Rutherford’s basic concept of the atom.
Figure 2: Rutherford's concept of the atom. Positive charge is concentrated in the center, surrounded by empty space and orbiting electrons.
Rutherford’s 1918 discovery that the positive charge of any atom is always
approximately equal to an integer multiple of the positive charge of hydrogen, coupled
with the fact that the same is not true for atomic mass, suggested that in addition to the
positive charge in the center of the atom, there may be neutral particles as well. He
coined the term proton to describe the positively charged particles, and the term
neutron to describe the negatively charged particles.
Though Rutherford’s 1918 analysis forms the basis of the modern model of the
atom, many new things have been discovered since then. Quantum mechanics predicts

11
that electrons don’t move in discrete orbits around the nucleus, but rather exist in a
probability cloud given by solutions of the Schrödinger equation. It also explains the
observation that certain quantities, called quantum numbers, obey particular sets of
rules. Some examples of quantum numbers include electric charge, which always exists
in integer multiples of the electron’s charge, and spin, which always exists either as odd
integer multiples of ½, or as integers, depending on the type of particle [2].
Figure 3: The modern concept of the atom, in particular, helium. Inset: The helium nucleus, showing two protons and two neutrons
The standard model of particle physics is a theory which explains how protons
and neutrons themselves are composite systems composed of more elementary
particles called partons. Figure 3 shows an accurate depiction of the modern concept of
an atom, but the standard model suggests that there is even more structure within the
nucleus of an atom than just the grouping of protons and neutrons. Indeed, within the

12
protons and neutrons are several different species of partons known as quarks and
gluons [3].
Figure 4: Table of the quarks, leptons, and bosons - the particles of the standard model
Figure 4 shows a table of the particles incorporated within the standard model.
At present, all known nuclear properties and phenomena can be explained as
interactions among these particles [3].
The standard model explains the preponderance of protons and neutrons in the
present universe as the most stable form that quarks and gluons can assume at low
temperatures. Combining two up quarks and a down quark yields a proton, while
combining two down quarks and an up quark yields a neutron.

13
Quarks are distinguished by a number of labels, including the familiar quantities
mass, charge, and spin. Less familiar properties include intrinsic parity, and both strong
and weak isospin [3]. Intrinsic parity is a property which describes whether the quantum
mechanical wave function of a particle reverses sign when the directions of the three
spatial axes are reversed. The wave function of a particle with negative parity, if
reflected through the origin, will experience an overall change in sign from the original
wave function. The wave function of a particle with positive parity would not exhibit this
change in sign. The parity of a particle or a system of particles is conserved for all
interactions involving the exchange of photons or gluons. By convention, all quarks have
positive intrinsic parity, and their antiquarks have negative intrinsic parity, although this
is not explicitly required: the only requirement is that the product of the parities of
particle and antiparticle must be -1 if the particle is a fermion. (It is equally valid to say
that quarks have negative intrinsic parity, and antiquarks have positive, but
conventionally the opposite is used.)
Isospin is a property of particles which describes the relationship between
multiplets of particles which behave similarly in certain interactions [3]. Though not at
all related to real angular momentum or spin, mathematically, isospin behaves in a
similar fashion. Certain groups of particles share common values for total isospin. Each
particle in a group is distinguished from other particles in the same group by a unique
projection of the group’s isospin along a quantization axis in abstract 3-dimensional
“isospin space.” This allows similar particles to be described as different isospin states of
a single particle.

14
There are two types of isospin. First, there is strong isospin, which describes the
relationship between particles which interact by exchange of gluons. Of all the quarks,
only the up and down quarks have strong isospin, with values of +½ and –½ respectively.
While it would seem that the charm and strange, and top and bottom quarks could also
be grouped in strong isospin pairs, it is not convenient to do so. Strong isospin is a useful
concept only when the two or more members of the isospin group are close enough in
mass to behave in a similar fashion. The two heaviest quark families (groups II and III in
Figure 4) each have a large mass gap between the two quarks, making strong isospin
symmetry a very poor approximation to reality.
Weak isospin is used to group together particles which transform from one to
another by interaction with the W± bosons. Although the pairing is not exact, all three
quarks in the first row of Figure 4 can be paired with their respective quarks in the
second row as +½ and –½ members of three weak isospin doublets.
A fourth property unique to quarks is that of color charge [3]. Despite its name,
color charge has little to do with color in the optical sense, and little to do with
electromagnetic charge. Each type of quark comes in three color varieties.
Appropriately, these varieties are named red, green, and blue. Antiquarks come in
antired, antigreen, and antiblue varieties. The reason color charge is described as a
charge is because just as electromagnetic charge leads to electromagnetic interactions,
color charge leads to another type of interaction, strong force interactions.

15
For a particle to experience an interaction with any other particle, the two
particles must both have a charge appropriate to the force by which they are interacting
[3]. Neutrons have no net electric charge, meaning they are not significantly attracted to
protons by the electric force. However, neutrons and protons are made up of quarks
which have color charge, meaning that neutrons do significantly interact with protons
via the strong force. This explains why neutrons can be bound within the nucleus, even
though they are not electrically attracted to protons.
The strong force is mediated by exchange particles known as gluons. As shown in
Figure 4, the gluon is just one of four force carrying particles currently known to exist.
The photon, which we observe as light, is the electromagnetic force carrier, and the Z0
and W± bosons carry the weak force. A fifth hypothetical particle called the graviton (not
shown in Figure 4), has been postulated to carry the force of gravity. These four
fundamental forces explain all known particle interactions. Of these forces,
electromagnetism, and to a greater extent gravity, work over extremely long ranges
compared to the strong and weak forces. The strong, weak, and electromagnetic forces
are the only forces that are relevant on the size scale of the atomic nucleus.
The strong force, as its name suggests, is the strongest of the fundamental forces
at the size scale of the nucleus. It acts only among and between quarks, antiquarks, and
gluons, since these are the only particles which have color charge. Appropriately, the
theory which describes the strong force is called quantum chromodynamics, or QCD.
QCD explains that gluons simultaneously carry both color and anticolor, meaning that
they can interact not only with color carrying quarks and antiquarks, but also with

16
themselves. Additionally, the fact that color and anticolor are carried by gluons means
that quark color changes during any exchange of gluons. Since exchange of gluons is
what holds quarks together inside the nucleus, it would seem that protons and neutrons
would come in several varieties with different net color, perhaps even changing color
with time. Experiment shows, however, that this is not the case. Protons and neutrons,
along with a group of other composite particles known as hadrons, exist only in color-
neutral configurations [3].
A color-neutral configuration, one with no net color charge, can be formed in
several ways, as shown in Figure 5. First, a red quark, a blue quark, and a green quark
may be bound together to make a color neutral, three quark hadron called a baryon. An
analogous antibaryon is also possible with three antiquarks and their respective
anticolors. Second, a quark and its complementary antiquark may bind together to
make a color neutral, two particle quark/antiquark hadron called a meson.
Figure 5: Quark color combinations that form color-neutral hadrons. From left to right: a red-green-blue baryon, a red-antired meson, a blue-antiblue meson, a green-antigreen meson, and an antired-antigreen-antiblue antibaryon
An interesting consequence of the color neutrality of hadrons arises when color
neutrality is considered along with the fact that the strong force carriers, gluons, carry
color charge themselves. When quarks inside a hadron are separated for any reason,

17
rather than the force between them decaying by the inverse square law like in
electromagnetism, the gluons between two separated quarks form a tube with a
constant energy per unit length, resulting in a constant force between the quarks. When
two quarks are separated far enough from each other that this gluonic flux tube costs
significantly more than twice the rest energy of two quarks, a new quark/antiquark pair
will spontaneously be generated from the vacuum, splitting the flux tube in half. If the
original hadron was a meson, this process produces two separate, color-neutral mesons.
If it the original was a baryon, this produces one color-neutral meson, and one color
neutral baryon. Regardless of the type of hadrons involved, this process is referred to as
confinement because it prevents quarks from ever being observed as isolated objects
[3].
The gluonic flux tube which holds together quarks and antiquarks can, according
to the flux-tube model, be excited and begin to vibrate just like a plucked string or a
rubber band [4]. Mesons with vibrating gluonic flux tubes are referred to as hybrid
mesons. It is these hybrid mesons that the GlueX experiment is designed to create and
study.
2.2 GlueX
The GlueX experiment is a high-energy nuclear physics experiment which will be
conducted at the Thomas Jefferson National Accelerator Facility (JLab) in Newport
News, VA. The purpose of the GlueX experiment is to map the spectrum of hybrid

18
mesons. In order to produce hybrid mesons GlueX will use a process known as
photoproduction, which involves bombarding hadrons with high-energy photons [4].
To produce these high-energy photons, GlueX will make use of JLab’s 12 GeV
electron accelerator. The photons will be produced by passing the electron beam
through a thin diamond wafer known as a radiator. As the electrons pass through this
radiator, they experience a quick deceleration, during which they radiate lost kinetic
energy in the form of high-energy photons. This process is in general known as
bremsstrahlung radiation. Since the diamond radiator has a regular crystal structure,
however, the radiated photons are polarized. This process is known as coherent
bremsstrahlung radiation because electrons scatter coherently from all of the atoms in
the crystal rather than from one atom at a time, as is the case in disoriented materials.
These bremsstrahlung photons ultimately collide with protons in a liquid hydrogen
target, producing a large assortment of different hadrons, particularly mesons. GlueX
experimenters will search for the remnants of hybrid meson decays within this shower
of hadrons [4].
Figure 6 shows an overview of the GlueX experiment. In the upper left is an
illustration of JLab’s 12 GeV electron accelerator. In yellow is the new Hall D, currently
under construction, where the GlueX experiment will take place. Beneath the drawing of
the accelerator is a drawing of the GlueX experiment itself. This shows the GlueX
apparatus, including the diamond wafer, and the hydrogen target. Also shown is the
array of detectors which be used to search for hybrid meson decays.

19
Figure 6: Illustrated overview of the GlueX experiment. Upper-left shows an overview of JLab's accelerator, including the new Hall D where GlueX will be located
In order to identify hybrid mesons decay products among the radiation produced
in the hydrogen target, it is essential to know the energy of the bremsstrahlung
photons. Direct measurement of photon energy using some type of detector would
destroy the photons in the measurement process. Therefore, photon energies are
determined indirectly by measuring the amount of energy lost by the electrons as they
pass through the diamond radiator. A device known as the photon tagger is responsible
for separating the electrons from the bremsstrahlung photons, and then measuring the
energy of the electrons after they have released their photons. Design of electronics for
this photon tagger was the focus of my research.

20
3 Functional Description of the Photon Tagger
After passing through the diamond radiator, the electrons are deflected out of
the beam of radiated photons by a strong magnetic field. The large electromagnet which
produces this field is called the tagger magnet.
The separation of electrons from photons is possible because of the Lorentz
force, Equation (1), which describes how particles behave in an electromagnetic field
[5].
(1)
In the case of the of tagger magnet, there is no electric field , so the first term
of Equation (1) is zero. The bremsstrahlung photons in the tagger magnet field have no
electric charge , so total force acting on them is zero, and they pass through the field
undeflected. The electrons, however, have a nonzero charge , a velocity , and are
moving through the tagger magnet field . Therefore, they experience a deflection,
separating them from the bremsstrahlung photons.
The bremsstrahlung electrons all have such high energies that they move very
nearly at the speed of light (>0.99999999 times the speed of light). At these velocities,
the traditional quadratic relationship between kinetic energy and velocity no longer
applies. Instead, the relativistic energy expression must be used, as shown in Equation
(2) [6].
√| |
(2)

21
At sufficiently high momentum , the rest mass of the electron is negligible,
and Equation (2) simplifies to Equation (3).
| | (3)
Equation (3) suggests that the energy of the electrons is proportional to the
magnitude of their relativistic momentum. The relativistic momentum is given by
Equation (4).
√ | |
(4)
Equation (4) shows that the relativistic momentum is not linearly proportional to
velocity as is the case for classical momentum. Instead, as the velocity approaches the
speed of light , the denominator of Equation (4) becomes very small. The primary
consequence of this is that small changes in velocity result in huge changes in relativistic
momentum. Particularly for the bremsstrahlung electrons, this means that despite
having a range of energies and momenta after passing through the diamond radiator,
the electrons all have essentially the same velocity!
Returning to Equation (1), all factors are now constants and it appears that all
the electrons will deflect identically, making it impossible to separate them by energy.
However, while it is true that all the electrons will experience the same deflection force,

22
they do not all deflect through the same angle. The key to calculating the angle of
deflection is to remember the fundamental relationship between force and momentum,
as shown in Equation (5).
(5)
Substituting Equation (5) into Equation (1) and dropping the always-zero
term:
( ) (6)
The factor in Equation (6) is the same for all electrons, thanks to all electrons
having the same velocity. Therefore, Equation (6) shows that the instantaneous change
in momentum d experienced by each electron is the same, and that because of the
cross product, the momentum changes in a direction perpendicular to the direction of
motion. However, the angle of deflection depends not only on the change in
momentum, but also the initial momentum, as shown in Figure 7.

23
Figure 7: Vector diagram showing how electrons are deflected by the tagger magnet
From Figure 7, the relationship between deflection angle and momentum is
obvious. It is given by Equation (7).
(
| |
| |) (7)
Since Equation (3) says that initial momentum and energy are proportional to
one another, this means that the tagger magnet is able to spatially separate electrons of
different energies by deflecting them through different angles.
To exploit this spatial separation of electrons based on their energies, an array of
scintillating fibers is located in the path of the electrons, just outside the tagger magnet.
These fibers are 2 mm x 2 mm in size, and roughly 2.5 cm long. They are arranged in a 5
x 100 fiber grid such that the electron energy spectrum maps along the longer side of
the grid. The five fiber height of the grid was chosen to capture electrons that may enter
the tagger with a small vertical displacement above or below the horizontal axis. Though
𝑝 𝑖𝑛𝑖𝑡𝑖𝑎𝑙
𝑝
𝑝 𝑓𝑖𝑛𝑎𝑙
𝑑𝜃

24
vertical displacements convey no information about electron energies, they are useful
to calibrate the alignment of the scintillating fibers with the incoming electrons.
When an electron passes through a scintillating fiber, the fiber scintillates,
releasing a flash of light due to inelastic collisions of the electron with atoms in the fiber.
This scintillation is captured and carried by a matching 5 x 100 array of clear optical
waveguides to the tagger electronics, where the scintillation is converted to an electrical
pulse, amplified, and sent off to be recorded for later analysis. The electrons themselves
are discarded into a beam dump after passing through the scintillators. Figure 8 shows a
functional drawing of the photon tagging detector, including several representative
scintillators and waveguides. The electrons coming out of the tagger magnet in Figure 6
are the same electrons incident on the scintillating fibers in Figure 8.

25
Figure 8: Functional drawing of the photon tagging detector, showing three groups of twenty-five scintillating fibers, a few representative waveguides, and the tagger electronics array
As shown in Figure 8, the tagger electronics consist of three unique circuit
boards: the amplifier board, the control board, and the backplane. Each set of these
three boards is responsible for monitoring twenty-five waveguides for scintillation.1 The
board which directly interfaces with the twenty-five waveguides is the amplifier board.
It contains photosensors, called SiPMs, which detect scintillation and convert it into an
electrical pulse, amplifiers which boost the SiPM signals, and summing circuitry which
combines signals that come from each fiber column.
1 Though there are only twenty-five waveguides per board set in the current design, the boards are
capable of monitoring up to thirty waveguides per set.

26
The amplifier board is connected by way of a multi-pin connector to a backplane
which supplies power, and also provides outputs for signals from the amplifier and
summing circuitry. Attached to the backplane through another multi-pin connector is a
digital control board, responsible for setting SiPM bias voltages, adjusting amplifier gain
and also monitoring temperatures and voltages in the board array. This digital control
board interfaces with a computer by a standard Ethernet interface to allow for easy
monitoring and control of the tagger.
4 Design of the Tagger Electronics
4.1 Digital Control Board
4.1.1 Component Selection
The digital control board was the first board designed for the photon tagger. The
first step in its design was to determine exactly what it needed to be able to do, and
select the most appropriate components to provide the necessary functionality.
Since one of the primary tasks of the digital control board is to adjust SiPM bias
voltages, a multichannel digital-to-analog converter (DAC) capable of outputting a wide
range of voltages had to be selected. For this purpose, we selected the Analog Devices
AD5535 DAC. Though expensive, it has 32 independent channels, each able to output
between 0 and 200V, and source up to 700 µA of current. The DAC’s ball grid array
(BGA) package helps keep it from taking up excessive space on the board, and its serial

27
programming interface allows it to be easily controlled by a microprocessor or a field
programmable gate array (FPGA.)
A field programmable gate array is a hardware device that can be rewired on the
fly. Using ingenious combinations of field effect transistors and logic gates, an FPGA
electronically rewires itself at power on to create a custom hardware-based logic device.
Hardware-based solutions in general provide more speed and stability than software-
based designs. While the digital control board doesn’t require extraordinarily fast clock
speeds, the negligibly higher cost of an FPGA was still justifiable to produce a board
which can operate stably and be ready for possible future applications.
We selected the Xilinx Spartan-3A XCS50A FPGA in a very thin quad flat pack
(VQFP) package to use on the digital control board. The VQFP package minimizes the
size of the FPGA to a mere 1.6 x 1.6 cm. Despite this small size, however, the FPGA has
50,000 internal logic gates, and supports a total of 68 input/output channels. Though
50,000 internal logic gates is considered few for an FPGA, software analyses with Xilinx’s
own programming platform suggested that for our needs, 50,000 would be more than
enough.
With the FPGA selected, we next had to select a component to allow the FPGA to
report back to the master computer. While many means of communication were
considered, Ethernet was determined to be the most practical. The wide availability of
cheap Ethernet switches allows all the digital boards to plug into a nearby switch with a
single wire uplinking the entire array of tagger electronics boards to the main computer.

28
The perfect Ethernet controller for this role was the Silicon Laboratories CP2201. The
CP2201 is a 10Base-T Ethernet controller in an incredibly small QFN package that is a
mere 5 mm x 5 mm. To achieve this small size, the chip uses a multiplexed address/data
bus, which conveniently also minimizes the number of I/O pins that have to be used for
controlling the CP2201 on the FPGA. To physically connect the CP2201 to an Ethernet
cable, we selected a Conn Pulsejack J0012D21. This jack has a 1:1 inductive coupling,
perfect for short Ethernet wire runs, while also keeping cost to a minimum.
While these components take care of the basic control and communication
features of the digital control board, the board was also supposed to be designed with
certain monitoring capabilities. In particular, the digital control board needs to be able
to monitor its own voltage levels and temperature, as well as the temperature on the
amplifier board. To accomplish voltage monitoring, we selected the Analog Devices
AD7928 12-bit analog-to-digital converter (ADC). This 8 channel ADC is able to measure
voltages between 0 and 5V, making it perfect for monitoring most of the voltages on the
digital control board. In addition, the AD7928 uses the standard Serial Peripheral
Interface (SPI) bus, which minimizes the number of PCB traces that are necessary to
connect it to the FPGA.
For temperature monitoring, we selected the Analog Devices AD7314
temperature sensor. Though it would have been possible to dedicate a channel on the
ADC to reading out a thermistor, a digital temperature sensor like the AD7314 is not
very expensive, takes up minimal space on the board, and is compatible with the same
SPI bus interface used by the ADC. Since SPI devices can be connected in parallel to

29
shared data lines, the number of FPGA I/O ports needed to readout SPI devices was
changed only by the addition of a chip select pin for the temperature sensor. In
addition, the use of an SPI digital temperature sensor on the control board left an extra
channel open on the ADC that is used to readout a thermistor on the distinctly non-
digital amplifier board.
In order to connect the digital board to the backplane and the amplifier board,
we chose a 48-pin DIN 41612 Eurocard connector. There were many reasons for
selecting the DIN 41612 board interconnect system, including the fact that the
connectors are keyed to prevent backwards insertion, housed in sturdy plastic to
prevent accidental misalignment and bent pins, tightly fitting enough to hold the
amplifier board upside down beneath the backplane, and able to safely isolate high
voltages even beyond the potential 200V associated with each DAC output channel.
4.1.2 PCB Layer Selection
Before any schematics were drawn or any traces were laid, I first did an audit of
the datasheets of the components that had been selected for the digital control board
to determine what voltages they needed to operate. With this information in hand, I
determined the best way to provide these voltages, either by bringing them in directly
by way of the backplane, or by using voltage regulators on the digital control board to
produce them from other available voltages. The voltage requirements, and how to
provide them, are listed below.
Voltage: +5V o Current required: 21.7 mA max

30
o Used by: DAC internal amplifiers Analog ADC subcomponents
o Supplied by: External power supply, by way of backplane
Voltage: +3.3V o Current required: 335 mA max o Used by:
DAC internal temperature diode Temperature sensor power ADC logic Ethernet controller power Auxiliary FPGA power EEPROM power
o Supplied by: On-board voltage regulator, from +5V
Voltage: +2.5V o Current required: 1 µA max o Used by: ADC reference voltage o Supplied by: On-board voltage reference, from +5V
Voltage: +1.2V o Current required: <10 mA typical o Used by: FPGA internal logic o Supplied by: On-board voltage regulator, from +5V
Voltage: -5V o Current required: 3.5 mA max o Used by: DAC internal amplifier o Supplied by: External power supply, by way of backplane
Voltage: ~+60V2 o Current required: 3 mA max o Used by: DAC high voltage line o Supplied by: External power supply, by way of backplane
The rationale for deciding to supply only +5V, -5V, and +60V to the digital control
board from the backplane was because there are not enough free pins on the Eurocard
connector to supply all of the voltages directly. In addition, since +1.2V and +2.5V are
used each by only one component, it would be wasteful to purchase separate power
supplies for those voltages. While +3.3V is used by many components, it can be easily
2 Exact voltage required may vary depending on SiPM requirements.

31
generated from +5V using a voltage regulator, and introduces a lesser noise risk than
there would be from producing +5V with a +3.3V supply using a switching regulator. For
the same reason, it is better to supply -5V directly, and obviously, +60V.
Once the power supplies were selected, the next task was to determine how to
distribute the power to components on the board. Typically, PCBs supply power to
components by means of copper planes inside the PCB. Connections to an electrical
ground are also made using copper planes. Especially on digital boards with rapidly
changing logic, this helps to stabilize supply voltages by keeping an entire plane of
charge available right near the components rather than attempting to draw charge
through a small trace from a distant power supply. Also, large copper planes help shield
against crosstalk between traces on opposite sides of the PCB.
Since adding internal layers to a PCB ultimately increases the fabrication cost, I
had to determine which voltages were essential to supply by a plane, and which could
be supplied to components using traces. Since +5V and +3.3V are both used by multiple
components spread all around the board, it made sense to dedicate two planes to these
voltages. An additional two planes were to be dedicated to both a digital and a separate
analog ground. This layer arrangement resulted in a 6 layer PCB, which is the maximum
number of layers that is considered standard (and hence cheap to produce).
However, this still left three voltages to deliver without planes. I determined that
it was acceptable to deliver the +2.5V and the +60V lines by traces, since the current
demands would be fairly stable. The +1.2V line, however, would be powering digital

32
FPGA logic, and would be more problematic to deliver by a trace. The ultimate solution
to the power plane dilemma didn’t come until much later, when most of the
components had been placed into the PCB layout. I was able to place the FPGA in a
location away from all components requiring +5V, and create a +1.2V island within the
+5V power plane. The final layer stackup is shown in Figure 9.
Figure 9: Drawing of the digital control board layer stackup
4.1.3 Wiring the DAC
The DAC was the first component to be “wired.” The term wired, in the context
of this paper, refers to the process of drawing up schematics and PCB layout files using a
computer aided design program called Altium Designer.
More than any of the other digital control board component, the DAC needed to
be placed in a position that would facilitate easy routing of PCB traces to the backplane
and ultimately the amplifier board. Therefore, I placed it at the bottom of the PCB, only
360 mil away from the Eurocard connector, as shown in Figure 10.

33
Figure 10: CAD drawing of the bottom of the digital control board, showing the DAC (U3) and its many connections to the Eurocard connector (P2)
The decision to place the DAC so close the Eurocard left insufficient space for
vias to move any of the bias voltage traces to the back side of the board. This was not
necessarily a problem, though it did impose a requirement that other traces connected
to the Eurocard had to be either be routed around the Eurocard to row “a” (see Figure
10), or sent in on the back layer. Fortunately, there was ample space on the rest of
board to allow for passing these outgoing signals to the back layer.
While routing the bias voltage traces was the greatest challenge of the DAC
wiring, there were also several other supporting components that had to be wired in the
region surround the DAC. As can be seen in Figure 11, a host of power conditioning
circuitry had to be placed around the DAC, consisting of decoupling capacitors for power
stability, as well as diodes to help with power supply sequencing. For decoupling, I
selected both 10 µF and 0.1 µF capacitors to place near each power input to the DAC.
The high voltage input has only one decoupling capacitor near the DAC (labeled C2). This
capacitor is 0.1 µF. However, there is a 10 µF electrolytic decoupling capacitor located

34
farther away from the DAC in the upper right corner of the board. The rationale for
placing this capacitor farther away is that there simply was not enough room in the
region of the DAC for such a large, through hole capacitor. A smaller surface mount
device could not be used because no capacitors with 10 µF capacitance and a 210V
rating exist.3 Since a 10 µF electrolytic capacitor has a fair amount of inductance
anyway, placing it farther away shouldn’t make it a whole lot worse than if it were
placed closer to the DAC.
Figure 11: Close-up CAD drawing of the DAC (U3) and its power supply circuitry
A few more components worth noting in the area of the DAC are resistor R1, and
resistors R9-R11. Resistor R1 is a current limiting resistor attached to the DAC’s internal
temperature sensing diode. +5V is internally applied to the anode of this diode, and it
3 While we anticipate using only 60V for the DAC’s high voltage supply, the board was designed to support
up to the DAC’s maximum of 210V.

35
has a typical diode drop of 0.65V. The resistor R1 is a 270K resistor, which, given a
maximum of +4.35V, will allow through a safe 16 µA of current. Since the diode drop is
temperature dependent, reading out the voltage at the diode/R1 junction using the ADC
allows the board to monitor the DAC’s internal temperature.
Resistors R9-R11 provide a means by which the board may test the basic
functionality of one channel of the DAC. Resistors R9-R11 function as a voltage divider,
reducing the DAC’s output voltage to a range readable by the 0-5V ADC. Since full scale
output on the DAC ranges from 0-200V, the divider needed to divide the voltage
approximately by a factor of 40. Picking exact resistor values for this voltage divider was
difficult, because it needed to be stiff enough so that the leakage current of the ADC
would not perturb the voltage level in the divider, but use a small enough amount of
current so that the channel would still be usable as a SiPM bias voltage source.4 In
addition, given that the DAC could output as much as 200V, the divider has to be able to
withstand high voltages without exceeding the breakdown voltage of the resistors.
I found that there were no small surface mount resistors capable of withstanding
voltage drops on the order of 200V, and therefore decided to use three resistors rather
than the typical two. This way, the voltage drop across any one resistor is far less than
200V. I then calculated the current that would be used by the voltage divider at all
possible DAC output voltages. Knowing the current requirements of different
4 This channel is not used as a bias voltage in the current design, but it is capable of supplying sufficient
current to SiPMs with bias voltages in the ~60V range, which is typical of the Photonique SiPMs used. At voltages approaching 200V, the divider uses too much current to simultaneously bias a SiPM.

36
configurations of the divider allowed me to select the one that would still leave
sufficient current left to use the channel as a SiPM bias voltage.
As shown in Figure 12, the current required increases dramatically as the divider
is changed to provide greater accuracy in the measured voltage. Since the DAC is
capable of outputting 700 µA maximum per channel, the divider had to be designed so
that it never would create a current draw of more than 700 µA. The ±0.4V accuracy
curve in Figure 12 does indeed never exceed 700 µA. We determined that ±0.4V is an
acceptable error for testing the functionality of a DAC channel. To achieve this level of
accuracy, I used two 200K resistors in series, followed by a 10.2K resistor to ground.
Readout occurs between the second 200K and the 10.2K resistor, providing the 40:1
resistance ratio that is needed. See Figure 13 in Section 4.1.4 for a schematic.

37
Figure 12: Current/voltage relationship for the DAC to ADC voltage divider, with curves showing data for different tolerances in the accuracy of the ADC readout: diamonds = ±0.2V, squares = ±0.04V, triangles = ±.4V, X’s = ±2V
4.1.4 Wiring the ADC
Compared to the DAC, wiring the ADC was quite simple. The ADC required
several power connections all 5V or less, decoupled with 0.1 µF and 10 µF capacitors
similar to the DAC. The low voltages of these power connectors meant that no large
electrolytic capacitors were needed.
The ADC also required several connections to the FPGA, and of course, inputs of
the various voltages that it is to measure. Figure 13 shows the basic wiring of the ADC.
8.00E-06
8.00E-05
8.00E-04
8.00E-03
0 50 100 150 200C
urr
en
t U
sed
by
Vo
ltag
e D
ivid
er
(A)
DAC Voltage (V)

38
Figure 13: Schematic of the ADC wiring
A description of the VIN measurement channels follows:
Channel: VIN0 o Measures: -5V power supply o Notes: Since the ADC has a 0-5V range, a voltage divider is used to bring
the -5V up above ground to be compatible with the ADC.
Channel: VIN1 o Measures: DAC thermal diode
Channel: VIN2 o Measures: +3.3V
Channel: VIN3 o Measures: +5V o Notes: Though it at first seems impossible for the ADC to measure the
voltage of its own power supply, it actually can since the ADC uses a separate 2.5V reference for voltage comparison.
Channel: VIN4 o Measures: Amplifier board RT1 o Notes: This is passed through the Eurocard connector to the amplifier
board, where it measures the voltage drop across a thermistor, RT1.
Channel: VIN5 o Measures: +1.2V
Channel: VIN6 o Measures: Amplifier board VCC o Notes: This is passed through the Eurocard to the amplifier board, where
it measures the VCC power supply for the amplifiers.

39
Channel: VIN7 o Measures: DAC testing channel o Notes: Monitors the output of one DAC channel to test basic functionality
of the DAC.
The voltage divider on channel VIN0 was not nearly as difficult to design as the
voltage divider for the DAC on channel VIN7. With the DAC channel, there was a strict
700 µA current limit, and a range of voltages exceeding two orders of magnitude. The
-5V to ADC voltage divider was designed with the assumption in mind that the -5V
supply should be able to source enough current to compensate for any current used by
the divider, and that the range of voltages needing to be measured would be on the
order of only a few percent above or below the nominal -5V. Therefore, I selected a
33.2K and a 100K resistor for the divider, and placed the divider between -5V and +5V
(rather than -5V and ground), producing a readout junction voltage of +2.5V when both
+5V and -5V are at their nominal values. While at first glance this appears not to provide
an independent readout of the -5V supply, it in fact does, since +5V is also separately
read out on channel VIN3.
4.1.5 Wiring the Ethernet Controller
The Silicon Laboratories CP2201 Ethernet controller is available from the
manufacturer in two variants. One, a 9 mm x 9 mm QFN package, has a total of 48 pins,
including independent 8-bit address and data lines to the FPGA. The other variant is a
24-pin QFN package with a footprint size of merely 5 mm x 5 mm. The smaller variant
achieves its small size by using a multiplexed 8-bit address/data bus. With this dual
purpose bus, the CP2201 requires only 12 I/O pins on the FPGA, making the challenge of

40
routing traces between the Ethernet controller and FPGA much easier. Therefore, we
selected the 28-pin CP2201 for the digital control board design.
In order to facilitate connection of an Ethernet cable to the digital control board,
we thought it appropriate to place the Ethernet controller and the Ethernet jack near
the top of the board. Figure 14 below shows this area of the control board. The Ethernet
controller is labeled U2, and the Ethernet jack is labeled J1.
Figure 14: CAD drawing of the top of the digital control board showing the Ethernet controller (U2) and the Ethernet jack (J1)

41
Figure 15: Schematic of the Ethernet controller and Ethernet jack
Figure 15 details how the Ethernet controller is connected. Pins AD0 through
AD7 are the 8-bit multiplexed address/data bus described previously; they connect to
the FPGA. The INT (interrupt request), ALE (address line enable), CS (chip select), and
RST (reset) pins also connect to the FPGA and help to facilitate communication over the
address/data bus. The pins along the bottom of the component symbol, AGND, AV+,
DGND, and VDD are appropriately decoupled power inputs and grounds, and the RX/TX
pins on the right side of the symbol are where the controller connects to the Ethernet
jack. Between the Ethernet controller and the Ethernet jack are several resistors and
capacitors which are specified in the Ethernet jack’s data sheet. These help ensure the
signals produced by the controller are consistent with the 10Base-T Ethernet
specification.
Pins XTAL1 and XTAL2 on the Ethernet controller are used for clocking the
device. The data sheet specifies that pin XTAL1 may be used either as an input from a

42
CMOS clock, or a crystal oscillator. In the latter case, pin XTAL2 is used as an inverting
driver. Originally, I selected the latter option, but in order to share a single clock
between the Ethernet controller and the FPGA, we eventually decided it was better to
replace the crystal oscillator with a CMOS clock. This is discussed in more detail in
Section 5.1.
4.1.6 Wiring the FPGA
As the heart and soul of the digital control board, the FPGA was a particular
challenge to route. Of the FPGA’s 100 pins, 74 are used in the control board’s design.
Since the signals from these pins go to components all over the board, it was important
to select input/output pins appropriately to avoid excessively crisscrossed traces.
Figure 16: Close-up CAD drawing of the FPGA, showing front (red) and back (blue) layer traces
Since the spacing between FPGA pins is less than 20 mil, there is precious little
space for vias in the region immediately surrounding the component. To ease this lack

43
of space, I made use of vias under the body of the FPGA. The bottom of the FPGA is non-
conducting, so this poses little risk. Most of the pins connected by under-body vias are
either power or ground pins, and connect directly to planes within the PCB. Some are in
fact signals, however, and fan out on the back of the PCB as shown by the blue traces in
Figure 16.
The FPGA shares a CMOS clock with the Ethernet controller in order to save
space on the board. Implementing a shared clock proved to be more difficult than
anticipated. First, while the Ethernet controller can accept a signal directly from a crystal
oscillator, the FPGA needs a CMOS compliant signal. Simply connecting a single CMOS
clock to the clock inputs of both devices is not possible because the capacitance of the
two devices in parallel distorts the signal beyond recognition. The easiest solution to this
problem was to send the CMOS clock signal into the FPGA, and then have the FPGA
output the signal to the Ethernet controller using one of its I/O pins.
Figure 17 shows a close up of the connection between the CMOS clock, the
FPGA, and the Ethernet controller. The CMOS clock is component Y1. It has only 4 pins:
1 ground, 1 power, 1 enable, and 1 clock output. The hatched trace going from pin 3 on
the clock to pin 27 on the FPGA (bottom) is what connects the two components.
Another hatched trace, leaving from pin 37 on the FPGA, brings another FPGA
generated clock signal to the Ethernet controller (U2).

44
Figure 17: Close-up CAD drawing detailing the CMOS clock connection to FPGA and Ethernet controller (cross-hatched traces)
The idea of having the FPGA generate a separate clock signal for the Ethernet
controller seems like a poor design choice, especially since the documentation for the
Xilinx Spartan-3A 100-pin VQFP does not designate pin 37 as optimized for clock signals.
However, clock skew introduced by the use of a non-clock pin on the FPGA should not
cause any synchronization problems between the two devices because of the parallel
nature of the data connection between the FPGA and the Ethernet controller. The
Ethernet controller communicates with the FPGA using a non-clocked parallel interface.
Reads and writes are performed using the ALE (address line enable), WR (write enable),
and RD (read enable) pins on the Ethernet controller, and since the interface is not
serial, the information on the address/data bus changes only when either device
requests it. The clock signal needed by the Ethernet controller is used only for clocking
the Ethernet signal itself.

45
Apart from the clock, another critical component of the FPGA system on the
digital control board is the EEPROM. The Xilinx EEPROM stores the configuration data
for the FPGA, and transmits that information to the FPGA at power on. Figure 18 shows
the many connections between the FPGA and the EEPROM.
Figure 18: Close-up CAD drawing of the EEPROM (U5) and the FPGA
The biggest challenge with EEPROM routing was trying to weave the traces
through the jungle of other traces that connect to the FPGA. Unlike many of the other
components which could be connected to any of the 68 I/O pins on the FPGA, the
EEPROM had to be connected to dedicated configuration pins on all four sides of the
FPGA. Careful routing, and in some places multiple vias, were necessary to make all of
the connections between the EEPROM and the FPGA.
Simply connecting the EEPROM to the FPGA was not all that had to be done,
however. Since the EEPROM is soldered directly to the PCB just like all the other

46
components, there is no way to reflash it after the boards are manufactured unless an
interface is provided on the PCB. Fortunately, this was not difficult to implement. The
EEPROM uses a JTAG interface. Conveniently, JTAG is designed to allow easy
connections from off the board using appropriate ribbon cables. With this capability in
mind, I placed a 14-pin JTAG header on the board to allow for easy post-assembly
reflashing of the EEPROM. This header also allows for hot reprogramming of the FPGA,
bypassing the EEPROM entirely. The EEPROM and the FPGA are simply daisy chained
together in a loop between the header’s TDI and TDO pins. A close-up of the header can
be found in Figure 19. To see the header in context, look for it in Figure 10, Figure 11, or
Figure 16.

47
Figure 19: Close-up CAD drawing of the JTAG header on the control board
One final noteworthy feature of the FPGA design is the use of unique location
identifier traces that allow the FPGA to be aware of where it is positioned in the tagger
circuitry array. An 8-bit active-low location ID bus runs between the FPGA and the
Eurocard to the backplane. Once on the backplane, the bus connects to a set of jumpers
which can be used to pull down any of the bits to ground in order to assign each card its
own unique identification number. This number is transmitted within all Ethernet
packets that leave the control board so that the main computer can tell the boards
apart, and understand where they sit in the array. While it is possible to accomplish the
same using the Ethernet MAC addresses of the control boards, we opted for a system of
jumpers on the backplane so that a control board can be replaced on the fly without the

48
need to manually reconfigure a MAC/position mapping table. In Figure 20, pins 70, 71,
72, 73, 77, 78, 84, and 86 are used for the location ID bus.
Figure 20: Close-up CAD drawing of the bottom left of the FPGA on the control board, specifically the region of the location ID pins
4.2 Amplifier Board
SiPMs on the amplifier board detect scintillation from the bremsstrahlung
electrons and output small electrical pulses. The amplifier board, appropriately,
amplifies these signals so that they can be measured by an analog-to-digital converter
located off of the tagger electronics array. The overall layout of the amplifier board is
shown in Figure 21.

49
Figure 21: CAD drawing of the amplifier board
4.2.1 Hierarchy
As is evident from the appearance of the amplifier board in Figure 21, the board
consists of several groups of repeated circuits. These circuits can be grouped into three
hierarchical levels, as shown in Figure 22.

50
Figure 22: Hierarchy of the amplifier board circuitry
Each of the 30 SiPMs on the amplifier board is connected directly to a dedicated
amplifier circuit. Each amplifier circuit outputs a signal into a summer. The summers add
signals from adjacent groups of five amplifiers and output the signals to the backplane.
Though not shown in Figure 22, each amplifier also outputs a signal directly to the
backplane, bypassing the summing stage completely, for testing and calibration
purposes.
4.2.2 PCB Layer Selection
Layers for the amplifier board were selected not only based on which power
supply voltages were necessary in various areas of the board, but also on the
requirement that all amplifier and summer outputs have a 50 Ω impedance to the
Amplifiers Summers Backplane Interface
Eurocard, Power Regulators
Summer1 Amp1... Amp5
Summer2 Amp6... Amp10
Summer3 Amp11... Amp15
Summer 4 Amp16... Amp20
Summer5 Amp21... Amp25
Summer6 Amp26... Amp30

51
ground plane. To guarantee proper impedance and cross-talk free signals, the board was
designed with two ground planes – one on each side under the front and back outer
signal layers. The two remaining internal layers were used for the amplifier power
supply plane (VCC) and a split plane containing two transistor base voltages needed by
the amplifiers. This layout is summarized in Figure 23.
Figure 23: Amplifier board PCB layer stack-up
4.2.3 Amplifiers
Except for which summing circuit they connect with, all amplifiers on the
amplifier board are identical. They can be independently controlled, since each routes a
separate bias voltage from the digital control board to a SiPM. They can also be
independently read out, since each routes an output trace directly to the Eurocard
connector.
The need for independent control and independent readout arises from the fact
that no two SiPMs are identical. The optimum bias voltage for each SiPM varies even
among SiPMs from the same batch. Independent bias voltages allow for sensitivity
adjustments to compensate for variations in the SiPMs’ performance. Independent
52
readout of all thirty channels is intended for manual testing of each channel using an
oscilloscope. The first five channels, however, are outputted along with the summed
column signals to the off-board analog-to-digital converter to allow for testing of the
vertical alignment of the scintillating fibers.
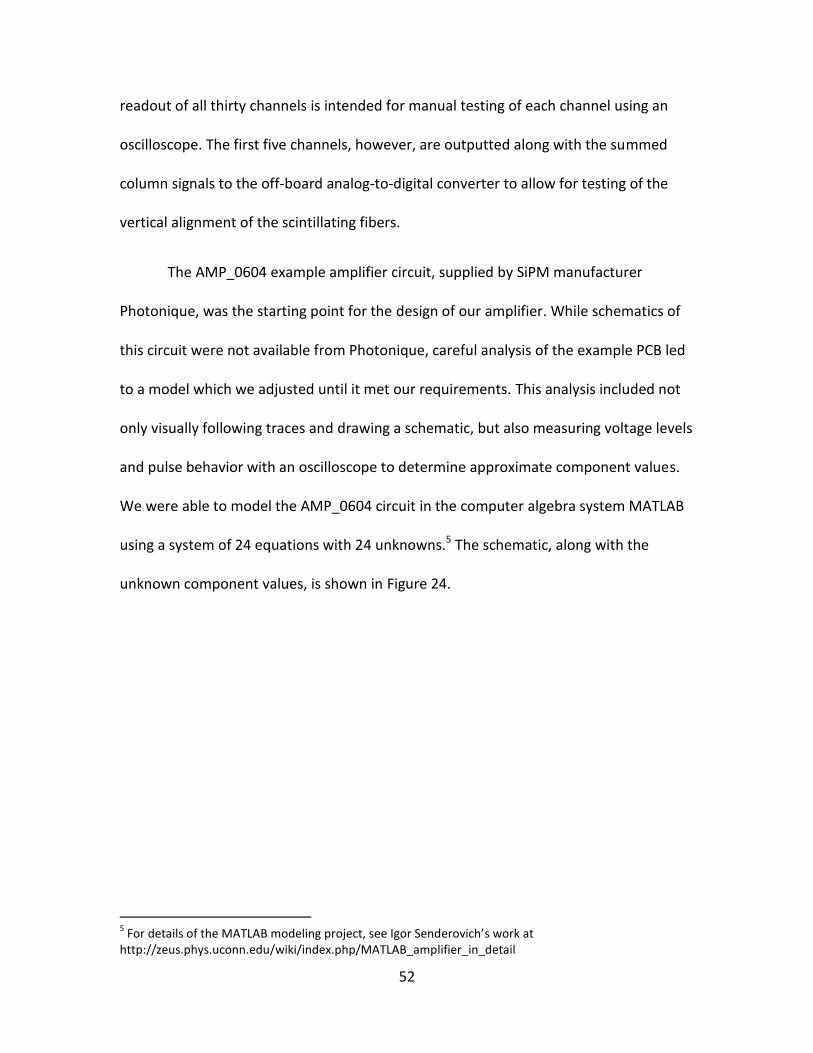
The AMP_0604 example amplifier circuit, supplied by SiPM manufacturer
Photonique, was the starting point for the design of our amplifier. While schematics of
this circuit were not available from Photonique, careful analysis of the example PCB led
to a model which we adjusted until it met our requirements. This analysis included not
only visually following traces and drawing a schematic, but also measuring voltage levels
and pulse behavior with an oscilloscope to determine approximate component values.
We were able to model the AMP_0604 circuit in the computer algebra system MATLAB
using a system of 24 equations with 24 unknowns.5 The schematic, along with the
unknown component values, is shown in Figure 24.
5 For details of the MATLAB modeling project, see Igor Senderovich’s work at
http://zeus.phys.uconn.edu/wiki/index.php/MATLAB_amplifier_in_detail

53
Figure 24: Schematic of the AMP_0604 circuit, upon which the amplifier circuit was based
The primary change made to the MATLAB model of the AMP_0604 circuit before
implanting it into the schematics of the amplifier board was the addition of an extra
transistor to support simultaneous output of the amplified signal both for independent
readout and to a summing circuit. While it would seem that the extra transistor could be
avoided by simply splitting the output trace into two traces, doing so allows amplifiers
that share a common summing circuit to affect each other’s individual outputs as well.
(Regardless of the fact that the trace is split in two separate directions, both ends are
electrically connected and can serve as a pathway for back feed from the summing
circuit into the amplifier.) The additional transistor added to the amplifier circuit allows
it to be safely connected to a summer without back feed of the summed signal into the
amplifier circuitry.

54
Figure 25: Schematic of the amplifier circuit
In Figure 25, BIAS represents the bias voltage input from the digital control
board. AMPREF represents one of the two transistor base voltages which is supplied by
the split plane, and shared by all the amplifiers. SIPMOUT represents the signal sent to
the Eurocard connector for individual readout, and TOSUM represents the signal sent to
the summing circuit.
Laying the circuit onto the PCB proved to be very challenging. In order to keep
the amplifier board from being longer than the backplane, the amplifier circuit had to be
placed in a space approximately the width of a single SiPM, 160 mil. Photonique’s
AMP_0604 was more than twice that width, and it had one less transistor than the
design to be used on the amplifier board. In order to accomplish such a dramatic size
reduction, I used 0201 (0603 metric) size components in the design. As indicated by
their name, these components are 0.6 mm x 0.3 mm in size, and are barely visible
without the aid of a magnifying glass. These tiny components, along with clever routing,
led to an amplifier circuit design with overall dimensions 1.13 in x 0.18 in excluding the
SiPM itself.

55
While the 0.18 in width of the summing circuit exceeds the 160 mil SiPM width,
it does not pose a problem because certain components of the amplifier circuit are
shared between adjacent channels. In particular, ground traces that run the full height
of the amplifier circuitry for crosstalk resistance are shared between adjacent amplifiers.
To see how this is possible, look at Figure 26. The yellow traces between amplifier
channels and in the component key on the left are silkscreen which is printed on the
PCB for visual reference. Behind the yellow silkscreen dividers between AMP1, AMP2,
and AMP3, there is a top layer (red) ground trace that jumps back and forth between
vias and components in adjacent channels.
Figure 26: Close-up CAD drawing of amplifier circuitry and component key

56
The blue traces in Figure 26 are bottom layer traces, and are from left to right
across any amplifier channel, the bias voltage from the control board, the output to the
summing circuit, and the output for independent readout.
4.2.4 Summing Circuit
Each of the six summing circuits on the amplifier board is designed to accept
inputs from five amplifier channels. In Figure 27, the point at which amplifier signals are
injected into the summing circuit is labeled TOSUM. The five input signals are combined
using an open-collector current sum that is injected into the base of transistor Q4. The
current from Q4 sinks into resistors R10 and R11, and drives emitter-follower pair
Q5/Q8. The signal is then inverted and buffered through transistors Q6 and Q7 to drive
a 50 Ω load.
The SUMREF input, like the AMPREF input in the amplifier circuit, is a transistor
base voltage provided by the split power plane, which can be adjusted as needed to
assure the correct operating range of the output signals. GAINMODE, set by the DAC on
the control board, allows for switching the summing circuit between a low gain and a
high gain mode. Transistor M1 is a field effect transistor which, depending on the
GAINMODE voltage, selects between R11 alone and R10 in parallel with R11 as a sink for
the current from Q4. R11 alone generates 40 times greater gain than when R10 is
enabled by opening the M1 FET gate.

57
Figure 27: Schematic of the amplifier board's summing circuit
Figure 28 shows a close-up of the layout of the summing circuit on the amplifier
board. Though it still looks quite complicated, the layout of the summing circuit was
dramatically easier than the layout of the amplifier, since the summing circuit had a
more relaxed size constraint. In Figure 28, amplifier signals are input into the five vias
just above the AMP1 through AMP5 silkscreen labels. The via labeled BASE1 (between
the CBi and RBi labels), pulls the SUMREF transistor base voltage from the gold plane
layer, which can be seen underneath all the circuitry. The split in this plane, so that it
can simultaneously carry the AMPREF and SUMREF signals, can be seen on the left side
of the summing circuit.

58
Figure 28: Close-up CAD drawing of summing circuit SUMMER1 on the amplifier board
4.3 Backplane
As described in Section 3, the backplane’s primary purpose is to connect the
digital control board to the amplifier board, and to provide a means to route SiPM
signals off the tagger electronics array for digitization. Figure 29 shows an overview of
the backplane.
Figure 29: CAD drawing of the backplane

59
4.3.1 PCB Layer Selection
The selection of layers on the backplane was driven by the power needs of the
digital control board and the amplifier board. In order to accommodate as many
voltages as possible without dramatically increasing production cost, we decided to
make the backplane a 6-layer board like the others. This provided two outer signal
layers and four internal power planes. The voltages assigned to the available planes
were determined by the control board’s and the amplifier board’s current requirements.
Voltages with high current loads were assigned to the planes, and voltages with lower
current requirements were assigned to traces.
Since the digital control board’s primary power source is the +5V power supply, I
assigned +5V to one of the power planes. The digital ground from the control board was
given its own plane as well. The analog ground from the digital control board was
combined with the ground from the amplifier board into a single analog ground plane,
and the final internal plane was reserved to carry the main power supply for the
amplifier board, VCC. The layer stackup is shown in Figure 30.
Figure 30: Drawing of the backplane’s layer stackup

60
Not shown in Figure 30 is an additional opaque black FR-4 layer in the middle of
the stackup, intended to make the backplane opaque. Since stray light hitting the
amplifier board’s photosensors would cause erroneous electron energy readings,
making the backplane light-proof was a critical design requirement. While the copper
planes inside the PCB are adequately opaque for most purposes, Figure 30 reveals that
there are holes in many of the planes in the area surrounding vias. Additionally, as
Figure 31 shows, even where vias connect with internal planes, there is still room for
light to pass through.
In order to aid with heating of surfaces during the soldering and plating
processes, vias are not connected with internal planes around all 360° of their
circumference. Instead, there are four small traces that make the electrical connection,
leaving some areas with no copper to block light. Figure 31 shows an example of a
typical via heat relief. The center black circle is the via hole itself, which in the case of
the backplane, is always plugged with a component pin and solder. However, the black
outer arcs represent regions within the board with no copper. These regions are filled
only with transparent FR-4 and prepreg glue. A layer of special black FR-4 in the middle
of the backplane layer stackup helps to block light that manages to pass through these
heat reliefs.

61
Figure 31: CAD drawing of a typical via heat relief
4.3.2 Eurocard Connectors
The digital control board and the amplifier board connect to the backplane by
means of DIN 41612 Eurocard connectors. The backplane has receptacles for both of
these connectors, and all the necessary routing to pass signals from the control board to
the amplifier board, and vice versa. Routing the connections between the control board
Eurocard connector and the amplifier board Eurocard connector was the biggest
challenge of the backplane design.
In order to satisfy the size constraints of the tagger, the backplane has a fairly
strict maximum width of about 2 inches. This size constraint doesn't leave much room
for the 32 SiPM bias voltage traces that had to be routed between the two Eurocard
receptacles. In order to squeeze so many traces into such a small space, I had to route
traces on both the front and back of the backplane. I used 5 mil traces to maintain safe
spacing between traces and Eurocard receptacle pads, and also maintained the 15 mil
recommended spacing between the traces themselves.

62
Figure 32: Close-Up CAD drawing of the Eurocard receptacle routing on the backplane
Figure 32 shows the intricate routing between the Eurocard receptacles. The
large screw hole (labeled “0 CHASSISGND”) to the left of the control board receptacle
(P2) forced the control board receptacle to be offset quite a bit from the center of the
amplifier board receptacle (P1, labeled in dark gold, indicating printing on the back side
of the board). This made bias voltage trace routing very tight between the two boards.
Also worth noticing in Figure 32 are the two red traces that snake between
screw hole 18 on P2 and screw hole 34 on P1. These traces connect the ADC on the
control board to voltages of interest on the amplifier board.
4.3.3 Location ID Header
The location ID bus from the digital control board is brought to the backplane by
pins A9 through A16 on the control board Eurocard connector. Traces routed on the
back side of the backplane connect these pins to a 16-pin through-hole header (P3), as
shown in Figure 33.

63
Figure 33: Close-Up CAD drawing of the location ID bus on the backplane
4.3.4 Ground Coupling Jumpers
To provide flexibility in grounding the control board and the amplifier board, two
jumpers were added to the backplane. These jumpers allow for coupling of the either
the analog or digital grounds, or both, to the aluminum chassis of the tagger. The
backplane is electrically connected to the chassis by means of the mounting screws that
hold it onto the metal baseplate on the top of the tagger box. This chassis ground
extends along much of the top surface of the backplane through a top layer polygon
(the large red area in Figure 29). Jumpers W1 and W2 allow easy connection of the
chassis ground to either or both of the electrical grounds, as shown in Figure 34. If W1

64
and W2 are used simultaneously, then all grounds will be coupled at the backplane.
Otherwise, they are carried off the tagger by separate wires.
Figure 34: Close-up CAD drawing of the ground coupling jumpers on the backplane
4.3.5 Power Connector and Fuses
The backplane is responsible for supplying power to control board and the
amplifier board. To ensure safe and reliable power delivery, the backplane uses a 6-pin
Molex KK® 6373 header for all power/ground connections. Though a slightly different
design than the type of header used to supply power to 3.5” floppy disk drives, it is built
around the same concept, and uses a friction ramp to secure the power cable in place.
This type of connector has the advantage of being easily connected and disconnected
without the need for extreme back and forth wiggling like the larger IDE hard drive style
power connector. In addition, since the friction ramp is on only one side of the
connector, it should be difficult or impossible to insert the cable backwards. Figure 35
shows what the power connector looks like.

65
Figure 35: Photograph of the Molex KK® 6373 6-pin power connector, used on the backplane
To prevent damage in the event of a short circuit, all of the incoming power lines
are equipped with on-board time-delay fuses. Selecting appropriate fuses was difficult
because there is always a tradeoff between trip current, time to trip, and non-tripped
resistance. A perfect fuse would have a low trip current, a short trip time, and a small
non-tripped resistance, but in reality that is not always possible.

66
Table 1: Backplane Fuses
Power Supply Line +5V, amplifier VCC -5V +60V
Fuse Selected Tyco RUSBF120 Bourns, Inc. MF-MSMF014-2
Bourns, Inc. CMF-RL35-0
Mounting Type Through hole Surface mount Through hole Trip Current6 2 A 340 mA 150 mA Hold Current7 1.2 A 140 mA 75 mA Typ. Current Required8 550 mA 7 mA max 3.2 mA max Non-Tripped Resistance
0.08 Ω 6.5 Ω 35 Ω
Typ. Voltage Drop9 0.044V 0.05V max 0.112V max Time to Trip 0.5 s at 8 A 0.15 s at 1.5 A 0.15 s at 3 A
Table 1 gives an overview of the fuses selected for the backplane. These fuses
were picked so that the time to trip during an overcurrent event of roughly one order of
magnitude is 0.5 s or less. Where possible, through hole fuses were used to avoid the
use of hollow vias that would transmit light through the backplane. The Bourns, Inc. MF-
MSMF014-2 surface mount fuse does not require any vias because the -5V line is
supplied to the digital control board entirely through a top layer trace. Though the +5V
supply for the digital board is nominally the same voltage as the amplifier VCC, the two
were fused separately in case different voltages are needed. The 550 mA current
requirement represents the combined current requirements of digital control board and
the amplifier board; each requires roughly half of this figure. Figure 36 shows a close-up
view of the power connector and the backplane fuses.
6 Minimum current required for fuse to open the circuit.
7 Maximum current at which the fuse will stably leave circuit closed.
8 Current needed by digital control board and/or amplifier board.
9 Voltage drop from nominal supply voltage expected to be introduced by fuse in its non-tripped state.

67
Figure 36: Close-up CAD drawing of backplane showing the power connector (P4) and power supply fuses. F1=-5V, F2=VCC, F3=+60V, F4=+5V
4.3.6 LEMO Connectors
The final important feature of the backplane is the LEMO connectors, which
route signals from the amplifier board off the tagger electronics array to be digitized. In
total there are eleven LEMO connectors, six of which route signals from the summed
columns of scintillating fibers in each 5 x 5 fiber array, and five of which route signals
from individual fibers in the first column of the 5 x 5 fiber array. The layout of the LEMO
connectors on the backplane is shown in Figure 37. LEMO1 through LEMO6 are outputs
of the amplifier board’s summing circuits, and LEMO7 through LEMO11 are outputs of
the first five amplifiers.

68
Figure 37: Close-up CAD drawing of the LEMO connectors
The specific part selected for the LEMO connectors is the LEMO EPA.250.00.NTN.
Though expensive, this connector has many advantages over standard coaxial cable. In
particular, cables that mate with the LEMO EPA.250.00.NTN are held in place by friction
rather than any type of screw or twist mount system. This is important given the close
spacing of the LEMO connectors on the backplane, as there is no room for fingers to
screw or twist a connector into place. Figure 38 shows what the LEMO EPA.00.250.NTN
looks like.
Figure 38: LEMO EPA.250.00.NTN dimensions and drawing

69
5 Debugging the Tagger Electronics
Once all of the circuitry had been designed, manufactured, and assembled, there
came the task of testing and debugging. This stage helped reveal critical problems with
the electronics so that they can be corrected for the final hardware revision.
5.1 Digital Control Board
Since the digital control board was produced before the other boards were even
designed, it was the first board to go through the debugging process. The first problem
we found with the digital control board was that it was not supplying the required +1.2V
for the FPGA’s internal logic. Instead, the +1.2V power plane was found to be at the
same potential as ground. It turned out that the +1.2V voltage regulator simply wasn’t
connected to its +5V power supply because its power pin was left floating in the
schematics. To fix this, we placed a dab of solder between the regulator’s power supply
pin and its adjacent chip enable pin, both of which should be at +5V permanently.

70
Figure 39: Photograph of the +1.2V voltage regulator (VR3) on the digital control board, showing the solder bridge used to connect the floating power input pin
The next problem we discovered was a miswiring of the SPI bus that connects
the FPGA, ADC, and temperature sensor. The pin on the FPGA that was designated as
SPI master-out-slave-in was connected to the SPI input of the ADC as it should have
been, but also connected to the SPI output of the temperature sensor. The SPI bus
standard specifies that all slave devices should share common input and output traces
which connect them back to the master device, in this case, the FPGA. High impedance
logic and independent chip select lines are used to prevent slave devices from
simultaneously driving the signal lines. We corrected the miswiring by cutting the
temperature sensor’s DOUT trace, and soldering a small wire to connect it to the same
trace as the ADC’s output, as shown in Figure 40.

71
Figure 40: Photograph of the temperature sensor (U1) and ADC (U4) on the digital control board after rewiring the SPI bus
A third mistake we found while debugging the control board was that I had
selected the wrong type of clock for our FPGA/Ethernet controller combo. Initially, I
selected a crystal oscillator to serve as a clock for the Ethernet controller. Since the
Ethernet controller had a built-in inverting driver, it seemed like a great, inexpensive,
and precise way of clocking the device. Later, however, we decided that to conserve
space, it would be convenient to share a single clock between both the FPGA and the
Ethernet controller. Forgetting that I had selected a crystal oscillator, I connected the
oscillator to both the FPGA and the Ethernet controller simultaneously. This caused a
number of problems. First, the FPGA is configured to use 3.3V CMOS logic, which is not

72
what the crystal oscillator’s sine wave output provided. Additionally, the capacitance of
the FPGA’s clock input pin was enough to distort the crystal’s signal, preventing even
the Ethernet controller from operating properly.
The solution to the problem with the crystal oscillator was to replace the
oscillator with a CMOS clock. As mentioned in Section 4.1.5, the CP2201 Ethernet
controller can accept a CMOS clock input in place of a crystal oscillator. Though
somewhat more expensive than a crystal oscillator, the CMOS clock output can be used
by the FPGA as well as the Ethernet controller, satisfying the shared clock design
requirement. To implement this change, I connected the output of the CMOS clock to
the FPGA, and then ran a trace from another FPGA pin to the Ethernet controller. The
FPGA is programmed to reproduce the clock signal on this second clock pin to clock the
Ethernet controller.

73
Figure 41: Photograph of the CMOS clock (immediately below label C17) used to replace the crystal oscillator on the digital control board
After this change, the FPGA was fully operational, and ready for debugging of its
internal configuration. However, before debugging could begin, we ran into another
problem. The header that the FPGA’s programming equipment attached to was not the
correct header called for in the equipment’s documentation. Though a 100 mil pitch
header is much more common, the Xilinx Platform II USB FPGA configuration cable
requires a 1 mm pitch header. Since the through holes for this header cannot be moved
without refabricating the entire board, we were forced to stick with the incorrect 100
mil header for the prototype. We used an alternative “flying lead” adapter from Xilinx to
connect signals from the Platform II cable to the individual pins on the 100 mil header.
The design was updated to use the correct 1 mm header for future revisions. Figure 42

74
shows the difference between the original 100 mil header footprint and the correct 1
mm header footprint. The red, green, black, white, and other color wires in the bottom
left of Figure 43 are the flying lead adapter connected to the 100 mil footprint.
Figure 42: Close-up CAD drawings of the footprint of the FPGA's JTAG configuration header and surrounding traces before (left) and after (right) the incorrect 100 mil header was replaced
With the flying lead adapter in place, we were able to debug the FPGA’s internal
configuration, and update its program as needed from the Xilinx programming software
running on a PC. Most of the work on debugging the FPGA involved getting the FPGA
and the Ethernet controller to talk to each other correctly. All the details of this process
are beyond the scope of this paper, but the process consisted primarily of programming
in VHDL code, downloading the program to the EEPROM/FPGA, and then testing using

75
an oscilloscope to see if changes in the code were successful.10 To aid in monitoring
particular internal signals in the FPGA, some were assigned to unused output pins and
routed to a header on the edge of the board. This header, shown in Figure 43, was
attached manually, only for the purpose of the debugging the FPGA, and is not part of
the actual board design.
Figure 43: Photograph of one of the digital control boards during testing, including the diagnostic signal output header at the top left
10
For further details about the FPGA debugging process, see http://zeus.phys.uconn.edu/wiki/index.php/Design_and_prototyping_of_SiPM_electronics #Digital_Control_Boards

76
After several weeks of work, the FPGA was up and running, able to communicate
with the Ethernet controller, the SPI bus, and all other components on the board
without any problems. The next difficulty arose, however, when trying to send packets
over the Ethernet wire. Though the FPGA was able to communicate with the Ethernet
controller properly, the Ethernet controller was not able to transmit the packets into the
wire. It turned out that I had ordered the wrong Ethernet jack for the board. The jack I
had ordered, the Pulse J0011D21, had the same footprint as the Pulse J0012D21 that
the bill of materials called for, but unfortunately did not have the same pinout. Ethernet
packets were being dropped before they ever left the board because they weren’t being
routed into the correct transmit/receive wires in the Ethernet cable. Fortunately, this
was easy to fix. We ordered the correct part, attached it in place of the wrong one, and
the problem was solved.
The final problems we encountered on the digital board centered on the DAC.
First, we found that diode D2, whose purpose it is to ensure proper power supply
sequencing, was reversed. Though correct in the schematics, the footprint in the PCB
layout had the pin numbers reversed. This was causing a short between the -5V power
supply and the analog ground. The built in ammeter on our -5V power supply was what
first alerted us to this problem.
The last and more perplexing problem was that on two of the three identical
prototype control boards, the DAC was completely nonfunctional. As of April, 2010, we
have been unable to determine the cause of the DAC failure. We are confident that it
was not caused by the reversed diode, because the diode was corrected before ever

77
applying power to one of the two failed boards. We are also fairly confident that it
wasn’t caused by problems in the assembly process, because the assembly company’s
records show that they followed all of the manufacturer’s recommendations for
soldering the DAC to the PCB. The failure also cannot be due to the design of the PCB,
because one of the three boards works perfectly. This is a problem that we are still
investigating, which we will be sure to solve before the final hardware revision. Figure
44 shows a photograph of the completed control board prototype.
Figure 44: Photograph of the completed digital control board

78
5.2 Amplifier Board
Compared to the control board, debugging the amplifier board was a fairly
simple process. Thanks to the MATLAB model of the amplifier and summing circuits,
checking for errors simply involved probing different component pins to see if their DC
and AC levels matched those predicted by the model.
The first problem we noticed was that the two transistor base voltages AMPREF
and SUMREF were both at ground, rather than their nominal values. We traced this
problem back to the voltage regulating circuitry on the amplifier board, where we
discovered that the two identical voltage regulators used to produce the transistor base
voltages had a pin mismatch. On both of the regulators, the output and the ground pins
were misnumbered in the schematics, causing the pins to be swapped during layout of
the PCB. Since the regulators are both shunt-type regulators, this caused no permanent
harm, and a quick resoldering job fixed the issue on the prototype board as shown in
Figure 45. I updated the component footprint in Altium Designer for the final hardware
revision.

79
Figure 45: Photograph of the power regulating circuitry on the amplifier board, showing the resoldering of the two voltage regulators to resolve a footprint mismatch
Also shown in Figure 45, though not indicative of a design problem, resistor R21
was replaced by two resistors in parallel to achieve a slight correction to the voltage of
SUMREF. Resistors R21 and R26 were intentionally made larger than many other
resistors on the board due to the expectation that they would have to be replaced to
tweak the AMPREF and SUMREF voltages.
Another problem with the amplifier board which we actually knew about from
the time we sent the board out for assembly, is that one of the components we selected
to use on the board was not available in the footprint that we selected. The NXP BF1108
MOSFET, which is responsible for controlling the gain of the summing circuit, is only

80
available in North America as the BF1108R. The BF1108R is identical to the BF1108,
except its footprint is a mirror image of the footprint that we selected while designing
the board layout. To resolve this, I examined the data sheet for the BF1108 and
determined how we could make the BF1108R function on the BF1108’s footprint (see
Figure 46.) Fortunately, the BF1108 and BF1108R both have four leads, meaning that it’s
possible to rotate the component 180° and attach it by hand. While this alone still
leaves a mismatch of pins, the particular design of the BF1108/BF1108R makes it
possible for this orientation to work. Since the BF1108/BF1108R is an FET transistor, it
has a drain and a source which are interchangeable. The 180° rotation swaps the drain
and the source of the FET, with no ill effects. The other two pins on the transistor are
the base voltage and the cathode of an internal diode which is not used in our design.
The rotation of the FET put the cathode pin where the base voltage pin should have
been, and left the base voltage pin on a floating pad. Since we didn’t plan to use the
internal diode anyway, we simply shorted these two pins with a solder bridge, resolving
the footprint mismatch. Figure 46 shows the BF1108/BF1108R packages and their
pinouts from the manufacturer’s datasheet, and Figure 47 shows the BF1108 attached
to the BF1108R’s footprint on the amplifier board.

81
Figure 46: Drawings and pin assignments of the BF1108 and BF1108R MOSFETs taken directly from the manufacturer’s datasheet, showing their mirror image pinouts
Figure 47: Photograph of the summing circuit on the amplifier board, showing the BF1108R attached to the BF1108 footprint (M1)

82
Once the BF1108 MOSTFETs were in place, debugging of the amplifier board was
complete. Figure 48 shows the completed amplifier board. Next, debugging began on
the backplane.
Figure 48: Photograph of the completed amplifier board
5.3 Backplane
Since the backplane does little other than connect the control board and the
amplifier board together, and route power connections from off-board power supplies,
debugging it was a fairly simply process. We used a multimeter to test that power was
being delivered to the correct pins on the control board and amplifier board Eurocard
receptacles, and then plugged in the boards to see if they worked. We found no major
problems with the backplane circuitry, except for when we attempted to hand solder
the LEMO connectors onto the board. Unfortunately, we discovered that I had made the
through holes for the LEMO connectors too small. The pins on the LEMO connectors
simply would not fit through the holes that were in place on the board. The reason for

83
this was because I had overlooked the thickness of the through hole plating when
designing the LEMO connector footprint.
Two possible solutions were considered to this problem. First, I considered the
consequences of drilling the existing holes to make them large enough to accept the
LEMO pins. Unfortunately, this would remove the plating on the inside of the through
holes. This would not stop the outgoing signals from passing into the LEMO connector,
because the end of the signal pin could be soldered to the metal pad carrying the signal
on the back side of the backplane. However, this would stop the four ground pins on the
LEMO connectors from making contact with the board’s internal analog ground plane.
Having unshielded signals could lead to interference from outside electrical sources, or
even cause signal reflection due to a mismatch in impedance. This is certainly not
something we wanted to happen with these analog signals from the summing circuit.
To avoid these problems, we proposed simply filing the pins on the LEMO
connectors to make them small enough to fit through the existing holes. Though a
delicate process, it was successful, and we were able to attach all of the LEMO
connectors to the backplane.

84
Figure 49: Photograph of the completed backplane, with the control board and power connector attached
6 Conclusion and Outlook
Though a long and at times tedious process, the design of electronics for the
GlueX photon tagger was successful. Through the summer of 2010, work will continue
on the prototype tagger microscope darkbox, which will house one set of twenty-five
scintillators and waveguides, as well as one set of the three circuit boards. A new project
which is just now beginning is the design of a robotic pulser which can be programmed
to selectively emit light pulses into certain waveguides within this darkbox for SiPM
calibration. Further work is also being done to develop a support system upon which the
prototype can be mounted.
At some point within the next year, the completed prototype photon tagger will
be taken to Hall B at JLab for a beamline test to verify that it works with a real electron
beam. Eventually, enough copies of the circuitry will be manufactured to support the
full 5 x 100 fiber grid which will be used in the GlueX experiment. The GlueX experiment,
along with the completed tagger, is scheduled to begin taking data in 2014.

85
Acknowledgements
There are a number of people who I am glad to thank for helping me to perform
my research and write this thesis. First and foremost, I’d like to thank Dr. Richard Jones
for providing me with this research opportunity and helping me learn so much about
particle physics over the last two years. Second, I’d like to thank Igor Senderovich for
always being there to answer questions that I encountered, and for working so hard to
debug my electronics after the design phase was complete. Additionally I’d like to
mention the other members of our lab group over the years, who were always there for
support when things came up and who helped to make the lab a great social and
research environment: Chris Pelletier, Matt Heiss, Jim Mcintyre, Brendan Pratt, Sarah
Lamb, Carl Nettleton, and Alisa Engsberg.
I also would not have been able to complete my thesis without the support of
my family. My parents Mitch and Susan, and my sister Laurel were there for me
throughout it all, and I am very grateful for their support. My wonderful girlfriend,
Ashley Watts, perhaps deserves the most appreciation of all for listening to my daily
rambles about physics and electronics design, and always being truly supportive of my
work in the lab.
This work would also not have been possible were it not for the financial support
of the National Science Foundation under grant number 0901016, and the financial
support of the UConn Presidential Scholars Enrichment Award.

86
Works Cited
1. C.H. Holbrow, J.N. Lloyd, and J. C. Amato, Modern Introductory Physics (Springer-Verlag, New York, 1999).
2. D.J. Griffiths, Introduction to Quantum Mechanics (Pearson Education, Upper Saddle River, New Jersey, 2005).
3. B. Povh, K. Rith, C. Scholz, and F. Zetsche, Particles and Nuclei (Springer, Berlin, 1995).
4. The GlueX Collaboration, 2006, GlueX Prosposal, Available on the web at http://dustbunny.physics.indiana.edu/HallD/docs/pac30.pdf
5. D. J. Griffiths, Introduction to Electrodynamics (Prentice-Hall, Upper Saddle River, New Jersey, 1999).
6. D. Morin, Introduction to Classical Mechanics (Cambridge University Press, Cambridge, 2009).